1
Owner's
ManualmDRAFT
2004-05-24-A
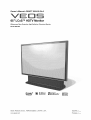
65" LCoS TMHDTV Monitor
Widescreen
Rear-Projection
High-Definition
Television Monitor
Model 6501MA
_
Bri||ian
UItraContrast _
ira1 powered by
pl_61wor ks"'
Drl_
_
SURROUND
Sears,
Roebuck
www.sears.com
and Co., Hoffman
Estates,
IL 60179,
U.S.A.
Espafiol,
p.
Fran_ais,
p.
6501MA HDTV Monitor Owner's Manual
Brillian, UItraContrast, and LCoS are trademarks of Brillian Corporation. Dolby and the double-D symbol are trademarks of Dolby
Laboratories. 3D-PANORAMA is a registered trademark of Micronas GmbH. Digital Plus Mirror is a trademark of Optical Coating Laboratory, Inc. High-Definition Multimedia Interface and HDMI are trademarks of HDMI Licensing, LLC.
This user's manual contains important safeguards and instructions that must be followed by the user for the safe and proper usage
and maintenance of this television. Please read the instructions carefully and keep the manual in a safe place for future use.
@Sears, Roebuck and Co.
2--DRAFT
2004-05-24-A
Veos
6501MAHDTVMonitorOwner'sManual
Table
Contents
of
Notices
............................................
..............................................................
TableofContents
3
S-Video
5
Composite
VIDEO
Warnings
and Symbols
FCC information
Changes
or Modifications
Interference
Power
.........................................
....................................................
On-Off
..................................
PC (VGA)
VIDEO
Behavior
6
DVI--Digital
.........................................
.........................
Grounding
Grounding
Safety
Instructions
Reminder
...............................................
.....................................................
.........................................................
Site Selection
.....................................................
Antenna
Mounting
Antenna
Rooftop
7
7
....................
HDMI
7
7
...........................................
8
installations
..........................................
8
Emergency
Aid for Shock
Recommendation
Service
and Accessory
Television
Warranty
..................................
8
..................................
9
Installation
.......................
Safety ...................................................
.........................................................
Product
Features
Carton
Contents
Installation
Lifting
......................................................
Acclimation
Location
Remote
..........
............................................
and Carrying
.............................................
..........................................................
..............................................................
Control
Connections
Battery
Installation
....................
...................................................
Precaution
AV Component
Connections
..............
29
Volume
..........................................................
29
Channel
.........................................................
29
Input ..............................................................
29
Menu .............................................................
29
and Lamp
Control
Remote
Remote
Control
Remote
Control
Pwr (Power)
OUT .........................................
Audio-Video
VIDEO
inputs ..............................................
VIDEO
32
.........................................
32
32
Ratio ....................................................
33
15
15
15
16
+/-.
Layout ..............................................................
33
PIP (Picture
34
Swap ................................................................
34
Help .................................................................
34
Jump
34
(Favorites)
Advancing
21
22
22
....................................
34
Adding
20
in Picture)
Move ................................................................
16
20
.....................................................
a Channel
Removing
Navigation
Channel
..............................................
to Favorites
Through
a Channel
Favorite
From
......................
Channels
Favorites
34
......... 34
........... 34
Keys ...............................................
34
+/-. ....................................................
35
.........................................................
35
Select ...............................................................
35
Return ..............................................................
35
Menu ................................................................
35
Dash ................................................................
35
Guide
35
...............................................................
Info ...................................................................
35
Numeric
35
2, 3, and 8
Composite
Veos
input ......................................
Keys
.....................................................
Aspect
15
1
480i Component
31
Mute .................................................................
Input +/-.
SUBWOOFER
Layout .......................................
32
19
...........................
30
31
15
2 .........................................
Output)
................................
32
19
Audio
Indicators
..............................................
Mode ....................................................
Inputs .................................
L/R (Left/Right
29
Picture
18
.....................................................
Keys ................................................
29
32
17
Outputs
28
............
Page ................................................................
........................................
Audio
Indicators
and
28
14
Panel
l/TUNER
Controls
28
32
Panel .........................................
TUNER
Input ...................
......................................
Sleep ................................................................
Rear Connector
(RF)
Interface
Volume
Side Connector
Antenna/Cable
Video
Compatibility
TM
12
16
...........................................................
Choosing
9
11
Specifications
and
9
26
Power ............................................................
Power
Lightning
Input ................................................
Front Panel
8
Installation
Inputs ........ 25
7
Panel
8
8
HD Component
Reset ..................................................................
Front
8
..............................................
24
6
5
CATV-lnstaller
Antenna
VIDEO
5
....................................................................
Antenna
480p/720p/1080i
5
23
Video ...........................................
4 and 5
........................................................
Important Safety Instructions
Power
5
.........................................................
and S-Video
inputs
........................
23
Keys ..................................................
DRAFT 2004-05-24-A--3
Table of Contents
Cancel
Enter
6501MA HDTV Monitor Owner's Manual
..............................................................
36
................................................................
36
Menu Map .......................................................
On-Screen
Layout
Menu ............................................
.................................................................
Selecting
Windows
...........................................
Full Screen .......................................................
PIP (Picture
in Picture)
.....................................
..................................................................
40
47
Closed-Caption
Mode ......................................
47
Closed
................................................
48
40
40
.............................................................
Caption
Balance
40
Audio
40
48
..........................................................
48
Output ....................................................
........................................................
48
Subwoofer
........................................................
48
Surround
Auto Volume
................................................................
Source
Select ...................................................
OSD Timeout
Menu
...................................................
Background
Language
Picture
............................................
.........................................................
Mode ....................................................
Color Temperature
Factory
Sleep
Picture
...........................................
41
Audio
41
41
Settings
41
41
41
49
50
Content
Blocking
TV Blocking
42
42
Sharpness
42
........................................................
................................................................
42
Frequency
43
53
.................................................
54
and Cabinet
Cleaning
Phase ...............................................................
Window
Image
...............................................................
Cleaning
........................
55
.............................
55
......................................................
Replacement
............................
55
Lamp Type .......................................................
44
55
Tools ................................................................
55
44
45
Step-by-Step
56
Appendix
Lamp
Replacement
....................
.........................................................
58
45
About
Letterbox
Zoom .............................................
45
Players ................................................................
Letterbox
Extend
45
Exact
Pixels
(1 : 1 ) ..........................................
46
Fill Screen
.....................................................
46
H Position
(Horizontal
V Position
(Vertical
Window
Position)
Position)
.......................
............................
................................................
Pan and Zoom
......................................
PIP Size ...........................................................
DVDs
46
...................................................
Digital
and Progressive-Scan
Video
47
About
47
47
Video
47
Master
..................................
58
58
2004-05-24-A
.................
Video-Component
DVD
58
Output
59
a Setting
..........................................
59
Formats
...........................................
60
Glossary
Protection
...............................................
Agreements
Manufacturer
4--DRAFT
58
...............................................................
Choosing
About
58
...................................
the Best DVD Performance
480p/720p/1080i
Settings
47
Video
and DVD Players
Getting
DVD
...............................................
Progressive-Scan
46
Proportional
Freeze
Deinterlacing
Interlaced
Size--
PC input and DVl .............................................
55
43
.......................................................
Image
55
......................................................
Letterbox
...........................................
55
...........................................................
Precautions
Size--
Composite,
S-Video and Component
..............
Widescreen
Zoom .........................................
52
...................................................
Enable
Precautions
52
..............................................
Care, Cleaning, Maintenance
Screen
51
......................................................
Lamp Assembly
........................................................
..............................................
Blocking
Source
42
Tint ...................................................................
49
49
.........................................................
42
Filter .................................................................
49
Channel
Movie
42
48
Input ..............................................................
42
...........................................................
.............................................
...............................................................
Timer ......................................................
Contrast
48
TV Tuner ..........................................................
Password
........................................................
48
Control ........................................
Speakers
41
Brightness
...............................................
Input .......................................................
Reset ...................................................
.................................................................
Color
Internal
41
48
Nite Mode
Virtual
40
47
............................................................
Equalizer
40
40
Options
47
M ute .................................................................
POP 3 ..............................................................
Grid ..................................................................
47
38
40
12 ............................................................
Audio
.....................................................
Volume
Split Screen ......................................................
POP
PIP Position
.....................
62
65
Document TD-00032-D1
Veos
6501MAHDTVMonitorOwner'sManual
WARNINGS
Notices
AND SYMBOLS
Caution
TO REDUCE
THE
RISK OF ELECTRIC
BACK). NO USER SERVICABLE
FIED SERVICE
PERSONNEL.
Z_
RISK
OF
ELECTRIC
Personnel
ATTENTION
REMOVE
REFER
SERVICING
Warning
from directly viewing the light produced
and allow to cool
protection required during servicing
De Service
PRECAUClON
Personal
of Electric
De Servieio
= AMONESTADORA
Shock"
The lightning-flash
with arrowhead
to alert the user to the presence
Operating
a triangle,
and
Surface":
Warning
temperature
is cool before
Refer to the instructions
TO PREVENT
FIRE OR SHOCK
RAIN OR MOISTURE.
within
is sufficient
attempting
HAZARD,
to cause
cooling
DO NOT
is intended
operation
point,
is intended
or service
a triangle,
to access
for minimum
The exclamation
maintenance,
a trianvoltage"
a risk of electric
the product,
may be hot during
within
"dangerous
to constitute
YOURSELF.
Instruction":
operating,
symbol,
of uninsulated
accompanying
symbol,
or component
The operating
face or component
surfaces.
of important
The heat-radiation
user that the surface
operation.
Maintenance
in or on the literature
the user to the presence
to follow.
"Hot
by the lamp
= D'Avertissernent
within the product's enclosure
that may be sufficient
shock. DO NOT TRY TO SERVICE THIS PRODUCT
within
(OR
TO QUALI-
" Pueden resultar directamente
de ver la luz producida pot la I&mpara
, De vuelta siempre apagado a la lampara y permita para refrescarse
, Protecc{6n de ojo de la radiaci6n ultravioleta
Riesgo de choque electrico. No abrir.
"Important
COVER
. Peuvent r6sulter de regarder directement la lumicre produite par ]a lampe
. Arr_tez toujours la lampe et laissez se refroidir
, Protection d'oeil de rayonnement
ultraviolet reqLfise pendant I'entretien
Risque de choc electrique. Ne pas ouvrir.
gle, is intended
DO NOT
INSIDE.
Service
Personnel
=
, Eye damage may result
, Always turn off the lamp
. Ultraviolet radiation eye
SHOCK
"Risk
SHOCK,
PARTS
to alert
instructions
to alert the
and for a time after
burns.
Wait until the sur-
these or nearby
components
or
times.
EXPOSE
THIS
TELEVISION
TO
FCC INFORMATION
Changes
or Modifications
The FCC requires the user to be notified that changes or modifications not expressly
approved by the manufacturer could void the user's authority to operate the equipment.
Interference
NOTE:
Class
This equipment
B digital device,
to provide
tion.
Veos
reasonable
has been tested
pursuant
protection
and found
to comply
with the limits
to Part 15 of the FCC Rules. These
against
harmful
interference
for a
limits are designed
in a residential
installa-
DRAFT 2004-05-24-A--5
Notices
6501MA HDTV Monitor Owner's Manual
This equipment
installed
generates,
to radio communications.
occur in a particular
If this equipment
which
radio frequency
there
may cause
is no guarantee
energy
and, if not
harmful
interference
that interference
will not
installation.
does cause
harmful
by turning
the interference
interference
by one or more
the receiving
to radio
the equipment
or television
reception,
off and on, the user is encouraged
of the following
•
Reorient
or relocate
•
Increase
the separation
between
•
Connect
receiver
the equipment
is connected.
into an outlet on a circuit
•
Consult
the dealer
measures:
antenna.
the equipment
or an experienced
radio/TV
and receiver.
different
from that to which
technician
the
for help.
BEHAVIOR
The picture
takes
about
If the HDTV monitor
pears
instantly.
will reappear
•
is turned
If turned
is relatively
monitor
sonal
computer.
detailed
to appear
on within
on between
after turning
60 seconds
on the HDTV.
after turnoff,
60 and 120 seconds
the picture
after turnoff,
reap-
the picture
in 135 seconds.
HDTV
For more
2004-05-24-A
15 seconds
The lamp used in the HDTV
room
6--DRAFT
and can radiate
with the instructions,
However,
can be determined
to try to correct
POWER ON-OFF
uses,
and used in accordance
monitor
uses a cooling
fan which
may be heard
quiet. The fan will also run for more than 60 seconds
is turned
off. The fan and noise
information,
see "Power
is similar
and Lamp
to that of the familiar
Indicators"
on page
if the
after the
per-
30.
Veos
6501MAHDTVMonitorOwner'sManual
Please
ImportantSafetyInstructions
read and understand
your product.
the following
important
Save
these instructions
for future
instructions
marked
on your product.
Safety
these units.
To help you operate
that will be of benefit
measures.
is foremost
your product
to you. Please
safety
instructions
use. Always
safety,
follow
in our minds
this section
read this section
carefully
before
using
all warnings
and
in the design
illustrates
and follow
of
safety
tips
all safety
POWER
•
Operate
this television
•
This television
set uses a 3-prong
If the location
outlet.
•
•
•
When
has a 2-prong
unplugging
Unplug
the television
for long periods
If the power
•
Do not allow
television
hazard.
CATV-INSTALLER
GROUNDING
•
cord. This is a safety
a qualified
pull on the plug,
the antenna
or cable
electrician
feature.
to replace
the
not the cord.
when
unused
or unat-
of time.
or frayed,
qualified
wall receptacle
anything
power.
service
unplug
this television
as this may result in fire or electric
to rest on or roll over the power
the power
cord is subject
set from
the
personnel.
to abuse.
shock.
cord and do not place the
This may result
in shock or fire
REMINDER
This is a reminder
the National
ANTENNA
and disconnect
and contact
where
contact
always
cord or plug is damaged
Do not overload
60Hz
ac plug and power
receptacle,
the television,
tended
wall receptacle
•
set only on 120Vac
Electric
to call the CATV
Code,
which
ground
system
provides
specifies
that the cable
building,
as close to the point of cable
installer's
attention
for proper
grounding
shall be connected
to Article
820-40
of
and, in particular,
to the grounding
system
of the
entry as possible.
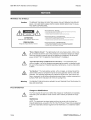
GROUNDING
ANTENNA
GROUNDING
EXAMPLE
Ground Clamp ,\
Leadqn Wire
Schematic
Symbols
T
_Antenna
Discharge Unit
(NEC Section 810-20)
Antenna
Grounding
Conductors
(NEC Section 810-21)
®round
Electric
Service
Equipment
NEC--National
Veos
Ground Clamps
Electrical Code
•
In the USA, refer to National
•
In Canada,
refer to Canadian
Electrical
Electrical
"_-Power
Service Grounding
Electrode System
(NEC Article 250, Part H)
Code
Code
Section
Section
810 for proper
grounding.
54-300.
DRAFT 2004-05-24-A--7
Important Safety Instructions
ANTENNA
6501MA HDTV Monitor Owner's Manual
SAFETY
Instructions
Read and observe
recommendations.
the antenna
manufacturer's
installation
and safety
instructions
and
Site Selection
Select
a safe site to install
An outside
other
antenna
electric
the antenna.
should
not be located
light or power
cuits. When
installing
the installation
head power
an outside
site should
and mast assembly.
circuits,
in the vicinity
or where
antenna,
of overhead
it may fall into such
the distance
between
be at least one and one-half
Make the distance
lines look somewhat
even greater,
alike, consider
times
power
lines or
power lines or cirany power
lines and
the height of the antenna
if at all possible.
Since
them all dangerous
all over-
as contact
with
them may be fatal.
If you have
power lines in the area,
utility for assistance.
Mounting
Antenna
NEVER
work
Certain
clothing
(rubber
boots or shoes,
Check
call your local electric
alone;
weather
The wind
have someone
Make
to install
a degree
industrial
conditions.
not wet or muddy.
you decide
always
may provide
Properly
depend
help.
on it for your life
and a long sleeve
rained
recently
shirt or jacket).
and that the lawn is
are not predicted
for the day
the antenna.
or heavy
into a nearby
power
line. Don't install
or remove
anten-
winds.
make sure
have someone
Antenna
gloves
Be sure that it hasn't
If you need to use a ladder,
rial.
If possible,
rubber
can summon
but don't
sure that rain or thunderstorms
can blow the antenna
nas in moderate
near who
of safety,
present
it is made
of nonconductive
who has been trained
(nonmetallic)
in electric
shock
mate-
first aid.
Installation
assemble
the antenna
according
to instructions
(do this where
the antenna
is
to be put up).
"Tie off" the mast with dry, nonconductive
the direction
it fall.
Don't attempt
Once
Ground
Rooftop
the side sway
is up in full vertical
and
up. If it does start to fall, let go of it and let
to "walk up" a mast over 30 feet tall. Get a professional
the antenna
of the house
ropes so you can control
of fall as you walk the assembly
position,
securely
fasten
to the National
Electrical
Code.
to do it for you.
it by tying
it to the side
or by using "guy" wires.
the antenna
according
Installations
DO NOT assume that just because you're on a roof, you're isolated from ground. You
may still be electrocuted or fall off the roof.
Emergency
Be prepared
Aid
2004-05-24-A
assistance
with several
should
of dry wood,
other
stand aside
does receive
with the electricity,
with a length
8--DRAFT
to work
One person
ble. If someone
contact
Shock
to call for medical
It is advisable
antenna.
for
a shock,
instead,
rope,
in an emergency.
people
when
installing
or removing
to direct the effort and watch
don't
touch the victim
while
or another
nonmetallic
of trou-
his body is still in
pry or pull him away from the source
a blanket,
an
for signs
of electricity
object.
Veos
6501MAHDTVMonitorOwner'sManual
If breathing
lance
ImportantSafetyInstructions
has stopped,
arrives
use mouth-to-mouth
and relieves
must be done simultaneously.
electric
shock
and have trained
LIGHTNING
Disconnect
storms
•
AND ACCESSORY
care or cardiac
be informed
will be equipped
care mobile
or ambu-
cardiac
when
with proper
unit equipped
massage
called
that an
equipment
with a heart
defibrillator
personnel.
the cable
to prevent
or antenna
and unplug
the possibility
Unplug
the television
tended
for long periods
the television
of lightning-caused
and disconnect
set during
electrical
damage.
the antenna
or cable
when
unused
or unat-
of time.
INSTALLATION
•
The lamp may be replaced
Assembly
TELEVISION
should
The ambulance
until a doctor
closed-chest
RECOMMENDATION
•
SERVICE
The ambulance
has occurred.
such as an intensive
resuscitation
you. If the heart has stopped,
Replacement"
by the user or a qualified
service
person.
See "Lamp
on page 55.
SAFETY
Follow
the operating
instructions
and safety
precautions
that have been
furnished
with your TV.
If the TV cabinet
mance
controls
qualified professional
vice information.
•
When
replacement
replacements
•
Upon
Unlike
checks
TVs using
lamp turn-on,
Never
have the service
or qualified
about
dropping
when
service
or pushing
operate
the TV if liquid
has been spilled
Unplug
the product
from the wall before
TV is on. Do not use liquid or aerosol
technician
instructions
in this manual.
Excess
to
should
not
unplug
A few clicks during
fan, is normal.
into the TV cabinet
and contact
can result
into it. Unplug
cleaning.
cleaners
that the
literature.
Never
other
liquid may drain
clean
the TV and have it
liquid
the screen
than specified
inside
openings.
in electrical
inspected
by a qualified service technician
before further use. Spilled
can cause electrical shorts which can result in fire or shock hazards.
•
by a
for ser-
the TV is operating,
technician.
objects
voltages
service
this TV technology
If this occurs
as well as a low hum from the cooling
children
verify
parts.
to the TV, ask the service
or CRT technology,
your dealer
technician
as the original
in the manufacturer's
Some internal parts carry hazardous
shock or death.
•
See the back cover of this manual
or repairs
sounds.
fails, or if the perfor-
the TV and have it checked
characteristics
described
picture-tube
or popping
the TV and consult
Caution
technician.
of any service
make snapping
•
service
parts are required,
the safety
if the picture
in any way, unplug
have the same safety
completion
perform
•
or set are damaged,
of the TV deteriorates
causing
inside
while
the
in the cleaning
a fire or hazard
to develop.
•
Do not use the television
kitchen
•
Do not place
causing
•
Never
Upon
bodily
completion
on an unstable
and/or
may result
safety
equipment
without
or repairs
checks
damage
approval
or other
to the television,
to determine
washbowl,
pool.
or table. The product
and serious
in risk of fire, shock,
of any service
routine
near a bathtub,
or near a swimming
cart, stand,
injury to a child or adult
add any attachment
cian to perform
for example,
tub, in a wet basement,
this product
serious
as such additions
•
near water;
sink, or laundry
may fall,
to the product.
of the manufacturer,
personal
injury.
ask the service
that the television
techni-
is in safe oper-
ating conditions.
Veos
DRAFT 2004-05-24-A--9
Important Safety Instructions
6501MA HDTV Monitor Owner's Manual
•
Never
expose
the set to rain or water.
the plug and have it inspected
excessive
death.
•
moisture
ated during
•
•
may cause
TV sets are provided
electrical
with ventilation
the operation
openings
which
•
Never
cover the openings
•
Never
place
the set near or over a radiator
•
Never
place
a set in a "built-in"
with cloth or other
enclosure
unless
the room
the house.
proper
for more
ventilation
is provided.
than a short
period
of
When leaving the home for extended periods of time, unplug the TV from the wall
outlet and disconnect
the external antenna lead-in wires at the TV set. A fire hazard
develop
practice
due to lightning
unplug
can cause
storms
If your TV power
checked
wires
cord has become
by a service
and electrical
power
line surges.
the TV from the wall outlet after each viewing
the stranded
ard. Also, someone
could be seriously
inserted into the wall outlet.
2004-05-24-A
heat build-
material.
leaving
Do not routinely
1O--DRAFT
heat gener-
are blocked,
or heat register.
to leave
a TV on when
to allow
or
may result in a fire hazard.
Turn the TV off if it is necessary
leave
disconnect
use. Rain or
can result in fire, shock,
openings
time.
Never
or wet,
further
in the cabinet
If these
the TV can cause
damp
before
shorts which
to be released.
failures
technician
up within
could
•
If the TV becomes
by a service
technician
within
shocked
if the plug is carelessly
worn for any other
for possible
session.
This
the cord to break and pose a fire haz-
reason,
removed
or
have the cord
replacement.
Veos
6501MAHDTVMonitorOwner'sManual
One
Year
Full
If this product
This warranty
state.
Sears,
Veos
Warranty
experiences
date of purchase,
contact
gives
Roebuck
Warranty
any failure
Sears
you specific
and Co.,
Dept.
due to a defect
at 1-800-4-MY-HOME®
legal
in material
or workmanship
to arrange
rights, and you may also have other
817WA,
Hoffman
Estates,
within
to have it repaired
rights which
one year from the
free of charge.
vary from state to
IL 60179
DRAFT 2004-05-24-A--11
Product Features and Specifications
6501MA HDTV Monitor Owner's Manual
A video
Imaging
glossary
Three
Brillian
is included
UItraContrast
TM
1280 x 720-pixel
Screen
Digital
Lamp
Plus Mirror
1--DVl
HDMI
1--VGA
(analog
•
1--480i
component
•
2--1080i/720p/480p
•
3--component
•
2--VHF/UHF/cable-ready
•
1--ATSC-tuner/digital-cable/input
video
Audio
Convenience
and
Security
Motion-adaptive
•
Digital
•
Sharpness,
•
Adjustable
•
Spatial,
•
High-quality
•
Virtual
•
15-watt/channel
•
Internal
•
Interactive
•
Sleep
•
Closed-caption
•
"V-Chip"
video)
a HDMI-to-DVI
adapter
(not included).
plus audio
plus audio
component
video
plus audio
plus audio
NTSC tuners
adapter
audio
accessory
port
output
line-level
detection
subwoofer
output
(film mode)
deinterlacing
3-D motion
adaptive
YtC separation
preprogrammed
white
temporal,
uniformity,
®
2-way
(comb)
filter 1
and contrast
enhancement
point and color optimization
and 3-D noise
picture-in-picture
Dolby
using
high-definition
line-level
•
plus audio
computer
or S-video
3-2 pulldown
reflective
is also supported
•
•
Gen II microdisplays
TM
rear-projection
decoder
• 1--volume-tracking
Video
on page 62.
metal-halide
video
• 1--1eft/right
LCoS
first-surface
TM
with HDCP
TM
TM
beginning
resolution
surface,
High-brightness
Inputs
Outputs
native
Ultra-fine-pitch
Mirror
in this manual
Surround
technology
stereo
stereo
reduction
and dual-image
audio
split screen
2
system
speakers
OSD (on-screen
display)
setup
and menus
timer
program
decoder
blocking
technology
1. Not available when closed captioning is on.
2. Described in "Video Glossary" on page 62.
12--DRAFT
2004-05-24-A
Veos
6501MAHDTVMonitorOwner'sManual
Power
Size
and
Weight
ProductFeaturesandSpecifications
•
120Vac, 60Hz nominal (104-132Vac,
57-63Hz)
•
370 watts maximum operating, 2.5 watts standby
•
61 "x44½"x23¼",
155cmx112cmx59cm
(width
x height
x depth)
1301bs, 60kg
Environment
Veos
•
+41°F
to +95°F
•
-4°F
•
10% to 70% relative
to 140°F
(+5°C to +35°C)
(-20°C
to +60°C)
ambient
operating
storage
temperature
temperature
humidity
DRAFT 2004-05-24-A--13
CartonContents
6501MAHDTVMonitorOwner'sManual
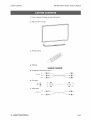
1. Owner's
manual
2.
6501MA
HDTV
3.
Remote
control
4.
Batteries
5.
Component
(includes
information)
monitor
video
cable
Colo,
Code
_,uo
6.
warranty
(YPbPr)
Jz
__
_
DVI cable
End
View
7. Audio
cable
Color
14--DRAFT
2004-05-24-A
Code
Veos
6501MAHDTVMonitorOwner'sManual
Installation
LIFTING AND CARRYING
•
Although
the 6501MA
than large-screen
and/or
HDTV features
LCoS
technology
TM
CRT TVs, this is a large device.
injury, enlist
help when
unpacking,
lifting,
which
To prevent
and moving
weighs
much less
accidental
damage
the television.
ACCLIMATION
•
If the HDTV monitor
is transported
tion or humid room,
allow
turning
directly
from a cold environment
it to sit, unpowered
for 2 hours
before
to a warm
plugging
loca-
it in and
on the power.
LOCATION
•
This RPTV
(rear-projection
television)
product
is designed
for use in a table-top
configuration.
•
Do not place
the television
on any table, stand,
designed to support the size and weight
to rest on a flat and level surface.
•
Do not expose
from
viewing
damage
•
to direct
illumination
In some cases,
surface
or direct sunlight.
sunlight
that is not
The television
can produce
is designed
It will detract
enough
heat to
the television.
Do not expose
(above
•
the television
performance.
cart, or other
of the television.
the television
to weather,
the television
where
moisture,
heat, or extremely
high humidity
70%).
Do not operate
the ambient
temperature
exceeds
+95°F
the battery
cover.
(+35°0).
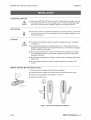
REMOTE
CONTROL
BATTERY
INSTALLATION
The remote
control
is shipped
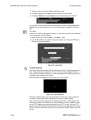
•
Push the tab in the direction
•
Insert two AA-size
•
Replace
alkaline
the battery
with the batteries
of the arrow
cells,
negative
uninstalled.
and lift to remove
(-) end first.
cover.
Push
1.5 Vo}t
Alkaline
Cells
Figure 1. Remote Control Battery Installation
Veos
DRAFT 2004-05-24-A--15
Connections
6501MA HDTV Monitor Owner's Manual
PRECAUTION
Turn off the HDTV
monitor
ing or disconnecting
•
There
Separate
if either
audio
speakers.
COMPONENT
changes
audio-video
Avoid
to the HDTV
these
components
before
connect-
risks:
monitor
or component
by misalignment
are operating.
systems
Connecting
large signal
CHOOSING AV
cables.
is some risk of damage
of connectors
•
and any external
audio-video
may have capabilities
or disconnecting
which
could
beyond
the audio
damage
the ratings
cables
speakers
of their loud-
may result in abnormally
and amplifiers
or receivers.
CONNECTIONS
•
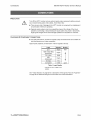
For best performance,
both the television
Signal-quality
choose
and video
capability
the highest
quality
connections
that are available
on
component.
is listed
below with the highest
Input
Signals
DVI*
digital
1080i/720p/480p
at the top:
Quality
best
YPbPr
Component
RGB
PC (VGA)
480i
YPbPr
Component
_r
S-Video
Y/C
Composite
CVBS
Table
1: Input
good
Quality
* Includes use of an HDMI to DVI
adapter.
See "Video
Glossary"
on page 62 for a description
on page 58 for additional
16--DRAFT
2004-05-24-A
background
information
of the signals.
Also see "Appendix"
and recommendations.
Veos
6501MAHDTVMonitorOwner'sManual
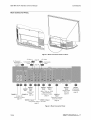
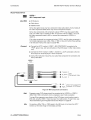
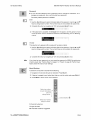
REAR CONNECTOR
Connections
PANEL
Figure 2. Rear Connector Panel Location
page 23
To Powered
(Variable)
page 21
S-Video
Composite
page 24
j%-
o
VIDEO 1
VIDEO 4 VIDEO 5
VIDEO7
AUDIO
Input
Input
Input
Input
OUT
480i
Digital Video
480p, 720p, or !080i
Interface
Component
High-Definition
Video
page 28
Component
Video
VIDEO 6
TUNER1
-TUNER2
page 22
page
25
Input
Analog TV
Antenna or Cable
Personal Computer
Computer Video
page 19
VIDEO 2 Input---VIDEO 3 Input
page 26
Composite Video or S-Video
page 23
Figure 3. Rear Connector
Veos
RESET
(Recessed
Pushbutton)
page 28
Panel
DRAFT 2004-05-24-A--17
Connections
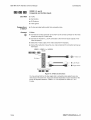
SIDE
6501MA HDTV Monitor Owner's Manual
CONNECTOR
PANEL
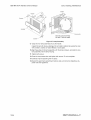
The side connector
panel (VIDEO
connecting
video
portable
8) is provided
components
such
for easy access
as camcorders
when
and digital
temporarily
still cameras.
Side Connector Panel
(VIDEO
Figure
The side connector
the HDTV cabinet.
•
To open, press
and release.
4. Side
panel is located
and release
Connector
Panel
on a spring-loaded,
Location
pop-out
door on the left side of
the door. To hide, press the door into the HDTV
monitor
S=Video
Composite
Video l_ak.
page 23
and
page 24
Video 8 Input
S=Video or
Composite
Video
Figure 5. Side Connector
18--DRAFT
2004-05-24-A
Panel
Veos
6501MAHDTVMonitorOwner'sManual
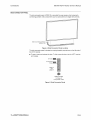
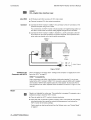
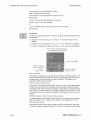
ANTENNA/CABLE
(RF)
__'_
Use
Connections
INPUTS
TUNER l/TUNER
With
•
2
Broadcast TV antenna
• Analog cable
Connect
Coaxial
Screw-on
Cable
•
Connect
•
To connect
a broadcast
a single
OUT to TUNER
F-connector
_
Push-on
Coaxial
Cable
or analog
2 IN with a short coaxial
ation with TUNER
(See"Layout"
antenna
cable
cable or single antenna
1 and TUNER
to TUNER
1 IN.
signal to both tuners,
cable.
2 receiving
This allows
different
connect
TUNER
PIP or split-screen
channels
at the same
time.
on page 33 and page 40.)
TUNER
F=connector
1 and TUNER
2
)uts
Antenna
or
Analog
Cable
-_JlmmmmmmB
OUT
Rear Connector
Figure 6. Connecting
•
Veos
1
oper-
To VCR RF input
Panel
Either an Antenna or Analog Cable
VCRs or other video component connections are optional.
DRAFT 2004-05-24-A--19
Connections
6501MA HDTV Monitor Owner's Manual
AUDIO OUTPUTS
The 6501MA
HDTV
put connections
The 6501MA
nection
L/R
Use
With
monitor
its own built-in
HDTV
monitor's
built-in
(Left/Right
a separate,
Audio
system
or AV system
receiver
•
Audio
system
or AV system
amplifier
dard,
•
fixed
Connect
inputs
•
audio output
audio or home-theater
line-level
output,
the HDTV
and has audio out-
sound system.
includes
powered
output,
AUDIO
audio
the instruction
connectors
a subwoofer
(amplified)
amplifier
manual
provide
sound system.
variable
monitor's
on a separate
Consult
system
output
con-
subwoofer.
Audio Output)
•
to a separate
audio
audio or home-theater
audio system
that may be used to connect
The L (left) and R (right)
Connect
includes
for use with a separate
audio signals
They
or turned
for stan-
off.
OUT: L and R connectors
or receiver,
for connection
can be configured
using
to the line-level
a stereo
for your audio amplifier
RCA audio
or receiver
cable.
to locate
its line-
or home
theater
level inputs.
The subwoofer
connector
sound
(See
AUDIO
system.
is not normally
"SUBWOOFER
used with a separate
OUT"
on page
audio
21 .)
OUT
Normally not used with
/separate
audio or
home theater systems
_----_q_
_'_'_..._,_
O
_--_
Rear Connector
7. Separate
•
Turn on the HDTV
•
Press
the menu
Output.
Select
Off to disable
menu.
Adjust
•
When using
controls
The volume
sound
20--DRAFT
2004-05-24-A
Left
'_ Audio Amplifier or Receiver:
_
Right .J"AV or Auxiliary Input
Panel
Figure
Configure
_
Audio
monitor
or Home-Theater
key to display
a separate
the on-screen
as needed
You may activate
of the built-in
level is then controlled
directly
menu and navigate
for the connected
them
audio or home-theater
to lower the volume
System
Connections
and wait for it to start up.
Fix or Variable
the outputs.
Sound
at any time using
sound
audio
to: Audio,
audio system;
system,
Audio
or select
the on-screen
use the HDTV
volume
system.
by the separate
audio
or home-theater
system.
Veos
6501MAHDTVMonitorOwner'sManual
Connections
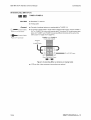
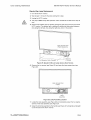
SUBWOOFER
OUT
Use
With
Separate,
powered
A separate,
system
subwoofer
powered
for extended
an improved
home-theater
Once the subwoofer
simultaneously
Connect
subwoofer
the HDTV
line-level
input on a separate,
as shown
to locate
without
and adjusted,
both the built-in
Connect
cable,
audio range.
experience
is installed
adjusts
woofer
may be used with the HDTV
low-frequency
monitor's
in Figure
AUDIO
a complete
monitor's
separate
and subwoofer
OUT: SUBWOOFER
(amplified)
audio
can provide
audio system.
volume
control
volume.
OUT
subwoofer
the instruction
built-in
subwoofer
the HDTV monitor
audio
powered
8. Consult
its line-level
A powered
manual
connector
using
to the
an RCA audio
for your
powered
sub-
input.
AUDIO OUT
SUBWOOFER
OUT
varies with the volume
control
Powered
_
(o
)owered
Rear Connector
•
8. Powered
Do not turn on the subwoofer
1. Turn on the HDTV monitor
2.
Adjust
the menu
key to display
Select
On for a variable
Lower
4.
Turn on the subwoofer.
5. Adjust
the HDTV
6. Adjust
the manual
the HDTV's
The HDTV
woofer.
Veos
built-in
volume
volume
volume
volume
Connection
until requested.
Press
3.
Subwoofer
and wait for it to start up.
woofer.
the manual
input
Panel
Figure
Configure
_y not used with
subwoofer
Subwoofer
Line-Leve!
the on-screen
output
control
control
control
menu
and navigate
to: Audio,
Sub-
to the subwoofer.
on the subwoofer.
for comfortable
listening.
on the subwoofer
to match the volume
level of
audio system.
control
adjusts
both the HDTV
built-in
audio
system
and the sub-
DRAFT 2004-05-24-A--21
Connections
AUDIO-VIDEO
6501MAHDTVMonitorOwner'sManual
INPUTS
VIDEO 1
480i Component
Use
With
•
DVD players
•
Cable
•
Satellite
Some
Input
boxes
boxes
video
the video
game
boxes
components
Some
video
720p,
and 1O8Oi output
components
the video component
VIDEO 5.
above
with component
in addition
output
has a component
progressive
scan, 480p,
Connect
YPbPr,
nent.
•
the HDTV
(green,
Connect
•
Consult
set-up
VIDEO
Input
the output
monitor's
monitor's
on the DVD
the instruction
manual
(YPbPr)
(YPbPr),
of
480p,
1 input, set
to VIDEO
4 or
and the video
component
those
is
settings
480i.
connectors
on the DVD player
1: AUDIO
or other
models
may also support
with the VIDEO
1 : 480i COMPONENT
VIDEO
Some
outputs.
or 1O8Oi, or does not mention
is usually
VIDEO
player
options.
the component
output
720p,
blue, and red) connectors
the HDTV
level outputs
outputs
to 480i, or connect
component
•
cable
to 480i. To use these
not marked
manual,
video
may not have component
If the video
in its instruction
Connect
may have component
listed
or other
IN: L and R connectors
to the
video
compo-
to the line-
component.
for your audio/video
component
for connection
and
information.
1
Y (green)
L]480i
PR (red)
J
PB<b uo>
rComponent
Video
.......
Rear Connector
_
_
Panel
__
Figure
Hint
Progressive-scan
(480p/72Op/1080i)
Turning
info
22--DRAFT
2004-05-24-A
the VIDEO
Deinterlacing
Connecting
monitor,
DVD players
connections
off the progressive-scan
480i) and using
"About
9. 480i Component
a 480p,
should
when
720p,
feature
_)
f (example:
or 1080i signal
Right
DVD Player)
to the VIDEO 4 or VIDEO
scan mode is selected.
in a better
DVD
from Component
Connections
of the DVD player
1 input may result
image
"[Audio
be connected
a progressive
and Progressive-Scan
but the video
(_) Left
Players"
(switching
picture.
the output
To learn
more,
5
to
see
on page 58.
to the 480i input will not harm the HDTV
will not display
correctly.
Veos
6501MAHDTVMonitorOwner'sManual
Connections
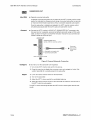
VIDEO 2, 3, and 8
Composite and S-Video Inputs
Use
With
Composite
or
S-Video?
Connect
•
VCRs
•
Camcorders
•
DVD players
•
Video
•
S-video
games
provides
better
quality
than composite
video.
S-Video
•
Connect
the S-video
component
•
Connect
connector
using an S-video
the AUDIO
on the HDTV
to the S-video
connector
on the video
cable.
IN: L and R connectors
to the line-level
audio outputs
on the
video component.
•
Select
•
Consult the instruction
information.
the S-video
output
on the video
manual
component
for your video
VmDEO 2, VIDEO 3, or VIDEO
inputs
if necessary.
component
for connection
8
__
@
S=\!ideo
__
_
LeftAudio
_
RightAudio
_
Rear Connector
video
Veos
both an S-video
input at the same time.
screen as separate
S-video.
Out
Panel
Figure
You may connect
and set-up
selections:
10. S-Video
signal
Connections
and a composite
Inputs are selected
VIDEO
video
separately
2, 3, or 8 composite
signal to any one
and are indicated
or VIDEO
on the
2, 3, or 8
DRAFT 2004-05-24-A--23
Connections
6501MA HDTV Monitor Owner's Manual
Connect
Composite
@
•
Connect
video
•
Video
the composite
connector
Connect
video
on the video
the AUDIO
connector
on the HDTV monitor
to the composite
component.
IN: L and R connectors
to the line-level
audio outputs
on the
video component.
VIDEO
2, VIDEO 3, or VIDEO
Inputs
8
Composite
_}}
Composite
Video
Left Audio
(white)
Right Audio
Rear Connector
Figure
screen
video.
24--DRAFT
2004-05-24-A
(red)
Panel
You may connect
video
(yellow)
input at the same time.
as separate
11. Composite
both a composite
selections:
video
Video
signal
Inputs are selected
VIDEO
Connections
and an S-video
separately
2, 3, or 8 composite
signal to any one
and are indicated
or VIDEO
on the
2, 3, or 8 S-
Veos
6501MAHDTVMonitorOwner'sManual
VIDEO
Connections
4 and 5
480p/720p/1080i
HD Component
Inputs
Enhanced definition (480p) and high-definition
Use
With
Connect
•
Progressive-scan
DVD player
•
D-VHS
•
ATSC
digital
TV tuner
•
Digital
cable
set-top
•
Digital
satellite
•
Connect
(digital)
VCR (480p,
Connect
the HDTV
box (480p,
720p,
box (480p,
monitor's
Consult
the instruction
720p,
VIDEO
720p,
1080i output)
1080i output)
1080i output)
4 or VIDEO
on the DVD player
monitor's
puts on the DVD player
•
or 1080i output)
set-top
blue, and red) connectors
•
720p,
output)
box (480p,
set-top
the HDTV
(480p
(720p and 1080i) component video
AUDIO
5 connectors
or other video
to the YPbPr
(green,
component.
IN: L and R connectors
to the line-level
out-
or other component.
manual
for your audio/video
component
for connection
and
set up information.
VIDEO 4 or V_DEO 5
lnputs
Y (green)/480p,
_ii_
Rear Connector
Component
Settings
12. Enhanced-Definition
Do either
•
•
HDTV
Left
"]Audio
Output
Right
fto
and
High-Definition
of the video
component
to "No Conversion"
of the video
component
to 1080i.
See "About
Turning
480p/720p/1080i
how to choose
Monitor
M onitor
Connections
the VIDEO
Deinterlacing
Connecting
a 480p,
monitor,
Video-Component
feature
Output
Settings"
of the DVD player
1 input may result
and Progressive-Scan
DVD players
720p,
if available.
Otherwise,
on page
59 to
your own setting.
off the progressive-scan
Non-progressive-scan
HDTV
HDTV
Component
set the output
"About
Veos
_
Jto
Set the output
480i) and using
Info
___
PR (red)
or 1080i
Video
of the following:
determine
Hint
_
_ Component
Panel
Figure
Video
ii}_
720p,
PB (blue)
(480i)
or 1080i signal
but the video
image
in a better
DVD
Players"
should
to VIDEO
will not display
(switching
picture.
the output
To learn
to
more,
see
on page 58.
be connected
1 (480i)
to the VIDEO
input will not harm
1.
the
correctly.
DRAFT 2004-05-24-A--25
Connections
6501MA HDTV Monitor Owner's Manual
VIDEO 6
PC (VGA) Input
Use With
•
Personal
computers
Connect
•
Connect
the HDTV
monitor's
personal
computer
using a male-male
Connect
the HDTV
monitor's
•
with analog
VGA
VIDEO
monitor
15-pin
VIDEO
may be required
connections
6: PC connector
to the VGA connector
D-subminiature
6: AUDIO
level outputs on the personal computer.
not to use the audio connections.
Note: An adapter
output
personal
computer
RCA connectors
on the
cable.
IN: L and R connectors
Some
to convert
video
to the line-
users may decide
to miniature
stereo
audio jack on the computer.
Personal
computers
vary. See the instructions
included
with your personal
computer.
VIDEO 6
Input
_m
w
m
w
w
I
m
m
o m
m
E
m
_
m
E
®,,>:+:+,@
Rear Connector
PC
VGA Output
Panel
,m _
,= ,= ,= ,= ,= ,= ,= ,= ,= ,= ,= ,= ,= ,= ,= ,= ,= ,= ,= ,= ,= ,= =(_._."_
_ _ _ _ _ _ _
................
_
_3
Left
_
_
Right
Figure
Configure
the
Computer
•
Set the computer
default
to one of the supported
The location
system.
monitor
settings
and appearance
Consult
Persona_ Computer
VGAJMonitor
Output
13. PC Connection
setting
listed
for the desired
system
Display
resolution
may vary by computer
documentation
2004-05-24-A
rate
Properties
and operating
for your personal
•
Open the computer's
or Monitor
Control
•
For the computer's
VGA/Monitor
Output, set the screen
set the Refresh Frequency
or Refresh Rate to 60Hz.
computer.
Panel.
area to 800 x 600 and
Figure 14. HDTV Image Size: Fill 1:1 for 800x600
26--DRAFT
and refresh
in Table 2.
of these settings
the operating
L Personal Computer
1"Line=Level Audio Out (Optional)
)
60Hz
Veos
6501MAHDTVMonitorOwner'sManual
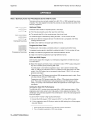
Configure
the
HDTV
•
Connections
Press
the MENU key to display
Size:
Exact Pixels
Exact
Pixels
(1:1 ) sends
and computer
The HDTV
before
Supported
Computer
Resolutions
each computer
will automatically
graphic
cards.
the computer
All computer
menu and navigate
adjust
In some cases,
has completed
resolutions
height
Fill Screen
Image
pixel to an HDTV pixel for the sharpest
accepted
itself to accommodate
the HDTV
configuring
by the HDTV
of the HDTV screen
settings.
See "Image
are shown
text
minor
may adjust
variations
itself
card.
in Table
resolutions
but may be scaled
Size--
monitor
its graphic
The 1024 x 768, 1152 x 864 and 1280 x 1024 computer
720-pixel
to Window:
graphics.
monitor
in computer
the on-screen
(1:1 ).
2.
are taller than the
to fit using the Proportional
or
PC Input and DVI" on page 46 for HDTV dis-
play options.
Using
reduces
Proportional
and Fill Screen
the sharpness
scales
the computer
of text and graphics.
video
See "Image
to the screen
Size--
and slightly
PC Input and DVI" on
page 46 for examples.
The preferred
the viewer's
setting,
Exact
Pixels
(1:1 ) vs. Proportional
or Fill Screen,
is according
preference.
Resolution
Refresh
Rate
60 Hz
640 x 480
75 Hz
720x400
70 Hz
60 Hz
800x600
75 Hz
60 Hz
1024x768
75 Hz
Table
Veos
1152x864
75 Hz
1280x1024
60 Hz
2: Computer
Display
Card
Settings
DRAFT 2004-05-24-A--27
to
Connections
6501MAHDTVMonitorOwner'sManual
VIDEO7
DVI--Digital
Use
With
Connect
Video Interface Input
•
DVD players
and other
•
Personal
computer
•
Connect
personal
connections
the HDTV
monitor's
VIDEO
7: DVl connector
computer
using
a DVI-I
the HDTV
monitor
monitor
monitor's
on the video
users may decide
to the DVl connector
on the
cable.
will also accept
does not receive
the HDTV
level outputs
puter
output
output
For convenience,
Connect
with DVl video
DVl video
the HDTV
•
sources
analog
VIDEO
signals
7: AUDIO
component
a DVl digital-analog
through
IN: L and R connectors
or personal
cable,
but
the DVl connector.
computer.
Some
to the line-
personal
com-
1 Audio
Output
not to use the audio connections.
VIDEO 7
Input
Rear Connector
Panel
DV!
Output
(_
_
Left
Right
Figure 15. DVI
Configure
the
Computer
and HDTV
When
connecting
a computer,
figure
the HDTV"
on page 27.
HDMF
Video
M
with
HDMI
(High-Definition
to the HDTV monitor's
(not included).
video
"Configure
the Computer"
on page 26 and "Con-
Compatibility
components
nected
follow
HDMI-to-DVl
component
with
Multimedia
Interface
VIDEO
7 DVl connector
using
adapters
pass only video
signals.
HDMI,
separate
audio connections,
TM)
can be con-
an HDMI-to-DVl
adapter
To play audio from
as shown
in Figure
a
15, are
required.
RESET
Reset
is not intended
for routine
use. This pushbutton
toothpick
to press to reset the HDTV monitor.
•
Press
to restart
the HDTV
•
Press
and hold
10 seconds
including
HDTV
Factory
favorites
monitor
reset
lists,
monitor's
internal
to perform
to the factory
If necessary,
use a
electronics.
a factory
resets the content
is recessed.
reset.
blocking
This erases
password,
all user settings,
and returns
the
settings.
can also be performed
from the Options
menu.
see "Factory
Reset"
on page 41.
28--DRAFT
2004-05-24-A
Veos
6501MAHDTVMonitorOwner'sManual
FrontPanelControlsandIndicators
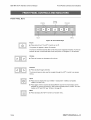
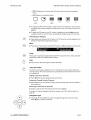
FRONT PANEL KEYS
Power
On-Off
Volume
Channel
Input
Menu
Figure
16. Front
Panel
Keys
Power
•
Press
once to turn The HDTV
The picture
will appear
in about
monitor
on or off.
15 seconds.
If turned
on within
60 seconds
after turnoff,
the picture
between
60 and 120 seconds
after turnoff,
the picture will reappear
reappears
instantly.
If turned
on
in 135 seconds.
Volume
•
Press to increase or decrease audio volume.
Channel
•
Press
to step through
The channel
channels.
keys are also used to navigate
through
the HDTV
monitor's
on-screen
menus.
Input
•
•
Press
once to display
VIDEO
2 S-Video,
Press
again within
selected
mation
the input (VIDEO
1 Component,
VIDEO
2 Composite,
etc.).
5 seconds
PIP (picture-in-picture)
to select
different
input for the main display
or POP (picture-outside-picture)
on PiP and POP, see "Window"
window.
or the
For infor-
on page 38.
Menu
•
Veos
Press
to display
the HDTV
monitor's
on-screen
menu.
DRAFT 2004-05-24-A--29
Front Panel Controls and Indicators
6501MA HDTV Monitor Owner's Manual
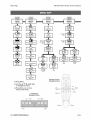
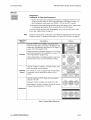
POWER AND LAMP INDICATORS
Power LED
(Green)
Figure
The combination
of the amber
mation about HDTV operation.
Note: To maximize
Turn-On
\\
I //
Normal
\\
I//
Turnoff
Res tarting
Seconds
\\Ill
\\Ill
Sleep
Timer
\\ I //
manages
Power
Blink
Lamp
Off
Power
Off
Lamp
Off
Power
Blink
Lamp
Off
Power
Blink
Lamp
Off
©©
Overheated
Replace
Lamp
@
Lamp
30--DRAFT
Access
Door
2004-05-24-A
Power
D
On
Lamp
Off
Power
Off
Lamp
Blink
Power
Off
Lamp
D
17. Front
and green
the life of the HDTV
automatically
\\ I //
in 60-120
Lamp LED
(Amber)
Normal:
HDTV
monitor's
lamp warm-up
Lamp warm-up:
Panel
Lamps
monitor
metal-halide
and cool-down
the picture
displaying
indicator
lights provide
infor-
lamp, the HDTV
monitor
times.
appears
in about
15 seconds.
picture.
HDTV monitor goes to standby for 60 seconds then turns
The cooling fan will run for more than 60 seconds.
off.
To prolong lamp life, there is a 135-second
delay from the time
you turn offthe HDTV monitor until the picture reappears.
(The
picture
reappears
within
60 seconds
instantly
if the H DTV
monitor
is turned
on
after you turn off the HDTV monitor.)
Sleep timer is set: the HDTV monitor will turn off according
the timer setting. (See page 32 or page 42.)
Temperature
in the HDTV monitor is above acceptable
Contact a qualified service person.
Lamp has failed.
page 55.
See "Lamp
Assembly
Replacement"
to
limits.
on
On
Power
Blink
Lamp
Blink
Lamp door is open or ajar. See "Lamp Assembly
ment" on page 55 for the door location.
Replace-
Veos
6501MAHDTVMonitorOwner'sManual
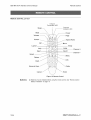
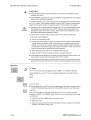
REMOTE CONTROL
RemoteControl
LAYOUT
infrared
Transmitter LED
Transmit
indicator LED
Slee
I
l
Mute
Power
\
--
Volume --X
Page
Picture
Aspect
Ratio
Move
Layout
Swap
Help --
Jump
Input
--
Channel +
input +
Channel =
Select
Menu
Return
Info
Dash
Numeric
Keys
Guide
Cancel
Enter
Figure
Batteries
•
Batteries
Battery
Veos
must be installed
installation"
before
18. Remote
Control
using the remote
control.
See "Remote
Control
on page 15.
DRAFT 2004-05-24-A--31
Remote Control
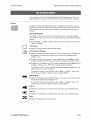
REMOTE CONTROL
6501MA HDTV Monitor Owner's Manual
KEYS
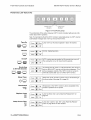
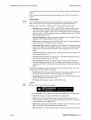
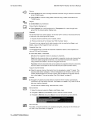
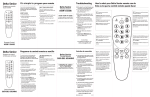
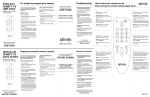
Keys are described below in approximately
top-to-bottom
layout order.
Pwr (Power)
•
Press once to turn the HDTV monitor on or off. The picture appears in about 15 seconds. See "Power and Lamp Indicators" on page 30 for turn-on and turnoff behavior.
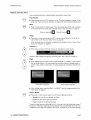
Mute
•
Press once to silence or restore audio. The mute symbol appears for a few seconds
in the upper-left of the screen after pressing the key. Also see "Mute" on page 47.
Mute on (silenced)
Mute off (normal)
Sleep
•
Press one or more times to set the HDTV monitor's turnoff timer for 30, 60, 90, or
120 minutes or off. Also see "Sleep Timer" on page 38.
When the sleep timer is activated, the green power indicator will be on. See "Power
and Lamp indicators" on page 30.
Vel
Volume
•
Press once or press and hold to increase or decrease the audio volume.
Volume
Page
+/-
is also available
When displaying
PIP or POP windows,
the individual
windows.
perform
dow.
actions
other
PIP Window
•
When
editing
"Edit Labels"
menu.
See "Volume"
on page 47.
labels,
Mode
•
one or more
Press
•
Standard
•
Cinema
•
Vivid
press the PAGE /_ or PAGE V keys to select
You must select the individual
on that widow.
A border
Selected
appears
window
to change
to indicate
Main Window
inputs
the selected
or
win-
Selected
press the PAGE /_ or PAGE V keys to change
channels.
See
on page 51.
Picture
These
2004-05-24-A
the on-screen
Page
•
32--DRAFT
through
times
for normal
for dark room
for bright
are preset
room
behaviors
the picture.
Technically
in different
surroundings
to select
room
lighting
lighting
lighting
conditions:
conditions
conditions
conditions
affecting
related
one of the room lighting
the low-, midrange-,
to gamma
with different
settings,
video
inputs.
and high-brightness
they accommodate
areas
the human
The best way to use these
of
eye
settings
Veos
6501MAHDTVMonitorOwner'sManual
is to choose
RemoteControl
the one you like best. You may prefer
different
settings
with different
pro-
grams.
Picture
Mode
is also available
through
the on-screen
menu.
See "Picture
Mode"
on
page 41.
Aspect
Ratio
See "Image
Size-•
Size--
Composite,
Press
•
one or more
Standard
displays
camcorders,
cable
boxes,
viewing
ATSC
•
and Component"
digital
Widescreen
correctly
DVD videos
have movie
Widescreen
Zoom
•
displays
boxes,
(digital)
DVDs,
most
high-definition
VCRs.
and undistorted
Provides
viewing
undis-
of 1.78 (16:9)
magnifies
widescreen
aspect
magnifies
aspect
from 4:3 images.
They
DVD videos.
Common
widescreen
DVD videos
of the picture.
the image
by 7%. Intended
ratios of 2.2-2.40,
by 20%.
Some
cropping
Intended
for wide-
this minimizes
the black
will occur
for letterbox
on the
DVD videos
with
ratios of 1.66.
Zoom
magnifies
aspect
the image
by 33%.
Intended
for letterbox
DVD vid-
ratios of 1.78-2.39.
Letterbox
Extend expands
the vertical direction by 33%, and nonuniformly
extends the horizontal
direction 33%. For letterbox DVD videos with movie
aspect
are
ratios of 1.78-2.40.
with movie
at the top and bottom
program
to fill the screen.
all widescreen
aspect
mattes
sides.
Letterbox
and D-VHS
information.
ratio modes:
2, full-screen
satellite
a widescreen
stretched
DVD videos
eos with movie
•
TV tuners,
screen
movie
1 and TUNER
high-definition
simulates
with the sides
Letterbox
aspect
programming.
Standard-Extended
•
TUNER
on page 44 and "Image
and additional
one of the picture
of 1.33 (4:3) programming
high-definition
displayed
to select
tapes,
torted
•
times
correctly
VHS video
•
S-Video
PC Input and DVI" on page 46 for examples
ratio of 1.66%.
This eliminates
the black mattes
a
on the left and right of the
picture.
The following
"Image
•
images
Size-Exact
Pixels
no scaling.
•
•
may be selected
(1:1)
matches
This produces
Proportional
aspect
sizes
only through
the on-screen
menu.
See
PC input and DVI" on page 46.
fills the screen
ratio (except
Fill Screen
the input resolution
the sharpest
as much
with 800x600
fills the screen
to the screen,
computer
as possible
pixel by pixel, with
text and graphics.
while
maintaining
the correct
video).
(except
with 800x600
video).
Layout
O
•
Press once to access the screen layouts.
Use the •
and •
keys to choose
•
Full Screen
displays
•
PIP (picture
in picture)
motion,
resizable,
a HD-component
•
Split
Screen
a single,
the layout
screen-size,
full-motion
a screen
size full-motion
displays
movable,
inset
input (VIDEO
displays
Veos
POP 3 displays
picture.
two reduced-size,
one reduced-size,
One picture,
layout.
picture.
picture,
plus a full-
but not both,
may be from
4 or 5).
both, may be from a HD-component
•
and the SELECT key to accept
full-motion
input (VIDEO
full-motion
pictures.
One picture,
but not
4 or 5).
picture
plus three
snapshot
scans.
DRAFT 2004-05-24-A--33
Remote Control
6501MA HDTV Monitor Owner's Manual
POP 12 displays
scans.
Grid displays
one reduced-size,
nine snapshot
Full
To change
change
picture
plus twelve
snapshot
scans.
PIP
Spilt
Screen
•
full-motion
POP3
POP
12
Grid
Screen
the PIP window
the PIP position
position,
press
Move one or more
using the on-screen
menu.
times.
You may also
See "PIP (Picture
in Picture)"
on
page 40.
•
To adjust
the PIP size when
navigate
to Window,
a PIP window
is displayed,
then PIP Size. Use •
press the MENU key and
or • to change
the size of the window.
PIP (Picture in Picture)
9
•
Press
press once to select
selects
the Full-Screen
the PIP layout.
single-window
If a PIP layout
is currently
displayed,
this
layout.
Move
•
Press
one or more
times
to move the PIP inset to a different
I_=,],m,z,]_,_[.],
position
_
on the screen.
...............
Swap
Press
once to exchange
split screen
windows,
images
between
or between
the PIP inset and the main window,
between
POP windows.
Help
•
©
iI
Press
to show technical
support
contact
information,
Jump (Favorites)
i_i
Favorites
is a temporary
collection
viewing session. All favorites
itor is turned off.
Adding
•
a Channel
Press
Through
•
Favorite
Press JUMP one or more
the favorites
list.
Removing
a Channel
Display
Favorites
are automatically
for quick
cleared
access
when
during
one
the HDTV
mon-
to Favorites
ENTER to add the displayed
Advancing
•
of up to 16 channels
channels
a channel
channel
to the list.
Channels
times
From
to quickly
advance
through
the channels
included
in
Favorites
from the favorites
can also be changed
using
list, then press CANCEL.
the on-screen
menu.
See "Edit
Favorites"
on
page 50.
Navigation
•
Use the A, V,
Press
34--DRAFT
2004-05-24-A
Keys
•,
and •
SELECT to accept
arrow
keys to navigate
through
the on-screen
menus.
a selection.
Veos
6501MAHDTVMonitorOwner'sManual
Channel
RemoteControl
+/-
Chan+
•
Press the CHAN + or CHAN -- keys once to view the channel number.
•
Press one or more times to step through higher- or lower-numbered
channels.
Input +/•
Press the INPUT + or INPUT- once to display the input. Press one or more times
again, within 5 seconds, to select another input for the main display or selected PIP
or POP window.
Select
•
Press once to select a submenu.
•
Press once to activate or deactivate selected item.
Return
•
When a tuner is the input, press once to return to previous channel.
Return
Menu
•
Press to show or hide on-screen menu. See "On-Screen Menu" on page 40.
_e_u
Dash
•
When the PC (VGA)
phase,
horizontal,
input is selected,
and vertical
position.
this automatically
tunes the frequency,
See "Frequency"
on page 43 and "Phase"
on page 43.
•
When equipped with the optional ATSC
and minor channel number entries.
digital
TV tuner,
press
once between
major
Guide
•
When equipped with the optional ATSC digital TV tuner, press once to display electronic program guide.
Info
•
Press
Numeric
•
Veos
to display
current
channel,
video
input, video
resolution,
and video
frequency.
Keys
When a tuner is the input, use to enter channel numbers. Channels are accepted
automatically after a 2-second delay.
DRAFT 2004-05-24-A--35
Remote Control
6501MA HDTV Monitor Owner's Manual
®
Cancel
•
Press to remove a displayed favorites channel from favorite channels. See "Jump
(Favorites)" on page 34.
Enter
•
36--DRAFT
2004-05-24-A
Press to add the displayed channel to favorites. See "Jump (Favorites)" on page 34.
Veos
6501MAHDTVMonitorOwner'sManual
Veos
RemoteControl
DRAFT
2004-05-24-A--37
Menu Map
6501MA HDTV Monitor Owner's Manual
Except
DVl
Except
PC and
DVI
Menu Background
page 41
Except
DVl
V Position
page 47
I
I Ol
I
|
Picture Mode
page 41
I
Grid
page 40
PIP
only
Color page
Temperature
41
Except
PIP
!
Except
PC and
DVl
•
•
•
Press
PC
only
Remote Control
Navigation Keys
Menu.
Use the A,
V, 41, and 1_ keys
to navigate
the menu.
Press
Menu one or more
times
to exit menus.
Up
Right
Down
Return /
Front Panel
Navigation Keys
Up
Down
Left
Right
\ Enter
Input
38--DRAFT
2004-05-24-A
Menu
Veos
6501MAHDTVMonitorOwner'sManual
I
/page
Volume
471
I
I
--_j_
I
page
47
MenuMap
page
49
I
Tuners
only
I
I
Content Blocking
page 51
I
;!Tge nt I°I
Veos
page
48
I
Closed-Caption Background 1
page 50
Audio Output
page 48
I
I Acquire Channel
page 50 Names
DVI, and
HD
Except
component
VGA,
_"
I
Password
page 52
Movie
Blocking
page 52
Appears only with
password
TV
Blocking
page 53
Appears only with
password
Appears onlywith
password
DRAFT 2004-05-24-A139
On-Screen Menu
6501MA HDTV Monitor Owner's Manual
The on-screen
menu
programmable
for 5 seconds,
will automatically
disappear
15 seconds,
when
changes
or 60 seconds.
are not made.
See "Options"
It is
on page 41.
LAYOUT
Layouts
are window
that have more
shots freeze
channel.
arrangements
for one or more
than two windows
and hold the picture
use snapshot
while
pictures
scans
on the screen.
Layouts
for some of the widows.
the input or tuner
acquires
Snap-
the next input or
Selecting Windows
For layouts
with two or more
ratio, select
window:
the audio, and more,
•
Press
windows,
to change
the channel,
for an individual
window,
the PAGE /_ or PAGE V keys on the remote
"Page"
video
input,
you must select
control
aspect
the desired
to select
a window.
plus an inset full-motion,
resizable,
See
on page 32.
Full Screen
•
Select
PIP
•
for a single,
for a screen-size
(VIDEO
•
the PIP size when
to Window,
the PIP position
navigate
to "Window",
Split
when
See "Move"
the window
control
is displayed,
or •
a PIP window
then "PIP Position."
of the PIP window
control.
To choose
a PIP window
then PIP Size. Use •
To adjust
remote
picture,
but not both, may be from an HD-component
navigate
remote
mov-
input
press the MENU key and
to change
is displayed,
Select
the size of the window.
press the MENU key and
the desired
can also be changed
position.
pressing
the MOVE key on the
on page 34.
to provide
audio,
to select the desired
use the PAGE /_ or PAGE V keys on the
window
and press SELECT.
Screen
Select
from
for two reduced-size
a HD-component
To choose
remote
•
full-motion
One picture,
To adjust
POP
picture.
4 or 5).
The location
•
full-motion
(Picture in Picture)
Select
able picture.
•
screen-size,
the window
control
full-motion
input (VIDEO
to provide
pictures.
audio,
to select the desired
One picture,
but not both, may be
4 or 5).
use the PAGE /_ or PAGE V keys on the
window
and press SELECT.
3
Select
for 1 reduced-size,
full-motion
picture
with audio,
plus 3 snapshot
scans.
POP 12
•
Select for 1 reduced-size, full-motion picture with audio, plus 12 snapshot scans.
Grid
•
40--DRAFT
2004-05-24-A
Select
for 9 snapshot
scans without
audio.
Veos
6501MAHDTVMonitorOwner'sManual
On-Screen
Menu
OPTIONS
Source Select
•
Select
Auto to allow
components
•
Select
Manual
to choose
the front panel
The Manual
require
the HDTV
monitor
to search
for the first active
input from
video
or the tuners.
setting
some
inputs
using the INPUT +/- keys on the remote
control
or
keys.
is recommended
setup before
when
the video
connecting
component
video
will provide
components
a usable
that may
output
signal.
OSD Timeout
•
Select
5 sec,
information
or 60 sec to set the time for the on-screen
on the screen
display
menus
or
after the last key pressed.
Background
Menu
•
15 sec,
to remain
Select
Opaque
menu
background.
for a solid background
or Translucent
for a see-through
Opaque
on-screen
Translucent
Language
•
Select
Picture
•
English,
Fran£ais,
or Espa£1ol for the on-screen
menu
language.
Mode
Select:
•
Standard
•
Cinema
•
Vivid
These
for normal
for dark room
for bright
are preset
room
Technically
in different
surroundings
lighting
lighting
conditions
affecting
related
conditions
conditions
lighting
behaviors
the picture.
is to choose
room
the low-, midrange-,
to gamma
with different
settings,
video
inputs.
the one you like best. You may prefer
and high-brightness
they accommodate
areas
the human
The best way to use these
different
settings
of
eye
settings
with different
pro-
grams.
To quickly
change
(See "Picture
Color
•
d
the setting,
Mode"
press picture
on the remote
control
one or more times.
on page 32.)
Temperature
Select
Warm,
Factory
Reset
•
to reset the HDTV
Select
Normal,
or Cool
to adjust
monitor
the color temperature
to the factory
settings.
of the picture.
This erases
all user set-
tings.
Veos
DRAFT 2004-05-24-A_
1
On-Screen
Menu
6501MAHDTVMonitorOwner'sManual
There
is also a reset
reset behavior.
nector
Q
pushbutton
See "Reset"
Panel" on page
on the rear connector
on page 28 for additional
panel with an additional
information.
See "Rear
Con-
17 for the location.
Sleep Timer
•
Press SELECTmultiple times to set sleep time to Off, 30 minutes, 60 minutes, 90
minutes, or 120 minutes. The HDTV monitor will turn itself off after the selected
number of minutes. Off disables the sleep timer.
To quickly set or turn off the sleep timer, press the Sleep key on the remote control.
(See "Sleep" on page 32.)
PICTURE
.!®:.
Brightness
• Adjust the value from 0 to 100 to change the luminance from darkest to brightest.
Each input individually retains its last setting. The factory setting is 50.
Contrast
• Adjust the value from 0 to 100 to emphasize or de-emphasize the difference
between light and dark areas. Each input individually retains its last setting. The factory setting is 50.
Filter
Filter does not appear for PC (VGA) and DVl inputs.
•
Select Sharpest, Sharp, Normal, Soft, Softest to adjust the apparent focus of the
picture. Each input individually retains its last setting.
Sharpness
• Adjust the value from Oto 100. Adjusts the definition of the edges of objects. Each
input individually retains its last setting.
Color
• Adjust the value from 0 to 100 to change the color saturation. Each input individually
retains its last setting.
Tint
• Adjust the value from 0 to 100 to adjust the hue. Each input individually retains its
last setting.
42--DRAFT
2004-05-24-A
Veos
6501MAHDTVMonitorOwner'sManual
On-Screen
Menu
Frequency
Frequency
VIDEO
appears
only for the "PC" input (analog
RGB signal
connected
to the
6).
Frequency
is automatically
set by the HDTV
monitor,
but it can also be manually
adjusted.
•
•
Adjust
the frequency
control
for the best image.
depending
on the computer
graphics
Alternately,
you may force the HDTV monitor
pressing the DASH key on the remote
information.
Figure
To see the change,
screen
image.
locate
and results
to automatically
control.
19. Correct
See "Dash"
Frequency
an easy to observe
Look for undesired
Appearance
may vary
card output.
graphic
reset the frequency
on page
by
35 for additional
Setting
item along the edges
of the
cropping.
Cropped
Figure 20. Frequency Too Low
Cropped
Figure
This adjustment
accommodates
21. Frequency
differences
Too High
in computer
graphic
cards.
Phase
Phase
appears
Phase
is automatically
•
Adjust
the phase
depending
•
Alternately,
set by the HDTV,
control
graphics
connected
but it can also be manually
for the best image.
on the computer
RGB signal
Appearance
6).
adjusted.
may vary
card output.
you may force the HDTV
monitor
to automatically
control.
See "Dash"
accommodates
to VIDEO
and results
pressing the DASH key on the remote
information.
This adjustment
Veos
only for the "PC" input (analog
differences
in computer
reset the phase
on page
graphic
by
35 for additional
cards.
DRAFT 2004-05-24-A_3
On-Screen Menu
6501MA HDTV Monitor Owner's Manual
WINDOW
Image Size-Composite,
S-Video
1. Set the connected
usually
a one-time
Choose
change
the image
(See
"Aspect
DVDs
come in full-screen,
setting.
Size
7 (DVl)
ellite boxes,
tuners,
tapes,
and D-VHS
wide-screen,
and letterbox
information,
Recommended
gramming
2, full-screen
formats
see "About
control
viewing
programming.
(Some
or broadcast
analog
cable
Use with TUNER
1, TUNER
VHS video
and camcorders.
that each work
DVD
of 1.33 (4:3) programming.
video
the entire
Black mattes
of aspect
by stretched
sat-
available
of 1.78
may be letsettings.)
DVDs,
most
This simulates
the sides to fill the
DVD videos
with movie
video
at the top and bottom
ratios greater
best with
on page 60.
digital TV
viewing
2, full-screen
For viewing
Use with widescreen
ratios of 1.78-2.40.
Formats"
of 1.33 (4:3) pro-
programs
widescreen
screen.
Displays
ATSC
and can use one of the letterbox
tapes,
one or more
DVDs,
high-definition
and undistorted
(16:9) high-definition
terboxed
ratios
VCRs.
for undistorted
(windowbox)
Aspect
Picture
cable boxes,
(digital)
below.
on the DVD jacket.
size, press ASPECT on the remote
camcorders,
high-definition
1, 4,
on page 33.)
1 and TUNER
most VHS video
to VIDEO
on the HDTV monitor.
to the descriptions,
is often
(16:9) TV. This is
connected
Description
Use with TUNER
Standard
Extend
according
to a widescreen
outputs
and VIDEO
DVD movies
For additional
Setting
Standard
Ratio"
for output
component
inputs),
and letterbox
times.
a different
Image
video
the image size settings
for widescreen
To quickly
components
setup for video
and 5 (component
2.
Component
and
video
height
aspect
and width.
increase
for movies
_J
J
than 1.78 (16:9).
Widescreen
iiii?!i!iiiiiii,i
¸ ;iiiii!iiiiiiii!iiiiiiii!iii!_!ii!i!i!i;i!i!ii!i!iiiiiiii!!
i:iiiiiiiiiii!iiiiiiii!iiii
ii!ii!iiiiiiiiii!i!iii_!ii
Table
44--DRAFT
2004-05-24-A
3: Aspect
Ratio
Selections
Veos
6501MAHDTVMonitorOwner'sManual
Image
On-Screen
Menu
Size
Picture
Description
Setting
Use with widescreen
DVD videos
with movie
ratios
of
2.2-2.40.
Widescreen
Zoom
The 7% magnification
Use with letterbox
aspect
Letterbox
reduces
and bottom, but also crops
video on the sides.
Black mattes
o_r}
with a movie
is approximately
DVD or VHS videos
of aspect
displays
the height of the
with movie
the entire
at the top and bottom
ratios greater
Use with letterbox
available
increase
for movies
than 1.78 (16:9).
DVD or VHS videos
with a movie
ratio of 1.66.
An alternate
vertical
to the Letterbox
direction
by 25%,
setting,
this expands
and nonuniformly
the
extends
the
horizontal direction 33%. This slightly distorts the picture
to eliminate
the black mattes found on each side in the
Letterbox
setting.
Table
Veos
3: Aspect
Ratio Selections
I
I
I
ratios of 1.78-2.39.
Black mattes
Letterbox
Extend
id
on each side are normal.
The 33% magnification
video width.
aspect
I
I
DVD or VHS videos
Use with letterbox
Letterbox
Zoom
matte at the top
7% of the available
ratio of 1.66.
The 25% magnification
screen.
aspect
the black
about
(Continued)
DRAFT 2004-05-24-A_5
On-Screen Menu
6501MA HDTV Monitor Owner's Manual
Image Size-PC Input and
Exact
•
!ilD ii!iii ¸!ii i
Pixels
Select
els.
for one-to-one
This produces
Exact Pixels (1:1)
Sharp Text
and Graphics
DVI
(1:1)
greater
than
correspondence
the sharpest
from computer
text and images
1024 x 720 pixels
pixels
to HDTV
from a computer.
will be cropped
Monitor
monitor
pix-
settings
to 1024 x 720 pixels.
Proportional
•
Select
to fit computer
screen
while
resolutions
maintaining
Text and graphics
greater
the correct
than
aspect
1024 x 720 to the HDTV
monitor
ratio.
are scaled.
Fill Screen
Proporational
or Fill Screen
Scaled Text
and Graphics
•
Select to fit computer
screen.
Text and graphics
resolutions
greater
than
1024 x 720 to the full HDTV
are scaled.
800x600
Computer Resolution
Image Size
monitor
1024x768
Computer Resolution
Exact Pixels
(1:1)
No Scaling
J
No Scaling
(Cropped
Bottom)
Proportional
Scaled
Scaled
With
Correct
Aspect
Ratio J
Fill Screen
Scaled
Table
4: Example
Recommended
are marked
46--DRAFT
2004-05-24-A
X
Scaled
Aspect
setting
"X." Settings
Ratio
Selections
are marked
not marked
"J".
to Fit Entire
Screen
for PC or DVI Input
Setting
not recommended,
are by personal
for scaling
reasons,
preference.
Veos
6501MAHDTVMonitorOwner'sManual
H Position
On-Screen
Menu
(Horizontal
Position)
• Adjust the value from 0 to 100 to adjust the image left or right. The factory setting is
50.
V Position
(Vertical
Position)
• Adjust the value from 0 to 100 to adjust the image up or down. The factory setting is
50.
Freeze
Window
Freeze Window is not available when a PIP window is on the screen.
•
Select On to stop the image on the screen or Off to return to the moving image.
Digital
Pan and Zoom
Digital Pan and Zoom is not available when a PIP window is on the screen.
•
Use Pan to move the viewing area within a zoomed picture. This is only meaningful
at zoom settings greater than 1.
•
Use Zoom to view a close-up area of a picture. Zoom range is 1 to 15.94.
PIP Size
PIP Size only appears when a PIP window is on the screen.
•
Press • and •
keys to decrease or increase the image size.
PIP Position
PIP Position only appears when a PIP window is on the screen.
•
Use the • and • keys to choose the PIP position and the SELECT key to accept the
PIP position.
i_fi_,i _'J[_lli _
AUDIO
Volume
•
Adjust
from
To quickly
remote
0 to 100 to change
change
control.
the setting,
(See
"Volume
the loudness
press,
+/-"
or press
of the audio.
and hold, VOLUME + or VOLUME - on the
on page 32.)
Mute
•
Select
On to silence
puts, including
To quickly
"Mute"
the audio. This controls
and rear-panel
audio out-
mute or restore
the audio,
press
MUTE once on the remote
control.
(See
on page 32.)
Closed-Caption
Mode
To view any of the closed-caption
•
the speakers
the subwoofer.
settings,
either:
•
Closed
Caption
must
be set to On, or
•
Closed
Caption
must
be set to On Mute
CCl--selects
the primary
language
and Mute must be On.
closed-caption
text (the text that is coordinated
with the sound)
•
CC2--selects
the supplemental
closed-caption
(information
text (displays
additional
text related
to the program)
Veos
•
Tl--selects
the first text service
•
T2--selects
the second
text service
usually
(information
not related
usually
to the program)
not related
to the program)
DRAFT 2004-05-24-A_7
On-Screen Menu
6501MA HDTV Monitor Owner's Manual
•
XDS--Extended
Data Services (displays information including program type, MPAA
ratings, weather service bulletins, and more)
Closed
Caption
•
Select On Mute to display the closed captioning text when the remote control MUTE
key is pressed or when Mute is selected using the on-screen menu.
•
Select On or Off to continuously show or hide closed captioning text.
Balance
• Adjust between L (left) and R (right) to compensate for an off-center seating location.
Equalizer
•
Choose and adjust the 5 individual audio ranges for the best sound.
Audio
Output
The audio outputs are labeled AUDIO OUT: L and R on the rear panel. (The subwoofer
output is controlled separately.)
•
Select Fix for fixed line-level output.
•
Select Variable to have the line-level output follow the volume controls.
•
Select Off to disable the audio outputs.
Nite Mode
•
Select On for a preprogrammed
audio response.
•
Select Off to normal audio response.
Subwoofer
3;
•
Select On for variable line-level output.
•
Select Off to disable the output.
Virtual
AV£:
Surround
•
Select On to enable the Virtual Dolby ® Surround technology. For a description, see
page 63 in the glossary.
•
Select Off for basic stereo operation.
Auto
Volume
•
Select On to automatically manage the volume. This may be used to limit extreme
changes in the volume level.
•
Select Off to provide exact reproduction of the volume levels.
Internal
48--DRAFT
2004-05-24-A
Control
Speakers
•
Select On to use the HDTV monitor's internal speakers.
•
Select Off to silence the HDTV monitor's internal speakers. This is usually desirable
when using a separate audio or home-theater sound system with the HDTV monitor.
Veos
6501MAHDTVMonitorOwner'sManual
¢
Input
Audio
•
Select
Follow
selected
•
On-Screen
Menu
Select
to accept
video
Video
5 to accept
less of which
video
The Video
5 setting
the HDTV
monitor.
system
•
audio only from VIDEO
may be used where
It also makes
channel
only a line-level
the inputs
level outputs
output
1. Set Audio
2.
3.
Connect
outputs.
monitor's
monitor.
speaker
internal
Speaks
Adjust
•
monitor's
system.
audio system
•
audio
VIDEO
Note:
system
audio
audio
to
audio
system.
speaker
(ampli-
levels
or amplifiers
for the center
5: AUDIO
to connect
may
have line-
channel
audio:
iN to the line-level
the audio system's
center-channel
have line-level
center
control
the volume
channel
out-
This will use
speaker.
to a comfortable
listening
level.
to a corresponding
level.
(volume-tracking)
line-level
output,
the
of the HDTV monitor.
has a fixed
and the HDTV
or amplifiers
inputs on the HDTV monitor.
has a variable
system
audio system
internal
output signal
Not all receivers
Not all receivers
volume
will also control
If the separate
separate
system
monitor's
audio
externally
monitor's
outputs.
as the single-center-channel
the HDTV
is performed
Do not connect
Speaker
audio system
You may use a Y-cable
If the separate
switching
to On.
the HDTV
separate
input, regard-
5.
of the audio
both the channels
5. Adjust
with the
audio
audio or home-theater
put to both the L (left) and R (right) audio
4.
5's associated
to any audio input.
on the HDTV
input to Video
Set the internal
outputs
associated
to use the HDTV
input on the HDTV.
accompanying
To use the HDTV
all audio
it possible
of a separate
fied) outputs to any audio
damage
input connector
input is selected.
for the center
Connect
audio at the audio
input.
line-level
monitor
output,
volume
you must adjust
to change
both the
the overall
volume.
SETTINGS
©
TV Tuner
The TV Tuner
Pressing
menus.
menu
item only appears
the i_ key, when
a TV tuner
when
TUNER
is selected,
1 or TUNER
displays
2 is selected.
the Input and Channel
Input
Auto Fine Tune
•
Choose
On to allow
channel
for the best picture
the HDTV monitor
and sound.
to adjust
Choose
itself to the receive
Off to enable
frequency
manual
of the
fine tuning.
Fine Tune
Fine Tune
is available
through the TUNER
is not desired.
for manually
1 or TUNER
1. Set Auto Fine Tune
2.
Select
3. Adjust
to Off to allow
the tuner
to a TV channel
Use Fine Tune
manual
when
received
automatic
fine tuning
fine tuning.
Fine Tune.
the value
reception.
Veos
adjusting
2 inputs.
between
The factory
0 and 100 to change
setting
the receive
frequency
for the best
is 50.
DRAFT 2004-05-24-A_9
On-Screen Menu
6501MA HDTV Monitor Owner's Manual
Source
•
Select
Antenna
to receive
to the TUNER
•
Select
Cable
TUNER
analog
broadcast
channels
using
an antenna
connected
inputs.
to receive
analog
cable
channels
using a cable
connected
to the
for a see-through
back-
inputs.
Region
•
United
Closed
•
States
Caption
Select
is preselected.
Background
Opaque
ground
for a solid background
for the closed-caption
or Transparent
display
area.
Channel
Not all channels
to channels
1. Acquire
2.
have active
with active
all active
Remove
The result
signals.
signals
channels.
channels
See "Autoset",
of no interest,
is an an internal
Scan
The Snapshot
dows
•
internal
channel
list
See "Edit Channels"
Scan
which
below.
is used by the CHAN + and
List, below.
List
Scan
List limits the channels
available
to select
in the snapshot
win-
in POP and Grid layouts.
Select
All, Valid,
All allows
Valid
or Favorites.
the snapshot
using Autoset
Favorites
or removed
memorized
typically
any channels.
in snapshot
or to channels
using
windows
to channels
that
that have been acquired
Edit Channels.
that can be selected
into the Favorites
in snapshot
list (see "Edit
windows
Favorites"
to channels
below).
Names
to acquire
mation
Edit Channels,
limits the channels
Channel
Select
to access
that can be selected
using
and added
that have been
Acquire
window
limits the channels
have been added
•
monitor's
below.
list of valid channels
CHAN - keys and the Snapshot
Snapshot
To limit the HDTV
of interest:
channel
adds station
displayed
information
callsigns
below the channel
tion in their signal.
from the broadcast
or network
designations
number.
This can be edited.
or cable
TV signal.
to the label,
Not all stations
See "Edit Labels"
which
provide
This
is infor-
this informa-
on page 51.
Autoset
•
Navigate
to Autoset
memorize
and press
a list of all active
skip over inactive
Select
channels.
to have the HDTV
monitor
automatically
The CHAN + and CHAN - keys use this list to
channels.
This list can be modified
using
"Edit Channels,"
below.
Edit Channels
1. Select
the channel
using
2.
Navigate
to Add
3.
Navigate
to Remove
the CHAN + and CHAN -- keys.
and press SELECT once to add the current
and press SELECT once to remove
channel.
the current
channel.
Edit Favorites
Favorites,
or favorite
trol. See "Jump
50--DRAFT
2004-05-24-A
channels,
(Favorites)"
are accessed
on page
using
the Jump
key on the remote
con-
34.
Veos
6501MAHDTVMonitorOwner'sManual
1. Select
On-Screen
Menu
the channel
using the CHAN + and CHAN - keys.
2.
Navigate
to ADD and press SELECT once to add the current
3.
Navigate
to REMOVE and press SELECT once to remove
You may also quickly
add and remove
CANCEL keys on the remote
tions.
control.
channels
channel.
the current
from favorites
See "Jump
(Favorites)"
channel.
using the ENTER and
on page
34 for instruc-
Edit Labels
Labels can be useful for identifying
channels.
with it's broadcast
network affiliation.
1. Select
2.
the channel
Use the •
change
using
and •
Content
individual
trols. These
Blocking
allow
may consider
only appear
Blocked
to access
unsuitable
is indicated
the content
is active,
or unblock
The HDTV
component
and •
keys to
may contain
signal. Consult
movies.
screen
Blocking
parental
of programs
con-
that you
and TV Blocking
menu items
and cannot
with a lock symbol.
23. Content
you may access
detects
the instruction
The Movie
by a black
4 and VIDEO
content
and the TV Blocking
to limit viewing
is entered.
the content.
monitor
(VIDEO
are not NTSC signals
Veos
Use the •
Entry
Blocking
the "V-chip"
for children.
after a password
content
and block
players
22. Label
the Movie
you to program
Figure
Note:
characters.
Blocking
Use Content
While
can be labeled
character.
Figure
_
the channel
the PAGE /_ and PAGE V keys.
keys to select
the selected
For example
Blocking
content
Blocked
the on-screen
choices
blocking
information
5), PC VGA (VIDEO
be blocked
blocking
manual
features
menu,
are accepted
enter
a password,
instantly.
in NTSC-signals.
6), and DVI (VIDEO
by the HDTV
monitor.
for DVD movies
for your DVD player
However,
regardless
to block
content
HD-
7) inputs
DVD
of the output
from
DVD
DRAFT 2004-05-24-A--51
On-Screen Menu
6501MA HDTV Monitor Owner's Manual
Password
•
To view
the Movie
manage
Blocking
your password,
The factory
default
and TV Blocking
menus,
you must first enter
password
change
the restrictions,
or to
your password.
is 00000O.
Enter
1. Use the • and •
keys to change
2. Complete
3.
keys to select
each number.
individual
the entry by navigating
If the password
digits in the password.
The numeric
is accepted,
to "OK" and pressing
the Change
to the top of the menu to access
menus.
Use the •
keys are not available
SELECT once.
item will appear.
the Password,
and •
for passwords.
Movie
Use the •
Blocking,
key to move
and TV Blocking
Change
This selection
only appears
1. Use the • and •
keys to change
after a password
keys to select
each number.
individual
has been entered.
digits in the password.
The numeric
Use the •
keys are not available
and •
for passwords.
©
2.
/rife
Complete
If you have
a factory
the entry by navigating
lost your password,
reset.
See "Factory
factory
reset will erase
Movie
Blocking
A password
is required
1. Navigate
If desired,
3.
Press
navigate
you may reset the password
Reset"
on page 41 or "Reset"
SELECT once.
to 000000
by performing
on page 28. Performing
a
all user settings.
to access
to the lowest
2.
to "OK" and pressing
rating
Movie
Blocking.
to be restricted.
to any locked
Press
item that you wish
SELECT.
to unlock
and press SELECT.
MENU to return to the menu selection.
Select any rating
to lock that rating --_
ratings plus
below=
all [
Symbol
Select any locked
rating to unlock=
G General
Audiences
All ages admitted.
PG Parental
52--DRAFT
2004-05-24-A
Guidance
Suggested
Veos
6501MAHDTVMonitorOwner'sManual
On-Screen
Menu
Some
material
may not be suitable
for children.
PG17
Parents
Strongly
Some
material
may be inappropriate
Cautioned
for children
under
13.
R Restricted
Under
17 requires
NC-17
accompanying
No one 17 and under
parent
or guardian.
admitted.
X
This not an MPAA
(Motion
Picture
Association
of America)
rating.
TV blocking.
The rating
symbols
NR Not rated.
TV Blocking
A password is required
the illustration.
to access
1. Navigate
SELECT.
to the lowest
2.
Navigate
to any subcategories
3.
If desired,
navigate
rating
descriptions
(Y, Y7, G, PG, 14, or MA) to be restricted.
(FV, D, L, S, or V) to be restricted.
to any locked
Select
item that you wish
items
in additional
to add limitations
to unlock
follow
Press
Press
SELECT.
and press SELECT.
columns
within
ratings.
/r
Locked Symbol
Select any rating
to lock that rating --_
plus all
ratings below.
TV-Y
All Children.
This program
is designed
action,
the themes
young
audience,
expected
TV-Y7
Directed
children
to be appropriate
and elements
including
to frighten
This program
children
younger
to Older
for all children.
in this program
from ages 2 through
is designed
for children
age 7 and above.
the developmental
skills
and reality. Themes
and elements
or comedic
or may frighten
fore, parents
children.
may wish to consider
violence,
TV-Y7-FV
Directed
For those
programs
where fantasy
than other
programs
in this category,
not signify
or live-
for a very
6. This program
is not
children.
tasy violence
Most parents
animated
designed
Children.
who have acquired
General
Whether
are specifically
make-believe
TV-G
Veos
Select any locked
rating to unlock.
_-
the suitability
to Older Children--Fantasy
to distinguish
in this program
children
may include
under
of this program
for
between
mild fan-
the age of 7. Therefor their very young
Violence
violence
such
It may be more appropriate
needed
may be more
programs
intense
or more
will be designated
combative
TV-Y7-FV.
Audience.
would
a program
find this program
designed
suitable
specifically
for all ages. Although
for children,
most parents
this rating
does
may let younger
DRAFT 2004-05-24-A--53
On-Screen Menu
6501MA HDTV Monitor Owner's Manual
children
guage
watch
this program
unattended.
and little or no sexual
TV-PG
Parental
Guidance
dialogue
contains
Many parents
may want to watch
moderate
Parents
This program
dren under
Strongly
contains
unattended.
lence
(V), intense
dialogue
TV-MA
Mature
This program
unsuitable
graphic
the program
contains
situations
for younger
children.
The theme
children.
itself may
one or more of the following:
(S), infrequent
coarse
language
(L), or
material
that many parents
are strongly
and are cautioned
This program
sexual
against
contains
situations
find unsuitable
to exercise
letting
one or more
(S), strong
would
urged
children
greater
under
of the following:
coarse
language
for chil-
care in
the age of 14
intense
vio-
(L), or intensely
sug-
(D).
Only.
designed
under
(V), explicit
to be viewed
17. This program
sexual
activity
by adults
contains
and therefore
one or more
(S), or crude,
indecent
may be
of the following:
language
(L).
Enable
the remote
follows:
inputs
control,
1. Navigate
Press
some
is specifically
To hide specific
2.
may find unsuitable
it with their younger
of age. Parents
for children
Source
lan-
(D).
Audience
violence
no strong
Cautioned.
this program
watch
gestive
and/or
dialogue
14 years
monitoring
that parents
(V), some sexual
some suggestive
TV-14
material
guidance
violence
little or no violence,
Suggested.
This program
call for parental
It contains
or situations.
so that they don't appear
or INPUT on the front-panel
to the input that you wish
MENU to return
to the Settings
when
keys,
to disable
using
INPUT - or INPUT + keys on
you may disable
or enable.
Press
those
inputs
as
SELECT once.
menu.
List of all inputs
/\
\
Input is selected
and disabled. --_
Figure 24. Source (Input) Listing
Disabled inputs are indicated by a diagonal red line through the connector symbol.
54--DRAFT
2004-05-24-A
Veos
6501MAHDTVMonitorOwner'sManual
SCREEN
AND CABINET
Care,Cleaning,Maintenance
CLEANING
Precautions
The screen
features
the screen
in its best viewing
a hard-coat
surface;
condition,
however,
avoid
it can still be scratched.
touching
the screen
To keep
to minimize
the
need for cleaning.
•
Do not use commercial
•
Do not use strong
•
Do not spray cleaning
•
Do not allow
around
•
window
commercial
cleaning
cleaning
solutions
solutions
solutions
directly
on the screen
on the screen
onto the screen
any liquid to drip or run into the HDTV
or cabinet.
or cabinet.
or cabinet.
monitor
openings,
seams,
or
the keys.
Do not use any abrasive
cloths
or cleaners
on the screen
or cabinet.
Cleaning
•
Clean the screen
solution.
Again,
ings, seams,
LAMP ASSEMBLY
and cabinet
using
be especially
or around
a soft cloth
careful
dampened
not to let any liquid
with a very mild, soapy
drip or run into the open-
the keys.
REPLACEMENT
The lamp is a user-replaceable
contact
manual
A
item. If you are uncomfortable
a qualified service professional
for service information.
to replace
the lamp.
with replacing
the lamp,
See the back cover
of this
Precautions
•
Do not defeat
any of the power
Do not attempt
to operate
Do not attempt
to look at the lamp when
lamp is a UV (ultraviolet)
The UV light is filtered
•
picture
is safe to view.
Do not
experiment
no filament.
•
Do not touch
remaining
weaken
hazard
a new
monitor
inside
or spent
be tested
the glass,
surface
and cause
lamp.
high temperature
to remove
cabinet.
light from
the
system.
The screen
The lamp is an arc lamp and has
for electrical
even
Unfiltered
optical
continuity
when
with an ohm meter.
cold.
and pressure.
of the lamp may chemically
react
Finger
prints
with the glass,
the lamp to fail.
the lamp can be cleaned
Do not attempt
its protective
eye damage.
the internal
the lamp with bare hands,
at extremely
without
it is operating.
and may cause
and removed
with
on the glass
If necessary,
the HDTV
The lamp cannot
The lamp operates
•
interlocks.
the spent
with a lint-free
lamp
towel
before
operation.
until after the 60-minute
waiting
period.
Lamp Type
•
Replace only with an ULTREX3 lamp assembly.
See the back cover for information on obtaining service or replacement parts.
Tools
• #2 Phillips screwdriver.
Veos
DRAFT 2004-05-24-A--55
Care, Cleaning, Maintenance
6501MA HDTV Monitor Owner's Manual
Step-by-Step Lamp Replacement
1. Turn offthe
2. Wait
HDTV monitor.
at least
1 minute
3.
Unplug
4.
The lamp is HOT shortly
cool.
5.
Remove
HDTV
the HDTV
for the lamp cooling
monitor.
the speaker
monitor.
(two along
fan to stop.
after operation.
grille
by carefully
The speaker
Allow
at least 60 minutes
pulling
grill is attached
the grille away
by plastic
the left side, two along the right side,
for the lamp to
from the front of the
ball-and-socket
fasteners
and 4 in the center).
2 Screws
Figure
6.
Remove
Figure
25. Speaker
the two screws
Grille
and Lamp
(see Figure
Access
25) and open
Door Screws
the lamp access
door (see
26).
Lamp Access Door
(Open)
/
Lamp
Assembly
Figure
7.
8.
56--DRAFT
2004-05-24-A
26. Lamp
Locate
the lamp assembly
screws
on the lamp assembly
Grasp the old lamp assembly
out of the base of the HDTV
(see Figure
Assembly
Location
26) and completely
(see Figure
by the handle
monitor.
loosen
the two captive
27).
(see Figure
27) and gently
pull straight
Veos
6501MAHDTVMonitorOwner'sManual
Care,Cleaning,Maintenance
Guide
Guide
"--Connector
Back ofLamp Assembly
DO NOT TOUCH LAMP
Screw
j
Figure
9.
Grasp the new lamp assembly
Inspect
the lamp for obvious
with a broken,
10.Align
the guides
lamp assembly
11. Tighten
Veos
damage.
or loose
Do not install
reflector
on the lamp assembly
or cover
or attempt
to operate
the lamp
glass.
with the lamp enclosure,
and slide the new
into the lamp housing.
the lamp access
13.Carefully
posal
Assembly
both screws.
12.Close
14.Discard
cracked,
27. Lamp
only by the handle.
door and tighten
snap the speaker
both screws.
grille
into place.
the spent lamp according
to federal,
Do not overtighten.
state, and provincial
hazardous
dis-
rules and regulations.
DRAFT 2004-05-24-A--57
Appendix
6501MAHDTVMonitorOwner'sManual
ABOUT DEINTERLACING
AND PROGRESSIVE-SCAN
Television
pictures
of pixels).
The video
laced
:
:
video
creates
The first step presents
•
The second
signal
(analog)
television
are also described
scan
line (odd lines).
scan
format.
lines (even
interlaced
high-definition
creates
signal
a complete
is identified
picture
in a single
by adding
is the 480-line
progressive-scan
enhanced
720p is the 720-line
progressive-scan
high-definition
their
DVD players
If a DVD player
images
of lines.
format.
is not marked
If the DVD
player
video
with 480 lines of pic-
(YPbPr)
output
and gener-
480i video.
"progressive
then
scan,"
and it doesn't
it is probably
has no component
video
a basic
output
mention
480p,
DVD player with 480i
(YPbPr),
it is not a pro-
player.
Progressive-scan
DVD players
can also produce
720p and 1080i output.
Progressive-scan
DVD players
laeer. The quality
of deinterlacers
widely.
step.
format.
arrangement
have a component
job of producing
720p, or 1080i in the instructions,
gressive-scan
definition
in an interlaced
commonly
ally do an excellent
output.
top-to-bottom
Players
DVD
DVD movies contain
ture information. 2
Basic
with NTSC
the letter "p" to the number
480p
and
of lines.
is compatible
format.
•
DVDs
lines).
the letter "i" to the number
The 480i format
•
•
inter-
Video
video
A progressive-scan
•
lines (rows
as either
sets. 1
1080i is the 1080-line
Progress-scan
Scanning
720, or 1080 horizontal
in two steps:
by adding
interlaced
Progressive-Scan
Progressive
picture
every other
is identified
480i is the 480-line
•
from 480,
the pictures
step fills in the remaining
An interlaced
Scanning
created
that create
a complete
•
•
Interlaced
signals
Video
interlaced
Even
are normally
PLAYERS
or progressive.
Interlaced
Odd
DVD
The quality
can produce
create
480p (progressive-scan)
their 480p
inside
of the deinterlacer
or 720p output
progressive-scan
affects
output.
using
a deinter-
DVD players
the appearance
Some
varies
of the edges
of mov-
ing objects.
Getting
the
The 6501MA
Best
DVD
HDTV
monitor
progressive-scan
deinterlacer
scan
video
always
using
can generally
converts
480i or 1080i interlaced
its own high-quality,
outperform
motion-adaptive
the deinterlacers
video
to 720p
deinterlacer.
This
in all but the best progressive-
DVD players.
To use the HDTV
1. Connect
2.
Performance
monitor's
the DVD
If it is a progressive-scan
sive-scan
high-quality
player's
YPbPr
deinterlacer:
output
DVD player,
to INPUT
select
1 on the HDTV
the 480i setting
monitor.
(turn off the progres-
feature).
1. NTSC signals have 525-lines but only 480 lines of picture information.
2. This is a simplified explanation of DVD video storage.
58--DRAFT
2004-05-24-A
Veos
6501MAHDTVMonitorOwner'sManual
•
If INPUT
Appendix
1 is used for another
tion on either
ABOUT
480p/720p/1080i
VIDEO
VIDEO-COMPONENT
Video
components
cable
•
Digital
satellite
•
ATSC
digital
•
D-VHS
•
Other
be labeled
•
480p,
TV tuner
set-up
"Output
720p,
component-video
outputs
connec-
include:
boxes
videocassette
to choose
an S-video
boxes
boxes
components
using
SETTINGS
set-top
(digital)
Connect
tor.
•
set-top
high-definition
video
consider
8.
that may have 480p/720p/1080i
Digital
menu settings,
component,
3, or VIDEO
OUTPUT
•
These
video
2, VIDEO
players
players
may have switches
component
on the outside
video output
formats.
of the unit, or on-screen
A switch
or menu
item may
Resolution".
and 1080i formats
these
outputs
appear
only
only to the VIDEO
If the video
component
the VIDEO
1 input on the HDTV monitor
provides
on component
4 or VIDEO
video
5 inputs
only 480i component
video
(Y Pb Pr) outputs.
on the HDTV moni-
(YPbPr),
connect
it to
for the best performance.
Choosing a Setting
•
Choose
"No Conversion"
if available.
terlacing) will be performed
HDTV monitor.
•
If you know that the signal
(480p,
720p,
or 1080i),
that is needed (scaling
HDTV monitor.
provided
select
•
Try both 720p or 1080i and choose
the best picture.
•
If you are familiar
details
a setting
performance
according
480p,
720p,
1080i
480p
HDTV
in the
in a specific
format
Any conversion
by the circuits
in the
experimenting.
and performance
to the following
of your video
compo-
information:
downscaled
have little or no resampling
is downscaled
720p is the internal
1280 pixels
wide
programs
and deinterlaced
format
are upscaled
1080i programs
are downscaled
Table
5: Video
Component
HDTV
1080i is
component.
The resulting
1080i is
and deinterlaced
component.
monitor.
The resulting
(The
LCoS
TM
in progressive-scan
imagers
are
mode.)
component.
by the video
Settings
The resulting
monitor.
to 720p by the video
have little or no scaling
format.
component.
by the video
high and are operated
720p programs
output.
monitor.
by the HDTV
of the 6501MA
x 720 pixels
component
automatically.
monitor.
to 1080i by the video
by the HDTV
inputs
broadcast
to 1080i by the video
by the HDTV
are upscaled
at the video
any of these
high-definition
are upscaled
and deinterlaced
1080i programs
components.
keep their format
will display
and deinterlaced
720p programs
480p
monitor
is the highest-resolution,
programs
downscaled
1080i
on all video
and 1080i programs
The 6501MA
Veos
without
and dein-
circuits
Description
May not be available
720p
(scaling
component.
will be performed
Select
with the technical
originates
on the video
and deinterlacing)
Video Component
Setting
1080i
by your service
that format
1080i to get excellent
conversion
by the high-performance
•
nent, choose
No Conversion
Any necessary
automatically
component.
to 720p
by the video
component.
and Behaviors
DRAFT 2004-05-24-A--59
Appendix
6501MA HDTV Monitor Owner's Manual
Video
Component
Setting
Description
480p
is below
unless
480p
480p
high-definition
the program
programs
quality.
was originated
have little or no resampling
720p and 1080i programs
Table
ABOUT
DVD
5: Video
This setting
by the video
are downscaled
Component
will produce
a less detailed
picture
in 480p format.
Settings
and
component.
to 480p
by the video
Behaviors
(Continued)
component.
FORMATS
DVDs are available in full-screen,
widescreen
(sometimes
terbox formats. Some DVDs even have full-screen
format
format
on the flip side.
While widescreen
are even wider
screen
DVDs,
screen
width.
a very wide
Aspect
Ratio
Examples
called anamorphic),
or leton one side and widescreen
2.40).
the manufacturer
ratio of 1.78 (16+9
When
very wide
may proportionally
In this case, it will be normal
= 1.78),
movies
reduce
many filmed
are transferred
movies
to wide-
the move to fit the TV
to see black mattes
at the top and bottom
of
movie.
•
To determine
•
If the package
setting
TVs have an aspect
(for example
your DVD's
format,
is not clearly
marked,
and use the table below
Standard
Image
check
the DVD jacket.
view
the DVD using
to choose
the "Standard"
image size
the best setting.
Recommended
Size Setting
Setting
...)
Full-Screen
DVD Video
-)
Remain
at Standard
or try Standard
Extend
Use Letterbox
Zoom
-.)
-.)
Letterbox
DVD or VHS Video
Table
60--DRAFT
2004-05-24-A
6: Aspect
-)
Ratio
Selections
Veos
6501MAHDTVMonitorOwner'sManual
Appendix
Standard
Image
Recommended
Size Setting
Setting
-)
...)
Widescreen
DVD Video
Table
Widescreen
DVD video
6: Aspect
provides
squeezing
the picture
horizontally.
the picture
to restore
the intended
on an ordinary
screen
at a loss of some
Selections
height
detail
as possible
The HDTV
movie
(Continued)
monitor's
aspect
ratio.
on a widescreen
TV. It takes
in the DVD video
format
widescreen
(When
1.33 (4:3) TV set, the DVD player
setting
a widescreen
by
expands
DVD
is
must scale it to fit the TV
detail.)
DVD video will contain
of the movie,
Use Widescreen
the most picture
of as much of the picture
Letterbox
with the picture
terbox formats lose a significant
tom of the screen.
Veos
Ratio
advantage
shown
-)
the least detail.
in its original
amount
filmed
of detail
It is intended
aspect
to show the entire width
ratio, on a 1.33 (4:3) TV. Let-
to the black mattes
at the top and bot-
DRAFT 2004-05-24-A_
1
VideoGlossary
3-2 pulldown
6501MAHDTVMonitorOwner'sManual
technique
for converting
24-frame/second
movie film images to 60-field/second
video. One film
frame is transferred
to three video fields and the following film frame
is transferred
tern is repeated
480i
fields.
480-line,
interlaced-scan
progressive-scan
tuner
digital
cable tuner.
Dolby
New ATSC
See Virtual
1080i
720-line,
video format
Digital television.
DVD
Digital
D-VHS
video format
progressive-scan
1080-line,
amplified
subwoofer
anamorphic
aspect
DVD
ratio
expressed
slightly
video
See "powered
See widescreen
Versatile
Width
and height
Movie
film formats
wider.
Many
DVl
subwoofer."
of the screen
or picture
TV aspect
ratios
are
and 4:3 (or 1.33) for full
list their aspect
ratio on
tuner
Refers
to "old" NTSC
cast TV or cable-ready
over-the-air
broad-
components
such
connector
Abbreviation
Committee
for Advanced
which
created
Television
Systems
the digital over-the-air
broad-
CATV
Cable
munity
antenna
television);
broadcast
TV
ing satellite
television.
comb
filter
video
or higher.
F-connector
areas
in the picture.
To produce
the 6501MA
electronic
(Y) from
a digital
(comb)
filter.
component
YPbPr
video.
three-signal
tors usually
composite
video.
have green,
video
across
sync).
Composite
deinterlacer
signal
video
Circuit
video signal
some components
ers.
62--DRAFT
are available
television
video
connec-
that contains
(or composite
This may also
video,
blanking,
an interlaced
video
signal.
in progressive-scan
HDTV)
Deinterlac-
televisions
and may be included
such as progressive-scan
2004-05-24-A
video
DVD
cable
to digital
The DVI-I
and DVl digital-ana-
television.
Intended
vertical
Sometimes
used to describe
threaded
scanning
sig-
not include
DVD
broadcast
connector,
RF. F-connector
antenna
inputs
an
(Compare
to fill a 4:3
to widescreen
Digital
is a type of digital
some
DVl- and HMDI-equipped
Content
DVD.)
Protection.
signal encryption
including
DVD players,
lite boxes
with DVl outputs,
video
digital
cables
versions.
A DVD that is formatted
screen.
cable
used between
components,
boxes,
and digital
digital
encryption
discourages
illegal
duplication
righted
material.
The 6501MA
HDTV
includes
for compatibility
with video
satel-
TVs or displays.
HDCP
decoder
or
or out-
equipped
or push-on
HDCP
of copyan HDCP
components
that use
encryption.
HDMI TM High-Definition
audio-video
interface.
video
to iden-
with active
in threaded
The 6501MA
lumi-
from
digital
and computers
coaxial-cable
High-Bandwidth
HDCP
video."
into a progressive-scan
(such as the 6501MA
inputs,
This is high-quality
The component
that converts
ers may be included
video
blue, and red color coding.
Single
See "composite
the TV and
3-D motion-adap-
nance (black and white), color, and sync.
be labeled "V" or "CVBS."
CVBS
(C) in a
finely detailed
from composite
features
tive Y/C separation
analog
that sepa-
is inside
smearing
the best picture
video
circuit
color information
This circuit
color from
HDTV
exclud-
signal connecsignals
An EDTVmonitordoes
Common
full-screen
normally
of
tapes
digital tuner.
HDCP
signal.
prevent
or com-
1 to 125.
television,
An improved
helps
television
channels
Over-the-air
rates the luminance
composite
access
video
of DVl connector.
definition
TV receiver
puts may be labeled
TV (community
capable
D-VHS
Digital video
both DVl digital
Enhanced
tify a digital
cable television
AV Audio-video.
format
log plugs and cables.
ATSC
cast signal format.
Disc.
as DVD players,
Variation
accepts
lines of 480p
tuners.
Interface.
nals that are 480p.
ATSC
or new
VHS VCR.
used to send digital
boxes, digital satellite boxes,
televisions
and monitors.
DVI-I
Video
and playback.
on a standard
Digital Visual
EDTV
the back of their package.
analog
be played
receptacle
may vary and are often
DVD videos
recording
tion standard
video
Disc or Digital
Digital VHS. A VHS videotape
cannot
format
DVD.
as a ratio or a number.
16:9 (or 1.78) for widescreen
screen.
video format
interlaced-scan
broadcast
Dolby ® Surround.
DTV
high-definition
720p
over-the-air
This pat-
in a 3, 2, 3, 2, 3, 2... sequence.
480-vertical-line,
480p
to two video
digital
HDTV
components
is connected
using
High-definition
480p,
720p,
an ATSC
monitor
playing
480p,
without
an ATSC
in
interlaced
play-
by displaying
television
1080i,
digital
receiver
adapter.
Audio
capable
of dis-
every other
television
images
horizontal
lines. Formats
include
ratio, and
tuner.
capable
with a 16:9 aspect
over-the-air
Complete
A digital
audio cable.
1080i, with a 16:9 aspect
High-definition
TM.
from HDMI-equipped
digital over-the-air
720p,
scan
the remaining
video
Interface
an HDMI-to-DVl
a separate
playing
HDTV
accepts
using
HDTV
includes
Multimedia
of dis-
ratio, but
tuner.
created
in twosteps
line and then filling
480i,
in
1080i.
Veos
6501MAHDTVMonitorOwner'sManual
LCoS
Brillian
TM
Corporation
uid-crystal-on-silicon
letterbox
reduced
trademark
microdisplays
VideoGlossary
for its unique
Video format where widescreen
pictures are
to the width of a 4:3 TV. The format includes
prominent
black
bars across
the top and bottom
of the
screen. A "zoom" size setting can expand
fill a widescreen
TV but the vertical detail
the picture
is limited.
(Compare
DVD
to "anamorphic.").
on page
See "About
to
Formats"
audio
speakers
NTSC
Analog
audio signals
components.
which
OSD On-screen
display.
information
menus.
Picture
audio
used
signals
system
has left, center,
Systems
the "old" analog
broadcast
Screen-based
control
and
plus a subwoofer.
Video
Video
Picture
brightness
One of the thousands
screen.
POP
Picture
powered
Virtual
Dolby
of
or com-
picture.
plus an amplifier
progressive
with a line-level
scan
Complete
step by displaying
include
in one
tener
DVD
right/left
line-level
video
connections.
and component
con-
audio and
picture
When
Red, green,
cables
and connectors.
accepted
RF
and blue video
labeled
In the 6501MA
carried
HDTV,
Radio frequency.
and cable
scaling
Sometimes
Converting
by VGA
these
however,
you cannot
used to identify
to higher
version
create
or lower
(They
Standard
a digital
definition
TV receiver
less than provided
include
an ATSC
describe
set-top
analog
box
Intended
vertical
line
tuner.
term
terrestrial
monitor
Sometimes
TVs or signals
to identify
scanning
by EDTV. An SDTV
General
cable, satellite,
to a TV.
lines
Extended
quency
Veos
audio.
on a widescreen
that usually
that produces
Also see "powered
TV, the
back to it's widescreen
the best vertical
detail
TV. Widescreen
"Enhanced
Data Service.
which
including
program
bulletins,
and more.
is capable
when
DVDs
may be
for Widescreen
TVs,"
displayed
DVD
in letter-
Formats"
on
in correct proportions
on the sides.
Information
included
of displaying
type, MPAA
Type of analog
signal.
color (C) components
ratings,
in the
information
weather
Separate
luminance
of a video signal.
implementation
of Y/C.
to
YCbCr
service
component
(Y) and
"S-video"
Digital
video
signal.
Digital
usually more specifically
labeled "DVI" or "HDMI".
connections
are sometimes
mislabeled
YCbCr.
is an
video
is
YPbPr
refers to separate
that are connected
YPbPr
three
Speaker
pic-
does not
misused
that are 480i.
converters
widescreen
but are squeezed
on a 4:3 TV.) See "About
Analog
signals
only very-low-fresubwoofer."
green
component
over three
color-difference
subwoofer
where
full height
detail.
television.
with active
digital
format
can also be correctly
TV signal
Y/C
SDTV
Film
or notice-
page 60.
XDS
of magnification;
additional
14 to 69.
are
inputs.
a picture
This is the electronic
channels
ratio slightly
windowbox
4:3 picture presented
on a widescreen
with black mattes
television
the lis-
by
that is 16:9 (1.78).
horizontally
"Anamorphic,"
or similar.
at the PC Input.
antenna
count.
signals
surrounded
broadcast
presented
is expanded
box format
RGB
Pro
all the origi-
and provides
of being
Video
This preserves
used for individual
Laboratories
experience
retains
information
at nearly
on a widescreen
composite
fea-
Pro Logic or Dolby
TV image format
shown
nector
HDTV
by Dolby
may vary from this aspect
shape.
settings.
coaxial
Dolby
Ultra-high-frequency
tures are stored
type of push-on
2 to 13.
speakers.
widescreen
720p.
Common
channels
virtualizer
audio
ally returns
connector
certified
with the sensation
horizontally.
RCA
red,
ably.
lines from top to bottom.
to the factory
used
moni-
carrying
surround-sound
using
reset "Start over" switch that usually clears memories
and behaviors
in the main electronic
circuits. Reset usua device
connector
The BR6501m
a virtualized
nal multichannel
movies
created
signal
Surround technology
using the Micro® virtualizer.
3D-PANORAMA
is a technology
widescreen
input.
images
horizontal
480p,
subwooferspeaker
video
DIN con-
and analog
broadcast
II. 3D-PANORAMA
UHF
Self-contained
An analog
computers)
_ Surround
tures Virtual Dolby
nas 3D-PANORAMA
additional
outside
subwoofer
Formats
of points
array.
Very-high-frequency
from two speakers
element.
into its luminance
and uses a 4-pin
a D-subminiature
that creates
and color that make up a television
puter
graphics
sound
and left-rear
signal that is separated
PCs (personal
speakers
blue and sync signals.
Logic
pixel
multiple
a 5.1 surround
right-rear,
(Y) and color (C) components
nector.
virtualizer
in picture.
right,
S-video
green,
sig-
that uses
For example,
speakers
VHF
Television
Audio
the listener.
tors. It uses
to
singles.)
for National
created
commonly
(The amplified
are not line-level
Abbreviation
Committee
nal format.
sound
around
between
audio
between
surround
VGA
60.
line-level
PIP
liq-
and technology.
signals
and blue signals.
and cables
blue.
are typically
video
cables:
signal.
It consists
luminance
(Pb and Pr) derived
of
(Y) and two
from red
Component
video
connectors
color-coded
red, green,
and
DRAFT 2004-05-24-A_3
VideoGlossary
64--DRAFT2004-05-24-A
6501MAHDTVMonitorOwner'sManual
Veos
6501MAHDTVMonitorOwner'sManual
MasterProtection
Agreements
Congratulations
on making a smart purchase. Your new Veos ® product
is designed and manufactured
for years of dependable operation. But
like all products, it may require preventive maintenance
or repair from
time to time. That's when having a Master Protection Agreement can
save you money and aggravation.
Purchase a Master Protection Agreement
from unexpected hassle and expense.
now and protect
yourself
The Master Protection Agreement also helps extend the life of your
new product. Here's what's included in the Agreement:
[]
Expert
[]
Unlimited
service
ered repairs
[]
"No-lemon"
guarantee--replacement
of your covered product if four or more product failures
twelve months
[]
Product
[] Annual
service
by our 12,000 professional
and no charge
replacement
Preventive
for parts and labor on all cov-
if your covered
Maintenance
repair specialists
product
Check
occur within
can't be fixed
at your request-
no extra
charge
[]
Fast help by phone--phone
products requiring in-home
ing
[] Power surge
protection
support from a Sears technician on
repair, plus convenient repair schedulagainst electrical
damage
due to power
fluctuations
[] Rental reimbursement
if repair of your covered
product takes
longer than promised
Once you purchase the Agreement, a simple phone call is all that it
takes for you to schedule service. You can call anytime day or night, or
schedule a service appointment online.
Sears has over 12,000 professional repair specialists, who have
access to over 4.5 million quality parts and accessories. That's the kind
of professionalism
you can count on to help prolong the life of your
new purchase for years to come. Purchase your Master Protection
Agreement today!
Some limitations
and exclusions
apply.
For prices and additional
information
call
1-800-827-6655.
Sears
Installation
Service
For Sears professional installation of home appliances, garage door
openers, water heaters, and other major home items, in the U.S.A. call
1-800-4-MY-HOME
Veos
®
DRAFT 2004-05-24-A_5
Your Home
iiiiiiiiiiiiiiii_;_
i¸¸
For repair- in your homelawn and garden equipment,
no matter who made
of aH major brand appliances,
or heating and cooling systems,
it, no matter who somd it!
For the replacement
parts, accessories
and
owner's manuals that you need to do-it-yourself.
For Sears professional
installation of home appliances
and items like garage door openers and water heaters.
1-800o4-MY-HOME
°
(1°800°469°4663)
Call anytime, day or night (U.S.A. and Canada)
www,sears.com
www,sears.ca
Our Home
For repair of carry-in items like vacuums, lawn equipment,
and electronics, call or go on-line for the location of your nearest
Sears Parts & Repair Center.
! ; iiiiiiiiiiiiiiiiiiiiiiiiiiiiiiiiiiiiiiiiiiiiiiiiiiii
;i!ii!iiiiiii
®
Registered
®
Marca
MC Marque
Trademark
Registrada
de
/
/
commerce
TM
TM
Trademark
/ SM Service
SM
Marca
Marca
de Fabdca
/
MD
/
Marque
depos6e
de
Mark
de
Sears,
of Sears,
Servicio
Roebuck
Roebuck
de
Sears,
and
Co,
and
Roebuck
Co.
and
Co
© Sears,
Roebuck
and Co,