1
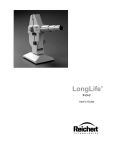
PDM
15020
Digital PD Meter
User’s Guide
Introduction
Congratulations on your purchase of the Reichert PDM Digital PD Meter. We
recommend that you carefully read and follow the steps in this guide to ensure
optimum performance from your new instrument. Additional copies of this
manual can be obtained from Reichert Customer Service.
PRECAUTIONS:
CAUTION: In order to ensure proper operation of the PDM, any repair or service
must be performed by Reichert, Inc. or an Authorized Reichert Distributor.
CAUTION: The internal circuitry of the PDM contains electrostatic discharge
sensitive devices (ESDS). These components may be damaged by high voltages produced by static charges from the human body. Do not remove the cover
of the PDM without taking proper ESDS precautions or damage to the instrument
may occur.
CAUTION: Do not use solvents or strong cleaning solutions on the PDM covers,
LCD, or patient windows or damage to the instrument may occur.
WARNING: This product is not suitable for use in the presence of lammable
anesthetic mixtures with air or with nitrous oxide.
WARNING: The PDM should be used in strict accordance with the instructions in
this manual. The safety of the operator and patient can not be guaranteed if the
instrument is used in a manner not speciied by Reichert, Inc.
© 2006 Reichert, Inc.
All rights reserved. No part of this publication may be reproduced, stored in a retrieval
system, or transmitted in any form or by any means, electronic, mechanical, recording, or
otherwise, without the prior permission of Reichert, Inc.
Page 1
15020-101 Rev B
Features and Functions
1.
ON/OFF Button (MAIN)
Press to turn the instrument on and off. The
PDM turns off after one minute to ensure
longer battery life.
2.
Measurement Slide Controls
Used to move the index lines that indicate
Pupillary Distance and Right/Left Nose-toPupil Distance measurements.
3.
Distance Dial
Rotate to measure inter-pupillary distance at
various distances, from ininity to 30 cm.
4.
PD/LD button
Changes between pupil distance (PD) and
vertex distance (LD) modes.
5.
LCD Screen
Measurement data is displayed on the LCD.
6. Viewinder
Operator looks through the viewinder to see
the index lines and the patient’s eyes.
7. MagniicationSwitch
Changes the view magniication to suit the
operator.
8.
Patient Windows
The patient views the ixation target through
these windows.
9.
Nose Support
Used to stabilize the PDM against the
patient’s nose.
10. Forehead Support
Used to stabilize the PDM against the
patient’s forehead.
11. Battery Compartments
Accepts 2 AA batteries in each side.
12. R/L Occluder lever
Used to occlude the right or left eye
for monocular nose to pupil distance
measurement.
Page 2
15020-101 Rev B
Instructions for Use and Speciications
Turning on the PDM
For all functions it is necessary to turn the PDM on. Press the ON/OFF button
(MAIN). During initialization the unit will show “88.8” across the display. When
the PDM is ready to measure, the display will indicate the numerical values of the
slide control positions.
CalibrationVeriication
1. Turn the PDM on.
2. Set the distance dial to ininity.
3. Ensure that the occluder lever is in the middle position.
4. Look through the viewinder and observe the small black calibration marks
visible along the bottom edge of each patient window.
5. Move the measurment slide controls until the index lines are directly over the
calibration marks.
6. Observe the LCD. The Right and Left measurements should each read 30
mm +/- 0.5 mm, with a total PD of 60 mm, +/- 0.5 mm.
7. If the measurement results are not within the speciied range, operators
should use the PDM’s “self calibration” feature (described below).
Self Calibration
1. Perform steps 1-5 above.
2. Press and hold the on/off (main) button until the display shows “— — —”.
Do not release the on/off (main) button.
3. While holding the on/off (main) button down, press the PD/LD switch then
release both switches simultaneously. The display will now show three 3digit numbers.
4. Quickly press both the on/off (main) and PD/LD buttons at the same time.
5. The display will show “88.8 88.8 88.8” for a short time then will show “30.0
60.0 30.0”.
6. Move the measurement slide controls all the way to the center. The display
should show “23.0 46.0 23.0”.
7. Slide the sliders all the way toward the outside of the instrument.
The display should show “41.0 82.0 41.0”.
8. Turn the instrument off. Turn on again. Align the indicator lines with the
calibration marks. Check to see that the readings are “30.0 60.0 30.0.
PD Measurement
1. Set the Distance Dial to ininity.
2. Carefully position the instrument in front of the patient using the Nose and
Forehead Supports to stabilize the instrument.
3. Instruct the patient to observe the green target.
4. Look through the Viewinder and observe the relected light on the center of
the patient’s cornea. Move the Measurement Slide Controls until the index
lines are directly over the center of the corneal relected light.
5. The right and left nose-to-pupil distance and the total interpupillary PD
measurements are indicated on the display.
Page 3
15020-101 Rev B
Instructions for Use and Speciications
Monocular PD Measurement
To measure the pupil-to-nose distance of one eye, or to measure PD one eye at
a time, switch the occluder lever to the left or right and follow steps 1-5 above.
Adjustable Distance PD Measurement
Near-viewing PD can be obtained for the distances shown on the Circular Dial.
Turn the Circular Dial until the arrow is aligned with the desired viewing distance,
then repeat steps 2-5 above.
Vertex Distance Measurement
Measurement of the distance between a pair of mounted spectacle lenses and
the patient’s eye is possible using the LD mode.
1. Press the PD/LD button - The LCD will show dashes where the PD value
is normally displayed.
2. Look through the Viewinder and observe the ixed index line at the far right
or left of the respective patient windows.
3. Approach the patient’s head from the side and position the PDM so that the
ixed index line appears to be touching the front of the cornea.
4. Position the Forehead Support against the side of the patient’s temple.
Keep the ixed index line positioned on the front of the cornea.
5. Move the Measurement Slide Control until the moving index line appears to
be touching the front of the spectacle lens.
6. Observe the measurement result on the LCD and subtract the thickness of
the lens to arrive at the vertex distance.
Cleaning
Clean the exterior surfaces of the PDM as necessary. Do not use alcohol or
other solvents to clean the covers, patient windows or screen, as damage may
occur to the instrument.
1.
2.
3.
4.
Apply a small amount of mild soap solution to a clean soft cloth and wipe the
exterior of the PDM to remove any contaminants that may accumulate from
normal use.
If necessary, apply a small amount of clean water to a clean, soft cloth to
remove any residual soap solution.
Dry the exterior using a clean, soft cloth.
Isopropyl alcohol may be used to clean the Forehead and Nose Supports.
Remove the Nose Support before cleaning to prevent contacting the
Patient Windows with alcohol. Simply pull the Nose Support away from the
instrument, clean, and reinstall.
Page 4
15020-101 Rev B
Maintenance and Speciications
Troubleshooting
Almost all potential problems, such as a no power, dim display, or dim
illumination, are caused by a low voltage condition. When in doubt, always install
new batteries in the instrument.
Battery Replacement
1. Using your thumbs, push and slide the Battery Compartment covers on
either side of the bottom of the PDM.
2. Remove and discard all 4 batteries. Replace them with new AA batteries
following the diagram on the inside of the Battery Compartment.
3. Replace the Battery Compartment covers.
Speciications
Display:
Fixation:
Batterys:
LCD - Digital
Green dot, with LED Ilumination
Alkaline - 4 AA
PD Measurement
Binocular:
46 - 82mm + 0.5 mm, 0.5mm steps
Monocular:
23 - 41mm + 0.5 mm, 0.5mm steps
Vertex:
5 - 23mm + 0.5 mm, 0.5mm steps
Distances:
30cm - Ininity
Dimensions:
Weight:
Page 5
6.1” W x 8.9” L x 2.17” H
1.5 pounds (690 g)
15020-101 Rev B
Product Warranty
This product is warranted by Reichert, Inc. against defective material and workmanship under
normal use for a period of one year from the date of invoice to the original purchaser. (An authorized dealer shall not be considered an original purchaser.) Under this warranty, Reichert’s sole
obligation is to repair or replace the defective part or product at Reichert’s discretion.
This warranty applies to new products and does not apply to a product that has been tampered
with, altered in any way, misused, damaged by accident or negligence, or which has had the serial number removed, altered or effaced. Nor shall this warranty be extended to a product installed
or operated in a manner not in accordance with the applicable Reichert instruction manual, nor
to a product which has been sold, serviced, installed or repaired other than by a Reichert factory,
Technical Service Center, or authorized Reichert Dealer.
Lamps, bulbs, charts, cards and other expendable items are not covered by this warranty.
All claims under this warranty must be in writing and directed to the Reichert factory, Technical
Service Center, or authorized instrument dealer making the original sale and must be accompanied by a copy of the purchaser’s invoice.
This warranty is in lieu of all other warranties implied or expressed. All implied warranties of
merchantability or itness for a particular use are hereby disclaimed. No representative or other
person is authorized to make any other obligations for Reichert. Reichert shall not be liable for
any special, incidental, or consequent damages for any negligence, breach of warranty, strict
liability or any other damages resulting from or relating to design, manufacture, sale, use or
handling of the product.
If notiied promptly in writing of any action brought against the purchaser based on a claim that
the instrument infringes a U.S. Patent, Reichert will defend such action at its expense and will pay
costs and damages awarded in any such action, provided that Reichert shall have sole control of
the defense of any such action with information and assistance (at Reichert’s expense) for such
defense, and of all negotiation for the settlement and compromise thereof.
Reichert reserves the right to make changes in design or to make additions to or improvements in
its products without obligation to add such to products previously manufactured.
We use extreme care in selection, checking, rechecking and packing to eliminate the possibility of
error. If any shipping errors are discovered:
1.
Carefully go through the packing materials to be sure nothing was
inadvertently overlooked when the unit was unpacked.
2.
Call the dealer you purchased the product from and report the
shortage. The materials are packed at the factory and none
should be missing if the box has never been opened.
3.
Claims must be iled within 30 days of purchase.
Our shipping responsibility ceases with the safe delivery in good condition to the transportation company. Claims for loss or damage in transit should be made promptly and directly to the
transportation company.
If, upon delivery, the outside of the packing case shows evidence of rough handling or damage,
the transportation company’s agent should be requested to make a “Received in Bad Order”
notation on the delivery receipt. If within 48 hours of delivery, concealed damage is noted upon
unpacking the shipment and no exterior evidence of rough handling is apparent, the transportation company should be requested to make out a “Bad Order” report. This procedure is necessary in order for the dealer to maintain the right of recovery from the carrier.
Page 6
15020-101 Rev B