1
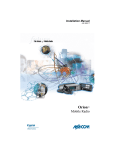
LBI-38847B Mobile Communications MDX SERIES MOBILE RADIO Printed in U.S.A. Installation Manual OPTION INTERCONNECTION DIAGRAM TABLE OF CONTENTS INTRODUCTION . . . . . . . . . . . . . . . . . . . . . . . . . 3 UNPACKING AND CHECKING EQUIPMENT . . . . . . . . . 3 PLANNING THE INSTALLATION . . . . . . . . . . EQUIPMENT REQUIRED . . . . . . . . . . . . INSTALLATION IN VEHICLES POWERED BY LIQUEFIED (LP) GAS . . . . . . . . . . . . MOUNTING LOCATION . . . . . . . . . . . . . . . . . . . 4 . . . . . . 6 INSTALLATION . . . . . . . . RUNNING CABLES . . . MOUNTING THE RADIO MICROPHONE HANGER MICROPHONE . . . . . . . . . . . . . . . . . . . . . . . . . . . . . . . . . . . . . . . . . . . . . . . . . . . . . . . . . . . . . . . . . . . . . . . . . . . . . 7 . . . . . . 7 . . . . . MOBILE OPTIONS INSTALLATION . . . . . . . . . . ANTENNA - OPTION PMAN1L (19B209568P5) . . OPTION CABLE KIT - OPTION PMCD7Z (19C851585P14) . . . . . . . . . . . . . . . . . . POWER CABLE - OPTION PMCD9A (19B801358P17) . . . . . . . . . . . . . . . . . . MICROPHONE, MIL SPEC - OPTION PMMC3W (19B801499P15) . . . . . . . . . . . . . . . . . . NOISE SUPPRESSION KIT - OPTION PMPD1A7 (19A148539G1) . . . . . . . . . . . . . . . . . . ALARM (HORN) RELAY KIT - OPTION PMSU1C (19A705499P1) . . . . . . . . . . . . . . . . . . EXTERNAL SPEAKER KIT - OPTION PMZM1K . . . . . . . . . . . . . . . . . . . . 8 8 11 12 14 . . . . 14 . . . . 14 . . . . 15 . . . . 17 . . . . 17 . . . . 17 . . . . 18 . . . . 19 OPTION INTERCONNECTION DIAGRAMS . . . . . . . . . . 24 Copyright© October 1992, Ericsson GE Mobile Communications Inc. (19D904133, Sh. 3, Rev. 2) 2 27 OPTION INTERCONNECTION DIAGRAM INTRODUCTION This manual contains installation instructions for the MDX Mobile Radio series and associated accessories. These instructions cover the mounting and cabling of the radio; interconnection diagrams are provided at the back of the manual for reference. Before installation, the radio should be programmed using an IBM compatible personal computer and the following items: Serial Programming Interface Module Kit . . . . . . . . . . . . Programming Cable . . . . . . . . . . . . . . . . . . . . . . . MDX Series Programming Software (EDACS) . . . . . . . . . or MDX Series Programming Software (GE-MARC only) . . . . TQ3370 . TQ3372 . TQ3373 . TQ3346 UNPACKING AND CHECKING EQUIPMENT When ready for installation, carefully unpack the radio and identify each item in the shipping container as listed below. If damage has occurred to the equipment during shipment, file a claim with the carrier immediately. The available options for the MDX Mobile Radio series are covered in Table 1 ❑ MDX Mobile Radio ❑ Microphone used with . . . . . . . . . . . . . . . . . . . . . . . . 19B801398P14 ❑ Microphone hanger, magnetic hookswitch . . . . . . 19B801398P5 or ❑ Microphone used with . . . . . . . . . . . . . . . . . . . . . . . . 344A4528P1 ❑ Microphone hanger . . . . . . . . . . . . . . . . . . 344A4678P1 ❑ Power cable, 9 feet . . . . . . . . . . . . . . . . . . . 19B801358P18 ❑ Mounting bracket kit . . . . . . . . . . . . . . . . . 19A138051G1 1 ❑ Operator’s Manual . . . . . . . . . . . . . . . . . . . LBI-38846 ❑ Installation Manual . . . . . . . . . . . . . . . . . . LBI-38847 (19D904133, Sh. 3, Rev. 2) 26 3 Table 1 - MDX Mobile Radio Series Optional Accessories Option Description Part Number PMAN1L 800 MHz roof mount antenna with TNC connector 19B209568P5 PMCC9M External speaker cable, 18 inches 19A149590P8 PMCD1W External speaker cable, 16 feet, requires option PMZM1K and PMCD7Z 19A149590P10 PMCD7Z External option cable, 2 feet 19C851585P14 PMCD9A Power cable, 18 feet 19801358P17 PMLS1F Speaker, MIL-STD-810C & D, 5" x 5", requires options PMCD7Z & PMCC9M 19A149590P1 PMMC3X Desk microphone for station use. 19C851086P14 PMMC3W Microphone, MIL SPEC 19B801499P15 PMMA1L Desk mounting wedge for station use. 19C851685G2 PMPD1A Noise suppression kit 19A148539G1 PMPS1C Power supply, 120/240V, 50/60 Hz, 13 A. For station use. 19A704647P2 PMPS1D Power supply, 240V AC, 50/60 Hz, 13 A. For station use. 19A704647P3 PMSU1C Alarm (horn) relay kit, requires option PMCD7Z 19A705499P1 PMZM1K External speaker kit, requires option PMCD7Z, includes options PMLS1F and PMCC9M PMMK3D Round pushbutton kit with commonly used legends. Includes button extraction tool. OPTION INTERCONNECTION DIAGRAM 344A4254G2 PLANNING THE INSTALLATION Before starting, plan the radio installation carefully so that it will be: • • • • • 4 safe for the operator and passengers. convenient for the operator to use. neat. protected from water damage. easy to service. (19D904133, Sh. 1, Rev. 3) 25 OPTION INTERCONNECTION DIAGRAM • • out of the way of auto mechanics. out of the way of passengers. It is suggested that the radio be installed by one of the many authorized General Electric Service Stations located throughout the United States. These experienced service stations can provide a proper radio installation and make any final adjustments that may be needed. WARNING Interference with Vehicular Electronics - Electronic fuel injection systems, electronic anti-skid braking systems, electronic cruise control systems, etc., are typical of the types of electronic devices which may be prone to malfunction due to the lack of protection from radio frequency energy present when transmitting. If the vehicle contains such equipment, consult the dealer for the make of vehicle and enlist his aid in determining if such electronic circuits will perform normally when the radio is transmitting. (19D904133, Sh. 1, Rev. 3) 24 Figure 1 - MDX Components and Mounting Hardware 5 EQUIPMENT REQUIRED NOTES The equipment required for installing the MDX Mobile Radio is listed below: • • • • • • • Electric drill for drilling mounting holes. Drills and circle cutters as follows: • No. 31 (1/8-inch) drill for No. 8 self-tapping screws. • No. 27 (9/64-inch) drill for No. 10 self-tapping screws. • 5/8-inch drill or circle cutter for power cable. • 3/4-inch circle cutter, hole saw or socket punch for antenna (optional). Phillips and flat-blade screwdrivers, and 1/4-inch and 5/16-inch hexhead drivers for mounting screws. No. 15 Torx® driver (ST0606). No. 15 Torx® tamper-proof driver (ST0618) if latch security screw (supplied in hardware kit) is used. No. 25 Torx® driver (STO610). POZIDRIV® driver for mounting screws. Torx® isa registered trademark of CAMCAR Division TEXTRON. Inc. POZIDRIV® is a registered trademark of Phillips International company. CAUTION Be careful to avoid damaging some vital part (fuel tank, transmission housing, etc.) of the vehicle when drilling mounting holes. Always check to see how far the mounting screws will extend below the mounting surface before installing. CAUTION If pilot holes must be drilled, remove all metal shavings from drilling holes before installing screws. WARNING Radio installations in vehicles powered by liquefied petroleum gas must conform to the following requirements. 6 23 INSTALLATION IN VEHICLES POWERED BY LIQUEFIED (LP) GAS NOTES Radio installation in vehicles powered by liquefied petroleum gas with the LP-gas container in the trunk or other sealed-offspace within the interior of the vehicle must conform to the National Fire Protection Association Standard NFPA 58 which requires that: • • • Space containing radio equipment shall be isolated by a seal from the space containing the LP-gas container and its fittings. Outside filling connections shall be used for the LP-gas container. The LP-gas container space shall be vented to the outside of the vehicle. Figure 2 - Typical Hump Or Dash Mount WARNING For passenger safety, mount the radio securely so that the unit will not break loose in the event of a collision. This is especially important in station wagons, vans and similar type installations where a loose radio could be extremely dangerous to the vehicle occupants. 22 7 INSTALLATION NOTES RUNNING CABLES To assure the feasibility of the planned cable routings. it is suggested that the cables be run before mounting the radio. Be sure to leave some slack in each cable going to the radio so that the radio may be pulled out for servicing with the power applied and antenna attached. Try to route the cables away from locations where they will be exposed to heat (exhaust pipes, mufflers, tailpipes. etc.). battery acid, sharp edges, or mechanical damage or where they will be a nuisance to automobile mechanics. the driver, or passengers. Keep wiring away from electronic computer modules. other electronic modules and ignition circuits to help prevent interference to these components and radio equipment. In addition. try to utilize existing holes in the fire wall and trunk wall and the channels above or beneath the doors. Also, channels through door and window columns that are convenient for running cables may be used, unless planning to install rigid or flexible conduit in which to run the cables. Power And Ignition Cable The power cable consists of a red lead, an orange lead, a black lead, a 3 pin systems plug. and a set of fuses and fuse holders to be installed as indicated in Figure 3. To install the power cable, drill a 5/8 inch hole in the firewall for the cable run and insert the rubber grommet. Starting with the plug end of the cable at the location of the radio, run the three cable leads through the hole. Secure the cable at several locations within the engine compartment. To install the fuses: 1. Cut off 12 to 18 inches from the red and orange wires. 2. Strip back the insulation approximately 3/8 of an inch on each end of the wires. 3. Lubricate the wire tips with liquid soap to insert the wires into the fuse holders. Pull the wire ends through the small opening at the end of each fuse holder section and crimp a fuse connector to each wire. 8 21 4. Push the prepared fuse connectors into each section of the fuse holders. Place the fuse into a fuse holder section until it seats within the connector. Connect the fuse holder sections to insure a tight fit and connection. Figure 11 - Mounting The External Speaker Figure 3 - Power Cable 20 9 Connect the orange fused lead to the positive (+) battery terminal, and black to the negative (-) battery terminal. Always locate the fuse as close to the battery as possible. Connect the red fused lead to the ignition on" sense point (preferably an "Accessory" point on the fuse panel that is switched on when the ignition switch is in the accessory position and in the "run" position). Locate the fuse as close as possible to the accessory point. NOTE With some accessory points, the voltage only drops when the ignition switch is in the START position. A connection point should be used where the voltage is completely off when the ignition switch is in the START position. NOTE In some installations an additional noise suppression filter such as option PMPD1A (19A148539G1) may be needed for satisfactory performance. CAUTION Certain problems may be encountered when accessory equipment is connected to the ignition or accessory lines of the vehicle, where these lines may have large filter capacitors or a leakage path present. If the radio does not turn off within a reasonable amount of time after the ignition is turned off, first try a different accessory or ignition sense pick up point in the vehicle. Many vehicles have more than one circuit that is switched by the ignition switch, and one may be available that does not have large filter capacitors or a leakage path present. If a different pickup point cannot be found, then add a 470-ohm 1-watt resistor from the ignition sense pick point to ground. This will discharge the capacitor(s) or reduce the leakage voltage to a low value. Current drain through this resistor will be minimal (less than 0.03A) when the ignition is switched on. 10 Figure 10 - External Alarm Relay EXTERNAL SPEAKER KIT - OPTION PMZM1K The external speaker kit includes a speaker (option PMLSIF) and an external speaker cable (option PMCC9M). External speaker cable (option PMCD1W) is available for use with this kit to place the external speaker up to 16 feet further away from the radio. Installation of this kit requires the option cable kit - option PMD7Z. 1. Mount the speaker so it is directed to the operator but does not cause interference with his vision. It also should not present a hazard in the event of an accident. The speaker may be mounted on the lower edge of the instrument panel, the fire wall, or above the windshield in some trucks. Use the mounting bracket as a template for locating the mounting holes, and mount the speaker as shown in Figure 11. 2. Install the option cable PMCD7Z if not already present. 3. Pins are supplied on the ends of the external speaker cable option PMCC9M. Push these pins into sockets 2 and 9 of the connector housing supplied with the option cable. Refer to Figure 8 and Table 2. 4. Plug the connector housing into P2 of the option cable. 5. Connect the plug end of the external speaker cable to the speaker. If installing the external speaker cable option PMCDIW connect it between the speaker and the plug end of the external speaker cable option PMCC9M. 19 ALARM (HORN) RELAY KIT - OPTION PMSUIC (19A705499P1) Requires the use of option cable kit - option PMCC3N. The alarm relay kit option consists of the following items: (1) Relay (19A149299P1) (1) Fuse holder (1) Fuse, 1 amp, 250 volt 4 feet red wire, AWG #18 with Ring Tongue Terminal for 3/8 stud 6 feet black wire, AWG #18 with Molex #39-00-0060 terminal (5) Insulated 1/4 inch spade tab receptacles (1) Ring Tongue Terminal for 3/8 inch stud (1) #8 x 3/4 long Type A sheet metal screw (1) Nut Plate for #8 screw 1. Install the option cable kit - option PMCD7Z in the radio. 2. Fasten the relay in the desired location, close to the voltage source, using one #8 x 3/4 inch self-tapping screw. 3. Crimp an insulated 1/4 inch spade tab receptacle tO one end of the #18 red wire. Connect the receptacle to relay lug #86. Cut the red lead so the fuse assembly is close to the voltage source. Install the fuse holder. Attach the other end of the fuse lead to the voltage source with appropriate hardware. See Figure 10. 4. Insert the black wire with the Molex terminal into pin 13 of the option connector housing supplied with the option cable. Plug the connector into the option cable. 5. Crimp an insulated 1/4 inch spade tab receptacle to the other end of the black wire. Connect the receptacle to relay lug #85. 6. Connect the horn or light circuit to lugs #30 and #87 (not 87a) using the insulated 1/4 inch spade tab receptacles. Coil any surplus cables and secure them out of the waywith the retaining strap provided. Be sure to leave some slack in the cables going to the radio so that it may be pulled out for servicing with power applied. MOUNTING THE RADIO Figure 4 - Mounting Dimensions Use the supplied mounting bracket as a template to locate the positions for each of the drill holes. Mount the radio as shown in Figure 5. Be sure to leave enough room at the rear of the radio for the cable connections. NOTE The relay contact make/break current and voltage rating is 30 amps at 16 volts. 18 11 Table 2 - Option Cable Connections Pins Function P2-1 A- P2-2 SPEAKER LO P2-3 SPEAKER HI P2-4 MIC HI P2-5 SW A+ P2-6 SERIAL REQUEST (GE-STAR) P2-7 PTT P2-8 CG DISABLE P2-9 SW SPEAKER HI P2-10 AUDIO MUTE P2-11 VOLUME-SQUELCH HI P2-12 MIC LO P2-13 RELAY P2-14 SPARE POWER CABLE (18 FEET) - OPTION PMCD9A (19B801358P17) Refer to the power and ignition cable installation section starting on page 8 to install this optional power cord. MICROPHONE, MIL SPEC - OPTION PMMC3W (19B80I499PIS) Figure 5 - Mounting Bracket Installation Refer to the microphone installation section on page 14 to install this optional microphone. MICROPHONE HANGER Mount the microphone hanger in a location convenient to the operator where it will not interfere with the safe operation of the vehicle orbe a hazard to the vehicle passengers. The microphone hanger is designed to be mounted with the open end of the mounting button slot pointed upward. The microphone hanger and two or three mounting screws are shown in Figure 6. 12 NOISE SUPPRESSION KIT - OPTION PMPD1A (19A148539G1) Refer to the noise suppression kit option installation manual that is included with this option and the interconnection diagrams at the back of this manual. 17 Figure 6 - Microphone Hanger Figure 8- Option Cable Pin Locations NOTE If mounting on a surface covered with carpet, punch holes with a small punch then make a small slit in the carpet, insert a short piece of metal tubing and drill through the tubing. Use the following procedure to mount the microphone hanger: 1. Use the hanger as a template to mark the screw locations and drill the three small pilot holes. 2. Use the self tapping screws to mount the hanger in an upright position. Figure 9 - Bottom View (Cover Removed) 16 13 MICROPHONE The microphone connects to the MDX Mobile Radio using a plug found at the end of its attached cable. Match the pins on this plug to the pin socket on the radio and press in the plug being sure not to damage the pins. Once the plug is seated, tighten down the plug using the thumbscrew on the mic connector. To remove the plug reverse this procedure. A permanent mount type of antenna should be located in the center of the roof of center of rear deck. Glass mounted antennas should be kept as high as possible in the top center of the rear window. Some states have laws restricting vision obstructing items from the windows. Be familiar with local laws before installing glass mount antennas. Try to route the cable away from locations where it will be exposed to heat, sharp edges or mechanical damage, and where it will be out of the way of the driver, passengers or vehicles mechanics. Wherever possible, existing holes in the trunkwall, and the channels above or beneath doors and window columns should be utilized. Avoid routing the antenna cable near any electronic modules or along side any vehicle wiring. Connect the antenna cable to the TNC connector on the radio being careful not to twist the cable. OPTION CABLE KIT - OPTION PMCD7Z (19C851585P14) The option cable kit brings all option connections from the System Board through the back of the radio to the outside. This cable is required with all external options. Supplied with the option cable is the empty connector housing which plugs into P2 of the option cable. Pins supplied on the ends of the wires of each option (Molex #39-00-0060) are inserted into this connector housing. Refer to the interconnection diagrams at the back of this manual. See Figure 8 for pin locations. Table 2 lists wire connections and functions. 1. Remove the bottom cover of the radio by removing the four bottom cover retaining screws. This also releases the top cover. 2. Remove the rubber plug from the option access opening in the rear of the radio adjacent to the power cable. Refer to Figure 3. Figure 7 - MDX Mobile Radio With Microphone 3. Plug the option cable intoJ905 on the System Board and push the strain relief on the cable into the slotted option access opening. Refer to Figure 9. MOBILE OPTIONS INSTALLATION 4. Replace the covers and the four bottom retaining screws. ANTENNA-OPTION PMAN1L (19B209568P5) Installation instructions for the antenna are packed with the antenna. The antenna must be installed in accordance with good engineering practice for optimum results. 14 15 MICROPHONE The microphone connects to the MDX Mobile Radio using a plug found at the end of its attached cable. Match the pins on this plug to the pin socket on the radio and press in the plug being sure not to damage the pins. Once the plug is seated, tighten down the plug using the thumbscrew on the mic connector. To remove the plug reverse this procedure. A permanent mount type of antenna should be located in the center of the roof of center of rear deck. Glass mounted antennas should be kept as high as possible in the top center of the rear window. Some states have laws restricting vision obstructing items from the windows. Be familiar with local laws before installing glass mount antennas. Try to route the cable away from locations where it will be exposed to heat, sharp edges or mechanical damage, and where it will be out of the way of the driver, passengers or vehicles mechanics. Wherever possible, existing holes in the trunkwall, and the channels above or beneath doors and window columns should be utilized. Avoid routing the antenna cable near any electronic modules or along side any vehicle wiring. Connect the antenna cable to the TNC connector on the radio being careful not to twist the cable. OPTION CABLE KIT - OPTION PMCD7Z (19C851585P14) The option cable kit brings all option connections from the System Board through the back of the radio to the outside. This cable is required with all external options. Supplied with the option cable is the empty connector housing which plugs into P2 of the option cable. Pins supplied on the ends of the wires of each option (Molex #39-00-0060) are inserted into this connector housing. Refer to the interconnection diagrams at the back of this manual. See Figure 8 for pin locations. Table 2 lists wire connections and functions. 1. Remove the bottom cover of the radio by removing the four bottom cover retaining screws. This also releases the top cover. 2. Remove the rubber plug from the option access opening in the rear of the radio adjacent to the power cable. Refer to Figure 3. Figure 7 - MDX Mobile Radio With Microphone 3. Plug the option cable intoJ905 on the System Board and push the strain relief on the cable into the slotted option access opening. Refer to Figure 9. MOBILE OPTIONS INSTALLATION 4. Replace the covers and the four bottom retaining screws. ANTENNA-OPTION PMAN1L (19B209568P5) Installation instructions for the antenna are packed with the antenna. The antenna must be installed in accordance with good engineering practice for optimum results. 14 15 Figure 6 - Microphone Hanger Figure 8- Option Cable Pin Locations NOTE If mounting on a surface covered with carpet, punch holes with a small punch then make a small slit in the carpet, insert a short piece of metal tubing and drill through the tubing. Use the following procedure to mount the microphone hanger: 1. Use the hanger as a template to mark the screw locations and drill the three small pilot holes. 2. Use the self tapping screws to mount the hanger in an upright position. Figure 9 - Bottom View (Cover Removed) 16 13 Table 2 - Option Cable Connections Pins Function P2-1 A- P2-2 SPEAKER LO P2-3 SPEAKER HI P2-4 MIC HI P2-5 SW A+ P2-6 SERIAL REQUEST (GE-STAR) P2-7 PTT P2-8 CG DISABLE P2-9 SW SPEAKER HI P2-10 AUDIO MUTE P2-11 VOLUME-SQUELCH HI P2-12 MIC LO P2-13 RELAY P2-14 SPARE POWER CABLE (18 FEET) - OPTION PMCD9A (19B801358P17) Refer to the power and ignition cable installation section starting on page 8 to install this optional power cord. MICROPHONE, MIL SPEC - OPTION PMMC3W (19B80I499PIS) Figure 5 - Mounting Bracket Installation Refer to the microphone installation section on page 14 to install this optional microphone. MICROPHONE HANGER Mount the microphone hanger in a location convenient to the operator where it will not interfere with the safe operation of the vehicle orbe a hazard to the vehicle passengers. The microphone hanger is designed to be mounted with the open end of the mounting button slot pointed upward. The microphone hanger and two or three mounting screws are shown in Figure 6. 12 NOISE SUPPRESSION KIT - OPTION PMPD1A (19A148539G1) Refer to the noise suppression kit option installation manual that is included with this option and the interconnection diagrams at the back of this manual. 17 ALARM (HORN) RELAY KIT - OPTION PMSUIC (19A705499P1) Requires the use of option cable kit - option PMCC3N. The alarm relay kit option consists of the following items: (1) Relay (19A149299P1) (1) Fuse holder (1) Fuse, 1 amp, 250 volt 4 feet red wire, AWG #18 with Ring Tongue Terminal for 3/8 stud 6 feet black wire, AWG #18 with Molex #39-00-0060 terminal (5) Insulated 1/4 inch spade tab receptacles (1) Ring Tongue Terminal for 3/8 inch stud (1) #8 x 3/4 long Type A sheet metal screw (1) Nut Plate for #8 screw 1. Install the option cable kit - option PMCD7Z in the radio. 2. Fasten the relay in the desired location, close to the voltage source, using one #8 x 3/4 inch self-tapping screw. 3. Crimp an insulated 1/4 inch spade tab receptacle tO one end of the #18 red wire. Connect the receptacle to relay lug #86. Cut the red lead so the fuse assembly is close to the voltage source. Install the fuse holder. Attach the other end of the fuse lead to the voltage source with appropriate hardware. See Figure 10. 4. Insert the black wire with the Molex terminal into pin 13 of the option connector housing supplied with the option cable. Plug the connector into the option cable. 5. Crimp an insulated 1/4 inch spade tab receptacle to the other end of the black wire. Connect the receptacle to relay lug #85. 6. Connect the horn or light circuit to lugs #30 and #87 (not 87a) using the insulated 1/4 inch spade tab receptacles. Coil any surplus cables and secure them out of the waywith the retaining strap provided. Be sure to leave some slack in the cables going to the radio so that it may be pulled out for servicing with power applied. MOUNTING THE RADIO Figure 4 - Mounting Dimensions Use the supplied mounting bracket as a template to locate the positions for each of the drill holes. Mount the radio as shown in Figure 5. Be sure to leave enough room at the rear of the radio for the cable connections. NOTE The relay contact make/break current and voltage rating is 30 amps at 16 volts. 18 11 Connect the orange fused lead to the positive (+) battery terminal, and black to the negative (-) battery terminal. Always locate the fuse as close to the battery as possible. Connect the red fused lead to the ignition on" sense point (preferably an "Accessory" point on the fuse panel that is switched on when the ignition switch is in the accessory position and in the "run" position). Locate the fuse as close as possible to the accessory point. NOTE With some accessory points, the voltage only drops when the ignition switch is in the START position. A connection point should be used where the voltage is completely off when the ignition switch is in the START position. NOTE In some installations an additional noise suppression filter such as option PMPD1A (19A148539G1) may be needed for satisfactory performance. CAUTION Certain problems may be encountered when accessory equipment is connected to the ignition or accessory lines of the vehicle, where these lines may have large filter capacitors or a leakage path present. If the radio does not turn off within a reasonable amount of time after the ignition is turned off, first try a different accessory or ignition sense pick up point in the vehicle. Many vehicles have more than one circuit that is switched by the ignition switch, and one may be available that does not have large filter capacitors or a leakage path present. If a different pickup point cannot be found, then add a 470-ohm 1-watt resistor from the ignition sense pick point to ground. This will discharge the capacitor(s) or reduce the leakage voltage to a low value. Current drain through this resistor will be minimal (less than 0.03A) when the ignition is switched on. 10 Figure 10 - External Alarm Relay EXTERNAL SPEAKER KIT - OPTION PMZM1K The external speaker kit includes a speaker (option PMLSIF) and an external speaker cable (option PMCC9M). External speaker cable (option PMCD1W) is available for use with this kit to place the external speaker up to 16 feet further away from the radio. Installation of this kit requires the option cable kit - option PMD7Z. 1. Mount the speaker so it is directed to the operator but does not cause interference with his vision. It also should not present a hazard in the event of an accident. The speaker may be mounted on the lower edge of the instrument panel, the fire wall, or above the windshield in some trucks. Use the mounting bracket as a template for locating the mounting holes, and mount the speaker as shown in Figure 11. 2. Install the option cable PMCD7Z if not already present. 3. Pins are supplied on the ends of the external speaker cable option PMCC9M. Push these pins into sockets 2 and 9 of the connector housing supplied with the option cable. Refer to Figure 8 and Table 2. 4. Plug the connector housing into P2 of the option cable. 5. Connect the plug end of the external speaker cable to the speaker. If installing the external speaker cable option PMCDIW connect it between the speaker and the plug end of the external speaker cable option PMCC9M. 19 4. Push the prepared fuse connectors into each section of the fuse holders. Place the fuse into a fuse holder section until it seats within the connector. Connect the fuse holder sections to insure a tight fit and connection. Figure 11 - Mounting The External Speaker Figure 3 - Power Cable 20 9 INSTALLATION NOTES RUNNING CABLES To assure the feasibility of the planned cable routings. it is suggested that the cables be run before mounting the radio. Be sure to leave some slack in each cable going to the radio so that the radio may be pulled out for servicing with the power applied and antenna attached. Try to route the cables away from locations where they will be exposed to heat (exhaust pipes, mufflers, tailpipes. etc.). battery acid, sharp edges, or mechanical damage or where they will be a nuisance to automobile mechanics. the driver, or passengers. Keep wiring away from electronic computer modules. other electronic modules and ignition circuits to help prevent interference to these components and radio equipment. In addition. try to utilize existing holes in the fire wall and trunk wall and the channels above or beneath the doors. Also, channels through door and window columns that are convenient for running cables may be used, unless planning to install rigid or flexible conduit in which to run the cables. Power And Ignition Cable The power cable consists of a red lead, an orange lead, a black lead, a 3 pin systems plug. and a set of fuses and fuse holders to be installed as indicated in Figure 3. To install the power cable, drill a 5/8 inch hole in the firewall for the cable run and insert the rubber grommet. Starting with the plug end of the cable at the location of the radio, run the three cable leads through the hole. Secure the cable at several locations within the engine compartment. To install the fuses: 1. Cut off 12 to 18 inches from the red and orange wires. 2. Strip back the insulation approximately 3/8 of an inch on each end of the wires. 3. Lubricate the wire tips with liquid soap to insert the wires into the fuse holders. Pull the wire ends through the small opening at the end of each fuse holder section and crimp a fuse connector to each wire. 8 21 INSTALLATION IN VEHICLES POWERED BY LIQUEFIED (LP) GAS NOTES Radio installation in vehicles powered by liquefied petroleum gas with the LP-gas container in the trunk or other sealed-offspace within the interior of the vehicle must conform to the National Fire Protection Association Standard NFPA 58 which requires that: • • • Space containing radio equipment shall be isolated by a seal from the space containing the LP-gas container and its fittings. Outside filling connections shall be used for the LP-gas container. The LP-gas container space shall be vented to the outside of the vehicle. Figure 2 - Typical Hump Or Dash Mount WARNING For passenger safety, mount the radio securely so that the unit will not break loose in the event of a collision. This is especially important in station wagons, vans and similar type installations where a loose radio could be extremely dangerous to the vehicle occupants. 22 7 EQUIPMENT REQUIRED NOTES The equipment required for installing the MDX Mobile Radio is listed below: • • • • • • • Electric drill for drilling mounting holes. Drills and circle cutters as follows: • No. 31 (1/8-inch) drill for No. 8 self-tapping screws. • No. 27 (9/64-inch) drill for No. 10 self-tapping screws. • 5/8-inch drill or circle cutter for power cable. • 3/4-inch circle cutter, hole saw or socket punch for antenna (optional). Phillips and flat-blade screwdrivers, and 1/4-inch and 5/16-inch hexhead drivers for mounting screws. No. 15 Torx® driver (ST0606). No. 15 Torx® tamper-proof driver (ST0618) if latch security screw (supplied in hardware kit) is used. No. 25 Torx® driver (STO610). POZIDRIV® driver for mounting screws. Torx® isa registered trademark of CAMCAR Division TEXTRON. Inc. POZIDRIV® is a registered trademark of Phillips International company. CAUTION Be careful to avoid damaging some vital part (fuel tank, transmission housing, etc.) of the vehicle when drilling mounting holes. Always check to see how far the mounting screws will extend below the mounting surface before installing. CAUTION If pilot holes must be drilled, remove all metal shavings from drilling holes before installing screws. WARNING Radio installations in vehicles powered by liquefied petroleum gas must conform to the following requirements. 6 23 OPTION INTERCONNECTION DIAGRAM • • out of the way of auto mechanics. out of the way of passengers. It is suggested that the radio be installed by one of the many authorized General Electric Service Stations located throughout the United States. These experienced service stations can provide a proper radio installation and make any final adjustments that may be needed. WARNING Interference with Vehicular Electronics - Electronic fuel injection systems, electronic anti-skid braking systems, electronic cruise control systems, etc., are typical of the types of electronic devices which may be prone to malfunction due to the lack of protection from radio frequency energy present when transmitting. If the vehicle contains such equipment, consult the dealer for the make of vehicle and enlist his aid in determining if such electronic circuits will perform normally when the radio is transmitting. (19D904133, Sh. 1, Rev. 3) 24 Figure 1 - MDX Components and Mounting Hardware 5 Table 1 - MDX Mobile Radio Series Optional Accessories Option Description Part Number PMAN1L 800 MHz roof mount antenna with TNC connector 19B209568P5 PMCC9M External speaker cable, 18 inches 19A149590P8 PMCD1W External speaker cable, 16 feet, requires option PMZM1K and PMCD7Z 19A149590P10 PMCD7Z External option cable, 2 feet 19C851585P14 PMCD9A Power cable, 18 feet 19801358P17 PMLS1F Speaker, MIL-STD-810C & D, 5" x 5", requires options PMCD7Z & PMCC9M 19A149590P1 PMMC3X Desk microphone for station use. 19C851086P14 PMMC3W Microphone, MIL SPEC 19B801499P15 PMMA1L Desk mounting wedge for station use. 19C851685G2 PMPD1A Noise suppression kit 19A148539G1 PMPS1C Power supply, 120/240V, 50/60 Hz, 13 A. For station use. 19A704647P2 PMPS1D Power supply, 240V AC, 50/60 Hz, 13 A. For station use. 19A704647P3 PMSU1C Alarm (horn) relay kit, requires option PMCD7Z 19A705499P1 PMZM1K External speaker kit, requires option PMCD7Z, includes options PMLS1F and PMCC9M PMMK3D Round pushbutton kit with commonly used legends. Includes button extraction tool. OPTION INTERCONNECTION DIAGRAM 344A4254G2 PLANNING THE INSTALLATION Before starting, plan the radio installation carefully so that it will be: • • • • • 4 safe for the operator and passengers. convenient for the operator to use. neat. protected from water damage. easy to service. (19D904133, Sh. 1, Rev. 3) 25 OPTION INTERCONNECTION DIAGRAM INTRODUCTION This manual contains installation instructions for the MDX Mobile Radio series and associated accessories. These instructions cover the mounting and cabling of the radio; interconnection diagrams are provided at the back of the manual for reference. Before installation, the radio should be programmed using an IBM compatible personal computer and the following items: Serial Programming Interface Module Kit . . . . . . . . . . . . Programming Cable . . . . . . . . . . . . . . . . . . . . . . . MDX Series Programming Software (EDACS) . . . . . . . . . or MDX Series Programming Software (GE-MARC only) . . . . TQ3370 . TQ3372 . TQ3373 . TQ3346 UNPACKING AND CHECKING EQUIPMENT When ready for installation, carefully unpack the radio and identify each item in the shipping container as listed below. If damage has occurred to the equipment during shipment, file a claim with the carrier immediately. The available options for the MDX Mobile Radio series are covered in Table 1 ❑ MDX Mobile Radio ❑ Microphone used with . . . . . . . . . . . . . . . . . . . . . . . . 19B801398P14 ❑ Microphone hanger, magnetic hookswitch . . . . . . 19B801398P5 or ❑ Microphone used with . . . . . . . . . . . . . . . . . . . . . . . . 344A4528P1 ❑ Microphone hanger . . . . . . . . . . . . . . . . . . 344A4678P1 ❑ Power cable, 9 feet . . . . . . . . . . . . . . . . . . . 19B801358P18 ❑ Mounting bracket kit . . . . . . . . . . . . . . . . . 19A138051G1 1 ❑ Operator’s Manual . . . . . . . . . . . . . . . . . . . LBI-38846 ❑ Installation Manual . . . . . . . . . . . . . . . . . . LBI-38847 (19D904133, Sh. 3, Rev. 2) 26 3 OPTION INTERCONNECTION DIAGRAM TABLE OF CONTENTS INTRODUCTION . . . . . . . . . . . . . . . . . . . . . . . . . 3 UNPACKING AND CHECKING EQUIPMENT . . . . . . . . . 3 PLANNING THE INSTALLATION . . . . . . . . . . EQUIPMENT REQUIRED . . . . . . . . . . . . INSTALLATION IN VEHICLES POWERED BY LIQUEFIED (LP) GAS . . . . . . . . . . . . MOUNTING LOCATION . . . . . . . . . . . . . . . . . . . 4 . . . . . . 6 INSTALLATION . . . . . . . . RUNNING CABLES . . . MOUNTING THE RADIO MICROPHONE HANGER MICROPHONE . . . . . . . . . . . . . . . . . . . . . . . . . . . . . . . . . . . . . . . . . . . . . . . . . . . . . . . . . . . . . . . . . . . . . . . . . . . . . 7 . . . . . . 7 . . . . . MOBILE OPTIONS INSTALLATION . . . . . . . . . . ANTENNA - OPTION PMAN1L (19B209568P5) . . OPTION CABLE KIT - OPTION PMCD7Z (19C851585P14) . . . . . . . . . . . . . . . . . . POWER CABLE - OPTION PMCD9A (19B801358P17) . . . . . . . . . . . . . . . . . . MICROPHONE, MIL SPEC - OPTION PMMC3W (19B801499P15) . . . . . . . . . . . . . . . . . . NOISE SUPPRESSION KIT - OPTION PMPD1A7 (19A148539G1) . . . . . . . . . . . . . . . . . . ALARM (HORN) RELAY KIT - OPTION PMSU1C (19A705499P1) . . . . . . . . . . . . . . . . . . EXTERNAL SPEAKER KIT - OPTION PMZM1K . . . . . . . . . . . . . . . . . . . . 8 8 11 12 14 . . . . 14 . . . . 14 . . . . 15 . . . . 17 . . . . 17 . . . . 17 . . . . 18 . . . . 19 OPTION INTERCONNECTION DIAGRAMS . . . . . . . . . . 24 Copyright© October 1992, Ericsson GE Mobile Communications Inc. (19D904133, Sh. 3, Rev. 2) 2 27 LBI-38847B Mobile Communications MDX SERIES MOBILE RADIO Printed in U.S.A. Installation Manual