1
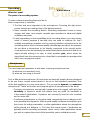
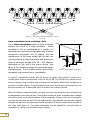
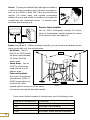
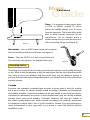
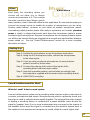
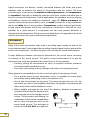
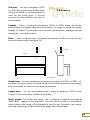
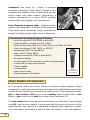
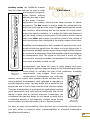
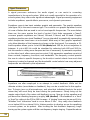
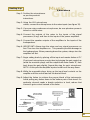
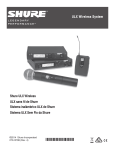
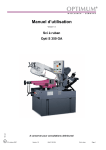
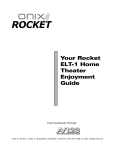
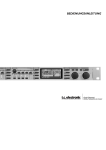
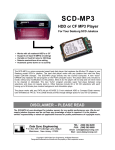
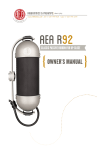
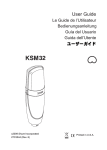
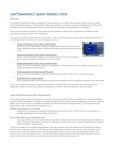
A Shure Educational Publication
AUDIO
SYSTEMS
GUIDE
MUSIC EDUCATORS
By Gino Sigismondi
Music
Educators
Guid
index
Introduction . . . . . . . . . . . . . . . . . . . . . . . .
4
Recording . . . . . . . . . . . . . . . . . . . . . . . . . .
5
The Parts of a Recording System . . . . . . . .
5
Microphones . . . . . . . . . . . . . . . . . . . . .
5
Recording Devices . . . . . . . . . . . . . . . .
9
Mixers . . . . . . . . . . . . . . . . . . . . . . . . . .
11
Hooking it up . . . . . . . . . . . . . . . . . . . . .
11
Sound Reinforcement for Music . . . . . . .
11
A Basic Sound System . . . . . . . . . . . . .
11
Microphones . . . . . . . . . . . . . . . . . . . . .
12
Mixers, Amplifiers and Loudspeakers . .
16
Signal Processors . . . . . . . . . . . . . . . . .
18
Hooking it up . . . . . . . . . . . . . . . . . . . . .
21
Sound Reinforcement for Theater . . . . . .
22
The Realities of Theater Sound . . . . . . . . . .
22
Lavalier Microphone Techniques for Theater 24
de
Summary . . . . . . . . . . . . . . . . . . . . . . . . . .
27
Appendix . . . . . . . . . . . . . . . . . . . . . . . . . . .
28
Glossary . . . . . . . . . . . . . . . . . . . . . . . . . . .
29
About the Author . . . . . . . . . . . . . . . . . . . .
31
Introduction
An often overlooked yet vital part of modern musical performances is the sound
reinforcement (PA) system. In a perfect world, a trained professional would always
be available to purchase, setup, and operate the school’s sound system. In reality,
most educational facilities do not have the available funds for such a luxury.
The responsibility then falls to the next most likely person at school to run the sound
system, the music director. After all, you just need a few microphones and a couple
of loudspeakers, and it’s time to go on tour! And we want it recorded as well!
Unfortunately, sound system setup is not quite that simple. It doesn’t, however, need
to be overly complicated. While the extreme quantity of choices available at your
local music shop may seem daunting (Cardioid? Dynamic? Low Impedance! Help!),
with a few basic guidelines, you can learn what you need, how to connect it, and
even how to make it sound good.
This guide will help you choose equipment for a variety of applications.
For simplicity sake, we will make recommendations of the Shure microphones you
might consider for each application. For those interested in the more technical aspects
of audio equipment, Shure publishes several booklets on a variety of audio topics,
including specific microphone techniques and wireless microphone operation.
Typical scenarios for school music applications include:
• Sound Reinforcement for Large Ensembles
(Concert Band, Orchestra, Choir)
• Sound Reinforcement for Small Ensembles
(Jazz Combo, Vocal Jazz or "Swing" Choir, Rock bands)
• Recording small ensembles
• Recording large ensembles
• Sound for theatrical productions
Recording will be discussed first, due to the smaller number of required
components, and reduced complexity. Feedback and room acoustics play a small
(or even non-existent) role in basic ensemble recording. Additionally, many of the
microphone, and possibly mixer, choices made for recording are equally applicable
in live sound reinforcement. Remember, there are few rules in audio – if it sounds
good to you, it is good. For every application, there will be a good, better, and best
option. A little knowledge and some common sense will allow you to choose a good
system with a reasonable budget and a minimum of frustration.
4
Recording
What do I need?
The parts of a recording system.
Music
Educators
Guide
To make a decent recording there are two or
three components to consider:
1. The first, and most important, is the microphone. Choosing the right microphone ensures accurate pickup of the desired sounds.
2. Next, consider the recording device. Recording equipment comes in many
shapes and sizes, from simple cassette tape recorders to advanced digital
multitrack machines.
3. Lastly, depending on the capabilities of the recording device, you may need a
mixer. A mixer’s purpose is two-fold; they are used to combine (or "mix")
multiple microphones together, and to properly interface microphones to the
recording device. Most consumer-quality cassette tape recorders, for example,
do not allow a microphone to be directly connected to the record inputs.
A microphone has an extremely low output level that would result in little or no
signal actually making it to tape. A mixer provides gain, which raises the
signal level from the microphone to a level that is acceptable to recorders that
don’t have microphone inputs.
Microphones
The most important questions to ask when choosing microphones are:
a) what are you recording? and
b) what are you using to record?
First, a little about microphones. Microphones are basically simple devices designed
to do one thing: convert sound waves in the air to their electrical equivalent. One
of the first questions you may encounter is, "Do you want a dynamic or condenser
microphone?" These are the two most popular types of microphones in the world.
• Dynamic microphones are typically inexpensive and rugged, with fairly low
sensitivity. In layman’s terms, this means they are good for handheld or
"close-miked" applications. Dynamics are commonly used for solo vocalists
and on drum kits.
• Condenser microphones, on the other hand, are typically (but not always) much
more sensitive than dynamics. Make a good quality condenser microphone your
first choice for miking ensembles, or other applications where the microphone
will be placed at a distance (> 2 ft.) from the sound source. Condensers are
typically used for recording orchestras, choirs, and in other applications where
you wish to capture the sound of the ensemble, versus individual sounds.
5
Figure 1: Choir microphone positions - stereo
top view
Large ensembles (band, orchestra, choir)
Use a stereo microphone setup to most accurately
capture the sound of a large ensemble. Stereo
recording is not as complicated as it sounds. For
simplicity sake, we’ll use the most basic type of stereo
microphone techniques, the X-Y pattern. Use two
microphones of the same model with the two mic
capsules placed as close as possible, and facing each
other at an angle ranging from 90 – 135 degrees,
depending on the size of the sound source. (see
figure 1). For a wider coverage area, the larger angles
should be used. The X-Y pattern results in good stereo
separation and excellent mono compatibility.
0.6 - 1m
(2 - 3 ft)
0.6 - 1m
(2 - 3 ft)
Figure 2: Area miking - side view
A second, somewhat simpler way to record in stereo uses what is known as a
"single-point" stereo microphone, such as the VP88. The VP88 has a single microphone housing that contains two microphone elements, electrically combined to
produce a stereo output. The advantage to this type of microphone is simplicity; put
the microphone on a stand and point it at what you want to record.
When recording a large ensemble, you may choose to use more than two microphones
to adequately cover each section. A technique known as "area" coverage uses multiple
microphones to cover small sections of the ensemble. Using a choir as an example,
use one microphone for each 6-9 foot wide section, and aim the microphone capsule
towards the last row. Microphones should be placed 2-3 feet in front of the first row of
the choir (see figure 2). The same technique can be applied to concert band or
orchestra, by using one microphone per section.
6
Music
Recommended Equipment/
Suggested Models:
Educators
• 2 cardioid-pattern
condenser microphones
(SM81, PG81, KSM109)
• Microphone stand(s)
• Shure A27M – an accessory that allows you
to mount two microphones on one stand.
• Microphone cables with XLR connectors
• Stereo microphone mixer with at least
2 microphone inputs
KSM109
Condenser
• Recording device (see next section)
Microphone
• Cables to connect mixer to recording device
Guide
Small ensembles (jazz combos, string quartet, vocal jazz groups)
The stereo techniques described above can also be successfully applied to smaller
ensembles, but to achieve a more "pop" sound, use multiple close microphones,
generally one per instrument. On the following page are some simple techniques for
getting good sounds for a variety of instruments or vocals.
Recommended Equipment/Suggested Models:
• Vocal microphone (Beta 58A, SM58, PG58)
• Guitar amplifier microphone (SM57, PG57)
• Drum microphones (Beta 52 or PG52, SM57,
two PG81 or SM81)
• Piano microphone (PG81, SM81, or KSM27)
• Woodwinds (SM57, PG57)
• Brass (SM57, PG57)
• Microphone stands
• Microphone cables with XLR connectors
• Microphone mixer with enough inputs to handle
the desired number of microphones
• Recording device (see next section)
• Cables to connect mixer to recording device
PG57
Dynamic
Microphone
Connectors commonly
used for audio
(from left to right:
3-Pin XLR female,
3-Pin XLR female – black,
3-Pin XLR male,
1/4” mono plug,
1/4” mono plug – black
7
Vocals – Try using a handheld style (although mounted on
a stand to reduce handling noise) dynamic microphone,
such as the SM58 or Beta 58A. Place the microphone
roughly 3-4 inches away, and pointed somewhere
between the nose and mouth. If possible, try to isolate the
vocalist from any unwanted sounds – in another room
would be ideal (see figure 3).
Figure 3
Side
Top
Electric Guitar Amplifier –
Use an SM57 microphone roughly 1-4 inches
from the loudspeaker, pointed toward the center
of the speaker cone (see figure 4).
Figure 4
Drums (see figure 5) – While seemingly complex, you can achieve a relatively decent
drum sound with only four microphones:
– Kick Drum – Place a
PG81
Beta 52 (or PG52) inside
the drum, approximately
1-6 inches from the
SM57
beater head.
– Snare Drum – Use an
SM57 to mike the top
head, placed at a 45
degree angle.
– Toms and cymbals –
Use a pair of condenser
microphones (PG81 or
SM81) suspended over
PG52
the drum kit, either
Figure 5
spaced apart or using one of the stereo
microphone techniques described earlier.
If you have a limited number of microphones, use the following chart:
Number of Microphones
One
Two
Three
Four
8
Positioning
Use an "overhead"
Kick drum and overhead
Kick drum, snare, and overhead
Kick drum, snare, and two overheads
Music
Educators
Guide
Hammers
6”-12”
8”
Figure 6
Piano – For a grand or baby grand, place
a PG81 or KSM27 roughly 12 inches
above the middle strings, and 8 inches
from the hammers. The lid should be at full
stick to allow enough clearance for the
microphone. For an upright, place a
similar microphone just over the open top,
above the treble strings (see figure 6).
Woodwinds – Use an SM57 placed a few inches above
the bell and aimed at the sound holes (see figure 7).
Brass – Place an SM57 1 to 2 feet in front of the bell.
The closer the microphone, the brighter the sound.
Figure 7
Recording devices
Two things to consider when choosing a recording format are sound quality and ease
of use. While it may be tempting to buy the same gear that the local recording studio
has, keep in mind your abilities, and how much time you are willing to devote to
pouring over manuals and pushing little buttons. Let’s take at look at some of the more
popular formats.
Cassette
Everyone has operated a cassette tape recorder at some point in their life, making
this a good choice for simple, straight ahead recording. Cassettes are inexpensive
and readily available. Cassette recorders can be purchased at your local electronics
superstore for attractively low prices, or more professional units are usually available
through music and sound retailers. Cassettes, however, rate near the bottom of
the sound quality totem pole. While cassette recordings are perfectly appropriate
for rehearsal or demo tapes, this is not the format to choose if you are looking for a
more "professional" sound, especially if you intend to make the finished product
available for sale.
9
Most consumer-level tape recorders will not accept a microphone directly. A mixer
(see the next section) will be required to properly interface microphones with a
cassette deck. Certain models of professional level cassette recorders have
microphone inputs on them, but they are often considerably more expensive.
Minidisc
Introduced in the early 1990s, the minidisc format combines the ease of cassette
recording with near-CD quality results. Sound is digitally recorded onto a disk
smaller than a computer’s floppy disk. Minidiscs also allow extensive editing of
the recorded material. Tracks can be moved, divided, combined, named, and
erased, tasks that are impossible with tape (unless you are really good with a
razor blade!) Consumer minidisc recorders are very similar to cassette recorders
in terms of their operation and audio interface, so any of the recording
techniques described above will apply to both formats.
PC-based Recording
With the price of hard disk storage continuing to plummet, PC-based recording
is quickly becoming a relatively inexpensive way to record high quality audio.
Computers are very useful for making multitrack recordings, which requires
several tracks of audio recorded and later combined into a stereo mix.
Unfortunately, a full discussion of multitrack recording techniques is beyond the
scope of this booklet. (For more information on multitrack recording, see the
Shure/Tascam publication "Microphones and Multitracks". This booklet also
introduces stand-alone multitrack recorders.)
Interfacing a microphone with a computer can be a tricky proposition. Most computer
sound cards have microphone inputs that are designed for low-cost "stick" microphones that are only useful in voice recognition or internet telephony applications.
Better results are obtained with an interface that accepts professional microphones. A
computer recording interface that has microphone inputs will result in better sound
and less time spent fooling around with adapters.
Personal computers also offer an inexpensive way to produce CDs. By recording your
music into a computer, a CD recorder can take those files and "burn" them onto
a recordable CD. Even if the PC isn’t used as the main recording device, the other
formats discussed above can easily be transferred into a computer. Stand-alone CD
recorders are also available, and work on basically the same principle.
10
Music
Educators
Mixers
Guide
Most likely, the recording device you
choose will not allow you to directly
connect a microphone to it. This is where
the mixer comes into play. Mixers come in
many varieties, a basic mixer will suffice for this application. Be sure that the mixer you
choose has enough inputs to handle the number of microphones you are using.
Another useful feature, common on just about all modern microphone mixers,
is something called phantom power. Not nearly as mysterious as it sounds, phantom
power is simply a voltage that travels back down the microphone cable to power
condenser type microphones. Dynamic microphones do not require phantom power,
nor will they be harmed if they are plugged into a microphone input that has phantom
power turned on. See the "Sound Reinforcement" section for a more complete
discussion of mixers.
Hooking it up
Step 1: Position the microphones as per the previous instructions.
Step 2: Using the XLR microphone cable, connect the microphones
to the mixer inputs.
Step 3: If you are using condenser microphones, be sure phantom
power is turned on at the mixer.
Step 4: Connect the outputs of the mixer to the inputs of the
recording device with the proper cables.
Step 5: Have the ensemble perform, and set levels accordingly (see
the instructions supplied with the mixer and/or recording device).
Step 6: Hit RECORD, and play!
Sound Reinforcement for Music
What do I need? A basic sound system.
A sound reinforcement system and a recording setup have two major components in
common, microphones and mixers. Microphones are used to capture the sound, and
the mixer is used to combine those signals together. The output of the mixer, instead
of feeding a recording device, is connected to a power amplifier, which boosts the
signal to "speaker" level. One or more loudspeakers are connected to the outputs of
the amplifier. At this point the signal is converted from the electrical domain back to
the variations in air pressure we recognize as sound, albeit at a much higher level.
11
Signal processors are devices, usually connected between the mixer and power
amplifier, used to enhance the signal or fix problems with the sound. The most
common types of processors are equalizers, effects processors, and compressors.
An equalizer is basically an extremely selective set of tone controls that allow you to
boost or cut specific frequencies. Typical applications for equalizers are tone shaping
and feedback control (see sidebar on feedback - page 19). Effects processors are
used to create special sound effects, such as reverb (sounds like a big, reverberant
room) and delay (echo), among others. Compressors control varying signal levels.
A loud signal that passes above the compressor’s threshold is reduced (or compressed) by a given amount. A compressor can also help prevent distortion or
damage to the loudspeakers. Of the processors listed above, the equalizer is the most
useful in just about any sound reinforcement application.
Microphones
Many of the same microphone rules used in recording apply equally as well for live
sound reinforcement. If you skipped the recording chapter, please back up and read the
section on microphones – the laws of physics don’t change for sound reinforcement.
A major difference between microphone placement in live sound versus recording
is proximity to the sound source. The goal in sound reinforcement is to get the
microphone as close as possible to the sound source, for two reasons:
• Primarily, placing all microphones as close as possible achieves maximum
sound level before feedback occurs.
• Secondly, close-miking reduces leakage and pickup of unwanted sounds.
Other general recommendations for live sound microphone techniques include:
• Try to get the sound source (instrument, voice, or amplifier) to sound good
acoustically before attempting to put a microphone on it.
• Use as few microphones as necessary. The more microphones you use, the
more likely you are to have feedback problems. Using fewer microphones will
allow more volume before feedback occurs.
• When multiple microphones are used, the distance between microphones
should be three times the distance from
each microphone to its intended sound
source. This prevents comb filtering, an
unpleasant, hollow sound created when
two or more microphones pick up the
same sound source. This technique is
known as the 3-to-1 Rule (see figure 8).
Figure 8: 3-to-1 rule
12
Music
Large ensembles
(band, orchestra, choir)
Educators
Large ensembles generally do not need
much sound reinforcement, unless
the performance area is unusually
spacious. For choirs, use a technique
known as area miking (see figure 2, page 6). To determine the right number of
microphones, use one for every 10-15 voices. Remember not to use more microphones than absolutely necessary and follow the 3-to-1 Rule (see page 12). As
in recording, use a flat frequency response condenser, preferably in a cardioidpattern. If the microphones will be suspended from the ceiling, make certain they
are aimed towards the singers’ mouths, not at tops of their heads. Handheld,
dynamic microphones are designed for up-close use only, and are not appropriate for choir-miking under any circumstance.
Guide
Similar techniques apply to orchestras and concert bands. Depending on the
size of the ensemble, use at least one microphone per section. Remember to
keep the microphones as close in as possible and as far from the loudspeakers
as possible. For soloists or lead instruments, consider using a microphone
attached directly to the instrument. Miniature condenser microphones can be
attached or clipped onto the bells of brass and woodwind instruments or the chin
rest of string instruments.
Recommended Equipment/Suggested Models:
• One condenser microphone (PG81 or SM81) per section
• Soloist microphones – SM57 (horns, stand-mounted) or Beta 98H/C
(horns or strings, clipped-on)
• Choir microphones – MX202 (permanent install, hung from ceiling or
stand-mounted) or PG81(stand-mounted only)
• Microphone stands
• An assortment of XLR microphone cables in varying lengths
• A mixer with enough input channels
• Power amplifier
• Loudspeakers
• Interconnect cables
• Signal processors (if desired)
Small ensembles (jazz combos, string quartet, vocal jazz groups)
For smaller groups, close-miking becomes essential for reducing leakage between
the instruments. Let’s examine each instrument type individually.
13
Lead vocal - Use a handheld, directional microphone (PG58, SM58 or Beta 58A).
The microphone should be touching the lips or just a few inches away. The same
technique applies to background vocalists or vocal ensembles (see figure 3).
Electric Guitar Amplifier – Use an SM57 (or PG57) microphone
roughly 1-4 inches from the loudspeaker, pointed toward the
center of the speaker cone (see figure 4).
Drums – Jazz Band – Generally, three microphones are sufficient
to achieve an authentic jazz drum sound. Place one microphone
in front of the kick drum (Beta 52 or PG52), and use a pair of decent
condenser microphones (PG81 or SM81) above the kit for
cymbals, toms, and snare drum.
Drums (see figure 9) – Rock Band – To get a "big" rock sound, try
to place a microphone on every drum, with the following guidelines:
PG81
Condenser
Microphone
SM81
PG56
PG81
SM57
PG52
Figure 9
Snare drum - Use a dynamic microphone (SM57) on a short boom stand. Aim the
microphone at the top head, just above the top edge of the drum.
Kick (bass) drum - Use a front drum head that has a hole in it, or remove the front
head altogether. Mount a microphone (Beta 52 or PG52) on a short boom and
position it inside the drum a few inches from the beater head, on axis with the beater.
Use a wood beater to get more "attack", or stuff the drum with a blanket or pillows to
reduce boominess.
14
Tom-toms – Use one microphone (SM57
or PG56) for every two toms. Position them
close to the heads, in a similar method as
used for the snare drum. If enough
microphones are available put one on
every tom-tom.
Music
Educators
Guide
Cymbals – Place a condenser microphone (PG81 or SM81) above the hi-hats,
pointed down and slightly away from the drummer. Or, angle the snare mic slightly
towards the hi-hats. To pick up the rest of cymbals, place another condenser near the
ride cymbal, a foot or two above.
Piano – Open the lid and aim a condenser microphone (PG81) just over the top,
above the treble strings (see figure 10).
Open
Open
Mic
Figure 10
Grand piano – Use two flat-response condenser microphones (PG81 or SM81), one
positioned 12 inches above the treble strings and the other above the lower strings.
Both mics should be about 8 inches from the hammers.
Upright bass – For the most natural sound, place a condenser (PG81) about
6 inches in front of the bass, just above the bridge.
String quartet: For violins and violas, use a miniature condenser microphone
(Beta 98H/C) clipped to the instrument. The best place to attach a microphone
without altering the sound of the instrument is the chin rest. For cellos, use a standmounted microphone (PG81) aimed at the bridge, about a foot away.
15
Saxophone (see figure 11) – Again, a miniature
condenser microphone (Beta 98H/C) clipped to the
instrument and aimed into the bell yields good, up-front
sound quality with great isolation. Alternatively, a
dynamic microphone on a stand (SM57) provides
similar results, but is slightly more cumbersome.
Brass (Trumpets, trombone, tuba) – Similar to the saxophone, clip a Beta 98H/C to the bell of the instrument.
If the sound seems excessively bright, especially the
trumpet, try slightly off-axis to get a more mellow tone.
Figure 11
Recommended Equipment/Suggested Models:
• Vocal microphone (PG58, SM58 or Beta 58A)
• Guitar amplifier microphone (PG57, SM57)
• Drum microphones (Beta 52 or PG52, SM57s, two SM81 or PG81)
• Piano microphone (PG81, SM81, or KSM27)
• Woodwinds (SM57 or Beta 98H/C)
• Brass (SM57 or Beta 98H/C)
• Stringed instruments (PG81 or Beta 98H/C)
• Microphone stands
• An assortment of XLR microphone cables in varying lengths
• A mixer with enough input channels
• Power amplifier
• Loudspeakers
SM58
Dynamic Vocal
• Interconnect cables
Microphone
• Signal processors (if desired)
Mixers, Amplifiers and Loudspeakers
As in recording, mixers are used to combine microphone signals together. Mixers
designed for sound reinforcement of musical instruments usually feature a set of extra
controls for each microphone beyond just a volume control. These typically include a
gain, or "trim" control, an EQ section, a set of auxiliary send volume controls, a bus
section, a pan control, and a fader for volume control (see figure 12).
The gain control boosts the signal from microphone up to line level. The next stage
is the EQ, used for tone shaping. A typical mixer will have knobs to boost or cut the
highs and lows. Also common is a "sweepable" midrange, which utilizes two controls.
One knob selects the frequency, and the other one boosts or cuts that frequency.
16
Music
Auxiliary sends are additional outputs
from the mixer that can be used to route
Educators
the microphone signal to
other devices without
affecting the main output
of the mixer. Common
applications for auxiliary sends include stage monitors or effects
processors. The bus section is used to assign the microphone signal to the main outputs of the mixer. The pan control typically serves
two functions, either working with the bus section to choose which
output the signal is routed to, or to adjust the left-to-right balance if
you are using a stereo sound system. At the bottom of the channel
strip is the fader, which gives you precise control of the volume of
each microphone that is assigned to the master outputs of the mixer.
Guide
Amplifiers and loudspeakers work together to reproduce the combined microphone signals from the mixer at a much higher level. A
typical power amplifier has two inputs (left and right) and two outputs
to connect to loudspeakers. Note that amplifier outputs are designed
for loudspeakers only! The signal at this point is much too high
to connect to any device besides a loudspeaker. Most amplifiers also
have input sensitivity controls as well.
Loudspeakers (see figure 13) come in many shapes and sizes,
choosing the right one depends largely on the individual application.
Some things to consider: the size of the auditorium, portability
Figure 12:
Mixer Input
requirements, and budget. Most sound
Channel
reinforcement loudspeakers are multi-way
devices, which means each speaker cabinet includes two (or
more) individual loudspeakers, each optimized to reproduce a
specific frequency range. Two-way boxes with a woofer for low
frequencies and a horn for highs are the most common variety.
This type of loudspeaker is appropriate for applications involving
voice reproduction and most musical instruments that do not
require a good deal of low-end response. Subwoofers can
complement the two-way boxes for rock bands or music with a
considerable amount of low frequency content. Large touring
Figure 13:
Loudspeaker
sound systems occasionally employ up to a five-way system.
For ease of setup and portability, these devices are occasionally combined into
one unit, either a powered mixer (mixer/amplifier) or powered loudspeaker
(amplifier/loudspeaker).
17
Signal Processors
A signal processor enhances the audio signal, or can assist in correcting
imperfections in the sound system. While not usually essential to the operation of a
sound system, they offer some significant advantages. Signal processing equipment
includes equalizers, special effects processors, and dynamic processors.
Equalizers come in two basic varieties: graphic and parametric. The graphic equalizer
(see figure 14) is the most common type. The controls on a graphic equalizer consist
of a row of faders that are used to cut or boost specific frequencies. The more faders
there are, the more precise the level of control. Each fader represents a "band";
common graphic equalizers are 5-band, 10-band, 15-band, and 31-band. Graphic
equalizers give the user visual "feedback" (no pun intended) by graphically representing
which frequencies have been cut or boosted. While easy to use, graphic equalizers
only allow alteration of the frequencies shown on the front panel. For example, a 31band equalizer allows you to cut at 400 Hz (Hertz) and 500 Hz, but not anywhere in
between. A cut at 450 Hz could be simulated by reducing both 400 and 500 Hz,
but this results in cutting more frequencies than is necessary. A parametric equalizer,
on the other hand, offers more precise control. Fully parametric equalizers consist of
three controls; frequency, boost/cut, and bandwidth. The frequency control permits
the user to select a specific frequency, the boost/cut control selects how much that
frequency is raised or lowered, and the bandwidth control selects how many adjacent
frequencies are affected by the adjustment.
Figure 14: Graphic Equalizer
Equalizers are often employed in an attempt to control feedback. While not the
ultimate solution (see sidebar on feedback), they can be a useful tool in this application. To begin, turn on all microphones, and raise their individual levels to the point
where they will most likely be used during the performance. Slowly bring up the
master output level of the mixer until feedback occurs. Now go to the equalizer and
pull down the offending frequency roughly 3dB (decibel). If the feedback is a "hoot"
or "howl" try cutting in the 250 to 500 Hz range. A "singing" tone may be around 1 kHz.
"Whistles" and "screeches" tend to occur above 2 kHz. Very rarely does feedback
occur below 80 Hz or above 8 kHz. It takes practice to develop an ear for equalizing
a sound system, so be patient. After locating the first feedback frequency, begin
turning up the system again until the next frequency begins ringing. Repeat the above
18
steps until the desired level is reached, but
do not over equalize. Keep in mind the
equalizers can only provide a maximum
level increase of 3 to 9 dB. Parametric
equalizers, though more confusing to the
novice user, allow for more precise control
of feedback frequencies.
Music
Educators
Guide
Automatic feedback reducers will accomplish the same results as above. They find and
cut the frequencies that are feeding back automatically. The same precautions listed
above apply to feedback reducers as well as equalizers. Automatic feedback reducers
are very helpful in wireless microphone applications. Remember that microphone
placement is crucial to eliminating feedback, and the temptation to wander away from
the ideal microphone position when using a wireless is great. If the performer gets too
close to a loudspeaker, feedback will result; a good feedback reducer will be able to
catch and eliminate the feedback faster than a human operator.
Feedback
One of the most commonly asked questions in professional audio is "What
microphone can I use that doesn’t cause feedback?" The answer to the question
is, of course, that no such microphone exists. Feedback results from a combination of many factors, including loudspeaker placement, microphone placement,
the frequency response of both devices, and room acoustics.
What is feedback?
Feedback is characterized by a sustained, ringing tone, which can vary from a
low rumble to a piercing screech. Echoes and reverberation caused by room
acoustics, as well as ground buzz and other extraneous noises, are not the same
thing as feedback, and cannot be cured in the same manner.
What causes feedback?
Feedback occurs whenever the sound entering a microphone is reproduced by a
loudspeaker, picked up by the microphone, and re-amplified again and again. The
familiar howl of feedback is an oscillation that is triggered by sound entering the
microphone. The easiest way to create feedback is to point a microphone directly
into a loudspeaker. (We don’t recommend you try this!) Placing the microphone
too close to the loudspeaker, too far from the sound source, or simply turning
the microphone up too loud exacerbates feedback problems. Other contributing
factors are too many open microphones, poor room acoustics, and uneven
frequency response in either the microphones or loudspeakers.
19
What can I do about feedback?
The single easiest way to reduce feedback is to move the microphone closer
to the desired sound source. Additionally, using a directional microphone
(cardioid, supercardioid, etc.) will typically increase the amount of gain
before feedback. Reducing the number of open microphones with an
automatic mixer will also improve the situation. Try to keep microphones and
loudspeakers as far away from each other as possible. Lastly, acoustically treat
the room to eliminate hard, reflective surfaces such as glass, marble, and wood.
When all of the above solutions have been exhausted, the next step is to look
towards equalizers and automatic feedback reducers.
Compressors, as mentioned above, are used to control varying sound levels. When
a singer is performing, certain notes or phrases tend to be louder than
others. Typically, that singer’s volume is set to the maximum possible level
without causing distortion further downstream in the sound system. In a loud
environment, quieter passages will get lost unless someone "rides" the vocal fader
to boost the singer during these quiet passages. The volume then needs to be
reduced to prevent distortion when the singer gets loud again. A compressor allows
the volume to be left at the "boosted" level by reducing the peaks (loud parts) by a
preset amount so they don’t cause distortion. An unfortunate myth that arose from
this practice promotes the idea that the compressor actually makes quiet sounds
louder. Two controls common to most compressors are threshold and ratio.
The threshold determines at what point the compressor function activates, and
ratio controls how much the signal is compressed. A lower threshold causes the
compressor to activate on quieter sounds, while a higher threshold requires louder
sound to activate. Similarly, a lower ratio control reduces the level by a small amount
(e.g. a ratio of 2:1 results in a level half of what it would normally be.) A higher ratio
(such as 10:1) would reduce the signal to a much greater degree.
A specialized form of compressor, called a limiter, uses a very high ratio (often ∞ :1)
that prevents any signal from surpassing the level set by the threshold. Limiters are
primarily used as overall system protection at the output of the mixer, while
compressors are typically employed on an individual channel basis.
Finally, special effects processors allow the user to add ambience (reverb) or create
unique sounds (chorus, flange, delay).
20
Music
Educators
Hooking it up
Step 1: Position the microphones
as per the previous
instructions.
Guide
Step 2: Using the XLR microphone
cables, connect the microphones to the mixer inputs (see figure 15).
Step 3: If you are using condenser microphones, be sure phantom power is
turned on at the mixer.
Step 4: Connect the outputs of the mixer to the inputs of the signal
processors (if any) and then to the inputs of the power amplifiers.
Step 5: Connect the speaker outputs of the amplifiers to the inputs of the
loudspeakers.
Step 6: IMPORTANT! Always turn the mixer and any signal processors on
first. Then turn the amplifiers on. This prevents possible damage to
the loudspeakers. When powering down the system, always turn the
amplifiers off first.
Step 7: Begin setting levels by placing all the input and master faders at "0."
Check each microphone one at a time by bringing the gain control up
(while the musician plays) until the output level meter reads "0", then
back down the gain slightly. Repeat this step for each microphone.
NOTE: At this point the amplifier inputs should be all the way down.
Step 8: While the ensemble plays, bring up the input level controls on the
amplifier until the sound reaches the desired level.
Step 9: Adjust the faders to achieve the proper blend of the instruments.
Avoid pulling any faders down to the bottom part of their travel. If a
particular channel needs a drastic reduction in level, reduce that
channel’s gain control instead of the fader.
INSTRUMENT
MICROPHONE
AMPLIFIER
LOUDSPEAKER
VOCAL MICROPHONE
BOUNDARY
MICROPHONE
MIXER
PROCESSOR
Figure 15: Typical sound system
21
Sound Reinforcement for Theater
The Realities of Theater Sound
Microphones for everybody!
Most theaters that operate on a limited budget try to use as few microphones as
possible. Common techniques include hanging a few microphones overhead, and
maybe a few boundary (or surface mount) microphones at the front of the stage.
Many inherent problems exist with these techniques, including, but not limited to:
• Reduced gain before feedback due to too many open microphones too far
away from the actors.
• Comb filtering (that thin, hollow sound) resulting from multiple microphones
picking up the same actor.
• Increased pickup of stage vibration noise, reverberation, and other unwanted
sounds.
• Varying sound levels as actors move in and out of the pick-up areas of
different microphones.
How do professional theaters deal with these issues? Easy - they don’t. Every
performer on stage gets a wireless microphone. Most Broadway productions use
over a hundred thousand dollars worth of wireless microphones for a single show. A
basic rule of microphone technique for any application is to get the microphone as
close as possible to the desired sound source. Therefore, even though you can’t
always see it, each actor has a small lavalier microphone clipped, taped, glued, or
sewn to some part of the face, hair, or costume. Having every actor "close-miked"
eliminates all of the above problems encountered with distant miking. The distance
between the microphone and the actor’s mouth remains constant, thus providing a
constant output level. High sound level shows go a step further, using headworn
microphones to get the microphone even closer to the sound source.
The Overhead Dilemma
Okay, so your budget doesn’t quite get up to Broadway standards. Using a few
overhead microphones for smaller speaking parts can be an acceptable alternative,
but be realistic about what to expect. Consider the following example:
Two actors on stage, one is wearing a lavalier microphone six inches from his mouth,
the other is standing six feet from the nearest overhead microphone. The actor
wearing the lavalier will be four times louder than the other actor will! Turning the
microphones up louder is not always an option, either. For any given sound system,
the farther the microphones are from the sound source, and the closer they are to the
22
Music
loudspeakers, the less you can turn them
up before feedback occurs. Multiple open
Educators
microphones will further increase the
chances for feedback. In addition, distant
microphones will pick up more ambient
sound, making the actors sound farther
away, when compared to close-miked actors. If you choose to use overhead microphones, pay close attention to where the actors are standing when they speak. If the
actors are always as close to the microphones as possible, sound quality will improve.
Turning down unused microphones will also help.
Guide
For downstage areas, or runways where it is not practical to hang an overhead
microphone, boundary microphones are often used. These small, flat microphones
are usually placed at the edge of stage, where they will be out of the actors way.
Boundary microphones are not magic; they are subject to the same limitations as
overhead microphones, with the additional issue of stage vibration pick-up.
Overhead and boundary microphones that you may see in a Broadway production
are not necessarily used for sound reinforcement; many times they are used for
hearing assist, backstage cues, or recording.
One final note on microphones: shotgun microphones are never used for sound
reinforcement! The shotgun microphone was designed for film and video production
work, where the microphone signals are going straight to tape. It does not "focus" on
the sound coming from the stage, nor does it filter out unwanted sounds. A shotgun
placed at the back of the hall will pick up everything that happens between the
microphone and the stage.
Acoustics
Another issue that can plague amateur theater is poor acoustics. The typical "cafegymna-torium" that is used for many school and church theatrical productions is,
acoustically speaking, the worst possible place for sound reinforcement. These rooms
tend to be extremely "echo-y", which limits intelligibility (the ability to understand what is
being said) and decreases gain before feedback (how loud you can turn up the sound
system). Professional productions are done in quiet, non-reflective, controlled environments that are optimized for theater sound. Many theaters also employ a distributed
sound system, which uses many speakers placed throughout the venue that are divided into "zones". Each zone is fed a varying amount of signal, depending on how far they
are from the stage. Loudspeakers nearest the stage get very little, if any, signal, while
those at the back get proportionally more. This also allows the overall volume level to
be lower, which improves intelligibility in a poor acoustic environment.
23
Know your performers!
Lastly, remember to keep in mind the skill level of the performers involved.
Professional actors and singers know how to project their voice, which creates more
signal level at the microphone. Children, especially shy ones, do not make much
sound, which further necessitates close-miking techniques. As mentioned above,
turning distant microphones up louder will most likely result in feedback. Remember,
if you can’t hear what the actors are saying from six feet away, the microphone
certainly can’t either!
If the above examples seem to paint a grim picture, don’t despair. Placing the
microphones as close as possible to the actors mouths will always result in improved
sound quality. Just be aware that overhead microphones, used carefully, can increase
intelligibility for smaller speaking roles. What they cannot do, however, is create a
Broadway-like experience. Wireless microphones and carefully controlled, expensive
sound systems operated by top-flight sound technicians are the science behind the
illusion in professional theater.
Recommended models:
Overhead microphones – MX202
Boundary microphones – MX391
Lavalier Microphone Techniques for Theater
The object of most theatrical microphone techniques is to make the mics as
inconspicuous as possible and provide the actors with freedom of movement, while
still providing a high level of sound quality. The obvious choice is wireless lavalier
microphones, which are becoming increasingly popular. Today it is common to find
Broadway productions that incorporate twenty to thirty wireless microphone systems
on a nightly basis. This section presents a few tips and techniques to get the best
results from lavalier microphones.
Place the microphone near the top of the
chest, above the ear, or in the hair line (see
figure 16). A common mistake is to place the mic
near the throat, but this will lead to an unnatural
sound due to a "shadow" created by the chin that
will block high frequencies from reaching the
microphone.
24
Figure 16:
Lavalier Microphone Placement
Music
Use an omni-directional mic if you have to
position it above the ear or in the hair line.
Educators
A side-effect of directional mics (cardioid,
supercardioid, etc.) is off-axis coloration, an
uneven pickup of the sound that results
when addressing a directional microphone
from the side or rear (off-axis). A mic placed on the head will, of course, always be
off-axis unless it is right in front of the mouth. Omnidirectional mics will sound more
natural when placed away from the mouth.
Guide
Consult the wig master on securing mics near the hair line. Mic cables can be
secured in the hair in several ways, including wig clips, comb clips, sewing them into
barrettes, bobby pins, and elastic headbands. Also, the mic can be mounted on the
temple of eyeglasses.
Never use "Gaffer" tape to secure a cable to the skin. The adhesive found on this
tape can cause skin irritation, as well as just being too sticky. Suggested alternatives
include surgical tape, spirit gum, medical adhesive, and clear bandage tape.
Be sure to provide strain-relief for the mic cable behind the neck. The point where
the neck bends needs to be the most secure. If no strain relief is present, a sharp neck
movement could tug the mic out of place. Again, surgical tape and elastic headbands
are good choices for securing the mic cable to the neck.
Be careful not to get make-up in the opening of the microphone element. Any
make-up that gets into the mic element will alter the frequency response, and could
destroy the element altogether.
If the mic cable is run inside clothing, tape the mic and cable to the fabric to
prevent contact noise. Contact noise is caused by clothing rubbing against the mic
capsule or cable. A little tape and some careful positioning can help eliminate this
problem. Also, tie a simple knot in the mic cable near the microphone. This will also
assist in blocking cable noise from getting into the microphone.
Consult the wardrobe master to help prevent clothing noise. Clothing noise is
caused by garments rubbing against each other. There is no practical way to shield the
mic from this noise, so it is a good idea to plan ahead with your wardrobe people.
Generally, synthetic materials make more noise than natural fabrics, such as cotton.
Also, ask wardrobe to tape or sew together multiple layers of clothing to prevent rustling.
25
Don’t be afraid to use equalization. Judicial use of high frequency boost can help
brighten a mic covered by clothing or positioned in the hair line. Low frequency cut
reduces cable noise, breath pops, and wind noise.
Keep spare mics on hand at all times. Many professional theater companies
consider lavalier microphones a disposable item. Condenser microphones especially
can be easily destroyed in such an abusive environment. Sweat, make-up, and
constant tugging on cables and connectors can quickly wear out even the highestquality microphone. Try to inspect your mics on a regular basis by plugging them in
and listening for any odd noises and crackling, or degradation of frequency response.
Wiggle the cables and connectors to check for loose connections.
Take the headworn approach. More and more, actors in Broadway musicals use
headworn microphones. The mic placement is always consistent, and right in front of
the mouth for best sound quality and better gain before feedback. Headworn mics
also give you that "hip, 21st century" look!
Recommended models:
• Lavalier – WL93, WL50, or WL51
• Headworn – WH30 or WBH53
26
Summary
Music
Educators
Guide
The techniques and concepts introduced
here only scratch the surface of what can
be accomplished with some basic audio
equipment. Feel free to experiment and
develop your own techniques, just remember a few key points:
1. Use only as many microphones as necessary.
2. Keep the microphones as close as possible to the sound source.
3. When powering up the sound system, turn amplifiers on LAST and off FIRST.
4. Overhead and boundary microphones will never sound like a lavalier.
5. If it sounds good, it is good!
For more information visit the Shure Web site, www.shure.com or read the following
publications available from Shure:
Microphone Techniques for Music: Sound Reinforcement,
Rick Waller, John Boudreau, and Tim Vear.
This book contains two sections, one that details microphone characteristics,
acoustics, and musical instrument characteristics, and a second that details
microphone placement for a variety of instruments. Also includes a section on
stereo miking and a Shure microphone selection guide.
Microphone Techniques for Music: Studio Recording,
John Boudreau, Rick Frank, Tim Vear, and Rick Waller.
Similar in scope to the Sound Reinforcement guide, but with an emphasis on
recording studio applications.
Microphones and Multitracks,
Jon Chappell.
An excellent primer on the concept of multitrack recording, from choosing mics
and setting levels, and some professional microphone tips and tricks.
27
Appendix: Selected Reading
Live Sound for Musicians,
Rudy Trubitt, ISBN: 0-7935-6852-8
A math-free, step-by-step guide to getting a basic sound system up and running.
This book contains a plethora of troubleshooting tips and set-up hints. Everything
is explained in plain English with as little technical mumbo-jumbo as possible.
Especially recommended for do-it-yourself musicians and volunteer sound
people at churches.
The Home Studio Guide to Microphones,
Loren Alldrin, ISBN: 0-918371-22-8
For anyone who has, or wants to have, a home recording studio. This book contains a wealth of detailed technical information on microphones, as well as microphone techniques for a variety of instruments, and a microphone selection guide
that covers nearly every microphone you might consider for your home studio.
Sound Design in the Theatre,
John L. Bracewell, ISBN: 0-13-825167-3
This easy to read volume includes the usual descriptions of sound reinforcement
components, with additional sections focusing on playback systems (both analog and digital), synthesis and samplers, MIDI, and the creative aspects of theater
mixing. The basic electronics explanations are among the most understandable
of any of these books. The book concludes with a detailed account of system
design and implementation for an actual production.
28
Glossary
3-to-1 Rule – When using multiple
microphones, the distance between
microphones should be at least 3 times
the distance from each microphone
to its intended sound source.
Automatic Mixer – A specialized
mixer that turns off unused microphone
channels without any user intervention,
and turns on microphone channels as
needed.
Boundary/Surface Microphone –
A microphone designed to be mounted
on an acoustically reflective surface.
Cardioid Microphone – A unidirectional
microphone with moderately wide front
pickup (131 degrees). Angle of best
rejection is 180 degrees from the front of
the microphone, that is, directly at the rear.
Close Pickup – Microphone placement
within 2 feet of a sound source.
Compressor – A device that controls
varying signal levels.
Condenser Microphone – A microphone
that generates an electrical signal when
waves vary the spacing between two
charged surfaces: the diaphragm and
the backplate.
Decibel (dB) – A number used to
express relative output sensitivity.
It is a logarithmic ratio.
Delay (echo) – Reflection of sound that
is delayed long enough to be heard as a
distinct repetition of the original sound.
Music
Educators
Guide
Dynamic Microphone – A microphone
that generates an electrical signal when
sound waves cause a conductor to
vibrate in a magnetic field. In a moving-coil
microphone, the conductor is a coil of
wire attached to the diaphragm.
EQ – Equalization or tone control to shape
frequency response in some desired way.
Feedback – In a PA system consisting of
a microphone, amplifier, and loudspeaker,
feedback is the ringing or howling sound
caused by amplified sound from the
loudspeaker entering the microphone
and being re-amplified.
Flat Response – A frequency response
that is uniform and equal at all frequencies.
Frequency – The rate of repetition of a
cyclic phenomenon such as a sound
wave. Usually measured in Hertz (Hz).
Frequency Response – A graph
showing how a microphone responds
to various sound frequencies. It is a
plot of electrical output (in decibels)
vs. frequency (in Hertz).
Gain – Amplification of sound level or
voltage.
Gain-Before-Feedback – The amount
of gain that can be achieved in a sound
system before feedback or ringing occurs.
Headworn Microphone – A microphone
designed to be worn on the head.
29
Glossary
Hertz (Hz) – A unit of measurement
that represents cycles-per-second.
The musical note "A" above middle
"C" is equivalent to 440 Hz.
Impedance – In an electrical circuit,
opposition to current flow of alternating
current, measured in ohms. A high
impedance microphone has an
impedance of 10,000 ohms or more.
A low impedance microphone has an
impedance of 50 to 600 ohms.
Lavalier Microphone – A small
microphone designed for hands-free
usage. Usually clipped to the clothing.
Leakage – Pickup of an instrument
by a microphone intended to pick up
another instrument.
Multitrack Recording – A method of
recording where each instrument (or
group of instruments) is recorded onto
a separate track and later combined
into a stereo mix. Common formats
include 4, 8, 16, and 24-track recording.
Omnidirectional Microphone –
A microphone that picks up sound
equally well from all directions.
Overhead Microphone – Microphones
that are typically hung from the ceiling.
Common applications are choir and
theater miking.
PA – Public Address. Usually refers
to a sound reinforcement system.
Phantom Power – A method of
providing power to the electronics of
a condenser microphone through the
microphone cable.
30
Reverberation – The reflection of a
sound a sufficient number of times that it
becomes non-directional and persists for
some time after the source has stopped.
The amount of reverberation depends of
the relative amount of sound reflection and
absorption in the room.
Sensitivity – The electrical output that a
microphone produces for a given sound
pressure level.
Shaped Response – A frequency
response that exhibits significant variation
from flat within its range. It is usually
designed to enhance the sound for a
particular application.
Shotgun Microphone – An extremely
directional microphone, commonly
used in broadcast and film production
applications.
Sound Reinforcement –
Amplification of live sound sources.
Stereo – Two channels of audio, left
and right, which can be used to simulate
realistic listening environments.
Supercardioid Microphone –
A unidirectional microphone with a
tighter front pickup angle (115 degrees)
than a cardioid, but with some rear pickup.
Angle of best rejection is 126 degrees
from the front of the microphone, that is,
54 degrees from the rear.
Unidirectional Microphone –
A microphone that is most sensitive to
sound coming from a single direction –
in front of the microphone. Cardioid
and supercardioid microphones are
unidirectional.
About the Author
Music
Educators
Gino Sigismondi, a Chicago native and
Shure Applications Specialist since 1997,
Guide
has been active in the music and audio industry for nearly ten years. In addition to
his work as a live sound and recording engineer, Gino’s experience also includes
performing and composing. Gino earned his BS degree in Music Business from
Elmhurst College, where he was a member of the Jazz Band, as both guitar player
and sound technician. After graduation, he spent several years working for Chicago
area sound companies and night clubs, before settling down to a select group of the
area’s top local acts. As a member of Applications Engineering, Gino brings his years
of practical experience to the product training seminars he conducts for Shure
customers, dealers, distribution centers, and internal staff. He is the author of the
"Shure Guide to Personal Monitors", several Shure applications bulletins, and has
written for the Shure Web site. Gino continues to remain active as a sound engineer,
expanding his horizons beyond live music to include sound design for modern
dance and church sound.
Shure Microphone Product Categories:
Performance Gear
Affordable, application specific microphones ideal for everyday use
and practice. $
SM Line
Performance tested, industry standard microphones for more critical
applications. $ $
Beta Line
Premier live performance microphones. Sensitive to fine sound
details in all demanding environments. $ $ $
31
Additional Shure Publications Available:
Printed or electronic versions of the following guides are available free of charge.
To obtain your complimentary copies, call one of the phone numbers listed below or
visit www.shure.com.
• Selection and Operation of Wireless Microphone Systems
• Audio Systems Guide for Video Production
• Audio Systems Guide for Houses of Worship
• Audio Systems Guide for Music Educators
• Microphone Techniques for Studio Recording
• Microphone Techniques for Live Sound Reinforcement
• Audio Systems Guide for Meeting Facilities
Our Dedication to Quality Products
Shure offers a complete line of personal monitor systems for everyone from first-time users
to the biggest names in the industry.
For over eight decades, the Shure name has been synonymous with quality audio.
All Shure products are designed to provide consistent, high-quality performance under the
most extreme real-life operating conditions.
Shure Listen Safe is the Company’s hearing conservation program, which is dedicated to
educating musicians, audio professionals, and consumers on how to enjoy sound in a safe,
responsible way. Donated funds are used to underwrite the cost of hearing screenings,
creating educational materials, and funding hearing research studies. In addition to these
donations, Shure’s activities include providing free hearing screenings and distributing
hearing protection devices at pro audio industry trade shows, music conferences and
festivals, and to its employees. For more information about Shure Listen Safe, please visit
www.shure.com/hearing.
www.shure.com
United States:
Shure Incorporated
5800 West Touhy Avenue
Niles, IL 60714-4608 USA
Europe, Middle East, Africa:
Shure Europe GmbH
Wannenäckerstr. 28,
74078 Heilbronn, Germany
Phone: 847-600-2000
Fax: 847-600-1212
Email: [email protected]
Phone: 49-7131-72140
Fax: 49-7131-721414
Email: [email protected]
©2008 Shure Incorporated
©2007 Shure
Incorporated
©2008
Shure
Incorporated
AL0000
Asia, Pacific:
Shure Asia Limited
3/F, Citicorp Centre
18 Whitfield Road
Causeway Bay, Hong Kong
Canada, Latin America,
Caribbean:
Shure Incorporated
5800 West Touhy Avenue
Niles, IL 60714-4608 USA
Phone: 852-2893-4290
Fax: 852-2893-4055
Email: [email protected]
Phone: 847-600-2000
Fax: 847-600-6446
Email: [email protected]