1
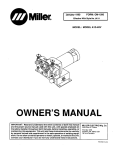
FORM: OM-i028A
January 1990
Miller
Ef tective With
Style
No. KA-16
MODEL: GA-17C
MANUAL
OWNERS
IMPORTANT:
Read and understand the entire contents of both this manual
and the power source manual used with this unit, with special emphasis Ofl
the safety material throughout both manuals, before installing, operating, or
maintaining this equipment. This unit and these Instructions are for use only
by persons
trained and
experienced
In the safe
operation
of
welding equip-
MILLER ELECTRIC
AMifler
Mfg. Co.
Group Ltd.. Conpany
P.O. Box 1079
Appleton,
WI 54912 USA
Tel. 414-734-9821
ment. Do not allow untrained
persons to Install, operate, or maintain this unit.
Contact your distributor If you do not fully understand these instructions.
PRINTED ~N U.S.A
1~
\~7
LIMITED WARRANTY
EFFECTIVE: MARCH 15, 1989
This warranty
supersedes all previous MILLER warranties
LIMITED WARRANTY
Subject
and is exclusive with
to the terms and conditions
hereof, Miller Electric Mfg. Co., Appleton, Wisconsin
warrants
to its Distributor/Dealer that all new and unused
Equipment fur
nished by Miller is free from defect in workmanship and material
as of the time and place of delivery by Miller. No warranty is
made by Miller with respect to engines, trade accessories or
other items manutacturedby others. Such engines, trade ac
cessories and other items are sold subject to the warranties of
their respective manufacturers, if any. All engines are war
ranted by their manufacturer for one year from date of original
purchase, except Tecumseh and Onan engines which have a
two year warranty.
Except as specified below, Millers warranty does not apply to
components having normal useful life of less than one (1) year,
such as spot welder tips, relay and contactor points, MILLER
MATIC parts that come in contact with the welding wire includ
nozzles and nozzle insulators where failure does not result
from defect in workmanship or material.
ing
Miller shall be required to honor warranty claims on warranted
Equipment in the event of failure resulting from a defect within
the following periods from the date of delivery of Equipment to
the original user:
1.
Arc welders, power sources, robots, and
1 year
components
2.
3.
4.
5.
6.
7.
Load banks
Original main power rectifiers
(labor 1 year only)
All welding guns, feeder/guns
1 year
3 years
and torches
All other Millermatic Feeders
Replacement
or
repair parts, exclusive
of labor
90 days
1 year
60 days
6 months
Batteries
provided that Miller is notified
in
writing within thirty (30) days of
the date of such failure.
As a matter of general
submitted by the original
policy only,
user
Miller may honor claims
within the
foregoing periods.
no
other guarantees
or
warranties expressed
or
implied.
In the case of Millers breach of warranty or any other duty with
respect to the quality of any goods, the exclusive remedies
therefore shall be, at Millers option (1) repair or (2) replacement
or, where authorized in writing by Miller in appropriate cases, (3)
the reasonable cost of repair or replacement at an authorized
Miller service station or (4) payment of or credit for the purchase
price (less reasonable depreciation based upon actual use)
upon return of the goods at Customers risk and expense.
MILLERs option of repair or replacement will be FOB., Factory
at Appleton, Wisconsin, or FOB. at a MILLER authorized serv
ice facility, therefore, no compensation for transportation costs
of any kind will be allowed. Upon receipt of notice of apparent
defect or failure, Miller shall instruct the claimant on the war
ranty claim procedures to be followed.
ANY EXPRESS WARRANTY NOT PROVIDED HEREIN
AND ANY IMPLIED WARRANTY, GUARANTY OR REPRE
SENTATION AS TO PERFORMANCE. AND ANY REMEDY
FOR BREACH OF CONTRACT WHICH, BUT FOR THIS PRO
VISION, MIGHT ARISE BY IMPLICATION, OPERATION OF
LAW, CUSTOM OF TRADE OR COURSE OF DEALING, IN
CLUDING ANY IMPLIED WARRANTY OF MERCHAN
TABILITY OR OF FITNESS FOR PARTICULAR PURPOSE,
WITH RESPECT TO ANY AND ALL EQUIPMENT FUR
NISHED BY MILLER IS EXCLUDED AND DISCLAIMED BY
MILLER.
EXCEPT AS
EXPRESSLY
PROVIDED
BY
MILLER
IN
WRITING, MILLER PRODUCTS ARE INTENDED FOR ULTI
MATE PURCHASE BY COMMERCIAL/iNDUSTRIAL USERS
AND FOR OPERATION BY PERSONS TRAINED AND EXPE
RIENCED IN THE USE AND MAINTENANCE OF WELDING
EQUIPMENT AND NOT FOR CONSUMERS OR CON
SUMER USE. MILLERS WARRANTIES DO NOT EXTEND
TO, AND NO RESELLER IS AUTHORIZED TO EXTEND
MILLERS WARRANTIES TO, ANY CONSUMER.
I
February 1,
1991
FORM: OM-1028A
ERRATA SHEET
After this manual
to data
was printed, refinements
appearing later in this manual.
AMENDMENT TO SECTION 6
Amend Parts List
Dia.
Mkgs.
7-16
7-16
7-16
7-
~First
as
in
equipment design occurred.
This sheet lists
exceptions
PARTS LIST
follow:
Part
No.
Replaced
133 352
133 353
133352
.
With
133 351
Added
digit represents page
no
133 353
133 351
106 590
Quantity
Description
CABLE, conduit lOft
CABLE, conduit 1 2ft
(Effw/KB014692) (consisting of)
(Eff w/KBO1 4692) (consisting of)
(Eff w/KB014692) (consisting of)
CABLE, conduit 15ff
0-RING, .375 ID x .1O3CS nitrile
digits following dash represent
item
.
.
..
1
.
.
..
1
.
.
..
1
no.
BE SURE TO PROVIDE MODEL AND SERIAL NUMBER WHEN ORDERING REPLACEMENT PARTS.
1
SECTION 1
1-1.
SAFETY PRECAUTIONS AND SIGNAL WORDS
GENERAL INFORMATION AND SAFETY
SAFETY
WORDS
1-2.
SYMBOL
ALERT
SIGNAL
AND
General
A.
The
presented in this manual and on various la
bels, tags, and plates on the unit pertains to equipment
design, installation, operation, maintenance, and
troubleshooting which should be read, understood, and
followed forthe safe and effective use of this equipment.
information
B.
following safety
alert
symbol
signal
and
words
are
used throughout this manual to call attention to and iden
tify different levels of hazard and special instructions.
a
This
safety
alert
symbol
is used with the
signal
words WARNING and CAUTION to call atten
tion to the
safety
statements.
Safety
a
WARNING statements identify procedures or
practices which must be followed to avoid seri
ous personal injury or loss of life.
and procedures which ensure personal safety and the
safety of others. Therefore, this equipment is to be in
stalled, operated, and maintained only by qualified per
sons in accordance with this manual and all applicable
a
CAUTION statements identify procedures or
practices which must be followed to avoid minor
personal injury or damage to this equipment.
codes such as, but not limited to, those listed at the end
of Section 1
Safety Rules For Operation Of Arc Weld
ing Power Source in the welding power source Owners
Manual.
IMPORTANT statements identify special instructions
necessary for the most efficient operation of this equip
The installation, operation, maintenance, and trouble
shooting of arc welding equipment requires practices
SECTION 2
-
Table 2-1.
Ampere Rating
600o
Duty Cyc
e
170 Amperes
With CO2
2-1.
Wire
Diameter
0.023-0.035
ment.
INTRODUCTION
SpecIfications
Cable
Cooling
Length
Method
Weight
Net
10 ft.
~fl.
(0.6-0.9 mm)
(3.0 m)
(3.7 m)
ft. (4.6 m)
12 ft.
15
DUTY CYCLE
4.5 lbs.
a
The duty cycle of awelding gun is the percentage of a ten
minute period that a gun can be operated at a given out
(2kg)
6 lbs.
(2.7 kg)
6.5 lbs. (3kg)
7 lbs. (3.~2 kg)
CAUTION;
EXCEEDING THE RATED AM
PERAGE WITH CO2 OR FAILING TO RE
DUCE THE WELDING AMPERAGE OR DUTY
CYCLE WHEN USING A MIXED SHIELDING
GAS can result In damage to the gun.
Do not exceed rated amperage when
put without overheating and damaging the gun. This gun
CO2.
Operate at 30% duty cycle
shielding gas.
is rated at 60%
duty cycle using CO2 shielding gas. This
the gun can be operated at 170 amperes for six
minutes Out of ten with CO2 shielding gas. During the re
means
maining four minutes, the gun must operate at no load to
permit proper cooling. If rated amperage is exceeded,
the duty cycle must be reduced.
3.5 lbs. (1.6 kg)
4 lbs. (1.8kg)
Air
Ship
2-2.
when
using
using mixed
DESCRIPTION
This unit is
an
air-cooled semiautomatic Gas Metal Arc
Welding (GMAW) gun.
OM-1028
Page
1
SECTION 3
INSTALLATION
Monocoil Liner
Trigger
Switch
Wire Outlet Guide
Gun Switch
Plug
Jer Connector
TB-124 473-A
Figure
4A
3-1. Gun
WARNING: ELECTRIC SHOCK can kill.
Do not touch live electrical parts.
Shut down
welding power
source
before
IMPORTANT: The wire outlet
of the gun assembly.
and wire
feeder, and disconnect input power employing
Iockouttagging procedures
or installing gun.
Components
1.
moving-fuses from fuse box, or shutting off and
red-tagging circuit breaker or other disconnect
ing device.
GUN/WIRE FEEDER CONNECTIONS (Figure
gun/feeder connector securing
assembly.
knob
on
IMPORTANT:
Wire guides should be positioned as
close as possible to the drive rolls without touching them.
This
2.
gives
wire, maximum column strength.
Insert gun into wire drive
connector
3.
3-1.
is provided as part
the wire drive
inspecting
Lockoutitagging procedures consist of remov
ing input power plug from receptacle, padlock
ing line disconnect switch in open position, re
Loosen the
guide
3-2.
assembly
until
gun/feeder
stops against wire drive assembly.
Tighten gun/feeder
connector
securing
GUN SWITCH CONNECTION
knob.
(Figure 3-1)
3-1)
Install the gun/feeder connector into the d~ve assembly
the wire feeder as follows:
on
OM-1028
Page
2
Connect gun triggerswitch into TRIGGER receptacle on
wire feeder as follows: align keyways, insert plug, and
rotate threaded collar
fully
clockwise.
SEQUENCE OF OPERATION
SECTION 4
4-1. GAS METAL ARC WELDING
(GMAW)
3.
Be sure that the proper shielding gas is connected to
shielding gas valve.
the
a
ELECTRIC SHOCK can kill;
WARNING:
MOVING PARTS can cause serious Injury;
IMPROPER AIRFLOW AND EXPOSURE TO
ENVIRONMENT can damage Internal parts.
4.
5.
Keep all
operating.
from
covers
panels
in
place while
Warranty is void it the wire feeder is operated
with any portion of the outer enclosure removed.
ARC RAYS, SPARKS, AND HOT SURFACES
burn eyes and skin; NOISE can damage
6.
Wear
7.
Connect work
hearing.
FUMES AND GASES can
your health.
body protection.
seriously
harm
Keep your head out of the fumes.
Ventilate to keep from
breathing fumes
and
8.
9.
inadequate,
use
approved
WELDING
wounds.
can
cause
puncture
METAL, SPATTER, AND SLAG
can
10. Press
fire
how to use it.
Al/ow work and
flammable material.
equipment
supply.
welding power
source
and the wire
respective Owners Manual).
installing
new
equipment,
or
after
Purge button on the wire feeder (if applicable)
housing, and
Manual).
ad just tension
(see ap
Owners
12. Press the gun trigger, and run the welding wire out
beyond the end of the gas nozzle. Cut the wire off so
it extends out 1/4 to 3/8 in.
(6.4
mm
to 9.5
mm) from
end of nozzle.
13. Set the Wire
and know
Speed control slightly higherthan antic
ing
welding
helmet with proper filter lens accord
to ANSI Z49.1.
15. Hold the end of the gas nozzle approximately 1/2 in.
(12.7 mm) from the workpiece.
to cool before
16. Press the gun trigger. Gas starts to flow, wire starts
to feed, and the arc will be established. If the welding
MAGNETIC FIELDS FROM HIGH CURRENTS
wire appearsto slip, adjust drive roll tension accord
ing to wire feeder Owners Manual.
handling.
can affect
pacemaker operation.
Wearers should consult their doctor before
17. After the controls
going near arc welding, gouging, orspot welding
the wire feeder (it
operations.
-
to
4-2.
Be sure that proper electrical connections have
been made to the welding power source and the
wire feeder.
that the
welding
wire has been properly
threaded and that correct initial tensions have been
set on the drive rolls (refer to the appropriate Own
ers Manual).
sure
the
welding power source and
applicable) have been adjusted for
normal operation, the welding power source (and
wire feeder) will function automatically when the gun
trigger is pressed. Releasing the gun trigger will ex
tinguish the arc and cause the wire feed and gas flow
See Section 1 Safety Rules For Operation Of
Arc Welding Power Source in the welding power
source Owners Manual for basic welding safety
information.
Be
the
gas
the gun switch to purge the gas line.
14. Wear
extinguisher nearby,
use near
clothing.
ipated wire speed.
Watch forfire.
Do not
shielding
11. Close drive roll
fire and burns.
a
and
clean, bare metal at work-
to
prolongedshutdown,
ously for at least one minute before welding to purge the
shielding gas line. To avoid wasting wire while purging,
open the drive roll housing.
Do not point gun toward any part of the body,
any conductive surface, or other personnel.
2.
Energize
propriate
WIRE
Manual).
allow shielding gas to flow continu
breathing
1.
Turn on the
or
Keep
clamp
feeder (refer to the
gases.
If ventilation is
device.
Owners
dry insulating gloves
IMPORTANT: When
Wear correct eye, ear, and
HOT
source
piece.
can
cause
Place the controls on the welding power source in
required position for the welding setup (refer to
welding power
moving parts.
and
required posi
the
Do not touch live electrical parts.
Keep away
Place the wire feed control(s) in the
tion for the welding setup.
on
stop.
SHUTTING DOWN
1.
Stop welding.
2.
Turn oft
3.
Turn off the
a
welding power
source
shielding gas
and wire feeder.
at its source.
WARNING:
HIGH CONCENTRATION OF
SHIELDING GAS can harm health or kill.
Shut off gas
supply when
not in use.
OM-1 028
Page
3
SECTION 5
INSPECTION AND UPKEEP
5-1.
Usage and shop conditions will determine frequency
and type of maintenance required.
4~
WARNING:
ELECTRIC SHOCK can kill;
MOVING PARTS can cause serious Injury;
WELDING
WIRE
can
cause
puncture
wounds; HOT SURFACES can cause severe
burns.
MAINTENANCE
3.
Remove contact tube, and replace with
tube.
4.
Reinstall nozzle, and
a
welding power source
working on gun.
and wire
a
WARNING:
ELECTRIC SHOCK can kill;
MOVING PARTS can cause serious Injury;
WIRE
WELDING
can
cause
puncture
wounds; HOT SURFACES can cause severe
burns.
Shut down
feeder before
in
welding power source
working on gun.
Inspect
as
Carefully
3.
Repair or replace as required all hose and cables;
give particular attention to frayed and cracked insu
lation and areas where it enters equipment.
dirt that has
accumulated around nozzle opening and inside
nozzle.
remove
any weld spatter
or
4.
Remove grease and grime from components and
moisture from electrical parts and cables.
5.
Blow out casingwith
compressed airwhen changing
wire. This removes any loose metal chips and dirt
that may have accumulated.
CAUTION: FLYING DIRT AND METAL CHIPS
can Injure personnel and damage equip
ment.
CONTACT TUBE REPLACEMENT
a
To change from .030 in. (0.8 mm) wire or .035 in. (0.9
mm) wire to .023 in. (0.6mm) wire or vice versa, or to re
place monocoil liner, proceed as follows:
1.
Remove nozzle. A slight twist clockwise aids
al and installation.
2.
Cut off any portion of electrode wire which extends
beyond end of contact tube.
4A
Do not touch live electrical parts.
Shut down welding power source and wire
feeder before working on gun.
Allow
a
servicing.
cooling period before servicing.
1.
Remove nozzle. A slight twist clockwise aids
al and installation.
2.
Cut off any portion of electrode wire which extends
beyond end of contact tube.
OM-1028
Page
4
LOOSE WELDING WIRE
injury.
Keep firm hold
can
cause
on
wire
during installation,
removal, and threading operations.
Spooled wire has a tendency to unravel
when loosened from the spool.
rapidly
3.
Manually retract wire onto wire spool (see wire feed
er Owners
Manual).
4.
Remove contact tube and contact tube adapter.
5.
Disconnect gun assembly from wire feeder, if appli
cable, and lay it out flat (no coils in cable/conduit).
6.
Remove outlet
7.
Pull out monocoil liner from
end of gun assembly.
Disconnect gun from wire feeder before in
or
CAUTION:
remov
(Figure 3-1)
WARNING:
ELECTRIC SHOCK can kill;
MOVING PARTS can cause serious Injury;
WELDING
WIRE
can
cause
puncture
wounds; HOT SURFACES can cause severe
burns.
specting, maintaining,
cooling period
servicing.
before servicing.
IMPORTANT: .030 and .035 in. (0.8 and 0.9 mm) diame
ter wires use the same monocoil liner and outlet guide.
Changing from .030 in. (0.8 mm) wire to .035 in. (0.9
mm) wire or vice versa requires changing the contact
tube only (see Section 5-2).
Point gun liner only in a safe direction away
from personnel and equipment when cleaning
with compressed air.
5-2.
a
or
required.
2.
4A
Allow
gun for broken areas, cracks and loose
parts; tighten, repair and replace
and wire
Disconnect gun from wire feeder before in
cooling period before servicing.
specting, maintaining,
1.
REPLACING
Do not touch live electrical parts.
Disconnect gun.from wire feeder before
specting, maintaining, or servicing.
Allow
contact
operation.
CHANGING WIRE SIZES AND
LINER
5-3.
Do not touch live electrical parts.
Shut down
feeder before
resume
new
4A
guide.
gun/feeder
connector
CAUTION: FLYING DIRT AND METAL CHIPS
can
Injure personnel
and
damage equip
ment.
Point gun liner only in a safe direction away
from personnel and equipment when cleaning
with compressed air.
remov
8.
Clean gun casing or liner with compressed air while
liner or welding wire is removed.
9.
Insert new monocoil linerinto gun/feeder end of gun
assembly. Be sure monocoil covered with tubing is
at the gun/feeder connector.
11. Cutoff liner so that 3/8 in.
12. Install contact tube
10. Insert
new
sticks out.
guide so that 1/8 in. (3 mm) of liner
Hand tighten outlet guide and then tighten
(9.5 mm)
of liner sticks out
of the head tube.
adapter.
outlet
13. Reinstall
appropriate
contact tube and nozzle.
two full turns more.
AA
CAUTION:
OVERTIGHTENING
GUIDE damages liner.
Do not
overtighten
outlet guide.
OUTLET
14. Reinstall gun to wire drive
15. Thread
Owners
assembly.
welding wire according to the wire feeder
manual, and resume operation.
OM-1028 Page 5
SECTION 6
PARTS LIST
4
2
1
.5
12
9
4
16
TC124
Figure
OM-1028
Page
6
6-1.
Exploded
View Of GA-17C Gun
605-B
Item
No.
Part
No.
Description
FIgure
1
2
3
4
4
4
5
6
7
8
9
10
11
12
13
12
13
14
15
16
16
16
17
18
089
118
128
087
000
000
885
267
535
299
067
068
120 164
089
079
079
048
604
602
081
902
878
535
834
525
173
909
129 178
128 769
129 179
120 995
079974
133 147
133 352
133 353
133 351
124 697
128758
6-1.
Exploded
Quantity
View Of GA-17C Gun
TUBiNG, nprn .375 ID x .062 (order by ft)
ADAPTER, contact tube
NOZZLE, slip type 1/2 on
TUBE, contact .023 wire
TUBE, contact .030 wire
TUBE, contact .035 wire
TRIGGER, switch
TERMINAL, receptacle pin
HOUSING PLUG & PINS, (consisting of)
TERMINAL, male I pin sz 16 18-14 wire
CLAMP, cable
CABLE, No. 18 2/c (order by ft)
SCREW, set sti sch 10-32 x .250 cup point
SPLICE, prl 20-16 wire nylon
KIT, liner monocoil .023/.025 wire (consisting of)
GUIDE, wire outlet .023
KIT, liner monocoil .030/.035 wire (consisting of)
GUIDE, wire outlet .030-.045
O-RING,1/2lDx.lO3CSrbr
STRAIN RELIEF, cable
CABLE, conduit lOft
itt
1
1
2
2
2
1
2
I
4
1
2ft
1
2
1
1
1
1
2
1
1
CABLE, conduit l2ft
1
CABLE, conduit 151t
HANDLE, gun (consisting of)
1
I
RING,Iocking
1
BE SURE TO PROVIDE MODEL AND SERIAL NUMBER WHEN ORDERING REPLACEMENT PARTS.
OM-1023 Page 7
ERRATA SHEET
After this manual
to data
was
appearing
printed, refinements
AMENDMENT TO SECTION 6
Amend Parts List
Dia.
as
7-16
133 352
7-16
7-16
133 353
133 351
Added
133352
133 353
133 351
106 590
~First
sheet lists
exceptions
follow:
Replaced
7-
equipment design occurred. This
PARTS LIST
Part
No.
Mkgs.
in
later in this manual.
digit represents page
With
no
Description
Quantity
CABLE, conduit lOft (EffwIKBO14692) (consisting of)
CABLE, conduit 12ff (Effw/KB014692) (consisting of)
CABLE, conduit 15ff (Effw/KB014692) (consisting of)
0-RING, .375 ID x .1O3CS nitrile
digits following dash represent
item
.
.
..
.
.
..
.
.
..
1
1
1
1
no.
BE SURE TO PROVIDE MODEL AND SERIAL NUMBER WHEN ORDERING REPLACEMENT PARTS.
NA
January
Miller
FORM: OM-1028A
1990
Effective With
Style
No. KA-1 6
MODEL: GA-17C
OWNERS
MANUAL
IMPORTANT: Read and understand the entire contents of both this manual
and the power source manual used with this unit, with special emphasis on
the safety material throughout both manuals, before installing, operating, or
maintaining this equipment. This unit and these instructions are for use only
by persons trained
and
experienced
in the safe
operation
of
welding equip
MILLER ELECTRIC
A Mifler
Mfg. Co.
Graip Ltd.. Cotr~any
P.O. Box 1079
Appleton.
Wi 54912 USA
Tel. 414-734-9821
ment. Do not allow untrained persons to install, operate, or maintain this unit.
Contact your distributor If you do not fully understand these instructions.
PRINTED IN USA
LIMITED WARRANTY
EFFECTIVE: MARCH 15, 1989
This warranty supersedes all previous MILLER warranties and is exclusive with
LIMITED WARRANTY
Subject to
the terms and conditions
hereof, Miller Electric Mfg. Co., Appleton, Wisconsin
warrants
to its Distributor/Dealer that all new and unused
Equipment fur
nished by Miller is free from defect in workmanship and material
as of the time and place of delivery by Miller. No warranty is
made by Miller with respect to engines, trade accessories or
other items manufactured by others. Such engines, trade ac
cessories and other items are sold subject to the warranties of
their respective manufacturers, if any. All engines are war
ranted by their manufacturer for one year from date of original
purchase, except Tecumseh and Onan engines which have a
two year
warranty.
Except as specified below, Millers warranty does not apply to
components having normal useful life of less than one (1) year,
such as spot welder tips, relay and contactor points, MILLER
MATIC parts that come in contact with the welding wire includ
ing nozzles and nozzle insulators where failure does not result
from defect in
workmanship
or
material.
Millershall be required to honorwarranty claims on warranted
Equipment in the event of failure resulting from a defect within
the following periods from the date of delivery of Equipment to
the original user:
1.
Arc welders, power sources, robots, and
1 year
components
2.
Load banks
3.
4.
Original main power rectifiers
(labor 1 year only)
All welding guns, feeder/guns and torches
5.
All other Millermatic Feeders
6.
7.
Batteries
Replacement
or
repair parts, exclusive
~~1
L
..
.
.
of labor.
90
days
writing
within
other guarantees
or
warranties
expressed
implied.
or
In the case of Millers breach of warranty or any other duty with
to the quality of any goods, the exclusive remedies
therefore shall be, at Millers option (1) repair or (2) replacement
respect
Miller in appropriate cases, (3)
replacement at an authorized
Miller service station or (4) payment of or credit for the purchase
price (less reasonable depreciation based upon actual use)
upon return of the goods at Customers risk and expense.
MILLERs option of repairer replacementwill be FOB., Factory
at Appleton, Wisconsin, or F.O.B. at a MILLER authorized serv
ice facility, therefore, no compensation for transportation costs
of any kind will be allowed. Upon receipt of notice of apparent
or, where authorized in writing
the reasonable cost of repair
by
or
defect or failure, Miller shall instruct the claimant
ranty claim procedures to be followed.
on
the
war
ANY EXPRESS WARRANTY NOT PROVIDED HEREIN
AND ANY IMPLIED WARRANTY, GUARANTY OR REPRE
SENTATION AS TO PERFORMANCE, AND ANY REMEDY
FOR BREACH OF CONTRACT WHICH, BUT FOR THIS PRO
VISION, MIGHT ARISE BY IMPLICATION, OPERATION OF
LAW, CUSTOM OF TRADE OR COURSE OF DEALING, IN
CLUDING ANY IMPLIED WARRANTY OF MERCHAN
TABILITY OR OF FITNESS FOR PARTICULAR PURPOSE,
WITH RESPECT TO ANY AND ALL EQUIPMENT FUR
NISHED BY MILLER IS EXCLUDED AND DISCLAIMED BY
MILLER.
EXCEPT AS
EXPRESSLY PROVIDED BY MILLER
IN
1 year
WRITING, MILLER PRODUCTS ARE INTENDED FOR ULTI
days
MATE PURCHASE BY COMMERCIAL/INDUSTRIAL USERS
AND FOR OPERATION BY PERSONS TRAINED AND EXPE
RIENCED IN THE USE AND MAINTENANCE OF WELDING
60
6 months
provided that Miller is notified in
the date of such failure.
As a matter of
submitted by the
1 year
3 years
no
thirty (30) days
of
general policy only, Miller may honor claims
original user within the foregoing periods.
EQUIPMENT AND NOT FOR CONSUMERS OR CON
SUMER USE. MILLERS WARRANTIES DO NOT EXTEND
TO, AND NO RESELLER IS AUTHORIZED TO EXTEND
MILLERS WARRANTIES TO, ANY CONSUMER.
r
I
SECTION 1
1-1.
-
SAFETY PRECAUTIONS AND SIGNAL WORDS
1-2. SAFETY
WORDS
GENERAL INFORMATION AND SAFETY
ALERT
SYMBOL
AND
SIGNAL
signal
words are
General
A.
The
Information presented in this manual and on various la
bels, tags, and plates on the unit pertains to equipment
design, installation, operation, maintenance, and
troubleshooting which should be read, understood, and
followed for the safe and effective
B.
use
of this
following safety
alert
symbol
and
used throughoutthis manual to call attention to and iden
tify different levels of hazard and special instructions.
equipment.
a
This safety alert symbol is used with the signal
words WARNING and CAUTION to call alien
tion to the safety statements.
a
WARNING statements identify procedures or
practices which must be followed to avoid seri
ous personal injury or loss of life.
a
CAUTION statements identify procedures or
practices which must be followed to avoid minor
personal injury or damage to this equipment.
Safety
The installation, operation, maintenance, and trouble
shooting of arc welding equipment requires practices
procedures which ensure personal safety and the
safety of others. Therefore, this equipment is to be in
stalled, operated, and maintained only by qualified per
sons in accordance with this manual and all applicable
and
codes such as, but not limited to, those listed at the end
of Section 1
Safety Rules For Operation Of Arc Weld
in the welding power source Owners
Source
Power
ing
IMPORTANT statements identify special instructions
necessary for the most efficient operation of this equip
Manual.
ment.
SECTION 2-INTRODUCTION
Table 2-1.
Ampere Rating
600o Duty Cycle
170 Amperes
With CO2
2-1.
SpecIficatIons
Wire
Cable
Cooling
Diameter
Length
Method
0.023-0.035
10 ft.
~fl
(0.6-0.9 mm)
12 ft.
15 ft.
Net
(3.0 m)
(3.7 m)
(4.6 m)
DUTY CYCLE
3.5 lbs. (1.6 kg)
4 lbs. (1.8 kg)
4.5 lbs. (2kg)
Air
a
The duty
cycle of a welding gun is the percentage of a ten
period that a gun can be operated at a given out
put without overheating and damaging the gun. This gun
is rated at 60% duty cycle using CO2 shielding gas. This
minute
Ship
6 lbs.
(2.7 kg)
6.5 lbs. (3
7 lbs. (3.2
kg)
kg)
CAUTION;
EXCEEDING THE RATED AM
PERAGE WITH CO2 OR FAILING TO RE
DUCE THE WELDING AMPERAGE OR DUTY
CYCLE WHEN USING A MIXED SHIELDING
GAS can result in damage to the gun.
Do not exceed rated amperage when
CO2.
Operate at3O% duty cycle
shielding gas.
the gun can be operated at 170 amperes for six
minutes out of ten with CO2 shielding gas. During the re
means
maining four minutes, the gun must operate at no load to
permit proper cooling. If rated amperage is exceeded,
the duty cycle must be reduced.
Weight
2-2.
when
using
using mixed
DESCRIPTION
This unit is
an
air-cooled semiautomatic Gas Metal Arc
Welding (GMAW)
gun.
OM-1028
Page
1
SECTION 3INSTALLATION
Contact Tube
Monocoil Liner
Trigger Switch
Wire Outlet Guide
Gun Switch
Plug
un/Feeder Connector
TB-124 473-A
Figure
a
WARNING: ELECTRIC SHOCK
can
3-1. Gun
kill.
Do not touch live electrical parts.
Shut down
welding power
source
before
IMPORTANT: The wire outlet
of the gun assembly.
and wire
feeder, and disconnect input power employing
lockout/tagging procedures
or installing gun.
Components
1.
IMPORTANT:
GUN/WIRE FEEDER CONNECTIONS
(Figure
-
Install the gun/feeder connector into the drive assembly
on the wire feeder as follows:
OM-1028
Page
2
gun/feeder connector securing knob
assembly.
on
Wire
guides
should be
positioned
as
close as possible to the drive rolls witho Ut touching them.
This
2.
gives wirc~ maximum
column
strength.
Insert gun into wire drive assembly until gun/feeder
stops against wire drive assembly.
connector
3.
3-1)
is pro vided as part
the wire drive
inspecting
Lockout/tagging procedures consist of remov
ing input power plug from receptacle, padlock
ing line disconnect switch in open position, re
moving fuses from fuse box, or shutting off and
red-tagging circuit breaker or other disconnect
ing device.
3-1.
Loosen the
guide
3-2.
Tighten gun/feeder
connector
securing
knob.
GUN SWITCH CONNECTION (Figure 3-1)
Connect gun trigger switch into TRIGGER receptacle on
wire feeder as follows: align keyways, insert plug, and
rotate threaded collar
fully clockwise.
SECTION 4- SEQUENCE OF OPERATION
4-1. GAS METAL ARC WELDING
3.
(GMAW)
Be sure that the proper shielding gas is connected to
shielding gas valve.
the
a
WARNING:
ELECTRIC SHOCK can kill;
MOVING PARTS can cause serious Injury;
IMPROPER AIRFLOW AND EXPOSURE TO
ENVIRONMENT can damage internal parts.
4.
5.
Keep
Keep
operating.
panels in place while
Warranty is void if the wire feeder is operated
with any portion of the outer enclosure removed.
ARC RAYS, SPARKS, AND HOT SURFACES
can burn eyes and skin; NOISE can damage
hearing.
Wear correct eye, ear, and
FUMES AND
GASES
can
body protection.
seriously harm
your health.
Keep your head out
Ventilate to
keep
of the fumes.
from
breathing
fumes and
6.
Wear
7.
Connect work
inadequate,
IMPORTANT: When installing new equipment, or after
prolongedshutdown, allow shielding gas to flowcontinu
ously for at least one minute before welding to purge the
shielding gas line. To avoid wasting wire while purging,
open the drive roll housing.
Purge button on the wire feeder (if applicable)
10. Press
the gun switch to purge the gas line.
end of nozzle.
cause
METAL, SPATTER,
cause
AND
SLAG
can
housing, and adjust tension (see ap
propriate Owners Manual).
trigger, and run the welding wire out
the
of the gas nozzle. Cut the wire off so
end
beyond
it extends out 1/4 to 3/8 in. (6.4 mm to 9.5 mm) from
13. Setthe Wire
tire and burns.
ipated
Watch for fire.
fire
Keep
how to use it.
Do not
14. Wear
extinguisher nearby,
a
use near
Allow work and
ing
and know
wire
Speed control slightly higherthan antic
speed.
welding helmet
to cool before
handling.
16. Press the gun trigger. Gas starts to flow, wire starts
to feed, and the arc will be established. If the welding
wire appears to slip, adjust drive roll tension accord
ing to wire feeder Owners Manual.
MAGNETIC FIELDS FROM HIGH CURRENTS
can affect pacemaker operation.
Wearers should consult their doctor before
17. Afler the controls
going near arc welding, gouging, orspot welding
operations.
the wire feeder (if
See Section 1
Fir,
~Al&d~n,
V
U
~
-
Safety
Pri,*,~r Qr,,
.JVV..#~
Owners
information.
source
Rules For
ur,o
~fl~~JIVJ…,
Operation
in thai t~uciIr~unri
~.,
~
on the welding power source and
applicable) have been adjusted for
normal operation, the welding power source (and
wire feeder) will function automatically when the gun
trigger is pressed. Releasing the gun triggerwillex
tinguish the arc and cause the wire feed and gas flow
Of
~
.~ r~.~
Manual for basic welding
safety
to
4-2.
Be sure that proper electrical connections have
welding power source and the
wire feeder.
Be sure that the welding wire has been properly
threaded and that correct initial tensions have been
set on the drive rolls (refer to the appropriate Own
stop.
SHUTTING DOWN
1.
Stopwelding.
2.
Turn off
3.
Turn off the
been made to the
Manual).
with proper filter lens accord
to ANSI Z49.1.
15. Hold the end of the gas nozzle approximately 1/2 in.
(12.7 mm) from the workpiece.
flammable material.
equipment
supply.
Energize
welding power source and the wire
(refer to the respective Owners Manual).
gas
feeder
Do not point gun toward any part of the body,
any conductive surface, or other personnel.
can
to clean, bare metal at work-
the
12. Press the gun
HOT
ers
shielding
the
puncture
WIRE
clothing.
9.
on
11. Close drive roll
WELDING
wounds.
clamp
and
Turn
breathing
2.
dry insulating gloves
approved
use
the welding power source in
for the welding setup (refer to
on
8.
or
If ventilation is
device.
required posi
piece.
gases.
1.
Place the controls
in the
required position
welding power source Owners Manual).
moving parts.
all covers and
control(s)
welding setup.
the
Do not touch live electrical parts.
away from
Place the wire feed
tion for the
a
welding
power
source
shielding gas
and wire feeder.
at its source.
WARNING:
HIGH CONCENTRATION OF
SHIELDING GAS can harm health or kill.
Shut off gas
supply
when not in
use.
OM-1028
Page
3
SECTION 5- MAINTENANCE
5-1.
3.
INSPECTION AND UPKEEP
Usage and shop conditions will determine
and type of maintenance required.
a
frequency
4.
ELECTRIC SHOCK can kill;
WARNING:
MOVING PARTS can cause serious injury;
WIRE
WELDING
can
cause
puncture
wounds; HOT SURFACES can cause severe
burns.
Remove contact tube, and
Reinstall nozzle, and
welding power source
working on gun.
Allow
a
or
ft~
4~
Do not touch live electrical parts.
Shut down
feeder before
welding power source
working on gun.
Inspect gun for broken areas, cracks and loose
parts; tighten, repair and replace as required.
2.
Carefully
3.
Repair or replace as required all hose and cables;
give particular attention to frayed and cracked insu
lation and areas where it enters equipment.
any weld spatter or dirt that has
accumulated around nozzle opening and inside
nozzle.
remove
Remove grease and grime from components and
moisture from electrical parts and cables.
Blow out casing with
wire. This
removes
compressed airwhen changing
any loose metal chips and dirt
Allow
a
CAUTION: FLYING DIRT AND METAL CHIPS
Injure personnel and damage equip
ment.
1.
2.
Remove nozzle. A slight twist clockwise aids
Do not touch live electrical parts.
welding power source
working on gun.
injury.
Allow
a
or
servicing.
cooling period before servicing.
Remove nozzle. A slight twist clockwise aids
al and installation.
2.
Cut off any portion of electrode wire which extends
beyond end of contact tube.
Page
4
on
wire
during installation,
Spooled wire has a tendency to unravel
when loosened from the spool.
rapidly
Manually retract wire onto wire spool (see wire feed
Owners Manual).
er
4.
Remove contact tube and contact tube
5.
Disconnect gun assembly from wire feeder, if appli
cable, and lay it out flat (no coils in cable/conduit).
6.
Remove outlet
7.
Pull out monocoil liner from
end of gun assembly.
adapter.
guide.
and wire
1.
OM-1028
firm hold
removal, and threading operations.
Disconnect gun from wire feeder before in
specting, maintaining,
LOOSE WELDING WIRE can
CAUTION:
cause
(Figure 3-1)
WARNING:
ELECTRIC SHOCK can kIll;
MOVING PARTS can cause serious injury;
WIRE
WELDING
can
cause
puncture
wounds; HOT SURFACES can cause severe
burns.
Shut down
feeder before
remov
Cut off any portion of electrode wire which extends
beyond end of contact tube.
4A
3.
a
servicing.
al and installation.
Keep
CONTACT TUBE REPLACEMENT
cooling period
servicing.
before
To change from .030 in. (0.8 mm) wire or .035 in. (0.9
mm) wire to .023 in. (0.6mm) wire or vice versa, or to re
place monocoil liner, proceed as follows:
Point gun liner only in a safe direction away
from personnel and equipment when cleaning
with compressed air.
5-2.
a
or
IMPORTANT: .030 and .035 in. (0.8 and 0.9 mm) diame
ter wires use the same monocoll liner and outlet guide.
Changing from .030 in. (0.8 mm) wire to .035 in. (0.9
mm) wire or vice versa requires changing the contact
tube only (see Section 5-2).
that may have accumulated.
can
and wire
Disconnect gun from wire feeder before in
servicing.
1.
5.
REPLACING
ELECTRIC SHOCK can kill;
WARNING:
MOVING PARTS can cause serious injury;
WIRE
WELDING
can
cause
puncture
wounds; HOT SURFACES can cause severe
burns.
specting, maintaining,
4.
AND
and wire
servicing.
cooling period before
contact
LINER
Disconnect gun from wire feeder before in
specting, maintaining,
new
operation.
resume
CHANGING WIRE SIZES
5-3.
Do not touch live electrical parts.
Shut down
feeder before
replace with
tube.
a
gun/feeder
connector
CAUTION: FLYING DIRT AND METAL CHIPS
can
injure personnel
and
damage equip
ment.
Point gun liner only in a safe direction away
from personnel and equipment when cleaning
with compressed air.
remov
8.
Clean gun casing or liner with compressed air while
liner or welding wire is removed.
9.
Insert
new
assembly.
at the
monocoillinerintogun/feederendofgun
Be
sure
11. Cutoff liner so that 3/8 in.
new
I__s_Il
sticks out.
guide so that 1/8 in. (3mm) of liner
Hand tighten outlet guide and then tighten
___S__S
S.
.L.....
IlI~LdII L011Ldt& LULJ~
~
~Uc1jJLeI.
outlet
two full turns
a
of liner sticks out
of the head tube.
monocoil covered with tubing is
gun/feeder connector.
I~.
10. Insert
(9.5 mm)
OVERTIGHTENING
CAUTION:
GUIDE damages liner.
Do not
13. Reinstall
appropriate
contact tube and nozzle.
more.
overtighten
outlet guide.
OUTLET
14. Reinstall gun to wire drive
15. Thread
Owners
assembly.
welding wire according to the wire feeder
manual, and resume operation.
OM-1028
Page
5
SECTION 6- PARTS LIST
4
3
12
9
TC-124 605-B
Figure
OM-1028
Page
6
6-1.
Exploded
View Of GA-17C Gun
Item
No.
Part
No.
Figure 6-1. Exploded
1
2
3
4
4
4
5
6
7
8
9
10
ii
12
13
12
13
14
15
16
16
16
17
18
089 885
118 267
128535
087 299
000 067
000 068
120 164
089 902
079 878
079 535
048 834
604 525
602 173
081 909
129 178
128769
129 179
120 995
079974
133 147
133352
133353
133 351
124 697
128758
Quantity
Description
View Of GA-17C Gun
itt
TUBING, nprn .375 ID x .062 (order by tt)
ADAPTER, contact tube
NOZZLE,sliptype
1
1
1/2ort
2
TUBE, contact .023 wire
TUBE, contact .030 wire
TUBE, contact .035 wire
TRIGGER, switch
TERMINAL, receptacle pin
HOUSING PLUG & PINS, (consisting of)
TERMINAL, male 1 pin sz 16 18-14 wire
CLAMP, cable
CABLE, No. 18 2/c (order by ft)
SCREW, set stl sch 10-32 x .250 cup point
SPLICE, prl 20-16 wire nylon
KIT, liner monocoil .023/.025 wire (consisting of)
~GUlDE,wireoutIet.023
KIT, liner monocoil .030/.035 wire (consisting of)
GUIDE, wire outlet .030-.045
O-RING,i/2IDx.lO3CSrbr
STRAIN RELIEF, cable
CABLE,conduit loft
CABLE,conduit i2ft
CABLE, conduit i5ft
HANDLE, gun (consisting of)
2
2
1
2
1
4
1
2ft
1
2
1
1
1
1
2
1
1
1
1
1
~RING,Iocking
1
BE SURE TO PROVIDE MODEL AND SERIAL NUMBER WHEN ORDERING REPLACEMENT PARTS.
OM-1028 Page 7
C