1
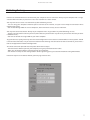
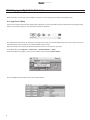
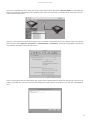
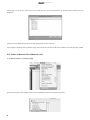
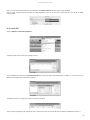
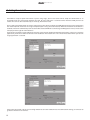
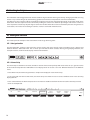
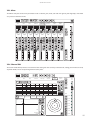
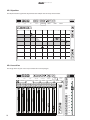
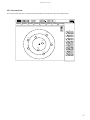
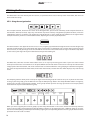
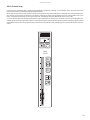
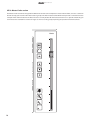
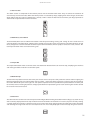
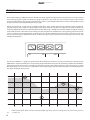
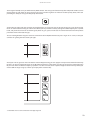
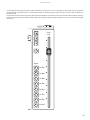
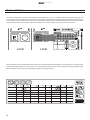
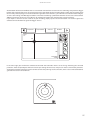
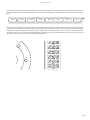
Contents
I. Welcome
4
PART ONE : INSTALLATION & SETTINGS
5
II. Installing Dexter Software
II 1. On the Mac
II 2. On the PC
6
6
6
III. Hooking Dexter up
7
IV. Setting up your Digital Audio Workstation
IV 1. Logic Pro 7.2 (Mac)
IV 2. Cubase 4 (Mac and PC) and Nuendo 3 (PC)
IV 3. Sonar (PC)
8
8
10
11
V. Getting them to talk
12
PART TWO : OPERATING DEXTER
13
VI. Touching techniques
14
VII. Workspace overview
VII 1. Navigation Bar
VII 2. Name Strip
VII 3. Mixer
VII 4. Channel Edit
VII 5. Equalizer VII 6. Insert View
VII 7. Surround View
14
14
14
15
15
16
16
17
VIII. Using the Mixer
VIII 1. Using the navigation bar
VIII 2. Channel strips
VIII 3. Master Fader section
3.1 Zoom section
3.2 Bank Mute, Solo and Arm
3.3 Simple Mix
3.4 Bank Pan Flip
3.5 Track Link 18
18
19
20
21
21
21
21
21
IX. Equalizer view
22
X. Insert View
24
XI. Channel Edit View
26
XII. Surround View
28
User Manual
I. Welcome
Thank you for choosing Dexter as your Digital Audio Workstation controller ! The first part of this guide will get you and your
Dexter all prepared and ready to get in control. Part two will then walk you through Dexter’s user interface and workflow.
PART ONE : INSTALLATION & SETTINGS
User Manual
II. Installing Dexter Software
Dexter relies on several pieces of software to integrate with your Digital Audio Workstation. Before you start using Dexter,
you need to install specially developped plug-ins at the heart of your DAW. Additionally, support for Apple Logic Pro on the
Mac is made possible via an extra application called the JazzDaemon. Read on to install the necessary Dexter software !
II 1. On the Mac
Double click the Dexter Installer icon located on the bundled CD. Choose the Volume you wish to install on : this is the one
that contains your Applications folder and all the DAWs you wish to control.
You may now select the components you wish to install.
For Cubase compatibility, select Cubase Plug-in.
For Logic compatiblity, select both Logic Pro Plug-in
and JazzDaemon.
Click on Install or Upgrade. The Installer will prompt
you for an administrator password, and will then
install all the relevant files.
II 2. On the PC
Double click the Dexter Installer icon located on the bundled CD, and click Next after the welcome screen.
You may now select the components you wish to install.
The Installer will ask you to locate the directories
where the plug-ins for each application should be
installed.
For Cubase, you'll need to locate the Components
directory inside your Cubase 4 installation folder.
For Nuendo, you'll need to locate the Components
directory inside your Nuendo 3 installation folder.
For Sonar, you'll need to locate the Shared Surfaces
directory inside your Cakewalk installation folder.
The Installer will then prompt you for confirmation.
Click Install and wait for the process to end. Click
Finish : you're done !
INSTALLATION & SETTINGS
III. Hooking Dexter up
Dexter uses standard Ethernet to connect with your computer. You can connect it directly to your computer with a single,
crossover Ethernet cable, or place it on a local area network via a hub or switch.
You may want to use a local area network if any of the following are true:
- You are using your computer’s Ethernet port to connect to the internet, and you want to keep the connection while
working with Dexter.
- You are distributing DAWs on several computers, and want Dexter to easily access all of them.
You may want to connect Dexter directly to you computer with a single cable if any of the following are true:
- Dexter is the only Ethernet device you have (either because you don’t own any others or you connect wirelessly to other
network devices).
- You want to control one single DAW on your main computer
To get in business rapidly, we’ll only cover the latter configuration in this section. It should suffice on most systems. Should
it not work out of the box, or if you seek more details on OS tinkering and connection to hubs and switches, please have a
look at the Appendix on Network Configuration.
The direct connection procedure basically boils down to three steps.
- Connect Dexter's Ethernet port to your computer, using the provided crossover cable.
- Make sure any firewall software is deactivated on your computer.
- Turn Dexter on and press the settings button. On the appearing panel, just select the Automatic Using DHCP mode.
Dexter will acquire an IP address without you worrying to choose one.
User Manual
IV. Setting up your Digital Audio Workstation
Now that Dexter can talk with your computer, we'll move on to setting up your Digital Audio Workstation.
IV 1. Logic Pro 7.2 (Mac)
First of all, you need to make sure the JazzDaemon application is running. Double click the JazzDaemon in your Applications
folder. Its icon should appear in the right hand side of your Menubar.
The JazzDaemon will convert all data that's coming frm the Lemur into standard MIDI data. To do so, it creates a bunch of
virtual MIDI ports, that will appear as traditional MIDI inputs in Logic.
We'll make Dexter aware of the JazzDaemon presence later on. Let's move to Logic now.
In the Menu Bar, select Logic Pro -> Preferences -> Control Surfaces -> Setup
From the window that appears, you can add a Dexter instance. Choose New->Install
Choose JazzMutant Dexter from the list of available devices.
INSTALLATION & SETTINGS
Select any virtual MIDI port as the Input port for the newly added surface. We'll choose Daemon Input 0, a virtual MIDI port
that was created by the JazzDaemon. You'll probably not care for the rest of those virtual MIDI ports, unless you also use a
Lemur with the JazzDaemon.
Logic has a whole bunch of control surface preferences, all of which are documented in its User Manual. There is one option
you need to turn off in Logic Pro -> Preferences -> Control Surfaces -> Preferences : disable the Pickup Mode, as Dexter use
only absolute controllers, instead of relative ones.
Dexter needs to speak with the JazzDaemon now : push Dexter's leftmost button, to display its settings page. Push the large
button in the MIDI box : you must now select the computer the JazzDaemon is running on. In our case, this is "MacBookPro.
local".
User Manual
Double-tap it or press the small arrow on the left. You are now presented with all the MIDI ports attached to this
computer.
Select the virtual MIDI port you chose in Logic preferences, and hit Connect.
You've setup everything that's specific to Logic, move on to the next section for the last words on conversing with a DAW!
IV 2. Cubase 4 (Mac and PC) and Nuendo 3 (PC)
In the Devices menu, select Device Setup.
Click the Plus sign to add a control surface. Select JazzMutant Dexter in the appearing menu.
10
INSTALLATION & SETTINGS
You can now see JazzMutant Dexter instantiated in the Remote Devices section of the Setup window.
You've setup everything that's specific to Cubase/Nuendo, move on to the next section for the last words on DAW
conversation !
IV 3. Sonar (PC)
Choose Options->Controllers/Surfaces.
Click the yellow star to add a new control surface.
Select JazzMutant Dexter in the Controller/Surface list. Leave the Input and Output ports to None, as Sonar doesn't use
MIDI for communication with Dexter. Click OK.
JazzMutant Dexter now appear in your list of control surfaces
You've setup everything that's specific to Sonar, move on to the next section for the last words on DAW conversation !
11
User Manual
V. Getting them to talk
Your DAW is ready to speak with Dexter. If you're using Logic, you've also learnt how to setup the JazzDaemon as an
intermediary for the conversation between the two. All you need to do is associate Dexter with the DAW you want to
control. This can be done automatically or manually, from Dexter itself.
Have a look at the DAW section in Dexter's settings page. The white list shows all DAW applications that were detected on
the network (which amount to one single computer if you're using direct connection). When the AutoConnect checkbox is
enabled, Dexter will automatically connect to the first detected DAW. The current target DAW appears in blue, and its name
is displayed at the right of "Connected to:"
If you'd rather select the target application manually, you'll want to disable the AutoConnect feature. In that case, select the
application you want to control and hit the Connect button. This button turns into a Disconnect button when you current
target application is selected.
You’re now connected ! Hit the «Save Config» button to store the AutoConnect and JazzDaemon settings, and «Close» to
go back to Dexter’s user interface.
12
PART TWO : OPERATING DEXTER
User Manual
VI. Touching techniques
The multitouch technology featured on Dexter combines high resolution with high sensitivity. Though you'll find caressing
Dexter a very natural thing to do, the following guidelines will make its manipulation even more comfortable.
You don't have to use excessive force to control the widgets on the screen. Extremely light touch, on the other hand, won't
work either. The best response will be achieved by making the contact area between your fingers and Dexter's surface as
small as possible. Use the tips of your fingers rather than the flat underside to achieve maximum precision. Fingernails are
even better, have no fear of scratching the surface : Dexter is rock-solid and built to last.
VII. Workspace overview
The Dexter provides multiple views to deal with a wide range of mixing tasks:
VII 1. Navigation Bar
The Navigation Bar, located at the top of the screen, will be your main stop for smart navigation inside a project and
between Dexter’s dedicated Views. This is where you will find the Bank Selector, filtering and grouping functions, the
transport controls, and Time Code display and the View Switchers.
Kik
Snare
VII 2. Name Strip
Bass
Guitar left
Guitar right
Chorus
Skank Gu...
Distorted
Guitar
Distorted
Guitar 2
Master
The Name Strip is common to all Views. A modern version of the old strip of tape with track names on it, it gets the names
of the tracks directly from the DAW software and displays them on screen. It also has different functions in the different
views :
• In the Mixer View, the Name Strip provides a simple name display for each channel strip.
Level
Level
Level
Level
Level
Level
Level
Level
-11.48
-2.76 also allows
-3.50the user -3.49
-2.54
• In the
Insert, EQ -11.06
and Channel-10.42
Edit views, -13.23
the Name Strip
to select a different
track in the currently
displayed bank.
• In the Surround View, the Name Strip lets the user enable or disable tracks from the Panner itself so that only relevant tracks are manipulated.
Kik
Level
-11.48
14
Snare
Level
-11.06
Bass
Level
-10.42
Guitar left
Level
-13.23
Guitar right
Chorus
Skank Gu...
Distorted
Guitar
Distorted
Guitar 2
Level
-2.76
Level
-3.50
Level
-3.49
Level
-2.54
Master
OPERATING DEXTER
VII 3. Mixer
The Mixer view puts all the main parameters such as volume, pan, mute, solo and arm right at your fingertips, and allows
easy access to the other views.
Kik
Snare
Level
-11.48
Bass
Level
-11.06
Guitar left
Level
-10.42
Guitar right
Chorus
Skank Gu...
Distorted
Guitar
Distorted
Guitar 2
Level
-2.76
Level
-3.50
Level
-3.49
Level
-2.54
Level
-13.23
Master
VII 4. Channel Edit
The Channel Edit View provides an overview of the settings for the currently selected track, letting you tweak bus sends,
equalizer bands, inserts and panning from the same place.
Kik
20
Snare
50
Bass
100
200
Guitar left
500
Guitar right
1k
1
2k
Chorus
Skank Gu...
5k
2
Distorted
Guitar
10k
Distorted
Guitar 2
Level
1.18
20k
Sends
Compressor
Amp Simulator
Auto Pan
No Effect
No Bus
No Bus
Drive
7.4
No Bus
15s
No Bus
No Bus
No Bus
3db
No Bus
Amp Model
Lead2
No Bus
15
User Manual
VII 5. Equalizer
The EQ View allows ergonomic adjustments to the EQ for the currently selected track.
Kik
Snare
20
50
Bass
100
Guitar left
200
Chorus
Skank Gu...
Guitar right
500
1k
Distorted
Guitar
2k
Distorted
Guitar 2
5k
10k
20k
0
2
3
1
VII 6. Insert View
The Plugin View lets you access all parameters for inserted plugins.
Kik
Snare
Compressor
Amp Model
Lead 2
Bass
Guitar left
AmpSimulator
Guitar right
AutoPan
No Effect
Drive
Bass
Mid
Treble
Presence
7.4
5.0
5.0
9.3
5.0
Chorus
Skank Gu...
Distorted
Guitar
No Effect
Volume
5.0
Distorted
Guitar 2
Level
1.18
No Effect
Speaker
Ty
Cabinet 2
Sends
No Bus
No Bus
No Bus
No Bus
No Bus
No Bus
No Bus
No Bus
16
OPERATING DEXTER
VII 7. Surround View
The Surround View provides a simple interface to perform surround panning across multiple tracks.
Synth1
Drums
Guitar
Synth2
Synth3
Bass
Voice2
Voice
Synth1
Guitar
Drums
Drums
Guitar
Synth1
Synth2
Synth3
Voice
Bass
Synth3
Bass
Synth2
Voice2
Voice2
Voice
17
e
User Manual
VIII. Using the Mixer
The Mixer View is the main hub of your mix sessions, as it provides direct access not only to the master fader, but also to all
banks of channel strips.
VIII 1. Using the navigation bar
The transport controls, located at the center of the Navigation Bar, put the most commonly used transport functions at
Chorus
Distorted playbackDistorted
theBass
forefront. Rewind,
Forward,
andright
Record all provide
instantly recognizable
functions, while the
Guitar
left Stop, Play
Guitar
Skank Gu...
Guitar
Loop Button, shown as an infinity sign, toggles the "loop playback"
or "cycle" mode
of your software.Guitar
To the 2right of these
transport functions you will see a Time Code readout, depicting the current playback position.
The Bank Selector in the upper left corner serves as a way of getting up and down through the tracks in banks of eight. Tap
the Bank Selector button and a row of banks will appear underneath
it as thumbnails.
either tap theGuitar
bank you
Kik
Snare You can then
Bass
left
want to access, or slide your finger across the thumbnails and see the names of the tracks change in the Name Strip above
it, then release your finger when you've found the bank you were looking for.
vel
.06
Level
-10.42
Level
-13.23
Level
-2.76
Level
-3.50
Level
-3.49
Level
-2.54
The Mute Filter, Solo Filter and Arm Filter buttons serve as an easy way of sorting your tracks. If you have several soloed
Kikit can be quite Snare
Guitar
leftonly the soloed
Guitartracks
right
tracks spread out across several banks
difficult to work withBass
them in concert.
To view
simply tap the Solo Filter button, and all non-soloed tracks are removed from the view, grouping the soloed ones together.
The same concept works for the Mute Filter, which hides muted tracks, and the Arm Filter which displays only record ready
tracks.
Level
-11.48
Level
-11.06
G
Level
-10.42
Sk
Level
-13.23
The Grouping Controls allow you to create up to eight Dexter-based groups of tracks to call up in any View on the Dexter.
Chorus
To assign
go to the Mix View
and tap the Group
Assign
The Group
button
will light up, Distorted
Kik your first group
Snare
Bass
Guitar
left button.Guitar
rightNumberSkank
Gu...
showing the currently selected group number. Find a group number you wish to assign your tracks to and tap anywhere Guitar
inside channel strips to add tracks to that group.
Level
-11.48
Kik
Level
Level
-11.48
-11.48
Snare
Level
-11.06
Bass
Level
Level
-11.06
-10.42
Level
-11.06
Guitar left
Guitar right
Level
Level
-10.42-2.76
Level
-13.23
Level
-10.42
Chorus
Skank Gu...
Level
-13.23
Level
-3.50
Level
-13.23
Distorted
Guitar
Distorted
Guitar 2
Level
-3.49
Level
-2.54
Level
-2.76
Level
-2.76
Master
Level
-3.50
When you have assigned your tracks to groups, tap the Group View button in the centre. Dexter will now only show the
tracks in the currently selected group. The Group Number button can be tapped to select a different group at any time.
You can leave Group Assign and Group View mode by tapping the corresponding buttons. This will get you back to normal
operation where all tracks are visible.
18
Level
-3.49
OPERATING DEXTER
VIII 2. Channel strips
Each Channel is equipped with a volume fader with built-in graphical metering, a level readout, mute, solo and record arm
track status buttons, and Automation Read/Write buttons.
At the top of each Channel strip you have direct access buttons to get to the EQ View, Insert View or the Channel Edit view.
This section also provides the Track Pan Flip button. Tapping the Track Pan Flip button turns the volume fader into a pan
fader - moving the fader up pans the signal to the left, and pulling the fader downwards pans to the right.
For even quicker operation we have provided three preset buttons to set the pan to hard left, centre or hard right positions.
Simply tap the Track Pan Flip button again to return to the regular volume control. Enabling either the Mute, Solo or Record
arm buttons will turn the entire channel strip respectively blue, yellow or red, providing great visual feedback of the current
status.
Kik
Level
-11.48
Snare
Level
-11.06
Bass
Level
-10.42
Guitar left
Level
-13.23
Guitar right
Chorus
Skank Gu...
Level
-2.76
Level
-3.50
19
User Manual
VIII 3. Master Fader section
The Master Fader Section to the right of the Mixer View contains the all-important master volume fader, as well as a selection
of tools to help you treat the individual tracks in groups. The Zoom Section of the Mixer View provides a novel twist on the
concept of the volume fader: for the first time ever it is now possible for the faders to zoom in on a specific amount of gain
and increase the resolution to achieve changes as small as 0.1 db, greatly improving the precision of volume control.
Chorus
Chorus
Distorted
Distorted
t Gu... Guitar right
Skank Guitar
Gu... 2
ank
Guitar
l
Level
3
3.50
LevelLevel
-2.76-3.49
20
LevelLevel
-3.50-2.54
Distorted
Guitar
Level
-3.49
Distorted
Master
Guitar
2
Level
-2.54
Master
OPERATING DEXTER
3.1 Zoom section
The Zoom section is comprised of three Zoom presets and the Variable Zoom slider. They all control the resolution of
channel strips and master faders. While the Zoom presets are selected by simply tapping them with a finger, the Variable
Zoom Sliders takes the guise of a button but is actually a slider : touch the Zoom Slider and move your finger upwards or
downwards to adjut the zoom level of all faders.
ass
Guitar left
Guitar right
Chorus
Skank Gu...
Distorted
Guitar
Distorted
Guitar 2
Master
3.2 Bank Mute, Solo and Arm
Level
10.42
Guitar right
The Bank Mute, Bank Solo and Bank Arm buttons allow for quick muting, soloing and arming of all the tracks that are
currently shown in the Mixer View. Suppose you’ve soloed several tracks across several banks in the Mixer View. To un-solo
Level
Level
these,Level
simply hit the Solo
Filter button Level
and then tap theLevel
Bank Solo button,
which rapidly un-soloes the tracks, 8 after 8. This
-13.23
-2.76
-3.50
-3.49
-2.54
technique works for mutes and record arming, too.
Chorus
Skank Gu...
Distorted
Guitar
Distorted
Guitar 2
Master
3.3 Simple Mix
The Simple Mix button shows and hides status and automation buttons from each channel strip, simplifying the interface
and making the faders wider for a sleek fader layout.
Level
-2.76
Guitar right
Level
-2.76
Level
-3.50
Level
-3.49
Level
-2.54
Chorus
Skank Gu...
Distorted
Guitar
Distorted
Guitar 2
Level
-3.49
Level
-2.54
3.4 Bank Pan Flip
Master
The Bank Pan Flip button converts the lower part of each channel strip into a full panorama control section. Tapping the
Bank Pan Flip button turns the volume fader into a pan fader - moving the faders up pans the signals to the left, and pulling
the faders downwards pans to the right. For even quicker operation we have provided three preset buttons to set the pan
to hard left, centre or hard right positions. Simply tap the Bank Pan Flip button again to return to the regular volume control
for all tracks in the current bank.
3.5 Track Link
Level
-3.50
Just above the Pan Control icon is the handy Track Link widget. When holding this button with one finger, any action on any
Chorus displayedDistorted
Distorted
currently
channel strip will
be mirrored on the whole current bank. For instance, if you’re currently viewing
Guitar right of the Skank
Master
Gu...
Guitar
Guitar 2
a custom group that consists in drum kit tracks, you can lower the whole group’s volume by holding the Track Link button
and lowering one single fader. You can also solo, mute or arm all currently displayed tracks at once by using the Track Link.
21
User Manual
IX. Equalizer view
The Dark Art of Eqing is difficult to master. The EQ View allows ergonomic adjustments to the EQ for the currently selected
track, while giving you a good view of what is going on EQ-wise in your track. This view is dominated by a large window
showing the EQ curve for the currently selected track. It also has a row of EQ band Activators and X/Y Locking Buttons along
its top, as well as the friendly Zoom buttons to the right.
We will start by taking a closer look at the EQ Band Activators. These enable and disable the different bands available for
your EQ and give you a graphical representation of the types of bands available*. Try tapping a few of these buttons to
enable the EQ bands. You will see yellow EQ Band Handles appearing in the EQ curve window. Grab these objects and play
around with them for a little while and see what you come up with. Even without prior training moving around the bands
can be a lot of fun, thanks to MultiTouch technology select a couple of EQ bands and move them around the screen. You
will learn that moving the EQ Band Handle up or down changes the gain of the Band, while moving it from side to side
modifies the frequency.
Kik
Snare
20
Bass
50
100
Chorus
KikThe
Guitar left
200
Distorted
Guita
500
Distorted
0
Snare
Guitar left
Guitar
right
EQ curve
window is Bass
a graphical representation
of the
frequency
spectrum,
accuratly
settings of your
Skank
Gu...
Guitar mimicking
Guitar the
2
DAW’s built-in equalizer. The EQ curve can be directly manipulated while at the same time providing valuable visual feedback.
Along the top of the black screen are frequency indications, showing the audible frequency range. When you drag an EQ
Band Handle you can see an accurate readout of the current frequency, Q and gain of the band you are manipulating in the
the upper left portion of the screen.
20
50
100
200
500
1k
2k
5k
10k
20k
0
2
3
1
Different DAWs provide different numbers of EQ bands. Apple Logic has 8, whereas Steinberg Cubase has 4. This will be reflected in
the interface, too.
22
1
Distorted
Guitar
Distorted
Guitar 2
OPERATING DEXTER
To the right of the EQ curve you will find the Q Mode Switch. This changes the functionality of the EQ Band Handles so that
moving them up and down no longer changes the gain, but rather tightens or widens the band’s quality factor, while still
Distortedproviding the
Distorted
ability to change the frequency of the band.
Guitar
Guitar 2
Distorted
Guitar
5k Distorted
10k
20k
Guitar 2
Should you be happy with the currently selected frequency, and you just want to change the Q or the gain for the band,
there are also functions to help you acheive this. When you’ve spent time carefully setting the cutoff frequency for a specific
5k you want to move
10kon to tweaking its20k
band, and
Q factor or gain, you can make use of a convenient feature that will protect
parameters from unwanted changes.
The X/Y Locking Buttons help you restrain the movement of the EQ Band Handles to just a single axis at a time, so that you
can focus
5kon getting the little
10kdetails just right. 20k
2
2
2
3
3
And if you want to get even more into details with the EQ processing you can apply the unique Dexter Zoom functionality
to zero in on just the right frequencies in the EQ. When zoomed in, simply touch and drag in the dark area surrounding the
EQ curve to move around the frequency spectrum. Last but not least, the all-important bypass button will help when you
want to A/B the original signal, or when you simply don't need the EQ*.
3
* Unavailable when used in combination with Apple Logic Pro
23
User Manual
Kik
Snare
X. Insert
View
Compressor
Bass
Guitar left
AmpSimulator
Guitar right
AutoPan
No Effect
Chorus
Skank Gu...
Distorted
Guitar
No Effect
Distorted
Guitar 2
Level
1.18
No Effect
Speaker
The
provides an
of the insert
plugins Presence
loaded onto
a track, and
lets you manipulate the parameters
Amp Insert
Model View
Drive
BassoverviewMid
Treble
Volume
Ty
associated with them.
Lead 2
7.4
5.0
5.0
9.3
5.0
5.0
Cabinet 2
In the Insert View you will see a row of tabs below the Name Strip. This row lets you access the different fx loaded onto the
track. Touch the tab for the plugin you wish to edit, and its parameters will be shown in the faders below. If you have loaded
more than 6 plugins on the track you can scroll left and right by using the arrow keys on either side of the tabs.
Kik
Snare
Compressor
Amp Model
Lead 2
Bass
Guitar left
AmpSimulator
Guitar right
AutoPan
No Effect
Drive
Bass
Mid
Treble
Presence
7.4
5.0
5.0
9.3
5.0
Guitar left
AmpSimulator
Bass
Guitar right
Chorus
Skank Gu...
Distorted
Guitar
Chorus
Skank Gu...
Distorted
Guitar
No Effect
Volume
5.0
No Effect
Speaker
Ty
Cabinet 2
Distorted
Guitar 2
Level
1.18
Sends
No Bus
No Bus
No Bus
No Bus
Distorted
Guitar 2
Level
access
1.18
Just like the Mixer View the parameters are shown in banks of eight. To facilitate easy
to potentially hundreds of
Bus
parameters there is also a scroll bar at the bottom of the Insert View to move through the available parameters forNothe
AutoPan
No Effect
No Effect
No Effect
currently selected plugin.
Bass
Mid
Treble
Presence
5.0
5.0
9.3
5.0
Volume
5.0
Sends No Bus
Speaker
Ty
No Bus
No Bus
Cabinet 2
No Bus
No Bus
No Bus
No Bus
Sends
No Bus
No Bus
To the right of the parameter faders lies the Zoom section, hopefully recognizable from the EQ View. Three preset zoom
No Bus
settings allow you to quickly home in on the right plugin settings, and the Variable
No BusZoom Slider allows a great deal of
flexibility to tighten and widen the current zoom.
No Bus
No Bus
No Bus
No Bus
No Bus
No Bus
No Bus
No Bus
Bass
Guitar left
AmpSimulator
Guitar right
Chorus
Skank Gu...
Distorted
Guitar
Distorted
Guitar 2
AutoPan
No Effect
No Effect
Noon
Effect
The effect
bypass button
lets you rapidly
switch inserts
and off*.
Bass
Mid
Treble
Presence
5.0
5.0
9.3
5.0
Volume
5.0
Speaker
Ty
Cabinet 2
•Unavailable when used in combination with Sonar
24
Level
1.18
rus
Gu...
OPERATING DEXTER
To the right of the plugin parameter faders and Zoom section you will see an enlarged version of the channel strip from
the Mixer View. The volume fader is now full throw with an amazing range, and you also gain access to the sends for that
particular track.
Here Dexter will show up to eight sends, the destination of which is shown just next to each send knob. To adjust its settings
push the send knob; the full-throw volume fader will now flip, giving you high-resolution access to the amount that goes
to the bus.
Distorted
Guitar
No Effect
Distorted
Guitar 2
Level
1.18
No Effect
me
Speaker
Ty
0
Cabinet 2
Sends
No Bus
No Bus
No Bus
No Bus
No Bus
No Bus
No Bus
No Bus
25
User Manual
Guitar
Guitar left
right
ft
Chorus
Distorted
Skank
Gu...
Guitar
Chorus
Guitar
Skankright
Gu...
Dist
Gu
Guit
XI. Channel Edit View
The Channel Edit View, accessed via the button marked with an "E", serves as a hub for controlling all what’s going on the
currently selected track. The channel strip portion on the right is identical to the enlarged channel strip from the Insert View,
but instead of a row of tabbed faders you now see condensed representations of both the EQ View, the Insert View and the
Surround View. All those condensed views feature buttons to instantly switch to their fullscreen counterparts.
Kik
20
Snare
50
Bass
100
200
Guitar left
500
Guitar right
1k
1
2k
Chorus
Skank Gu...
5k
Distorted
Guitar
10k
2
Distorted
Guitar 2
Level
1.18
20k
Sends
Compressor
Amp Simulator
Auto Pan
No Bus
No Effect
No Bus
Drive
7.4
No Bus
15s
No Bus
No Bus
No Bus
3db
ell
2
23
Level
-13.23
-2.76
Level
-2.76
-3.50
Level
Level
-3.50
-3.49
Amp Model
Lead2
No Bus
No Bus
Le
-3.
-2.
At the top of the screen, just below the Name Strip is the condensed EQ View, featuring the same controls as its larger sibling.
All your band adjustments can be done here, and if you require a bit more screen space to do your tweaking, simply tap the
EQ View button in the lower right of the EQ box to get to the bigger version.
Kik
20
Snare
50
Bass
100
200
Guitar left
500
Guitar right
1k
1
2k
Chorus
Skank Gu...
5k
2
Distorted
Guitar
10k
Distorted
Guitar 2
20k
Sends
Compressor
Drive
7.4
26
15s
Amp Simulator
Auto Pan
No Effect
Kik
Snare
Bass
Guitar left
Guitar right
OPERATING DEXTER
Chorus
Skank Gu...
Distorted
Guitar
20 Effects View
50
100
200
500 Insert View.
1k It is coloured
2k
5k like its10k
At the bottom of the Channel
is a condensed
view box for the
green just
bigger
brother, but unlike the full-screen Insert View it provides a touchpad-like X/Y controller field, in which two parameters from
the currently selected plugin can be tweaked.To the right of the X/Y controller , you’ll find the usual Zoom Control widgets,
as well as X/Y locking and effect bypass buttons. The wheel resembling a pitchbend controller lets the user select between
different parameters for the X/Y axes. Move it up and down to jump to the next/previous pair of parameters.
If you require a bit more screen estate to do your tweaking, simply tap the Insert View button in the lower right of the
condensed Insert View box to get to the bigger version.
2
1
Compressor
Amp Simulator
Auto Pan
No Effect
Drive
7.4
15s
3db
Snare
50
100
Bass
200
Guitar left
500
Guitar right
1k
2k
Chorus
Skank Gu...
5k
Distorted
Guitar
10k
Amp Model
Distorted
Guitar 2 Lead2
Level
1.18
20k
In the lower right you will find the condensed
2 Surround View Controller with a series of rings indicating the surround
1
panorama.
A ball-shaped object shows the current pan settings for the track, and you can move it arround the panorama.
Should you need finer controls or want to control several track pannings at the same time, there is also a shortcut button to
get to the full-screen Surround View.
Sends
Compressor
Amp Simulator
Auto Pan
No Effect
No Bus
No Bus
No Bus
15s
No Bus
No Bus
No Bus
3db
No Bus
Amp Model
Lead2
No Bus
27
20k
User Manual
XII. Surround View
The Surround View provides a revolutionary way of controlling surround soundscape across several channels, through
detailed panorama management tools.
The View consists of a main Panning Circle to the left and rows of panorama management tools to the right. The Panning
Circle will show up to eight tracks at a time as different coloured balls. Track names are displayed above each ball for
Hi
easy identification. Of course, all the balls can be grabbed and moved at the same time, thanks to Dexter’s multitouch
capabilities.
In the upper right corner of the main Panning Circle you will see two hand icon buttons. Enabling the Rotate Mode Button
lets you rotate the entire set of 8 tracks around the surround panorama. Simply tap the button so that it starts flashing and
rotate your finger around the central point of the Panning Circle to move all the balls.
Underneath it is the Distance Mode Button, which lets you move all the currently shown tracks closer to or further from the
surround center. Tap the button so that it starts to flash to enable the function. To adjust the Distance Mode put two fingers
on the Panning Circle. Moving the fingers closer or further from each other in a "pinching" motion lets you move all the
currently shown tracks.
Synth1
Drums
Guitar
Synth2
Synth3
Bass
Voice2
Voice
Hi
Synth1
Guitar
Drums
Drums
Guitar
Synth1
Synth2
Synth3
Voice
Synth3
Bass
Bass
Synth2
Voice2
Voice2
Voice
Synth1
Drums
Guitar
Synth2
Synth3
Bass
Voice2
Voice
Synth1
Guitar
Drums
Drums
Synth3
Voice
Guitar
Synth1
Synth2
Bass
Synth3
Synth2
Bass
Voice2
Voice2
Voice
28
OPERATING DEXTER
As mentioned earlier, the Name Strip above the Panning Circle displays the tracks that can be manipulated. A track can be
added or left out from the view by pressing its name in the Strip. Tracks that can’t be adjusted in Surround view appear in
gray.
Synth1
Synth2
Drums
Guitar
Synth2
Synth3
Bass
Voice2
Voice
The panorama management tools provided in the Surround View consist of individual controls for each of the eight shown
tracks. The
row of Distance
locks the panning’s
distance from surround centre, and lets you adjust the angular
Synth3
Bass Lock buttons
Voice2
Voice
position. The Angle Lock buttons lock the relative angle of the track panning balls and lets you alter the distance from
surround centre. Finally a row of Pan View Solo buttons allows you to remove all other track pans from the Panning Circle,
Guitar
giving you easy access to just the track you want to manipulate.
Synt
Drum
Drums
Synth1
Guitar
Guit
Synth1
Synth3
Drums
Drums
Guitar
Bass
Synth3
Synt
Voice
Synt
Synth2
Bas
Synth3
Voice
Synth2
Voice
Voice2
Bass
Voic
Synth2
Voice2
Voice2
Voice
29