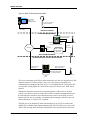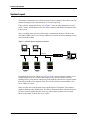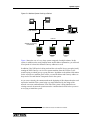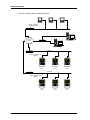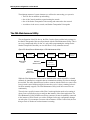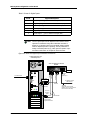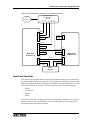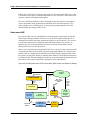
1
Fire Station Alerting System
Installation and Maintenance
025-9581M
Software License
The Zetron software described in this manual is subject to the terms and conditions of Zetron's Software License Agreement,
a copy of which is contained on the product distribution media or otherwise provided or presented to buyer. Installation and/
or use of the Zetron software constitutes acceptance of Zetron's Software License Agreement.
Limited Warranty
Buyer assumes responsibility for the selection of the Products to achieve buyer's or its customer's intended results obtained
from the Products. If buyer has provided Zetron with any requirements, specifications or drawings, or if Zetron provides
buyer with such materials, such materials are provided solely for buyer's convenience and shall not be binding on Zetron
unless agreed in writing by the President of Zetron. ZETRON DOES NOT WARRANT THAT THE PRODUCTS OR ITS
CUSTOMER'S REQUIREMENTS OR SPECIFICATIONS OR THAT OPERATION OF THE PRODUCTS WILL BE
UNINTERRUPTED OR ERROR FREE. SUBJECT TO THE LIMITATIONS SET FORTH BELOW, Zetron warrants that all
Zetron Products and Zetron Accessories will be free from material defects in material and workmanship for one year from
date of shipment (except where indicated otherwise in the Zetron Price Book). For buyer's convenience, Zetron may purchase
and supply additional items manufactured by others. In these cases, although Zetron's warranty does not apply, buyer shall be
the beneficiary of any applicable third party manufacturer's warranties, subject to the limitations therein. Zetron's warranty
covers parts and Zetron factory labor. Buyer must provide written notice to Zetron within the warranty period of any defect. If
the defect is not the result of improper or excessive use, or improper service, maintenance or installation, and if the Zetron
Products or Zetron Accessories have not been otherwise damaged or modified after shipment, AS ZETRON'S SOLE AND
EXCLUSIVE LIABILITY AND BUYER'S SOLE AND EXCLUSIVE REMEDY, Zetron shall either replace or repair the
defective parts, replace the Zetron Products or Zetron Accessories or refund the purchase price, at Zetron's option, after return
of such items by buyer to Zetron. Shipment shall be paid for by the buyer. No credit shall be allowed for work performed by
the buyer. Zetron Products or Zetron Accessories which are not defective shall be returned at buyer's expense, and testing and
handling expense shall be borne by buyer. Out-of-warranty repairs will be invoiced at the then - current Zetron hourly rate
plus the cost of needed components. THE FOREGOING WARRANTY AND THE THIRD PARTY MANUFACTURER'S
WARRANTIES, IF ANY, ARE IN LIEU OF ANY AND ALL OTHER WARRANTIES EXPRESSED, IMPLIED OR
ARISING UNDER LAW, INCLUDING, BUT NOT LIMITED TO, THE IMPLIED WARRANTIES OF
MERCHANTABILITY, NON-INFRINGEMENT AND FITNESS FOR A PARTICULAR PURPOSE.
Limitation of Liability
Zetron makes no representation with respect to the contents of this document and/or the contents, performance, and function
of any accompanying software. Further, Zetron reserves the right to revise this document or the accompanying software and
to make changes in it from time to time without obligation to notify any person or organization of such revisions or changes.
ZETRON SHALL NOT UNDER ANY CIRCUMSTANCES BE LIABLE TO BUYER OR ANY THIRD PARTY FOR ANY
INCIDENTAL, SPECIAL, CONSEQUENTIAL OR INDIRECT LOSS OR DAMAGE ARISING OUT OF OR
CONNECTED WITH BUYER'S PURCHASE OR USE OF PRODUCTS OR SERVICES, INCLUDING WITHOUT
LIMITATION, LOSS OF USE, LOSS OR ALTERATION OF DATA, DELAYS, LOST PROFITS OR SAVINGS, EVEN IF
ZETRON HAS BEEN ADVISED OF THE POSSIBILITY OF SUCH DAMAGES AND EVEN IF THE LIMITED
REMEDY ABOVE IS FOUND TO FAIL OF ITS ESSENTIAL PURPOSE. IN NO EVENT SHALL ZETRON'S
LIABILITY (WHETHER FOR NEGLIGENCE OR OTHER TORT, IN CONTRACT OR OTHERWISE) EXCEED THE
PRICE PAID TO ZETRON FOR THE PRODUCTS.
IP networks by their nature are subject to a number of limitations, such as security, reliability, and performance. Anyone using
non-dedicated IP networks, such as shared WANs or the Internet, to connect to any Zetron Products or systems should
consider and is responsible for these limitations.
©Zetron, Inc. All rights reserved. This publication is protected by copyright; information in this document is subject to
change without notice. Zetron and the Zetron logo are registered trademarks of Zetron, Inc. Other company names and
product names may be the trademarks or registered trademarks of their respective owners. This publication may not be
reproduced, translated, or altered, in whole or in part, without prior written consent from Zetron, Inc.
Regulatory Compliance
Information on Disposal of Old Electrical and Electronic Equipment and
Batteries (applicable for EU countries that have adopted separate waste
collection systems)
Products and batteries with the symbol (crossed-out
wheeled bin) cannot be disposed as household
waste. Old electrical and electronic equipment and
batteries should be recycled at a facility capable of
handling these items and their waste byproducts.
Contact your local authority for details in locating a
recycle facility nearest to you.
Proper recycling and waste disposal will help
conserve resources whilst preventing detrimental
effects on our health and the environment.
Notice: The sign “Pb” below the symbol for
batteries indicates that this battery contains lead.
FCC Class A User Information
This equipment has been tested and found to comply with the limits for a Class A digital device, pursuant to Part
15 of the FCC Rules. These limits are designed to provide reasonable protection against harmful interference
when the equipment is operated in a commercial environment. This equipment generates, uses, and can radiate
radio frequency energy and, if not installed and used in accordance with the instruction manual, may cause
harmful interference to radio communications. Operation of this equipment in a residential area is likely to cause
harmful interference in which case the user will be required to correct the interference at his own expense.
Regulatory Compliance Markings
When required these products are provided with the following Product Certification Markings:
• FCC markings
• FCC Part 68 (USA)
• CS-03(Canada)
• C-Tick (Australia)
EMC Compliance
• FCC Part 15 - Radiated & Conducted Emissions (USA)
• ICES-003 - Radiated & Conducted Emissions (Canada)
• EN 55022 - Radiated & Conducted Emissions (Australia)
Telecommunications Compliance
• FCC Part 68 (USA)
• CS-03 (Canada)
3
Safety Summary
STOP
Warning! For your safety and the protection of the equipment, observe these
precautions when installing or servicing Zetron equipment:
• Follow all warnings and instructions marked on the equipment or included in documentation.
• Only technically qualified service personnel are permitted to install or service the equipment.
• Be aware of and avoid contact with areas subject to high voltage or amperage. Because some
components can store dangerous charges even after power is disconnected, always discharge
components before touching.
• Never insert objects of any kind through openings in the equipment. Conductive foreign objects
could produce a short circuit that could cause fire, electrical shock, or equipment damage.
• Remove rings, watches, and other metallic objects from your body before opening equipment.
These could be electrical shock or burn hazards.
• Ensure that a proper electrostatic discharge device is used, to prevent damage to electronic
components.
• Do not attempt internal service of equipment unless another person, capable of rendering aid
and resuscitation, is present.
• Do not work near rotating fans unless absolutely necessary. Exercise caution to prevent fans
from taking in foreign objects, including hair, clothing, and loose objects.
• Use care when moving equipment, especially rack-mounted modules, which could become
unstable. Certain items may be heavy. Use proper care when lifting.
Change List for Rev L, 15 Oct 2010
• Added Windows 7 Professional, Server 2003, and Server 2008 to the list of supported operating
systems, in addition noted the other versions of .NET framework that need to be present to
support interfacing to CAD systems, see Requirements for FSA Computer Platforms on page 24
• Modified the graphic in Figure 36 to list the part numbers for the various cables used, see page
100
• Added new Caution and Tip admonishments to the procedure for setting Station Transponder IP
addresses, see page 76
• Added a reference to the FSA Operation manual (part number 025-9582) for a description of
how the PA Ready option behaves in Day Mode as opposed to Night Mode, see PA Ready
Control Signal on page 87
• Added a note advising the PTT input signal to the FSA Server interface must be a dry contact
closure, see Installing the Audio and Digital Input Interface Unit on page 99
• Added a note advising the installer to record the COM port assigned to the USB-to-Serial
convertor for PTT input for use later in configuring Global Server settings, see Confirming the
USB-to-Serial Bridge Installation on page 102
• Added a procedure for resetting the configuration of VoIP intercom boards in Station
Transponder units, see Resetting the VoIP intercom board to defaults: on page 105
• Updated the description of jumper JP14, see Jumper JP14 (Source of Audio to PA) on page 164
4
025-9581M
Change List for Rev M, 17 Jun 2011
• Added 64-bit Windows 7 to the list of supported operating systems, and removed .NET 1.1 from
the list of requirements, see Requirements for FSA Computer Platforms on page 24
• Added instructions for installing license files on a PC with a 64-bit OS, see To install the license
files on a PC with a 64-bit OS on page 35
• Added instructions for setting the all-user compatibility mode for the VoIP Gateway Server
application, see VoIP Gateway Server Installation on page 44
• Replaced PA Talk-Back Mode option in the PA Options menu with Allow Handset use when PA
On option as a feature enhancement, see Allow Handset use when PA On on page 74
• Updated the instructions for using the new installation program (various locations)
• Removed several notes referencing the discontinued optional relay enhancement (various
locations)
• Updated the screen captures referencing the discontinued optional relay enhancement (various
locations)
5
6
025-9581M
Contents
Contents
System Overview . . . . . . . . . . . . . . . . . . . . . . . . . . . . . . . . . . . . . . . . . . . . . 11
Introduction . . . . . . . . . . . . . . . . . . . . . . . . . . . . . . . . . . . . . . . . . . . . . . . . . . . . . . . . . .
Features . . . . . . . . . . . . . . . . . . . . . . . . . . . . . . . . . . . . . . . . . . . . . . . . . . . . . . . . . . . .
Related Documentation . . . . . . . . . . . . . . . . . . . . . . . . . . . . . . . . . . . . . . . . . . . . . . . . . .
Overall System Operation . . . . . . . . . . . . . . . . . . . . . . . . . . . . . . . . . . . . . . . . . . . . . . . .
IP FSA Console Functions . . . . . . . . . . . . . . . . . . . . . . . . . . . . . . . . . . . . . . . . . . . . . . . .
What About CAD Systems? . . . . . . . . . . . . . . . . . . . . . . . . . . . . . . . . . . . . . . . . . . . . . . .
Station Transponder Unit Functions . . . . . . . . . . . . . . . . . . . . . . . . . . . . . . . . . . . . . . . . .
Panel Description . . . . . . . . . . . . . . . . . . . . . . . . . . . . . . . . . . . . . . . . . . . . . . . . . . . .
Communication Interface . . . . . . . . . . . . . . . . . . . . . . . . . . . . . . . . . . . . . . . . . . . . . .
PA Control. . . . . . . . . . . . . . . . . . . . . . . . . . . . . . . . . . . . . . . . . . . . . . . . . . . . . . . . .
Relays . . . . . . . . . . . . . . . . . . . . . . . . . . . . . . . . . . . . . . . . . . . . . . . . . . . . . . . . . . .
Sense Inputs . . . . . . . . . . . . . . . . . . . . . . . . . . . . . . . . . . . . . . . . . . . . . . . . . . . . . . .
Specifications . . . . . . . . . . . . . . . . . . . . . . . . . . . . . . . . . . . . . . . . . . . . . . . . . . . . . . . . .
Requirements for FSA Computer Platforms . . . . . . . . . . . . . . . . . . . . . . . . . . . . . . . . . .
IP Network Functional Requirements . . . . . . . . . . . . . . . . . . . . . . . . . . . . . . . . . . . . . .
Model 6203/6204 Station Transponder Units. . . . . . . . . . . . . . . . . . . . . . . . . . . . . . . . .
11
12
13
13
17
19
20
21
22
23
23
23
24
24
25
26
Planning the System . . . . . . . . . . . . . . . . . . . . . . . . . . . . . . . . . . . . . . . . . . 27
Overview . . . . . . . . . . . . . . . . . . . . . . . . . . . . . . . . . . . . . . . . . . . . . . . .
System Layout . . . . . . . . . . . . . . . . . . . . . . . . . . . . . . . . . . . . . . . . . . . .
Collecting and Assigning IP Information . . . . . . . . . . . . . . . . . . . . . . . . . .
Default IP Addresses . . . . . . . . . . . . . . . . . . . . . . . . . . . . . . . . . . . . .
General Order of Installation . . . . . . . . . . . . . . . . . . . . . . . . . . . . . . . . . .
Licensing . . . . . . . . . . . . . . . . . . . . . . . . . . . . . . . . . . . . . . . . . . . . . . . .
..
..
..
..
..
..
..
..
..
..
..
..
.
.
.
.
.
.
..
..
..
..
..
..
.
.
.
.
.
.
..
..
..
..
..
..
..
..
..
..
..
..
27
28
31
32
32
33
Creating Console Positions . . . . . . . . . . . . . . . . . . . . . . . . . . . . . . . . . . . . . 37
Overview . . . . . . . . . . . . . . . . . . . . . . . . . . . . . . . . . . . . . . . . . . . . . . . . . . . . . . . . . . . .
Preparing the Console Computer . . . . . . . . . . . . . . . . . . . . . . . . . . . . . . . . . . . . . . . . . . .
Installing the IP FSA Console Software . . . . . . . . . . . . . . . . . . . . . . . . . . . . . . . . . . . . . . .
License Files . . . . . . . . . . . . . . . . . . . . . . . . . . . . . . . . . . . . . . . . . . . . . . . . . . . . . . . . . .
37
37
39
39
Creating the System Servers. . . . . . . . . . . . . . . . . . . . . . . . . . . . . . . . . . . . 41
Overview . . . . . . . . . . . . . . . . . . . . . . . . . . . . . . . . . . . . . . . . . . . . . . . . . . . . . . . . . . . . 41
Preparing the Server Computer . . . . . . . . . . . . . . . . . . . . . . . . . . . . . . . . . . . . . . . . . . . . 41
7
Contents
Installing the IP FSA Server . . . . . . . . . . . . . . . . . . . . . . . . . . . . . . . . . . . . . . . . . . . . . . . . 41
Installing the IP FSA Maintenance Utility . . . . . . . . . . . . . . . . . . . . . . . . . . . . . . . . . . . . . . . 43
Installing the VoIP Gateway Server . . . . . . . . . . . . . . . . . . . . . . . . . . . . . . . . . . . . . . . . . . 44
Installing the VoIP Gateway Maintenance Utility . . . . . . . . . . . . . . . . . . . . . . . . . . . . . . . . . 46
Installing the UBAM™ Components . . . . . . . . . . . . . . . . . . . . . . . . . . . . . . . . . . . . . . . . . . 47
UBAM Listener. . . . . . . . . . . . . . . . . . . . . . . . . . . . . . . . . . . . . . . . . . . . . . . . . . . . . . . 50
UBAM Repeater . . . . . . . . . . . . . . . . . . . . . . . . . . . . . . . . . . . . . . . . . . . . . . . . . . . . . . 51
CAD Translator . . . . . . . . . . . . . . . . . . . . . . . . . . . . . . . . . . . . . . . . . . . . . . . . . . . . . . . . . 52
Installing the CAD Translator . . . . . . . . . . . . . . . . . . . . . . . . . . . . . . . . . . . . . . . . . . . . 52
Using the CAD Translator Viewer . . . . . . . . . . . . . . . . . . . . . . . . . . . . . . . . . . . . . . . . . . 53
Configuring the Translator and the Viewer . . . . . . . . . . . . . . . . . . . . . . . . . . . . . . . . . . . 53
Using the Communications Viewer. . . . . . . . . . . . . . . . . . . . . . . . . . . . . . . . . . . . . . . . . 55
Configuring Station Transponder Units . . . . . . . . . . . . . . . . . . . . . . . . . . . 57
Overview . . . . . . . . . . . . . . . . . . . . . . . . . . . . . . . . . . . . . . . . . . . . . . . . . . . . . . . . . . . . . 57
Setting the Unit Number . . . . . . . . . . . . . . . . . . . . . . . . . . . . . . . . . . . . . . . . . . . . . . . . . . 57
Serial Port Programming . . . . . . . . . . . . . . . . . . . . . . . . . . . . . . . . . . . . . . . . . . . . . . . . . . 60
“Station Configuration” Menu . . . . . . . . . . . . . . . . . . . . . . . . . . . . . . . . . . . . . . . . . . . . 63
“Communications Mode” Menu . . . . . . . . . . . . . . . . . . . . . . . . . . . . . . . . . . . . . . . . . . . 66
“Alerts” Menu . . . . . . . . . . . . . . . . . . . . . . . . . . . . . . . . . . . . . . . . . . . . . . . . . . . . . . . 67
“Relays” Menu. . . . . . . . . . . . . . . . . . . . . . . . . . . . . . . . . . . . . . . . . . . . . . . . . . . . . . . 69
“Inputs” Menu. . . . . . . . . . . . . . . . . . . . . . . . . . . . . . . . . . . . . . . . . . . . . . . . . . . . . . . 71
“PA Options” Menu . . . . . . . . . . . . . . . . . . . . . . . . . . . . . . . . . . . . . . . . . . . . . . . . . . . 73
Setting the IP Interface Network Address . . . . . . . . . . . . . . . . . . . . . . . . . . . . . . . . . . . . . . 75
Basic System Configuration on the Bench . . . . . . . . . . . . . . . . . . . . . . . . 79
Overview . . . . . . . . . . . . . . . . . . . . . . . . . . . . . . . . . . . . . . . . . . . . . . . . . . . . . . . . . . . . . 79
Connecting the System Elements . . . . . . . . . . . . . . . . . . . . . . . . . . . . . . . . . . . . . . . . . . . . 79
The FSA Maintenance Utility . . . . . . . . . . . . . . . . . . . . . . . . . . . . . . . . . . . . . . . . . . . . . . . 80
Configuring the FSA Console . . . . . . . . . . . . . . . . . . . . . . . . . . . . . . . . . . . . . . . . . . . . . . . 81
FSA Server Initial Configuration . . . . . . . . . . . . . . . . . . . . . . . . . . . . . . . . . . . . . . . . . . . . . 83
Global Settings Window . . . . . . . . . . . . . . . . . . . . . . . . . . . . . . . . . . . . . . . . . . . . . . . . 84
Station Transponder Unit Configuration . . . . . . . . . . . . . . . . . . . . . . . . . . . . . . . . . . . . . . . . 87
Move Up/Move Down Buttons . . . . . . . . . . . . . . . . . . . . . . . . . . . . . . . . . . . . . . . . . . . . 89
Fire Station Definition Settings . . . . . . . . . . . . . . . . . . . . . . . . . . . . . . . . . . . . . . . . . . . 89
Station Interface Settings . . . . . . . . . . . . . . . . . . . . . . . . . . . . . . . . . . . . . . . . . . . . . . . 90
Station I/O Settings . . . . . . . . . . . . . . . . . . . . . . . . . . . . . . . . . . . . . . . . . . . . . . . . . . . 92
Unit Type Definitions . . . . . . . . . . . . . . . . . . . . . . . . . . . . . . . . . . . . . . . . . . . . . . . . . . 96
Audio Support with Optional VoIP Intercom . . . . . . . . . . . . . . . . . . . . . . . . . . . . . . . . . . . . 98
Audio and PTT Connections from Console to Servers . . . . . . . . . . . . . . . . . . . . . . . . . . . . 98
Installing the USB-to-Serial Bridge. . . . . . . . . . . . . . . . . . . . . . . . . . . . . . . . . . . . . . . . 101
Initial VoIP Configuration . . . . . . . . . . . . . . . . . . . . . . . . . . . . . . . . . . . . . . . . . . . . . . 102
Installing the PA Ready Option . . . . . . . . . . . . . . . . . . . . . . . . . . . . . . . . . . . . . . . . . . 106
Installing the Station Transponder Units on Site . . . . . . . . . . . . . . . . . . 107
Overview . . . . . . . . . . . . . . . . . . . . . . . . . . . . . . . . . . . . . . . . . . . . . . . . . . . . . . . . . . . .
Equipment Needed . . . . . . . . . . . . . . . . . . . . . . . . . . . . . . . . . . . . . . . . . . . . . . . . . . . . .
Opening the Case . . . . . . . . . . . . . . . . . . . . . . . . . . . . . . . . . . . . . . . . . . . . . . . . . . . . . .
Mounting the Case . . . . . . . . . . . . . . . . . . . . . . . . . . . . . . . . . . . . . . . . . . . . . . . . . . . . .
Connections to the Station Transponder Unit . . . . . . . . . . . . . . . . . . . . . . . . . . . . . . . . . . .
8
107
107
108
108
109
025-9581M
Contents
Power Connections . . . . . . . . . . . . . . . . . . . . . . . . . . . . . . . . . . . . . . . . . . . . . . . . . .
IP Connections . . . . . . . . . . . . . . . . . . . . . . . . . . . . . . . . . . . . . . . . . . . . . . . . . . . . .
PA Audio Connections . . . . . . . . . . . . . . . . . . . . . . . . . . . . . . . . . . . . . . . . . . . . . . . .
Front Panel Test Mode . . . . . . . . . . . . . . . . . . . . . . . . . . . . . . . . . . . . . . . . . . . . . . . .
Output Relay Connections. . . . . . . . . . . . . . . . . . . . . . . . . . . . . . . . . . . . . . . . . . . . . .
Sense Input Connections . . . . . . . . . . . . . . . . . . . . . . . . . . . . . . . . . . . . . . . . . . . . . .
Optional Radio Connections . . . . . . . . . . . . . . . . . . . . . . . . . . . . . . . . . . . . . . . . . . . . . . .
Conventional Radio Setup . . . . . . . . . . . . . . . . . . . . . . . . . . . . . . . . . . . . . . . . . . . . . .
Model 6203/6204 Programming . . . . . . . . . . . . . . . . . . . . . . . . . . . . . . . . . . . . . . . . .
Level Setting Procedures . . . . . . . . . . . . . . . . . . . . . . . . . . . . . . . . . . . . . . . . . . . . . . . . .
Equipment & Prerequisites . . . . . . . . . . . . . . . . . . . . . . . . . . . . . . . . . . . . . . . . . . . . .
Setting Receive Levels at the VoIP Server. . . . . . . . . . . . . . . . . . . . . . . . . . . . . . . . . . .
Setting Station Transponder Unit Levels for a VoIP-based System . . . . . . . . . . . . . . . . . .
Setting Station Transponder Unit Levels for a Radio-based System . . . . . . . . . . . . . . . . .
111
112
112
113
114
115
115
115
115
117
117
120
121
122
Using a Model 26 Fire Station Dispatcher for System Backup . . . . . . . . 125
Overview . . . . . . . . . . . . . . . . . . . . . . . . . . . . . . . . . . . . . . . . . . . . . . . . . . . . . . . . . . . .
Voice over Radio or VoIP . . . . . . . . . . . . . . . . . . . . . . . . . . . . . . . . . . . . . . . . . . . . . . . . .
Voice over Radio . . . . . . . . . . . . . . . . . . . . . . . . . . . . . . . . . . . . . . . . . . . . . . . . . . . .
Voice over VoIP . . . . . . . . . . . . . . . . . . . . . . . . . . . . . . . . . . . . . . . . . . . . . . . . . . . . .
Model 26 Backup in a Voice over Radio System . . . . . . . . . . . . . . . . . . . . . . . . . . . . . . . . .
Connection Changes between the Station Transponder Units and the Radio. . . . . . . . . . .
Jumper Settings inside the Model 6203 . . . . . . . . . . . . . . . . . . . . . . . . . . . . . . . . . . . .
Programming Changes to the Model 6203 . . . . . . . . . . . . . . . . . . . . . . . . . . . . . . . . . .
Possible Level Setting Changes . . . . . . . . . . . . . . . . . . . . . . . . . . . . . . . . . . . . . . . . . .
Model 26 Backup in a VoIP System . . . . . . . . . . . . . . . . . . . . . . . . . . . . . . . . . . . . . . . . . .
Connection between the Station Alerting Units and the Radio. . . . . . . . . . . . . . . . . . . . .
Jumper Changes inside the Model 6203 . . . . . . . . . . . . . . . . . . . . . . . . . . . . . . . . . . . .
Programming Changes to the Model 6203 . . . . . . . . . . . . . . . . . . . . . . . . . . . . . . . . . .
Possible Level Setting Changes . . . . . . . . . . . . . . . . . . . . . . . . . . . . . . . . . . . . . . . . . .
125
126
127
128
129
129
131
132
134
138
138
139
140
142
Appendix A: Details of Model 6203/6204 Hardware . . . . . . . . . . . . . . . . 147
Overview . . . . . . . . . . . . . . . . . . . . . . . . . . . . . . . . . . . . . . . . . . . . . . . . . . . . . . . . . . . . 147
Connector Details . . . . . . . . . . . . . . . . . . . . . . . . . . . . . . . . . . . . . . . . . . . . . . . . . . . . . . 147
Transponder Board Connectors . . . . . . . . . . . . . . . . . . . . . . . . . . . . . . . . . . . . . . . . . . 147
Power Supply Board Connectors . . . . . . . . . . . . . . . . . . . . . . . . . . . . . . . . . . . . . . . . . 154
IP Interface Board Connectors . . . . . . . . . . . . . . . . . . . . . . . . . . . . . . . . . . . . . . . . . . 157
Jumper Details . . . . . . . . . . . . . . . . . . . . . . . . . . . . . . . . . . . . . . . . . . . . . . . . . . . . . . . . 160
Transponder Board Jumpers . . . . . . . . . . . . . . . . . . . . . . . . . . . . . . . . . . . . . . . . . . . . 160
Power Supply Board Jumpers . . . . . . . . . . . . . . . . . . . . . . . . . . . . . . . . . . . . . . . . . . . 164
Switch Settings . . . . . . . . . . . . . . . . . . . . . . . . . . . . . . . . . . . . . . . . . . . . . . . . . . . . . . . . 165
Potentiometers . . . . . . . . . . . . . . . . . . . . . . . . . . . . . . . . . . . . . . . . . . . . . . . . . . . . . . . . 166
FFSK OUT (R108) . . . . . . . . . . . . . . . . . . . . . . . . . . . . . . . . . . . . . . . . . . . . . . . . . . . 167
FFSK IN (R62) . . . . . . . . . . . . . . . . . . . . . . . . . . . . . . . . . . . . . . . . . . . . . . . . . . . . . . 168
4-RCV (R107) . . . . . . . . . . . . . . . . . . . . . . . . . . . . . . . . . . . . . . . . . . . . . . . . . . . . . . 168
COR (R84) . . . . . . . . . . . . . . . . . . . . . . . . . . . . . . . . . . . . . . . . . . . . . . . . . . . . . . . . 168
VOX (R86) . . . . . . . . . . . . . . . . . . . . . . . . . . . . . . . . . . . . . . . . . . . . . . . . . . . . . . . . 168
MIC (R63) . . . . . . . . . . . . . . . . . . . . . . . . . . . . . . . . . . . . . . . . . . . . . . . . . . . . . . . . . 169
TONE (R61) . . . . . . . . . . . . . . . . . . . . . . . . . . . . . . . . . . . . . . . . . . . . . . . . . . . . . . . 169
AUX RX (R137) . . . . . . . . . . . . . . . . . . . . . . . . . . . . . . . . . . . . . . . . . . . . . . . . . . . . . 169
VOICE (R87) . . . . . . . . . . . . . . . . . . . . . . . . . . . . . . . . . . . . . . . . . . . . . . . . . . . . . . . 169
9
Contents
EAR (R64). . . . . . . . . . . . . . . . . . . . . . . . . . . . . . . . . . . . . . . . . . . . . . . . . . . . . . . . . 169
Relay Outputs . . . . . . . . . . . . . . . . . . . . . . . . . . . . . . . . . . . . . . . . . . . . . . . . . . . . . . . . 170
Sense Inputs . . . . . . . . . . . . . . . . . . . . . . . . . . . . . . . . . . . . . . . . . . . . . . . . . . . . . . . . . 170
Appendix B: Worksheets . . . . . . . . . . . . . . . . . . . . . . . . . . . . . . . . . . . . . 171
Overview . . . . . . . . . . . . . . . . . . . . . . . . . . . . . . . . . . . . . . . . . . . . . . . . . . . . . . . . . . . .
IP Console Worksheet . . . . . . . . . . . . . . . . . . . . . . . . . . . . . . . . . . . . . . . . . . . . . . . . . . .
Server Worksheet . . . . . . . . . . . . . . . . . . . . . . . . . . . . . . . . . . . . . . . . . . . . . . . . . . . . . .
FSA Server . . . . . . . . . . . . . . . . . . . . . . . . . . . . . . . . . . . . . . . . . . . . . . . . . . . . . . . .
VoIP Gateway Server . . . . . . . . . . . . . . . . . . . . . . . . . . . . . . . . . . . . . . . . . . . . . . . . .
Station Transponder Unit Worksheet . . . . . . . . . . . . . . . . . . . . . . . . . . . . . . . . . . . . . . . . .
171
172
173
173
173
174
Appendix C: Using a Model 620x in a Model 26-based System . . . . . . . 175
Overview . . . . . . . . . . . . . . . . . . . . . . . . . . . . . . . . . . . . . . . . . . . . . . . . . . . . . . . . . . . .
Unit Number and Serial Programming . . . . . . . . . . . . . . . . . . . . . . . . . . . . . . . . . . . . . . . .
Unit Number Assignment . . . . . . . . . . . . . . . . . . . . . . . . . . . . . . . . . . . . . . . . . . . . . .
Serial Port Programming. . . . . . . . . . . . . . . . . . . . . . . . . . . . . . . . . . . . . . . . . . . . . . .
Wiring Connections to the Model 620x . . . . . . . . . . . . . . . . . . . . . . . . . . . . . . . . . . . . . . .
Inputs and Relays . . . . . . . . . . . . . . . . . . . . . . . . . . . . . . . . . . . . . . . . . . . . . . . . . . .
Connections to Radios . . . . . . . . . . . . . . . . . . . . . . . . . . . . . . . . . . . . . . . . . . . . . . . .
Connections to Wire-line . . . . . . . . . . . . . . . . . . . . . . . . . . . . . . . . . . . . . . . . . . . . . .
Setting Levels in the Model 620x . . . . . . . . . . . . . . . . . . . . . . . . . . . . . . . . . . . . . . . . . . .
Equipment for this Procedure . . . . . . . . . . . . . . . . . . . . . . . . . . . . . . . . . . . . . . . . . . .
Initial Conditions . . . . . . . . . . . . . . . . . . . . . . . . . . . . . . . . . . . . . . . . . . . . . . . . . . . .
Setting FFSK Levels in a Radio-based System . . . . . . . . . . . . . . . . . . . . . . . . . . . . . . . .
Setting FFSK Levels in a Wire Line-based system . . . . . . . . . . . . . . . . . . . . . . . . . . . . .
Setting Voice Audio Output Level to the Station PA System . . . . . . . . . . . . . . . . . . . . . .
175
176
176
177
177
177
178
180
182
182
183
183
185
186
Index . . . . . . . . . . . . . . . . . . . . . . . . . . . . . . . . . . . . . . . . . . . . . . . . . . . . . 189
10
025-9581M
Introduction
System Overview
Introduction
The Zetron IP Fire Station Alerting system (IP FSA) has been specifically designed to
speed the dispatch of emergency vehicles, to aid in tracking their status, and to provide
remote control and sense capability at each fire station. This system is ideal for any
municipality that has IP links between its central communications center and its fire
stations.
The use of a private IP network designed to support mission critical communications both
increases the speed at which alerting occurs and broadens connectivity options in building/
expanding the dispatch system.
With the IP FSA system, data commands and voice are sent independently. The IP
network always handles the alert commands. Voice traffic can be sent over the IP network
or can be carried by existing radio channels.
Typically, there is a Model 6203 Station Transponder Unit at each fire station in the
system. If the station is large enough, there will also be a Model 6204 Station Transponder
Unit to support unit-specific alerting and status tracking for the additional emergency
response units that work out of that station.
At the dispatch center end of the system is the FSA Console application running at the
individual console positions and the FSA Server application running on a machine located
with the rest of the back-room equipment. The FSA Console enables a dispatcher to
remotely control the actions of the Station Transponder Units in the field, to receive and
display status changes from the Station Transponder Units, and to send verbal
announcements out to all or individual station PA systems. The voice audio may be
carried by Voice over IP (VoIP) or radio. On the console display, each station is
represented by its own button and each vehicle/resource assigned to a station will also
have a button.
11
System Overview
Features
• Supports up to 255 stations per system
• Supports up to 24 dispatch console positions
• Station Transponder Unit provides flexible alerting, control, and status capabilities
• Near instantaneous alert times can often be achieved with independent voice and
data channels
• Dispatcher voice announcements can be made by means of Voice over Internet
Protocol (VoIP) or a radio channel
• System includes a dedicated dispatcher client application with which commands
may be initiated from each dispatch position
• The FSA Server and FSA Console (dispatcher client application) are both fully field
configurable
• The IP FSA system is easy to integrate with radio dispatch console systems
• Provides integration to computer aided dispatch (CAD) systems using either
through a serial port (using M26 CAD protocol) or through a network port (using
XML CAD protocol)
• IP FSA is NFPA 1221-compliant for dispatch systems
12
025-9581M
Related Documentation
Related Documentation
Title
P/N
Description
Fire Station Alerting
Installation and Maintenance
025-9581
Describes how to install and maintain the IP FSA
System.
Fire Station Alerting Operation
025-9582
Describes how to operate the IP FSA System.
Fire Station Alerting
XML CAD Protocol
025-9583
Defines the functional and protocol messages used
for communications between a third-party CAD
application and the Zetron FSA Server service.
Installing the VoIP Intercom Option
011-0741
Describes how to add a VoIP Intercom board to a
Model 6, Model 6203, or Model 6204.
Model 6 Upgrade for FSA Compatibility
011-0742
This application note covers installing the
components of the upgrade package 950-0839 on an
existing Model 6 Station Transponder.
Overall System Operation
The IP FSA system uses a client-server architecture to receive commands and then direct
them to the appropriate fire stations. Figure 1 provides an example of the basic system.
The core of the system is made up of the following:
• FSA Server
• FSA Console client application running on the dispatch position computer
• One Model 6203 Station Transponder Unit installed at each fire station in the
system (optionally, one Model 6204 unit d also be installed at each fire station to
support additional units)
Note
FSA Server should be running on a computer dedicated to FSArelated software. This computer should not be running any thirdparty software or other Zetron software that is not related to FSA.
13
System Overview
Figure 1: Basic Overview of IP FSA System
FSA Console
running on a
Dispatch position
FSA Console
running on a
Dispatch position
Up to 24 FSA Console positions can be supported by an FSA Server .
DISPATCH CENTER
BACK ROOM EQUIPMENT
IP Network
A private Ethernet network
created for the purpose of
supporting "mission critical"
communications traffic.
FSA Server
BACK ROOM EQUIPMENT
OUTSIDE NETWORK CONNECTING STATIONS
Up to 255 IP Station Units can be supported by an FSA Server .
Model 6203,
Model 6204,
or
Upgraded Model6
IP Station
Unit #1
Model 6203,
Model 6204,
or
Upgraded Model6
IP Station
Unit #2
Additional complexity is added to the system when some capacity for voice alerting the
stations and talk-back communications from the stations is considered. There are two
methods for available for handling voice audio traffic: VoIP over the network or using a
radio channel.
Using the VoIP Gateway approach reduces the demands on the radio channels in use and
prevents fire station alerts from being delayed by other radio traffic on the repeater.
Figure 2 provides an example of the basic system when the VoIP Intercom is used.
14
025-9581M
Overall System Operation
Figure 2: Basic IP FSA System Using VoIP Gateway
FSA Console
running on a
Dispatch position
Voice audio for station
alerts and talkback
FSA alerting and
status traffic
DISPATCH CENTER
BACK ROOM EQUIPMENT
Dispatch Channel Card Rack
with Audio Channel Cards
Voice Audio
and PTT
Indication
IP Network
FSA Server
and VoIP Server
Audio & Digital
Input Interface
950-0690
BACK ROOM EQUIPMENT
OUTSIDE NETWORK CONNECTING STATIONS
FSA alerting and
status traffic
Model 6203,
Model 6204,
or
Upgraded Model 6
Voice audio for station
alerts and talkback
IP Station
Unit #1
Using a radio channel cuts down on network traffic and network bandwidth requirements.
It also opens up the possibility of using a Model 26 as a backup dispatch system. Figure 3
provides an example of the basic system when a radio channel is used to distribute voice
audio.
15
System Overview
Figure 3: Basic IP FSA System Using Radio
FSA Console
running on a
Dispatch position
FSA alerting and
status traffic
Voice audio for station
alerts and talkback
DISPATCH CENTER
BACK ROOM EQUIPMENT
Voice audio for station
alerts and talkback
Dispatch Channel Card Rack
with Audio Channel Cards
PTT
Indication
Only
IP Network
FSA Server
Audio & Digital
Input Interface
950-0690
Radio Transceiver
PTT Signal
from
Channel Card
BACK ROOM EQUIPMENT
OUTSIDE NETWORK CONNECTING STATIONS
Voice audio for station
alerts and talkback
FSA alerting and
status traffic
Model 6203, Model 6204,
or Upgraded Model6
Radio Transceiver
IP Station
Unit #1
The server-client nature to the FSA system architecture provides easy integration of CAD
dispatch consoles. If CAD is present, it can serve as the primary user interface by
communicating commands to the FSA Server. To accomplish this, the CAD system will
use either the existing Model 26 CAD interface protocol or Zetron’s new XML-based
protocol.
Whether the dispatcher instructions are input through the CAD console or the FSA
Console, once the user inputs are made, the FSA Server handles communications out to
the individual fire stations to ensure that all messages sent are successfully received.
Because the FSA Server is capable of monitoring system integrity and able to provide
failure indications, it is NFPA 1221 compliant.
The FSA Server can both notify and be acknowledged by up to 255 fire station units
(Model 6203 or Model 6204) almost simultaneously. Once the FSA Server receives the
“OK to talk” message from the Station Transponder Units (sent after all the alert tones
16
025-9581M
IP FSA Console Functions
have been played at the station), it signals the originating console position to go ahead and
transmit any additional verbal announcement related to the alert. The voice audio is
transmitted to the fire stations either by radio or by means of a VoIP intercom that uses the
same IP network as the FSA Server. At the stations, the voice audio is played over the
station PA system.
In addition to its primary functions related to alerting and keeping track of station and unit
status, the Station Transponder Unit also provides control relays that can be used to
control station lighting, open doors, or perform any other function that can be controlled
by relays. The status of these relays is not directly displayed. If you require a status
display, the sense inputs on the Station Transponder Unit can be used to create one.
IP FSA Console Functions
The FSA Console is a client application that resides on a computer at each dispatch
position. It can be used as a backup to a more extensive CAD system or as the primary
user interface for dispatch.
The FSA Console is designed to be highly functional and easy to use. The stations (or the
stations and their assigned units) are displayed in the center of the screen. Please see
Figure 4.
Each button displayed in this area provides the current status of the resource it represents.
This includes failure of the communications link, if one occurs.
To initiate an action, the operator selects the buttons assigned to the appropriate stations or
units and then presses the button for the desired action. The actions available can include:
ALERT ON/OFF, PA ON/OFF, STATION I/O, or SEND TEXT.
If all of the stations/units in a system will not fit on a single screen, the filter buttons
displayed in the column on the left of the screen can be used to reduce the number of
stations and units displayed on the screen.
Two other buttons are provided to better support the needs of larger systems. They are
Select All Stations and Unselect All. The Select All Stations button enables the operator
to turn on the PA systems of all the stations currently displayed on the screen for a general
announcement with a single button click. The Unselect All button enables the operator to
clear all currently selected station or units buttons with a single click. This eliminates the
need to manually search through the whole list and clear the buttons one by one.
17
System Overview
Figure 4: IP FSA Console User Interface
If the Send Text button is selected in the Actions column, the text box that opens in the
lower portion of the screen enables operators to enter text messages that can be printed out
at the station receiving the alert (provided a printer is interfaced to the Station Transponder
Unit). At least one station button must be selected when using this feature. It can be used
with multiple stations selected.
The FSA Console also provides a window that gives dispatch operators control over the
station relays in each Model 6203 or Model 6204, and a view of the status of the inputs.
Clicking the Station I/O button in the Actions column opens the Input/Output window in
the lower part of the screen, which allows the console user to control the relays and view
the inputs for one station at a time.
When a console has a single station allocated (its button is selected), then that station's
defined inputs and outputs are all displayed in the I/O window. Allocation of units from a
single station (as shown in Figure 5) provides an alternate method for populating the I/O
window … but only when that console has no station allocated.
18
025-9581M
What About CAD Systems?
Figure 5: IP FSA Console Window with Station I/O Open
What About CAD Systems?
If the dispatch center is already using a CAD system, then it is likely that the control
functions for the FSA system will be integrated into the CAD system rather than setting up
two console systems at each operator position.
The computer that acts as the core of the CAD system will communicate with the FSA
Server in one of two ways, depending on the protocol used.
If the CAD computer will connect with the FSA system by means of a dedicated serial
port, then the Model 26 Serial CAD protocol is used. This port will be one of the first four
COM ports on the FSA Translator PC.
If the two servers will communicate with each other over the Ethernet network used to
connect the servers with the rest of the FSA system, then the XML CAD Interface
protocol is used.
19
System Overview
Station Transponder Unit Functions
The Station Transponder Units come in two types, the Model 6203 and the Model 6204.
Typically, there will be a single Model 6203 installed at every station in the system. The
left column in a Model 6203 represents the station status; while the remaining three
columns are used to track unit status.
The Model 6204 uses all four of the columns on its front panel for tracking unit status. If
the station is large enough to require it, a Model 6204 unit can be installed in addition to
the single Model 6203. The Model 6204 adds four more units and four more relays to the
dispatch capability available for that station.
Figure 6: Front Panel Layout for Model 6203 and Model 6204
MODEL 6203 IP STATION UNIT
ALL STATION
EMERGENCY
MODEL 6204 IP STATION UNIT
IN QUARTERS
IN QUARTERS
IN QUARTERS
IN QUARTERS
IN QUARTERS
AVAIL. ON AIR
AVAIL. ON AIR
AVAIL. ON AIR
AVAIL. ON AIR
AVAIL. ON AIR
RESPONDING
RESPONDING
RESPONDING
RESPONDING
RESPONDING
ON SCENE
ON SCENE
ON SCENE
ON SCENE
ON SCENE
TRANSPORT
TRANSPORT
TRANSPORT
TRANSPORT
TRANSPORT
OUT OF SVC.
OUT OF SVC.
OUT OF SVC.
OUT OF SVC.
OUT OF SVC.
ALERT
ALERT
ALERT
ALERT
ALERT
ALERT
ALERT
ALERT
STA
ACK
QRTRS
AIR
QRTRS
AIR
QRTRS
AIR
QRTRS
AIR
QRTRS
AIR
QRTRS
AIR
QRTRS
AIR
OUT
SRVC
OUT
SRVC
OUT
SRVC
OUT
SRVC
OUT
SRVC
OUT
SRVC
EMR
CLR
XMIT
PA
XMIT
PA
OUT
SRVC
While the IP FSA Server does poll the Station Transponder Units periodically when the
system is idle, if a member of the station staff presses one of the buttons on the front of the
unit or the status of one of the sense inputs changes, the Station Transponder Units will
send a full status update to the server immediately, without waiting for the next poll.
When a dispatcher sends an alert, the Station Transponder Unit involved responds by
automatically sending the IP FSA Server an acknowledgement and then carrying out
whatever action it has been programmed to perform in response to the alert issued.
In a typical scenario, the Station Transponder Unit unmutes the station PA and plays the
alert tones associated with the station or unit being alerted. If any relays have been
programmed to accompany the alert, they will be energized as well.
20
025-9581M
Station Transponder Unit Functions
The Station Transponder Unit keeps the PA open after it plays the alert tones and signals
the IP FSA Server that the PA is available for a voice announcement.
The current status of units is indicated on the front panel of Station Transponder Units
with a column of LEDs for each unit. Two buttons at the bottom of each column enable
station personnel to update unit status manually.
Each Station Transponder Unit has a serial printer port that can be used to generate hard
copy of text messages sent to the station during an alert.
A handset option is available for Model 6203 units to provide station personnel with a
means to communicate by voice with dispatchers. This is a half-duplex, talk-back feature.
It is intended to support administrative conversations. The handset may also be used for
local access to the fire station PA system.
Panel Description
The front panel of a Model 6203 consists of eight push buttons and 30 LEDs. All eight of
the buttons and 28 of the 30 LEDs are arranged into four columns. The columns consist of
two buttons and seven LEDs each. Each column of buttons and LEDs is associated with
either the station itself or a unit assigned to the station.
The first column on the left can be associated with either the whole station or one of the
station's units (vehicles). The remaining three columns represent individual station units.
A Model 6204 can be used for representing four additional units.
Two additional LEDs on the front panel of the Model 6203/6204 (labeled XMIT and PA)
are associated with the operation of the Model 6203/6204 itself.
Buttons
The Model 6203 receives commands from the FSA Server and sends status back. The
buttons on the front panel of the Model 6203 are for changing the status of the station or
units. Pressing one of these buttons changes the status of the entity it represents. When a
button being pressed at the Model 6203 results in a status change, that causes an
immediate data transmission to the FSA Server, updating the displays of all the FSA
Console clients in the system.
LEDs
The LEDs on the front panel of the Model 6203 are used to show current status. This
status is transmitted back to the FSA Server, which sends it to the FSA Console clients to
be displayed.
There are another two LEDs at the bottom of the panel. These two LEDs are not
associated with station or unit status. The XMIT LED on the left is lit whenever the Model
6203 is transmitting to the FSA Server. The PA LED is lit when the Model 6203 has
turned on its relays to steer audio it is receiving to the PA system at the fire station.
21
System Overview
Communication Interface
The Station Transponder Units are designed to operate over a private IP network. All
commands traveling out to the stations and all station/units status messages going back to
the FSA Server are handled over the IP network. Each Station Transponder Unit in the
system is assigned a unique IP address so that FSA Server can communicate with it.
Audio traffic can be sent over the same network using VoIP software and hardware, or it
can be sent by means of either conventional or trunked radio systems. When VoIP is used,
there will be a single VoIP intercom card at each station location even if there is more than
one Station Transponder Unit installed there. Each VoIP intercom card is assigned a
unique IP address.
The Station Transponder Unit receive interface includes a 4-wire, transformer coupled,
audio input with adjustable sensitivity. Input impedance is jumper selectable to either
600 Ω or 10 kΩ.
The Station Transponder Unit transmit interface includes a transformer coupled audio
output with adjustable output levels. The Model 6203/6204 can transmit either FFSK
modulated data packets for Model 26 backup or voice over the radio.
Conventional Radio Interface
Besides the transmit and receive audio connections, the Station Transponder Unit provides
an open drain, Push-to-Talk (PTT) output signal for transmitter keying and a Carrier
Operated Relay (COR) input for detecting channel availability. If the radio does not
provide a COR output signal, the Station Transponder Unit has an internal VOX circuit
(with adjustable sensitivity) for detecting channel activity. Along with these special
hardware circuits, there are a number of user-configurable software parameters for setting
up and optimizing the radio interface.
Trunked Radio Interface
When used only to support voice communications in an FSA system, the Station
Transponder Unit will be connected to a trunked radio in the same way it is connected to a
conventional radio. The only difference in operation is that the user will press and release
the PTT button on the handset and listen for the trunking go-ahead prompt before pressing
PTT and speaking. If the trunking radio is being used to support a Model 26 being used as
backup then the following applies.
When used with trunked radio equipment, the Station Transponder Unit alters the
designation of its inputs and outputs. The Station Transponder Unit provides an open drain
Channel Request signal (the PTT connection) and a Channel Grant input (the COR
connection). The software in the Station Transponder Unit responds to these signals in a
manner that is consistent with the differences between conventional and trunked radio
operation. When configured as Trunking interface, the Station Transponder Unit interprets
the COR input as an “OK to transmit” signal rather than a “channel is busy” signal. Along
with these special hardware circuits, there are a number of user-configurable software
parameters for setting up and optimizing this interface.
22
025-9581M
Station Transponder Unit Functions
PA Control
The Station Transponder Unit has two dedicated relays for controlling a Fire Station PA
system. They are used to enable the PA system either when commanded to do so by the
FSA Server, or locally using the handset in the Station Transponder Unit. The Station
Transponder Unit typically uses the PA to play alert tones and dispatcher messages. When
alert tones and messages are not being generated, these relays are de-energized, and an
auxiliary audio input can be routed through them to the PA system. A handset connected
to an Station Transponder Unit can be used to take local control of PA system for
broadcasting an internal message.
Relays
Besides the dedicated relays used for PA management, the Station Transponder Unit has
four general-purpose relays that can be used for a variety of user-defined tasks. These
relays can be remotely controlled from the FSA Console (i.e. buttons on the FSA Console
user interface are programmed to energize or de-energize relays at the Station
Transponder Unit). These relays may also be automatically controlled by the Station
Transponder Unit based on user configurable parameters (for example, to energize when
unit “n” is alerted and de-energize “m” seconds later). The relays can also be manually
energized, at the Station Transponder Unit, by using an external contact closure. The
programmable parameters are set with the Station Configuration Utility. (See Serial Port
Programming on page 60.) These enable the relays to be activated by selected alerts and
deactivated by the acknowledgment of the alert, turned on and off by a timer, or controlled
by the change of state at one of the sense inputs.
Sense Inputs
Each Station Transponder Unit has four opto-isolated inputs that can be useful for status
monitoring. Whenever there is a change of status at one of these inputs, the Station
Transponder Unit transmits this change back to the FSA Server and from there to the FSA
Console clients. The FSA Console can be configured so that its screen shows the current
status of the inputs for an individual station. Any change at these inputs is also reported to
the CAD interface.
Sense inputs can also be associated with individual relays. This is user configurable by
means of the Station Configuration Utility. (See Serial Port Programming on page 60.)
When configured in this way, a relay can be deactivated by a change of state at one of the
Station Transponder Unit sense inputs.
23
System Overview
Specifications
Requirements for FSA Computer Platforms
Item
Description
Operating
System
Windows XP Professional with Service Pack 3 (32 bit), or
Windows 7 Professional (32-bit)/(64-bit) with Service Pack 1
Services for FSA will run under Windows Server 2003 or Windows
Server 2008R2 with Service Pack 1
.NET
.NET 3.5 SP1
Processor
Intel Pentium Processor or equivalent x86 class processor, 2 GHz
Intel Dual Core or equivalent x86 class processor, 1.7 GHz
Memory
1 GB of memory for dispatch workstations
2 GB of memory for servers
Hard Drive
60 GB hard drive
CD-ROM
Required during installation only
Video Card
Must support minimum of 1024 x 768 screen resolution and
16-bit color depth
Sound Card
Console positions will use the voice audio capabilities of the Series
4000 (or other Audio Dispatch Console) equipment with which the
FSA system is installed in parallel; no sound card or motherboard
audio capability is required for an FSA Console position.
If the VoIP Intercom option is used, then a Zetron-supplied sound
card is required.
24
Serial Port
An unused RS-232 port
User I/O
Standard keyboard and mouse
NIC
10/100/1000 Ethernet connection with TCP/IP protocol enabled
025-9581M
Specifications
IP Network Functional Requirements
Item
Description
IP Address
Assignment
FSA Server and VoIP Server = Static
Station Transponder Unit and VoIP Intercom = Static
FSA Console = Uses host computer address assignment or static
Packet Type
Used
FSA Alerting = uses TCP packets only
VoIP Audio = TCP for incoming calls, UDP to broadcast outgoing calls
Network
Bandwidth1
FSA Alerting = (peaks of 1 KBps) X (number of stations)
VoIP Server = 8 KBps per sub-net used in the system
VoIP at sub-net level = 8 KBps at sub-net endpoint
Quality of Service (QOS)
FSA Alerting = not required
VoIP Audio = Yes, QOS must be used and set to a high value relative
to other network traffic
Fixed Network
Delay2
FSA Alerting = 1 second max., point-to-point
VoIP Audio = less than 200 ms (<150 ms recommended)
Network Jitter
FSA Alerting = 1 second max., point-to-point (Delta-sigma)
VoIP Audio = less than 200 ms point-to-point (<150 ms recommended)
Network Packet
Loss
FSA Alerting = does not apply
VoIP Audio = less than 2% (Delta sigma)
Network Packet
Duplication
FSA Alerting = does not apply
VoIP Audio = less than 2% (Delta sigma)
1 KBps
= kilobytes per second
FSA Maintenance Utility can be used to increase the fixed delay retry period to up to 10
seconds point-to-point. The recommended setting is 10 seconds
2 The
25
System Overview
Model 6203/6204 Station Transponder Units
Item
Description
Buttons
8 momentary, high-reliability push buttons
Indicators
30 LEDs, 4 LEDs are high-intensity type for displaying ALERT statuses
Power
Requirements
External Power Supply (802-0692):
INPUT — 90 to 264 Vac, 47 to 63 Hz, < 1.5 Amps RMS
OUTPUT — +13.5 Vdc, 4.4 Amps
An uninterruptible power supply (UPS) is recommended for station units
Internal Power Supply Board:
12 to 14 Vdc at 2A maximum
26
External Inputs
4 opto-isolated inputs for status monitoring,
jumper configurable for detection of contact closures or voltage levels
Control Relays
4 general purpose, independently controlled DPDT contact sets:
2.0 A at 30 Vdc
Programming/
Printer Port
Digital serial RS232 interface at 2400, 4800 or 9600 baud
Data Transmission
FFSK modulated at 1200 baud (FFSK is used for Model 26 backup only)
Audio Rx
Interface
Transformer coupled
2-wire: Not Used
4-wire: 600 Ω or 10 kΩ
Sensitivity: -40 dBm, 300 Hz to 3000 Hz
COR input or internal VOX detection
Aux Audio Rx
Interface
Transformer coupled, Selectable 10 kΩ or 600 Ω balanced, Sensitivity: 40 dBm, 300 Hz to 3000 Hz
Tx Interface
Transmit: 600 Ω transformer coupled balanced audio output adjustable
to 0 dBm
Idle: 600 Ω or 10 kΩ selectable
PA Interface
600 Ω balanced audio output adjustable to 0 dBm
DPDT audio switching relay
DPDT PTT steering relay
Operating
Temperature
0 to +65° C
Size
13 in H x 9 in W x 4.5 in D
Weight
8 lb.
025-9581M
Overview
Planning the System
Overview
This chapter is composed of several sections of rather general information and advice. It is
intended to aid you in working up a plan for the installation of your system and to remind
you of the various types of information you will need to collect and decisions that will
need to be made in order to create a working system.
Since the FSA system is IP-based, it is not surprising that its final architecture is highly
dependent on the type of network available. If the network is being built in order to
support the FSA system, its design will be highly influenced by the needs of the FSA
system. The System Layout section provides diagrams of several general scenarios in
order to provide a starting point for your thinking.
Several worksheets have been provided in the back of the manual to aid you in both
planning the system initially and in recording the final configuration when configuration is
completed. You should make copies of these worksheets and use them to help you keep
track of the necessary IP information as the design of the system solidifies, and again as
equipment is finally installed and final configuration takes place.
27
Planning the System
System Layout
The amount of information you will need to plan for and eventually collect about your Fire
Station Alerting System is determined by its size and complexity.
If the system is constructed like the one in Figure 7, then the only information you will
need is “names” and IP addresses for each of the computers and Station Transponder Units
in the system.
Since everything in the system is on the single, common network, they will all use the
same Subnet Mask. There is no Gateway address to keep track of because nothing is being
routed to another subnet.
Figure 7: A Simple System without any Subnet
Console #1
Console #2
Ethernet
LAN Switch
FSA Server
IP Station
Unit #1
IP Station
Unit #2
IP Station
Unit #3
In a medium sized system, like the one in Figure 8, the console computers and the server
machine might all be on a common subnet because they are all located in the same
building. However, the Station Transponder Units might be connected to a separate subnet
that existed outside of the dispatch center. This subnet would be connected back to the
server subnet by a router.
In this case the units in the dispatch center and the Station Transponder Units might or
might not share the same Subnet Mask. The Station Transponder Units will also need to be
given the Gateway address that the router uses when it passes packets out of its local
subnet to the subnet on which the server resides.
28
025-9581M
System Layout
Figure 8: A Medium System Involving a Subnet
Console #2
Console #1
Ethernet
Local network
LAN Switch
FSA Server
Ethernet
Router
Subnet connecting
fire stations.
IP Station
Unit #1
IP Station
Unit #2
IP Station
Unit #3
Figure 9 shows the case of a very large system composed of multiple subnets. In this
system, in addition to the usual computer name and IP address information, you will need
to keep track of at least four different Gateway addresses as well.
In addition, if the VoIP option is being used and the voice traffic is heavy enough to justify
running the VoIP Gateway1 service on a separate machine from the FSA Server, the
record keeping overhead goes up a great deal more. In addition to the address information
for the second server machine, there will be a second IP address and Gateway address to
keep track of for each Station Transponder Unit in the system.
As you can see already, the comment made at the beginning of this chapter about the work
required to install the FSA system being very much influenced by the design of the
network was not an understatement. Even if the FSA system is being installed on an
existing network, the network questions must be considered and solved before you move
on to trying to install the system.
1. This use of the term “gateway” is not related to its use in relation to routers.
29
Planning the System
Figure 9: A Large System with Multiple Subnets
Console #1
Console #2
Console #3
Subnet connecting
console positions.
Ethernet
Router
Large Scale
IP Network
VoIP Server
Router
FSA Server
Ethernet
Router
Subnet connecting fire
stations.
IP Station
Unit #1
IP Station
Unit #2
IP Station
Unit #3
IP Station
Unit #5
IP Station
Unit #6
Ethernet
Router
Subnet connecting fire
stations.
IP Station
Unit #4
30
025-9581M
Collecting and Assigning IP Information
Collecting and Assigning IP Information
There are a number of pieces of information that are helpful to have “in hand” prior to
starting the installation of software components and network hardware that make up an IP
FSA system. Collecting this information allows you to review how the system is
organized, as well as speeding up the basic configuration of system components.
Tip
The worksheets provided in the back of the manual should help in
the collection and organization of system address information.
Please make copies of the worksheets found in Appendix B:
Worksheets on page 171.
The items needed are:
• The fixed IP address for the FSA Server machine
• The IP address for each of the FSA Console computers
(if fixed addresses are being used for the consoles)
• The fixed IP address for the VoIP Gateway Server machine, if a separate machine is
used (in many systems, both the FSA Server and the VoIP Gateway Server will
reside on the same machine)
• The fixed IP addresses reserved for the Station Transponder Units at each fire
station in the system. This list should also have the name or designation that will be
used for this station in the FSA Console GUI.
• The fixed IP addresses for the VoIP Intercom units in each fire station (if the VoIP
option is used). This list should cross-reference the VoIP IP addresses to the same
list of station names that was used with the Station Transponder Unit addresses.
• If the IP Fire Station Alerting System is not being set up on a single, contiguous
network, then you will need router information for all of the routers that connect the
subnets back to the network on which the FSA Server and VoIP Gateway Server are
installed.
Some general considerations to keep in mind while mapping out which computers the
various components get installed on are:
• The VoIP Gateway Maintenance Utility should be installed on some computer other
than the machine running the VoIP Gateway Server whenever possible.
• If the system spans several subnets and the VoIP Gateway option is being used, you
will need to install a utility called UBAM™ Listener on the same branch of the
network that the VoIP Gateway Server resides on and a companion utility called
UBAM™ Repeater on each of the other subnets in the system. The UBAM™
Listener utility should be installed on some computer other than the one that is
running the VoIP Gateway Server if the number of subnets in the system exceeds
10. See Installing the UBAM™ Components on page 47.
31
Planning the System
Default IP Addresses
IP equipment from Zetron will typically be configured with an initial IP address. The
following list identifies factory default IP addresses:
• Model 6203: 10.0.0.1 to 10.0.0.50
• Model 6204: 10.0.0.51 to 10.0.0.100
• VoIP Intercom Unit: 10.0.0.101 to 10.0.0.150
• Zetron-supplied FSA PC: 10.0.0.201 to 10.0.0.223
General Order of Installation
The general order of installation for the software components is presented here. While it
can be carried out in another order to support the circumstances of a particular installation
situation without any danger of causing problems, this order ensures that the servers are in
place before the client components.
1. FSA Server - on a dedicated machine
2. CAD Translator - if it is going to be used in this system the CAD Translator is
installed on the same machine as the FSA Server
3. FSA Maintenance Utility - can be installed on any machine in the network that
can communicate with both the FSA Server machine and the console position
computers, it may be installed on multiple machines
4. FSA Console - on the computers located at the dispatch operator positions, it may
also be installed on the server machine
At this point you might want to do the initial configuration on the FSA Server, a few client
FSA Console positions, and a few Model 6203 units to confirm their operation and the
operation of the network connecting them. Once you have completed this part of the
process, you can proceed to installing the components that support the VoIP option if you
are using it.
• VoIP Gateway Server - on the same machine as the FSA Server, or on a dedicated
machine
• VoIP Gateway Maintenance Utility - this is the configuration tool for the VoIP
Server, because of how it interacts with the server and the individual VoIP intercom
units in the system, when possible, it is recommended that it be installed on some
machine in the system other than the VoIP Server or on a laptop computer that is
connected to the network when maintenance needs to be done.
• UBAM™ Utilities - these utilities become necessary if the FSA system spans more
than one subnet and the routers that connect the various portions of the overall
network are configured not to pass UDP packet transmissions from one subnet to
32
025-9581M
Licensing
another - this is all discussed at greater length under Installing the UBAM™
Components on page 47.
Note
UDP = User Datagram Protocol, the protocol used for broadcasting
a message over a network to multiple computers
Tip
If you purchased a preconfigured system from Zetron, the
applications are already licensed. If you are supplying your own
computers, the applications must be licensed as described in this
section.
Licensing
!
Caution!
There is no grace period to use the software without a license.
Fire Station Alerting System applications require a valid software license. Every time the
software applications go through a startup cycle, they check for the presence of an
applicable license file. If one exists, the application checks to see that the key provided is
valid for the hardware on which the application is being run. This license file is supplied
by Zetron. The license key is based on the hardware ID number for the Network Interface
Card (NIC) present (or possibly the hard drive the application has been installed on, if no
NIC is present).
License files for Zetron FSA applications are stored in C:\Program
Files\Zetron\Licenses (on a PC with a 32-bit OS) and in C:\Program Files
(x86)\Zetron\Licenses (on a PC with a 64-bit OS). If an FSA application does not
find valid license files in this location, some or all functions are not available.
FSA Console
• A valid license allows the FSA Console to start.
• If a valid license is not found the console will display that the license was
invalid.
FSA Server
• A valid license allows the FSA Server to accept live connections.
• If a valid license is not found, the service will start and record an invalid
license log entry. The service will not accept any live connections.
FSA VoIP
Gateway Server
• A valid license allows the FSA VoIP Gateway Server to accept live
connections.
• If a valid license is not found, the service will start and record an invalid
license log entry. The service will not accept any live connections.
33
Planning the System
FSA XML
CAD Interface
• A valid license allows a connection to the XML CAD Interface.
• If a valid license is not found all requests will be rejected with a
FaultResponse message stating that the feature is not licensed. This will also
be noted in the log.
FSA Serial
CAD Interface
• A valid license allows a connection to the Serial CAD Interface.
• If a valid license is not found the CAD interface will be inactive. This will
be noted in the log.
Getting License Files
To obtain a valid license for a Zetron application, you need to contact Zetron and provide
specific information about the computer(s) on which the application has been installed.
This information can be obtained as follows.
♦ To collect computer information
1. Insert the FSA CD.
2. Use Windows Explorer to navigate to the folder License Manager.
3. Double-click the program Zetron.LicenseManager.exe to start it.
4. Click Generate Resource Lock File. This creates a <computer>.zlock file
containing the necessary hardware ID information for the computer. Save the file
to a portable data device, replacing <computer> with a filename unique for each
computer.
Tip
Select a name that indicates the types of licenses to associate with
the PC. The information helps to ensure each PC receives the
correct license types.
5. Repeat this process for each computer that this application will be installed on,
while collecting all of the .zlock files on the portable data device.
6. Create an email to [email protected], with all .zlock files attached,
requesting license files for Fire Station Alerting. Identify your organization and
system ID/name in the body of your email.
7. When you receive the requested license files from Zetron, proceed to Installing the
License Files on page 34.
Installing the License Files
The email you receive back from Zetron should have license files for each computer. Each
file name includes the <computer> part of the <computer>.zlock file that was sent to
Zetron.
For example, an installer sends an email to Zetron containing two data files. The files are
named Console1.zlock and Console2.zlock. The email received back has several
files attached. They have file names such as console1xxxx.zlic and
34
025-9581M
Licensing
console2xxxx.zlic. The console1... files belong to computer #1, and the
console2... files belong to computer #2.
Note
The number of license files on a computer does not necessarily
indicate the number of licensed features or applications.
♦ To install the license files on a PC with a 32-bit OS
Tip
The following procedure describes how to use License Manager to
install the license files. However, if you prefer, you can simply copy
the license file(s) specific to a particular computer to the following
location on that computer: C:\Program Files\Zetron\Licenses
This alternative method is useful if you don’t have the FSA CD with
you to run License Manager.
1. Once you receive the email back from Zetron, save the attached license files to a
portable data device.
2. Insert the portable data device into the PC for which the files are intended.
3. Run License Manager from the FSA CD. If you do not have the CD, see the Tip at
the beginning of this procedure.
4. Click Install Licenses...
5. Select the appropriate license file(s) for the computer, and click Open.
6. After a few seconds the new licenses should appear in License Manager, if they are
correct for this computer.
7. If you are upgrading the license files, keep the old .zlic files as well. Do not
remove them.
8. Remove the portable data device.
9. Make a backup copy of the license files and store it in a secure location. It is very
important to have a backup copy of the license files. In the event of a hard drive
crash or disk file corruption, the license files will be required in order to restore
Fire Station Alerting.
♦ To install the license files on a PC with a 64-bit OS
1. Once you receive the email back from Zetron, save the attached license files to a
portable data device.
2. Insert the portable data device into the PC for which the files are intended.
3. Copy the appropriate license file(s) to C:\Program Files
(x86)\Zetron\Licenses.
4. Remove the portable data device.
5. Make a backup copy of the license files and store it in a secure location. It is very
important to have a backup copy of the license files. In the event of a hard drive
35
Planning the System
crash or disk file corruption, the license files will be required in order to restore
Fire Station Alerting.
36
025-9581M
Overview
Creating Console Positions
Overview
This chapter covers the installation of the FSA Console application onto the computers
that are used in the dispatch center to create individual operator positions.
It covers the installation of the console application and the loading of the license file that
keeps the application working.
If you actually looking for information on configuring the FSA Console application once
the software is up and running on a computer, please see Configuring the FSA Console on
page 81.
Preparing the Console Computer
Disabling Security Features
Several security features in Windows XP and Windows 7 must be or should be disabled.
♦ To set Data Execution Prevention (DEP) to OptIn (Windows 7 only)
1. Click the Windows Start button.
2. Type cmd and press CTRL-SHIFT-ENTER. This opens a command prompt
window with administrator rights.
3. At the command prompt, type the following command and press Enter.
bcdedit /set nx “optin”
4. Close the command prompt window.
37
Creating Console Positions
♦ To disable Windows Firewall (for XP)
1. Log in or start Windows with administrative rights.
2. Click the Windows Start button.
3. Click Run, type cmd, and press Enter.
4. Type firewall.cpl and press Enter.
5. On the General tab, click Off, and then click OK.
6. Close the control panel.
♦ To disable Windows Firewall (for Windows 7)
1. Click the Windows Start button.
2. Type cmd and press CTRL-SHIFT-Enter.
3. Type firewall.cpl and press Enter.
4. Click Turn Windows Firewall on or off.
5. Click Change Settings, then Off.
6. Close the control panel.
♦ To disable Windows Defender (XP only)
Windows Defender might have been installed on Windows XP by the computer
manufacturer.
1. Click Start, All Programs, Windows Defender.
2. Click Tools, Options.
3. Under Administrator options, clear the Use Windows Defender check box, and
click Save.
♦ To disable Windows Defender (Windows 7 only)
Windows Defender is included by default with Windows 7.
1. Click Start, and search for Windows Defender.
2. If the Windows Defender application launches:
a. Click Tools, Options.
b. Under Administrator options, clear the Use Windows Defender check box,
and click Save.
♦ To disable User Account Control (Windows 7 only)
1. Click the Windows Start button.
2. Type msconfig and press Enter.
3. Click Tools.
4. Scroll down the list to find and click Change UAC Settings.
5. Press Launch. The User Account Control Settings window will open.
6. Ensure UAC is set to Never notify.
38
025-9581M
Installing the IP FSA Console Software
7. Close the command line window.
8. Close MSCONFIG.
9. Reboot the computer.
Installing the IP FSA Console Software
The requirements for the FSA Console can be found under Requirements for FSA
Computer Platforms on page 24. The machine does not have to be connected to the
network in order to perform the FSA Console installation.
A license is required for this application to continue running.
Note
Before installing any of the FSA software, ensure that Windows is
properly configured. See Preparing the Console Computer on
page 37.
♦ FSA Console Installation
1. Insert the IP FSA Suite CD in the computer’s CD or DVD drive. The installation
routine should start automatically and display the opening screen. (If it does not,
use the RUN command on the Start menu to browse the CD-ROM root directory,
select the Autorun.exe file, and run it.)
2. From the opening screen, select the FSA Installation menu, select the FSA
Console option, and click the Install 'FSA Console' button. The installer for the
console program will start.
3. Follow the on-screen instructions of the installer.
4. When the installation is complete, you may remove the CD-ROM from the drive.
A desktop icon is installed for starting the FSA Console application.
Note
The default port number for the FSA Console is always 43004
License Files
A separate license file will need to be obtained for each position running the IP FSA
Console software and installed on the machine at that position.
For instruction on obtaining specific computer ID information and installing the license
files you will receive back from Zetron, see Licensing on page 33.
39
Creating Console Positions
40
025-9581M
Overview
Creating the System Servers
Overview
This section covers the procedures necessary to install the FSA Server and VoIP Gateway
Server software onto the machine(s) that will act as server for the FSA system. In addition,
it covers the installation of the UBAM™ Listener and UBAM™ Repeater utilities and
how to determine whether or not your system requires them.
Preparing the Server Computer
The server needs to have the same preparation as the console computers. See Preparing
the Console Computer on page 37.
Installing the IP FSA Server
The machine used for FSA Server does not have to be connected to the network in order to
perform the FSA Server installation.
The FSA Server does require a license to continue running.
Note
Before installing any of the FSA software, ensure that Windows is
properly configured. See Preparing the Console Computer on
page 37.
41
Creating the System Servers
♦ FSA Server Installation
1. Insert the IP FSA Suite CD in the computer’s CD or DVD drive. The installation
routine should start automatically and display the opening screen. (If it does not,
use the RUN command on the Start menu to browse the CD-ROM root directory,
select the Autorun.exe file, and run it.)
2. From the opening screen, select the FSA Installation menu, select the FSA Server
option, and click the Install 'FSA Server' button. The installer for the server will
start.
3. Follow the on-screen instructions of the installer.
4. When the installation is complete, you may either remove the CD-ROM from the
drive or continue on with the installation of other software.
5. Click Start, Control Panel, Administrative Tools, Services.
6. On the Recovery tab, right-click Zetron FSA Server service and select
Properties.
7. Set First failure, Second failure, and Subsequent failures to Restart the
Service.
8. Click OK.
Note
The FSA Service starts automatically whenever the machine is
turned on and runs in the background as a Windows service. The
default port number 43001.
Guidance on configuring the FSA Server can be found under FSA Server Initial
Configuration on page 83.
42
025-9581M
Installing the IP FSA Maintenance Utility
Installing the IP FSA Maintenance Utility
There are no special requirements for the machine running FSA Maintenance Utility. The
machine does not have to be connected to the network in order to perform the FSA
Maintenance Utility installation. If the FSA Maintenance Utility is not installed on the
same machine as the FSA Server, it may be installed on any machine in the network that
can communicate with the machine running the FSA Server.
Note
Before installing any of the FSA software, ensure that Windows is
properly configured. See Preparing the Console Computer on
page 37.
♦ FSA Maintenance Utility Installation
1. Insert the IP FSA Suite CD in the computer’s CD or DVD drive. The installation
routine should start automatically and display the opening screen. (If it does not,
use the RUN command on the Start menu to browse the CD-ROM root directory,
select the Autorun.exe file, and run it.)
2. From the opening screen, select the FSA Installation menu, select the FSA
Maintenance Utility option, and click the Install 'FSA Maintenance Utility'
button. The installer for the maintenance utility will start.
3. Follow the on-screen instructions of the installer.
4. When the installation is complete, you may remove the CD-ROM from the drive or
continue on with the installation of other software.
A desktop icon is installed for the FSA Maintenance Utility.
43
Creating the System Servers
Installing the VoIP Gateway Server
The machine does not have to be connected to the network in order to perform the VoIP
Gateway Server installation.
The VoIP Gateway Server requires a license in order to run after installation.
Note
Before installing any FSA software, ensure Windows is properly
configured. See Preparing the Console Computer on page 37.
♦ VoIP Gateway Server Installation
1. Insert the IP FSA Suite CD in the computer’s CD or DVD drive. The installation
routine should start automatically and display the opening screen. (If it does not,
use the RUN command on the Start menu to browse the CD-ROM root directory,
select the Autorun.exe file, and run it.)
2. From the opening screen, select the FSA VoIP Installation menu, select the FSA
Voip Gateway Server option, and click the Install 'FSA Voip Gateway Server'
button. The installer for the server will start.
3. Follow the on-screen instructions of the installer.
4. When the installation is complete, you may remove the CD-ROM from the drive or
continue on with the installation of the FSA VoIP Gateway Maintenance Utility.
5. On a Windows 7 PC, Service Pack 1 is known to cause instabilities, so the VoIP
Gateway Server application should be configured with an all user compatibility
mode of Windows 7 (without SP1).
a. Right-click VoipGatewayServer.exe in C:\Program Files
(x86)\Zetron\Applications\Zetron FSA VoIP Gateway
Server, select Properties from the menu, select the Compatibility tab, and
click the Change settings for all users button.
b. Ensure Run this program in compatibility mode for: is checked, and select
Windows 7 in the drop-down menu.
c. Click OK to exit each property window.
6. Click Start, Control Panel, Administrative Tools, Services.
7. On the Recovery tab, right-click Zetron FSA Voip Gateway Server service and
select Properties.
8. Set First failure, Second failure, and Subsequent failures to Restart the
Service.
9. Click OK.
Note
44
The VoIP Gateway service runs in the background as a Windows
service any time the machine is running. The default port for this
service is number 43002.
025-9581M
Installing the VoIP Gateway Server
45
Creating the System Servers
Installing the VoIP Gateway Maintenance Utility
There are no special requirements for the machine running VoIP Gateway Maintenance
Utility. The machine does not have to be connected to the network in order to perform the
VoIP Gateway Maintenance Utility installation.
While it is preferred that the VoIP Gateway Maintenance Utility not be installed on the
same machine as the VoIP Gateway Server, the machine on which it is installed should be
connected to the same subnet to which the VoIP Gateway Server is connected.
Note
Before installing any of the FSA software, ensure that Windows is
properly configured. See Preparing the Console Computer on
page 37.
♦ FSA VoIP Gateway Maintenance Utility Installation
1. Insert the IP FSA Suite CD in the computer’s CD or DVD drive. The installation
routine should start automatically and display the opening screen. (If it does not,
use the RUN command on the Start menu to browse the CD-ROM root directory,
select the Autorun.exe file, and run it.)
2. From the opening screen, select the FSA VoIP Installation menu, select the FSA
Voip Gateway Maintenance Utility option, and click the Install 'FSA Voip
Gateway Maintenance Utility' button. The installer for the maintenance utility
will start.
3. Follow the on-screen instructions of the installer.
4. When the installation is complete, you may remove the CD-ROM from the drive.
A desktop icon is installed for starting the VoIP Maintenance Utility.
46
025-9581M
Installing the UBAM™ Components
Installing the UBAM™ Components
UBAM™ is an acronym for UDP Broadcast Agent Manager. The two software utilities
enable the VoIP Server to use the UDP mode for sending out all-call voice information
even though the routers connecting various subnets in the system have been configured to
not pass UDP transmissions.
Note
Whenever possible it is recommended that all the elements of a
VoIP system be on the same subnet. If this is not possible, then the
UBAM utilities should be used to get VoIP traffic around routers, or
you must open UDP broadcast source ports 5000 through 5255 and
destination port 1459 on each of the routers involved.
There are two utilities: UBAM Listener and UBAM Repeater. The UBAM Listener is
installed in the same subnet as the VoIP Gateway Server. If the total number of subnets
used does not exceed 10, the UBAM Listener may be installed on the same machine as the
VoIP Gateway Server. If it is installed on another machine, that machine must be
connected to the same subnet as the server machine. The UBAM Repeater is installed on a
computer in each of the subnets used by the Fire Station Alerting system.
Whenever the VoIP Server issues a UDP message on its own subnet, the UBAM Listener
sends that same message to all of the UBAM Repeater computers using the TCP mode.
How often and where the two utilities end up being installed depends on how routers are
used to connect the various subnet segments throughout the network used to support the
Fire Station Alerting system.
As shown in Figure 10, when the subnet segments are connected back to the main segment
in a hub & spoke fashion, the UBAM Listener is installed once on the main segment and
the UBAM Repeaters on all the other subnet segments are configured to connect to it.
Note: Because of the role that both the UBAM Listener and Repeater play in making VoIP
communication possible, the computers on which they are running become a vital part of
the hardware that makes up the Fire Station Alerting System. While the UBAM
applications themselves place no particular requirements on the computers used, the fact
that they are a vital part of the overall system requires that they be thought of as being on a
par with servers.
47
Creating the System Servers
Figure 10: UBAM Utilities Deployed on a Typical Hub & Spoke System Network
Station V oIP
Intercom
Router (Hub)
Station V oIP
Intercom
Station V oIP
Intercom
V oIP Gatew ay Server
(also running UBA M Listener)
Router (C)
PC running
UBA M Repeater
Station V oIP
Intercom
Router (A )
Station V oIP
Intercom
Station V oIP
Intercom
Station V oIP
Intercom
PC running
UBA M Repeater
Station V oIP
Intercom
Station V oIP
Intercom
Station V oIP
Intercom
Router (B)
PC running
UBA M Repeater
Station V oIP
Intercom
Station V oIP
Intercom
If the subnet segments are connected sequentially (a “daisy chain”), then multiple
instances of both the UBAM Listener and UBAM Repeater are installed. The Repeater in
each subnet is configured to connect to the Listener in the segment that precedes it. Please
see Figure 11.
48
025-9581M
Installing the UBAM™ Components
Figure 11: UBAM Utilities Deployed on a Typical Daisy Chain System Network
Station VoIP
Intercom
Station VoIP
Intercom
Station VoIP
Intercom
UBAM Listener only is installed
on segment A of the network
Router A
VoIP Gateway Server
(also running UBAM Listener)
Station VoIP
Intercom
Station VoIP
Intercom
Router B
PC running
UBAM Repeater/
UBAM Listener
The UBAM Repeater in
segment B is configured
to connect to the UBAM
Listener in segment A
Station VoIP
Intercom
The UBAM Repeater in
segment C is configured to
connect to the UBAM
PC running
Listener in segment B
UBAM Repeater/
Router C
Station VoIP
Intercom
Station VoIP
Intercom
Station VoIP
Intercom
UBAM Listener
Station VoIP
Intercom
The UBAM Repeater in
segment D is configured
to connect to the UBAM
PC running
Listener in segment C
UBAM Repeater
Router D
Station VoIP
Intercom
Station VoIP
Intercom
49
Creating the System Servers
UBAM Listener
There are no special requirements for the machine running the UBAM Listener utility.
The machine should be connected to the network in order to perform the UBAM Listener
utility installation.
If the total number of subnets used does not exceed 10, the UBAM Listener may be
installed on the same machine as the VoIP Gateway Server. If the UBAM Listener utility
is not installed on the same machine as the VoIP Gateway Server, it should be installed on
a machine that is connected to the same subnet as the VoIP Gateway Server.
Note
Before installing any of the UBAM Utilities software, ensure that
Windows is properly configured. See Preparing the Console
Computer on page 37.
♦ UBAM Listener Installation
1. Insert the IP FSA Suite CD in the computer’s CD or DVD drive. The installation
routine should start automatically and display the opening screen. (If it does not,
use the RUN command on the Start menu to browse the CD-ROM root directory,
select the Autorun.exe file, and run it.)
2. From the opening screen, select the FSA VoIP Installation menu, select the
UBAM Listener option, and click the Install 'UBAM Listener' button. The
installer for the UBAM utility will start.
3. Follow the on-screen instructions of the installer.
4. When the installation is complete, you may remove the CD-ROM from the drive.
5. Click on the Windows Start button. Locate the UBAM Listener Console
application and start it. The window that opens will display the IP address of the
computer running UBAM Listener and the port the application is using. Copy
down the address displayed in that window. It is used to configure any instance of
UBAM Repeater that will connect back to this instance of Listener.
6. Click the Done button to close the window.
Note
50
The UBAM Listener runs in the background as a Windows service.
025-9581M
Installing the UBAM™ Components
UBAM Repeater
There are no special requirements for the machine running the UBAM Repeater utility.
The machine does not have to be connected to the network in order to perform the UBAM
Repeater utility installation.
There are no problems associated with running both the UBAM Listener and the UBAM
Repeater on the same machine.
Note
Before installing any of the UBAM Utilities software, ensure that
Windows is properly configured. See Preparing the Console
Computer on page 37.
♦ UBAM Repeater Installation
1. Insert the IP FSA Suite CD in the computer’s CD or DVD drive. The installation
routine should start automatically and display the opening screen. (If it does not,
use the RUN command on the Start menu to browse the CD-ROM root directory,
select the Autorun.exe file, and run it.)
2. From the opening screen, select the FSA VoIP Installation menu, select the
UBAM Repeater option, and click the Install 'UBAM Repeater' button. The
installer for the UBAM utility will start.
3. Follow the on-screen instructions of the installer. At some point the installer will
prompt for the IP address and port number of the instance of UBAM Listener to
which the repeater connects.
Note
Always use the default port assignment for any VoIP configuration.
4. The installer will provide a list of port numbers that must be open to allow traffic
to pass between network segments for the UBAM utilities. Copy these down so
you can make firewall exceptions later if necessary.
5. When the installation is complete, you may remove the CD-ROM from the drive.
6. If there is a firewall running on any of the computers involved, set up exceptions
for the port numbers you recorded in step 4.
Note
Once installed, the UBAM Repeater utility runs in the background
as a Windows service.
51
Creating the System Servers
CAD Translator
The CAD Translator is an optional part of the FSA system software. It will be used when
an existing CAD console system is in use and the CAD system has been configured to use
either the communications protocol first used with the Zetron Model 26 or to use an XMLbased CAD protocol. When the Model 26 CAD protocol is used, the CAD system is
connected to one of the serial ports on the FSA Server machine. When the XML CAD
protocol is used, the CAD system communicates over the network and a network port is
assigned for CAD - FSA Server traffic. (The default port is 43003.)
The CAD Translator decides which mode to operate in automatically; based on the
information it finds in the CAD license file installed on the computer.
Installing the CAD Translator
There are no special requirements for the machine running the CAD Translator. If it is
used in a system, it is installed on the same machine as the FSA Server. The machine does
not have to be connected to the network in order to perform the CAD Translator
installation.
The CAD Translator does require a license to continue running.
Note
Before installing any of the FSA software, ensure that Windows is
properly configured. See Preparing the Console Computer on
page 37.
♦ CAD Translator Installation
1. Insert the IP FSA Suite CD in the computer’s CD or DVD drive. The installation
routine should start automatically and display the opening screen. (If it does not,
use the RUN command on the Start menu to browse the CD-ROM root directory,
select the Autorun.exe file, and run it.)
2. From the opening screen, select the FSA CAD Installation menu, select the CAD
Translator option, and click the Install 'CAD Translator' button. The installer
for the CAD translator will start.
3. Follow the on-screen instructions of the installer.
4. When the installation is complete, you may either remove the CD-ROM from the
drive or continue on with the installation of other software.
5. Click Start, Control Panel, Administrative Tools, Services.
6. On the Recovery tab, right-click Zetron FSA CAD Server service and select
Properties.
7. Set First failure, Second failure, and Subsequent failures to Restart the
Service.
52
025-9581M
CAD Translator
8. Click OK.
Note
The CAD Translator service runs in the background as a Windows
service whenever the machine is turned on.
Note
A desktop icon for the Serial CAD Viewer is installed that enables
you to open the CAD Viewer support application. This tool is used
to observe the message traffic moving back and forth between the
CAD system and the FSA Server. It also provides tools for
configuring the CAD translator settings.
Using the CAD Translator Viewer
The CAD Translator is a software utility that runs in the background and handles the
translation of commands and status messages moving between the Fire Station Alerting
System and a third-party CAD system at the dispatch center.
If your dispatch center is not using a CAD system, then you do no need to read any further
in this chapter.
As mentioned before, the CAD Translator runs continuously in the background. Normally
you would never need to know what it was doing; however, sometimes it could be useful
to watch the messages being passed back and forth for troubleshooting purposes. To
support this, a viewer is automatically installed along with the CAD translator. The viewer
enables you to track messages on both side of the divide. You can see traffic coming and
going on the FSA side and on the CAD side.
Configuring the Translator and the Viewer
There are only two screens involved in setting up the CAD translator and the
communications viewer. They are both based on telling the software where to connect to
get the message traffic.
CAD Translator Configuration
To open the translator configuration window, start the FSA CAD Viewer program and
then click on the Translator Config label found just under the title bar on the right.
Note
If the Translator Config label is greyed out, verify that the Windows
Service “Zetron FSA Serial CAD Translator Service” is started.
53
Creating the System Servers
CAD Input Selection
Type
This sets the type of CAD license that the translator checks for when the service is
started. Choose from Serial, TriTech_Serial, or XML.
Note
The default setting is Serial. If you have the XML CAD license, set
this parameter to XML.
CAD Serial Communications
Port
The CAD Translator uses a serial port when it is supporting the Model 26 Serial
CAD protocol. This field holds the COM port on the FSA Server computer used by
the serial data link coming from the CAD system. It will typically be one of the first
four COM ports on the server machine.
Baud Rate
This is the baud rate used by the CAD-FSA serial connection. It defaults to 9600. It
should be set to whatever speed the connection is using.
FSA Communications
Host
This parameter is for the IP address of the computer running the FSA Server. In
most cases, it will be the same machine that the CAD Translator is running on.
Port
This is the port used by the FSA Server. It defaults to 43001 and should not be
changed.
54
025-9581M
CAD Translator
Viewer Configuration
To open the communications viewer configuration window, start the FSA Serial CAD
Viewer program and then click on the Config label found just under the title bar on the
right.
The settings in this dialog box configure the viewer to get information from the translator.
Host
This parameter is the IP address of the computer that is running the CAD
Translator.
Port
This parameter is the port being used by the CAD Translator program. It defaults to
43003 and should not be changed.
Using the Communications Viewer
When the FSA Serial CAD Viewer is started, it opens the window shown here. Once the
configuration information has been entered it will automatically start to populate its two
panes with information about the messages passing back and forth between FSA Server
and the CAD system.
55
Creating the System Servers
The window follows all of the usual Windows® rules for resizing the window and
scrolling within it. If you wish to clear the existing message history in order to reduce the
clutter of the window, click Clear Histories at the right of the center bar.
Note
Unlike the log files, which use the Universal date/time reference,
the Viewer uses the date/time settings of the computer on which
the Viewer is being run.
The hex data displayed in the upper window under the heading CAD Packet (hex frame
bytes) can be decoded by referring to the CAD Protocol Document (Zetron part number
027-0059E, included with the purchase of the 930-0117 M26 CAD Interface license). The
direction column (Dir.) should show both transmit (Tx, from FSA Server to CAD) and
receive (Rx, from CAD to FSA Server) traffic. If there is no Rx data present, you should
check the serial port connection between the FSA server computer and the CAD system to
ensure that you have both Tx and Rx connections.
The bottom window shows messages being sent back and forth between the FSA Server
and the FSA CAD Translator (converts XML messages into/out of hex packets used by the
older serial CAD interface.
56
025-9581M
Overview
Configuring Station Transponder Units
Overview
This chapter covers the initial configuration of the Station Transponder Units. In most
cases, it is necessary that these settings be made prior to the unit being connected to a
system. Once the units have been configured, they may be connected into a system on the
workbench to test their basic functions (an excellent idea when assembling a new system
for the first time) or they can be taken to their final destination and connected to the
system there.
The assignment of the unit number and IP address are necessary to support the addition of
the unit to the overall FSA system.
The serial programming described in this chapter covers certain attributes of the Station
Transponder Unit sense inputs and relay operation that cannot be programmed through the
network connection.
Setting the Unit Number
Each Model 6203 or Model 6204 Station Transponder Unit in the system must have a
unique hardware ID number assigned to it. This number not only identifies the unit within
the system, it also indicates whether the unit in question is the primary or secondary unit at
any station with more than one unit. Primary units are numbered from 1 to 511. Secondary
units are given an ID number equal to the ID of the primary unit plus 512.
57
Configuring Station Transponder Units
For example, the primary unit at a station is assigned “7” as its ID number, then the
secondary unit would be assigned “519” (7 + 512 = 519).
Note
The ID number set with SW2 and SW1 have nothing to do with the
IP address assigned to the network interface board in each unit.
You will still need to assign an IP address to each unit before
connecting it to the network.
The switches work in a binary fashion. You must convert the number you wish to assign to
a station unit into its binary equivalent and then set the switches.
♦ Assigning a Unit ID Number to the Station Transponder Unit
1. Choose a number to assign to a unit.
2. Convert the number from decimal into its binary equivalent.
3. Starting with the Least Significant Bit (LSB) of the number, start entering the
number at SW2-1, then SW2-2, SW2-3, and so on, until the number is completely
entered.
4. (Optional) if the unit is a secondary unit, set its switches to the same number used
in the primary unit and then set SW1-2 to the ON position.
5. Make sure that SW1-8 is in the OFF position.
Figure 12: Close-up of SW2
OFF = 0
ON = 1
OFF
1
2
1
58
3
4
5
6
7
8
ON
2 4 8 16 32 64 128
(2 + 8 + 16 = 26)
025-9581M
Setting the Unit Number
Table 1: Switch Values for Setting Unit ID
Switch
Description
Address Value
SW2 -1
Address bit 1 (LSB)
1
SW2 -2
Address bit 2
2
SW2 -3
Address bit 3
4
SW2 -4
Address bit 4
8
SW2 -5
Address bit 5
16
SW2 -6
Address bit 6
32
SW2 -7
Address bit 7
64
SW2 -8
Address bit 8
128
SW1 -1
Address bit 9
256
SW1 -2
Address bit 10 (MSB)
(0 = Primary Unit at station,
1 = Secondary Unit)
512
SW1 -3
Not Used
—
SW1 -4
Not Used
—
SW1 -5
Not Used
—
SW1 -6
Not Used
—
SW1 -7
Software Program baud rate select:
OFF = 1200 baud
ON = 9600 baud
—
SW1 -8
J1 mode selection
OFF = Printer mode
ON = Software Program mode
—
59
Configuring Station Transponder Units
Serial Port Programming
The Station Transponder Unit will have default settings in it as it comes from the factory.
In many cases these will be sufficient; however, if you intend to use the sense inputs to
trigger relay functions (or need to alter several timer settings), you will need to access the
serial programming mode for setting up the Station Transponder Unit.
In order to carry out serial programming on the Station Transponder Unit, you will need
the following:
• A laptop or desktop computer with a free COM port
• A compatible serial cable (see J1 Serial Port Pinout on page 153)
• A terminal emulation program, such as Hyper-Terminal
♦ Accessing the Serial Settings of an Station Transponder Unit
1. Connect a compatible serial cable (see J1 Serial Port Pinout on page 153) between
your computer and socket J1 on the transponder board.
2. Set switch SW1-8 to the ON position.
3. Using a serial terminal emulation program (such as HyperTerminal), set up a
connection for the COM port to which the cable is connected. The settings should
be: 9600 baud, 8-bit words, 1 stop-bit, no parity checking.
4. Hit the SPACE bar three times to open the Model 620x configuration main menu.
5. Enter a “1” to open the Station Configuration menu. Press “1” to toggle between
the station types.
6. Enter a “2” to enable the correct number of units (fire station resources, like trucks)
supported by this transponder. After selecting the number of units, press “e” to
return to the Station Configuration menu.
60
025-9581M
Serial Port Programming
7. Press “4” to open the Communication Mode menu and “4” again to set the
Communication Mode to COR, TX on COR Low. Press “e” to return to the
Station Configuration menu.
8. Enter a “5” and set the keyup delay to 0.10 seconds (for a system using VoIP, if the
system uses radio to handle voice you will need to set this delay longer). When you
are finished, enter “e” to return to the top menu.
9. From the top menu, enter a “5” to open the PA Options menu. Confirm that the
number “3” option, PA Un-Muted Mode, is Enabled. Enable it if necessary.
When you are finished, enter an “e” to return to the top menu.
Note
The options and settings available from this menu are not available
in the FSA Maintenance Utility. If you intend to use these
capabilities of the Model 6203 in your system, then you must
make the settings here.
61
Configuring Station Transponder Units
10. (Optional) Entering a “2” at the top menu opens the Alerts menu. This menu is
used to determine what kind of audible alert tone the Station Transponder Unit
plays in response to an incoming alert for a particular unit (or the station). In
addition, you can configure a unit energize a relay based on receiving an alert and
to reset a relay based on the activation of a sense input. For more information about
the options in this menu, see “Alerts” Menu on page 67. When you have finished
in this menu, type “e” to return to the top menu.
11. (Optional) Entering a “3” at the top menu opens the Relays menu. From this menu
you can select an individual relay and configure the manner in which the relay gets
reset. For more information on the reset options, see “Relays” Menu on page 69.
When you have finished in this menu, type “e” to return to the top menu.
62
025-9581M
Serial Port Programming
12. (Optional) Entering a “4” at the top menu opens the Inputs menu. From this menu,
you can set which polarity is considered the active state for the sense input being
programmed. You can also set the debounce time used to filter state transitions for
each input. For more information on this menu and its options, see “Inputs” Menu
on page 71.
When you have finished in this menu, type “e” to return to the top menu.
13. When you have finished programming the station unit, type “e” as many times as
necessary to return to the top menu, then type “e” one more time to exit the serial
programming mode.
14. Move switch SW1-8 back to the Off position and disconnect the serial cable from
the socket J1 on the transponder board. Close the unit.
“Station Configuration” Menu
Note
The firmware in the Model 6203 is based on an earlier product that
also supported wireline connections. Please ignore any references
to wireline that appear in the menus. This mode is no longer
supported.
This menu selection is found in the Main Menu. There are several different Station
Configuration Menus that can be displayed. The menu displayed depends on the Model
6203 current Communication Mode. This mode is also selected from within this menu.
Different Communication Modes require different parameters and only the parameters
that affect the selected mode are displayed. The mode that you are most likely to use is
shown in Figure 13.
63
Configuring Station Transponder Units
Figure 13: The COR Mode
All of the programmable parameters are described in the following paragraphs.
Station or 4 Unit Display
This is the first parameter listed in the Station Configuration Menu. It determines whether
the first column of LEDs on the Model 6203 front panel represents the station status or a
unit (vehicle) status. If the Model 6203 is the primary unit, this parameter is normally set
for Station status displayed. If the Model 6203 is a secondary unit (address greater than
512) then this parameter is normally set to 4 Unit Display.
Unit Enables
This is the second parameter listed in the Station Configuration Menu. This parameter is
used to select which units (vehicles) are active on the Model 6203. Selecting this
parameter displays another menu where individual units can be enabled or disabled. If a
unit is disabled its status will no longer be displayed and its alerts will no longer be
sounded.
Always Sound Unit Alerts
This is the third parameter listed on the Station Configuration Menu. This parameter deals
with how alerts are sounded for units (vehicles) which are not In Quarters. Selecting this
parameter from the menu toggles between always sounding unit alerts or only sounding
unit alerts when the unit’s status is In Quarters.
Communications Mode
This is the fourth parameter listed in the Station Configuration Menu. This parameter
holds the Communication Mode that the Model 6203 is currently operating under and this
in turn effects the parameters that are displayed in the Station Configuration Menu. When
64
025-9581M
Serial Port Programming
this parameter is selected, the menu shown in Figure 14 is displayed showing the
communication modes that can be selected for the Model 6203.
For detailed explanations of the various Communication Modes, see “Communications
Mode” Menu on page 66.
Keyup Delay
This parameter is found in the Station Configuration Menu. In conventional radio modes it
sets the delay time, in seconds, from PTT activation until the Model 6203 starts to transmit
data. In the trunking radio modes it sets the delay time from channel grant to the beginning
of data transmission. This parameter accepts any value between 0.00 and 59.99 seconds.
When the VoIP Gateway is being used this parameter is usually set to 0. In all other
communication modes it should be as small as possible to maximize system performance.
Retry Period
This parameter is found in the Station Configuration Menu. It sets the minimum time, in
seconds, that the Model 6203 will wait for a reply from the FSA Server before doing a
retry. The Model 6203 also adds a randomly generated time value to this parameter to
calculate the total wait time.
This parameter accepts any value between 0.00 and 59.99 seconds. A typical value would
be 10.00 seconds.
Max Timeout
This parameter is found in the Station Configuration Menu. It sets the maximum time the
Model 6203 will wait for a clear channel (No VOX or COR signal) before it goes ahead
and transmits anyway. If the value of this parameter is 0, the Model 6203 always wait until
a channel is clear before transmitting. This parameter accepts any value between 0.00 and
59.99 seconds. Typically it is set to 0 (the default, always wait for a clear channel).
Voice Debounce
This parameter is found in the Station Configuration Menu. It sets the period of time that
the Model 6203 is prevented from transmitting after it stops receiving non-FFSK data. It is
used to prevent the pauses in normal speech (VOX communication mode) from giving a
false channel clear indication. It also prevents the muting of the PA prematurely during
station announcements. This parameter accepts any value between 0.00 and 59.99
seconds. Typically it is set for about 1.50 seconds.
FFSK Mute Debounce
This parameter is found in the Station Configuration Menu. It sets the period of time after
the Model 6203 stops receiving or sending FFSK data that it continues to mute the PA and
handset from FFSK packet noise (“packet racket”). If packet noise can be heard while the
PAs are on, increasing the value of this parameter should help to minimize it. This
65
Configuring Station Transponder Units
parameter accepts any value between 0.00 and 59.99 seconds. Typically it is set for about
0.25 seconds.
Trunking Grant Debounce
This parameter is no longer used.
Trunking Grant Timeout
This parameter is no longer used.
Trunking Grant Retry Delay
This parameter is no longer used.
TX Delay
This parameter is found in the Station Configuration Menu. It sets the delay time that the
Model 6203 waits, after receiving a valid FFSK packet, before asserting PTT for a
response in the Trunking Modes. This parameter accepts any value between 0.00 and
59.99 seconds. The value defaults to 0, but should be increased in situations where the
sending radio, which sent the stimulus (poll), needs more time to turn around to receive
after transmission.
“Communications Mode” Menu
Figure 14: The Communications Mode Menu
Note
66
The firmware in the Model 6203 is based on an earlier product that
also supported wireline connections. Please ignore any references
to wireline that appear in the menus. This mode is no longer
supported.
025-9581M
Serial Port Programming
Wire Line
This mode is not supported in the Model 6203 for IP FSA systems.
VOX
This communications mode is designed for use with a conventional radio interface where
the Model 6203 uses its own internal circuitry to detect channel availability. If the Model
6203 detects noise above a threshold set by the VOX potentiometer, it thinks the channel
is busy and does not transmit. When this mode is selected the COR input is ignored by the
Model 6203. The Model 6203 attempts to transmit status changes as soon as they happen.
It does not need to receive a poll from the Model 26 in order to transmit (exception
reporting).
COR Communications Modes
There are two different COR (Carrier Operated Relay) communication modes: TX on
COR High and TX on COR Low. For the purposes of IP alerting, the COR TX on COR
Low mode is used and the COR input is always grounded.
Trunking Communications modes
This mode of operation is no longer supported in IP network-based systems.
“Alerts” Menu
This menu selection is accessed from the Main menu. It is used in the configuration of
alert commands and appears as shown in Figure 15 when selected.
Figure 15: Serial Programming of Model 6203 - Alerts Menu
67
Configuring Station Transponder Units
There are six different types of alerts that can be received by the Model 6203 and each
alert has several different configurable parameters. Selecting one of the alert types, from
this menu, displays the menu in Figure 16 for changing the parameters of an alert.
Figure 16: Alert Parameters Menu
Tone
This parameter holds the type of tone that is sounded for the selected alert. Selecting this
parameter displays the menu in Figure 17, which lists the different types of tones that this
parameter can hold.
Selecting a tone from this menu assigns the tone to the Tone Parameter for the selected
alert.
Figure 17: Alert Tone Menu
68
025-9581M
Serial Port Programming
Ramp Time
This parameter sets the alert tone volume ramp time. The volume of an alert goes from no
volume to full volume in seven increments spread over the time period set with this
parameter. The valid range for Ramp Time includes any integer value from 0 to 9 seconds.
Hold Time
This parameter sets the alert tone's full volume, hold time. The valid range for Hold Time
includes any integer value from 0 to 9 seconds.
Sense Input
This parameter selects which of the sense inputs is used to acknowledge the selected alert.
The alert is acknowledged when the input goes active. One way to use this parameter is to
sense the presence of each vehicle at the station. When an alert for a particular unit sounds,
the vehicle alerted causes the Model 6203 to automatically acknowledge the alert and
change the its status to Responding when the vehicle pulls out of the station and trips a
sensor. The same Sense Input can also be used to deactivate a relay. For example, it could
close a garage door or to turn off lights (see “Relays” Menu on page 69). This parameter
accepts values from 0 to 4, where 0 indicates no sensor inputs.
Relays
This parameter selects which relays are associated with the selected alert. Relays
associated with a particular alert are activated by the Model 6203 whenever it receives that
alert condition. The condition that deactivates the relays is set in the Relay Menu.
One example for using this parameter is to connect a relay that is associated with a unit
alert, to the overhead door opener for that unit. Whenever an alert for that unit is received
the relay is activated, opening the garage door.
This parameter accepts values from 1 to 4. Entering a number either associates or
disassociates (toggles) the numbered relay with the alert being programmed.
Test Alert
This menu selection is found in the Alert Parameters Selection Menu. Selecting this item
sounds the tone for the selected alert as presently configured. Use this feature when setting
up the tones in the station to temporarily sound the alert tones.
“Relays” Menu
The Relay Menu selection is found in the Main menu (not to be confused with the Relays
selection under the Alerts menu). It is used for the configuration of the Model 6203 relays.
The menu in Figure 18 appears when Relays is selected from the Main menu.
Selecting one of the relays listed in this menu will display the Relay Parameter Selection
Menu as shown in Figure 19.
69
Configuring Station Transponder Units
Figure 18: The Relay Menu
Figure 19: The Relay Parameter Selection Menu
The Parameter Selection Menu is used to select the way that the relay is reset (deactivated)
after it has been activated. It also provides a way to manually operate the relay for test
purposes. These reset conditions do not apply whenever a relay has been activated
manually by using the Relay Control input (see Relay Control (P9) on page 155). The
following paragraphs give brief descriptions of the parameters shown in Figure 19.
Alert Off Reset
This selection causes the relay to reset once an alert is acknowledged, if the relay is also
configured to be activated by that alert’s on condition. Relays can be configured to
activate on the reception of an alert command, in the Alerts Menu.
70
025-9581M
Serial Port Programming
Sense Reset
This selection causes one of the sense inputs to be assigned to reset the relay. When the
assigned sense input has a state transition from an inactive state to an active state (see
“Alerts” Menu on page 67), the relay is reset. If “0” is assigned to this parameter, the relay
can only be reset by a reset command from the FSA Server (or CAD system) or from the
Manual Relay Off selection in the Relay Parameter Selection Menu.
Timer Reset
This parameter sets the time period for which the relay remains activated. This parameter
accepts any value between 0.00 seconds and 9 minutes/59.99 seconds. If “0” is entered as
the time period, the relay will only be reset by a reset command from the FSA Server or
from the Manual Relay Off selection in the Relay Parameter Selection Menu.
Manual Relay On
Choosing this menu selection manually turns on the selected relay. The relay turns off
based on its reset parameter.
Manual Relay Off
Choosing this selection manually turns off the selected relay.
“Inputs” Menu
The Model 6203 has four inputs for connecting to logic level sensors (see Sense Inputs on
page 170). There are many applications for these sensors. Any change of state at one of
these inputs is immediately transmitted to the FSA Server. Please note that these state
changes are not queued. This means that under some conditions, if multiple state changes
occur at the same input before the first state change is successfully transmitted to the FSA
Server, not all of the changes will be reported.
Sense input state changes can also be used to reset Model 6203 relays and to acknowledge
alerts. The configuration and assigning of sense inputs is done in the Inputs Menu of the
Software Configuration Program.
The Inputs Menu is found in the Main menu of the Software Configuration Program and it
is used for configuring the Model 6203 sense inputs. When selected, it opens the menu
shown in Figure 20.
71
Configuring Station Transponder Units
Figure 20: The Inputs Menu
This menu shows the current state of each sense input, polarity (Active State), the state
transition necessary to reset the relay (if so configured; see “Relays” Menu on page 69),
and debounce time. The states (open and closed) are in reference to the state of a contact
closure between the sense input negative lead and its ground input (see Sense Inputs on
page 170). Selecting one of the sense inputs from this menu displays the menu in Figure
21. The paragraphs following the figure give a brief description of the parameters in this
menu.
Figure 21: Sense Input Parameter Selection Menu
Active Polarity
This parameter is found in the Sense Input Parameter Selection Menu. It holds the active
polarity of the selected sense input. Selecting this parameter toggles the polarity shown
under Current Setting.
72
025-9581M
Serial Port Programming
Debounce Time
This parameter is found in the Sense Input Parameter Selection Menu. It sets the debounce
time of the selected sense input. Debounce time is the delay time between the transition of
the sense input to its opposite state and the reporting of that transition. If the transitions are
closer together than the debounce time, this prevents short duration transitions (bounces)
from being reported as transition pairs. This parameter accepts any value between 0 and
255 milliseconds.
“PA Options” Menu
This sub menu is accessed from the Main menu. It gives access to several options
concerning the PA system controlled by the Station Transponder Unit. The menu shown in
Figure 22 appears when PA Options is selected. The paragraphs following the figure give
a brief description of the parameters in this menu.
Figure 22: PA Options Configuration Menu
5 Minute Fail Safe Timeout
This parameter enables or disables the 5-Minute Fail Safe timer, which turns off the PA
system if it was inadvertently left on due to a communication problem. In systems using
the Day/Night mode, which leaves the PA on for long periods of time, this parameter must
be disabled.
PA Always Open Mode
This parameter enables and disables the PA relays, which enables the station personnel to
monitor all of the traffic passing between the dispatch center and the Station Transponder
Units. Commands from the FSA Server to turn the PA system off are ignored by the
Station Transponder Unit when this option is enabled. When this option is enabled, the 573
Configuring Station Transponder Units
Minute Fail Safe timer is automatically disabled so that the PA may remain in the ON
state indefinitely.
PA Un-muted Mode
This mode is used to ensure that audio supplied at the AUX RX audio input is heard. The
PA Un-muted Mode must be set to the Enabled condition for all installations of the
Model 6203 and the Model 6204.
Allow Handset use when PA On
This option allows handset users to place emergency calls to a dispatcher or make
announcements over the local PA while the Model 6203 is in Day Mode (PA is always
enabled for listening to announcements being made to any station) and is connected to an
IP FSA Server (this option disables itself when a Model 26 is used). When enabled, the
handset hook switch and PTT switch determines audio behavior when the PA LED is on.
Behavior when this option is enabled:
Alert tones override the handset PTT switch, but keying the PTT switch blocks incoming
announcements from the dispatcher, so station personnel should be trained to reserve
handset use while the PA LED is on for emergency use.
Behavior when this option is disabled:
If the PA LED is on, then the Station Transponder Unit ignores the handset PTT switch.
74
025-9581M
Setting the IP Interface Network Address
Setting the IP Interface Network Address
Each Station Transponder Unit has a tag or a label with the factory-supplied IP address.
For replacement or single units, the address is 10.0.0.1. If you are receiving multiple units,
they will range from 10.0.0.1 to 10.0.0.50, as defined in the configuration guide.
Once it is installed in your Fire Station Alerting system, each unit will need to be assigned
a new address that is compatible with your existing network. Fortunately this is easy to do
and does not require any special hardware or software. In addition to the Station
Transponder Unit (powered up and running), the items required to set the IP address on
that unit are:
• A desktop computer or a laptop, with a network interface card installed
• A typical web browser such as Internet Explorer or Firefox
• Either one of the following:
an IP switch and two network connection cables, or
a network cable suitable for a peer-to-peer connection
• The IP address the unit is currently set to (10.0.0.1 to 10.0.0.50 if it came the
factory, as defined in the configuration guide)
• The IP address to which your IT department has determined the unit needs to be set
Note
For a complete list of the default IP address ranges used by IP FSA
equipment, see Default IP Addresses on page 32.
♦ Changing the IP Address in a Station Transponder Unit
1. Connect power to the Station Transponder Unit.
2. Connect the network ports of the computer and the Station Transponder Unit. This
can either be peer-to-peer or through a switch. If it is done through a switch or hub,
only one Station Transponder Unit should be connected to the switch at any time.
!
Caution!
Do not connect multiple Station Transponder Units to a hub,
switch, or network prior to changing their IP addresses from
the factory default to their final IP addresses. Attempting to
communicate with a group of units while they all share the
same default IP address results in unpredictable and unstable
behavior.
3. Configure the IP address of the computer to be 10.0.0.201. This is a temporary
change so the computer can communicate with the Station Transponder Unit.
4. Start the browser on the computer and instruct it to open the IP address to which
the Station Transponder Unit is currently set. The login screen for the Digi
Connect ME should open.
75
Configuring Station Transponder Units
5. When the login screen shown in Figure 23 opens, enter the Username: root and
the Password: dbps, then click on the Login button. The Home screen for the Digi
Connect ME opens.
Figure 23: Login Screen of Digi Connect ME
6. In the column on the left of the screen, under the heading Configuration, select the
Network option. The Network screen shown in Figure 24 opens.
!
Caution!
Never use the Factory Default Settings option. Doing so
changes many parameters set at Zetron that will negatively
impact network connection reliability and performance.
Figure 24: Assign the New IP Address
7. Make sure the “Use the following IP address:” radio button is selected and fill in
the new IP Address: and Subnet Mask: for the unit. (The subnet will almost
always be 255.255.255.0) Whether or not you need to enter a Default Gateway:
76
025-9581M
Setting the IP Interface Network Address
setting will depend on how your network is designed. Be sure to select the Apply
button before exiting this screen.
!
Caution!
Never use the Network Services Settings or Advanced
Network Settings options found at the bottom of the Network
Configuration window. Changing any of the settings found in
these two sub-windows could prevent the system from working.
8. From the bottom of the column on the left, select the Logout option.
Tip
Always use the Logout option to quit a programming session.
Leaving the programming mode in any other manner can cause
unpredictable results.
9. After disconnecting the Station Transponder Unit from the computer, cycle power
on the unit to make the new IP address take effect.
77
Configuring Station Transponder Units
78
025-9581M
Overview
Basic System Configuration on the
Bench
Overview
This chapter covers the connection of the basic system components into a functioning
system for the first time under controlled conditions in the shop. This step is an important
one when installing new systems. It enables technicians to confirm the basic operability of
the system and to remedy any “teething” problems while the “commuting time” from one
end of the system to the other is still fairly short.
In addition to all of the FSA components that will eventually end up as part of the final
system, you will need enough spare Ethernet® networking hardware to emulate the
system network in your shop.
Connecting the System Elements
When setting up the server(s), consoles, and Station Transponder Units in the shop in
order test their basic configuration, you will need to emulate at least a basic network. This
would involve at least one network switch, as shown in Figure 7 on page 28.
The drawback of doing this (if your actual system is going to be larger and more complex)
is that you will be forced to do an interim address configuration on the units you are
testing and then a final configuration on them before taking them out into the field. In
addition to the extra work of having to set the addresses in multiple units more than once is
the need to keep extra records for the current address to which each unit is actually set.
The other alternative is to acquire enough switches and routers in the shop to emulate the
actual system network “as-built”. If it can be done, this is the preferred solution.
79
Basic System Configuration on the Bench
The minimum amount of system elements you will need to start testing you system is:
• The FSA Server machine up and running
• One of the Console machines up and running the console
• One of the Station Transponder Units running and connected to the network
• A switch to tie the server, console, and Station Transponder Unit together
The FSA Maintenance Utility
The configuration of the FSA Server, the FSA Console clients, and the basic settings for
the Station Transponder Units are all performed with the FSA Maintenance Utility. This is
not a very complicated utility. In fact, it is only while programming the settings for the
Station Transponder Units that you can “drill down” to any submenus/screens.
Figure 25: Menu/Screen Relationships in FSA Maintenance Utility
FSA Console
Settings
FSA Server
Settings
Main Menu
Level
FSA Global
Configuration
Define IP
Station Units
Define the
I/O for IP
Station Units
Inputs
Fire Station
Configuration
Unit Type
Definition
Station
Interface Type
Definition
Fire Station
Definitions
Station Interfaces
Outputs
Units
While the FSA Maintenance Utility can be installed on the console client PCs, it should
definitely be installed on a computer that can communicate with the FSA Server through
the network. The utility should always be able to connect with the FSA Server (once it has
been given the correct address and port) because the service is always running (unless it
has been manually stopped). The FSA Maintenance Utility itself does not need to run
continuously.
The only time a specific instance of the FSA Console application needs to be running is
when you are specifically trying to configure that instance of the client application. The
FSA Maintenance Utility defaults to not being connected. It must be manually connected
to the instance of FSA Console you wish to configure before any configuration changes
can take place. If your attempt to connect with an instance of FSA Console fails, the first
thing to check is whether or not that instance is running.
80
025-9581M
Configuring the FSA Console
When it is first started, the utility opens on the FSA Console Settings window. From here,
you can either enter the IP address of the console client that you want to connect to, or
select the FSA Server Settings option from the menu to shift to that window.
Configuring the FSA Console
The FSA Console client cannot be edited in the sense of redefining the button shapes or
altering their placement on the screen. It is possible, from within the FSA Maintenance
Utility, to determine the order in which the stations are listed vertically or the order in
which a particular station’s apparatus is displayed horizontally. You may also alter the
look of the user interface to make it easier to use by changing the colors used for
background and text throughout the user interface.
You can use the FSA Maintenance Utility to configure an instance of FSA Console in one
of two ways. You can install the utility on the same computer as the instance of FSA
Console that you intend to configure and run it locally. If you can reach the machine that is
running the instance of FSA Console from the server of the network, the you can simply
supply the utility with the IP address of the console computer and run the utility from the
server.
For the following procedure, it is assumed that the instance of FSA Console that you want
to configure is installed and running on the computer that it will be used on.
♦ Using the FSA Maintenance Utility to Configure a Console
1. Start the FSA Maintenance Utility.
2. Click Console Settings from the menu on the left. The window shown in Figure 26
opens.
3. In the Console Connection box at the top of the window, in the Host field, enter the
IP address of the computer running the instance of FSA Console that you are going
to configure. Leave the Port setting at its default value of 43004.
4. Click Connect. If the IP address is correct and the network is functioning correctly,
the window changes to the Console Settings window as shown in Figure 27.
5. In the Settings box, select the Operation View and the time display mode. When
set to Units, the console displays Station and Unit buttons for each station. If set to
Station, the console will only display a single station button for each station.
Note
The option Display Time in UTC is for future use and is not yet
enabled.
6. In the Colors box, make whatever alterations are necessary to the background and
text colors used in the display.
81
Basic System Configuration on the Bench
7. In the FSA Server Connection Information box, enter the IP address for the
computer that is running the FSA Server.
8. When you are finished configuring the console, click Save Console Settings at the
bottom of the window.
9. When the utility informs you that it has finished with the save, click Disconnect.
You will need to restart the FSA Console for the changes to take affect
Figure 26: FSA Console Settings Prior to Connecting
Figure 27: FSA Console Settings After Connecting
82
025-9581M
FSA Server Initial Configuration
FSA Server Initial Configuration
The basic settings for the FSA Server must be entered the first time that the FSA
Maintenance Utility is run. After that, the utility will retain the settings.
For the purposes of the procedure given here, it is assumed that the FSA Maintenance
Utility is being run on the same PC that is host to the FSA Server and the VoIP Gateway
Server.
♦ Making Initial Settings for the FSA Server
1. Start the FSA Maintenance Utility program.
2. In the menu on the left of the utility window, click Server Settings.
3. (The utility will default to a setting of “localhost”, and if the utility is running on
the same computer as the server, you may leave the parameter set that way.) In the
FSA Server Settings window, in the FSA Server Connection box, click in the Host
parameter field and fill in the URL of the computer running the FSA Server.
4. Unless instructed to do otherwise by Zetron, leave the Port parameter set to the
factory default of 43001.
5. Click Connect. If the address and port settings are correct, the utility connects to
the server and the host and port settings for the server become unavailable. See
Figure 28.
Note
If Gateway is selected for the VoIP Connection in the Fire-Station
Definitions window, the Add, Edit, and Remove buttons will be
grayed out and will not function.
6. If the VoIP Gateway Server has not been entered previously, click Add or Edit (as
appropriate) and enter the URL of the computer running the VoIP Gateway Server
under the VoIP Gateway Server parameter. (The VoIP Gateway Server defaults
to “localhost” and the Port to 43002. In most systems, you should be able to
simply leave these parameters at their default settings.)
7. In the menu on the left of the window, click Global Server Settings. The window
shown in Figure 29 opens.
8. Fill in the parameters in the Zetron Customer box. These parameters do no affect
the operation of the system, but can be useful when calling Zetron for technical
support. It might be helpful to include the System ID number and your Zetron
Customer ID number in this field.
9. Review the parameters under Settings and change them if necessary. For details
about the parameters in this box, see Global Settings Window on page 84.
10. In the menu on the left of the utility window, click Server Settings. Click Save to
Server before leaving this window to save the changes made.
11. Restart the FSA Server for the changes you made to take effect.
83
Basic System Configuration on the Bench
Figure 28: Connected to FSA Server
Figure 29: FSA Maintenance Utility - Global Settings Window
Global Settings Window
The Global Settings window of the FSA Maintenance Utility contains two boxes that
group the available information. The Zetron Customer box holds information that will be
useful when contacting Zetron. The Settings box holds a number of configurable
parameters.
84
025-9581M
FSA Server Initial Configuration
Zetron Customer
The parameters in this box have no affect on the operation of the Fire Station Alerting
system. However, if you are trying to get technical support from Zetron for the system you
will be asked to provide these two pieces of information. Filling it in here ensures that it
will be available when you need it.
Tip
This is a good place to include things like the System ID, Customer
ID, and other general site information that might be useful during
calls to technical support.
Customer Name
This is the name of the organization to which the equipment was sold, or the end user for
which the equipment was installed.
Customer ID
Each sales order filled by Zetron has a unique number assigned to it for record keeping
purposes. It is standard practice to continue using this number to identify any subsequent
activity related to the equipment sold under this order. This ensures that the entire history
of a particular system can be brought together any time it becomes necessary to provide
support for that system.
Settings
This box holds a number of system-wide timers.
Resource Allocation Hold Timeout Period
Resources (stations or units) must be allocated to (selected by) a dispatcher before an
action (Alert, Send Text, etc.) can be performed.
This parameter is measured in seconds and defaults to a value of 300 (5 minutes). The
valid range for this parameter is 60 to 3600.
This timer defines the amount of time that a resource can remain allocated before the FSA
Server automatically deallocates the resource. If the resource is associated with a PA ON
or Alert with PA, the FSA Server will ensure the resources remain allocated until the PA
audio channel is released (manually or automatically when the Audio Idle Timeout Period
expires), so the deallocation will not occur until after the dispatcher finishes using the PA.
85
Basic System Configuration on the Bench
Batch Request Hold Timeout Period
Note
This parameter is for future use and not available to be edited from
the Global Settings window.
This parameter is measured in seconds and defaults to a value of 600 (10 minutes).
This timer defines the amount of time that a “Batch” request may be buffered waiting to be
told to execute before the FSA Server automatically aborts it and clears the request from
the batch buffer. Setting this parameter to zero disables the timer.
Audio Idle Timeout Period
This parameter is measured in seconds and defaults to a value of 20. The valid range for
this parameter is 0 to 300.
This timer defines the maximum time that the audio communications activity at the
dispatch center can be idle before the FSA Server automatically sets the Station
Transponder Unit PA state to OFF and shuts down communication with the Station
Transponder Unit. Setting this parameter to zero disables the timer.
Station Master Polling Period
This parameter is measured in seconds and defaults to a value of 60 (1 minute). The valid
range for this parameter is 30 to 3600.
This parameter defines how long the FSA Server waits between polling the Station
Transponder Units to confirm the communications link is still operating and to receive
status updates from the units.
Station Retry Timeout Period
This parameter represents the period that the station waits before initiating a retry. It is
measured in seconds and defaults to a value of 10. The valid range for this parameter is 2
to 20.
If the FSA Server sends a message or command out to an Station Transponder Unit and
does not receive a reply back from that station within the time limit set by this parameter,
the FSA Server will mark that Station Transponder Unit as being in a state of
communications failure. Unless the network is operating in a very substandard way, it
should not be necessary to ever increase the setting of this parameter above the default
value. This timer is provided in order to enable the system maintenance technicians to cut
down on spurious communications failure alarms while they are working to cure a known
network problem.
86
025-9581M
Station Transponder Unit Configuration
Serial USB PTT Comm Port
This parameter selects the COM port that will be used to provide an external PTT input to
the FSA Server. It is used when the System employs a 950-0690 Audio Input Interface
adapter and a USB cable. The parameter defaults to None. Opening the drop-down list
enables you to select from any of the available COM ports.
Note
If CAD is in use, this parameter must be set to a different COM port
than the one being used by the serial CAD input.
Serial USB Comm Port PA Ready
This parameter selects the COM port that is connected to the optional PA Ready Cable
(P/N 709-7929). This COM port and cable provide the PA Ready Signal. The parameter
defaults to None. Opening the drop-down list enables you to select from any of the
available COM ports.
This setting is only useful if you are using the PA Ready option to provide an external PA
Ready indication. For more information, see Installing the PA Ready Option on page 106.
PA Ready Control Signal
This parameter affects the on/off behavior of the PA Ready Signal. The parameter has two
options: positivetrigger and negativetrigger. The correct setting depends on what the
equipment to be connected to is expecting. Select positivetrigger if the connected-to
equipment expects an active high signal. Select negativetrigger if it expects an active low
signal. In general, use negativetrigger for most consoles and positivetrigger for most
lamps. If the parameter is not configured, it shows as blank and defaults to
negativetrigger.
This setting is only useful if you have the PA Ready option. For more information, see
Installing the PA Ready Option on page 106. For a description of its behavior in a
functioning system under various conditions (for example, if Day/Night Mode is in use)
see the Fire Station Alerting System Operation manual, part number 025-9582.
Station Transponder Unit Configuration
Assigning and defining the Station Transponder Units that make up the system is a threestep process. It starts out with selecting the Fire Station Definitions option from the menu
and continues down through two additional levels of windows to where you assigning
operational units to the station.
87
Basic System Configuration on the Bench
The following procedure is written from the standpoint of adding a new station to the
system for the first time. To edit an existing station, you select a station from the list at the
top of the Fire Station Definitions window and then click Edit instead of Add.
Note
When adding a new station or editing an existing station, it
assumed that the FSA Server instance is running and connected to
the network. In addition, that at least one instance of the FSA
Console is running and connected to the network.
♦ Configuring a Fire Station using the FSA Maintenance Utility:
1. Select Fire Station Definitions from the menu.
2. In the Fire Stations window click Add on the right side. The Fire Station Definition
parameters in the lower portion of the window will become available. See Figure
30.
3. Fill in the parameters under Fire Station Definition. The Name and Display Name
fields must have valid entries in them. If the VoIP Intercom feature is going to be
used, the VoIP Connection drop-down menu should be selected to Gateway. The
remaining fields can be left blank without causing any problems. For more
information on these parameters, see Fire Station Definition Settings on page 89.
4. Click Station Interfaces located in the lower right of the window. The Station
Interface window shown in Figure 31 opens.
5. In the right column, click Add. The Station Interface parameters in the bottom of
the window become available. Select the type of Station Transponder Unit
installed at this station and enter its IP address. For more information on the
parameters in this box, see Station Interface Settings on page 90.
6. When you have finished the Station Interface entries, use the buttons along the
bottom of the window to open the appropriate windows for defining the units
assigned to that station or the I/O connections made to the Station Transponder
Unit itself. Detailed information on these windows can be found under:
Input Definition Settings on page 92
Output Definition Settings on page 94
Unit Definition Settings on page 95
It is not necessary to configure any of these windows unless you are going to use
the resources it controls. In the beginning, you will most likely only need to
configure the operational units assigned to that station.
7. When you have completed the Unit and I/O entries, click the Accept buttons as
appropriate to work you back up through the windows to the Fire Station
Definitions window you started at in Figure 30.
8. To save your changes, select Server Settings from the menu and click Save Server
Settings. Once you Accept and then Save for the last time, the FSA Maintenance
Utility will inform you that the changed settings are being saved to the
configuration file and that they will take effect the next time the FSA Server is
started. You can now exit the utility.
88
025-9581M
Station Transponder Unit Configuration
9. Restart the FSA Server
Note
Remember that you must restart the FSA Server in order for the
new settings to take effect.
Move Up/Move Down Buttons
The Move Up and Move Down buttons appear in the upper right of the windows for
station set up as well as for inputs, outputs, and units. These controls are provided to
enable you alter the position of selected items within the lists in which they appear. The
position of a station, unit, input, or output within the list in a programming window
determines the order in which these items will be displayed in the FSA Console window.
Fire Station Definition Settings
Figure 30: Fire Station Definitions Window
The following parameters make up the basic definition of an Station Transponder Unit for
the Fire Station Alerting system.
Name
This is the name that the system uses internally to identify this station. The name can be
from 1 to 30 characters in length and contain both letters and numbers. The name cannot
contain any spaces; however, periods (.) and underscores ( _ ) are allowed. If a CAD
interface is used, this name label will be used in the CAD messages.
89
Basic System Configuration on the Bench
Display Name
This is the name that is used on the buttons displayed on the FSA Console user interface.
The name can be from 1 to 30 characters in length and does support the use of spaces.
When choosing this name, you should remember that the buttons are fixed in size and the
name needs to be easy to read even after it has wrapped to try and fit in the space provided.
Note
When the VoIP Gateway capability of the FSA system is in use. The
station Display Name entered here must be an exact match for
the name entered for the Location Name parameter when setting
up the VoIP intercom. This is necessary for the system to associate
the intercom with the Station Transponder Unit in which it is
installed. See Figure 38 on page 105.
Description
This parameter is a verbose description of the station, its location, and anything else you
think is useful. The maximum length of this text entry is 250 characters (including spaces).
This field may be left empty.
Address
This parameter is a verbose description of the physical address for the fire station. The
maximum length of this text entry is 100 characters (including spaces). This field may be
left empty.
Region
One of the filters available in the FSA Console user interface to limit which station/unit
buttons are displayed on the screen is the Region filter. All of the stations sharing the same
Region name will be displayed whenever that filter button is selected. You can make up
whatever Region names you find useful; however, whenever they are entered in this field
for the individual station definitions, the entries must be identical. The maximum length
for a Region name is 100 characters (including spaces). This field may be left empty.
VoIP Connection
This parameter specifies the VoIP Gateway Server that is handling audio traffic to this
Station Transponder Unit. Currently the only options are a single VoIP Gateway Server to
handle all voice audio traffic to that station or no VoIP to that station.
A drop-down menu (Figure 30) is used to change the selection between None (VoIP is not
used at that fire station) and Gateway (use the VoIP Gateway Server).
Station Interface Settings
Each Station Transponder Unit (Model 6203 or Model 6204) uses an independent
interface. When multiple interfaces are installed at a single fire station, you must define
90
025-9581M
Station Transponder Unit Configuration
each Model 6203 or Model 6204 individually. The Station Interface box in the bottom of
this window is used for that purpose.
Figure 31: Station Interface Window
Hardware Type
This parameter selects the type of Station Transponder Unit being configured. There are
only two choices, the Model 6203 or the Model 6204. The Model 6203 uses its first
column of indicators/buttons (on the left) for the station and the remaining three columns
for units assigned to the station. The Model 6204 devotes all four columns to supporting
units. The Model 6204 is normally used as an expansion unit if the station has more than
three units assigned to it.
Use the down arrow on the right to open the drop-down list and select the appropriate
mnemonic.
Network Address
This parameter holds the IP address for the IP Interface board used in this Station
Transponder Unit to receive and respond to messages from the FSA Server. This field has
no default value and must be filled in when the system is configured in order for the FSA
Server to communicate with this Station Transponder Unit.
Port
This is the port used by the FSA Server when communicating with the Station
Transponder Unit. The default setting is 2101. Do not change this setting without
consulting first with Zetron Technical Support.
91
Basic System Configuration on the Bench
Hardware ID
This parameter is the unit specific hardware ID for the Station Transponder Unit. The
hardware ID was set with the two DIP switches on the transponder board inside the unit.
For primary station units this number will be between 1 and 511. For secondary station
units (usually Model 6204s) this number will be equal to the primary unit number plus
512. See Setting the Unit Number on page 57 for more details on setting the unit number
with SW1 and SW2.
Master Station Unit
When this box is checked, it defines this Station Transponder Unit as being the primary
unit at this fire station. The VoIP intercom card (if one is used) will always be installed in
the Master Station Unit. Typically, this will be a Model 6203 unit; however, in some cases
a station might have two Model 6204 units installed instead of a Model 6203 and a Model
6204. In those instances, the Model 6204 designated as the Master Station Unit will also
contain the VoIP intercom card.
Controls Station Printer
When this box is checked, it indicates that a printer has been connected to the serial port
connector on the bottom of the Station Transponder Unit. Printers can only be installed on
units that have been set as Master Station Units.
Station I/O Settings
Once you have completed the Station Interface settings you can configure the I/O settings
for that Station Transponder Unit. You can also come back at any time in the future to add
or subtract inputs or outputs.
The Units button is used to open the window from which you can configure the
operational units assigned to the fire station.
Input Definition Settings
Name
This is the name that the system uses internally to identify this sense input. The name can
be from 1 to 30 characters in length and contain both letters and numbers. The name
cannot contain any spaces; however, periods (.) and underscores ( _ ) are allowed. If a
CAD interface is used, this name label will be used in the CAD messages.
Display Name
This is the name that is used on the buttons displayed on the FSA Console user interface.
The name can be from 1 to 30 characters in length and does support the use of spaces.
When choosing this name, you should remember that the buttons are fixed in size and the
name needs to be easy to read even after it has wrapped to try and fit in the space provided.
92
025-9581M
Station Transponder Unit Configuration
Figure 32: Station Inputs Window
Description
This parameter is a verbose description of the sense input, what it means when the input
goes active, and anything else you think is useful. The maximum length of this text entry
is 250 characters (including spaces). This field may be left empty.
ID
This parameter is a number between 1 and 4. It identifies the specific sense input used on
the power supply/relay board of the Station Transponder Unit. Use the down arrow at the
right to open a drop-down list and select the correct number. For more information on how
the sense inputs are numbered and how to connect them, see Sense Inputs (P7 - P8) on
page 156.
93
Basic System Configuration on the Bench
Output Definition Settings
Figure 33: Station Outputs Window
Name
This is the name that the system uses internally to identify this relay output. The name can
be from 1 to 30 characters in length and contain both letters and numbers. The name
cannot contain any spaces; however, periods (.) and underscores ( _ ) are allowed. If a
CAD interface is used, this name label will be used in the CAD messages.
Display Name
This is the name that is used on the buttons displayed on the FSA Console user interface.
The name can be from 1 to 30 characters in length and does support the use of spaces.
When choosing this name, you should remember that the buttons are fixed in size and the
name needs to be easy to read even after it has wrapped to try and fit in the space provided.
Description
This parameter is a verbose description of the relay output, what it does when the output
goes active, and anything else you think is useful. The maximum length of this text entry
is 250 characters (including spaces). This field may be left empty.
94
025-9581M
Station Transponder Unit Configuration
ID
This parameter is a number between 1 and 4. It identifies the specific relay output used on
the power supply/relay board of the Station Transponder Unit.
Note
Actually, only the first four relays, native to the power supply/relay
board in the Station Transponder Unit, are functional. The relays
numbered 5 through 10 refer to a discontinued external relay
option, which is no longer available.
Use the down arrow at the right to open a drop-down list and select the correct number.
For more information on how the relay outputs are numbered and how to connect them,
see Relay Connections (P1-P4) on page 154.
Unit Definition Settings
Figure 34: Station Units Window
Name
This is the name that the system uses internally to identify this operational unit. The name
can be from 1 to 30 characters in length and contain both letters and numbers. The name
cannot contain any spaces; however, periods (.) and underscores ( _ ) are allowed. If a
CAD interface is used, this name label will be used in the CAD messages.
Display Name
This is the name that is used on the buttons displayed on the FSA Console user interface.
The name can be from 1 to 30 characters in length and does support the use of spaces.
95
Basic System Configuration on the Bench
When choosing this name, you should remember that the buttons are fixed in size and the
name needs to be easy to read even after it has wrapped to try and fit in the space provided.
Description
This parameter is a verbose description of the operational unit, its equipment, and
anything else you think is useful. The maximum length of this text entry is 250 characters
(including spaces). This field may be left empty.
Unit Type
This parameter is chosen from a drop-down list. The unit types available in a system are
defined in the Unit Type Definitions window. For more information on defining unit types,
see Unit Type Definitions on page 96.
ID
This parameter establishes a relationship between the unit defined in this window and a
column of indicator LEDs/buttons on the front of the Station Transponder Unit. How the
columns are numbered depends on the specific model of the Station Transponder Unit.
For a Model 6203, the first column on the left is reserved for the station itself. Column 1 is
the next column and column 3 is the column on the far right.
For a Model 6204, all four columns are available for use by units. Column 1 is the one on
the far left and column 4 is the column on the far right.
Unit Type Definitions
The last item on the menu of the FSA Maintenance Utility refers to “type” definitions.
This option opens a window from which you can define the labels given to various units to
describe their operational functions, or other characteristics.
Name
This is the name that the system uses internally for this unit type. The name can be from 1
to 30 characters in length and contain both letters and numbers. The name cannot contain
any spaces; however, periods (.) and underscores ( _ ) are allowed. If a CAD interface is
used, this name label will be used in the CAD messages.
Display Name
This is the name that is by the FSA Console user interface when it needs to refer to this
unit type. The name can be from 1 to 30 characters in length and does support the use of
spaces.
96
025-9581M
Station Transponder Unit Configuration
Figure 35: Unit Type Definitions Window
Description
This parameter is a verbose description of this unit type. The maximum length of this text
entry is 250 characters (including spaces). This field may be left empty.
97
Basic System Configuration on the Bench
Audio Support with Optional VoIP Intercom
Note
In stations equipped with both Model 6203 and Model 6204 station
transponders, only the Model 6203 unit has a VoIP card installed.
This section covers the setup of the VoIP intercom system to carry voice audio between
the dispatch center and the Station Transponder Units that have VoIP intercom boards
installed.
The current implementation of the VoIP option in the Fire Station Alerting system
provides a single channel of voice audio between the console system being used in the
dispatch center and one or more Station Transponder Units equipped with the optional
VoIP Intercom card.
950-0690
Audio and
Digital Input
Interface
Tx/Rx Audio
and PTT
signal from
Console
System
Audio
PC Sound
Card
VoIP
Gateway
Server
FSA and VoIP servers may be on
the same or different PCs
PTT
PA Ready
USB Port
FSA
IP Network
FSA
Server
Connections
to IP Station
Units
USB Port
The tasks involved in bringing the VoIP part of the FSA system on line are:
• Interfacing the dispatch console system to the VoIP Gateway Server and the FSA
Server
• Configuring the IP connections of the VoIP Intercom cards
Audio and PTT Connections from Console to Servers
In order to enable the operator from any dispatch center console position to send/receive
audio to/from the Station Transponder Units, the FSA system is not interfaced to
individual console positions. Instead, it is interfaced to a channel card slot of the general
radio dispatch console system. The audio traffic is handled as though it was a radio
channel from the point of view of the console. However, in this case the voice audio and
PTT signal are connected to the VoIP and FSA servers instead of a radio base station. The
PTT signal presented to the FSA server interface must be a dry contact closure.
The interface handles PTT as well as both receive and transmit audio. This was done to
enable the operators to use PTT inputs other than the button on the FSA Console screen.
98
025-9581M
Audio Support with Optional VoIP Intercom
This would include foot switches and headset/handset PTT switches that are part of the
dispatch console system.
The connection between the console channel card and the FSA/VoIP Gateway server PC is
accomplished using the Zetron Audio and Digital Input Interface (950-0690). The
connections made are shown in Figure 36. The pinout for the cable connecting to the
console channel card are given in Table 2.
Note
The Audio and Digital Input Interface is also used for systems that
employ radio to carry the voice audio. In these systems the
interface does not handle the voice audio signal, but it is still
required to provide an input for the PTT signal into the FSA Server.
♦ Installing the Audio and Digital Input Interface Unit
Note
The USB-to-Serial Bridge unit must be installed on the server
machine prior to installing the Audio/Digital Interface Unit. The
USB-to-Serial Bridge must be used even if the computer has a
serial port. See Installing the USB-to-Serial Bridge on page
101.
1. Locate the FSA/VoIP server machine in the equipment room so that it is
conveniently close to the equipment rack that holds the dispatch console channel
card assigned to handle the audio for the FSA system.
2. Make up the necessary cable to connect the channel card to the Digital Input 1 jack
on the Audio and Digital Input Interface box (950-0690). The pinout for the end
with the RJ-11 modular connector is shown in Table 2. The leads on the other end
will need to match the connections on the channel card.
Note
The PTT signal supplied to the FSA Server interface box must be a
dry contact closure. An open-collector circuit or some other
“electrical” signal is not usable.
3. Make the connections between the channel card and the interface box.
4. Make the connections between the interface box and the server PC.
99
Basic System Configuration on the Bench
Table 2: Pinout for Digital Input 1
Pin #
Signal Description
1
Audio Output + , goes to channel card input (RX)
2
Digital Input, goes to channel card PTT Normally Open
3
Audio Input + , goes to channel card audio output (TX)
4
Audio Input - , goes to channel card audio output (TX)
5
Digital Input, from channel card PTT Common
6
Audio Output - , goes to channel card input (RX)
Note
The PTT signal input from the dispatch console channel card is
required for installations using radio to distribute PA audio to
stations or if customers wish to have PA Ready remain enabled
while the dispatch operator is speaking. The only alternative is
setting a fixed delay after key up, which gives the operator a preset window within which to complete all announcements.
Figure 36: Audio and Digital Input Interface Connections
Combined FSA Server and
VoIP Gateway Server
Audio and Digital Input Interface
950-0690
VGA
USB to Serial
Adapter
Digital Out
Network
Audio Out
To network switch
Not Used
Audio In
Keyb. Mouse
To Dispatch Console
Channel Card
709-0001
USB
Left Audio
In & Out
Digital Input 1
Audio and PTT
709-7000
(Depending on the console
interface, you may have to rework
the other end of the cable.)
802-0487
Line Out /
Speaker /
Green
709-0055
Mic In / Pink
Use the Zetronsupplied sound card
100
025-9581M
Audio Support with Optional VoIP Intercom
Installing the USB-to-Serial Bridge
The purpose of the USB-to-Serial Bridge is to convert the PTT signal available at the
Audio and Digital Input Interface Unit into a convenient form to input into the FSA
Server. The USB-to-Serial Bridge is an aftermarket device provided by Zetron along with
the interface unit.
!
Caution!
The USB-to-Serial Bridge must be used even if the computer
has a serial port.
Before the USB-to-Serial Bridge can be used you will need to install its driver off the
provided CD-ROM.
♦ Installing the USB-to-Serial Bridge
1. Place the CD-ROM that came with the bridge into the CD-ROM drive on the FSA
server machine.
2. Connect the USB-to-Serial Bridge to an available USB port on the FSA server.
3. The “Found New Hardware” wizard will open. Click the Next button.
4. Leave the wizard set to the default choice of “Search for a suitable driver for my
device” and click the Next button.
5. In the Locate Driver Files screen, uncheck all the boxes except for “CD-ROM
drives”, then click the Next button.
6. When the wizard completes its search, it will display a window like the following
one. Click the Next button.
7. The wizard will install the driver and notify you that it has completed the
installation. Click on the Finish button.
8. Remove the CD-ROM from the drive and store it in a safe place.
Once you have completed the installation of the USB-to-Serial Bridge, you can use the
following procedure to confirm the installation and check on the COM port to which the
device got assigned.
101
Basic System Configuration on the Bench
♦ Confirming the USB-to-Serial Bridge Installation
1. Open the Windows Control Panel on the FSA Server machine.
2. From the Control Panel, select the System icon and open it.
3. In the System dialog, click on the Hardware tab.
4. From the Hardware tab, locate the Device Manager section and click on the
Device Manager button in that section.
5. From the Device Manager window that opens, select the Ports (COM & LPT)
icon and expand it.
6. Select the item labeled USB-to-Serial Bridge and open its Properties dialog. The
General tab will display the COM port number to which the USB device was
assigned.
7. Click on the Port Settings tab to review the serial settings for the port.
Tip
Make a note of the COM port name assigned to the USB-to-Serial
convertor. You will need this information when you assign the COM
ports on the Global Server Settings page in the FSA Maintenance
Utility.
8. When you are finished confirming the settings for the new USB device, close all of
the dialog boxes.
Initial VoIP Configuration
The VoIP intercom cards in the Station Transponder Units are configured with the VoIP
Gateway Maintenance Utility. This utility application can be installed on the same
machine that the VoIP Gateway Server is running on or it can be installed on some other
computer in the network. If you have the maintenance utility running on the server
machine, when you first start the program you get the following warning:
102
025-9581M
Audio Support with Optional VoIP Intercom
Generally you will answer this question yes and go on, but you need to understand where
this warning comes from to decide whether or not to do so.
The VoIP Maintenance Utility and the VoIP Gateway Server both want to use Port 3000
on the computer on which they are running. As long as they are running on separate
computers, there is no conflict. In an existing system, if there were already configured
cards working with the VoIP Gateway Server and you installed a new Station Transponder
Unit with a VoIP card, the server would continue to communicate with the existing
intercom cards and the maintenance utility would communicate only with the new card.
There would be no interruption of service to the FSA system.
If both programs are trying to run on a single computer, they cannot both use Port 3000
simultaneously. In order for the VoIP Gateway Maintenance Utility to run, the VoIP
Gateway Server must be stopped. This means that all voice traffic in the system stops until
you close the utility. When you close the utility, it automatically restarts the VoIP
Gateway Server.
The point to understand is, if you are running the VoIP Gateway Maintenance Utility on
the same computer as the VoIP Gateway Server, you must be prepared for a brief loss of
VoIP service any time you run the maintenance utility.
You will need to run this utility at least once, when the Station Transponder Unit is first
installed, in order to set the IP and subnet address for the VoIP intercom card and to give it
the IP address for the VoIP Gateway Server of which it is a client.
The following procedure for configuring a VoIP Intercom card assumes that the Station
Transponder Unit has been installed in its station house already and is operating on the IP
network that forms the FSA system. It also assumes that the utility is being run from a
computer on that system that can communicate with all of the subnets in the network.
(Actually, these screen captures were taken with it running on the same computer as the
VoIP Gateway Server.)
♦ Configuring a VoIP Intercom Card
1. Start the VoIP Gateway Maintenance Utility. If you get the warning message about
running both programs on the same PC, answer YES and go on.
2. The first window you see looks like Figure 37. Click Configure Intercoms in the
upper right of the window.
3. When the window in opens, shown in Figure 38, locate the station you want to
work on in the list to the left and select it. (If the VoIP intercom card you want to
work with does not appear in the list, it may be that the VoIP card has become
103
Basic System Configuration on the Bench
corrupted. Cancel out of this procedure and try resetting the VoIP card to defaults.
See Resetting the VoIP intercom board to defaults: on page 105.)
4. Ensure Input Source is set to Microphone. (This refers to the Sounds and Audio
Device Properties dialog accessed from the Windows Control Panel. On the Audio
tab, make sure that the Sounds Recording input is set to Mic.)
5. The column on the right should populate with the IP information for the station you
selected from the list.
a. Change or verify the IP Address and Subnet Mask entries to match the
settings provided by your IT department.
b. When the intercom is on a different subnet than the VoIP Server, ensure the
address of the gateway for the intercom’s subnet is entered in the Gateway
field. Otherwise, leave the field blank.
c. Assign IP automatically with DHCP should always be disabled.
d. The Location Name for the VoIP intercom board must match exactly the
Display Name (yes, it is case sensitive) used during station programming for
the Station Transponder Unit. See Display Name on page 90.
e. If the maintenance utility is being run from the VoIP Server you can check the
box to “Assign this PC address as client’s server”. If not, then you must be
sure the box is not checked and manually fill in the IP address for the VoIP
Gateway Server that this station is supposed to use. The Port is always set to
3000.
6. When you have finished entering the IP addresses, click Apply.
7. When the utility finishes updating the card, click Exit.
8. When the utility returns to its opening window, you can use PTT or Test Intercom
Audio to test the intercom. PTT enables you to speak into the mic to test the
intercom. If the computer is not equipped with a mic, you can click Test Intercom
Audio, which sends a prerecorded message.
In this application, PTT is a toggle button, not a push-and-hold button. An
indicator above the button displays the current PTT status (on or off).
!
Caution!
Before you exit the utility, be sure to click the Disconnect
Intercoms button. This causes the VoIP Gateway
Maintenance Utility to relinquish the port it was using and
restart the VoIP Gateway Server.
9. Exit the VoIP Gateway Maintenance Utility.
104
025-9581M
Audio Support with Optional VoIP Intercom
Figure 37: VoIP Gateway Maintenance Utility at Start-up
Figure 38: VoIP Maintenance Utility with a Single Card Selected
♦ Resetting the VoIP intercom board to defaults:
1. Remove power from the Station Transponder unit in question.
2. Locate the two volume control buttons on the VoIP intercom board (these will be
the two blue buttons). Press and hold both buttons.
3. While continuing to press both buttons, power-up the station transponder unit.
4. Wait for 8 seconds after powering up the unit and then release the buttons.
5. The VoIP intercom board is now reset to defaults. When you try the procedure for
configuring the board again, the VoIP intercom board should show up on the list of
units detected.
105
Basic System Configuration on the Bench
Installing the PA Ready Option
The PA Ready option provides a PA Ready signal generally used for the purpose of
controlling a PA Ready indicator. This indicator may be in a console, or it may simply be
a light.
The PA Ready option primarily consists of a serial cable with flying leads (IP FSA PA
Ready Cable, P/N 709-7929). The flying leads provide the ready signal to the connected
third-party equipment, such as the “busy input” of a console or to control a PA Ready
lamp. (In the case of controlling a free-standing lamp or other indicator, a third-party
RS232-to-TTL convertor or circuit will need to be installed to convert the signal from
standard RS232 levels to whatever is required by the indicator.)
The levels provided by the PA Ready cable are standard RS-232 levels:
• +5 to +15 volts for high output state
• -5 to -15 volts for low output state
Use following pinout information to connect this cable to your equipment.
Table 3: IP FSA Ready Cable
Tip
Pin #
Wire Color
Signal
4
Red
PA Ready
5
Black
Ground
If your console computer does not have a suitable serial port, you
can use a 25-to-9-pin serial adapter or a USB-to-serial adapter. Not
all USB-to-serial adapters work properly. For more information, see
Installing the USB-to-Serial Bridge on page 101.
In addition to this hardware connection, you must also configure the correct serial port and
the nature of the signal trigger. For more information, see Serial USB Comm Port PA
Ready on page 87 and PA Ready Control Signal on page 87. You may also have to
configure any third-party equipment that is connected to recognize the signal and respond
to it by changing the state of an indicator.
Note
In the FSA Server Global Settings, the Serial USB PTT COM Port for
PA Ready must have a specific COM port assigned and the active
state for the PA Ready signal must be set as Positive or Negative
trigger.
See the Fire Station Alerting System Operation manual, part
number 025-9582, for an explanation of the behavior of the PA
Ready signal in regards to the use of Day mode or Night mode
operations.
106
025-9581M
Overview
Installing the Station Transponder
Units on Site
Overview
This section covers the mounting, basic connections to, and configuration of the Station
Transponder Units. Because the Model 6203 and Model 6204 are very similar in
construction and internal layout, only the Model 6203 will be described here. If anything
that is specific to the Model 6204 needs to be described, it will be identified as such.
The configuration of software settings for the Station Transponder Units is described in
Configuring Station Transponder Units on page 57 or Basic System Configuration on the
Bench on page 79.
For descriptions of the various connectors, jumpers, switches, and potentiometers in the
Station Transponder Unit, see Appendix A: Details of Model 6203/6204 Hardware on
page 147.
Note
When communicating with the Model 6203 units by means of the
network connection, the port 2101 is always open.
Equipment Needed
The installation of the Station Transponder Units in the field will require the use of some
or all of the following resources.
• Typical set of hand tools for an electrician/electronics technician
• A multimeter for measuring voltages
107
Installing the Station Transponder Units on Site
• An oscilloscope (and/or a Radio Service Monitor) is used for level setting, for RFbased interfaces, a Radio Service Monitor has the added benefit of sensing
deviation
• A PC or laptop with a terminal program and a serial port, Windows XP includes
HyperTerminal, the terminal program is required to configure user-programmable
parameters and a serial port is required to complete the data connection, a
programming cable, Zetron part number 709-7208, completes this item
• A second person is required for audio level alignment at the Station Transponder
Unit, one person works at the dispatch console and the other in the remote Station
Transponder Unit, having two people is the most efficient method of setting the RX
and TX levels
Opening the Case
During installation the Station Transponder Units must be opened to enable access to the
mounting holes in the rear of the chassis, and later, to enable power connections, PA audio
and other miscellaneous connections, and level settings to be made.
♦ Opening the Model 6203
1. If it is not already mounted on a wall, lay the unit on its back on a convenient work
surface.
2. Loosen the two retaining screws located at the top of the faceplate. These are
captive screws, so they do not need to be removed to open the unit.
3. Grasp the outer cover at the top of the faceplate and fold the unit open around the
hinge at the bottom of the unit. If the unit is already mounted on a wall, be careful
prevent the front panel from just falling open and striking the wall below the unit.
4. When you have completed the task for which you opened the unit, close the front
cover and tighten the two screws at the top of the faceplate.
Mounting the Case
The Model 6203 is designed primarily for wall mounting in a vertical position. There are
four standard screw-mounting slots in the back corners of the case for securing it to a wall.
Standard conduit knockouts are provided in the bottom and back for the connection of
permanent power, control and communication wiring. Alternatively, a stand can be built
for vertical desk mounting, or the unit can be mounted horizontally.
108
025-9581M
Connections to the Station Transponder Unit
♦ Mounting the Station Transponder Unit
1. Either by using the back plate of the Station Transponder Unit as a template or by
measuring, mark the locations for and drill the pilot holes for the mounting screws.
2. Install the mounting screws in the wall on which the unit is to be mounted. Leave
the heads of the screws far enough off the surface of the wall so the unit can be
slipped over them.
3. Position the slots in the unit over the screws and slide it down over them. Check
that the unit hangs correctly (plumb) from the screws.
4. Tighten the mounting screws to secure the Station Transponder Unit to the wall.
5. Make the necessary power and PA wiring connections.
Connections to the Station Transponder Unit
Many of the connections to the Station Transponder Unit can be made without opening the
case. Figure 40 shows the connectors available on the bottom of the case.
The connections that require opening the case are:
• Power connections
• PA audio and control connections
• Relay connections
• Sense Input connections
The wiring for power is routed through a hole in the center of the bottom plate. The wiring
for the rest of these connections is routed through the grommets on either side of the
power connection.
109
Installing the Station Transponder Units on Site
Figure 39: Mounting Slots on the Rear Panel of Model 6203
6.63
As seen from back side of the
IP Station Unit enclosure.
Dimensions are in inches.
10.75
110
025-9581M
Connections to the Station Transponder Unit
Figure 40: Model 6203 Bottom Plate
IP
NETWORK
SERIAL
PORT
HANDSET
DC LINE
CONNECTION
PA, RELAYS,
AND SENSE
INPUTS
PA, RELAYS,
AND SENSE
INPUTS
Power Connections
Note
This manual assumes you have an external DC power supply. Older
IP FSA units have an internal AC power supply. Refer to the
documentation that came with your equipment or contact Zetron
for revision E of this manual.
The power connection for the Station Transponder Unit is routed through a large hole in
the center rear of the bottom side of the unit. The hole in the case is sized to accept a
standard electrical conduit coupler (1.2 inches). Inside the unit is a reversible plate that has
a large hole (0.875 inches) in one end to support a second size of conduit coupler and a
smaller hole (0.5 inches) to accept a line cord with strain relief. The coaxial connector of
the DC power supply is routed through this central hole.
An uninterruptible power supply (UPS) is recommended for station units.
♦ Connecting DC Power to the Station Transponder Unit
1. Feed the coaxial connector of the DC power supply through the opening in the
bottom of the unit and through the 1/4-inch clamp. The clamp provides strain relief
and cable routing.
2. Connect the DC power supply male coaxial connector to the female coaxial
connector on J1.
3. [Optional] If needed, mount the Power Supply Wall-Mount Bracket (415-0642) to
a convenient location and place the DC power supply in the bracket. This bracket
can help provide strain relief between the Model 6 and the power supply, or to keep
the power supply up off of the floor. Use the provided hook and loop tape to secure
the power supply to the bracket. This prevents the power supply from falling out
during an event such as an earthquake.
4. When the Station Transponder Unit is ready to be powered, connect the DC power
supply to a suitable AC source.
111
Installing the Station Transponder Units on Site
IP Connections
The network cable going to the Station Transponder Unit should terminate in an RJ-45
modular connector (the same 8-pin connector that would be used to connect to any
desktop computer). Plug this connector into the RJ-45 socket located next to the handset
connector on the bottom of the unit.
PA Audio Connections
All of the PA connections are made to terminal J3 on the transponder board. For this
reason, it is most convenient to bring the PA wring into the Station Transponder Unit
through the grommetted hole near the back of the case that is positioned between the fuse
holder and the 9-pin serial port connector.
The primary connections for basic PA operation are:
• PA Audio Com A - J3-pin 11
• PA Audio Com B - J3-pin 9
The orange plug can be removed from connector J3 in order to make it easier to attach the
wires.
The full list of signal connections for the PA function can be found under Connector J3
(PA) on page 148.
Figure 41 shows the connections made in a typical station that uses both a Model 6203 and
a Model 6204, and is using a VoIP Intercom unit in the Model 6203 to receive audio sent
from the dispatch center.
The connections made between the IP Interface card and connectors J5 and J4 of the
Model 6203 will normally be made at Zetron when the unit is built. The additional
connections to the Model 6204 and the PA system will be made on-site.
112
025-9581M
Connections to the Station Transponder Unit
Figure 41: Typical PA Audio Connections in a System Using VoIP
C o n n ec t io n s o n
IP In t e rf a ce
B o a rd
IP
N e tw o rk
P4
PTT
In
3
TX
RX
Off
Hook GND Audio Audio
2
6
4
5
J5
8
7
2
1
J4
11
9
7
Model 6203
IP Station Unit
Handset
PTT
J5
RX COR
HKSW
GND
GND
TX Audio +
TX Audio GND
J4
AUX RX "A"
AUX RX "A"
3
AUX RX "B"
AUX RX "B"
GND
GND
J3
9
PA Audio Comm A
Input 1
PA Audio
Comm B
Common
PA System
3
2
Model 6204
IP Station Unit
1
PA Audio Comm A
PA Audio
Comm B
4
J3
PA Busy
1
11
2
RX COR
4
2
1
11
9
Input 2
Front Panel Test Mode
If the top left and top right buttons are both pressed and held while power is connected to
the unit, the Model 6203 enters a test mode. The Test Mode is indicated by the state of the
LEDs in the fourth row down from the top (ON SCENE). When the Model 6203 is in test
mode, these LEDs are on at start-up. The test mode can be used to test the following:
• Relays
• Sense Inputs
• Buttons
• LEDs
This mode of operation is brought up here because being able to manually cycle relays or
check the status of sense inputs might come in very handy while you are wiring up I/O
connections to the relays and sense inputs.
113
Installing the Station Transponder Units on Site
Testing Relays
Pressing the top button in each column activates the fifth LED in that column
(TRANSPORTING), and a relay. The top button in the first column activates relay 1; the
top button in the second column activates relay 2, and so forth. When a relay is activated,
there is an audible click. Releasing the button will return both the associated relay and
LED to their inactive states.
Testing Sense Inputs
Grounding a sense input negative input on the Power Supply board should change the state
of that sense input. This is assuming that the pull-up jumper associated with the input is in
the “B” position. When the sense input is pulled low, the ON SCENE LED (fourth down
from the top) in the column matching the input number turns off.
Testing Buttons
The functionality of top row buttons is confirmed during the testing of relays. The bottom
buttons can be verified in a similar manner. Pressing one of the bottom-row buttons turns
on the OUT OF SERVICE LED (sixth from the top) in the same column.
Testing LEDs
The LEDs are tested every time the Model 6203 is started in normal mode. They can also
be checked while in the test mode by pressing both the buttons in a single column
simultaneously. This causes all LEDs in the same column to light.
Exit Test Mode
The Model 6203 can be switched from test mode to the normal operating mode by
pressing the four corner buttons simultaneously.
Output Relay Connections
All of the relay connections to the Station Transponder Unit are made to connectors P1
through P4 and P9 on the I/O and Power Supply board, which is mounted on the rear panel
of the case. For this reason, it is most convenient to bring relay control wiring into the case
through the grommet located behind the IP Network and Handset jacks.
Refer to Relay Connections (P1-P4) on page 154 and Relay Control (P9) on page 155 for
details about the connector pinouts that apply to the relay functions you intend to use.
♦ Making Relay Connections
1. Route the relay wiring up through the grommet in the bottom of the unit.
2. Remove the plug from the appropriate connector on the I/O and Power Supply
board.
3. Insert the wires into the correct terminal slots and tighten the screws to secure
them.
114
025-9581M
Optional Radio Connections
4. Insert the plug back into its terminal and confirm the wires are in the correct slots.
Sense Input Connections
All of the sense input connections to the Station Transponder Unit are made to connectors
P7 and P8 on the I/O and Power Supply board, which is mounted on the rear panel of the
case. For this reason, it is most convenient to bring relay control wiring into the case
through the grommet located behind the IP Network and Handset jacks.
Refer to Sense Inputs (P7 - P8) on page 156 for details about the connector pinouts for the
four sense inputs.
♦ Making Sense Input Connections
1. Route the sense input wiring up through the grommet in the bottom of the unit.
2. Remove the plug from the appropriate connector on the I/O and Power Supply
board.
3. Insert the wires into the correct terminal slots and tighten the screws to secure
them.
4. Insert the plug back into its terminal and confirm the wires are in the correct slots.
Optional Radio Connections
While the Fire Station Alerting System is designed to send both dispatch/control
information and voice audio back and forth over the IP network, the system can be
installed with the voice audio being sent back and forth over radios. If the system you are
building is using radios, the example that follows shows the typical connections made
between the radios and a pair of Station Transponder Units.
If your fire stations have only one Station Transponder Unit installed, you may simply
ignore the connections shown to a Model 6204.
Conventional Radio Setup
This section describes the set up used with a conventional base radio. The use of trunked
radios for this application is not recommended. See Figure 42.
Model 6203/6204 Programming
• In the serial programming menus for the Station Transponder Unit, set Comm
Interface = VOX if no COR signal available.
115
Installing the Station Transponder Units on Site
Figure 42: Typical Connections for Voice Audio over Radio
IP
N e tw o rk
Off Hook
PTT In
Radio
Carrying
Voice
Audio
GND
P4
IP
PTT Out
1
Interface
GND
Board
6
PTT
2
NC
3
RX COR
TX Audio
RX Audio
J5
Handset PTT
8
HKSW
7
J5
GND
2
2
RX COR
1
Model 6204
IP Station
Unit
1 RX COR
Model 6203
J4
IP Station
Unit TX Audio + 11
GND
J4
11 TX Audio +
TX Audio -
9
9
TX Audio -
XMIT PTT
8
8
XMIT PTT
GND
7
7
GND
AUX RX "A"
4
4
AUX RX "A"
AUX RX "B"
3
3
AUX RX "B"
GND
2
2
GND
J3
J3
PA Busy
1
1
PA Audio Comm A 11
PA Audio Comm B
PA Busy
11 PA Audio Comm A
9
9
Input 1
PA Audio Comm B
Input 2
Common
PA System
Note
116
The COR input (J5-pin 1) is not used, it must be grounded. The
radio must share a common ground with the station transponder
unit(s).
025-9581M
Level Setting Procedures
Level Setting Procedures
You may be able to install all of your units with the default settings they arrived with from
the factory, and the system may perform very satisfactorily. However, it is likely that at
least one or two stations will need to have their levels adjusted to provide optimum output.
This section of the manual deals with adjusting the audio levels in individual Station
Transponder Units and at the VoIP Server (if the VoIP option is used to distribute voice
traffic through the system).
If your system uses a radio-based infrastructure to distribute voice audio through the
system, there is a separate set of instructions to cover adjusting levels in the Station
Transponder Unit to match the radio to which it is interfaced.
It is recommended that you read through this section at least once prior to actually trying
to make adjustments. The procedures are not that difficult; however, the whole process
will go more smoothly if you know what to expect and have arranged to have everything
you need on hand before you start.
Note
While the Station Transponder Unit will provide clear audio at its
location, it was never intended to provide a high level audio output.
It is assumed that the signal from the Station Transponder Unit will
be sent to a PA amplifier and that the PA amplifier will drive the
speakers in the fire station.
Equipment & Prerequisites
• A small, flat-bladed screwdriver suitable for adjusting the potentiometers on the
transponder board of the Station Transponder Unit
• An oscilloscope, actually you may want two of them, one at the server location and
one at the Station Transponder Unit location
• For setting levels in a radio-based system, a service monitor is required to check
channel deviation levels
• A land line, cell phone, or radio link so instructions can be passed between the
dispatch center equipment room and the station at which the Model 6203 is located
• The necessary hardware to create adapters that will enable you to make oscilloscope
readings at the Mic In (pink) and Speaker Out (green, Line Out on some cards)
jacks on the sound card of the VoIP server computer
117
Installing the Station Transponder Units on Site
Figure 43: IP-FSA audio levels with Zetron-supplied sound card
FSA Station to Operator Console
Sidetone level
R64
Handset
J5
Pots set to 50%
U41
pin 1
P6
R63
Paging
Amplifier
Mic+
P11
TransJ4
former
P9
GND
-56 dB
Mic-
Sound
card gains
Wave and
Master
Set to
100%
PA talk
Transformer
PA receive
FSA Station 702-9358
FSA Station 702-0240
Voice 3.16 Vpp
Sine 2.23 Vpp
Sine 0.79 Vrms
Sine 0.16 dBu
Voice -6.16 dBu
Voice 1.48 Vpp
Sine 1.05 Vpp
Sine 0.37 Vrms
Sine -6.4 dBu
Voice -12.4 dBu
GND
AGC
600
ohm
load
Transformer
FSA Station
IP7 PA module
IP-FSA
Server PC
Digital VoIP
Voice 0.0027 Vpp
Sine 0.0019 Vpp F.S. Sine = 0 dB
Sine 0.0007 Vrms Sine -2.62 dB
Voice -8.62 dB
Sine -61.2 dBu
Voice -67.2 dBu
950-0690
Isolation
Interface
Operator
Console
System
Voice 2.04 Vpp Voice 1.12 Vpp
Sine 0.80 Vpp
Sine 1.44 Vpp
Sine 0.51 Vrms Sine 0.28 Vrms
Sine -8.8 dBu
Sine -3.62 dBu
Voice -9.62 dBu Voice -14.8 dBu
Operator Console to FSA Station
Rx volume
J5
P5
Handset
Pots set to 50%
R64
AUX Rx
P4
J4
Transformer
AGC
Paging
Amplifier,
600 ohm
Load
R137
P3
GND
IP7 blue
buttons
P11
TransJ3
former
P9
GND
audio
Transformer
Sound
card gain
Line In
Set to
100%
PTT
PA receive
R87
FSA Station 702-9358
Voice 1.13 Vpp
Sine 0.801 Vpp
Sine 0.283 Vrms
Sine -8.74 dBu
Voice -14.74 dBu
118
FSA Station 702-0240
Voice 0.143 Vpp
Sine 0.101 Vpp
Sine 0.036 Vrms
Sine -26.7 dBu
Voice -32.7 dBu
FSA Station
IP7 PA module
Voice 0.143 Vpp
Sine 0.101 Vpp
Sine 0.036 Vrms
Sine -26.7 dBu
Voice -32.7 dBu
IP-FSA
Server PC
Digital VoIP
F.S. Sine = 0 dB
Sine -16.9 dB
Voice -22.9 dB
950-0690
Isolation
Interface
Operator
Console
System
Voice 0.558 Vpp Voice 1.55 Vpp
Sine 0.395 Vpp Sine 1.096 Vpp
Sine 0.140 Vrms Sine 0.388 Vrms
Sine -14.89 dBu
Sine -6.0 dBu
Voice -20.89 dBu Voice -12 dBu
025-9581M
Level Setting Procedures
Figure 44 shows the general location of the potentiometers and test points on the lower
half of the transponder board that are used during the various level alignment procedures.
Figure 44: Controls and Testpoints for setting Levels
J1
TP-1
1
JB2
TONE
R61
R87
JP14
R64
VOICE
EAR
R107
R63
RCV 4W
R137
R135
J3
K2
12
1
J4
E34
RCV2W
E31
E32
E33
AUX RX
E27
E28
E29
E30
JP6
1
JP7
K1
E25
E26
MIC
P2
12
1
J5
12
119
Installing the Station Transponder Units on Site
Setting Receive Levels at the VoIP Server
Note
This procedure will be easier to perform if you temporarily connect
an Station Transponder Unit to the network at the VoIP Server
location. If this is not possible, you must arrange for an assistant to
make the required measurements on site and relay them back to
the location of the server.
Note
If the system is going to have radios installed as a permanent
backup to the VoIP intercom cards, check that jumper JP-14 has a
summing jumper in all of the Station Transponder Units (this is
standard). See Communications Mode on page 64.
♦ To set the VoIP Server sound card levels
1. Set the FSA Station Unit pots R63 and R64 at mid range (see Figure 44).
2. Set IP-FSA server’s Windows Control Panel sound mixer’s playback Wave and
Master gains to max.
3. Mute all sources in the sound mixer playback except Master and Wave.
4. Have someone speak into the FSA Station while measuring the voice output at the
IP-FSA server, after the Audio and Digital Input Interface (P/N 950-0690). Into a
600 ohm load, this level should be 1.1 Vpp (-15 dBu rms). For a 60% deviation
sine wave test tone, this would be a level of 0.28 Vrms (-8.8 dBu rms).
5. Adjust the dispatch console’s input gain to accept the IP-FSA output level
observed using the console’s input audio adjustment procedure. If the console is a
Zetron Series 4000, see the audio level setting procedure for the dual channel card
in the installation manual (P/N 025-9533).
120
025-9581M
Level Setting Procedures
Setting Station Transponder Unit Levels for a VoIP-based System
It may turn out that the factory default settings on the Station Transponder Units in your
system are adequate and you do not need to do any adjustments to the system beyond
adjusting the level at the VoIP Server. If you do need to make level adjustments at the
individual stations, the procedure which follows will provide uniform levels compatible
with most PA systems.
Note
The following procedure assumes two things: 1) the VoIP Server
levels have been set, and 2) that there is an external PA amplifier
between the Station Transponder Unit and the loud speakers in the
station.
♦ To set Station Transponder Unit levels
1. At the FSA station, set the IP7 intercom Rx gain to mid range (using the two blue
buttons to step up and down):
a. Click the blue button SW-2 (the one closer to the Ethernet connectors) six
times to go to minimum volume.
b. Click the other blue button SW-1 three times to select medium volume for the
PA.
2. At the FSA stations set the 1-turn pots R87 and R137 to mid range.
3. Set the radio console system output gain so typical voice is 2.2 Vpp (0 dBm)
leaving the console.
4. At the IP-FSA server, set the Windows Control Panel sound mixer’s record settings
to Mic In and set the Mic In gain to half-way.
5. Make a connection from the radio dispatch console and check the voice audio level
from the console entering the Audio and Digital Input Interface (P/N 950-0690) at
the IP-FSA server. It should be 2.2 Vpp (0 dBm). For a 60% deviation sine wave
test tone, this would be a level of 0.77 Vrms. If the level is wrong (too low due to
long cables, etc.), re-adjust the radio dispatch console’s output until the level
entering the IP-FSA server’s Audio and Digital Input Interface is correct.
6. Check the voice audio level at the FSA station PA output pins, J3 pin 11 to J3 pin
9. It should be 1.13 Vpp +/- 0.5 Vpp (-14.7 dBu rms +/- 3 dBu).
7. If the FSA station output level is too low, try adjusting the Mic In gain at the IPFSA server up (from 50% to 100%). Listen for added distortion as some sound
card inputs (like some motherboard audio) will distort when set above the 50%
level. The Zetron-supplied sound card requires a 100% Mic In gain setting.
8. If increasing the Mic In gain caused audio distortion, set the IP-FSA server Mic In
gain back down to 50% and try adjusting the FSA station PA IP intercom gain up.
This can be done by pressing the blue buttons on the IP7. The button closer to the
Ethernet jacks (SW-2) steps the gain down, the other button (SW-1) steps the gain
up. There are seven IP intercom gain levels. If the IP Intercom gain is set too high
the background noise may become objectionable.
121
Installing the Station Transponder Units on Site
Setting Station Transponder Unit Levels for a Radio-based System
It may turn out that the factory default settings on the Station Transponder Units in your
system are adequate and you do not need to do any adjustments in order to get adequate
audio levels from the radio receivers. If you do need to make level adjustments at the
individual stations, the procedure which follows will provide uniform levels compatible
with most PA systems.
Note
The following procedure assumes two things: 1) the radio receiver
is the only source of voice audio supplied to the Station
Transponder Unit, and 2) that there is an external PA amplifier
between the Station Transponder Unit and the loud speakers in the
station.
♦ Setting the Station Transponder Unit Levels for Radio
1. Attach the oscilloscope probe to R149 (near J4-pin3) on the transponder board of
the unit being adjusted. Attach the ground lead to R148.
2. Confirm that the receive audio level coming from the radio is nominally 0.4 Vp-p,
with the peak audio level no more than 1.0 Vp-p. If necessary, adjust the controls
in the radio receiver to get the audio within this range.
3. Attach the oscilloscope probe to R134 (near relay K2) on the transponder board of
the unit being adjusted. Attach the ground lead to R133.
4. From an FSA Console position, select the target Station Transponder Unit and
send it an Alert. While the alert tones are being played at the unit, use the TONE
control (R61) to adjust the peak tone level to 2.2 Vp-p (0 dBm). (The tone levels
can be readjusted later with R61, if necessary.)
5. Clear the Alert at the FSA Console position and set the VOICE control (R87) to
approximately the 1/4 CW (clockwise) position. (1/4 of its range from fully CCW)
6. At the console position, select Alert with PA for the target Station Transponder
Unit. When the alert ends and the operator starts speaking in a normal voice, adjust
the AUX RX control (R137) for the knee of compression at R134. (approximately
0.4 Vp-p) (The voice levels can be readjusted later with R137, if necessary.)
7. At the console position, select Alert with PA for the target IP station transponder.
When the alert ends and the dispatch operator starts speaking in a normal voice,
adjust the Voice Control R87 for a 2.2 Vp-p (0dBm) level at R134.
8. At the console position, have the operator clear the Alert with PA for the target
Station Transponder Unit.
Tip
The following steps are only necessary if your Station Transponder
Unit has a handset. If you do not have a handset, the following 9
through 12 are unnecessary and you may skip to step 13 to finish
the procedure.
9. (MIC Level - for handset option only) At the station unit, move the oscilloscope
probe to R139 on the transponder board (close to J4-pin 11). Lift the handset, press
122
025-9581M
Level Setting Procedures
the PTT button, and speak in a normal volume with your mouth a typical distance
from the mouthpiece. Adjust the MIC control (R63) for a nominal reading of 0.4
Vp-p (peak amplitude should be 1.0 Vp-p). Hang up the handset when you are
finished making the adjustment.
10. Disconnect the oscilloscope from the Station Transponder Unit.
11. Configure your service monitor to provide a deviation reading on the transmit
frequency of the radio interfaced to the Station Transponder Unit.
12. Lift the station handset, press the PTT button, and speak in a normal volume with
your mouth a typical distance from the mouthpiece. Adjust the transmit audio level
controls on the radio (or R63 in the Station Transponder Unit if that is more
convenient) to achieve the proper carrier deviation on the transmit frequency.
13. When you are finished with the adjustment, hang up the handset and close up the
Station Transponder Unit.
14. Have operator initiate an Alert with PA from the console position to the target
Station Transponder Unit. Adjust the volume control on the external PA amplifier
to achieve the correct loud speaker output in the station.
15. When you have completed your adjustments, have the operator unselect the station
at the console and move on to the next unit.
123
Installing the Station Transponder Units on Site
124
025-9581M
Overview
Using a Model 26 Fire Station
Dispatcher for System Backup
Note
In order for the system backup arrangement described in this
chapter to work correctly, the Station Transponder units in the
system (whether they are newly manufactured Model 6203 or 6204
units or updated Model 6 units) must be using firmware 601-1409
revision 1.11 or later (check the label on the EPROM in socket U9).
If you find that some of your units need to be updated to the
correct firmware revision, please contact Zetron at 425-820-6363,
ask for Technical Support, and arrange to receive the required
firmware upgrade for the units that require it. Please have a list of
the unit serial numbers ready when you call as they will be required
to issue updates.
Note
Whenever the system is operating in the backup mode (using the
Model 26 to alert stations), the Station Transponder Talkback
function is disabled and the handset on the Station Transponder
unit cannot be used to speak to the dispatch operator.
Overview
Prior to the introduction of the IP-based Fire Station Alerting system, Zetron offered a
system based on FFSK signaling. This system used a unit called the Model 26 Fire Station
Dispatcher in the communications center which alerted a unit called the Model 6 in the fire
stations.
The motherboard and much of the firmware that makes up the Model 6203 and Model
6304 units comes from the Model 6. (For the remainder of this chapter, any mention of the
Model 6203 should be understood to refer to the Model 6204 as well, unless specifically
stated otherwise.) While the Model 6203 units are intended for building IP-based systems,
125
Using a Model 26 Fire Station Dispatcher for System Backup
they retain the ability to decode and understand the older FFSK signaling from a Model
26. In fact, if they are properly installed and setup, Model 6203 units can “downshift” into
communicating with a Model 26 by means of FFSK automatically. When they next
receive commands over their TCP/IP connection, they automatically shift back to
operating in that mode.
Please understand that the system cannot have both the FSA server and a Model 26 Fire
Station Dispatcher controlling it simultaneously. However, if the equipment is set up
correctly, the control can be shifted from the server to the Model 26 at the communications
center without having to make any changes at the fire stations. Once the IP system failure
is taken care of, control can be shifted back to the FSA server, again, without any need to
take any actions at the fire stations.
Note
While the original Model 6/Model 26 Fire Station Alerting system
did offer the capability of a wire line interface between the Model
26 controller and the Model 6 station alerting units, this mode of
operation is no longer supported by the IP FSA system. The only
interface supported for using a Model 26 to control Model 6203 and
Model 6204 units is by means of FFSK signaling transmitted over
dedicated radios.
A brief review of the two possible system organizations is provided to ground you in how
the primary and backup controllers work. After that, a separate section is provided with
instructions for setting either type of backup. This is done deliberately in order to allow
the installer to concentrate on whichever approach is being used.
Note
The FFSK packets will be heard over the PA system at the fire
stations while the Model 26 is in use as a backup to FSA. This is a
consequence of the configuration of the Model 6203 and Model
6204 units to allow them to switch modes of operation without any
operator actions at the fire stations.
Voice over Radio or VoIP
The details involved in converting the system from the station alerting units being
controlled by the FSA Server to their being controlled by a Model 26 will vary based on
how the system normally works when controlled by the server.
This section provides an overview of the differences between systems which are using
radio links to distribute voice audio to the Model 6203 units at the fire stations and
systems that are using VoIP technology over the IP-network to send and receive voice
audio.
126
025-9581M
Voice over Radio or VoIP
Voice over Radio
In a system of this type, the individual FSA console positions communicate control and
status request messages with the FSA Server (over the IP network) and then the server
communicates with the individual station units (again over the IP network). The reverse is
true when the station units communicate status information back to the consoles.
Voice audio is transmitted through a radio console, over a radio channel, and received by a
radio connected directly to each station unit. The received voice audio is controlled by the
Model 6203 based on what commands the station unit has received over the IP network.
In the event of a problem occurring with the FSA Server, the server can be shut down and/
or disconnected from the IP network. A properly programmed Model 26 which is
connected to a radio on the same channel used for voice audio distribution can be turned
on and take control of the system using FFSK commands over the radio channel.
Note
Keep in mind the fact that the system is “cold-switched” when the
Model 26 takes over. Depending on the size of the system, it may
take several minutes for the Model 26 to poll all of the station
alerting units and capture an accurate picture of the station status
for all of the units.
Figure 45: IP-FSA System with Radio for Voice Audio (FFSK over Radio for Backup
Control)
Private IP
Network
Console
Audio Interface
FSA Client
Radio Console
Primary
Voice Radio
4-Wire
Audio
Radio Voice
With FFSK Radio
Backup
Radio
Channel A
- Console Channel -
Serial CAD
Translator
Radio
Channel A
IP FSA
Primary Server
IP
Station
Control
M6203
IP / Radio
With FFSK
Backup
M26 Bakup
FFSK / Voice
A
Serial CAD
Interface
B
Model-26
"ColdStart" Radio
Backup
4-Wire
Audio
Radio
Channel A
127
Using a Model 26 Fire Station Dispatcher for System Backup
If the Serial CAD interface was being used to allow CAD control of the FSA Server, that
CAD interface may also be switched to the Model 26. This will allow CAD control of the
system to continue with minimal interruption.
One of the significant attributes of this configuration is that the radio is not sharing the
receive and transmit audio connections on the Model 6203 with the IP interface. The
audio, whether voice or FFSK packets, is always passing just through the radio. This
should simplify the setting of audio levels.
Voice over VoIP
In a system of this type, the individual FSA console positions communicate control and
status request messages with the FSA Server (over the IP network) and then the server
communicates with the individual station units (again over the IP network). The reverse is
true when the station units communicate status information back to the consoles. In
addition, any voice audio transmitted between the console positions and the station
alerting units travels over the IP network.
In the event of a problem occurring with the FSA Server, the server can be shut down and/
or disconnected from the IP network. A properly programmed Model 26 is connected to a
suitable radio on a channel that is dedicated to providing backup communications for the
this system. At each of the stations, a matching radio transceiver is installed and interfaced
to the Model 6203. When the Model 26 is turned on it will interrogate the station units and
take control of the system using FFSK commands over the radio channel.
Figure 46: IP-FSA System with VoIP for Voice Audio (FFSK & Voice over Radio for Backup)
Private IP
Network
Console
Audio Interface
FSA Client
Radio Console
Radio Voice
With FFSK Radio
Backup
4-Wire
Audio
VoIP Gateway
Serial CAD
Translator
Radio
Channel A
IP FSA
Primary Server
IP
Station
Control
&
VoIP
Audio
M6203
IP / VoIP
With FFSK
Backup
M26 Bakup
FFSK / Voice
A
Serial CAD
Interface
128
B
Model-26
"ColdStart" Radio
Backup
4-Wire
Audio
Radio
Channel A
025-9581M
Model 26 Backup in a Voice over Radio System
Note
Keep in mind the fact that the system is “cold-switched” when the
Model 26 takes over. Depending on the size of the system, it may
take several minutes for the Model 26 to poll all of the station
alerting units and capture an accurate picture of the station status
for all of the units.
If the Serial CAD interface was being used to allow CAD control of the FSA Server, that
CAD interface may also be switched to the Model 26. This will allow CAD control of the
system to continue with minimal interruption.
One of the significant attributes of this configuration is that the radio shares the receive
and transmit audio connections on the Model 6203 with the VoIP module of the IP
interface. This will make the setting of audio levels a bit more critical than it would be in a
system that always operated in just a single mode.
Model 26 Backup in a Voice over Radio System
The assumption made in writing these procedures is that the system is already up and
running as a voice-over-radio system or, at the very least, planned and laid out to operate
in that manner. The Model 26 as a backup is being added to that system. The procedures in
this section are presented in the following order:
• Connection changes between the Model 6203 units and the radio transceiver,
please refer to Figure 47
• Jumper changes inside the Model 6203 units
• Programming changes to the Model 6203 units
• Level setting procedures to ensure proper FFSK levels
In order for the station units to switch between IP-mode and FFSK-mode without operator
action, the COR input will be tied low and the units shifted to VOX mode operation (if
they were not already set to that). If the station has both a Model 6203 and a Model 6204,
both units must share the RX audio, TX audio, and PTT line. This is because, in FFSKmode operation, each of the station units individually must be able to exchange FFSK
packets with the Model 26.
Connection Changes between the Station Transponder Units and the Radio
The following procedure changes the connections between the station alerting units and
the radio transceiver to allow the system to operate in both modes: IP network-based and
FFSK packet-based. If the station being worked on does not have a Model 6204 installed,
you may simply ignore any of the connections indicated for a Model 6204.
129
Using a Model 26 Fire Station Dispatcher for System Backup
♦ Connecting the Model 6203 to the voice radio for FFSK backup:
1. If any wire is connected to the PTT Out (P4, pin 1) signal of the IP Interface
Board, disconnect it.
2. If there is an existing connection to the AUX RX “A” input (J4, pin 4) on the
station unit motherboard, disconnect it.
3. Jumper the RX COR input (J5, pin 1) on the station unit to ground (J5, Pin 2).
The COR output of the radio should not be connected to anything.
4. Connect the RX audio from the radio to RX Audio + (J5, pin 3) on the station unit
motherboard. Connect the RX Audio - (J5, pin 4) to ground (J5, pin 2).
5. Connect the TX audio input of the radio to TX Audio + (J4, pin 11) on the station
unit motherboard. Connect the TX Audio - (J4, pin 9) to ground (J4, pin 7).
6. Connect the XMIT PTT output (J4, pin 8) of the station unit to the PTT input of
the radio.
7. Review all of your connections to ensure that they have been made to the correct
pins and that they are securely fastened.
130
025-9581M
Model 26 Backup in a Voice over Radio System
Figure 47: Model 6203/6204 Radio Connections for Voice over Radio System Backup
IP
N e tw o rk
GND
P4
PTT Out
GND
IP Off Hook
Interface
PTT In
Board
PTT
1
NC
6
Radio
Carrying
Voice Audio
&
Backup
FFSK Data
RX COR
TX Audio
2
RX Audio
3
J5
J5
Handset PTT
8
8
HKSW
7
7
RX Audio -
4
4
RX Audio -
RX Audio +
3
3
RX Audio +
GND
2
2
GND
RX COR
1
1
RX COR
J4
J4
TX Audio + 11
11 TX Audio +
TX Audio -
9
9
TX Audio -
XMIT PTT
8
8
XMIT PTT
GND
Model 6204
IP Station
Unit
7
7
GND
AUX RX "A" 4
4
AUX RX "A"
AUX RX "B" 3
3
AUX RX "B"
2
2
GND
J3
J3
Model 6203
IP Station
Unit
GND
PA Busy
1
1
PA Busy
PA Audio Comm A 11
11
PA Audio Comm A
PA Audio Comm B
9
PA Audio Comm B
9
Input 1
Common
PA System
Input 2
Jumper Settings inside the Model 6203
Depending on how the Model 6203 was originally configured, you may not need to
change anything. Still you will need to check the positions of the jumpers mentioned here
in order to ensure proper operation of the station alerting unit in both normal and backup
modes. For help in locating jumpers on the station alerting unit motherboard, refer to
Figure 49 on page 148.
131
Using a Model 26 Fire Station Dispatcher for System Backup
♦ Checking the Model 6203 jumper settings:
1. Check that the Dual RX Audio Source Summing jumper is installed on JP14
(instead of a normal 2-pin jumper). This jumper will be three pins wide and have a
small PCB attached to its top.
2. Check that the COR Pull-up (JP9) jumper is in the “A” position.
3. Check that the VOX Control (JP3) jumper is in the “B” position.
Programming Changes to the Model 6203
This sub section covers changes that need to be made to the programmable settings in the
station alerting units in order to ensure proper system operation in both normal and backup
operating modes. The settings changed are primarily timers. You should not have to alter
the settings concerning unit type (6203 or 6204) or ID number.
♦ Checking the serial settings for the station alerting units:
1. Connect a compatible serial cable (see J1 Serial Port Pinout on page 153) between
your computer and socket J1 on the transponder board.
2. Set switch SW1-8 to the ON position.
3. Using a serial terminal emulation program (such as HyperTerminal), set up a
connection for the COM port to which the cable is connected. The settings should
be: 9600 baud, 8-bit words, 1 stop-bit, no parity checking, and flow control set to
none.
4. Hit the SPACE bar three times to open the Model 620x configuration main menu.
5. Enter a “1” to open the Station Configuration menu. Confirm the items 1 and 2 are
correctly set.
132
025-9581M
Model 26 Backup in a Voice over Radio System
6. If item {4} Communication Mode is not set to VOX, enter a “4” to open the
Communication Mode sub menu and enter a “2” to set the unit to use VOX. When
finished, press “e” to return to the Station Configuration menu. For more
information on this sub menu, see “Communications Mode” Menu on page 66.
7. Enter a “5” to select {5} Keyup Delay. Set this parameter to the necessary value to
ensure that the unit waits until the transmitter is fully keyed before sending data.
Systems using a repeater will require a longer delay. One to two seconds is usually
a good starting point for this parameter. When finished, press “e” to return to the
Station Configuration menu.
8. Enter a “6” to select {6} Retry Period. Set this parameter to 10 seconds to start
with and then adjust it later as necessary to optimize system performance. When
finished, press “e” to return to the Station Configuration menu. For more
information on this parameter, see Retry Period on page 65.
9. Enter an “e” to return to the main menu. Then enter a “5” to open the {5} PA
Options menu.
133
Using a Model 26 Fire Station Dispatcher for System Backup
10. Enter a “3” to select {3} PA Un-Muted Mode. If this option is not already set to
Enabled, enable it now. Enter an “e” to return to the PA Options menu, and then a
second “e” to return to the main menu.
11. Verify that the 5 Minute Failsafe Timeout is Disabled.
12. At the Main menu, enter an “e” to exit the serial programming mode.
13. Move switch SW1-8 back to the Off position and disconnect the serial cable from
the socket J1 on the transponder board.
Possible Level Setting Changes
While the radio link used for carrying the voice audio was originally set up to provide an
adequate level of voice audio for sending announcements to the station PA system, in this
new arrangement it also needs to provide a reliable path for FFSK packets traveling back
and forth between the Model 26 and the individual Model 6203 station units. It is assumed
that the Model 26 has been programmed to support the station units in this system and
properly interfaced to a suitable radio. It can either be the one used to transmit voice audio
from the communications center when the FSA Sever is in control, or a similar unit.
It is recommended that you read through this section at least once prior to actually trying
to make adjustments. The procedures are not that difficult; however, the whole process
will go more smoothly if you know what to expect and have arranged to have everything
you need on hand before you start.
Note
While the Model 6203 (or Model 6204) will provide clear audio at its
location, it was never intended to provide a high level audio output.
It is assumed that the signal from the station unit will be sent to a
PA amplifier and that the PA amplifier will drive the speakers in the
fire station.
Equipment & Prerequisites
• A small, flat-bladed screwdriver suitable for adjusting the potentiometers on the
transponder board of the Station Transponder Unit
• An oscilloscope, actually you may want two of them, one at the Model 26 location
and one at the Model 6203 location
• For setting levels in a radio-based system, a service monitor is required to check
channel deviation levels
• Again, you will want two of these, a laptop computer or PC with an available serial
port and running serial terminal software to be used for controlling either the Model
26 or any of the Model 6203/Model 6204 units, the settings should be: 9600 baud,
8-bit words, 1 stop-bit, no parity checking, and flow control set to none
• Serial cables (Zetron P/N 709-7208) for connecting between PC or laptop and
Model 26 and Model 620x
• A land line, cell phone, or radio link so instructions can be passed between the
dispatch center equipment room and the station at which the Model 6203 is located
134
025-9581M
Model 26 Backup in a Voice over Radio System
Tip
Do not try to set Model 26 or Model 6203 transmit or receive levels
based on FFSK packets exchanged in normal polling. To do so can
lead to erroneous level settings. Only set levels while using the test
tones generated by both units.
Model 26 FFSK Transmit Level
This procedure will require personnel at both the Model 26 location and at one of the
Model 6203 station locations.
♦ Setting the Model 26 FFSK transmit level:
1. At the Model 26, connect the laptop (or PC) to the serial programming port of the
Model 26. Set Switch 7 on the rear of the Model 26 to the ON position (places the
unit in the programming mode). Hit the SPACE bar three times to open the Model
26 Main menu.
2. Enter a “7” to open the {7} FFSK Test Menu.
3. Enter a “1” to initiate the FFSK test mode. The Model 26 should key its radio and
transmit for 30 seconds and then unkey. If you finish making adjustments before
30 seconds is up, you can cancel the test by hitting any character key on the
computer keyboard. If you require more time to make the adjustments, enter the
“1” again to repeat the test tone.
4. While the FFSK test tone is being transmitted by the Model 26, use the service
monitor to measure the deviation of its radio transmitter. Adjust the FSK XMIT
pot (R79) on the back of the Model 26 for a deviation of 2.5 kHz (assuming wide
band and a full channel deviation of 5 kHz). If the signal cannot be set low enough,
move JP10 in the Model 26 from position B to C. If the signal cannot be set high
enough, move JP10 from position B to A.
5. When finished making adjustments, let the test signal time-out or stop the test.
6. Leave the laptop attached to the Model 26 and leave it in the FFSK Test menu for
now.
!
Caution!
Some radios exhibit a roll-off of the audio at higher
frequencies. If this roll-off is severe enough, it can compromise
the data integrity of the FFSK packets. The radios used and the
interface to them should be configured to provide a flat
frequency response (as much as possible).
135
Using a Model 26 Fire Station Dispatcher for System Backup
Model 6203 FFSK Receive Level
Note
If there is an external control on the radio transceiver that allows
people to alter the receive audio level going to the Model 6203, this
control must be locked in some way after the adjustments are
made. Changing the level of the receive audio presented to the
Model 6203 can compromise the decoding of FFSK data packets.
♦ Setting the Model 6203 receive level:
1. At the Model 6203 location, connect an oscilloscope to measure the receive audio
signal at TP-1 on the Model 6203 motherboard. The expected signal will be
approximately 1.0 Vp-p (0.35 Vrms).
2. On the Model 6203 motherboard, turn R107 (4-wire Rcv) fully clockwise and
R135 (2-wire Rcv) fully counterclockwise.
3. Turn R62 (FFSK in) fully counterclockwise. Set R86 (VOX threshold) to the
middle of its range.
4. Call the Model 26 site and have the operator there initiate the FFSK Test signal
from the Model 26.
5. If the voltage measured at TP-1, while the test signal is being received, is less than
1.0 Vp-p (0.35 Vrms), turn R62 clockwise until it reaches 1.0 Vp-p.
6. If the voltage measured at TP-1, while the test signal is being received, is greater
than 1.0 Vp-p (0.35 Vrms), turn R107 counterclockwise until it is reduced to 1.0
Vp-p (0.35 Vrms).
7. When finished making adjustments, let the test signal time-out or stop the test.
Model 6203 FFSK Transmit Level
♦ Setting the Model 6203 transmit level:
1. At the Model 6203, connect the laptop (or PC) to the serial programming port of
the Model 6203. Set SW1-8 to ON (places unit in programming mode). Hit the
SPACE bar three times to open the Model 6203 Main menu.
2. Enter an “8” to start the {8} FFSK LEVEL SET test tone sequence. The Model
6203 should key its radio and transmit for 30 seconds and then unkey. If you finish
making before 30 seconds is up, you can cancel the test by hitting any character
key on the computer keyboard. If you require more time, enter an “8” again.
3. While the FFSK test tone is being transmitted by the Model 6203, use the service
monitor to measure the deviation of its radio transmitter. Adjust the R108 pot
(FFSK OUT) on the motherboard of the Model 6203 for a deviation of 2.5 kHz
(assuming wide band operation with a full channel deviation of 5 kHz). If the
signal cannot be set low enough, move JP5 in the Model 6203 from position TEL
to RAD. If the signal cannot be set high enough, move JP5 from position RAD to
TEL.
4. When finished making adjustments, let the test signal time-out or stop the test.
136
025-9581M
Model 26 Backup in a Voice over Radio System
5. Leave the laptop attached to the Model 6203 and leave it in the programming mode
for now.
Model 26 FFSK Receive Level
♦ Setting the Model 26 transmit level:
1. Attach an oscilloscope to the FFSK test point (TP6) on the back of the Model 26.
The signal to be measured will be approximately 1.0 Vp-p.
2. On the back panel of the Model 26, turn the 4W RCV pot (R69) fully clockwise
and the 2W RCV pot (R81) fully counterclockwise.
3. Turn the FSK POST RCV pot (R78) fully counterclockwise and set the VOX pot
(R31) to its mid-position.
4. At one of the Model 6203 sites that has had its FFSK transmit level set, hit the
SPACE bar on the computer keyboard three times to open the Model 6203 Main
menu. Then enter an “8” to start the {8} FFSK LEVEL SET test tone sequence.
5. If the voltage measured at the FFSK test point (TP6) while receiving the FFSK test
tone is less than 1Vp-p (0.35 Vrms), turn the FSK POST RCV pot (R78) on the
Model 26 clockwise until it is at least 1.0 Vp-p.
6. If the voltage measured at the FFSK test point (TP6) while receiving the FFSK test
signal is greater than 1.0 Vp-p (0.35 Vrms), turn the 4W RCV pot (R69) on the
Model 26 counterclockwise until it is 1.0 Vp-p or less.
Finishing Up
The following list covers the cleaning up after the levels have been set at the Model 26 and
all of the Model 6203 station units.
♦ Finishing up the Model 26 backup system setup:
1. At both the Model 26 location and the Model 6203 site, return the units to normal
operating mode and remove the serial cables.
• Keep entering “e” until you reach the Main menu and then enter “e” one more
time to exit the programming mode.
• Model 6 — move SW1-8 to the off position
• Model 26 — move SW7 to the off position (CAD/Data Logging)
2. Remove all test lead connections and close up the Model 26 and Model 6203 units.
3. After the Model 26 has had a chance to poll all of the Model 6203 units in the
system, try making an alert to each of the units to check whether the voice audio
levels are adequate. If they need to be adjusted use R107 (RCV-4W) on the Model
6203 mother board.
4. In the IP FSA Configuration Utility, under Global Server Settings, confirm that
the Station Retry Timeout for the IP FSA system is still set to the default setting
of 10.0 seconds.
137
Using a Model 26 Fire Station Dispatcher for System Backup
Model 26 Backup in a VoIP System
The assumption made in writing these procedures is that the system is already up and
running as a VoIP system or, at the very least, planned and laid out to operate in that
manner. The Model 26 as a backup is being added to that system. The procedures in this
section are presented in the following order:
• Connections between the Model 6203 units and the radio transceiver, please
refer to Figure 48
• Jumper changes inside the Model 6203 units
• Programming changes to the Model 6203 units
• Level setting procedures to ensure proper FFSK levels
In order for the station units to switch between IP-mode and FFSK-mode without operator
action, the COR input will be tied low and the units shifted to VOX mode operation (if
they were not already set to that). If the station has both a Model 6203 and a Model 6204,
both units must share the RX audio, TX audio, and PTT line. This is because, in FFSKmode operation, each of the station units individually must be able to exchange FFSK
packets with the Model 26.
Connection between the Station Alerting Units and the Radio
The following procedure establishes the connections between the station alerting units and
the radio transceiver to allow the system to operate in both modes: IP network-based and
FFSK packet-based. If the station being worked on does not have a Model 6204 installed,
you may simply ignore any of the connections indicated for a Model 6204. Refer to Figure
48 for overall wring connections.
♦ Connecting the Model 6203 to the radio for voice and FFSK backup:
1. If any wire is connected to the PTT Out (P4, pin 1) signal of the IP Interface
Board, disconnect it.
2. Jumper the RX COR input (J5, pin 1) on the station unit to ground (J5, Pin 2).
The COR output of the radio should not be connected to anything.
3. Connect the RX audio from the radio to RX Audio + (J5, pin 3) on the station unit
motherboard. Connect the RX Audio - (J5, pin 4) to ground (J5, pin 2).
4. Connect the TX audio input of the radio to TX Audio + (J4, pin 11) on the station
unit motherboard. Connect the TX Audio - (J4, pin 9) to ground (J4, pin 7).
5. Connect the XMIT PTT output (J4, pin 8) of the station unit to the PTT input of
the radio.
6. Review all of your connections to ensure that they have been made to the correct
pins and that they are securely fastened.
138
025-9581M
Model 26 Backup in a VoIP System
Figure 48: Model 6203/6204 Connections for a VoIP System using Radio Backup
IP
N e tw o rk
PTT Out
TX Audio
IP
Interface
Board
P4
RX Audio
GND
Off Hook
PTT In
Backup Radio
Carrying
Voice Audio
GND
&
FFSK Data
1
4
5
6
PTT
2
TX Audio
3
RX Audio
NC
J5
RX COR
Handset PTT
8
HKSW
7
J5
RX AUD -
4
4
RX AUD -
RX AUD +
3
3
RX AUD +
GND
2
2 GND
RX COR
1
1
J4
J4
Model 6203
IP Station
Unit
RX COR
TX Audio + 11
11 TX Audio +
TX Audio -
9
9
TX Audio -
XMIT PTT
8
8
XMIT PTT
GND
7
7
GND
AUX RX-A
4
4
AUX RX-A
AUX RX-B
3
3
AUX RX-B
GND
2
2
GND
J3
J3
PA Busy
1
1
PA Audio Comm A 11
PA Audio Comm B 9
Input 1
Model 6204
IP Station
Unit
PA Busy
11
PA Audio Comm A
9
PA Audio Comm B
Input 2
Common
PA System
Jumper Changes inside the Model 6203
Depending on how the Model 6203 was originally configured, you may not need to
change anything. Still you will need to check the positions of the jumpers mentioned here
in order to ensure proper operation of the station alerting unit in both normal and backup
modes. For help in locating jumpers on the station alerting unit motherboard, refer to
Figure 49 on page 148.
♦ Checking the Model 6203 jumper settings:
1. Check that the Dual RX Audio Source Summing jumper is installed on JP14
(instead of a normal 2-pin jumper). This jumper will be three pins wide and have a
small PCB attached to its top.
2. Check that the COR Pull-up (JP9) jumper is in the “A” position.
3. Check that the VOX Control (JP3) jumper is in the “B” position.
139
Using a Model 26 Fire Station Dispatcher for System Backup
Programming Changes to the Model 6203
This sub section covers changes that need to be made to the programmable settings in the
station alerting units in order to ensure proper system operation in both normal and backup
operating modes. The settings changed are primarily timers. You should not have to alter
the settings concerning unit type (6203 or 6204) or ID number.
♦ Checking the serial settings for the station alerting units:
1. Connect a compatible serial cable (see J1 Serial Port Pinout on page 153) between
your computer and socket J1 on the transponder board. (Recommend using Zetron
cable, part number 709-7208.)
2. Set switch SW1-8 to the ON position.
3. Using a serial terminal emulation program (such as HyperTerminal), set up a
connection for the COM port to which the cable is connected. The settings should
be: 9600 baud, 8-bit words, 1 stop-bit, no parity checking, and flow control set to
none.
4. Hit the SPACE bar three times to open the Model 620x configuration main menu.
5. Enter a “1” to open the Station Configuration menu. Confirm the items 1 and 2 are
correctly set.
140
025-9581M
Model 26 Backup in a VoIP System
6. If item {4} Communication Mode is not set to VOX, enter a “4” to open the
Communication Mode sub menu and enter a “2” to set the unit to use VOX. When
finished, press “e” to return to the Station Configuration menu. For more
information on this sub menu, see “Communications Mode” Menu on page 66.
7. Enter a “5” to select {5} Keyup Delay. Set this parameter to the necessary value to
ensure that the unit waits until the transmitter is fully keyed before sending data.
Systems using a repeater will require a longer delay. One to two seconds is usually
a good starting point for this parameter. When finished, press “e” to return to the
Station Configuration menu.
8. Enter a “6” to select {6} Retry Period. Set this parameter to 10 seconds to start
with and then adjust it later as necessary to optimize system performance. When
finished, press “e” to return to the Station Configuration menu. For more
information on this parameter, see Retry Period on page 65.
9. Enter an “e” to return to the main menu. Then enter a “5” to open the {5} PA
Options menu.
141
Using a Model 26 Fire Station Dispatcher for System Backup
10. Enter a “3” to select {3} PA Un-Muted Mode. If this option is not already set to
Enabled, enable it now. Enter an “e” to return to the PA Options menu, and then a
second “e” to return to the main menu.
11. At the Main menu, enter an “e” to exit the serial programming mode.
12. Move switch SW1-8 back to the Off position and disconnect the serial cable from
the socket J1 on the transponder board.
Possible Level Setting Changes
The radios used in this system need to provide a reliable path for FFSK packets traveling
back and forth between the Model 26 and the individual Model 6203 station units. It is
assumed that the Model 26 has been programmed to support the station units in this
system and properly interfaced to a suitable radio.
It is recommended that you read through this section at least once prior to actually trying
to make adjustments. The procedures are not that difficult; however, the whole process
will go more smoothly if you know what to expect and have arranged to have everything
you need on hand before you start.
Note
While the Model 6203 (or Model 6204) will provide clear audio at its
location, it was never intended to provide a high level audio output.
It is assumed that the signal from the station unit will be sent to a
PA amplifier and that the PA amplifier will drive the speakers in the
fire station.
Equipment & Prerequisites
• A small, flat-bladed screwdriver suitable for adjusting the potentiometers on the
transponder board of the Station Transponder Unit
• An oscilloscope, actually you may want two of them, one at the Model 26 location
and one at the Model 6203 location
• For setting levels in a radio-based system, a service monitor is required to check
channel deviation levels
• Again, you will want two of these, a laptop computer or PC with an available serial
port and running serial terminal software to be used for controlling either the Model
26 or any of the Model 6203/Model 6204 units, the settings should be: 9600 baud,
8-bit words, 1 stop-bit, no parity checking
• Serial cables (Zetron P/N 709-7208) for connecting between PC and Model 26 and
Model 620x
• A land line, cell phone, or radio link so instructions can be passed between the
dispatch center equipment room and the station at which the Model 6203 is located
142
025-9581M
Model 26 Backup in a VoIP System
Tip
Do not try to set Model 26 or Model 6203 transmit or receive levels
based on FFSK packets exchanged in normal polling. To do so can
lead to erroneous level settings. Only set levels while using the test
tones generated by both units.
Model 26 FFSK Transmit Level
This procedure will require personnel at both the Model 26 location and at one of the
Model 6203 station locations.
♦ Setting the Model 26 FFSK transmit level:
1. At the Model 26, connect the laptop (or PC) to the serial programming port of the
Model 26. Set Switch 7 on the rear of the Model 26 to the ON position (places the
unit in the programming mode). Hit the SPACE bar three times to open the Model
26 Main menu.
2. Enter a “7” to open the {7} FFSK Test Menu.
3. Enter a “1” to initiate the FFSK test mode. The Model 26 should key its radio and
transmit for 30 seconds and then unkey. If you finish making adjustments before
30 seconds is up, you can cancel the test by hitting any character key on the
computer keyboard. If you require more time to make the adjustments, enter the
“1” again to repeat the test tone.
4. While the FFSK test tone is being transmitted by the Model 26, use the service
monitor to measure the deviation of its radio transmitter. Adjust the FSK XMIT
pot (R79) on the back of the Model 26 for a deviation of 2.5 kHz (assuming wide
band operation and a full channel deviation of 5 kHz). If the signal cannot be set
low enough, move JP10 in the Model 26 from position B to C. If the signal cannot
be set high enough, move JP10 from position B to A.
5. When finished making adjustments, let the test signal time-out or stop the test.
6. Leave the laptop attached to the Model 26 and leave it in the FFSK Test menu for
now.
!
Caution!
Some radios exhibit a roll-off of the audio at higher
frequencies. If this roll-off is severe enough, it can compromise
the data integrity of the FFSK packets. The radios used and the
interface to them should be configured to provide a flat
frequency response (as much as possible).
143
Using a Model 26 Fire Station Dispatcher for System Backup
Model 6203 FFSK Receive Level
Note
If there is an external control on the radio transceiver that allows
people to alter the receive audio level going to the Model 6203, this
control must be locked in some way after the adjustments are
made. Changing the level of the receive audio presented to the
Model 6203 can compromise the decoding of FFSK data packets.
♦ Setting the Model 6203 receive level:
1. At the Model 6203 location, connect an oscilloscope to measure the receive audio
signal at TP-1 on the Model 6203 motherboard. The expected signal will be
approximately 1.0 Vp-p (0.35 Vrms).
2. On the Model 6203 motherboard, turn R107 fully clockwise and R135 fully
counterclockwise.
3. Turn R62 (FFSK IN) fully counterclockwise. Set R86 (VOX threshold) to the
middle of its range.
4. Call the Model 26 site and have the operator there initiate the FFSK Test signal
from the Model 26.
5. If the voltage measured at TP-1, while the test signal is being received, is less than
1.0 Vp-p (0.35 Vrms), turn R62 clockwise until it reaches 1.0 Vp-p.
6. If the voltage measured at TP-1, while the test signal is being received, is greater
than 1.0 Vp-p (0.35 Vrms), turn R107 counterclockwise until it is reduced to 1.0
Vp-p (0.35 Vrms).
7. When finished making adjustments, let the test signal time-out or stop the test.
Model 6203 FFSK Transmit Level
♦ Setting the Model 6203 transmit level:
1. At the Model 6203, connect the laptop (or PC) to the serial programming port of
the Model 6203. Hit the SPACE bar three times to open the Model 6203 Main
menu.
2. Enter an “8” to start the {8} FFSK LEVEL SET test tone sequence. The Model
6203 should key its radio and transmit for 30 seconds and then unkey. If you finish
making before 30 seconds is up, you can cancel the test by hitting any character
key on the computer keyboard. If you require more time, enter an “8” again.
3. While the FFSK test tone is being transmitted by the Model 6203, use the service
monitor to measure the deviation of its radio transmitter. Adjust the R108 pot
(FFSK OUT) on the motherboard of the Model 6203 for a deviation of 2.5 kHz
(assuming wide band operation and a full channel deviation of 5 kHz). If the signal
cannot be set low enough, move JP5 in the Model 6203 from position TEL to
RAD. If the signal cannot be set high enough, move JP5 from position TEL to
PWR.
4. When finished making adjustments, let the test signal time-out or stop the test.
144
025-9581M
Model 26 Backup in a VoIP System
5. Leave the laptop attached to the Model 6203 and leave it in the programming mode
for now.
Model 26 FFSK Receive Level
♦ Setting the Model 26 receive level:
1. Attach an oscilloscope to the FFSK test point (TP6) on the back of the Model 26.
The signal to be measured will be approximately 1.0 Vp-p.
2. On the back panel of the Model 26, turn the 4W RCV pot (R69) fully clockwise
and the 2W RCV pot (R81) fully counterclockwise.
3. Turn the FSK POST RCV pot (R78) fully counterclockwise and set the VOX pot
(R31) to its mid-position.
4. At one of the Model 6203 sites that has had its FFSK transmit level set, hit the
SPACE bar on the computer keyboard three times to open the Model 6203 Main
menu. Then enter an “8” to start the {8} FFSK LEVEL SET test tone sequence.
5. If the voltage measured at the FFSK test point (TP6) while receiving the FFSK test
tone is less than 1Vp-p (0.35 Vrms), turn the FSK POST RCV pot (R78) on the
Model 26 clockwise until it is at least 1.0 Vp-p.
6. IF the voltage measured at the FFSK test point (TP6) while receiving the FFSK
test signal is greater than 1.0 Vp-p (0.35 Vrms), turn the 4W RCV pot (R69) on the
Model 26 counterclockwise until it is 1.0 Vp-p.
Finishing Up
The following list covers the cleaning up after the levels have been set at the Model 26 and
all of the Model 6203 station units.
♦ Finishing up the Model 26 backup system setup:
1. At both the Model 26 location and the Model 6203 site, return the units to normal
operating mode and remove the serial cables.
• Keep entering “e” until you reach the Main menu and then enter “e” one more
time to exit the programming mode.
• Model 6 — move SW1-8 to the off position
• Model 26 — move SW7 to the off position (CAD/Data Logging)
2. Remove all test lead connections and close up the Model 26 and Model 6203 units.
3. After the Model 26 has had a chance to poll all of the Model 6203 units in the
system, try making an alert to each of the units to check whether the voice audio
levels are adequate. If they need to be adjusted use R107 (RCV-4W) on the Model
6203 mother board.
4. In the IP FSA Configuration Utility, under Global Server Settings, confirm that
the Station Retry Timeout for the IP FSA system is set to 10.0 seconds.
145
Using a Model 26 Fire Station Dispatcher for System Backup
146
025-9581M
Overview
Appendix A: Details of Model 6203/
6204 Hardware
Overview
This chapter of the manual is provided as a reference. It contains detailed descriptions of
the connectors, jumpers, potentiometers, etc. within the Model 6203 and Model 6204
Station Transponder Units.
The information provided here can be used for planning the system design in the
beginning. It is also useful for planning expansion or modification of the system.
Connector Details
The following subsections provide detailed information about the connectors found inside
an Station Transponder Unit.
Transponder Board Connectors
There are three 12-terminal, block connectors across the bottom of the Transponder board
labeled J3, J4, and J5, and there are two DB-9 connectors on the left edge labeled J1 and
J6. These are the connectors used to install the unit. The connector J2 is for the cable
connecting the transponder board to the power supply. (Connectors JA2 and JB2 form a
single 12-pin connector, J2.) Figure 49 shows the relative placement of the connectors on
this board.
147
Appendix A: Details of Model 6203/6204 Hardware
Figure 49: Transponder Board - Component Side
JP11
U7
JP12
JP2
SW1
U9
SW2
J6
JP1
Note: Jumper positions shown DO NOT
indicate final jumper positions after setup.
JP13
12
JA2
J2
J1
TP-1
1
R62
JP4
R61
JP3
JP5
R87
R64
JP14
R86
R108
R107
JP8
R135
R137
JB2
R63
R84
P2
JP6
K1
JP7
JP15
K2
J3
1
JP9
JP10
12
J4
1
J5
12
1
12
Connector J3 (PA)
All of the pins on connector J3 are associated with interfacing the Model 6203 to a Public
Address (PA) system. The Model 6203 is designed to automate the operation of the station
PA system by turning it on while the Model 6203 generates alert tones or passes along
dispatch messages, and turning off the PA when not in use. J3 also provides connections
for sharing the PA system with other audio sources.
There are two DPDT relays (PA AUD and PA PTT) and an LED (PA) that operate from a
single “PA ON” signal, generated within the Model 6203. When the Model 6203 PA LED
is on, common contacts of these two relays are connected to the normally open contacts.
When the PA LED is off, the common contacts are connected to the normally closed
contacts.
The PA PTT relay (pins 3 through 8) has all of its contacts available to the user. These
contacts are typically connected to the PA amplifier PTT input if needed.
148
025-9581M
Connector Details
The PA AUD relay (pins 9 through 12) is used to select the source of the PA system audio
input. The common contacts from this relay should be connected to the PA system audio
input. The normally open inputs, to this relay, are internally connected to the Model 6203
PA output. The normally closed inputs, to this relay, can be connected to a second audio
source, such as a microphone. This second audio source would then have control of the PA
during the times that the Model 6203 is not using the PA.
The pin connections for the J3 connector are listed in Table 4.
A diagram showing the pinouts for the PA relays is shown in Figure 50.
Table 4: Transponder Board Connector J3 Pinout
Pin
Description
Pin 1
(PA BUSY)
This connection is used if there are two Station Transponder Units (a primary and a secondary) at the same station. This pin should be connected
between the two units. Its purpose is to prevent both units from sending
tones to the PA at the same time. This pin is driven low by a Model 6203
while it is toning, and it must be high before the Station Transponder
Unit can start toning.
Pin 2
(GND)
This pin is connected to the Model 6203 chassis ground.
Pin 3
(PA PTT COM B)
This pin is connected to the PA PTT relay common “B” contacts. It
would typically be connected to the PA amplifier PTT input.
Pin 4
(PA PTT NC B)
This pin is connected to the PA PTT relay normally closed “B” contacts.
It is connected to the common “B” contacts when the PA LED is off.
Pin 5
(PA PTT NO B)
This pin is connected to the PA PTT relay normally open “B” contacts. It
is connected to the common “B” contacts when the PA LED is on.
Pin 6
(PA PTT COM A)
This pin is connected to the PA PTT relay common “A” contact. It would
typically be connected to the PA amplifier's PTT input.
Pin 7
(PA PTT NC A)
This pin is connected to the PA PTT relay normally closed “A” contact.
It is connected to the common “A” contact when the PA LED is off.
Pin 8
(PA PTT NO A)
This pin is connected to the PA PTT relay normally open “A” contact. It
is connected to the common “A” contact when the PA LED is on.
Pin 9
(PA AUD COM B)
This pin is connected to the PA AUD relay common “B” contacts. It
would typically be connected to the PA amplifier audio input (+ side).
Pin 10
(PA AUD NC B)
This pin is connected to the PA AUD relay normally closed “B” contacts. It is connected to the common “B” contacts when the PA LED is
off. It is typically connected to a second PA audio source.
Pin 11
(PA AUD COM A)
This pin is connected to the PA AUD relay common “A” contacts. It
would typically be connected to the PA amplifier audio input (- side or
GND).
Pin 12
(PA AUD NC A)
This pin is connected to the PA AUD relay normally closed “A” contacts. It is connected to the common “A” contact when the PA LED is
off. It is typically connected to a second PA audio source.
149
Appendix A: Details of Model 6203/6204 Hardware
Figure 50: Graphical Representation of PA Relay Pinouts to J3
J3
K1
J3
PA PTT
COM B
3
NO
NO
6
PA PTT
NO B
4
PA PTT
NC B
COM
NC
PA PTT
COM A
5
8
PA PTT
NO A
7
PA PTT
NC A
COM
NC
K2
NO
PA AUDIO
11
COM A
COM
NC
12
PA AUDIO
NC A
10
PA AUDIO
NC B
NO
PA AUDIO
COM B
9
COM
NC
150
025-9581M
Connector Details
Connector J4 (Tx)
This connector contains connections for the transmit interface. If a 2-wire system is being
used, then the receive audio connection is also made here.
The pin connections for the J4 connector are listed in Table 5.
Table 5: Transponder Board Connector J4 Pinout
Pin
Description
Pin 1
(XMIT BUSY)
This pin is a cross-busy input. If this pin is externally driven to ground,
the Model 6203 is prevented from transmitting. This pin is never driven
low by the Model 6203.
Pin 2
(GND)
This pin is connected to Model 6203 chassis ground.
Pin 3
(AUX RX AUD B)
Typically grounded by installing a jumper to J4 pin 2
Pin 4
(AUX RX AUD A)
If the VoIP Intercom option is installed, the Line Out audio (P4-pin 5)
from the IP Interface board is typically connected here.
Pin 5
This pin is not connected.
Pin 6
This pin is not connected.
Pin 7
(GND)
This pin is connected to Model 6203 chassis ground.
Pin 8
(XMIT PTT)
This pin is the Model 6203 Push-to-Talk output. It is an open drain
output that is grounded when the Model 6203 starts transmitting and
stays grounded until finished. At all other times this pin is open. THIS
FUNCTION IS NOW PERFORMED BY THE IP INTERFACE
BOARD, P4-pin 1.
Pin 9
(-AUD Tx)
This pin is the negative side of the transformer-coupled audio output. It
is typically grounded to J4 pin 7. The output audio levels are adjusted by
potentiometers FFSK OUT (R108), MIC (R63).
Pin 10
This pin is not connected.
Pin 11
(+AUD Tx)
This pin is the positive side of the transformer coupled audio output.
Pin 12
This pin is not connected.
151
Appendix A: Details of Model 6203/6204 Hardware
Connector J5 (Rx and Handset)
This connector contains the connections for the receiver audio and the handset option, if
installed.
The pin connections for the J5 connector are listed in Table 6.
Table 6: Transponder Board Connector J5 Pinout
Pin
Description
Pin 1
(Rx COR)
This is an input that is typically connected to a radio Carrier Operated Relay
(COR) output. It gives the Model 6203 an indication of when the radio is receiving a carrier signal (channel busy). It can also be used as a “Channel Grant” signal input in a trunked radio system. Potentiometer “COR” (R84) adjusts this
signal threshold and LED DS33 can be used to monitor its state. Jumper JP9 is
also associated with this input as well as the Communications Mode selection in
the Software Configuration Program.
Pin 2
(GND)
This pin is connected to Model 6203 chassis ground.
Pin 3
(+AUD Rx)
This is the positive side of the 4-wire, transformer coupled, audio input. JP10
sets the input impedance of this input and potentiometer “4-W RCV” (R107)
adjusts the audio input level.
Pin 4
(-AUD Rx)
This is the negative side of the 4-wire, transformer coupled, audio input. JP10
sets the input impedance for this input, and potentiometer “4-W RCV” (R107)
adjusts the audio input level.
Pin 5
(EAR)
This is an output to the handset speaker. When Pin 7 (HKSW) is grounded (offhook), all audio (except FFSK packet reception) is routed to this pin. When
“HKSW” is “on-hook,” all audio to this output is muted except when pin 8
(PTT) is grounded. When “PTT” is grounded, then audio from pin 6 (MIC) is
routed to this output. Potentiometer “EAR” (R64) adjusts the output level of this
pin.
Pin 6
(MIC)
This is the handset microphone input. When Pin 8 (PTT) is grounded, the input
from this pin is routed to either the Model 6203 transmit or PA circuits, based on
the state of pin 7 (HKSW). Potentiometer “MIC” (R63) adjusts the input level
of this pin.
Pin 7
(HKSW, Hookswitch)
This is the handset hook switch input. It determines how the Model 6203 routes
audio coming in on pin 6 (MIC) whenever pin 8 (PTT) is grounded. When pin 7
is grounded (off hook) and the handset PTT is pressed (grounded), the Model
6203 attempts to go into talkback mode with the dispatcher. When in talkback
mode, audio from MIC is routed to the Model 6203 transmit circuits.
When this pin is not grounded (on hook) and the handset PTT is pressed, the
Model 6203 will enable PAs and audio from “MIC” is routed to the Model 6203
PA output circuits.
152
Pin 8
(PTT)
This is the handset push-to-talk input. When this input is grounded audio from
Pin 6 (MIC) is routed to the transmit and PA circuits of the Model 6203.
Pins 9 to 12
(GND)
These pins are connected to the Model 6203 chassis ground.
025-9581M
Connector Details
Connector J1 (DB-9 Printer/Software Configuration Connector)
This connector is a serial port. It is connected to the 9-pin D-connector on the bottom of
the Model 6203 case. This port serves two different functions based on the position of
SW1-8. If SW1-8 is in the ON position, this port is used to access the Software
Configuration Program with an RS-232 terminal. If SW1-8 is in the OFF position, this
port outputs Model 26 CAD generated text messages. The port operates with the following
data parameters (8N1):
Start Bits = 1
Stop Bits = 1
Data Bits = 8
Parity = None
When operating in the Software Configuration mode, its baud rate is selected by SW1-7
(off = 1200, on = 9600). When operating as a CAD text message logger, its baud rate is set
in PRINTER BAUD RATE MENU, in the Software Configuration Program.
The voltage and current levels at this port are RS-232 compatible; however, its pin
connections are not. (See the note following the pinout.) The pin connections for this port
are listed in the following table.
Table 7: J1 Serial Port Pinout
Pin
Description
Pin 1
This pin is not connected.
Pin 2
(RXD/NC)
This pin is RXD if JP-13 is in position “A”. There is no connection
otherwise. See the note that follows this table.
Pin 3
(TXD)
Data output
Pin 4
(RXD/DTR)
This pin is RXD if JP-13 is in position “B”. It is pulled up to +12V
through 4.7K (DTR) otherwise. See the note that follows this table.
Pin 5
(GND)
This pin is connected to the Model 6203 chassis ground.
Pin 6
This pin is not connected.
Pin 7
(RTS)
RTS Output
Pin 8
(CTS)
CTS input, this pin is pulled up to +12V through 10K.
Pins 9
This pin is not connected.
Note
If the Zetron interface cable (P/N 709-7208) is being used, then JP13 should be in position “B”. If an off-the-shelf RS-232 null modem
cable is being used, then JP-13 should be in position “A”.
153
Appendix A: Details of Model 6203/6204 Hardware
Connector J6 (IP Interface Connection)
This connector is a serial port. It is connected to the serial output connector on the IP
Interface board. The part number for the connecting cable is 702-7856. Jumper 11 must be
in the “9600” position. Jumper JP-12 should be in position “A”.
Table 8: J6 Serial Port Pinout
Pin
Description
Pin 1
This pin is not connected.
Pin 2 (RXD)
This pin is RXD if JP-12 is in position “A”. There is no connection otherwise.
Pin 3(TXD)
Data output
Pin 4 (RXD/DTR)
This pin is DTR when JP-12 is in position “A”. It is pulled up to +12V
through 4.7K. This pin is RXD if JP-12 is in position “B”.
Pin 5 (GND)
This pin is connected to the Model 6203 chassis ground.
Pin 6
This pin is not connected.
Pin 7 (RTS)
RTS Output
Pin 8 (CTS)
CTS input, this pin is pulled up to +12V through 10K.
Pins 9
This pin is not connected.
Power Supply Board Connectors
There are four types of electrical connections to the Power Supply board: relay outputs,
relay control, power input (12 Vdc), and sense inputs. Figure 51 shows the relative
locations of the connectors on the Power Supply board.
Relay Connections (P1-P4)
P1 - P4 are made through four general purpose, 2 A, DPDT relays that can be used for a
wide variety of control applications. Connector P1 is associated with relay 1, P2 with relay
2, P3 with relay 3, and P4 with relay 4. Each of these relays is controlled by the dispatcher
via the FSA Console user interface. They can also be locally controlled by either a switch
connected to the P9 connector (to be discussed), or by an event such as an alert at the
Model 6203 (programmable). The way in which these relays are controlled is user
configurable (please see Station I/O Settings on page 92). Each relay has two sets of Form
C contacts, set “A” and set “B”. There are four LEDs (DS1 through DS4) that monitor the
state of their respective relays. When they are on, their associated relay is activated.
154
025-9581M
Connector Details
Figure 51: Power Supply Board Connector Locations
1
P1
P2
1
P3
1
P4
1
1
6
P5
6
6
6
K1
K2
K3
K4
DS1
DS2
DS3
DS4
3
1
P6A
JP1
B A
1
JP2
P7
1
B A
P8
JP3
1
B A
JP4
B A
6
7
P9
P6B
12
6
6
6
1
J1
3
The pin connections for connectors P1 through P4 are as follows:
Pin 1 (NO)
Pin 2 (NC)
Pin 3 (COM)
Pin 4 (NO)
Pin 5 (NC)
Pin 6 (COM)
= Relay Kn Contacts A Normally Open
= Relay Kn Contacts A Normally Closed
= Relay Kn Contacts A Common
= Relay Kn Contacts B Normally Open
= Relay Kn Contacts B Normally Closed
= Relay Kn Contacts B Common
Relay Control (P9)
The P9 connector contains four inputs (with pull-ups) for directly controlling the four
general-purpose relays at connectors P1 through P4. Grounding one of these control inputs
activates the associated relay, and removing the ground deactivates (resets) the relay. The
pin connections for this connector are as follows:
Pin 1 (K1)
Pin 2 (K2)
Pin 3 (K3)
Pin 4 (K4)
Pin 5 (GND)
Pin 6 (GND)
= Relay 1 control input
= Relay 2 control input
= Relay 3 control input
= Relay 4 control input
= Connected to Model 6203 chassis ground
= Connected to Model 6203 chassis ground
155
Appendix A: Details of Model 6203/6204 Hardware
Connections to the Transponder Board (P6A and P6B)
These two connectors are used to carry power, sense input state, and relay control signals
between the I/O and Power Supply board and the Transponder board. The pinout for these
two connectors is as follows:
Pin 1
Pin 2
Pin 3
Pin 4
Pin 5
Pin 6
= Sense Input 4
= Sense Input 3
= Sense Input 2
= Sense Input 1
= Connected to Model 6203 chassis ground
= Connected to Model 6203 chassis ground
Pin 7
Pin 8
Pin 9
Pin 10
Pin 11
Pin 12
= +12 Vdc
= +12 Vdc
= Relay 1 Control Line
= Relay 2 Control Line
= Relay 3 Control Line
= Relay 4 Control Line
12 Vdc Output (P5)
The P5 connector is used to power the IP Interface board. The pin connections for this
connector are as follows:
Pin 1 (+12V)
Pin 2 (GND)
Pin 3 (+12V)
= This is the +12 Vdc power output
= Connected to the Model 6203 chassis ground
= This is the +12 Vdc power output
12 Vdc Input (J1)
Note
This manual assumes you have an external DC power supply. Older
IP FSA units have an internal AC power supply. Refer to the
documentation that came with your equipment or contact Zetron
for revision E of this manual.
J1 is the input to the Power Supply board.
Pin 1 = Connected to a +12 to +15 Vdc power source
Pin 2 = Connected to the power source ground
Sense Inputs (P7 - P8)
P7 and P8 are the connection points for the inputs to the four sense inputs of the Model
6203. These inputs can be configured to serve the following functions:
• Notify dispatcher when a status change occurs at one of the inputs on a Station
Transponder Unit
• Activate a relay
• Acknowledge an alert
156
025-9581M
Connector Details
Connector P8 contains the input connections for sense inputs 1 and 2. Connector P7
contains the connections for sense inputs 3 and 4. These sense inputs are individually
opto-isolated. They may be configured with jumpers to detect either contact closures or
voltage levels. The polarity of the active signal sent to the FSA Server can be individually
selected with the FSA Maintenance Utility. The pin connections for these connectors are
as follows:
Pin 1 (GND)
Pin 2 Input (-)
Pin 3 Input (+)
Pin 4 (GND)
Pin 5 Input (-)
Pin 6 Input (+)
= Connected to Model 6203 chassis ground
= This is the negative input for Sense 1 (or 3)
= This is the positive input for Sense 1 (or 3)
= Connected to Model 6203 chassis ground
= This is the negative input for Sense 2 (or 4)
= This is the positive input for Sense 2 (or 4)
The jumpers JP1 through JP 4 are used to apply +12 Vdc to the positive side of each sense
input through a 1.5 kΩ pull-up resistor. See Power Supply Board Jumpers on page 164 for
more information on these jumpers.
IP Interface Board Connectors
The Station Transponder Unit Interface board performs two important functions in the
Station Transponder Unit. In every unit, it handles the translation of TCP/IP data packets
from the FSA Server into RS-232 serial format to pass to the serial port at J6 on the
Transponder board. When the Model 6203 sends information back to the FSA Server it
handles the process in reverse. If a VoIP Intercom board is installed in the Station
Transponder Unit, the IP Interface board provides the connections for the VoIP Intercom
to pass its audio and control signals on to the Transponder board.
If there is no VoIP Intercom installed, then the IP network connection is made by plugging
the network cable directly into the RJ-45 connector that is part of U1 on the IP Interface
board.
If there is a VoIP Intercom board installed, then the IP network connection is made to an
RJ-45 jack on the VoIP board, with the other RJ-45 jack used to connect with U1. See
Figure 52 and Figure 53.
157
Appendix A: Details of Model 6203/6204 Hardware
Figure 52: Station Transponder Unit Interface Board
RJ-45 connector in this
end for IP connection
U1
VoIP Intercom Board
covers this area
P2
P4
P3
P5
Figure 53: VoIP Intercom Board
RJ-45
IP connection from
VoIP Intercom board
to IP Station Unit
Interface board
Power
RJ-45
External IP network
connection
To IP Station Unit
Interface board
Power and audio signals are passed between the VoIP Intercom board and the Station
Transponder Unit Interface board through the 20-conductor ribbon cable that plugs into P2
158
025-9581M
Connector Details
on the Station Transponder Unit Interface board. See Installing the VoIP Intercom Board
(P/N 011-0741) for more information about the VoIP Intercom Board.
The serial port, audio/control connections, and power to the Transponder board are
handled through the connectors P3, P4, and P5.
Serial Port (P3)
Pin
Description
1
No Connection
2
TXD
3
RXD
4
No Connection
5
Signal Ground
6
No Connection
7
CTS
8
RTS
9
No Connection
Audio Connections (P4)
Pin
Description
1
PTT OUT (Connects to radio PTT when VoIP option is not
installed)
2
OFF HOOK (connects to J5-pin 7 on Transponder board)
3
PTT IN (connects to J5-pin 8 on Transponder board)
4
LINE IN (connects to J4-pin 11 on Transponder board)
5
LINE OUT (connects to J4-pin 4 on Transponder board)
6
GND (connects to J5-pin 2 on Transponder board)
Power Connections (P5)
Pin
Description
1
+12 Vdc
2
DC Ground
3
—
159
Appendix A: Details of Model 6203/6204 Hardware
Jumper Details
There are 15 selectable jumpers on the Model 6203 Transponder circuit board and four on
the Model 6203 Power Supply circuit board. The position of these jumpers affects the
performance of the Model 6203.
Transponder Board Jumpers
The Transponder circuit board is located on the hinged cover of the Model 6203 case.
Please see Figure 49 on page 148 for the relative locations of the jumpers on this board.
The following table provides a quick reference of each jumper on the transponder board.
The default setting for each jumper is in bold face type.
Table 9: Transponder Board Jumpers
Jumper
Description
Position A
Position B
No Jumper
JP1
Ram Select
32K
8K
8K
JP2
JP2 is for testing purposes only and should otherwise never be installed
JP3
VOX Control
VOX Disabled
VOX enabled
VOX enabled
JP4
FFSK RCV
Select
Bypass AGC
Enables AGC
Prevents reception of all data
from Model 26
—
—
TEL
PWR
RAD
No Jumper
JP5
FFSK Output
Range
Middle Output
Level
Highest Output
Level
Lowest Output Level
Same as TEL
(Middle Output)
JP6
The posts for jumper JP6 are not normally installed
JP7
The posts for jumper JP7 are not normally installed
JP8
This jumper is no longer used. Leave it set to the default position.
JP9
COR Input
Pull-Up
Pulled-up
(default)
Floating
Floating
JP10
4-Wire RCV
Impedance
600 Ω
10 kΩ
10 kΩ
JP11
Baud Rate for J6
9600
4800
2400
JP12
J6 Serial Data
Received On
A
(Pin 2)
B
(Pin 4)
No Jumper
JP13
J1 Serial Data
Received On
A
(Pin 2)
B
(Pin 4)
No Jumper
JP14
Source of Audio
to PA(2)
PA audio from
normal Rx pair
PA audio from
AUX input on J4
No audio
JP15
Auxiliary Audio
RCV Impedance
600 Ω
10 kΩ
10 kΩ
1A
special “summing” jumper is used on JP14, except in cases where the M6203 or M6204 is used
in a Model 26-based system to replace a Model 6. In that situation, use a regular jumper on A or B as
appropriate.
160
025-9581M
Jumper Details
Jumper JP1 (RAM Select)
This jumper selects the size of on board RAM. There are three choices:
Position A = 32K RAM
Position B = 8K RAM
No Jumper = 8K RAM
All Model 6203 and 6204 units use 32K RAM. This jumper should always be in the “A”
position.
Jumper JP2 (Microprocessor Mode Select)
This jumper is for testing purposes and should otherwise never be installed.
Jumper JP3 (VOX Control)
This jumper enables or disables the VOX circuit. There are three choices:
Position A = VOX disabled (use this setting for radios with
Carrier Operated Relay)
Position B = VOX enabled
No jumper = Enables VOX
On the Model 6203 this jumper should always be in the enabled position (B). The reason
for this is that the Model 6203 uses the VOX signal in all of its COMM modes to
determine PA muting.
Jumper JP4 (FFSK RCV Select)
This jumper enables or disables the automatic gain control (AGC) circuit for FFSK
signals. There are three choices:
Position A = Bypasses the AGC circuit (default)
Position B = Enables the AGC circuit
No Jumper = Prevents reception of all data from the Model 26
The normal position for this jumper is the bypass position (A). The FFSK modem chip
that receives this signal in the Model 6203 has its own gain control circuit. If no jumper is
installed, the Model 6203 cannot communicate with the Model 26.
Jumper JP5 (FFSK Output Range)
This jumper selects between 3 different output signal level ranges for FFSK transmissions.
There are four choices for the position of this jumper:
Position “TEL” = The middle output level - Not typically used
Position “PWR” = The highest output level - This level should
not be needed
Position “RAD” = The lowest output level - Use for radio
No Jumper = This is the same as the “TEL” position
161
Appendix A: Details of Model 6203/6204 Hardware
Note
The optimal setting will vary due to different models of radios.
When configuring JP5 for a radio, start with “RAD”, but change the
setting as needed to get 60% channel deviation.
If the Model 6203 is interfaced with a radio, this jumper should probably be in the “RAD”
position to enable lower output levels.
Jumper JP6 & JP7 (PA Relay Bypass Circuits)
The posts for these jumpers are not installed on the circuit board for normally shipped
products. Connecting their contacts makes a short across the output of the PA relay. This
would cause audio to be routed out the PA pins regardless of the state of the relay.
Jumper JP8 (2-Wire RCV Impedance)
This jumper selects the impedance of the 2-wire receive audio. There are three choices for
the position of this jumper:
Position A = 600 Ω
Position B = 3.3 kΩ
No Jumper = This is the same as position “B”
This jumper should be in the “A” position (600 Ω) for one Model 6203. If there is a Model
6204 connected in parallel to the primary Model 6203, then the jumper in the Model 6204
jumper should be in the “B” position. (3.3 kΩ).
Jumper JP9 (COR Input Pull-Up)
This jumper selects whether the COR input is pulled-up through a 10K resistor or is
floating. There are three possible choices for the position of this jumper:
Position A = Pulled-up (default)
Position B = Floating
No jumper = This is the same as position “B” (floating)
STOP
Warning! If the COR input (Pin 1 on J5) is not used, it must be
grounded.
If the Model 6203 “RX COR” (J5-1) input is not used (not connected to a radio), this
jumper should be in the “A” (pulled-up) position. If “RX COR” input is connected to a
radio COR output that is controlled by a contact closure this jumper should also be in
position “A” (pulled-up). If “RX COR” input is connected to a radio COR output that is an
active pull-up to a voltage source, this jumper should be in the “B” position (floating). If
the communications system is a trunked system with the Model 6203 “RX COR” input
connected to a grant signal which is active low, then this jumper should be in the “A”
(pulled-up) position. If the COR signal from the radio is able to drive the Model 6203 “RX
COR” input high and low (bi-polar driver), then the jumper should be in the “B” (floating)
position.
162
025-9581M
Jumper Details
Jumper JP10 (4-Wire RCV Impedance)
This jumper selects the impedance of the 4-wire receive audio. There are three positions
for this jumper:
Position A = Sets impedance to 600 Ω
Position B = Sets impedance to 10 kΩ
No jumper = Sets impedance to 10 kΩ
JP10 should be in the “A” position (600 Ω) for the primary Model 6203. If there is a
secondary Model 6203, connected in parallel to the primary position, the JP10 in the
secondary should be in the “B” position (10 kΩ).
Jumper JP11 (IP/Serial Port Baud)
This jumper selects the serial port baud rate for connector J6. The default condition for
this jumper is “9600”.
9600 = Port runs at 9600 baud
4800 = Port runs at 4800 baud
2400 = Port runs at 2400 baud
Jumper JP12 (IP/Serial Port Rx Data)
This jumper selects the pin on connector J6 from which serial received data will be taken.
There are three positions for this jumper:
Position A = Receive Data is taken from J6 Pin 2 (normal
connection)(default)
Position B = Receive Data is taken from J6 Pin 4 (Zetron
connection)
No jumper = No receive data (Do Not Disturb) and should be
avoided if possible.
This jumper should be in the position that matches the serial data source on the mating
connector. The Model 6203 will always use Position A. An alternate connection is
supplied to support some older Zetron equipment which uses pin 4 of the serial cable for
received data.
Jumper JP13 (Serial Port Received Data Connection)
This jumper selects the pin on connector J1 from which serial received data will be taken.
There are three positions for this jumper:
Position A = Receive Data is taken from J1 Pin 2 (normal
connection)(default)
Position B = Receive Data is taken from J1 Pin 4 (Zetron
connection)
No jumper = No receive data (Do Not Disturb) and should be
avoided if possible.
163
Appendix A: Details of Model 6203/6204 Hardware
This jumper should be in the position that matches the serial data source on the mating
connector. The Model 6203 will always use Position A. An alternate connection is
supplied to support some older Zetron equipment which uses pin 4 of the serial cable for
received data.
Jumper JP14 (Source of Audio to PA)
This jumper selects the source of the voice audio signal that is put out on the PA pins
when the Model 6203 is handling a Dispatcher Announcement. The Station Transponder
unit will arrive from the factory with a “summing” jumper installed that uses all the pins of
JP14 and sums the inputs from both the normal (J5, pin-3) and auxiliary audio (J4, pin-4)
inputs. For all types of FSA systems, leave the summing jumper in.
If the Model 6203 is being used as a Model 6 replacement, then the summing jumper
should be replaced with a normal, single jumper positioned in A or B, as appropriate.
There are three positions for this jumper:
Position A = PA audio taken from the normal 2 or 4 wire receive
input (J5, pin 3)
Position B = PA audio taken from the auxiliary audio input (J4, pin-4)
No jumper = No audio connected to the PA
If no jumper is installed, the Model 6203 will still output alert tones to the PA but no voice
audio will be possible.
Jumper JP15 (Auxiliary Audio RCV Impedance)
This jumper selects the impedance of the 2-wire auxiliary receive audio. There are three
choices for the position of this jumper:
Position A = is 600 Ω
Position B = is 10 kΩ
No Jumper = the same as position “B” (10 kΩ)
This jumper should be in the “B” position (10 kΩ) for one Model 6203. If there is a Model
6204 whose auxiliary audio is connected in parallel to the primary Model 6203, then the
Model 6204 jumper should also be in the “B” position. (10 kΩ).
Power Supply Board Jumpers
The four jumpers on this circuit board select whether the four sense inputs are pulled-up to
+12 Vdc through 1.5-kΩ resistors or left floating. (See Figure 51 on page 155 for jumper
locations.)
For contact closures and signals from open collector outputs, this jumper should be in the
“B” (Pulled-up) position. For voltage level inputs, this jumper should be in the “A”
(floating) position. If the “A” position is used, then both the positive and negative pins for
a sense input (for example J11 and J12) need to be connected to the sensor. If the “B”
position is used, then connecting the negative pin of the sense input to ground activates the
164
025-9581M
Switch Settings
sense input. If a sense input is not being used, its jumper should be in the “B” (pull-up)
position.
Table 10: Power Supply Board Jumpers
Jumper
Configures
Position A
Position B
JP1
Sense Input 4
Floating
Pulled Up (default)
JP2
Sense Input 3
Floating
Pulled Up (default)
JP3
Sense Input 2
Floating
Pulled Up (default)
JP4
Sense Input 1
Floating
Pulled Up (default)
Note
No jumper is equivalent to position “A” (floating).
Switch Settings
There are two switches (SW1 and SW2). Each switch package has 8 individual switches
for a total of 16 switches. See Figure 54 for details of the individual switch blocks, and
Figure 49 on page 148 for their locations on the transponder PCB.
The primary function of these switches is to set the address of the Model 620x. Each
Model 620x must have a unique address that is also known by the FSA Server. Each
station must have a primary Model 620x. If a station has another Model 620x, then that
one is considered the secondary Model 620x. Primary Model 620xs have addresses that
are less than 512 and secondary Model 620xs have addresses equal to the primary unit
address plus 512. Ten switches are used to select the Model 620x address in binary. Each
address switch in the “ON” position indicates a binary “1” while the “OFF” position
indicates a binary “0”.
Figure 54: Detail of Switches 1 & 2 on Station Transponder Board
OFF = 0
ON = 1
OFF
1
2
1
3
4
5
6
7
8
ON
2 4 8 16 32 64 128
(2 + 8 + 16 = 26)
Two of the switches on SW1 are associated with the serial port at connector J1. SW1-8 is
used to select the mode of operation for the port, and SW1-7 selects the Software
Configuration Program baud rate. The usual baud rate is 9600 (SW1-7 ON). See the
following table for the descriptions of SW2 and SW1.
165
Appendix A: Details of Model 6203/6204 Hardware
Table 11: Switch Settings — Model 620x Transponder Board
Switch
Description
Address Value
SW2 -1
Address bit 1 (LSB)
1
SW2 -2
Address bit 2
2
SW2 -3
Address bit 3
4
SW2 -4
Address bit 4
8
SW2 -5
Address bit 5
16
SW2 -6
Address bit 6
32
SW2 -7
Address bit 7
64
SW2 -8
Address bit 8
128
SW1 -1
Address bit 9
256
SW1 -2
Address bit 10 (MSB)
(0 = Primary Unit at station,
1 = Secondary Unit)
512
SW1 -3
Not Used
—
SW1 -4
Not Used
—
SW1 -5
Not Used
—
SW1 -6
Not Used
—
SW1 -7
Software Configuration Program baud
rate select:
—
OFF = 1200 baud
ON = 9600 baud
SW1 -8
J1 mode selection
—
OFF = Printer mode
ON = Software Configuration
Program mode
Potentiometers
Ten of the audio circuits on the Model 6203 Transponder main board are adjustable. Some
of these circuits must be adjusted before the Model 6203 can transmit and receive
properly. (See Figure 49 on page 148 for potentiometer locations.)
For a more detailed procedure for setting the transmit and receive audio levels, see Level
Setting Procedures on page 117.
The Model 6203 and the Model 6204 can produce continuous FFSK test tones, for up to
30 seconds. These test tones are provided to help in the adjustment of the pots associated
166
025-9581M
Potentiometers
with the receive and transmit FFSK signals. To activate the test tones, enter the Software
Configuration Program and select FFSK Level Set in the Main Menu.
Table 12 summarizes the purpose of the pots on the transponder main board. After the
table, each pot is individually described in more detail.
The potentiometers are presented in the order of adjustment for a new installation.
Table 12: Transponder Board Potentiometers
Pot #
Name
Description
R108
FFSK Out
This pot adjusts the output level of FFSK transmissions.
R62
FFSK In
This pot is the secondary receive level adjustment for the
FFSK input.
R135
2-Wire RCV
This pot is not used for FSA systems. In should be turned
fully counter-clockwise.
R107
4-Wire RCV
This pot, along with R135, adjusts the receive signal level.
To start out it should be turned fully clockwise
R84
COR
This pot adjusts the COR detect circuit.
R86
VOX
This pot adjusts the VOX detect circuit and needs to be
adjusted regardless of the communication mode being used.
R63
MIC
This pot adjusts the handset mic input signal level.
R61
TONE
This pot adjusts the signal level of tones generated by the
Model 620x.
R137
AUX RX
This pot controls the input level of audio coming from the
AUX RX input. Set it in the center of its range.
R87
VOICE
This pot adjusts received signal levels that are routed to the
PA system and handset ear.
R64
EAR
This pot adjusts all signal levels routed to the handset
earpiece.
FFSK OUT (R108)
This pot adjusts the output level of FFSK transmissions. The Model 6203 does not
normally use this control.
The Model 6203 FFSK output level for a radio communications interface should be set to
the radio manufacturer’s specification. It is normally recommended that the data signal
produce a 2.5 kHz deviation on FM or PM type transmitters. If you do not know what the
radio input level should be, stick with 1 Vpp (0.3 Vrms) unless the received signal is too
small at the other end. In that case, JP-5 may need to be moved to PWR. If the received
signal is radio born and distorted, use the RAD position for radio inputs which need to be
smaller than the level available with the TEL position.
167
Appendix A: Details of Model 6203/6204 Hardware
FFSK IN (R62)
This pot is a secondary receive level adjustment for the FFSK input. It should initially be
turned completely counterclockwise (its lowest setting). It is only used in systems
employing a Model 26 as a backup dispatch method.
Before doing the necessary adjustment, verify that the receive impedance jumpers JP8 and
JP10 have been properly set (see Transponder Board Jumpers on page 160) and that the
Alerting system primary Model 26 is sending an FFSK test tone so the Model 6203
receive level can be measured. Verify that the Model 26 FFSK transmit level has been
properly set first.
4-RCV (R107)
Turn R135 fully counterclockwise and R107 fully clockwise. Measure the voltage at TP1,
which should be 1.0 Vp-p (0.35 Vrms). If the voltage is too low, adjust R62 clockwise
until it is 1.0 Vp-p (0.35 Vrms). If the voltage is too high, adjust R107 counterclockwise
until it is 1.0 Vp-p (0.35 Vrms).
COR (R84)
This pot adjusts the COR detect circuit and needs to be adjusted whether RX COR input is
being used or not. This pot can usually be set to about its middle position. The important
thing is that the COR/VOX LED (DS33) is off when nothing is connected to the RX COR
input (J5-1) and goes on when it is grounded.
When making this adjustment JP9 should be in the “A” position (COR pulled up) and JP3
should be in the “A” position (VOX disabled).
Note
Do not forget to put JP3 back to position “B” when the COR
adjustment has been completed.
VOX (R86)
This pot adjusts the VOX detect circuit and needs to be adjusted regardless of the
communication mode being used. This pot is like a squelch on a radio and should be
adjusted so VOX does not detect background noise during times of channel inactivity
(DS33 off). However, VOX should detect channel activity (DS33 on) when the channel is
busy and voice/FFSK signals are being received.
When making this adjustment, input RX COR (J5-1) should not be connected to anything,
JP9 should be in the “A” position (COR pulled up), and JP3 should be in the “B” position
(VOX enabled). Use COR/VOX LED (DS33) to monitor when channel activity is being
detected. If there is no LED activity when the input is inactive and this pot is fully
counterclockwise, then further audio tests should be done at a later time for dispatch
announcements with a lot of background noise. This is a qualitative judgment and is a
168
025-9581M
Potentiometers
matter of what works best for the system operators. Most systems run with this pot fully
counterclockwise (most sensitive). When finished, make sure that any input is reconnected and the position of JP-9 is restored.
MIC (R63)
This pot adjusts the HANDSET MIC (J5-6) input signal level. This level controls the
audio transmitted to the console position during talkback mode. This is also the audio
routed to the PA system from the handset. If this pot is adjusted completely
counterclockwise, HANDSET MIC audio will be muted. Adjust this pot as required.
TONE (R61)
This pot adjusts the signal level of tones generated by the Model 6203 and routed to the
PA system and HANDSET EAR (J5-5). If this pot is adjusted completely
counterclockwise, Model 6203 tones will be muted. Adjust this pot as required.
AUX RX (R137)
This pot should be placed in the mid-range position and JP-14 should have the summing
jumper installed across all three pins if the Aux Audio Input is being used.
VOICE (R87)
This pot adjusts received signal levels that are routed to the PA system and HANDSET
EAR (J5-5). If this pot is adjusted completely counterclockwise, this signal will be muted.
Adjust this pot as required.
EAR (R64)
This pot adjusts all signal levels routed to the HANDSET EAR (J5-5). If this pot is
adjusted completely counterclockwise, HANDSET EAR will be muted. Adjust this pot as
required.
169
Appendix A: Details of Model 6203/6204 Hardware
Relay Outputs
The Model 6203 has four general-purpose, DPDT relays that can be controlled from the
Model 6203, by commands from the FSA Server, or by external events.
For relay connection information, see Relay Connections (P1-P4) on page 154. If a relay
is to be controlled by the FSA Server, then the FSA Console must have a dedicated relay
control button, or if a CAD interface is used, the CAD console must have one.
Manually operated relays may be configured from the FSA Maintenance Utility. The
operating parameters for relays that change state in response to the condition of sense
inputs are set with the M6 Configuration Utility. See Serial Port Programming on page 60
for information on how to use the serial programming mode.
Note
If relays are operated manually, through the Relay Control input
(on the Power Supply board), the programmed set/reset conditions
do not apply.
Sense Inputs
The Model 6203 has four inputs for connecting to logic level sensors (see Sense Inputs (P7
- P8) on page 156). There are many applications for these sensors. Any change of state at
one of these inputs is immediately transmitted to the FSA Server. Please note that these
state changes are not queued. This means that under some conditions, if multiple state
changes occur at the same input before the first state change is successfully transmitted to
the FSA Server, not all of the changes will be reported.
In order for the state of a Sense Input to be displayed at the dispatch console position, the
FSA Console or CAD application must have an annunciator button assigned to that
particular Sense Input. Sense Input state changes are always reported on the CAD and
Data Logging interfaces even if no annunciators are assigned to display sense input status.
Sense input state changes can also be used to reset Model 6203 relays and to acknowledge
alerts. The configuration and assigning of sense inputs is done with the M6 Configuration
Utility. (See Serial Port Programming on page 60.)
170
025-9581M
Overview
Appendix B: Worksheets
Overview
The worksheets provided in this appendix are intended for use both as data collection tools
and as log sheets.
During the design and initial setup of the system they can be used to plan and map out the
IP addresses and other settings for the computers and Station Transponder Units involved.
After the system is up and running, they can be used to record the final settings.
It is recommended that you make copies of the pages in this section and use the copies to
record the data.
171
Appendix B: Worksheets
IP Console Worksheet
Subnet Mask ________________________
Gateway ____________________________
Position Name
IP Address
Port #
Notes
43004
43004
43004
43004
43004
43004
43004
43004
43004
43004
43004
43004
43004
43004
43004
43004
43004
43004
43004
43004
43004
43004
43004
43004
43004
43004
43004
43004
43004
43004
43004
43004
172
025-9581M
Server Worksheet
Server Worksheet
FSA Server
Server IP Address = ______________________________________
Server Port = 43001
Server Machine Name = __________________________________
Resource Allocation Hold Timeout (seconds) = _______________
Batch Request Hold Timeout (seconds) = ____________________
Audio Idle Timeout (seconds) = ____________________________
Station Master Polling (seconds) = _________________________
Station Retry Timeout (seconds) = _______________________
Serial USB PTT COM Port = ________________________
VoIP Gateway Server
VoIP Gateway IP Address = _______________________________
VoIP Gateway Port = 43002
VoIP Gateway Machine Name = ___________________________
173
Appendix B: Worksheets
Station Transponder Unit Worksheet
Station Name
174
Type
IP Address
Port
IP
2101
VoIP
3000
IP
2101
VoIP
3000
IP
2101
VoIP
3000
IP
2101
VoIP
3000
IP
2101
VoIP
3000
IP
2101
VoIP
3000
IP
2101
VoIP
3000
IP
2101
VoIP
3000
IP
2101
VoIP
3000
IP
2101
VoIP
3000
IP
2101
VoIP
3000
IP
2101
VoIP
3000
IP
2101
VoIP
3000
IP
2101
VoIP
3000
IP
2101
VoIP
3000
Subnet Mask
Gateway
025-9581M
Overview
Appendix C: Using a Model 620x in a
Model 26-based System
Overview
With the advent of the IP FSA system, Zetron has stopped manufacturing the Model 6
station transponder unit. This appendix is intended as sort of a FAQ section for installers
faced with utilizing a Model 6203 or Model 6204 station transponder in an existing Model
26-based system either as replacement for a failed Model 6 or as an expansion for the
system as a whole.
The good news is that the Model 6203 and 6204 units share a great deal with the original
Model 6 primary and secondary station transponder units. Utilizing them in this
application is mainly a matter of ignoring the IP interface and making use of controls and
settings that may not normally be used in an IP FSA system.
Figure 55: Model 6 Primary Station Unit versus a Model 6203
MODEL 6203 IP STATION UNIT
ALL STATION
EMERGENCY
ALERT
IN QUARTERS
IN QUARTERS
IN QUARTERS
AVAIL. ON AIR
AVAIL. ON AIR
AVAIL. ON AIR
AVAIL. ON AIR
RESPONDING
RESPONDING
RESPONDING
RESPONDING
ON SCENE
ON SCENE
ON SCENE
ON SCENE
TRANSPORT
TRANSPORT
TRANSPORT
TRANSPORT
OUT OF SVC.
OUT OF SVC.
OUT OF SVC.
OUT OF SVC.
ALERT
STA
ACK
EMR
CLR
IN QUARTERS
QRTRS
AIR
XMIT
OUT
SRVC
ALERT
OUT
SRVC
EMERGENCY
ALERT
QRTRS
AIR
MODEL 6 STATION TRANSPONDER
ALL STATION
ALERT
ALERT
ALERT
ALERT
STA
ACK
QRTRS
AIR
QRTRS
AIR
QRTRS
AIR
OUT
SRVC
OUT
SRVC
QRTRS
AIR
PA
OUT
SRVC
EMR
CLR
XMIT
PA
OUT
SRVC
175
Appendix C: Using a Model 620x in a Model 26-based System
Figure 56: Model 6 Secondary Station Unit versus a Model 6204
MODEL 6204 IP STATION UNIT
IN QUARTERS
IN QUARTERS
IN QUARTERS
IN QUARTERS
IN QUARTERS
IN QUARTERS
AVAIL. ON AIR
AVAIL. ON AIR
AVAIL. ON AIR
AVAIL. ON AIR
AVAIL. ON AIR
AVAIL. ON AIR
RESPONDING
RESPONDING
RESPONDING
RESPONDING
RESPONDING
RESPONDING
ON SCENE
ON SCENE
ON SCENE
ON SCENE
ON SCENE
ON SCENE
TRANSPORT
TRANSPORT
TRANSPORT
TRANSPORT
TRANSPORT
TRANSPORT
OUT OF SVC.
OUT OF SVC.
OUT OF SVC.
OUT OF SVC.
ALERT
QRTRS
AIR
OUT
SRVC
OUT OF SVC.
ALERT
QRTRS
AIR
XMIT
OUT
SRVC
OUT OF SVC.
ALERT
ALERT
QRTRS
AIR
OUT
SRVC
ALERT
ALERT
ALERT
ALERT
QRTRS
AIR
QRTRS
AIR
QRTRS
AIR
QRTRS
AIR
OUT
SRVC
OUT
SRVC
QRTRS
AIR
PA
OUT
SRVC
MODEL 6 STATION TRANSPONDER
OUT
SRVC
XMIT
PA
OUT
SRVC
The manual that you will receive with you new Model 6203 or Model 6204 is this manual,
part number 025-9581. It will aid you considerably to locate a copy the original Model 6
product manual, part number 025-9157, before starting the installation of the new unit.
Since the most likely scenario for your having to use a Model 6203 or Model 6204 in this
manner involves there being an established Model 26-based fire station alerting system up
and running, a great deal of your work will involve installing and configuring the new unit
in the same way the existing Model 6 units are set up and configured.
Unit Number and Serial Programming
When used in a fire station alerting system that is controlled by a Model 26 Fire Station
Dispatcher unit, the IP interface that is built into the Model 6203 or Model 6204 is not
connected to anything. It is, therefore, not necessary to assign any IP address to that
interface.
Unit Number Assignment
The Model 26 keeps track of and controls the station transponders by their unit numbers.
All primary station transponder units fall in the range from 1 to 511. At stations that have
secondary station transponder units, the unit numbers for the secondary units are
determined by adding 512 to the number of the primary unit. For example:
if the primary unit number = 5
the secondary unit number = 5 + 512 = 517
This arrangement allows the Model 26 to keep track of each individual transponder and
recognize which units have been paired together.
176
025-9581M
Wiring Connections to the Model 620x
Transponder number assignment is done by setting SW2 and SW1 on the transponder
mother board. See Setting the Unit Number on page 57 for a complete description of this
process.
Serial Port Programming
The serial port programming for the station transponder unit is accomplished in the same
way that it would be if the unit was being used in an IP FSA system. Some of the timers
are set to longer values to allow for the limitations of the FFSK signaling method and
radio key up delays versus the speed of IP/TCP over an Ethernet connection. Some of the
more significant differences are:
• Communications Modes — Model 26 systems will use all of the possible
Communications Modes (option number 4 in the Station Configuration menu), this
includes wire-line, COR (both types), VOX, and Trunking. Set the Model 620x unit
to use the same communication mode as the existing Model 6 units in the system.
For more information on what these modes actually do, see the original Model 6
transponder manual.
• Timers — The timers in the Station Configuration menu (options 5 through 9) have
been set fairly short at the factory in anticipation of the unit ending up in an IP FSA
system. Set these timers to the same values used by the other Model 6 station
transponders already in the system.
• PA Options — When used the Model 620x as a Model 6 replacement, open the PA
Options menu and set option 1, the 5 Minute Fail Safe Timeout, to Enabled. The
following two options in this menu should be set to Disabled. The fourth option
(Allow Handset use when PA on) disables itself when its most recent command
comes from a Model 26.
Wiring Connections to the Model 620x
Wiring connections to a Model 620x used in a Model 26-based system will differ from
those used in an IP FSA system for two reasons:
• The power supply and relay board in the Model 620x is laid out differently.
• The unit may be connected to a wire line or radio for passing FFSK data packets.
Inputs and Relays
While the relays and sense inputs of the Model 620x function just as they did in the Model
6, their physical layout is different.
The general instructions for connecting to the sense inputs can be found under Sense Input
Connections on page 115. A detailed description of the sense inputs can be found under
Sense Inputs (P7 - P8) on page 156.
177
Appendix C: Using a Model 620x in a Model 26-based System
The general instructions for connecting to the relays can be found under Output Relay
Connections on page 114. A detailed description of the relay connections can be found
under Relay Connections (P1-P4) on page 154.
Connections to Radios
The material shown in the following sub topics is taken from the Model 6 manual. If a
station does not have a secondary unit simply ignore any of the connections indicated for
one.
Conventional Radios
The following figure displays the basic connections made in system using conventional
radios to pass FFSK packets and voice audio between the Model 26 and the station
transponder units.
Conventional Radio
RX
Audio
J5
4
SW-2
3
1 2 3 4 5 6 7 8
1
COR
TX
Audio PTT
J5
4W RX
4
4W RX
3
RX COR
SW-2
1 2 3 4 5 6 7 8
1
ON
ON
J4
Unit Address = 5
11
SW-1
9
1 2 3 4 5 6 7 8
8
J4
TX & 2W RX
11
TX & 2W RX
9
TX PTT
8
Unit Address = 517
SW-1
1 2 3 4 5 6 7 8
ON
ON
J3
= Not used for setting address
1
11
Primary Model 6
9
J3
PA Busy
1
PA Audio Comm A
PA Audio Comm B
= Not used for setting address
11
9
Secondary Model 6
PA System
• If a COR (carrier detect) signal from the radio is used, you will need to program the
M620x for COR operation with either active high or active low carrier detect
178
025-9581M
Wiring Connections to the Model 620x
• If a COR signal cannot be obtained from the radio receiver, the M620x must be
programmed for VOX operation and the VOX threshold level set
!
Caution!
If the COR input (J5, pin 1) on the Model 620x is not used, it
must be grounded to prevent spurious signals.
• Set jumper JP5 (FFSK Output Range) to the “RAD” position, if FFSK transmit
levels cannot be set high enough, move it to the “TEL” position and try again
Trunked Radios
The information provided here is of the most generic type. Interfacing information
regarding several specific types of trunked radio systems used in the public safety sector
can be found in the Model 6 product manual (part number 025-9157).
!
Caution!
Channel Grant signaling must be supported by your radio type,
or the system will not function reliably or efficiently due to
non-deterministic channel grant response time in most
trunking systems. If your radio type does not support a
channel grant output, use a dedicated talk-group or
emergency group call as an alternative approach. “Mission
critical” fire station alerting can not be achieved otherwise.
Trunking
Radio
Radio Interface Unit
GND
Spkr High
1
Mic Low
3
1 2 3 4 5 6 7 8
4W RX
Spkr Low
SW-2
Mic High
4
Relay
PTT
J5
J5
4
4W RX
3
RX COR
SW-2
1 2 3 4 5 6 7 8
1
ON
ON
J4
Unit Address = 5
11
SW-1
9
1 2 3 4 5 6 7 8
8
ON
= Not used for setting address
7
J3
1
Primary Model 6
11
9
J4
TX & 2W RX
11
TX & 2W RX
9
TX PTT
8
GND
7
J3
PA Busy
Unit Address = 517
SW-1
1 2 3 4 5 6 7 8
ON
= Not used for setting address
1
PA Audio Comm A
11
PA Audio Comm B
Secondary Model 6
9
PA System
179
Appendix C: Using a Model 620x in a Model 26-based System
M6 Connection
Description
J4-pin 7
Ground
J4-pin 8
PTT
J4-pin 9
TX Audio -
J4-pin 11
TX Audio +
J5-pin 1
COR (Channel Grant)
J5-pin 3
RX Audio +
J5-pin 4
RX Audio -
• In the Station Configuration Menu of the Model 620x programming, the unit must
have its Communications Mode set for Trunked with the appropriate polarity for
channel grant.
• Set jumper JP5 (FFSK Output Range) to the “RAD” position, if FFSK transmit
levels cannot be set high enough, move it to the “TEL” position and try again
Connections to Wire-line
The material shown in the following sub topics is taken from the Model 6 manual.
Basic 2-wire Interface
To a wireline
TX/RX pair
Basic 2-Wire System
SW-2
SW-2
1 2 3 4 5 6 7 8
1 2 3 4 5 6 7 8
ON
ON
J4
SW-1
11
1 2 3 4 5 6 7 8
9
J4
TX & 2W RX Audio & FFSK
TX & 2W RX Audio & FFSK
11
SW-1
1 2 3 4 5 6 7 8
9
ON
ON
Unit Address = 5
J3
1
Primary Model 6
11
9
J3
PA Busy
1
PA Audio ComA
11
PA Audio ComB
Unit Address = 517
Secondary Model 6
9
PA
180
025-9581M
Wiring Connections to the Model 620x
• In the Station Configuration Menu of the Model 620x programming, the unit must
have its Communications Mode set for Wire Line
• The Model 620x 4-wire Receive (R107) pot should be turned all the way down (set
fully counterclockwise)
• Set jumper JP8 (2-wire RCV Impedance) each unit according to whether the
transponder is the primary or secondary unit at that station:
Primary Station Unit = set JP8 to position “A” = 600 Ω
Secondary Station Unit = set JP8 to position “B” = 3.3 kΩ
• Set jumper JP5 (FFSK Output Range) to the “TEL” position, if FFSK transmit
levels cannot be set high enough, move it to the “PWR” position and try again
Basic 4-wire Interface
TX Pair
To 4-wire
Wireline Service
Basic 4-wire System
RX Pair
J5
SW-2
4
1 2 3 4 5 6 7 8
3
J5
4W RX Audio & FFSK
4W RX Audio & FFSK
4
SW-2
1 2 3 4 5 6 7 8
3
ON
ON
J4
SW-1
11
1 2 3 4 5 6 7 8
9
J4
TX & 2W RX Audio & FFSK
TX & 2W RX Audio & FFSK
11
SW-1
1 2 3 4 5 6 7 8
9
ON
ON
Unit Address = 5
J3
1
Primary Model 6
11
9
J3
PA Busy
1
PA Audio ComA
11
PA Audio ComB
Unit Address = 517
Secondary Model 6
9
PA
• In the Station Configuration Menu of the Model 620x programming, the unit must
have its Communications Mode set for Wire Line
• The Model 620x 2-wire Receive (R135) pot should be turned all the way down (set
fully counterclockwise)
• Set jumper JP10 (4-wire RCV Impedance) each unit according to whether the
transponder is the primary or secondary unit at that station:
Primary Station Unit = set JP10 to position “A” = 600 Ω
Secondary Station Unit = set JP10 to position “B” = 10 kΩ
181
Appendix C: Using a Model 620x in a Model 26-based System
• Set jumper JP5 (FFSK Output Range) to the “TEL” position, if FFSK transmit
levels cannot be set high enough, move it to the “PWR” position and try again
Setting Levels in the Model 620x
The underlying assumption for this entire chapter is that you are adding one or two station
transponder units to a system that is already in existence and functioning properly. This
means that you do not need to set levels for the Model 26 dispatcher unit or for the other
station transponders already in service.
The procedures presented here will guide you through quickly setting the receive and
transmit FFSK levels for the Model 6203 and Model 6204 station transponders that have
just been added to the system. In an effort to promote clarity, the level setting procedures
are presented it two formats. The first set is written for radio-based systems. The second
set is written for wire-line-based systems. In addition, the procedures deal only with the
setting of FFSK levels to ensure reliable communications between the Model 26 and the
station transponder units. A brief procedure for adjusting the voice levels going to the PA
amplifier in the station house is presented on page 186.
Note
The procedures given here only cover setting the FFSK levels to
ensure reliable data packet communication between the Model 26
dispatcher and the station transponder units. Once this is done,
you still have to adjust the voice audio levels on one or both ends
in order to clearly understand announcements made over the
system.
Equipment for this Procedure
• A small, flat-bladed screwdriver suitable for adjusting the potentiometers on the
transponder board of the Station Transponder Unit
• An oscilloscope, actually you may want two of them, one at the Model 26 location
and one at the Model 6203 location
• For setting levels in a radio-based system, a service monitor is required to check
channel deviation levels
• Again, you will want two of these, a laptop computer or PC with an available serial
port and running serial terminal software to be used for controlling either the Model
26 or any of the Model 6203/Model 6204 units, the settings should be: 9600 baud,
8-bit words, 1 stop-bit, no parity checking, and flow control set to none
• Serial cables (Zetron P/N 709-7208) for connecting between PC and Model 26 and
Model 620x
182
025-9581M
Setting Levels in the Model 620x
• A land line, cell phone, or radio link so instructions can be passed between the
dispatch center equipment room and the station at which the Model 6203 is located
Tip
Do not try to set Model 6203 transmit or receive levels based on
FFSK packets exchanged in normal polling. To do so can lead to
erroneous level settings. Only set levels while using the test tones
generated by both units.
Initial Conditions
• The new Model 6203 or Model 6204 units have been configured and installed at
their permanent fire station locations.
• The Model 26 that controls the system has been programmed as necessary to
account for the new transponder units in the system.
• The necessary personnel are at both the Model 26 and the transponder locations,
there are laptops or PCs connected and ready to enter the serial programming mode
to place the units in FFSK test mode when required
• The system is quiet and expected to remain so for long enough to accomplish the
level setting procedures for the new unit(s).
Setting FFSK Levels in a Radio-based System
Tip
If there is an external control on the radio transceiver that allows
people to alter the receive audio level going to the Model 6203, this
control must be locked in some way after the adjustments are
made. Changing the level of the receive audio presented to the
Model 6203 can compromise the decoding of FFSK data packets.
♦ Setting the Model 6203 receive level:
1. At the Model 6203 location, connect an oscilloscope to measure the receive audio
signal at TP-1 on the Model 6203 motherboard. The expected signal will be
approximately 1.0 Vp-p (0.35 Vrms).
2. On the Model 6203 motherboard, turn R107 fully clockwise and R135 fully
counterclockwise.
3. Turn R62 (FFSK IN) fully counterclockwise. Set R86 (VOX threshold) to the
middle of its range.
4. Call the Model 26 site and have the operator there initiate the FFSK Test signal
from the Model 26.
a. At the Model 26, connect the laptop (or PC) to the serial programming port of
the Model 26. Hit the SPACE bar three times to open the Model 26 Main
menu.
b. Enter a “7” to open the {7} FFSK Test Menu.
183
Appendix C: Using a Model 620x in a Model 26-based System
c. Enter a “1” to initiate the FFSK test mode. The Model 26 should key its radio
and transmit for 30 seconds and then unkey. If you finish making adjustments
before 30 seconds is up, you can cancel the test by hitting any character key on
the computer keyboard. If you require more time to make the adjustments,
enter the “1” again to repeat the test tone.
5. If the voltage measured at TP-1, while the test signal is being received, is less than
1.0 Vp-p (0.35 Vrms), turn R62 clockwise until it reaches 1.0 Vp-p.
6. If the voltage measured at TP-1, while the test signal is being received, is greater
than 1.0 Vp-p (0.35 Vrms), turn R107 counterclockwise until it is reduced to 1.0
Vp-p (0.35 Vrms).
7. When finished making adjustments, let the test signal time-out or stop the test. If
this is the last transponder you are setting the receive level on, you may exit the test
and serial programming mode at the Model 26 and disconnect the laptop. Return
the Model 26 to normal operation.
Note
This procedure only sets the FFSK levels. For information on setting
the final voice audio output level to the station PA system, see
Setting Voice Audio Output Level to the Station PA System on page
186.
♦ Setting the Model 6203 transmit level:
1. At the Model 6203, connect the laptop (or PC) to the serial programming port of
the Model 6203. Move switch SW1-8 on the transponder motherboard to the ON
position. Hit the SPACE bar three times to open the Model 6203 Main menu.
2. Enter an “8” to start the {8} FFSK LEVEL SET test tone sequence. The Model
6203 should key its radio and transmit for 30 seconds and then unkey. If you finish
making before 30 seconds is up, you can cancel the test by hitting any character
key on the computer keyboard. If you require more time, enter an “8” again.
3. While the FFSK test tone is being transmitted by the Model 6203, use the service
monitor to measure the deviation of its radio transmitter. Adjust the R108 pot
(FFSK OUT) on the motherboard of the Model 6203 for a deviation of 2.5 kHz
(assuming wide band operation and a full channel deviation of 5 kHz). If the signal
cannot be set low enough, move JP5 in the Model 6203 from position TEL to
RAD. If the signal cannot be set high enough, move JP5 from position TEL to
PWR.
4. When finished making adjustments, let the test signal time-out or stop the test.
5. Enter the letter “e” as many times as necessary to exit the programming mode.
Move switch SW1-8 on the transponder motherboard to the OFF position.
Remove the serial cable from the transponder.
Once the level setting procedure has been completed and both the transponder and the
Model 26 returned to the normal operating mode. The Model 26 should soon
communicate with the new transponder and display its current status.
184
025-9581M
Setting Levels in the Model 620x
Setting FFSK Levels in a Wire Line-based system
The following procedures are very similar to the ones used in radio-based system;
however, in some cases the specific pots used have changed. It also matters whether the
wire-line system is 2-wire or 4-wire. Pay close attention to ensure that you adjust the
correct controls.
♦ Setting the Model 6203 receive level:
1. At the Model 6203 location, connect an oscilloscope to measure the receive audio
signal at TP-1 on the Model 6203 motherboard. The expected signal will be
approximately 1.0 Vp-p (0.35 Vrms).
2. On the Model 6203 motherboard, set controls R107 and R135 according to
whether this is a 2-wire or 4-wire system.
• 2-wire = turn R107 fully counterclockwise and R135 fully clockwise
• 4-wire = turn R107 fully clockwise and R135 fully counterclockwise
3. Turn R62 (FFSK IN) fully counterclockwise. Set R86 (VOX threshold) to the
middle of its range.
4. Call the Model 26 site and have the operator there initiate the FFSK Test signal
from the Model 26.
a. At the Model 26, connect the laptop (or PC) to the serial programming port of
the Model 26. Hit the SPACE bar three times to open the Model 26 Main
menu.
b. Enter a “7” to open the {7} FFSK Test Menu.
c. Enter a “1” to initiate the FFSK test mode. The Model 26 should key its radio
and transmit for 30 seconds and then unkey. If you finish making adjustments
before 30 seconds is up, you can cancel the test by hitting any character key on
the computer keyboard. If you require more time to make the adjustments,
enter the “1” again to repeat the test tone.
5. If the voltage measured at TP-1, while the test signal is being received, is less than
1.0 Vp-p (0.35 Vrms), turn R62 clockwise until it reaches 1.0 Vp-p.
6. If the voltage measured at TP-1, while the test signal is being received, is greater
than 1.0 Vp-p (0.35 Vrms):
• 2-wire = turn R135 counterclockwise until it is reduced to 1.0 Vp-p (0.35
Vrms)
• 4-wire = turn R107 counterclockwise until it is reduced to 1.0 Vp-p (0.35
Vrms).
7. When finished making adjustments, let the test signal time-out or stop the test. If
this is the last transponder you are setting the receive level on, you may exit the test
185
Appendix C: Using a Model 620x in a Model 26-based System
and serial programming mode at the Model 26 and disconnect the laptop. Return
the Model 26 to normal operation.
Note
This procedure only sets the FFSK levels. For information on setting
the final voice audio output level to the station PA system, see
Setting Voice Audio Output Level to the Station PA System on page
186.
♦ Setting the Model 6203 transmit level:
1. At the Model 26 location, attach an oscilloscope to monitor the incoming signal
level from the wire-line.
• 2-wire = J14 pins 9 (AUD+) and 10 (AUD-)
• 4-wire = J13 pins 3 (AUD+) and 4 (AUD-)
2. At the Model 6203, connect the laptop (or PC) to the serial programming port of
the Model 6203. Move switch SW1-8 on the transponder motherboard to the ON
position. Hit the SPACE bar three times to open the Model 6203 Main menu.
3. Enter an “8” to start the {8} FFSK LEVEL SET test tone sequence. The Model
6203 should key its radio and transmit for 30 seconds and then unkey. If you finish
making adjustments before 30 seconds is up, you can cancel the test by hitting any
character key on the computer keyboard. If you require more time, enter an “8”
again.
4. While the FFSK test tone is being transmitted by the Model 6203, adjust the R108
pot (FFSK OUT) on the motherboard of the Model 6203 for a level of 1.0 Vp-p
(0.35 Vrms) is measured at the FFSK test point (TP6) on the back of the Model 26.
If the signal cannot be set low enough, move JP5 in the Model 6203 from position
TEL to RAD. If the signal cannot be set high enough, move JP5 from position
TEL to PWR.
5. When finished making adjustments, let the test signal time-out or stop the test.
6. Enter the letter “e” as many times as necessary to exit the programming mode.
Move switch SW1-8 on the transponder motherboard to the OFF position.
Remove the serial cable from the transponder.
Once the level setting procedure has been completed and both the transponder and the
Model 26 returned to the normal operating mode. The Model 26 should soon
communicate with the new transponder and display its current status.
Setting Voice Audio Output Level to the Station PA System
As stated elsewhere in this manual, it is not intended that the Model 6203 or Model 6204
station transponder unit directly drive the PA speakers in the fire station in which they are
installed. The PA audio coming from J3-pin9 and J3-pin 11 should be routed to an input on
the station house PA amplifier.
186
025-9581M
Setting Levels in the Model 620x
The audio level sent to those connectors is controlled by the pot R87. Initially this control
is set to its mid-range position, and it may turn out that no further adjustment is required
once the FFSK receive level is set. If you do need to adjust the audio level going to the PA
amplifier use the following procedure. You will need to have the following:
• The Model 6203 unit open and a small screwdriver or alignment tool suitable for
adjusting R87
• If you intend to set the audio to a specific level specified by the PA amplifier
manual, the required meter or test equipment to read the signal level at J3-pin 9 and
J3-pin11.
• Some means of communicating with the dispatcher at the Model 26 location to coordinate the sending of test announcements (a slow 10-count or something like that)
to your station
♦ Adjusting the voice audio level to the PA input:
1. When you are prepared to make the adjustment, call the dispatch center and have
the operator send a station alert with PA to the station you are working on.
2. Once the alert tones are over and the voice audio is being sent to the PA (whatever
you arrange for as a test message, you can use the PA ON mode instead of an
actual alert), adjust R87 as necessary to get the voice audio in the correct range.
Repeat this step as necessary to get the level correct.
Note
Turning the pot R87 fully counterclockwise will mute the PA audio.
3. Remove any test equipment and close up the station transponder.
Note
If the Model 6203 has a handset installed, the final audio level to
the handset ear piece can be set with the pot R64. This setting
should be made after the PA audio level has been set using R87.
187
Appendix C: Using a Model 620x in a Model 26-based System
188
025-9581M
Index
Numerics
B
12 Vdc connector (J1) 156
12 Vdc output connector (P5) 156
2-wire RCV impedance (JP8) 162
4-RCV (R107) 168
4-wire RCV impedance (JP10) 163
5 minute failsafe timeout 73
batch request hold timeout period 86
buttons, station transponder units 21
buttons, testing 114
A
accessing serial setting of Station Transponder
Units 60
active polarity 72
address 90
alert off reset, relays 70
Alert parameters menu
hold time 69
ramp time 69
relays 69
sense input 69
test alert 69
tone 68
Alerts menu 67
Allow Handset use when PA on 74
always sound unit alerts 64
audio & PTT connections from console to servers
98
audio connections (P4) 159
audio connections to Station Transponder Unit
112
audio idle timeout period 86
audio support with optional VoIP Intercom 98
AUX RX (R137) 169
auxiliary audio RX impedance (JP15) 164
C
CAD 12
CAD input selection
type 54
CAD serial communications
baud rate 54
port 54
CAD systems, what about 19
CAD Translator
configuring the translator and the viewer 53
installing 52
using the communications viewer 55
using the viewer 53
CAD viewer config
host 55
port 55
channel grant 22
channel request 22
collecting and assigning IP information 31
communication interface, station transponder
units 22
communications mode 64
Communications Mode menu
COR Communications mode 67
trunking modes 67
VOX 67
wireline 67
configuring Station Transponder Units
serial port programming 60
189
Fire Station Alerting System Installation and Maintenance
setting the unit number 57
with FSA Maintenance tool 87
configuring the CAD Translator and the viewer
53
configuring the FSA Console 81
connecting the system elements 79
connections
output relay 114
radio 115
sense input 115
connections to the Station Transponder Unit 109
connections, Station Transponder Unit
audio 112
IP 112
power 111
connectors
IP Interface Board 157
J1 (12 Vdc) 156
J1 (serial port) 153
J3 (PA) 148
J4 (TX) 151
J5 (RX and Handset) 152
J6 (serial port) 154
P1 - P4 (relays) 154
P3 (IP interface serial port) 159
P5 (12 Vdc output) 156
P5 (main power) 159
P6A & P6B (PS & Transponder boards) 156
P7 - P8 (sense inputs) 156
P9 (relay control) 155
power supply board 154
transponder board 147
console computer specifications 24
console functions 17
console worksheet 172
controls station printer 92
conventional radio interface 22
COR 22
COR (R84) 168
COR Communications mode 67
COR input pull-up (JP9) 162
creating console positions
installing FSA Console software 39
license files 39
preparing the computer 37
creating system servers
installing CAD Translator 52
installing the FSA Maintenance Utility 43
190
installing the FSA Server 41
installing the UBAM components 47
installing the VoIP Gateway Maintenance
Utility 46
installing the VoIP Gateway server 44
preparing the computer 41
customer ID 85
customer name 85
D
debounce time 73
description 90, 93, 96, 97
Digi Connect ME 75
display name 90, 92, 95, 96
documentation, related 13
E
EAR (R64) 169
equipment & prerequisites for level setting 117
equipment for setting levels 134, 142, 182
equipment needed for installation 107
exit Station Transponder Unit test mode 114
F
features of FSA 12
FFSK IN (R62) 168
FFSK mute debounced 65
FFSK OUT (R108) 167
FFSK output range (JP5) 161
FFSK receive select (JP4) 161
FFSK signaling 126
fire station definition settings
address 90
description 90
display name 90
name 89
region 90
VoIP Connection 90
fixed IP addresses 31
front panel test mode 113
FSA communications
Host 54
Port 54
FSA features 12
FSA maintenance utility 80
FSA Maintenance Utility, installing 43
FSA Server
025-9581M
initial configuration 83
installing 41
move up/down buttons 89
functions, Station Transponder Units 20
G
general order of installation 32
global server settings 83
global settings
audio idle timeout period 86
batch request hold timeout period 86
PA Ready Control Signal 87
resource allocation hold timeout period 85
Serial USB Comm Port PA Ready 87
serial USB PTT Comm Port 87
station master polling period 86
station relay timeout period 86
Zetron customer 85
H
hardware ID 92
hold time parameter 69
I
ID 93, 95, 96
initial configuration FSA Server 83
initial VoIP configuration 102
input definition settings
description 93
display name 92
ID 93
name 92
inputs, sense 170
installation equipment 107
installing
CAD Translator 52
FSA Console software 39
FSA Maintenance Utility 43
FSA server 41
UBAM components 47
UBAM Listener 50
UBAM Repeater 51
USB-to-serial bridge 101
VoIP Gateway Maintenance Utility 46
VoIP Gateway server 44
interface type 91
IP addresses, default 32
IP connections to Station Transponder Unit 112
IP FSA 11
IP FSA console functions 17
IP interface board
audio connections (P4) 159
IP Interface Board Connectors 157
IP interface network address, setting 75
IP serial port baud (JP11) 163
IP serial port RX data (JP12) 163
J
J1 (12 Vdc) 156
J1 (serial port) 153
J3 (PA) 148
J4 (TX) 151
J5 (RX and Handset) 152
J6 (serial port) 154
JP1 (RAM select) 161
JP10 (4-wire RCV impedance) 163
JP11 (IP serial port baud) 163
JP12 (IP serial port RX data) 163
JP13 (serial port J1 RX data) 163
JP14 (source audio to PA) 164
JP15 (auxiliary audio RX impedance) 164
JP2 (microprocessor mode select) 161
JP3 (VOX control) 161
JP4 (FFSK receive select) 161
JP5 (FFSK output range) 161
JP6 & JP7 (not used) 162
JP8 (2-wire RCV impedance) 162
JP9 (COR pull-up) 162
jumper details 160
jumpers
power supply board 164
transponder board 160
K
keyup delay 65
L
LEDs, station transponder units 21
LEDs, testing 114
level setting
at Station Transponder Unit 121
at VoIP Server 120
equipment & prerequisites 117
radio-based system 122
191
Fire Station Alerting System Installation and Maintenance
level setting equipment 134, 142, 182
level setting procedures 117
license files 39
License Manager 34
M
M26 backup for voice over radio
finishing up 137
jumper settings 131
level setting 134
M26 FFSK RX level 137
M26 FFSK TX level 135
M620x FFSK TX level 136
M620x RX level 136
programming changes 132
radio connections 129
M26 backup for VoIP
finishing up 145
jumper settings 139
level setting 142
M26 FFSK RX level 145
M26 FFSK TX level 143
M620x FFSK RX level 144
M620x FFSK TX level 144
programming changes 140
radio connections 138
M26-based system
basic 2-wire connections 180
basic 4-wire connections 181
conventional radio connections 178
inputs and relay connections 177
IP address assignment 176
overview 175
serial port programming 177
setting radio-based RX levels 183
setting radio-based TX levels 184
setting transponder levels 182
setting wire line RX levels 185
setting wire line TX levels 186
trunked radio connections 179
unit number assignment 176
manual relay off 71
manual relay on 71
manuals, related 13
master station unit 92
max timeout 65
menus explained
Alerts 67
192
Communications Mode 67
Inputs 71
PA Options 73
Relays 69
Station Configuration 63
MIC (R63) 169
microprocessor mode select (JP2) 161
Model 26 backup
overview 125
voice over radio 127
voice over VoIP 128
mounting the Station Transponder Unit case 108
move up/move down buttons 89
N
name 89, 92, 94, 95, 96
network address 91
number of console positions 12
O
opening the station unit case 108
output definition settings
ID 95
name 94
output relay connections 114
output relays 170
overall system operation 13
P
P1 - P4 (relay connections) 154
P3 (IP interface serial port) 159
P4 (audio connections IP interface) 159
P5 (12 V dc output) 156
P5 (main power) 159
P6A & P6B 156
P7 - P8 (sense inputs) 156
P9 (relay control) 155
PA always open mode 73
PA control 23
PA LED 21
PA options menu
5 minute fail safe timeout 73
Allow Handset use when PA on 74
PA always open mode 73
PA un-muted mode 74
PA Ready Control Signal 87
PA relay pinout 150
025-9581M
PA un-muted mode 74
panel description, station transponder units 21
port 91
potentiometers
4-RCV (R107) 168
AUX RX (R137) 169
COR (R84) 168
EAR (R64) 169
FFSK IN (R62) 168
FFSK OUT (R108) 167
MIC (R63) 169
TONE (R61) 169
transponder board 166
VOICE (R87) 169
VOX (R86) 168
power connections to Station Transponder Unit
111
power supply board jumpers 164
power supply connectors
12 Vdc (J1) 156
12Vdc output (P5) 156
P5 (main power) 159
P6A & P6B 156
relay control (P9) 155
relays (P1 - P4) 154
sense inputs (P7 - P8) 156
preparing the computer 37, 41
PTT 22
PTT connections 98
R
R107 (4-RCV) 168
R108 (FFSK out) 167
R137 (AUX RX) 169
R61 (TONE) 169
R62 (FFSK IN) 168
R63 (MIC) 169
R64 (EAR) 169
R84 (COR) 168
R86 (VOX) 168
R87 (VOICE) 169
radio connections 115
radio interface
conventional 22
trunked 22
RAM select (JP1) 161
ramp time parameter 69
region 90
relay connections (P1 - P4) 154
relay control connector (P9) 155
Relay menu
alert off reset 70
manual relay off 71
manual relay on 71
sense reset 71
timer reset 71
relays
described 170
overview 23
PA relay pinout 150
testing 114
relays and sense inputs 17
relays parameter 69
resource allocation hold timeout period 85
retry period 65
router information 31
S
sense input connections 115
sense input parameter 69
sense input parameter menu
active polarity 72
debounce time 73
sense inputs
described 170
overview 23
testing 114
sense inputs connectors (P7 - P8) 156
sense reset, relays 71
serial CAD viewer, using 55
serial port (J1) RX data (JP13) 163
serial port (P3) 159
serial port programming, Station Transponder
Units 60
serial programming menus
Alerts 67
Communications Mode 67
Inputs menu 71
PA Options 73
Relays 69
Station Configuration 63
Serial USB Comm Port PA Ready 87
serial USB PTT Comm port 87
server settings, global 83
server worksheet 173
server, FSA, initial config 83
193
Fire Station Alerting System Installation and Maintenance
setting alert tones 67
setting levels at the VoIP Server 120
setting Station Transponder Unit levels 121
setting the IP interface network address 75
settings unit ID with SW1 59
source of audio to PA (JP14) 164
specifications
console computer platforms 24
network requirements 25
Station Transponder Units 26
Station Configuration menu 63
always sound unit alerts 64
communications mode 64
FFSK mute debounced 65
keyup delay 65
max timeout 65
retry period 65
station or 4-unit display 64
trunking grant debounce 66
trunking grant retry 66
TX delay 66
unit enables 64
voice debounce 65, 66
Station I/O Settings 92
station interface settings
controls station printer 92
hardware ID 92
interface type 91
master station unit 92
network address 91
port 91
station master polling period 86
station or 4-unit display 64
station relay timeout period 86
Station Transponder Unit Configuration 87
Station Transponder Units
accessing serial settings 60
audio connections 112
buttons 21
communication interface 22
front panel test mode 113
functions 20
IP connections 112
LEDs 21
level setting 121
level setting procedures 117
levels for radio-based system 122
mounting the case 108
194
opening the case 108
PA control 23
panel description 21
power connections 111
relays 23
sense inputs 23
serial port programming 60
setting the unit number 57
specifications 26
wiring connections 109
worksheet 174
station unit functions 20
stations per system 12
switch 1 values 59
switch settings, transponder board 165
system layout 28
system overview 11
T
table of SW1 address values 59
test alert parameter 69
test mode, Station Transponder Unit front panel
113
testing
buttons 114
exit test mode 114
LEDs 114
relays 114
sense inputs 114
timer reset 71
TONE (R61) 169
tone parameter 68
transponder board connectors 147
transponder board jumpers 160
transponder board switch settings 165
trunked radio interface 22
trunking grant debounce 66
trunking grant retry 66
trunking modes 67
TX delay 66
U
UBAM 31, 32
installing Listener 50
installing Repeater 51
UBAM Repeater 51
UBAM, installing the components 47
025-9581M
UDP 32
unit alert tones 67
unit definition settings
description 96
display name 95
ID 96
name 95
unit type 96
unit enables 64
unit ID switch settings 165
unit type 96
unit type definitions
description 97
display name 96
name 96
USB-to-serial bridge installation 101
User Datagram Protocol 32
using the CAD Translator viewer 53
using the communications viewer 55
using the serial CAD viewer 55
VoIP Connection 90
VoIP Gateway Server 83
VoIP Gateway Server, installing 44
VOX 22
VOX (R86) 168
VOX control (JP3) 161
VOX mode 67
V
Z
VOICE (R87) 169
voice debounce 65, 66
VoIP 11
Gateway Maintenance Utility 103
initial configuration 102
W
what about CAD systems 19
wire line interface 126
wireline mode 67
worksheet
console 172
server 173
Station Transponder Unit 174
X
XMIT LED 21
Zetron customer
customer ID 85
customer name 85
195
Fire Station Alerting System Installation and Maintenance
196
025-9581M