1
programmed then the entire programming can be reset to
factory default by using the “Hardware Reset” method
described on page 23.
8 To successfully program or remove additional codes,
the panel must be put into the code program mode by
following step 1 followed by steps 3 or 4. Note that if no
key entry is made for 2 minutes the panel will go back to
the normal arm/disarm mode, after which step 1 must be
repeated to get back into the code program mode.
9 To exit the code program mode press [#].
To review:
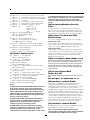
programming a new code;
the [4] is released the system returns to the ready mode
and the switched auxiliary supply is restored.
User’s Programming Commands
[✱]+[5]+[MASTER CODE]
The [✱][5] user’s programming commands are used to
program additional access codes. Up to 16 user armdisarm codes may be programmed. The 1st code is the
Master Code (factory default [1234]). The 16th code is
optionally a “One Time Use” or maid code. The 16th code
may be changed from a “One Time Use” code to a
regular code using an installer’s programming command
(section [15]...light 8). Remember if no keypad entry is
made for more than 2 minutes the keypad will return to
the normal arm-disarm display and the complete
command will have to be re-entered to program a new
access code.
Programming Additional Access Codes
enter [✱] [5] [Master Code] [1 to 8] [4 digit code], or
[✱] [5] [Master Code] [9] [1 to 8] [4 digit code]
eliminating an existing code;
enter [✱] [5] [Master Code] [2 to 8] [✱ ✱ ✱ ✱], or
[✱] [5] [Master Code] [9] [1 to 8] [✱ ✱ ✱ ✱].
Note: The access code numbers must be entered as
one digit. E.g. 2, 3,......, 7, 8.
1 Press the [✱] and [5] keys then enter the Master
Security Code (default [1234]) to enter the additional
code programming mode. The “Program” light and “Zone
1” light will be on to show that the first code (the Master
Code) is already programmed with the factory default
code [1234]. The Master Code may be changed but do
not try to erase the Master Code. The installer can
disable user changing of the Master Code by turning on
light 2 in section [16].
2 15 additional codes may be programmed. The zone
lights are used to indicate which of these codes are
already programmed (zone light on steady) and the one
which is currently being programmed (zone light is
flashing).
3 To program the second code, press [2] and zone 2
light will flash. Then enter a 4 digit code and the buzzer
will beep three times and zone light 2 will come on steady
indicating a programmed code.
4 To remove the second code, press [2] - the buzzer will
beep three times and zone light 2 will flash. Enter [✱ ✱ ✱
✱], the buzzer will beep three times and zone 2 light will
go out to show that the code has been removed.
5 Follow the instructions in 3 or 4 for programming or
removing any of the other additional codes.
6 To program access codes 9 to 16, press 9 to toggle
into the upper code region. Zone lights 1 to 8 now
represent access codes 9 to 16 (light 1 is code 9.... light
8 is code 16). The “Ready” and “Armed” LEDs will flash to
indicate that the user is in the upper programming region.
Program or remove access codes 9 to 16 as stated in 3
and 4 above. Press 9 again to toggle back down to the
lower region (access codes 1 to 8).
7 Do not try to remove the Master Code (1st code). The
Master Code may be changed but it must not be
removed. When changing the Master Code be sure to
enter a valid 4 digit number (use only number keys 0 to
9). Do not enter [#] or [✱] as one of the digits. If the
Master Code is forgotten and the panel is left disarmed,
program a new Master Code using the [✱][8][Installer’s
Code][25] command. If the Master Code is forgotten and
the panel is left armed, use the 2nd Master Code to
disarm the system. If the 2nd Master Code is not
User’s Functions Command
[✱]+[6]+[MASTER CODE]
This command is used to set the system clock time and
to set the auto-arm time. It is also used to turn on and off
a number of system functions. The command is used by
entering [✱], [6], [Master Code] then a number from the
following list to select the item to be changed.
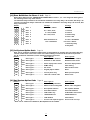
[0] Installer’s test
[1] System 24 hour clock (enter HH:MM)
[2] Auto-arming time (enter HH:MM)
[3] DO NOT USE
[4] Quick arm enable/disable
[5] Auto-arm enable/disable
[6] Door chime enable/disable
[7] DO NOT USE
[8] Bell test function
[9] User Initiated Callup
Note: The system clock is a 24 hour clock and times
must be entered as two digit number.
e.g. HH - 00, 01,.....10, 11,.....22, 23
MM - 00, 01,.....35, 36,.....58, 59
If a printer is attached
Day - 01.....31, Month - 01.....12, Year - XX (two digits)
e.g. HH: MM: DAY: MONTH: YEAR.
Items 1 and 2 are time setting functions. Enter 4 digits
representing the time in hours and minutes (HH:MM)
based on the 24 hour or military clock. Always enter a
leading zero where only one digit is required, 8:05 am
would be entered as 0805 and 1:30 pm would be entered
as 1330. Items [0], [4], [5] and [6] turn on and off various
features. When the item key is pressed, the feature is
turned on if the keypad beeps quickly 3 times. The
feature is turned off if the keypad sounds one long beep.
Pressing item [8] gives a 2 second bell and keypad light
test. Pressing [9] makes the panel call the Downloading
computer if enabled in section [47].
If a printer is attached to the panel (see section [30]) and
is enabled (see section [48]) the clock data entry will be
9