1
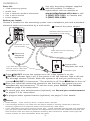
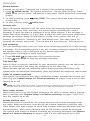
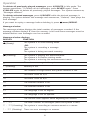
© 2011 Advanced American Telephones. All Rights Reserved.
AT&T and the AT&T logo are trademarks of AT&T Intellectual Property licensed to
Advanced American Telephones, San Antonio, TX 78219.
Message Guard® is a registered trademark of Advanced American Telephones.
Printed in China. Issue 4 AT&T 12/11.
www.telephones.att.com
Part 2
User’s manual
1740 Digital answering system
This manual contains information about this
product’s installation and operation. Please also
read Part 1- Important product information.
For customer service or product information, visit
our website at www.telephones.att.com or
call 1 (800) 222-3111. In Canada, dial
1 (866) 288-4268.
Installation
Parts list
•
•
•
•
•
1740 answering system
Wallet card
Part 1 Important product information
Part 2 User’s manual
Power adapter
Use only the power adapter supplied
with this product. To obtain a
replacement, visit our website at
www.telephones.att.com or call
1 (800) 222-3111. In Canada, dial
1 (866) 288-4268.
Before you install
Choose a location for the answering system near a telephone jack and a standard
electrical outlet not controlled by a wall switch.
1 Connect the power adapter.
Standard electrical outlet not
controlled by a wall switch.
Telephone line cord
(not included)
Strain-relief tab for protecting
the power cord.
3 Connect a
telephone
(optional).
2 Connect the
telephone line cord.
If you have DSL high-speed
Internet service, a DSL filter
(not included) is required.
Telephone jack
4 Press ON/OFF to turn the system on or off. If the system is on, the
ON/OFF indicator light is on. If the system is off, the indicator light is off and
the message window is blank. When the system is off and you press any key
(except ON/OFF), it announces, “The machine is off. Press ON/OFF to turn on.”
5 After you install the answering system for the first time, the system turns on
automatically and announces, “To set the clock, press CLOCK.” See Set the
clock on page 2 for instructions.
6 To record your own announcement (optional), see Record your announcement
on pages 2-3 for instructions.
7 To program other system features (optional), see pages 3-4 for details.
NOTES:
• Power adapter - Input: 117V AC, 60 Hz / Output: 6V AC, 350 mA.
• If the message window is off, make sure the power adapter is securely connected to both the
answering system and an electrical outlet not controlled by a wall switch.
• If you subscribe to high-speed Internet service (DSL - digital subscriber line) through your telephone
line, you must install a DSL filter between the telephone line cord and the telephone wall jack. The
filter prevents noise and caller ID problems caused by DSL interference. Please contact your DSL
service provider for more information about DSL filters.
1
Feature setup
Set the clock
You must set the clock so that the system announces the correct day and time of
incoming messages. Make sure the year is correct because the day of the week
is calculated from the year. When you press CLOCK, the system announces the
current time (if set) and “To set the clock, press CLOCK.” To exit at anytime while
setting the clock, press
PLAY/STOP.
1. Press CLOCK and the message window displays . The system announces the
day and “To change the day, press SKIP or REPEAT. To accept and continue,
press CLOCK.”
2. To change the day, press
MEMO/REPEAT or
ANNOUNCE/SKIP until the
correct day is announced.
3. Press CLOCK. The correct day is saved. The system announces the current hour
setting and “To change the hour, press SKIP or REPEAT. To accept and continue,
press CLOCK.”
4. To change the hour, press
MEMO/REPEAT or
ANNOUNCE/SKIP until the
correct hour is announced.
5. Press CLOCK. The correct hour is saved. The system announces the current
minute and “To change the minute, press SKIP or REPEAT. To accept and
continue, press CLOCK.”
6. To change the minute, press
MEMO/REPEAT or
ANNOUNCE/SKIP until the
correct minute is announced.
7. Press CLOCK. The correct minute is saved. The system announces the current
year and “To change the year, press SKIP or REPEAT. Press CLOCK, when you
are done.”
8. To change the year, press
MEMO/REPEAT or
ANNOUNCE/SKIP until the
correct year is announced.
9. Press CLOCK. The correct year is saved. The new day, time and year are
announced.
To check the day and time, press CLOCK.
NOTE: In the event of a power failure, the clock needs to be reset. If the clock is not set, the system
announces, “Time and day not set,“ before message playback.
Auto reset of answering system clock
If you subscribe to caller ID service, the day, month and time are set automatically
with each incoming call. The year must be set so that the day of the week can be
calculated from the caller ID information.
Record your announcement
An announcement is the greeting callers hear when calls are answered by the
answering system.
The telephone is preset with a greeting that answers calls with “Hello, please leave
a message after the tone.” You can use this default announcement, or replace it
with your own (up to three minutes long).
1. Press
ANNOUNCE/SKIP. The system announces, “Announcement. Press
ANNOUNCE to record or press PLAY to play.”
2. Press
ANNOUNCE/SKIP again. The system announces, “Record after the tone.
Press STOP when you are done,“ followed by a long beep. Speak toward the
answering system, from about nine inches away. While recording, the message
window shows the recording time.
2
Feature setup
3. To stop recording, press
PLAY/STOP. The system automatically plays back the
recorded outgoing announcement.
To review your announcement, press
ANNOUNCE/SKIP. The system announces,
“Announcement. Press ANNOUNCE to record or press PLAY to play.” Press
PLAY/STOP and the system plays the announcement.
To erase your own recorded announcement, press X/DELETE while the
announcement is playing. Calls are then answered with the default announcement.
Feature setup
1. To enter the feature setup mode, press SETUP until the system announces,
“Language is... To change the setting, press SKIP or REPEAT. To accept and
continue setup, press SETUP.”
2. Press SETUP repeatedly until you hear the desired feature.
3. When you hear the feature you want to modify, press
ANNOUNCE/SKIP or
MEMO/REPEAT to scroll through the setting’s options.
4. Press SETUP to save and continue setup.
-ORPress
PLAY/STOP to save the setting and exit feature setup.
Feature summary
SYSTEM
FEATURE
ANNOUNCEMENT
Language
“Language is...”
OPTIONS
• You may choose English or Español
(Spanish) for the voice prompts used by the
system.
• During setup, the message window displays
the current language setting (En for English
or SP for Spanish)
Ring select
“Number of rings...”
• Choose the number of rings before the
system answers a call. You can set it
between two and seven rings, toll saver 2/4
or toll saver 4/6.
• When the toll saver is set as 2/4, the
system will answer after two rings if there
are new messages, or after four rings if
there are no new messages. When the toll
saver is set as 4/6, the system will answer
after 4 rings if there are new messages, or
after six rings if there are no new messages.
• During setup, the message window displays
the number of rings (or 24 for toll saver
2/4, 46 for toll saver 4/6).
Remote access
code
“Remote access
code is...”
• Change the remote access code to any
two-digit number between 10 and 99.
• The default remote access code is 19. With
it, you can access many features remotely
from a touch-tone telephone.
3
Feature setup
Feature summary (continued)
FEATURE
SYSTEM
ANNOUNCEMENT
Announcement
monitor
“Announcement
monitor is...”
OPTIONS
• When this feature is on, the answering
machine broadcasts your outgoing
announcement when answering a call.
When the feature is off, your outgoing
announcement is not broadcast from the
answering machine, but callers will hear the
announcement.
NOTE: You must set the volume to an audible
level to use this feature.
Number
announce
“Number announce
is...”
• When this feature is on, the system
announces the incoming telephone number.
NOTE: For this feature to work, you must
subscribe to caller ID service from your
telephone service provider. There may be a fee
for this service, and it may not be available in
all areas.
Store caller
number
“Store caller number • When this feature is on, the system
announces the incoming telephone number
is...”
when it plays back a message.
NOTE: For this feature to work, you must
subscribe to caller ID service from your
telephone service provider. There may be a fee
for this service, and it may not be available in
all areas.
Accept blocked
calls
“Accept blocked
calls is...”
• When this feature is on, the system answers
and records messages from any caller.
• When this feature is off, the system
responds to blocked calls with the
announcement, ”We’re sorry. Blocked calls
to this number cannot be accepted,” and
hangs up without recording a message.
NOTES:
• Blocked calls can arrive from callers who have
chosen to block their numbers from identification.
• For this feature to work, you must subscribe to
caller ID service from your telephone service
provider. There may be a fee for this service, and
it may not be available in all areas.
Audible message “Message alert is...”
alert
• When this feature is on, the system beeps
every 15 seconds when there are new
messages.
4
Operation
Listen to, save & delete messages
• The system automatically saves all incoming messages until you delete them. You
can store approximately 60 minutes of messages, memos and announcements
(up to a maximum of 99 messages).
• Before playing each message, the system announces the day and time the
message was received. If Store caller number is activated, the system also
announces the caller’s telephone number (see Store caller number under Feature
setup on page 4). After playing the last message, the system announces, “End of
messages.”
• Messages cannot be deleted until they have been reviewed, and deleted
messages cannot be retrieved.
To operate the answering system, follow the instructions below.
Press to listen to
new messages.
If there are no
new messages,
press to listen to
old messages.
Press to listen to
the current time.
Press twice to set
the clock.
Press during
playback to stop
playback.
Press to stop
recording memo
or announcement.
Message window
Press to listen to
the current setup.
Press to exit
feature setup.
Press to start
and navigate
through the
setup process.
Press to adjust
volume. The
system beeps
three times at the
highest or lowest
setting.
Press to turn the
system on or off.
The light is off
when the system
is turned off.
The light is on steadily when
the system is turned on.
The light flashes when there
is an incoming call.
Press to delete the message
currently playing.
Press twice in idle mode to
delete all old (previously
reviewed) messages.
Press to repeat the
current message or
press twice to listen to
the previous message.
Press during time/day
announcement to repeat
the previous message.
When listening to
messages, press and hold
to play them at half speed.
Press to choose the
setting in feature setup.
Press in idle mode to
record a memo.
5
Press to skip to the next
message.
When listening to
messages, press and
hold to play them at
double speed.
Press twice in idle
mode to record an
announcement.
Press to choose the
setting in feature setup.
Operation
Record memos
A memo can be up to 3 minutes and is stored as an incoming message.
1. Press
MEMO/REPEAT. The system announces, “Record after the tone. Press
STOP when you are done,“ followed by a long beep. Speak toward the answering
system.
2. To stop recording, press
PLAY/STOP. The system saves the memo and plays
a long beep.
3. To play a memo, press
PLAY/STOP.
Answer calls
When the system answers a call, the caller hears the outgoing announcement
followed by a beep. After the beep, the system begins recording the caller’s
message. A caller can leave a message of up to three minutes. If the message is
longer than three minutes, or if the caller is silent for more than seven consecutive
seconds, the system hangs up followed by a beep. If the system runs out of
memory, it announces, “Memory is full” and beeps twice. Then after about 10
seconds, the system announces, ”The machine will now hang up,” then hangs up.
Call screening
The call screening feature lets you listen at the answering system to a caller leaving
a message. If the answering system is on, the incoming message broadcasts through
the speaker when a call is answered by the answering system.
Options while a message is being recorded:
• Press VOLUME
to adjust the call screening volume.
• Press
PLAY/STOP to stop the message recording.
Call intercept
When a caller is leaving a message on your answering system, you can talk to the
caller by answering a call using any telephone on the same line.
When you take the call, the answering system beeps and stops recording. If the
system does not disconnect immediately, press and release the telephone switch hook.
Caller ID number announce
This system can announce the caller’s telephone number between the second and
third ring (see Feature setup and Feature summary on pages 3 and 4 to turn this
feature on or off).
NOTE: You must subscribe to caller ID service from your telephone service provider for this feature
to work. There may be a fee for this service, and it may not be available in all areas.
Store caller number
When this feature is on, the system announces the caller’s number before playing
back a message (see Feature setup and Feature summary on pages 3 and 4 to
turn this feature on or off).
Accept blocked calls
When this feature is turned on, the system answers and records messages from
any caller. When this feature is turned off, the system responds to blocked calls
(from callers who have chosen to block their numbers from identification) with the
announcement, “We’re sorry. Blocked calls to this number cannot be accepted.”
The system then hangs up without recording any incoming messages (see Feature
setup and Feature summary on pages 3 and 4 to turn this feature on or off).
6
Operation
Listen to incoming messages
When the system plays incoming messages, the message window displays
the number of the message playing. Before playing each message, the system
announces the day and time the message was received. If the clock was not set
when the message was recorded, or there was a power failure after it was set, the
system will announce, “Time and day not set,” before playing the message. After
playing the last message, the system announces, “End of messages.”
If you want the system to answer a call when you are playing a message, press
PLAY/STOP to end message playback.
To play messages, press
PLAY/STOP. If there are new messages, they will be
played. If there are no new messages, the old messages will be played. If there are
no messages, the system announces, ”No messages.”
To play a message at half speed, press and hold
MEMO/REPEAT while the
message is being played.
To play a message at double speed, press and hold
ANNOUNCE/SKIP while the
message is being played.
To repeat a message, press
MEMO/REPEAT. Press
MEMO/REPEAT during the
time/day announcement or press
MEMO/REPEAT twice to hear the previous
message. If there is only one message recorded in the system, the same message
will be played again.
To skip to the next message, press
ANNOUNCE/SKIP.
To stop message playback, press
PLAY/STOP.
Memory monitor
Find out the remaining recording time by turning the system on:
1. If the system is already on, press ON/OFF to turn the system off.
2. Press ON/OFF again to turn the system back on. The system announces the
remaining recording time.
Save messages
The system can record up to 99 messages, depending on the length of each
message. Individual messages can be up to three minutes. The maximum combined
recording time for the announcement, messages and memos is approximately 60
minutes. The actual recording time depends on individual message characteristics.
Messages remain available for replay until you delete them.
Message Guard®
The answering system protects the recorded messages from loss in the event of a
power failure.
Message Guard® is a registered trademark of Advanced American Telephones.
Memory is full
When the memory is full, or when 99 messages have been recorded, F flashes in the
message window. You need to delete messages to make room for new ones. When
the memory is full, the system answers calls after 10 rings, announces “Memory is
full,” then beeps twice without playing the outgoing announcement. You can delete
messages from the answering machine (see the next page) or remotely (page 9).
7
Operation
To delete all previously played messages, press X/DELETE in idle mode. The
system announces, “To delete all old messages, press DELETE again.” Press
X/DELETE again to delete all previously played messages. The system announces,
“Messages deleted.”
To delete selected messages, press X/DELETE while the desired message is
playing. The system deletes the message and announces, “Deleted,” then plays the
next message.
If you want to replay a message before deleting it, press
MEMO/REPEAT.
Message window
The message window displays the total number of messages recorded. If the
message window displays F, then the memory is full and some messages must be
deleted before new messages can be recorded.
Message window displays
FUNCTION
DISPLAY
(Steady)
The system is in clock setting mode.
-ORThe system is recording a message.
-ORThe system is being accessed remotely.
(Flashing)
The system is playing the announcement.
The system is in feature setting mode.
The system is entering the announcement menu.
0
There is no message in the system.
F (Flashing)
Memory is full.
2 - 7
The number of rings before the system answers a call.
24
Toll saver is set to 2/4.
46
Toll saver is set to 4/6.
On
The selected feature is on.
OF
The selected feature is off.
En
The language is set to English.
SP
The language is set to Spanish.
0 - 7
The volume level appears while adjusting the volume.
0 - 99
The total number of messages (when the system is idle).
0 - 99 (Counting) The system is recording an announcement or a memo.
1 - 99 (Flashing)
There are new messages or memos.
8
Remote operation
Access the answering system remotely
You can access many features remotely from a touch-tone telephone.
1. Dial the telephone number of your answering system.
2. When the system answers, enter your two-digit remote access code during or
after the announcement. The system announces the number of messages, then
begins playing back the messages. If the announcement continues to play after
you have entered your remote access code, wait for the announcement to end,
then enter the remote access code again.
3. To use remote access commands (see below), press 5 during message playback
and wait for the two-beep signal.
4. Enter a remote access command.
Feature summary
FUNCTION
Voice help menu
COMMAND
Press 5.
Play all messages
Press 1.
Play new messages Press 2.
Repeat a message
Press 4 while the message is playing.
Stop new playback
Press 5 while the message is playing.
Skip a message
Press 6 while the message is playing.
Save message
Hang up.
Delete message
Press 3 while the message is playing. You hear “Deleted.”
Delete all
messages
After listening to all messages and the system has beeped
twice, press 3 twice. You hear “Messages deleted.”
Record
announcement
Press 7 after the beep. Record the announcement, and press
5 to stop. The system will then play back the announcement.
Review
announcement
Press 7.
Record memo
Press #, and speak after the beep. Press 5 to exit.
Review the clock
Press 8.
Set the clock
Press 8. Follow the prompts to set the day, time and year.
Turn system off
Press 0.
Turn system on
When the system is off, it answers after 10 rings, and
announces, “The machine is off.” The system beeps twice. You
can turn the system on as follows:
• Press 0. The system announces, “The machine is on. XX
minutes to record,” then beeps twice. The system is now
turned on.
Review settings
Press 9.
9
Remote operation
Feature summary (continued)
FUNCTION
End remote
access call
COMMAND
Press 9. The system announces “The machine will now hang
up,” and disconnects the call.
NOTE: If no commands are entered within 15 seconds, the system announces, “The machine will
now hang up,” and then disconnects the call.
In case of difficulty
If you have difficulty operating this answering system, try the suggestions below. For
customer service, or to purchase accessories or obtain replacement parts, visit our
website at www.telephones.att.com or call 1 (800) 222-3111. In Canada,
dial 1 (866) 288-4268. Please retain your receipt as your proof of purchase.
Messages are incomplete.
• The system can record messages of up to 3 minutes.
• If a caller leaves a long message, part of it might be lost when the system disconnects the
call after 3 minutes.
• If the memory is full when recording a message, the system stops and disconnects the call.
The system does not answer after the correct number of rings.
• If the toll saver feature is on, the number of rings changes from four to two, or six to four,
when there are new messages waiting.
• In some cases, the system might be affected by the ringing system used by the telephone
service provider.
• If the system’s memory is full or the system is off, the remote access system answers after
10 rings.
• If the system is in feature setup mode and a call comes in, it will not answer the call until
you press
PLAY/STOP or the setup timeout has elapsed.
The system does not record messages.
• When the memory is full, some saved messages must be deleted before new messages
can be recorded.
Incoming messages are not heard during recording.
• Press VOLUME
until the desired volume is reached.
System does not respond to remote commands.
• Make sure you are calling from a touch-tone telephone. When dialing a number, there
should be audible tones. If there are clicks instead, the telephone is not a touch-tone
telephone.
• The answering system may not detect the remote access code while the announcement is
playing. Try entering the code again when the announcement is over.
• There may be noise interference on the telephone line. Press the dial buttons firmly.
• Make sure the remote access code is entered correctly.
• You might be calling from a telephone which sends tones that are too short for the
answering system to detect.
• If there are many messages recorded, the system may take longer than usual to respond.
10
In case of difficulty
Power failure recovery
• If the system is disconnected from its AC power, it will not operate. The announcement
and messages are retained in memory during a power failure, but it will be necessary to
reset the clock.
• If the system announces, “Time and day not set,” after announcing the time and day, it
may be necessary to reset the clock.
The system takes longer than usual to respond.
• If there are too many messages recorded, the system may take longer than usual
to respond.
The message window is off.
• Make sure the power cord is securely connected to both the answering system and an
electrical outlet not controlled by a wall switch.
• Press ON/OFF to turn on the system.
General product care
To keep the answering system working and looking good, follow these guidelines:
• Avoid putting it near heating appliances and devices which generate electrical noise
(motors, fluorescent lights, etc.)
• DO NOT expose it to direct sunlight or moisture.
• Avoid dropping the answering system and other rough treatment.
• Clean with a soft cloth.
• Never use a strong cleaning agent or abrasive powder because this will damage
the finish.
• Retain the original packaging in case it is necessary to ship it at a later date.
11