1
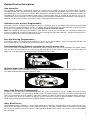
Proudly Designed
in Australia
AUSTRALIAN STANDARDS APPROVED
REMOTE CONTROL ENGINE IMMOBILISER
AN D AL AR M W I T H W I R E L E S S K E Y P AD .
•
•
•
•
N517
This product complies with AS/NZS 3749.1 2003 Class A. Volumetric Sensing must be enabled to
comply with a Class A installation (refer ‘feature programming’).
Class A VSAS (Vehicle security alarm system) includes control equipment including setting and
unsetting facilities, all sensors, warning devices and provisions for immobilization of the vehicle and the
volumetric sensing device (glass break/shock).
This product complies with AS/NZS 3749.1 2003 Class B. Volumetric Sensing must remain disabled to
comply with a Class B installation (refer ‘feature programming’).
Class B VSAS (Vehicle security alarm system) includes control equipment including setting and
unsetting facilities, all sensors, warning devices and provisions for immobilization of the vehicle.
•
This product complies with AS/NZS 4601:1999/Amdt 1: 2003
•
This product is to be installed in accordance with the methods & principles detailed in AS 3749.2:1997
Has your insurer
specified fitting a
“RES2001”?
For details, please
refer to page 12
Instruction Manual
RAKP
Thank you for purchasing a Rhino Engine Immobiliser. Please read this manual carefully
before commencing installation and keep it in a safe place for future reference.
1
Contents
Contents ................................................................................................................................................................................................ 2
Features ................................................................................................................................................................................................. 3
Standard System Features ..............................................................................................................................................3
Selectable System Features (These features can be turned on and off)........................................................................3
Optional Accessories .......................................................................................................................................................3
Detailed Feature Descriptions ............................................................................................................................................................... 4
Auto Immobilise ...............................................................................................................................................................4
Automatic re-arm & relock (Programmable) ....................................................................................................................4
Door Ajar Warning (Programmable) ................................................................................................................................4
Timed Headlight Delay (Optional connection by installer at extra cost)..........................................................................4
Perimeter Night Light (Programmable)............................................................................................................................4
Dome Light Extension (Programmable) ..........................................................................................................................4
Glass Break Sensor.........................................................................................................................................................4
Door Lock On Ignition (Programmable)...........................................................................................................................5
Pre-Alert (2 Stage) Car Body Impact Warning with ETS™ .............................................................................................5
Auto Bypass.....................................................................................................................................................................5
Operation .............................................................................................................................................................................................. 6
Remote Control Functions .................................................................................................................................................................... 6
Operation .............................................................................................................................................................................................. 6
Your Remote Control .......................................................................................................................................................6
Arming and Disarming Your Immobiliser .........................................................................................................................7
Activate Panic or Car Finder Function.............................................................................................................................7
Remote Boot Release......................................................................................................................................................7
Programming Additional Remote Controls / Erasing Lost Remote Controls...................................................................7
Overriding the Immobiliser................................................................................................................................................................... 8
Programming......................................................................................................................................................................................... 8
How to Program the Selectable Features .......................................................................................................................8
How to Change REGISTER 1: ........................................................................................................................................9
How to Change REGISTER 2: ......................................................................................................................................11
Installation .......................................................................................................................................................................................... 12
“RES2001” Insurance Requirements.............................................................................................................................12
Installing the Main Control Unit......................................................................................................................................12
Internal Connector Diagram ..........................................................................................................................................12
Installing the BBSC siren ...............................................................................................................................................15
Connecting To An Existing Electric Boot Release Motor ..............................................................................................15
Installing Additional Sirens ............................................................................................................................................15
Installing Timed Headlight Delay ...................................................................................................................................15
Connecting Your System To Central Locking ...............................................................................................................16
WARRANTY TERMS & CONDITIONS .........................................................................................................................19
2
Features
Standard System Features
•
•
•
•
•
•
•
•
•
•
•
•
•
•
•
•
Microprocessor Controlled
Three Point Engine Immobilisation (Onboard Relays)
Auto Immobilise (Passive Arming)
Code Hopping Remote Technology (Anti-Scanning, Anti-Code Grabbing)
Two SSR™ Solid State Remote Controls with 4 Function Operation (Arm / Disarm, Boot Release, Panic & LED
Torch)
Long Life Lithium Cell Remote Control Batteries (Each Remote Uses 2 x CR2025)
Automatic Re-arm in case of Accidental Disarm
Ultra-Bright Red Flashing LED Light
Visual Arming and Disarming via Indicators (1 Flash For On, 2 Flashes For Off)
Safety Circuit Prevents Arming While Ignition On
Learning Mode for Adding Additional Remote Controls (maximum of 5)
Negative On Alarm Output for Optional Internal Cabin Siren
Onboard Central Locking Relay Outputs
All points of entry alarm protection (doors, boot, bonnet)
Personal panic button via remote control (siren sounds & indicators flash)
Auto Bypass (prevents false alarms caused by faulty sensors / or switches)
Selectable System Features (These features can be turned on and off).
•
•
•
•
•
•
•
•
•
•
•
•
•
•
•
Arm / disarm beeps (if optional siren fitted)
Door ajar warning (indicators flash & siren (if fitted) beeps for 3 seconds if a door is left ajar i.e. Vehicle’s interior
light circuit sees door in open position)
Electric boot release output via remote control – no delay (standard feature is to hold button for 3 seconds)
Timed headlight delay (optional feature at additional installation cost)
Multiple vehicle remote control (control 2 cars separately from the 1 remote)
Central closure (allows electric window / sunroof closure on arming of some vehicles)
Door lock on ignition (anti hi-jack)
Perimeter night light (indicators hold on for 20 seconds on disarm)
Dome Light Extension (interior light turns on for 20 seconds on disarm)
User programmable override code in case of loss or damage of remotes (over 63,000 possible codes)
Compatible with Transformer interface for vehicles with factory keyless entry systems. Allows for factory remote
controls to arm/disarm the system.
Compatible with Wireless Keypad to allow arm/disarm of the system without remote controls.
In-built 2 stage pre-alert car body impact sensor with ETS™
Audio discriminating glass break sensor
Alarm memory (allows recall of the10 most recent alarm activations in order)
Optional Accessories
•
•
•
•
•
•
•
Internal Cabin Siren
Ultrasonic Sensors
Microwave Sensor
Electronic Tilt Sensor
Paging System
Transformer Interface
Wireless Keypad
(Part No: DPS)
(Part No: UD6)
(Part No: UD5)
(Part No: TILTSENSE2)
(Part No: APAGER)
(Part No: TRANS TX)
(Part No: WKPB)
3
Detailed Feature Descriptions
Auto Immobilise
The immobiliser will always automatically activate 38 seconds after the ignition is turned off no matter what. The dash
mounted LED will come on constantly to confirm the system has entered auto immobilise mode. The vehicle cannot be
started now unless the remote is pressed first. When disarming, if you do not switch the ignition on within 38 seconds, the
immobiliser will also enter auto immobilise mode again. If you take longer than 38 seconds to exit your car & press the
remote thinking you are locking it, in fact you will actually be just turning the immobiliser off temporarily & leaving your car
unlocked. You must in this instance press your remote a second time to lock your vehicle.
Automatic re-arm & relock (Programmable)
This feature prevents accidental disarming by the owner i.e. the owner turns the immobiliser off but is then distracted and
forgets that they have deactivated the system. If a door is not opened or ignition turned on within 60 seconds from when
the system is turned off by the remote, the system will fully re-arm & re-lock the vehicle.
Note: The immobiliser will enter auto immobilise mode after 38 seconds (the LED will come on constantly to indicate the
vehicle is immobilised). At the 60-second mark, the system will fully arm & the doors will lock – the blinkers will flash once
& the siren will beep once & the LED will start flashing.
Door Ajar Warning (Programmable)
If the vehicles doors are not properly closed when you try to activate your immobiliser system, the indicators will flash and
the siren will beep for 3 seconds to alert you that the vehicle is not secure.
Timed Headlight Delay (Optional connection by installer at extra cost)
You can have your car headlights turn on automatically for 15 seconds when you arm the immobiliser by remote control.
This may allow you for instance to see your way to your front door, or out of a dark car park. You can turn the lights off
before the 15-second period ends by pressing the left button on your remote.
Perimeter Night Light (Programmable)
When this feature is on, the indicators will stay on constantly for 20 seconds on disarm, or until the ignition is turned on.
This allows for illumination around the vehicle at night.
Dome Light Extension (Programmable)
The dome (interior) light comes on automatically when the system is disarmed via remote, enabling the owner to verify
the vehicle is safe inside. The light stays on for 20 seconds, or until the ignition is turned on. The dome (interior) light also
comes on automatically when the ignition is turned off, enabling the owner to quickly gather belongings before exiting the
car. The light stays on for 20 seconds, or until the system is armed via remote, or until the ignition is turned on again.
NOTE: If you activate the Automatic Rearm & Relock Feature, this feature will be disabled.
Glass Break Sensor
The RES4601A with the addition of a special cabin microphone incorporates intelligent glass break sensing circuitry. This
inbuilt device will trigger the alarm system, provided it registers the correct sound frequency parameters for breaking
glass & that the impact sensor also registers a corresponding vibration to the vehicle. This ensures accurate detection of
glass breakage.
4
Door Lock On Ignition (Programmable)
If you have central locking connected, when this feature is on the doors will lock when the ignition is turned to on, and
unlock when the ignition is turned to off. This is to prevent anyone but occupants in the vehicle from being able to open
the doors.
Pre-Alert (2 Stage) Car Body Impact Warning with ETS™
This special feature provides a two-stage impact sensing system. It gives the security conscious owner a sensitive car
body impact sensor that will give a potential thief prior warning that the vehicle is protected by this most formidable alarm
system. On detection of a low level impact i.e. from a tyre kick, the siren will simply beep for a few seconds to warn away
the would-be thief. If the vehicle is attacked any further, the system will move into full siren mode. The unique ETS™
Environment Tuned Sensor is able to distinguish between environmental shocks caused by aircraft, trucks, or extreme
weather conditions, and the impact caused by any thief attempting to break in or other heavy impacts. Furthermore the
system features the unique Rhino "Auto Adjust” process, where during the 45 sec. arming delay, the alarm samples the
background noise where the vehicle is parked, and will if necessary automatically reduce the sensitivity of the impact
sensor to an appropriate level. This process allows a trouble free sensitivity that ordinary alarms simply cannot provide.
The sensitivity level reference point can be adjusted to suit your particular needs. Please refer to the programming section
contained later in this manual.
Auto Bypass
Auto bypass is designed to reduce false alarms caused by faulty switches or external sensors. If the alarm is triggered 3
times by the same sector then the particular sector will be bypassed. (i.e. the sector will become inactive.) The sector will
only be bypassed for one arming period. The next time the system is armed the sector that was bypassed will become
active again.
5
Operation
Remote Control Functions
TOP
BUTTON
Operation
Your Remote Control
Press for
high
intensity
LED torch.
LEFT
BUTTON
RIGHT
BUTTON
Press to activate panic
feature, press again to
cancel.
Press and hold for 3
seconds to activate the
boot release feature.
Press to
Arm and
Disarm.
CENTRE
BUTTON
6
Arming and Disarming Your Immobiliser
TO ARM YOUR IMMOBILISER (& lock your vehicle if central locking is connected)
The immobiliser is activated by pressing the Centre Button on the remote control transmitter. The blinkers
will flash once and the siren will beep once. For silent arm / disarm press both buttons (left and bottom) If
central locking is connected, your doors will lock. The dash LED-light will stay on for 20 seconds then flash,
THE IMMOBILISER IS NOW ON.
…
Press Centre Button
Blinkers will flash once
LED COMES ON……….and after 20 seconds starts to
flash.
TO DISARM YOUR IMMOBILISER (& unlock your vehicle if central locking is connected)
To deactivate the immobiliser, press the Centre Button. The blinkers will flash twice and the siren will beep
twice. The LED will stop flashing. If central locking is connected, your doors will unlock.
THE
IMMOBILISER IS NOW OFF. Note: If the alarm has been activated in your absence, the siren will beep 4 times on
disarm.
Activate Panic or Car Finder Function
…
Button 1
Press CentrePress
Button
Blinkers will flash Twice
LED Switches OFF
EMERGENCY PANIC / CAR FINDER FUNCTION
The panic / car finder feature is activated by pressing the Right Button on the remote control transmitter.
This causes the indicators to flash (i.e. same as hazard lights) and the siren to sound. To cancel “panic”,
press the Right Button on the transmitter again. NOTE: Panic does not work when the ignition is on by
requirement of Australian Law (EPA-Environmental Protection Agency).
Remote Boot Release
BOOT RELEASE (Optional connection by installer at extra cost)
This immobiliser is fitted with remote boot release capability for vehicles with existing electric boot release.
This feature enables the user to unlock the boot by pressing the Left Button for 3 seconds. The boot will
unlock, and the immobiliser will disarm. NOTE: For safety reasons the remote boot release will not work
when the ignition is on. Note: You can also program the boot to release as soon as you press the Left
Button.
Programming Additional Remote Controls / Erasing Lost Remote Controls
Your RES4601a is supplied standard with 2 remote controls. You can use up to a maximum of 5. To add a new remote
to your alarm, simply follow the procedure below:
1. Turn the vehicle’s ignition to on.
2. Immediately press and hold the Centre Button on the original remote control until the indicators start
to flash (approximately 4 seconds) and then release the button.
3. Immediately press and hold the Centre Button on the new remote control for at least 4 seconds.
4. Turn the vehicle’s ignition off.
5. The new remote control is now programmed into the immobiliser.
Erasing Lost Remote Controls: If you lose a remote control or perhaps have your car keys stolen, you can
simply erase the lost/stolen remotes by repeating the procedure above 6 times. This will fill the system memory with
remotes that only you have in your possession.
Learning In a Remote If all Remotes are Lost: You may learn in a remote without having an already learntin remote. Simply perform the Overriding the Immobiliser procedure followed by the remote learning procedure above7
(from step 2).
Overriding the Immobiliser
PROCEDURE:
This feature enables the owner to override their immobiliser in case they have lost their remote controls or
they have damaged them. You have the secure choice of over 63,000 possible codes. Refer to Register 2 of
the Programmable Feature section of this manual (page 8) on how to choose your own code. This should
be done upon installation.
To enter your override code:
1. Open your driver’s door and sit in the car. The siren will sound this is normal.
2. Now turn the ignition from on to off an equal number of times to your first code digit (this is a number
you have chosen between 3 and 255).
3. Wait for the blinkers to flash once. (This occurs whether you have entered the correct number or not).
4. Now turn the ignition from on to off an equal number of times to your second code digit (this is a
number you have chosen between 3 and 255).
5. The immobiliser will now disarm. You must start your car within 38 seconds; otherwise the
immobiliser will automatically rearm.
NOTE: Unless a remote control is learnt in, if you turn the ignition off, you will have to repeat this
Programming
How to Program the Selectable Features
Your Rhino Security system incorporates the latest in high security & convenience features. It is possible to
customise your security system so that it suits your requirements perfectly. Detailed below is the full list of
programmable features that can either be turned on or turned off.
We have set, at the factory, the most common configuration chosen and these settings are listed in the
REGISTER Settings listed below. Once the desired features have been selected, the selection is permanently
retained in memory, even if power is removed.
To turn on or turn off any feature use the following procedure: eg to activate door lock on ignition.
1. Find the REGISTER (1or 2) in which the feature is located. (E.g. door lock on ignition is located in
REGISTER 1).
2. Set the vehicle up as described to access REGISTER 1, (all doors closed, turning ignition on last).
3. After turning the ignition to on, immediately press the Left Button an equal number of times to the selected
feature’s code number (eg 3 times for door lock on ignition). Each press of the remote will be confirmed by
a flash of both the blinkers & the dash LED, a confirmation beep will also be produced.
4. Turn the ignition to off.
5. The system will then confirm which features are activated via visual readout. If a feature is enabled the
LED & indicators will flash out its code corresponding to the number shown in the column “Press Remote
This Many Times”. The indicators in this example will flash once for arming beep on, then twice for disarm
beep on, and then three times for door lock on ignition now being on.
8
How to Change REGISTER 1:
Vehicle Set Up:
ALL DOORS CLOSED AND THE IGNITION TURNED ON LAST
Remote Key action: TURN ON / OFF FEATURES VIA THE LEFT BUTTON ON THE REMOTE
FEATURE
Arming & Disarming Beeps
Door Lock on Ignition
(Anti-Hijack)
Press
Remote
This Many
Times
1
3
FACTORY
SETTING
DESCRIPTION
ON
OFF
1 beep on Arm & 2 beeps on Disarm.
When this feature is on, the doors will lock when the ignition
is turned to on, and unlock when the ignition is turned to off.
When this feature is on, the door ajar warning feature is
removed (the siren & indicators will not beep & flash for 3
sec. if a door is not closed properly).
When this feature is on, the indicators will stay on
constantly for 20 seconds on disarm, or until the ignition is
turned on. This allows for illumination around the vehicle at
night.
When this feature is on, the boot release button (Left
Button) will only require be pressing once rather than
holding down for 3 seconds to open an electric boot.
The dome (interior) light comes on automatically when the
system is disarmed via remote, enabling the owner to verify
the vehicle is safe inside. The light stays on for 20 seconds,
or until the ignition is turned on. The dome (interior) light
also comes on automatically when the ignition is turned off,
enabling the owner to quickly gather belongings before
exiting the car. The light stays on for 20 seconds, or until
the system is armed via remote, or until the ignition is
turned on again.
After pressing the remote 11 times to enter this mode, turn
the ignition to off. There are 8 levels of adjustment. The
factory default setting is level 6. Pressing the remote once
will increase the sensitivity by one level i.e. to level 7. The
LED will then flash seven times to confirm the new level.
Pressing the remote again will increase the sensitivity to
level 8 (max). Pressing the remote again will return the
adjustment to level 1(least sensitive). Once you have
adjusted the sensitivity level to the desired setting, turn the
ignition on to exit this mode.
After pressing the remote 12 times to enter this mode, turn
the ignition to off. This mode allows the installer / owner to
verify that each trigger of the alarm system is working,
without having to arm & disarm the system each time & set
off the siren. The siren will beep and the blinkers will flash
to indicate a trigger eg push the bonnet switch, open a door,
hit the vehicle. The siren will beep four times to indicate a
pre-warning impact sensor detection, or once to indicate full
alarm trigger level. Turn the ignition to on to exit this mode.
No Door Ajar Warning
4
OFF
Perimeter Night Light
5
OFF
Instant Boot Release
6
OFF
Dome Light Extension
(Interior lights on when
ignition off, interior lights on
when system disarmed via
remote). Note: This feature
cannot be turned on if AutoRearm & Relock is activated.
See register 2.
8
OFF
Shock Sensor Adjustment
11
6
SELECT
the level
required.
Installer Mode
12
SELECT
The Mode
Required
9
PAT™ Past Alarm
Trigger Memory
13
SELECT
to replay
memory
After pressing the remote 13 times to enter this mode, turn
the ignition off. Your Rhino Alarm offers a unique memory
that stores the ten last reasons why the alarm was
triggered. This memory cannot be erased.
1 Beep, 1 Flash - Voltage Drop Alarm
2 Beep, 2 Flashes - Glass Break Alarm
3 Beep, 3 Flashes - Shock Sensor Alarm
4 Beep, 4 Flashes - Power Fail Alarm
5 Beep, 5 Flashes - Ignition Alarm
6 Beep, 6 Flashes - Aux Alarm
7 Beep, 7 Flashes - Door Alarms
8 Beep, 8 Flashes - Bonnet / Boot Alarm
If two previous alarms were recorded i.e. voltage drop and
shock sensor the LED will flash and the siren will beep once
for voltage drop, then no noise for 1 second then beep three
times for shock sensor. The last memory heard is the
most recent alarm sector triggered. Turn the ignition to
on to exit this mode.
When this feature is on, the alarm will not trigger when a
sudden change in battery current is sensed.
NOTE: This will ONLY beep out the state of this feature i.e.
no other active features in the register will be beeped out.
I.e. if this feature is NOT on, then NO beeps will be heard.
Current Sense Override
15
ON
Wireless Keypad Mode
18
OFF
When this feature is turned on then the Wireless Keypad
may be used to disarm the vehicle while still using the
standard factory remotes to lock and unlock the vehicle.
See the Wireless Keypad instructions for further details.
If this featured is turned on then a single beep will be
produced. If this feature is turned off then no beeps will be
heard.
Transformer Interface
19
OFF
When this feature is turned on then the Transformer module
may be interfaced to allow the user to arm and disarm their
vehicle via the factory remote control.
NOTE: If the Transformer module was supplied with the
unit, then this feature would have been turned ON by
default.
If this featured is turned on then a single beep will be
produced. If this feature is turned off then no beeps will be
heard.
10
How to Change REGISTER 2:
Vehicle Set Up:
DRIVER’S DOOR OPEN, AND THE IGNITION TURNED ON LAST
Remote Key action: TURN ON / OFF FEATURES VIA THE LEFT BUTTON ON THE REMOTE
Press
Remote This
Many Times
FACTOR
Y
SETTIN
G
DESCRIPTION
Centre button disabled.
1
OFF
LEFT Button Used To
Arm/Disarm This Vehicle
2
OFF
Impact Sensor
Automatic Rearm & Relock
3
4
ON
OFF
Timed Negative on Arm
(Headlight Timer – 15 sec)
5
OFF
Selectable Indicator Flash
6
ON
Extended Lock Pulse (Central
Closure)
7
OFF
Extended Unlock Pulse
8
OFF
Override Code
14
(3) (4)
Stop button centre button from arming and disarming, not
normally used.
This is activated if you have two cars with Rhino remote
controls, the vehicle that this is feature is activated on will use
the left button to arm disarm and loose the ability to activate
the boot release output.
Activate 2 Stage Impact sensor & glass break sensor.
This feature prevents accidental system disarming & will
relock the doors if a door is not opened within 60 seconds.
See page 2 for full function description. If you activate this
feature, dome light extension will be turned off automatically.
Installers must wire up the door circuit to function.
When on, this feature changes the –ARM wire from being a
constant negative on arm to a timed 15 second negative
on arm wire. This will allow you to connect this wire via a
relay (see diagram on page 15) to your headlight circuit, so
that when you arm your immobiliser, your headlights will turn
on for 15 seconds to illuminate your path, and then
automatically switch off. (You can press the LEFT button on
your remote to turn the lights off before the 15-second
period). You can still connect window lift modules to this wire,
as long as it takes no longer than 15 seconds to wind up the
windows in the car.
When off, this feature prevents the indicators from flashing
when the system is triggered.
When on, the lock output becomes a 15 second negative
pulse instead of 0.5 seconds. This feature is for certain
vehicles with vacuum central locking or those with a central
closure wire (some BMW, Mercedes) i.e. doors lock, electric
windows wind up, sunroof closes automatically.
When on, the unlock output becomes a 15 second negative
pulse instead of 0.5 seconds. This feature is for certain
vehicles with vacuum central locking.
This feature enables the owner to set their own individual
code to override their immobiliser in case they have lost their
remote controls or they are have stopped working. You have
the secure choice of over 63,000 possible codes. To set a
new code:
1. After pressing the remote 14 times to enter this
mode, turn the ignition off. The blinkers will flash
once to confirm you have entered the override code
entry mode.
2. Now turn the ignition from on to off anywhere from 3
to 255 times i.e. 11 times
3. Wait for the blinkers to flash once.
4. Now turn the ignition from on to off anywhere from 3
to 255 times i.e. 36 times
5. Wait for the blinkers to flash once.
6. You have changed the override code from the factory
setting of (3)(4) to (11)(36).
7. Make sure you remember the new override number!
Do not record it anywhere where a would-be thief
may find it in your car.
NOTE: The driver’s door must be left open throughout this
procedure.
FEATURE
11
WARRANTY TERMS & CONDITIONS
RhinoCo Technology (The Company) warrants its products to be in conformance with its own plans and specifications
and to be free from defects in materials and workmanship under normal use and service for 12 months from the date
stamp control on the product, or for products not having a date stamp, for twelve months from the date of original
purchase unless the installation instructions or catalogue sets forth a shorter period, in which case the shorter period
shall apply. The Company’s obligation shall be limited to repairing or replacing, at its option, free of charge for
materials or labor, any part which is proved not in compliance with The Company’s specifications or proves defective
in materials or workmanship under normal use and service. The Company shall have no obligation under this Limited
Warranty or otherwise if the product is altered or improperly repaired or serviced by anyone other than The Company.
For warranty service, return transportation prepaid, to RhinoCo Technology, 9 Hannabus Place McGraths Hill NSW
2756 Australia.
There are no warranties, expressed or implied, of merchant ability, or fitness for a particular purpose or otherwise,
which extend beyond the description on the face hereof. In no case shall The Company be liable to anyone for any
consequential or incidental damages for breach of this or any other warranty, express or implied, or upon any other
basis of liability whatsoever, even the loss or damage is caused by its own negligence or fault.
The Company does not represent that the products it sells may not be compromised or circumvented; that the
products will prevent any personal injury or property loss by burglary, robbery, fire or otherwise; or that the products
will in all cases provide adequate warning or protection. Customer understands that a properly installed and
maintained alarm system may only reduce the risk of a burglary, robbery, or fire without warning, but it is not insurance
or a guarantee that such will not occur or that there will be no personal injury or property loss as a result.
Consequently, The Company shall have no liability for any personal injury; property damage or other loss based on a
claim the product failed to give any warning. However, if The Company is held liable, whether directly or indirectly, for
any loss or damage arising under this limited warranty or otherwise, regard less of cause or origin, The Company's
maximum liability shall not in any case exceed the purchase price of the product, which shall be the complete and
exclusive remedy against The Company.
This warranty replaces any previous warranties and is the only warranty made by The Company on this product. No
increase or alteration, written or verbal, of the obligations of this Limited Warranty is authorised.
19
20