1
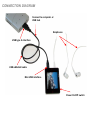
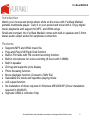
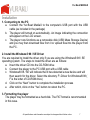
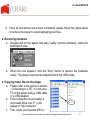
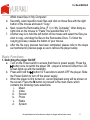
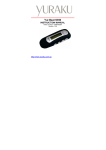
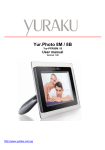
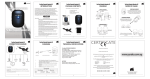
YUR.BEAT MEDIAX
INSTRUCTION MANUAL
Version: 1.00
http://www.yuraku.com.sg
CONNECTION DIAGRAM
Connect to computer or
USB hub
Earphones
USB type A interface
USB eMediaX cable
Mini USB interface
Power On/Off switch
Declaration of Conformity
EC-Declaration of Conformity to the essential
requirements of the applicable EMC Directive 2004/108/EC
We, Yuraku GmbH of Germany, declare under our sole responsibility as authorized representative that the
following product
Brand Name:
Model Name:
Model No.:
Yuraku
YUR.BEAT MEDIAX
YUR.BEAT MEDIAX
Is fully in conformity with the essential requirement of the European Directive 2004/108/EC.
This declaration is based on the full compliance of the product with the following European standards:
EN 55013 : 2001 + A1 : 2003
EN 55022: 2006
EN 55020: 2002 + A1: 2003 + A2: 2005 (IEC61000-4-2: 2001)
EN 55024: 1998 + A1: 2001 + A2: 2003 (IEC61000-4-2: 2001, IEC61000-4-3: 2006, IEC61000-4-8: 2001)
Lorsch, 05.14.07
Yuraku GmbH, Industriestraβe 2, 64653 Lorsch, Germany
Safety and Information
Do not violate or infringe the copyright law and other international copyright laws while using this
player for recording.
The copyright law forbids unauthorized reproduction of copyrighted music for any other purpose
other than self-entertainment without the author’s permission.
For the purpose of self-entertainment, it is strictly prohibited to compile and disseminate
copyrighted music to a third party without the author’s permission.
If copyrighted music is intentionally disseminated by means of information network without the
author’s permission, the infringer will violate “the right of communications to the public” and “the
right of distribution” and shall be subject to the criminal charges.
The Company, and the manufacturers, distributors and dealers of this player are not liable for any
of the above infringement acts.
The Company shall not be liable for any loss or damage (whether anticipated or unanticipated
loses) of customers or other third parties due to the usage of the player.
Before introducing or using the player, please back-up all essential information stored in PCs. The
Company shall not be liable for any loss or damage due to the usage of the player.
All specification and design are
subject to change without further
notice or obligation
Please follow the rules depicted in this manual closely to ensure your safety. Before using the
player, we would strongly encourage you to read through this user manual
Be more wary of any edges, uneven surfaces, metal parts, accessories and its packaging so as to
prevent any possible injury or damage.
Keep this player out of reach of children. Take note that this player is not edible and should not be
placed in your mouth.
Do not modify, repair or dismantle the player. Doing so may result in fires, electric shocks,
complete breakdown of the player, etc. All of which, are not covered under warranty.
Do not use any diluents or volatile liquid to clean the player. Keep in mind that the surface of the
player should only be wiped with a dry cloth.
Do not use this player in locations whereby there are high-temperatures or high humidity levels (For
instance, bathrooms); ideally, the player should be used in a location free of dust and exposure to
direct sunlight.
Do not insert foreign objects, such as pins, into this player.
Do not touch this player when your hands are wet as this may result in electric shocks.
Be extremely cautious while using headphone /earphones as they may strangle the user when
entangled.
Turn down the volume before/while using this player as sudden loud sounds may damage your ear
drums.
Refrain from dropping the player as well as any collision with other objects.
When plugging in/out the headphone/earphones or wires please hold the player and jacks firmly to
prevent the wires from breaking and the player from dropping.
If using the player while walking, do pay attention to the traffic situations and road conditions.
Do not use this player when in hazardous locations.
Should any abnormal situations or problems occur while using the player, discontinue use of player
immediately.
Yur.Beat MEDIAX
Introduction
Watch your movies and photo album while on the move with Yur.Beat MediaX
portable multimedia player. Carry it in your pocket and travel with it. Enjoy digital
music playbacks with support for MP3, and WMA songs.
Small and compact, the Yur.Beat MediaX comes with built-in speaker and 3.5mm
stereo audio output socket for earphones connection.
Features
•
•
•
•
•
•
•
•
•
•
•
Supports MP3 and WMA music file.
Plug-and-Play USB Flash Disk function
Built-in FM radio with FM content recording function.
Built-in microphone for voice recording (8 hours with 128MB)
Built in speaker
ID3 tag and supports lyrics display
Photo browsing function
Movie playback function (Convert to SMV file)
Selectable EQ mode and repetitive playing mode
A-B repeat function
No installation of driver required in Windows ME/2000/XP (Driver installation
required in Win98/S).
• Sigmatel USB2.0 controller Chip
All specifications and information are subject to changes without further notice
6
Yur.Beat MEDIAX
Installation
1. Connecting to the PC
a. Connect the Yur.Beat MediaX to the computer’s USB port with the USB
cable (as included in the package)
b. The player will turned on automatically. An image indicating the connection
will appear on the LCD screen.
c. The player now functions as a removable disk (USB Mass Storage Device)
and you may then download files from it or upload files into the player from
the PC.
2. Install the Windows® 98 / SE Driver
You are required to install the driver only if you are using the Windows® 98 / SE
operating system. The steps to install the driver are as follows:
a. Insert the driver CD into the CD-ROM drive
b. Connect the player to the PC USB port with a USB cable
c. Windows® 98 / SE will indicate that it has detected a new device and will
then search for the driver. Select the directory F:\ Driver for Windows® 98 (
F is the letter of CD-ROM drive)
d. Click on the “Next” button to complete the installation process
e. After which, click on the “Yes” button to reboot the PC.
3. Formatting the player
The player may be formatted as a hard disk. The FAT format is recommended
in this case.
All specifications and information are subject to changes without further notice
7
Yur.Beat MEDIAX
4. Upgrade or Recovery of Firmware
Attention: Do not carry out this operation unless the MP3 player is not working,
e.g., the player cannot be turned on, or when the company issues a new
software version for the player.
5. Install the Software
a. Insert the Driver CD into the CD-ROM of the computer.
b. Enter the “F:\Firmware Setup” folder (The F: is the CD-ROM letter of the
computer).
c. Note: Some players do not offer the firmware in the bundled driver CD. In
this case you will have to obtain the firmware as a .zip file from the Internet.
Unzip this file to a folder before following the steps:
d. Double click the “Setup.exe” file to start installation.
e. Click on “Next” - ”Yes” - ”Next” - ”Next” - ”Finish” button in every prompt
window to complete the installation.
f. After installation has been completed, the computer will prompt you to
reboot. Reboot your computer as indicated.
g. If you wish to delete the player upgrade software, click start - program files
- Sigmatel MSCN Audio Player - Uninstall the software.
NOTE: Do not connect the player to the computer before or during installation
process of the software.
Remark:
Running the SETUP program for the first time would install the software. However,
running the SETUP program a second time will lead to un-installation of the
software.
All specifications and information are subject to changes without further notice
8
Yur.Beat MEDIAX
6. Upgrading/Recovering the software of the player.
a. Connect the player to the computer while pressing and holding the PLAY
button; continue pressing for 5 seconds.
b. Right click My computer - Properties - Device Manager, wait till the player
Recovery Device Class appears in the device manager.
c. Click Start (in the left bottom corner of the computer screen) - Programs
Files - Sigmatel MSCN Audio Player - Firmware Update. A pop-up window
will appear.
d. In the firmware upgrade window, Click “Start” button to start firmware
upgrading.
NOTE: Ensure that the player is removed safely by using the “Eject” or “Safely
remove USB Mass storage Device” option to disconnect it from your computer.
Failure to do so may result in damage to the player or corrupted files and music
tracks.
Operations
1. Connecting to a PC
a. Ensure that the player is switched off before connecting the player to the
computer via the provided USB cable to upgrade firmware or copy music
into the player.
b. After connecting to your computer, the system will create a removable drive
in “My Computer” whereby the data stored in the player becomes available.
An alert prompt “Ready” will be displayed on the screen of the player if the
PC and player have been successfully connected.
c. The files stored on the player can be managed through Windows File
All specifications and information are subject to changes without further notice
9
Yur.Beat MEDIAX
d. Once all procedures have been completed, please follow the steps below
to remove the player to avoid damaging your files.
2. Removing hardware
a. Double-click on the applet that says “safely remove hardware” under the
Notification area.
b. When the icon appears, click the “Stop” button to remove the hardware
safely. The player may then be detached from the USB Cable.
3. Copying music files to the player
a. Please refer to the previous section
-“Connecting to a PC” to connect a
PC to the player using a USB cable
or a USB adapter.
b. If the connection is successful, a
removable drive icon (F :\) will
appear in “My Computer.”
c. First, locate your favorite MP3 or
All specifications and information are subject to changes without further notice
10
Yur.Beat MEDIAX
WMA music files in “My Computer.”
d. Secondly, select specific music files and click on those files with the right
button of the mouse and select “Copy.”
e. Next, locate the Removable Drive (F :\) in “My Computer”. After doing so,
right click on the mouse to “Paste” the selected files to F:\.
f. Another way is to hold the left button of the mouse and select the files you
wish to copy, and drag the files to the Removable Drive. To finish the
copying process, release the button of your mouse.
g. After the file copy process has been completed, please refer to the steps
as mentioned in previous page so as to remove the player safely.
Basic Functions
1. Switching the player On/Off
a. Turn on the Power switch to ensure that there is power supply. Press the
button once to switch the player ON - player is turned on when the LCD
screen lights up with the backlight.
b. Press and hold the button for 5 seconds to switch OFF the player. Slide
the Power Switch to turn off the power supply.
c. When the player is first turned on, current playback song will be shown on
the screen. Press the M button to proceed to the main menu which
contains the following menu selections:
i.
Music
ii.
Video
iii.
Record
iv.
Photo
v.
Radio
vi.
System
All specifications and information are subject to changes without further notice
11
Yur.Beat MEDIAX
2. Browsing through the stored files
a. Press and hold the M button. The Browse menu will appear with a list of
categories such as the following:
• Internal Media
• External Media
• Artist
• Album
• Genre
• Year
• Playlist
• Recorded List
• All Audio Tracks
• All Image Files
• Audio Play Queue
• Image Play Queue
• Video Play Queue
b. Use the ‘Λ’ and ‘V’ arrow to move up or down the list. In order to further
expand a chosen category, press the . However, to exit the category list,
press until you reach the main browse menu.
c. To select or deselect a song or image, press when the chosen file name
is highlighted. Song tracks which are checked will be played during music
playback while checked image files would be displayed when browsing
through the pictures.
d. Once the various songs or pictures have been selected, press the M
button to return to the main menu.
All specifications and information are subject to changes without further notice
12
Yur.Beat MEDIAX
3. Operating in Music Mode
Once the player is turned on, the main Music menu will appear. Press or ,
which is located at the left and right hand of the screen, to search for the
desired track. The LCD screen will display the ID3 tag which shows the current
song name, artist, total number of songs, play time of current song, etc.
a. Press the button to start playing the selected track
b. Press the ‘Λ’ arrow or ‘V’ arrow, at the top and bottom of the screen, to
increase or decrease the volume of the songs. The LCD Screen will
display the volume level during adjustment.
c. Press the button if you wish to pause the music playback.
d. NOTE: Only tracks that have been checked will be played in the MUSIC
mode
Using A-B repeat function
e. When the music is playing and gets to the beginning of the part you wish
to repeat, press the A/B button once – this sets the starting (Point A) of
the repeat segment and “A-” will be shown on the screen.
f. Press the A/B button again to select the end of the part you wish to repeat
(Point B). You will then observe an “A-B” mark on the screen. The music
will be played repeatedly between Point A and Point B.
g. Press the A/B button for a third time, the segment repeat will be cancelled
and would return to the normal mode.
4. Operating in Video Mode
In the main menu, press the M button to activate the VIDEO menu.
a. Press the or button to select the VIDEO file you want to play.
b. Press the button to start playing the VIDEO
c. Press the button to pause and press again to resume playing.
All specifications and information are subject to changes without further notice
13
Yur.Beat MEDIAX
d. Press M to stop playing that video and to return to the VIDEO menu.
e. Press the M button again to activate the main menu so as to carry out
other functions.
NOTE: Pressing and holding the button while the video is playing would result
in the shutting down of the player.
5. Operating in Voice Record Mode
In the main menu, press the M button to activate the RECORD menu.
a. Once the RECORD menu has been displayed, voice recording will take
place straightaway.
b. The screen will display the record file name, recording time as well as the
record time remaining.
c. Pause the recording by pressing the button once. Press the button
again to resume recording.
d. Stop the recording by pressing the M button once. The player will store the
information you have recorded in voice files automatically. The player will
then return to its main menu status. You may then select other menu
operations or select the Music menu to return to music playback function.
NOTE: While recording, only the and MENU buttons are active.
6. Operating in Voice Playback Mode
To playback recorded file, return to main menu by pressing M after voice
recording has stopped.
a. Return to the music mode by selecting the MUSIC menu from the main
menu
b. Press the or button to search for the respective recorded file or follow
All specifications and information are subject to changes without further notice
14
Yur.Beat MEDIAX
c.
step 2.1 to browse for the recorded files under the RECORDED LIST
category
Press button to start playback.
7. Operating in Photo Mode
You must create a “photos” directory in your computer before being able to
copy photos that you want to display in. the player.( “JPEG” format files are
supported.)
In the main menu, press the M button to activate the PHOTO menu. The first
picture in the photos folder will automatically be displayed on the screen.
a. Press the or button to view the pictures
b. Select other pictures that you wish to view by following step 2.1 to select
or deselect certain pictures under the ALL IMAGE FILES
NOTE: Only images that have been checked will be displayed in the PHOTO
mode
8. Operating in FM radio Mode (optional: depending on product version)
In the main menu, press the M button to activate the RADIO menu.
a. Press the button to select the previous or next channel or press and
hold the M button and select Tune to Preset to switch channels.
b. Press the ‘Λ’ or ‘V’ button to increase or decrease the volume.
Auto scan the Channel
a. In the FM tuner mode, press and hold the or button for 1 second to
start scanning.
b. The player will automatically detect the radio channels. To start scanning
for another channel, press and hold the or again.
c. You may select this function to automatically scan all stations before
All specifications and information are subject to changes without further notice
15
Yur.Beat MEDIAX
storing the relevant stations with sequential channel numbers and its
frequency.
NOTE: All buttons will not be active until the scanning is complete.
Manual scan the Channel
When the player may not be able to locate the exact FM frequency that you
desire, you may use this function to adjust accordingly:
• In the FM tuner mode, press the or button to select the frequency
you desire.
Store the Channel
a. In the FM tuner mode, when the frequency is adjusted, press and hold the
M button .By doing so, a PRESET ACTIONS menu will appear.
b. To store the channel press select the ADD PRESET option and press the
or button to select preset channel
c. Press the button to confirm storing.
d. Once the storing process is complete, the channel number and its
frequency will be displayed.
e. Press or M to return to the FM TUNER menu
NOTE: Able to store up to 40 preset channels
8. Operating in the System Set Mode
In the main menu, press the M button to activate the SETTINGS menu.
a. Press the ‘Λ’ or ‘V’ arrow to select the desired option and press the
button to confirm selection.
b. Press the M button after making desired changes to the various submenus to return to the SYTEM menu
All specifications and information are subject to changes without further notice
16
Yur.Beat MEDIAX
c.
There are 8 sub-menus and corresponding sub-menus in the System
Settings menu , which are listed as below:
i.
ContrastÆ Select the LCD Contrast by pressing the or button
or
ii.
BrightnessÆ Select the LCD Brightness by pressing the
button
iii.
Power Save ModeÆ 3 subcategories: Display off, Backlight Dim and
Auto Shutdown
button to select the desired option. Then, press the or
iv.
Press the
button to make selected changes.
v.
Graphic EQÆ Select the desired EQ by pressing the or button.
Press M to return to System menu
vi.
Play ModeÆ 2 subcategories: Shuffle Now and Repeat All
vii.
Press the button to select the desired option. Then, press the ‘Λ’ or
‘V’ arrow to make selected changes.
viii.
Slides IntervalÆ Select the desired slides interval by pressing the
or button
ix.
RecordÆ 4 subcategories: Source, Encoder, Channel and Device
x.
Press the button to select the desired option. Then, press the ‘Λ’ or
‘V’ arrow to make selected changes.
xi.
Format DriveÆ Press the ‘Λ’ or ‘V’ arrow to make selected changes.
xii.
LanguageÆ Select from four different languages: English, German,
French and Spanish
9. Power Charge
The player has a built-in rechargeable lithium battery. When the player power
is low, simply connect the player to the USB port with the USB cable. The
time taken to charge the player is approximately 3-4 hours.
All specifications and information are subject to changes without further notice
17
Yur.Beat MEDIAX
Key Functions
External View of Product
FR
UP
FF
M – menu
Play/Pause
On/Off switch
A/B – repeat
Microphone
Down
Built-in speaker
MicroSD slot
Mini USB
Lanyard loop 3.5mm stereo socket
All specifications and information are subject to changes without further notice
18
Yur.Beat MEDIAX
LCD Display screen
All specifications and information are subject to changes without further notice
19
Yur.Beat MEDIAX
Troubleshooting
1. Problems playing MP3/WMA files compressed by user
Answer:
The player supports only the standard compression mode. Thus, when user
compresses MP3/WMA files, please select standard compression.
2. What is the storage capacity of the player in terms of total number of
minutes?
Answer:
Different flash have different capabilities. Usually a 1 minute MP3 file takes up
1MB. A 128MB/256MB memory player can thus save up to 128min/256mins of
music.
3. Problem with downloading files
Answer:
Check if the USB cable is connected to the PC and that the player is turned on.
Check if the USB driver is installed in Win98/SE OS.
Check if the player’s memory is full.
Power is too low.
4. Data loss
Answer:
Data is lost when voltage is unstable during the process of file download. (It is
strongly advised that users backup all data as The Company shall not be liable for
any loss.)
All specifications and information are subject to changes without further notice
20
Yur.Beat MEDIAX
5. Why does different music have different volumes?
Answer:
MP3 music has different volumes as their parameters are different.
6. No display on screen despite power being on
Answer:
Check if power is low.
The firmware might be missing. In this case, program recovery or upgrade is
necessary.
All specifications and information are subject to changes without further notice
21
Yur.Beat MEDIAX
Technical Specifications
•
•
•
•
•
•
•
•
•
•
•
•
•
•
•
•
•
•
•
2.2" TFT LCD screen, 262K colours
220 x 176 pixel resolutions
Supports digital music files: MP3, WMA, and WAV formats
Supports digital video files: SMV, AVI (MPEG4) and WMV formats
Supports JPEG image file display with zoom and pan functions
Built-in FM radio with RDS and FM content recording functions
10 FM channel presets
FM frequency range: 87.5MHz - 108MHz
FM S/N ratio: 60dB
5 Equalizer presets - normal, rock, pop, jazz, classic, and custom
10mW + 10mW at 32 Ohm
THD: <0.05%
LCD with auto backlight off and backlight dim
Digital voice recording with built-in microphone
USB 2.0 High speed compliant
Rechargeable lithium battery for 22 hours of music playback time
3.5mm stereo audio output socket
Dimension: 70.7 x 49.7 x 14.9mm
Weight: 47.4g
All specifications and information are subject to changes without further notice
22
Yur.Beat MEDIAX
Package Contents
•
•
•
•
Yur.Beat MediaX
1 pair of earphones
USB cable
CD for Windows® 98 SE driver and manual
System Requirements
•
•
•
•
•
•
Intel® Pentium® III or later
128MB of system RAM or more
One available USB 2.0 port
Windows® 98SE / ME / 2000 / XP
CD-ROM drive for Windows® 98SE installation
External 3.5mm stereo audio earphones or speakers outputs.
- end -
All specifications and information are subject to changes without further notice
23