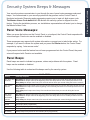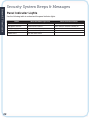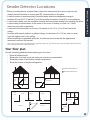
1
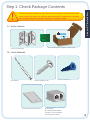
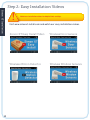
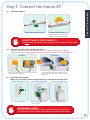
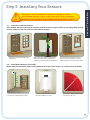
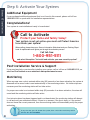
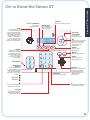
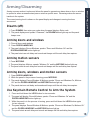
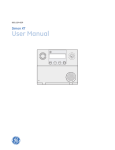
The Simon XT Easy Installation Manual and User Guide
Table of Contents
Simon XT Installation
Simon XT Easy Installation Manual
Step 1: Check Package Contents .................................... page 3
Step 2: Easy Installation Videos .................................... page 4
Step 3: Connect the Simon XT ...................................... page 5
Step 4: Chime, Clock & User Setup ............................... page 6
Step 5: Installing Your Sensors ...................................... page 7
Step 6: Activate Your System ........................................ page 8
Sensor Information Worksheet ...................................... page 9
FCC Notices ....................................................................... page 10
Simon XT User Guide
Get to Know the Simon XT .............................................. page 11
Simon XT Key Features ................................................... page 12
Product Overview ............................................................. page 13
Smoke Detector Locations ............................................ page 23
Testing Your System .......................................................
False Alarm Prevention .................................................. page 25
Frequently Asked Questions .........................................
Access Codes and Arming/Disarming .......................... page 14
Top Level Menus ............................................................... page 18
Security System Beeps and Messages ........................ page 21
page 24
page 27
IMPORTANT
Complete User Setup Worksheet Before You Begin
A very important step in the installation process is deciding your 4-digit Master Code, Duress Code, Verbal
Password, Emergency Contacts, and Additional User Codes. Please refer to User Setup on the bottom of page 6
and fill out the USER SETUP WORKSHEET before you begin the installation process. This is an important step
for the safety of your home and family. It will also save you a lot of time during the alarm activation process.
2
!
Simon XT Installation
Step 1: Check Package Contents
Find a convenient location for your Simon XT control panel. It should be located
near a phone jack and a non-switched electrical outlet. It should be in a location
that can be accessed easily when entering or leaving the home.
1.1 — Verify Contents
G
C
A
K
P
IN
L
P
S I
Disarmed
12:23a
Doors +
Windows Motions Disarm
Status
Silent
Bypass
Use your packing slip to verify the contents of your
Locate your packing slip.
1.2 — Verify Materials
(1) Screwdriver
(2) 0.75" Mounting Screws
(1) Plastic Spacer per microsensor
(2) Plastic Wall Anchors
(1) Line Grabber (Not included with Broadband
or Cellular - do not install unless
instructed by Tech Support)
3
Step 2: Easy Installation Videos
Simon XT Installation
!
Watch our installation videos for helpful hints and tips.
Visit www.simonxt-install.com and watch our easy installation videos.
4
Simon XT Easy Install Video
Wireless Door Sensors
Wireless Motion Detector
Wireless Window Sensors
Step 3: Connect the Simon XT
Simon XT Installation
2.1 — Connect the Battery
CLICK
Turn Simon XT and locate the two red
Clip the two wires together. The
Simon XT will power on & beep. Not
included for HomePulse OR Cellular
DO NOT PLUG IN YOUR SIMON XT!
You must connect the battery before plugging your Simon XT into the wall outlet.
2.2 — Connect the Phone Cord or the Ethernet Cable —
Standard and Two-Way Voice customers follow the "Landline" instructions. Broadband customers follow the "Broadband" instructions.Cellular customers, skip this step and please continue to the next step below (2.3).
Landline
CLIC
K
Broadband
OR
CLIC
K
Locate the phone wire labeled "Wall" on the back of the Simon XT
and plug it into the wall phone jack.
CLICK
Locate the ethernet cable on the back of the Simon XT and
plug it into your router. This must be done before connecting
the battery wires.
2.3 — Plug in the Power Supply
Make sure you properly secure the power supply to a non-switched and non-GFCI
Unscrew the faceplate.
Plug in power supply and secure
with screw provided.
Ensure that power supply is secure.
BROADBAND USERS:
It is highly recommended that you connect a battery back-up (not included) to
your router and modem to prevent system failure in the event of power outage.
5
Step 4: Chime, Clock & User Setup
Simon XT Installation
Programming the Simon XT requires keys to be pressed in order, with little or no
delay. It is recommended that you familiarize yourself with these steps before
beginning. For initial programming, the default master code is 1234 (
).
Turn on Chime
If the chime is on and the system is disarmed, the Simon XT panel will use voice notification when doors or windows are opened.
When the chime is on, a bell icon is shown on the display.
Press SCROLL DOWN (
) until the display reads, "Chime," then press OK (
Press SCROLL UP (
) to select “on” or “off,” then press OK (
(Note: It is recommended that the chime be turned on while installing sensors.)
Press STATUS (
Status
).
).
) to return to the main menu.
Set the Clock
Press SCROLL UP (
) until the display reads "Set Clock," and then press OK (
Enter the master code, then press OK twice (
If no master code has been set, the default master code is 1234.
).
).
The hour should be blinking. Type in the current hour using the KEYPAD then press OK (
The minute should be blinking. Type in current minute using the KEYPAD then press OK (
Press SCROLL UP (
Press STATUS twice (
) to select "am" or "pm," then press OK (
Status
Status
).
) to return to the main menu.
USER SETUP WORKSHEET
Code Description
Code
Master Code
User Code 1
User Code 2
User Code 3
User Code 4
User Code 5
User Code 6
User Code 7
User Code 8
Duress Code
Verbal Password
Emergency Contacts
Emergency Contact 1
Emergency Contact 2
6
Emergency Contact 3
Name
Phone 1
Phone 2
).
).
!
Simon XT Installation
Step 5: Installing Your Sensors
Make sure to clean the installation location before applying each sensor.
Upon installing, write the location of each sensor on the "Sensor Information
Worksheet" located on page 8 of the installation manual for future reference.
5.1 — Install Door & Window Sensors
Place marked sensors in their proper location. Additional sensors may be placed to your liking. When placing
sensors, make sure that the arrows on each side are aligned.
/
3 8 in
sensor
Determine an appropriate location for
each sensor.
magnet
Make sure that the sensor and magnet are
within 3/8" of each other. Use spacers on
metal doors or to aid proper sensor alignment.
Use the provided self-adhesive velcro to
secure the sensor to the door or window,
and the magnet to the door or window frame.
Place the motion detector in the corner of
the room, 6.5-7 feet above the ground.
25
ft
6.5-7ft
5.2 — Install Motion Detector (If Included)
Motion detectors should be placed in the highest-traffic areas of your home, e.g., a living room or a hallway.
Use the self-adhesive velcro to secure
the motion detector in a corner.
Each motion detector protects up to a
25' range in a 90° arc.
7
Step 6: Activate Your System
Simon XT Installation
Additional Equipment
If you purchased additional equipment that is not found in this manual, please call toll free
1-800-951-5111 to speak with our Installation representatives.
Congratulations!
Your system is now installed and ready to be activated.
Call to Activate
Protect your home and family today!
Your system is not yet active—you must call Protect America
to activate your system!
When calling, please have your Sensor Information Worksheet and your Packing Slip at
hand. A representative will guide you through the activation process.
Call toll-free:
1-800-951-5111
and select the option "to install and activate your new security system"
Post-installation Service & Support
If you need any help or service after installing your system, call us toll-free at 1-800-951-5111, or
use Live Chat located on our website at www.protectamerica.com.
Monitoring
When a proper user code is entered within sixty (60) seconds of an alarm activation, the system is
disarmed and a cancel code is sent automatically to the monitoring station. No further steps are
necessary and the monitoring station will not take action.
If a proper user code is not entered within sixty (60) seconds of an alarm activation, the siren will
sound and the monitoring station will take action.
If an intrusion alarm has been triggered and is not deactivated, the monitoring station will attempt
to call and verify an authorized contact. If there is no answer, if the line is busy, or if the contact
does not know the correct password, then the monitoring station will immediately notify the proper
authorities.
If any siren has gone off, disarm the system, then contact the monitoring station
toll-free at 1-877-274-0604.
8
Sensor
Number
Example
Sensor 1
Sensor Name
Sensor Type
Back Door
Door/Window Sensor
Simon XT Installation
Sensor Information Worksheet
Location
Kitchen
Sensor 2
Sensor 3
Sensor 4
Sensor 5
Sensor 6
Sensor 7
Sensor 8
Sensor 9
Sensor 10
Sensor 11
Sensor 12
Sensor 13
Sensor 14
Sensor 15
Sensor 16
Sensor 17
Sensor 18
Sensor 19
Sensor 20
Sensor 21
Sensor 22
Sensor 23
Sensor 24
Sensor 25
Sensor 26
Sensor 27
Sensor 28
Sensor 29
Sensor 30
Sensor 31
Sensor 32
Sensor 33
Sensor 34
Sensor 35
Sensor 36
Sensor 37
Sensor 38
Sensor 39
Sensor 40*
*For broadband and cellular monitoring, the zone for Sensor 40 is occupied by the communication module and
that zone cannot be used for a security device.
9
FCC Compliance
Simon XT Installation
This equipment has been tested and found to comply with the limits for a Class B digital device, pursuant to part 15 of the FCC rules. These limits
are designed to provide reasonable protection against harmful interference when the equipment is operated in a residential environment. This
equipment generates, uses, and can radiate radio frequency energy and, if not installed and used in accordance with the instruction manual, may
cause harmful interference to radio communications.
Changes or modifications not expressly approved by the party responsible for compliance could void the user’s authority to operate the
equipment.
If this equipment does cause harmful interference to radio or television reception, which can be determined by turning the equipment off and on,
the user is encouraged to try to correct the interference by one or more of the following measures:
•
•
•
•
Reorient or relocate the receiving antenna.
Increase the separation between the equipment and receiver.
Connect the affected equipment and the panel receiver to separate outlets, on different branch circuits.
Consult the dealer or an experienced radio/TV technician for help.
FCC Part 15 registration number: B4Z-910C-SIMON.
Part 68. This equipment complies with Part 68 of the FCC rules and the requirements adopted by ACTA. A label on this equipment contains a
product identifier in the format US:AAAEQ##TXXXX. You must provide this number to the telephone company upon request.
FCC Part 68 registration number: US:B4ZAL02B55910.
The plug and jack used to connect this equipment to the premises wiring and telephone network comply with the applicable FCC Part 68 rules
and requirements adopted by ACTA. A compliant telephone cord and modular plug is provided with this product. It is designed to be connected
to a compatible modular jack that is also compliant. See the installation instructions for details.
The REN is used to determine the maximum number of devices that may be connected to your telephone line. Excessive RENs on a telephone line
may result in devices not ringing in response to an incoming call.
In most cases, the sum of all device RENs should not exceed five (5.0). To be certain of the number of devices that may be connected to a line, as
determined by the total RENs, contact your local telephone company.
For products approved after July 23, 2001, the REN is part of the identifier with the format US:AAAEQ##TXXXX. The digits represented by ##
are the REN without a decimal point. (For example, 03 is a REN of 0.3). For earlier products, the REN is separately shown on the label.
Alarm dialing equipment must be able to seize the telephone line and place a call in an emergency situation. It must be able to do this even if
other equipment (telephone, answering system, computer modem, etc.) already has the telephone line in use. To do so, alarm dialing equipment
must be connected to a properly installed RJ31X jack that is electrically in series and ahead of all other equipment attached to the same telephone
line. If you have any questions concerning these instructions, consult your local telephone company or a qualified installer about installing an
RJ31X jack and alarm dialing equipment for you.
If this equipment causes harm to the telephone network, the telephone company may temporarily disconnect your service. The telephone
company may notify you in advance, but when advance notice isn’t practical, they will notify you as soon as possible and advise you of your right
to file a complaint with the FCC.
The telephone company may make changes in their facilities, equipment, operations, or procedures that could affect the operation of the
equipment. If they do, they will notify you in advance so you can make the modifications to maintain uninterrupted service.
This equipment may not be used on coin service provided by the telephone company. Connection to party line service is subject to state tariffs.
Contact the state public utility commission, public service commission, or corporation commission for information.
If you experience trouble with this equipment, please contact the company that installed the equipment for service and repair information. If
the equipment is causing harm to the telephone network, the telephone company may ask you to disconnect the equipment until the problem is
resolved.
CUSTOMER CARE
Company Name: Protect America
Phone Number: 1-800-951-5111
10
Simon XT User Guide
Get to Know the Simon XT
Motions
Doors + Windows
Press to arm
perimeter sensors.
Siren
The piezo siren is used
for status beeps and
alarms. Fire and intrusion
alarms always sound at
high volume. The volume
of status beeps (such as
trouble or chime beeps,
entry and exit delay
beeps, or auxiliary alarm
beeps) are programmable.
Press to arm interior sensors.
LCD Display
The LCD display can
show a variety of
phrases and icons.
Scroll Up /
Scroll Down
Press to scroll
through the menus.
OK
Disarmed
12:23a
Doors +
Windows Motions Disarm
Press to select a particular
menu item or commit to
memory a menu item
that has just been
programmed.
Status
Status
Press to check
system status.
Disarm
Signifies the system is
armed when lit. When
illuminated, pressing
the button will prompt
you to enter your
access code to disarm
the system.
Bypass
Silent
Bypass
Press to bypass a sensor.
Silent
Press to silence exit
beeps when arming.
Microphone
Emergency
Buttons
Press and hold button
for two seconds (or press
twice quickly) to notify
the central monitoring
station of a call for help.
Speaker
*Reminder
Test your system monthly.
Police
Used for voice output and
key beeps. The Simon
XT speaks arming level
changes, system status,
and voice-chime
sensor trips.
Emergency
Emergency
*
Turn on lights (additional
equipment is required).
#
Turn off lights (additional
equipment is required).
Keypad
Twelve-key keypad for
entering access codes or
other numerical data.
11
Simon XT User Guide
Simon XT Key Features:
Control
Description
Piezo Siren
The piezo siren makes alarm beeps and status beeps. Fire and intrusion alarm
beeps are always played at high volume, while the volume of status beeps (such
as trouble or chime beeps, entry and exit delay beeps, or auxiliary alarm beeps)
is programmable.
LCD Display
Doors + Windows
Motions
Disarm
Status
Silent
Bypass
Police
Emergency
Fire
Microphone
Scroll Up/Scroll Down
OK
Numeric Keypad
Speaker
*
#
12
The LCD module has a 2x16 character array that displays a variety of phrases
and icons.
Press to arm perimeter sensors.
Press to arm interior sensors.
Press to turn off intrusion/burglary protection for your system. Only intrusion/
burglary sensors such as doors, windows, and motion sensors are disarmed.
Environmental sensors, such as smoke and carbon monoxide, stay active at all
times.
Press to determine system status.
Press to silence exit beeps when arming.
Press to bypass a sensor.
Press and hold the Police button for two seconds (or press twice quickly) to call
the central monitoring station and notify them of a nonmedical call for help.
Press and hold the Emergency button for two seconds (or press twice quickly) to
call the central monitoring station and notify them of a medical call for help.
Press and hold the Fire button for two seconds (or press twice quickly) to call the
central monitoring station and notify them of a nonmedical call for help.
Used to communicate with central monitoring station after an alarm if you have
Two-Way Monitoring.
Press to scroll through lists of similar items.
Press to select a particular menu item or commit to memory a menu item that has
just been programmed.
Twelve-key telephone-type keypad (0-9, *, #) for entering access codes or other
numerical data.
Provides voice output and sounds key beeps. The panel speaks arming level
changes, system status, and voice chime sensor trips. The panel voice is also
used for voice reporting and remote phone control.
Lights on (except with Z-wave).
Lights off. (except with Z-wave).
*
DOOR &
WINDOW
SENSOR
GLASS
BREAK
SENSOR
MOTION
DETECTOR
SIMON XT
#
SMOKE
DETECTOR
Simon XT User Guide
Product Overview
GARAGE
DOOR
SENSOR
SIMON XT
TOUCH
SCREEN
INTERACTIVE
VIDEO CAMERA
KEYCHAIN
REMOTE
CONTROL
*
GPS
VEHICLE
TRACKING
SOLAR
YARD SIGN
LIGHT
13
Simon XT User Guide
Access Codes and Arming/Disarming
Changing / adding access codes
The master code is used for all operations including adding, modifying, and removing other codes. Up
to eight user codes can be set along with one duress code. The duress code generates a silent duress
alarm that is reported to the monitoring station.
Press SCROLL UP (
OK (
).
) until the display reads "System Programming" then press
Enter the Master Code, then press OK twice (
Press SCROLL UP (
).
) to select the code you wish to change, then press OK (
).
The current value will flash
on the display. Use the KEYPAD to type in the new 4-digit code
Disarm
—or press DISARM (
) to deactivate a user or duress code — then press OK (
).
Press STATUS three times (
Status
Status
Status
) to return to the main screen.
Checking system status
Pressing STATUS will cause the system to display and speak system information. The STATUS light will be lit
for one of three reasons:
1) A secured door/window is open, or a motion sensor is detecting motion.
2)The alarm system has been activated.
3) There is a problem with the system; contact technical support toll-free at
1-800-951-5111.
Arming the system when leaving
Press DOORS + WINDOWS (
Doors +
Windows
) to arm all door and window sensors.
If you have a motion sensor, press MOTIONS (
Motions
) to arm all motion sensors.
Your system will now beep; you generally have 45 seconds to exit the premises or disarm your
system.
Arming the system when staying (e.g., bedtime)
Doors +
Windows
Doors +
Windows
Press DOORS + WINDOWS twice (
) to instantly arm all door and window sensors.
After the exit delay has expired, the alarm will sound immediately when a door is opened.
Disarming the system
Use the KEYPAD to enter your 4-digit master or user code. The Simon XT will voice "System
Disarmed."
For advanced programming tips, frequently asked questions, and further help
with your system, visit www.protectamerica.com/support
14
Arming a sensor makes it active and allows the panel to generate an alarm when a door or window
is opened or when an unauthorized person enters a specific area. Disarming makes the sensor
inactive in the system.
The current arming level is shown on the panel display and changes in arming level are
announced.
Disarm (off)
1.Press DISARM, then enter your code when the panel displays Enter code.
2. The panel displays and speaks "Disarmed," the DISARM button lights up and the panel
beeps once
Simon XT User Guide
Arming/Disarming
Arming doors and windows
1.Close all doors and windows.
2.Press DOORS+WINDOWS.
3.The panel displays Doors+Windows, speaks "Doors and Windows On" and the DOORS+WINDOWS button lights up.
4.The panel starts an exit delay and sounds exit beeps until the exit delay time expires.
Arming motion sensors
1.Press MOTIONS.
2.The panel displays Motions, speaks "Motions On" and the MOTIONS button lights up.
3.The panel starts an exit delay and sounds exit beeps until the exit delay time expires.
Arming doors, windows and motion sensors
1.Press DOORS+WINDOWS.
2. While the panel in the process of arming, press MOTIONS.
3. The panel displays Doors+Windows & Motions, speaks "Doors and Windows On, Motions
On" and the DOORS+WINDOWS and MOTIONS buttons light up.
4. The panel starts an exit delay and sounds exit beeps until the exit delay time expires.
Use Keychain Remote Control to Arm the System
1. Press and hold down the LOCK button for two seconds.
2. The panel will display Doors+Windows, speaks “Doors and Windows On” and the
DOORS+WINDOWS button lights up.
3. While the panel is in the process of arming, press and hold down the LOCK button again for two seconds.
4. The panel displays Doors+Windows & Motions, speaks “Doors and Windows On, Motions On” and the DOORS+WINDOWS and MOTIONS buttons light up.
5. The panel starts an exit delay and sounds exit beeps until the exit delay time expires.
15
Simon XT User Guide
Arming/Disarming
Use Keychain Remote Control to Disarm the System
1. Press and hold down the UNLOCK button for two seconds.
2. The panel displays and speaks “Disarmed,” the DISARM button lights up and the panel beeps once.
Use Keychain Remote Control to Send a Panic Signal
1. Press and hold down the LOCK and UNLOCK buttons at the same time for 2 seconds.
2. The system will go into Alarm Mode, the siren will sound, the panel will display Alarm, Alarm, Alarm, and the STATUS light will flash.
No Entry Delay
Use the No Delay feature when you are staying at home, for instance when you are sleeping or
when you're away from home and will carry a wireless touchpad that will allow you to disarm the
system before opening a protected door. Check with your installer to find out how this option is
programmed.
1. Close all doors and windows
2.Press DOORS+WINDOWS twice.
3. The panel displays Doors+Windows - No Delay and speaks "Doors and Windows On, No Entry Delay." The DOORS+WINDOWS light will blink and the exit delay time will begin.
Note: To avoid causing an alarm, you must disarm the system with a wireless touchpad before entering your home.
Quick exit
Use the quick exit feature when someone wants to briefly leave while the home is still armed ( for
instance to get the newspaper). When you press the DISARM button, the display shows Exit Time
Is On. This allows a designated door to be open for up to two minutes without triggering an alarm.
(Must be an Entry/Exit Delay door.)
Note: The designated door can only be opened and closed once. If you close the door when you exit, the system will need to be disarmed upon reentry. Leave the door open during the quick exit feature.
Exit delay extension
If enabled by your installer, the Exit delay extension feature will recognize when you arm the
system, leave your house and then quickly re-enter your house (such as you would if you forgot
your car keys.) In such a case Simon XT will restart your exit delay to give you the full exit delay
again
16
Bypassing sensors
Bypassing a sensor allows you to open the sensor while the system is armed. For example, if
your
Doors & Windows are armed and you want to open your kitchen window but do not want to
disarm the entire system, then you can bypass the kitchen window sensor and then open the
kitchen window without causing an alarm. Bypassed sensors are automatically unbypassed when
the arming level is changed to a level where the sensor is not active.
The easiest way to bypass any window sensor is to make sure your system is disarmed, then
open the window(s) you want to bypass, and then arm your system. It will automatically bypass
the open window(s) and arm the rest of the sensors.
Simon XT User Guide
Arming/Disarming
Note: If you close the bypassed window(s), the sensor(s) will automatically become active and if opened, the alarm will be triggered.
System Status
Press STATUS (no code is required) to cause the system to display and speak the following types
of information:
• Alarm conditions
• Alarm history
• Trouble conditions
• Open sensors
• Bypassed sensors
The STATUS button blinks when an active alarm exists. The STATUS is lit when an abnormal
condition such as a trouble or open sensor exists in the system.
You can clear certain status entries from the system (such as old alarm history) by pressing
DISARM after checking the status.
Chimes
Use the Chime feature to signal when a protected door is opened while the system is disarmed.
The panel chimes twice when a chime sensor is tripped, if the chime mode is enabled. This
feature allows you to be notified when family members are going in and out of your home. The
Chime and Special chime features are turned on or off in the system menu.
Note: If there are no chime sensors in your system, the Chime option will not appear in the System menu.
Voice chime
Your installer may have programmed the system to speak the sensor name or make a custom
chime sound when a chime sensor is tripped. The chime sound, if programmed, will be played in
place of the standard chime beeps.
17
Simon XT User Guide
Top Level Menus
This section explains the top-level menus, with the exception of system programming, which makes
up the bulk of the menus and can be found in its own section.
Set clock
If the panel loses both AC and battery power, then upon restoring power the system time will default
to midnight and blink. Your installer can set your system time to display in either 12-hour or 24-hour
format.
Time of day format is HH:MMx
Where:
HH = 01 to 12 (12-hour format) or 00-23 (24-hour format)
MM = 00 to 59
x = a or p (12-hour format) or none (24-hour format)
To reset the clock:
18
1. Scroll up/down until the display shows Set Clock.
2.Press OK.
3.The display shows Enter Code.
4. Enter your master code with numeric keys. Press OK.
5.Press OK again. The display now flashes the hours.
6. Scroll up/down to set the hours.
7. Press the OK key to accept. The display now flashes the minutes.
8. Scroll up/down to set the minutes.
9. Press the OK key to accept. The display is now flashing the AM/PM.
10. Scroll up/down to set the AM/PM
11. Press OK to accept. The display now shows the current time, and stops flashing.
12.Press STATUS twice to exit.
System Programming
To enter system programming mode, do the following:
1.Enter the system menu.
2. Scroll up/down to System Programming, then press OK.
3. The panel displays Enter code.
4. Enter your master code, then press OK.
At this point, you are in the System Programming submenu. At this level, the following items are
accessible:
• Access codes
• Timers
• Siren options
• Light control
• System tests
Simon XT User Guide
Top Level Menus
Access codes
There are three types of access codes: master, user and duress.
Master code
The master code is your most powerful code and can be used for all user operations including
programming. The initial value of the master code is 1234. To change the master code, do the
following:
1. Enter the System Programming menu.
2. Scroll up/down to Access codes, then press OK.
3. Scroll up/down to Master code, then press OK.
4. The current value of the code now flashes.
5. Enter a new code (use correct length), then press OK.
6.Press Status repeatedly to exit.
User codes 1 to 8
There are eight user codes, which can be used for many user operations, but not subdisarming,
programming, or bypassing sensors.
To change a user code, do the following:
1. Enter the System Programming menu.
2. Scroll up/down to Access codes, then press OK.
3. Scroll up/down to the user code you want to change, the press OK.
4. The current value of the code now flashes.
5. Enter a new code (use correct length), then press OK.
6.Press Status repeatedly to exit.
Initially, all user codes are blank. A user code can be deleted by pressing Disarm while the code is being changed.
19
Simon XT User Guide
Top Level Menus
Duress code.
The duress code, when used in place of another user code, generates a silent duress alarm,
which is reported to the central monitoring station. Initially, the duress code is blank. The duress
code can be deleted by pressing Disarm while the code is being changed.
To change the duress code:
1. Enter the System programming menu.
2. Scroll up/down to Access codes, then press OK.
3. Scroll up/down to Duress code, then press OK.
4. The current value of the code now flashes.
5. Enter a new code (use correct length), then press OK.
6.Press Status repeatedly to exit.
Interactive Monitoring
If you have Cellular Interactive or Broadband Interactive monitoring, you can control your system
from the web or most smart phones. To setup your interactive account access, please visit
www.ProtectAmericaInteractive.com. Your username and password should be provided to
you during the installation process.
20
Simon XT User Guide
Security System Beeps & Messages
Your security system communicates to you through the use of panel voice messages and panel
beeps. You communicate to your security system with key presses on the Control Panel or
Keychain touchpads. Disarming and programming require you to input a 4-digit access code.
The Master Access Code default is 1-2-3-4 when the security system is shipped from the
factory. During the installation process, our installations representatives will assist you to change
the Master Access Code.
Panel Voice Messages:
When you press the buttons on the Control Panel or a touchpad, the Control Panel responds with
voice messages. Panel voice can be enabled or disabled.
These messages may respond with system information or prompt you to take further action. For
example, if you want to disarm the system and you press the Disarm button, the Control Panel
responds by saying, "enter access code."
If you press a button and the feature has not been programmed into the Control Panel, the panel
voice will respond with Function not available.
Panel Beeps:
Panel beeps are used to indicate key presses, status and problems with the system. Panel
beeps can be enabled or disabled.
Use the following table to understand the beeps used by the security system.
PANEL BEEPS
Activity
Piezo beep response
Arm motion
sensors
Exit delay-three beeps sound every five seconds and three times per second during the last ten seconds.
Silent exit-three beeps sound at the beginning of the exit delay and three more sound just before the exit
delay expires.
Entry delay-three beeps sound every five seconds and three times per second during the last ten
seconds.
Arm doors and Exit delay-two beeps sound every five seconds and two times per second during the last ten seconds.
windows
Silent exit-two beeps sound at the beginning of the exit delay and two more sound just before the exit.
Entry delay-two beeps sound every five seconds and two times per second during the last ten seconds.
Arm doors
/ windows
and motion
sensors
Disarm
Exit delay-four beeps sound every five seconds and four times per second during the last ten seconds.
Silent exit-four beeps sound at the beginning of the exit delay and four more sound just before the exit
delay expires.
Entry delay-four beeps sound every five seconds and four times per second during the last ten seconds.
One beep
Chime
Two beeps (when programmed)
Trouble beeps
Six beeps every minute. Press STATUS to stop beeps for four hours.
Special chime
No activity
Three beeps (when programmed)
Twenty beeps every minute for five minutes (when programmed)
21
Simon XT User Guide
Security System Beeps & Messages
Panel Indicator Lights
Use the following table to understand the panel indicator lights.
Button
When the button Flashes
ARM Doors & Windows
Doors / Windows armed
Doors / Windows armed & No Entry Delay on
DISARM
System disarmed
System subdisarmed
ARM Motion Sensors
SYSTEM STATUS
CHIME Doors
22
When the Button Light is on
Motion Sensors armed
System trouble or Open Sensor
Door will cause chime
Motion Sensors armed & Latchkey on
System in alarm
• Before mounting alarms, program (learn) them into memory and do a sensor test from the alarm’s intended location to ensure good RF communication to the panel.
• Locate the alarm in environmentally controlled areas where the temperature range is between 40 and 100°F (5 and 38°C) and the humidity is between 0 and 90% noncondensing.
• Locate alarms away from the ventilation sources that can prevent smoke from reaching the alarm.
• Locate ceiling mounted alarms in the center of the room or hallway, at least 4 in. (10cm) away from any walls or partitions.
• Locate wall mounted alarms so the top of the alarm is 4 to 12 in. (10 to 31cm) below the ceiling.
• In rooms with sloped, peaked, or gabled ceilings, locate alarms 3 ft. (0.9 m) down or away from the highest point of the ceiling.
• When mounting to suspended ceiling tile, the tile must be secured with the appropriate fasteners to prevent tile removal.
Simon XT User Guide
Smoke Detector Locations
Note: Do not mount the alarm to the metal runners of suspended ceiling grids. The metal runners can draw the magnet’s field away from the alarm’s reed switch and cause a false tamper alarm.
Your floor plan
Use the following guidelines when drawing your floor plan:
• Show all building levels.
• Show exits from each room (two exits per room are recommended).
• Show the location of all security system components.
• Show the location of any fire extinguisher
Required Smoke Detector
Optional Smoke Detector
Bedroom
Bedroom
Hall
Bedroom
Hall
Bedroom
Living Room
Living
Room
Dining
Room
Recreation Room
Basement
Basement
Dining
Room
Kitchen
Bedroom
Bedroom
TV Room
Dining
Room
Kitchen
Living Room
Living Room
Bedroom
Bedroom
Bedroom
Bedroom
23
Simon XT User Guide
Testing Your System
1) Your monitoring service must be placed in test mode to avoid a false alarm and dispatch of emergency response personnel. To put your service into test mode contact Protect America by visiting www.protectamerica.com and click for Live Chat.
The siren will sound throughout the test. Do not disarm your system before the
test is complete.
2) Close all doors and windows and make sure that the status light on your Simon XT is off.
3) Use the keypad to enter the master or a valid user code. Your display should read “System Disarmed” or “Sub Disarmed” - this ensures that you have a working disarm code. Make sure that you have a working code before beginning the test.
Doors +
Windows
Doors +
Windows
4) Arm your system:
press DOORS + WINDOWS twice (
), then press
Motions
MOTIONS (
). Your system will stop beeping when the system is fully armed.
5) Test every sensor on your system using the chart below.
6) Disarm your system using your master or valid user code. The Simon XT should say "System disarmed" or "Alarm cancelled."
Status
7) Press STATUS (
) to listen to all of the sensors that were activated. Listen carefully to make sure that every sensor is mentioned. If any sensors are not mentioned, return to step 4 and re-test those sensors.
8) When your control panel has finished speaking the status, press DISARM (
memory.
Disarm
) to clear the 9) Contact Protect America to verify that signals were received and to put your monitoring service back into active mode.
Device
To Trip Device
Keychain Remote
Press and hold both the lock and unlock button
simultaneously for two seconds.
Door/Window Sensor
Motion Sensor
Smoke Detector
Simon XT Emergency Buttons
24
Open the secured door or window
Avoid the motion sensor's area for five minutes, then enter
its area.
Press and hold the "Test" button until the system sounds.
Press and hold each individual button for 3 seconds.
What is a false alarm?
A false alarm is defined as any signal that elicits a response by police, fire, or emergency medical
services for which there is no evidence of any activity that justifies an emergency response.
With an estimated 25% yearly increase in alarm systems nationwide, emergency responders are
becoming overwhelmed with false alarms. This is resulting in stricter ordinances, severe fines,
and limited or no response policies.
Help us reduce false alarms through the proper use and maintenance of your alarm system
and by testing your alarm system monthly. Your alarm has been programmed with a 60-second
alarm cancel period. If you activate your alarm, but disarm it with your code within 60 seconds
of activation, the monitoring station will be notified that an authorized user has disarmed the
system—the activity will be logged, but no further action is taken.
Simon XT User Guide
False Alarm Prevention
If you do not enter your code within 60 seconds to cancel the alarm, our monitoring station
will call your home to ask for your verbal password BEFORE we dispatch police, fire, or
medical personal. This gives you another opportunity to avoid false alarms if you or your family
accidentally set off your alarm system.
For information on upgrading your system or ordering additional equipment visit
www.ProtectAmerica.com, and use our live chat feature.
25
Simon XT User Guide
False Alarm Prevention
Major causes of false alarms:
• User error
• Unlocked or loose doors or windows
• Kids, pets, neighbors, visitors, repairmen, cleaning crews, etc.
Before you activate your alarm:
• Make sure you securely close and lock all protected doors and windows.
• When leaving, make sure the exit door is closed tightly and locked.
• Keep pets, balloons, fans, heaters, etc. away from motion sensor areas.
• Know and rehearse the procedure to cancel an accidental alarm. Anyone with access to your home should know this procedure.
• Be aware of how much time you have to exit your home after you arm your system and how much time you have to disarm your system when you return.
What to do if you set off your alarm by accident:
• DO NOT PANIC. Carefully enter your disarm code to deactivate your system.
• Call the monitoring station toll-free at 1-877-274-0604 immediately. Be prepared to give your password.
• Tell the monitoring station that you had an accidental alarm activation and ask them to cancel
the dispatch.
• DO NOT CALL 911. DO NOT LEAVE UNTIL YOU HAVE SPOKEN WITH THE MONITORING STATION.
Contact the Protect America Customer CARE when
you...
• Need to perform your monthly system test.
• Are planning any home renovation projects that will change the number of doors or windows, or that will require additional motion sensors.
• Are planning on changing phone providers (or DSL / Cable if you are using HomePulse Broadband service).
• Hire a contractor, cleaning crew, domestic help, realtor, etc.
Visit www.protectamerica.com and use our Live CHAT
feature online.
26
How do I test my security system?
Please see "Test Your System Monthly" on page 23 of this manual, or Live CHAT on our website
and a representative will walk you through testing your security system.
How many access codes can my Simon XT hold?
The Simon XT control panel can store 8 user codes and 1 duress (panic) code in addition to
the master code.
Why is my system status light on?
Simon XT User Guide
Frequently Asked Questions
The system status light will remain lit while a secured door or window is open. IfStatus
all secured doors
and windows are closed and the system status light is still on, press STATUS (
) to have your
panel voice any pending status messages.
How do I clear alarms from the memory?
Status
To clear alarms in the memory, press STATUS (
). Your Simon XT will voice
the list of alarms
Disarm
stored in memory. When your panel has spoken all alarms, press DISARM (
) to clear the
memory.
Why does my system display a low battery?
Your system will display a low battery when either the batteries in your sensors or the back-up
battery in your Simon XT becomes low. Make sure that your battery is connected (see page 5 of
this manual). The back-up battery is rechargeable and should be fully charged within 24 hours of
regaining electrical power.
Why does my system display sensors in failure?
Your Simon XT will indicate sensor failure when it is unable to communicate with a sensor. This
could be due to a missing sensor, damaged sensor, or a dead battery. For assistance visit our
website at www.protectamerica.com and Live CHAT with a representative.
Why does my system beep 6 times every minute?
These are called trouble beeps; they are used to indicate trouble conditions with your panel. Press
Status
STATUS (
) to have your Simon XT voice any trouble conditions.
Why does my system beep after I arm it?
After you arm your system, it will beep for the exit-delay time—the time in which you can exit your
home before it is armed. The beeping will grow more frequent as the end of the exit-delay time
approaches. When the exit-delay time has expired, the beeping will stop and the system will be
armed.
27
Simon XT User Guide
Frequently Asked Questions
How do I silence the exit-delay beeps?
After arming your system, press SILENT (
). The system will beep after the exit-delay time
has passed to indicate that it is fully armed. Note: This is not a permanent setting; press SILENT
after arming each time that you want to silence the exit-delay beeps.
Silent
Why does my Simon XT have two phone lines?
The phone line labeled "Wall" is connected to the wall phone jack; it is necessary to communicate
to the monitoring station. The second phone line can be used to plug in a telephone. The Simon
XT comes equipped with an internal line grabber. Do not connect an additional line grabber to the
Simon XT.
What is bypass? How do I use it?
The bypass feature is used to bypass (deactivate) specific sensor(s) while the system is armed.
For example, you are home with the system armed and want to open a specific door or window
without disarming the entire system. To bypass a sensor press BYPASS (
), then use the
KEYPAD to enter your master/user code. Press SCROLL UP (
) to select the sensor to be
bypassed, then press ENTER (
) to bypass the sensor. When a sensor is bypassed, the
panel will display "Bypassed."
Bypass
Note: Bypassing a sensor only lasts until you disarm your system. You must disarm and then arm the
system to void the bypass sensors.
How do I add or remove a sensor?
To add or remove sensors, please contact customer service toll-free at 1-800-951-5111.
How do the door / window sensors work?
Doors and windows use the same piece of equipment to detect when they have been opened.
The component is comprised of a sensor and a magnet; the sensor is attached to the door or
window, while the magnet is attached to the frame. The sensor then reads alignment with the
magnet to determine the open or closed state of the door or window. If a door is constructed of
steel (not aluminum), use of the spacer is necessary to ensure proper functioning of the magnet.
Special sensors can be purchased for use with overhead garage doors (to order visit our
website at www.protectamerica.com and Live CHAT with a representative).
How do the motion sensors work?
Motion sensors are passive infrared. They will detect both heat and movement (this decreases
false-alarms that could be caused by a curtain or plant blown by a fan). Motion sensors are
designed to ignore any pets less than 40 pounds as long as they are not within 6 feet of the
motion sensor. If your pet is larger than 40 pounds or will be within 6 feet of the motion sensor,
please contact customer service toll-free at 1-800-951-5111 or visit www.protectamerica.com
28 and click Live CHAT.
Customer Care
For fast online assistance, Live Chat with a customer care
agent on our website: www.protectamerica.com
1-800-951-5111
[email protected]
Central Monitoring Station
1-877-274-0604
Protect America, Inc, 3800 Quick Hill Road, Building 1-100, Austin, TX 78728. 1-800-951-5111. Licenses:
AL: 027; AR: E 2001-0538; AZ: ROC114856 (L-67), ROC114855 (C-12); CA: ACO 4115; DE: 06-204;
FL: EG13000437; GA: LVA205875; IA: AC-0081; IL: 127-001092; LA: F492; MD: 107-1657; MI: 8714
Huckleberry Lane, Lansing MI. 48917. Lic #3601202409; MS: 15005347; Licensed by the Alarm
Systems Licensing Board of the State of North Carolina NC: 635-CSA; NJ: Burglar alarm and fire alarm
bus. Lic. #34BF00023700; NM: 60519; OK: 739; PA: PA023169; SC: BAC 5432, FAC 3104; TN:
00000265; TX: B16272, ACR-1204; UT: 345548-6501; VA: 11-3129; WA: PROTEAI962LD; WV: WV032962
For information regarding our return policy visit | returns.protectamerica.com