1
C350.RG.book Page 1 Friday, February 14, 2003 8:35 AM
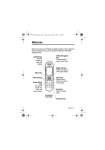
Welcome
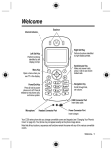
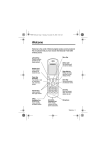
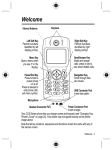
Earpiece
Internal Antenna
Left Soft Key
Perform functions
identified by left display
prompt.
Right Soft Key
Perform functions
identified by right
display prompt.
Menu Key
Open a menu when
you see M in the
display.
Send/Answer Key
Make and answer
calls; press in idle to
see recent dialled
calls.
Power/End Key
Press & hold to power
phone on
& off.
Press & release to end
phone calls, exit menu
system.
Navigation Keys
Scroll through lists, set
volume.
USB Connector Port
Insert data cable.
Microphone
Headset Connector Port
Power Connector Port
Insert charger.
Your C350 phone lets you change covers and keypads (see page 23).Your phone
may not appear exactly as the phone image above.
Note that all key locations, sequences and functions remain the same with any of
the various covers.
Welcome - 1
C350.RG.book Page 2 Friday, February 14, 2003 8:35 AM
www.hellomoto.com
MOTOROLA and the Stylised M Logo are registered in the US
Patent & Trademark Office. All other product or service names are
the property of their respective owners.
© Motorola, Inc. 2002.
Software Copyright Notice
The Motorola products described in this manual may include
copyrighted Motorola and third party software stored in
semiconductor memories or other media. Laws in the United States
and other countries preserve for Motorola and third party software
providers certain exclusive rights for copyrighted software, such as
the exclusive rights to distribute or reproduce the copyrighted
software. Accordingly, any copyrighted software contained in the
Motorola products may not be modified, reverse-engineered,
distributed, or reproduced in any manner to the extent allowed by
law. Furthermore, the purchase of the Motorola products shall not
be deemed to grant either directly or by implication, estoppel, or
otherwise, any licence under the copyrights, patents, or patent
applications of Motorola or any third party software provider, except
for the normal, non-exclusive, royalty-free licence to use that arises
by operation of law in the sale of a product.
While Products specifications and features may be subject to
change without notice, we are making every possible effort to
ensure that user manuals are updated on a regular basis to reflect
product functionality revisions. However, in the unlikely event that
your manual version does not fully reflect the core functionality of
your product, please let us know.You may also be able to access
up-to-date versions of our manuals in the consumer section of our
Motorola web site, at www.hellomoto.com.
2 - Welcome
C350.RG.book Page 3 Friday, February 14, 2003 8:35 AM
Menu Map
M ain M enu
• Voice Dial
• Recent Calls
• Received Calls
• Dialled Calls
• Notepad
• Call Tim es
• Call Cost
• Data Tim es
• Data Volum es
• Chat *
• Media Centre
• Them e
• M y Tones
• M otoM ixer
• Picture Viewer
• Ring Styles
• Alert
• Alert Detail
• M y Tones
• WebAccess
• W eb Brow ser
• Bookm arks
• Stored Pages
• History
• G o to URL
• Browser Setup
• Games
• Browser *
• Office Tools
• Datebook
• Calculator
• More
(go to following menu items)
• Settings
(see next page)
•
•
•
•
•
•
•
•
Phonebook
Web Sessions *
MyMenu
Messages *
• C reate M essage
• Voicem ail
• Text M sgs
• Brow ser M sgs
• Info Services
• Q uick Notes
• O utbox
• D rafts
SIM Applications *
Fixed Dial *
Service Dial *
Quick Dial *
Note: Select More when it appears in the menu to
see additional menu items.
Note: This is the standard phone menu layout.
Your service provider may change the layout, or
feature names. For example, some features listed
in the generic Main Menu shown on this page may
appear under More in your phone and vice versa.
To change the layout yourself, see page 91. Not all
features may be available for all users.
* Optional network, SIM card, or
subscription-dependent features
Menu Map - 3
C350.RG.book Page 4 Friday, February 14, 2003 8:35 AM
Settings M enu
• Call Divert *
• Voice Calls
• Fax Calls
• Data C alls
• Cancel All
• Divert Status
• Phone Status
• M y Tel. Num bers *
• Credit Info/Available *
• Active Line *
• Battery M eter
• O ther Inform ation
• In-Call Setup
• In-Call Tim er
• Call Cost Setup *
• M y Caller ID
• Talk and Fax *
• Answer O ptions
• Call W aiting *
• Security
• Phone Lock
• Lock Keypad
• Lock Application
• Fixed Dial
• Call Barring *
• SIM PIN
• New Passwords
Note: Not all features m ay be available for all
users.
* Optional network, SIM card, or
subscription-dependent features
4 - Menu Map
• Other Settings
• Personalise
• M ain M enu
• Keys
• C olour Style
• G reeting *
• W allpaper
• Screen Saver
• Q uick Dial *
• Initial Setup
• Tim e and Date
• 1-Touch Dial
• Backlight
• Zoom
• Scroll
• Anim ation
• Language
• Battery Save
• C ontrast
• D TM F
• M aster Reset
• M aster Clear
• N etw ork
• C ar Settings
• H eadset
C350.RG.book Page 5 Friday, February 14, 2003 8:35 AM
Shortcuts
Following are some useful shortcuts. To create your own MyMenu
shortcuts, see page 93.
Task
Change display zoom
Lock/unlock keypad
Change ringer alert
Display my phone number
Go to dialled calls list
Exit menu system
Open phonebook
Create phonebook entry
Shortcut
Press M, then press and
hold M
Press M *
Press S left (at lowest
volume setting) to switch to
vibrate alert, then silent
alert. Press right to reset
ring alert.
Press M # in idle
(number must be stored on
SIM card)
Press N in idle
Press O
Press S down in idle
Press S up in idle
\
Shortcuts - 5
C350.RG.book Page 6 Friday, February 14, 2003 8:35 AM
Contents
Menu Map . . . . . . . . . . . . . . . . . . . . . . . . . . . . . . . . . . . . . . . . . 3
Shortcuts . . . . . . . . . . . . . . . . . . . . . . . . . . . . . . . . . . . . . . . . . 5
Safety and General Information . . . . . . . . . . . . . . . . . . . . . . 10
Getting Started. . . . . . . . . . . . . . . . . . . . . . . . . . . . . . . . . . . . 17
What’s in the Box? . . . . . . . . . . . . . . . . . . . . . . . . . . . . . . . 17
About This Guide . . . . . . . . . . . . . . . . . . . . . . . . . . . . . . . . 17
Installing the Battery . . . . . . . . . . . . . . . . . . . . . . . . . . . . . . 18
Charging the Battery . . . . . . . . . . . . . . . . . . . . . . . . . . . . . . 19
Battery Use . . . . . . . . . . . . . . . . . . . . . . . . . . . . . . . . . . . . . 20
Changing Your SIM Card . . . . . . . . . . . . . . . . . . . . . . . . . . 21
Changing Your Phone’s Cover . . . . . . . . . . . . . . . . . . . . . . 23
Resetting Your Phone . . . . . . . . . . . . . . . . . . . . . . . . . . . . . 26
Turning Your Phone On . . . . . . . . . . . . . . . . . . . . . . . . . . . 26
Adjusting the Volume . . . . . . . . . . . . . . . . . . . . . . . . . . . . . 27
Making and Answering Calls . . . . . . . . . . . . . . . . . . . . . . . 27
Changing the Call Alert . . . . . . . . . . . . . . . . . . . . . . . . . . . . 29
Viewing Your Phone Number . . . . . . . . . . . . . . . . . . . . . . . 29
Using Your Phone . . . . . . . . . . . . . . . . . . . . . . . . . . . . . . . . . 30
Using the Display . . . . . . . . . . . . . . . . . . . . . . . . . . . . . . . . 30
Using the Menu . . . . . . . . . . . . . . . . . . . . . . . . . . . . . . . . . . 33
Entering Text . . . . . . . . . . . . . . . . . . . . . . . . . . . . . . . . . . . . 36
Changing the Zoom Setting . . . . . . . . . . . . . . . . . . . . . . . . 45
Setting Up Your Phone . . . . . . . . . . . . . . . . . . . . . . . . . . . . 45
Calling Features. . . . . . . . . . . . . . . . . . . . . . . . . . . . . . . . . . . 52
Displaying Your Phone Number . . . . . . . . . . . . . . . . . . . . . 52
Redialling a Number . . . . . . . . . . . . . . . . . . . . . . . . . . . . . . 52
Using Caller ID . . . . . . . . . . . . . . . . . . . . . . . . . . . . . . . . . . 53
6 - Contents
C350.RG.book Page 7 Friday, February 14, 2003 8:35 AM
Terminating an Incoming Call . . . . . . . . . . . . . . . . . . . . . . . 53
Dialling an Emergency Number . . . . . . . . . . . . . . . . . . . . . 54
Dialling International Numbers . . . . . . . . . . . . . . . . . . . . . . 54
Inserting Special Characters into Dialling Sequences . . . . 54
Viewing the Received Calls or Dialled Calls List . . . . . . . . 55
Returning an Unanswered Call . . . . . . . . . . . . . . . . . . . . . . 58
Entering Numbers in the Notepad . . . . . . . . . . . . . . . . . . . 58
Attaching a Number . . . . . . . . . . . . . . . . . . . . . . . . . . . . . . 59
Using Voicemail . . . . . . . . . . . . . . . . . . . . . . . . . . . . . . . . . 59
Speed Dialling . . . . . . . . . . . . . . . . . . . . . . . . . . . . . . . . . . . 61
One-Touch Dialling . . . . . . . . . . . . . . . . . . . . . . . . . . . . . . . 61
Quick Dialling . . . . . . . . . . . . . . . . . . . . . . . . . . . . . . . . . . . 62
Using Call Waiting . . . . . . . . . . . . . . . . . . . . . . . . . . . . . . . 62
Diverting a Call . . . . . . . . . . . . . . . . . . . . . . . . . . . . . . . . . . 63
Linking Calls . . . . . . . . . . . . . . . . . . . . . . . . . . . . . . . . . . . . 65
Transferring a Call . . . . . . . . . . . . . . . . . . . . . . . . . . . . . . . 66
Barring a Call . . . . . . . . . . . . . . . . . . . . . . . . . . . . . . . . . . . 67
Putting a Call on Hold . . . . . . . . . . . . . . . . . . . . . . . . . . . . . 68
Messages . . . . . . . . . . . . . . . . . . . . . . . . . . . . . . . . . . . . . . . . 69
Setting Up the Text Message Inbox . . . . . . . . . . . . . . . . . . 69
Sending Messages, Pictures, and Ring Tones . . . . . . . . . . 71
Viewing Message Status . . . . . . . . . . . . . . . . . . . . . . . . . . 72
Receiving a Text Message . . . . . . . . . . . . . . . . . . . . . . . . . 73
Reading, Locking, or Deleting a Text Message . . . . . . . . . 73
Using Chat . . . . . . . . . . . . . . . . . . . . . . . . . . . . . . . . . . . . . 75
Phonebook . . . . . . . . . . . . . . . . . . . . . . . . . . . . . . . . . . . . . . . 79
Viewing Entry Details . . . . . . . . . . . . . . . . . . . . . . . . . . . . . 79
Storing a Phonebook Entry . . . . . . . . . . . . . . . . . . . . . . . . . 80
Recording a Voice Name For a Phonebook Entry . . . . . . . 84
Dialling a Phonebook Entry . . . . . . . . . . . . . . . . . . . . . . . . 85
Editing a Phonebook Entry . . . . . . . . . . . . . . . . . . . . . . . . . 85
Contents - 7
C350.RG.book Page 8 Friday, February 14, 2003 8:35 AM
Sorting Phonebook Entries . . . . . . . . . . . . . . . . . . . . . . . . . 86
Copying Phonebook Entries . . . . . . . . . . . . . . . . . . . . . . . . 87
Checking Phonebook Capacity . . . . . . . . . . . . . . . . . . . . . . 90
Customising Your Phone Settings . . . . . . . . . . . . . . . . . . . 91
Reordering the Main Menu . . . . . . . . . . . . . . . . . . . . . . . . . 91
Reordering the Message Centre Menu . . . . . . . . . . . . . . . . 91
Redefining Soft Keys . . . . . . . . . . . . . . . . . . . . . . . . . . . . . 92
Selecting a Different Language . . . . . . . . . . . . . . . . . . . . . 93
Activating Ringer IDs . . . . . . . . . . . . . . . . . . . . . . . . . . . . . 93
Using Shortcuts . . . . . . . . . . . . . . . . . . . . . . . . . . . . . . . . . 93
Setting a Wallpaper Image . . . . . . . . . . . . . . . . . . . . . . . . . 95
Setting a Screen Saver . . . . . . . . . . . . . . . . . . . . . . . . . . . . 95
Getting More Out of Your Phone . . . . . . . . . . . . . . . . . . . . . 96
Dialling Options . . . . . . . . . . . . . . . . . . . . . . . . . . . . . . . . . . 96
Managing Your Calls . . . . . . . . . . . . . . . . . . . . . . . . . . . . . . 97
Monitoring Phone Use . . . . . . . . . . . . . . . . . . . . . . . . . . . . 98
Network Features . . . . . . . . . . . . . . . . . . . . . . . . . . . . . . . 101
Security . . . . . . . . . . . . . . . . . . . . . . . . . . . . . . . . . . . . . . . . 106
Locking and Unlocking Your Phone . . . . . . . . . . . . . . . . . 106
Changing Your Unlock Code . . . . . . . . . . . . . . . . . . . . . . 107
Locking and Unlocking the Keypad . . . . . . . . . . . . . . . . . 109
Protecting the SIM Card . . . . . . . . . . . . . . . . . . . . . . . . . . 109
Line Security . . . . . . . . . . . . . . . . . . . . . . . . . . . . . . . . . . . 111
Personal Organiser Features . . . . . . . . . . . . . . . . . . . . . . . 112
Datebook . . . . . . . . . . . . . . . . . . . . . . . . . . . . . . . . . . . . .112
Alarm Reminders . . . . . . . . . . . . . . . . . . . . . . . . . . . . . . . 117
Calculator . . . . . . . . . . . . . . . . . . . . . . . . . . . . . . . . . . . . .117
News and Entertainment. . . . . . . . . . . . . . . . . . . . . . . . . . .120
Mobile Internet . . . . . . . . . . . . . . . . . . . . . . . . . . . . . . . . . 120
Phone Themes . . . . . . . . . . . . . . . . . . . . . . . . . . . . . . . . . 122
8 - Contents
C350.RG.book Page 9 Friday, February 14, 2003 8:35 AM
Picture Viewer . . . . . . . . . . . . . . . . . . . . . . . . . . . . . . . . . . 124
Games . . . . . . . . . . . . . . . . . . . . . . . . . . . . . . . . . . . . . . . 125
MotoMixer Sound Editor . . . . . . . . . . . . . . . . . . . . . . . . . . 129
Creating Alert Tones . . . . . . . . . . . . . . . . . . . . . . . . . . . . . 132
SIM Applications . . . . . . . . . . . . . . . . . . . . . . . . . . . . . . . . 137
Troubleshooting . . . . . . . . . . . . . . . . . . . . . . . . . . . . . . . . . 138
Warranty Information . . . . . . . . . . . . . . . . . . . . . . . . . . . . . 146
Specific Absorption Rate Data . . . . . . . . . . . . . . . . . . . . . . 151
Index . . . . . . . . . . . . . . . . . . . . . . . . . . . . . . . . . . . . . . . . . . . 153
Contents - 9
C350.RG.book Page 10 Friday, February 14, 2003 8:35 AM
Safety and General Information
IMPORTANT INFORMATION ON SAFE AND EFFICIENT
OPERATION
READ THIS INFORMATION BEFORE USING YOUR PERSONAL
COMMUNICATOR
The information provided in this document supersedes the general
safety information contained in user guides published prior to this
date. For information regarding radio use in a hazardous
atmosphere please refer to the Factory Mutual (FM) Approval
Manual Supplement or Instruction Card, which is included with
radio models that offer this capability.
RF Operational Characteristics
Your Personal Communicator contains a transmitter and a receiver.
When it is ON, it receives and transmits radio frequency (RF)
energy. The Personal Communicator operates in the frequency
range of 900 MHz to 1990 MHz and employs digital modulation
techniques.
When you communicate with your Personal Communicator, the
system handling your call controls the power level at which your
personal communicator transmits. The output power level typically
may vary over a range from 0.063 watts to 1.58 watts.
Exposure To Radio Frequency Energy
Your Motorola Personal Communicator is designed to comply with
the following national and international standards and guidelines
regarding exposure of human beings to radio frequency
electromagnetic energy:
• United States Federal Communications Commission, Code of
Federal Regulations; 47 CFR part 2 sub-part J
10 - Safety and General Information
C350.RG.book Page 11 Friday, February 14, 2003 8:35 AM
• American National Standards Institute (ANSI) / Institute of
Electrical and Electronic Engineers (IEEE) C95. 1-1992
• Institute of Electrical and Electronic Engineers (IEEE) C95.
1-1999 Edition
• National Council on Radiation Protection and Measurements
(NCRP) of the United States, Report 86, 1986
• International Commission on Non-Ionizing Radiation
Protection (ICNIRP) 1998
• National Radiological Protection Board of the United Kingdom
1995
• Ministry of Health (Canada) Safety Code 6. Limits of Human
Exposure to Radiofrequency Electromagnetic Fields in the
Frequency Range from 3 kHz to 300 GHz, 1999
• Australian Communications Authority Radiocommunications
(Electromagnetic Radiation - Human Exposure) Standard
1999 (applicable to wireless phones only)
To assure optimal performance and make sure human exposure to
radio frequency electromagnetic energy is within the guidelines set
forth in the above standards, always adhere to the following
procedures:
Portable Personal Communicator Operation
and EME Exposure
Antenna Care
Use only the supplied or an approved replacement antenna.
Unauthorised antennas, modifications, or attachments could
damage the Personal Communicator and may violate FCC and/or
other applicable regulations.
DO NOT hold the antenna when the Personal Communicator is
“IN USE”. Holding the antenna affects call quality and may cause
Safety and General Information - 11
C350.RG.book Page 12 Friday, February 14, 2003 8:35 AM
the Personal Communicator to operate at a higher power level than
needed.
Phone Operation
The Personal Communicator is designed to be used with a headset
for talking and listening. The Personal Communicator can also be
placed inside the holster, then the holster can be clipped onto your
belt, pocket, handbag, or other apparel and used with the headset.
Body-worn Operation
To maintain compliance with FCC RF exposure guidelines, if you
wear the Personal Communicator on your body when transmitting,
always place the Personal Communicator in a Motorola supplied
or approved clip, holder, holster, case, or body harness. Use of
non-Motorola-approved accessories may exceed FCC RF
exposure guidelines. If you do not use a body-worn accessory,
ensure the antenna is at least one inch (2.5 cm) from your
body when transmitting.
Approved Accessories
For a list of approved Motorola accessories, look in the accessory
section of this manual.
Electromagnetic Interference/Compatibility
Nearly every electronic device is susceptible to electromagnetic
interference (EMI) if inadequately shielded, designed or otherwise
configured for electromagnetic compatibility.
Facilities
To avoid electromagnetic interference and/or compatibility conflicts,
turn off your Personal Communicator in any facility where posted
notices instruct you to do so. Hospitals or health care facilities may
be using equipment that is sensitive to external RF energy.
12 - Safety and General Information
C350.RG.book Page 13 Friday, February 14, 2003 8:35 AM
Aircraft
When instructed to do so, turn off your Personal Communicator
when on board an aircraft. Any use of a Personal Communicator
must be in accordance with applicable regulations per airline crew
instructions.
Medical Devices
Pacemakers
The Health Industry Manufacturers Association recommends that a
minimum separation of 6 inches (15 centimetres) be maintained
between a handheld wireless phone and a pacemaker.These
recommendations are consistent with the independent research by,
and recommendations of, Wireless Technology Research.
Persons with pacemakers should:
• ALWAYS keep the Personal Communicator more than six
inches (15 centimetres) from their pacemaker when the
Personal Communicator is turned ON.
• not carry the Personal Communicator in the breast pocket.
• use the ear opposite the pacemaker to minimise the potential
for interference.
• turn the Personal Communicator OFF immediately if you have
any reason to suspect that interference is taking place.
Hearing Aids
Some digital wireless phones may interfere with some hearing aids.
In the event of such interference, you may want to consult your
hearing aid manufacturer to discuss alternatives.
Other Medical Devices
If you use any other personal medical device, consult the
manufacturer of your device to determine if it is adequately
Safety and General Information - 13
C350.RG.book Page 14 Friday, February 14, 2003 8:35 AM
shielded from RF energy. Your doctor may be able to assist you in
obtaining this information.
Safety and General
Use in Vehicles
Check the laws and regulations on the use of phones in your
vehicle. You are advised to always obey them.
When using your Personal Communicator in a vehicle, please:
• Use hands-free operation, if available.
• Pull off the road and park before making or answering a call.
Operational Warnings
For Vehicles with an Air Bag
Do not place the Personal Communicator in the area over an air
bag or in the air bag deployment area. Air bags inflate with great
force. If the Personal Communicator is placed in the air bag
deployment area and the air bag inflates, the Personal
Communicator may be propelled with great force and cause
serious injury to occupants of the vehicle.
Potentially Explosive Atmospheres
Turn off your Personal Communicator prior to entering any area
with a potentially explosive atmosphere, unless it is especially
qualified for use in such areas as “Intrinsically Safe” (for example,
Factory Mutual, CSA, or UL Approved). Do not remove, install, or
charge batteries in such areas. Sparks in a potentially explosive
atmosphere can cause an explosion or fire resulting in bodily injury
or even death.
The areas with potentially explosive atmospheres referred to above
include fuelling areas such as below decks on boats, fuel or
14 - Safety and General Information
C350.RG.book Page 15 Friday, February 14, 2003 8:35 AM
chemical transfer or storage facilities, areas where the air contains
chemicals or particles, such as grain, dust or metal powders, and
any other area where you would normally be advised to turn off
your vehicle engine. Areas with potentially explosive atmospheres
are often but not always posted.
Blasting Caps and Areas
To avoid possible interference with blasting operations, turn off your
Personal Communicator when you are near electrical blasting
caps, in a blasting area, or in areas posted: “Turn off two-way
radio”. Obey all signs and instructions.
Operational Cautions
Antennas
Do not use the Personal Communicator if it has a damaged
antenna. If a damaged antenna comes into contact with your skin,
a minor burn can result.
Batteries
All batteries can cause property damage and/or bodily injury such
as burns if a conductive material such as jewellery, keys, or beaded
chains touch exposed terminals. The conductive material may
complete an electrical circuit (short circuit) and become quite hot.
Exercise care in handling any charged battery, particularly when
placing it inside a pocket, bag, or other container with metal
objects.
Safety and General Information - 15
C350.RG.book Page 16 Friday, February 14, 2003 8:35 AM
European Union Directives Conformance Statement
Hereby, Motorola declares that this product is in
compliance with
• The essential requirements and other relevant
provisions of Directive 1999/5/EC
• All other relevant EU Directives
IMEI: 350034/40/394721/9
0168
Type: MC2-41H14
Product
Approval
Number
The above gives an example of a typical Product Approval Number.
You can view your product's Declaration of Conformity (DoC) to
Directive 1999/5/EC (the R&TTE Directive) at www.motorola.com/
rtte - to find your DoC, enter the Product Approval Number from
your product's label in the "Search" bar on the Web site.
16 - Safety and General Information
C350.RG.book Page 17 Friday, February 14, 2003 8:35 AM
Getting Started
What’s in the Box?
Your digital wireless phone typically comes equipped with a battery
and a charger. Other accessory options can customise your phone
for maximum performance and portability.
To purchase Motorola Original™ accessories, please contact
Motorola as per the enclosed User Information publication.
About This Guide
Optional Features
Features marked with this label are optional network,
SIM card, and/or subscription-dependent features.
These features may not be offered by all service
providers in all geographical areas. Contact your
service provider for information about availability.
Optional Accessories
Features marked with this label require the use of an
optional Motorola Original™ accessory.
Getting Started - 17
C350.RG.book Page 18 Friday, February 14, 2003 8:35 AM
Installing the Battery
You must install and charge the battery to use your phone.
Your phone is designed to be used only with Motorola
Original batteries and accessories. We recommend that
you store batteries in their protective cases when not in
use.
Do This
1 Remove the battery from its protective clear plastic
case, if necessary.
3
2 Press down on the
2
cover release button
at the top of your
phone.
3 Pull the top of the
phone’s back cover
to release it.
4 Insert the battery
with printed arrows
and two tabs at the
top of the battery
compartment.
5 Push down until the
battery is inserted at
the bottom.
18 - Getting Started
Release
button
5
4
C350.RG.book Page 19 Friday, February 14, 2003 8:35 AM
Do This
6 Insert the bottom of
the back cover.
7
7 Press the top of the
back cover down
until it hooks over
the cover release
button.
6
Charging the Battery
New batteries are shipped partially charged. Before you can use
your phone, you need to install and charge the battery, as indicated
by the following instructions. Some batteries perform best after
several full charge/discharge cycles.
Do This
1 Plug the travel
charger into the
middle jack on the
bottom of your
phone.
2 Plug the other end of the travel charger into the
appropriate electrical outlet.
3 When your phone indicates that the battery is fully
charged ( ), remove the travel charger.
Caution: If the battery is fully or heavily discharged, your phone
may not display for up to one minute after inserting the
charger. Do not attempt to force the charger further in if you do not
see an immediate response.
Getting Started - 19
C350.RG.book Page 20 Friday, February 14, 2003 8:35 AM
Note: When you charge the battery, the battery level indicator in
the upper right corner of the display shows how much of the
charging process is complete. See page 31.
Battery Use
Caution: To prevent injuries or burns, do not allow metal objects to
contact or short-circuit the battery terminals.
To maximise your battery’s performance:
• Always use Motorola Original™ batteries and battery
chargers. The phone warranty does not cover damage caused
from using non-Motorola batteries and/or battery chargers.
• New batteries or batteries that have been stored for long
periods of time may require a longer initial charge time.
• Maintain the battery at or near room temperature when
charging.
• Do not expose batteries to temperatures below -10°C (14°F)
or above 45°C (113°F). Always take your phone with you
when you leave your vehicle.
• When you do not intend to use a battery for a while, store it
uncharged in a cool, dark, dry place, such as a refrigerator.
• Over extended periods of time, batteries gradually wear down
and require longer charging times. This is normal. If you
charge your battery regularly and notice a decrease in talk
time or an increase in charging time, then it is probably time to
purchase a new battery.
The rechargeable batteries that power this product must
be disposed of properly and may need to be recycled.
Refer to your battery’s label for battery type. Contact
your local recycling centre for proper disposal methods.
Never dispose of batteries in a fire because they may explode.
20 - Getting Started
C350.RG.book Page 21 Friday, February 14, 2003 8:35 AM
Changing Your SIM Card
Your SIM (Subscriber Identity Module) card contains your phone
number, service details, and phonebook/message memory. It must
be installed in the base of the phone. If you have problems with
your SIM card, contact your service provider.
Caution: Do not bend or scratch your SIM card. Avoid exposing
your SIM card to static electricity, water, or dirt.
Note: Since your phone lets you change covers and keypads, it
may not appear exactly as the phone pictured. All key locations,
sequences, and functions remain the same with any of the various
covers.
Do This
1 Press down on the
cover release button
at the top of your
phone.
2 Pull the top of the
phone’s back cover
to release it.
2
1
Release
button
3 Lift out the battery
from the base of the
phone.
Getting Started - 21
C350.RG.book Page 22 Friday, February 14, 2003 8:35 AM
Do This
4 Slide the plastic SIM
card tab forward to
unlock the SIM.
SIM card
5 Lift out the old SIM
card, if necessary.
SIM card
tab
6 Slide in the new SIM
card in the holder
with the cut corner
on the upper left and
the gold plate facing
down.
7 Insert the battery
with printed arrows
and two tabs at the
top of the battery
compartment.
8 Push down until the
battery is inserted at
the bottom.
22 - Getting Started
SIM card
8
7
C350.RG.book Page 23 Friday, February 14, 2003 8:35 AM
Do This
9 Insert the bottom of
the back cover.
10
10 Press the top of the
back cover down
until it hooks over
the cover release
button.
9
Changing Your Phone’s Cover
Always use Motorola Original™ covers. The phone
warranty does not cover damage caused from using
non-Motorola accessories.
Your phone uses a convertible cover, keypad, and (in some cases)
side band that you may replace to completely change its
appearance.
Note: Since your phone lets you change covers and keypads, it
may not appear exactly as the phone pictured. All key locations,
sequences, and functions remain the same with any of the various
covers.
Getting Started - 23
C350.RG.book Page 24 Friday, February 14, 2003 8:35 AM
Remove Cover and Keypad
Do This
1 Press down on the
cover release button
at the top of your
phone.
2 Pull the top of the
phone’s back cover
to release it.
3 If your cover has a
removable side
band, remove it
now.
4 Pull the side tabs
away from the
phone.
5 Lift up on the
lanyard loop to pull
the phone out of the
front cover.
2
1
Release
button
Side band
Lanyard loop
5
4
Side tabs
Always use the keypad and side band (if applicable) that matches
the new cover.
24 - Getting Started
C350.RG.book Page 25 Friday, February 14, 2003 8:35 AM
Install Cover and Keypad
Do This
1 If your phone has an
end cap, install it
before attaching the
front cover.
2 Slide the top of the
phone into the top of
the new front cover.
2
3 Press the bottom of
the phone into the
front cover until the
side tabs snap into
place.
4 If your cover has a
removable side
band, attach it now.
5 Insert the bottom of
the back cover.
3
Side tabs
6
6 Press the top of the
back cover down
until it hooks over
the cover release
button.
5
Getting Started - 25
C350.RG.book Page 26 Friday, February 14, 2003 8:35 AM
Resetting Your Phone
If your phone becomes frozen on a single display, error message,
or power up, reset your phone as follows:
Do This
1 Remove your phone’s back and front cover as
described on page 21.
2 Use a small object
to press the Reset
button on the front of
your phone.
Your phone display
should be restored.
Reset
button
3 Replace your phone’s cover.
Turning Your Phone On
Do This
1 Press and hold O End/
(the End/Power key). Power
Key
2 If necessary, enter your SIM card PIN code and press
(+) to unlock your SIM card.
Note: If you enter an incorrect PIN code three times
in a row, your SIM card is disabled and your phone
displays the message . (For more
information, see page 109.)
26 - Getting Started
C350.RG.book Page 27 Friday, February 14, 2003 8:35 AM
Do This
3 If necessary, enter your four-digit unlock code and
press (+) to unlock your phone.
Note: The unlock code is originally set to 1234. (For
more information, see page 106.)
Note: At startup, you are given the option to personalise
your phone. Select (-) to set personal phone
options, or (+) to go to the idle display. For more
information, see page 91.
Adjusting the Volume
You can adjust your phone’s earpiece and ring tone volume by
pressing S left and right.
When
you are in a call
the display is idle
You Can Adjust
earpiece speaker volume
ring tone volume
Making and Answering Calls
This section summarises the most basic calling features. For more
features, see page 52.
Making a Call
Built-in antenna
There is a built-in antenna in the top of your
phone. Do not block the antenna while you
are making a call.
To call a number, your phone must:
• be turned on and unlocked
• have a SIM card inserted and unlocked
• have a network connection with adequate signal strength
Getting Started - 27
C350.RG.book Page 28 Friday, February 14, 2003 8:35 AM
Do This
1 Enter the number with the keypad keys (up to 40
digits).
Note: If you make a mistake, press
(-) to delete the last digit, or press and hold
(-) to clear all digits.
2 Press N (send key) to make the call.
3 Press O (end key) when the call is done.
Note: You can make an emergency call even when the phone is
locked, or when a SIM card is not inserted. See page 54.
Answering a Call
To answer a call, your phone must:
• be turned on and unlocked
• have a SIM card inserted and unlocked
• have a network connection with adequate signal strength
When you receive a call, your phone rings and/or vibrates and
displays an incoming call message.
Do This
1 Press N or (+)
2 Press O (end key) when the call is done.
28 - Getting Started
C350.RG.book Page 29 Friday, February 14, 2003 8:35 AM
Changing the Call Alert
• Press S left to switch the alert for incoming calls and other
events to vibrate, then silent.
• Press S right to reset your phone to ring alert.
Viewing Your Phone Number
To view your phone number from the idle display, press M #.
While you are on a call, press M > ! "
#$.
Note: Your phone number must be stored on your SIM card to use
this feature. If you do not know your phone number, contact your
service provider.
Getting Started - 29
C350.RG.book Page 30 Friday, February 14, 2003 8:35 AM
Using Your Phone
See page 1 for a diagram of basic phone components.
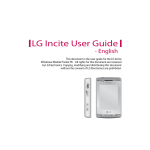
Using the Display
The top section of the display shows phone status indicators. The
following illustration shows some of the common indicators that you
may see at the top of the display when using your phone.
Messages, phone numbers, and menu options appear in the
middle of the display. Text labels at the bottom corners of the
display show the current soft key functions. A M (menu) indicator in
the bottom centre of the display indicates that you can open the
main menu or a feature sub-menu to see more options. For more
information about the soft key and menu key labels, see page 33.
Some of the phone functions described in this guide must be
performed from the idle display. The term idle display refers to the
standard display that you see when your phone is on and ready to
use, when you are not on a call or using the menu system.
➋ GPRS
Indicator
➊ Signal
Strength
Indicator
➒ Alert Type
Indicator
➌ In Use
Indicator
30 - Using Your Phone
➎ Text Entry
Indicator (if
applies)
➏ Message
Indicator
)
5 O, õ=E
x
Clock
➍ Roam
Indicator
M ➑ Menu Indicator
➐ Battery
Level
Indicator
C350.RG.book Page 31 Friday, February 14, 2003 8:35 AM
➊ Signal Strength Indicator Shows the strength of your phone’s
connection with the network.
Strong
5 4 3 2
1
j No signal
You cannot make or answer calls when the “no signal” indicator is
displayed.
)
➋ GPRS Indicator Indicates that your phone is using
a high-speed GPRS network connection ( ). GPRS
allows faster data transfer speeds. The indicator does
not mean that you are in a call; only that you are
registered on the network via a GPRS connection.
Other indicators can include:
( = GPRS PDP
context active
9
* = GPRS packet data
available
:
➌ In Use Indicator Indicates when a call is in progress, and when
you have a secure ( ) or unsecure ( ) connection.
➍ Roam Indicator Appears when your phone uses
another network system outside your home network.
When you leave your home network area, your phone
roams or seeks another network. Icons here can also
indicate your text entry mode (alpha, numeric, symbol,
etc.)
➎ Text Entry Indicator Indicates your Text Entry Method
whenever you are in a text editor (Tap, iTap, etc.). See page36.
➏ Message Indicator Indicates when you have an
active Chat session, or when you have a new voice or
text message waiting.
Using Your Phone - 31
C350.RG.book Page 32 Friday, February 14, 2003 8:35 AM
➐ Battery Level Indicator Shows the amount of charge left in
your battery. The more bars visible, the greater the charge.
High
E
D
C
B
Low
Recharge your battery when you see the % warning
message and hear the low battery alert.
➑ Menu Indicator Indicates that you can press M to open a
menu. See page 33.
➒ Alert Type Indicator Shows the current selected alert profile.
The default alert setting is loud ring.
w = loud ring
y = vibrate
t = silent
32 - Using Your Phone
x = soft ring
= vibrate and ring
C350.RG.book Page 33 Friday, February 14, 2003 8:35 AM
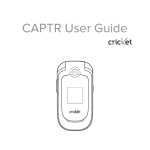
Using the Menu
You can access many of your phone’s features by using these keys
to move through the menu system:
Left Soft Key
Perform functions
identified by left
display prompt.
Right Soft Key
Perform functions
identified by right
display prompt.
Menu Key
Enter menu
system or open a
sub-menu.
Power/End Key
Press & hold to
power phone on &
off.
Press & release to
end phone calls,
exit menus.
Navigation
Keys
Scroll through
menus and lists,
set feature values.
From the idle display, press M to enter the main menu. Press
S to scroll through menu features in the main menu.
Using Your Phone - 33
C350.RG.book Page 34 Friday, February 14, 2003 8:35 AM
Navigating to a Feature
This guide shows how to navigate to a menu feature as follows:
M > $
> $
Find the Feature
The > symbol means that you should scroll to and select the
feature. This example shows that you should press M, scroll to
and select $, then scroll to and select $ to see the
dialled calls list.
Selecting a Feature
Some features require you to select an item from a list:
Press
(-)
to go back to
the previous
screen.
A sub-menu is
available. Press
M to open
the sub-menu.
5
E
10) John Smith
M !
Highlighted
item
Press & (+) to view details
of the highlighted item.
Select an item by highlighting it using one of these approaches:
• Press S to scroll up or down to the item you want.
• In a numbered list, press a number key to highlight the item.
• In an alphabetised list, press a key multiple times to cycle
through the letters on the key and highlight the closest
matching list item.
34 - Using Your Phone
C350.RG.book Page 35 Friday, February 14, 2003 8:35 AM
Entering Feature Information
Features such as the phonebook and datebook require you to enter
information to fill in an entry’s details:
S
Press
to
scroll down
to additional
items.
5
E
"
Highlighted
item
Name: John Smith
#$$$
M &
%
Press (-) to exit
without making changes.
(-) appears when you
enter or edit information. Press
(-) to save your changes.
Press
'( (+)
to edit the
selected
information.
• Enter numbers or text with the keypad.
• When an item has a list of possible values, press * to scroll
left or # to scroll right, and select a value.
• When an item has a list of possible numeric values, press a
number key to set the value.
• If you enter or edit information and then decide that you do not
want to save your changes, press O to exit without saving.
Using Your Phone - 35
C350.RG.book Page 36 Friday, February 14, 2003 8:35 AM
The message centre lets you compose and send text messages. A
flashing cursor shows where the text will appear:
Press
Flashing
cursor
indicates
insertion
point.
5
E
'
%
Press (-)
to exit without
making changes.
M ()!
(+)
to view and
insert a name,
number, or
message from
previously
stored
information.
Press M
to open the
sub-menu.
When you enter text, the flashing cursor changes to a block cursor,
and the soft key functions change
Block
5
E
cursor
'
indicates
T
current
highlighted
character.
%* M
)
After two
seconds, the block cursor
reverts to a flashing cursor Press (-)
and moves to the next
to delete the character
position.
to the left of the insertion
point.
Press
(+)
to accept
and store
the text.
Entering Text
Various text entry methods make it easy for you to enter names,
numbers, and text messages on your phone.
36 - Using Your Phone
C350.RG.book Page 37 Friday, February 14, 2003 8:35 AM
Choosing a Text Mode
To activate a text mode, press M > from any text entry
screen and select the text mode:
)
"
#
%$
Let the phone predict each word as you
enter it, then choose the word from a list
(see page 41).
Enter characters one at a time by pressing
the key for the letter, number, or symbol
(see below). This is the standard mode for
entering text on your phone.
Enter numbers only.
Enter symbols only (see page 40).
Browse through your phonebook and
recent calls lists to select a name or
number to enter.
Note: The text mode you select remains active until you change it
by selecting another mode.
Using Tap Method
Tap method is the default standard mode for entering text on your
phone.
To activate tap method from any text entry screen, press M and
select the menu option.
To enter text using the tap method:
Do This
1 Press a number
key one or more
times
To
cycle through the characters
associated with the key and
select the character you want
(see page 40).
Using Your Phone - 37
C350.RG.book Page 38 Friday, February 14, 2003 8:35 AM
Do This
2 Continue to press
number keys
3 Press (+)
To
enter the rest of the characters
in the text message.
accept and store the text when
you are finished.
Character Chart
Use this chart as a guide for entering spaces, numbers, letters,
symbols, and other characters with the text mode. Press
the same key repeatedly to cycle through available characters.
1
space . 1 ? ! , @ _ & ~ : ; " ( ) ' ¿ ¡ % £ $ ¥
2
a b c 2 ä å á à â ã α
3
d e f 3 δ ë é è ê ε
4
g h i 4 ï í î γ η
j k l 5 κ λ
5
6
7
8
9
0
β ç
φ
ι
m n o 6 ñ ö ø ó ò ô õ µ ν ω
p q r s 7 π ß σ
t u v 8 θ ü ú ù û τ
w x y z 9 ξ ψ
+ - 0 x * / \ [ ] = > < # §
Note: Your phone model may not include all of the characters
shown in this chart.
38 - Using Your Phone
C350.RG.book Page 39 Friday, February 14, 2003 8:35 AM
General Text Entry Rules
Press a number
key as many
times as
necessary to
enter the desired
character at the
flashing cursor
location.
'
%
Press and hold a
number key to
cycle between
text entry modes.
M ()!
Press up or
down to change
character in
block cursor to
uppercase or
lowercase.
Press left or right
to move flashing
cursor to the left
or right in text
message.
• If you do not press a key for two seconds, the character in the
block cursor is accepted, and the cursor moves to the next
position.
• The first character of each sentence is capitalised unless you
manually change it. (Press S up or down to change the
character to upper or lower case while it is highlighted.)
Using Your Phone - 39
C350.RG.book Page 40 Friday, February 14, 2003 8:35 AM
Use Symbol Mode
Your phone provides an alternative way to find and enter symbol
characters in a text message. You can view and select from a
variety of available symbols.
To activate symbol mode from any text entry screen, press M and
select the # menu option.
To enter a symbol in symbol mode:
Do This
1 Press a number
key one time
2 Scroll left or right
with *# or
To
display its symbol options (See
page 41.)
The symbols associated with the
key you pressed are shown at
the bottom of the display. If
necessary, press other keypad
keys to find the symbol you
want.
highlight the symbol you want
S
or
Press the number
key multiple times
3 Press
(+)
40 - Using Your Phone
add the highlighted symbol to
the text area at the top of the
display
C350.RG.book Page 41 Friday, February 14, 2003 8:35 AM
Symbol Chart
Use this chart as a guide for entering symbols in symbol mode.
1
2
3
4
5
6
7
8
9
0
space . ? ! , @ _
& ~ : ; " - ( ) ' ¿
¡ % £ $ ¥
@ _ \
/ : ;
" & '
( ) [ ] { }
¿ ¡ ~
< > =
$
#
+
#
£ ¥
% *
- x * / = > <
§
Use iTAP™ Software Predictive Text Entry
iTAP™ software provides a predictive text entry method that lets
you enter the letters of a word using only one keypress per letter.
You must activate iTAP software prior to entering letters. You can
do this from any text entry screen by pressing M to open the
menu and selecting the ) menu option.
Using Your Phone - 41
C350.RG.book Page 42 Friday, February 14, 2003 8:35 AM
Enter Words
Do This
1 Press a number
key one time
2 Press number
keys (one per
letter)
To
enter the first letter of the word
The letters associated with the
key you pressed are shown at
the bottom of the display.
enter the rest of the word
Alternative words and letter
combinations are shown at the
bottom of the display based on
the keys you press. These word
choices are updated with each
keypress.
locate and highlight the word
you want
3 When you have
entered all the
letters of the word,
press S right
or left
add the highlighted word to the
4 Press
(+)
text area at the top of the display
A space is automatically
inserted after the word.
42 - Using Your Phone
C350.RG.book Page 43 Friday, February 14, 2003 8:35 AM
For example, to spell “art,” press 2 7 8. The display
shows:
Flashing
cursor
indicates
insertion
point.
5
E
79 + +, %*
Press (-) to
clear the last letter entered.
S
to
Press
scroll and see
additional word
choices.
}
M %*
Press (+) to insert the
highlighted word.
Enter Novel Words
You may enter a word that the iTAP software does not recognise. If
the word is not displayed:
Do This
To
1 Press (-) one delete letters until you see a
or more times
letter combination that
matches the start of the word
highlight the letter or letter
2 Press S
combination
shift the text entry cursor to
3 Press (+),
then press S to the the left and “lock” the
selected word portion
left
4 Continue to enter
letters and highlight
letter combinations
spell the word
Your phone stores the unrecognised word, and includes
it in the list of alternative word choices the next time you
enter it. When memory space for storing unrecognised
words is filled, your phone deletes the oldest words as
new words are added.
Using Your Phone - 43
C350.RG.book Page 44 Friday, February 14, 2003 8:35 AM
Enter Punctuation
Press
1 or 0
To
enter punctuation or other
characters as shown on page 38
Use Capitalisation
The first word of a sentence is automatically capitalised, with
following words in lowercase.
Press
S up or down
To
change the words to initial
character capitalised, all
uppercase characters, or all
lowercase characters
Enter Numbers
Do This
1 Enter the first digit
and then highlight
it
2 Press number
keys
3 Press
(+)
44 - Using Your Phone
To
put the iTAP software in number
entry mode
add digits to the number
enter the number at the flashing
cursor location
C350.RG.book Page 45 Friday, February 14, 2003 8:35 AM
Delete Letters and Words
Place the cursor to the right of the text you want to delete, and then
do the following:
Do This
Press (-)
Hold (-)
To
delete one letter at a time
delete the entire message
Changing the Zoom Setting
You can set your phone’s display to show either three lines or two
lines of text plus soft key labels. Three lines of text display more
information, while two lines increase text size.
To change the display view, press M once, then press and hold
M again within two seconds of the first press.
Setting Up Your Phone
Setting the Time and Date
You must set the time and date to use the datebook.
Find the Feature
M> > $
> $
> " > Note: When you remove the phone battery, the stored time and
date is displayed the next time you turn the phone on. You may
need to reset the time and date, depending on how long the phone
is without power.
Using Your Phone - 45
C350.RG.book Page 46 Friday, February 14, 2003 8:35 AM
Changing Personal Greetings
To change the text displayed when you turn on your
phone:
M> > $
> $ > )$$
> (
Find the Feature
Choosing Alert and Ring Tones
Your phone rings or vibrates to notify you of an incoming call,
message, or other event. This ring or vibration is called an alert.
You can select one of five different alert profiles:
w Loud ring
y Vibrate
t Silent
x
Soft ring
Vibrate and ring
The alert setting indicator in your display shows the current alert
profile (see illustration on page 31).
Each alert profile contains settings for ring tone and keypad
volume. It also includes alert tone settings for different events:
incoming calls, text messages, voicemail messages, data calls,
alarms, and reminders. You can modify the settings in each profile.
Note: To create your own alert tones, see page 129. To download
sounds to use as your alert tones, see page 122.
46 - Using Your Phone
C350.RG.book Page 47 Friday, February 14, 2003 8:35 AM
Select an Alert Profile
M> $ > Find the Feature
Press
1 S
2 (+)
To
scroll to the alert profile you
want to use
select the alert profile
The phone displays the
* +message.
Customise an Alert Profile
You can customise a profile by changing the alerts used for specific
events (such as incoming calls, text messages, etc.). Your phone
includes a variety of preset alert tones and vibrations. Any changes
you make are saved to the current alert profile.
Note: This feature also lets you set the profile’s ring tone volume
and keypad volume.
Find the Feature
Press
1
S
2 '( (+)
3
S
4 (+)
M> $
> Alert To
scroll to the event for which you
want to set a new alert
select the event
The phone displays the list of
available alerts.
scroll to the alert you want for
the event
select the alert
Using Your Phone - 47
C350.RG.book Page 48 Friday, February 14, 2003 8:35 AM
Setting Your Backlight
You can set the amount of time that the display backlight remains
on, or turn off the backlight to conserve battery power:
Find the Feature
M> > $
> $
> " > Setting Your Contrast
You can set the amount of contrast in your display:
Find the Feature
M> > $
> $
> " > $
Setting Your Display Colour
You can select the colour palette that your phone uses to display
indicators, highlights, and soft key labels:
Find the Feature
M> > $
> $ > )$$
> " Setting Your Display Scrolling
You can set the cursor to stop or wrap around when it reaches the
top or bottom of a list in the display:
Find the Feature
48 - Using Your Phone
M> > $
> $
> " > C350.RG.book Page 49 Friday, February 14, 2003 8:35 AM
Setting Display Animation
You can turn animation off (to conserve the battery) or on.
Animation makes your phone’s menus move smoothly as you scroll
up and down.
Find the Feature
M> > $
> $
> " > Setting Battery Save
To adjust the phone’s power usage to conserve power
Find the Feature
M> > $
> $
> " > ,
Setting Wallpaper and Screen Saver
You can use the picture viewer to select a wallpaper or screen
saver image (see page 124). You can also download new pictures
and animations to use as your wallpaper or screen saver images
(see page 122).
Resetting All Options
To reset all options back to their factory settings except for the
unlock code, security code, and lifetime timer:
Find the Feature
M> > $
> $
> " > $ $
Using Your Phone - 49
C350.RG.book Page 50 Friday, February 14, 2003 8:35 AM
Clearing All Information
To reset all options back to their factory settings and clear all user
entries (such as Phonebook entries and downloaded wallpapers,
screen savers, and sounds):
Warning: This option erases all user-entered information stored in
your phone’s memory, including phonebook and datebook entries
and downloaded files. Once you erase the information, it cannot be
recovered. It resets all options back to their factory settings except
for the unlock code, security code, and lifetime timer.
Find the Feature
M> > $
> $
> " > $ Setting Up Your Phone for Hands-Free Use
A phone headset lets you use your phone without using your
hands.
You can also purchase an optional Motorola Original™
Easy-Install Hands-Free Kit for your car. This accessory
provides an alternative way for you to use your phone
without using your handset.
Note: The use of wireless devices and their accessories may be
prohibited or restricted in certain areas. Always obey the laws and
regulations on the use of these products.
Automatic Answer
When you activate automatic answer and connect your phone to
the Easy-Install Hands-Free Kit or phone headset, your phone
automatically answers calls after two rings.
Find the Feature
50 - Using Your Phone
M> > $
> $
> $ or '$
> " $%
C350.RG.book Page 51 Friday, February 14, 2003 8:35 AM
Automatic Hands-Free
You can set up your phone to automatically route calls to the
Easy-Install Hands-Free Kit when it detects a connection.
Find the Feature
M> > $
> $+
> $+
> " '$-
Using Your Phone - 51
C350.RG.book Page 52 Friday, February 14, 2003 8:35 AM
Calling Features
This chapter describes features related to making and answering
calls. For information about other call-related features, see page 55
and page 101. For basic instructions on how to make and answer
calls, see page 27.
Displaying Your Phone Number
From the idle display:
Press
M#
To
see your phone number
Your phone number must be
programmed on your SIM card
in order to use this feature.
While you are on a call:
Do This
Press M
> ! "
#$
To
see your phone number
Redialling a Number
You can redial a previously dialled phone number, whether the call
was connected or busy. From the idle display:
Press
1 N
2
S
52 - Calling Features
To
go directly to the dialled calls list
scroll to the entry you want to
call
C350.RG.book Page 53 Friday, February 14, 2003 8:35 AM
Press
3 N
To
redial the highlighted number
Using Caller ID
The calling line identification (caller ID) feature lets you
see who is calling before you answer.
• If the caller’s name is stored in your phonebook, the phone
automatically displays the (or + and a distinctive
+, when one is assigned). Otherwise, the phone displays
the caller’s phone number. To create or change a phonebook
entry, see page 80.
• If caller ID information is not available, your phone displays
the message .
• Outgoing Calls: Other phones can display your phone
number when you call them or send a message. To hide your
number for the next call or message, press M > > $ > . " > > / .
Terminating an Incoming Call
While the phone is ringing or vibrating:
Press
( (-)
To
cancel the incoming call
Depending on your phone settings and the type of
subscription you have, the call may be diverted to
another number, or the caller may hear a busy signal.
Calling Features - 53
C350.RG.book Page 54 Friday, February 14, 2003 8:35 AM
Dialling an Emergency Number
Your service provider programs one or more emergency phone
numbers (such as 999) that you can call under any circumstances.
You can dial and call the emergency number even when your
phone is locked, when you are prompted to enter a code or
password, when the SIM card is not inserted in your phone, or
when the SIM card is blocked or disabled.
Note: Emergency numbers vary by country. Your phone’s
emergency number(s) may not work in all locations.
To call the emergency number at any time:
Press
1 keypad keys
2 N
To
dial the emergency number
call the emergency number
Dialling International Numbers
To dial the local international access code:
Do This
Press 0 for two
seconds
To
insert the international access
code for the country from which
you are dialling
Inserting Special Characters into Dialling
Sequences
In addition to pressing numbers on your keypad, you can insert
special characters in a phone number.
54 - Calling Features
C350.RG.book Page 55 Friday, February 14, 2003 8:35 AM
While dialling (with digits visible in the display), you can press M
and insert one of the following:
Option
$ )"$
(inserts a )
$ (inserts a %)
$ 00
(inserts an )
Description
Your phone waits until the call
connects before it dials the next
digit(s) in the series
Your phone waits until the call
connects, then prompts you for
confirmation before it dials the
next digit(s)
Your phone prompts you for a
number before dialling the call.
The number you enter is
inserted into the dialling
sequence in place of the Note: You can insert characters in Phonebook entries.
Viewing the Received Calls or Dialled Calls List
Your phone keeps lists of the numbers from calls you recently
received and dialled, even if the calls did not connect. The lists are
sorted from newest to oldest entries. The oldest entries are deleted
as new ones are added. Each entry tells you the person’s number
(or name, if available) and whether the call connected or not. You
can call, store, or delete the numbers on these lists.
Shortcut: Press N to go directly to the dialled calls list from the
idle display.
To open the recent calls menu:
Find the Feature
M> $
Calling Features - 55
C350.RG.book Page 56 Friday, February 14, 2003 8:35 AM
Press
1
S
2 (+)
3
S
4 N
To
scroll to , $ or $
select , $ or $
scroll to an entry you want to
call, store, or delete
Note: < means the call
connected.
call the entry’s number
Note: Press and hold N for
two seconds to send the entry
number as DTMF tones. To
activate DTMF tones, see
page 98.
or
+
or
M
56 - Calling Features
if &% appears above the +
key—view the entry’s details
if appears above the +
key—store the entry’s details in
the phonebook
open the $ $ " to
perform other procedures as
described in the following list
C350.RG.book Page 57 Friday, February 14, 2003 8:35 AM
The $ $ " can include the following options:
Option
' /% $$
$
"
#
$
Description
Create a phonebook entry with the
selected number in the ! field. (This
option does not appear if appears above the + key, or if the
number is already stored as a
phonebook entry.)
Delete the entry. (This option does
not appear if appears above the
+ key.)
Delete all entries in the current list.
Hide (or show) your caller ID for the
next call.
Create a new text message, with the
selected number in the ! field.
See page 71.
Add digits to the end of the selected
number.
Attach another number from the
phonebook or recent calls list to the
end of the selected number.
Send the selected number to the
network as DTMF tones, for credit
card calling or password entry. (This
option is available only during an
active call.)
To activate DTMF tones, see
page 98.
Calling Features - 57
C350.RG.book Page 58 Friday, February 14, 2003 8:35 AM
Option
1/
Description
Tell the network you want to call and
talk to someone, and then send a
fax—all to the same number in the
same call. See page 101.
Returning an Unanswered Call
Your phone keeps a record of your unanswered calls. When you
cannot answer a call, your phone displays:
• the T (missed call) indicator
• the message X $$ $, where X is the total number of
missed calls
Press
1 & (+)
2
S
3 N
To
see the received calls list,
beginning with the most recent
call
scroll through the list and select
a call that you want to return
make the call
Entering Numbers in the Notepad
Your phone stores the most recent string of digits entered on the
keypad in a temporary memory location called the notepad. These
digits can be the last phone number that you called, or a phone
number that you simply entered but did not call. These digits
remain in the notepad even when you turn off the phone.
To call the number, create a phonebook entry, or perform other
operations with the number stored in the notepad:
Find the Feature
58 - Calling Features
M> $ > C350.RG.book Page 59 Friday, February 14, 2003 8:35 AM
Press
To
call the number
N
or
M
open the " to attach a
number or insert a special character
(see page 54)
or
(+)
create a new phonebook entry, with
the notepad number copied into the
! field (see page 80)
Attaching a Number
You can attach a number from your phonebook or recent calls list to
the digits you enter in the display.
While dialling (with digits visible in the display):
Do This
Press M
> "
#
To
attach a number from the
phonebook or recent calls list to
the end of the digits you entered
Using Voicemail
You can listen to your voicemail messages by calling
your network voicemail phone number. Voicemail
messages are stored on the network—not on your
phone. Contact your service provider for more details.
Calling Features - 59
C350.RG.book Page 60 Friday, February 14, 2003 8:35 AM
Storing Your Voicemail Number
Store your voicemail number in your phone to make it faster and
easier to use voicemail.Your voicemail number is provided by your
service provider.
Find the Feature
Press
1 keypad keys
2 (+)
M> > $$$
M> & "
To
enter the phone number for your
voicemail
store the number
Receiving a New Voicemail Message
When you receive a voicemail message, your phone displays
% &+&. (Some networks only indicate when you have
messages, whether they are new or not.) If reminders are turned
on, your phone sends a reminder every five minutes until you close
the new message notification, listen to the message, or turn off your
phone. (See page 117.)
From the new message notification:
Do This
Press (+)
To
call the voicemail phone number
you stored and listen to the
message
Listening to a Voicemail Message
Once you store your voicemail number, you can listen to your
voicemail messages at any time:
Find the Feature
60 - Calling Features
M> > $$$
> &
C350.RG.book Page 61 Friday, February 14, 2003 8:35 AM
Your phone calls the voicemail phone number you stored. If you do
not have a voicemail number stored, the phone guides you through
storing a number.
Speed Dialling
Speed dial lets you dial any phonebook entry with a minimal
number of keypresses.
When you store an entry in your phonebook, it is assigned a unique
speed dial number. You can then use the speed dial feature to call
the entry. In the idle display:
Press
1 keypad keys
2 #
3 N
To
enter the speed dial number for
the entry you want to dial
submit the number
call the entry
To make an entry in the phonebook or view an existing entry’s
speed dial number, see page 80.
One-Touch Dialling
You can call phonebook entries 1 to 9 with the push of a single key.
Press and hold the one-digit speed dial number for one second. To
store entries in locations 1 to 9 in the phonebook, see page 80.
You must assign the 1-touch dial feature to numbers 1 to 9 in your
phone memory phonebook or SIM card phonebook:
Find the Feature
M> > $
> $
> " > 2." Note: Your service provider may assign entry 1 to your voicemail
number.
Calling Features - 61
C350.RG.book Page 62 Friday, February 14, 2003 8:35 AM
Quick Dialling
You can dial pre-programmed numbers stored on your
phone. Your service provider may program your phone
with one or more quick dial numbers, such as the
customer service number. You can call them by
selecting them from the quick dial list.
Find the Feature
M> > 3" Note: Your service provider may use a different name for this
feature.
To change your quick dial numbers:
Find the Feature
M> > $
> $ > )$$
> 3" Using Call Waiting
If you subscribe to call waiting, an alert tone sounds
while you are on a call to indicate that you have
received a second call. To put the first call on hold and
answer the second call, press N. To put the first call
on hold and answer the second call:
Press
1 N
2 ' (+)
or
( -)
62 - Calling Features
To
answer the new call
switch back to the first call
Note: You can press
' (+) at any time to
switch between calls.
connect the two calls
C350.RG.book Page 63 Friday, February 14, 2003 8:35 AM
To end the first call and answer the second call:
Press
1 O
To
end the current call
2 N
Your phone rings to signal the
new call.
answer the new call
To activate or deactivate call waiting:
Find the Feature
M> > $
> . " > Diverting a Call
Call diverting sends your phone’s incoming voice, fax,
and/or data calls directly to another phone number.
Set Up or Cancel Call Diverting
The diverting options for voice, fax, or data calls are:
$
- 4,#
--
diverts all calls
divert calls if your phone is
unavailable
set different diverting numbers if you
are out of range, unable to answer, or
busy (voice calls only)
do not divert calls
Find the Feature
M> > $
> ,
Calling Features - 63
C350.RG.book Page 64 Friday, February 14, 2003 8:35 AM
Press
1
S
2 (+)
3
S
4 '( (+)
5
S
6 (+)
7
S
8 '( (+)
9 keypad keys
To
scroll to the type of calls you
want to divert
Scroll to to cancel all
call diverting.
view call diverting details
scroll to ,
change the , option
scroll to a diverting option
store the option
scroll to (for diverting,
scroll to - "$ , - $%, or
- 4#)
select enter the diverting phone
number
or
( +)
10 (+)
11 (-)
select a number from the
phonebook or recent call lists
store the number
save call diverting settings
Note: Repeat this procedure to enter diverting information for other
call types.
64 - Calling Features
C350.RG.book Page 65 Friday, February 14, 2003 8:35 AM
Check Call Diverting Status
Your network may store call diverting status for you. If you change
your phone’s call divert settings, then you should confirm that the
network call divert status matches your preferences.
Find the Feature
Press
1
S
2 &% (-)
M> > $
> ,
> , "$
To
scroll to &, 1/, or calls
confirm that the network settings
are correct
Linking Calls
To talk to more than one person on a call, you can make
a conference call. Call the first person, call the second
person, then link the two calls.
Press
1 keypad keys
2 N
3 ' (+)
(if available) or
M > '
4 keypad keys
To
dial the first person’s number
call the number
put the first call on hold
Your phone displays a l
(flashing phone) indicator next to
the call on hold.
dial the next person’s number
Calling Features - 65
C350.RG.book Page 66 Friday, February 14, 2003 8:35 AM
Press
5 N
6 (-)
7 O
To
call the number
Your phone displays a W (active
call) indicator next to the new
active call.
connect the two calls
end the entire call
Transferring a Call
While you are on a call, you can transfer the call to another phone
by first talking to the person who answers the other phone, or by
directly transferring the call.
Announce the Call Transfer
You can talk to the person who answers the other phone before you
transfer the call, to tell them whom you are transferring.
Find the Feature
Press
1 keypad keys
2 N
3 M
4
S
5 (+)
66 - Calling Features
M> '
To
enter the phone number where
you are transferring the call
dial the phone number
Speak to the person who
answers the target phone.
open the menu
scroll to $-
select $-
C350.RG.book Page 67 Friday, February 14, 2003 8:35 AM
Press
6 (+)
To
confirm the transfer
Your phone displays the
message $-* when
the call is transferred. You can
hang up the phone when you
see this message.
Do Not Announce the Call Transfer
You can directly transfer a call without talking to the person who
answers. During a call:
Find the Feature
Press
1 keypad keys
2 N
M> $-
To
enter the phone number where
you are transferring the call
dial the phone number
Your phone displays the
message $-* when
the call is transferred. You can
hang up the phone when you
see this message.
Barring a Call
Call barring lets you restrict outgoing or incoming calls.
You can restrict all calls, calls to international numbers,
or calls while roaming, or all calls but home.
Calling Features - 67
C350.RG.book Page 68 Friday, February 14, 2003 8:35 AM
M> > $
> "
> Find the Feature
Press
1
S
2 '( (+)
3
S
4 (+)
5 keypad keys
6 (+)
To
scroll to "+or calls
select barring for "+or
calls
scroll to a restriction for the
barred calls
select the restriction for the
barred calls
enter your call barring password
(from your network service
provider)
submit your password
Putting a Call on Hold
While you are on a call:
Press
' (+) (if
available) or M > '
68 - Calling Features
To
put a call on hold
Your phone displays a l
(flashing phone) indicator to
indicate that the call is on hold.
C350.RG.book Page 69 Friday, February 14, 2003 8:35 AM
Messages
You can send and receive text messages, pictures, and
ring tones on your wireless phone. Received messages
appear on your phone display or in your text message
inbox.
You must set up the text message inbox before you can send and
receive these messages. The total number of messages the inbox
can hold depends on the length of the messages, and the number
of other messages and drafts stored in your phone.
Note: Your service provider may have already programmed the text
message inbox settings for you.
Setting Up the Text Message Inbox
Find the Feature
Press
1
S
2 '( (+)
3 keypad keys
4 (+)
5 '( (+)
M> > $$$
M> / $ "
To
scroll to , !
change the , ! which
is provided by your service
provider
enter the phone number for the
service centre that handles your
outgoing messages
store your service centre
number
change the / - period
Messages - 69
C350.RG.book Page 70 Friday, February 14, 2003 8:35 AM
Press
6 keypad keys
7 (+)
8 '( (+)
9
S
10 (+)
11 '( (+)
12
S
13 (+)
14
S
15
S
16 (-)
70 - Messages
To
enter the expiry period—the
number of days your network
tries to resend unreceived
messages
store the expiry period
change the + scroll to the default type of
replies you want to send—text
messages, or other formats
store the reply type
change the " setting
scroll to the period of time that
messages stay in your inbox
select the cleanup period
If you select "$
, continue.
Otherwise, the procedure is
complete.
change the entry for the number
or label
switch between the number and
the label
store the custom cleanup period
after you finish entering all
information
C350.RG.book Page 71 Friday, February 14, 2003 8:35 AM
Sending Messages, Pictures, and Ring Tones
You can send text messages, pictures, and ring tones to one or
more recipients. You can manually enter each recipient’s phone
number, or select one or more numbers from the phonebook or
recent calls lists.
Note: The recipient’s phone may be unable to display pictures or
ring tones inserted in your message.
Shortcut: While dialling (with digits visible in the display), you can
Press M > $$ to create a text message addressed to the
number entered.
When you manually enter multiple phone numbers in the field,
you must insert a space between each number. Press and hold
1 to insert a space as needed.
Find the Feature
Press
1 keypad keys
M> > $$$+
M> $$
To
enter the text message
To insert a picture, animation, or
sound file in the message,
press:
M > $ > object type
> object
2 (+)
Note: Message length is limited.
When you near the limit, a
two-digit counter at the top of
the display shows how many
characters are left.
store the text message
Messages - 71
C350.RG.book Page 72 Friday, February 14, 2003 8:35 AM
Press
3 keypad keys
To
enter one or more phone
numbers where you want to
send the message
Note: Press and hold 1 to
add a space between numbers
that you enter manually.
or
( +)
4 (+)
5 (-)
6
S
select one or more phone
numbers from the phonebook or
recent calls lists
store the number(s)
finish the message
scroll to $$,
$$ $, , -$, or
$$
7 (+)
select the option
Viewing Message Status
Text messages that you send are stored in the outbox. To view the
contents of your outbox:
Find the Feature
M> > $$$
> "#/
Messages are sorted from newest to oldest. The following icons
indicate message status:
á = sending in progress
m = sending failed
72 - Messages
Y = delivered
C350.RG.book Page 73 Friday, February 14, 2003 8:35 AM
Receiving a Text Message
Note: Your text message inbox must be set up before you can
receive text messages. See page 69.
When you receive a text message, your phone displays %+$$
X and gives an alert.
Press
(+)
To
open the message
If reminders are turned on, your phone sends a reminder at regular
intervals until you close the new message notification, read the
message, or turn off your phone. (See page 117.)
When your inbox is full, flashing envelope icon appears. New
messages do not appear until you delete some existing ones.
Reading, Locking, or Deleting a Text Message
Messages in the text message inbox are sorted from newest to
oldest. The oldest messages are deleted automatically as specified
by the inbox cleanup setting. If you want to save a message, you
should lock it to prevent it from being deleted during cleanup.
Find the Feature
Press
1
S
2 (+)
M> > $$$
> / $$
To
scroll to the message you want
(Y = unread,
n = read, f = read and locked)
open the message
Messages - 73
C350.RG.book Page 74 Friday, February 14, 2003 8:35 AM
Press
3 (-)
To
close the message
or
) ( +)
compose and send a reply
or
M
open the / $ " to perform
other procedures as described in
the following list
The / $ " can include the following options:
Option
+
1%
54
74 - Messages
Description
Delete the message.
Call the number in the message
header or embedded in the message.
Open a new text message, with the
sender’s number or email
address in the field.
Open a copy of the text
message, with an empty
field.
Note: You cannot forward
sound files embedded in a text
message. Only the text is forwarded.
Lock or unlock the message.
C350.RG.book Page 75 Friday, February 14, 2003 8:35 AM
Option
+
Description
Store a phone number listed in a
message, or store a picture,
animation, or ring tone attachment.
When you store a message
attachment, you can optionally set it
as a screen saver image, wallpaper
image, or ring tone.
Delete all inbox messages.
Open a new text message.
Open the text message inbox setup
menu.
% $$
"
Using Chat
You can exchange text messages in real time with
another wireless phone user in a chat session. The
messages you send appear immediately on your chat
partner’s phone.
Start a Chat Session
Find the Feature
M > M > % Press
1 keypad keys
2 (+)
To
enter your save your Messages - 75
C350.RG.book Page 76 Friday, February 14, 2003 8:35 AM
Press
3 keypad keys
To
enter your chat partner’s phone
number
or
( +)
4 (+)
5 keypad keys
select a number from the
phonebook or recent call lists
store the number
enter your first chat message
or
( +)
6 (+)
select a quick note
send the chat message
7 ' (+)
8 (+)
When your chat partner replies,
the reply appears below your
text.
enter a reply to your partner
send your reply
Notes:
• You can start a chat session from a text message. Press M
and select to start a new session with the sender’s number in the field.
• When your phone displays +$+1"6, you must delete
some existing messages from your inbox, outbox, or drafts
folder to receive new chat messages.
76 - Messages
C350.RG.book Page 77 Friday, February 14, 2003 8:35 AM
Use the Chat Log
The chat log displays the messages exchanged in a chat session.
Chat
name
5
S
Press
to
scroll and see
more text.
Message
Status:
77 sending
m failed
E
#-!
#.
---
M &*
/ *
Exit
chat
Press M
to open the
+"
Chat text
Newest
messages
appear at
bottom of log.
Enter
reply
Use the Chat Menu
During a chat session, you can press M to open the " to
perform procedures as described in the following list:
Option
% )
"
#
"
#
( ( .$
$$
Description
Open a new chat session.
Call your chat partner.
Call the number listed in the chat log.
Create a phonebook entry for the
number listed in the chat log.
End the chat session.
Go to the top of the chat log.
Go to the bottom of the chat log.
Clear all text from the chat log.
Resend your most recent chat
message, if it failed.
Create a new chat message.
Messages - 77
C350.RG.book Page 78 Friday, February 14, 2003 8:35 AM
Respond to Chat
When you receive a chat message, your phone displays -
chat name, and gives an alert.
Press
) (+)
( (-)
To
accept the chat session
refuse the chat session
If reminders are turned on, your phone sends a reminder at regular
intervals until you respond to the chat notification or turn off your
phone.
If you receive another chat request during a chat session, the new
request appears as an incoming text message, with the requestor’s
chat name at the beginning of the message.
End a Chat Session
Press
1 M
2
S
3 (+)
4 (-)
To
open the "
scroll to select end the chat session
A chat session also ends when you turn off the phone, answer an
incoming call, or start a new chat session.
Your chat partner is not notified when you end a chat session. If
your partner sends more chat text, the phone treats it as an
incoming text message, with your chat partner’s chat name at the
beginning of the message.
If you exit the chat log without selecting , and your chat
partner sends another message, your phone notifies you and adds
it to the chat log.You can re-enter the session by returning to the
chat log.
78 - Messages
C350.RG.book Page 79 Friday, February 14, 2003 8:35 AM
Phonebook
You can store a list of names and phone numbers or email
addresses in your phone’s electronic phonebook.
To see the list of names stored in your phonebook, press M > > )# from the idle display. Scroll to a name and press
& (+) to view details of the phonebook entry as shown below.
Shortcut: Press S up or down from the idle display to open the
phonebook.
Viewing Entry Details
Type indicator
shows number
type:
$ Work
U Home
S Main
h Mobile
Z Fax
p Pager
[ Email
Return to
list
Voice Name indicator
indicates a recorded
voice name
5
E
$*#
$$$
+#0$123
M *
Press M to
open )#
"
Edit
entry
Entry’s Name
Phone number,
email address, or
mailing list
members.
8)9 indicates entry
stored in phone
memory, 89
indicates
SIM memory
Notes:
• +$$ entries, +$ entries, and entries stored on
the SIM card do not have , & , , or information.
Phonebook - 79
C350.RG.book Page 80 Friday, February 14, 2003 8:35 AM
• If the phonebook entry is a mailing list, list members are listed
after the entry’s name.
• When you set a distinctive ringer alert for an entry, the setting appears below the speed dial number.
Storing a Phonebook Entry
A phone number or email address is required for a phonebook
entry. All other information is optional.
For email addresses, you can send a text message
directly from your phone.
You can store a phonebook entry on your phone or on
the SIM card. Entries with a speed dial number from 1
to 100 are stored on the phone. 101 and above are stored on the
SIM.
Shortcut: Enter a phone number in the idle display, then press
(+) to create a phonebook entry with the number in the !
field. Go directly to step 3 in the following procedure to enter
additional information and store the entry.
Note: You can also use the following procedure to store a fixed dial
entry by scrolling to and selecting 1/ .
Enter Information
Find the Feature
Press
1 S
2 (+)
3 '( (+)
80 - Phonebook
M> > )#
M> %
To
scroll to ) "
#,
$$, or $
select the type of entry
select C350.RG.book Page 81 Friday, February 14, 2003 8:35 AM
Press
4 keypad keys
5 (+)
6 '( (+)
To
enter a name for the phonebook
entry (see page 36)
store the name
select !, , or #$
Note: If you select #$ (for a
Mailing List), a list of phonebook
entries appears.
7 keypad keys
8 (+)
9 '( (+)
a Press S to scroll to
an entry.
b Press (+) or
& (+).
c Press (-) when
you are finished. You
can skip to step 12
below.
enter the phone number or email
address
store the phone number or email
address
select Notes:
• Your phone automatically
applies an [ (email) type
indicator when you enter an
email address.
• This option is not available
for email entries, or for
entries stored on the SIM
card.
Phonebook - 81
C350.RG.book Page 82 Friday, February 14, 2003 8:35 AM
Press
10
S
11 (+)
12 (+)
or
Go to step 13 if
you do not want to
record a voice
name for the entry
13
S
14 '( (+)
15 keypad keys
16 (+)
17 '( (+)
To
scroll to the type of phone
number
select the number type
record a voice name for the
entry, if desired
See page 84.
Note: This option is not
available for entries stored on
the SIM card.
scroll to !, the number to
speed dial the entry
The next available speed dial
number is assigned to a new
phonebook number by default.
Entries 101 and above are
stored on the SIM.
select ! if you want to
change it
enter a different speed number,
if desired
save the modified speed number
If your chosen speed number is
already assigned to another
entry, you are asked if you want
to replace that entry.
select Note: This option is not
available for entries stored on
the SIM card.
82 - Phonebook
C350.RG.book Page 83 Friday, February 14, 2003 8:35 AM
Press
18
S
19 (+)
20 '( (+)
21
S
22 (+)
23 (+)
To
scroll to the ring tone that should
sound when you receive calls or
messages from this entry
Note: To activate ringer IDs, see
page 93.
select the ring tone
select +
Note: This option is
not available for
entries stored on the
SIM card.
scroll to the icon that should
appear when you receive calls
or messages from this entry
select the icon
select if you want to create
another entry with the same
Note: You must enter a name
and number to use this option.
Complete Phonebook Entry
When you are finished entering information for a phonebook entry:
Press
(-)
To
store the entry
Phonebook - 83
C350.RG.book Page 84 Friday, February 14, 2003 8:35 AM
Recording a Voice Name For a Phonebook Entry
You can record a voice name for a new or existing phonebook
entry. A voice name lets you call the phonebook entry using voice
dial (see page 85).
Note: You cannot record a voice name for an entry stored on the
SIM card.
Make your voice recording in a quiet location. Hold the phone about
four inches (10 centimetres) from your mouth, and speak directly
into the phone in a normal tone of voice.
Find the Feature
Do This
1 Press S
2 Press & (+)
3 Press (+)
4 Press S
5 Press
(+)
6 Press and release
(+),
then say the
entry’s name (in
two seconds)
7 Press and release
(+),
then repeat the
name
84 - Phonebook
M> > )#
To
scroll to the entry that needs a
voice name
display the entry’s detailed view
edit the phonebook entry
scroll to & begin the recording process
The phone displays )$$++
++$ +
.
record the voice name
The phone displays )$$++
++)+
.
confirm the voice name
The phone displays * &+
.
C350.RG.book Page 85 Friday, February 14, 2003 8:35 AM
Dialling a Phonebook Entry
You can use the phonebook list, voice dial, speed dial, or 1-touch
dial to call a number stored in your phonebook. To use speed dial,
see page 61. To use 1-touch dial, see page 61.
Phonebook List
Find the Feature
Press
1
S
2 N
M> > )#
To
scroll to the entry you want
call the entry
Shortcut: In idle, press S up or down to open the Phonebook.
Voice Dial
Find the Feature
M> &+
Say the pre-recorded phonebook entry name.
Editing a Phonebook Entry
You can edit a phonebook entry stored on your phone or the SIM
card. If you change an entry’s speed dial number, the entry is
moved to the new speed dial location and the original entry is
deleted.
Note: You can also use the following procedure to edit a fixed dial
entry by scrolling to and selecting 1/ .
Find the Feature
M> > )#
Phonebook - 85
C350.RG.book Page 86 Friday, February 14, 2003 8:35 AM
Press
1
S
2 & (+)
3 (+)
To
scroll to the entry you want to
edit
display the entry’s detailed view
edit the phonebook entry
For a description of the items in a phonebook entry or fixed dial
entry, see page 79 and page 80.
Deleting a Phonebook Entry
To delete a phonebook entry:
Find the Feature
Press
1
S
2 M
3
S
4 (+)
M> > )#
To
scroll to the entry you want to
delete
open the )# "
scroll to select Sorting Phonebook Entries
You can set up your phone to sort your phonebook list by speed
dial number (the standard), name, or voice dial.
Note: The voice dial sort is identical to the name sort, except that
the entries with voice name tags appear first.
Find the Feature
Press
1 M
86 - Phonebook
M> > )#
To
open the )# "
C350.RG.book Page 87 Friday, February 14, 2003 8:35 AM
Press
2
S
3 (+)
4
S
5 '( (+)
6
S
7 (+)
To
scroll to "
select "
scroll to #
select #
scroll to the entry you want
select the entry you want
Copying Phonebook Entries
You can copy one or more phonebook entries from your phone to
the SIM card or from the SIM card to your phone.
Notes:
• This procedure copies the original entry to a new location. It
does not delete the original entry.
• The SIM card cannot store and & data for entries.
If you try to copy an entry with a type or voice name to the SIM
card, the phone asks you for confirmation before dropping this
information and copying the entry.
Copy a Single Entry
To copy a single phonebook entry from your phone to the SIM card
or from the SIM card to your phone:
Find the Feature
M> > )#
Phonebook - 87
C350.RG.book Page 88 Friday, February 14, 2003 8:35 AM
Press
1
S
2 M
3
S
4
(+)
5 keypad keys
6 (+)
To
scroll to the entry you want to
copy
Note: Entries with a speed dial
number from 1 to 100 are stored
on the phone. Entries with a
speed dial number of 101 or
higher are stored on the SIM
card.
open the )# "
scroll to select The phone displays the form, with the next available
speed dial number.
edit the speed dial number on
the form
approve the copy to the speed
dial number
The phone displays the message. You can now delete
the old phonebook entry, if
desired.
Copy Multiple Entries
To copy multiple phonebook entries from your phone to the SIM
card or from the SIM card to your phone:
Find the Feature
88 - Phonebook
M> > )#
C350.RG.book Page 89 Friday, February 14, 2003 8:35 AM
Press
1 M
2
S
3 (+)
4
S
5 '( (+)
6 keypad keys
7 (+)
8
S
9 '( (+)
10 keypad keys
11 (+)
12
S
13 '( (+)
To
open the )# "
scroll to $
select $
The phone displays the
$ form.
scroll to 1
8$9
select 1
8$9
enter the first (lowest) speed dial
number in the range of entries
that you want to copy
Note: Entries with a speed dial
number from 1 to 100 are stored
on the phone. Entries with a
speed dial number of 101 or
higher are stored on the SIM
card.
store the number and return to
the $ form
scroll to 1
89
select 1
89
enter the last (highest) speed
dial number in the range of
entries that you want to copy
store the number and return to
the $ menu
scroll to 8$9
select 8$9
Phonebook - 89
C350.RG.book Page 90 Friday, February 14, 2003 8:35 AM
Press
14 keypad keys
15 (+)
16 (-)
To
enter the first (lowest) new
speed dial number for the
entries’ new location
store the number and return to
the $ menu
copy the entries
The phone displays the
$ message. You can
now delete the old entries, if
desired.
Checking Phonebook Capacity
You can check phonebook capacity to see how much space is left
for storing phonebook entries on your phone and on the SIM card.
For entries stored on the phone, your phone displays a memory
meter that shows how much memory space remains to store
phonebook and datebook entries. For the SIM card, your phone
lists the number of phonebook entries used and the number
available.
Find the Feature
Press
1 M
2
S
3 (+)
M> > )#
To
open the )# "
scroll to ) select ) Your phone displays the phone
memory meter, or the number of
SIM card phonebook entries
available.
90 - Phonebook
C350.RG.book Page 91 Friday, February 14, 2003 8:35 AM
Customising Your Phone Settings
You can adjust your phone’s menus and features.
Reordering the Main Menu
Your service provider can change the order of menu items from
what is listed in this manual. Additionally, you can also reorder the
menu items.
Find the Feature
Press
1 S
2 ( (-)
3
S
4 (-)
M> > $
> $ > )$$
> "
To
scroll to the menu item you want
to move
grab the menu item you want to
move
move the item up or down the
menu
insert the item in the new
location
Reordering the Message Centre Menu
Your service provider can change the order of Message Centre
items from what is listed in this manual. Additionally, you can also
reorder the menu items.
Find the Feature
M> > $$$
M> Customising Your Phone Settings - 91
C350.RG.book Page 92 Friday, February 14, 2003 8:35 AM
Press
1
S
2 ( (-)
3
S
4 (-)
To
scroll to the menu item you want
to move
grab the menu item you want to
move
move the item up or down the
menu
insert the item in the new
location
Redefining Soft Keys
You can relabel the soft keys (left - and right +) to access
different main menu items from the idle display.
M> > $
> $ > )$$
> $
Find the Feature
Press
1
S
2 '( (-)
3
S
4 (-)
To
scroll to - or open the key editor
scroll to the new key function
confirm the new function
The key will have the new
function whenever the phone is
idle.
92 - Customising Your Phone Settings
C350.RG.book Page 93 Friday, February 14, 2003 8:35 AM
Selecting a Different Language
You can select a different language for your phone’s display:
M> > $
> $
> " > "
Find the Feature
Activating Ringer IDs
When ringer IDs are turned on, your phone uses distinctive ring
tones to notify you of incoming calls or messages from specific
entries stored in your phonebook.
Note: To assign a ringer ID to a new or existing phonebook entry,
see page 80.
Find the Feature
M > > $
> Alert > $
Note: Alert represents the current ring style.
Press
1
S
2 (+)
To
scroll to or -select the option
Using Shortcuts
MyMenu lets you create shortcuts to quickly access your favourite
menu features, stored entries (such as phonebook or datebook
entries), or URLs.
Customising Your Phone Settings - 93
C350.RG.book Page 94 Friday, February 14, 2003 8:35 AM
Adding a MyMenu Shortcut
Do This
1 Press M
2 Scroll to the item
you want to add to
MyMenu
3 Press and hold
M
4 Press (-)
5 Press
'( (+)
or
Press (-)
To
enter the menu system
select the menu item, entry, or
URL
open the MyMenu editor
The phone displays:
$$ " for: :Item;?
where Item is the name of the item
you selected.
view your options
change the MyMenu key number,
if necessary
select the MyMenu key number
and close the editor
Using a MyMenu Shortcut
You can use MyMenu from the idle display, while on a call, or while
scrolling through a menu.
Use a MyMenu Key Command
If you know the MyMenu key number:
Press
1 M
2 the MyMenu key
number
To
open the menu
go to the menu item, or perform
the menu action
94 - Customising Your Phone Settings
C350.RG.book Page 95 Friday, February 14, 2003 8:35 AM
Select a Shortcut From the MyMenu List
To select a feature from the MyMenu list:
M> > "
> the feature you want
Find the Feature
Tip: To edit or delete a MyMenu shortcut, highlight it in the list and
press M to open a menu of options for the shortcut.
Setting a Wallpaper Image
Find the Feature
Setting
)"
"
M > > $
> $ > )$$
> Description
select the picture or animation for the
background image in your idle display
select or Setting a Screen Saver
Find the Feature
Setting
)"
M > > $
> $ > )$$
> ,
Description
select the picture that appears when your
phone is idle
select how long your phone must be idle
before the screen saver picture appears
Note: If this setting is longer than your
Display Timeout setting, then your display will
turn off before you ever see the screen saver.
Customising Your Phone Settings - 95
C350.RG.book Page 96 Friday, February 14, 2003 8:35 AM
Getting More Out of Your Phone
Dialling Options
Fixed Dialling
When you turn on fixed dial, users can only call
numbers stored in the fixed dial list.
Note: Employers can use fixed dial to limit employees’
phones to a predefined list of numbers, country codes,
or other prefixes.
Activating Fixed Dial
To activate fixed dial:
Find the Feature
M> > $+
> " +> 1/ Creating and Calling Fixed Dial Entries
Fixed dial list entries can be any length. If there is a fixed dial entry
for the digits 555, users can call any number that starts with 555.
You must enter your SIM PIN2 code, from your network service
provider, to edit fixed dial entries. To open the fixed dial list:
Find the Feature
M> > 1/ In the fixed dial list, you can create, edit, delete, and sort entries
just like in the phonebook list. Fixed dial list entries are stored on
your SIM card and do not have or & fields.
96 - Getting More Out of Your Phone
C350.RG.book Page 97 Friday, February 14, 2003 8:35 AM
Service Dialling
Dial pre-programmed numbers stored on your SIM
card. Your service provider may program your SIM card
with numbers for services such as taxi companies,
restaurants, and hospitals.
Find the Feature
M> > , Managing Your Calls
Calling a Number in a Text Message
If you receive a text message with an embedded phone
number, you can dial the number directly.
Note: You must set up the text message inbox before
you can receive text messages. See page 69.
Find the Feature
Press
1
S
2 M
3
S
4 (+)
M> > $$$
> / $$
To
scroll to the message with the
number
open the /+$+"
scroll to dial the number in the message
If the message contains more than one phone number, press S
to scroll to a number, then press (-) to dial.
Getting More Out of Your Phone - 97
C350.RG.book Page 98 Friday, February 14, 2003 8:35 AM
Sending DTMF Tones
While you are on a call, you can send keypresses as tones:
Do This
Press M > $
To
send a number to the network
as DTMF tones, for credit card
calling or password entry
To set DTMF tones to be long, short, or off:
Find the Feature
M> > $+
> $
> " > 1
Monitoring Phone Use
Viewing and Resetting Call Timers
Your phone tracks and records call times. Use the recent calls
menu to view and reset a call timer.
Network connection time is the elapsed time from the moment you
connect to your service provider’s network to the moment you end
the call by pressing O. This time includes busy signals and
ringing.
The amount of network connection time you track on your
resettable timer may not equal the amount of time for which
you are billed by your service provider. For billing information,
please contact your service provider directly.
To view a call timer:
Find the Feature
98 - Getting More Out of Your Phone
M> $ > $
C350.RG.book Page 99 Friday, February 14, 2003 8:35 AM
Press
1
S
2 (+)
To
scroll to the timer you want to
view
view the recorded time
To reset the call timer:
Press
1 (+)
2 (-)
To
reset the time (if available)
confirm the reset
You can view the approximate network connection time elapsed
during the following calls:
Timer
$ $
, $
$
-
Description
Time spent on the last call dialled or
received. You cannot reset this timer.
Total time spent on dialled calls since
the last time you reset this timer.
Total time spent on calls received
since the last time you reset this
timer.
Total time spent on dialled and
received calls since the last time you
reset this timer.
Total time spent on all calls on this
phone. You cannot reset this timer.
Getting More Out of Your Phone - 99
C350.RG.book Page 100 Friday, February 14, 2003 8:35 AM
Viewing and Resetting Call Costs
To view a cost tracker:
M> $ > $
Find the Feature
Press
1
To
scroll to the cost tracker you
want to view
view the recorded cost
S
2 (+)
To reset the cost tracker:
Press
1 (+)
2 (-)
To
reset the cost (if available)
enter your PIN2 code to confirm
the reset
Your phone network can provide the following cost
information:
Cost Tracker
+,#
Description
Amount of your credit remaining.
For GSM advice-of-charge, this is
only available if you set a credit limit.
Note: Your phone receives cost
information from the advice-of-charge
feature or third-party prepay
software.
100 - Getting More Out of Your Phone
C350.RG.book Page 101 Friday, February 14, 2003 8:35 AM
Cost Tracker
/ $ $
$ $
, $
$
Description
Date that the available credit expires
(available only with a subscription to
a prepay option).
Amount of the last deposit (available
only with a subscription to a prepay
option).
Amount spent on the last call you
dialled or received. You cannot reset
this cost tracker.
Amount spent on calls you dialled
since the last time you reset this cost
tracker.
Amount spent on calls you received
since the last time you reset this cost
tracker.
Amount spent on all dialled and
received calls since the last time you
reset this cost tracker.
You can reset this value separate
from $ and , $, so
$ plus , $ may not
equal $.
Network Features
Data and Fax Calls
A Motorola Original™ data kit lets you transfer data
between your phone and a computer or other external
device. You can:
Getting More Out of Your Phone - 101
C350.RG.book Page 102 Friday, February 14, 2003 8:35 AM
• use your phone to make and answer data and fax calls on
your computer or hand-held device.
• use your phone as a modem to connect to the Internet
Note: 56K modems are capable of receiving 56Kbps from a
compatible service provider. Receiving is currently limited in
the U.S. and Canada to 53 Kbps, and transmitting to 33.6
Kbps. Actual speeds will vary depending on line conditions.
Your phone can use GPRS network connections when available
(see page 31).
For more information about Motorola Original data kits, see the
Motorola Web site at:
http://www.hellomoto.com
Connecting Your Phone to an External Device
Connect your phone to an external device (such as a computer or
hand-held device) using a USB cable.
Note: Not all devices are compatible with USB cable connections.
Check your external device for specifications.
Set Up a Cable Connection
Attach a Motorola Original USB cable to the phone and external
device as follows.
Note: Your phone requires a mini-USB connector. Check your
computer or hand-held device to determine the type of cable you
need.
Do This
1 Plug the end of the cable with the Motorola logo into
your phone’s accessory connector port. Make sure
that the logo and the phone are both facing you.
2 Plug the other end—the USB connection—into the
USB port on the external device.
102 - Getting More Out of Your Phone
C350.RG.book Page 103 Friday, February 14, 2003 8:35 AM
Install the Software
Install the software from the CD-ROM that comes with your
Motorola Original data kit. See the data kit’s user guide for more
information.
Making a Data or Fax Call
You can connect your phone to a computer or hand-held device to
send data or a fax from the connected device.
Attach the cable (see page 102) and do the following:
Do This
1 Check the phone
2 Open the
application on
your computer
To
make sure that the phone is
connected and powered on
place the call through the
application (such as
dial-up-networking)
3 End the transfer
on your computer
Note: You cannot dial data or
fax numbers through your
phone’s keypad. You must dial
them through your computer.
close the call and connection
when the transfer is complete
Receiving a Data or Fax Call
You can connect your phone to a computer or hand-held device to
receive data or a fax.
Use this feature to transfer data to your computer from another
device.
Transfer the Data or Fax
Connect your phone (see page 102).
Getting More Out of Your Phone - 103
C350.RG.book Page 104 Friday, February 14, 2003 8:35 AM
Your phone notifies you when the call arrives, and transfers the call
to the connected device. You must use the application running on
the connected device to answer the call.
End the Data/Fax Connection
When the data or fax transfer is complete:
Do This
End the call from the
connected device
To
close the connection
Make a Talk and Fax Call
You can place a call where you talk and then send a fax
to the same phone number within the same call.
Connect to the device that will send the fax and do the
following:
Press
1 keypad keys
2 M
3
S
4 (+)
5 N
To
enter the phone number
open the "
scroll to 1/
select 1/
Your selection applies to the
next call only.
make the call
Speak and, when ready, initiate
the fax transfer on the
connected device. When the
transfer is complete, end the call
from the connected device.
104 - Getting More Out of Your Phone
C350.RG.book Page 105 Friday, February 14, 2003 8:35 AM
Network Selection
You can view and adjust your phone’s network settings:
Find the Feature
M> > $
> $ > %
Your service provider registers your phone to a network. You can
view information about the current network, change how your
phone searches for a network, specify your preferred networks,
and activate alerts that indicate when a call is dropped or network
registration changes.
Getting More Out of Your Phone - 105
C350.RG.book Page 106 Friday, February 14, 2003 8:35 AM
Security
Locking and Unlocking Your Phone
You can lock your phone manually or set your phone to lock
automatically whenever you turn it off.
When you try to use a locked phone, it asks you to enter the unlock
code. A locked phone still rings or vibrates for incoming calls or
messages, but you must unlock it to answer.
You can make emergency calls on your phone even when it is
locked. See page 54.
Lock Your Phone Manually
Find the Feature
Press
1 keypad keys
2 (+)
M> > $
> " > ) > %
To
enter your four-digit unlock code
lock the phone
Set Your Phone to Lock Automatically
You can set your phone to lock every time you turn it off:
Find the Feature
Press
1 keypad keys
2 (+)
106 - Security
M> > $
> " > ) > "
> To
enter your four-digit unlock code
set the phone to lock automatically
C350.RG.book Page 107 Friday, February 14, 2003 8:35 AM
Unlock Your Phone
At the 4 prompt:
Press
1 keypad keys
To
enter your four-digit unlock code
2 (+)
The unlock code is originally set
to 1234. If necessary, see
page 108.
unlock your phone
Changing Your Unlock Code
Your phone’s four-digit unlock code is originally set to 1234, and the
six-digit security code is originally set to 000000.Your service
provider may reset these numbers before you receive your phone.
If your service provider has not reset these numbers, we
recommend that you change them to prevent other users from
accessing your personal information or modifying your phone
settings. The unlock code must contain four digits, and the security
code must contain six digits. Be sure to make a note of the new
numbers.
Notes:
• Your service provider may retain your phone’s security code
for customer service purposes. In this case, you will not be
able to use phone features that require you to enter the
security code (such as master clear, master reset, and the
unlock code bypass feature).
• If the only password you can change is the unlock code, the
% )$$%$ menu is unavailable and the 4 option
appears on the ) menu. In this case, open the unlock
code editor by selecting: M > > $ > "
> ) > 4 .
Security - 107
C350.RG.book Page 108 Friday, February 14, 2003 8:35 AM
To change a code or password:
Find the Feature
Press
1
S
2 '( (+)
3 keypad keys
4
5
6
7
8
(+)
keypad keys
(+)
keypad keys
(+)
M> > $
> " > % )$$%$
To
scroll to the code or password
you want to change
select the code or password
enter your old code
If you do not know your code,
see page 108.
submit your old code
enter the new code
assign the new code
re-enter the new code
confirm the new code
If You Forget a Code or Password
If you forget your security code (originally set to 000000), SIM PIN,
SIM PIN2, or call barring password, contact your service provider.
If you forget your unlock code, try entering 1234 or the last four
digits of your phone number. If that does not work, do the following
when you see the 4 message:
Press
1 M
2 keypad keys
3 (+)
108 - Security
To
go to the unlock code bypass
screen
enter your security code
submit your security code
C350.RG.book Page 109 Friday, February 14, 2003 8:35 AM
Locking and Unlocking the Keypad
You can lock your phone keypad to prevent accidental keypresses
(for example, when carrying your phone in a purse or pocket).
Press
M*
To
lock or unlock your keypad
Select M > > $ > " > to view
instructions on how to lock/unlock the keypad.
Note: Incoming calls and messages unlock the keypad.
Protecting the SIM Card
Your PIN (Personal Identification Number) code protects the
information stored on your SIM card. When the SIM PIN feature is
activated, you must enter your SIM card PIN code each time you
turn on the phone or insert a SIM card. Your SIM card PIN code is
given to you by your service provider.
Find the Feature
Press
1
S
2 (+)
3 keypad keys
4 (+)
M> > $
> " > )
To
scroll to or -switch protection on or off
enter your SIM card PIN code
submit your code
Security - 109
C350.RG.book Page 110 Friday, February 14, 2003 8:35 AM
Unblock the SIM Card PIN Code
If you enter an incorrect SIM card PIN code three times in a row,
your SIM card is disabled and your phone displays . You
must enter a PIN unblocking key (PUK) code, which you can obtain
from your service provider.
Caution: If the unblocking attempt is tried unsuccessfully 10 times,
the SIM card is permanently disabled and your phone displays
$#.
Press
1 ##05
*
2 keypad keys
3 (+)
4 keypad keys
5 (+)
6 keypad keys
7 (+)
110 - Security
To
open the PIN unblocking
editor
enter the PUK code
submit the PUK code
enter a new SIM card PIN
code
Note: The SIM PIN code
must be between four and
eight digits in length.
assign the new SIM PIN
code
re-enter the new SIM PIN
code
confirm the new SIM PIN
code and unblock the SIM
card
C350.RG.book Page 111 Friday, February 14, 2003 8:35 AM
Unblock the SIM Card PIN2 Code
If you enter an incorrect SIM card PIN2 code three times in a row,
your phone’s SIM PIN2 protected features are disabled and your
phone displays when you try to use a PIN2 feature. You
must enter a PIN2 unblocking key (PUK2) code, which you can
obtain from your service provider.
Press
1 ##05
*
2 keypad keys
3 (+)
4 keypad keys
5 (+)
6 keypad keys
7 (+)
To
open the PIN2 unblocking
editor
enter the PUK2 code
submit the PUK2 code
enter a new SIM card
PIN2 code
Note: The SIM PIN2 code
must be between four and
eight digits in length.
assign the new SIM PIN2
code
re-enter the new SIM PIN2
code
confirm the new SIM PIN2
code and unblock PIN2
features
Line Security
If your phone displays ++" while you are on a call, your
phone has detected another device monitoring the call. This
message does not appear when caller ID, call cost, or other
information fills the display.
Security - 111
C350.RG.book Page 112 Friday, February 14, 2003 8:35 AM
Personal Organiser Features
Datebook
The datebook is a calendar that lets you schedule and organise
events such as appointments and meetings.You can review your
schedule of events for the week or by the day, and have the
datebook play a reminder alarm for specific events.
Note: You must set the phone’s correct time and date in order to
use the datebook (see page 45).
To schedule or review events in the datebook:
M> --+$+> #
Find the Feature
Viewing by the Week
When you open the datebook, your phone displays a calendar for
the week. Lines or filled boxes under each day indicate scheduled
events.
Untimed
event
12 hour
window
Exit the
datebook
5
{ 45$ 4
E
}
S * ! * 6 Days of week
(press
to select)
S
One-hour event
/ *
Full day (12-hour)
event scheduled
112 - Personal Organiser Features
M
!
Go to
selected day
Press M to open
the #+"
C350.RG.book Page 113 Friday, February 14, 2003 8:35 AM
Viewing by the Day
Select a day in the week view and press & (+) to see the
day’s events. You can store, edit, view, copy, and delete any event
from the day view.
Untimed
event
Down scroll
Return to
previous screen
Day of week
5
E
{ *&
754
}
ç Joes B-day
A8000
M !
Press M to open
the #+"
Alarm
Event
Show event
details
Viewing by the Event
Select an event in the day view and press & (+) to open the
detailed event view. You can edit, copy, and delete events from the
event view.
Alarm
Day and time
5
Down scroll
arrow
Return to
previous screen
E
A*&
8"'9#,
":+#,;
M *
Event details
Edit event
Press M to open
the #+"
Personal Organiser Features - 113
C350.RG.book Page 114 Friday, February 14, 2003 8:35 AM
Storing a New Event
A title is required for a datebook event. All other information is
optional.
M> --+$+> #
> day
M> %
Find the Feature
Press
1 '( (+)
2 keypad keys
3 (+)
4
S
5 (-)
To
select enter a title for the event (see
page 36)
store the event title
scroll to other fields and enter
information as necessary
Other fields let you enter start
time, duration, date, repeating
events, and reminder alarm.
store the new event and return
to the day view
Changing Event Information
To change information about an existing event:
Find the Feature
Press
1
S
2 & (+)
3
S
114 - Personal Organiser Features
M> --+$+> #
To
scroll to the scheduled event
day
display the day view
scroll to the event to change
C350.RG.book Page 115 Friday, February 14, 2003 8:35 AM
Press
4 & (+)
5 (+)
6
S
7 '( (+)
8 keypad keys
9 (-)
To
display the event view
edit the event
scroll to the detail to change
edit the information
enter the new information
store the information and return
to the day view
Copying an Event
To copy information from a current event to a new event:
Find the Feature
Press
1 S
2 & (+)
3
S
4 M
5
S
M> --+$+> #
To
scroll to the scheduled event
day
display the day view
scroll to the event to copy
open the # "
scroll to 6 (+)
7 (+)
copy the event
confirm the copy
8 keypad keys
Your phone assumes that you
want to change the date, and
displays the field.
enter the date information
Personal Organiser Features - 115
C350.RG.book Page 116 Friday, February 14, 2003 8:35 AM
Press
9 } (+)
10 (-)
11
S
12 (-)
To
move to the day, month, and
year
save the copy of the event
scroll to event details and edit
the information as necessary
store the new event and return
to the day view
Deleting an Event
Find the Feature
Press
1
S
2 & (+)
3
S
4 M
5
S
6 (+)
a
S
b ( +)
116 - Personal Organiser Features
M> --+$+> #
To
scroll to the scheduled event
day
display the day view
scroll to the event to delete
open the # "
scroll to select For non-repeating events, the
procedure is complete. For
repeating events, the phone
displays a delete event menu:
scroll to $ , or
,$
select the event(s) to delete
C350.RG.book Page 117 Friday, February 14, 2003 8:35 AM
Alarm Reminders
Reminders are alerts that ring or vibrate to notify you about a
voicemail or text message you have received, or a datebook event
you have scheduled. To set or turn off reminders:
Find the Feature
Press
1
S
M> $+
> Alert > $
To
scroll to the reminder alert you
want: , &#, or - or &# sets the
2 (+)
corresponding reminder alert
type. -- turns off all reminders.
select the reminder alert
Calculator
You can use your phone as a convenient calculator and currency
converter.
Calculating Numbers
Find the Feature
M> --+$ > "
Press
1 number keys
To
enter a number in the calculator
2 S (left or right) highlight a calculator function
3 (+)
perform the highlighted function
Personal Organiser Features - 117
C350.RG.book Page 118 Friday, February 14, 2003 8:35 AM
Selected
function
appears
here
S to
5
E
;,#
<
Press
highlight
a function
{ 0 =
Exit the
calculator
Press M to open
the "+"
/ *
+ 5
>
}
Entered
number
S
Press
to scroll to
other functions
M %*
Perform the
highlighted
function
The calculator can perform the following functions:
Function
!
<
.
/
=
>
?
<.
Description
Insert a decimal point
Clear the calculation
Clear entry (replaces the function when
you enter more values in a calculation)
Add
Subtract
Multiply
Divide
Divide the displayed value by 100
Calculate the exchange rate
Change the entry’s sign (positive/negative)
Recall the value stored in memory
Store the displayed number in memory
Clear memory
118 - Personal Organiser Features
C350.RG.book Page 119 Friday, February 14, 2003 8:35 AM
Converting Currency
The currency converter works just like the calculator, using the ?
(currency) function and the exchange rate you set:
Find the Feature
Press
1 number keys
2 (+)
3 number keys
4
S (left or right)
5 (+)
M> --+$+> "
M> / To
enter the exchange rate
store the exchange rate
enter the amount to convert
(amount to multiply by the
exchange rate)
highlight the ?+function
perform the conversion
Personal Organiser Features - 119
C350.RG.book Page 120 Friday, February 14, 2003 8:35 AM
News and Entertainment
Mobile Internet
The Web micro-browser lets you access Web pages
and Web-based applications (such as on-line banking,
shopping, and games) on your phone. Contact your
service provider to set up access, if necessary.
Note: Your phone may use a high-speed GPRS (General Packet
Radio Service) network connection. This type of connection can be
identified by a GPRS indicator ( ) in the idle display that
disappears when you start a micro-browser session. If a W
(connected call) indicator is displayed when you start a
micro-browser session, your phone is using a standard voice
channel connection. Your network connection charges may vary
depending on the type of connection used.
)
Setting Up Your Phone for Mobile Internet Access
Note: Your service provider may have set up your phone for
Internet access.
You can adjust the mobile Internet network connection settings, or
create a new network connection profile:
Find the Feature
M> > # $$$
> @% A
Starting a Mobile Internet Session
To open the Web micro-browser:
Find the Feature
120 - News and Entertainment
M> %$
C350.RG.book Page 121 Friday, February 14, 2003 8:35 AM
The micro-browser displays the home page set up by your service
provider.
Press
1
S
2 (+)
To
scroll to a bookmark or service,
or application
select the service
Shortcut: If you open a text message with a Web address (URL) in
it, you can press M > ( to launch the micro-browser and go
directly to the URL.
If you are unable to establish a network connection with the
micro-browser, contact your service provider.
Interacting With Web Pages
You can perform the following operations on a Web page:
Do This
Press S
up or down
Press S
left or right
Press M
To
scroll through a page
go back to the previous page or
forward to the next one
open the %$ "
News and Entertainment - 121
C350.RG.book Page 122 Friday, February 14, 2003 8:35 AM
Downloading Pictures and Sounds
You can download a file such as a ring tone, wallpaper,
screensaver, MotoMixer file, or theme to your phone. To download
files with the browser on a desktop computer or your phone:
Do This
1 In the browser, go to the Web site and find the file you
want.
2 Follow the directions on the site to purchase the file
(payment details vary). The site sends a text message
to your phone, containing the attached file or a URL
link to the file.
3 Open the message and store the file (see page 75).
Notes:
• Call charges apply during download sessions.
• When your phone runs out of memory for downloaded files,
new files overwrite the old ones. Downloaded files share your
phone’s memory, so you can make room for a picture, for
example, by deleting ring tones.
Phone Themes
A phone theme consists of a bundled set of image and sound files
with a specific theme (such as a special event or cartoon character)
that you can apply collectively to your phone. Phone themes
typically include a wallpaper image, screen saver image, and ring
tone. Your phone includes several preloaded themes. You can
download and install additional themes on your phone.
Downloading Themes
To download a theme from the browser, see page 122. When you
install the theme, you can instantly apply its screen saver,
wallpaper, and ring tone when your phone prompts you to +
+%B
122 - News and Entertainment
C350.RG.book Page 123 Friday, February 14, 2003 8:35 AM
Selecting Themes
You can apply any of the themes installed on your phone.
Note: If one of a theme’s components is not available, then a
default setting is applied.
Find the Feature
Press
1 S
2 (+)
M> +> To
scroll to the theme that you
would like to apply
select the theme
Deleting Themes
You cannot delete the preloaded themes on your
phone. To delete one or all of the themes that you have
downloaded and installed:
Find the Feature
M> +> Press
1 S
To
scroll to the theme to delete
2 (+)
3 M
select the theme
enter the submenu
scroll to or +
4
S
5 (+)
select the option
News and Entertainment - 123
C350.RG.book Page 124 Friday, February 14, 2003 8:35 AM
Picture Viewer
Your phone contains pictures and animations that you
can insert into text messages, and use as wallpaper
and screen saver images.
To download pictures or animations, see page 122.
Your phone may also include predefined images that are identified
by a ë (predefined object) indicator. You cannot rename, delete,
or view details about predefined images.
Find the Feature
Press
1
S
2 (+)
3
S up or down
M> +
> )" &%
To
scroll to the picture
view the picture
view the previous/next picture
or
( +)
or
M
view picture information
open the )" &% menu to
perform other procedures as
described in the following list
The )" &% menu can include the following options:
Option
$
$ 124 - News and Entertainment
Description
View picture information.
Set the picture as your
phone’s wallpaper image.
C350.RG.book Page 125 Friday, February 14, 2003 8:35 AM
Option
$ ,
Description
Set the picture as your
phone’s screen saver image.
Rename the picture.
Delete the picture.
Games
Your phone comes with three games. If you get an incoming call,
message, alarm, or alert while playing a game, the game pauses.
In some cases, when the game is over, you may have the option to
purchase more advanced game levels.
Selecting and Starting a New Game
Find the Feature
M> (
$ > the game
When the game is over, you can play again or return to the games
menu. Depending on the game:
Press
(-)
To
return to the games menu
or
( (+)
or
start another session of the
game you just played
(+)
News and Entertainment - 125
C350.RG.book Page 126 Friday, February 14, 2003 8:35 AM
Ending a Game
You can end a game at any time.
Press
(-)
or
To
end the game session and
return to the games menu
O
Playing a Game
Astrosmash
In Astrosmash, your job as Commander is to repel an attack of
meteors and spinning bombs. You try to shoot as many meteors,
bombs, missiles, and flying saucers as possible without getting hit.
Item
Big Rock
Small Rock
Big Spinner
Points
10
20
40
Item
Guided Missile
Small Spinner
UFO
Points
50
80
100
Rules of the game
• Guided Missiles move toward the Laser Gun.
• UFOs appear when the score is greater than or equal to
5,000. UFOs sweep across the screen and release bombs at
the Laser Gun. The bombs cannot be destroyed
• When you shoot a Big Rock, it breaks into 2 Small Rocks.
• When you are out of Laser Guns, the game is over. You lose a
Laser Gun if a spinner (both big and small) hits the ground, or
if a rock, rock pieces, or a guided missile collides with a Laser
Gun.
• Every time the peak score goes up by another 1,000 points,
you get another Laser Gun.
126 - News and Entertainment
C350.RG.book Page 127 Friday, February 14, 2003 8:35 AM
How to Play
Press
S
8
2
5
To
move the Laser Gun
move the Laser Gun to a random position
toggle control for firing between you and the
phone (Auto-Fire)
fire the Laser Gun, if Auto-Fire is off
MotoGP
In this game, you are a MotoGP motorcycle racer. Before the game
begins, you have the option to select a rider, a team, and a track.
How to Play
Press
S
To
accelerate, brake, and turn your motorcycle
Snood 21
In this solitaire game, you try to use all the cards in a deck by
making combinations of 21 on any of four columns. When a
combination of 21 is created, the cards are discarded, letting you
start another combination of 21.
If you finish the first level in one minute, you can move on to the
next level.
Rules of the game
• Aces are worth either 1 or 11, Jacks, Queens, and Kings are
worth 10, and all other cards are worth the amount written on
their faces.
• You can place a wild card in any non-frozen column for an
automatic 21.
News and Entertainment - 127
C350.RG.book Page 128 Friday, February 14, 2003 8:35 AM
• When the countdown timer reaches 20 seconds, the word
'4 blinks twice in place of the cards left field. If the timer
reaches zero and there is a card still on the deck, 4+1+
appears in place of the cards left field for 2 seconds and the
game is over.
• The number of cards in a deck depends on the current level:
the first level contains 32 cards (two complete suits plus six
wild cards), the second level contains 45 cards (three
complete suits plus six wild cards), the third and fourth levels
contain 58 cards (all four complete suits plus six wild cards)
• When there are no more cards in the deck, you score 200
times the number of cards left in all the columns.
• Every time you place a card, you score 50 points.
• Whenever the total of all the cards placed on a column is
equal to 21, you score 100 times the column’s position (21 on
the first column scores 100 points, while 21 on the third
column scores 300). 5 cards totalling less than 21 in a column
is treated as 21.
• If the value of the cards in a column is greater than 21, the
column is frozen and marked with an C (the column’s total
displays 4).
• If all the columns become frozen, ++& appears in
place of the cards left field for 2 seconds, and the game is
over.
How to Play
Press
1
2
3
4
To
place a card on the first column
place a card on the second column
place a card on the third column
place a card on the fourth column
128 - News and Entertainment
C350.RG.book Page 129 Friday, February 14, 2003 8:35 AM
MotoMixer Sound Editor
The MotoMixer lets you edit and save special MIDI-based sound
files called Groove Tunes on your phone. These sound files are
made up of four instrument parts such as piano, bass, drums, and
guitar. The phone comes preloaded with five base tracks (which
cannot be edited or deleted), but you can download others and use
them all to create or edit your own MIDI files.
Create or Edit a Mix File
To create or edit a MotoMixer file:
Find the Feature
Press
1
S
2 (+)
3 '( (+)
4 keypad keys
5 (+)
6 '( (+)
7
S left or right
8 (+)
9 '( (+)
10 ) (+)
11 keypad keys
M> > / > @% /A or
a tune to edit
To
scroll to a track you want to
include in the new mix
select the first base track
select enter a name for the mix file you
are creating (see page 36)
store the name
select adjust the tempo setting
store the tempo setting
select / and open the base
track editor
start playing/mixing the track
edit the base tracks (see
following section)
News and Entertainment - 129
C350.RG.book Page 130 Friday, February 14, 2003 8:35 AM
Press
12 ) (+)
13 (-)
14 (-)
To
stop playing/mixing the track
close the base track editor
close the mix file display
Base Track Editing Display and Keys
You can select the instruments you want to play and when you want
to play them.
First column:
on/off
Name of
instrument/
track
Second column:
add effect
3"#
,
,
M
Third column:
set instrument
variant
3%
Press ) (+) to play the mix file. Turn instruments on or off,
add effects, and/or set an instrument variant using the following
keypad keys.
Key
1
2
3
4
5
6
Effect
Turn first track () in example) on/off
Add effect to first track
Set instrument variant for first track
Turn second track ($$ in example) on/off
Add effect to second track
Set instrument variant for second track
130 - News and Entertainment
C350.RG.book Page 131 Friday, February 14, 2003 8:35 AM
Key
7
8
9
*
0
#
Effect
Turn third track ("
$ in example) on/off
Add effect to third track
Set instrument variant for third track
Turn fourth track ((" in example) on/off
Add effect to fourth track
Set instrument variant for fourth track
The track plays one time and then stops. Press ) (+) again
to continue mixing the track. Use the following keys to perform
additional mix functions:
M
(-)
Open a sub-menu to reset one or all
tracks
Return to the / $ menu when
you are finished mixing the track
Note: To download new MotoMixer files, see page 122.
Use, Edit, or Delete a Mix File
To edit or delete a mix file, or set a mix file as a ring tone:
Find the Feature
Press
1
S
2 M
3
S
4 (+)
M> > /
To
scroll to the file you want
open the mix menu
scroll to , , ) , or
$ select the option
News and Entertainment - 131
C350.RG.book Page 132 Friday, February 14, 2003 8:35 AM
Creating Alert Tones
You can create and store custom ring tones on your phone. The
ring tones appear in the list of available alerts (see page 46).
Create a Tone
Find the Feature
M> ++
> $ > @% A
Press
1 '( (+)
2 keypad keys
To
select $
enter notes (see following
section)
store the notes
select enter the name for the tone
store the name
store the tone
3
4
5
6
7
(+)
'( (+)
keypad keys
(+)
(-)
Enter Notes
To create a new ring tone, use the keypad keys to enter notes. For
each note, you must specify the octave (optional), pitch, length, and
a length modifier (optional). Press a key multiple times to cycle
through its available options. Enter the necessary character as
described in the following lists.
132 - News and Entertainment
C350.RG.book Page 133 Friday, February 14, 2003 8:35 AM
Octave
The default setting for a new tone is octave four.
Key
Display
0
D
Description
enter D followed by a number (E
to F) to set the octave
Notes and Rests
Key
Display
0
G
H
2
#
3
-
4
7
Description
sharp
flat
note A
note B
note C
note D
note E
note F
note G
rest
Lengths and Modifiers
Key
Display
0
E
1
2
2
I
3
J
4
K
Description
whole note
half note
quarter note
eighth note
sixteenth note
News and Entertainment - 133
C350.RG.book Page 134 Friday, February 14, 2003 8:35 AM
Key
Display
5
L
1
!
*
M
Description
1/32 note
dotted note
double dotted note
2/3 length note
Note Entry Sequence
Do This
1 Set the octave
(optional)
2 Set the note to a
sharp or flat, if
necessary
3 Select the note
(required)
4 Set length
(required)
5 Modify length
(optional)
134 - News and Entertainment
Action
Set the octave (DE to DF) before
selecting the note. The octave
applies to the note and all
following notes until you change
it again.
Enter a sharp or flat (G or H)
before selecting the note.
Press a keypad key.
Set the length (E to L) after
selecting the note. If you do not
specify a length, a I (quarter
note) length is appended to the
note.
Enter a length modifier (! , *, or M)
after you set the length.
C350.RG.book Page 135 Friday, February 14, 2003 8:35 AM
You can perform the following tasks when creating a tone:
Task
Insert a rest
Listen to a new
tone as you
compose it
Action
Enter one or more rests
( characters) as needed in the tone
sequence. Set the length of the rest
(E to L) after the rest, just as you
would for a note.
Press M to enter the $ ",
and select ) to play the notes
you have entered.
Example
Press the following keys to create this sequence of notes and rests
in octave three: C (quarter note), E flat (quarter note), half rest,
and G (whole note):
Press
To
1 0 0 3 3 set octave three
33
2 222
3 222
4
5
6
7
8
9
10
enter note C
set length to quarter
2
note
0 0 0 0 enter flat symbol
33
enter note E flat
222
set length to quarter
2
note
7
enter rest
1
set length to half rest
4
enter note G
0
set length to whole note
Display
DJ
I
H
I
2
E
News and Entertainment - 135
C350.RG.book Page 136 Friday, February 14, 2003 8:35 AM
Play a Tone
Find the Feature
M> +
> $
Press
1 S
To
scroll to the tone
2 M
open the "
scroll to )
3
S
4 (+)
5 ) (+)
or
( -)
select )
play the tone again
return to the my tones list
Edit a Tone
You cannot edit the predefined ring tones included with your phone.
To edit a custom ring tone:
Find the Feature
M> +
> $
Press
1 S
To
scroll to the tone
2 (+)
open the tone details
scroll to the details you want to
edit (
or $)
select the item
enter new text or notes
store the new text or notes
save your changes
3
4
5
6
7
S
'( (+)
keypad keys
(+)
(-)
136 - News and Entertainment
C350.RG.book Page 137 Friday, February 14, 2003 8:35 AM
Delete a Tone
You cannot delete the predefined ring tones included with your
phone. To delete a custom ring tone:
Find the Feature
Press
1
S
2 M
3
S
4 (+)
M> +
> $
To
scroll to the tone
open the "
scroll to select SIM Applications
You can access information and applications stored on
your SIM card.
To access the available applications:
Find the Feature
M> > $
Your SIM card may contain applications that process your outgoing
calls, text messages, and other events. Contact your service
provider for more information.
News and Entertainment - 137
C350.RG.book Page 138 Friday, February 14, 2003 8:35 AM
Troubleshooting
Check these questions first if you have problems with your phone:
Question
Is your battery
charged? Do
you see B in
the display?
Do you have a
valid SIM card
inserted in your
phone?
Does the
handset have a
signal? Do you
see j in the
display?
Is the earpiece
volume too
low?
Is the other
party unable to
hear you?
Answer
The battery level indicator should
have at least one segment showing
(C). If it does not, recharge your
battery. (See page 19 and page 20.)
If necessary, turn off your phone and
make sure that you have inserted a
valid SIM card. (See page 21). If you
have problems with your SIM card,
contact your service provider.
The signal strength indicator should
have at least one segment showing
(1). If it does not, move to an area
with a stronger signal to use your
phone.
While on a call, press S to the
right to raise the earpiece volume.
Your phone may be muted. Press
44 (+) if necessary to unmute
the phone.
Also, make sure that your phone’s
microphone is not blocked by its
carrying case or a sticker.
138 - Troubleshooting
C350.RG.book Page 139 Friday, February 14, 2003 8:35 AM
Question
Has the phone
been damaged,
dropped, or got
wet?
Was a
non-Motorola
battery charger
used?
Answer
Dropping your phone, getting it wet,
or using a non-Motorola battery
charger can damage the phone. The
phone’s limited warranty does not
cover liquid damage or damage
caused from using non-Motorola
accessories.
The following refer to specific problems:
Problem
My phone was
stolen. To whom
should I report
this?
I forgot my
password.
I pressed the
End/Power key,
but nothing
happened.
I pressed keys,
but the display
has stopped
responding.
Solution
Report a stolen phone to the police
and to your service provider (the
company that sends you your
monthly wireless service bill).
See page 108.
Be sure to press and hold O (the
End/Power key) until the display
appears and you hear an audible
alert (this could take a couple of
seconds). If nothing happens, check
that the battery is charged. (See
page 19.)
You might need to reset your phone.
See page 26.
Troubleshooting - 139
C350.RG.book Page 140 Friday, February 14, 2003 8:35 AM
Problem
The display
says:
$ or
even though I
have inserted
my SIM card in
the phone.
Solution
The SIM card may be incorrectly
inserted. Check the SIM card to make
sure that it is inserted properly. See
page 21.
Note: Be sure to turn your phone off
and then back on after you re-insert
the SIM card.
Also, you may have an older SIM
card that is not compatible with your
phone. Call your service provider for
more information.
The display
Call your service provider (the
says: . company that sends you your
How do I
monthly wireless service bill) to
unblock my SIM obtain the PIN unblocking key (PUK)
card?
code. See page 109.
Enter the factory-preset unlock code
The display
says: +4+ (1234), or the last four digits of your
. How do I
phone number. (See page 106.) If
unlock my
this fails, call your service provider
phone?
(the company that sends you your
monthly wireless service bill).
My phone asks The application you want is locked. If
for an unlock
you own the phone but do not know
code when I try the unlock code, see page108.
to open a
feature.
140 - Troubleshooting
C350.RG.book Page 141 Friday, February 14, 2003 8:35 AM
Problem
My phone does
not ring.
My phone rings
even though I
selected the
(or &#)
alert profile.
I tried to place a
call and heard
an alternating
high/low tone.
I cannot make/
answer calls.
Solution
If you see t or y in the display,
then the ring tone is turned off. See
page 46.
Also, the ring tone may be set to even though your phone is set to a
ring alert profile. Be sure to listen to
your ring tone before setting it to
make sure it is effective in the
environment where you use your
phone.
The ring tone may be set to play a
tone even though your phone is set to
a silent alert profile. See page 47.
Your call did not reach the wireless
system. You may have dialled the
number too soon after turning the
phone on. Wait until the display
shows the name of your service
provider before making a call.
Make sure that you have a phone
signal (see page 31). Avoid electrical
or radio interference, and
obstructions such as bridges, car
parks, or tall buildings.
Your phone also may have the
feature turned on. If you
know the unlock code, you can
change this setting in the security
menu (M > > $ > " ).
Also, check to be sure your SIM card
is installed and working.
Troubleshooting - 141
C350.RG.book Page 142 Friday, February 14, 2003 8:35 AM
Problem
My phone has
poor reception
and drops calls.
Solution
Make sure you have a phone signal
(see page 31). Stay clear of any
obstructions such as bridges, car
parks, or tall buildings.
I cannot hear
While on a call, press the volume key
others on my
on the left side of your phone. Your
phone.
phone display should show the
volume increasing.
Also, make sure that your phone’s
earpiece is not blocked by its carrying
case.
I cannot open
Before you can use text or
my inbox.
information services messages, you
must set up the appropriate inbox.
See page 69.
How do I see the To see the most recent calls you
calls I sent or
dialled or received, open the “Recent
received?
Calls” lists:
M> $ > , $
or $
142 - Troubleshooting
C350.RG.book Page 143 Friday, February 14, 2003 8:35 AM
Problem
My phone will
not dial
voicemail
commands,
passwords, or
other codes.
Solution
Your phone sends commands and
passwords as DTMF tones. You can
set your phone’s DTMF tones to be
, , or --. If you have trouble
sending numbers, check your DTMF
setting.
From the idle display, press:
M> > $
> $ > "+
> 1
Press S to scroll to or .
My phone’s
display is too
light.
Press (+) to select it.
You can change the level of contrast
in your phone display. See page 48.
You can also change the backlight
settings. See page 48.
What can I do to Your battery’s performance is
extend battery
affected by charge time, feature use,
life?
temperature changes, and other
factors. For tips on extending your
battery life, see page 20.
I can’t find a file You may have deleted the file to
I downloaded.
make room for a new one. See
page 122.
Troubleshooting - 143
C350.RG.book Page 144 Friday, February 14, 2003 8:35 AM
Problem
I plugged the
data cable into
my phone but
my phone did
not beep. How
do I know if the
data cable is
ready to go?
My phone
beeped when I
attached the
data cable, but
my fax and data
applications
don’t work.
When sending
data with the
data cable, why
does the
computer show
a connection
rate of 19200
Kbps?
Solution
The beep indicates that you are set
up correctly. If you did not hear a
beep, make sure that both ends of
the data cable are connected—the
smaller end to your phone and the
larger end to your computer.
Finally, your computer may have
deactivated the port to save power.
Try opening an application that uses
the port, like a fax or dial-up
application, and your computer will
automatically activate the port.
Some wireless networks may not
support data or fax transmission. If
you are roaming on an unfamiliar
network, this may be the case.
Also, remember that data and fax
transmission usually requires a
subscription. Call your service
provider for more information.
19200 Kbps is the data transfer rate
of the connection between your
computer and the phone in a
standard CSD (Circuit Switch Data)
connection. The rate of the
connection between your phone and
the network is displayed on your
phone, and will be either 14400 or
9600 Kbps.
A GPRS connection may have a
higher data transfer rate.
144 - Troubleshooting
C350.RG.book Page 145 Friday, February 14, 2003 8:35 AM
Problem
I can’t end my
data call by
closing the
application on
my computer.
What can I do?
I launched the
micro-browser
but the display
says: , +
,#.
I launched the
micro-browser
but the display
says: ,+
4,#.
Solution
Try pressing O on your phone.
Also try disconnecting the cable or
turning off the phone. If possible,
always close the connection through
your computer. These alternative
methods may disrupt the application
on your computer.
You may be in an area without
service, or you may be connected to
a network that does not support
Internet access.
Try again in a few minutes. The
servers may be temporarily busy.
Troubleshooting - 145
C350.RG.book Page 146 Friday, February 14, 2003 8:35 AM
Warranty Information
Motorola guarantees you, the original purchaser, the Personal
Communicator and accessories which you have purchased from an
authorised Motorola dealer (the "Products"), to be in conformance
with the applicable Motorola specifications current at the time of
manufacture for a term of [1] year from date of purchase of the
Product(s) (WarrantyTerm).
You must inform Motorola of the lack of conformity to the applicable
specifications of any of the Products within a period of two (2)
months from the date on which you detect a defect in material,
workmanship or lack of conformity and in any event within a term
not to exceed the Warranty Term, by submitting the Product for
service to Motorola. Motorola shall not be bound by Product related
statements not directly made by Motorola nor any warranty
obligations applicable to the seller.
A list of the Motorola Call Centre numbers is enclosed with this
Product.
During the Warranty term, Motorola will, at its discretion and without
extra charge, as your exclusive remedy, repair or replace your
Product which does not comply with this warranty; or failing this, to
reimburse the price of the Product but reduced to take into account
the use you have had of the Product since it was delivered. This
warranty will expire at the end of the Warranty Term.
This is the complete and exclusive warranty for a Motorola
Personal Communicator and accessories and in lieu of all other
warranties, terms and conditions, whether express or implied.
Where you purchase the product other than as a consumer,
Motorola disclaims all other warranties, terms and conditions
express or implied, such as fitness for purpose and satisfactory
quality.
146 - Warranty Information
C350.RG.book Page 147 Friday, February 14, 2003 8:35 AM
In no event shall Motorola be liable for damages nor loss of data in
excess of the purchase price nor for any incidental special or
consequential damages* arising out of the use or inability to use
the Product, to the full extent such may be disclaimed by law.
This Warranty does not affect any statutory rights that you may
have if you are a consumer, such as a warranty of satisfactory
quality and fit for the purpose for which products of the same type
are normally used under normal use and service, nor any rights
against the seller of the Products arising from your purchase and
sales contract.
(*)including without limitation loss of use, loss of time, loss of data,
inconvenience, commercial loss, lost profits or savings.
How to get warranty service?
In most cases the authorised Motorola dealer which sold and/or
installed your Motorola Personal Communicator and original
accessories will honour a warranty claim and/or provide warranty
service. Alternatively, for further information on how to get warranty
service please contact either the customer service department of
your service provider or Motorola's call centre at the telephone
numbers below for your country.
In order to claim the warranty service you must return the Personal
Communicator and/or accessories in question to Motorola please
avoid leaving any supplementary items like SIM cards. The Product
should also be accompanied by a label with your name, address,
and telephone number; name of operator and a description of the
problem. In the case of vehicular installation, the vehicle in which
the Personal Communicator is installed should be driven to the
Authorised Repair Centre, as analysis of any problem may require
inspection of the entire vehicular installation.
In order to be eligible to receive warranty service, you must present
your receipt of purchase or a comparable substitute proof of
purchase bearing the date of purchase. The phone should also
clearly display the original compatible electronic serial number
(IMEI) and mechanic serial number [MSN]. Such information is
contained with the Product.
Warranty Information - 147
C350.RG.book Page 148 Friday, February 14, 2003 8:35 AM
Conditions
This warranty will not apply if the type or serial numbers on the
Product has been altered, deleted, duplicated, removed, or made
illegible. Motorola reserves the right to refuse free-of-charge
warranty service if the requested documentation can not be
presented or if the information is incomplete, illegible or
incompatible with the factory records.
Repair, at Motorola's option, may include reflashing of software, the
replacement of parts or boards with functionally equivalent,
reconditioned or new parts or boards. Replaced parts, accessories,
batteries, or boards are warranted for the balance of the original
warranty time period. The Warranty Term will not be extended. All
original accessories, batteries, parts, and Personal Communicator
equipment that have been replaced shall become the property of
Motorola. Motorola does not warrant the installation, maintenance
or service of the products, accessories, batteries or parts.
Motorola will not be responsible in any way for problems or damage
caused by any ancillary equipment not furnished by Motorola which
is attached to or used in connection with the Products, or for
operation of Motorola equipment with any ancillary equipment and
all such equipment is expressly excluded from this warranty.
When the Product is used in conjunction with ancillary or peripheral
equipment not supplied by Motorola, Motorola does not warrant the
operation of the Product/peripheral combination and Motorola will
not honour any warranty claim where the Product is used in such a
combination and it is determined by Motorola that there is no fault
with the Product. Motorola specifically disclaims any responsibility
for any damage, whether or not to Motorola equipment, caused in
any way by the use of the Personal Communicator, accessories,
software applications and peripherals (specific examples include,
but are not limited to: batteries, chargers, adapters, and power
supplies) when such accessories, software applications and
peripherals are not manufactured and supplied by Motorola.
148 - Warranty Information
C350.RG.book Page 149 Friday, February 14, 2003 8:35 AM
What is not covered by the warranty
This warranty is not valid if the defects are due to damage, misuse,
tampering, neglect or lack of care and in case of alterations or
repair carried out by unauthorised persons.
1. Defects or damage resulting from use of the Product in other
than its normal and customary manner.
2. Defects or damage from misuse, access to incompatible
sources, accident or neglect.
3. Defects or damage from improper testing, operation,
maintenance, installation, adjustment, unauthorised software
applications or any alteration or modification of any kind.
4. Breakage or damage to antennas unless caused directly by
defects in material or workmanship.
5. Products disassembled or repaired in such a manner as to
adversely affect performance or prevent adequate inspection
and testing to verify any warranty claim.
6. Defects or damage due to range, coverage, availability, grade
of service, or operation of the cellular system by the cellular
operator.
7. Defects or damage due to moist, liquid or spills of food.
8. Control unit coil cords in the Product that are stretched or have
the modular tab broken.
9. All plastic surfaces and all other externally exposed parts that
are scratched or damaged due to customer normal use.
10. Leather cases (which are covered under separate
manufacturer's warranties).
11. Products rented on a temporary basis.
12. Periodic maintenance and repair or replacement of parts due to
normal wear and tear.
Warranty Information - 149
C350.RG.book Page 150 Friday, February 14, 2003 8:35 AM
Note: The talk-time, stand-by time and total life cycle of a Motorola
rechargeable battery for your Personal Communicator will depend
on usage conditions and network configurations. As a consumable
product, the specifications indicate that you should be able to
obtain optimum performance for your Motorola Personal
Communicator within the first six months from date of purchase and
up-to (200) charges.
The warranty for Motorola rechargeable batteries becomes void if
(i) the batteries are charged other than by Motorola approved
battery chargers specified for the charging of the battery, (ii) any of
the seals on the battery are broken or show evidence of tampering,
(iii) the battery is used in equipment or service other than the
cellular telephone equipment for which it is specified.
150 - Warranty Information
C350.RG.book Page 151 Friday, February 14, 2003 8:35 AM
Specific Absorption Rate Data
This model phone meets international standards for exposure
to radio waves
Your mobile phone is a radio transmitter and receiver. It is designed
and manufactured not to exceed limits for exposure to radio
frequency (RF) energy. These limits are part of comprehensive
guidelines and establish permitted levels of RF energy for the
general population. The guidelines are based on standards that
were developed by independent scientific organisations through
periodic and thorough evaluation of scientific studies. The
guidelines include a substantial safety margin designed to assure
the safety of all persons, regardless of age and health.
The exposure standard for mobile phones employs a unit of
measurement known as the Specific Absorption Rate, or SAR.
Under the guidelines for your phone model, the SAR limit is 2.0 W/
kg.* Tests for SAR are conducted in accordance with CENELEC**
testing procedures using standard operating positions with the
phone transmitting at its highest certified power level in all tested
frequency bands. Although the SAR is determined at the highest
certified power level, the actual SAR of the phone while operating
can be well below the maximum value. This is because the phone
is designed to operate at multiple power levels so as to use only the
power required to reach the network. In general, the closer you are
to a base station, the lower the power output of the phone.
Before a phone model is available for sale to the public, it is tested
to confirm compliance with the guidelines. The tests are performed
in positions and locations (e.g., at the ear and worn on the body)
that conform to a uniform testing methodology determined by an
expert standards body. The highest SAR value for this model
phone when tested for use at the ear is: 0.9 W/kg.***
Specific Absorption Rate Data - 151
C350.RG.book Page 152 Friday, February 14, 2003 8:35 AM
While there may be differences between the SAR levels of various
phones and at various positions, they all meet the governmental
requirements for safe exposure. Please note that modifications to
this product model could cause differences in the SAR value for
later products; in all cases, products are designed to be within the
guidelines.
*
The SAR limit recom m ended by international guidelines (ICNIRP) for m obile
phones used by the public is 2.0 watts/kilogram (W /kg) averaged over ten gram s of
tissue. The lim it incorporates a substantial m argin for safety to give additional
protection for the public and to account for any variations in m easurem ents.
** CENELEC is a European Union standards body.
*** Additional related inform ation includes the M otorola testing protocol, assessm ent
procedure, and m easurement uncertainty range for this product.
152 - Specific Absorption Rate Data
C350.RG.book Page 153 Friday, February 14, 2003 8:35 AM
Index
A
accessories
connector ports 1
optional 17, 50, 101
standard 17
+$ feature 57
alert
creating 132
defined 46
indicators 32, 46
reminders 117
type, selecting 47
alert profile 47
animation 49, 122
managing 124–125
screen saver 125
wallpaper 95, 124
appointments. See datebook
Astrosmash 126
+"
# feature 57, 59
B
backlight 48
barring calls 67–68
battery
charging 19
extending battery life 20, 48,
49, 143
installing 18
level indicator 20, 30, 32
block cursor, defined 36
browse text mode 37
browser. See micro-browser
C
calculator 117–119
calendar. See datebook
call
adding digits after phone
number 57
alert profile, setting 47
alert type, selecting 47
alert, creating 132
answering 28
barring 67–68
call waiting 62–63
cancelling 53
costs 100
deleting 55
dialled calls list 55
dialling 27–28
dialling a recent call 55
emergency number 54
ending 28
Index - 153
C350.RG.book Page 154 Friday, February 14, 2003 8:35 AM
hold 68
ignoring 53
making 27–28
placing 27–28
prefix digits, inserting 59
received calls list 55
receiving 28
recent calls 55
storing 55
terminating 53
timing 98, 98–99
transferring 66–67
unanswered call 58
call barring 67–68
call cost information 100
call diverting 63–65
call timers 98, 98–99
call waiting 62
caller ID
incoming calls 53
outgoing calls 57
calling line identification. See
caller ID
car kit
automatic answer 50
automatic hands-free 51
chat 75–78
clock 30
codes. See passwords
colour, display 48
computer
154 - Index
connecting to phone
102–103
conference call 65–66
contrast, display 48
cost trackers 100
credit information 100
currency converter 119
cursor 36
customer service, calling 62
D
data call
connecting to external
device 102–103
receiving 103–104
sending 103
date, setting 45
datebook
adding an event 114
alarm 114
calendar 112
changing event information
114–115
copying an event 115–116
day view 113
deleting an event 116
event view 113
reminders 114, 117
week view 112
#+" 112, 113
default passwords 107
C350.RG.book Page 155 Friday, February 14, 2003 8:35 AM
deleting a call 55
dialled calls list 55
dialling
service numbers 97
dialling a number 27–28
display
animation 49
backlight 48
colour 48
contrast 48
described 30
frozen 26
greeting 46
idle display 30
illustration 30
language 93
resetting 26
zoom setting 45
diverting calls 63–65
download
animation 75, 122
ring tone 75, 122
screen saver 75, 122
theme 122
DTMF tones 56, 57, 98, 143
E
earpiece
illustration 1
volume, adjusting 27
email address, storing in
phonebook 80
emergency number 54
end key
functions 1, 28, 33
ending a call 28
+4+ message 107,
108
+ menu 41
event alert 47
exchange rate, calculating 119
external device
connecting to phone
102–103
F
factory settings, resetting
49–50
fax call
connecting to external
device 101
receiving 103
sending 103
fixed dial
defined 96
dialling numbers 96
editing an entry 85–86, 96
storing an entry 80–83
flashing cursor, defined 36
frequency, changing 105
Index - 155
C350.RG.book Page 156 Friday, February 14, 2003 8:35 AM
G
games 125–128
GPRS indicator 30, 31
displayed 120
GPRS, defined 120
greeting, display 46
H
hands-free mode
automatic answer 50
automatic call routing 51
defined 50
headset
automatic answer 50
'+ feature 57
hold a call 68
I
icon ID 82, 83
icon ID, setting 83
idle display, defined 30
ignoring a call 53
inbox, text message 69–70
incoming call
cancelling 53
ignoring 53
terminating 53
+ message 53
indicators
alert setting 32, 46
156 - Index
battery level 20, 30, 32
GPRS 30, 31, 120
menu 30, 32
message 31
message waiting 30, 73
missed call 58
ring alert 32, 46
roam 30, 31
signal strength 30, 31
silent alert 32, 46
text entry 31
transmit 31
vibrate alert 32, 46
voice name 79
iTAP™ software
activating 41
described 41
entering words 42
K
key
end 1, 28, 33
left soft key 1, 33, 92
lock 109
menu 1, 33, 52
navigation 1
right soft key 1, 33, 92
send 1, 28, 55
voice 84
volume control 27
keypad
C350.RG.book Page 157 Friday, February 14, 2003 8:35 AM
locking and unlocking 109
volume, setting 47
L
language, setting 93
$+$+"
opening 56
options 57
left soft key
customising 92
functions 1, 33
lock
keypad 109
phone 106–107
SIM card 109
loud ring alert 32, 46
M
making a call 27–28
master clear 50
master reset 49
+$+1"6 message 76
menu
%$+" 121
#+" 112, 113
entering text 35–36, 45
+ menu 41
features 96
language, setting 93
$+$+" 56
lists 34
MyMenu 93
navigating 34
)#+" 79
scroll feature 48
/+$+" 74–75
using features 35–36
menu indicator
defined 30, 32
illustration 30
menu key 1, 33, 52
message
chat 75–78
deleting, text 73–75
dialling number from 97
inbox setup 69–70
locking, text 73–75
outbox 72
reading, text 73–75
receiving, text 73
reminders, receiving 73
reminders, text message
117
reminders, voicemail 60,
117
sending 71
status 72
voicemail 59–61
message indicator
defined 31
message waiting indicator
displayed 73
Index - 157
C350.RG.book Page 158 Friday, February 14, 2003 8:35 AM
flashing 73
illustration 30
micro-browser
animation 122
%$+" 121
defined 120
functions 121
go back to previous page
121
picture 122
sound 122
starting 120, 121
microphone 1
missed call indicator 58
$$+$ message 58
moto GP 127
My Menu
creating 94
using 94
my telephone number 29, 52
my tones 132
N
navigation keys 1
network settings 105
notepad
defined 58
entering digits 58
number
viewing your number 29
number, viewing your own 52
158 - Index
numeric text mode 37
O
1-touch dial
defined 61
setting preference 61
using 61
optional accessory, defined 17
optional feature, defined 17
outbox 72
P
passwords
changing 107
default 107
if you forget a password 108
phone
accessories, optional 17
accessories, standard 17
connecting to external
device 102–103
credit available 100
date, setting 45
erase user-entered
information 50
frequency, changing 105
keypad, locking and
unlocking 109
language, setting 93
locking 106–107
network settings 105
C350.RG.book Page 159 Friday, February 14, 2003 8:35 AM
1-touch dial 61
passwords 107, 108
reset all options 49
security code 108
speed dial, using 61
startup greeting 46
text entry indicator 31
time, setting 45
unlock code 108
unlocking 27, 106–107
phone number
adding digits after 57
attaching to prefix digits 59
attaching two numbers 57
redialling 52
sending text message to 71
storing in phonebook 80–83
viewing your number 29
viewing your own 52
phonebook
attaching two numbers 57
capacity, checking 90
copying entries 87–90
deleting an entry 86
dialling a number 85
editing an entry 85–86
email address 79
entry name 79
fields 79
icon ID 82, 83
number type indicator 79
1-touch dial 61
phone number 79
prefix digits, inserting 59
ringer ID 82, 93
sorting entries 86
speed dial number 61, 82
speed dial, using 61
storing an entry 80–83
voice name entry 84
voice name indicator 79
)#+" 79
picture
managing 124–125
screen saver 125
storing 122
wallpaper 95, 124
PIN code
activating/deactivating 109
defined 109
protecting the SIM card 109
unblocking 110
PIN2 code 96
unblocking 111
predictive text entry
activating 41
entering words 42
profile
customising 47
setting 47
PUK code 110
PUK2 code 111
Index - 159
C350.RG.book Page 160 Friday, February 14, 2003 8:35 AM
Q
quick dial 62
R
received calls list 55
receiving a call 28
recent calls 55
redial
busy number 52
reminders
chat message 78
datebook 114
setting 117
text message 73, 117
voicemail message 60, 117
reordering the main menu 91
reordering the Message Centre
menu 91
resetting display 26
right soft key
customising 92
functions 1, 33
ring alert
creating 132
indicators 32, 46
setting 47
type, selecting 47
volume, adjusting 27, 47
ring and vibrate alert
indicator 32, 46
ringer ID
160 - Index
listed in phonebook entry 80
setting 82
turning on/off 93
roam indicator
defined 31
illustration 30
S
screen saver 125
scroll feature 48
security code 108
send key 1, 28, 55
sending a call. See making a
call
service dial 97
short message service. See
text message
shortcuts 93
%+ feature 57
signal strength indicator
defined 31
illustration 30
silent alert indicator 32, 46
SIM applications 137
+ message 26, 110,
111
SIM card
applications 137
defined 21
precautions 21
protecting 109
C350.RG.book Page 161 Friday, February 14, 2003 8:35 AM
service phone numbers 97
+ message 26, 110,
111
+$# message 110
unblocking 110
+$# message 110
SIM PIN code
activating/deactivating 109
protecting the SIM card 109
unblocking 110
SIM PIN2 code 96
unblocking 111
SMS. See text message
snood 21 127
soft keys
customising 92
illustration 1, 33
soft ring alert 32, 46
sound
storing 122
speed dial
changing number 82
number, defined 61
sorting phonebook entries by
86
using 61
storing a call 55
symbol text mode 40–41
symbols, entering 40–41
T
Talk and Fax call 104
tap method text entry 37
telephone number
viewing your number 29
telephone number, viewing
your own 52
text
block cursor 36
browse mode 37
character chart 38
entering from keypad 36, 45
entry mode, changing 37
flashing cursor 36
numeric mode 37
symbol chart 41
symbol mode 40–41
tap method 37
text entry indicator
defined 31
text message
deleting 73–75
dialling number from 97
inbox setup 69–70
locking 73–75
reading 73–75
receiving 73
reminders 73, 117
sending 71
status 72
text mode, changing 37
Index - 161
C350.RG.book Page 162 Friday, February 14, 2003 8:35 AM
themes 122
time, setting 45
timers 98, 98–99
transfer a call 66–67
transmit indicator
defined 31
travel charger, using 19
W
wallpaper 95, 124
Web pages 120, 121
Z
zoom setting 45
U
unblocking the SIM card 110
unlock
keypad 109
unlock code 106–107, 108
V
vibrate alert
indicator 32, 46
setting 47
type, selecting 47
voice dial
dialling a number 85
recording voice name 84
voice name
defined 84
phonebook indicator 79
recording 84
voicemail 59–61
volume
earpiece 27
keypad 47
ring 27, 47
162 - Index
6809458A65