1
Back Vac™ 6, Back Vac™ 10
READ THIS BOOK
LEA ESTE LIBRO
LISEZ CE MANUEL
INSTRUCTIONS FOR USE
MODE D'EMPLOI
INSTRUCCIONES DE USE
Printed in China
823 0100 050 Instruction for use Euroclean Back Vac 6 Back Vac 10.indd 1
823 0100 050
Edition P00 2008-02
2008-02-25 14:38:07
READ THIS BOOK
LEA ESTE LIBRO
LISEZ CE MANUEL
Contents/ Contenido/ Table des matières
2-16,
English
2-12,17-19
Français
2-12, 20-22
~
Espanol
23
Data
2
823 0100 050 Instruction for use Euroclean Back Vac 6 Back Vac 10.indd 2
2008-02-25 14:38:42
This book has important information for the use and safe operation of this
machine. Failure to read this book prior to operating or attempting any service
or maintenance procedure to your machine could result in injury to you or to
other personnel; damage to the machine or to other property could occur as
well. You must have training in the operation of this machine before using it.
If your operator(s) cannot read this manual, have it explained fully before
attempting to operate this machine.
USA
Euroclean
14600 21st Avenue North
Plymouth, MN 55447-3408
Tel.: (763) 745 3500
Fax :(763) 745 3718
3
823 0100 050 Instruction for use Euroclean Back Vac 6 Back Vac 10.indd 3
2008-02-25 14:38:42
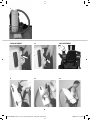
1
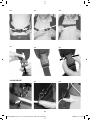
3 ADJUSTMENT
5
3:1
4 ADJUSTMENT
5:1
5:2
4
823 0100 050 Instruction for use Euroclean Back Vac 6 Back Vac 10.indd 4
2008-02-25 14:38:43
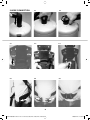
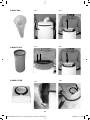
2 HOSE CONNECTION
2:1
2:2
4:1
4:2
4:3
5:3
5:4
5:5
5
823 0100 050 Instruction for use Euroclean Back Vac 6 Back Vac 10.indd 5
2008-02-25 14:38:45
5:6
5:7
5:8
6:1
6:2
6:3
8:1
8:2
8 CORD RELIEF
6
823 0100 050 Instruction for use Euroclean Back Vac 6 Back Vac 10.indd 6
2008-02-25 14:38:52
5:9
5:10
6
7 CORD SET
7:1
7:2
9 ON/OFF
9:1 OPERATION
On/Off
7
823 0100 050 Instruction for use Euroclean Back Vac 6 Back Vac 10.indd 7
2008-02-25 14:38:55
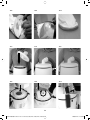
10 DUST BAG
10:1
10:2
11 MAIN FILTER
11:1
11:2
12 HEPA-FILTER
12:1
12:2
2
1
8
823 0100 050 Instruction for use Euroclean Back Vac 6 Back Vac 10.indd 8
2008-02-25 14:39:02
10:3
10:4
10:5
11:3
11:4
11:5
12:3
12:4
12:5
1
2
1
2
9
823 0100 050 Instruction for use Euroclean Back Vac 6 Back Vac 10.indd 9
2008-02-25 14:39:06
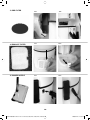
13 PRE-FILTER
13:1
13:2
14 EXHAUST FILTER
14:1
14:2
15 POWER NOZZLE
15:1
15:2
10
823 0100 050 Instruction for use Euroclean Back Vac 6 Back Vac 10.indd 10
2008-02-25 14:39:14
13:3
13:4
14:3
14:4
13:5
14:5
15:3
11
823 0100 050 Instruction for use Euroclean Back Vac 6 Back Vac 10.indd 11
2008-02-25 14:39:18
16
16:2
17
18
18:2
18:3
19
19:2
19:3
20
20:2
12
823 0100 050 Instruction for use Euroclean Back Vac 6 Back Vac 10.indd 12
2008-02-25 14:39:22
This book has important information for the use and safe operation of this
machine. Failure to read this book prior to operating or attempting any service
or maintenance procedure to your machine could result in injury to you or to
other personnel; damage to the machine or to other property could occur as
well. You must have training in the operation of this machine before using it.
If your operator(s) cannot read this manual, have it explained fully before
attempting to operate this machine.
USA
Euroclean
14600 21st Avenue North
Plymouth, MN 55447-3408
Tel.: (763) 745 3500
Fax :(763) 745 3718
13
823 0100 050 Instruction for use Euroclean Back Vac 6 Back Vac 10.indd 13
2008-02-25 14:39:24
(Only for grounded appliances):
ENGLISH
GROUNDING INSTRUCTIONS
IMPORTANT SAFETY INSTRUCTIONS
This appliance must be grounded. If it should malfunction or
breakdown, grounding provides a path of least resistance
for electric current to reduce the risk of electric shock. This
appliance is equipped with a cord having an equipmentgrounding conductor and grounding plug.
The plug must be inserted into an appropriate outlet that is
properly installed and grounded in accordance with all local
codes and ordinances.
When using an electrical appliance, basic precautions should
always be followed, including the following:
READ ALL INSTRUCTIONS
BEFORE USING THE VACUUM CLEANER!
WARNING!
To reduce the risk of fire, electric shock, or injury:
*
*
*
*
*
*
*
*
*
*
*
*
*
*
*
*
*
*
*
*
WARNING!
Only motorized nozzle is double insulated. To reduce risk of
Do not leave appliance when plugged in. Unplug from
outlet when not in use and before servicing.
To reduce the risk of electric shock - do not use outdoor
or on wet surfaces.
Connect to a proper grounded outlet only. See grounding
instructions.
Do not allow to be used as a toy. Close attention is
necessary when used by or near children.
Use only as described in this manual. Use only the
manufacturer’s recommended attachments.
Do not use with damaged cord or plug. If appliance is
not working as it should, has been dropped, damaged,
left outdoors or dropped into water, return it to a service
center.
Do not pull or carry by the cord, use cord as a handle,
close a door on cord, or pull cord around sharp edges or
corners. Do not run the appliance over cord. Keep cord
away from heated surfaces.
Do not unplug by pulling on cord. To unplug, grasp the
plug, not the cord.
Do not handle plug, cord or appliance with wet hands.
Do not put any object into openings. Do not use with any
opening blocked; keep free of dust, lint, hair, and anything
that may reduce air flow.
Keep hair, loose clothing, fingers, and all parts of body
away from openings and moving parts.
Turn off all controls before unplugging.
Use extra care when cleaning on stairs.
Do not use to pick up flammable or combustible liquids
such as gasoline or use in areas where they may be
present.
Do not pick up anything that is burning or smoking, such
as cigarettes, matches, or hot ashes.
This machine is not suitable for picking up health
endangering dust, unless all special authorized
local/state federal precautions are complied with.
Do not use without dust bag and filters in place.
Always turn off the vacuum cleaner before connecting or
disconnecting motorized nozzle.
Do not use outdoor or on wet surfaces. Do not expose
to rain. Store indoors between max. 60°C (degrees
centigrade), and min. 0°C (degrees centigrade), or
140°Fahrenheit / 32°Fahrenheit.
Do not pick up water or other liquids.
electrick shock - connect this vacuum cleaner to a properly
grounded outlet.
WARNING!
Improper connection of the equipment-grounding conductor
can result in a risk of electric shock. Check with a qualified
electrician or service person if you are in doubt as to whether
the outlet is properly grounded. Do not modify the plug
provided with the appliance - if it will not fit the outlet, have a
proper outlet installed by a qualified electrician.
This appliance is for use on a nominal 120-volt circuit and has
a grounding attachment plug that looks like the plug illustrated
in figure A below. Make sure that the appliance is connected to
an outlet having the same configuration as the plug.
No adapter should be used with this appliance.
GROUNDED OUTLET
GROUNDED
OUTLET BOX
GROUNDING PIN
Figure A
SAVE THESE INSTRUCTIONS
14
823 0100 050 Instruction for use Euroclean Back Vac 6 Back Vac 10.indd 14
2008-02-25 14:39:24
IMPORTANT WARNINGS
(Only for double-insulated, cord-connected appliances):
SERVICING OF DOUBLE-INSULATED
APPLIANCES
A double insulated appliance is marked with one of the
following: The words “DOUBLE INSULATION” or “DOUBLE
INSULATED” or the double insulation symbol (square within a
square).
In a double-insulated appliance, two systems of insulation
are provided instead of grounding. No grounding means is
provided on a double-insulated appliance, nor should a means
for grounding be added to the appliance. Servicing a doubleinsulated appliance requires extreme care and knowledge of
the system, and should be done by qualified service personnel.
Replacement parts for a double-insulated appliance must be
identical to the parts they replace.
WARNING!
Only motorized nozzle is double insulated. To reduce risk
of electrick shock - connect vacuum cleaner to a properly
grounded outlet.
MAINTENANCE
Always keep the vacuum cleaner in a dry place. The cleaner
is designed for continuous heavy work. Depending on the
number of running hours – the dust filters should be replaced.
The dust bag must be replaced at the same time the Mainfilter (sack-filter) is replaced/cleaned. Keep the container clean
with a dry cloth, and a small amount of spray polish. Any
other servicing should be performed by an authorized
service representative.
Do not use with damaged cord or plug. If appliance is not
working as it should, has been dropped, damaged, left
outdoors or dropped into water, return it to a service center.
While the machine is in use do not pull or carry by the
cord, use cord as a handle, close a door on cord, or pull
cord around sharp edges or corners. Keep cord away
from heated surfaces.
The size and quality of the dust bag and filters affect the
machine efficiency. Use of non original dust bags or non
original filters can cause restricted air flow which may lead to
machine overload.
1. This machine is also suitable for commercial use, for
example in hotels, schools, hospitals, factories, shops and
offices and for normal housekeeping purposes.
2. This machine is not suitable for picking up health
endangering dust, unless all special authorised
local/state federal precautions are complied with.
3. This machine is for dry use only and shall not be
used or stored outdoors in wet conditions. Store indoors
between max. 60°C (degrees centigrade) and min. 0°C
(degrees centigrade) 140°Fahrenheit / 32°Fahrenheit..
4. The machine must not be used for the suction of water
or other liquids.
5. Live conductors must not be vacuum cleaned by the
machine for dry dust before their current has been
switched off. This is to avoid creating a short-curcuit
through the dust remaining in the nozzles and tubes.
6. The machine must not be used for picking up combustible
or explosive materials, nor should it be used in an
explosive atmosphere.
7. Under no circumstances should the machine be used for
picking up hot material. In particular the machine must not
be used for cleaning open and closed fireplaces, ovens
or similar objects that contain warm or glowing ashes.
8. The machine must not be used if the electrical cord or
plug shows any sign of damage. Regularly inspect the
cord and plug for damage, in particular if it has been
crushed, shut in a door or run over.
9. The machine must not be used if it is faulty.
10. Do not unplug by pulling on cord. To unplug, grasp the
plug, not the cord.
11. Always turn off this vacuum cleaner before connecting or
disconnecting motorized nozzle.
12. When repairing or replacing the cord, the same type of
cord as originally supplied with the machine must be
used. This cord can be supplied by the manufacturer.
12b.If the fixed supply cord is damaged, it must be replaced
by the manufacturer or its service agent or a similarly
qualified person in order to avoid a hazard.
13. The plug must always be removed from the socket outlet
before starting any maintenance of the machine or the
cord.
14. Disconnect vacuum cleaner before servicing and when not
in use. Do not leave unattended vacuum cleaner
plugged in.
15. No changes or modifications to the mechanical or
electrical safety devices should be made.
INSTRUCTIONS FOR USE
This machine is equipped with a thermal cut-out to protect
the motor and other vital machine parts from overheating.
Should the machine cut out, you will have to wait at least 510 minutes for it to automatically reset. While you are waiting,
switch the machine off and unplug it, then check the hose,
dust bag and filters to be sure that nothing is blocking the flow
of air through the machine.
Before using the vacuum cleaner make sure that the voltage
shown on the rating plate on the vacuum cleaner corresponds
with the main voltage.
Accessories shown in the illustrations may vary from model to
model.
When cleaning is performed roll up the extension cord
starting at the machine end and store it at the machine
belt by snapping the nylon tie around the cord.
15
823 0100 050 Instruction for use Euroclean Back Vac 6 Back Vac 10.indd 15
2008-02-25 14:39:25
GENERAL INSTRUCTION FOR USE
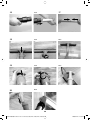
Numbered sections below correspond to numbered photos on pages 4-12
1. General overview of equipment:
Accessories shown in the illustrations may vary from model to
model.
2. Hose connection:
Fit the hose inlet sleeve into the opening on the upper lid.
Apply soft pressure and turn the inlet sleeve approximately
half a turn to ensure it is firmly secured. Turn clockwise to
lock, counterclockwise to release.
3. Adjustment of strap position on support plate:
On the primary strap, the position of the strap can be
adjusted for your individual comfort by moving the
adjustment plate to the inner or outer position.
4. Adjustment of tension ties on the strap’s support
plate:
You can adjust the tension ties for your individual comfort.
Form a loop with your finger, then move the tie through the
clip forwards or backwards to the required length. Remove
your finger. Tension the tie.
5. Adjusting the vacuum cleaner to sit comfortably on
your back:
Pick up the vacuum cleaner. Put your arms through the
shoulder straps. Snap the waistbelt clip shut. Adjust
the length. Snap the chest clip shut. Adjust the straps
vertically by pulling down on both ties as shown in the
picture.
6. Tension tie clip:
Snap the two halves of the clip together. Make sure they
are securely fastened. To unlock, press both sides of the
clip simultaneously.
7. Cord set:
This vacuum cleaner is equipped with a 50 ft extension
power cord, of type 3x16AWG, 125V, SJT, SJO, that
must be connected to the cord set from the machine.
Always use and connect such an extension cord to
this vacuum cleaner. Place the end of the extension
cord in to the snap hook from the vacuum cleaner in
order to create a cord relieve by the hook. When cleaning
is performed roll up the extension cord starting at the
machine end and store it at the machine belt by
snapping the nylon strap around the cord.
8. Cord Relief:
Connect the extension cord to the outlet from the cleaner.
Place the end of the extension cord in to the snap hook
that is placed at the vacuum cleaner in order to create a
Cord Relief by the hook. Make sure the cord is properly
secured in the hook.
9. On/Off:
The on/off switch is located in a separate housing attached
to the right side of the waistbelt. Tilt the switch for ON or
OFF function.
10. Dust bag:
If the suction power diminishes, it may be time to replace
the dust bag. Check the bag frequently to make sure that
you don’t overfill. Release the latches on the upper lid.
Lift up the lid from the container. Grasp at the cardboard
part of the dust bag and carefully lift the bag out of the
container. Some types of dust bag can be sealed to
prevent any dust/rubbish from being released.
In that case, peel off the protective paper and fold the
cardboard collar to seal the bag.
11. Main filter:
When you replace the dustbag also replace or clean the
Main filter. This can be done after you have lifted out the
dust bag. Clean the filter by shaking it well. Reinstall the
filter into the machine or replace it with a new one if it
can not be cleaned. Replace the dust bag and slide it in
place to the main filter. Then put back the lid and close the
latches.
12. HEPA filter:
HEPA filters cannot be cleaned or washed. Once they
have become dirty, they must be replaced. Check and
change the HEPA filter frequently. When handling a new
HEPA filter, avoid touching the surface of the filter. Take
hold of the plastic framework instead to insure the HEPA
filter functions properly. To replace the HEPA filter: Unlock
the lower set of latches that secure the motor base to
container. Lift off the container and lid assembly. Turn the
HEPA filter counterclockwise and lift filter directly upward
to remove. Repeat in reverse order to install new HEPA
filter.
13. Pre-filter:
Check the pre-filter frequently. Never run the vacuum
cleaner without the pre-filter in place. Once the HEPA
filter is removed (see Section 12 above) it is possible to
inspect and replace the pre-filter if needed. Release the
two latches on the motor top. Remove the container and
the upper lid. Place the pre-filter in the center of the motor
top. Lock both latches down.
14. Exhaust filter:
This filter is used to clean the exhaust air coming from the
motor. To replace exhaust filter: press down on the center
tab of the exhaust cover and pull outward to remove the
cover from machine. Place a new exhaust filter into the
cover and replace the cover onto the machine.
15. Power Nozzle:
Always turn off the vacuum cleaner before connecting or
disconnecting motorized nozzle. Plug the cord of the nozzle
into the socket outlet on the side of the machine. The
power outlet for the Power Nozzle is only available on
some models.
16. Connection of hose and tube end:
Connect the hose sleeve and the bent tube end by
pushing the bent end into the hose sleeve.
17. Extension tubes:
Fit the to tubes together and secure them by pressing
down the knob. Make sure the knob is securing the two
tubes.
18. Scallop nozzle:
Brush floor nozzle for both hard floors and carpets. Fit the
nozzle to the tube end coupling. Secure and fasten the
nozzle by turning the nut at the tube to the right. To unlock
- turn the nut to the left.
19. Brush nozzle:
Useful tool for cleaning furnishings etc. Fit the nozzle to
the tube end coupling. Secure the nozzle by turning the
nut at the tube to the right. To unlock - turn the nut to the
left.
20. Crevice nozzle:
For cleaning tight spaces such as furniture, radiators and
corners. Secure the nozzle by turning the nut at the tube to
the right.
16
823 0100 050 Instruction for use Euroclean Back Vac 6 Back Vac 10.indd 16
2008-02-25 14:39:25
FRANÇAIS
Pour l’appareil prévu pour mise a la terre):
INSTRUCTIONS VISANT LA MISE À LA TERRE
IMPORTANTES
MESURES DE SECURITE
L’utilisation d’un appareil électrique demande certaines
Cet appareil doit être mis à la terre. En cas de défaillance ou
de panne, la mise à la terre fournit au courant un chemin de
moindre résistance qui réduit le risque de choc électrique.
Cet appareil est pourvu d’un cordon muni d’un conducteur de
terre et d’une fiche avec broche de terre. La fiche doit être
branchée dans une prise appropriée correctement installée et
mise à la terre conformément aux règlements et ordonnances
municipaux.
précautions:
LIRE TOUTES LES INSTRUCTIONS
AVANT DE FAIRE FONCTIONNER
CET APPAREIL!
AVERTISSEMENT!
Pour réduire les risques d’incendie, de choc électrique ou de
AVERTISSEMENT!
blessure:
Seulement le bec motorisé (l´embout Electro) est double isolé.
*
*
*
*
*
*
*
*
*
*
*
*
*
*
*
*
*
*
*
*
*
Ne pas laisser l’appareil sans surveillance lorsqu’il est
branché. Débrancher lorsque l’appareil n’est pas
utilisé et avant l’entretien.
Pour réduire les risques de choc électrique, ne pas utiliser
à l’extérieur et ne pas aspirer de matières humides.
Reliez à une sortie au sol appropriée seulement. Voyez
fondre des instructions a la terra.
Ne pas permettre aux enfants de jouer avec l’appareil.
Une attention particulière est nécessaire lorsque l’appareil
est utilisé par des enfants ou à proximité de ces derniers.
N’utiliser que conformément à cette notice et avec les
accessoires recommandés par le fabricant.
Ne pas utiliser si le cordon ou la fiche est endommagé.
Retourner l’appareil à un atelier de réparation s’il ne
fonctionne pas bien, s’il est tombé ou s’il a été
endommagé, oublié à l’extérieur ou immergé.
Ne pas tirer, soulever ni traîner l’appareil par le cordon.
Ne pas utiliser le cordon comme une poignée, le coincer
dans l’embrasure d’une porte ou l’appuyer contre des
arêtes vives ou des coins. Ne pas faire rouler l’appareil
sur le cordon. Garder le cordon à l’écart des surfaces
chaudes.
Ne pas débrancher en tirant sur le cordon. Tirer plutôt la
fiche.
Ne pas toucher la fiche ni l’appareil lorsque vos mains
sont humides.
N’insérer aucun objet dans les ouvertures. Ne pas utiliser
l’appareil lorsqu’une ouverture est bloquée. S’assurer
que de la poussière, de la peluche, des cheveux ou
d’autres matières ne réduisent pas le débit d’air.
Maintenir les cheveux, les vêtements amples, les doigts et
toutes les parties du corps à l’écart des ouvertures et des
pièces mobiles.
Mettre toutes les commandes à la position ARR T avant
de débrancher l’appareil.
User de prudence lors du nettoyage des escaliers.
Ne pas aspirer des liquides inflammables ou
combustibles, comme de l’essence, et ne pas faire
fonctionner dans des endroits où peuvent se trouver de
tels liquides.
Ne pas aspirer de matières en combustion ou qui
dégagent de la fumée, comme des cigarettes.
Cette machine n’est pas appropriée à la sélection vers le
haut de la santé mettant en danger la poussière, à moins
que toutes les précautions fédérales autorisées spéciales
d’état local soient satisfaites à.
Ne pas utiliser l’appareil si le sac à poussière ou le filtre
n’est pas en place.
Toujours mettre l’interrupteur de l’appareil en position
ARR T avant de brancher ou de débrancher la
brosse du moteur.
Si l’appareil est à double isolation, les pièces de rechange
de l’appareil doivent être identiques aux pièces originales.
Voir Instructions pour entretien des appareils à double
isolation.
Ne pas utiliser à l’extérieur ou sur surfaces humides.
Ne pas exposer la pluie. Ranger l’appareil à l’intérieur à
une température ambiante de max.60 C et min. 0 C.
Ne reprenez pas arrosent ou d’autres liquides.
Pour réduire le risque de choc d’electrick - reliez l’aspirateur à
une sortie correctement au sol.
AVERTISSEMENT!
Un conducteur de terre mal raccordé peut entraîner un risque
de choc électrique. Consulter un électricien ou un technicien
d’entretien qualifié si vous n’êtes pas certain que la prise est
correctement mise à la terre. Ne pas modifier la fiche fournie
avec l’appareil - si elle ne peut être insérée dans la prise, faire
installer une prise adéquate par un électricien qualifié.
(Uniquement pour les appareils pourvus d’un cordon muni
d’un conducteur de terre et destiné à un courant de moins de
15A et à un circuit de 120 V):
Cet appareil est destiné à un circuit de 120 V et est muni
d’une fiche de mise à la terre semblable à celle illustrée par le
croquis A de la figure A. S’assurer que l’appareil est branché à
une prise de courant ayant la même configuration que la fiche.
Aucun adaptateur ne devrait être utilisé avec cet appareil.
PRISE DE TERRE
Figure A
BOîTIER
BROCHE POUR MISE À LA TERRE
CONSERVER CES INSTRUCTIONS
17
823 0100 050 Instruction for use Euroclean Back Vac 6 Back Vac 10.indd 17
2008-02-25 14:39:26
(Uniquement pour appareils à double isolation et à cordon):
INSTRUCTIONS D’UTILISATION
ENTRETIEN DES APPAREILS A DOUBLE
Avant de mettre l’aspirateur en service, il faut s’assurer que la
tension indiquée sur la plaque du moteur correspond à celle
du réseau.
ISOLATION
ENTRETIEN
Un appareil à double isolation porte le marquage 'DOUBLE
ISOLATION'. Le symbole (carré dans un carré) peut aussi
figurer sur l'appareil.
Rangez l’appareil dans un endroit sec. Au bout d’un certain
temps, suivant la fréquence d’utilisation, les filtres devront
être renouvelés. Un sac poussière doit être monté quand le
filtre principal de l’aspirateur est nettoyé avec l’aspirateur luimême. Nettoyez l’extérieur de l’appareil à l’aide d’un chiffon
sec. Utilisez éven-tuellement un peu de nettoyant ménager.
Tout autre qui entretient devrait être exécuté par un technicien
autorisé
Ne pas utiliser si le cordon ou la fiche est endommagé.
Retourner l’appareil à un atelier de réparation s’il ne fonctionne
pas bien, s’il est tombé ou s’il a été endommagé, oublié à
l’extérieur ou immergé.
Dans un appareil à double isolation, deux isolations
distinctes remplacent la mise à la terre. L'appareil à double
isolation n'est pourvu d'aucun dispositif de mise à la terre
et un tel dispositif ne doit pas être ajouté. L'entretien d'un
appareil à double isolation demande beaucoup de soins
ainsi qu'une bonne connaissance du système et ne devrait
être effectué que par un technicien d'entretien qualifié. Les
pièces de rechange d'un appareil à double isolation doivent
être identiques aux pièces originales.
Tandis que la machine est en service ne tirez pas ou ne
portez pas par la corde, la corde d’utilisation comme poignée,
la fin une porte sur la corde, ou la corde de traction autour
des bords ou des coins pointus. Maintenez la corde partie des
surfaces de chauffage.
AVERTISSEMENT !
Seulement le bec motorisé (l´embout Electro) est double isolé.
Pour réduire le risque de choc d’electrick - reliez l’aspirateur à
une sortie correctement au sol.
L’utilisation de sacs poussière ou de filtre non d’origine est
susceptible d’empêcherle passage de l’air et de provoquer
une surchauffe de l’appareil.
REMARQUES IMPORTANTES
1. Ces appareils sont également adaptés à un usage autre
que domestique comme, par exemple, dans les hôtels, les
écoles, les hôpitaux, les usines, les ateliers et les bureaux.
2. Cette machine n’est pas appropriée à la sélection vers le
haut de la santé mettant en danger la poussière, à moins
que toutes les précautions fédérales autorisées spéciales
d’état local soient satisfaites à.
3. Ce matériel est destiné à un usage dans des conditions
sèches et ne devra être, ni utilisé, ni stocké à l’extérieur. La
plage de température de stockage, à l’intérieur, devra se
situer entre 60° C maximum et 0° C minimum
140°Fahrenheit / 32°Fahrenheit..
4. Ce matériel, destiné à l’aspiration de poussières sèches, ne
doit pas être utilisé pour l’aspiration d’eau ou d’autres
liquides.
5. Afin d’éviter des courts-circuits dûs à la poussière pouvant
rester dans les embouts et les tubes, il convient de couper
le courant dans les conducteurs sous tension avant
aspiration.
6. Ces appareils ne sont pas adaptés pour l’aspiration
dematières combustibles ou explosibles ou dans une
atmosphère explosive.
7. Ce matériel ne doit, en aucun cas, être utilisé pour
l’aspiration de matières chaudes ou incandescentes
(nettoyage de foyers ouverts ou fermés, de poêles ou
autres contenant des cendres chaudes ou des
braises).
8. Ces appareils ne doivent pas être utilisés avec
un cordon électrique endommagé. Vérifier régulièrement
l’état du cable, tout particulièrement s’il a subi un
dommage.
9. Le matériel ne doit pas être utilisé s’il est défectueux.
10. Ne pas débrancher le cable électrique en tirant sur le câble
mais en enlevant la fiche de raccordement.
11. Veuillez toujours débrancher votre appareil avant de
raccorder ou d’enlever l’électrobrosse.
12. Si le cable est endommagé, le changer par un neuf
du même type que celui d’origine (disponible chez votre
distributeur Manufacturer).
12b.Si le cable fixe d’alimentation est endommagé, il doit être
remplacé par le fabricant, son service après vente ou une
personne de qualification similaire afin d’éviter un danger.
13. Débranchez toujours l’appareil avant toute intervention.
14. Débranchez l’appareil avant toute intervention et lorsqu’il
n’est pas utilisé. Ne laissez pas l’appareil branché sans
surveillance.
15. Aucune modification des organes de sécurité mécaniques
ou électriques n’est autorisée.
Cet aspirateur est muni d’un rupteur thermique pour protéger
les composants contre la surchauffe. Si ce rupteur thermique
arrête l’aspirateur, attendre de 5 à 10 minutes et l’aspirateur
se remet automatiquement en marche. Pendant ce temps
vérifier le flexible, le sac et le filtre. Déboucher éventuellement
le flexible, remplacer le sac s’il est plein ou remplacer le filtre
s’il est colmaté.
Quand le nettoyage est exécuté enroulent la corde de
prolongation commençant à l’extrémité de machine et stockezl’à la ceinture de machine en cassant l’en nylon attachent
autour de la corde.
18
823 0100 050 Instruction for use Euroclean Back Vac 6 Back Vac 10.indd 18
2008-02-25 14:39:26
INSTRUCTIONS GÉNÉRALES D’UTILISATION
Les sections numérotées ci-dessous correspondent aux photos numérotées aux pages 4-12
et sortir prudemment le sac du conteneur. Certains
sacs à poussière peuvent être scellés pour empêcher la
poussière/les déchets de s’échapper. Dans ce cas : retirer
le film de protection. Replier le carton et sceller le sac.
11. Filtre du sac :
Profiter du remplacement du sac à poussière pour
remplacer ou nettoyer le filtre su sac. Cette mesure peut
être effectuée après le retrait du sac à poussière. Nettoyer
le filtre en le secouant. Remettre en place le filtre ou le
remplacer par un filtre neuf s’il est usé ou endommagé.
Mettre en place un sac à poussière, refermer le couvercle
supérieur et fermer les attaches.
12. Filtre HEPA :
Les filtres HEPA ne peuvent être ni nettoyés ni lavés. Une
fois qu’ils sont sales, ils doivent être remplacés. Contrôler
et remplacer fréquemment le filtre HEPA. Lors de la
manipulation d’un filtre HEPA, éviter de toucher la surface
du filtre. Tenir le châssis en plastique du filtre pour vérifier
que le filtre HEPA fonctionne correctement. Procéder
comme suit pour remplacer le filtre HEPA : Libérer
les deux attaches sur le dessus du moteur. Retirer le
conteneur même et le couvercle supérieur. Tourner le filtre
HEPA dans le sens contraire des aiguilles d’une montre.
Sortir le filtre. Le montage s’effectue dans l’ordre inverse.
13. Pré-filtre :
Ne jamais utiliser l’aspirateur sans pré-filtre. Une fois
le filtre HEPA retiré (voir le point 12 ci-dessus), le préfiltre peut être remplacé. Libérer les deux attaches sur
le dessus du moteur. Retirer le conteneur et le couvercle
supérieur. Placer le pré-filtre au centre du haut du moteur.
Verrouiller les deux attaches.
14. Filtre d’échappement :
Le filtre nettoie l’air d’échappement de l’aspirateur. Pousser
le bouton vers le bas et ouvrir le couvercle. Monter le
filtre d’échappement dans le couvercle. L’attacher au bord
inférieur du couvercle. Fermer le couvercle.
15. Embout Electro :
Veuillez toujours débrancher votre appareil avant de
raccorder ou d’enlever l’électrobrosse. Brancher le câble
sur la prise sur le côté de la machine. La prise pour
l’embout Electro n’est disponible que sur certains modèles.
16. Raccordement d’extrémité de tuyau et de tube:
Reliez la douille de tuyau et l’extrémité coudée de tube en
poussant l’extrémité coudée dans la douille de tuyau.
17. Tubes de prolongation:
Adaptez aux tubes ensemble et fixez-les en enfonçant le
bouton. Assurez-vous que le bouton fixe les deux tubes.
18. Bec de feston:
Balayez le bec de plancher pour les deux planchers et
tapis durs. Adaptez le bec à l’accouplement d’extrémité de
tube. Fixez et attachez le bec en tournant l’écrou au tube
vers la droite. Pour ouvrir - tournez l’écrou vers la gauche.
19. Bec de brosse:
Outil utile pour nettoyer l’ameublement etc.Adaptez le
bec à l’accouplement d’extrémité de tube. Fixez le bec
en tournant l’écrou au tube vers la droite. Pour ouvrir tournez l’écrou vers la gauche.
20. Bec de crevasse:
Pour les espaces serrés de nettoyage tels que des
meubles, des radiateurs et des coins. Fixez le bec en
tournant l’écrou au tube vers la droite.
1. Présentation de l’équipement :
Les accessoires montrés sur les illustrations peuvent varier
d’un modèle à l’autre.
2. Raccord du flexible :
Introduire le manchon d’admission du flexible dans
l’ouverture du couvercle supérieur.
Appliquer une légère pression et tourner le manchon
d’environ un demi-tour pour l’attacher correctement.
Tourner dans le sens des aiguilles d’une montre pour
verrouiller et dans le sens contraire des aiguilles d’une
montre pour déverrouiller.
3. Réglage de la position de la sangle sur la plaque de
support :
Sur la sangle primaire, la position de la sangle peut être
réglée pour un plus grand confort personnel en déplaçant
la plaque de réglage sur la position sortie ou rentrée.
4. Réglage des tirants d’ancrage sur la plaque de
support de la courroie :
Les tirants d’ancrage peuvent être réglés pour un plus
grand confort personnel.
Former une boucle avec le doigt et déplacer le tirant à
travers le clip vers l’avant ou l’arrière à la longueur requise.
Retirer le doigt. Serrer le tirant.
5. Réglage de l’aspirateur pour qu’il adopte une
position confortable sur le dos de l’utilisateur :
Prendre l’aspirateur. Enfiler en passant les courroies
sur les épaules. Fermer le clip de la ceinture. Régler la
longueur. Fermer le clip de la poitrine. Régler les courroies
verticalement en tirant les deux tirants comme montré sur
l’illustration.
6. Serrage du clip du tirant :
Fermer le clip en joignant les sections. Vérifier que la
fermeture est solide. Pour déverrouiller, appuyer en même
temps sur les deux sections du clip.
7. Jeu de cordons :
Cet aspirateur est équipé d’un cordon de secteur de
prolongation de 50 ft (pi) du type 3x16AWG, 125V,
SJT, SJO, qui doit être relié à la corde réglée de la
machine. Toujours employez et reliez une telle corde de
prolongation à cet aspirateur. La corde électrique peut
être maintenu en place sur la ceinture en passant et
fermant l’attache en nylon autour du câble d’alimentation
enroulé. Enrouler le corde électrique en commençant à la
aspirateur.
8. Libération du câble :
Branchez la corde de prolongation à la sortie de douille
de l’aspirateur. Placez alors l’extrémité de machine de la
câble de prolongation dedans au crochet instantané afin
de créer une corde soulagent. Assurez-vous que la corde
est correctement fixée par le crochet.
9. Marche/Arrêt :
Le commutateur est confortable situé dans une maison
séparée de commutateur. Appuyez sur le commutateur
d’inclinaison pour MARCHE ou ARRÊT de la fonction.
10. Sac à poussière :
Quand la puissance d’aspiration diminue, il est temps
de remplacer le sac à poussière. Vérifier fréquemment
le sac pour éviter qu’il ne soit trop rempli. Libérer les
attaches sur le couvercle supérieur. Lever le couvercle du
conteneur. Saisir la partie en carton du sac à poussière
19
823 0100 050 Instruction for use Euroclean Back Vac 6 Back Vac 10.indd 19
2008-02-25 14:39:27
INSTRUCCIONES PARA PUESTA A TIERRA
PARA MÁQUINAS CON ENCHUFE DE TRES
PATAS.
ESPAÑOL
Los accidentes debidos al mal uso, sólo pueden ser prevenidos por aquellos que estén utilizando la máquina.
Este artefacto debe ser puesto a tierra. Si llegase a funcionar
mal o a averiarse, la puesta a tierra proporciona un camino
de resistencia mínima a la corriente eléctrica para reducir el
riesgo de choque eléctrico. Este artefacto está equipado con
un cable que posee un conductor del equipo a tierra y una
pata a tierra en el enchufe. El enchufe debe ser conectado en
un tomacorriente apropiado que esté correctamente instalado
y puesto a tierra de acuerdo con los códigos y ordenanzas
locales.
LEA Y SIGA TODAS LAS INSTRUCCIONES
DE SEGURIDAD ANTES DE USAR ESTE
APARATO!
ADVERTENCIA!
Para reducir el riesgo de incendio, choque eléctrico o
lesión, por favor lea y siga todas las instrucciones de
seguridad y señales de precaución antes de usar.
Esta aspiradora está diseñada para ser segura cuando es
utilizada para funciones de limpieza tal como se especifican. En caso de que las partes eléctricas o mecánicas
se dañen, la aspiradora y/o los accesorios deben ser
reparados por el fabricante o centro de servicios competente antes de usarse, para evitar daños adicionales a la
máquina o lesión física al usuario.
* No la utilice al aire libre o en superficies húmedas.
* Desconecte la aspiradora antes de efectuar mantenimiento
o cuando no esté en uso. No deje una
aspiradora enchufada si no va a prestarle atención.
* Conecte con un enchufe puesto a tierra apropiado sola
mente. Vea poner a tierra instrucciones.
* No la utilice con cable o enchufe dañados. Para desenchu
far, agarre del enchufe, no del cable. No manipule el
enchufe o la aspiradora con las manos húmedas. Apague
todos los controles antes de desenchufar.
* No jale del cable ni arrastre la aspiradora usando
el mismo. No utilice el cable como manija. No cierre
una puerta sobre el cable, ni jale del mismo contra bordes
o esquinas filosos.
* Mantenga el pelo, la ropa suelta, los dedos y demás partes
del cuerpo, lejos de aperturas y partes móviles. No ponga
objetos en las aperturas o utilice la aspiradora con sus
aperturasobstruidas. Man tenga las aperturas libres de
polvo, hilachas, pelo o cualquier otra cosa que pueda
reducir el flujo de aire.
* No recoja nada que esté quemándose o echando humo, tal
como cigarrillos, cerillos o cenizas calientes.
* No la utilice para recoger líquidos inflamables o combusti
bles tales como gasolina, ni la utilice en áreas donde
puedan estar presentes esos combustibles.
* Esta máquina no es conveniente para escoger encima
de la salud que pone en peligro el polvo, a menos que
todas las precauciones federales autorizadas
especiales del estado local se conformen con.
* No permita que sea utilizada como juguete. Una
atenta vigilancia es necesaria cuando es utilizada
por los niños o cerca de ellos.
* No la utilice a menos que los filtros y la bolsa estén en
su lugar.
* Use cuidado extremo cuando se la utilice en esc
leras o superficies irregulares.
* Si la aspiradora no está funcionando correctamente, se ha
caído, se ha dañado, ha sido dejada al aire libre o ha caído
al agua, llévela al centro de servicios o concesionario.
* Utilícela solamente según se describe en este
manual y sólo con los accesorios recomendados por
el fabricante.
* No tome riegan u otros líquidos.
ADVERTENCIA!
Solamente el inyector motorizado (tobera eléctrica) es
doble aislado. Para reducir el riesgo del choque del electrick
- conecte el aspirador con un enchufe correctamente puesto
a tierra.
PELIGRO!
La conexión inapropiada del conductor de equipo a tierra
puede resultar en riesgo de choque eléctrico. Consulte con
un electricista calificado o personal de servicio si tiene dudas
sobre la correcta puesta a tierra del tomacorriente. No modifique el enchufe provisto con el artefacto. Si no encaja en el
tomacorriente, haga instalar el tomacorriente apropiado por
un técnico calificado.
Este artefacto es para uso en un circuito de 120 volts nominales y posee un enchufe con bajada a tierra que se asemeja
al ilustrado en la Figura A. Un adaptador provisorio, que se
asemeja al ilustrado en la Figura B, puede ser usado para
conectar este enchufe a un receptáculo de dos polos, como
se muestra, si no hay disponible un tomacorriente con bajada
a tierra. El adaptador provisorio debe ser usado solo hasta
que un tomacorriente con bajada a tierra pueda ser instalado
por un electricista calificado. La orejeta o lengüeta rígida, de
color verde, que se extiende del adaptador, debe ser conectada a una bajada a tierra permanente tal como la cubierta
de la caja de un tomacorriente con bajada a tierra. Cuando
quiera que el adaptador sea utilizado, debe ser fijado en su
lugar por un tornillo metálico.
TOMACORRIENTE CON
PUESTA A TIERRA
Figura A
BOîTIER
LA PATA DE TIERRA ES LA MAS
LARGA DE LAS TRES PATAS
GUARDE ESTAS INSTRUCCIONES
20
823 0100 050 Instruction for use Euroclean Back Vac 6 Back Vac 10.indd 20
2008-02-25 14:39:27
SERVICIO DE ARTEFACTOS DE DOBLE AISLACIÓN PARA MÁQUINAS CON ENCHUFE
DE DOS PATAS.
En un artefacto de doble aislación, se proveen dos sistemas de aislación en reemplazo de la puesta a tierra. No se
proveen medios de puesta a tierra en un artefacto de doble
aislación, ni debe serle agregado un medio de puesta a tierra
al artefacto. El servicio de un artefacto de doble aislación
requiere extremo cuidado y debe ser realizado solamente
por personal de servicio calificado. Las partes de reemplazo
para un artefacto de doble aislación deben ser idénticas a las
partes que reemplazan. Un artefacto de doble aislación está
marcado con las palabras
”DOUBLE INSULATION” o ”DOUBLE INSULATED” (doble
aislación) El símbolo (cuadrado dentro de un cuadrado)
puede también ser usado en el producto.
Este aparato va equipado con un tipo especial de cable que
si se estropea, tiene que ser sustituido por otro del mismo
tipo. Estos cables pueden obtenerse en centros de servicio
autorizado y ha de ser montados por persona competente.
¡ADVERTENCIA!
Solamente el inyector motorizado (tobera eléctrica) es
doble aislado. Para reducir el riesgo del choque del electrick
- conecte el aspirador con un enchufe correctamente puesto
a tierra.
ADVERTENCIAS IMPORTANTES
Adem·s de su utilización para las tareas domésticas
normales, esta m·quina también es adecuada para uso
institucional, por ejemplo en hoteles, hospitales, f·bricas,
tiendas y oficinas.
2. Esta máquina no es conveniente para escoger encima
de la salud que pone en peligro el polvo, a menos que
todas las precauciones federales autorizadas
especiales del estado local se conformen con.
3. Esta m·quina es sólo para uso en seco y no se
debe utilizar ni almacenar en exteriores, con humedad.
Almacenar en interiores, con temperaturas comprendidas
entre los 0°C y los 60°C 140°Fahrenheit / 32°Fahrenheit.
4. La maquina no debe ser utilizada para aspirar agua u
otros liquidos.
5. No se debe aspirar el polvo del cable electrico si
este esta conectado, este debe estar desconectado. Esta
precaucion es para que no se cree un cortocircuito a
traves del polvo que quede en boquillas y tubos.
6. La m·quina no se debe utilizar para recoger materiales
explosivos o combustibles, ni se debe utilizar en una
atmósfera explosiva.
7. Bajo ninguna circunstancia se debe utilizar la m·quina
para recoger material caliente. En particular, la m·quina
no se debe utilizar para limpiar chimeneas abiertas ni
cerradas, hornos o similar que contengan cenizas
calientes o brasas.
8. La maquina no se debe utilizar si el cable eléctrico
muestra cualquier signo de deterioro. Inspeccione
regularmente el cable para ver que no existen
daños especialmente si el cable ha sido aplastado al
cerrar una puerta o ha pasado la m·quina por encima.
9. La mquina no se debe utilizar si est· averiada.
10. No desenchufe la m·quina tirando del cable. Para
desenchufarla, tire de la clavija y no del cable.
11. Antes de enchufar o desenchufar la boquilla motorizada
debe desconectarse el aspirador.
12. Al reparar o sustituir el cable, se debe utilizar el mismo
tipo de cable que el original. El cable puede suministrarlo
Manufacturer.
12b.Si el cable electrico fijo resultara dañado, éste debe ser
reparado por el fabricante, por un revendedor autorizado,
o por una persona cualiflcada a fln de evitar posibles
accidentes.
13. Siempre se debe desconectar el enchufe de la toma
mural antes de comenzar cualquier operación de servicio
de la m·quina o del cable.
14. Desconectar la máquina antes de efectuar el
mantenimiento de la misma o cuando no se utiliza.
Vigilar siempre la máquina mientras está enchufada.
15. No se deben realizar cambios ni modificaciones en los
dispositivos mecnicos ni eléctricos de seguridad.
INSTRUCCIONES DE USO
Antes de utilizar la máquina asegúrese de que el voltaje
indicado en la placa de especificaciones situada en la base
del aspirador, corresponde a la tensión de la red.
MANTENIMIENTO
Mantenga el aspirador en un lugar seco. El aspirador se ha
diseñado para el trabajo en continuo, sin embargo después
de cierto periodo de utilización – dependiendo del número
de horas trabajadas – los filtros de polvo deberán cambiarse.
Una bolsa de polvo debe estar montada cuando el filtro
principal del aspirador se limpia con el aspirador. Limpiar el
depósito con un paño seco, utilizando algún tipo de limpiador
apropiado.
Cualquier otro que mantiene se debe realizar por un
representante/delegado técnico autorizado.
Mientras que la máquina está en uso no tire ni lleve por la
cuerda, la cuerda del uso como manija, el cierre una puerta
en la cuerda, o la cuerda del tirón alrededor de los bordes
o de las esquinas agudos. Mantenga la cuerda ausente de
superficies calentadas
No utilice con la cuerda o el enchufe dañada. Si la aplicación
no está trabajando como él si, se ha caído, dañado, a la
izquierda al aire libre o caído en el agua, vuélvala a un centro
de servicio.
1.
El tamaño y la calidad de la bolsa del polvo y los filtros
afectan a la eficacia de la máquina. El uso de bolsas del
polvo no originales o filtros no originales puede causar una
obstrucción de la circulación del aire que puede dar lugar a
una sobrecarga en la máquina.
Esta máquina está equipada con un interruptor térmico para
proteger las partes vitales contra el recalentamiento. Si el
interruptor se activa, demora luego unos 5 a 10 minutos hasta
que la máquina arranque nuevamente y en forma automática.
Pulse el interruptor y desenchufe el cable, controle luego
la manguera, la bolsa y el filtro para asegurarse que nada
impide el paso del aire por la máquina.
Cuando se realiza la limpieza rueda para arriba la cuerda de
la extensión que comienza en el extremo de la máquina y
almacénelo en la correa de la máquina encajando a presión
el de nylon atan alrededor de la cuerda.
21
823 0100 050 Instruction for use Euroclean Back Vac 6 Back Vac 10.indd 21
2008-02-25 14:39:28
INSTRUCCIONES GENERALES DE USO
Las secciones numeradas abajo corresponden a las fotos numeradas en las páginas 4-12
1. Visión general del material:
Los accesorios mostrados en las imágenes pueden variar
de un modelo a otro.
2. Tubo flexible:
Ajuste la boca de entrada del tubo flexible en la abertura
de la tapa superior.
Ejerza una suave presión y gire la boca de entrada
aproximadamente media vuelta para asegurarse de que
está firmemente sujeta. Gire en el sentido de las agujas
del reloj para cerrar y en sentido contrario para abrir.
3. Ajuste de la posición de la correa en la placa de
soporte:
En la correa principal, la posición de la correa se puede
regular a su medida moviendo la placa de ajuste hacia
adentro o hacia fuera.
4. Ajuste de las cintas de amarre en la placa de
soporte de la correa:
Puede ajustar las cintas de amarre a su propia medida.
Forme un bucle con un dedo y posteriormente desplace la
cinta hacia adelante o hacia atrás a través de la horquilla
hasta alcanzar el largo deseado. Retire el dedo. Ciña la
cinta.
5. Adaptación de la aspiradora para que descanse
cómodamente sobre la espalda:
Levante la aspiradora. Pase los brazos a través de las
tiras de sujeción para los hombros. Encaje el cierre del
cinturón. Ajuste el largo. Encaje el cierre del pecho. Ajuste
las correas verticalmente tirando hacia debajo de las dos
cintas tal y como muestra la imagen.
6. Ajuste del cierre de la cinta:
Encaje las dos mitades del cierre. Asegúrese de que
están firmemente abrochadas. Para abrir, presione
simultáneamente sobre los dos laterales del cierre.
7. Colocación del cable:
Este aspirador se equipa de un cable eléctrico de la
extensión de 50 ft pies, del tipo 3x16AWG, 125V, SJT,
SJO, que se deba conectar con la cuerda fijada de la
máquina. Utilice y conecte siempre tal cuerda de la
extensión con este aspirador. El cable eléctrico se puede
mantener en su sitio en el cinturón cerrando la cinta de
nylon alrededor del cable de suministro enrollado. Enrolle
el cable eléctrico comenzando por el aparato.
8. Portacables:
Tape la cuerda de la extensión en el enchufe del zócalo
del aspirador. Entonces ponga el extremo de la máquina
de la cuerda de la extensión adentro al gancho rápido
para crear una cuerda relevan. Cerciórese de que la
cuerda sea asegurada correctamente por el gancho.
9. Encendido/Apagado
El interruptor es cómodo situado en una casa separada
del interruptor. Presione el interruptor de la inclinación
para ENCENDER o APAGAR de la función.
10. Bolsa del polvo:
Cuando disminuye la capacidad de succión ha llegado
el momento de cambiar la bolsa del polvo. Compruebe
la bolsa con frecuencia para asegurarse de que no se
sobrellena. Suelte los cierres de la tapa superior. Levante
la tapa del contenedor. Sujete la parte de cartón de la
bolsa del polvo y saque cuidadosamente la bolsa de
dentro del contenedor. Algunos tipos de bolsa del polvo se
pueden sellar para evitar que salga polvo o residuos hacia
el exterior. En ese caso retire el papel protector, pliegue el
cartón y selle la bolsa.
11. Filtro de la bolsa:
Cuando cambie la bolsa del polvo puede ser buena idea
cambiar o limpiar el filtro de la bolsa. Esto puede hacerse
una vez haya sacado la bolsa del polvo. Limpie el filtro
sacudiéndolo bien. Ponga el filtro en su sitio o cámbielo
por otro si está gastado o dañado. Ponga la bolsa del
polvo en su sitio y vuelva a poner la tapa superior y
afianzar los cierres.
12. Filtro HEPA:
Los filtros HEPA no se pueden limpiar o lavar. Una vez
se han ensuciado, es necesario cambiarlos. Compruebe
y cambie el filtro HEPA con frecuencia. Cuando
manipule un filtro HEPA nuevo, evite tocar la superficie
del filtro. En vez de eso, sujételo por la estructura de
plástico para asegurarse de que el filtro HEPA funciona
adecuadamente. El procedimiento para cambiar los
filtros HEPA es el siguiente: Abra los dos cierres que
están situados en la parte superior del motor. Retire el
propio contenedor y la tapa superior. Gire el filtro HEPA
en sentido contrario a las agujas del reloj. Tire del filtro.
Repita la operación en sentido contrario para volver a
montarlo.
13. Prefiltro:
No limpie nunca la aspiradora sin antes colocar un prefiltro
dentro del aparato. Una vez retirado el filtro (véase el
punto 12 más arriba) puede cambiar el prefiltro. Abra los
dos cierres que están situados en la parte superior del
motor. Retire el propio contenedor y la tapa superior. Sitúe
el prefiltro en el centro de la parte superior del motor.
Afiance ambos cierres hacia abajo.
14. Filtro de escape:
El filtro limpia el aire de escape procedente de la
aspiradora. Presione el botón hacia abajo y abra la
cubierta. Ajuste el filtro de escape en la tapa. Sujételo
hacia el extremo inferior de la tapa. Cierre la tapa.
15. Tobera eléctrica
Antes de enchufar o desenchufar la boquilla motorizada
debe desconectarse el aspirador. Conecte el cable en
la toma de corriente que está situada en el lateral del
aparato. El conector para tobera eléctrica sólo está
disponible en algunas variantes.
16. Conexión del extremo de la manguera y del tubo:
Conecte la manga de la manguera y el extremo doblado
del tubo empujando el extremo doblado en la manga de la
manguera.
17. Tubos de la extensión:
Quepa a los tubos junto y asegúrelos presionando abajo
de la perilla. Cerciórese de que la perilla esté asegurando
los dos tubos.
18. Inyector de la concha de peregrino:
Cepille el inyector del piso para ambos pisos y alfombras
duros. Quepa el inyector al acoplador del extremo del
tubo. Asegure y sujete el inyector dando vuelta a la tuerca
en el tubo a la derecha. Para abrir - dé vuelta a la tuerca a
la izquierda.
19. Inyector de cepillo:
Herramienta útil para limpiar los mobiliarios etc. Quepa
el inyector al acoplador del extremo del tubo. Asegure el
inyector dando vuelta a la tuerca en el tubo a la derecha.
Para abrir - dé vuelta a la tuerca a la izquierda.
20. Inyector de la grieta:
Para los espacios apretados de la limpieza tales como
muebles, radiadores y esquinas. Asegure el inyector
dando vuelta a la tuerca en el tubo a la derecha.
22
823 0100 050 Instruction for use Euroclean Back Vac 6 Back Vac 10.indd 22
2008-02-25 14:39:28
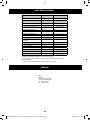
DATA SPECIFICATION
SPECIFICATION
Back Vac 6
Back Vac 10
Voltage @ 60Hz, volts
120
120
Type of Power no. of phases
1
1
Power, max watts
1300
1300
Current Draw, max (Amps)
12 with power outlet
12 with power outlet
Current Draw, (Amps)
10
10
Protection grade (dust, moist) –
IP 20
IP 20
Protection class (electrical) Grounded
I
I
Waterlift, max. inches H2O
99
99
Airflow, max (cfm)
144
144
Filter Area, main filter (Sq. in.)
217
311
Main Filter Filter Efficiency,
DIN 44956-2
98.2%
98.2%
Dust bag capacity (Gallon)
1.0
1.8
Tank Capacity (Gallon)
1.5
2.6
Machine Inlet, (in/mm)
1.5 / 38
1.5 / 38
Sound pressure level, BS 5415 dB(A)
62
62
Dimensions w x h, (in)
8.2 x 22.3
9.4 x 23
Weight, cleaner only (lbs.)
9.3
10.8
Cord Length (ft.)
50
50
Specifications and details are subject to change without prior notice.
Les caractéristiques des matérials peuvent être modifiées à tout moment, en fonction de
l’évolution technique.
Las especificaciones y detalles pueden sufrir variaciones sin previo aviso.
SERVICE
USA
Euroclean
14600 21st Avenue North
Plymouth, MN 55447-3408
Tel.: (763) 745 3500
Fax :(763) 745 3718
23
823 0100 050 Instruction for use Euroclean Back Vac 6 Back Vac 10.indd 23
2008-02-25 14:39:29
24
823 0100 050 Instruction for use Euroclean Back Vac 6 Back Vac 10.indd 24
2008-02-25 14:39:29