1
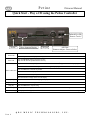
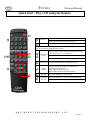
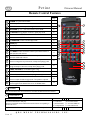
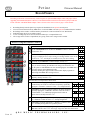
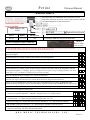
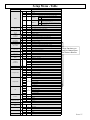
Petine
O w n e r ’s M a n u a l U p d a t e
Use these pages to replace those in your current version 041 owners manual.
Updates to Application Version 045
There are two major changes to how Petine operates:
1] Accessing the different sources using the remote control has changed. See below and on the page 12 insert.
2] The record procedure has changed. See pages 10 & 11. An optional record strip must be installed to record to Petine.
Press the F1/SOURCE button to display the current source.
Press the STOP button to halt play.
Tap the F1/SOURCE button and then the number button corresponding to
the desired source.
Tap the F1/SOURCE button and then the #3 button for the CompactFlash.
2 i n
1 cd=CD Drive
2iN=Internal Music
3cF=CompactFlash
4Av=External Audio
5Ni=External MIDI IN
6rc=Internal Record
3 c F
QRS Music Technologies, Inc.
Owners Manual
Petine
Connecting Petine to the Pianomation Engine
Standard Playback
To Driver Boards
To Power Supply
Powered Adapter #990522
To Test Box
“Y” Cable - 1M to 2FM
#70213
Powered Speaker
#70040
To avoid damage to the Petine controller a jumper must be installed
inside the Petine controller whenever the MIDI Adapter cable is used.
If this cable is ever removed the jumper must be removed.
MIDI IN
RECORD
To Driver Boards
MIDI OUT
Female
To Test Box
Powered Speaker
#70040
Female
“Y” Cable - 1M to 2FM
#70213
Male
MIDI OUT
MIDI IN
Cable: MIDI Adapter #99140
MIDI IN-Record / MIDI OUT
Power Adapter
Input: AC 100-240V
800mA 50Hz/60Hz
Q R S
M U S I C
Pianomation
Processor
To User Interface
Cable: 3.5mm stereo to dual RCA male
#990026
To Power Supply
Powered Adapter #990522
MIDI In
Standard Cable
#70329
Male
PAGE 6
Pianomation
Processor
To User Interface
Cable: 3.5mm stereo to dual RCA male
#990026
MIDI In
Standard Cable
#70329
Power Adaptor
#990522
T E C H N O L O G I E S ,
From the MIDI Out
of the Optional
Record System Or
other MIDI Source
Output: 5v DC 5A
Center Positive
I N C .
Owners Manual
Petine
Quick Start - Play a CD using the Petine Controller
Infrared Eye (IR)
Remote Control
Three Segment Display
Power
CD Eject
ADJ Dial
Rotate to Adjust - Press to Select
Press the Power button to turn on the system.
Power ON
Petine will power on and display the last played source.
Press the CD Eject button to open the CD tray.
Snap the CD onto the spindle and close the tray.
Insert CD
Tap the ADJ Dial twice, quickly, within one-half second so that an “S” appears in the left display segment.
Rotate the ADJ Dial clockwise to place the dot in the right display segment.
Select CD Source
Press the ADJ Dial so that the dot flashes.
Rotate the ADJ Dial to display “Scd”.
Tap the ADJ Dial twice, quickly, within one-half second to exit.
The total number of songs on the CD will display.
Play Song
Adjust Volume
Press the ADJ Dial and the first song begins to play.
Rotate the ADJ Dial to change the Master Volume level.
Stop play
Press the ADJ Dial to stop the song.
Next song
While playback is Stopped, rotate the ADJ Dial clockwise will advance to the Next song.
Previous Song
PAGE 8
While playback is Stopped, rotate the ADJ Dial counter-clockwise will revert back to the Previous song.
Q R S
M U S I C
T E C H N O L O G I E S ,
I N C .
Owners Manual
Petine
Quick Start - Play a CD using the Remote
1
4
1
2
Power ON
Press Stop
Press the Power button to turn on the system.
Petine will power on to the last played source.
Press the STOP button to stop any flashing dots.
Press the CD Eject button to open the CD tray.
Snap the CD onto the spindle and close the tray.
7
2
8
3
5
4
Tap the F1/Source button and then the number 1 button to
select the CD Source. “1cd” displays.
Select the CD
Source
Wait for Petine to scan the CD.
A “C” and the total number of songs will display.
3
6
Q R S
M U S I C
5
Play Song
Press the PLAY and the first song begins to play.
6
Adjust
Volume
Use these six buttons to adjust the volume levels.
Piano adjusts the piano only.
Audio adjusts the speaker volume.
Master adjusts the Piano and Audio together.
7
Stop play
Press the STOP button to stop the song.
8
Next Song
Previous
Pressing the TRACK >> will advance to the Next song.
Pressing the << TRACK will go to the Previous song.
T E C H N O L O G I E S ,
I N C .
PAGE 9
Owners Manual
Petine
Understanding How SyncAlong Series Music Works
The QRS SyncAlong series music plays the piano and the audio using two of Petine’s sources. The audio of the original artist’s CD
sounds through powered speakers via the CD drive and the piano keys play from MIDI files located on the CompactFlash card.
With your first SyncAlong series order you will receive one CompactFlash card along with all of the original artist CDs ordered. This
CompactFlash card contains the piano music for ALL of the SyncAlong series CDs in production to-date. On all subsequent
SyncAlong CD orders you place, QRS will ship the original artist CDs ordered and one CDROM containing all of the update files
needed to keep Petine and the CompactFlash card up to date with new SyncAlong series releases.
For the QRS SyncAlong CD to work properly in Petine the following three things must happen.
Petine must recognize the CD as QRS SyncAlong Series by locating it’s ID number in an index file embedded in Petine’s Internal
Source (demo.ima).
Petine must find the Access Code, in it’s memory, for the SyncAlong CD currently in the CD drive.
This code is located on the packing slip, next to the catalog number, that comes with each SyncAlong order.
The code is entered by the user, once for each CD title, and is stored in Petine’s memory.
Petine must find and access the MIDI files located on a CompactFlash card.
Preparing Petine for SyncAlong Series Music
See if the SyncAlong music will work without updating. See the next page, “Playing a QRS SyncAlong Series CD for the First Time”.
Update the demo.ima to insure that the latest SyncAlong index is installed.
See the CompactFlash Utilities or CD Drive Utilities sections of this manual for instructions.
1] Use the CompactFlash card or the CDROM that you received with your most recent SyncAlong order.
2] Go to the QRS website to download the current demo.ima file. http://www.qrsmusic.com/support_pa.asp
Copy SyncAlong Files From CDROM To CompactFlash
While playback is stopped, press the Petine’s ADJ Dial twice within one-half second to enter the Setup Menu.
Petine will open to the source section of the Setup Menu and display the current source.
S i n
Press the ADJ Dial once so that the dot begins to flash.
S i n
Rotate the ADJ Dial to display a large “C” and access the CD Drive’s Utility functions.
C D e
Press the ADJ Dial to stop the flashing.
C d E
Rotate the ADJ Dial to move the dot to the center display segment.
C d E
Press the ADJ Dial so the dot flashes.
C D E
Rotate the ADJ Dial to display the a small “c” in the center display segment.
C c E
Press the ADJ Dial to stop flashing.
C c E
Rotate the ADJ Dial to move the dot to the far right display segment.
C c E
Insert the update CDROM disk into the CD drive and the SyncAlong CompactFlash card in the reader.
Press the ADJ Dial to execute the copy function.
Petine will read a group of files from the CDROM...
1 1 6
...and then copy the group to the CompactFlash card. Groups of files will be read and copied until the
all files are copied. This will take several minutes.
1 1 6
A countdown to zero will begin to verify that the files are copied.
1 1 6
Press the ADJ Dial when “Scc” displays.
S c c
Press the Petine’s ADJ Dial twice within one-half second to exit the Setup Menu.
C c E
PAGE 10
Q R S
M U S I C
T E C H N O L O G I E S ,
I N C .
Petine
Owners Manual
Y
Playing a QRS SyncAlong Series CD for the First Time
T
s
P
o
See Preparing Petine for SyncAlong Series Music on the previous page and update Petine if necessary.
L
Insert the CompactFlash card containing the SyncAlong MIDI files into Petine’s CompactFlash card reader.
J
Insert the original artist’s SyncAlong audio CD.
I
H
Using the remote control, tap the F1/SOURCE button and then the number 1 button. “1cd” displays.
0
S A L
Petine will scan the CD and display “SAL” IF the CDs ID number is found in the Petine’s index.
F Y
If “SAL” never displays then: either the...
E T
d s
...CDs ID number for this CD is missing from the Petine’s index embedded in the demo.ima file.
...or, the SyncAlong CD has an ID number that we haven’t seen.
Y c P
To fix, update the demo.ima file or call QRS - 800-247-6557
T b o
s a L
Look for the hand written access code on the QRS packing slip that came with the SyncAlong CD order.
Use the six volume buttons at the bottom of the remote control to enter the three digit SyncAlong access code.
The two Audio buttons change the left display character.
The two Master buttons change the center display character.
The Piano buttons change the right display character.
See diagram at right.
P 9 J
o 8 I
L 7 H
J 6 0
I 5 F
Press PLAY to enter the access code into memory.
H 4 E
Press PLAY again to play the CD
0 3 d
SAL displays to acknowledge that the CDID number was found in the index.
S A L
F 2 c
SAL displays a second time to acknowledge the access code.
S A L
E 1 b
SAL displays a third time to acknowledge the MIDI files located on the CompactFlash card.
S A L
Once the access code has been entered it will never need to be entered again for the same title.
d 0 a
c
9
b
8
a
7
9
6
8
5
7
4
6
3
5
2
4
1
3
0
2
1
0
QRS Remote
Q R S
M U S I C
T E C H N O L O G I E S ,
I N C .
PAGE 11
Owners Manual
Petine
Remote Control Features
Page
1
POWER the system ON and OFF.
14
2
MUTE the piano and audio.
15
3
NUMBER buttons select specific song tracks.
17
4
PROGRAM Up “PVP" exits from within a source folder.
16
5
Tap REPEAT during playback to select a repeat play mode.
16
6
Return to a PREVIOUS TRACK or PROGRAM.
17
7
Advance to the NEXT TRACK or PROGRAM.
17
8
Tap RANDOM to select a random play mode.
16
4
5
9
PAUSE play.
15
6
7
10
STOP play.
15
8
9
10
11
12
14
13
15
1
2
3
11
Begin PLAY.
15
12
Press BASS and then the master volume up and down buttons to
adjust the bass audio volume.
15
13
Press TREBLE and then the master volume up and down buttons to
adjust the treble audio volume.
15
14
Press TRANSPOSE and then the master volume up and down
buttons to change the key of the music, except when playing a CD.
15
15
Press TEMPO and then the master volume up and down buttons to
change the tempo of the music, except when playing a CD.
16
17
16
PIANO VOLUME UP and DOWN (piano only).
15
18
17
MASTER VOLUME UP and DOWN (piano and audio).
15
18
AUDIO VOLUME UP and DOWN (background only).
15
19
Press the STEREO BALANCE and then one of the <<track>>
buttons to adjust the left and right audio. Two speakers required.
17
20
In stop mode, tap the F1/SOURCE button and then the number
button assigned to the desired source. See F1/SOURCE below.
14
1
19
20
16
POWER
Press the POWER button to turn the Petine controller and Pianomation ON and OFF.
20
F1/SOURCE
2 i n
Press the F1/SOURCE button to display the current source.
Press the STOP button to halt play.
Tap the F1/SOURCE button and then the number button corresponding to
the desired source.
1 cd=CD Drive
2iN=Internal Music
3cF=CompactFlash
Tap the F1/SOURCE button and then the #3 button for the CompactFlash.
PAGE 12
Q R S
M U S I C
T E C H N O L O G I E S ,
4Av=External Audio
5Ni=External MIDI IN
6rc=Internal Record
3 c F
I N C .
Owners Manual
Petine
CD Source
CFLASH Eject Button
CompactFlash Reader
CD Drive Door
Emergency CD Eject Hole
CD “Busy” LED
Source
Display
File Extension
1cd
Scd
File Types Recognized
cda
Stereo Audio and QRS Pianomation
mid
General MIDI
mp3
MP3 Audio Only
mpe
MP3 Pianomation with Audio
CD
CD ROM
CD Eject Button
CD ROM Drive
Press the Eject Button to open the CD Drive door.
Insert a CD and close the door.
Tap the remote’s F1/Source button and then the number 1 button. 1cd displays.
The “Busy” LED flickers as the CD is being scanned for media content.
The “Busy” LED will go dark once the CD has been scanned.
See “Examples: How Source Content is Displayed”.
Several sections of the manual explain how to select the CD Source and play a song.
The Emergency CD Eject Hole can be used to open the CD Drive door when power is disconnected from the Petine CD controller.
Straighten the open end of a small paper clip and gently insert it into the hole to open the door.
Maximum Number of Songs & Programs
Source
CDROM Root
000 - 999
CDROM Program
000 - 999
CFLASH Root
000 - 509
CFLASH Program
000 - 509
Internal Music Demo Disk
Programs On CFLASH or CDROM
PAGE 16
Q R S
Range
M U S I C
Max=1.44MB
P01 - P99
T E C H N O L O G I E S ,
I N C .
Owners Manual
Petine
CompactFlash Source
Source
Display
File Extension
ScF
3cF
CompactFlash
File Types Recognized
mid
General MIDI
mp3
MP3 Audio Only
mpe
MP3 Pianomation with Audio
CompactFlash Card Reader
Position the CompactFlash card, as shown on the right, and insert it into the reader.
Nothing will happen unless ScF is the selected source.
Tap the remote’s F1/Source button and then the number 3 button. 3cF displays.
See “Examples: How Source Content is Displayed”.
CompactFlash cards known to work in the Petine controller.
Sandisk CF
Sandisk Ultra II
Samsung Extreme Memory
Kingston
IBM Microdrive
Kodak
How to Format a CompactFlash Card
Insert the CompactFlash card into the reader.
0 2 5
Press the STOP button on the remote to stop any flashing dots on the display.
0 2 5
Press the ADJ Dial twice, quickly, within one-half second to enter the Setup Menu.
S i N
Press the ADJ Dial once. The display dot will begin to flash.
S I n
Rotate the ADJ Dial until an “F” is displayed in the first display segment.
F d e
Press the ADJ Dial once to stop the dot from flashing.
F D E
Rotate the ADJ Dial clockwise to move the dot to the second segment.
F D E
Press the ADJ Dial once. The display dot will begin to flash.
F D E
Rotate the ADJ Dial to place the letter “F” in the second segment.
F F E
Press the ADJ Dial once to stop the dot from flashing.
F F E
Rotate the ADJ Dial clockwise to move the dot to the third segment.
F F E
Press the ADJ Dial once to execute the formatting procedure, then wait...
s c c
If formatting is successful “Scc” will display for a few seconds.
Press the ADJ Dial once.
F F E
Press the ADJ Dial twice, quickly, within one-half second to exit the Setup Menu.
0 2 5
Q R S
M U S I C
T E C H N O L O G I E S ,
I N C .
PAGE 17
Petine
Owners Manual
Record Source
Recording to the Petine’s internal memory location requires an optional MIDI Adapter Cable and jumper. When
upgrading from Standard Playback to Record, a certified Pianomation technician must install a jumper inside the
Petine controller and add the MIDI Adapter Cable as shown on the center section of page 6 of this manual.
•
•
•
•
•
•
Recording directly from the piano keys requires the installation of an optional record system.
You can record to Petine from any MIDI device. To hear all MIDI voices the optional soundcard must be installed.
Recordings can be stored to 9 internal memory locations for a total record time of over 400 minutes.
Individual songs may be re-recorded or erased.
A new recording may also be saved to and stored directly to a CompactFlash card.
All 9 songs can be saved to CompactFlash, as a group, so that 9 new songs can be recorded.
Record Using the Remote Control
0 0 1
1 Press the STOP button to halt play.
2 Tap the F1/SOURCE button and then the Number 6 button to select the
3
3 record source “6rc”.
6 R c
The first record source’s playback location “rP1” displays.
If you go to a different source before saving a recording and then return to the r P 1
record source “rEC” will display to remind you save your last recording.
4
5
r E C
4 Repeatedly tap the TRACK>> button to display record “rEC”.
Press PLAY to enter the record session. Three dots will begin to flash at 60
0 6 0
beats per minute. Rotating the ADJ Dial will change the metronome rate..
Play the piano or send MIDI data to start. Recording begins when MIDI data is
5
received by Petine via the MIDI Input cable.
Alternately flashing dots appear in the left and center display segments to
0 6 0
acknowledge that MIDI data is being received.
1
Press the STOP button when finished. The recording is now stored in the
temporary memory location “rPn”.
r P n
You now have several options to choose from:
2
PAGE 18
Listen to the recording by pressing PLAY. Or listen to a song
recorded in any one of the 9 record source locations by repeatedly
tapping the <<TRACK>> buttons to select “rPx” and press PLAY.
1
Q R S
r P x r P x
Record Over an existing recording or Save to an empty location by
repeatedly tapping the <<TRACK>> button to select one of the 9
or
record locations “rcx” and then pressing the PLAY button to
replace what’s currently stored in “rPx”.
r c x r S A
or
Save the recording to a CompactFlash card by repeatedly tapping
the <<TRACK>> button to select “rcF” then pressing PLAY.
r c f r S A
or
Re-record by repeatedly tapping the <<TRACK>> button to select
“rEC” and then pressing PLAY to repeat the process.
r E C 0 6 0
or
Erase an existing recording by going through the record procedure but, do not send
MIDI data to Petine. Then “save” this empty song to the desired record location.
M U S I C
T E C H N O L O G I E S ,
I N C .
Owners Manual
Petine
Record Source
When upgrading from Standard Playback to Record, a certified
Pianomation technician must install a jumper inside the Petine controller
and add the MIDI IN/OUT cable shown below.
Optional Record System
must be installed.
Processor Cable
MIDI Adapter Cable
99140
MIDI OUT
RECORD / MIDI IN
Source
Display
File Extension
Record
Src or 6rc
mid
Optional Record System
Record and play MIDI files using the internal memory.
ADJ Dial
Rotate to Adjust
Press to Select
Record Using the Petine Controller
The optional MIDI Adapter cable must be used and a jumper installed inside Petine. See page 6 for cable connections.
To record from the piano an optional record strip must be installed under the keys.
If a song is playing, indicated by a flashing dot in the far right display segment, press the ADJ Dial once so that no dots
appear in the display.
0 0 1
Tap the ADJ Dial twice, quickly, within one-half second to enter the Setup Menu.
S i n
Rotate the ADJ Dial clockwise to move the dot to the far right display segment.
S I n
Press the ADJ Dial once so that the dot begins to flash.
S I n
Rotate the ADJ Dial until “Src” appears in the display.
S R c
Tap the ADJ Dial twice, quickly, within one-half second to select the record source and exit the Setup Menu. The first
record playback location “rP1” displays. If you go to a different source before saving a recording and then return to the
record source “rEC” will display to remind you save your last recording.
r P 1
Rotate the ADJ Dial clockwise to display “rEC” for the record location.
r E C
Press the ADJ Dial to enter the record session.
Three dots will begin to flash at 60 beats per minute. Rotate the dial to change this metronome rate.
0 6 0
Play the piano or send MIDI data to start. Recording begins when MIDI data is received by the MIDI Input cable.
Alternately flashing dots appear in the left and center display segments to acknowledge that MIDI data is being received.
0 6 0
Press the ADJ Dial once when finished. The recording is now stored in a temporary memory location.
r P n
You now have several options to choose from:
Listen to the recording by pressing PLAY. Or listen to a song recorded in any one of the 9 record source
locations by repeatedly tapping the <<TRACK>> buttons to select “rPx” and press PLAY.
r P x r P x
or
Record Over an existing recording or Save to an empty location by rotating the ADJ Dial to one of the 9
record locations “rcx” and pressing the ADJ Dial to replace what’s in “rPx”.
r c x r S A
or
Save the recording to a CompactFlash card by rotate the ADJ Dial to “rcF” then pressing the ADJ Dial.
r c f r S A
or
Re-record by rotating the ADJ Dial to “rEC” and pressing the ADJ Dial to repeat the process.
r E C 0 6 0
or
Erase an existing recording by going through the record procedure but, do not send MIDI data to Petine.
Then “save” this empty song to the desired record location.
Q R S
M U S I C
T E C H N O L O G I E S ,
I N C .
PAGE 19
Owners Manual
Petine
Internal Source - Pre-installed Music
The Petine controller has an internal memory location to store song files for playback on the QRS Pianomation
system. The built in capacity of the internal memory is about the size of a HD Floppy disk, 1.44MB.
Currently there are 24 songs in this memory location. See the list below.
Source
Display
Internal
SIN
2in
File Extension
File Types Recognized
mid
General MIDI
mp3
MP3 Audio Only
mpe
QRS Pianomation with Audio
Play a Song
Press STOP to halt play. Press the remote control’s F1/SOURCE button and then the number 2 button. “2in” displays.
2 i n
The Internal Music Source is scanned and the total number of songs displays.
0 2 4
Press the ADJ Dial on the Petine controller or...
Press PLAY on the remote control to play song 001 or...
Play
Press one of the <<TRACK>> buttons to select a song number and then either press the ADJ Dial on the controller or the
PLAY button on the remote.
Press the Number buttons to select and play that song number.
Internal Source Music List (Songs 001-024 are solo piano)
#
Name
Type
#
Name
Type
#
Name
Type
001 Georgia On My Mind
MIDI 010 Sweet And Low Down
MIDI 019 Music Of The Night
MIDI
002 Candle In The Wind
MIDI 011 Angel Eyes
MIDI 020 Amazing Grace
MIDI
003 Feelings
MIDI 012 Yes! We Have No Bananas
MIDI 021 On The Beautiful Blue Danube MIDI
004 Greensleeves
MIDI 013 Perfidia
MIDI 022 Ave Maria
MIDI
005 Danny Boy
MIDI 014 Crazy
MIDI 023 Meditation and Intermezzo
MIDI
006 Mack The Knife
MIDI 015 Night And Day
MIDI 024 Liebesleid
MIDI
007 Burt Bacharach Medley
MIDI 016 Someone To Watch Over Me
MIDI
008 Ain’t Misbehavin’
MIDI 017 Something
MIDI
009 Nice Work If You Can Get It MIDI 018 Stars Fell On Alabama
PAGE 20
Q R S
M U S I C
MIDI
T E C H N O L O G I E S ,
I N C .
Owners Manual
Petine
Auxiliary Source “Line In”
Use the Line In jack to connect an
external device to the Petine
controller and QRS Pianomation.
QRS SyncAlong
series music will
NOT play from an
external source.
Cable: 3.5 mm stereo Male
to two RCA Male
#990026
R
L
or
Cable: 3.5 mm stereo Male
to 3.5mm stereo Male
Source
Connect to an external CD/DVD
player’s Left and Right Line Outputs.
Display
Auxiliary Input
“Line In”
Connect to an external
computer’s Line Output jack.
File Extension
SAv
4Av
File Types Recognized
cda
Stereo Audio CDs (no Pianomation), QRS CDs and DVDs via an
external CD/DVD player or computer.
wma
QRS Pianomation music downloaded from NetPiano.com.
Must play from computer.
Play Petine / Pianomation From an External Source
Press STOP to halt play. Press the remote control’s F1/SOURCE button and then the number 4 button. “4Av” displays.
Or...
On the Petine controller, in stop mode, press the ADJ Dial twice within one-half second to enter the Setup Menu.
Rotate the ADJ Dial so that the dot is in the far right display segment.
Press the ADJ Dial once so that the dot is flashing.
Rotate the ADJ Dial until “SAv” appears.
Press the ADJ Dial twice within one-half second to save setting and exit the Setup Menu.
4 A v
After a few seconds the display changes to the default “AMI” setting. Petine will now respond to the external source.
A N I
s A v
Start playback on the external source connected to the “Line In” jack on the back panel of the Petine controller and the piano will
play. Use Petine’s remote to control piano and audio volume levels.
A N I
Press the STOP button on the remote or the ADJ Dial on Petine to halt playback.
The two modes of the Auxiliary Input Source:
The AnI setting is used when Petine expects to receive “Analog MIDI Input” signal from the left channel of the external
source. This is needed to play the piano.
A N I
The StE setting is used when Petine expects to receive a “Stereo” audio signal on both the left and right channels of the
external source. The piano won’t play.
S t e
Use the <<TRACK>> buttons on the remote control or the ADJ Dial on the controller to select the AnI or StE modes.
Q R S
M U S I C
T E C H N O L O G I E S ,
I N C .
PAGE 21
Owners Manual
Petine
MIDI Input Source
When upgrading from Standard Playback to Record, a certified
Pianomation technician must install a jumper inside the Petine
controller and add the MIDI IN/OUT adapter cable as shown below.
Processor Cable
MIDI Adapter Cable
99140
MIDI OUT
RECORD / MIDI IN
Source
Display
File Extension
External MIDI
Input/Output
Sni
5ni
mid
MIDI IN and MIDI OUT capability when the optional MIDI adapter cable
is connected to Petine.
Set up Petine to play from a MIDI player or computer.
While playback is stopped, press the Petine’s ADJ Dial twice within one-half second to enter the Setup Menu.
Petine will open to the source section of the Setup Menu and display the current source.
S i n
Press the ADJ Dial once so that the dot begins to flash.
S i n
Rotate the ADJ Dial to display an “ '” and access to the MIDI Input Select function.
' r c
Press the ADJ Dial to stop the flashing.
' r c
Rotate the ADJ Dial to move the dot to the right display segment.
' r c
Press the ADJ Dial so the dot flashes.
' r c
Rotate the ADJ Dial to display “FP” for the File Player option.
' F p
Press the Petine’s ADJ Dial twice within one-half second to exit the Setup Menu.
Play Petine from a MIDI player or computer.
Press STOP to halt play. Press the remote control’s F1/SOURCE button and then the number 5 button. “5ni” displays.
Or...
On the Petine controller, press the ADJ Dial twice within one-half second.
Rotate the ADJ Dial so that the dot is in the far right segment.
Press the ADJ Dial once so that the dot is flashing.
Rotate the ADJ Dial until “Sni” appears.
Press the ADJ Dial twice within one-half second to exit.
S n i
After a few seconds the display changes to “---” with a flashing dot at right.
Petine will now respond to MIDI data received into MIDI IN cable.
- - -
Rotate the ADJ Dial to adjust the volume.
0 2 0
Press STOP in the remote or Press the ADJ Dial on Petine to halt playback.
S n i
PAGE 22
Q R S
M U S I C
T E C H N O L O G I E S ,
I N C .
S n i
Setup Menu - Table
Function
Display
Option
c
d
Compact Disk Drive
i
n
Internal
c
F
CompactFlash
A
v
Auxiliary
Settings below are not seen when in the Setup Menu.
Source
S
n
i
AnI
Analog MIDI
StE
Stereo
001
General MIDI Sound number when MIDI Input
Select is set to Record Strip “rc”.
Plays from MIDI IN cable when MIDI Input Select is
set to File Player “FP”.
MIDI IN
---
c
1 to 9
Record [rc1-rc9; rEC; rcF] Playback [rP1-rP9; rPn]
Decreases Audio Offset
0 to 9
Zero Offset or Increases Audio Offset
1 to 9
Decreases Piano Offset
0 to 9
Zero Offset or Increases Piano Offset
0
1 to 9
Standard Tempo
h
0
0 to 4
100 Faster
/
0 to 9
1 to 9
Transpose
v
0 or1
0 to 9
Increases Tempo: Displays “nA” for Max=100
00 = no change or change “Key” Up (Max=12)
12 Half-Steps
N
0 or1
1 to 9
Change “Key” Up/Down (Max=12)
Microphone
\
0
0 to 9
Microphone Volume
_
0
0 to 9
Left audio = Right audio
<
0
0 to 2
]
0 to 2
0 to 9
Right Increases as Left Decreases (Max=20 Right)
- or -1
0 to 9
Negative Bass Offset
0 or 1
0 to 9
Zero or Positive Bass Offset
t - or -1
0 or1
0 to 9
Negative Treble Offset
0 to 9
Zero or Positive Treble Offset
U
o
0 to 9
d
P
S
n
y
Click Track Volume Level Range= U0 to U9
Pianomation = 500ms Delay
Synthesis = No Delay
1
2
All Pianos
Piano Channel 1
3
All Instruments
All MIDI
Not Yet Available
r
Audio Volume
-9 to +9
Piano Volume
-9 to +9
Tempo
50 Slower
Stereo Balance
L20 to R20
Bass Volume
-12 to +12
Treble Volume
-12 to +12
Metronome Volume
Delay
Configure
Pianomation
A
P
-
b
n
-
a
Decreases Tempo: Displays “nI” for Min=50
Left Increases as Right Decreases (Max=20 Left)
Test 2
2
E
4
=
Alignment / Test 11
"
e
=
Sets Force of Keys and Pedal Solenoid
S
S
t
A
Standard
Karaoke (Sing Along)
S
L
Silent Piano
b
2
b
o
Barcus Berry Pickup
Mixed Output
Configure Audio
c
d
CompactFlash
CD
F
Demo Update
S
A
E
Execute
L
F
C
Midi Input Select
/
'
System Update
Application Update
Key List Update
Format
c
Copy Record
d
S
Demo Update
System Update
E
Execute
A
L
c
F-Curves
These functions can
only be changed from
the Petine controller.
Application Update
L=Key List Update
Copy SyncAlong
o
F
Off
A
n
U
A
Automatic
Manual
r
c
Record Strip
F
p
F-Player
Metronome Click-track
Time Signature
Mixed Out Level
Piano
n
P
0 to 9
0 to 9
Soundcard Output
S
n
d
A
y
Maximum
Dynamic
Main Audio Output
o
n
o
Mono
S
t
Stereo
Exit
E
n
d
Exit Setup Menu (“double-click” the ADJ Dial)
See Table
Soundcard Piano Volume on Line Output 2
PAGE 27