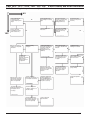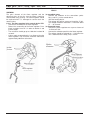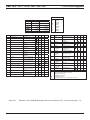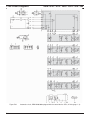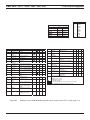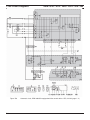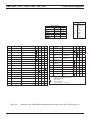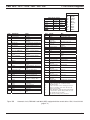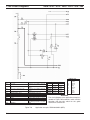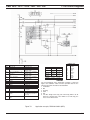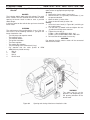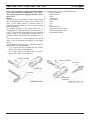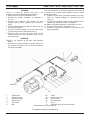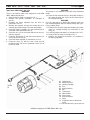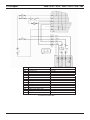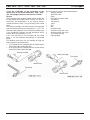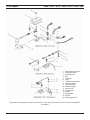
1
Water Type Heating Devices The Workshop Handbook DBW 2010 DBW 2012 DBW 2020 DBW 2022 DBW 300 DBW 350 08/2004 DBW 2010 / 2012 / 2020 / 2022 / 300 / 350 Contents Contents 1 The Introduction ........................................................................................................................................................101 1.1 1.2 1.3 1.4 1.5 1.6 1.7 The Contents and Purpose................................................................................................................................101 The field of validity of the handbook ..................................................................................................................101 The Meaning of the Warning Notes...................................................................................................................101 The additional documentation that will be used ................................................................................................101 The Security Instructions and Security Provisions ............................................................................................101 1.5.1. The General Security Provisions ..........................................................................................................101 The Legal Provisions for the Assembly .............................................................................................................102 The Recommendations of Improvement and Change.......................................................................................103 2 The General Definition ..............................................................................................................................................201 2.1 2.2 2.3 2.4 2.5 2.6 2.7 2.8 2.9 2.10 2.11 2.12 2.13 Brülör fanı The burner fan .................................................................................................................................206 The engine.........................................................................................................................................................206 The fuel pump....................................................................................................................................................206 2.3.1 The pre-heating of the nozzle block .....................................................................................................207 The heat exchanger...........................................................................................................................................207 The combustion chamber ..................................................................................................................................208 The control device .............................................................................................................................................208 The flame regulator ...........................................................................................................................................209 The induction bobbin and ignition electrodes ....................................................................................................209 The heat sensor.................................................................................................................................................209 The temperature constrainer / thermal fuse ......................................................................................................210 The regulation thermostat..................................................................................................................................210 The fan thermostat.............................................................................................................................................211 The circulation pump .........................................................................................................................................211 3 The Definition of the Function..................................................................................................................................301 3.1 3.2 General ..............................................................................................................................................................301 Operation ...........................................................................................................................................................301 3.2.1 Opening ................................................................................................................................................301 3.2.1 The heating ...........................................................................................................................................301 3.2.3 Shutting off............................................................................................................................................301 3.2.4 Shutting off as a result of failure ...........................................................................................................301 3.2.5 The Economy Circuit ............................................................................................................................302 4. The Technical Data ...................................................................................................................................................401 4.1 4.2 The Electrical Elements .....................................................................................................................................401 The Fuel.............................................................................................................................................................401 5 Error Search and Error Elimination .........................................................................................................................501 5.1 5.2 5.3 5.4 General ..............................................................................................................................................................501 The General Error Indications ...........................................................................................................................501 The Error Search – Fast Error Identification......................................................................................................503 The Error Indications .........................................................................................................................................504 5.4.1 The heating device does not start working when opened ....................................................................504 5.4.2 The heating device gives defect sign approximately 30 seconds after the heating device is started (at the control device 1563/6430 seconds (20 seconds at control device 1563/64). .............................................505 I Contents 5.4.3 5.4.4 5.4.5 5.4.6 5.4.7 DBW 2010 / 2012 / 2020 / 2022 / 300 / 350 The heating device starts to work only after a few trials.......................................................................506 The heating device stops by itself while working..................................................................................506 The heating device produces soot (dense black smoke comes out) ...................................................507 The heating device produces light colored dense smoke ....................................................................508 The heating device cannot be shut off..................................................................................................508 6 The Function Test......................................................................................................................................................601 6.1 6.2 General ..............................................................................................................................................................601 The Settings.......................................................................................................................................................601 6.2.1 Setting the CO2 proportion....................................................................................................................601 6.3 Testing the individual elements .........................................................................................................................602 6.3.1 The resistance check of the heat sensor (only the heating devices equipped with the control device 1563/64).............................................................................................................................................................602 6.3.2 The resistance test of the flame regulator ............................................................................................603 6.3.3 Checking and setting the ignition electrodes ........................................................................................604 6.3.4 Testing the induction bobbin..............................................................................................................................604 6.3.5 Testing the fuel pump ........................................................................................................................................605 6.3.6 Testing the burner engine..................................................................................................................................605 6.3.7 Testing the magnetic valve................................................................................................................................605 6.3.8 Testing the front heating element of the nozzle block .......................................................................................605 7 The Circuit Diagrams.................................................................................................................................................701 7.1 General ..............................................................................................................................................................701 8 The Service Tasks .....................................................................................................................................................801 8.1 8.2 8.3 8.4 8.5 8.6 8.7 8.8 General ..............................................................................................................................................................801 The tasks that will be carried out on the heating device ...................................................................................801 The tasks that are carried out on the vehicle ....................................................................................................801 The test operation of the heating device ...........................................................................................................801 The Maintenance Tasks ....................................................................................................................................801 8.5.1 Opening and closing of the burner head to the side.............................................................................802 The Visual Examination or the Assembly Instructions ......................................................................................803 8.6.1 The connection to the cooling system of the vehicle............................................................................803 8.6.2 The connection to the fuel system of the vehicle .................................................................................803 8.6.3 The supply of combustion air................................................................................................................805 8.6.4 The exhaust line ...................................................................................................................................805 Dismantling and mounting .................................................................................................................................806 8.7.1 Heating device, disassembling and installation ....................................................................................806 8.7.2 The replacement of the temperature constrainer .................................................................................806 8.7.3 The replacement of the heat sensor.....................................................................................................806 8.7.4 The replacement of the thermal fuse....................................................................................................807 8.7.6 The replacement of the fan thermostat.................................................................................................807 8.7.7 The replacement of the thermal fuse element ......................................................................................807 8.7.8 The replacement of the burner head ....................................................................................................807 8.7.9 The replacement of the induction bobbin .............................................................................................807 8.7.10 The replacement of the flame regulator................................................................................................807 8.7.11 The replacement of the combustion chamber ......................................................................................807 Commissioning ..................................................................................................................................................808 8.8.1 Evacuating the air from the water circuit ..............................................................................................808 8.8.2 The evacuation of air from the fuel supply system ...............................................................................808 9 The Repair ..................................................................................................................................................................901 9.1 II General ..............................................................................................................................................................901 9.1.1 The measures pertaining to the elements that are dismantled to parts ...............................................902 DBW 2010 / 2012 / 2020 / 2022 / 300 / 350 Contents 9.1.2 Making the changes ..........................................................................................................................................902 9.2 Dismantling in parts and assembly....................................................................................................................911 9.2.1 The replacement of the heat constrainer..............................................................................................911 9.2.2 The replacement of the heat sensor.....................................................................................................911 9.2.3 The replacement of the thermal fuse....................................................................................................911 9.2.4 The replacement of the regulation thermostat......................................................................................911 9.2.5 The replacement of the fan thermostat.................................................................................................913 9.2.6 The replacement of the fuse element ...................................................................................................913 9.2.7 The replacement of the control device .................................................................................................913 9.2.8 The replacement of the burner head ....................................................................................................913 9.2.9 The replacement of the engine .............................................................................................................915 9.2.10 The replacement of the high pressure nozzle ......................................................................................916 9.2.11 The replacement of the pre-heating of the nozzle block ......................................................................916 9.2.12 The replacement of the induction bobbin .............................................................................................916 9.2.13 The replacement of the flame regulator................................................................................................916 9.2.14 The replacement of the ignition electrodes...........................................................................................916 9.2.15 The replacement of the fuel pump........................................................................................................918 9.2.16 The replacement of the magnetic valve................................................................................................918 9.2.17 The replacement of the combustion chamber ......................................................................................918 9.2.18 The pre-heating thermostat of the nozzle block ...................................................................................918 9.2.19 The replacement of the heat exchanger...............................................................................................920 9.2.20 The replacement of the nozzle block....................................................................................................921 9.2.21 The replacement of the burner fan .......................................................................................................921 10 The Packaging / Storage / Shipment .....................................................................................................................101 10.1 General ..............................................................................................................................................................101 ANNEX A........................................................................................................................................................................101 The Periodical Maintenance……………………………………………………………………………………………………..1 The Periodical Maintenance of the Heating Device .......................................................................................................2 III The Diagrams and Figures DBW 2010 / 2012 / 2020 / 2022 / 300 / 350 The Diagrams and Figures Figure 301 Figure 302 Figure 501 Figure 701 Figure 702 Figure 703 Figure 704 Figure 705 Figure 706 Figure 707 Figure 708 Figure 709 Figure 710 Figure 711 Figure 801 Figure 802 Figure 901 The function flow (the heating device equipped with the control device 1553) ........................................302 The function flow 8the heating device equipped with the control device 1563/64) ..................................302 General Error Indications..........................................................................................................................501 Automatic circuit, DBW 2010, 12 AND 24 Volt equipped with the control device 1553 ...........................702 Automatic circuit, DBW 2020/300 equipped with the control device 1553, 24 Volt..................................704 Automatic circuit, DBW 300/350 equipped with the control device 1553, 24 Volt....................................706 Automatic circuit, DBW 2010/2020/300/350 equipped with the control device 1563, 12 and 24 V .........708 Automatic circuit, DBW 2012 and 2022 (ADR) equipped with the control device 1564,12 and 14 V ......710 Application sample, DBW 2010/2020/300, Volt, works with program timer and battery switch ...............712 Application example, DBW 2010/2022 (ADR) ..........................................................................................713 Application example, DBW 2010/2022 (ADR) ..........................................................................................714 Application example, DBW 2010/2022 (ADR) ..........................................................................................715 Application example, DBW 2010/2022 (ADR) ..........................................................................................716 Application example, DBW 2012/2022 (ADR) ..........................................................................................717 Opening and closing of the burner head to the side.................................................................................802 The installation example for the heating device of the bus ......................................................................804 The replacement of the heat constrainer, heat sensor, thermal fuse, fuse elements and regulation thermostat.................................................................................................................................................912 Figure 902 The replacement of the control device .....................................................................................................914 Figure 903 The replacement of the burner head ........................................................................................................914 Figure 904 The replacement of the engine .................................................................................................................915 Figure 905 The replacement of the nozzle block, pre-heating of the nozzle block, high pressure nozzle and flame regulator....................................................................................................................................................917 Figure 907 The replacement of the magnetic valve....................................................................................................919 Figure 909 The replacement of the burner fan ...............................................................................................................922 IV DBW 2010 / 2012 / 2020 / 2022 / 300 / 350 1 The Introduction 1.1 The Contents and Purpose The purpose of this workshop handbook is to provide support to the trained personnel with regard to the repair of the DBW 2010/2012/2020/2022/300/350 water type heating devices. The heating device can only be operated with the fuel indicated on the type label (diesel or EL type fuel-oil) and the mentioned electrical connection type. 1.2 1 The Introduction 1.4 The additional documentation that will be used This information and instructions necessary for the repair of the DBW 2010/2012/2020/2022/300/350 water type heating devices are contained in this workshop handbook. There is no need to use an additional document under normal conditions. The assembly instructions and the manual can be used in additions in case of need. The field of validity of the handbook 1.5 The Security Instructions and Security This handbook is valid for the heating devices indicated Provisions on the cover page. The heating devices will be distinguished basically with the varying technical data (refer to Section 4) and different control devices: the control device 1553 or 1563/64 (refer to 2.6). Furthermore, a different flame regulator has been installed in connection with the control device 1563/645 (refer to 2.7). 1.3 The Meaning of the Warning Notes The phrases DANGER, ATTENTION, WARNING have been used in the following meanings: DANGER This phrase has been used for the cases, in which the occurrence of injuries or fatal accidents is possible in case of non-compliance or the violation of the compliance with the instructions or procedures. ATTENTION This phrase has been used for the cases, in which damage will be inflicted on the structural elements in case of non-compliance or violation of the compliance with the instructions or procedures. WARNING This phrase has been used in case of the desire to draw attention to a certain property. As a matter of principle, the compliance with the general accident prevention regulations and the operation security instructions is required. The “general security provisions” beyond these regulations are listed below. The special security provisions related to this handbook have been indicated in each section or procedure in form of a warning note. 1.5.1. The General Security Provisions The type permits according to the EU Directives 72/245/EEC (EMV) and 1001/156/EU (heater) are available for the DBW 2010/2012/2020/2022/300/359 heating devices and the EU permit numbers are indicated below: e1*2001/156*006xx The provisions in the section VII of the Annex to the Directive 2001/56/EU must be taken into account with priority. ATTENTION The obligations regarding the responsibility of Webasco will be cancelled in case of non-compliance with the assembly instructions and the warnings included therein. The same condition is valid in case of carrying out repair work without conforming to the procedures or if original spare parts will not be used. The general type permit of the heater will no longer be valid as a result, of which the consequence will be that the general operation permit of the vehicle will no longer be valid. The digits on the type label related to the year must be removed and marked permanently in the first operation year. These heating devices have been designed for heating the vehicle engine and the interior part of the vehicle cabin. In the case that the heating device will be used in vehicles that are not included in the scope of the Traffic Regulation for the Land Roads (for instance, ships), the compliance with the regulations with partial local validity will be necessary in association with this. 101 1.The Introduction DBW 2010 / 2012 / 2020 / 2022 / 300 / 350 This heating device can only be mounted on motor vehicles, of which the minimum amount of the cooling liquid is 10 liters or on independent heating systems. The heating device cannot be installed in the driver or passenger cabin of the vehicles. In the case that the heating device should be installed in such location at any rate, the assembly box must be completely insulated in the direction of the interior of the cabin of the vehicle. The assembly box must have sufficient ventilation from 0 outside so that maximum 85 C will not be exceeded in the box. Failures could be result in the case that this temperature will be exceeded. DANGER The heating device should not be operated in closed locations such as garage or workshop without the suction system, not even as time programmed, due to the danger of poisoning and suffocation. The heating device must be shut off in places such as gas stations or filling stations due to explosion danger. ATTENTION The heating device should be shut off in places with the possibility of the availability of combustible vapor or dust such as near the fuel, coal, wood shavings, wheat storage areas or similar places due the danger of explosion. The temperature of 110 0C (storage temperature) should not be exceeded near the control device (for instance, during painting tasks on the vehicle).Permanent damage could be inflicted on the electronic parts if the temperature limit is exceeded. The level of the cooling liquid should be checked in accordance with the instructions of the vehicle manufacturer. The water in the heating circuit of the heating device should contain quality anti-freeze material in a ratio of 10 % at minimum. The admixtures in the heating circuit should not harm metal, plastic or rubber parts and should not lead to sedimentary formation. The opening pressure in the vehicle cooling system – which is normally indicated on the radiator cap – must be between 0,4 and 2.0 bar positive working pressure (this applies also for the separate heating circuits). 102 1.6 The Assembly Legal Provisions for the WARNING The provisions of these directives are binding within the validity area of the EU Directive 70/156/EEC and should be taken into consideration in the countries, in which particular regulations pertaining to this issue are not available! (Citation from 2001/156/EU Annex VII) 1.7.1. A conspicuous operation indicator within the visual area of the operator should give information as to whether or not the heater is working. WARNING Please refer to the assembly instructions for other warnings and provisions related to the installation on the vehicles. The supply of the combustion air from within the vehicle is prohibited. In the case that the mouth of the exhaust pipe is upwards at the side or if the exhaust pipe passes underneath the bottom of the vehicle, it should be brought near the driver cabin or the lateral or back border lines of the vehicle. The exhaust pipes must be laid in such way that the exhaust gases cannot enter the interior part of the vehicle. The parts that are important with respect to the functioning of the vehicle should not be adversely affected. The condensation water residues in the exhaust pipe should be directly discharged and the permission will be granted, if the need arises, for a hole to be drilled in order to evacuate the condensation water. The entrance clearance for the combustion air and the exit clearance for the exhaust air must be manufactured in such way that a ball of 16 mm cannot enter through such holes. The electrical lines and the circuit and control elements of the heating device should be installed in such way on the vehicle that perfect operation will not be adversely affected under normal conditions. The articles 45 and 46 of the German Traffic Regulation for Land Roads must be taken into consideration for laying the fuel lines and the installation of the additional fuel tank. The most important articles of the Regulation are: • The fuel lines must be manufactured and installed in such way that the torsion of the vehicle, movements of the engine, etc. will not have any adverse influence on the life time of the lines. They must be protected against mechanical damage. The fuel lines should be protected against excessive heat that could spoil the work and they should be installed in such way that the collection of the dropping or vaporizing fuel or the inflammation as a result of the heat or the parts with electrical current will not be possible. DBW 2010 / 2012 / 2020 / 2022 / 300 / 350 • • • • • The fuel pipes and the fuel tanks of the busses should not be located within the passenger or driver cabin. The fuel tanks in such vehicles must be located in such way that the exit will not be exposed to direct danger in case of a fire. The fuel transportation should not be achieved with gravitation or the positive pressure in the fuel tank. The instructions for the installation of the Webasto fuel tank for the fuel supply of the water type heating devices in the vehicles: The installation in the passenger or driver cabin of the motor busses is prohibited The fuel filling clamping sleeve cannot be located in the passenger or driver cabin in any vehicle. The fuel tanks must either have a ventilated cover or they should be ventilated in some other way (ventilation pipe). Only covers that comply with DIN 73400 standard can be used. All fuel tanks included in the Webasto part catalogue are suited for the maximum working pressure that is equivalent to 0.15 bar positive pressure. All fuel tanks included in the Webasto part catalogue will be individually subject to a pressure test that is equivalent to 0.3 bar positive pressure at the time of manufacture. The working status of the heating device (shut off or open) should be easily distinguishable. An acceptance test must be carried out by the relevant testing institution for the heating devices in the vehicles that are not subject to the Regulation for the Traffic Permits on the Land Roads – if an applicable legislation is available. 1 The Introduction 1.7 The Recommendations Improvement and Change of Please send the complaints and the recommendations for improvements or corrective measures to Webasto AG Abt. Technische Dokumentation Bus Hotline: 0 18 05 / 93 22 78 Hotfax: (0395) 55 92-353 103 1.The Introduction 104 DBW 2010 / 2012 / 2020 / 2022 / 300 / 350 DBW 2010 / 2012 / 2020 / 2022 / 300 / 350 2 The General Definition The Webasto DBW 2010, 2012, 2020, 300 and 350 water type heating devices will be used in connection with the heating system of the vehicle - for heating the passenger cabin - for defrosting the windows, and - for pre-heating the water cooled engines. The water type heating device works independent of the engine of the vehicle and will be connected to the cooling system, fuel system and electrical installation of the vehicle. The heating device that has been designed in accordance with the heat transfer principle works in intervals by being regulated by the temperature sensor. The heating devices DBW 2012 and DBW 2022 They are special types designed to be installed on the vehicles that are used for the transport of hazardous materials. The heating device DBW 2012 corresponds in terms of the basic functions to the heating device DBW 2010 and the heating device DBW 2022 corresponds to DBW 2020. 2.The General Definition The heating devices DBW 2010, 2012, 2020, 2022, 300 and 350 are established basically by - burner fan - fuel pump, - heat exchanger - combustion chamber, and - induction bobbin and ignition electrodes. The nozzle pre-heating block can be installed according to the type of the heating device. - A control device - A flame regulator are integrated in the heating device with the aim of control and supervision. The control device will be installed on the side at the back or at the top according to the type of the heating device. - A heat sensor - A heat constrainer - A thermal fuse - A fan thermostat can be integrated in the heating device according to the type of the heating device. A circulation pump will be installed externally in the vehicle. 201 2.The General Definition 1 2 3 4 5 6 7 8 9 202 DBW 2010 / 2012 / 2020 / 2022 / 300 / 350 10 The exhaust exit The burner head 11 The control device The induction bobbin 12 The control device 1547 TRS The cooling liquid, exit Regulation thermostat* The thermal fuse element* The regulation thermostat* * The parts that will be included according to the type of The temperature constrainer the heating device The fan thermostat The heat exchanger The heating devices DBW 2010 and DBW 2012 DBW 2010 / 2012 / 2020 / 2022 / 300 / 350 1 2 3 4 5 6 7 2.The General Definition 8 The exhaust exit The burner head 9 The control device The induction bobbin The cooling liquid, exit The temperature sensor* * The parts that will be included according to the type of The thermal fuse element* the heating device The temperature constrainer The heat exchanger The heating devices DBW 2010 and DBW 2012 Sensoric 203 2.The General Definition 1 2 3 4 5 6 7 8 9 204 DBW 2010 / 2012 / 2020 / 2022 / 300 / 350 10 Fuel, pressure pipe The burner head 11 The exhaust exit The induction bobbin 12 The control device The cooling liquid, access The thermal fuse element* The regulation thermostat* * The parts that will be included according to the type of The temperature constrainer the heating device The cooling liquid, exit The heat exchanger The fuel, return The heating devices DBW 2020, DBW 2022, DBW 300 and DBW 350 DBW 2010 / 2012 / 2020 / 2022 / 300 / 350 1 2 3 4 5 6 7 8 9 2.The General Definition 10 Fuel, pressure pipe The burner head 11 The exhaust exit The induction bobbin 12 The control device The cooling liquid, access The thermal fuse* * The parts that will be included according to the type of The temperature sensor* the heating device The temperature constrainer* The cooling liquid, exit The heat exchanger The fuel, return The heating devices DBW 2020, DBW 2022, DBW 300 and DBW 350 Sensoric 205 2.The General Definition 2.1 DBW 2010 / 2012 / 2020 / 2022 / 300 / 350 Brülör fanı The burner fan The burner fan conveys the air that is necessary for the combustion from the entrance of the combustion chamber to the combustion chamber. The following fan types will be installed on the heating devices: DBW 2010 / 2012 – fan with lateral channel DBW 2020 / 2022 / 300 – radial fan DBW 350 – two stage radial fan . 2.2 The engine The engine operates the burner fan over a clutch and the fuel pump over a gear. DBW 2010 / 2012 DBW 2010 / 2012 DBW 2020 / 2022 / 300 / 350 2.3 DBW 2020 / 2022 / 300 DBW 350 206 The fuel pump The fuel supply will be achieved over the fuel pump. The pump will be operated with the help of a clutch over the engine of the burner fan. The fuel will be compressed approximately up to 10 bar in the fuel pump and will be sprayed in vaporized form through the high pressure nozzle. A magnetic valve adjusts the fuel that comes to the magnetic valve. DBW 2010 / 2012 / 2020 / 2022 / 300 / 350 2.3.1 The pre-heating of the nozzle block The fuel going to the vaporizer nozzle will be heated with the pre-heating of the nozzle block. Work failures could occur at excessive low temperatures if there is no pre-heating of the nozzle block. The heater cartridge in the nozzle block will be activated over a 0 thermostat when the temperature is < 0 C. The heating period depends on the temperature of the radiation reflected in the combustion chamber and will be ended 0 when this is +8 C in the thermostat. In the case that there is no pre-heating at the nozzle block, this can be installed at a later time. Please refer to the Spare Part List for the necessary parts. 2.The General Definition 2.4 The heat exchanger The heat that will be produced with the combustion will be transferred to the cooling water circuit at the heat exchanger. DBW 2010/2012 Heating cartridge Nozzle block Thermostat DBW 2010/2012 Heating cartridge Thermostat Nozzle block Up to DBW 2020.32 Up to DBW 300.15 DBW 2020 / 2022 / 300 / 350 Beginning with DBW 2020.33 Beginning with DBW 300.15 Beginning with 350.01 207 2.The General Definition 2.5 DBW 2010 / 2012 / 2020 / 2022 / 300 / 350 2.6 The combustion chamber The fuel-air combination will be sprayed in the combustion chamber and burned here. The heat exchanger will be heated in the meanwhile. The control device The control device is the central element and ensures that functioning and combustion actions will be supervised. DBW 2010 / 2012 The control device 1553 Up to DBW 2020.32 Up to DBW 300.15 Beginning with DBW 2020.33 Beginning with DBW 300.16 Beginning with DBW 350.01 208 The control device for the sensoric heating devices 1563 / 1564 DBW 2010 / 2012 / 2020 / 2022 / 300 / 350 2.7 2.The General Definition The flame regulator 2.8 The induction bobbin and ignition electrodes The flame status will be supervised with the flame regulator during the entire combustion action. The flame regulator in the non-sensoric types photo-resistance or is photo-transistor at the sensoric types and reacts according to the illumination power of the flame. The signals will be conveyed to the control device and processed here. The induction bobbin produces the high voltage that is necessary for the ignition of the fuel-air combination. The ignition will be achieved with the high voltage spark between two ignition electrodes. The ignition electrodes The flame regulator 2.9 The flame regulator in the control device 1553 The heat sensor The heat sensor specifies the temperature of the cooling water as electrical resistance at the exit of the heat exchanger. This signal will be conveyed to the control device and processed here. The ignition electrodes The flame regulator The ignition electrodes The flame regulator The flame regulator in the control devices 1563 / 1564 of the sensoric heating devices 209 2.The General Definition DBW 2010 / 2012 / 2020 / 2022 / 300 / 350 2.10 The temperature constrainer / thermal 2.11 The regulation thermostat fuse The regulation thermostat at the heating device The temperature constrainer The temperature constrainer (bi-metal) protects the heating device against high work temperatures that are not permitted. The temperature constrainer reacts at a 0 0 temperature over 107 C or 117 C and shuts off the heating device. The temperature constrainer will be set manually or automatically. The thermal fuse The thermal fuse protects the heating devices against high working temperatures that are not permitted. There is a fuse element in the thermal fuse that reacts and shuts off the heating device when the permitted temperature will be exceeded. A temperature constrainer can also be installed in the heating device instead of the thermal fuse. Thermal fuse Button for setting The regulation thermostat takes over the task of regulation after the working temperature has been reached. The temperature of the cooling water will be kept at a fixed temperature by opening and shutting off the heating device in certain intervals. The thermostat 0 0 shuts off at 63 ± 5 C and opens at 70 ± 3 C. The external regulation thermostat The regulation task can be controlled by a regulation thermostat installed externally. The regulation thermostat takes over the task of regulation after the working temperature has been reached. The temperature of the cooling liquid will be kept at a fixed level by opening and shutting off the heating device at certain intervals. The 0 0 thermostat shuts off at 71 ± 2 C and opens at 78 ± 2 C 0 or shuts off alternatively at 62 ± 2 C and opens at 70 ± 2 0 C. 0 A thermostat that shuts off at 35 ± 2 C and opens at 42 0 ± 2 C can be installed in the heating devices that have an economy circuit (mode for keeping warm). 0 The temperature opens at 107 C 0 ± 5 C. 0 It can be set to zero at 30 C. There will be automatic setting to Button for setting to zero zero at 0C. The temperature constrainer opens Thermal fuse 0 at 117 ± 5 C. 0 It can be set to zero at approximately 90 C. 0 Automatic setting to zero at 0 C. Control device for sensoric heating devices Flame Controller in 1563*1564 The regulation thermostat in the heating device 210 DBW 2010 / 2012 / 2020 / 2022 / 300 / 350 2.The General Definition U 4810 It will be recommended for the heating devices DBW 2010 and DBW 2012. U 4814 Heating devices The fan thermostat in the heating device 2.12 The fan thermostat The fan thermostat shuts off and opens the fan of the heating system of the vehicle when the temperature of 0 0 the cooling liquid is between 30 C and 40 C. The 0 0 thermostat shuts off at 40 C ± 3 C and opens at 30 ± 5 0 C. It will be recommended for DBW 2020, 2022, 300 and 350. Aquavalent 5000 S It will be recommended for the heating devices DBW 2020, 2022, 300 and 350. U 4851 The fan thermostat in the cooling water circuit The external regulation thermostat 2.13 The circulation pump The circulation pump that will be externally installed ensures that the cooling water will be circulated circuit of the vehicle or heating device. The pump will be activated by the control device and goes on working as long as the heating device works. The circulation pumps of the heating devices can be operated with U 4810, U 4814, Aquavalent 5000 S, U4851 or Aquavalent 6000 S. It will be recommended for the heating devices DBW 2020, 2022, 300 and 350. Aquavalent 6000 S and U 4852 They will be recommended for the heating devices DBW 2020, 2022, 300 and 350. 211 2.The General Definition 212 DBW 2010 / 2012 / 2020 / 2022 / 300 / 350 DBW 2010 / 2012 / 2020 / 2022 / 300 / 350 3 The Definition of the Function 3.1 General The heating devices with high pressure vaporizer burner work intermittently. The regulation will be achieved by thermostatic sensor (heating device equipped with the control device 1553), or temperature sensor (the sensoric heating devices equipped with the control device 1563/1564) 3.2 Operation 3.The Definition of the Function work period begins in the heating device when the temperature falls underneath the lower limit. 3.2.3 Shutting off The combustion will be ended when the heating device is shut off. The control lamp goes off and the post-function will be started. The burner fan and the circulation pump will be shut off approximately after 150 seconds (90 seconds in the sensoric devices). The re-activation of the heating device during the postfunctioning period is possible. 3.2.4 Shutting off as a result of failure Opening and shutting off of the heating devices will be achieved by For the heating devices equipped with the control switch (on/off), or device 1553 and 1564/64 program timer (DBW 2012 and DBW 2022 / not Shutting off as a result of failure occurs in the following permitted for TRS) cases: A work indicator lamp in the program timer or a If there is no combustion 30 seconds after the separately installed indicator lamp is available for the heating device has been started supervision of the work flow. If there is an interruption of fuel supply for more The heating devices can be equipped with the following than 10 seconds during the heating operation as desired: The heating device will be shut off by the thermal pre-heating of the nozzle block with heating fuse or temperature constrainer in case of cartridge for excessively low temperatures excessive heating of the heating device. A new an economy circuit for the reduction of the fuel thermal fuse of the same value (pay attention to consumption (only with the control device 1563) the color code) should be installed or the The work flow of the sensoric heating devices is partially temperature constrainer should be set to zero by somewhat different (refer to Figure 302). pushing the button (after the temperature has 3.2.1 Opening fallen under 60 0C) in such case. The control lamp goes on when the device is started. The For the heating devices equipped with the control burner fan, fuel pump and circulation pump start device 1553 In case of low voltage for approximately 10 – 25 functioning. The magnetic valve will be opened seconds after the temperature has fallen under approximately after 15 seconds, the fuel will be sprayed the lower limit in the combustion chamber through the vaporizer nozzle For the sensoric heating devices equipped with the and will be ignited with the high voltage arc that will be control device 1563/64 activated at the same time. The control device shuts off In case of sensing foreign light or low voltage 12 the induction bobbin with a signal conveyed by the flame seconds after staring regulator after the formation of the flame. If there is no The heating device will enter the failure blockage combustion, refer to 3.2.4. after 90 seconds of post-functioning in case of 3.2.2 The heating low voltage for 12 seconds during the combustion The failure blockage will be cancelled after the heating The regulation thermostat takes over the regulation task device has been shut off and opened following the after the work temperature has been reached (the control elimination of the reason of the failure. device in the sensoric heating devices). The temperature of the heat carrier (the cooling liquid) will be kept at a fixed level by alternately opening and shutting off the heating device. The magnetic valve interrupts the fuel supply if the temperature exceeds the upper limit and the flame goes off as a result. The postfunction will be started, the burner fan continues to work in the meanwhile and stops working automatically approximately after 150 seconds (90 seconds in the sensoric heating devices). The circulation pumps goes on working with intervals and the control lamp is on. A new 301 3.The Definition of the Function 3.2.5 DBW 2010 / 2012 / 2020 / 2022 / 300 / 350 The Economy Circuit Only for the sensoric heating devices equipped with the control device 1563 The control device can be operated in the economy mode as an alternative to normal functioning. The setting temperatures of the water circuit will be kept at a lower temperature in the economy mode. The fuel consumption Figure 301 Figure 302 302 can be reduced at low heat requirement (for instance while keeping warm) due to less radiation loss resulting from this. A B C D E F G Control lamp Circulation pump Burner fan Induction bobbin Magnetic valve Flame regulator Regulation thermostat 1 2 3 4 5 6 7 8 9 10 Opening Pre-operation Starting Security period Combustion period Start of interruption Post-operation End of interruption Shutting off Shut off The function flow (the heating device equipped with the control device 1553) A B C D E F Control lamp Circulation pump Burner fan Induction bobbin Magnetic valve Flame regulator 1 2 3 4 5 6 7 8 9 10 11 12 Opening Pre-operation Foreign light query Pre-ignition Starting Security period Combustion begin Interruption begin Post-operation End of interruption Shutting off Shut off The function flow 8the heating device equipped with the control device 1563/64) DBW 2010 / 2012 / 2020 / 2022 / 300 / 350 4. The Technical Data As long as no limit value is indicated, the technical data are given at +20 0C and with ± 10 % tolerance that is normal at the heating devices for nominal voltage. 4.1 The Electrical Elements The control device, the engines of the burner fan and circulation pump, magnetic valve, induction bobbin, heater of the nozzle block, heating cartridge and the program timer have been designed to be suited for 24 Volts. The voltage does not make any difference for the heat constrainer, flame regulator, temperature sensor and switches. WARNING The suitability of the circulation pumps to the heating devices will be specified according to the resistances on the cooling water side. 4.2 The Fuel The diesel fuel recommended by the vehicle manufacturer is suitable as fuel. Only the fuel indicated on the factory label can be used. EL class fuel-oil (not L class) can also be used if it complies with the quality in the German market. No adverse situation resulting from the admixtures is known. Heating device Test sign Model Heat flow Fuel Fuel consumptionh Nominal voltage Work voltage field Nominal power intake (except for the circulation pump) The environmental temperature that is permitted during work (heating device, control device, circulation pump) The storage temperature that is permitted (heating device, control device, circulation pump) Positive working pressure that is permitted The filling amount of the heat exchanger l Dimensions of the heating device, including the control device (tolerance ± 3 mm) Length Width Height Weight, heating device including the control device 4.Technical Data The instructions of the vehicle manufacturer related to the admixture must be observed if the fuel will be taken from the fuel tank of the vehicle. In the case that the fuel will be taken from a separate fuel tank, winter diesel fuel must be used at temperatures under 0 0C or gas oil or gas must be added to the diesel fuel under the condition that attention will be paid to the mixture proportion. The utilization of substances that provide fluidity is possible. The mixture proportions in separate fuel tanks Temperature Winter diesel Gas oil or gas fuel as admixture 0 Between 0 C 100 % – 0 and -20 C 0 between -20 C - 70 % 30 % 0 30 C or special winter diesel fuel 0 between -30 C special winter 0 and -40 C diesel fuel or 100 % gas oil DBW 2010 DBW 2012 DBW 2020 DBW 2022 DBW 300 DBW 350 ~ S129 ~ S189 ~ S136 ~ S216 ~ S164 ~ S196 High pressure vaporizer KW (kcal/h) 11,6 / 9,3 (10 000 / 8 000) 23,3 (20 000) 30 (26 000) 35 (30 000) Diesel / EL class fuel-oil kg/h VVW 1,3 / 1,0 °C 2,5 12 or 24 10 ... 14 or 20 ... 28 60 90 > .33: 120 –40 ... +60 °C –40 ... +85 bar 0,4 ... 2,0 l 1,1 mm mm mm kg 584 205 228 15 3,3 3,7 24 20 ... 28 130 170 2,4 < .32: > .33: 681 680 230 240 270 279 24 > .33: 22 < .15: > .16: 681 680 230 240 270 279 24 > .16: 22 725 240 279 23 401 4. Technical Data Circulation pump Volume flow Nominal voltage Working voltage field Nominal power intake Dimensions Length Width Height Weight 402 l/h VVW mm mm mm kg DBW 2010 / 2012 / 2020 / 2022 / 300 / 350 U 4810 U 4814 1600 5200 (against 0.15 bar) (against 0.15 bar) 12 or 24 10 ... 14 or 20 ... 24 25 104 with Bühler engine 173 228 94 100 77 105 0,8 2,1 U 4851 6000 (against 0.4 bar) Aquavent 6000 S 6000 (against 0.4 bar) 209 Aquavent 5000 S 5200 (against 0.15 bar) 24 20 ... 28 104 279 115 110 2,7 221 100 105 2,1 284 115 110 2,95 209 DBW 2010 / 2012 / 2020 / 2022 / 300 / 350 5 Error Search and Error Elimination 5.1 General The error search and error elimination in the DBW 2010/2012/2020/2022/300/350 heating devices will be defined in this section. ATTENTION The error search and error elimination requires knowledge on the structure and work of each component of the heating device and can only be carried out by trained personnel. The functional relationships can be seen in Section 2 or 3 in case of uncertainty. 5.Error Search and Error Elimination ATTENTION The sensing of the error is under normal conditions limited with specifying the defective element. The following reasons of defect have not been taken into consideration and must as a matter of principle be checked or no chance should be given to the occurrence of defects due to such reasons. Corrosion in the socket Contact failure in the contact of the socket Failure of the cable shoe in the socket Corrosion in the cables and fuses Corrosion in the battery poles A function test must be conducted on the vehicle after each error elimination. 5.2 The General Error Indications The likely general error indications have been listed in the table below (Figure 501) Error Indication Likely Reason Error in the electrical system Control lamp does not light and the heating device does not work • • • No feeding voltage Fuses The feeding line in the socket contacts of the A socket of the control device F2 fuse disconnected Short circuit in the circulation pump or in the line to the heating device F3 fuse disconnected Short circuit in the line to the heating device / engine / pre-heating element of the nozzle block (if any) . The work indicator lamp is defective or there is an interruption or short circuit in its cables The heating devices works normally but the work indicator lamp is not lighted Error in the water system The heating device will be shut off because the attached heat exchanger cannot provide sufficient heat Flow amount is very low because • there is air or gas in the heating device, heat exchangers or system sections • the valves are partially closed (flow adjustment), dirty or closed • there is dirt in the system, for instance in the filter or bottlenecks • the circulation pump pumps insufficient amounts (there is air or gas in the pump body) • the rotation direction is opposite – check the cable colors (black + / brown -) • insufficient anti-freeze Figure 501 General Error Indications (Page 1 / 2) 501 5.Error Search and Error Elimination DBW 2010 / 2012 / 2020 / 2022 / 300 / 350 Error indication Likely reason • the system resistance is very high (increases particularly when it is cold) • the circulation pump is defect The heat exchangers (water/air) provide very little heat because • there is air or gas in the heat exchangers or system sections • the heat transfer surfaces are dirty (inside/outside) • air access/exit is insufficient • Fan: does not blow sufficient air /its rotation direction is wrong / resistance is too high • anti-freeze proportion is too high • the dimension of the heat exchanger is too small The rough calculation of the flow amount Flow amount (l/h) = thermal flow according to the type label The heat difference will be measured in terms of ǻt [K] or [0C] at the water access or exit at the heating device (for instance with contact thermometer) x 860 Error in the fuel supply • • • No fuel coming to the heating device • • • fuel tank is empty the pipes are broken, closed, clogged or leaking paraffin decomposition or frozen water in the fuel filter or fuel pipes the ventilation hole of the tank is closed the fuel pipes are mixed-up fuel filter is dirty Error in the combustion system The CO2 value cannot be set to the nominal value. The combustion is disorderly • • • • • • • • • There are bubbles in the suction pipe (suction pipe leaks) The fuel filter is dirt or leaks There is leakage in the fuel intake (suction height, vacuum in the tank); pay attention to the assembly instruction Fuel pump is defective (pump pressure) The return pipe is obstructed The sieve in the pump is dirty The vaporizer nozzle is defective The combustion air and exhaust pipes are obstructed or closed The revolution of the pump engine is too low Figure 501 General Error Indications 502 DBW 2010 / 2012 / 2020 / 2022 / 300 / 350 5.3 5.Error Search and Error Elimination The Error Search – Fast Error Identification The types of the heating devices: All heating devices Only sensoric heating devices, of which the control devices are 1563/64 Check and repair and replacement, if necessary Voltage feeding Fuses Electric cables and connections Switches Thermal fuse or heat Regulation thermostat or heat Flame regulator Control device Ignition electrodes Induction bobbin, induction Drive (engine) Fuel feeding Fuel pump Fuel magnetic valve Vaporizer nozzle Circulation pump Combustion air path Exhaust gas pat Heating system Failure type Does not work after starting Control lamp – goes off approximately after 25 (30) seconds Burner fan – does not work Burner fan – no pre-operation Burner fan – no post-operation Circulation pump – does not work Spark – none Combustion – combustion does not start (after 15 seconds) Combustion – stops approximately after 25 (30) seconds Combustion – cannot be closed Combustion occurs – flame is too bright Combustion – flame is not bright Heating device – excessive heat 503 5.Error Search and Error Elimination DBW 2010 / 2012 / 2020 / 2022 / 300 / 350 5.4 The Error Indications 5.4.1 The heating device does not start working when opened YES Is there voltage on B1, B2 and B4? (At control device 1563/64: Clamp A1, A2, A3, A4) NO Are F2/F3 fuses burned out? (at control device 1563/64: F1/F2) Is there passage at regulation thermostat? (the heat sensor at control device 1563/64) Replace the fuses and start the heating device. Does the fuse get burned out again? The incoming line is defective (at the control device 1563/64: control device is defective) Search for short circuit and eliminate it. Is the voltage low? < 18 ± 1.0 V or < 9 ± 0.5 V (At control device 1563/64: < 20 -1 V or < 10 -1V) Is there voltage in the engine (burner fan)? Regulation thermostat is defective, replace it. The temperature in the water circuit is too high Only control device 1563/64: the incoming line or the temperature sensor is defective Is there voltage in the clamps C2 and C5 of the control device The control device is defective, replace it. Check out to see whether or not the line to the engine (burner fan) The low voltage protection of the control device has reacted: charge the battery Can the engine shaft be rotated easily? Can the engine shaft be easily rotated when the plate of nozzle block is in dismantled status? Can the engine shaft be easily rotated when the engine is dismantled? The cylindrical roller of the fan wheel is defective The engine (burner fan) defective; replace it Can the large butt gear be easily rotated? The engine (burner fan) is defect; replace it 504 Is there passage at the regulation thermostat after cooling of the water circuit) The fuel tank is defective; replace it The engine shaft (burner fan) is detective; replace it DBW 2010 / 2012 / 2020 / 2022 / 300 / 350 5.4.2 5.Error Search and Error Elimination The heating device gives defect sign approximately 30 seconds after the heating device is started (at the control device 1563/6430 seconds (20 seconds at control device 1563/64). YES Is the thermal fuse F1 disconnected? Is the heat classifier disconnected? Is the temperature classifier disconnected? NO The sound of the induction bobbin can be heard approximately after 20 or 12 seconds. Is there voltage on the clamp C8 and C5? (At the control device 1563/64: Clamp D8 and D5) Eliminate the reason of disconnection. For instance, water is insufficient. Change the thermal fuse or set the temperature constrainer to zero. Check the lines to the control device. Any break? Is the resistance / voltage of the flame regulator 100 kOhm when there is no light? (At the control device 1563/64: > 3.5 V) Do you hear combustion? a sound of The flame regulator is defective. Replace it. the magnetic valve in the suction and return line open because the magnetic valve and tank are located high? The control device is defective. Replace it. The bobbin of the magnetic head is defective No Is there passage in the magnetic valves? Is there voltage in the magnetic valve? Yes Is fuel sent to the pump? The vaporizer nozzle is clogged. Replace it. Is the resistance / voltage of the flame regulator 1.56 kOhm with 50 Lux light? (At the control device 1563/64: < 3.5 V) Does the nozzle spray with a limited angle? No Yes The fuel quality does not comply with the mixture proportion in the cold weather instruction. Replace the fuel pump The magnetic valve is defective. Replace it. Control the incoming lines. Does the setting of the ignition electrodes comply with the gauge? Adjust the ignition electrodes according to the gauge. Is there fuel in the tank? Fill fuel. Are all fuel lines connected? Tighten. New gasket. Is the gasket surface of the regulation piston or the air evacuation hole dirty? Dismantle the fuel pump. Is the dragging nail on the shaft okay? Check the conductivity of the suction and exhaust clamping sleeves and clean it. Replace it or clean it. The suction line is clogged. It is either paraffin decomposition or the water in the fuel is frozen. Or the hole in the ventilation in the tank is clogged. Is the viscosity under 20 c St? The voltage control device in the heating device is at the border of the low voltage protection. The sieve of the suction connection in the fuel pump is dirt. Clean it. Yes The induction bobbin is defective. Replace it. The isolator of the ignition electrodes is defective. Fix the break. Does fuel spray out of the vaporizer nozzle? Do you get the same result with a new induction bobbin? The vaporizer nozzle is clogged. Replace it. The flame regulator is defective. Replace it. No Recharge the battery. 505 5.Error Search and Error Elimination DBW 2010 / 2012 / 2020 / 2022 / 300 / 350 5.4.3 The heating device starts to work only after a few trials NO Does dense smoke come out of the exhaust at the unsuccessful trials? YES The fuel level is fallen during the time the heating device has not worked. Check the suction and return line. Do you see any leakage? No Refer to 5.4.7 No Seal it. Does the arc jump from the high voltage cables? The induction bobbin is defective. Replace it. Does the arc jump from the insulation of the ignition electrodes? The ignition electrode is defective. Replace it. 5.4.4 The heating device stops by itself while working NO YES 506 Does the heating device start working after a new trial? Does the heating device react in any way? The fuel intake from the tank was interrupted for a rather long period. The heating device passes over to defect status after approximately 30 seconds (24 seconds with the control device 1563/64). Refer to 5.4.2 The fuel pump is defective. Replace it. The pressure regulation valve is clogged. Refer to 5.4.7 The high voltage cable is defective. DBW 2010 / 2012 / 2020 / 2022 / 300 / 350 5.Error Search and Error Elimination 5.4.5 The heating device produces soot (dense black smoke comes out) NO Is the combustion air suction pipe or the suction clamping sleeve dirty? Clean it. Check the assembly if necessary 8refer to Section 8). No Are the gas paths in the heat exchanger excessively dirty? Does low or excessive pressure occur at the entry of the combustion air (during the drive too)? Clean according to the instructions. Is the screw cap (at DBW 2010) defective? Does the burner protection cap / head leak? No YES Does the heating device produce soot only at the first start? Has the air setting changed? Is there a narrowing or a node in the fuel return line or is there a leak in the suction line or is it heated? (Are there any bubbles?) Does the valve socket of the magnetic valve leak? (The socket is damaged, the hook is squeezed. The flow amount of the vaporizer nozzle has been increased as a result of the increase of the fuel pressure. Is the correct fuel used according to the table in the manual? The revolution of the engine is too low (refer to section 6). No Pay attention to the warnings in the manual. Check the pressure of the fuel pump (refer to section 6). Is the pump pressure too high? Is the voltage at the engine under load lower than 10 V or 20 V? Recharge the batteries; corrosion on the electric cables or the cables are too small; the engine defective. Does the vaporizer nozzle spray correctly? No Does the valve socket of the magnetic valve leak? (The socket is damaged, the hook is squeezed. Can the combustion values that are permitted be set? (Refer to section 4) Check the valve socket. Replace the small parts of the magnetic valve if necessary. Does the heating device continue to produce soot after the setting? Does the valve socket of the magnetic valve leak? (the socket is damaged, the hook is squeezed) The distance between the fan wheel and body is too large (for DBW 2010/12) or the engine revolution is too low (refer to section 6) Replace the vaporizer nozzle Clean or replace the vaporizer nozzle. 507 5.Error Search and Error Elimination DBW 2010 / 2012 / 2020 / 2022 / 300 / 350 5.4.6 The heating device produces light colored dense smoke NO Does the heating device produce dense smoke for 20 seconds after shut off? Open the burner and take out the combustion chamber. Do you see soot that is collected in the combustion chamber? Were the previous trials to start unsuccessful? Yes Does the electrode setting conform to the gauge? (refer to section 6) Adjust the ignition electrodes according to the gauge (refer to section 6). Does the socket of the magnetic valve not close? YES Does the heating device produce dense smoke after shut off? Replace the vaporizer nozzle. First the fuel collected in the combustion chamber must evaporate. Does the heating device continue to produce dense smoke? Does the heating device produce dense smoke while working? (even if it is only from time to time) Is the flow amount of the vaporizer nozzle too small? Replace. Does the heating device still produce dense smoke? Replace the vaporizer nozzle. Check the socket of the magnetic valve. Replace the small parts if necessary. Clean the combustion chamber. 5.4.7 The heating device cannot be shut off NO Is there current when the switch and program timer are closed? The switch or the program times is defective. Replace it. Is there still exhaust gas after shut off? Does the heating device work longer than 180 seconds after the shut off (90 seconds with the control device 1563/64)? The control device is defective. Replace it. YES Does the regulation thermostat open up when the threshold value is reached? The regulation thermostat is defective. Replace it (except the control device 1563/64). Is there no 8+9 voltage in the magnetic valve? The control device is defective. Replace it. Does the magnetic valve close? 508 The magnetic valve is defective. Replace it. The check valve of the vaporizer nozzle leaks. Replace the vaporizer nozzle (only DBW 2010 with return nozzle) DBW 2010 / 2012 / 2020 / 2022 / 300 / 350 6. Function Test 6 The Function Test General 6.2 The Settings 6.2.1 Setting the CO2 proportion CO2 (in terms of volume %) The amount of the combustion air that will be set in the factory can be changed, which will be achieved by turning the setting ring. The CO2 value must be measured in the exhaust gas in the following cases and the combustion air amount must be adjusted if necessary: - After the burner has been repaired - In case of disorderly combustion - In the scope of the function test - After the nozzle has been replaced The adjustment - Measure the access voltage at the heating device - Operate the heating device approximately for 5 minutes - Measure the CO2 value and emission and compare them to the relevant graphics Voltage (Volt) CO2 adjustment at 500 m altitude DBW 2010 (nozzle: 0.4 gph and 0.3 gph) DBW 2012 The pressure of the fuel pump 7 bar (0.4 gph) The pressure of the fuel pump 10 bar (0.3 gph) CO2 (in terms of volume %) The tests and settings have been defined in this section that will be carried out in assembled status and in dismantled status from the vehicle in order to prove that the heating device is functional. DANGER The heating device should not be operated in closed places such as garage or workshop without the exhaust suction mechanism. Do not operate the heating device while the burner is working because of fire danger. CO2 (in terms of volume %) 6.1 Voltage (Volt) CO2 adjustment at 500 m altitude DBW 2020 ( .32) DBW 300 ( .15) The pressure of the fuel pump 10 bar Voltage (Volt) CO2 setting at 500 m altitude CO2 (in terms of volume %) Voltage (Volt) CO2 adjustment at 500 m altitude DBW 2010 (nozzle: 0.3 gph) DBW 2020 ( .33) DBW 2022 / DBW 300 / DBW 350 The pressure of the fuel pump is 10 bar. 601 6.Function Test DBW 2010 / 2012 / 2020 / 2022 / 300 / 350 WARNING 6.3 Testing the individual elements The suction clamping sleeve 0 can be rotated by 180 . 6.3.1 The resistance check of the heat sensor (only the heating devices equipped with the control device 1563/64) Squeezing bolt - Loosen the tightening bolt (refer to Figure) and push the adjustment ring with the squeezing bolt until the nominal value has been reached. Squeeze the bolt with 1.0 + 0.5 Nm and put security varnish on it. WARNING The CO2 setting depends on the viscosity and geodetic altitude (0.1 % for each 100 m). In the case that the CO2 value cannot be adjusted according to the rules, act as follows: - Check if there is any damage on the air side of the burner head and replace if there is a damage. - Check the pressure of the fuel pump and replace the pump if necessary. - Replace the nozzle - Measure the revolution of the burner engine - Check to see whether or not the assembly at the cable joints is correct. 602 Resistance (Ohm) The heat sensor should exhibit the values shown in the graphic below at the electrical test conducted with the digital multimeter. The resistance measurement should 0 be carried out preferably at 20 C and approximately at 0 100 C (the sensor will be immersed in water). 0 Water temperature C DBW 2010 / 2012 / 2020 / 2022 / 300 / 350 6.3.2 The resistance test of the flame regulator WARNING The glass element of the flame regulator and the observing glass of the disc (see the figure) should be cleaned when they get dirty. The flame regulator should be replaced when it is damaged or cannot reach the nominal value. 6.3.2.1 The flame regulator in the control device 1553 - Connect the ohmmeter to the flame regulator - Darken the surrounding of the flame regulator. Put a black insulation hose on it in order to darken it and pull the edges. - The resistance should go up to > 100 ohm in about 20 seconds. - Light a match at approximately 1 cm distance from the flame regulator. The resistance should be reduced to approximately 300 Ohm at that time. 6. Function Test 6.3.2.2 The flame regulator in the control device 1563/64 In assembled status - Connect the voltmeter to the connections points D6(+) and D7 (-) of the control device. - Start the heating device. - The voltage that will be measured should be 5 Volt. The voltage should be reduced to < 1 Volt after about 15 …. 26 seconds. In dismantled status Connect the flame regulator over a pre-resistance of 1 k-Ohm to 5 Volt. Connect the voltmeter parallel to the flame regulator. The voltage should be reduced to > 1 Volt when the lens is darkened or the lamp (5 W) is shown. Ignition electrodes Ignition contacts Flame regulator Observing glass Observing glass Flame regulator 603 6.Function Test DBW 2010 / 2012 / 2020 / 2022 / 300 / 350 6.3.3 Checking and setting the ignition electrodes WARNING ł There should be no damage on the insulation elements of the ignition electrodes. Adjust or replace the ignition electrodes, of which the electrode distance is outside the tolerance or which do not work in an orderly manner. ł The ignition electrodes can be adjusted using a gauge. For this, the front edge of the gauge must lean on the vaporizer nozzle and the ends of the ignition electrodes must be in two nicks. Test - Check out whether or not there is any damage on the insulation element of the ignition electrodes. ATTENTION Do not touch the nozzle hole during the measurement of the electrode distance in order to prevent affecting the fuel spraying. - Adjust the electrode distance with the gauge as shown in the figure and check the status of the electrodes. Setting Adjust the electrode distance by twisting and check with the gauge as shown in the figure. 604 6.3.4 Testing the induction bobbin DANGER The high voltage creates approximately an 8.000 Volt arc at the ignition electrodes. ATTENTION Do not give voltage to the induction bobbin without the ignition electrodes. Test WARNING Connect the positive side of the direct current to the black cable and the negative to the brown cable. Give 12 or 24 Volt direct current. The situation that should be: there should be sparks at the ignition electrodes. DBW 2010 / 2012 / 2020 / 2022 / 300 / 350 6.3.5 Testing the fuel pump WARNING The fuel pump will be tested in installed status. The adjustment of the pump pressure will be permitted. A test device is necessary for the test. It is possible to supply a test device for this from the Webasto support dealer (indicator dial between 0 and 15 bar). ATTENTION The induction bobbin must be dismantled. Test - Dismantle the induction bobbin (refer to 9.2.7.1) - Remove the vaporizer nozzle. - Connect the test device. - Cover the flame regulator. - Start the heating device. - The pump pressure will be exhibited in approximately 15 seconds (see the graphics). - Shut off the heating device. - Dismantle the test device. ATTENTION Do not harm the nozzle hole. - Install the vaporizer nozzle and tighten with 20 Nm. - Install the induction bobbin (refer to 9.2.7.2). 6. Function Test 6.3.7 Testing the magnetic valve WARNING In the case that the heating device produces smoke for a long period during the post-operation, this is an indication that there is a leak in the magnetic valve socket. In this case, the fuel will continue to drip from the vaporizer nozzle. Smoke for a short period is normal. This results from the emptying of the section between the magnetic valve and nozzle hole. Test ATTENTION Separate the socket of the magnetic valve from the control device. Otherwise, the control device could be damaged. - Checking the electric function in the 12 Volt devices according to the data below: • Opening voltage 8.5 Volt • Working voltage 9.6 … 14.4 Volt 0 • Power supply at nominal voltage and 20 C is 10 Watt • Nominal current 0.83 ampere - Testing the electric function in the 24 Volt devices according to the data below: • Opening voltage 17.0 Volt • Working voltage 19.2 …. 28.8 Volt 0 • Power supply at nominal voltage and 20 C is 10 Watt • Nominal current 0.42 ampere 6.3.8 Testing the front heating element of the nozzle block 6.3.6 Testing the burner engine WARNING The burner engine will be tested in installed status. The fan engine should be replaced if the situation cannot be reached that should be reached. Test - Examine the status of the burner engine bearings 8whether or not there is any difficulty of movement). - Measure the access voltage at the heating device. - Start the heating device. - Measure the revolution (the revolution should be in the interval indicated in the nominal voltage). DBW 2010/2012 …. 4050 – 4950 DBW 2020/2022 …. 5220 – 6380 DBW 300 …. 5220 – 6380 DBW 350 …. 5040 – 6160 WARNING The heater cartridge in the nozzle block will be activated 0 over the thermostat when the temperature is < 0 C. The period of heating depends on the reflected radiation temperature in the combustion chamber and it will be 0 shut off when the temperature at the thermostat is +8 C. Power supply is 130 ± 13 Watt at 12 Volt or 24 Volt. Test - Turn the burner head sideward or remove it. - Take out the socket in the nozzle block - Connect the Ohmmeter to the socket - Cool the thermostat with cooling spray or bridge the thermostat. - The resistance value (maximum 4.5 ȍ) 605 6.Function Test 606 DBW 2010 / 2012 / 2020 / 2022 / 300 / 350 DBW 2010 / 2012 / 2020 / 2022 / 300 / 350 7.The Circuit Diagrams 7 The Circuit Diagrams 7.1 General The circuit diagrams or the application examples (Figure 701 to 711) exhibit the circuits that are possible in the DBW 2010, 2012, 2020, 2022, 300 and 350 heating devices.. 701 7.The Circuit Diagrams Figure 701 702 DBW 2010 / 2012 / 2020 / 2022 / 300 / 350 Automatic circuit, DBW 2010, 12 AND 24 Volt equipped with the control device 1553 (Page 1 / 2) DBW 2010 / 2012 / 2020 / 2022 / 300 / 350 7.The Circuit Diagrams Cable colors bl Br ge gn gr or rt sw vi Cable cross-sections Pos. Definition Note 1 Heating device Without chassis 2 Control device SG 1553 4 Induction bobbin 5 Thermostat 7 Thermostat 8 Thermostat 10 Ignition electrodes Regulation thermostat (internal) Fan thermostat Temperature constraining thermostat 61.3 Anti-parasite set (2 x) F1 Thermal fuse F2 Fuse 8 A F3 Fuse 8 A F4 Fuse F5 Fuse H1 Lamp, green H2 K1 Lamp, for the circulation pump Relay K2 Relay K3 Relay K4 Relay Figure 701 Wireless parasite prevention Polarity makes no difference Car fuse complying with DIN 72581 Car fuse complying with DIN 72581 Car fuse complying with DIN 72581 Car fuse complying with DIN 72581 Function indicator < 7,5 m 7,5 - 15 m 0,75 mm2 1,5 mm2 1,0 mm2 1,5 mm2 1,5 mm2 2,5 mm2 2,5 mm2 4,0 mm2 4,0 mm2 6,0 mm2 A B C D Poz. Tanım Not K5 Röle K7 Relay M1 M2 Motor Motor M3 R Motor Flame regulator S1 S3 Switch Switch on the water valve Switch Manyetik ventil; alev denetçisi Fan of the vehicle heating (okunamadı) Engine of the heating device Fan of the vehicle Photo-resistance polarity makes no difference For heating ON-OFF Contact is on while water valve is open S4 S6 X1 X2 If controlled over S4 X3 Circulation pump, negative of the heating device Heating device engine Y1 Lamp, work of the regulation thermostat Induction bobbin Blue Brown Yellow Green Grey Orange Red Black Violet A B C D Switch Socket connection Socket connection Socket connection Magnetic valve A B C For ON-OFF, same circulation pump Fan of the vehicle With 2 pins With 1 pin With 2 pins Polarity makes no difference Installed in the heating device The part delivered without connection Only in case of need Available in the vehicle Inseparable match According to the scope of the delivery or the type Automatic circuit, DBW 2010 equipped with the control device 1553, 12 and 24 Volt (page 2 / 2) 703 D 7.The Circuit Diagrams Figure 702 704 DBW 2010 / 2012 / 2020 / 2022 / 300 / 350 Automatic circuit, DBW 2020/300 equipped with the control device 1553, 24 Volt (page 1 / 2) DBW 2010 / 2012 / 2020 / 2022 / 300 / 350 7.The Circuit Diagrams Cable cross-sections Pos. Definition Note 1 Heating device Without chassis 2 Control device SG 1553 4 5 Induction bobbin Thermostat 7 Thermostat 8 Thermostat 10 F1 Ignition electrodes Anti-parasite set (2 x) Thermal fuse F2 Fuse 8 A F3 Fuse 8 A F4 Fuse F5 Fuse H1 Lamp, green H2 If controlled over S4 K1 Lamp, for the circulation pump Relay K1 Relay K2 Relay Circulation pump, negative of the heating device Heating device engine K3 Relay 61.3 Figure 702 A B C D < 7,5 m 7,5 - 15 m 0,75 mm2 1,5 mm2 1,0 mm2 1,5 mm2 1,5 mm2 2,5 mm2 2,5 mm2 4,0 mm2 4,0 mm2 6,0 mm2 Pos. Definition Note 1 Without chassis 5 Heating device Control device Induction bobbin Thermostat 8 Thermostat Wireless parasite prevention 10 Polarity makes no difference 12 Ignition electrodes Thermostat Car fuse complying with DIN 72581 Car fuse complying with DIN 72581 Car fuse complying with DIN 72581 Car fuse complying with DIN 72581 Function indicator 61.3 2 Regulation thermostat (internal) Fan thermostat Temperature constraining thermostat Circulation pump, negative of the heating device 4 F1 F2 A B C D 1 bl Br ge gn gr or rt sw vi ws A Cable colors Blue Brown Yellow Green Grey Orange Red Black Violet White B C D SG 1553 Regulation thermostat (internal) Temperature constraining thermostat Regulation thermostat (external) Anti-parasite Wireless parasite set (2 x) prevention Thermal fuse Polarity makes no difference Fuse 8 A Car fuse complying with DIN 72581 Installed in the heating device Part delivered without the connection Only in case of need Available in the vehicle Inseparable match In accordance with the scope of the delivery or the type Be careful that the chassis connection is good! Lamp, work of the regulation thermostat Automatic circuit, DBW 2020/300 equipped with the control device 1553, 24 Volt (page 2 / 2) 705 7.The Circuit Diagrams Figure 703 706 DBW 2010 / 2012 / 2020 / 2022 / 300 / 350 Automatic circuit, DBW 300/350 equipped with the control device 1553, 24 Volt (page 1 / 2) DBW 2010 / 2012 / 2020 / 2022 / 300 / 350 7.The Circuit Diagrams Kablo kesitleri < 7,5 m 7,5 - 15 m 0,75 mm2 1,5 mm2 1,0 mm2 1,5 mm2 1,5 mm2 2,5 mm2 2,5 mm2 4,0 mm2 4,0 mm2 6,0 mm2 Poz. Tanım Not Poz. Tanım Not A1 Isıtma cihazı ùasesiz K7 Röle (Poz. A1’de) Brülör motoru için A2 Kumanda cihazı SG 1553 M1 Motor Isıtma cihazı B1 Alev denetçisi Foto-direnç, polarite fark etmiyor M2 Motor Devridaim pompası B2 Termostat Sıcaklık sınırlandırıcı S1 ùalter B3 Termostat Regüle termostatı S2 ùalter Isıtma cihazı AÇIK - KAPALI için Ayrı devridaim pompası için F1 Termik sigorta Polarite fark etmiyor F2 Sigorta 8 A DIN 72581 uy. oto sigortası F3 Sigorta 16 A DIN 72581 uy. oto sigortası F4 Sigorta 8 A DIN 72581 uy. oto sigortası G Akü H1 Lamba, yeúil A B C D U1 U2 çalıúma göstergesi K1 Röle (Poz. A2’de) Eksi ayrımı için K2 Röle (Poz. A2’de) Röle K7 için K3 Röle (Poz. A2’de) Regüle iúlemi için K4 Röle (Poz. A2’de) Endüksiyon bobini için K5 Röle (Poz. A2’de) Manyetik ventil için K6 Röle (Poz. A1’de) Devridaim pompası için Figure 703 Kablo renkleri bl Mavi br Kahverengi ge Sarı gn Yeúil gr Gri or Turuncu rt Kırmızı sw Siyah vi Mor ws Beyaz A B C D Endüksiyon bobini Ateúleme elektrotları W1 Kablo demeti X1 Soket ba÷lantı X2 Soket ba÷lantı 2 pinli, Poz. W1’de X3 Soket ba÷lantı 2 pinli, Poz. M2’de Y1 Manyetik ventil polarite fark etmiyor A B C D Isıtma cihazı içine monteli Ba÷lantı yapılmadan teslim edilen parça Yalnız ihtiyaç halinde Araçta mevcut Ayrılmaz eúleútirme Teslimat kapsamına veya tipe göre 2 pinli, Poz. W1’de Automatic circuit, DBW 300/350 equipped with the control device 1553, 24 Volt (page 2 / 2) 707 7.The Circuit Diagrams Figure 704 708 DBW 2010 / 2012 / 2020 / 2022 / 300 / 350 Automatic circuit, DBW 2010/2020/300/350 equipped with the control device 1563, 12 and 24 Volt (page 1 / 2) DBW 2010 / 2012 / 2020 / 2022 / 300 / 350 7.The Circuit Diagrams Cable colors Cable Cross-section < 7,5 m 7,5 - 15 m 0,75 mm2 1,5 mm2 1,0 mm2 1,5 mm2 1,5 mm2 2,5 mm2 2,5 mm2 4,0 mm2 4,0 mm2 6,0 mm2 Bl Br Ge Gn Gr Or Rt Sw Vi ws Blue Brown Yellow Green Grey Orange Red Black Violet White Pos. Definition Note Pos. Definition A1 A2 B1 Heating device Control device Flame regulator B2 Heat sensor B3 Fan thermostat M2 M3 P S1 S2 S3 S4 S5 F1 Fuse A8 (for all types) F2 F3 Fuse 8 A for all 24 V types + DBW 2010 (12 V) Fuse F4 Fuse F5 Thermal fuse Without chassis SG 1553 Pay attention to the pole connection Polarity connection makes no difference At water circuit for the vehicle fan (ON – OFF) Car fuse complying with DIN 72581 Car fuse complying with DIN 72581 Car fuse complying with DIN 72581 Car fuse complying with DIN 72581 Pole connection makes no difference G H1 Battery Illuminated diode, green H2 Illuminated diode, yellow X3 Y 1 H3 Lamps H4 Illuminated diode, green K1 K2 K3 K4 K5 Relay (at pos. A2) Relay (at pos. A2) Relay (at pos. A2) Relay (at pos. A2) Relay Function indicator (at Pos. P) Indicator for ready status (at Pos. P) Symbol illumination (at Pos. P) Function indicator (when S1 is used) For the circulation pump For the burner fan For the induction bobbin For the magnetic valve It is only necessary at negative when there is battery switch Motor Burner fan Motor Vehicle fan Program timer (digital) For programmed work Switch (ON-OFF) For ON-OFF of the heating device Switch Battery switch Switch At the water faucet Switch Economy mode Switch (for the vehicle Alternative to Pos. S6 fan) Switch (for the vehicle Alternative to Pos. S5 fan) Switch Separate circulation pump, ON-OFF Induction bobbin With the ignition electrodes Diode Control device at Pos. A2 Cable bunch Control device – heating device Socket connection with To Pos. P 8 pins Socket connection with 2 pins Socket connection With 2 pins, at Pos. M2 Magnetic valve Polarity makes no difference Program timer P Positive connection at 9 = continuous work at immediate heating Positive connection not at 9 = heating period 1 hour Clamp 75, if available, in the vehicle direction, and clamp 75 if not available Vehicle illumination (clamp 58) Relay K5 and K6 with the hatched lines only if the battery switch is used Alternative Vehicle clamp 15 K6 K7 Relay Relay, for the vehicle fan Figure 704 S6 S7 U V1 W X1 X2 2 3 4 5 6 Note It is only necessary with B3 Automatic circuit, DBW 2010/2020/300/350 equipped with the control device 1563, 12 and 24 Volt (page 2 / 2) 709 7.The Circuit Diagrams DBW 2010 / 2012 / 2020 / 2022 / 300 / 350 WARNING The ADR operation application Refer to Figure 707 to 711 Figure 705 Automatic circuit, DBW 2012 and 2022 (ADR) equipped with the control device 1564, 12 and 14 V (page 1 / 2) 710 DBW 2010 / 2012 / 2020 / 2022 / 300 / 350 7.The Circuit Diagrams Cable colors Cable Cross-section < 7,5 m 7,5 - 15 m 0,75 mm2 1,5 mm2 1,0 mm2 1,5 mm2 1,5 mm2 2,5 mm2 2,5 mm2 4,0 mm2 4,0 mm2 6,0 mm2 Bl Br Ge Gn Gr Or Rt Sw Vi ws Pos. Definition Note Poz. Tanım Not A1 A2 B1 Heating device Control device Flame regulator S1 S2 S3 S4 Heat sensor B3 B4 F1 Thermostat Thermostat Thermal fuse S6 Switch (ON-OFF) Switch Switch Switch (for the vehicle fan) Switch (for the vehicle fan) Switch Alternative to Pos. P Separate ON /UPFA At the water faucet Alternative to Pos. S5 B2 F2 Fuse 8 A F3 U1 V1 V2 V3 W1 Induction bobbin Diode Diode Diode Cable bunch W2 Cable bunch F5 Fuse 8 A (DBW 2022 – 16 A at 12 V) Fuse 12 V = 16 A / 24 V =8A Fuse, vehicle fan F6 Fuse, vehicle fan Without chassis SG 1564 Pay attention to the pole connection Polarity connection makes no difference Pre-heating of the nozzle block Fan thermostat Polarity connection makes no difference Car fuse complying with DIN 72581 Car fuse complying with DIN 72581 Pole connection makes no difference Car fuse complying with DIN 72581 Car fuse complying with DIN 72581 S1 S2 X1 G H1 H2 Battery Illuminated diode, green Illuminated diode, yellow X2 H3 H4 Lamps Illuminated diode, green K1 K2 K3 K4 K5 Relay (at pos. A2) Relay (at pos. A2) Relay (at pos. A2) Relay (at pos. A2) Relay K6 Relay Function indicator (at Pos. P) Indicator for ready status (at Pos. P) Symbol illumination (at Pos. P) Function indicator (when S1 is used) For the circulation pump For the burner fan For the induction bobbin For the magnetic valve For the pre-heating of the nozzle block It is only necessary at negative when there is battery switch KY K7 K10 Relay Relay, for the vehicle fan Relay with free work diode Relay Motor Motor Motor Program timer (digital) Switch (ON-OFF) Switch Socket connection with 2 pins Socket connection with 2 pins Socket connection with 2 pins Socket connection with 2 pins Socket connection with 8 pins Socket connection with 1 pin Socket connection with 2 pins Socket connection with 2 pins Magnetic valve F4 K11 M1 M2 M3 P Figure 705 S5 X3 X4 X5 X6 X7 X8 Y It is only necessary with B3 For the pre-heating of the nozzle block For the vehicle fan Circulation pump Burner fan Vehicle fan For programmed work / not for ARD 1 2 3 4 5 6 Blue Brown Yellow Green Grey Orange Red Black Violet White Alternative to Pos. S4 Battery switch at positive or negative At Pos. A1 Control device at Pos. A2 Control device – heating device Pre-heating of the nozzle block Alternative to Pos. P Separate ON /UPFA Marking: black Marking: blue At Pos. W2 At Pos. P At Pos. P At Pos. A1 At Pos. A1 Polarity makes no difference Program timer P Positive connection at 9 = continuous work at immediate heating Positive connection not at 9 = heating period 1 hour Clamp 75, if available, in the vehicle direction, and clamp 15 if not available Vehicle illumination (clamp 58) Relay K6 and K7 with the hatched lines only if the battery switch s6is used K10 only with the free work diode Only at the pre-heating of the nozzle block Automatic circuit, DBW 2012 and 2022 (ARD) equipped with the control device 1564, 12 and 24 Volt (page 2 / 2) 711 7.The Circuit Diagrams DBW 2010 / 2012 / 2020 / 2022 / 300 / 350 Cable Cross-section WARNING The circuit diagram of the application example is related to Figure 701 or 702 Pos. Definition Note H1 Illuminated diode, green Illuminated diode yellow Work indicator (at Pos. p) Indicator for ready status (at Pos. p) Symbol illumination (at Pos. P) It is only necessary at negative when there is battery switch H2 H3 Lamps K9 Relay K10 Relay P Program timer (digital) S2 Switch S3 Switch on the water valve S4 Switch (ON – OFF) Figure 706 712 A B C D 7,5 - 15 m 0,75 mm2 1,5 mm2 1,0 mm2 1,5 mm2 1,5 mm2 2,5 mm2 2,5 mm2 4,0 mm2 4,0 mm2 6,0 mm2 Definition X4 Socket With 8 pins (for connection Pos. P) Installed in the heating device Part that is delivered without connection Only in case of need Available in the vehicle Inseparable match A B C D Note Blue Brown Yellow Green Grey Orange Red Black Violet White Poz. A B C D According to the scope of the delivery or the type 1 2 3 For programmed work Battery switch < 7,5 m Cable colors Bl Br Ge Gn Gr Or Rt Sw Vi ws Positive connection at 9 = continuous work at immediate heating Positive connection not at 9 = heating period 1 hour Clamp 75, if available, in the vehicle direction, and clamp 15 if not available Vehicle illumination (clamp 58) Contact is open when the water valve is closed Separate circulation pump ON OFF Application sample, DBW 2010/2020/300, Volt, works with program timer and battery switch DBW 2010 / 2012 / 2020 / 2022 / 300 / 350 Cable colors Pos. Definition Note F2 Fuse 8 A F3 Fuse 8 A DBW 2022 ---, 16 A at 12 V) Fuse 12 V = 16 A / 24 V = 8A Battery Illuminated diode, green Relay Switch Switch Vehicle fuse in compliance with DIN 72581 Vehicle fuse in compliance with DIN 72581 Vehicle fuse in compliance with DIN 72581 F4 G H1 K9 S1 S6 S7 S8 V4 Switch, at guide mechanism Separation switch, with 1 or 2 pins Work indicator (at Pos. S1) ON - OFF Battery switch at positive or negative At positive or negative Emergency shut off switch (mechanical, pneumatic or electrical) Diode Figure 707 7.The Circuit Diagrams Cable Cross-section < 7,5 m 7,5 - 15 m 0,75 mm2 1,5 mm2 1,0 mm2 1,5 mm2 1,5 mm2 2,5 mm2 2,5 mm2 4,0 mm2 4,0 mm2 6,0 mm2 Bl Br Ge Gn Gr Or Rt Sw Vi ws Blue Brown Yellow Green Grey Orange Red Black Violet White WARNING The circuit diagram of the application example is related to Figure 705 automatic switch and the operation that has the switch for the guide mechanism at POSITIVE. Application example, DBW 2010/2022 (ADR) 713 7.The Circuit Diagrams DBW 2010 / 2012 / 2020 / 2022 / 300 / 350 Cable Cross-section < 7,5 m 7,5 - 15 m 1,5 mm2 Pos. Definition Note 0,75 mm2 F2 F3 F4 G H1 K8 K9 S1 S6 S7 S8 Fuse 8 A Fuse 8 A DBW 2022 ---, 16 A at 12 V) Fuse 12 V = 16 A / 24 V = 8 A Battery Illuminated diode, green Relay Relay Switch Switch Switch, at guide mechanism Separation switch, with 1 or 2 pins Vehicle fuse in compliance with DIN 72581 Vehicle fuse in compliance with DIN 72581 Vehicle fuse in compliance with DIN 72581 1,0 mm2 1,5 mm2 1,5 mm2 2,5 mm2 2,5 mm2 4,0 mm2 4,0 mm2 6,0 mm2 Work indicator (at Pos. S1) ON - OFF Battery switch at positive or negative At positive or negative Emergency shut off switch (mechanical, pneumatic or electrical) Figure 708 714 Bl Br Ge Gn Gr Or Rt Sw Vi ws Cable colors Blue Brown Yellow Green Grey Orange Red Black Violet White WARNING The circuit diagram of the application example is related to Figure 705 automatic switch and the operation that has the switch for the guide mechanism at POSITIVE. Application example, DBW 2010/2022 (ADR) DBW 2010 / 2012 / 2020 / 2022 / 300 / 350 7.The Circuit Diagrams Cable Cross-section Pos. Definition Note F2 Fuse 8 A Vehicle fuse in compliance with DIN 72581 Vehicle fuse in compliance with DIN 72581 Vehicle fuse in compliance with DIN 72581 < 7,5 m 7,5 - 15 m 0,75 mm2 1,5 mm2 1,0 mm2 1,5 mm2 1,5 mm2 2,5 mm2 2,5 mm2 4,0 mm2 Work indicator (at Pos. S1) 4,0 mm2 6,0 mm2 F3 F4 G H1 K9 S1 S3 S6 S7 S8 V4 Fuse 8 A DBW 2022 ---, 16 A at 12 V) Fuse 12 V = 16 A / 24 V = 8 A Battery Illuminated diode, green Relay Switch Dragging switch Switch Switch, at guide mechanism Separation switch, with 1 or 2 pins Diode ON - OFF At the water faucet Battery switch at positive or negative At positive or negative Emergency shut off switch (mechanical, pneumatic or electrical) Figure 709 Bl Br Ge Gn Gr Or Rt Sw Vi ws Cable Color Blue Brown Yellow Green Grey Orange Red Black Violet White WARNING The circuit diagram of the application example is related to Figure 705 automatic switch and the operation that has the switch for the guide mechanism at POSITIVE. Application example, DBW 2010/2022 (ADR) 715 7.The Circuit Diagrams DBW 2010 / 2012 / 2020 / 2022 / 300 / 350 Cable Cross-section Pos. Definition Note F2 Fuse 8 A Vehicle fuse in compliance with DIN 72581 Vehicle fuse in compliance with DIN 72581 Vehicle fuse in compliance with DIN 72581 < 7,5 m 7,5 - 15 m 0,75 mm2 1,5 mm2 1,0 mm2 1,5 mm2 1,5 mm2 2,5 mm2 2,5 mm2 4,0 mm2 Work indicator (at Pos. S1) 4,0 mm2 6,0 mm2 F3 F4 Fuse 8 A DBW 2022 ---, 16 A at 12 V) Fuse 12 V = 16 A / 24 V = 8 A G H1 K8 K9 S1 S6 S7 S8 Battery Illuminated diode, green Relay Relay Switch Switch Switch, at guide mechanism Separation switch, with 1 or 2 pins Pos. Definition ON - OFF Battery switch at positive or negative At negative Emergency shut off switch (mechanical, pneumatic or electrical) Note Figure 710 716 Cable Colors Bl Blue Br Brown Ge Yellow Gn Green Gr Grey Or Orange Rt Red Sw Black Vi Violet ws White WARNING The circuit diagram of the application example is related to Figure 705 automatic switch and the operation that has the switch for the guide mechanism at POSITIVE. Application example, DBW 2010/2022 (ADR) DBW 2010 / 2012 / 2020 / 2022 / 300 / 350 Pos. B4 B5 F2 Definition Thermostat Heat sensor Fuse 8 A F3 F5 Fuse 8 A DBW 2022 ---, 16 A at 12 V) Fuse 12 V = 16 A / 24 V = 8 A Fuse, vehicle fan G K8 K9 K11 M3 S3 S5 S6 Battery Relay Relay Relay Motor Dragging switch Awitch, for the vehicle fan Switch S7 S8 Switch, at guide mechanism Separation switch, with 1 or 2 pins X4 Socket connection, with 8 pins F4 Note Fan thermostat External Vehicle fuse in compliance with DIN 72581 Vehicle fuse in compliance with DIN 72581 Vehicle fuse in compliance with DIN 72581 Vehicle fuse in compliance with DIN 72581 For the vehicle fan Vehicle fan At the water faucet Alternative to Pos. S4 Battery switch at positive or negative At negative Emergency shut off switch (mechanical, pneumatic or electrical) At B6 Figure 711 7.The Circuit Diagrams Cable Cross-section < 7,5 m 7,5 - 15 m 0,75 mm2 1,5 mm2 1,0 mm2 1,5 mm2 1,5 mm2 2,5 mm2 2,5 mm2 4,0 mm2 4,0 mm2 6,0 mm2 Cable Colors Bl Blue Br Brown Ge Yellow Gn Green Gr Grey Or Orange Rt Red Sw Black Vi Violet ws White WARNING The circuit diagram of the application example is related to Figure 705 automatic switch and the operation that has the switch for the guide mechanism at POSITIVE. 1 Ventilation 2 Off 3 Heating 4 Cold 5 Hot 6 The wire bridge at the top part of the body will be cut off when the external heat sensor will be used. This way, the heat sensor will not work Application example, DBW 2012/2022 (ADR) 717 7.The Circuit Diagrams 718 718 DBW 2010 / 2012 / 2020 / 2022 / 300 / 350 DBW 2010 / 2012 / 2020 / 2022 / 300 / 350 8 Service Tasks 8 The Service Tasks 8.5 8.1 The following maintenance tasks should be carried out due to the work security of the heating device: General The service tasks will be defined in this section that can be carried out on the heating devices that are installed on the vehicle • 8.2 The tasks that will be carried out on the heating device • Taking into consideration the danger of excessive heating of the heating device and no response by the protection against excessive heating in connection with this, the main battery current should not be interrupted as long as the heating device or the post-operation is in working status. It would be useful to dismantle the device before carrying out more comprehensive repair tasks on the heating device. The cooling liquid consisting of water and antifreeze should be filled following the work on the heating circuit in accordance with the information provided by the vehicle manufacturer and the air of the heating circuit should be evacuated. • • 8.3 The tasks that are carried out on the • vehicle ATTENTION 0 The temperature limit of 85 C should never be exceeded near the vehicle (for instance, when painting tasks are carried out on the vehicle). . • The Maintenance Tasks The combustion air should be checked with respect to the openings of the suction line and as to whether or not there is pollution at the exhaust exit and it should be cleaned. The heating device should be operated in the period of non-utilization approximately once every 4 weeks for 10 minutes when the vehicle engine is cold and the heating system is in “warm” status. This will prevent the difficulties of starting. Attention must be paid at the time when the cooling liquid of the vehicle will be replaced that the air of the heating device and the circulation pump will be carefully evacuated after the air of the cooling system of the vehicle has been evacuated. The missing amount of the cooling liquid must be added in accordance with the data provided by the vehicle manufacturer. The fuel filter or the filter element must be replaced at least once a year and more often if the fuel is too dirty in order to prevent the defects. The fuel pump and the fuel pipes must be replaced immediately in case of a leak and once every 5 years otherwise. The heating device must be checked regularly but at the latest at the start of each period of operation in a Webasto service station. 8.4 The test operation of the heating device The heating device should not be operated in closed locations such as garage and workshop without the suction system, not even as time programmed. 801 8. Service Tasks DBW 2010 / 2012 / 2020 / 2022 / 300 / 350 8.5.1 Opening and closing of the burner head to the side DANGER The induction bobbin works with high voltage. The cable bunch sockets must be removed from the vehicle before opening the burner head in order to avert a possible death danger. Install the socket on the vehicle after you have closed the burner head. WARNING The maintenance of the heating device is easy. You can have access to the following elements if you open the burner head to the side. - The fuel pump and vaporizer nozzle - The magnetic valve - The induction bobbin - The ignition electrodes - The flame regulator - The combustion chamber - The pre-heating of the nozzle block (if any) - Pay attention that the cable jackets of DBW 2010/2012 are placed correctly. 1 Bolt (2) 2 Cotter 3 Nut (2) 4 Burner head It may be necessary to remove the electric cables in order to have an appropriate opening angle. Opening 1. Remove the electric cables if necessary. 2. Loosen the nuts (3, Figure 801) until the bolts (1) can be opened sideward. 3. Move the bolts (1) to the sides. 4. Open the burner head (4) to the side. Closing 1. Close the burner head (4, Figure 801) and bring to the installed status. 2. Turn the bolts (1) toward inside and tighten the nuts (3) with the hand to prevent coercion. 3. Tighten the nuts with (3) 5.0 Nm + 1 Nm at DBW 2010 / 2012, and 8.0 Nm ± 10 % at DBW 2020 / 2022 / 300 / 350 4. Re-install the electric cables if necessary. WARNING Pay attention that the electric cables will be connected with the correct colors. WARNING The cotter may be at the opposite side depending on the opening direction of the burner head. Figure 801 802 Opening and closing of the burner head to the side DBW 2010 / 2012 / 2020 / 2022 / 300 / 350 8.6 The Visual Examination Assembly Instructions or the 8 Service Tasks 8.6.2 The connection to the fuel system of the vehicle 8.6.1 The connection to the cooling system of The fuel will be supplied from the fuel tank of the vehicle or from a separate fuel tank. the vehicle The heating system must be installed at a place that is as deep as possible in order to ensure that the evacuation of air from the heating device and circulation pump will occur by itself. This feature is valid for the circulation pump that does not suck by itself. The heating device must be connected to the cooling system of the vehicle according to the Figure 802. The amount of the cooling liquid available in the circuit must be at least 10 liters. Excessive pressure valves, of which the sole opening pressure is at least 0.4 bar and maximum 2.0 bar, can be used in the cooling system of the vehicle or in a separate heating circuit. As a matter of principle, the cooling liquid hoses delivered by Webasto must be used. If this is not the case, the hoses must comply at least with DIN 73411 standard. The hoses must be laid without any break – so that the evacuation of air can be carried out without problems – and as far as possible in climbing manner. The hose connections must be accomplished securely with hose clamps. WARNING Attention must be paid to the tightening torque of the hose clamps that will be used. The air of the heating device must be carefully evacuated prior to the commissioning or after the cooling liquid has been replaced. The heating device and the pipes must be installed in such way to ensure the accomplishment of static air evacuation. Insufficient air evacuation could lead to defects during the course of work as a result of excessive heating. The fact that the circulation pump works almost entirely silent means that there are no problems with regard to the evacuation of air. In the case that there is no cooling water while the circulation pump is working or when the pump wheel is blocked, the circulation pump will be automatically shut off 15 seconds after the start and can only be re-operated after 2 minutes. 8.6.2.1 The fuel lines The fuel pipes must be laid as far as possible in a climbing inclination in order to prevent the seizure of air. The connections in a line must be secured by hose clamps if mechanical screwed connection is not used. As a matter of principle, the hoses delivered or offered by Webasto must be used if fuel hoses are used. If this is not the case, the fuel hoses must comply at least with DIN 73379 standard. The fuel hoses should not break or be twisted and must be fixed at a distance of 25 cm with clamps. Subject to the condition of compliance with the proper connection technique regarding the fuel line, steel, cupper and soft plastic pipes conforming to DIN 73378 resistant to light and heat and manufactured from PA11 or PA12 (for instance, Mecanyl RWTL) can be used. Attention must be paid to the following issues while laying the fuel lines: • The lines must be protected against the effect of heat DANGER In case of excessive heating of the heating device, the outer coating of the heating device can reach the inflammation temperature of diesel fuel! • The lines must be protected from the impacts caused by stone. • The dripping or evaporating fuel should not gather and should not be exposed to inflammation resulting from the contact with hot parts or electrical mechanisms. 803 8. Service Tasks DBW 2010 / 2012 / 2020 / 2022 / 300 / 350 The heating circuit with water – heater with radiators at the wall and roof channel heater Flow Return 1 2 3 4 5 6 7 8 804 Wall type radiator with fan The heat exchanger at the entrance The heating device The circulation pump The heat exchanger on the roof The vehicle engine The heater at the driver cabin The control unit Figure 802 The installation example for the heating device of the bus DBW 2010 / 2012 / 2020 / 2022 / 300 / 350 A conspicuous warning sign must be placed when a closing mechanism has been installed in the return line. ATTENTION The operation of the return line of the device in closed status will damage the fuel pump. The fuel could leak out. That means fire danger. The warning sign The suspended fuel lines must be fixed to prevent hanging. The installation of an additional fuel pump is prohibited. • The dimensions that are permitted for the fuel lines:• The internal diameter for the suction and return: 6 mm (other diameters can be used upon request) • The maximum line length that is permitted for suction and return: 10 m • The maximum suction height that is permitted: 2 m (the installation of bottom valve at maximum height will be recommended) • The maximum pre-pressure that is permitted: 0.3 bar for the suction and return line 8.6.2.2 The fuel filter A fuel filter delivered or permitted by Webasto must be installed. The installation must be vertical as far as possible and in that case the flow direction will be horizontal. The filter or the filter elements must be replaced at least once a year and more frequently if the fuel is very dirty in order to prevent defects. 8.6.3 The supply of combustion air ATTENTION The compliance with the legal provisions is a must for the installation (refer to 1.6). 8 Service Tasks The combustion air should never be taken from locations, where people are present. The suction opening of the combustion air should not be in the driving direction. It must be placed in such way to prevent clogging as a result of pollution and snow and to avoid the suction of bouncing water. The location of the entry of the combustion air and the exit of the exhaust gas must be selected in such way that no air pressure difference will be created in any function status of the vehicle. The dimensions that are permitted for the suction line of the combustion air: • Internal diameter: 55 mm • The maximum line length that is permitted: 5 m 0 • The maximum bending that is permitted: 270 The combustion air entrance must be placed to prevent the suction of the exhaust gas. WARNING In the case that the suction line for the combustion air cannot be laid vertically, a water discharge hole with a diameter of 4 mm must be drilled at the deepest place. In the case that the heating device will be installed near the fuel tank of the vehicle, in a common assembly section, the combustion air must be sucked freely from outside and the exhaust gas must be discharged outside. The passage places must be manufactured to prevent the passage of bouncing water. In the case that the heating device is located in a closed installation module, a combustion air opening will be necessary. 2 DBW 2010/2012 20 cm 2 DBW 2010 / 2012 / 300 30 cm 2 DBW 350 35 cm In the case that temperature in the installation module exceeds the environmental temperature of the heating device that is permitted (refer to the technical data), the ventilation opening must be enlarged after counseling with Webasto. 8.6.4 The exhaust line ATTENTION The legal provisions must be observed for the installation (refer to 1.6) The exit opening of the exhaust gas should not be in the driving direction. The opening at the exhaust exit should be located to prevent being closed by snow and mud. The location of the entry of the combustion air and the exit of the exhaust gas must be selected in such way that no air pressure difference will be created in any function status of the vehicle. 805 8. Service Tasks DBW 2010 / 2012 / 2020 / 2022 / 300 / 350 Rigid pipes manufactured from steel or steel alloy or flexible pipes from steel with a flesh thickness of at least 1.0 mm must be used as the exhaust line. The exhaust pipe will be fixed on the heating device using for instance connection clamps. The dimensions permitted for the exhaust line are: - Internal diameter: DBW 2010 / 2012 = 38 mm DBW 2020 .32 / DBW 300 .15 = 80 mm DBW 2020 .33 / DBW 2022 / DBW 300 .16 / DBW 350 = 70 mm - The maximum length of the line that is permitted: 5 m 0 - The maximum bending that is permitted: 270 As an alternative, the exhaust diversion approved by Webasto will be installed. 8.7 8.7.1.2 Mounting 1. Bring the heating device to mounting position and fix it using the proper bolts, washers and nuts. 2. Fixate the exhaust exit line with a clamp. 3. Install the cooling liquid hoses and fixate with clamps. Open the water valves. 4. Install the fuel pressure and return lines and secure them. 5. Install, if necessary, the combustion air access line of the heating device. 6. Install the socket of the cable bunch on the control device. 7. Evacuate the air from the fuel supply system. 8. Evacuate the air from the cooling liquid circuit. 8.7.2 Dismantling and mounting The replacement constrainer of the temperature DøKKAT ATTENTION Subject to the condition that there is sufficient place for dismantling, only the following dismantling or dismounting tasks will be permitted in mounted status - The replacement of the temperature constrainer - The replacement of the heat sensor - The replacement of the fan thermostat or regulation thermostat - The replacement of the thermal fuse - The replacement of the thermal fuse element - The replacement of the burner head - The replacement of the induction bobbin - The replacement of the flame regulator - The replacement of the combustion chamber WARNING The acts for the replacement of the temperature constrainer are the same whether the heating device is in mounted or dismantled status. DANGER The excessive pressure in the cooling system must be reduced by opening the cooling connection in the course of the replacement of the temperature constrainer when the heating device equipped with the control device 1563/64 is mounted. If necessary, wait as an additional measure for the heating device to cool down and keep a pot ready for the cooling liquid that will be freed. 8.7.1 WARNING The acts of replacement regarding the heat sensor are the same whether it is mounted or dismounted. The act of replacement will be carried out according to 9.2.2. DANGER The excessive pressure in the cooling system must be reduced by opening the cooling connection in the course of the replacement of the heat sensor when the heating device equipped with the control device 1563/64 is mounted. If necessary, wait as an additional measure for the heating device to cool down and keep a pot ready for the cooling liquid that will be freed. Heating device, installation disassembling and 8.7.1.1 Dismantling 1. Separate the socket of the cable bunch from the control device 2. Remove the access line of the combustion air in the heating device if necessary 3. Remove the clamp at the exhaust exit 4. Remove the fuel pressure and return lines and clog with a blind cap after pulling the fuel lines Shut off the valves, if any 5. Remove the clamps on the cooling liquid hoses and close with blind caps by pulling the hoses. 6. Remove the fixation elements at the base (bolt, nut, washer). 7. Dismantle the heating device. 806 8.7.3 The replacement of the heat sensor DBW 2010 / 2012 / 2020 / 2022 / 300 / 350 8.7.4 The replacement of the thermal fuse 8.7.9 8 Service Tasks The replacement of the induction bobbin WARNING The acts of replacement regarding the thermal sensor are the same whether it is mounted or dismounted. The act of replacement will be carried out according to 9.2.3. DANGER The excessive pressure in the cooling system must be reduced by opening the cooling connection in the course of the replacement of the thermal fuser when the heating device equipped with the control device 1563/64 is mounted. If necessary, wait as an additional measure for the heating device to cool down and keep a pot ready. WARNING The acts of replacement regarding the induction bobbin are the same whether it is mounted or dismounted. The act of replacement will be carried out according to 09.02.2012. DANGER The induction bobbin works with high voltage. The cable bunch sockets must be separated from the control device before the burner head will be replaced because otherwise there is danger of death. 8.7.5 The replacement of the regulation thermostat WARNING The acts of replacement regarding the flame regulator are the same whether it is mounted or dismounted. The act of replacement will be carried out according to 09.02.2013. DANGER The induction bobbin works with high voltage. The cable bunch sockets must be separated from the control device before the burner head will be replaced because otherwise there is danger of death. WARNING The acts of replacement regarding the regulation thermostat are the same whether it is mounted or dismounted. The act of replacement will be carried out according to 9.2.4. 8.7.6 The replacement of the fan thermostat WARNING The acts of replacement regarding the fan thermostat are the same whether it is mounted or dismounted. The act of replacement will be carried out according to 9.2.5. 8.7.7 The replacement of the thermal fuse element WARNING The acts of replacement regarding the thermal fuse element are the same whether it is mounted or dismounted. The act of replacement will be carried out according to 9.2.6. 8.7.8 8.7.10 The replacement of the flame regulator 8.7.11 The replacement of the combustion chamber WARNING The acts of replacement regarding the combustion chamber are the same whether it is mounted or dismounted. The act of replacement will be carried out according to 09.02.2017. DANGER The induction bobbin works with high voltage. The cable bunch sockets must be separated from the control device before the burner head will be replaced because otherwise there is danger of death. The replacement of the burner head WARNING The acts of replacement regarding the burner head are the same whether it is mounted or dismounted. The act of replacement will be carried out according to 9.2.8. DANGER The induction bobbin works with high voltage. The cable bunch sockets must be separated from the control device before the burner head will be replaced because otherwise there is danger of death. 807 8. Service Tasks 8.8 DBW 2010 / 2012 / 2020 / 2022 / 300 / 350 Commissioning The air in the cooling liquid circuit and the fuel supply system must be carefully evacuated after the heating device has been mounted. The instructions of the vehicle manufacturer must be observed during the course of this act. The imperviousness and tightness of all cooling liquid and fuel connections must be checked during the test operation. The error search acts must be carried out if the heating device indicates defect during the operation (refer to Section 5). 8.8.1 Evacuating the air from the water circuit WARNING As a matter of principle, the acts of the evacuation of air will be carried out in accordance with the instructions of the manufacturer. The circulation pump should not be used for the evacuation of air. Bring the heating system of the vehicle to the “warm” position and fill the system with water and cooling liquid (in order to protect against corrosion), which must consist of at least 10 % anti-freeze (glycol based). The protection against corrosion will not be accomplished when only water will be used and a partial loss of cooling water will ensue in case of excessive warming resulting from the fact that the boiling point of water is low and consequently it will be necessary to constantly add water. The admixtures in the cooling liquid should not harm metal, plastic or rubber parts and should not lead to the formation of sediments. After that, operate the vehicle engine at high revolution of idle status until the radiator thermostat will be opened. Stop the vehicle engine and check the level of the cooling liquid and add cooling liquid if necessary. Operate the heating device and the heater fan while the vehicle engine is not working. The heating device should be set in motion after a certain cooling period and stop the operation. In the case that the heating device will be re-activated after this, the heat constrainer in the heating devices will be triggered because the air in the heating device has not been fully evacuated. Set the heat constrainer to zero (push the button of the heat constrainer) and repeat the act of air evacuation. WARNING The heating device may be equipped with a heat constrainer that will be set automatically to zero. In that case, there will be no need to manually set to zero 808 8.8.2 The evacuation of air from the fuel supply system The fuel pump will take fuel when the heating device will be operated and fills the entire fuel supply system. In the case that the combustion does not start in this first operation, the heating device must be shut off and started once again. DBW 2010 / 2012 / 2020 / 2022 / 300 / 350 9.The Repair 9 The Repair 9.1 General The acts of repair will be defined in this section that will be carried out on the heating devices dismounted from the vehicle. Any dismounting act that is more detailed than the way as explained here will invalidate all rights of guarantee. Only the spare parts from the proper spare part kit can be used for the mounting of the device. DANGER The induction operates with high voltage. It is possible to replace the parts indicated below also as the heating device is in mounted status if there is sufficient place. - The heat constrainer - The heat sensor - The fan thermostat or regulation thermostat - The thermal fuse - The thermal fuse element - The burner head - The induction bobbin - The flame regulator - The combustion chamber The sockets of the cable bunch must be separated from the control device prior to the act of replacement because otherwise there will be danger of death. The excessive pressure in the cooling system must be reduced by opening the cooling connection before the heat sensor, heat constrainer or thermal fuse in the heating devices equipped with the control device 1563/64 will be replaced. If necessary, wait furthermore for the heating device to cool down. 901 9.The repair 9.1.1 The measures pertaining to the elements that are dismantled to parts ATTENTION All gaskets between the elements that are dismantled to parts must as a matter of principle be removed and replaced with new ones. 9.1.1.1 General Visual Examination ł All parts must be checked to see whether or not there is any damage (crack, deformation, wearing, etc.) and the parts must be replaced in case of any damage. ł The sockets and cables must be checked to see whether or not there is any corrosion, contact failure, etc. and repaired if necessary. ł It must be checked to see if there is corrosion on the socket contacts and whether or not the sockets have been installed correctly and must be repaired if necessary. 9.1.1.2 The visual examination of the combustion chamber Check if the screw cap sits tight Check to see if there is any scaling in the combustion chamber and clean the soot layer if there is any scaling. Check to see if there is crack on the welding seam. WARNING Cracks up to a length of 80 mm in the longitudinal direction on the welding seam can be permitted. 9.1.1.3 The visual examination of the heat exchanger Check to see if there is any soot, sediment, damage or corrosion in the exhaust path of the heat exchanger. WARNING The sediments must be cleaned with water and brush. Check to see if there is any external damage, deformation, etc. in the heat exchanger. WARNING Excessive deformation can obstruct the flow of the cooling liquid. 9.1.1.4 The visual examination of the burner fan - Check to see whether or not there is pollution and cracks on the burner fan. - Check to see if the cap sits tight. - Check to see if the slide bolt sits correctly. Only at DBW 2010/2012: - Adjust the clearance between the fan wheel and fan body to be 0.15 ± 0.05 mm at the narrowest place (can be measures with a scintil). Refer to the Spare Part Catalogue and Accessory Catalogue for the tool. 902 DBW 2010 / 2012 / 2020 / 2022 / 300 / 350 Special wrench Clearance measurement 0.15 ± 0.05 mm Only DBW 2020/2022/300/350: Check to see if there are cracks at the rotor core and the cover disc (back wall) is sound. 9.1.2 Making the changes WARNING The constant improvement of the heating devices is based on the endeavor of raising the level of development with the aim preventing the defects and failure to work. Under normal conditions, change of equipment can be made regarding the devices that are currently functioning. Improvement kits are available for this. The changes that could be carried out in the framework of the repair tasks are indicated below: • The installation of the pre-heating element of the nozzle block in the heating devices DBW 2010 / 2012 / 2020 / 300 / 350equipped with the control device 1553 (REFER TO 9.1.2.1) • The installation of the pre-heating element of the nozzle block in the heating devices DBW 2012 / 2010 / 2020 / 300 / 350 equipped with the control device 1563/64 (refer t0 9.1.2.2). DBW 2010 / 2012 / 2020 / 2022 / 300 / 350 9.1.2.1 The installation of the pre-heating element of the nozzle block in the DBW 2010 / 2012 / 2020 / 300 / 350 heating devices equipped with the control device 1553 General The fuel going to the vaporizer nozzle will be heated with the pre-heating of the nozzle block. Defects can occur at the heating devices indicated above at excessively low temperatures if there is no pre-heating of the nozzle block. The heating cartridge in the nozzle block will be activated over the thermostat when the temperature is 0 < 0 C. The period of heating depends on the reflecting radiation heat in the combustion chamber and the thermostat will be shut off when the temperature is +8 0 C. In the case that there is no pre-heating of the nozzle block, it can be mounted subsequently as described below. The following spare part sets are available to equip the heating devices mentioned above: • 12 V heating devices equipped with the control device 1553, order number 968 89A. • 24 V heating device equipped with the control device 1553, order number 989 71A. 9.The Repair The spare part set consists of the following parts: 1 Heating cartridge 1 Attachment wire 1 Relay 1 Thermostat 1 Cable bunch 1 Catch 1 Disc 1 Nut 1 Knurled washer 1 Socket bushing, with 4 pins 1 Socket bushing, with 2 pins 4 Flat socket bushings Heating cartridge Heating cartridge Thermostat Nozzle block Thermostat Nozzle block 903 9.The repair DBW 2010 / 2012 / 2020 / 2022 / 300 / 350 Application, DBW 2010 WARNING There is no need for washers and nuts in the equipment set of the DBW 2010 heating devices. 1. Open the burner head as indicated in 8.5.1. 2. Remove the ignition electrodes as indicated in 9.2.14.1 3. Dismount the segments and remove the disc together with the flame regulator from the nozzle block. 4. Fixate the thermostat with catch (5) and bolt (6) on the nozzle block plate. 5. Place the heating cartridge (3) on the nozzle block (4) and fixate it with the attachment wire (2). 6. Fixate the relay (11) with the sheet screw (9) and knurled washer (10) on the protection cover (12) of the burner head. WARNING Polarity is not important at the work step indicated below. 7. Place the flat socket bushings in a proper manner in the socket bushing with 2 pins for the connection of the heating cartridge. WARNING Pass the cable bunch (1) behind the magnetic valve and pull it outside using a rubber jacket together with the socket bushing with 2 pins. 8. Establish the electrical connections between the cable bunch (1), heating cartridge (3), thermostat (5) and relay (11). 9. Install the disc together with the flame regulator on the nozzle block and secure it with the segment. 10. Mount the ignition electrodes as indicated in 9.2.14.2. 11. Close the burner head as indicated in 8.5.1. 12. Establish the electrical connections as indicated in the figure (page 905). Socket X1 1 2 3 4 5 6 Cable bunch Attachment wire Heating cartridge Nozzle block* Thermostat Bolt* 07 Catch 08 Nozzle block plate* 09 Sheet screw* 10 Knurled washer 11 Relay 12 Protection cover of the burner head* * Not included in the spare part set. The additional equipment of DBW 2010 904 DBW 2010 / 2012 / 2020 / 2022 / 300 / 350 Application, DBW 2020 / 300 / 350 WARNING There is no need for catch in the equipment set of DBW 2020 / 300 heating devices. 1. Open the burner head as indicated in 8.5.1. 2. Remove the ignition electrodes as indicated in 9.2.14.1. 3. Dismount the flame regulator from the discs as indicated in 9.2.13.1. 4. Remove the segment and put the existing disc at a separate place after taking it from the nozzle block. 5. Install the heating cartridge (3) in the nozzle block (8) and fixate it with attachment wire (2). 6. Install the disc (4) on the nozzle block and secure it with the segment. 7. Fixate the thermostat (7) with the knurled washer (5) and nut (6) on the disc (4). 8. Install the flame regulator as indicated in 9.2.13.2. 9. Fixate the relay (11) with the steel screw (9) and knurled washer (10) on the protection cover (12) of the burner head. Socket X1 9.The Repair WARNING The polarity is not important in the work step mentioned below. 10. Place the flat socket bushings in the proper fashion in the socket bushing with 2 pins for the connection of the heating cartridge. WARNING Pass the cable bunch (1) behind the magnetic valve and pull it outside together with the socket bushing with 2 pins using a rubber jacket 11. Establish the electrical connection between the cable bunch (1), heating cartridge (3), thermostat (7) and relay (11). 12. Install the ignition electrodes as indicated in 9.2.14.2. 13. Close the burner head as indicated in 8.5.1. 14. Establish the electrical connections as exhibited in the figure (page 905). 01 02 03 04 05 06 07 08 09 10 11 12 Cable bunch Attachment wire Heating cartridge Disc Knurled washer Nut Thermostat Nozzle block* Steel screw* Knurled washer* Relay Protection cover of the burner head* *It is not included in the spare part set Additional equipment for DBW 2020 / 300 / 350 905 9.The repair DBW 2010 / 2012 / 2020 / 2022 / 300 / 350 Pos. A1 A2 B B5 F1 F2 F3 G H1 K6 R2 S1 S2 W2 X1 Definition Heating device Control device Socket connection, with 6 pins Thermostat Fuse Fuse Fuse 16 A (12 V); 8 A (24 V) Battery Lamp Relay Heating cartridge Switch Switch on the water valve Cable bunch Socket connection, with 4 pins Note SG 1553 For the pre-heating of the nozzle block Flat fuse DIN 72581 Flat fuse DIN 72581 Flat fuse DIN 72581 Work indicator For the pre-heating of the nozzle block For the pre-heating of the nozzle block On/off The electrical Connection 906 DBW 2010 / 2012 / 2020 / 2022 / 300 / 350 9.1.2.2 The installation of the pre-heating of the nozzle block at the devices DBW 2010 / 2012 / 2020 / 300 / 350 equipped with the control device 1563/64 General The fuel going to the vaporizer nozzle will be heated with the pre-heating of the nozzle block. Defects can occur at excessively low temperatures at the heating devices mentioned above if there is no pre-heating of the nozzle block. The heating cartridge in the nozzle block will be activated 0 over the thermostat when the temperature is < 0 C. The period of heating depends on the reflecting radiation heat in the combustion chamber and the thermostat will be 0 shut off when the temperature is +8 C. In the case that there is no pre-heating of the nozzle block, it can be mounted subsequently as described below. The following spare part sets are available to equip the heating devices mentioned above: • 12 V heating devices equipped with the control device 1563/1563, order number 968 91A. • 24 V heating device equipped with the control device 1563/1563, order number 968 90A. 9.The Repair The spare part set consists of the following parts: 1 Heating cartridge 1 Attachment wire 1 Relay 1 Relay with free work diode 1 Thermostat 1 Cable bunch 1 Catch 1 Disc 1 Nut 1 Knurled washer 1 Socket bushing, with 3 pins 1 Socket bushing, with 2 pins 7 Flat socket bushings 1 Relay platform Heating cartridge Heating cartridge Thermostat Nozzle block Thermostat Nozzle block 907 9.The repair DBW 2010 / 2012 / 2020 / 2022 / 300 / 350 Application, DBW 2010/2012 WARNING There is no need for washers and nuts in the equipment set of the DBW 2010 heating devices. 1. Open the burner head as indicated in 8.5.1. 2. Remove the ignition electrodes as indicated in 9.2.14.1 3. Dismount the segments and remove the disc together with the flame regulator from the nozzle block. 4. Fixate the thermostat with catch (5) and bolt (6) on the nozzle block plate. 5. Place the heating cartridge (3) on the nozzle block (4) and fixate it with the attachment wire (2). 6. Fixate the relay (11) with the sheet screw (9) and knurled washer (10) on the protection cover (12) of the burner head. WARNING Polarity is not important at the work step indicated below. 7. Place the flat socket bushings in a proper manner in the socket bushing with 2 pins for the connection of the heating cartridge. WARNING Pass the cable bunch (1) behind the magnetic valve and pull it outside using a rubber jacket together with the socket bushing with 2 pins. 8. Establish the electrical connections between the cable bunch (1), heating cartridge (3), thermostat (5) and relay (11). 9. Install the disc together with the flame regulator on the nozzle block and secure it with the segment. 10. Mount the ignition electrodes as indicated in 9.2.14.2. 11. Close the burner head as indicated in 8.5.1. 12. Separate the A socket from the control device 1564. 13. Establish the electrical connections between the socket X4 socket bushing, relay K10 (13) and A socket as indicated in the figure (page 909). 14. Fixate the K10 relay on the cover of the burner head if necessary. Socket X4 01 02 03 04 05 06 07 Cable bunch Attachment wire Heating cartridge Nozzle block* Thermostat Bolt* Catch 08 Nozzle block plate* 09 Sheet screw* 10 Knurled washer 11 Relay K5 12 Protection cover of the burner head* 13 Relay K10 14 Knurled washer * Not included in the spare part set. The additional equipment of DBW 2010/2012 908 DBW 2010 / 2012 / 2020 / 2022 / 300 / 350 Application, DBW 2020 / 300 / 350 WARNING There is no need for catch in the equipment set of DBW 2020 / 300 heating devices. 1. Open the burner head as indicated in 8.5.1. 2. Remove the ignition electrodes as indicated in 9.2.14.1. 3. Dismount the flame regulator as indicated in 9.2.13.1. 4. Dismount the high pressure nozzle as indicated in 9.2.10.1. 5. Remove the existing disc from the nozzle block and put it at a separate place. 6. Install the heating cartridge (3) in the nozzle block (8) and fixate it with attachment wire (2). 7. Install the disc (4) on the nozzle block. 8. Fixate the thermostat (7) with the knurled washer (5) and nut (6) on the disc (4). 9. Install the flame regulator and the high pressure nozzle as indicated in 9.2.13.2 and 9.2.10.2. 10. Fixate the relay (11) with the steel screw (9) and knurled washer (10) on the protection cover (12) of the burner head. WARNING The polarity is not important in the work step mentioned below. Socket X4 9.The Repair 11. Place the flat socket bushings in the proper fashion in the socket bushing with 2 pins for the connection of the heating cartridge. WARNING Pass the cable bunch (1) behind the magnetic valve and pull it outside together with the socket bushing with 2 pins using a rubber jacket 12 stablish the electrical connection between the cable bunch (1), heating cartridge (3), thermostat (7) and relay (11). 13 nstall the ignition electrodes as indicated in 9.2.14.2. 14 lose the burner head as indicated in 8.5.1. 15 eparate the A socket from the control device 1563. 16 Establish the electrical connections between the X4 socket bushing, relay K10 (13) and A socket as exhibited in the figure (page 909). 17 If necessary, fix K10 relay on burner head cover. 01 02 03 04 05 06 07 08 09 10 11 12 13 Cable bunch Attachment wire Heating cartridge Disc Knurled washer Nut Thermostat Nozzle block* Steel screw* Knurled washer* Relay K5 Protection cover of the burner head* Relay K10 *It is not included in the spare part set Additional equipment for DBW 2020 / 300 / 350 909 9.The repair DBW 2010 / 2012 / 2020 / 2022 / 300 / 350 Pos. A1 A2 A B3 F2 F3 F4 G H4 K5 K10 R1 S1 S2 S3 W2 X1 Definition Heating device Control device Socket connection, with 6 pins Thermostat Fuse Fuse Fuse 16 A (12 V); 8 A (24 V) Battery Lamp Relay Relay with free working diode Heating cartridge Switch Switch Switch Cable bunch Socket connection, with 3pins Note SG 1563/1564 For the pre-heating of the nozzle block Flat fuse DIN 72581 Flat fuse DIN 72581 Flat fuse DIN 72581 Work indicator For the pre-heating of the nozzle block For the pre-heating of the nozzle block For the pre-heating of the nozzle block On/off On(off / UPFA At the water faucet The Electrical Connection 910 DBW 2010 / 2012 / 2020 / 2022 / 300 / 350 9.2 Dismantling in parts and assembly 9.2.1 The replacement of the heat constrainer WARNING Discharge the pressure of the cooling circuit in accordance with the instructions and information provided by the manufacturer before carrying out the replacement work at the devices of the sensoric type. ATTENTION The danger of injury as a result of the cooling liquid that will be discharged. 9.2.1.1 Dismantling 1. Remove the nut (4, Figure 901) if necessary and take off the protection cap (3). 2. Remove the electrical connection of the heat constrainer (8). 3. Take off the heat constrainer (8) from the angle bar (5) or the plug (3). 4. Apply the measures pertaining to the elements in dismounted status (refer to 9.1.1). 9.2.1.2 Mounting 1. Screw the heat constrainer (8, Figure 901) manually to the angle bar (5) or the plug (6). 2. Install the electric connection. 3. Install the protection cap (3) if necessary and tighten it with a nut (4). 9.2.2 The replacement of the heat sensor WARNING Discharge the pressure of the cooling circuit in accordance with the instructions and information provided by the manufacturer before carrying out the replacement work at the devices of the sensoric type. ATTENTION The danger of injury as a result of the cooling liquid that will be discharged. 9.The Repair 2. Tighten the heat sensor (11) with 20 Nm + 5Nm. 3. Install the electrical connection. 9.2.3 The replacement of the thermal fuse WARNING Discharge the pressure of the cooling circuit in accordance with the instructions and information provided by the manufacturer before carrying out the replacement work at the devices of the sensoric type. ATTENTION The danger of injury as a result of the cooling liquid that will be discharged. 9.2.3.1 Dismantling 1. Cut off the electrical connection of the thermal fuse (12, Figure 901). 2. Dismantle the thermal fuse (12) from the heat exchanger (10) and remove it together with the gasket (15) 3. Apply the measures pertaining to the elements in dismantled status (refer to 9.1.1). 9.2.3.2 Mounting 1. Screw the thermal fuse (12, Figure 901) manually together with the ring gasket (14) or the gasket (15). 2. Tighten the thermal fuse manually. 3. Install the electrical connection. 9.2.4 The replacement thermostat of the regulation 9.2.4.1 Dismantling 1. Dismantle the nut (4, Figure 901) and remove the protection cap (3). 2. Dismount the regulation thermostat (1) in the connection block (2) from the electrical connection. 3. Take off and remove the regulation thermostat (1) from the angle bar (5) or heat exchanger (10). 4. Apply the measures pertaining to the elements in dismounted status (refer to 9.1.1). 9.2.2.1 Dismantling 1. Remove the electrical connection of the heat sensor (11, Figure 901). 2. Dismount the heat sensor (11) from the heat 9.2.4.2 Mounting exchanger (10) or the cooling liquid exit (16) and take 1. Screw the regulation thermostat (1, Figure 901) manually to the angle bar (5) or the heat exchanger it off together with the gasket (15) or ring gasket (14). (10). 3. Apply the measures pertaining to the elements in WARNING dismounted status (refer to 9.1.1). Tighten the regulation thermostat manually. 9.2.2.2 Mounting 1. Screw the heat sensor (11, Figure 901) together with 2. Install the electrical connection. the gasket (15) or ring gasket (14) manually to the 3. Put on the protection cap (3) and tighten it with a nut (4). cooling liquid exit (16) or the heat exchanger (10). 911 9.The repair DBW 2010 / 2012 / 2020 / 2022 / 300 / 350 1 2 3 4 5 6 7 8 9 10 11 12 13 14 15 16 Regulation thermostat Connection block Protection cap Nut Angle bar Plug Thermal fuse element Heat constrainer Fan thermostat Heat exchanger Heat sensor Thermal fuse Gasket Ring gasket Gasket Cooling liquid exit Figure 901 The replacement of the heat constrainer, heat sensor, thermal fuse, fuse elements and regulation thermostat 912 DBW 2010 / 2012 / 2020 / 2022 / 300 / 350 9.2.5 The replacement of the fan thermostat 9.2.5.1 Dismounting 1. Remove the nut (4, Figure 901) and take off the protection cap (3). 2. Cut off the electrical connection of the fan thermostat (9). 3. Take off and remove the fan thermostat from the angle bar (5). 4. Apply the measures pertaining to the elements in dismounted status (refer to 9.1.1). 9.2.5.2 Mounting 1. Screw the fan thermostat (9, Figure 901) manually to the angle bar (5). 2. Install the electrical connection. 3. Put on the protection cap (3) and tighten it with the nut (4). 9.2.6 The replacement of the fuse element 9.2.6.1 Dismountung 1. Remove the nut (4, Figure 901) and take off the protection cap (3). 2. Cut off the electrical connection of the thermal fuse element (7) in the connection block (2). 3. Remove and take off the thermal fuse element manually from the plug (6). 4. Apply the measures pertaining to the elements in dismounted status (refer to 9.1.1). 9.2.6.2 Mounting 1. Screw the thermal fuse element (7, Figure 901) manually to the plug (6). 2. Install the electrical connection. 3. Put on the protection cap (3) and tighten it with the nut (4). 9.2.7 The replacement of the control device 9.2.7.1 Dismounting 1. Remove the socket (1 or 3, Figure 901) in the control device. 2. Push the catch between the control device (1 or 3) and the protection cap (4) using a proper tool (for instance a screwdriver) in the direction of the control device and remove the control device in the direction of its axis. 3. Expand the attachment wire (2) in the control device 1553 to the side, if necessary, and pull the control device forward. 4. Apply the measures pertaining to the elements in dismounted status (refer to 9.1.1). 9.The Repair 9.2.7.2 Mounting 1. Slide the control device 1563/64 (3, Figure 902) or the control device 1553 (1) with the attachment wire (2) sideward in the protection cap (4) guide and push until it leans on the wall. 2. Install the socket in the control device. 9.2.8 The replacement of the burner head 9.2.8.1 Dismounting WARNING The socket connections must be marked or a note should be made before the connections between the socket connections or cable bunch and the measuring and regulation sensors are removed. 1. Separate the socket connections of the measuring and regulation sensors on the heat exchanger and remove the cable bunch. 2. Remove the fuel lines if necessary. 3. Loosen the nuts (2, Figure 903) until the bolts can be opened to the side. 4. Turn the bolts (3) to the side and remove the cotter pin (1). 5. Take off the burner head (4). 6. Apply the measures pertaining to the elements in dismounted status (refer to 9.1.1). 9.2.8.2 Mounting 1. Get the burner head (4, Figure 903) in the assembly position, turn the bolts (3) inside and tighten the nuts (2) manually. 2. Install the cotter pin (1) in its place in accordance with the opening direction that has been foreseen and secure it. 3. Turn the bolts (1) toward inside and tighten the nut (3) manually in order to prevent one-sided coercion. 3 Tighten the nuts (3) - with 5.0 Nm + 1 Nm at DBW 2010 / 2012 - with 8.0 Nm ± 10 % at DBW 2020 / 2022 / 300 / 350 4. Install the fuel lines if necessary 5. Make sure that electrical connections are sound. 913 9.The repair DBW 2010 / 2012 / 2020 / 2022 / 300 / 350 1. 2. 3. 4. Figure 902 The replacement of the control device 1 2 3 4 Figure 903 914 Control device 1553 Pliers Control device 1563/1564 Burner head Cotter pin Nut (2) Nut (2) Burner head WARNING • The cotter pin can be at the other side according to the opening direction of the burner head • The burner head of the heating device DBW 2010 is exhibited in the figure. The replacement of the burner head DBW 2010 / 2012 / 2020 / 2022 / 300 / 350 9.2.9 The replacement of the engine 9.2.9.1 Dismounting 1. Remove the bolts (7, Figure 904) at the protection cap (4) and take off the protection cap by pulling forward. 2. Cut off the electrical connections of the engine (16). 3. Remove the bolts (10) and take off the engine (16) together with the flange (14). 4. Take off and remove the clutch (13) from the engine shaft. 5. Take off and remove the clutch (12) together with the knurled washers (11). 6. Apply the measures pertaining to the elements in dismounted status (refer to 9.1.1). 9.The Repair 9.2.9.2 Mounting 1. Get the engine (16, Figure 904) in the assembly position and install the knurled washers (11) and the bolts (12) on the flange (14). 2. Tighten the bolts with 5 Nm + 1 Nm. 3. Install the clutch (13) on the engine shaft. 4. Fixate the flange (14) with the bolts (10). 5. Tighten the bolts with 5 Nm + 1 Nm. 6. Install the electrical connections of the engine in the correct color. 7. Install the protection cap (4) and fixate it with the bolts (17). 10 Bolt (3) Control device 11 Knurled Pincers of the control device 1553 washer (2) Control device 1563/64 12 Bolt (2) Protection cap 13 Clutch Bolt (4) 14 Flange Induction bobbin 15 Cable tie Induction cable 16 Engine Pliers (2) 17 Bolt (4) Ignition electrodes WARNING The heating devices 2010 have been shown in the figure as heating device 2012 1 2 3 4 5 6 7 8 9 Figure 904 The replacement of the engine 915 9.The repair DBW 2010 / 2012 / 2020 / 2022 / 300 / 350 9.2.10 The replacement of the high pressure nozzle 9.2.10.1 Dismounting 1. Open the burner head sideward (refer to 8.5.1). 2. Remove the high pressure nozzle (11, Figure 905) by turning it. 3. Apply the measures pertaining to the elements in dismounted status (refer to 9.1.1). 9.2.10.2 Mounting 1. Screw the high pressure nozzle (11, Figure 905) and tighten it with 20 Nm. 2. Turn the burner head toward inside (refer to 8.5.1). 9.2.11 The replacement of the pre-heating of the nozzle block 9.2.11.1 Dismounting 1. Open the burner head to the side (refer to 8.5.1) 2. Remove and take off the pliers (3, Figure 905). 3. Cut off the electrical connection. 4. Remove and take off the heating cartridge (2) from the nozzle block (15) to the side. 5. Apply the measures pertaining to the elements in dismounted status (refer to 9.1.1). 9.2.11.2 Mounting 1. Install the electrical connection. 2. Install the heating cartridge (2, Figure 905) on the nozzle block (15) and secure it with pliers. 3. Turn the burner head toward inside (refer to 8.5.1). 9.2.12 The replacement of the induction bobbin 9.2.12.1 Dismounting 1. Open the burner head to the side (refer to 8.5.1). 2. Take off the socket from the electrodes. 3. Take off the bolts (5) from the induction bobbin (6) and remove the induction bobbin. 4. Cut off the electrical connections. 5. Apply the measures pertaining to the elements in dismounted status (refer to 9.1.1). 9.2.12.2 Mounting 1. Make sure that the electrical connections are sound. 2. Bring the induction bobbin (6, Figure 904) in the assembly position and fixate it with the bolts (5). 3. Tighten the bolts with 0.8 Nm. 4. Take the ignition cable (4) in the jacket to the induction bobbin (6). 5. Install the ignition cable (4) on the ignition electrodes (9) and secure it with pliers (8). 6. Turn the burner head toward inside (refer to 8.5.1). 916 9.2.13 The replacement of the flame regulator 9.2.13.1 Dismounting 1. Open the burner head to the side (refer to 8.5.1). 2. Take off the electrical connection of the ignition regulator (10, Figure 905). 3. Remove the bolt (14) and flame regulator (10) or take off the flame regulator (10a) from the socket. 4. Apply the measures pertaining to the elements in dismounted status (refer to 9.1.1). 9.2.13.2 Mounting 1. Get the flame regulator (10, Figure 905) in the assembly position and fixate it with the bolt (14) or install the flame regulator (10a) in its socket. 2. Tighten the bolts with 1.3 Nm. 3. Install the electrical connection. 4. Turn the burner head toward inside (refer to 8.5.1). 9.2.14 The replacement of the ignition electrodes 9.2.14.1 Dismountin 1. Open the burner head to the side (refer to 8.5.1). 2. Remove the bolt (8, Figure 905). 3. Take off and remove the washer (7) and clamp (6). 4. Remove the segment (13) if necessary and take off the disc (12). 5. Pull back the insulation jackets on the ignition cable if necessary. 6. Take off and remove the pliers (5) from the ignition electrodes (9). 7. Remove the ignition electrodes (9). 8. Apply the measures pertaining to the elements in dismounted status (refer to 9.1.1). 9.2.14.2 Mounting 1. Install the disc (12, Figure 905) and secure it with the segment (13) if necessary. 2. Put the ignition electrodes (9) through the disc (12), align then and fixate them with the clamp (6), washer (7) and bolt (8). 3. Tighten the bolts (8) with 1.7 Nm. 4. Install the ignition cable (4) and secure it with the pliers (5). 5. Remove the insulation jackets on the ignition cable if necessary. 6. Turn the burner head toward inside (refer to 8.5.1). DBW 2010 / 2012 / 2020 / 2022 / 300 / 350 9.The Repair WARNING The parts marked with * are not available in the one-way fuel pumps. 1 2 3 4 5 6 7 8 9 10 Magnetic valve Heating cartridge Attachment wire Induction cable (2) Pliers 82) Clamp Disc Bolt Ignition electrodes (2) Flame regulator Figure 905 11 12 13 14 15 16 17 18 19 20 High pressure nozzle Disc Segment Bolt Nozzle block Pressure line Bolt (2) Washer (2) Fuel pump Fuel line (2) 21 22 23 24 25 26 27 Washer (4) Hollow bolt (2) Bolt (4) Nozzle block plate Plain butt gear Segment Bolt (2) The replacement of the nozzle block, pre-heating of the nozzle block, high pressure nozzle and flame regulator. 917 9.The repair DBW 2010 / 2012 / 2020 / 2022 / 300 / 350 9.2.15 The replacement of the fuel pump 9.2.15.1 Dismounting 1. Open the burner head to the side (refer to 8.5.1). 2. Remove the ignition electrodes (refer to 9.1.14.1). 3. Remove the hollow bolts (22, Figure 905) and washers (21) and take off and remove the fuel lines (20). 4. Remove the screwed connections at the pressure line (16) and take off the pressure line. 5. Remove the bolts (23) and take off the plain butt gear (25). 6. Remove the segment (26) and take off the nozzle block plate (24). 7. Take off the bolts (17) and washers (18) and remove the fuel pump (19). 8. Apply the measures pertaining to the elements in dismounted status (refer to 9.1.1). 9.2.15.2 Mounting 1. Get the fuel pump (19, Figure 905) in the assembly position and fixate it with the bolts (17) and washers (18). 2. Tighten the bolts with 3.0 Nm. 3. Install the plain butt gear (25) and secure it with the segments (26). 4. Install the nozzle block plate 824) and fixate it with bolts (23). 5. Tighten the bolts with 5.5 Nm. 6. Bring the pressure line (16) in the assembly position and tighten the screwed connections with 6 ± 0.6 Nm. 7. Bring the fuel lines (20) in the assembly position and fixate with the hollow bolts (22) and washers (21). 8. Tighten the bolts with 15 ± 1.5 Nm. 9. Install the ignition electrodes (refer to 9.2.14.2). 10. Turn the burner head toward inside (refer to 8.5.1). 9.2.16.2 Mounting 1. Install the gasket (5, Figure 907) on the magnetic valve block (4). 2. Place the spring (7) and pin (6) on the stud (8). 3. Place the stud together with the spring and pin in the magnetic nozzle block (4). 4. Screw the magnetic valve block (4) in the nozzle block (9). 5. Tighten the bolt with 11.5 Nm. 6. Place the magnetic valve head (3) on the magnetic valve block and fixate it with washer (2) and nut (1). 7. Tighten the nut with 2 Nm. 8. Fixate the nozzle block plate (24, Figure 905) with bolts (23). 9. Tighten the bolts with 5.5 Nm. 10. Install the pre-heating of the nozzle block (refer to 9.2.9.2). 11. Install the ignition electrodes (refer to 9.2.12.2). 12. Install the electrical connections of the magnetic valve. 13. Turn the burner head toward inside (refer to 8.5.1). 9.2.17 The replacement of the combustion chamber 9.2.17.1 Dismounting 1. Open the burner head to the side (refer to 8.5.1). 2. Take off the combustion chamber (1, Figure 908) from the heat exchanger (2). 3. Apply the measures pertaining to the elements in dismantled status (refer to 9.1.1). 9.2.17.2 Mounting 1. Install and push the combustion chamber (1, Figure 908) on the heat exchanger (2) all the way to the end. 2. Turn the burner head toward inside (refer to 8.5.1). 9.2.16 The replacement of the magnetic valve 9.2.18 The pre-heating thermostat of the nozzle block 9.2.16.1 Dismounting 1. Open the burner head to the side 8refer to 8.5.1). 2. Remove the ignition electrodes (refer to 9.2.14.1). 3. Remove the pre-heating of the nozzle block (refer to 9.2.11.1). 4. Remove the bolts (23, Figure 905) and take off the nozzle block plate (24). 5. Remove the electrical connections of the magnetic valve. 6. Remove the nut (1, Figure 907), remove and take off the magnetic valve head (3) and washer (2). 7. Remove the magnetic valve block (4) if necessary and take off the gasket (5), pin (6), spring (7) and stud (8). 8. Apply the measures pertaining to the elements in dismantled status. 9.2.18.1 Dismounting 1. Open the burner to the side (refer to 8.5.1). 2. Dismount the electrical connection. 3. Remove the thermostat (4, Figure 906) from the nozzle block plate (7) or the disc (1) and remove the bolt (5), catch (6) or the nut (3) and knurled washer (2). 4. Apply the measures pertaining to the elements in dismounted status (refer to 9.1.1). 9.2.18.2 Mounting 1. Bring the thermostat (4, Figure 906) in the assembly position and fixate it with catch (6) and bolt (5) to the nozzle block plate (7) or to the disc (1) with the bolt (3) and knurled washer (2) 2. Install the electrical connection. 3. Turn the burner toward inside (refer to 8.5.1). 918 DBW 2010 / 2012 / 2020 / 2022 / 300 / 350 9.The Repair 1 2 3 4 5 6 7 Figure 906 1 2 3 4 5 Nut Disc Magnetic valve head Magnetic valve block Gasket Disc Knurled washer Nut Thermostat Bolt Catch Nozzle block plate The replacement of the pre-heating thermostat of the nozzle block 6 7 8 9 Figure 907 Pin Spring Shaft Nozzle block The replacement of the magnetic valve 919 9.The repair DBW 2010 / 2012 / 2020 / 2022 / 300 / 350 9.2.19 The replacement of the heat exchanger 9.2.19.1 Dismounting 1. Take off the nut (6, Figure 908) from the cap (5) if necessary and remove the cap. 2. Dismount the heat constrainer or thermal fuse (refer to 9.2.1.1 or 9.2.3.1). 3. Dismount the heats sensor (refer to 9.2.2.1). 4. Dismount the thermal fuse element if necessary (refer to 9.2.6.1). 5. Dismount the regulation thermostat if necessary (refer to 9.2.4.1) 6. Dismount the fan thermostat if necessary (refer to 9.2.5.1) WARNING The work steps 7 and 8 apply only DBW 2010 / 2020 / 300 / 350 that are not sensoric. 7. Remove the bolt (4) and take off the console (3) together with the electrical connections. 8. Remove the plug (7) and take it off together with the angle bar (8). 9. Dismount the burner head (refer to 9.2.8.1). 10. Take off the combustion chamber (1) from the heat exchanger (2). 11. Take off the heat exchanger (2). 12. Apply the measures pertaining to the elements in dismounted status (refer to 9.1.1). 9.2.19.2 Mounting 1. Install the combustion chamber (1, Figure 908) on the heat exchanger (29 all the way to the end. 2. Install the burner head (refer to 9.2.8.2). WARNING The work steps 3 to 6 apply only to the DBW 2010 / 2020 / 300 / 350 devices that are non-sensoric. 3. Bring the angle bar (8) in the assembly position and screw the plug (7). 4. Tighten the nut manually. 5. Bring the console (3) together with the electrical connections in the assembly position and fixate it with bolt (4). 6. Tighten the bolt manually. 7. Install the heat sensor (refer to 9.2.2.2). 8. Install the heat constrainer or the thermal fuse (refer to 9.2.1.2 or 9.2.3.2). 9. Install the thermal fuse element if necessary 8refer to 9.2.6.2). 10. Install the regulation thermostat if necessary (refer to 9.2.4.2). 11. Install the fan thermostat if necessary (9.2.5.2). 12. Install the protection cap (5) if necessary and tighten it with a nut (6). WARNING The combustion chamber and heat exchanger of the DBW 2010 heating devices in the figure. 1 2 3 4 5 6 7 8 Figure 908 920 Combustion chamber Heat exchanger Console Bolt Cap Nut Plug Angle bar The replacement of the combustion chamber and heat exchanger DBW 2010 / 2012 / 2020 / 2022 / 300 / 350 9.The Repair 9.2.20 The replacement of the nozzle block 9.2.21 The replacement of the burner fan 9.2.20.1 Dismounting 1. Open the burner head to the side (refer to 8.5.1). 2. Remove the ignition electrodes (refer to 9.2.14.1). 3. Remove the high pressure nozzle (refer to 9.2.10.1). 4. Remove the pre-heating of the nozzle block if necessary (refer to 9.2.11.1). 5. Dismount the magnetic valve (refer to 9.2.16.1). 6. Dismount the screwed connections on the pressure line (16, Figure 905) and take off the pressure line. 7. Remove the bolts (23) and take off the nozzle block plate (24). 8. Remove the bolts (27), dismount and remove the nozzle block. 9. Apply the measures pertaining to the elements in dismounted status (refer to 9.1.1). 9.2.20.2 Mounting 1. Bring the nozzle block (15, Figure 905) in the assembly position and fixate it with the bolts (27). 2. Tighten the bolts with 5.5 Nm. 3. Bring the nozzle block plate (24) in the assembly position and fixate it with bolts (23). 4. Tighten the bolts with 5.5 Nm. 5. Bring the pressure line (16) in the assembly position and tighten the bolts with 6 ± 0.6 Nm. 6. Install the magnetic valve (refer to 9.2.10.1). 7. Install the pre-heating of the nozzle block if necessary (refer to 9.2.11.2). 8. Install the high pressure nozzle (refer to 9.2.10.2) 9. Install the ignition electrodes (refer to 9.2.14.2). 10. Turn the burner head toward inside (refer to 8.5.1). 9.2.21.1 Dismounting 1. Dismount the burner head (refer to 9.2.8.1). 2. Dismount the engine (refer to 9.2.9.1). 3. Remove the bolts (6, Figure 909) from the nozzle block plate (5). 4. Remove the bolts (1) and washers (2). 5. Take off the engine hanger (3) from the shaft. 6. Dismount the burner fan. 7. Apply the measures pertaining to the elements in dismounted status. 9.2.21.2 Mounting 1. Only at the DBW 2010 / 2012: Check the clearance of the fan wheel (refer to 9.1.1.4). 2. Bring the burner fan (4, Figure 909) in the assembly position and fixate it with bolts (6) to the nozzle block plate (5). 3. Tighten the bolts (6) with 5.5 Nm. 4. Install the engine hanger (3) on the shaft and fixate with bolts (1) and washers (2). 5. The bolts will be tightened with - 5.5 Nm + 1 Nm at the DBW 2010 / 2012 - 8.0 Nm + 10 % at the DBW 2020 / 2022 / 300 / 350. 6. Install the engine (refer to 9.2.9.2). 7. Install the burner head (refer to 9.2.8.2). 921 9.The repair 1 2 3 Bolt (3) Washer (3) Engine hanger DBW 2010 / 2012 / 2020 / 2022 / 300 / 350 4 5 6 Burner fan Nozzle block plate Bolt (4) Figure 909 The replacement of the burner fan 922 DBW 2010 / 2012 / 2020 / 2022 / 300 / 350 9.The Repair 923 9.The repair 924 DBW 2010 / 2012 / 2020 / 2022 / 300 / 350 DBW 2010 / 2012 / 2020 / 2022 / 300 / 350 10.The Packing/Storage/Shipment 10 The Packaging / Storage / Shipment 10.1 General The heating device or its structural elements, which will be sent to Webasto Thermosysteme GmbH in order the checked, must be cleaned and packaged in such way that they will not be damaged during the shipment, transport and storage. ATTENTION In the case that the heating device will be returned as a whole, the device must be totally emptied. Measures must be taken to ensure that there will be no leakage of fuel or cooling liquid from the packaging or during the shipment. The access and exit cuffs of the cooling liquid as well as the fuel lines must be closed with blind plugs. The environmental temperature indicated in Section 4 should not be exceeded during the period of storage. 101 10.The Packing/Storage/Shipment 102 DBW 2010 / 2012 / 2020 / 2022 / 300 / 350 DBW 2010 / 2012 / 2020 / 2022 / 300 / 350 A ANNEX ANNEX A The Periodical Maintenance A-1 A ANNEX DBW 2010 / 2012 / 2020 / 2022 / 300 / 350 The maintenance intervals indicated below apply for the The Periodical Maintenance of the Heating normal utilization of the busses under the normal Device conditions. These intervals may be shortened or The heating device must be checked in regular intervals but at least at the beginning of the heating season (this is the period, in which the heating device will be used as a result of the climatic conditions). prolonged if the heating devices will be used in other vehicles or for other purposes. Please contact your Webasto authorized representative in such cases. Checking / Maintenance Tasks Important Warnings 1.The electrical connections Use the proper contact spray, for instance, Special Contact Spray (Order Number 101322) a) Remove the electrical socket connections of the cable bunches, check to see whether or not there is oxidation, spray it and install once again after having implemented the Article 5. b) Check the oxidation or the transmission resistances of the electrical fuses. 2. The Heat Exchanger a) Check whether or not there are dark burn stains on the paint (local excessive heating) b) Check to see if there is any trace of leakage c) Clean the heating device from outside and inside 3. The fuel system a) Check the imperviousness or the fuel lines and connections b) Replace the fuel filter element together with the gasket c) Open the fuel valve, if any d) The fuel pump and fuel lines e) Replace the fuel sieve in the pump together with the gaskets 4. The heater head a) Check to see whether or not the combustion air suction clearance is free Open the burner head to the side b) Check inside the body to see if any fuel is collected resulting from leakage c) Clean the observing glass of the flame regulator d) Check the status of the ignition electrodes e) Replace the vaporizer nozzle Identify the reason of excessive heating if necessary (for instance, water circuit); check the heat constrainer Pay attention that the incoming and return fuel lines do not leak! Tighten the screwed connections and hose clamps. Replace the pump and line once every 5 years Replace the bended electrodes. Shorten the interval for replacing the fuel filter if soot will be collected. 5. The exhaust system a) Check to see whether or not the exhaust line is free and clean if necessary b) Take the combustion chamber off the heat exchanger. Check to see if there is any damage on both parts and clean or replace if necessary c) Install the combustion chamber and the burner head. Pay attention that the connection of the heat exchanger is tight. d) Re-install the electrical socket connections 6. The water system a) Clean the water filter element, if any b) Open the water valves, if any 7. The function check a) Open the valve in the return line, if any b) Check the work of the heating device c) Pay attentions to see if smoke is produced during the post-operation and replace the nozzle if necessary A-2 After approximately 10 minutes of warming up. Result of the Check OK NOT OK Measured values, repair tasks to be carried out