1
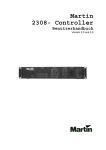
Martin 2308 Controller
user’s guide
version 2.1/3.1
Part# 510111
Table of contents
Preface . . . . . . . . . . . . . . . . . . . . . . . . . . . . . . . . . . . . . . . . . . . . . . . . . . . . . . . .
5
Introduction . . . . . . . . . . . . . . . . . . . . . . . . . . . . . . . . . . . . . . . . . . . . . . . . . . . . .
5
Connections . . . . . . . . . . . . . . . . . . . . . . . . . . . . . . . . . . . . . . . . . . . . . . . . . . . . .
Rear panel connections . . . . . . . . . . . . . . . . . . . . . . . . . . . . . . . . . . . . . . . . . . .
Joystick Control . . . . . . . . . . . . . . . . . . . . . . . . . . . . . . . . . . . . . . . . . . . . . . . . .
7
7
9
Basic operation . . . .
Switching on . . . .
The front panel . .
Channel-section
Program-section
Function-section
Control-section .
.
.
.
.
.
.
.
.
.
.
.
.
.
.
11
11
12
12
12
12
12
Program structure . . . . . . . . . . . . . . . . . . . . . . . . . . . . . . . . . . . . . . . . . . . . . . . .
13
Creating sequences and shows . . . . .
Edit sequence . . . . . . . . . . . . . . . .
Delete sequence . . . . . . . . . . . . . .
Edit trig-rate . . . . . . . . . . . . . . . . .
Edit sequence hints . . . . . . . . . . . .
The show editor . . . . . . . . . . . . . . .
Edit show - Creating a New Show .
Edit show - Editing an existing Show
Insert sequence in show . . . . . . .
Delete sequence from show . . . .
Delete show . . . . . . . . . . . . . . . . .
.
.
.
.
.
.
.
.
.
.
.
13
14
15
15
15
16
16
16
17
17
17
Set up . . . . . . . . . . . . . . . . . . . . . . . . . . . . . . . . . . . . . . . . . . . . . . . . . . . . . . . .
18
Running sequences and shows
Run sequence . . . . . . . . . . .
Run show . . . . . . . . . . . . . .
Trig sources . . . . . . . . . . . .
Manual trig . . . . . . . . . . . .
Auto trig . . . . . . . . . . . . . .
Music trig . . . . . . . . . . . . .
Follow-spots
..........
Frozen-mode . . . . . . . . . . . .
On-Line . . . . . . . . . . . . . . . .
.
.
.
.
.
.
.
.
.
.
19
19
19
20
20
20
21
21
21
21
Special functions . . . . . . . . . . . . . . . . . . . . . . . . . . . . . . . . . . . . . . . . . . . . . . . . .
Initialization . . . . . . . . . . . . . . . . . . . . . . . . . . . . . . . . . . . . . . . . . . . . . . . . . . .
Write-protecting the memory . . . . . . . . . . . . . . . . . . . . . . . . . . . . . . . . . . . . . . .
22
22
22
Martin 2308 Controller
.
.
.
.
.
.
.
.
.
.
.
.
.
.
.
.
.
.
.
.
.
.
.
.
.
.
.
.
.
.
.
.
.
.
.
.
.
.
.
.
.
.
.
.
.
.
.
.
.
.
.
.
.
.
.
.
.
.
.
.
.
.
.
.
.
.
.
.
.
.
.
.
.
.
.
.
.
.
.
.
.
.
.
.
.
.
.
.
.
.
.
.
.
.
.
.
.
.
.
.
.
.
.
.
.
.
.
.
.
.
.
.
.
.
.
.
.
.
.
.
.
.
.
.
.
.
.
.
.
.
.
.
.
.
.
.
.
.
.
.
.
.
.
.
.
.
.
.
.
.
.
.
.
.
.
.
.
.
.
.
.
.
.
.
.
.
.
.
.
.
.
.
.
.
.
.
.
.
.
.
.
.
.
.
.
.
.
.
.
.
.
.
.
.
.
.
.
.
.
.
.
.
.
.
.
.
.
.
.
.
.
.
.
.
.
.
.
.
.
.
.
.
.
.
.
.
.
.
.
.
.
.
.
.
.
.
.
.
.
.
.
.
.
.
.
.
.
.
.
.
.
.
.
.
.
.
.
.
.
.
.
.
.
.
.
.
.
.
.
.
.
.
.
.
.
.
.
.
.
.
.
.
.
.
.
.
.
.
.
.
.
.
.
.
.
.
.
.
.
.
.
.
.
.
.
.
.
.
.
.
.
.
.
.
.
.
.
.
.
.
.
.
.
.
.
.
.
.
.
.
.
.
.
.
.
.
.
.
.
.
.
.
.
.
.
.
.
.
.
.
.
.
.
.
.
.
.
.
.
.
.
.
.
.
.
.
.
.
.
.
.
.
.
.
.
.
.
.
.
.
.
.
.
.
.
.
.
.
.
.
.
.
.
.
.
.
.
.
.
.
.
.
.
.
.
.
.
.
.
.
.
.
.
.
Version 2.1/3.1
.
.
.
.
.
.
.
.
.
.
.
.
.
.
.
.
.
.
.
.
.
.
.
.
.
.
.
.
.
.
.
.
.
.
.
.
.
.
.
.
.
.
.
.
.
.
.
.
.
.
.
.
.
.
.
.
.
.
.
.
.
.
.
.
.
.
.
.
.
.
.
.
.
.
.
.
.
.
.
.
.
.
.
.
.
.
.
.
.
.
.
.
.
.
.
.
.
.
.
.
.
.
.
.
.
.
.
.
.
.
.
.
.
.
.
.
.
.
.
.
.
.
.
.
.
.
.
.
.
.
.
.
.
.
.
.
.
.
.
.
.
.
.
.
.
.
.
.
.
.
.
.
.
.
.
.
.
.
.
.
.
.
.
.
.
.
.
.
.
.
.
.
.
.
.
.
.
.
.
.
.
.
.
.
.
.
.
.
.
.
.
.
.
.
.
.
.
.
.
.
.
.
.
.
.
.
.
.
.
.
.
.
.
.
.
.
.
.
.
.
.
.
.
.
.
.
.
.
.
.
.
.
.
.
.
.
.
.
.
.
.
.
.
.
.
.
.
.
.
.
.
.
.
.
.
.
.
.
.
.
.
.
.
.
.
.
.
.
.
.
.
.
.
.
.
.
.
.
.
.
.
.
.
.
.
.
.
.
.
.
.
.
.
.
.
.
.
.
.
.
.
.
.
.
.
.
.
.
.
.
.
.
.
.
.
.
.
.
.
.
.
.
.
.
.
.
.
.
.
.
.
.
.
.
.
.
.
.
.
.
.
.
.
.
.
.
.
.
.
.
.
.
.
.
.
.
.
.
.
.
.
.
.
.
.
.
.
.
.
.
.
.
.
.
.
.
.
.
.
.
.
.
.
.
.
.
.
.
.
.
.
.
.
.
.
.
.
.
.
.
.
.
.
.
.
.
.
.
.
.
.
.
.
.
.
.
.
.
.
.
.
.
.
.
.
.
.
.
.
.
.
.
.
.
.
.
.
.
.
.
.
.
.
.
.
.
.
.
.
.
.
.
.
.
.
.
.
.
.
.
.
.
.
.
.
.
.
.
.
.
.
.
.
.
.
.
.
.
.
.
.
.
.
.
.
.
.
.
.
.
.
.
.
.
.
.
.
.
.
.
.
.
.
.
.
.
.
.
.
.
.
.
.
.
.
.
.
.
.
.
.
.
.
.
.
.
.
.
.
.
.
.
.
.
.
.
.
.
.
.
.
.
.
.
.
.
.
.
.
.
.
.
.
.
.
.
.
.
.
.
.
.
.
.
.
.
.
.
.
.
.
.
.
.
.
.
.
.
.
.
.
.
.
.
.
.
.
.
.
.
.
.
.
.
.
.
.
.
.
.
.
.
.
.
.
.
.
.
.
.
.
.
.
.
.
.
Page 3
Using external joystick . . . . . . . . . . . . . . . . . . . . . . . . . . . . . . . . . . . . . . . . . . .
22
Transferring data from one Controller to another . . . . . . . . . . . . . . . . . . . . . . . . . .
22
Display messages . . . . . . . . . . . . . . . . . . . . . . . . . . . . . . . . . . . . . . . . . . . . . . . .
Status information . . . . . . . . . . . . . . . . . . . . . . . . . . . . . . . . . . . . . . . . . . . . . .
Error messages . . . . . . . . . . . . . . . . . . . . . . . . . . . . . . . . . . . . . . . . . . . . . . . .
24
24
24
APPENDIX A DIP switch settings for Martin intelligent light units . . . . . . . . . . . . . .
26
APPENDIX B - Programming Roboscans
Roboscan 804 / 805 / 1004 . . . . . . . .
Roboscan 1016 . . . . . . . . . . . . . . . . .
Roboscan 812 . . . . . . . . . . . . . . . . . .
Roboscan Pro 218 . . . . . . . . . . . . . . .
Roboscan Pro 518 . . . . . . . . . . . . . . .
.
.
.
.
.
.
.
.
.
.
.
.
.
.
.
.
.
.
.
.
.
.
.
.
.
.
.
.
.
.
.
.
.
.
.
.
.
.
.
.
.
.
.
.
.
.
.
.
.
.
.
.
.
.
.
.
.
.
.
.
.
.
.
.
.
.
.
.
.
.
.
.
.
.
.
.
.
.
.
.
.
.
.
.
.
.
.
.
.
.
.
.
.
.
.
.
.
.
.
.
.
.
.
.
.
.
.
.
.
.
.
.
.
.
.
.
.
.
.
.
.
.
.
.
.
.
.
.
.
.
.
.
.
.
.
.
.
.
.
.
.
.
.
.
.
.
.
.
.
.
.
.
.
.
.
.
.
.
.
.
.
.
.
.
.
.
.
.
.
.
.
.
.
.
.
.
.
.
.
.
.
.
.
.
.
.
27
28
29
31
34
37
APPENDIX C - Programming
Robocolor . . . . . . . . . . . .
Robocolor II . . . . . . . . . . .
Robocolor MSD 200 . . . . .
Robocolor Pro 400 . . . . . .
.
.
.
.
.
.
.
.
.
.
.
.
.
.
.
.
.
.
.
.
.
.
.
.
.
.
.
.
.
.
.
.
.
.
.
.
.
.
.
.
.
.
.
.
.
.
.
.
.
.
.
.
.
.
.
.
.
.
.
.
.
.
.
.
.
.
.
.
.
.
.
.
.
.
.
.
.
.
.
.
.
.
.
.
.
.
.
.
.
.
.
.
.
.
.
.
.
.
.
.
.
.
.
.
.
.
.
.
.
.
.
.
.
.
.
.
.
.
.
.
.
.
.
.
.
.
.
.
.
.
.
.
.
.
.
.
.
.
.
.
.
.
.
.
.
.
.
.
.
.
.
.
.
.
.
41
42
44
46
48
APPENDIX D - Programming Robozaps . . . . . . . . . . . . . . . . . . . . . . . . . . . . . . . .
Robozap . . . . . . . . . . . . . . . . . . . . . . . . . . . . . . . . . . . . . . . . . . . . . . . . . . . . .
RoboZap MSR 1200 . . . . . . . . . . . . . . . . . . . . . . . . . . . . . . . . . . . . . . . . . . . .
51
52
54
APPENDIX E - Programming the Centrepiece . . . . . . . . . . . . . . . . . . . . . . . . . . .
56
APPENDIX F - Programming the 516 Dimmer Controller . . . . . . . . . . . . . . . . . . . .
59
..............................................................
...........................................................
59
59
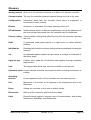
Glossary . . . . . . . . . . . . . . . . . . . . . . . . . . . . . . . . . . . . . . . . . . . . . . . . . . . . . . .
60
Index . . . . . . . . . . . . . . . . . . . . . . . . . . . . . . . . . . . . . . . . . . . . . . . . . . . . . . . . .
62
Page 4
Robocolors
.........
.........
.........
.........
Version 2.1/3.1
Martin 2308 Controller
Preface
The Martin 2308 controller is an extremely powerful and versatile computer controlled
programming tool:
To ensure maximum benefit from the controller please take the
time to read this manual before use.
For your convenience a glossary as well as an index can be found at the back of this
manual. If Words present in the glossary are printed in italics.
Before making any connections please make sure that you received the following items with
your 2308 controller :
Martin 2308 Controller.
10 metre cable with XLR male-female plugs.
Terminating-plug.
Introduction
The Martin 2308 controller is a tool for creating countless numbers of different light-set-ups
and provides support of the following products from Martin Professional :
2308 Controller with
software version 2.1
2308 Controller with
software version 3.1
Roboscan
Roboscan
Roboscan
Roboscan
Roboscan
Roboscan
Roboscan
Roboscan
Roboscan
Roboscan
804/805
812
1004/1005
1016
Pro 218
Robocolor
Robocolor II
Robocolor MSD 200
804/805
812
1004/1005
Pro 218
Pro 518
Robocolor II
Robocolor Pro 400
Robozap
Robozap MSR 1200
Centrepiece
Martin 516, 16 channel 0-10 V
dimmer controller
Martin 2308 Controller
Version 2.1/3.1
Page 5
These products will be referred to as Units.
For more information about the supported products, consult Appendix B - F.
All the above-mentioned units can be controlled and programmed individually.
The controller itself has the following memory capabilities:
Up
Up
Up
Up
Up
Note:
to
to
to
to
to
99 different scenes in a sequence.
99 different sequences.
255 sequences in a show.
255 loops per sequence in a show.
10 different shows.
It is not possible to have both 10 shows with 255 sequences and 99 sequences
with 99 scenes. The maximum number of available programable scenes will be
displayed when switching on the controller, which is 611 scenes for 2308
controller ver. 2.1/3.1. Previous versions with less memory can be upgraded, thus
allowing 611 scenes to be programmed.
The Martin 2308 controller has four different operational modes and entering one of these
modes enables access to the operating functions available in that selected operational
mode.
Keys
The keys are used to operate the Martin 2308 controller. All keys referred to are presented
in square brackets. For example:
[edit seq] refers to the key labelled "edit seq".
LEDs
Some keys have a related Light Emitting Diode called a LED and the status of these LED’s
is printed in normal brackets in this manual. When a LED is alight it indicates that the key
in question is active.
A flashing LED means that the function related to that paticular key is frozen. Later in the
manual we will explain which of the keys can be used to select this operating function.
Display
The front of the controller includes a 4 digit display. The display indicates various messages
such as: seq no., scene no., error messages, status etc. This information will be referred to
in curly brackets. For example:
{FAC } means that the controller is resetting to factory setting.
Page 6
Version 2.1/3.1
Martin 2308 Controller
Connections
Setting the mains voltage switch
Before connecting the controller to the mains, ensure that the voltage selector switch on the
back of the controller is set for your local power supply.
Fitting a mains plug
If necessary connect a three pin plug to the mains cable using;
- the BROWN wire for the LIVE connection,
- the BLUE wire for the NEUTRAL connection and
- the GREEN/YELLOW wire for the EARTH (Ground) connection.
Linking the Units to the 2308 Controller
All data (instructions) goes from the data output of the controller (3 pin female XLR), via a
standard balanced microphone cable, to the data input (3 pin male XLR) on the first Unit
to be on the link. This Unit has also a data output (3 pin female XLR) which allows you to
continue the serial data link to the next Unit, etc. (daisy-chain).
Martin 2308 Controller
Version 2.1/3.1
Page 7
The following instructions describe how to make a proper serial data link:
1 Connect the output of the 2308 Controller to the data input of the first Unit, using the
2
3
XLR-XLR cable that came with the controller. Additional cables can be supplied by your
Martin dealer. Alternatively, you can use standard balanced microphone XLR-XLR cables.
Connect the output of the first Unit to the input of the next, again using a XLR-XLR cable.
Continue this way until all Units are connected. The order, in which you connect the Units,
is not important and has no effect on programming as far as the controller is concerned use an order which gives the easiest and shortest cable routing.
Finally, insert the XLR terminating-plug, that came with the controller, into the free output
socket of the last Unit on the link. It’s important to insert this plug to ensure correct and
error-free communication between the Martin 2308 controller and the Units.
Addressing the Units
Please refer to Appendix A when setting the address on each individual Unit on the link by
setting the DIP switch. The address that is given to the Unit decides which channel to select
on the controller in order to program that particular Unit. In order to control each unit
individually each must have its own individual address.
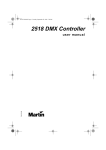
Connecting an audio source
If you wish to trigger some of your sequences from the beat of the music then connect your
audio source to the 6.35mm (1/4 inch) mono jack-socket on the rear of the controller. The
audio source you connect, should provide a line level signal (775mV RMS).
Rear panel connections
Page 8
Version 2.1/3.1
Martin 2308 Controller
Link Configuration
This feature is used to make the product configuration, i.e. to configure which type of Units
you want to control on each of the eight controller channels. Please note that using this
feature resets the controller to the factory-default settings of sequence number, show
number and trig rate (please see the section named "Set Up". It may also be used to rescue
a controller whose information has been damaged in non vital areas (where the set-up
information is stored).
Please follow this procedure in order to make the Configuration:
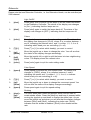
1 Switch off the Martin 2308 controller, and then back on again.
2 After {robo} stops flashing, press [set up].
3 Channel (1) turns on and the display shows which type of Unit has been assigned to this
channel by displaying one of the following:
{1004} Roboscan 1004/1005/804/805
{805 }
Do not use. Please note that 804/805 Units should be configured as
1004s
{1016} Roboscan 1016
{COL } Robocolor
{ZAP }
Robozap
{0-10}
Martin 516, 16 channel 0-10 V Dimmer Controller
{1408} Roboscan 1408
{ZAPII} Robozap MSR 1200
{P218} Roboscan Pro 218
{C200} Robocolor MSD 200
{COL2}
Robocolor II
{CNTR}
Centrepiece
{812 }
Roboscan 812
{C400} Robocolor Pro 400
{518 }
Roboscan Pro 518
NOTE
Some of the products are supported by version 2.1 only and some only by
version 3.1. Please refer to table in the "Introduction".
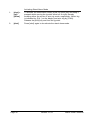
4 You may now change the Unit type for this channel by using the joystick up or down, or,
5
6
[↑] or [↓] to browse through the supported Units.
Press [enter] to assign the Unit currently shown in the display. You will then be able to
configure channel 2. Repeat this process, selecting Unit and press [enter] until all 8
channels are set up.
After pressing [enter] for channel 8 the display will show {FAC }, at which point, the
controller will run a factory setting and then continue normal operation.
NOTE
If you already have sequences programmed and you change the type of Unit
assigned to a channel your programs are likely to be unusable and you will need
to re-program.
Martin 2308 Controller
Version 2.1/3.1
Page 9
Joystick Control
The following applies when configuring a channel for Roboscans only.
When configuring a channel to control a Roboscan you can choose between standard direct
joystick control and joystick acceleration mode (ideal for micro-stepping Roboscans like Pro
218, Pro 518 etc.). The difference between the two modes is that extremely small and
precise movements can be made in acceleration mode while it is still possible to make
bigger movements by holding the joystick in position. The initial movement is very slow to
enable fine adjustment and then the motor speeds up.
To configure a channel for acceleration mode first select a Roboscan when configuring a
channel. You can toggle acceleration mode by using left/right joystick positions. When in
acceleration mode there is a dot shown on the display eg. 10.04 or 10.16.
Basic operation
This section explains how to switch on the Martin 2308 controller, how to use the keys, and
how to select operation mode. It also helps you to understand the way the controller
operates.
Switching on
1 First, switch on the Martin 2308 controller by pressing the [on] key, located in the bottom
left hand corner of the front panel.
Because an error-free memory is necessary for the correct functioning of the Martin 2308
controller, various factory-set tests are performed before you will be able to work with it.
Initially {robo} is flashing in the display. Then the version number of the software is
displayed as {rX.XX} where X.XX is the version number. The version number will be
displayed until the memory tests are completed. These tests will last about five seconds.
As soon as the display stops flashing and the version number is displayed you may
perform an initialization or a factory setting as explained in the Special functions section
of this manual.
If for some reason the memory tests fail, an error message will be displayed. Please
consult the error messages section of this manual for possible ways to continue
operation. If the remaining tests are satisfactory the controller will transmit a reset signal
to all Units connected to the link.
If you need to (re)configure the controller for a specific purpose please refer to the section
Factory setting in the Special functions section of this manual.
2 Then, switch on the Units and wait for approximately 1 minute until they have finished
their reset. It is important that you switch on the controller first to ensure that units with
protocol auto-detect function (Martin units that accept both Martin RS-485 and DMX 512
data) select the correct protocol.
Page 10
Version 2.1/3.1
Martin 2308 Controller
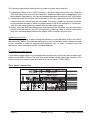
The front panel
The Martin 2308 controller front panel is divided into four sections:
Channel, Program, Function and Control.
By pressing a key briefly a different mode of the controller is selected. The keys [↑] and [↓]
repeat if pressed down for more than half a second. The [trig] key and the joystick also
repeat when activated for longer than half a second. The repetition rate increases the longer
you operate the control.
Some special functions such as deleting a program require 2 keys to be pressed simultaneously. The initialization procedure requires 3 keys to be pressed simultaneously.
Channel-section
The channel section includes eight keys labelled [1] - [8] each equipped with an LED. The
numbers correspond to the address settings of the Units. Thus, pressing [1] selects the Unit
that has 1 as its address setting.
Program-section
The program section is used to select different operation modes and the operating functions
related to these modes.
Function-section
The function section is primarily for use in the run sequence and run show modes.
Control-section
The control section includes several keys and a joystick. These functions will be explained
later. Consult the appendices B - F for further information.
Martin 2308 Controller
Version 2.1/3.1
Page 11
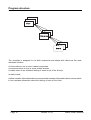
Program structure
The controller is designed to run both sequences and shows with shows as the most
advanced function.
A show refers to one or more related sequences.
A sequence refers to one or more related scenes.
A scene refers to an individual setting of some or all of the 8 Units.
In other words:
A show contains information about sequences that contains information about scenes which
in turn contains information about the setting of each of the Units.
Page 12
Version 2.1/3.1
Martin 2308 Controller
Creating sequences and shows
Using the sequence editor you may create sequences that match the physical dimensions
of the room you are lighting. Later, by using the show editor you may link the sequences to
make shows which can last for hours without the need of an operator. You can edit your
sequences and shows at any time.
Edit sequence
1
2
3a
3b
4
5
6
7
Press [edit seq]. The status of the display now changes to {01 }, where 01 indicates
sequence number 01.
Press [↑] or [↓], or, use the joystick to change the sequence number. Confirm by
pressing [enter]. One of two things will happen:
If you are about to program a new sequence you will be placed in step one ready to
program scene one. The display shows {sequence number} and {01} scene one in the
sequence, or
if the sequence already exists the display shows {Pr }. Press [enter] and the sequence
is ready to be edited. You are now ready to edit the first scene.
Depending on which Units are configured to which channels, (1) - (8) turn on. This is
done automatically by the controller, which scans all the channels and turns on the
LEDs of the channels which are configured to Units of the same type as the Unit on
channel 1.
Select the Unit(s) to be programmed by pressing [1] - [8]. (1) to (8) will be lit
accordingly. If a Unit different from the one currently in use is selected, the LED for that
channel is turned on and all others turned off. Use the function keys described in the
Appendices B to F to program the Unit now in use.
When you are satisfied press [enter] to go to the next scene. The right part of the
display will show the new scene number. Note that the last scene in a new sequence
is automatically saved by the controller and you should not press [enter] in order to
store this. Press [enter] only if you want to add another scene to the sequence.
You may browse through the scenes by pressing [↑] or [↓] to make some changes in
the positions or effects if necessary. If any changes to a scene are made - press
[enter] to save it temporarily.
When you are satisfied with the whole sequence, save it permanently in memory by
pressing [edit seq]. The display will show {SAXX}, where XX is the sequence number,
until the sequence is saved. If you still have scenes to program, continue as described
and save again. It’s not possible to increase or decrease the number of scenes
in a sequence after you have left edit-sequence mode. The limit of scenes in any
sequence is 99. If you press [enter] in scene 99 will be placed in scene 01.
NOTE
Do not turn off the controller whilst saving or deleting sequences as the
information in a sequence could be lost - not fatal but annoying as the ruined
scene in the sequence has to be found, edited and saved again.
Martin 2308 Controller
Version 2.1/3.1
Page 13
Delete sequence
1
2
3
4
5
To delete a sequence, enter edit-sequence mode, by pressing [edit seq], as if you
were about to edit an existing sequence.
Find the sequence you wish to delete by pressing [↑] or [↓], or, use the joystick.
Press [enter] to select the sequence for deletion (or editing) and the display will show
{Pr }.
If you wish to delete the sequence press [edit seq] again. The display will now flash {dE
}.
You may cancel by pressing [enter] or confirm by pressing [↑] and [↓] at the same time.
The display shows {dE } until the sequence is deleted. You may now select a new
sequence to be edited or deleted.
NOTE
Sequences that are deleted but still referred to in shows will be replaced by the
sequence with the lowest sequence number during execution in Run Show.
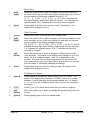
Edit trig-rate
As some sequences look better at a higher trig rate than others, you may program the rate
by pressing [auto] and tapping [trig] at the preferred rythem. This trig rate may be used
when the sequence is executed in run-sequence or run-show mode, and is set to the
period of time between that last two pushes of the trig button. If you do not set the trig rate
now, a default trig rate will be used. You may change this default setting by entering and
editing the sequence and setting a new trig rate.
Edit sequence hints
When you are programming the Units you will discover that only the keys you press have
affect on the functions of the Units selected. For example:
If you press [color] and then use the joystick while Unit number 1, 2 and 3 are
selected all these Units will change to the same color and all other remaining
functions such as pan and tilt will be unchanged.
Be aware of which Unit(s) you have selected when activating a function as only those, but
all of these selected Units will be affected.
Page 14
Version 2.1/3.1
Martin 2308 Controller
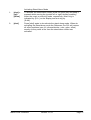
The show editor
The show editor gives you the possibility of designing shows containing your own sequences
or pre-programmed sequences. You can choose the order, the number of loops and even
put in blackouts lasting for a pre-arranged period. For example:
Use a sequence containing one blackout scene and a trig rate of 1 minute. Let it
loop 60 times in the show and the result will be a blackout lasting one hour.
Edit show - Creating a New Show
1
2
3
4
5
6
7
Press [edit show] to enter the edit show mode. Please note that if no sequences are
programmed you will be denied access to the show editor. The display shows {ShoX},
where X is a show number from 0 to 9. Default X is the first free number for your next
show. If no shows are programmed, the default show number will be 0.
You may now press [↑] or [↓] to select a show to edit.
Press [enter] to confirm the selection. You are now ready to program your first show
step.
The display now changes to display {SEXX}, where XX is the sequence number. The
displayed sequence will be the first one present in memory.
To change the sequence number move the joystick up or down, thereby browsing
through the sequences in memory. Press [enter] when you have found the sequence
you want. The status of the display then changes to {LXXX} where XXX is a number
from 1 to 255.
You will now have to decide how many times this sequence is to loop before the
sequence in the next step of the show is to be executed. Increase / decrease the
number of loops, by using the joystick and press [enter] when satisfied. The status of
the display then changes to {Se--}.
Repeat step 5 and 6 above to add further steps to your show. If, however, no more
sequences are to be added, press [edit show] and the show is saved. You may now
either continue to edit the show or select another mode.
NOTE:
You cannot exceed 255 steps in one show.
Edit show - Editing an existing Show
It is possible to replace sequences and the number of loops in existing shows, as well as
inserting new steps or deleting existing ones.
Replacing a sequence and changing the number of loops
1
2
3
4
Enter the edit show mode and select the show you wish to edit, as described above.
The display then shows {Pr }, indicating that a show is already programmed. You now
have two options; either delete the show or edit it. To delete it see later in the manual.
Press [enter] to start editing the show. The display now changes to display {SEXX},
where XX is the sequence number of the first step in the show.
You can leave the sequence number unchanged by pressing [enter], or, change it by
first moving the joystick up or down and then and pressing [enter] when satisfied.
The status of the display then changes to {LXXX}, indicating the number of loops. You
Martin 2308 Controller
Version 2.1/3.1
Page 15
5
6
can leave the loop number unchanged by pressing [enter], or, change it by first moving
the joystick up or down and then and pressing [enter] when satisfied.
Either way, you automatically proceed to the next step of the show. Repeat step 3 and
4 above to edit the rest of the show.
Finally, press [edit show] to save the show.
Insert sequence in show
To insert an extra sequence between existing steps in a show follow the procedure
described above. However, instead of selecting a new sequence, push the joystick up until
the display shows {InS_} and then press [enter] to insert a new step before the step you
were in. By default, the sequence that was programmed at this position is used again and
you must scroll to another sequence with the joystick or your show will contain a duplicate
step. Please note that you cannot insert a step if all 255 steps in the show are used.
Delete sequence from show
To delete an existing step in a show follow the procedure described above. However,
instead of selecting a new sequence, push the joystick down until the display shows {dEl_}
and then press [enter] to delete the step. You cannot delete a sequence if you have only
1 step in the show - use delete show instead.
Delete show
To delete a show, enter edit-show mode as you would if you were about to edit the same
show by pressing [edit show] and selecting the required show number followed by [enter]
so that the display reads {Pr.oX}, where X is the show number. If you want to delete the
show press [edit show] so that {dEoX} starts flashing in the display. Press [↑] and [↓] at the
same time to confirm that you wish to delete the show. The show is now deleted and you
are ready to select a new show.
Page 16
Version 2.1/3.1
Martin 2308 Controller
Set up
For your convenience the controller is capable of remembering actual settings for:
Run-sequence or run-show mode.
Show number (when in run-show mode).
Sequence number (when in run-sequence mode).
Units to be moved in the sequence.
Units to be used as follow spots.
Units to be frozen.
Whether music trig source is on or off.
Whether auto trig source is on (frozen, normal or off).
Autotrig-rate (if frozen is on).
Whether manual trig source is on or off.
Music input trig level (Level 1 to 20).
(The positions of the various function settings are not restored if the controller is turned
off and then back on or if another mode of the controller is selected)
It is necessary to be in either run-sequence or run-show mode to program these functions.
Choose the setting that you require, hold down the [set up] button for 2 to 3 seconds until
the controller displays {SEUP}. Release the button and the setting is stored. The set-up is
now saved and will be the default set up the next time the controller is switched on.
Changing the Unit configuration on the 2308 Controller will "reset" all settings to the "factory
default setting".
Martin 2308 Controller
Version 2.1/3.1
Page 17
Running sequences and shows
Run sequence
To run a sequence press [run seq].
The controller will select this mode and will check of the set-ups (to be explained later),
checking if the default sequence number is present. If the default sequence is found this
sequence will be executed until a new one is selected. If the default sequence does not exist
the controller, automatically, selects the sequence with the lowest number. If no sequences
have been programmed this function will not be accessible.
To change the current sequence press [↑] or [↓] to see which sequences are present in
memory. The sequence displayed will be executed when [enter] is pressed.
Select any other mode by pressing [edit seq] [edit show] or [run show].
Run show
To run a show press [run show].
The default show number, if any, will automatically be selected.
The show will start with the first sequence contained in the show, executing this sequence
as many times as the loop is set. It will then proceed to the next sequence if any. If the
show contains information about a non-existnt sequence - that is, one that may have been
erased after the show was created - this sequence will automatically be replaced by the
sequence with the lowest number during this operation. The sequence will, as before, be
executed as many times as the loop setting indicates. After the last sequence in the show
has been executed the show will automatically restart.
While a show is running a new show may be selected by pressing [↑] or [↓]. If confirmed
by pressing [enter] the newly selected show will be executed.
If no show has been programmed pressing [run show] takes you to the edit-show mode.
Page 18
Version 2.1/3.1
Martin 2308 Controller
Trig sources
To run a sequence or a show a signal is needed to tell the controller when to continue from
one scene to the next. This signal is called a trig source.
There are three basic trig sources:
Manual trig, Auto trig and Music trig.
These functions are accessed by pressing [man], [auto] or [music], respectively. One, two
or all trig sources may be selected at the same time. This will be explained in detail later in
this section.
Manual trig
If manual trig is selected then - when tapping the button marked [trig] - the controller will
step through each of the scenes in the selected sequence. If (manual) is on, tapping [trig]
always overrides auto- and music trig.
Auto trig
The auto trig function has two modes of operation:
To select the first mode, press [auto] and (auto) will be continuously on. The trig rate with
which a sequence has been programmed is used.
To select the second trig mode, press [auto] again and (auto) starts flashing. The trig rate
is ’frozen’ to the current rate and will use this rate for the following sequences and shows
until [auto] is pressed again. It is possible to tap [trig] at a particular rate in both modes (two
to three times are sufficient) and the controller will continue with this new trig rate. The rate
is the period of time between 2 consecutive pushes of the trig button.
When setting the autotrig rate it can be a little difficult to hit the desired rate accurately. It
is possible to fine-tune the trig rate by moving the joystick up to increase or down to
decrease the rate. This is not possible when Units are being used as follow-spots or if (level)
is on.
Setting the autotrig rate when (man) is on is not possible because tapping the [trig] button
is used to override the auto trig function.
If only Manual Trig is selected, then pressing [auto] will automatically swap the mode to
Auto-Trig and de-select [man] turning (man) off.
Martin 2308 Controller
Version 2.1/3.1
Page 19
Music trig
The music trig mode requires a line level signal (775mV RMS) to be connected to the 6mm
jack-socket in the rear of the controller.
The input signal sensitivity may be adjusted by pressing [level] and then [↑] to increase or
[↓] to decrease the sensitivity level. The new level setting takes effect immediately. The
joystick up - down may also be used to select level. You may select levels from 1 to 20.
Press [level] again to leave the level setting function. You have to leave level setting mode
to return to normal operation.
If (auto) is enabled while (music) is on, a special function is obtained:
If the music signal stops for 2-3 seconds the autotrig rate will take over until a new music
signal is detected.
Follow-spots
To use one or more Units as follow spots while a show or sequence is running press [1] [8] to select the Unit(s) to be used. (1) - (8) will be turned on accordingly. It is not possible
to select two different types of Units at the same time. If you try to do this anyway, the
controller turns off the channel(s) not frozen, and turns on the last one you selected. Now
you have control of the unit(s) and may use the control keys to change position, color, gobo
etc..
Frozen-mode
When the mirror(s) have been moved to a selected spot you may freeze the position by
pressing [1] - [8]. (1) - (8) will start flashing to indicate the frozen state. To disable this
function press [1] - [8] again and they will return to normal run mode.
On-Line
Pressing [on line], so that (on line) turns off, disables communication between the controller
and the Units, switches off the Units’ lights and disables the trigging. If you have a RoboZap
connected, and the mirror is rotating, this is stopped. Pressing [on line] again re-enables the
communication and trigging and turns on the lights that were switched on before.
Page 20
Version 2.1/3.1
Martin 2308 Controller
Special functions
Initialization
Only use this feature when it is absolutely essential as it will entirely erase all information
about shows and sequences in memory. However, this is the only way to regain control of
your controller when information about sequences is too damaged to be restored in the
usual way.
Use this function only if you really want to erase all sequence information as the controller
will be returned to the state it was in when you first purchased it.
The procedure is as follows:
1
2
3
4
5
Switch off the controller then switch it back on.
Wait until {robo} has stopped flashing.
Press [level], [on line] and [setup] at the same time and keep them down.
The display shows { In }.
Press [enter] to erase all memory, or turn the controller off, and then back on if you
wish to cancel.
Write-protecting the memory
If you want to prevent unauthorized personnel from overwriting the memory contents in your
2308 controller you may write-protect the memory. Unplug the controller from the mains and
remove the jumper labelled ’SEQ STORE ENABLE’ located at the top edge of the front
PCB.
The 2308 Controller will give a warning when trying to save data to a write-protected
memory. If the memory is write-protected the controller will display a {-Pr-}, thereby giving
warning when entering Edit Seq or Edit Show modes. It will also warn if you try to save
other information such as setup or configuration. To clear the warning message press
[enter].
Using external joystick
By connecting an external joystick (standard digital or micro-switch type) you may duplicate
the functions of the built-in joystick as well as some of the functions from the front panel
(gobo, color, shutter and speed). The functions which are duplicated depend on the exact
connection of the joystick to the controller. The label on the rear of the controller shows how
to connect the external joystick.
Transferring data from one Controller to another
In order to transfer (copy) data from one controller to another please note that both
controllers MUST have at least software version 2.0 and they MUST have the same memory
installed in them (eg. 611 scenes).
In the following the term upload is used to describe the process of transferring data from a
source controller and download describes the process of receiving data to a target
Martin 2308 Controller
Version 2.1/3.1
Page 21
Controller. Please note that the complete programmable data memory is transferred from
source to target, completely overwriting the existing memory in the target controller.
The transferal of data between two controllers uses the normal serial transmission link for
communication. Switch off both controllers and connect them using any of the 3 pin XLR
cables that are normally used to connect units. Disconnect the serial link leading to the
fixtures. Whether the input or output connections are used on the controllers is not
important.
1
2
Switch the target controller on and during the initialization pull the joystick downwards
until the display shows {do00} (Download mode). The target controller is now ready for
receiving data.
Switch the source controller on and during the initialization push the joystick upward
until the display shows {up--} (Upload mode). The data transfer will engage
automatically.
During the data transfer the two displays show {UpXX} and {doXX}, respectively, where XX
is a hexadecimal counter. The process will continue until the complete memory is transferred
where after both controllers will display {----}. To reset the controllers to normal operation
you will have to switch them off, and then on. Do not do this however before you have
disconnected the link cable used for transferal as two controllers transmitting on the same
link may cause damage to either or both of the controllers.
If an error message should occur, then consult the "error messages" section of this manual.
Page 22
Version 2.1/3.1
Martin 2308 Controller
Display messages
Status information
In
FAC
ShoX
Shxx
:
:
:
:
Pr
dEl
:
:
SA
LEXX
SEUP
ShuX
On-OffSPEX
YSPX
:
:
:
:
:
:
:
:
COLX :
YCoX :
d XX
:
Initialization. The entire content of the memory is to be deleted.
Factory setting. The restoring to factory-default values is taking place.
show is about to be edited or deleted. X is a number from 0 to 9.
show is running. XX is a legal sequence number. 1 to 99 for user sequences and
A0-A9 B0-B9 C0-C9 D0-D9 for pre-programmed sequences.
Existing sequence or show about to be deleted or edited.
Delete. Display flashing indicates that a sequence or show is to be deleted.
Constant display indicates the deleting phase. Must be confirmed by the user.
Saving sequence or show.
Music trig level. XX is a number from 1 to 20 level may be changed by user.
Setup is saved, refer to Run sequence or Run show.
Shutter key is pressed, X is selected strobe rate.
Shutter key is pressed and depressed within a second.
Shutter key is pressed and depressed within a second.
Speed key is pressed, X is selected movement speed.
Speed key is pressed, X is selected movement speed. Y varies depending of the
Unit controlled.
Color key is pressed, X is selected color number.
Color key is pressed. X is selected color number. Y varies depending on the Unit
controlled.
Dimmer level.
For further status information, please refer to the individual product information in the
appendices A to F.
Error messages
Err0
Err1
Err2
Err3
:
:
:
:
Err4
:
Err5
:
Err6
Err7
Err8
Err9
:
:
:
:
ErrA
:
FATAL ERROR. The RAM circuit is malfunctioning. Contact your dealer.
Memory full. There is no more room for additional scenes.
User memory malfunctioning. Contact your dealer.
Memory configuration error. The software has detected an inconsistency in the
memory configuration. Please check your programs. If the error persists contact
your dealer.
More memory has been added. Shows will be deleted. Confirm by pressing
[enter].
If you have upgraded from a version earlier than 1.5, this error will always be
shown when you switch on the first time. Press [enter] to proceed. If this
message appears at any other time it indicates that memory has been removed.
All scenes, sequences and shows will be deleted.
Memory full. No room for additional show steps.
Memory full. No room for additional scenes or show steps.
The maximum number of sequences (99) have already been programmed.
Information about sequences in the memory is too damaged to be restored. You
must re-initialize the controller. If this error persists contact your dealer.
Wrong memory size. You can only transfer data between controllers with the
Martin 2308 Controller
Version 2.1/3.1
Page 23
ErrB
ErrC
same memory size (upload/download).
: Sync Error. Received data is out of synchronization, download aborted. The data
already transferred is probably corrupted. Check connections and try again
(upload/download).
: Memory protect error. You cannot download to a controller that is write- protected
(upload/download).
Page 24
Version 2.1/3.1
Martin 2308 Controller
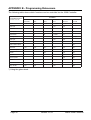
APPENDIX A DIP switch settings for Martin intelligent light units
To achieve proper control of the Units connected to the 2308 Controller you will have to
address these so they match with the controller configuration, or vice versa. You can use
any of the addresses from 1 through 8. If you are not sure about this procedure then refer
to the user’s manual for the particular Unit for detailed information.
The following table shows which DIP-switches that you will have to switch on in order to
address any of the eight controller channels.
DIP-Switch settings
Unit/Channel no.
1
2
3
4
5
6
7
8
Martin 2308 Controller
DIP-switch ON
1
2
1,2
3
1,3
2,3
1,2,3
4
Version 2.1/3.1
Page 25
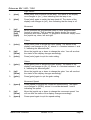
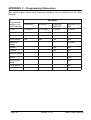
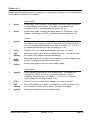
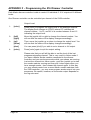
APPENDIX B - Programming Roboscans
The following table shows which functions can be controlled via the 2308 Controller:
Unit Name
Programable functions
via 2308 controller
Colors
Roboscan
804/1004
Roboscan
805
Roboscan
1016
Roboscan
812
Roboscan
Pro 218
Roboscan
Pro 518
4+W
4+W
15+W
11+W+B/O
17+W
17+W
yes
yes
Color split
Continuous color scroll
yes
Color Speed
Fixed Gobos
4
16
yes
yes
12+B/O
18
Rotating Gobos
yes
5+Open
Gobo split
yes
yes
Gobo speed
yes
yes
Gobo rotation speed
yes
Movement
yes
yes
yes
yes
yes
yes
Movement speed
yes
yes
yes
yes
yes
yes
yes
yes
Dimmer
yes
yes
Dimmer speed
yes
yes
yes
yes
Shutter
yes
Strobe
yes *)
Stand Alone Mode
yes
yes
yes
yes
Lamp On/Off
yes
yes
*) Using the gobo wheel.
Page 26
Version 2.1/3.1
Martin 2308 Controller
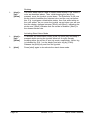
Roboscan 804 / 805 / 1004
Light On/Off
1:
[shut]
Press [shut] once to power on the lamp. The status of the display
now changes to {on--}, thus indicating that the lamp is on.
2:
[shut]
Press [shut] again to switch the lamp back off. The status of the
display now changes to {off-}, thus indicating that the lamp is off.
Movement
1:
[up]/
[down]/
[left]/
[right]
Mirror positions are programmed when no other programmable
feature is selected. That is when the display shows the current
sequence and scene number. To program a movement simply move
the joystick up, down, left and right.
Colors
1:
[color]
Press [color] once to access the color setting. The status of the
display now changes to {Co_X}, where X i a number between 1 and
5, indicating the selected color.
2:
[up]/
[down]
Move the joystick up or down to change the color. You will see that
the status of the display changes accordingly.
3:
[color]
Press [color] again to quit the color setting.
Gobos
1:
[gobo]
Press [gobo] once to access the gobo setting. The status of the
display now changes to {Go_X}, where X i a number between 1 and
4, indicating the selected gobo.
2:
[up]/
[down]
Move the joystick up or down to change the gobo. You will see that
the status of the display changes accordingly.
3:
[gobo]
Press [gobo] again to quit the gobo setting.
Movement Speed
1:
[speed]
Press [speed] to access the movement speed setting. The status
now changes to {SPEX}, where X is number between 1 and 8
indicating the speed.
2:
[up]/
[down]
Move the joystick up or down to change the movement speed. You
will see that the status of the display changes accordingly.
3:
[speed]
Press speed again to quit the speed setting.
Martin 2308 Controller
Version 2.1/3.1
Page 27
Roboscan 1016
Light On/Off
1:
[shut]
When powering on the Roboscan 1016 the lamp itself will
automatically switch on. Press [shut] once to open the shutter,
thereby switching on the light. The status of the display changes to
{On--}, thus indicating that the light is now on.
2:
[shut]
Press [shut] again to switch the light back off. The status of the
display now changes to
{OFF-}, thus indicating that the light is now off. Please note that the
lamp itself remains on.
Strobing
1:
[shut] +
[up]/
[down]
To program a strobe effect, press the [shut] key, and keep it
pressed, whilst moving the joystick up or down to change the strobe
rate. The status of the display changes to {ShuX} where X is a
number between 0 and 6 indicating the strobe rate. As you move
the joystick up and down, you will see that X changes accordingly.
{Shu0} indicates that the strobe is disabled. {Shu6} is the slowest
strobe rate.
Movement
1:
[up]/
[down]/
[left]/
[right]
Mirror positions are programmed when no other programmable
feature is selected. That is when the display shows the current
sequence and scene number. To program a movement simply move
the joystick up, down, left and right.
Colors
1:
[color]
Press [color] once to access the color setting. The status of the
display now changes to {Co_X}, where X is a number between 1
and 16, indicating the selected color.
2:
[up]/
[down]
Move the joystick up or down to change the color. You will see that
the status of the display changes accordingly.
3:
[color]
Press [color] again to quit the color setting.
Gobos
1:
[gobo]
Press [gobo] once to access the gobo setting. The status of the
display now changes to {Go_X}, where X is a number between 1
and 16, indicating the selected gobo.
2:
[up]/
[down]
Move the joystick up or down to change the gobo. You will see that
the status of the display changes accordingly.
3:
[gobo]
Press [gobo] again to quit the gobo setting.
Page 28
Version 2.1/3.1
Martin 2308 Controller
Movement Speed
1:
[speed]
Press [speed] to access the movement speed setting. The status
now changes to {SPEX}, where X is a number between 1 and 8
indicating the speed.
2:
[up]/
[down]
Move the joystick up or down to change the movement speed. You
will see that the status of the display changes accordingly.
3:
[speed]
Press speed again to quit the speed setting.
Martin 2308 Controller
Version 2.1/3.1
Page 29
Roboscan 812
Lamp On/Off
1:
[shut]
When powering-on the Roboscan 812 the lamp itself will remain off
until a ’lamp on’ command is sent fro the controller. Press [shut]
once to ignite the lamp. The status of the display then changes to
{on--}, thus indicating that the lamp is now on. Please note that the
color and gobo wheels in the Roboscan 812 black-out as default
positions. To enable light output both color and gobo must be
moved from default position. See below.
2:
[shut]
To power the lamp off again, keep the [shut] key pressed for about
8 seconds until the status of the display changes to {LOFF}. Please
note that the Roboscan 812 uses a cold restrike lamp, meaning that
must wait approximately 3 minutes before you can power it back on
again.
t>8 sec.
Colors
1:
[color]
Press [color] once to access the color setting. The status of the
display now changes to {Co_X}, where X is a number between 1
and 13, indicating the selected color.
2:
[up]/
[down]
Move the joystick up or down to change the color. You will see that
the status of the display changes accordingly.
2:
[left]/
[right]
Move the joystick left or right to split the beam into two neighbouring
colors. The display shows the nearest color.
3:
[color]
Press [color] again to quit the color setting.
Gobos
1:
[gobo]
Press [gobo] once to access the gobo setting. The status of the
display now changes to {Go_X}, where X is a number between 1
and 13, indicating the selected gobo.
2:
[up]/
[down]
Move the joystick up or down to change the gobo. You will see that
the status of the display changes accordingly.
[left]/
[right]
Move the joystick left or right to split the beam into two neighbouring
gobos. The display shows the nearest gobo.
[gobo]
Press [gobo] again to quit the gobo setting.
3:
Page 30
Version 2.1/3.1
Martin 2308 Controller
Strobing (gobo strobe)
1:
[shut] +
[up]/
[down]
The gobo wheel can be used to create strobe effects. First, select a
gobo as described above. Then, whilst keeping the [shut] key
pressed, move the joystick up and down. The Roboscan 812 will
now strobe (switch) between the selected gobo and the one just
before this. As you move the joystick up and down you will see that
the display changes between {Shu0} and {Shu7}, thus indicating the
strobe rate. {Shu0} indicates that the strobe is disabled. {Shu7} is
the slowest strobe rate.
Movement
1:
[up]/
[down]/
[left]/
[right]
Mirror positions are programmed when no other programmable
feature is selected. That is when the display shows the current
sequence and scene number. To program a movement simply move
the joystick up, down, left and right. If you have configured the
controller with acceleration factor during the set-up, you will see
that, when moving the joystick in one direction and keeping it there,
the mirror starts moving with a slow speed and then accelerates
until full speed is obtained. This feature allows you to program
accurate positions in a quick way.
Movement, Color and Gobo Speed
1:
[speed]
Press [speed] to access the movement speed setting. The status in
the display now changes to {SPEX}, where X is a number between
1 and 8 indicating the movement speed.
2:
[up]/
[down]
Move the joystick up or down to change the movement speed. You
will see that the status of the display changes accordingly.
3:
[speed]
Press [speed] another time to access the color speed setting (the
speed at which the color wheel scrolls from one color to another).
The status in the display now changes to {CSPX}, where X is a
number between 1 and 8 indicating the speed.
4:
[up]/
[down]
Move the joystick up or down to change the color speed. You will
see that the status of the display changes accordingly.
5:
[speed]
Press [speed] a third time to access the gobo speed setting (the
speed at which the gobo wheel scrolls from one gobo to another).
The status in the display now changes to {GSPX}, where X is
number between 1 and 8 indicating the speed.
6:
[up]/
[down]
Move the joystick up or down to change the gobo speed. You will
see that the status of the display changes accordingly.
7:
[speed]
Finally, press speed once again to quit the speed setting.
Martin 2308 Controller
Version 2.1/3.1
Page 31
Activating Stand Alone Mode
1:
[shut] +
[up]/
[down]
To activate the stand-alone mode, press the [shut] key and keep it
pressed whilst moving the joystick left or right, thereby enabling
either the music or auto trig mode, respectively. Music trig is
indicated by {S-A } on the display and auto trig by {S-AA}. Release
the [shut] key and then the joystick.
2:
[shut]
Press [shut] again to de-activate the stand alone mode. When deactivating the stand-alone mode, the Roboscan 812 will restore all
effect positions (pan, tilt, color, gobo) exactly as they were at the
time the stand-alone function was activated.
Page 32
Version 2.1/3.1
Martin 2308 Controller
Roboscan Pro 218
Light On/Off
1:
[shut]
When powering on the Roboscan Pro 218 the lamp itself will
automatically switch on. Press [shut] once to open the shutter,
thereby switching on the light. The status of the display changes to
{On--}, thus indicating that the light is now on.
2:
[shut]
Press [shut] again to switch the light back off. The status of the
display now changes to {OFF-}, thus indicating that the light is now
off. Please note that the lamp itself remains on.
Strobing
1:
[shut] +
[up]/
[down]
To program a strobe effect, press the [shut] key, and keep it
pressed, whilst moving the joystick up or down to change the strobe
rate. The status of the display changes to {ShuX} where X is a
number between 0 and 6 indicating the strobe rate. As you move
the joystick up and down, you will see that X changes accordingly.
{Shu0} indicates that the strobe is disabled. {Shu6} is the slowest
strobe rate.
Dimmer - Light intensity
1:
[dimmer]
Press [dimmer] once to access the dimmer function. The status of
the display now changes to {d XX}, where XX is a number between
00 and 31 indicating the dimming level.
{d 31} is no dimming (full light} and {d 00} is full dimming (no light).
If you are using a 2208 controller the [dimmer] key is not printed on
the front panel but is located ’invisibly’ just to the right of the [shut]
key.
2:
[up]/
[down]
Now, move the joystick up and down to set the desired light
intensity. As you move the joystick you will see that the display
changes between {d 00} and {d 31}, as an indication of the
programmed intensity.
3:
[dimmer]
Press [dimmer] again to quit the dimmer setting.
Martin 2308 Controller
Version 2.1/3.1
Page 33
Movement
1:
[up]/
[down]/
[left]/
[right]
Mirror positions are programmed when no other programmable
feature is selected. That is when the display shows the current
sequence and scene number. To program a movement simply move
the joystick up, down, left and right. If you have configured the
controller with acceleration factor during the set-up, you will see
that, when moving the joystick in one direction and keeping it there,
the mirror starts moving with a slow speed and then accelerates
until full speed is obtained. This feature allows you to program
accurate positions in a quick way.
Colors
1:
[color]
Press [color] once to access the color setting. The status of the
display now changes to {Co_X}, where X is a number between 1
and 18, indicating the selected color.
2:
[up]/
[down]
Move the joystick up or down to change the color. You will see that
the status of the display changes accordingly.
3:
[left]/
[right]
Move the joystick left or right to split the beam into two neighbouring
colors. The display shows the nearest color.
4:
[color]
Press [color] again to quit the color setting.
Gobos
1:
[gobo]
Press [gobo] once to access the gobo setting. The status of the
display now changes to {Go_X}, where X is a number between 1
and 18, indicating the selected gobo.
2:
[up]/
[down]
Move the joystick up or down to change the gobo. You will see that
the status of the display changes accordingly.
3:
[left]/
[right]
Move the joystick left or right to split the beam into two neighbouring
gobos. The display shows the nearest gobo.
4:
[gobo]
Press [gobo] again to quit the gobo setting.
Page 34
Version 2.1/3.1
Martin 2308 Controller
Movement, Color and Gobo Speed
1:
[speed]
Press [speed] to access the movement speed setting. The status in
the display now changes to {SPEX}, where X is a number between
1 and 8 indicating the movement speed.
2:
[up]/
[down]
Move the joystick up or down to change the movement speed. You
will see that the status of the display changes accordingly.
3:
[speed]
Press [speed] another time to access the color speed setting (the
speed at which the color wheel scrolls from one color to another).
The status in the display now changes to {CSPX}, where X is a
number between 1 and 8 indicating the speed.
4:
[up]/
[down]
Move the joystick up or down to change the color speed. You will
see that the status of the display changes accordingly.
5:
[speed]
Press [speed] a third time to access the gobo speed setting (the
speed at which the gobo wheel scrolls from one gobo to another).
The status in the display now changes to {GSPX}, where X is a
number between 1 and 8 indicating the speed.
6:
[up]/
[down]
Move the joystick up or down to change the gobo speed. You will
see that the status of the display changes accordingly.
7:
[speed]
Press [speed] a fourth time to access the dimmer speed setting. The
status in the display now changes to {dSPX}, where X is a number
between 1 and 8 indicating the dimmer speed.
8:
[up]/
[down]
Move the joystick up or down to change the dimmer speed. You will
see that the status of the display changes accordingly.
9:
[speed]
Finally, press speed once again to quit the speed setting.
Martin 2308 Controller
Version 2.1/3.1
Page 35
Roboscan Pro 518
Lamp On/Off and Light On/Off
1:
[shut]
When powering-on the Roboscan Pro 518 the lamp itself will remain
off until a ’lamp on’ command is sent fro the controller. Press [shut]
once to ignite the lamp. The status of the display then changes to
{on--}, thus indicating that the lamp is now on. This key-press also
opens the shutter.
2:
[shut]
Press [shut] again to close the shutter, thereby blanking off the light.
The status of the display then changes to {OFF-} Pressing [shut]
further times toggles the light between on and off. Please note that
the lamp itself remains on.
2:
[shut]
To power the lamp back off again, keep the [shut] key pressed for
about 8 seconds until the status of the display changes to {LOFF}.
Please note that the Roboscan Pro 518 uses a cold restrike lamp,
meaning that you’ll have to wait approximately 5 minutes before you
can power it back on again.
t>8 sec.
Strobing
1:
[shut] +
[up]/
[down]
To program a strobe efect, press the [shut] key, and keep it
pressed, whilst moving the joystick up or down to change the strobe
rate. The status of the display changes to {ShuX} where X is a
number between 0 and 6 indicating the strobe rate. As you move
the joystick up and down, you will see that X changes accordingly.
{Shu0} indicates that the strobe is disabled. {Shu6} is the slowest
strobe rate.
Dimmer - Light intensity
1:
[dimmer]
Press [dimmer] once to access the dimmer function. The status of
the display now changes to {d XX}, where XX is a number between
00 and 31 indicating the dimming level.
{d 00} is no dimming (full light} and {d 31} is full dimming (no light).
If you are using a 2208 controller the [dimmer] key is not printed on
the front panel but is located ’invisibly’ just to the right of the [shut]
key.
2:
[up]/
[down]
Now, move the joystick up and down to set the desired light
intensity. As you move the joystick you will see that the display
changes between {d 00} and {d 31}, as an indication of the
programmed intensity.
3:
[dimmer]
Press [dimmer] again to quit the dimmer setting.
Page 36
Version 2.1/3.1
Martin 2308 Controller
Movement
1:
[up]/
[down]/
[left]/
[right]
Mirror positions are programmed when no other programmable
feature is selected. That is when the display shows the current
sequence and scene number. To program a movement simply
move the joystick up, down, left and right. If you have configured
the controller with acceleration factor during the set-up, you will
see that, when moving the joystick in one direction and keeping it
there, the mirror starts moving with a slow speed and then
accelerates until full speed is obtained. This feature allows you to
program accurate positions in a quick way.
Colors
1:
[color]
Press [color] once to access the color setting. The status of the
display now changes to {Co_X}, where X is a number between 1
and 18, indicating the selected color.
2:
[up]/
[down]
Move the joystick up or down to change the color. You will see that
the status of the display changes accordingly.
3:
[left]/
[right]
Move the joystick left or right to activate continuous color scroll. The
status of the display then changes to {Co L} or
{Co r}, for left and right color scrolling, respectively. The scroll speed
is identical to the current color speed (see below).
4:
[left]/
[right]
Move the joystick left or right again to terminate the continuous color
scroll. The Roboscan Pro 518 will then restore the previously
programmed color position.
5:
[color]
Press [color] again to quit the color setting.
Gobos
1:
[gobo]
Press [gobo] once to access the gobo setting. The status of the
display now changes to {Go_X}, where X is a number between 1
and 6, indicating the selected gobo.
2:
[up]/
[down]
Move the joystick up or down to change the gobo. You will see that
the status of the display changes accordingly.
3:
[left]/
[right]
Move the joystick left or right to activate gobo rotation. The status of
the display then changes to {GoXL} or {GoXr}, for left and right
rotation, respectively. X indicates the selected gobo. The speed of
the rotation is identical to the current gobo speed (see below).
4:
[left]/
[right]
Move the joystick left or right to stop the obo rotation.
5:
[gobo]
Press [gobo] again to quit the gobo setting.
Martin 2308 Controller
Version 2.1/3.1
Page 37
CTC, Frost, Prism
1:
[iris]
Press [iris] once to access the effect wheel setting. The status of the
display now changes to {EF_X}, where X indicates the following
effects:
1
2
3
4
Open (no effect).
Hot color temperature corrector (5500-3400K).
Frost.
3-facet prism.
Note that on the 2208 controller the [iris] key is not printed on the
front panel but is located ’invisibly’ just to the right of the right of the
[speed] key.
2:
[up]/
[down]
Move the joystick up or down to change the effect. You will see that
the status of the display changes accordingly.
5:
[iris]
Press [iris] again to quit the effect setting.
Movement, Color and Gobo Speed
1:
[speed]
Press [speed] to access the movement speed setting. The status in
the display now changes to {SPEX}, where X is a number between
1 and 8 indicating the movement speed.
2:
[up]/
[down]
Move the joystick up or down to change the movement speed. You
will see that the status of the display changes accordingly.
3:
[speed]
Press [speed] another time to access the color speed setting (the
speed at which the color wheel scrolls). The status in the display
now changes to {CSPX}, where X is a number between 1 and 8
indicating the speed.
4:
[up]/
[down]
Move the joystick up or down to change the color speed. You will
see that the status of the display changes accordingly.
5:
[speed]
Press [speed] a third time to access the gobo rotation speed setting.
The status in the display now changes to {GSPX}, where X is a
number between 1 and 8 indicating the speed.
6:
[up]/
[down]
Move the joystick up or down to change the gobo speed. You will
see that the status of the display changes accordingly.
7:
[speed]
Press [speed] a fourth time to access the dimmer speed setting. The
status in the display now changes to {dSPX}, where X is a number
between 1 and 8 indicating the dimmer speed.
8:
[up]/
[down]
Move the joystick up or down to change the dimmer speed. You will
see that the status of the display changes accordingly.
9:
[speed]
Finally, press speed once again to quit the speed setting.
Page 38
Version 2.1/3.1
Martin 2308 Controller
Activating Stand-Alone Mode
1:
[shut] +
[up]/
[down]
To activate the stand-alone mode, press the [shut] key and keep
it pressed whilst moving the joystick left or right, , thereby
enabling either the auto or music trig mode, respectively. Auto trig
is indicated by {S-A } on the display and music trig by {S-AA}.
2:
[shut]
Press [shut] again to de-activate the stand alone-mode. When deactivating the stand-alone mode the Roboscan Pro 518 will
restore all effect positions (pan, tilt, dimmer/shutter, color, gobo,
effect) exactly as they were at the time the stand-alone mode was
activated.
Martin 2308 Controller
Version 2.1/3.1
Page 39
APPENDIX C - Programming Robocolors
The following table shows which Robocolor functions can be controlled via the 2308
controller:
Unit Name
Programable
functions via
2308 controller
Robocolor
Robocolor II
Robocolor
MSD 200
Robocolor Pro
400
Colors
4+W+B/O
11+W+B/O
2*(4+W)
2*(6+W)
Color split
Color Speed
yes
yes
yes
yes
Motorized
Gobos
yes
3+Wash
Shutter
yes
yes
Dimmer
yes
yes
Dimmer speed
Strobe
yes
Stand-Alone
Mode
yes
Lamp On/Off
yes
Page 40
Version 2.1/3.1
Martin 2308 Controller
Robocolor
Please note that one Robocolor Controller, i.e. four Robocolor Heads, can be controlled per
2308 channel.
Light On/Off
1:
[shut]
Press [shut] once to power on the lamps in all the heads connected
to the Robocolor Controller. The status of the display now changes
to {On--}, indicating that the lamps are on.
2:
[shut]
Press [shut] again to switch the lamps back off. The status of the
display now changes to {OFF-}, indicating that the lamps are off.
Colors
1:
[color]
Press [color] once to access the color setting mode. The status of
the display now changes to {YCoX}, where X is a number between 1
and 6, indicating the selected color, and Y is either 1, 2, 3, 4 or A,
indicating which head your are controlling (A = all).
2:
[↑]/[↓]
Press [↑] or [↓] to select which head(s) you want to control.
3:
[up]/
[down]
Move the joystick up or down to change the color. You will see that
the status of the display changes accordingly.
4:
[left]/
[right]
Move the joystick left or right to split the beam into two neighbouring
colors. The display shows the nearest color.
5:
[color]
Press [color] again to quit the color setting mode.
Color Speed
1:
[speed]
Press [speed] to access the color speed mode. The status now
changes to {YSPX}, where X is a number between 1 and 8
indicating the speed, and Y is either 1, 2, 3, 4 or A, to indicate
which head your are controlling (A = all).
2:
[↑]/[↓]
Press [↑] or [↓] to select which head(s) you want to control.
3:
[up]/
[down]
Move the joystick up or down to change the movement speed. You
will see that the status of the display changes accordingly.
4:
[speed]
Press speed again to quit the speed setting.
Strobing
1:
[shut] +
[up]/
[down]
The color wheel has a black-out position which can be used to
create strobe effects. Press the [shut] key and keep it pressed whilst
moving the joystick up and down to change the strobe rate. As you
move the joystick up and down you will see that the display changes
between {Shu0} and {Shu6}, indicating the strobe rate. {Shu0}
indicates that the strobe is disabled. {Shu6} is the slowest strobe
rate.
Martin 2308 Controller
Version 2.1/3.1
Page 41
Activating Stand-Alone Mode
1:
[shut] +
[up]/
[down]
To activate the stand-alone mode, press the [shut] key and keep it
pressed whilst moving the joystick either left or right, thereby
enabling either the music or auto trig mode, respectively. Music trig
is indicated by {S-A } on the display and auto trig by {S-AA}.
Release the [shut] key and then the joystick.
2:
[shut]
Press [shut] again to de-activate the stand alone-mode.
Page 42
Version 2.1/3.1
Martin 2308 Controller
Robocolor II
Please note that one Robocolor II Controller, i.e 4 Robocolor II Heads, can be controlled per
2308 channel (4 Robocolor II Heads).
Light On/Off
1:
[shut]
Press [shut] once to power on the lamps in all the heads connected
to the Robocolor II Controller. The status of the display now
changes to {On--}, indicating that the lamps are on.
2:
[shut]
Press [shut] again to switch the lamps back off. The status of the
display now changes to {OFF-}, indicating that the lamps are off.
Colors
1:
[color]
Press [color] once to access the color setting mode. The status of
the display now changes to {YC X}, where X is a number between 1
and 13, indicating the selected color, and Y is either 1, 2, 3, 4 or A,
to indicate which head your are controlling (A = all).
2:
[↑]/[↓]
Press [↑] or [↓] to select which head(s) you want to control.
3:
[up]/
[down]
Move the joystick up or down to change the color. You will see that
the status of the display changes accordingly.
4:
[left]/
[right]
Move the joystick left or right to split the beam into two neighbouring
colors. The display shows the nearest color.
5:
[color]
Press [color] again to quit the color setting mode.
Color Speed
1:
[speed]
Press [speed] to access the color speed mode. The status now
changes to {YSPX}, where X is a number between 1 and 8
indicating the speed, and Y is either 1, 2, 3, 4 or A, to indicate
which head your are controlling (A = all).
2:
[↑]/[↓]
Press [↑] or [↓] to select which head(s) you want to control.
3:
[up]/
[down]
Move the joystick up or down to change the movement speed. You
will see that the status of the display changes accordingly.
4:
[speed]
Press speed again to quit the speed setting.
Martin 2308 Controller
Version 2.1/3.1
Page 43
Strobing
1:
[shut] +
[up]/
[down]
The color wheel can be used to create strobe effects. First, select a
color as described above. Then, whilst keeping the [shut] key
pressed, move the joystick up and down. The Robocolor II will now
strobe (switch) between the selected color and the one just before
this. E.g. to program a black/white strobe, then first select white on
the color wheel. As you move the joystick up and down you will see
that the display changes between {Shu0} and {Shu6}, indicating the
strobe rate. {Shu0} indicates that the strobe is disabled. {Shu2} is
the slowest strobe rate.
Activating Stand Alone Mode
1:
[shut] +
[up]/
[down]
To activate the stand-alone mode, press the [shut] key and keep it
pressed whilst moving the joystick either left or right, thereby
enabling either the music or auto trig mode, respectively. Music trig
is indicated by {S-A } on the display and auto trig by {S-AA}.
Release the [shut] key and then the joystick.
2:
[shut]
Press [shut] again to de-activate the stand alone mode.
Page 44
Version 2.1/3.1
Martin 2308 Controller
Robocolor MSD 200
Light On/Off
1:
[shut]
When powering on the Robocolor MSD 200 the lamp itself will
automatically switch on. Press [shut] once to open the shutter,
thereby switching on the light. The status of the display changes to
{On--}, indicating that the light is now on.
2:
[shut]
Press [shut] again to switch the light back off. The status of the
display now changes to {OFF-}, indicating that the light is now off.
Please note that the lamp itself remains on.
Strobing
1:
[shut] +
[up]/
[down]
To program a strobe effect, press the [shut] key, and keep it
pressed, whilst moving the joystick up or down to change the strobe
rate. The status of the display changes to {ShuX} where X is a
number between 0 and 6 indicating the strobe rate. As you move
the joystick up and down, you will see that X changes accordingly.
{Shu0} indicates that the strobe is disabled. {Shu6} is the slowest
strobe rate.
Dimmer - Light intensity
1:
[dimmer]
Press [dimmer] once to access the dimmer function. The status of
the display now changes to {d XX}, where XX is a number between
00 and 31 indicating the dimming level.
{d 31} is no dimming (full light} and {d 00} is full dimming (no light).
If you are using a 2208 controller the [dimmer] key is not printed on
the front panel but is located ’invisibly’ just to the right of the [shut]
key.
2:
[up]/
[down]
Now, move the joystick up and down to set the desired light
intensity. As you move the joystick you will see that the display
changes between {d 00} and {d 31}, as an indication of the
programmed intensity.
3:
[dimmer]
Press [dimmer] again to quit the dimmer setting.
Colors
1:
[color]
Press [color] once to access the color mode. The status of the
display now changes to {YCoX}, where X is a number between 1
and 5, indicating the selected color, any Y is either 1 or 2 to indicate
the color flag that your are programming.
2:
[↑]/[↓]
Press [↑] or [↓] to select the color flag you want to control.
3:
[up]/
[down]
Move the joystick up or down to change the color. You will see that
the status of the display changes accordingly. Please note that it is
possible to program two colors on top of each other (color flag 1
and 2), thereby creating additional colors.
Martin 2308 Controller
Version 2.1/3.1
Page 45
4:
[left]/
[right]
Move the joystick left or right to split the beam into two neighbouring
colors. The display shows the nearest color.
5:
[color]
Press [color] again to quit the color mode.
Color and Dimmer Speed
1:
[speed]
Press [speed] once to access the speed setting of color flag number
1. The status in the display now changes to {1PEX}, where X is a
number between 1 and 8 indicating the color scroll speed.
[up]/
[down]
Move the joystick up or down to change the color speed. You will
see that the status of the display changes accordingly.
2:
[speed]
Press [speed] another time to access the speed setting of color flag
number 2. The status in the display now changes to {2PEX}, where
X is a number between 1 and 8 indicating the color scroll speed.
3:
[up]/
[down]
Move the joystick up or down to change the color speed. You will
see that the status of the display changes accordingly.
4:
[speed]
Press [speed] a third time to access the dimmer speed setting. The
status in the display now changes to {dSPX}, where X is number
between 1 and 8 indicating the dimmer speed.
5:
[up]/
[down]
Move the joystick up or down to change the dimmer speed. You will
see that the status of the display changes accordingly.
6:
[speed]
Finally, press speed once again to quit the speed setting.
Page 46
Version 2.1/3.1
Martin 2308 Controller
Robocolor Pro 400
Lamp On/Off and Light On/Off
1:
[shut]
When powering on the Robocolor Pro 400 the lamp itself will remain
off until a ’lamp on’ command is sent from the controller. Press
[shut] once to ignite the lamp. The status of the display then
changes to {On--}, indicating that the lamp is now on. This key-press
also opens the shutter.
2:
[shut]
Press [shut] again to close the shutter, thereby switching off the
light. The status of the display then changes to {OFF-} Pressing
[shut] again toggles the light between on and off. Please note that
the lamp itself remains on.
2:
[shut]
To power the lamp back off again, keep the [shut] key pressed for
about 8 seconds until the status of the display changes to {LOFF}.
Please note that the Roboscan Pro 518 uses a cold restrike lamp,
meaning that you must wait approximately 5 minutes before you can
power it back on again.
t>8 sec.
Strobing
1:
[shut] +
[up]/
[down]
To program a strobe effect, press the [shut] key, and keep it
pressed, whilst moving the joystick up or down to change the strobe
rate. The status of the display changes to {ShuX} where X is a
number between 0 and 6 indicating the strobe rate. As you move
the joystick up and down, you will see that X changes accordingly.
{Shu0} indicates that the strobe is disabled. {Shu6} is the slowest
strobe rate.
Dimmer - Light intensity
1:
[dimmer]
Press [dimmer] once to access the dimmer function. The status of
the display now changes to {d XX}, where XX is a number between
00 and 88 indicating the dimming level.
{d 00} is no dimming (light full on} and {d 88} is full dimming (blackout). If you are using a 2208 controller the [dimmer] key is not
printed on the front panel but is located ’invisibly’ just to the right of
the [shut] key.
2:
[up]/
[down]
Now, move the joystick up and down to set the desired light
intensity. As you move the joystick you will see that the display
changes between {d 00} and {d 88}, as an indication of the
programmed intensity.
3:
[dimmer]
Press [dimmer] again to quit the dimmer setting.
Martin 2308 Controller
Version 2.1/3.1
Page 47
Colors
1:
[color]
Press [color] once to access the color mode. The status of the
display now changes to {YCoX}, where X is a number between 1
and 7, indicating the selected color, and Y is either 1 or 2, indicating
the color flag that your are programming.
2:
[↑]/[↓]
Press [↑] or [↓] to select the color flag you want to control.
3:
[up]/
[down]
Move the joystick up or down to change the color. You will see that
the status of the display changes accordingly. Please note that it is
possible to program two colors on top of each other (color flag 1
and 2), thereby creating additional colors.
4:
[left]/
[right]
Move the joystick left or right to split the beam into two neighbouring
colors. The display shows the nearest color.
5:
[color]
Press [color] again to quit the color mode.
Gobos
1:
[gobo]
Press [gobo] once to access the gobo setting. The status of the
display now changes to {Go_X}, where X is a number between 1
and 5, indicating the following:
1
2
3
4
5
Full Wash
Wide Beam
Medium Beam
Narrow Beam
Black-out
2:
[up]/
[down]
Move the joystick up or down to change the gobo. You will see that
the status of the display changes accordingly.
3:
[gobo]
Press [gobo] again to quit the gobo setting.
Color and Dimmer Speed
1:
[speed]
Press [speed] once to access the speed setting of color flag number
1. The status in the display now changes to {1PEX}, where X is a
number between 1 and 8 indicating the color scroll speed.
[up]/
[down]
Move the joystick up or down to change the color speed. You will
see that the status of the display changes accordingly.
2:
[speed]
Press [speed] another time to access the speed setting of color flag
number 2. The status in the display now changes to {2PEX}, where
X is number between 1 and 8 indicating the color scroll speed.
3:
[up]/
[down]
Move the joystick up or down to change the color speed. You will
see that the status of the display changes accordingly.
Page 48
Version 2.1/3.1
Martin 2308 Controller
4:
[speed]
Press [speed] a third time to access the dimmer speed setting. The
status in the display now changes to {dSPX}, where X is a number
between 1 and 8 indicating the dimmer speed.
5:
[up]/
[down]
Move the joystick up or down to change the dimmer speed. You will
see that the status of the display changes accordingly.
6:
[speed]
Finally, press speed once again to quit the speed setting.
Activating Stand-Alone Mode
1:
[shut] +
[up]/
[down]
To activate the stand-alone mode, press the [shut] key and keep it
pressed whilst moving the joystick left or right, thereby enabling
either the music or auto trig mode, respectively. Music trig is
indicated by {S-A } on the display and auto trig by {S-AA}.
2:
[shut]
Press [shut] again to de-activate the stand alone-mode. When deactivating the stand-alone mode the Roboscan Pro 518 will restore
all effect positions (pan, tilt, dimmer/shutter, color, gobo, effect)
exactly as they were at the time the stand-alone mode was
activated.
Martin 2308 Controller
Version 2.1/3.1
Page 49
APPENDIX D - Programming Robozaps
The following table shows which Robozap functions can be controlled via the 2308
controller:
Robozap
Programable functions via
2308 controller
Robozap
Robozap MSR 1200
Colors
2 x (4+W+B/O)
2 x (9+W)
Color Split
Color Speed
Gobos
8+Open+B/O
Gobo Split
Gobo speed
Mirror Drum
Strobe
yes *
yes **
Stand Alone Mode
Lamp On/Off
yes
*) Using the color wheel.
**) Using the gobo wheel.
Page 50
Version 2.1/3.1
Martin 2308 Controller
Robozap
Light On/Off
1:
[shut]
Press [shut] once to power on the lamps. The status of the display
now changes to {on--}, indicating that the lamp is on.
2:
[shut]
Press [shut] again to switch the lamp back off. The status of the
display now changes to {off-}, thus indicating that the lamp is off.
Mirror Drum Rotation
1:
[left]/
[right]
Positions of the mirror drum are programmed when no other
programmable feature is selected. That is when the display shows
the current sequence and scene number. The mirror position can be
programmed between plus and minus 180 degree from is current
position. To program a movement simply move the joystick left or
right.
2:
[up]/
[down]/
Move the joystick up or down to program a continuous mirror
rotation.
Colors
1:
[color]
Press [color] once to access the color setting mode. The status of
the display now changes to {YCoX}, where X is a number between 1
and 6, indicating the selected color, and Y is either 1, 2 or A, to
indicate which color flag your are controlling (A = both).
2:
[↑]/[↓]
Press [↑] or [↓] to select which color flag(s) you want to control.
3:
[up]/
[down]
Move the joystick up or down to change the color. You will see that
the status of the display changes accordingly.
4:
[left]/
[right]
Move the joystick left or right to split the beam into two neighbouring
colors. The display shows the nearest color.
5:
[color]
Press [color] again to quit the color setting mode.
Strobing
1:
[shut] +
[up]/
[down]
The color flags have a black-out position which can be used to
create strobe effects. Press the [shut] key and keep it pressed whilst
moving the joystick up and down to change the strobe rate. As you
move the joystick up and down you will see that the display changes
between {Shu0} and {Shu6}, indicating the strobe rate. {Shu0}
indicates that the strobe is disabled. {Shu6} is the slowest strobe
rate.
Martin 2308 Controller
Version 2.1/3.1
Page 51
Movement Speed
1:
[speed]
Press [speed] to access the movement speed setting of the mirror
drum. The status in the display now changes to {SPEX}, where X is
a number between 1 and 8 to indicate the movement speed.
2:
[left]/
[right]
Move the joystick left or right to change the movement speed of the
mirror drum. You will see that the status of the display changes
accordingly.
3:
[up]/
[down]
Move the joystick up or down to change access the speed setting of
the color wheels. The status of the display now changes to {YSPX}
where X is a number between 1 and 8, indicating the speed, and Y
is either 1, 2 or A, indicating which color wheel your are controlling
(A = both).
4:
[↑]/[↓]
Press [↑] or [↓] to select which color wheel(s) you want to control.
4:
[up]/
[down]
Move the joystick up or down to change the movement speed of the
color wheel(s) You will see that the status of the display changes
accordingly.
5:
[speed]
Press [speed] a again to quit the speed setting mode.
Page 52
Version 2.1/3.1
Martin 2308 Controller
RoboZap MSR 1200
Light On/Off
1:
[shut]
When powering on the Robozap MSR 1200 the lamp it self will
automatically switch on. Press [shut] once to enable light. The status
of the display now changes to {On--}, indicating that the light is on.
Please note that the Robozap MSR 1200 does not have a separate
shutter, but uses the gobo wheel instead. When switching on the
light, using the [shut] key, both gobo wheels goes to the open
position.
2:
[shut]
Press [shut] again to sblank off the light. Both gobo wheels then go
to blackout positions, thereby blanking the light. The status of the
display now changes to {Off-}, indicating that the light is off. Please
note that the lamp itself remains on.
Mirror Drum Rotation
1:
[left]/
[right]
Positions of the mirror drum are programmed when no other
programmable feature is selected. That is when the display shows
the current sequence and scene number. The mirror position can be
programmed between plus and minus 180 degree from is current
position. To program a movement simply move the joystick left or
right.
2:
[up]/
[down]/
Move the joystick up or down to program a continuous mirror
rotation.
Colors
1:
[color]
Press [color] once to access the color setting mode. The status of
the display now changes to {YCoX}, where X is a number between 0
and 9, indicating the selected color, and Y is either 1, 2 or A, to
indicate which color wheel your are controlling (A = both).
2:
[↑]/[↓]
Press [↑] or [↓] to select which color wheel(s) you want to control.
3:
[up]/
[down]
Move the joystick up or down to change the color. You will see that
the status of the display changes accordingly.
4:
[left]/
[right]
Move the joystick left or right to split the beam into two neighbouring
colors. The display shows the nearest color.
5:
[color]
Press [color] again to quit the color setting mode.
Martin 2308 Controller
Version 2.1/3.1
Page 53
Gobos
1:
[gobo]
Press [gobo] once to access the color setting mode. The status of
the display now changes to {YGoX}, where X is a number between
0 and 9, to indicate the selected gobo, and Y is either 1, 2 or A,
indicating which gobo wheel your are controlling (A = both).
2:
[↑]/[↓]
Press [↑] or [↓] to select which color wheel(s) you want to control.
3:
[up]/
[down]
Move the joystick up or down to change the gobo. You will see that
the status of the display changes accordingly.
4:
[left]/
[right]
Move the joystick left or right to split the beam into two neighbouring
gobos. The display shows the nearest gobo.
5:
[gobo]
Press [gobo] again to quit the gobo setting mode.
Strobing
1:
[shut] +
[up]/
[down]
Both the gobo wheels have a blackout position which can be used
to create strobe effects. Press the [shut] key and keep it pressed
whilst moving the joystick up and down to change the strobe rate.
As you move the joystick up and down you will see that the display
changes between {Shu0} and {Shu6}, indicating the strobe rate.
{Shu0} indicates that the strobe is disabled. {Shu6} is the slowest
strobe rate. The gobo wheel will always strobe between the blackout
and the open gobo, thereby overriding any previously programmed
gobo.
Movement Speed
1:
[speed]
Press [speed] to access the movement speed setting of the mirror
drum. The status in the display now changes to {SPEX}, where X is
number between 1 and 8 indicating the movement speed.
2:
[left]/
[right]
Move the joystick left or right to change the movement speed of the
mirror drum. You will see that the status of the display changes
accordingly.
3:
[up]/
[down]
Move the joystick up or down to change access the speed setting of
the color wheels. The status of the display now changes to {YSPX}
where X is a number between 1 and 8, indicating the speed, and Y
is either 1, 2 or A, to indicate which color wheel your are controlling
(A = both).
4:
[↑]/[↓]
Press [↑] or [↓] to select which color wheel(s) you want to control.
4:
[up]/
[down]
Move the joystick up or down to change the movement speed of the
color wheel(s) You will see that the status of the display changes
accordingly.
5:
[speed]
Press [speed] a again to quit the speed mode.
Page 54
Version 2.1/3.1
Martin 2308 Controller
APPENDIX E - Programming the Centrepiece
Lamp On/Off
1:
[shut]
When powering on the Centrepiece, the lamp itself will remain off
until a ’lamp on’ command is sent fro the controller. Press [shut]
once to ignite the lamp. The status of the display then changes to
{On--}, indicating that the lamp is now on. To enable light output the
tilt mirrors must be moved from the default position as described
below.
2:
[shut]
+
[up]
To switch the lamp back off again, keep the [shut] key pressed and
move the joystick upwards. The of the display changes to {OFF-},
indicating that lamp is now off. Please note that the Centrepiece
uses a cold restrike lamp, meaning that you must wait 5 to 10
minutes before you can power it back on again.
Tilt Mirrors
1:
[up]
Please note that the tilt mirrors are programmed in pairs placed on
opposite sides of the fixture - you cannot program just a single
mirror.
To program a movement start by moving the joystick up. The status
of the display now changes to {tYXX}, where Y is either 1, 2, 3, 4 or
A (A = All), indicating which mirror pair you are controlling, and XX
is a number between 01 and 99 to indicate the position of the
mirror.
2:
[↑]/[↓]
Press [↑] or [↓] to select which mirror set you want to program.
3:
[up]/
[down]
Move the joystick up or down to change the position of the mirrors.
You will see that the status of the display changes accordingly.
4:
[shut]
Press [shut] to quit the tilt movement mode. The status of the
display then changes to {On--}.
Martin 2308 Controller
Version 2.1/3.1
Page 55
Mirror Drum
1:
[left]/
[right]
Press the joystick left or right to program a continuous rotation of
the mirror drum. As you move the joystick left and right you will see
that the status of the display changes through {L 8},
{L 7},..., {L 1}, {St }, {r 1}, {r 2},..., {r 8}. L and r indicates left
and right rotation, respectively, and the number, 1-8, indicates the
rotation speed. {St } indicates that the mirror drum is stopped.
2:
[shut]
Press [shut] to quit the tilt movement mode. The status of the
display then changes to {On--}.
Color Carousel
1:
[color]
Press [color] once to access the color setting mode.
2:
[left]/
[right]
Move the joystick left or right to program a continuous rotation of the
color carousel. As you move the joystick left and right you will see
that the status of the display changes through
{CL 8}, {CL 7},..., {CL 1}, {CSt }, {Cr 1}, {Cr 2},..., {Cr 8}. CL and Cr
indicates left and right color rotation, respectively, and the number,
1-8, indicates the rotation speed. {CSt } indicates that the color
carousel is stopped.
3:
[up]/
[down]
Move the joystick up or down to program a fixed position of the
color carousel. The status of the display then changes to {CO.XX},
where XX is a number between 1 and 16, indicating the color
position. The fixed color positions represents full, as well as half,
color positions. As you move the joystick up and down you will see
that the status of the display changes accordingly.
4:
[shut]
Press [shut] to quit the tilt color setting mode. The status of the
display then changes to {On--}.
Tilt Movement Speed
1:
[speed]
Press [speed] to access the speed mode for the tilt mirrors. The
status in the display then changes to {YPEX}, where X is number
between 1 and 8 indicating the movement speed and Y is either 1,
2, 3, 4 or A (for all), indicating which mirror set you are controlling
the speed.
2:
[↑]/[↓]
Press [↑] or [↓] to select which mirror set you want to program.
3:
[up]/
[down]
Move the joystick up or down to change the speed setting of the tilt
mirrors.
4:
[speed]
Press [speed] again to quit the speed mode.
Page 56
Version 2.1/3.1
Martin 2308 Controller
Activating Stand-Alone Mode
1:
[shut] +
[up]/
[down]
To activate the stand-alone mode, press the [shut] key and keep it
pressed whilst moving the joystick left or right, thereby enabling
either the music or auto trig mode, respectively. Music trig is
indicated by {S-A } on the display and auto trig by
{S-AA}.
2:
[shut]
Press [shut] again to de-activate the stand alone mode. When deactivating the stand-alone mode the Roboscan Pro 518 will restore
all effect positions (pan, tilt, dimmer/shutter, color, gobo, effect)
exactly as they were at the time the stand-alone mode was
activated.
Martin 2308 Controller
Version 2.1/3.1
Page 57
APPENDIX F - Programming the 516 Dimmer Controller
Each Martin dimmer controller is able to control 16 individual 0-10 V outputs at 16 different
levels.
One Dimmer controller can be controlled per channel of the 2308 controller.
Output Level
1:
[color]
Press [color] to program the output level of the analogue outputs.
The display then changes to {CCXX} where CC indicates the
channel number, 1 to 16, and XX is a number between 0 and 15
indicating the output level.
2:
[left]/
[right]
Move the joystick left or right to change the channel number. You
will see that the status of the display changes accordingly.
3:
[up]/
[down]
Then, move the joystick up or down to change the output level. You
will see that the status of the display changes accordingly.
[shut]
You can press [shut] if you wish to set a channel to full output.
[color]
Press [color] again to quit the output setting.
4:
Please note that you will still be able to set the level of the last
programmed analog channel. This is very useful in follow mode if
you have a Martin smoke machine connected to the dimmer
controller and you need some smoke while your shows are running.
Just set the channel into follow mode - push the joystick up to start
the smoke machine running and then pull it down again when you
have enough smoke - then release the channel again. In this way
you may remote-control one or more Martin smoke machines from
the 2308 controller - you may even program smoke-output into your
sequences. Be careful, however, as the smoke output depends on
the trig rate used.
Page 58
Version 2.1/3.1
Martin 2308 Controller
Glossary
Analog channel One out of 16 individual channels on a Martin 516 dimmer controller.
Communication The way the controller transmits signals through the link to the units.
Configuration
Information which tells the controller which piece of equipment is
connected to which channel.
Dimmer
Increases, or decreases, the output intensity of the unit.
DIP addresses
Small switches which, in different combinations, set up the addresses of
the units so that commands from the controller can be interpreted.
Factory setting
Various default settings that affect the way that the controller operates
the units.
Gobo
A perforated metal plate placed in a light beam to create different
patterns.
Initialization
Resetting the controller to factory setting including completely clearing the
memory.
Iris
An adjustable aperture plate that can reduce, or enlarge, the diamater of
the beam angle.
Light set-ups
Position, color, gobo, etc. of individual units together forming a complete
start position.
Link
The signal cable which runs from the controller to the last unit.
Operation mode A main task the controller has to perform such as editing a sequence or
a show.
Operating function
A more special function of the controller such as selecting color.
Pan
Movement of the mirror at 90 degrees to the longitudinal axis of the
Roboscan.
Reset
Setting the controller or the units to default values.
Run-modes
Refers to Run-sequence and Run-show modes.
Units
Products which support a common way of communication, and include
Roboscans, RoboZaps, and Robocolors.
Martin 2308 Controller
Version 2.1/3.1
Page 59
Scene
The smallest step in a program. A scene will contain information of how
each connected unit is set. One or more scenes are linked together to
form a sequence.
Sequence
Refers to one or more scenes linked together to be executed sequentially
by the controller.
Sequencenumber
Each sequence has its own individual number that is unique for that
sequence.
Show
Refers to a selection of sequences linked together to be executed
sequentially by the controller.
Show number
Each show has its own unique number.
Shutter
A device which opens and closes the light aperture.
Software
The part of the programs contained within the controller that make the
controller work.
Strobe
A device that makes light flash at different speeds (a function of the
shutter or gobo wheel).
Strobe rate
The rate at which the lights are flashing.
Terminating-plug
Tilt
The XLR plug supplied with the controller, to be plugged into the
last unit on the link to terminate the link.
Movement of the mirror parallel with the longitudinal axis of the
Roboscan.
Trig level
The sensitivity with which the controller detects a music trig.
Trig rate
The speed at which the next scene follows.
Trig (sources)
The way to tell the controller to continue with the next scene in the
sequence.
Auto
Trig generated by controller (programmable)
Manual
Trig generated by operator by tapping the [trig] button
Music
Trig generated by music signal.
Page 60
Version 2.1/3.1
Martin 2308 Controller
Index
Address . . . . . . . . . . . . . . .
Auto trig . . . . . . . . . . . . . . .
Autotrig rate . . . . . . . . . . . .
Blackout . . . . . . . . . . . . . . .
Channel-section . . . . . . . . .
Communication . . . . . . . . . .
Configuration . . . . . . . . . . .
Connections . . . . . . . . . . . .
Control-section . . . . . . . . . .
Damaged information . . . . .
Default sequence number . .
Default setup . . . . . . . . . . .
Default show number . . . . .
Default trig rate . . . . . . . . . .
Delete sequence . . . . . . . . .
Delete sequence from show
Delete show . . . . . . . . . . . .
DIP switch . . . . . . . . . . . . .
Display messages . . . . . . . .
Edit sequence . . . . . . . . . . .
Edit show . . . . . . . . . . . . . .
Edit trig-rate . . . . . . . . . . . .
Error messages . . . . . . . . .
External joystick . . . . . . . . .
Factory setting . . . . . . . . . .
Fine-tune trig rate . . . . . . . .
Follow-spots . . . . . . . . . . . .
Front panel . . . . . . . . . . . . .
Frozen . . . . . . . . . . . . . . . .
Frozen-mode . . . . . . . . . . .
Function-section . . . . . . . . .
Initialization . . . . . . . . . . . .
Input signal sensitivity . . . . .
Insert sequence in show . . .
Jack-socket . . . . . . . . . . . .
Joystick . . . . . . . . . . . . . . .
Joystick Control
Microstepping . . . . . . . . . . .
LED . . . . . . . . . . . . . . . . . .
Level . . . . . . . . . . . . . . . . .
Line level signal . . . . . . . . .
Link . . . . . . . . . . . . . . . . . .
Loop . . . . . . . . . . . . . . . . .
Manual trig . . . . . . . . . . . . .
Memory test . . . . . . . . . . . .
Music signal . . . . . . . . . . . .
Music trig . . . . . . . . . . . . . .
On-Line . . . . . . . . . . . . . . .
Operating functions . . . . . . .
Operation modes . . . . . . . .
Pre-programmed sequences
Program structure . . . . . . . .
Program-section . . . . . . . . .
Repetition . . . . . . . . . . . . . .
Reset . . . . . . . . . . . . . . . . .
Robocolor . . . . . . . . . . . . . .
Martin 2308 Controller
.
.
.
.
.
.
.
.
.
.
.
.
.
.
.
.
.
.
.
.
.
.
.
.
.
.
.
.
.
.
.
.
.
.
.
.
.
.
.
.
.
.
.
.
.
.
.
.
.
.
.
.
.
.
.
.
.
.
.
.
.
.
.
.
.
.
.
.
.
.
.
.
.
.
.
.
.
.
.
.
.
.
.
.
.
.
.
.
.
.
.
.
.
.
.
.
.
.
.
.
.
.
.
.
.
.
.
.
.
.
.
.
.
.
.
.
.
.
.
.
.
.
.
.
.
.
.
.
.
.
.
.
.
.
.
.
.
.
.
.
.
.
.
.
.
.
.
.
.
.
.
.
.
.
.
.
.
.
.
.
.
.
.
.
.
.
.
.
.
.
.
.
.
.
.
.
.
.
.
.
.
.
.
.
.
.
.
.
.
.
.
.
.
.
.
.
.
.
.
.
.
.
.
.
.
.
.
.
.
.
.
.
.
.
.
.
.
.
.
.
.
.
.
.
.
.
.
.
.
.
.
.
.
.
.
.
.
.
.
.
.
.
.
.
.
.
.
.
.
.
.
.
.
.
.
.
.
.
.
.
.
.
.
.
.
.
.
.
.
.
.
.
.
.
.
.
.
.
.
.
.
.
.
.
.
.
.
.
.
.
.
.
.
.
.
.
.
.
.
.
.
.
.
.
.
.
.
.
.
.
.
.
.
.
.
.
.
.
.
.
.
.
.
.
.
.
.
.
.
.
.
.
.
.
.
.
.
.
.
.
.
.
.
.
.
.
.
.
.
.
.
.
.
.
.
.
.
.
.
.
.
.
.
.
.
.
.
.
.
.
.
.
.
.
.
.
.
.
.
.
.
.
.
.
.
.
.
.
.
.
.
.
.
.
.
.
.
.
.
.
.
.
.
.
.
.
.
.
.
.
.
.
.
.
.
.
.
.
.
.
.
.
.
.
.
.
.
.
.
.
.
.
.
.
.
.
.
.
.
.
.
.
.
.
.
.
.
.
.
.
.
.
.
.
.
.
.
.
.
.
.
.
.
.
.
.
.
.
.
.
.
.
.
.
.
.
.
.
.
.
.
.
.
.
.
.
.
.
.
.
.
.
.
.
.
.
.
.
.
.
.
.
.
.
.
.
.
.
.
.
.
.
.
.
.
.
.
.
.
.
.
.
.
.
.
.
.
.
.
.
.
.
.
.
.
.
.
.
.
.
.
.
.
.
.
.
.
.
.
.
.
.
.
.
.
.
.
.
.
.
.
.
.
.
.
.
.
.
.
.
.
.
.
.
.
.
.
.
.
.
.
.
.
.
.
.
.
.
.
.
.
.
.
.
.
.
.
.
.
.
.
.
.
.
.
.
.
.
.
.
.
.
.
.
.
.
.
.
.
.
.
.
.
.
.
.
.
.
.
.
.
.
.
.
.
.
.
.
.
.
.
.
.
.
.
.
.
.
.
.
.
.
.
.
.
.
.
.
.
.
.
.
.
.
.
.
.
.
.
.
.
.
.
.
.
.
.
.
.
.
.
.
.
.
.
.
.
.
.
.
.
.
.
.
.
.
.
.
.
.
.
.
.
.
.
.
.
.
.
.
.
.
.
.
.
.
.
.
.
.
.
.
.
.
.
.
.
.
.
.
.
.
.
.
.
.
.
.
.
.
.
.
.
.
.
.
.
.
.
.
.
.
.
.
.
.
.
.
.
.
.
.
.
.
.
.
.
.
.
.
.
.
.
.
.
.
.
.
.
.
.
.
.
.
.
.
.
.
.
.
.
.
.
.
.
.
.
.
.
.
.
.
.
.
.
.
.
.
.
.
.
.
.
.
.
.
.
.
.
.
.
.
.
.
.
.
.
.
.
.
.
.
.
.
.
.
.
.
.
.
.
.
.
.
.
.
.
.
.
.
.
.
.
.
.
.
.
.
.
.
.
.
.
.
.
.
.
.
.
.
.
.
.
.
.
.
.
.
.
.
.
.
.
.
.
.
.
.
.
.
.
.
.
.
.
.
.
.
.
.
.
.
.
.
.
.
.
.
.
.
.
.
.
.
.
.
.
.
.
.
.
.
.
.
.
.
.
.
.
.
.
.
.
.
.
.
.
.
.
.
.
.
.
.
.
.
.
.
.
.
.
.
.
.
.
.
.
.
.
.
.
.
.
.
.
.
.
.
.
.
.
.
.
.
.
.
.
.
.
.
.
.
.
.
.
.
.
.
.
.
.
.
.
.
.
.
.
.
.
.
.
.
.
.
.
.
.
.
.
.
.
.
.
.
.
.
.
.
.
.
.
.
.
.
.
.
.
.
.
.
.
.
.
.
.
.
.
.
.
.
.
.
.
.
.
.
.
.
.
.
.
.
.
.
.
.
.
.
.
.
.
.
.
.
.
.
.
.
.
.
.
.
.
.
.
.
.
.
.
.
.
.
.
.
.
.
.
.
.
.
.
.
.
.
.
.
.
.
.
.
.
.
.
.
.
.
.
.
.
.
.
.
.
.
.
.
.
.
.
.
.
.
.
.
.
.
.
.
.
.
.
.
.
.
.
.
.
.
.
.
.
.
.
.
.
.
.
.
.
.
.
.
.
.
.
.
.
.
.
.
.
.
.
.
.
.
.
.
.
.
.
.
.
.
.
.
.
.
.
.
.
.
.
.
.
.
.
.
.
.
.
.
.
.
.
.
.
.
.
.
.
.
.
.
.
.
.
.
.
.
.
.
.
.
.
.
.
.
.
.
.
.
.
.
.
.
.
.
.
.
.
.
.
.
.
.
.
.
.
.
.
.
.
.
.
.
.
.
.
.
.
.
.
.
.
.
.
.
.
.
.
.
.
.
.
.
.
.
.
.
.
.
.
.
.
.
.
.
.
.
.
.
.
.
.
.
.
.
.
.
.
.
.
.
.
.
.
.
.
.
.
.
.
.
.
.
.
.
.
.
.
.
.
.
.
.
.
.
.
.
.
.
.
.
.
.
.
.
.
.
.
.
.
.
.
.
.
.
.
.
.
.
.
.
.
.
.
.
.
.
.
.
.
.
.
.
.
.
.
.
.
.
.
.
.
.
.
.
.
.
.
.
.
.
.
.
.
.
.
.
.
.
.
.
.
.
.
.
.
.
.
.
.
.
.
.
.
.
.
.
.
.
.
.
.
.
.
.
.
.
.
.
.
.
.
.
.
.
.
.
.
.
.
.
.
.
.
.
.
.
.
.
.
.
.
.
.
.
.
.
.
.
.
.
.
.
.
.
.
.
.
.
.
.
.
.
.
.
.
.
.
.
.
.
.
.
.
.
.
.
.
.
.
.
.
.
.
.
.
.
.
.
.
.
.
.
.
.
.
.
.
.
.
.
.
.
.
.
.
.
.
.
.
.
.
.
.
.
.
.
.
.
.
.
.
.
.
.
.
.
.
.
.
.
.
.
.
.
.
.
.
.
.
.
.
.
.
.
.
.
.
.
.
.
.
.
.
.
.
.
.
.
.
.
.
.
.
.
.
.
.
.
.
.
.
.
.
.
.
.
.
.
.
.
.
.
.
.
.
.
.
.
.
.
.
.
.
.
.
.
.
.
.
.
.
.
.
.
.
.
.
.
.
.
.
.
.
.
.
.
.
.
.
.
.
.
.
.
.
.
.
.
.
.
.
.
.
.
.
.
.
.
.
.
.
.
.
.
.
.
.
.
.
.
.
.
.
.
.
.
.
.
.
.
.
.
.
.
.
.
.
.
.
.
.
.
.
.
.
.
.
.
.
.
.
.
.
.
.
.
.
.
.
.
.
.
.
.
.
.
.
.
.
.
.
.
.
.
.
.
.
.
.
.
.
.
.
.
.
.
.
.
.
.
.
.
.
.
.
.
.
.
.
.
.
.
.
.
.
.
.
.
.
.
.
.
.
.
.
.
.
.
.
.
.
.
.
.
.
.
.
.
.
.
.
.
.
.
.
.
.
.
.
.
.
.
.
.
.
.
.
.
.
.
.
.
.
.
.
.
.
.
.
.
.
.
.
.
.
.
.
.
.
.
.
.
.
.
.
. . 8, 12
. . . . 20
. . . . 21
. . . . 16
. . . . 12
. . . . 21
..... 9
..... 7
. . . . 12
. . 9, 22
. . . . 19
. . . . 18
. . . . 19
. . . . 15
. . . . 15
. . . . 17
. . . . 17
..... 8
. . . . 24
. . . . 14
. . . . 16
. . . . 15
. . . . 24
. . . . 22
..... 9
. . . . 20
. 20, 21
. . . . 12
. . 6, 20
. . . . 21
. . . . 12
. . . . 22
. . . . 21
. . . . 17
. . 8, 21
12, 14-16
.
.
.
.
.
.
.
.
.
.
.
.
.
.
.
.
.
.
.
.
.
.
.
.
.
.
.
.
.
.
.
.
.
.
.
.
.
.
.
.
.
.
.
.
.
.
.
.
.
.
.
.
.
.
.
.
.
.
.
.
.
.
.
.
.
.
.
.
.
.
.
.
.
.
.
.
.
.
.
.
.
.
.
.
.
.
.
.
.
.
.
.
.
.
.
.
.
.
.
.
.
.
.
.
.
.
.
.
.
.
.
.
.
.
.
.
.
.
.
.
.
.
.
.
.
.
.
.
.
.
.
.
.
.
.
.
.
.
.
.
.
.
.
.
.
.
.
.
.
.
.
.
.
.
.
.
.
.
.
.
.
.
.
.
.
.
.
.
.
.
.
.
.
.
.
.
.
.
.
.
.
.
.
.
.
.
.
.
.
.
.
.
.
.
.
.
.
.
.
.
.
.
.
.
.
.
.
.
.
.
.
.
.
.
.
.
.
.
.
.
.
.
.
.
.
.
.
.
.
.
.
.
.
.
.
.
.
.
.
.
.
.
.
.
.
.
.
.
.
.
.
.
.
.
.
.
.
.
.
.
.
.
.
.
.
.
.
.
.
.
.
.
.
.
.
.
.
.
.
.
.
.
.
.
.
.
.
.
.
.
.
.
.
.
.
.
.
.
.
.
.
.
.
.
.
.
.
.
.
.
.
.
.
.
.
.
.
.
.
.
.
.
.
.
.
.
.
.
.
.
.
.
.
.
.
.
.
.
.
.
.
.
.
.
.
.
.
.
.
.
.
.
.
.
.
.
.
.
.
.
.
.
.
.
.
.
.
.
.
.
.
.
.
.
.
.
.
.
.
.
.
.
.
.
.
.
.
.
.
.
.
.
.
.
.
.
.
.
.
.
.
.
.
.
.
.
.
.
.
.
.
.
.
.
.
.
.
.
.
.
.
.
.
.
.
.
.
.
.
.
.
.
.
.
.
.
.
.
.
.
.
.
.
.
.
.
.
.
.
.
.
.
.
.
.
.
.
.
.
.
.
.
.
.
.
.
.
.
.
.
.
.
.
.
.
.
.
.
.
.
.
.
.
.
.
.
.
.
.
.
.
.
.
.
.
.
.
.
.
.
.
.
.
.
.
.
.
.
.
.
.
.
.
.
.
.
.
.
.
.
.
.
.
.
.
.
.
.
.
.
.
.
.
.
.
.
.
.
.
.
.
.
.
.
.
.
.
.
.
.
.
.
.
.
.
.
.
.
.
.
.
.
.
.
.
.
.
.
.
.
.
.
.
.
.
.
.
.
.
.
.
.
.
.
.
.
.
.
.
.
.
.
.
.
.
.
.
.
.
.
.
.
.
.
.
.
.
.
.
.
.
.
.
.
.
.
.
.
.
.
.
.
.
.
.
.
.
.
.
.
.
.
.
.
.
.
.
.
.
.
.
.
.
.
.
.
.
.
.
.
.
.
.
.
.
.
.
.
.
.
.
.
.
.
.
.
.
.
.
.
.
.
.
.
.
.
.
.
.
.
.
.
.
.
.
.
.
.
.
.
.
.
.
.
.
.
.
.
.
.
.
.
.
.
.
.
.
.
.
.
.
.
.
.
.
.
.
.
.
.
.
.
.
.
.
.
.
.
.
.
.
.
.
.
.
.
.
.
.
.
.
.
.
.
.
.
.
.
.
.
.
.
.
.
.
.
.
.
.
.
.
.
.
.
.
.
.
.
.
.
.
.
.
.
.
.
.
.
.
.
.
.
.
.
.
.
.
.
.
.
.
.
.
.
.
.
.
.
.
.
.
.
.
.
.
.
.
.
.
.
.
.
.
.
.
.
.
.
.
.
.
.
.
.
.
.
.
.
.
.
.
.
.
.
.
.
.
.
.
.
.
.
.
.
.
.
.
.
.
.
.
.
.
.
.
.
.
.
.
.
.
.
.
.
.
.
.
.
.
.
.
.
.
.
.
.
.
.
.
.
.
.
.
.
.
.
.
.
.
.
.
.
.
.
.
.
.
.
.
.
.
.
.
.
.
.
.
.
.
.
.
.
.
.
.
.
.
.
.
.
.
.
.
.
.
.
.
.
.
.
.
.
.
.
.
.
.
.
.
.
.
.
.
.
.
.
.
.
.
.
.
.
.
.
.
.
.
.
.
.
.
.
.
.
.
.
.
.
.
Version 2.1/3.1
. . . 11
.... 6
20, 21
. . . 21
. . 7, 8
16, 19
. . . 20
. . . 11
.... 8
. . . 21
. . . 21
. . . 12
. . . 12
. . . 24
. . . 13
. . . 12
. . . 12
. 9, 11
. . . 42
Page 61
Robocolor II . . . . . . . . . . .
Robocolor MSD 200 . . . . .
Robocolor Pro 400 . . . . . .
Roboscan 1016 . . . . . . . .
Roboscan 804 / 805 / 1004
Roboscan 812 . . . . . . . . .
Roboscan Pro 218 . . . . . .
Roboscan Pro 518 . . . . . .
Robozap . . . . . . . . . . . . .
RoboZap MSR 1200 . . . . .
Run sequence . . . . . . . . .
Run show . . . . . . . . . . . . .
Save . . . . . . . . . . . . . . . .
Scene . . . . . . . . . . . . . . .
Sequence . . . . . . . . . . . . .
Sequence number . . . . . . .
Setup . . . . . . . . . . . . . . . .
Show . . . . . . . . . . . . . . . .
Show number . . . . . . . . . .
Special functions . . . . . . . .
Status information . . . . . . .
Terminating-plug . . . . . . . .
Trig rate . . . . . . . . . . . . . .
Trig sources . . . . . . . . . . .
Upload . . . . . . . . . . . . . . .
Write-protect . . . . . . . . . . .
[1] - [8] . . . . . . . . . . . . . . .
[auto] . . . . . . . . . . . . . . . .
[color] . . . . . . . . . . . . . . . .
[edit seq] . . . . . . . . . . . . .
[edit show] . . . . . . . . . . . .
[level] . . . . . . . . . . . . . . . .
[man] . . . . . . . . . . . . . . . .
[on line] . . . . . . . . . . . . . .
[on] . . . . . . . . . . . . . . . . .
[run seq] . . . . . . . . . . . . . .
[run show] . . . . . . . . . . . .
[set up] . . . . . . . . . . . . . . .
[setup] . . . . . . . . . . . . . . .
[speed] . . . . . . . . . . . . . . .
[trig] . . . . . . . . . . . . . . . . .
.
.
.
.
.
.
.
.
.
.
.
.
.
.
.
.
.
.
.
.
.
.
.
.
.
.
.
.
.
.
.
.
.
.
.
.
.
.
.
.
.
.
.
.
.
.
.
.
.
.
.
.
.
.
.
.
.
.
.
.
.
.
.
.
.
.
.
.
.
.
.
.
.
.
.
.
.
.
.
.
.
.
.
.
.
.
.
.
.
.
.
.
.
.
.
.
.
.
.
.
.
.
.
.
.
.
.
.
.
.
.
.
.
.
.
.
.
.
.
.
.
.
.
.
.
.
.
.
.
.
.
.
.
.
.
.
.
.
.
.
.
.
.
.
.
.
.
.
.
.
.
.
.
.
.
.
.
.
.
.
.
.
.
.
.
.
.
.
.
.
.
.
.
.
.
.
.
.
.
.
.
.
.
.
.
.
.
.
.
.
.
.
.
.
.
.
.
.
.
.
.
.
.
.
.
.
.
.
.
.
.
.
.
.
.
.
.
.
.
.
.
.
.
.
.
.
.
.
.
.
.
.
.
.
.
.
.
.
.
.
.
.
.
.
.
.
.
.
.
.
.
.
.
.
.
.
.
.
.
.
.
.
.
.
.
.
.
.
.
.
.
.
.
.
.
.
.
.
.
.
.
.
.
.
.
.
.
.
.
.
.
.
.
.
.
.
.
.
.
.
.
.
.
.
.
.
.
.
.
.
.
.
.
.
.
.
.
.
.
.
.
.
.
.
.
.
.
.
.
.
.
.
.
.
.
.
.
.
.
.
.
.
.
.
.
.
.
.
.
.
.
.
.
.
.
.
.
.
.
.
.
.
.
.
.
.
.
.
.
.
.
.
.
.
.
.
.
.
.
.
.
.
.
.
.
.
.
.
.
.
.
.
.
.
.
.
.
.
.
.
.
.
.
.
.
.
.
.
.
.
.
.
.
.
.
.
.
.
.
.
.
.
.
.
.
.
.
.
.
.
.
.
.
.
.
.
.
.
.
.
.
.
.
.
.
.
.
.
.
.
.
.
.
.
.
.
.
.
.
.
.
.
.
.
.
.
.
.
.
.
.
.
.
.
.
.
.
.
.
.
.
.
.
.
.
.
.
.
.
.
.
.
.
.
.
.
.
.
.
.
.
.
.
.
.
.
.
.
.
.
.
.
.
.
.
.
.
.
.
.
.
.
.
.
.
.
.
.
.
.
.
.
.
.
.
.
.
.
.
.
.
.
.
.
.
.
.
.
.
.
.
.
.
.
.
.
.
.
.
.
.
.
.
.
.
.
.
.
.
.
.
.
.
.
.
.
.
.
.
.
.
.
.
.
.
.
.
.
.
.
.
.
.
.
.
.
.
.
.
.
.
.
.
.
.
.
.
.
.
.
.
.
.
.
.
.
.
.
.
.
.
.
.
.
.
.
.
.
.
.
.
.
.
.
.
.
.
.
.
.
.
.
.
.
.
.
.
.
.
.
.
.
.
.
.
.
.
.
.
.
.
.
.
.
.
.
.
.
.
.
.
.
.
.
.
.
.
.
.
.
.
.
.
.
.
.
.
.
.
.
.
.
.
.
.
.
.
.
.
.
.
.
.
.
.
.
.
.
.
.
.
.
.
.
.
.
.
.
.
.
.
.
.
.
.
.
.
.
.
.
.
.
.
.
.
.
.
.
.
.
.
.
.
.
.
.
.
.
.
.
.
.
.
.
.
.
.
.
.
.
.
.
.
.
.
.
.
.
.
.
.
.
.
.
.
.
.
.
.
.
.
.
.
.
.
.
.
.
.
.
.
.
.
.
.
.
.
.
.
.
.
.
.
.
.
.
.
.
.
.
.
.
.
.
.
.
.
.
.
.
.
.
.
.
.
.
.
.
.
.
.
.
.
.
.
.
.
.
.
.
.
.
.
.
.
.
.
.
.
.
.
.
.
.
.
.
.
.
.
.
.
.
.
.
.
.
.
.
.
.
.
.
.
.
.
.
.
.
.
.
.
.
.
.
.
.
.
.
.
.
.
.
.
.
.
.
.
.
.
.
.
.
.
.
.
.
.
.
.
.
.
.
.
.
.
.
.
.
.
.
.
.
.
.
.
.
.
.
.
.
.
.
.
.
.
.
.
.
.
.
.
.
.
.
.
.
.
.
.
.
.
.
.
.
.
.
.
.
.
.
.
.
.
.
.
.
.
.
.
.
.
.
.
.
.
.
.
.
.
.
.
.
.
.
.
.
.
.
.
.
.
.
.
.
.
.
.
.
.
.
.
.
.
.
.
.
.
.
.
.
.
.
.
.
.
.
.
.
.
.
.
.
.
.
.
.
.
.
.
.
.
.
.
.
.
.
.
.
.
.
.
.
.
.
.
.
.
.
.
.
.
.
.
.
.
.
.
.
.
.
.
.
.
.
.
.
.
.
.
.
.
.
.
.
.
.
.
.
.
.
.
.
.
.
.
.
.
.
.
.
.
.
.
.
.
.
.
.
.
.
.
.
.
.
.
.
.
.
.
.
.
.
.
.
.
.
.
.
.
.
.
.
.
.
.
.
.
.
.
.
.
.
.
.
.
.
.
.
.
.
.
.
.
.
.
.
.
.
.
.
.
.
.
.
.
.
.
.
.
.
.
.
.
.
.
.
.
.
.
.
.
.
.
.
.
.
.
.
.
.
.
.
.
.
.
.
.
.
.
.
.
.
.
.
.
.
.
.
.
.
.
.
.
.
.
.
.
.
.
.
.
.
.
.
.
.
.
.
.
.
.
.
.
.
.
.
.
.
.
.
.
.
.
.
.
.
.
.
.
.
.
.
.
.
.
.
.
.
.
.
.
.
.
.
.
.
.
.
.
.
.
.
.
.
.
.
.
.
.
.
.
.
.
.
.
.
.
.
.
.
.
.
.
.
.
.
.
.
.
.
.
.
.
.
.
.
.
.
.
.
.
.
.
.
.
.
.
.
.
.
.
.
.
.
.
.
.
.
.
.
.
.
.
.
.
.
.
.
.
.
.
.
.
.
.
.
.
.
.
.
.
.
.
.
.
.
.
.
.
.
.
.
.
.
.
.
.
.
.
.
.
.
.
.
.
.
.
.
.
.
.
.
.
.
.
.
.
.
.
.
.
.
.
.
.
.
.
.
.
.
.
.
.
.
.
.
.
.
.
.
.
.
.
.
.
.
.
.
.
.
.
.
.
.
.
.
.
.
.
.
.
.
.
.
.
.
.
.
.
.
.
.
.
.
.
.
.
.
.
.
.
.
.
.
.
.
.
.
.
.
.
.
.
.
.
.
.
.
.
.
.
.
.
.
.
.
.
.
.
.
.
.
.
.
.
.
.
.
.
.
.
.
.
.
.
.
.
.
.
.
.
.
.
.
.
.
.
.
.
.
.
.
.
.
.
.
.
.
.
.
.
.
.
.
.
.
.
.
.
.
.
.
.
.
.
.
.
.
.
.
.
.
.
.
.
.
.
.
.
.
.
.
.
.
.
.
.
.
.
.
.
.
.
.
.
.
.
.
.
.
.
.
.
.
.
.
.
.
.
.
.
.
.
.
.
.
.
.
.
.
.
.
.
.
.
.
.
.
.
.
.
.
.
.
.
.
.
.
.
.
.
.
.
.
.
.
.
.
.
.
.
.
.
.
.
.
.
.
.
.
.
.
.
.
.
.
.
.
.
.
.
.
.
.
.
.
.
.
.
.
.
.
.
.
.
.
.
.
.
.
.
.
.
.
.
.
.
.
.
.
.
.
.
.
.
.
.
.
.
.
.
.
.
.
.
.
.
.
.
.
.
.
.
.
.
.
.
.
.
.
.
.
.
.
.
.
.
.
.
.
.
.
.
.
.
.
.
.
.
.
.
.
.
.
.
.
.
.
.
.
.
.
.
.
.
.
.
.
.
.
.
.
.
.
.
.
.
.
.
.
.
.
.
.
.
.
.
.
.
.
.
.
.
.
.
.
.
.
.
.
.
.
.
.
.
.
.
.
.
.
.
.
.
.
.
.
.
.
.
.
.
.
.
.
.
.
.
.
.
.
.
.
.
.
.
.
.
.
.
.
.
.
.
.
.
.
.
.
.
.
.
.
.
.
.
.
.
.
.
.
.
.
.
.
.
.
.
.
.
.
.
.
.
.
.
.
.
.
.
.
.
.
.
.
.
.
.
.
.
.
.
.
.
.
.
.
.
.
.
.
.
.
.
.
.
.
.
.
.
.
.
.
.
.
.
.
.
.
.
.
.
.
.
.
.
.
.
.
.
.
.
.
.
.
.
.
.
.
.
.
.
.
.
.
.
.
.
.
.
.
.
.
.
.
.
.
.
.
.
.
.
.
.
.
.
.
.
.
.
.
.
.
.
.
.
.
.
.
.
.
.
. . . . . . . 44
. . . . . . . 46
. . . . . . . 48
. . . . . . . 29
. . . . . . . 28
. . . . . . . 31
. . . . . . . 34
. . . . . . . 37
. . . . . . . 52
. . . . . . . 54
. . . . . . . 19
. . . . . . . 19
. . . . . . . 14
. . 13, 14, 20
13, 15-17, 19
. 9, 14, 16, 17
. . . . . . . . 18
. . . 13, 16, 19
. . . 9, 16, 17
. . . . . . . . 22
. . . . . . . . 24
......... 8
. . . 9, 15, 20
. . . . . . . . 20
. . . . . . . . 23
. . . . . . . . 22
. . . 12, 14, 21
. . . . . 15, 20
. . . . . . . . 15
. . . . . 14, 19
. . . 16, 17, 19
. . . . . 21, 22
. . . . . . . . 15
. . . . . 21, 22
. . . . . . . . 11
. . . . . . . . 19
. . . . . . . . 19
......... 9
. . . . . . . . 22
. . . . . . . . 12
. . . 12, 15, 20
PS-960209
Page 62
Version 2.1/3.1
Martin 2308 Controller