1
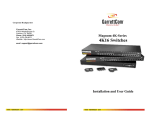
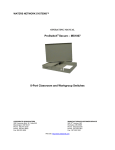
INSTALLATION GUIDE AND OPERATING MANUAL ProSwitch Quad Series 3200 ProSwitch-QS3200 Modular Ethernet Switch Combine 10/100Mbps and 1000Mbps copper; 100 and 1000Mbps fiber ports CORPORATE HEADQUATERS 13705 26th Avenue, N., Suite 102 Minneapolis, MN 55441 Phone: 800.441.5319 Fax: 763.509.7450 E-mail: [email protected] www.watersnet.com MANUFACTURING/CUSTOMER SERVICE 2411 Seventh Street, NW Rochester, MN 55901 Phone: 800.328.2275 Fax: 507.252.3734 E-mail: [email protected] TABLE OF CONTENTS 1.0 SPECIFICATIONS..........................................................................................................................3 2.0 Package Contents - ProSwitch Quad Series 3200 ...................................................................5 2.1 Product Description .....................................................................................................................5 2.2 100Base-FX Fiber Modules..........................................................................................................6 2.3 10/100Base-TX Module (PM-8-UTP) ............................................................................................6 2.4 1000Base-SX, LX and TX Modules..............................................................................................6 2. 5 Location of the QS3200 Switch ...................................................................................................6 3.0 Connecting the QS3200 ...............................................................................................................7 3.1 Mounting the QS3200...................................................................................................................7 3.2 Powering the QS3200...................................................................................................................7 3.3 Module Installation .......................................................................................................................8 3.4 Connecting the Modules..............................................................................................................8 3.5 Removing the Modules ................................................................................................................9 4.0 Operation of the QS3200..............................................................................................................9 4.1 Status of LEDs ..............................................................................................................................9 4.2 Dip Switches ...............................................................................................................................10 5.0 Troubleshooting .........................................................................................................................12 5.1 Before Calling for Assistance....................................................................................................12 5.2 Return Material Authorization (RMA) Procedure.....................................................................13 5.3 Shipping and Packaging Information .......................................................................................14 12 QS3200 User’s Manual Page 2 1.0 SPECIFICATIONS OPERATIONAL CHARACTERISTICS: MAC Address Table Up to 12,000 per module Switching Mode Store-and-forward Memory Buffer Size Per Module 10/100Base-T: 2Mbps 100Base-FX: 2Mbps 1000Base-SX & LX: 3Mbps Performance 10Mbps: Filtering/Forwarding Rate, 14,880 pps 100Mbps: Filtering/Forwarding Rate, 148,800 pps 1000Mbps: Filtering/Forwarding Rate, 1,488,000 pps LED INDICATORS: Power/Link/Activity/HDX/FDX System LED Power: Red: Indicates that there is power to the switch Off: No power Link (LK)/Activity (ACT): Green: Detects a connection point Flashing Green: Indicates that transmission (TX) of data is occurring Full Duplex (FD)/Collision (COL): Red: Indicates the port is in full-duplex mode; In half-duplex the LED is off Flashing Red: Indicates that there is a collision (COL) occurring 100Mbps: Green: Indicates port is running at 100Mbps; At 10Mbps the LED is off NETWORK STANDARDS: IEEE 802.3 10BASE-T Ethernet IEEE 802.3u 100BASE-TX/FX Fast Ethernet IEEE 802.3z 1000BASE-X Gigabit Ethernet EMI/SAFETY COMPLIANCE: UL 1950, CSA 22.2 No. 950 EN60950 (TUV), VCCI, FCC Class A, CE EN50082-1, CE FIBER CABLE: 50, 62.5/125mm, 1300nm for 100Base-FX 50/125mm, 850nm for 1000Base-SX (SC); 9/125mm, 1300nm for 1000Base-LX (SC); 12 QS3200 User’s Manual Page 3 FIBER DISTANCE: 100Mbps Fiber Multimode: Full Duplex 2km, Half Duplex 1000Mbps Fiber Singlemode: 10km; multimode: 500m 412m NETWORK CABLE CONNECTORS: RJ-45 Shielded Female Ports 100Mbps: CAT5 UTP or better Fiber Port Connectors ST, SC or MTRJ Multimode or singlemode POWER SUPPLY: Input Voltage 110VAC @ 60Hz 240VAC @ 50Hz Power Consumption 33-42 Watts, depending on modules installed Internal Universal Power Supply: DC 3.3V/15A, 5V/2A OPERATING ENVIRONMENT: Ambient Temperature 32° to 113°F (0° to 40°C) Storage -40° to 158°F (-40°to 70°C) Ambient relative humidity 10% to 90% (non-condensing) MECHANICAL: Enclosure: Rugged high-strength sheet metal suitable for stand-alone or rack-mounting Cooling Method: Fan cooled PHYSICAL CHARACTERISTICS: Dimensions 17.3” W x 8.8” D x 2.6” H 440mm x 225mm x 66mm Weight Switch: 8.75lbs (3.9kg) Module: 0.75lbs (0.34kg) 12 QS3200 User’s Manual Page 4 Package Contents - ProSwitch Quad Series 3200 2.0 Examine the shipping container for obvious damage prior to installing this product. Notify the carrier of any damage that you believe occurred during shipment. Ensure that the items listed below are included. The QS3200 package contains the following: QS3200 switch chassis AC power cord Rack mounting kit Four rubber feet User manual Remove the items from the shipping container. Be sure to keep the shipping container should you need to re-ship the unit at a later date. In the event there are items missing or damaged, contact the party from whom you purchased the product. If the unit needs to be returned, please use the original shipping container if possible. 2.1 Product Description The ProSwitch Quad Series 3200 (QS3200) switches are multi-speed network devices combining copper and fiber switch ports in speeds of 10/100 and 1000 in a single compact rack mountable chassis. By combining 10/100, 100 and 1000Mbps in one chassis, you can unclog your existing LAN and provide a path to efficient, high-speed networking. The QS3200 switch’s four-slot chassis provides the flexibility to configure the switch to meet your unique requirements. This flexibility is achieved via a family of ten available modules that can be integrated with the base unit either in the factory or in the field to adapt the unit to meet your LAN requirements. The QS3200 provides the switching speed and reliability to smoothly support multiple workgroups at 10/100Mbps or 1000 Mbps speed. The QS3200 offers the flexibility of two or four ports in 100Base-FX or eight ports in 10/100BaseTX or 1 port of 1000BaseSX, LX, or TX in connector types of SC, ST, MTRJ or RJ45. QS3200 Front and Rear Panels This section describes the features on the front and rear panels of the QS3200 switch. All LED status indicators are located on the FRONT panel of the switches. They provide a real-time indication of system and operational status. The ports for connections to other devices and networks are also on the front panels, along with the crossover switches. Figure 1: Front Panel 12 QS3200 User’s Manual Page 5 2.2 100Base-FX Fiber Modules Fiber modules are available in the following configurations: PM-2SC Fiber module with two 100Base-FX multimode ports with SC connectors PM-2ST Fiber module with two 100Base-FX multimode ports with ST connectors PM-2MTRJ Fiber module with two 100Base-FX multimode ports with MTRJ connectors PM-4SC Fiber module with four 100Base-FX multimode ports with SC connectors PM-4ST Fiber module with four 100Base-FX multimode ports with ST connectors PM-4MTRJ Fiber module with four 100Base-FX multimode ports with MTRJ connectors Any of the modules listed above can be used to: Connect the switch to the backbone of your network Connect the switch to a classroom/workgroup hub or switch Connect the switch to a server or workstation with a fiber NIC 2.3 10/100Base-TX Module (PM-8-UTP) The 8-port 10/100Base-TX module provides eight 10/100Mbps switch ports that can be used to: Connect the switch to the backbone of your network Connect the switch to a classroom/workgroup hub or switch Connect the switch to a server or workstation 2.4 1000Base-SX, LX and TX Modules The following choices are available for Gigabit speed: PM-1G-UTP Copper Gigabit module with one 1000Base-TX port with RJ45 connector PM-1G-MMSX Fiber Gigabit module with one 1000Base-SX multimode port (3km) with SC connector PM-1G-SMLX Fiber Gigabit module with one 1000Base-LX singlemode port (10km) with SC connector The modules listed above can be used to: 2. 5 Connect the switch to the backbone of your network Connect the switch to a server or workstation with a fiber GIG NIC Location of the QS3200 Switch The QS3200 can be installed quickly and easily. However, for an installation with minimum impact on the existing network, please read the following information carefully. Installing a QS3200 involves three steps: 1. Choosing a location 2. Supplying power 3. Connecting the switch Consider the following criteria when selecting a location for the switch: Avoid dusty locations Avoid electromagnetic noisy areas, such as locations close to power transformers or radio transmitters Avoid temperatures below 32° to 113°F (0° to 40°C) Allow a clear view of the front panel LED indicators Allow easy access to the front panel ports and the rear panel switches 12 QS3200 User’s Manual Page 6 Your switch comes with two rack mounting brackets which can be used to mount the switch on an EIA 19” standard rack. Attach the brackets to the switch using the screws provided. Next, install the switch in the rack using the screws provided to attach the brackets to the rack. 3.0 Connecting the QS3200 The QS3200 switch has been designed to support all standard Ethernet media types within a single switch unit. The various media types supported along with the corresponding IEEE 802.3 and 802.3u standards and connector types are as follows: Fiber: IEEE Standard Media Type Max. Distance Connector Type 100Base-FX multimode fiber 2km (6,562 ft) SC or ST 100Base-FX singlemode fiber 20km (65,616 ft) SC 10Base-T CAT3, 4 or 5 100m (328 ft) RJ45 100Base-TX CAT5 or 5E 100m (328 ft) RJ45 Copper: NOTE : Since dual-speed ports are auto-sensing for either 10 and 100Mbps, it is recommended that high quality CAT5 cables (which work for both 10Mbps and 100Mbps) be used whenever possible in order to provide flexibility in a mixed-speed network 3.1 Mounting the QS3200 Table-Top or Shelf Mounting The QS3200 switch can be easily mounted on a table-top or any suitable horizontal surface. There are four rubber feet provided for stability so finished surfaces won’t be scratched. Rack Mount Installation Your switch comes with two rack mounting brackets. You can use these brackets to mount the switch on an EIA standard 19" rack. Attach the brackets to the switch, using the screws provided. Figure 2: Attaching the mount brackets for rack installation Next, install the switch in the rack using the screws provided to attach the brackets to the rack. When properly installed, the front-mounted LED status indicators should be in plain view and easy to read 3.2 Powering the QS3200 The QS3200 switch is equipped with a universal power supply that accepts AC input voltages from 100 to 240VAC and 50 to 60 Hz. To supply power to your switch: 1. Plug the connector of the power cord into the power port on the rear panel of your switch. 2. Plug the other end of the power cord into an AC wall outlet. 12 QS3200 User’s Manual Page 7 3. Set the power switch to ON and verify that the Power LED is lit. If it is not, check the following: The power switch is in the ON position. The power cord is properly connected to the wall outlet and to the power connection on the switch. The wall outlet is functional. Note: Network cable segments can be connected or disconnected from the switch while the power is on, without interrupting the operation of the switch. 3.3 Module Installation Warning: Before installing the modules into the QS3200, you must disconnect the switch from the main power supply. Handling the Modules The module can be easily damaged by electrostatic discharge. To prevent damage, please observe the following: Do not remove modules from their packaging until you are ready to install it into a switch. Do not touch any of the pins, connections or components on the modules. Handle the modules only by its edges and front panel. Always wear an anti-static wristband connected to a suitable grounding point. Always store or transport modules in appropriate anti-static packaging. Module Setup and Installation 1. Ensure that the switch is disconnected from the main power supply and that you are wearing an anti-static wristband connected to a suitable grounding point. 2. Place the switch on a flat surface. 3. Using a small cross-bladed screwdriver, remove the blank module plate from the front of the switch. Do not remove any other screws from the switch. 4. Keep the blanking plate and screws in a safe place. If you remove the module at any time, you must replace the blanking plate to prevent dust and debris from entering the switch and to aid the circulation of cooling air. 5. Hold the module so that the text on the front panel is oriented correctly, and insert it into the switch, ensuring the connectors are fully engaged. Tighten the two captive thumbscrews that secure the module in place. Figure 3 - Inserting the module 3.4 Connecting the Modules Connecting the 10/100Base-TX Modules 1. Insert the RJ-45 connector on your cable into the socket of the module. 2. Connect the other end of the cable to an appropriate device with a 100Mbps Fast Ethernet or 10Mbps Ethernet twisted pair interface. 3. Power up the switch. 12 QS3200 User’s Manual Page 8 Connecting the 100Base-FX Modules 1. Remove the protective plastic covers from the fiber connectors on the module. 2. Plug the ST (or SC) connector on the fiber cable into the fiber socket on the module. 3. Connect the other end of the fiber optic segment to an appropriate device fitted with a 100Mbps adapter. 4. Check the LED indicators on the front of the switch to ensure that the module is operating correctly. 5. Power up the switch. Connecting the 1000Base-SX/LX Modules 1. Remove the protective plastic covers from the fiber connectors on the module. 2. Plug the SC connector on the fiber cable into the fiber socket on the module. 3. Connect the other end of the fiber optic segment to an appropriate device fitted with a 1000Mbps adapter. 4. Check the LED indicators on the front of the switch to ensure that the module is operating correctly. 5. Power up the switch. Connecting the 1000Base-TX Module 1. Insert the RJ-45 connector on your cable into the socket of the module. 2. Connect the other end of the cable to an appropriate device with a 100Mbps Fast Ethernet or 10Mbps Ethernet twisted pair interface. 3. Power up the switch. 3.5 Removing the Modules 1. Ensure that the power supply and the backbone connection cables are disconnected from the switch. 2. Place the switch on a flat surface. Undo the two captive thumbscrews securing the module into the switch. Do not remove any other screws from the switch. 3. If you are not installing another module immediately, you must replace the blank module plate to ensure that dust and debris do not enter the switch, as well as to aid circulation of cooling air. 4.0 Operation of the QS3200 4.1 Status of LEDs LED Indicators Explanation Power The red power indicator is illuminated when power is provided to the switch and the switch is turned to the ON position. Link/Activity Green Link/Activity indicators are illuminated when the switch detects a connection to that port. The indicator blinks when data is transmitted over the network connected to that port. When a port is not connected, the indicator is off. 12 QS3200 User’s Manual Page 9 Red Full Duplex/Col indicators are illuminated when that port is in full duplex mode. The indicator is off when that port is in half duplex mode. Full Duplex/Col When a collision occurs on the network connected to a port, that Full Duplex/Col indicator blinks. 100Mbps 4.2 Green 100Mbps indicators are illuminated when the port is operating in 100Mbps mode. The indicator is off when the port is operating in 10Mbps mode. Dip Switches 8-port 10/100Base-TX Module The 8-port 10/100Base-TX module provides a dip switch for ports 1 through 4 so you can adjust the link mode with other network devices. Ports 5 through 8 use the auto-negotiation protocol only. The types of link mode that can be selected are: Auto-negotiation 100Mbps/Full duplex 10Mbps/Full duplex Port 1 Port 2 Port 3 ON adjustable DIP Switch for ports Port 1 to Port 4 Port 1 Port 4 Port 3 1 2 3 4 5 6 7 8 Port 5 Port 2 Port 6 Port 4 OFF Port 7 Full Duplex Port 8 10M Auto1 2 100M negotiation Figure 4 – Dip Switch Location for the Module PM-8-UTP (8 10/100 ports with RJ45 connectors) By default, the dip switches are in the OFF position. Ports 5, 6, 7 and 8 are auto-negotiating for duplex operating mode and speed. There are two dip switches per port for Ports 1, 2, 3 and 4 that can be set. The first dip switch of the two switches per port sets the port to either full duplex or auto-negotiating. If this switch is set to Auto (in the OFF position), the second dip switch, which allows either 10 or 100Mbps, is inactive. If the first switch is set to Full (in the ON position), you can force the port to either 10 or 100Mbps. See Table 1 to determine the settings for ports 1-4: SW ON OFF PORT 1 1 2 Full 10M Auto 100M PORT 2 3 4 Full 10M Auto 100M PORT 3 5 6 Full 10M Auto 100M PORT 4 7 8 Full 10M Auto 100M Table 1 – Dip Switch Settings for the Module PM-8-UTP (8 10/100 ports with RJ45 connectors) 12 QS3200 User’s Manual Page 10 100Base-FX Fiber Modules (2 and 4-port modules) The fiber connectors (ST, SC or MTRJ) provide the link to multimode fiber cabling in either the two or four port modules. You can use the dip switch settings described in Table 2 to set the operating mode to half or full duplex. DIP Sw itch Location ON Half Duplex Full Duplex Port 2 1 2 OFF Port 1 Figure 5 – Dip Switch Location for the Module PM-2ST, SC or MTRJ (2 port 100Base-FX fiber module) Port 1 Port 2 ON Half Duplex Full Duplex Port 4 1 2 3 4 DIP Switch Location OFF Port 3 Figure 6 – Dip Switch Location for the Module PM-4ST, SC or MTRJ (4 port 100Base-FX fiber module) The following Table lists the port operating modes based on the DIP switch positions for both the 2 and 4-port fiber modules. SW ON OFF PORT 1 1 Half-Duplex Full-Duplex PORT 2 2 Half-Duplex Full-Duplex PORT 3 3 Half-Duplex Full-Duplex PORT 4 4 Half-Duplex Full-Duplex Table 2 - Dip Switch Settings for the Modules PM-2SC, 2ST, 2MTRJ, 4SC, 4ST, or 4MTRJ 12 QS3200 User’s Manual Page 11 1000Base Modules On the 1000Base modules, if the dip switch is set to OFF, N-Way is enabled. Full and half duplex cannot be enabled if auto-negotiation is in use. If auto-negotiation is disabled, the DIP switch for half and full duplex is enabled. Full Duplex OFF DIP 2 DIP 1 Enable N-way Disable N-way ON 1 2 Half Duplex DIP Sw itch Location Figure 7 – Dip Switch Location for the Module PM-1G-MMSX or SMLX (1000Base-SX or LX fiber module Table 3 lists the port operating modes based on the dip switch position. SW ON OFF Gigabit Port 1 2 Disable N-way Half Duplex Enable N-way Full Duplex Table 3 - Dip Switch Settings for the 1000Base-SX/LX Fiber Module 5.0 Troubleshooting All Waters’ switching products are designed to provide reliability and consistently high performance in all network environments. The installation of Waters’ QS3200 switch is a straightforward procedure (See Section 3); the operation is also straightforward and is discussed in Section 4. Should problems develop during installation or operation, this section is intended to help locate, identify and correct these types of problems. Please follow the suggestions listed below prior to contacting your supplier. However, if you are unsure of the procedures described in this section or if the Waters’ QS3200 switch is not performing as expected, do not attempt to repair the unit; instead contact your supplier for assistance or contact Waters Network Systems’ Customer Support Center at 800.328.2275 or email [email protected]. 5.1 Before Calling for Assistance 1. If difficulty is encountered when installing or operating the unit, refer back to the Installation Section of the chapter of this manual. Also check to make sure that the various components of the network are inter-operable. 2. Check the cables and connectors to ensure that they have been properly connected and the cables/wires have not been crimped or in some way impaired during installation. (About 90% of network downtime can be attributed to wiring and connector problems.) 3. Make sure that an AC power cord is properly attached to the QS3200. 4. Be certain that each AC power cord is plugged into a functioning electrical outlet. Use the PWR LEDs to verify each unit is receiving power. 5. If the problem is isolated to a network device other than the Waters’ QS3200 switch, it is recommended that the problem device be replaced with a known good device. Verify whether or not the problem is corrected. If not, 12 QS3200 User’s Manual Page 12 go to next step. If the problem is corrected, the Waters’ QS3200 switch and its associated cables are functioning properly. 6. If the problem continues, contact Waters Network Systems Customer Service at 800.328.2275 or email [email protected] for assistance. When Calling for Assistance Please be prepared to provide the following information. 1. A complete description of the problem, including the following points: a. b. c. d. The nature and duration of the problem Situations when the problem occurs The components involved in the problem Any particular application that, when used, appears to create the problem 2. An accurate list of Waters Network Systems product model(s) involved. Include the date(s) that you purchased the products from your supplier. 3. It is useful to include other network equipment models and related hardware, including personal computers, workstations, terminals and printers; plus, the various network media types being used. 4. A record of changes that have been made to your network configuration prior to the occurrence of the problem. Any changes to system administration procedures should all be noted in this record. 5.2 Return Material Authorization (RMA) Procedure All returns for repair must be accompanied by a Return Material Authorization (RMA) number. To obtain an RMA number, call Waters Network Systems Customer Service at 800.328.2275 during business hours in 8:00 am to 5:00 pm (CT) email [email protected]. When calling, please have the following information readily available: Name and phone number of your contact person Name of your company/institution Your shipping address Product name Invoice Number Packing List Number (or Sales Order Number) Date of installation Failure symptoms, including a full description of the problem Waters Network Systems will carefully test and evaluate all returned products, will repair products that are under warranty at no charge, and will return the warranty-repaired units to the sender with shipping charges prepaid (see Warranty Information, Appendix A, for complete details). However, if Waters cannot duplicate the problem or condition causing the return, the unit will be returned as: No Problem Found. Waters Network Systems reserves the right to charge for the testing of non-defective units under warranty. Testing and repair of product that is not under warranty will result in a customer (user) charge. 12 QS3200 User’s Manual Page 13 5.3 Shipping and Packaging Information Should you need to ship the unit back to Waters Network Systems, please follow these instructions: Package the unit carefully. It is recommended that you use the original container if available. Units should be wrapped in a "bubble-wrap" plastic sheet or bag for shipping protection. (You may retain all connectors and this Installation Guide.) CAUTION: Do not pack the unit in Styrofoam "popcorn" type packing material. This material may cause electro-static shock damage to the unit. Clearly mark the Return Material Authorization (RMA) number on the outside of the shipping container. Waters Network Systems is not responsible for your return shipping charges. Ship the package to: Waters Network Systems Attention: Customer Service RMA Number: ______ 2411 Seventh Street NW Rochester, MN 55901 APPENDIX A: WARRANTY INFORMATION Waters Network Systems warrants its products to be free from defects in materials and workmanship for a limited lifetime from the date of shipment by Waters. Waters Network Systems will repair or, at its option, replace components in the products that prove to be defective at no charge other than shipping and handling, provided that the product is returned pre-paid to Waters. This warranty will not be effective if, in the opinion of Waters Network Systems, the product has been damaged by misuse, misapplication, or as a result of service or modification other than by Waters. Waters Network Systems reserves the right to make a charge for handling and inspecting any product returned for warranty repair which turns out not to be faulty. This device complies with Class A Part 15 the FCC Rules. Operation is subject to the following two conditions: (1) This device may not cause harmful interference, and (2) this device must accept any interference received including the interference that may cause. CE NOTICE Marking by the symbol CE indicates compliance of this equipment to the EMC directive of the European Community. Such marking is indicative that this equipment meets or exceeds the following technical standards: EN 55022: Limits and Methods of Measurement of Radio Interference characteristics of Information Technology Equipment. EN 60555-2: Disturbances in supply systems caused by household appliances and similar electrical equipment - Part 2: Harmonics. 2002 Waters Network Systems. All rights reserved. The information contained in this document is subject to change without prior notice. All trademarks are the property of their respective owners. 12 QS3200 User’s Manual Page 14