1
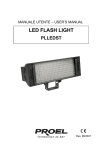
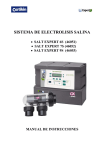
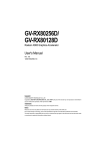
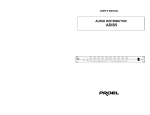
MANUALE UTENTE – USER’S MANUAL
DIMMER 1K
PLDM1K
Rev. 09/2006
INDICE
CARATTERISTICHE GENERALI ............................................ 4
CARATTERISTICHE TECNICHE ............................................ 5
ISTRUZIONI GENERALI ...................................................... 5
UTILIZZO SICURO ED EFFICIENTE ................................... 5
AVVERTENZE ........................................................................ 6
CONTROLLO E FUNZIONI ..................................................... 7
PANNELLO FRONTALE ...................................................... 7
PANNELLO POSTERIORE .................................................. 8
GUIDA AL FUNZIONAMENTO................................................ 8
MODALITÀ DMX ADDRESS ................................................ 9
MODALITÀ SWITCH PACK ................................................. 9
MODALITÀ DIMMER PACK ............................................... 10
2
TABLE OF CONTENTS
GENERAL FEATURES ......................................................... 12
TECHNICAL SPECIFICATIONS............................................ 13
GENERAL INSTRUCTIONS............................................... 13
SAFE AND EFFICIENT USE .............................................. 13
PRODUCT CARE ................................................................. 14
CONTROLS AND FUNCTIONS ............................................ 15
FRONT PANEL .................................................................. 15
REAR PANEL .................................................................... 16
OPERATION GUIDE............................................................. 16
DMX ADDRESS MODE ..................................................... 17
SWITCH PACK MODE....................................................... 17
DIMMER PACK MODE ...................................................... 18
3
CARATTERISTICHE GENERALI
Grazie per l’acquisto del dimmer PLDM1K. Questo modello è un
modulo dimmer ad un canale. Possiede una varietà di funzioni
che includono:
•
Porta DMX IN / OUT standard a 3 poli per fornire
informazioni sul dimmer;
•
Modalità SWITCH PACK o DIMMER PACK;
•
Assegnazione DMX, Dimmer Preset e Dimmer Limit;
•
Memoria in caso di mancanza di alimentazione;
•
Display per la visualizzazione dell’attività in corso e lo
stato della funzione.
È stato impiegato i massimo sforzo per far convergere affidabilità
e
solidità
in
ciascuna
unità.
I
nuovi
prodotti
vengono
costantemente aggiornati per soddisfare le esigenze del mondo
dello spettacolo e dell’industria lighting. I Vostri commenti
riguardo i nostri prodotti e servizi sono molto graditi.
È un piacere e un privilegio essere al vostro servizio.
4
CARATTERISTICHE TECNICHE
Input di alimentazione
AC 230V ~ 50Hz
Output canale
6 A max
Ingresso / uscita DMX
Prese XLR a 3 poli
Fusibile
F6.3 A 250V 5×20 mm
Dimensioni (mm)
182×92×65
Peso (kg)
1,1
ISTRUZIONI GENERALI
Leggere attentamente le istruzioni contenute in questo manuale
prima di installare od utilizzare il prodotto. Successivamente,
conservare il manuale in un luogo sicuro allo scopo di poterlo
consultare in futuro.
UTILIZZO SICURO ED EFFICIENTE
• Questo prodotto deve essere collegato a terra.
• Evitare che liquidi infiammabili, acqua od oggetti metallici
penetrino nell’apparecchio.
• Evitare di danneggiare il cavo di alimentazione.
• Non aprire l’apparecchio, nessun componente può essere
riparato dall’utente. Per la riparazione consultare sempre
personale autorizzato.
• In caso di problemi di funzionamento (odore di bruciato,
ecc…) cessare immediatamente l’utilizzo, disconnettere la
presa dell’alimentazione e rivolgersi al proprio rivenditore per
un controllo oppure contattare direttamente la PROEL Spa.
5
• Per prevenire rischi di incendio o di shock elettrico, non
esporre il prodotto alla pioggia o all’umidità.
• Evitare di eseguire la riparazione. Eventuali interventi da
parte di personale non qualificato ne provocherebbe danni o il
funzionamento difettoso.
AVVERTENZE
• Questo prodotto è destinato all’esclusivo utilizzo interno.
• Provvedere a non precludere la ventilazione durante l’utilizzo.
• Disconnettere la presa di alimentazione quando l’unità non
viene utilizzata per lunghi periodi.
• Non utilizzare l’unità in luoghi esposti ad eccessiva umidità,
vibrazioni o urti.
• Porre l’unità in una posizione stabile.
• Non smontare o apportare modifiche all’apparecchio.
6
CONTROLLO E FUNZIONI
PANNELLO FRONTALE
1. Uscita:
6 A max.
2. Display:
Mostra l’attività in corso o lo stato della
funzione.
3. Pulsante MENU: Premere
per
entrare
al
livello
successivo.
4. Pulsante UP:
Ogni pressione aumenterà il valore di
una unità.
5. Pulsante DOWN: Ogni pressione diminuirà il valore di
un’unità. Premendolo e mantenendo
premuto lo diminuirà rapidamente.
7
PANNELLO POSTERIORE
1. Cavo di alimentazione: Connettere all’appropriata presa
di corrente.
2. Fusibile:
F6.3 A 250V 5×20 mm
3. Ingresso DMX:
Presa XLR maschio a 3 pin per
ricevere dati DMX
4. Uscita DMX:
Presa XLR femmina a 3 pin per
inviare dati DMX
GUIDA AL FUNZIONAMENTO
Connettere all’appropriata presa di corrente. Questa unità
ripristina automaticamente lo stato delle funzioni dell’ultimo
utilizzo grazie alla memoria attiva in caso di mancanza di
alimentazione e il display mostra l’indirizzo DMX dell’ultimo
cambiamento. Se la frequenza dell’alimentazione non è
stabile,
il
display
mostrerà
l’alimentazione sia stabile.
8
“AC-0”.
Attendere
che
Il prodotto funziona da dimmer pack o switch pack a seconda
della modalità operativa selezionata. Assicurarsi che i
requisiti di alimentazione corrispondano a quelli specificati su
questa unità.
MODALITÀ DMX ADDRESS
1. Il Display mostra l’indirizzo DMX dell’ultima
A
12 3
modifica effettuata. Se l’ultima volta era stato
selezionato l’indirizzo DMX 123, il display
visualizzerà 123.
2. Ogni pressione del pulsante UP o DOWN
A
125
cambierà
l’indirizzo
Premendolo
e
DMX
di
mantenendolo
una
unità.
premuto,
cambierà l’indirizzo DMX rapidamente.
Nota: Durante l’operazione di assegnazione DMX l’output è
disattivato.
MODALITÀ SWITCH PACK
1. Quando l’indirizzo DMX è completo, premere
d
---
il pulsante MENU per entrare al livello
successivo.
2. Premere il pulsante UP o DOWN in modo
S
---
che il display mostri S - - -
9
S
-on
3. Premere il pulsante MENU per entrare in
modalità Switch Pack. La modalità Switch
Pack consiste di Switch On (S-on) e Switch
Off (S-of).
In modalità Switch On, l’output è attivo e l’apparecchio si illuminerà
indipendentemente al segnale DMX. I modalità Switch Off, l’output è
inattivo e l’apparecchio è controllato dal segnale DMX. Quando il
livello DMX è inferiore al 40% l’apparecchio si spegne; quando il
livello DMX è superiore al 40% l’apparecchio si illumina
4. Premere il pulsante up o il pulsante down per
S
-of
passare da Switch On a Switch Off.
5.
A
12 5
Una
volta
che
Switch
Pack
è stato
selezionato, premere il pulsante MENU per
tornare alla modalità indirizzo DMX.
MODALITÀ DIMMER PACK
1. Premere il pulsante MENU per entrare al
A
12 5
livello successivo.
2. Premere il pulsante UP o DOWN in modo
d
- - -
che il display mostri “d - - -“
10
L
8 8 8
3. Premere il pulsante MENU per entrare in
modalità Dimmer Limit.
4. Premere il pulsante UP o DOWN per
L
8 8 8
cambiare il valore entro la gamma si 10100. Ogni pressione cambierà il valore di
una unità. Premendo e mantenendo
premuto il pulsante, il valore cambierà
rapidamente.
P
8 8 8
5. Premere il pulsante menu per entrare in
modalità Dimmer Preset.
6. Premere il pulsante UP o DOWN per
P
8 8 8
cambiare il valore entro la gamma di 00100. Ogni pressione cambierà il valore di
una unità. Tenendo premuto il pulsante il
valore cambierà rapidamente.
Una volta che Dimmer Preset è selezionato verrà memorizzato
automaticamente.
7. Premere il pulsante MENU per tornare alla
A
12 5
modalità di assegnazione DMX.
11
GENERAL FEATURES
Thank you for your purchase. This product features include:
•
3 pin standard DMX IN / OUT ports providing dimmer
information.
•
Serves as a Switch Pack or Dimmer Pack, depending
upon the current operation mode.
•
Allows DMX Addressing, Dimmer Preset and Dimmer
Limit.
•
Power failure memory.
•
Display shows current activity and function state.
Every effort has been made to design dependability, reliability and
comfort into each unit. New products are being designed
constantly to meet the needs of both entertainment and the
lighting industry. We welcome your comments about our product
and services.
It is both a privilege and pleasure serving you.
12
TECHNICAL SPECIFICATIONS
Power Input
AC 230V ~ 50Hz
Channel Output
6 A max
DMX In / Out
3 pin XLR socket
Fuse
F6.3 A 250V 5×20 mm
Dimensions (mm)
182×92×65
Weight (kg)
1,1
GENERAL INSTRUCTIONS
Please read through this operating instructions before installing or
using your new product. After you have finished reading this
guide, put it in a safe place for future reference.
SAFE AND EFFICIENT USE
• This product must be earthed
• Do not make any inflammable liquids, water or metal objects
enter the unit.
• Take care not to damage the power cord.
• No user serviceable parts inside, always consult authorized
personnel for repairs.
• In the event of malfunction (burning smell, etc…) immediately
stop operation, disconnect the power supply plug and consult
authorized service personnel.
• To prevent fire or shock hazard, do not expose this product to
rain or moisture.
13
PRODUCT CARE
• This product is intended for indoor use only.
• Provide occasional ventilation during use.
• Unplug the power plug from the sockets when not using the
unit for extended period.
• Do not use the unit in places subject to excessive humidity,
vibration or bumps.
• Place this unit in a stable location.
• Do not dismantle or modify the unit.
14
CONTROLS AND FUNCTIONS
FRONT PANEL
1. Output:
6 A max
6. Display:
Shows current activity or function state.
7. MENU button: Press to enter next level.
8. UP button:
Each tapping will increase the value
once. Pressing and holding down will
increase quickly.
9. DOWN button: Each tap will decrease the value once.
Pressing and holding down will decrease quickly.
15
REAR PANEL
1. Power Cord:
Plug in the appropriate power outlet.
2. Fuse:
F6.3 A 250V 5×20 mm
3. DMX Input:
3 pin XLR socket used to receive DMX
data
4. DMX Output:
3 pin XLR socket used to send DMX data
OPERATION GUIDE
Plug in the appropriate power outlet , this unit recovers to the
function state of last time automatically by reasons of power
failure memory and the display shows the DMX address of
last change. If the frequency of power is not stable, the
display will show “AC-0”, wait until the power is stable.
The product serves as a dimmer pack or a switch pack,
depending on operating mode you’ve selected.
16
DMX ADDRESS MODE
1. The display shows the DMX address of last
A
12 3
change when powered this unit. If you’ve
selected DMX address 123 for the last time,
then the display will show 123.
2. Each tap ph the UP or DOWN button will
A
125
change the DMX address once. Pressing and
holding down will change the DMX address
quickly. Once the DMX address is selected, it
will be stored into memory automatically.
Note: during DMX addressing, output is disable.
SWITCH PACK MODE
1. When DMX address is complete, press
d
---
S
---
S
-on
MENU button to enter into the next level.
2. Tap the UP or DOEN button causing the
display shows S - - -
3. Press MENU button to enter Switch Pack
mode. Switch Pack mode consists of Switch
On (S-on) e Switch Off (S-of).
17
In the Switch Off mode, output is turned off and the fixture is
controlled by DMX signal. When DMX level is less than 40% the
fixture goes out. When DMX level exceeds 40% the fixture lights.
S
-of
4. Tap the UP or DOWN button to change
between Switch On and Switch Off.
5. Once the Switch Pack is selected, press
A
12 5
MENU button to return to DMX Address
mode.
DIMMER PACK MODE
1. Press MENU button to enter next level.
A
12 5
d
- - -
2. Tap the UP or DPWN button causing the
L
8 8 8
display shows d - - -
3. Press MENU button to enter Dimmer Limit
mode.
18
4. Tap the UP or DOWN button to change
L
8 8 8
the value within the range of 10-100.
Each tap will change the value once,
pressing and holding down will change
the value quickly. Once the Dimmer Limit
is selected, it will be stored automatically.
P
8 8 8
5. Press MENU button to enter Dimmer
Preset mode.
6. Tap the UP or DOWN button to change
P
8 8 8
the value within the range of 00-100.
Each tap will change the value once,
pressing and holding down will change
the value quickly.
Once the Dimmer Preset is selected, it will be stored
automatically.
7. Press MENU button to return to DMX
A
12 5
Address mode.
19
PROEL S.p.A.
(World Headquarters – Factory)
Via alla Ruenia 37/43
64027 Sant’Omero (TE) – Italy
Tel. +39 0861 81241
Fax. +39 0861 887862
e-mail: [email protected]
www.proelgroup.com