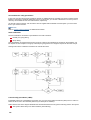
1
Installation and
Administration Guide
6.1
www.esker.com
VSI-FAX Version 6.1 Issued April 2009
Copyright © 2001-2009 Esker S.A. All rights reserved.
Esker, the Esker logo, Esker on Demand, VSI-FAX and LanFax are registered trademarks of Esker, S.A. in the
United States, France, and other countries. Microsoft, Windows, Windows Server, Outlook, Windows Vista are either
registered trademarks or trademarks of Microsoft Corporation in the United States and/or other countries. Intel and
Pentium are registered trademarks of Intel Corporation in the U.S. and other countries. IBM and AIX are trademarks
of International Business Machines Corporation in the United States, other countries, or both. Dialogic, Brooktrout,
Diva, and Diva Server for Windows are registered trademarks of Dialogic Corporation. Sun and Solaris are
trademarks or registered trademarks of Sun Microsystems, Inc. in the United States and in other countries. Linux is a
registered trademark of Linus Torvalds. Multitech is a trademark or registered trademark of Multi-Tech Systems, Inc.
in the U.S. and other countries. HP-UX is a trademark or registered trademark of Hewlett-Packard Company. SCO
Open Server is a trademark or registered trademark of The SCO Group, Inc. in the U.S.A. and other countries. SCO
UnixWare is a trademark or registered trademark of The Open Group in the United States and other countries. Red
Hat, Red Hat Linux, and Red Hat Enterprise Linux are trademarks or registered trademarks of Red Hat, Incorporated.
All other brand and product names are or may be trademarks, registered trademarks, or service marks of, and are
used to identify products or services of, and is the property of, their respective owners.
Esker S.A., 10 rue des Émeraudes, 69006 Lyon, France Tel: +33 (0)4 72 83 46 46 • Fax: +33 (0)4 72 83 46 40/41 •
[email protected] • www.esker.fr
Esker, Inc., 1212 Deming Way, Suite 350, Madison, WI 53717 USA Tel: +1 608-828-6000 • Fax: +1 608-828-6001 •
[email protected] • www.esker.com
Esker Australia Pty Ltd. (Lane Cove - NSW) • Tel: +61 (0)2 8596 5100 • [email protected] • www.esker.com.au
Esker GmbH (München) • Tel: +49 (0)89 700 8870• [email protected] • www.esker.de
Esker Italia SRL (Milano) • Tel: +39 02 89 20 03 03 • [email protected] • www.esker.it
Esker Ibérica, S.L. (Madrid) • Tel: +34 91 552 9265 • [email protected] • www.esker.es
Esker UK Ltd. (Derby) • Tel: +44 (0)1332 54 8181 • [email protected] • www.esker.co.uk
Esker, Inc. (Stillwater, OK) • Tel: +1.405-533-5500 • [email protected] • www.esker.com
Esker, Inc. (Lake Forest, CA) • Tel: +1 608-828-6000 • [email protected] • www.esker.com
No part of this document may be reproduced or transmitted in any form or by any means without the prior written
consent of Esker S.A. For the Americas: printed in the United States of America. For the rest of the world: printed in
France.
Table of Contents
What's New in this Version?..................................................................... 5
VSI-FAX Pre-Installation............................................................................ 7
Supported Platforms and Equipment .................................................... 11
Installing VSI-FAX Server on Windows.................................................. 19
Installing VSI-FAX Server on Unix/Linux ............................................... 23
Upgrading to version 6.1......................................................................... 27
Testing the Fax Server ............................................................................ 29
Installing VSI-FAX Server Administration MMC snap-in ...................... 31
Installing the Outlook Client ................................................................... 33
Installing CoverMaker ............................................................................. 41
Installing the Software Development Kit ............................................... 43
Fax on Demand Connector ..................................................................... 45
Fax Fundamentals ................................................................................... 63
Fax Imaging.............................................................................................. 71
Basic Fax Server Administration ........................................................... 85
Historical Logs......................................................................................... 97
Retry Strategies ....................................................................................... 99
Fax Routing............................................................................................ 101
Dial String Conversion .......................................................................... 103
Event Notify Procedures ....................................................................... 107
LDAP Setup and Configuration ............................................................ 125
Least Cost Routing................................................................................ 131
Imaging Server Setup and Configuration ............................................ 137
3
Server Maintenance ............................................................................... 139
Integration Fundamentals ..................................................................... 143
Customization Techniques ................................................................... 153
Troubleshooting .................................................................................... 157
Using vfx Tags ....................................................................................... 169
Embedded commands........................................................................... 175
Print-to-fax.............................................................................................. 181
Email-to-fax ............................................................................................ 187
SMTP Authentication............................................................................. 191
Advanced Group Faxing ....................................................................... 195
VSI-FAX MailMerge Client ..................................................................... 203
Forms Overlay........................................................................................ 207
Virtual Fax Server .................................................................................. 213
lp Spooler (Unix Only) ........................................................................... 215
Using XML-F........................................................................................... 219
Inbound and Outbound Fax Filter ........................................................ 225
Font handling ......................................................................................... 227
Ordering DID Service............................................................................. 231
Roxbury fonts ........................................................................................ 233
Sample Unix and Linux Mount Commands ......................................... 235
Fax Server Information Form................................................................ 237
4
What's New in this Version?
Extended OS support
New platforms are supported for the server installation including Windows Server 2008 32 or 64 bits and Red Hat
Entreprise 5.
For the complete list of supported platforms for each VSI-FAX server and client component, refer to Supported
Platforms and Equipment (page 11).
Extended Brooktrout support
VSI-FAX 6.1 can now be installed with Brooktrout TR1034 boards, TruFax boards or SR140 software on:
Windows Server 2008 systems either 32-bit or 64 bits
Red Hat Entreprise 5
For the complete list of which Brooktrout fax solution can be set up on which operating systems, refer to Dialogic
Brooktrout fax boards and drivers in the Fax Boards and Fax Drivers Installation documentation.
More fax boards supported
VSI-FAX 6.1 integrates Dialogic Brooktrout SDK 6.0. You can use the new version with the new TR1034 or TruFax
Brooktrout boards that require Brooktrout SDK 6.0.
To set up VSI-FAX with a fax board, refer to Fax boards and fax drivers installation in the Fax Boards and Fax Drivers
Installation documentation.
Refer to Recommended modems and fax boards in the VSI-FAX Recommended Modems and Fax Boards
documentation for a complete list of the supported fax boards and modems.
Brooktrout SR140 software on Unix/Linux
Brooktrout SR140 software is now supported on Unix/Linux platforms. For the installation, refer to Brooktrout SR140
installation and configuration on Unix/Linux in the Fax Boards and Fax Drivers Installation documentation.
VSI-FAX clients extended OS support
LanFax now supports Windows Server 2008 and Windows Vista.
Outlook Client, MailMerge Client, CoverMaker now support Windows Vista 64 bits.
For the complete list of supported platforms, refer to Supported Platforms and Equipment (page 11).
5
INSTALLATION AND ADMINISTRATION GUIDE
VSI-FAX Outlook Client
VSI-FAX Windows Client now supports Outlook 2007.
New Fax on Demand device for failover
VSI-FAX 6.1 now comes with two different devices to send faxes via Fax on Demand:
FoDC is the main Fax on Demand device that already existed in the previous version,
FoDC2 is a new backup Fax on Demand device used when the FoDC fails to send the faxes.
If FoDC fails because the main Fax on Demand server (by default, the server located in the US) is unreachable, VSIFAX automatically redirects the fax queue to FoDC2 that points to a different Fax on Demand server (by default, the
server located in Europe).
For more information, refer to Managing failover with the Fax on Demand Connector (page 57).
New version of JetPCL
VSI-FAX 6.1 includes version 9.51 of the JetPCL converter from Tech Know Systems.
The PCLTOTIF formatter, which uses JetPCL to convert standard text, PCL 5e, PCL 6 into TIFF, has been rebuilt
with the new version of JetPCL. It provides various bug fixes and better performances. To learn about PCL files'
conversion through VSI-FAX, refer to Fax Imaging (page 71).
New print drivers
VSI-FAX Server and VSI-FAX LanFax Windows Client come with new print drivers to allow native application printing
on 64-bits platforms. For more information on the way you can send faxes directly from your applications using VSIFAX printers, refer to Print-to-fax (page 181).
Improved registration portal
The registration Web site from which you retrieve your VSI-FAX license (serial number and activation key) offers a
more intuitive interface and now allows you to obtain a license for any other Esker products . For more information,
refer to VSI-FAX 6.1 registration.
Support of Office 2007
You can now fax Microsoft Office 2007 documents (.docx or .xlsx files) with the VSI-FAX server, either by printing the
document directly from the Microsoft Office 2007 application or by faxing the document from LanFax Windows client.
Support of Acrobat 7 and above
The PDFTOTIF converter is now compatible with Acrobat 7 and above versions.
6
VSI-FAX Pre-Installation
VSI-FAX Pre-Installation
Read this information before beginning your VSI-FAX installation.
What you will need
You will need the following:
Installation CD
VSI-FAX Installation and Administration documentation (available in HTML format or in printed version on the
VSI-FAX CD at \docs\vsifax_instadm.pdf)
Your VSI-FAX PIN/secret code(s), given to you upon purchase. This is required to register your software on
the Web and obtain your Serial Number and Activation Key. Follow the instructions on the registration card
provided with the software to obtain your Serial Number and Activation Key if you have not already received
this information by email.
Verify
Is the target host machine a supported Windows, Unix, or Linux platform and your system compatible with
VSI-FAX System Requirements? See Supported Platforms and Equipment.
Is TCP/IP running on the target host machine, and a properly configured network card installed?
Is at least one supported fax device (e.g., modem or fax board) installed and configured on the host machine?
For a full listing of supported fax devices, see Supported fax devices and accessories.
Do you have Administrator access to your system?
Does the machine from which you are installing have access to a local or networked CD-ROM drive?
Do you have a multi-page TIFF viewer installed on your system in order to view faxes received on the server?
For instance, Wang Imaging for Windows is provided on the Windows installation CD-ROM. Similar programs
are available for Unix and Linux platforms.
For using a client with VSI-FAX, is a VSI-FAX Server accessible via a network connection?
Are you using the proper modem cabling? For detailed information about modem cabling, go to the knowledge
base at http://www.esker.com/support.
Have you stopped all existing processes running on serial ports to which you will connect your fax devices?
Installing libstdc++.so.5 on Red Hat Enterprise 4 or 5
VSI-FAX Server requires that the libstdc++.so.5 library be installed on your Operating System to function properly.
The VSI-FAX Server installation program checks the library version, so you might be prompted to install the
libstdc++.so.5 library during the server installation. In this case, cancel the installation, then install the libstdc++.so.5
library:
For Red Hat 4.0, install the compat-libstdc++-33-3.2.3-47.3.i386.rpm RPM package that you can find on the
CD2 in the RedHat\RPMS folder.
7
INSTALLATION AND ADMINISTRATION GUIDE
For Red Hat 5.0, install the compat-libstdc++-33-3.2.3-61.i386.rpm RPM package that you can find on the
CD2 or DVD in the Server folder.
Next, perform the VSI-FAX Server installation.
Other considerations
This section describes several other items for you to take into consideration before installing VSI-FAX.
Port 2996 and 2539 availability
VSI-FAX uses TCP ports 2996 and 2539 to communicate with the fax server. You must ensure that no other
application or device is using these ports. You can check this by using the netstat -an command and checking
the output for the presence of these port numbers.
See also
Refer to your operating system documentation for port assignment information.
Serial port assignments
VSI-FAX may communicate with your various fax devices (modems or fax boards) via serial ports on your system.
You should know the name and physical location of the serial ports you are going to use to install your fax devices.
Serial port names are usually found in the/dev directory on Unix and Linux systems and are named COM1 through
COM9 in Windows.
See also
Go to the Knowledge Base at http://www.esker.com/support for detailed information about serial port compatibility.
Annotated fax server information form
This server information form includes detailed descriptions of the information required for a successful fax server
installation. Esker strongly suggests that you print or photocopy the blank Fax Server Information Form, fill it out, and
have it nearby when you install the fax server. Furthermore, if you require technical support to resolve an installation
problem, you may be asked to supply this information to our technical support staff.
Cover page information
This company information appears on your fax cover pages.
Information
Description
Company Name Your company name as you want it to appear on your cover pages
Address 1
First line of your company address
Address 2
Second line of your company address
Address 3
Third line of your company address. In the US, this is typically the city, state and zip code
Country
Your country as you want it to appear on your cover pages
Voice phone
Your voice telephone number as you want it to appear on your cover pages
FAX phone
Your fax telephone number as you want it to appear on your cover pages
Email
Your Internet email address as you want it to appear on your cover pages
Dialing properties
This information is used to set up local dialing and station identification information. Some of this information appears
on your sent fax headers.
8
VSI-FAX PRE-INSTALLATION
Information
Description
Country Code
Your country code. This is used to dial international fax numbers. In the US, this is typically 1.
Long
Distance
Access #
Number you enter to dial long distance telephone numbers. In the US, this is typically 1.
Area Code
Your local telephone area code
Local Number
Length
Number of digits in a local phone number. In the US, this is typically 7.
Local number length is used to determine whether the number being dialed is local or long
distance.
Dial Prefix
Number you enter to access an outside telephone line. In the US, this is typically 9, if required.
Dial Suffix
This is typically an internal accounting code used for billing long distance telephone usage to the
proper department or cost center.
Called
Subscriber ID
(CSI)
This is typically your outgoing fax number and company name. This string can be a maximum of
20 characters long. For best compatibility, restrict your CSI string to letters, numerals, plus signs,
and spaces.
Transmitting
Station ID (TSI)
This is typically your outgoing fax number. This string can be a maximum of 20 characters long.
For best compatibility, restrict your TSI string to letters, numerals, plus signs, and spaces.
The TSI string is used to negotiate with other fax devices and normally appears in the fax header
at the top of each faxed page. Because the TSI will appear on the header even if the rest of the fax
doesn't get sent, it is an especially good practice to make the TSI string your fax number. That
way, people can fax you back in the event of problems.
Note: Recent telecommunications laws in some countries (e.g., U.S.) now require that your TSI
appear on any unsolicited fax transmissions.
Internet email servers
Internet email services are used to send faxes directly from email clients and route received faxes to users' email
inboxes.
Important
When setting up your POP3 Email-to-Fax gateway email account, do not use an email account that receives
normal email. The fax server will try to process all received email on this account as an inbound fax. This can
cause drastically degraded fax routing performance or unexpected application behavior. Furthermore, the fax
server will remove email messages from this inbox. For these reasons, Esker strongly suggests setting up email
user, such as autofax, for your POP3 fax routing and ensuring that email user autofax is left off distribution lists at
your company
Information
Description
SMTP Server
Name
Fully qualified domain name or IP address of an outbound Internet mail server. VSI-FAX uses this
server to provide fax transmission notification to network clients and to send faxes as email
attachments.
SMTP From
Name
Default SMTP mailbox used to distribute fax transmissions. Default is user vsifax.
POP3 Server
Name
Fully qualified domain name or IP address of the mail server where the POP3 user account
resides.
POP3 User
Name
POP3 user account for use with the Email-to-Fax gateway integration. The default is user autofax.
POP3
Password
Password for the POP3 user account.
9
INSTALLATION AND ADMINISTRATION GUIDE
Fax modem properties
This information is used to configure supported fax modems for use with VSI-FAX.
Information
Queue name
Description
Short name for this fax modem device.
Description Short descriptive name for this fax modem device.
COM port
Serial port this fax modem device will use to communicate with VSI-FAX. Ensure that no other
modem is using the same port.
Prepare
Register your VSI-FAX software to get your Serial Number and Activation Key.
1. Go to http://www.esker.com.
2. Click Register your product at the bottom right of the Home page.
3. Enter the requested information. Refer to the VSI-FAX 6.1 registration documentation for more details. Upon
submission, you will receive the Serial Number and Activation Key by email.
See also
For Windows installation, refer to Installing VSI-FAX Server on Windows (page 19).
For Linux installation, see Installing VSI-FAX Server on Unix/Linux, Sample Unix and Linux Mount Commands, and
Fax Server Information Form.
If you require further assistance, contact your Esker Technical Support representative.
10
Supported Platforms and Equipment
Supported Platforms and Equipment
This section provides detailed technical information about:
Qualified platforms and detailed system requirements for each VSI-FAX application (e.g., fax server, clients,
development tools)
Supported fax devices (i.e., modems and fax boards)
Support for Windows Terminal Services environments
Support for other equipment (e.g., Ethernet Terminal Servers, Port Expanders, etc.)
Note
The information in this section was correct at publication time. However, you can always access the latest
supported platforms and equipment information in the support area of the Esker web site at http://www.esker.com.
What is a platform?
A platform is a specific combination of operating system and Central Processing Unit (CPU). Many commercial
operating systems run on both Intel and RISC CPUs. VSI-FAX does not always support all of these combinations. In
order to avoid confusion, this documentation routinely specifies entire supported platforms (i.e., operating system and
CPU) rather than just a supported operating system.
VSI-FAX Server
UNIX Platforms
Hardware
The Unix/Linux platforms on which you install the VSI-FAX Server must meet the following minimum requirements in
terms of hardware:
Hardware
Requirements
Required Minimum
CPU
RISC 90 MHz or higher, Intel 300 MHz or higher
RAM
128 MB (256 MB recommended)
Hard Disk Space
100 MB permanent disk space plus 100 MB additional temporary
space required during installation
Network Interface
Card
10baseT or higher, configured with the latest drivers for your platform
Qualified and recommended platforms
The VSI-FAX server has been qualified on the following Unix/Linux operating systems:
11
INSTALLATION AND ADMINISTRATION GUIDE
Qualified platforms
Sun Solaris SPARC
Operating System Version(s)
9 (32-bits or SPARC v8 compatible)
Sun Solaris (Intel)
10
IBM AIX
5.1 and 6.1
HP-UX
11iv1 (B.11.11)
SCO OpenServer
5.0.7 and 6.0
SCO UnixWare
7.1.3
Red Hat Enterprise
3, 4 and 5
Companion software - TCP/IP
TCP/IP must be running on the target host machine and a network card must be installed.
Fax on Demand Connector
Uses an HTTPs Internet Connection, no proxy server.
Windows Platforms
Hardware
The Windows platforms on which you install the VSI-FAX server must meet the following minimum requirements in
terms of hardware:
Hardware
Requirements
Required Minimum
CPU
Pentium III 450 MHz or higher
RAM
128 MB (256 MB recommended)
Hard Disk Space
120 MB permanent disk space plus 100 MB additional temporary
space required during installation
Network Interface
Card
10baseT or higher, configured with the latest drivers for your platform
Qualified and recommended platforms
The VSI-FAX server has been qualified on the following Windows operating systems:
Qualified
platforms
Microsoft
Windows
Operating System Version(s)
Server 2003 R2 SP2 (32-bit version only) or Windows Server 2003 SP2 (32bit Standard Edition, Enterprise Edition, or Datacenter Edition).
Server 2008 SP1 (32-bit and 64-bit Standard Edition, Enterprise Edition, or
Datacenter Edition).
12
SUPPORTED PLATFORMS AND EQUIPMENT
Companion software - TCP/IP
TCP/IP must be running on the target host machine and a network card must be installed.
Fax on Demand Connector
Uses an HTTPS Internet Connection, no proxy server.
Evaluation
If you are evaluating VSI-FAX, you do not have to install a physical fax device (modem or fax board). You can use
the Demonstration Driver (also called loopback) to evaluate the software.
VSI-FAX Server administration
These are the detailed system requirements for installing and using the VSI-FAX Server Administration application.
Supported
Platforms
Microsoft
Windows
Operating System Version(s)
Server 2003 R2 SP2 (32-bit version only) or Windows Server 2003 SP2
(32-bit Standard Edition, Enterprise Edition, or Datacenter Edition).
Server 2008 SP1 (32-bit and 64-bit Standard Edition, Enterprise Edition, or
Datacenter Edition).
XP SP3 (32-bit version only) .
Vista SP1 (32-bit and 64-bit versions) .
Hardware
Requirements
Required Minimum
CPU
Pentium II 300 MHz
RAM
64 MB (128 MB recommended)
Hard Disk Space
Cell 5 MB permanent disk space plus 10 MB additional temporary
space required during installation
Software Requirements
TCP/IP Connectivity
Required Minimum
As provided by your platform
VSI-FAX Server1 (*)
6.1
Microsoft Management Console (MMC)
1.1 (1.2 recommended)
(*) A VSI-FAX Server must be properly installed, configured, and accessible via a network connection.
Outlook Client
These are the detailed system requirements for installing and using the VSI Outlook Client.
13
INSTALLATION AND ADMINISTRATION GUIDE
Supported Platforms
Microsoft Windows
Operating System Version(s)
XP SP3 (32-bit version only) .
Vista SP1 (32-bit and 64-bit versions) .
Supported Client
Client Version(s)
Outlook
Outlook 2000
Outlook XP
Outlook 2003
Outlook 2007
Hardware
Requirements
Required Minimum
CPU
Pentium II 300 MHz
RAM
32 MB (64 - 128 MB recommended)
Hard Disk Space
10 MB permanent disk space plus 8 MB additional temporary space
required during installation
Software Requirements
Required Minimum
TCP/IP Connectivity
As provided by your platform
VSI-FAX Server (1)
6.1
Microsoft Outlook(2)
2000
(1) A VSI-FAX Server must be properly installed, configured, and accessible via a network connection.
(2) The Outlook Client is best used with Outlook in Corporate or Workgroup mode in conjunction with a Microsoft
Exchange Server. This configuration provides access to the fax message form published on the Microsoft Exchange
Server.
While you can use the Outlook Client with Outlook in standalone Internet e-mail only mode, you will have to manually
enter your fax recipient information using MAPI syntax each time you send a fax.
See also
Refer to the VSI-FAX Outlook Client help for additional information about various ways to send faxes using the
Outlook Client.
LanFax Windows Client
Note
With version 6.0 and up, VSI-FAX offers a new LanFax™ Windows Client with enhanced usability to replace VSIFAX Windows Client. VSI-FAX Windows Client remains available on the CD-ROM as an unsupported client.
The computer you're installing the LanFax Windows Client on must meet the following requirements:
14
SUPPORTED PLATFORMS AND EQUIPMENT
Supported
Platforms
Microsoft
Windows
Operating System Version(s)
XP SP3 (32-bit version only) .
Vista SP1 (32-bit and 64-bit versions) .
Server 2003 R2 SP2 (32-bit version only) or Windows Server 2003 SP2
(32-bit Standard Edition, Enterprise Edition, or Datacenter Edition) with
Terminal Services or not.
Server 2008 SP1 (32-bit and 64-bit Standard Edition, Enterprise Edition, or
Datacenter Edition) with Terminal Services or not.
Hardware Requirements
Hard Disk Space
Required Minimum
15 MB
Software
Requirements
Recommended
HTTP connectivity
As provided by your platform to provide connectivity to the VSI-FAX
Server
VSI-FAX Server
6.1
The LanFax Windows Client is a front end to the VSI-FAX Server and provides an easy way for you to use VSI-FAX
on your desktop. The LanFax Windows Client lets you: send faxes, save drafts of outgoing faxes, view sent faxes
through an Outbox, view received faxes through an Inbox, manage phonebooks and customize fax headers and
cover pages.
Using the LanFax Windows Client you can send faxes in one of two methods:
Send a fax directly from the LanFax Windows Client.
Send a fax from an application that allows you to print on LanFax Windows Client Printer. This is known as
print to fax.
See also
Refer to the VSI-FAX LanFax Windows Client help for more information on installing and using the LanFax Windows
Client.
CoverMaker
These are the detailed system requirements for installing and using VSI CoverMaker.
Supported Platforms
Microsoft Windows
Operating System Version(s)
XP SP3 (32-bit version only) .
Vista SAP1 (32-bit and 64-bit versions) .
15
INSTALLATION AND ADMINISTRATION GUIDE
Hardware Requirements
Required Minimum
CPU
Pentium II 300 MHz
RAM
16 MB (32 - 128 MB recommended)
Hard Disk Space
3 MB
Software Requirements
Required Minimum
TCP/IP Connectivity (1)
As provided by your platform.
VSI-FAX Server (1)
6.1
(1) A properly installed and configured VSI-FAX Server must be accessible via a network connection in order to save
your fax cover pages on the fax server so that they can be used for faxing. However, you can use CoverMaker on a
standalone (i.e., non-networked) computer while designing your cover pages.
Note
Users must have write access to the vsicover directory to be able to save their cover pages.
MailMerge client
Supported Platforms
Microsoft Windows
Operating System Version(s)
XP SP3 (32-bit version only) .
Vista SP1 (32-bit and 64-bit versions) .
Hardware Requirements
Required Minimum
CPU
Pentium II 300 MHz
RAM
16 MB (32 - 128 MB recommended)
Hard Disk Space
3 MB
Supported Client
Microsoft Office
Required Minimum
Office XP
Office 2003
Office 2007
VSI-FAX Server
6.1
Note
The MailMerge Client is not designed to work with Microsoft Access.
16
SUPPORTED PLATFORMS AND EQUIPMENT
Software Development Kit (SDK)
These are the detailed system requirements for installing and using VSI Software Development Kit (SDK).
Supported
Platforms
Microsoft
Windows
Operating System Version(s)
Server 2003 R2 SP2 (32-bit version only) or Windows Server 2003 SP2
(32-bit Standard Edition, Enterprise Edition, or Datacenter Edition) with
Terminal Services or not.
Server 2008 SP1 (32-bit and 64-bit Standard Edition, Enterprise Edition, or
Datacenter Edition) with Terminal Services or not.
XP SP3 (32-bit version only) .
Vista SP1 (32-bit and 64-bit versions) .
Hardware Requirements
Required Minimum
CPU
Pentium II 300 MHz
RAM
32 MB (64 - 128 MB recommended)
Hard Disk Space
43 MB (50 MB recommended)
Software Requirements
Required Minimum
TCP/IP Connectivity (1)
As provided by your platform.
VSI-FAX Server (1)
6.1
Development Environment
Microsoft Visual Basic 6.0, Visual C++ 6.0
(1) Connection to a VSI-FAX Server is not required but is useful for testing and debugging your applications.
Supported fax devices and accessories
This section provides information about the supported fax boards, modems and accessories (e.g., port expanders,
terminal services).
Recommended fax boards and modems
In order to get maximum performance and reliability from your fax server, Esker recommends fax boards and
modems from these manufacturers:
Dialogic (www.dialogic.com) (formerly Eicon Networks and Cantata Technology).
Multi-Tech Systems (www.multitech.com)
Refer to Recommended modems and fax boards in the VSI-FAX Recommended Modems and Fax Boards
documentation for a complete list of the supported boards and modems.
Note
The Esker web site always provides the most current fax device compatibility information. Go to
http://www.esker.com/support for additional information.
17
INSTALLATION AND ADMINISTRATION GUIDE
Dialogic Brooktrout fax boards and drivers
VSI-FAX supports the following fax solutions from Dialogic Corporation:
Dialogic Brooktrout TR1034 and TruFax boards
Dialogic Brooktrout SR140™ Fax Software for Fax over IP.
Brooktrout TR1034 boards, TruFax boards, and SR140 Fax Software are supported in Windows and Red Hat Linux
environments.
Refer to Dialogic Brooktrout fax boards and drivers in the Fax Boards and Fax Drivers Installation documentation for
the list of Windows and Linux systems these fax solutions have been tested on, and for more information about using
Dialogic Brooktrout hardware and software with VSI-FAX.
Note
Dialogic Brooktrout TR114™ and legacy Brooktrout TruFax boards are no longer supported as from VSI-FAX
version 6.1.
Dialogic Corporation provides detailed technical information about their fax products on their web site at
http://www.dialogic.com.
This web site also presents excellent information about the advantages of fax boards over fax modems, the relative
merits of analog and digital fax boards, and guidelines and recommendations for ordering various telephony services
(e.g., T1, DID) for use with your networked fax solution.
Dialogic Diva Server fax boards
VSI-FAX supports Dialogic Diva Server analog and digital fax boards (formerly Eicon fax boards) on Windows and
Linux platforms.
Refer to Dialogic Diva Server fax boards and drivers in the Fax Boards and Fax Drivers Installation documentation for
the list of Windows and Linux systems the Diva Server boards have been tested on, and for more information about
using Dialogic Diva Server boards with VSI-FAX.
You must install the physical fax board in the machine following the manufacturer recommendations before installing
VSI-FAX. For this, refer to the manual shipped with the board. You can also visit the Dialogic web site at
http://www.dialogic.com, and consult documentation on these fax boards at
http://www.dialogic.com/support/helpweb/divasvr/default.htm.
Once the boards is installed, install the drivers as described in Dialogic Diva Server fax boards and drivers in the Fax
Boards and Fax Drivers Installation documentation.
Ethernet terminal servers
While some Esker customers have had success using Ethernet terminal servers, Esker does not recommend this
practice nor do we support it in any way. Fax modems should always be connected to local serial ports. If you want to
use more modems than can be connected to open serial ports on your system, use a local serial port expander.
18
Installing VSI-FAX Server on Windows
Installing VSI-FAX Server on Windows
Installing fax board drivers
First you should install and configure your board in the VSI-FAX computer.
®
For information about installing VSI-FAX with a Dialogic Brooktrout fax board or with Brooktrout SR140™ Fax
Software solution, refer to Installing Brooktrout drivers on Windows in the Fax Boards and Fax Drivers Installation
documentation.
®
For information about installing VSI-FAX with a Dialogic Diva Server fax board, refer to Dialogic Diva Server fax
board and drivers in the Fax Boards and Fax Drivers Installation documentation.
Installing VSI-FAX Server on Windows
This section describes how to install a VSI-FAX server on a supported Windows platform. For a list of supported
platforms, see Supported Platforms and Equipment (page 11).
If you are installing VSI-FAX in a Terminal Services environment, make sure you refer to Considerations in the
Terminal Services environment before you start.
VSI-FAX Server setup installs a print driver on the computer. When installing VSI-FAX on a server with very
restrictive security rules, make sure that the installation of a new print driver is allowed.
Tip
Use your completed Fax Server Information Form (page 237) to provide the required information for this
installation.
1. Load your VSI-FAX CD-ROM into your CD-ROM drive.
If the installation program does not start automatically, run autorun.exe located in the root directory of your
VSI-FAX CD-ROM.
The VSI-FAX CD browser appears.
2. Choose VSI-FAX Server. The VSI-FAX Server Welcome screen appears.
3. Click Next to proceed with the installation. The Software License Agreement appears.
4. Click Yes to agree to the conditions in the license agreement and Next to continue with VSI-FAX server
installation.
5. If you agree with the Destination Location, click Next. Otherwise, click Browse to select a different location.
Click Next to proceed with the installation.
Tip
The installation program suggests a default destination directory for the VSI-FAX server program files. To
install the VSI-FAX server in another directory, click Browse and follow the on-screen instructions.
6. In the VSI-FAX Software License screen that appears after the file copy, enter the Serial Number and
Activation Key you received when you registered your software or when you asked for an upgrade and click
Next to proceed with the installation.
To know how to get your Serial Number and Activation Key, refer to Prepare.
19
INSTALLATION AND ADMINISTRATION GUIDE
To install an imaging server, enter the license provided in Imaging Server Setup and Configuration (page
137).
Note
If you do not enter a Serial Number and Activation Key, an evaluation license will be installed. This license
allows you to test VSI-FAX and see if the product matches your needs. With such a license, you can use
VSI-FAX for 30 days. After that, you can reactivate it with another time-limited evaluation license or with a
production license.
7. Enter the Cover Page Information and click Next. This information will appear on a typical cover page.
Users can change this information when they send a fax, or they can create other cover pages that show
different information. In most cases however, this will be the information you want most of your fax recipients
to see.
Note
You may want to dedicate a separate email account on your company mail server for fax administration.
8. In the Telephony Information screen, enter your Country code, Area code, Local number length, Long distance
access number, Dial prefix, and Dial suffix. Enter your Called Subscriber ID (CSI) and Transmitting Station ID
(TSI) strings and click Next to accept your dialing properties and proceed with the installation.
For information on the fields to fill in, refer to Dialing properties.
9. In the SMTP/POP3 Information screen, enter your SMTP server name, SMTP from-name, POP3 server name,
POP3 user name, POP3 password, and confirm password. Click Next to continue.
For information on the fields to fill in, refer to Internet email servers.
Note
You only need to create the POP3 user account if the Email-to-Fax gateway integration will be used.
Important
When setting up your POP3 fax routing email account, do not use an email account that receives normal
email. The fax server will try to process all received email on this account as an inbound fax, causing
drastically poor fax routing performance or unexpected application behavior. Furthermore, the fax server
will remove email messages from this inbox. Therefore, Esker strongly suggests setting up an email user
like autofax for your POP3 fax routing, as well as to ensure that this email user is left off distribution lists
at your company.
10. The Add fax modem devices to server screen appears. This screen allows you to add fax modems to the
server. Enter the information for the modem(s) you have installed, if any. Enter a name and a description for
the device queue, and the serial port to use with the modem. Ensure that no other modem is using the same
port. Click Add Device to add a fax modem and Next to proceed with the installation. If you do not have a
modem installed, leave this screen blank and click Next.
Notes
If you have a fax board, its setup is addressed later in the installation process.
If you are testing VSI-FAX with the loopback device or you are only planning to route faxes to email
addresses, you can skip this dialog box.
You can skip this part of the installation and add your fax modem devices later using the vfxadmin
command or the VSI-FAX Server Administration snap-in.
11. When asked if you wish to install/update the Brooktrout TR1034, TruFax or SR140 drivers now, click either
Yes or No depending on the fax solution you are to use. If you click Yes, the driver package will be installed
before proceeding with the VSI-FAX Server installation.
20
•
To use a Booktrout TR1034 or TruFax board with VSI-FAX, you need to install/update the fax
hardware before installing the drivers support from the main setup. If you have already
installed/updated to the Brooktrout Plug and Play driver, click Yes to continue. Otherwise, click No to
cancel the installation, refer to Installing the Brooktrout Plug and Play Driver for TR1034, TruFax
boards in the Fax Boards and Fax Drivers Installation documentation to install the new plug and play
driver, and relaunch the server installation.
•
To use the SR140 Fax Software, you do not need to install or update any hardware. Click Yes to
continue.
INSTALLING VSI-FAX SERVER ON WINDOWS
•
If you want to install VSI-FAX Server with the loopback and install the drivers later, click No.
For information about installing VSI-FAX Server with Dialogic Brooktrout drivers, refer to Dialogic Brooktrout
fax boards and drivers in the Fax Boards and Fax Drivers Installation documentation.
12. You may be warned that the last version of the Dialogic Brooktrout Plug-and-play-driver 6.0.0 is required to
use VSI-FAX with a Brooktrout fax board.
•
To use a Brooktrout TR1034 or TruFax board with VSI-FAX, you need to install/update the fax
hardware before running the server installation. Click No to cancel the VSI-FAX server installation,
follow the steps in Installing the Brooktrout Plug and Play Driver for TR1034, TruFax boards in the Fax
Boards and Fax Drivers Installation documentation and relaunch the server installation.
•
To use the SR140 Fax Software, you do not need to install or update any hardware. Click Yes to
continue the installation.
For information about installing VSI-FAX Server with Dialogic Brooktrout drivers, refer to Dialogic Brooktrout
fax boards and drivers in the Fax Boards and Fax Drivers Installation documentation.
13. If you have installed a Diva Server board, the installation program automatically detects this board. When
asked if you wish to configure your board, click Yes.
For information about installing Diva Server fax board drivers, refer to Dialogic Diva Server fax board and
drivers in the Fax Boards and Fax Drivers Installation documentation.
14. When asked if you want to start VSI-FAX server now, click Yes.
Tip
We strongly suggest that you start the VSI-FAX service at this point. Otherwise, you will need to manually
start the fax scheduler before you can test the fax server.
If you change the VSI-FAX services to be manual or run as a user, you will have to reset those changes
after an update install since they will be set to automatic.
15. Click Finish to complete the installation.
16. Logout, then log back in to the server. VSI-FAX modifies the path to point to the bin folder and sets up an
environment variable. These changes do not take effect until you logout and then login to the server.
Preparing fax imaging via application printing
To generate the Tiff fax images, VSI-FAX server uses application printing: the requested documented is requested to
be opened with the default program and printed on the VSI-FAX printer from this application. Often, these application
(such as Microsoft Office ones, or Adobe Acrobat Reader) will require some additional information to be provided the
first time they are launched after being installed (like providing registration information), and these dialogs will block
the printing process. Therefore, we strongly recommend that you manually launch these application at least
once after they have been installed to make sure they open without popping any mandatory dialogs.
Microsoft Office Word 2007 component
In addition to running the application at least once, the Microsoft Office Word 2007 Visual Basic for applications
component must be installed for Microsoft Word documents to be properly opened and printed.
Considerations in the Terminal Services environment
Usually, installing software accessed by multiple users in a terminal server environment requires that you are in
Install mode on the server before setup is launched. However you don't need to do so to install VSI-FAX as the setup
program will automatically detect that your are running a terminal server and will therefore switch to Install mode
without any other action required.
21
Installing VSI-FAX Server on
Unix/Linux
Installing VSI-FAX Server on Unix/Linux
This section describes how to install a VSI-FAX server on a supported Unix or Linux platform.
See also
See Supported Platforms and Equipment (page 11) for more information about supported Unix or Linux platforms.
Tip
Use your completed Fax Server Information Form (page 237) to provide the information required during this
installation.
Installing fax drivers
With Diva Server fax boards, you should first install and configure your board before installing VSI-FAX Server. For
more information, refer to Installing Diva Server fax boards drivers in the Fax Boards and Fax Drivers Installation
documentation.
With Brooktrout TR1034-TruFax boards, you should install VSI-FAX Server first then install the Brooktrout drivers and
configure your board. For details, refer to Installing Brooktrout drivers package and configuring your board on
Unix/Linux in the Fax Boards and Fax Drivers Installation documentation.
To use the Brooktrout SR140 fax software, you should install VSI-FAX Server first then install the Brooktrout drivers,
obtain an SR140 Fax Software license, activate this license and configure SR140. For details, refer to Installing
Brooktrout drivers package and configuring SR140 on Unix/Linux in the Fax Boards and Fax Drivers Installation
documentation.
Installing VSI-FAX Server
VSI-FAX is supplied on CD-ROM media. Follow the explanations in Installing VSI-FAX with the CD-ROM to perform
the installation using the CD-ROM.
You may need to install a VSI-FAX version using a downloaded file. For this, refer to Installing VSI-FAX using a
downloaded file.
Note
When installing on Red Hat 4/5, you need to have the libstdc++.so.5 installed. Refer to Installing libstdc++.so.5 on
Red Hat Enterprise 4/5 for details.
Installing VSI-FAX with the CD-ROM
Because VSI-FAX is supplied on CD-ROM media, you must either know the Unix or Linux mount command required
to mount the CD-ROM drive or know how to use Windows Explorer to gain access to the files on the CD-ROM.
1. Log in as root.
2. Open a terminal window if you are running X Windows.
3. Load your VSI-FAX product CD-ROM into your CD-ROM drive.
23
INSTALLATION AND ADMINISTRATION GUIDE
4. Mount the CD-ROM drive.
Refer to Sample Unix and Linux Mount Commands (page 235) for additional information.
5. Change directory to the CD-ROM mount point by entering:
cd /mnt/cdrom
6. Run the installation program by entering:
./install.sh
7. Confirm your platform.
8. The list of available packages appears:
Available packages are:
s) Fax Server
v) Virtual Fax Server
a) Fax Client APIs
b) Dialogic Brooktrout TR1034-SR140 drivers
*) All packages
Q) quit
Enter package to install [s]:
Choose Fax Server (s) as the package to install.
9. Choose where you want to extract the temporary install files (The default location is /tmp).
10. Choose where you want to install the VSI-FAX system. (The default location is /usr/vsifax).
11. Let the setup create a group "vsifax".
12. Let the setup create a user "vsifax".
13. Agree to the conditions in the Software License Agreement.
14. When asked for License information, enter the Serial Number and Activation Key you received when you
registered your software or when you asked for an upgrade.
To know how to get your Serial Number and Activation Key, refer to Prepare.
Note
If you do not enter a Serial Number and Activation Key, an evaluation license will be installed. This license
allows you to test VSI-FAX and see if the product matches your needs. With such a license, you can use
VSI-FAX for 30 days. After that, you can renew it with another time-limited evaluation license or with a
production license.
The setup installs VSI-FAX Server.
15. Enter the information for the modem(s) you want to configure, if any.
Notes
If you are testing VSI-FAX with the loopback device or you are only planning to route faxes to email
addresses, you can skip this dialog box.
You can skip this part of the installation and add your fax modem devices later using the vfxadmin
command.
16. Enter your TSI and CSI strings.
Refer to Dialing properties .
17. Enter your SMTP server name.
18. Indicate if you reside in the United States or Canada.
19. Enter your country code, long distance access number, area code, local number length, dial prefix, and dial
suffix.
Refer to Dialing properties.
20. Enter your POP3 server name, POP3 user name, POP3 password, and confirm password.
Note
You need to create the POP3 user account only if the Email-to-Fax gateway integration will be used.
24
INSTALLING VSI-FAX SERVER ON UNIX/LINUX
Refer to Internet email servers.
Important
When setting up your POP3 fax routing email account, do not use an email account that receives normal
email. The fax server will try to process all received email on this account as an inbound fax, causing
drastically poor fax routing performance or unexpected application behavior. Furthermore, the fax server
will remove email messages from this inbox. Therefore, Esker strongly suggests setting up an email user
like autofax for your POP3 fax routing as well as to ensure that this email user is left off distribution lists at
your company.
21. Enter the cover page information. This information will appear on a typical cover page. Users can change this
information when they send a fax, or they can create other cover pages that show different information. In
most cases however, this will be the information you want most of your fax recipients to see.
22. Set automatic start at system boot for VSI-FAX Admin Server and Fax Server.
23. Start Admin Server and Fax Server now to be able to test the fax server after installation.
24. The installation is complete. Thank you for using VSI-FAX.
Installing VSI-FAX using a downloaded file
To extract and install using the server.tgz file, follow the instructions below.
1. Create a temporary directory.
2. Copy the server.tgz file into the temporary directory.
3. Uncompress/unzip the file. If you have gunzip, then execute the following command:
gunzip server.tgz
If you don't have gunzip on your system, move the server.tgz file to server.tar.Z with the following command:
mv server.tgz server.tar.Z
and then uncompress the file with the following command:
uncompress server.tar.Z
4. Extract the contents of the tar file with the following command:
tar xvf server.tar
5. Run the installation program with the following command:
./install.sh
6. Select the Fax Server package.
The installation program will guide you through the remainder of the fax server installation. Follow the on-screen
instructions.
Tip
The installation program will ask if you want to start the fax scheduler. We strongly suggest that you start the fax
scheduler. Otherwise, you will need to manually start the fax scheduler before you can test the fax server.
25
Upgrading to version 6.1
You can upgrade to version 6.1 from the following versions:
VSI-FAX 6.0
Direct upgrades to 6.1 from versions prior to 6.0 are not advised. Existing customers running a version of VSI-FAX
prior to 6.0 must upgrade to version 6.0 before installing version 6.1.
Prerequisites
Ensure that no application will try to access the server during the upgrade operation
If you were using a Brooktrout fax board with your former version of VSI-FAX, refer to the the Fax boards and fax
drivers installation manual for information about fax board upgrade.
Upgrade steps on Windows platforms
1. Load the VSI-FAX CD-ROM.
2. Click VSI-FAX Server under Fax Server on the Autorun screen.
3. The installation program detects that the VSI-FAX server has previously been installed on the machine and
proceeds with the upgrade. Existing cover page information, telephony information, SMTP server and POP3
server connection settings and fax modem devices configuration are kept. Click Next when the file copy is
finished.
4. In the VSI-FAX Server License screen, enter your Serial Number and Activation Key or leave the screen
empty to install the evaluation version. Click Next.
5. Click Finish to complete the server upgrade.
6. Then upgrade the other VSI-FAX components you were using by launching the corresponding setup from VSIFAX Autorun:
•
•
•
•
•
•
•
•
Server Administration
LanFax Windows Client
CoverMaker
VSI-FAX SDK
Outlook Client
MailMerge Client
Virtual Server
Add-On Formatters
Server Upgrade steps on Unix/Linux platforms
1.
2.
3.
4.
5.
6.
Mount the CD-ROM drive.
Change directory to the CD-ROM mount point by entering:cd /mnt/cdrom
Run the installation program by entering: ./install.sh
Confirm platform type.
The list of available packages appears. Enter "s" to install the Fax Server package.
Follow the on-screen instructions. Answer yes when prompted to stop the existing VSI-FAX server.
27
INSTALLATION AND ADMINISTRATION GUIDE
7. Enter your Serial Number, Activation Key and remote server addresses if requested.
8. After the file copy, modify existing fax modem devices configuration, cover page information, telephony
information, SMTP server and POP3 server connection settings if needed.
9. Answer yes when prompted to start the VSI-FAX Admin Server and Fax Server tasks.
Breaking changes
VSI-FAX MailMerge Client
The printer port name has been renamed VSI-FAX Port 3.0 in VSI-FAX 6.1. The macro used in Microsoft Word to
customize the mail merge mechanism uses the port name. Thus you should use the new macro version to send your
faxes with the MailMerge Client.
If you customized the Microsoft Word document or template provided with a previous version of VSI-FAX, you should
update the macro contained in your document. To do this, you must:
1. Edit your document in Microsoft Word.
2. Enter ALT + F8 to open the Macro dialog.
3. Click the Organizer button.
4. Delete the previous mergebox macro.
5. Use the Close File/Open File button on the right to open the template file provided with VSI-FAX 6.1.
6. Copy the new mergebox macro in your document.
28
Testing the Fax Server
Testing the Fax Server
Immediately after installing the fax server, verify proper fax server operation by sending a simple test fax via the vfx
command line. You can send this test fax using the loopback feature or you can send it to any fax machine.
Sending a test fax using the loopback
Sending a test fax using the loopback feature eliminates potential outside problems (e.g., phone lines, modems, etc)
that could cause a fax transmission failure.
You need a small text file to use as a test fax. Any text file will do.
1. Important : If you have not already logged out and logged back in to the server since you've installed VSIFAX, then do so now.
2. Open a command shell on your computer.
3. Verify that the fax server is running by entering:
vfxstat -s 2
Server status information is displayed. The display will be continually refreshed every two seconds.
4. Open another command shell on your computer.
5. Send your test fax by entering:
vfx -n <fax_number> -d lb <my_file.txt>
For example, to fax a test file called MyFile.txt to (800) 123-4567 using the loopback feature, you would
enter:
vfx -n 8001234567 -d lb MyFile.txt
The test fax is sent to the loopback device queue, and the fax job number appears.
6. Switch to the command shell showing the fax server status.
You can track the status of your test fax as the display is continually updated.
1. After your test fax is successfully sent, it is routed to your received fax inbox. You can open and view this file
with the multi-page TIFF viewer on your computer to verify that the fax was sent correctly.
2. Run the vfxilog command. The first entry listed will show the request ID of the last fax that was received.
Write down this request ID. The fax will be stored in the fax queue for the user named in the clientid column.
3. Launch your multi-page TIFF viewer.
4. Open the <request_ID>.tif file located in the fax server faxq/<user> directory, where <request_ID>
corresponds to the test fax request ID you wrote down.
Your test fax is displayed in your multi-page TIFF viewer.
Sending a test fax to a fax machine
For the fax to work, you need a valid fax number for a fax machine in your area. You also need a small text file to use
as a test fax. Any text file will do.
1. Open a command shell on your computer.
29
INSTALLATION AND ADMINISTRATION GUIDE
2. Verify that the fax server is running by entering:
>vfxstat -s 2
Server status information is displayed. The display will be continually refreshed every two seconds.
3. Open another command shell on your computer.
4. Send your test fax by entering:
vfx -n <fax_number> <my_file.txt>
For example, to fax a test file called <my_file.txt> to (800) 123-4567, you would enter:
vfx -n 8001234567 <my_file.txt>
The test fax is sent to the default device queue.
5. Switch to the status command shell.
You can track the status of your test fax as the display is continually updated.
Your test fax should be received by your fax machine.
30
Installing VSI-FAX Server
Administration MMC snap-in
Installing VSI-FAX Server Administration MMC snap-in
Important
Refer to the VSI-FAX Server Administration help for additional information about loading the snap-in from a
Microsoft Management Console (MMC) session.
If you do not install VSI-FAX Server Administration on the VSI-FAX Server computer, ensure that the VSI-FAX
server that you want to remotely administer is accessible via a network connection and that port 2539 is opened
through any firewalls.
1. Load your VSI-FAX CD-ROM into your CD-ROM drive.
If the autorun does not start automatically, run autorun.exe located in the root directory of your VSI-FAX
CD-ROM.
The VSI-FAX CD browser appears.
2. Select Server Administration under Tools.
3. The Welcome screen appears. Click Next to proceed with the installation.
4. Click Next if you agree with the default destination directory for the VSI-FAX Server Administration program
files. To install the VSI-FAX Server Administration files in another directory, click Browse and follow the onscreen instructions.
The program files are copied to the local hard drive. This may take several seconds.
5. When the Setup complete screen appears, click Finish.
Launching VSI-FAX Server Administration console
Before you can administer VSI-FAX using this snap-in, configure the connection to the Fax Server:
1. Select Start > Programs > VSI-FAX > VSI-FAX Server Administration to launch the VSI-FAX Server
Administration console.
2. When prompted, enter the hostname of the VSI-FAX server in the Fax Server field, or click Browse to select
an existing Fax Server.
3. Enter vsifax in the User ID field.
4. If you have not added a password for the vsifax user within the VSI-FAX database, do not enter a password
in the Password field. Otherwise, enter the password that you assigned to the vsifax user.
5. Click OK to. You can now administer VSI-FAX.
To administer another server from this snap-in or change the connection settings, right-click the VSI-FAX Server
Administration icon, and select New > Fax Server. Enter the connection settings as above and click OK to save the
new Fax Server icon.
31
Installing the Outlook Client
Installing the Outlook Client
Refer to the Supported Platforms and Equipment (page 11) before installing the Outlook Client.
Important
You must use an administrator account when installing the Outlook Client on Windows Vista.
See also
Refer to the VSI-FAX Outlook Client help for information about configuring Outlook for Corporate or Workgroup
mode.
Notes
The reason the Outlook Client will not work with Outlook in Internet only mode is that our fax technology requires
the full MAPI DLLs, which are only installed when you configure Outlook for Corporate or Workgroup mode.
For best results and performances, it is recommended that you have an up-to-date version of Microsoft Office,
with he latest available service pack installed.
The preferred way to use the Outlook Client is to use Outlook with a Microsoft Exchange Server. Although this is the
preferred configuration, the Exchange Server is not required. However, if you run Outlook without an Exchange
Server, you will not have access to the custom fax form.
Large-scale deployment
For the most effective large-scale client deployment:
Publish the fax message form once to the Organizational Forms Library on your Exchange server. Do this by
running the VSI-FAX Outlook Client setup on a machine with which you have administrative and Exchange
publication privileges. Subsequent client installations should just answer "No" to the dialog prompting for republishing the fax message form.
Turn on the remote registration option on the fax server.
Set up the master default profile on the fax server with reasonable defaults for your organization.
What you need to know before installing Outlook Client
Outlook needs to be closed prior to launching the Outlook client setup.
During the installation, you will have to choose the VSI-FAX form publication location:
On the Exchange server: Organizational Forms Library (your Outlook user then needs to have the appropriate
publication rights)
Locally: Personal Forms Library. This option cannot be chosen in a Terminal Service Environment as only the
user doing the installation would have the form available
No publication. Used when you don't want to use the fax form but rather a regular Mail message form. Also
used when you are not in an Exchange environment.
At the end of the setup, you will need to enter the VSI-FAX server name or IP address as well as the user ID used
when connecting to the VSI-FAX server and sending a fax.
33
INSTALLATION AND ADMINISTRATION GUIDE
After the installation, when launching Outlook, you will have three new buttons: Fax message, Fax Status and Fax
Profile settings.
Basic installation procedure
1. Load your VSI-FAX CD-ROM into your CD-ROM drive.
If the autorun program does not start automatically, run autorun.exe located in the root directory of your
VSI-FAX CD-ROM.
The VSI-FAX CD browser appears.
2. Select Outlook Client under Desktop Client.
If an existing version of the VSI-FAX Outlook Client is detected, you will be advised that this older version
must be removed before you can proceed with the installation. Click Yes to remove the old VSI-FAX Outlook
Client and proceed with the installation.
3. The Welcome screen appears. Click Next to proceed with the installation.
4. If Microsoft Outlook is currently running on the machine, you will be advised that this client must be closed.
Close Microsoft Outlook and click Retry on the Microsoft Outlook Running advertisement dialog box.
5. Click Next if you agree with the default destination directory for the VSI-FAX Outlook Client program files. To
install the VSI-FAX Outlook Client files in another directory, click Browse and follow the on-screen instructions.
The program files are copied to the your local hard drive. This takes several seconds.
6. Enter the hostname or IP address of your fax server. Enter your VSI-FAX user account login name (client ID).
7. Click Next to proceed with the installation.
8. Select your form publishing option (personal forms library, organizational forms library, or none).
Note
If you want to use the custom fax form provided with the VSI-FAX Outlook Client, you must decide where
you want to publish it. You can either publish to the organizational forms library or your personal forms
library.
9. Click Next to proceed with the installation.
10. When the Setup Complete screen appears, click Finish.
Post-installation notes
You can use the Outlook Client to send faxes directly from Outlook or from another Windows application.
Refer to the VSI-FAX Outlook Client help for additional information.
If you are unable to send faxes after installing VSI-FAX Outlook Client in Windows Server 2003, reboot the
server. This will ensure that installed DLLs get registered.
If you are using the Outlook Client on a system that has other fax products installed, you must control the
order that Microsoft polls the services. To make VSI-FAX the preferred fax product, choose Tools > Services >
Delivery and move the VSI-FAX Outlook Client service closer to the top of the list than any other fax service.
Phone book conversion notes
A conversion utility (PbConvert.exe) that converts phone book and user profile information is part of the
Outlook Client install and is called at the end of the installation. It can also be run separately by users who
want to run the conversion manually.
Command line parameters are available for all of the configuration options the program supports. Invoking the
PbConvert.exe /help displays help for this utility.
During the conversion process, City, State and Zip information is lost. This is primarily because our directory
format uses Address 1/Address 2/Address 3 fields rather than City/State/Zip Code to store this information.
34
INSTALLING THE OUTLOOK CLIENT
Windows Terminal Server installation notes
This section provides critical information for successfully installing the VSI Outlook Client in a Windows Terminal
Server environment.
The Outlook Client supports Microsoft Windows Terminal Services. Make sure you have deployed Outlook in a
Windows Terminal Services Environment before deploying the Outlook Client.
Requirements
To successfully install the Outlook Client in a Terminal Services environment, you must:
Log in and run the installation program directly from the Terminal Services machine with local Administrator
privileges.
Ensure that each Terminal Services user has a unique path name defined for the Terminal Services Home
Directory.
Launch the fax client installation program in Install Mode see below).
Have Installed Outlook in Corporate or Workgroup configuration.
Ensure that no Terminal Services clients are running Outlook.
If your Outlook users connect to an Exchange Server, add the Exchange service to the default mail profile for the
Administrator account and each Terminal Services client user. If your Outlook users connect to an Exchange server
using Outlook 2000 and you want to use the custom Fax Message Form, the Terminal Services Administrator must
be granted publishing rights to the Exchange server Organizational Forms Library specified in the default mail profile.
General application notes
To successfully install the Outlook Client in a Windows Terminal Server environment, please note the following:
When installing the Outlook Client in a Terminal Server environment, the Fax Message Form can only be
published in the Organizational Forms Library of your Exchange server (or not at all).
Ensure that you have the appropriate publication rights before you install.
The Outlook Client setup program installs the client in "Install Mode" when launched in a Terminal Server
environment. When you are ready to proceed with the installation, click "Install" on the setup information
message box. Otherwise click "Cancel" .
Terminal Server client users must not run or launch Outlook during the install or uninstall procedures.
If you are using Microsoft Outlook in a Terminal Services environment, and if Outlook was installed after the
Terminal Services support, the Visual Basic Script support is not installed in Outlook and you cannot use
VBScript in custom Outlook forms. This means that you will not be able to send faxes from Outlook correctly
with the VSI-FAX form: the device used is always the one set by default on the VSI-FAX server, you cannot
modify the cover page settings, etc. Refer to the Microsoft Support article
http://support.microsoft.com/default.aspx?scid=kb;en-us;302003 for more information on how to install these
components.
Multiple mail profiles are not supported in a Terminal Server environment with the Outlook Client.
The installation program will only add the Outlook Client service to the default mail profile for each user.
Once the software is installed, have all of your Terminal Server client users restart their sessions before
attempting to use the Outlook Client.
Important caching information
In the Windows Terminal Server environment, it is possible that some users will not see the Outlook Client exchange
extension the first time they log into the Terminal Server following product installation. This is because Outlook
maintains a cache of the registered Exchange extensions and may use that cache instead of checking if any new
extensions have been registered.
There are three ways to remedy this, described in the following sections:
Delete all Outlook cache files
35
INSTALLATION AND ADMINISTRATION GUIDE
Force Outlook to regenerate each cache file
Create a registry key
Delete all Outlook cache files
This method is faster (especially if there are many Terminal Server users) but should only be attempted by
experienced system administrators.
1. Ensure that Outlook is not running in any Terminal Server session.
2. Search for and delete all instances of extend.dat file (extension cache) on the Windows Terminal Server
machine.
This file is typically found in each user's Outlook data directory: C:\Documents and
Settings\%username%\Local Settings\Application Data\Microsoft\ folder.
The next time Outlook is started, the extend.dat file will be regenerated.
3. Launch Outlook. You can verify that the extend.dat file is recreated. Verify that the fax buttons appear.
Force Outlook to regenerate each cache file
This method is safer than manually deleting the cache files. However, this method must be performed by each
Terminal Server user.
1. Open Outlook.
2. Choose Tools > Options. The Options dialog box appears.
3. Click the Other tab.
4. Click Advanced Options. The Advanced Options dialog box appears.
5. Click Add-In Manager. The Add-In Manager dialog box appears.
If the Outlook Client add-in does not appear in the list, proceed with the remainder of this procedure.
6. Change your current add-in configuration by setting or unsetting any item in the add-in list, and write this
information down.
7. Close the Add-In Manager, Advanced Options and Options dialog boxes by successively clicking OK in each
one.
8. Close and restart Outlook.
9. Perform Steps 2 through 5 again.
Now the Outlook Client add-in should appear in the add-in list.
10. Undo the change you made in Step 6 (i.e., restore it to the original setting).
11. Close the Add-In Manager, Advanced Options, and Options dialog boxes by clicking OK in each one.
Create a registry key
You can create a registry key. Under:
[HKEY_LOCAL_MACHINE\SOFTWARE\Microsoft\Exchange\CLient\Extensions]
Create a new string value named:
Outlook Setup Extension
Enter the value:
4.0;Outxxx.dll;7;000000000000000;0000000000;OutXXX
If the problem occurs for other users, verify that the key has not been deleted when Outlook has been launched.
36
INSTALLING THE OUTLOOK CLIENT
Troubleshooting problems with the Outlook Client
Troubleshooting procedures
When there is a problem with the Outlook Client, you can check the following components:
Mapi account
State of the VSI-FAX server
Forms
Outlook extension
Mapi account
In Outlook, under Tools > Email Accounts > View or change e-mail accounts, verify that the VSI-FAX MAPI account
has been created.
Open its properties and verify that the proper parameters are set.
State of the VSI-FAX server
If the VSI-FAX server is down or not responding, you will get an unclear error message from Outlook:
In this case, restart the scheduler on the VSI-FAX server and make sure that the scheduler stays up.
Forms
If you have a problem opening forms, you can verify that the form was installed in the appropriate location:
In Outlook, select Tools > Options > Other > Advanced > Custom Forms > Manage forms.
37
INSTALLATION AND ADMINISTRATION GUIDE
If the form was published in the organizational form, you can try copying it locally in the personal forms folder to verify
that there is no problem accessing the form on the exchange server.
Outlook extension
VSI-FAX is an Outlook extension. If the fax buttons do not appear, you can verify that the extensions is correctly
installed by checking the following registry key:
HKEY_LOCAL_MACHINE\SOFTWARE\Microsoft\Exchange\Client\Extensions
The VSI-FAX Outlook client extension should appear.
In some case, the extensions are cached by Outlook and are not loaded. Refer to Important caching information to
learn how you can clear the Outlook cache.
Traces activation
You can activate some tracing with the following procedure:
1. Open the registry.
2. Set HKEY_LOCAL_MACHINE\SOFTWARE\VSI-FAX\Outlook client\debugLevel to 255 ( 255 in decimal = ff in
hexadecimal).
3. Install the debugview tool that can be found on the sysinternals.com web site.
4. Launch this tool and you can capture traces when using the client and even when installing or reinstalling it
(the key needs to be set manually before the installation).
Known issues & Tricks
Fax address format
In some cases, the usual [fax:<faxnb>] format will not work because there is already another Fax Integration in
Outlook from other software (or from Esker Deliveryware for instance). The fax is then sent by this other integration.
In this case, you can use the undocumented [vfn: <faxnb>] format to send faxes from Outlook.
Cover page issue
When sending from the Outlook client, the status window is completely grayed out and the fax is not sent.
This problem occurs because a setting of the fax is incorrect. You can activate the traces to have further information.
Outlook Signature
38
INSTALLING THE OUTLOOK CLIENT
In Outlook, you can define a signature that will be put on all new messages. Depending on which email account is set
as default (the mail exchange account or the VSI-FAX MAPI account), you will get this signature when opening a
New fax message.
39
Installing CoverMaker
Note
You must have write access to the vsicover directory to be able to save your cover pages. Without correct rights,
you can have the "permission denied" or "no such file or directory" errors.
Install CoverMaker to design custom fax cover pages.
1. Load your VSI-FAX CD-ROM into your CD-ROM drive.
If the autorun does not start automatically, run autorun.exe located in the root directory of your VSI-FAX
CD-ROM.
2. Select CoverMaker under Tools.
3. The Welcome screen appears. Click Next to proceed with the installation.
4. If a former version of VSI-FAX CoverMaker is installed on your machine, answer Yes when prompted to
search for a previous installation of CoverMaker if you want to keep existing covers. If this is a fresh
installation of CoverMaker, click No not to search for a previous installation.
5. Click Next if you agree with the destination directory for the CoverMaker program files. To install CoverMaker
in another directory, click Browse and follow the on-screen instructions.
6. Enter the hostname or IP address of your fax server. Enter your VSI-FAX user account login name (client ID).
7. Click Next to proceed with the installation.
The program files are copied to the your local hard drive. This takes several seconds.
8. When the Setup Complete screen appears, click Finish.
41
Installing the Software Development
Kit
Installing the Software Development Kit
Note
You will find the C/C++ Client API Reference guide (c_api.pdf) in the \docs folder of VSI-FAX CD-ROM.
Installing on Unix or Linux
1. On the VSI-FAX CD, select server\<platform>\faxapi.tgz, where <platform> is the appropriate
platform for your system.
See below for information on how to work with .tgz files.
2. Follow the on-screen installation instructions to complete installation.
Extracting .tgz files (Unix only)
To extract and install using the faxapi.tgz file, follow these instructions:
1. Create a temporary directory.
2. Copy the faxapi.tgz file into the temporary directory.
3. Uncompress/unzip the file. If you have gunzip, then execute the following command:
gunzip faxapi.tgz
If you don't have gunzip on your system move the server.tgz file to server.tar.Z with the following
command:
mv faxapi.tgz faxapi.tar.Z
and then uncompress the file with the following command:
uncompress faxapi.tar.Z
4. Extract the contents of the tar file with the following command:
tar xvf faxapi.tar
5. Run the installation program with the following command:
./install.sh
Installing on Windows
1. Load the VSI-FAX CD-ROM into your CD-ROM drive.
If the installation program does not start automatically, run autorun.exe located in the root directory of your
VSI-FAX CD-ROM.
The VSI-FAX CD browser appears.
2. Select VSI-FAX SDK under Tools.
3. The Welcome screen appears. Click Next to proceed with the installation.
43
INSTALLATION AND ADMINISTRATION GUIDE
4. The Software License Agreement appears. Click Yes to agree to the conditions in the license agreement and
continue with SDK installation.
5. Click Next if you agree with the default destination directory for the SDK program files. Otherwise, click
Browse and follow the on-screen instructions to install the SDK in another directory.
6. The Choose VSI-FAX SDK Components screen appears. Select the components to install (Com client API,
C/C++ client API, XML-F client API, and Java client API are selected by default).
7. Click Next to proceed with the installation. The program files are copied to the local hard drive. This may take
several seconds.
8. When the Setup complete screen appears, click Finish.
44
Fax on Demand Connector
Fax on Demand Connector
The Fax on Demand Connector is the link between VSI-FAX and the Esker multi-channel e-document delivery
solution, a.k.a. Esker on Demand. This connection allows VSI-FAX to automatically fax business documents directly
from your company and desktop applications through outsourced fax service providers.
The Fax on Demand Connector for VSI-FAX is easy to implement and easy to use. It requires no custom
programming, no disruption of existing business processes, and no changes to existing file formats. Once the Fax on
Demand Connector is configured and enabled, a job can be submitted to the Esker on Demand server from VSI-FAX.
Two Fax on Demand devices are installed by default (FoDC and FoDC2). The first one points to the USA Esker on
Demand server while the second one point to the European Esker on Demand server. Having two possible servers
allows failover management, meaning that if a Fax on Demand destination is not available, then your faxes can be
automatically processed by the other connector waiting for the primary location to be available again. Refer to
Managing failover with the Fax on Demand Connector to learn more about his feature.
Important
You do not need to purchase any additional license to fax through Esker on Demand; the Fax on Demand
Connector is included within all standard VSI-FAX licenses.
Configuration overview
There are two parts to setting up the Fax on Demand Connector in VSI-FAX:
1. Establishing an Esker on Demand account.
2. Configuring and enabling the Fax on Demand Connector.
Each part is covered in detail in this documentation.
Establishing an Esker on Demand account
To have access to the Esker on Demand server, you need to:
1. Obtain an Esker on Demand ID and password. For this, contact your Esker Account Manager and ask for an
Esker on Demand account to be created for your company.
2. Know the name of the Esker on Demand server you'll be communicating with. This information is provided by
Esker when your Esker on Demand account is opened.
3. Have an Internet connection between VSI-FAX at your site and the Esker on Demand server.
Configuring and enabling the Fax on Demand Connector
VSI-FAX Server installation program automatically installs the Fax on Demand Connector and creates a fax
destination called FoDC and another one named FoDC2 for you. The FoDC2 destination is disabled by default.
This is the destination to use for sending fax jobs to the Esker on Demand server.
To be able to fax thru Esker on Demand, you simply need to enter the following Esker on Demand connection
information in the server configuration file and enable the Fax on Demand Connector (it is disabled by default after
setup):
45
INSTALLATION AND ADMINISTRATION GUIDE
Hostname : The hostname or IP address of the Esker on Demand server you received from your Esker
Account Manager. Set it to your main location for the main FoDC device (FoDC) and to the other location for
the failover device (FoDC2), according to:
• USA server: na.ondemand.esker.com
• European server: as1.ondemand.esker.com
Account ID : The Esker on Demand ID you received from your Esker Account Manager. Set the same value
for both devices.
Password : The Esker on Demand password you received from your Esker Account Manager. Set the same
value for both devices.
This can be done from VSI-FAX Server Administration or from a command shell.
Command line
Log on to the VSI-FAX Server with the vsifax user, open a command prompt on your computer and enter the
following:
vfxadmin config -a -i FODC DEVICE hostname na.ondemand.esker.com
vfxadmin config -a -i FODC DEVICE accountid myaccount222
vfxadmin config -a -e -i FODC DEVICE password mypasswordxxx
vfxadmin config -a -i FODC2 DEVICE hostname as1.ondemand.esker.com
vfxadmin config -a -i FODC2 DEVICE accountid myaccount222
vfxadmin config -a -e -i FODC2 DEVICE password mypasswordxxx
The example above sets the USA location as main device and the European location as failover device.
Once configured, you need to enable the main Fax on Demand Connector by entering the following (you can also
start the VSI-FAX administration interface, if Fax on Demand failover is enabled, which is the default status for this
feature, as it will automatically enable the main Fax on Demand device).
vfxadmin enable fodc
MMC
1. Open VSI-FAX Server Administration.
2. Connect to the appropriate VSI-FAX server with vsifax user.
3. Expand the tree view in the left pane and click on Devices. You should see the FoDC device (disabled) in the
right pane.
4. Right-click on FoDC in the right pane, and select Properties:
•
On the General tab, check the hostname and change it if necessary (see above for available
destinations).Enter your Esker on Demand account ID and password in the AccountID and Password
fields respectively.
•
Check Enabled to enable the Fax on Demand Connector.
•
Click Apply to apply your modifications and OK to complete.
5. Right-click FoDC2 in the right pane, and select Propertie s:
46
•
On the General tab, check the hostname and change it if necessary (see above for available
destinations).
•
Enter your Esker on Demand account ID and password in the AccountID and Password fields
respectively.
•
Leave the device as Disabled (do not check the Enabled otpion).
•
Click Apply to apply your modifications and OK to complete.
FAX ON DEMAND CONNECTOR
Configuring a proxy for the Fax on Demand Connector
If you need to use a proxy to connect to the Fax on Demand service, you need to configure VSI-FAX so that it can
connect properly. To do so, you need to add keys in the vsisrv.ini file and reload VSI-FAX when done. These keys
define the proxy name, its port, the username and the password used to access the proxy.
To add these keys, we advise that you use the vfxadmin command line four times as following:
vfxadmin
vfxadmin
vfxadmin
vfxadmin
config
config
config
config
-a
-a
-a
-a
-i
-i
-e
-i
FODC DEVICE proxy-host myproxy.example.com
FODC DEVICE proxy-user myproxyuser
-i FODC DEVICE proxy-password myproxypassword
FODC DEVICE proxy-port 8080
Important note
Notice the -e option used to specify the password. It enables encryption, which is required to store the password
for the proxy.
For more information about the vfxadmin command, refer Command Reference in the Reference Addendum
documentation.
Testing the Fax on Demand Connector
1. Create a simple text document called test.txt and at a command prompt issue the command:
vfx -n +<fax number> -d FoDC test.txt
where <fax number> is a fax number you have access to. The response should be the job number.
Example:
> C:\temp>vfx -n +<fax number> -d FoDC test.txt
> 1005
2. At a command prompt you can now issue the command vfxstat to check the status of the job:
Example (using the job number retrieved in the previous example):
C:\temp>vfxstat 1013
Status for VSI-FAX fax job: 1005
Submitted by: joes E-mail : <none>
Submit time : 10/14 14:17 Queue : FoDC
Result : done Status : Normal
To name : <none> From name : <none>
To company : <none> From company: <none>
To fax # : +8280024 From fax # : <none>
To voice # : <none> From voice #: <none>
Subject : <none>
Num dialed : 8280024
File 1 : 1 pg test.txt
Total pgs : 1 pg
Attempt Send-Time Result CSI
------- ----------- ------------------ --------------1 10/14 14:18 Normal <none>
Changing your Fax on Demand Connector information
On occasion, you may need to change your Fax on Demand Connector Account ID, password, or hostname. This
information is stored in your vsisrv.ini file. You can change the hostname and the Account ID from this file but
not the password (which is encrypted in this file):
1. Use a text editor to edit the VSIFAX\lib\vsisrv.ini file. Find the [DEVICE:FoDC] section of the file. Edit
the following fields as needed:
47
INSTALLATION AND ADMINISTRATION GUIDE
•
hostname : The hostname or IP address of the Esker on Demand server, from your Esker Account
Manager
•
accountID : The Esker on Demand ID you received from your Esker Account Manager.
•
dial-convert : When set ON , converts the dialstring according to the rules found in dialcvt.lst.
Note
The other fields in the section are advanced fields for Technical Support only. Save your changes
and close the file.
2. Restart the VSI-FAX scheduler by typing the command vfxsched restart.
3. To change the password, you need to edit the general properties of the FoDC device in VSI-FAX Server
Administration or open a command shell and issue the vfxadmin config -a -e -i FODC DEVICE
password mypasswordxxx command.
Sending a fax using Fax on Demand
Once you have the Fax on Demand Connector configured and enabled, you can send faxes using Fax on Demand.
To send a fax using command lines: create and submit a job, and specify the destination/queue as FoDC, which was
automatically created during the Fax on Demand Connector installation. For example:
vfx -n +6085551212 -d FoDC test.txt
You can also send faxes thru Fax on Demand from VSI-FAX LanFax Windows Client. As a prerequisite, set FoDC as
the default device either at the server's level or for the client only (open VSI-FAX LanFax Windows Client application,
select Tools > Options from the main window, open the Outgoing tab and set the Queue field to FoDC).
Then send your fax either by selecting Fax > New from the application toolbar or by printing the file on the VSI-FAX
LanFax Windows Client Printer from the source application.
Troubleshooting
How you should format destination fax numbers when submitting faxes via Esker on Demand depends on the
telephone system of the country where the Fax on Demand server you are communicating with is located.
By default, the FoDC FIM communicates with a server located in the United States. If you are faxing from the
United States, you should have no problem. Enter American local fax numbers to send faxes within the United
States, and use international fax numbers to send faxes outside the United States.
If you are faxing from France, the Fax on Demand server whose hostname you have been provided with is
located in France. You should enter French local fax numbers to send faxes within the France, and use
international fax numbers to send faxes outside France.
In all cases, we strongly recommend to you always use internationalized fax numbers as it will guarantee
that your fax is properly sent whatever the Fax on Demand device used.
Canceling a fax sent through Fax on Demand
You can cancel a fax job sent to the Esker on Demand server using the vfxcancel command. For more information
on the vfxcancel command options, see Command Reference in the Reference Addendum documentation. You
can also cancel outgoing faxes from VSI-FAX LanFax Windows Client provided client-side archiving is enabled and
you see outgoing faxes in the Outbox. Keep the following in mind when canceling jobs sent using the Fax on Demand
Connector:
You can cancel a fax job that has not been transferred to Esker on Demand yet, which means that it is still in
the FoDC device's queue. However, performing a cancel action on a fax that has already been submitted to
Esker on Demand (i.e. the fax is in the FoDC hold queue) may be too late depending on which step(s) the
document has already been through on Esker's side. You are not guaranteed that your cancel action will be
effectively taken into account.
VSI-FAX receives updates on the status of faxes from the Esker on Demand server once every minute.
Because of this, you may see a fax with the status of "queued" that has, in reality, already been sent. If you try
to cancel a fax in this case, you will receive an error.
48
FAX ON DEMAND CONNECTOR
Receiving notifications about Fax on Demand fax jobs
Jobs sent from VSI-FAX to the Esker on Demand server are logged in the outbound fax log just as other VSI-FAX
jobs are. To view the outbound fax log, type vfxolog. For more information on the vfxolog command options, see
Command Reference in the Reference Addendum documentation.
Customizing the header in outgoing faxes
By default, the following type of header is added to any fax sent using Fax on Demand:
Date: <Date> | From: <CompanyName> | Page <CurPage> of <Pages>
<Date> is filled with the date when the fax was composed.
<CompanyName> is the company name you enter during server setup.
<CurPage> is filled with the current page number in the fax transmission.
<Pages> is filled with the total number of pages in the fax transmission.
The pipe character ( | ) is used to divide the header string into three parts on the fax page:
The first part is left-justified on the fax page
The middle-part is centered on the fax page
The right part is right-justified on the fax page
You can customize this header by editing the header parameter's value in the [DEVICE:FoDC] section of the
vsisrv.ini server configuration file:
[DEVICE:FoDC]
header=Date: <Date> | From: Esker | Page <CurPage> of <Pages>
In the header parameter's value, you can enter the syntax that suits your needs. For example, you can:
Add constant text (e.g. change labels).
Add variables among the List of supported variables for Fax on Demand faxes' headers below.
For example:
[DEVICE:FoDC]
header=Today's Date: <Date> | From <FromName> to <ToName> | <Pages>
For a completely blank page header, use a single space.
Limitation
If you use <CurPage> in your custom syntax, the resulting header will be the standard page header
notwithstanding your custom syntax.
Note
Editing the vsisrv.ini file is the only way to customize the fax header of faxes sent using Fax on Demand.
You cannot do it via vfxadmin config command or using VSI-FAX Server Administration.
List of supported variables for Fax on Demand faxes' headers
The two following sections provide you with reference information on the variables that you can use in the header
parameter's value in vsisrv.ini file. Put the name inside angle brackets to designate it as a variable. For example,
to specify the message subject, use <Subject>.
Variable
Description
Message values
49
INSTALLATION AND ADMINISTRATION GUIDE
Variable
Description
Subject
Subject of the message
Date
Date when the message was composed
Message
Cover page message text
Page
Current page number in the message
Pages
Total number of pages in the message
CurDate
Current date
CurTime
Current time
CurPage
Current page number in this transmission
CurPages Total number of pages in this transmission
Sender/Recipient values*
Name
Name
Company
Company name
Dept
Department
Mail
Mailing address, including city and state
Country
Country
Postal
Postal or zip code
Voice
Voice telephone number
Fax
Fax telephone number
Email
Email address
Account
Account number
SUB
Sub-address
Station Id
Station ID
* These variables are used as either From.VariableName or To.VariableName, depending on whether you want to
specify the sender or the recipient information. For example, to specify the recipient fax number, use <To.Fax>.
Troubleshooting Fax on Demand Connector network issues
The Fax on Demand Connector of your VSI-FAX server uses an Internet link to send faxes and instructions to the
Esker on Demand servers. If the quality and/or speed of this link is not sufficient, network packets can be lost,
causing request timeouts. If handled incorrectly, such request timeouts can lead to be "stuck" indefinitely in your
FoDC queue.
Note
This section is intended for advanced VSI-FAX administrators.
To prevent this issue, VSI-FAX relies on three timeout management mechanisms:
1. First of all, the fodcpgm process, which manages the FoDC devices, will wait for a TCP timeout or an
acknowledgment of receipt for 300 seconds after having sent the http request. This first delay is the standard
timeout delay for all http requests.
2. After this delay, if this process is still waiting for a TCP timeout notification, the FIM management process will
wait another 100 seconds before registering the FoDC job as failed. This 400 seconds delay is the execution
timeout.
3. If the fodcpgm process is still running 700 seconds after the initial http request was sent, in spite of the above
two timeout triggers, the VSI-FAX scheduler will kill and restart it. Once this process has been restarted, the
VSI-FAX scheduler will try to send your fax once more. This final timeout mechanism is the maximum idle
delay.
50
FAX ON DEMAND CONNECTOR
The above 300, 400 and 700 timeout delays should be suitable in most cases. However, if you are using a slow
Internet connection and notice that the timeout delays are not long enough, you can choose to adjust these timeout
delays.
Follow these steps if you wish to change the length of the above timeout delays:
1. Stop the VSIFAX server.
2. Use a text editor to edit the VSIFAX\lib\vsisrv.ini file:
•
Find the [DEVICE:FoDC] and [DEVICE:FoDC-hold] sections of the file and add or alter the
following lines:
request-timeout=<request timeout value>
Where <request timeout value> is the value you wish to set for the standard timeout delay for
all http requests (by default 300 seconds).
exec-timeout=<exec timeout value>
Where <exec timeout value> is the value you wish to set for the execution timeout (by default
400 seconds).
•
Find the [VFXSCHED] section of the file and add or alter the following line:
MaxFimIdle=<Freeze timeout value>
Where <Freeze timeout value> is the value you wish to set for the maximum idle delay (by
default 700 seconds).
3. Restart the VSIFAX server to apply your modifications.
Fax on Demand Connector
The Fax on Demand Connector is the link between VSI-FAX and the Esker multi-channel e-document delivery
solution, a.k.a. Esker on Demand. This connection allows VSI-FAX to automatically fax business documents directly
from your company and desktop applications through outsourced fax service providers.
The Fax on Demand Connector for VSI-FAX is easy to implement and easy to use. It requires no custom
programming, no disruption of existing business processes, and no changes to existing file formats. Once the Fax on
Demand Connector is configured and enabled, a job can be submitted to the Esker on Demand server from VSI-FAX.
Two Fax on Demand devices are installed by default (FoDC and FoDC2). The first one points to the USA Esker on
Demand server while the second one point to the European Esker on Demand server. Having two possible servers
allows failover management, meaning that if a Fax on Demand destination is not available, then your faxes can be
automatically processed by the other connector waiting for the primary location to be available again. Refer to
Managing failover with the Fax on Demand Connector to learn more about his feature.
Important
You do not need to purchase any additional license to fax through Esker on Demand; the Fax on Demand
Connector is included within all standard VSI-FAX licenses.
Configuration overview
There are two parts to setting up the Fax on Demand Connector in VSI-FAX:
1. Establishing an Esker on Demand account.
2. Configuring and enabling the Fax on Demand Connector.
Each part is covered in detail in this documentation.
Establishing an Esker on Demand account
To have access to the Esker on Demand server, you need to:
51
INSTALLATION AND ADMINISTRATION GUIDE
1. Obtain an Esker on Demand ID and password. For this, contact your Esker Account Manager and ask for an
Esker on Demand account to be created for your company.
2. Know the name of the Esker on Demand server you'll be communicating with. This information is provided by
Esker when your Esker on Demand account is opened.
3. Have an Internet connection between VSI-FAX at your site and the Esker on Demand server.
Configuring and enabling the Fax on Demand Connector
VSI-FAX Server installation program automatically installs the Fax on Demand Connector and creates a fax
destination called FoDC and another one named FoDC2 for you. The FoDC2 destination is disabled by default.
This is the destination to use for sending fax jobs to the Esker on Demand server.
To be able to fax thru Esker on Demand, you simply need to enter the following Esker on Demand connection
information in the server configuration file and enable the Fax on Demand Connector (it is disabled by default after
setup):
Hostname : The hostname or IP address of the Esker on Demand server you received from your Esker
Account Manager. Set it to your main location for the main FoDC device (FoDC) and to the other location for
the failover device (FoDC2), according to:
• USA server: na.ondemand.esker.com
• European server: as1.ondemand.esker.com
Account ID : The Esker on Demand ID you received from your Esker Account Manager. Set the same value
for both devices.
Password : The Esker on Demand password you received from your Esker Account Manager. Set the same
value for both devices.
This can be done from VSI-FAX Server Administration or from a command shell.
Command line
Log on to the VSI-FAX Server with the vsifax user, open a command prompt on your computer and enter the
following:
vfxadmin config -a -i FODC DEVICE hostname na.ondemand.esker.com
vfxadmin config -a -i FODC DEVICE accountid myaccount222
vfxadmin config -a -e -i FODC DEVICE password mypasswordxxx
vfxadmin config -a -i FODC2 DEVICE hostname as1.ondemand.esker.com
vfxadmin config -a -i FODC2 DEVICE accountid myaccount222
vfxadmin config -a -e -i FODC2 DEVICE password mypasswordxxx
The example above sets the USA location as main device and the European location as failover device.
Once configured, you need to enable the main Fax on Demand Connector by entering the following (you can also
start the VSI-FAX administration interface, if Fax on Demand failover is enabled, which is the default status for this
feature, as it will automatically enable the main Fax on Demand device).
vfxadmin enable fodc
MMC
1. Open VSI-FAX Server Administration.
2. Connect to the appropriate VSI-FAX server with vsifax user.
3. Expand the tree view in the left pane and click on Devices. You should see the FoDC device (disabled) in the
right pane.
4. Right-click on FoDC in the right pane, and select Properties:
•
52
On the General tab, check the hostname and change it if necessary (see above for available
destinations).Enter your Esker on Demand account ID and password in the AccountID and Password
fields respectively.
FAX ON DEMAND CONNECTOR
•
Check Enabled to enable the Fax on Demand Connector.
•
Click Apply to apply your modifications and OK to complete.
5. Right-click FoDC2 in the right pane, and select Propertie s:
•
On the General tab, check the hostname and change it if necessary (see above for available
destinations).
•
Enter your Esker on Demand account ID and password in the AccountID and Password fields
respectively.
•
Leave the device as Disabled (do not check the Enabled otpion).
•
Click Apply to apply your modifications and OK to complete.
Configuring a proxy for the Fax on Demand Connector
If you need to use a proxy to connect to the Fax on Demand service, you need to configure VSI-FAX so that it can
connect properly. To do so, you need to add keys in the vsisrv.ini file and reload VSI-FAX when done. These keys
define the proxy name, its port, the username and the password used to access the proxy.
To add these keys, we advise that you use the vfxadmin command line four times as following:
vfxadmin
vfxadmin
vfxadmin
vfxadmin
config
config
config
config
-a
-a
-a
-a
-i
-i
-e
-i
FODC DEVICE proxy-host myproxy.example.com
FODC DEVICE proxy-user myproxyuser
-i FODC DEVICE proxy-password myproxypassword
FODC DEVICE proxy-port 8080
Important note
Notice the -e option used to specify the password. It enables encryption, which is required to store the password
for the proxy.
For more information about the vfxadmin command, refer Command Reference in the Reference Addendum
documentation.
Testing the Fax on Demand Connector
1. Create a simple text document called test.txt and at a command prompt issue the command:
vfx -n +<fax number> -d FoDC test.txt
where <fax number> is a fax number you have access to. The response should be the job number.
Example:
> C:\temp>vfx -n +<fax number> -d FoDC test.txt
> 1005
2. At a command prompt you can now issue the command vfxstat to check the status of the job:
Example (using the job number retrieved in the previous example):
C:\temp>vfxstat 1013
Status for VSI-FAX fax job: 1005
Submitted by: joes E-mail : <none>
Submit time : 10/14 14:17 Queue : FoDC
Result : done Status : Normal
To name : <none> From name : <none>
To company : <none> From company: <none>
To fax # : +8280024 From fax # : <none>
To voice # : <none> From voice #: <none>
Subject : <none>
Num dialed : 8280024
File 1 : 1 pg test.txt
Total pgs : 1 pg
Attempt Send-Time Result CSI
53
INSTALLATION AND ADMINISTRATION GUIDE
------- ----------- ------------------ --------------1 10/14 14:18 Normal <none>
Changing your Fax on Demand Connector information
On occasion, you may need to change your Fax on Demand Connector Account ID, password, or hostname. This
information is stored in your vsisrv.ini file. You can change the hostname and the Account ID from this file but
not the password (which is encrypted in this file):
1. Use a text editor to edit the VSIFAX\lib\vsisrv.ini file. Find the [DEVICE:FoDC] section of the file. Edit
the following fields as needed:
•
hostname : The hostname or IP address of the Esker on Demand server, from your Esker Account
Manager
•
accountID : The Esker on Demand ID you received from your Esker Account Manager.
•
dial-convert : When set ON , converts the dialstring according to the rules found in dialcvt.lst.
Note
The other fields in the section are advanced fields for Technical Support only. Save your changes
and close the file.
2. Restart the VSI-FAX scheduler by typing the command vfxsched restart.
3. To change the password, you need to edit the general properties of the FoDC device in VSI-FAX Server
Administration or open a command shell and issue the vfxadmin config -a -e -i FODC DEVICE
password mypasswordxxx command.
Sending a fax using Fax on Demand
Once you have the Fax on Demand Connector configured and enabled, you can send faxes using Fax on Demand.
To send a fax using command lines: create and submit a job, and specify the destination/queue as FoDC, which was
automatically created during the Fax on Demand Connector installation. For example:
vfx -n +6085551212 -d FoDC test.txt
You can also send faxes thru Fax on Demand from VSI-FAX LanFax Windows Client. As a prerequisite, set FoDC as
the default device either at the server's level or for the client only (open VSI-FAX LanFax Windows Client application,
select Tools > Options from the main window, open the Outgoing tab and set the Queue field to FoDC).
Then send your fax either by selecting Fax > New from the application toolbar or by printing the file on the VSI-FAX
LanFax Windows Client Printer from the source application.
Troubleshooting
How you should format destination fax numbers when submitting faxes via Esker on Demand depends on the
telephone system of the country where the Fax on Demand server you are communicating with is located.
By default, the FoDC FIM communicates with a server located in the United States. If you are faxing from the
United States, you should have no problem. Enter American local fax numbers to send faxes within the United
States, and use international fax numbers to send faxes outside the United States.
If you are faxing from France, the Fax on Demand server whose hostname you have been provided with is
located in France. You should enter French local fax numbers to send faxes within the France, and use
international fax numbers to send faxes outside France.
In all cases, we strongly recommend to you always use internationalized fax numbers as it will guarantee
that your fax is properly sent whatever the Fax on Demand device used.
Canceling a fax sent through Fax on Demand
You can cancel a fax job sent to the Esker on Demand server using the vfxcancel command. For more information
on the vfxcancel command options, see Command Reference in the Reference Addendum documentation. You
54
FAX ON DEMAND CONNECTOR
can also cancel outgoing faxes from VSI-FAX LanFax Windows Client provided client-side archiving is enabled and
you see outgoing faxes in the Outbox. Keep the following in mind when canceling jobs sent using the Fax on Demand
Connector:
You can cancel a fax job that has not been transferred to Esker on Demand yet, which means that it is still in
the FoDC device's queue. However, performing a cancel action on a fax that has already been submitted to
Esker on Demand (i.e. the fax is in the FoDC hold queue) may be too late depending on which step(s) the
document has already been through on Esker's side. You are not guaranteed that your cancel action will be
effectively taken into account.
VSI-FAX receives updates on the status of faxes from the Esker on Demand server once every minute.
Because of this, you may see a fax with the status of "queued" that has, in reality, already been sent. If you try
to cancel a fax in this case, you will receive an error.
Receiving notifications about Fax on Demand fax jobs
Jobs sent from VSI-FAX to the Esker on Demand server are logged in the outbound fax log just as other VSI-FAX
jobs are. To view the outbound fax log, type vfxolog. For more information on the vfxolog command options, see
Command Reference in the Reference Addendum documentation.
Customizing the header in outgoing faxes
By default, the following type of header is added to any fax sent using Fax on Demand:
Date: <Date> | From: <CompanyName> | Page <CurPage> of <Pages>
<Date> is filled with the date when the fax was composed.
<CompanyName> is the company name you enter during server setup.
<CurPage> is filled with the current page number in the fax transmission.
<Pages> is filled with the total number of pages in the fax transmission.
The pipe character ( | ) is used to divide the header string into three parts on the fax page:
The first part is left-justified on the fax page
The middle-part is centered on the fax page
The right part is right-justified on the fax page
You can customize this header by editing the header parameter's value in the [DEVICE:FoDC] section of the
vsisrv.ini server configuration file:
[DEVICE:FoDC]
header=Date: <Date> | From: Esker | Page <CurPage> of <Pages>
In the header parameter's value, you can enter the syntax that suits your needs. For example, you can:
Add constant text (e.g. change labels).
Add variables among the List of supported variables for Fax on Demand faxes' headers below.
For example:
[DEVICE:FoDC]
header=Today's Date: <Date> | From <FromName> to <ToName> | <Pages>
For a completely blank page header, use a single space.
Limitation
If you use <CurPage> in your custom syntax, the resulting header will be the standard page header
notwithstanding your custom syntax.
55
INSTALLATION AND ADMINISTRATION GUIDE
Note
Editing the vsisrv.ini file is the only way to customize the fax header of faxes sent using Fax on Demand.
You cannot do it via vfxadmin config command or using VSI-FAX Server Administration.
List of supported variables for Fax on Demand faxes' headers
The two following sections provide you with reference information on the variables that you can use in the header
parameter's value in vsisrv.ini file. Put the name inside angle brackets to designate it as a variable. For example,
to specify the message subject, use <Subject>.
Variable
Description
Message values
Subject
Subject of the message
Date
Date when the message was composed
Message
Cover page message text
Page
Current page number in the message
Pages
Total number of pages in the message
CurDate
Current date
CurTime
Current time
CurPage
Current page number in this transmission
CurPages Total number of pages in this transmission
Sender/Recipient values*
Name
Name
Company
Company name
Dept
Department
Mail
Mailing address, including city and state
Country
Country
Postal
Postal or zip code
Voice
Voice telephone number
Fax
Fax telephone number
Email
Email address
Account
Account number
SUB
Sub-address
Station Id
Station ID
* These variables are used as either From.VariableName or To.VariableName, depending on whether you want to
specify the sender or the recipient information. For example, to specify the recipient fax number, use <To.Fax>.
Troubleshooting Fax on Demand Connector network issues
The Fax on Demand Connector of your VSI-FAX server uses an Internet link to send faxes and instructions to the
Esker on Demand servers. If the quality and/or speed of this link is not sufficient, network packets can be lost,
causing request timeouts. If handled incorrectly, such request timeouts can lead to be "stuck" indefinitely in your
FoDC queue.
Note
This section is intended for advanced VSI-FAX administrators.
To prevent this issue, VSI-FAX relies on three timeout management mechanisms:
56
FAX ON DEMAND CONNECTOR
1. First of all, the fodcpgm process, which manages the FoDC devices, will wait for a TCP timeout or an
acknowledgment of receipt for 300 seconds after having sent the http request. This first delay is the standard
timeout delay for all http requests.
2. After this delay, if this process is still waiting for a TCP timeout notification, the FIM management process will
wait another 100 seconds before registering the FoDC job as failed. This 400 seconds delay is the execution
timeout.
3. If the fodcpgm process is still running 700 seconds after the initial http request was sent, in spite of the above
two timeout triggers, the VSI-FAX scheduler will kill and restart it. Once this process has been restarted, the
VSI-FAX scheduler will try to send your fax once more. This final timeout mechanism is the maximum idle
delay.
The above 300, 400 and 700 timeout delays should be suitable in most cases. However, if you are using a slow
Internet connection and notice that the timeout delays are not long enough, you can choose to adjust these timeout
delays.
Follow these steps if you wish to change the length of the above timeout delays:
1. Stop the VSIFAX server.
2. Use a text editor to edit the VSIFAX\lib\vsisrv.ini file:
•
Find the [DEVICE:FoDC] and [DEVICE:FoDC-hold] sections of the file and add or alter the
following lines:
request-timeout=<request timeout value>
Where <request timeout value> is the value you wish to set for the standard timeout delay for
all http requests (by default 300 seconds).
exec-timeout=<exec timeout value>
Where <exec timeout value> is the value you wish to set for the execution timeout (by default
400 seconds).
•
Find the [VFXSCHED] section of the file and add or alter the following line:
MaxFimIdle=<Freeze timeout value>
Where <Freeze timeout value> is the value you wish to set for the maximum idle delay (by
default 700 seconds).
3. Restart the VSIFAX server to apply your modifications.
Managing failover with the Fax on Demand Connector
When sending faxes, if a device fails it is interesting to redirect the jobs queue to another device. Fax failover
management depends on the type of device that fails (local device or Fax on Demand Device).
Fax on Demand device failure
A Fax on Demand device failure can occur if the main Fax on Demand server is unreachable. Fax on Demand
failover management is enabled by default.
How does it work?
By default, the FoDC device is enabled and the FoDC2 device is disabled, thus the FoDC device is the main Fax on
Demand device, and if it fails more than a certain amount of times to send a fax it will be disabled and the FoDC2
device (the failover device) will be enabled to process the faxes instead. You can configure after how many
attempts the main Fax on Demand device will be disabled.
If a failover has occurred and the FoDC device has been disabled, a script will automatically re-enable it (and by the
way will also disable the FODC2 device) every 30 minutes (by default), making the configuration back to what it was
before the failure.
57
INSTALLATION AND ADMINISTRATION GUIDE
The failover mechanism is based on a set of scripts:
sys-start.tcl: this script is run when VSI-FAX is launched. It sets up the initial state of the FoDC and
FoDC2 devices (i.e. the main device enabled and the failover device disabled).
sys-devfail.tcl: this scripts called whenever a device fails. It will disable the main device and enable the failover
one when the main device fails. Refer to configuring notifications on device failure below to learn more.
crontab.lst and restorefodc.tcl: allows the devices configuration to be automatically re-initialized
after a certain amount of time after the main device has failed. Refer to Configuring the failover status reinitialization below to learn more.
Submitting faxes with Fax on Demand failover support
The FoDC and FoDC2 devices belongs to a same class, the FODCClass. Therefore, you need to submit your faxes
to this class queue so that failover management works properly.
Examples:
To submit a single fax to this class queue enter the following command:
vfx –n 555555 –d FoDCClass fax.txt
To set the FODCClass as the default submission queue, enter:
vfxadmin class –u –d FoDCClass
See also
Refer to Command Reference in the Reference Addendum documentation to learn more about these commands.
Enabling / Disabling the Fax on Demand failover
If you want to disable the failover feature, you need to modify an entry in the vsisrv.ini file. To do so, either edit it with
a text editor and locate the [DEVICE:FoDC] section. Under this section change the failover key to on or off
depending on if you want to enable or disable the feature:
[DEVICE:FoDC]
debug=off
failover=on
keep-files=off
dial-convert=off
request-timeout=300
...
Or you can use the vfxadmin config command to achieve the same result, by entering:
vfxadmin config -a -i FODC DEVICE failover off
Configuring the failover
Configuring the maximum number of attempts on the main device
By default, a device is disabled after three consecutive attempts. You can change this value to any number by editing
the vsisrv.ini file. Locate the [VFXSCHED] section and and change the MaxNoResps key value. Below is an example
to set this value to 5 instead of 3:
[VFXSCHED]
MaxNoRsps=5
You can also use the vfxadmin config command to achieve the same result, by entering:
vfxadmin config -a VFXSCHED MaxNoRsps 5
Important note
Make sure the value set for the MaxNoRsps key is compliant with your current retry strategy: you want more
total retries than the maximum number of fails on a device, or esle you faxes will fail before they have been
submitted to the failover device.
58
FAX ON DEMAND CONNECTOR
Configuring FoDC devices localization
By default, the main device (i.e. FoDC) points to the USA platform and the failover device (FoDC2) points to the
European platform. Invert the two locations if you would rather have the European server as main device destination
and the USA server as failover location. Those addresses are:
USA: na.ondemand.esker.com
European: as1.ondemand.esker.com
Configuring notifications on device failure
If you want to be notified by email when the main device fails, you need to set the address to which the email will be
sent in the sys-devfail.tcl script:
set EMAIL "<[email protected]>"
Configuring the failover status re-initialization
When the main device fails, it is disabled and faxes are routed to the failover device. After a certain amount of time,
VSI-FAX will rollback to the default devices configuration (i.e. the main device will be enabled and the failover device
disabled). This is done via scripts:
The Crontab.lst file contains the call to the main re-initialisation srcipt:
!5 * * * * exec-online ./faxtcl "../lib/enp/restorefodc.tcl"
By default the main script is called every 5 minutes. You can change this value if needed.
The Restorefodc.tcl script is the re-initialization script that actually enables and disables devices. This script
allows you to configure the amount of time before the main device is re-enabled after a failure. To do so, set
the MAX_DOWN_TIME_MIN value to the amount of minutes you want:
set MAX_DOWN_TIME_MIN 30
Local device failure
This section describes how you can use the device fail script to handle local fax failover by routing faxes to the Fax
on Demand device in case of fax board failure.
Configuring the maximum number of attempts before the device fails
By default, a device is disabled after three consecutive attempts. You can change this value to any number by editing
the vsisrv.ini file. Locate the [VFXSCHED] section and and change the MaxNoResps key value. Below is an example
to set this value to 5 instead of 3:
[VFXSCHED]
MaxNoRsps=5
You can also use the vfxadmin config command to achieve the same result, by entering:
vfxadmin config -a VFXSCHED MaxNoRsps 5
Important note
Make sure the value set for the MaxNoRsps key is compliant with your current retry strategy: you want more
total retries than the maximum number of fails on a device, or esle you faxes will fail before they have been
submitted to the failover device.
Below is a sample sys-devfail.tcl file (whish script is executed whenever a device fail), which shows how to
route the faxes to the Fax on Demand devices in case of local fax board failure. This sample actually defines the
FoDDCClass as default class and enables the correct mainFoDC device, therefore using all the failover capacities of
the Fax on Demand configurations.
This sample logs the device failure and the failure reason in %VSI-FAX%/spool/ logs/devfail, and sends it
sends a notification email to an administrator, before routing the faxes to Fax on Demand devices..
#-------------------------------------------------------# sys-devfail.tcl
59
INSTALLATION AND ADMINISTRATION GUIDE
# Failover : VSI-FAX Device failure notification and Failover to FODC for Windows
#-------------------------------------------------------set VSIFAX $env(VSIFAX)
# -----------------------------------------------------------------------# Configurable globals
# -----------------------------------------------------------------------set FODC_MAIN_DEVICE "FoDC"
set FODC_FAILOVER_DEVICE "FoDC2"
set EMAIL ""
global argv env
set DEVICE [lindex $argv 0]
set REASON [lindex $argv 1]
set TIMESTAMP [ clock format [ clock seconds ] -format {%Y/%m/%d %H:%M:%S} ]
set FAILOVER_DEVICE ""
# -----------------------------------------------------------------------# Update log file & send a notification email
# -----------------------------------------------------------------------if {[string length "$FAILOVER_DEVICE"] > 0} {
set ERROR "Device $DEVICE failed: $REASON. Enabling $FAILOVER_DEVICE"
} else {
set ERROR "Device $DEVICE failed: $REASON."
}
set f [ open $VSIFAX/spool/logs/devfail a+ ]
puts $f "$TIMESTAMP $ERROR"
close $f
if {[string length "$EMAIL"] > 0} {
#--------------------------------------------------------------------# Create email file
#--------------------------------------------------------------------set g [ open $VSIFAX/spool/temp/devfail w+ ]
puts $g "$TIMESTAMP $ERROR"
close $g
#--------------------------------------------------------------------# Email notification to specified mail address
#--------------------------------------------------------------------catch {exec "$VSIFAX/lbin/vmime" -t -s $ERROR "$VSIFAX/spool/temp/devfail" |
"$VSIFAX/lbin/vmail" -R $EMAIL $EMAIL}
file delete "$VSIFAX/spool/temp/devfail"
}
if {[string length "$FAILOVER_DEVICE"] > 0} {
#--------------------------------------------------------# Fax on Demand failover management
#--------------------------------------------------------catch {exec "$VSIFAX/bin/vfxadmin" enable $FAILOVER_DEVICE}
catch {puts stdout "Enabling $FAILOVER_DEVICE"}
}
else {
#--------------------------------------------------------# Local device failover management:
# Issue command to set the FoDCClass as default queue
# and set the FoDC device as default device (enabled)
# and the FoDC2 device as failover device (disabled)
#------------------------------------------------------exec "$VSIFAX\\bin\\vfxadmin" class -u -d FodCClass
exec "$VSIFAX\\bin\\vfxadmin" device -u -d -E on FodC
exec "$VSIFAX\\bin\\vfxadmin" device -u -E off FodC2
60
FAX ON DEMAND CONNECTOR
}
exit 0
See also
Refer to Fail notify procedures for more samples of such scripts for Windows and Unix/Linux.
Refer to Command Reference in the Reference Addendum documentation for information about the VSI-FAX
commands used.
Automatic overflow to the FODC FIM
Overflow automatically switches from local outbound faxing to Esker on Demand outbound faxing when the local
outbound faxing delay is too high. This feature provides better handling of fax peaks and un-planned fax-mailings.
To activate this functionality, write a script that executes a vfxstat command and when there are "X" amount of fax
jobs in the outbound queue it launches the vfxadmin default command. Contact Esker Technical Support Staff if
you need help.
61
Fax Fundamentals
Fax Fundamentals
This section introduces and briefly describes various fundamental concepts that should be thoroughly understood
before you begin administering your VSI-FAX server.
Important terms and concepts
This section defines some important terms and concepts that you should understand before you begin administering
your fax server.
Fax devices
Fax devices can be either single-channel modems or multi-channel fax boards.
There are also three special devices: loopback (lb), sendmail (sm) and Fax on Demand Connector (FoDC).
The loopback device is used to route fax requests back to the originating user's fax inbox.
The sendmail device is used to send faxes as email attachments.
The Fax on Demand Connector device is used to send faxes through Esker on Demand fax provider. The VSI-FAX
server sends fax transmission requests in XML format to a remote Esker on Demand server. The Esker on Demand
server sends the faxes and notifies the originating VSI-FAX server of the fax transmission status. To use the Fax on
Demand connector device, you must specify the hostname of the On Demand server to use, your On Demand
Account ID and password, and then activate the device. You can do this from VSI-FAX Server Administration on
Windows or from a command shell. For more information, refer to Fax on Demand Connector.
Classes
Faxes can be sent to either a single physical device or a group of devices called a class. For example, a class could
be a group of devices dedicated to long distance calls, or a group of devices used only for high-volume fax requests.
A class can only contain physical devices; it cannot contain other classes. However, any device can be included in
one or more classes. When a fax is sent to a class, it will be routed to the first available device in that class.
Queues
Each device and class has a queue. Pending fax requests are held in the queue until the job is completed.
Users
To send or receive faxes, a person must be registered in the fax server user database. User information is the most
basic and unique information about each fax user, such as username and password. Most fax settings and privileges
are actually controlled via profiles.
License
You need a VSI-FAX license to install and run VSI-FAX Server. There are various types of VSI-FAX licenses:
Evaluation license (i.e. "eval"): This is the license installed when you enter no license information during
setup. It allows you to test the product and see if it matches your needs. You can use this license during a
limited period of 30 days. Once the evaluation license has expired, you can reactivate it with another timelimited evaluation license or with a regular production license requested from Esker.
63
INSTALLATION AND ADMINISTRATION GUIDE
Time-limited evaluation license (i.e. "date"): Evaluation license that expires on a given date.
Regular production license (i.e. "real"): Time-unlimited production license.
Licensed devices
The VSI-FAX license controls the numbers ports used by modems and fax board devices on the server. If your
license allows you to use a certain number of ports (for example, 24), you cannot exceed this number otherwise the
VSI-FAX Fax Server will stop.
If you have a licensing problem, this might be because you are using too many ports with the current license. For
more information, refer to Troubleshooting licensing problems due to the number of devices used
Licensed user
VSI-FAX uses a pure client/server architecture. Even users logged directly into the fax server are in fact
communicating with the fax server via a network connection; this network connection just happens to have the same
IP address as the server. If you send a fax from a different IP address than the fax server (i.e., you do not telnet,
rlogin, or use the keyboard at the fax server), you must be registered as a licensed user on the server to do so.
VSI-FAX uses scalable user licensing. Each license specifies a certain number of licensed users (e.g. 10). For
example, you can buy a five-user license initially and upgrade to a 25-user license or to an unlimited user license
later.
Serial number and activation key
All VSI-FAX licenses are comprised of two elements: a Serial Number and an encrypted Activation Key. You must
have both pieces of information in order to install and run VSI-FAX Server. They are provided when you buy licenses
from Esker.
Note
Maintenance keys have been removed in version 6.0 ; you need to contact your Esker Sales Representative to
obtain a new license when you want to upgrade your fax server to a newer version.
You should contact Esker directly to obtain a new license when you need more features or more capacity on your
production server (e.g., more remote clients, more devices, or more virtual servers.). Once you have the new
license, you can reactivate the licence from the command shell or from VSI-FAX Server Administration. For more
information, see See Reactivating VSI-FAX Server license.
Profiles
Profiles provide centralized management of fax user settings and privileges
Master
Profile
The master profile is created during fax server installation. Depending on how you use it, the master
profile can provide completely centralized control over a user's fax settings and privileges.
User
Profiles
Unless a user profile exists for a fax user, all fax settings and privileges are centrally controlled from the
master profile. If you want to grant certain users greater flexibility or privileges, create a user profile for
them.
Inheritance
If a user profile exists for a fax user, each time they accesses the fax server (e.g., send a fax or
explicitly log into the fax server for some other reason), their user profile is dynamically created at that
moment by merging the inheritable settings from the master profile with persistent user preferences
stored in their user profile. If the user explicitly logs in to the fax server, these settings remain in effect
until the user logs off.
Important
Do not delete the master profile under any circumstances.
If you want to use the settings from your user profile, you must specify it when sending the fax. To send a single fax
request using your profile settings, include this on your vfx command line:
vfx ... -t udf="yes"
64
FAX FUNDAMENTALS
To send a single fax request without using your profile settings, include this on your vfx command line:
vfx ... -t udf="no"
Note
If you do not want to use your profile settings to send a fax, you can also omit the udf tag from your fax envelope.
Not including it is the same as setting it to false or no.
Directories
Directories store fax addressing and routing (i.e., fax recipient) information.
People
People records store fax addressing and routing information for a single individual.
Groups
Group records are lists of people. They are a convenient method of sending the same fax to multiple
people. This is useful for faxing an entire department or marketing prospect list.
Groups can also be used to receive faxes for an entire workgroup, allowing any member of that group to
process received faxes on behalf of the entire group. This is useful for departments like Customer
Support or Sales where fax supports duties can be shared among various persons in the group.
Public
directory
There is only one public directory. It is read-only to all fax users and can be used to send or route faxes
to anyone listed in the public directory. Only fax administrators can modify information in the public
directory.
Private
Private directories are owned by a particular user and are typically controlled so only that user can
directories access these entries. Only one private directory can be displayed at a time, and the owner is the only
person who can modify information in that private directory.
External
VSI-FAX supports external Lightweight Directory Access Protocol (LDAP) directories for storing fax
directories addressing and routing information. However, before you can use an LDAP directory, you must explicitly
add it via MMC. Refer to the VSI-FAX Server Administration help for additional information.
Resources
Resources are common elements that are available to all users when they send faxes.
Attachments Attachments are text, PCL, TIFF, Postscript, or Epson files that can be added to a fax transmission.
Attachments are usually re-usable items such as price lists and promotional materials that are
repeatedly sent. In Windows, attachments may also be any document type supported by DDE.
Cover
Pages
VSI-FAX cover pages are template files that dynamically populate themselves with information when a
fax is sent. You can use the default cover pages that Esker provides or design your own with
CoverMaker.
Folders
Folders are a logical collection of attachment files. When you attach a folder to a fax, all files in that
folder are included in the fax.
Overlays
Overlays are files, such as letterhead, that can be placed on top of a fax.
See also
Refer to the VSI-FAX CoverMaker help for information about using CoverMaker to design custom cover pages.
Logs
The fax server generates many different kinds of logs. You can use these logs to troubleshoot problems, get fax
status, or review server history.
Event logs
Event logs provide detailed information about each device, class, or fax server process.
Inbound fax log The inbound fax log maintains a detailed record of each received fax.
65
INSTALLATION AND ADMINISTRATION GUIDE
Outbound fax
The outbound fax log maintains a detailed record of each sent fax request.
Functional overview
This section briefly describes how VSI-FAX sends, receives, and routes faxes and how it send email messages.
Sending faxes
One of the primary design goals of VSI-FAX is to provide as many reliable ways as possible to send a fax. You can
send a fax by logging on to the fax server and entering information in a command shell, by sending an email
message to the fax server, by placing a file in the autosend directory, or via one of our graphical fax clients. This
figure shows the various ways you can send faxes with VSI-FAX:
Email
VSI-FAX provides an Email-to-Fax Gateway feature that allows you send faxes via email to the fax server, following
these steps:
1. Create a new email user account on your corporate mail server (we recommend that you use autofax for this
user account).
2. Enter the fax recipient information in a specific format (i.e., <fax_number> or <fax_number>[subject]) in
your email message subject line.
3. Send your fax email messages to autofax@my_company.com.
LanFax Windows Client
66
FAX FUNDAMENTALS
Note
Starting with version 6.0, VSI-FAX offers a new LanFax™ Windows Client with enhanced usability to replace VSIFAX Windows Client. VSI-FAX Windows Client remains available on the CD-ROM as an unsupported client.
The LanFax Windows Client is a front end to the VSI-FAX Server that provides an easy way for you to use VSI-FAX
on your desktop. The LanFax Windows Client lets you: send faxes, save drafts of outgoing faxes, view sent faxes
through an Outbox, view received faxes through an Inbox, manage phonebooks and customize cover pages.
Using the LanFax Windows Client, you can send faxes using one of two methods:
Send a fax directly from the LanFax Windows Client
Send a fax from an application that allows you to print on LanFax Windows Client Printer ("print to fax")
See also
Refer to the VSI-FAX LanFax Windows Client help for more information on installing and using the LanFax
Windows Client.
Outlook Client
The Outlook Client provides advanced desktop faxing capabilities for Microsoft Outlook and Exchange users.
The Outlook Client includes a custom form and fax status applet that tightly integrates with the Microsoft
Outlook messaging client
Use your Outlook Contacts folder or Personal Address Book to store your fax recipient information
Faxes are sent directly to the fax server via your network; they are not routed through the Exchange server.
Faxes are sent directly to the fax server via your network; they are not routed through the Exchange server.
vfx commands
The simplest way to send a fax is to log on to the VSI-FAX server, open a command shell, and enter a vfx
command. For example, to fax my_file.txt to local fax number 555-1212, enter:
vfx -n 555-1212 my_file.txt
Note
If you do not specify a device name, the default device will be used.
See also
For more information about vfx commands, see Basic Fax Server Administration.
Autosend directory
The autosend directory is an advanced feature that allows you to send faxes just by placing special files (i.e., VSIFAX tag and batch files) in this directory.
Receiving faxes
Receiving faxes is quite different from sending them. Consider that when you send a fax, you begin with various
pieces of information, then you rasterize (image) that information into a document that can be transmitted over a
telephone line. However, once the document is imaged, it ceases to be anything other than pixels at various grayscale color depths (it no longer contains anything that can be understood as human-readable data).
Of course, when you receive a fax, the reverse is true. All you know for certain is that a particular fax device (i.e., a
modem or channel on a fax board) answered a telephone call and received a fax (i.e, a rasterized file). So while the
person sending the fax intends for it to be read by a particular person, in most cases the fax server doesn't have any
idea who that person is.
VSI-FAX handles this situation by creating a default inbox for all incoming faxes. It uses the only user account it is
certain exists on all systems (user vsifax). Therefore, until you change these settings, the default behavior is that all
incoming (received) faxes are placed in user vsifax's inbox as shown in this figure:
67
INSTALLATION AND ADMINISTRATION GUIDE
Incoming faxes are stored as numbered TIFF files in this directory. You can view these files by going to the vsifax
inbox directory and opening them with a multi-page TIFF file viewer.
Important
You must have a multi-page TIFF viewer installed on your system to view received faxes. While most paint
programs can open a multi-page TIFF file, they only display the first page and are therefore unsuitable for viewing
faxes (in most cases, you will only see the fax cover page). Imaging for Windows is a common multi-page TIFF
file viewer that is provided free with Windows. Similar programs are also available for Unix and Linux systems.
You can customize the way VSI-FAX processes received faxes for each inbox. Depending on your settings, VSI-FAX
will automatically perform one or more of the following actions each time a fax is received:
Print the fax (this emulates a standalone fax machine)
Notify someone via email that a fax has arrived
Forward the fax as an email attachment
After performing these actions, you can also configure VSI-FAX to do one of the following:
Delete the received fax
Archive the received fax (move it from the inbox to another directory)
Leave the received fax in the inbox
Simple departmental fax routing
You can see that the level of fax routing provided with a default VSI-FAX system is very modest. It is really only
suitable for small companies with a single fax telephone number.
If your fax server has more than one fax device (modem or fax board) installed, you can easily extend this default
routing behavior by creating a departmental user account for each of your incoming fax numbers. VSI-FAX will
automatically create a new fax inbox for each of these departmental users. Furthermore, one of the settings that VSIFAX stores for each fax device is the default inbox for received faxes. Simply change each device's default inbox to
one of your new departmental inboxes and VSI-FAX will route faxes received on a particular telephone line to the
correct inbox as shown in this figure:
68
FAX FUNDAMENTALS
The advantage to this approach is that it is very inexpensive because you do not have to purchase any additional
telephone numbers or services from your telephone company.
Routing received faxes
You can simplify departmental routing scheme to cover individual fax users. This is how it works.
Thus far, our discussions have assumed that each fax device can only answer one incoming fax telephone number.
This is not exactly true. Contiguous blocks of Direct Inward Dial (DID) telephone numbers can be purchased from
most telecom providers. One important feature of these DID numbers is that they are answered from a single trunk
telephone line. Therefore, if you connect a fax device to a DID trunk line, that single fax device can actually answer
more than one incoming fax telephone number.
DID numbers are typically comprised of a contiguous block of one hundred numbers beginning with xxx-xx00 and
ending with xxx-xx99. If a DID number is assigned to each fax user, then VSI-FAX can strip off the last four digits of
the incoming fax number and use that information to route the fax to the appropriate user's inbox as shown in the
following figure:
When using a Class 2/2.0 fax modem or a Dialogic Brooktrout TR1034 Analog fax board to receive faxes, you can
also route received faxes based on DTMF digits detection.
See also
To learn how to turn on DTMF detection for modems or fax boards, refer to Setting a modem or Brooktrout board to
detect DTMF.
To learn how to assign a DID or DTMF extension to a user for fax routing, refer to Assigning a DID or DTMF
extension to a user.
Sending email messages
VSI-FAX can send two general types of email messages:
The email submitted to send faxes when using the sm FIM (Send Mail).
The email notifications (delivery status or reception notifications).
An email gateway is used to send those email messages. VSI-FAX connects to this email gateway and
communicates with it using the SMTP protocol (Simple Mail Transfer Protocol).
VSI-FAX Server can connect to any mail server as long as the SMTP protocol is enabled. However, depending on the
email gateway, you could have some problems when sending emails. In this case, refer to Emails problems.
69
Fax Imaging
Fax Imaging
Multi-page Tagged Image File Format (TIFF) is the basic underlying file format used to send all faxes with VSI-FAX.
However, you do not have to restrict your faxing to just TIFF files. VSI-FAX uses programs called formatters to
convert common file types to TIFF files so that they can be faxed. This conversion process is what is referred to as
"imaging."
How does VSI-FAX know which formatter to use with which file extension? When the VSI-FAX server is started, one
of the tasks performed on start-up is to compile a list of file types that can be handled by the imaging engine. This list
is constructed in the following manner:
1. First, VSI-FAX looks in the formatters.lst file for an entry that associates the file extension and formatter
(for example the entry doc:doctotif.exe:o: indicates that all files with a .doc extension should be
imaged using the DOCTOTIF formatter). All formatters.lst entries are added to the list.
2. Then, VSI-FAX queries the list of internal formatters (see Types of formatters for the definition of an "internal"
formatter) and adds these entries to the list.
3. Next, VSI-FAX queries the operating system to determine if there are any file type associations that are
handled at the OS level. When the fax server is a Windows OS, this list will be the list found under Tools >
Folder Options > File Types. When the fax server is a Unix OS, it will look to see if an imaging server has
been configured. If an imaging server is configured, the file type available on that system will be retrieved. All
of the available file type associations are then added to the list.
Note
Once the server starts, you can check the file types than can be handled by entering the following
command:
vinfo -D -v filetypes | more
The result is a list of the file type associations recognized by the VSI-FAX server. From this list, you can
tell whether a standard formatter or a DDE print command will be used to image the file. When executed
on a Unix fax server, this command will also list the DDE associations for an imaging server if one is
configured.
4. When a fax request is submitted to the server, VSI-FAX determines which formatter to use when imaging the
file by performing the following checks:
•
Does the file extension (the characters after the "dot" in the file name) match any of the file types on
the list created at start-up? If so, use the formatter specified with the extension.
•
If the file has no extension or one that VSI-FAX still cannot associate with a formatter, VSI-FAX will try
to determine the file type by examining the first 256 bytes of that file. If VSI-FAX determines that it is a
PostScript, PCL, or TIFF file, it will image it using the appropriate formatter. If VSI-FAX cannot
determine that it is a PostScript, PCL, or TIFF file, it will image the file as plain ASCII text.
Types of formatters
There are five types of formatters used by VSI-FAX. While differentiation between types of formatters is a construct
that is internal to the VSI-FAX program and not a term you will emcounter in the program, knowing the type of the
formatter that you want to use will help you determine how and under what circumstances it is accessed by VSI-FAX.
Native formatters : VSI-FAX has support for specific file types. This support is internal to the server and thus
provided on all platforms. Native formatters can process .tif, .fax, .pcx, and .bmp files.
Internal formatters : these formatters come preconfigured and do not require any additional set up on your
part. The internal formatters can be identified by using the -F switch on the VFX command line. They are
71
INSTALLATION AND ADMINISTRATION GUIDE
usually wrappers which rely on third-party tools that actually create the output TIFF file. Internal formatters are
supported on all platforms and can process .txt, .pcl, .ep, .ps, .ps2, .pdf, and simple .rtf files.
User-defined formatters : these are specified by the user via the%VSI-FAX%\lib\formatters.lst file.
The user-defined formatters typically will be used to image specific file types produced by an application
installed on the server. For more information, refer to Setting up user-defined formatters.
Add-on formatters : these additional formatters, built and supported by Esker, can be installed on the fax
server to handle .xls, .ppt, .pdf, .doc, .htm, and .html files. Add-on formatters can be installed
separately with setup <VSI-CD>\server\w32\fmtrs\setup.exe that can be launched from VSI-FAX Autorun.
They are document viewers that print on the "VSIFAX server" printer in order to generate a pcl file which will
be then converted by PclToTif into a TIFF document. For more information, refer to Setting up add-on
formatters
External formatters : this formatter (only available on Windows platforms) uses the application associated to
a given extension in the Operating System to image corresponding documents. This formatter relies on direct
printing or DDE mechanism to generate a print job on the "VSIFAX server" printer and the resulting PCL file is
then converted by PclToTif. It is used to treat files whose extensions cannot be handled by any other
formatters. To use it on a "known" file type, you need to create an entry in the formatters.lst as you would for a
user-defined formatter. Here is a sample entry associating pdf files with the system default viewer for PDF files
(e.g. Acrobat reader): pdf:mstotif.exe:o:
The following table shows which types of files (based on their file extensions) use which formatters, and includes
information on the type of each formatter:
File extensions
Formatter
name
(type)
Comments
.tif, .fax, .pcx, .bmp
(native)
.fax is a legacy VSI-FAX 2 fax file (not .tif).
.tif can be either Group 3 or Group 4.
.pcx is a MS Paintbrush file.
.bmp is a bitmap file
.txt, .pcl
PCLTOTIF
(internal)
Uses JetPCL to convert standard text, PCL 5e, PCL 6
.ep
EPTOTIF
(internal)
Epson printer
.ps,.ps2, .pdf
GSTOTIF
(internal)
Uses Ghostscript for Postscript Level 1 and 2 and basic PDF.
.rtf
RTFTOTIF
(internal)
Simple RTF, like those produced by a mail client, using basic rich text
formatting commands. When full rich text formatting is used, you must
use DOCTOTIF or a user-defined formatter.
.xls
XLSTOTIF
(add-on)
Excel spreadsheet (.xls only)
.ppt
PPTTOTIF
(add-on)
PowerPoint file
.pdf
PDFTOTIF
(add-on)
Uses a PDF viewer instead of Ghostscript.
This formatter should be used when the internal Ghostscript formatter
fails to image the file correctly.
.doc
DOCTOTIF
(add-on)
Uses Wordview97.exe to image Word documents and RTF files.
Windows only. In case of problems with these converters (new Office
features mishandled) you can try to install a current Office on the
server and image documents with mstotif converter.
.htm, .html
HTMTOTIF
(add-on)
Uses Esker's HTML Viewer for imaging.
This formatter has some limitations. It will not image object files
embedded in an HTML page but all basic text components will be
handled properly.
.docx, .xlsx and any file
extension in the filetypes list
other than those specified
MSTOTIF
(external)
Uses Microsoft File Type associations to look for a viewer to render
the file (Windows DDE mechanism).
You must install Microsoft Office 2007 on the server to be able to
72
FAX IMAGING
File extensions
Formatter
name
(type)
above
Comments
process .docx or .xlsx files.
Manages the interface to a VSI-FAX imaging server when imaging
requests for non-Unix file types are made on a Unix server.
Imaging on a Unix fax server
Unix fax servers are commonly used in environments where legacy applications and print streams are fax enabled.
The tools used in these environments are typically .txt, .pcl, or .ps. The internal formatters can process these file
types.
If you want to fax Microsoft Office files (Word, Excel, etc.) from a Unix fax server (in a desktop faxing environment, for
example) the Unix fax server must be configured to work with a Windows imaging server. The imaging server images
file types not normally available on Unix.
See also
See Imaging Server Setup and Configuration for additional information.
Imaging on a Windows fax server
In addition to the file types typically found on Unix servers, a fax server running on Windows is often asked to fax
native Windows documents like Word documents.
Esker has add-on formatters which handle the common Windows file types (.doc, .xls, .ppt, .htm, .rtf). Each
of these formatters are built to comply with the Windows Print mechanism:
1. A formatter program (one of the "*TOTIF.exe" files) collects the file and manages the imaging operation.
2. The application associated with that file extension, (either the applicaton that generated the file in the first
place, or a viewer program) images the fax, producing a binary file built to GDI (Graphical Device Interface)
specifications.
Note
One way to determine if an application file type can be rendered is to check for a print preview function in
the application. Rendering is essentially performing a Print Preview on the file.
3. Once the file is rendered, the bit stream is handed off to a print driver for conversion from GDI to PCL.
4. Once the PCL file is produced, a TIFF file is created and returned to the VSI-FAX server.
Windows file types not related to an internal or add-on formatter will be handled by the MSTOTIF formatter or will be
treated as an ASCII text file depending on the file extension used and whether this file extension appears in the file
types list. For a complex file type, the resulting fax will not be formatted as expected and will likely be unreadable (for
example, you try to image a spreadsheet and end up with a fax that is 200 pages of garbage text).
Note
Your Windows fax server will almost certainly have other file types registered. Launch Windows Explorer and
choose View > Options > File types to see a complete list of all supported file types on your Windows fax server.
VSI-FAX Fax Server service properties
Important
After you install VSI-FAX, we highly recommend that you change the properties of the VSI-FAX Fax Server
service to run as a normal user. By default, this service is installed to run as a "Local System Account." Some
imaging requires this service to run as a regular user account in order to gain control of the desktop and to comply
with Windows security settings.
73
INSTALLATION AND ADMINISTRATION GUIDE
Setting up add-on formatters
For some file types, you must use an add-on formatter to image the document. (For a list of formatter types and the
file types they process, see the table on File extensions). To set up add-on formatters to work, you must:
1. Stop the VSI-FAX server.
2. Set the VSI-FAX server service to log in as an existing user. (See VSI-FAX Fax Server service properties if
you want to understand why.)
3. Load your VSI-FAX CD-ROM into your CD-ROM drive.
4. If the autorun does not start automatically, run autorun.exe located in the root directory of your VSI-FAX
CD-ROM.
The VSI-FAX CD browser appears.
5. Select Add-On Formatters under Fax Server.
6. The Welcome screen appears. Click Next to proceed with the installation.
The program files are copied to the local hard drive. This may take several seconds.
7. When the Setup Complete screen appears, click Finish.
8. Restart the VSI-FAX server.
Setting up user-defined formatters
For some file types, VSI-FAX appropriately images your files using an internal or native formatter (imaged "right out
of the box," so to speak), with no additional setup on your part. (If you are not sure what type of formatter you need,
see Types of formatters for an explanation of format types.)
However, to image document types formatted by a user-defined formatter, you must install a tool for formatting the
document type and create an association between the file type extension and the tool it should use to format it. To do
this:
1. Stop the VSI-FAX server.
2. Set the VSI-FAX server service to log in as an existing user. (See VSI-FAX Fax Server service properties if
you want to understand why.)
3. Install either the program that created this document or a viewer appropriate to the document type.
4. Open the %VSIFAX%\lib\formatters.lst file in a text editor, and add a line associating the file type with
the program or viewer. The construction of the line is as follows:
type:program:options:description:
Where type is the file extension of the files you want to fax (for example, .xls),
program is the file (and path, if necessary) you launch to run the program you want to use to image the files
(if not fully-qualified, it is interpreted as being in <VSIFAX>\lbin)
andoptions can take various values listed in the table below (usually you only need the "O" option):
Option
74
Description
U
The program can use the option "-U clientid" to get user-specific info. If not specified, the clientid is
not passed to the program
E
The program can use the option "-E std|fine" to specify output resolution. If not specified, output
resolution will be processed externally to the program
l
The program can use the option "-l letter|legal|a4" to specify the page size. If not specified, any page
size specification is ignored
p
The program can use the option "-p <page-range> to specify the pages to be processed. If not
specified, any page-range information is processed externally to the program
Z
The program can use the option"-Z <options>" to specify program-specific options. If not specified,
any file-conversion options are ignored
FAX IMAGING
Option
O
Description
The program can use the option "-o filename" to specify the output file to use. If not specified, it is
assumed that the output will be written to stdout
Entries in this file take priority over native and internal conversions. A line starting with # sign is ignored.
Here is an example associating .pdf files with our pdftotif:
pdf:viewers\pdftotif.exe:o:
5. Save and close the formatters.lst file.
6. Restart the VSI-FAX server.
Choosing a formatter
VSI-FAX determines which formatter to use for a given input file based on its extension.
First it looks for a matching entry in <VSIFAX>\lib\formatter.lst file and uses the first one available.
Then if no specific behavior is specified, it tries to use one of the internal formatters.
If there is still no match, on Windows platforms, it tries to find an application associated to this extension while
on Unix platform, it queries the imaging server (if one is defined).
If this was not helpful, it tries to determine the file type based on the first few bytes in the file.
And finally as a last resort it considers the document to be plain text.
Note
It is possible to provide the scheduler with the document file type (avoiding extension analysis and potential
mistakes) using ftp tag or the-F option available on vfx command. This way, you can be sure your document
will be treated correctly regardless of its name.
To check which file types are defined on the server and how they would be handled, you can use the option -D -v
filetypes on vinfo command. It will show the file types requiring the use of mstotif, the exact commands
executed to convert documents, or the DDE arguments used.
Here is a partial sample output:
> vinfo -D -v filetypes
list of valid file types:
ps 1 PostScript [tif]
ps2 1 PostScript Level 2 [tif]
pdf 1 Portable Data Format [tif]
tif 1 TIFF [pdf]
pcl 1 PCL [tif]
rtf 1 RTF [tif]
txt 1 Text [tif]
ep 1 Epson [tif]
fax 1 VSIFAX [tif]
bmp 1 Microsoft Bitmap [tif]
pcx 1 Microsoft Paint [tif]
tif 1 TIFF [tif]
arc 4 WinZip File [C:\PROGRA~1\WINZIP\winzip32.exe /print /ni "%1"]
bat 4 MS-DOS Batch File [%SystemRoot%\System32\NOTEPAD.EXE /p %1]
bmp 4 Bitmap Image ["C:\WINNT\system32\mspaint.exe" /p "%1"]
cmd 4 Windows NT Command Script [%SystemRoot%\System32\NOTEPAD.EXE /p %1]
cov 4 Fax Coverpage File [%SystemRoot%\system32\faxcover.exe /p "%1"]
doc 4 Microsoft Word Document [[REM
_DDE_Minimize][FileOpen("%1")][t=IsDocumentDirty()][FilePrint 0][SetDocumentDirty
t][DocClose]]
dot 4 Microsoft Word Template [[REM
_DDE_Minimize][FileOpen("%1")][t=IsDocumentDirty()][FilePrint 0][SetDocumentDirty
75
INSTALLATION AND ADMINISTRATION GUIDE
t][DocClose]]
htm 4 HTML Document ["C:\Program Files\Microsoft Office\OFFICE11\msohtmed.exe" /p
%1]
html 4 HTML Document ["C:\Program Files\Microsoft Office\OFFICE11\msohtmed.exe" /p
%1]
pdf 4 Adobe Acrobat Document [[FilePrintSilentEx("%1")]]
ppt 4 Microsoft PowerPoint Presentation ["C:\Program Files\Microsoft
Office\OFFICE11\POWERPNT.EXE" /p "%1"]
txt 4 Text Document [%SystemRoot%\system32\NOTEPAD.EXE /p %1]
xls 4 Microsoft Excel Worksheet [[open("%1")][print()][close()]]
...
In this sample you can see that PowerPoint files (.ppt) will be imaged by "standard printing", meaning a particular
command line wil launch the tool and get it to print. Word documents (.doc) will be printed via DDE. Also note that Txt
files should be treated by an internal converter but can be switched over to Notepad (by adding the line
txt:mstotif:o: in the formatters.lst file).
Troubleshooting fax imaging
Generic troubleshooting
When having imaging troubles the first thing to determine is exactly which step in the process is going wrong. Below
you will find a diagram summarizing the various steps an incoming file may follow before becoming a valid TIFF file.
To diagnose the issue properly, here are a few classic questions you should try to get answers for:
Which type of input file is causing problems? All of them, only pdf, only doc, etc. ?
Is this problem happening for all documents of this type? Or only some of them ?
Can you provide Technical Support with a sample file you are having problems with ?
Tip
When your input file is a PostScript or PCL file, you can validate its contents by sending the document in raw form
to a printer (using a corresponding driver). This forces a processing of the commands in the file and will help you
see if the problem is in the conversion or in the original file. In order to do so, use the OS file copy command with
your printer as the destination file. For example if you declared a network PS printer named "MyPrinter" located
on a print server "PrintServer" you can use the following command:
> copy input.ps \\PrintServer\MyPrinter
Usually customer problems appear in the "upper" part of the process, i.e., the creation of a TIF file based on the input
document. But sometimes the server is able to generate a proper image which is altered by the Fax Interface Module
(FIM) or the fax transfer itself.
In order to isolate a problem in this part of the process, you may launch a sample vfx command with "-o
<filename>" option. This generates an output TIF file based on your original document in the same way the server
would during normal processing therefore allowing easier tests than a full job submission. For example:
> vfx -o output.tif input.file
If the output file obtained is correct then the problem comes from the FIM.
If the imaging problem is visible in the resulting TIF, the problem comes from the conversion.
If you reproduce the issue with one of your files, try to see if this particular file is the only one impacted, and what is
different; or if all files for a given format are suspected.
Assuming we are facing a conversion problem, we need to figure out which converter is used and thus which
"branch" in the diagram below we are currently going through. This is especially important for formats that can be
treated by different converters (text or pdf for example). So you need to review the contents of your
formatters.lst to be sure that the files are handled as you think they should be. Once you have ensured which
formatter is used, refer to its corresponding section in this troubleshooting guide for more detailed information about
it.
76
FAX IMAGING
Tip
Remember that our formatters may not recognize files with "weird" extensions (.0, .file, .tmp) and the file will end
up being considered as plain text which can lead to behaviors such as transforming an image or PDF/Word
document into many pages of ASCII. In this case, try changing the input file extension and see if the output is
better.
Converter specific troubleshooting
Internal formatters
GSTOTIF
This converter relies on Ghostscript to manage Postscript files and PDF files. To diagnose if the problem comes from
the converter or from the way it is launched by the server, run Gstotif with a -o option (similar to the one we used with
vfx). For example with a pdf file:
> gstotif -o output.tif input.pdf
Note
VSI-FAX server includes a "standard" version of Ghostscript installed in <VSIFAX>\lib\ghostscript and gstotif is
really a simple wrapper over this installed version. By adding the -D flag on the previous command you can see
the parameters actually provided to Ghostscript.
> gstotif -D -o output.tif input.pdf
0: C:\Program Files\VSI-FAX\FaxServer\lib\ghostscript\bin\gs.exe
1: -dNOPAUSE
77
INSTALLATION AND ADMINISTRATION GUIDE
2: -dBATCH
3: -q
4: -sDEVICE=tiffg3
5: -IC:\Program Files\VSI-FAX\FaxServer\lib\ghostscript\lib;C:\Program
Files\VSI-FAX\FaxServer\lib\ghostscript\fonts
6: -sOutputFile=C:\Program Files\VSI-FAX\FaxServer\spool\temp\tmp00564aa.tif
7: GV_TOTALRN_99.pdf
So if this command is not working properly, you can try to go into <VSIFAX>\lib\ghostscript\bin and launch
Ghostscript directly (gs.exe) with all these parameters (except -d and -q ones which are only useful within
server integration):
gs -sDEVICE=tiffg3 -I%vsifax%\lib\ghostscript\lib;%vsifax%\lib\ghostscript\fonts sOutputFile=c:\ouput.tif c:\inputfile.pdf
If you get an error at this stage, the problem is not in VSI-FAX but in Ghostscript itself. The solution could be to
upgrade Ghostscript and see if a more recent version behaves better. You can access latest builds of
Ghostscript on this website: http://www.cs.wisc.edu/~ghost. Note that due to Ghostscript licensing, Esker is only
allowed to distribute GPL versions but customers can download AFPL versions on their own.
Updating Ghostscript on a Windows platform
VSI-FAX always looks for the gs.exe in the same place so to upgrade Ghostscript on Windows the idea is to install it
in a new folder; and then replace the current working directory with this new one. Some changes are needed though,
so here is a procedure you can follow (as an example, it is given for the version 8.15 of ghostscript):
1. Create a new sub-directory in the VSI-FAX lib directory called "GSUpgrade".
2. Save the newer version of the GhostScript converter to this sub-directory.
3. Execute Ghostscript installation and click on Setup.
4. On the GPL Ghostscript Setup dialog box, under "Install to directory", browse to the VSI-FAX lib\GSUpgrade
directory, click OK and then Install.
5. This will create a sub-directory called "gs" and this will contain 2 sub-directories called "fonts" and "gs8.15".
6. Create a new sub-directory in the VSI-FAX lib directory called "Ghostscript_new".
7. Create a new sub-directory in the VSI-FAX lib\Ghostscript_new directory called "fonts".
8. Create a new sub-directory in the VSI-FAX lib\Ghostscript_new directory called "bin".
9. Create a new sub-directory in the VSI-FAX lib\Ghostscript_new directory called "lib".
10. Copy all the files from the VSI-FAX lib\GSUpgrade\fonts directory to the VSI-FAX lib\Ghostscript_new\fonts
directory.
11. Copy all the files from the VSI-FAX lib\GSUpgrade\gs8.15\bin directory to the VSI-FAX
lib\Ghostscript_new\bin directory.
12. Copy all the files from the VSI-FAX lib\GSUpgrade\gs8.15\lib directory to the VSI-FAX lib\Ghostscript_new\lib
directory.
13. In the VSI-FAX lib\Ghostscript_new\bin directory copy and paste the file gswin32c.exe (in the same folder)
and rename the copy to gs.exe.
14. Stop the VSI-FAX scheduler.
15. Rename your VSI-FAX lib\Ghostscript directory to VSI-FAX lib\Ghostscript_old.
16. Rename your VSI-FAX lib\Ghostscript-new directory to VSI-FAX lib\Ghostscript.
17. Start the VSI-FAX scheduler.
Installation note
In recent versions of Ghostscript, the \fonts subfolder doesn't exist anymore. However the procedure is exactly
the same as the one described above except for the parts concerning the \fonts folder.
78
FAX IMAGING
Updating Ghostscript on a Unix platform
Unfortunately upgrading Ghostscript on Unix is not as easy as on Windows. Indeed no binaries are available for
these platforms on the official website, only the sourcecode. So you will either need to retrieve these sources from the
website and compile them following Ghostscript instructions or find a binary version for their platform on websites
providing "built" versions of this tool (such as Sunfreeware.com).
Once you get your compiled version of Ghostscript:
1. Go to $VSIFAX/lib/ghostscript/bin.
2. Backup the old gs file (ghostscript v7 executable).
3. Copy the new ghostscript binary in this folder.
4. The ghostscript executable needs to be called gs. Rename it if needed.
PCLTOTIF
Wrapping JetPCL, this converter is in charge of text, PCL and by design all other formats with conversions based on
the printing mechanism. You can launch Pcltotif manually and generate a TIFF file in a similar way as vfx -o. This can
point out if the problem is in the converter itself or in the way the server handles it.
> pcltotif -o output.tif input.file
Additionally here is a list of options you can use to alter the output based on your input file. These flags are normally
set by VSI-FAX according to the information provided on the job via tags and/or data in user profile. You can use
them to reproduce problems linked to particular options (such as Landscape for example).
Option
Description
-h on|off
include VSI tags in header
-E std|fine
specify resolution
-o outfile
specify output file (use "-o -" for stdout)
-l length
page length (letter, legal, a4)
-p range
specify page range
-s
scan for embedded keywords
-O landscape
specify landscape mode
-e
pre-process epson file to PCL
-D lvl
debug level
-K
keep temp PCl file
-T
keep temp TIF file
-Z[no]keywords specify if scan for keywords is active.
Note that VSI-FAX integration with JetPCL is done at a lower level than with Ghostscript and this makes any upgrade
impossible without rebuilding the converter itself. So if you isolate a problem within pcltotif, it will likely require Esker
Technical Staff and R&D involvement.
Tip
Versions 5.1 and on include a wrapping feature for text documents in order to avoid unwanted cut text and to
comply with Outlook client display. However in some cases, this wrapping may be applied to files that you do not
want to wrap. This is likely to happen with PCL files being submitted with unspecific extensions (file.tmp for
example) or redirected on the Standard Input (cat file.pcl | vfx). In these configurations, the server could
be unable to recognize the file as a PCL and treat it as text hence forcing wrapping. The solution in this case is to
slightly alter the way the document is submitted in order to ensure the PCL format is recognized: either by
changing the extension (file.tmp tofile.pcl) or by adding the file type tag (ftp) to declare the input file is pcl
regardless of its extension or by referring to the file within vfx command (cat file.pcl | vfx becomes vfx
file.pcl).
79
INSTALLATION AND ADMINISTRATION GUIDE
Add-on formatters
On Windows servers, it is possible to enhance VSI-FAX support for Office file types by deploying add-on formatters
(doctotif, htmtotif, pdftotif, ppttotif and xlstotif). They are available as a separate installation on the CD-ROM (in
server\w32\fmtrs). This setup will install the converters in <VSIFAX>\lbin\viewers and modify the formatters.lst in
order for them to be active by default on the following pattern:
#pdf:viewers\pdftotif.exe:o:
#rtf:viewers\doctotif.exe:o:
doc:viewers\doctotif.exe:o:
xls:viewers\xlstotif.exe:o:
ppt:viewers\ppttotif.exe:o:
htm:viewers\htmtotif.exe:o:
html:viewers\htmtotif.exe:o:
A few notes regarding these default settings:
Pdftotif is not activated by default because Gstotif is the recommended converter for PDF files and Pdftotif
should only be used when Gstotif fails to convert your documents properly.
Doctotif is only activated for .doc and not .rtf for a similar reason, we consider rtftotif to be the recommended
converter. However for complex documents the doctotif converter can give better results.
All these converters offer the same option -o as vfx command to test their output. For example to test doctotif, we can
launch from <VSIFAX>\lbin\viewers :
> doctotif -o output.tif input.doc
If the output is not correct, we need to find out if the problem comes from the viewer not launching properly, the
viewer not displaying the document properly, the printing operation failing, the pcl not being generated properly or the
pcltotif conversion not giving satisfying results.
First step: the viewer
By default VSI-FAX services are setup at installation to start with the LocalSystem account. This works fine for
normal job processing but can lead to right issues when using add-on formatters (also applies to user-defined
or external ones). It is then recommended to edit the service definition and switch from a LocalSystem
account to an administrator user on the server. This will help regarding the execution of right issues and will
ease troubleshooting because you can login with this account (which is not possible with LocalSystem).
Once you are logged in to the server with this user account, you can go in <VSIFAX>\lbin\viewers and
launch the viewer corresponding to the converter you have a problem with (for example wordview for doctotif).
Be aware that some of the viewers require specific Microsoft libraries to run (such as mso97v.dll) which are
stored in the <VSIFAX>\lbin\viewers\common folder. During normal execution, the server launches the
viewers from this folder so you need to do so too when launching them manually. For example with wordview:
In <vsifax>\lbin\viewers\common > ..\wordview\wordview.exe
If the viewer doesn't appear, you need to use any error message popping up to track the problem. If the
viewer appears properly but the file does not look good, this could be due to the fact that it uses some Word
features the viewer doesn't support. In this case, try installing Office on the server and switch to the external
formatter (mstotif). If the file looks good in the viewer, the issue may be appearing at a later stage in the
process. Go on and check the printing step.
Second step: the printing
Once you managed to launch the viewer and open the input file, we need to check if the viewer is able to
submit the file to "VSIFAX server" printer. First pause the printer and then print to it from the viewer. A job
should appear in the print spooler. If this is not the case, we need to check that the printer is declared in the
Printers properties for the current windows account then ensure that the current user is allowed to print onto it
(domain users for example may not be allowed to access it).
Once the job is sitting in the spool, open the printer properties and go to the Ports tab. Double-check that
current port is VFXSERVER: and open the "Configure port" menu. The work directory should be set to
<VSIFAX>\spool\temp and the output pcl filename currentpcl.pcl. If these values were altered, reset them
back to default. Finally release the print job and check that currentpcl.pcl is created where it should be.
Tip
In previous versions, VSI-FAX port created a sub-folder in a TSE environment corresponding to the
printing user name so the pcl file created was <VSIFAX>\spool\temp\<username>\currentpcl.pcl and the
80
FAX IMAGING
server couldn't find it. A workaround consisted of changing the filename to ..\currentpcl.pcl. This trick is no
longer useful in versions 5.1 and on (the original problem was solved) but you may find such settings on
migrated platforms.
If the pcl file is incorrect (margin issues for example), try to change the print settings in the viewer and see if
this impacts the output. If it is correct, the next step may be the cause of the conversion.
Third step: currentpcl.pcl conversion
This is the last step in the conversion: the pcl file generated by the printing is submitted to pcltotif in order to
be converted to TIF. If you suspect the problem lies here, please refer to PCLTOTIF.
Faxing PDF files
While Ghostscript can be used to image most standard PDF files, consideration must be given to the program that
produces the PDF file. There are known problems with some applications, like Crystal Reports, when landscape
margins are used. If you encounter problems imaging PDF files (for example, portrait compressed instead of
landscape full page), use the PDFTOTIF formatter. To do this:
1. Stop the fax server.
2. Run the VSI-FAX Add-on formatters program (see Setting up add-on formatters for instructions).
3. Install a PDF viewer on your fax server.
4. Edit the faxserver\lib\formatters.lst file and un-comment out the line
pdf:viewers\pdftotif.exe:: (i.e. remove the "#" from the beginning of the line).
5. Save your changes to the formatters.lst file.
6. Restart the fax server.
External and User-defined formatters
The purpose of these formatters is to provide VSI-FAX with a generic way to treat virtually any file type by launching
an application that will be able to display and print the document on our "VSIFAX server" printer. Their behavior is
similar to our add-on formatters' so most of the troubleshooting steps apply here too.
The only thing different being that it is harder to be sure about the application used to print. Any file type that is not
declared in the formatters.lst but associated to a program in the OS will be imaged using this very program. To check
this association:
1. Open Windows Explorer, and select Tools > Folder Options.
2. In the File Types tab, look for the document type you have trouble with in the Registered file types list.
3. Once you have found it, select it and click on the Advanced button at the bottom of the tab.
4. You can now see detailed information about the command executed for any given action by selecting the
action name and clicking Edit.
Click here for a preview of the steps to follow for Word documents.
81
INSTALLATION AND ADMINISTRATION GUIDE
Tip
You can also check this association by using the command vinfo -D -v filetypes.
If the application linked to a file format is not the one you wish to use (for example if Wordpad is associated with rtf
but you want to use Word), you can use the Change button on the folder options to override default setting.
Tip
This can also be done automatically by the OS when opening a document with Open with option by ticking the
Always use this program to open these files setting.
The VSI-FAX server integrates via the Print command. This command is used to send a document to the default
printer. You can manually emulate this behavior by defining the "VSIFAX server" printer as default and right-clicking
on your document to choose "print". The server will not be able to image the document if you get any pop-ups here
(first time launch message for example). If this is working manually, you can launch a test conversion with the -o
option as with vfx.
> mstotif -o output.tif input.doc
To get details about this conversion you can activate debug traces for Mstotif converter in
$VSIFAX/lib/vsisrv.ini file by creating a section named [MSTOTIF] and add the following lines into it:
[MSTOTIF]
debug = on
hide-window=off
82
FAX IMAGING
dde-only=on
This will generate a new log file mstotifin <vsifax>\spool\logs containing information related to these
conversions. If this appears to be working and the imaging program is launched and closed properly, you can go to
Add-on formatters and follow the procedure to confirm the printer setting and the currentpcl.pcl conversion.
Tip
The most frequent message in mstotif log is "Timeout" which happens when the imaging program gets stuck on a
pop-up message and cannot complete the printing. The "hide-window=off" option will allow you to see the
program on the desktop and detect such problems.
Faxing Microsoft Office files
If you are using an add-on viewer to image Microsoft Office documents and your document is generated from a
newer version of a Microsoft Office product, your document may not format properly. In this case, install Microsoft
Office on the fax server. Check the formatters.lst file for the file type(s) that are not formatting correctly and, if
they exist, comment them out by putting a pound sign (#) at the beginning of the line that contains them. After you
save your changes to the formatters.lst file, you must stop and restart the VSI-FAX server. VSI-FAX will then
use the Office products and the MSTOTIF formatter to image the files.
Important
When using MS Office conversions, the VSI-FAX Fax Server service (vrsched.exe) should be running under a
user, not under a SYSTEM account.
If using Microsoft Office 2003 SP2 and running vrsched.exe under a SYSTEM account, the Office 2003 program
unexpectedly quits with an unrecoverable error (the Mso.dll fails and a DW20.exe component appears in the list of
Windows processes from Windows Task Manager that reports the Office 2003's program failure). The workaround
is to run the VSI-FAX Fax Server service (i.e. vrsched.exe) under a user.
If when imaging Microsoft Office files like Powerpoint, Word or Excel files you encounter a failure with the add-on
viewers as shown below:
c:\test\Sample.doc: mstotif: vfxview failed
the workaround is also to run the VSI-FAX Fax Server service (i.e. vrsched.exe) under a user, not under a
SYSTEM account.
Additional troubleshooting
For more information about troubleshooting formatters, see Formatter errors.
83
Basic Fax Server Administration
Basic Fax Server Administration
This section describes the basic tools, techniques, and procedures used to administer a VSI-FAX server.
Tools and techniques
This section describes the tools and techniques you can use to administer your VSI-FAX server. Many fax
administration tasks can be accomplished more than one way (e.g., from the command or via a graphical
administration environment such as the Microsoft Management Console).
Microsoft Management Console (MMC)
VSI-FAX Server Administration is a Microsoft Management Console (MMC) snap-in that allows you to manage your
fax server from a common Windows-based Graphical User Interface (GUI).
Before you can use VSI-FAX Server Administration, you must install the software from your VSI-FAX CD-ROM and
load the snap-in from a Microsoft Management Console (MMC) session.
See also
Installing VSI-FAX Server Administration MMC snap-in
Refer to the VSI-FAX Server Administration help for additional information about loading the snap-in from an MMC
session.
Command line
VSI-FAX administration commands can be entered from any Unix/Linux or Windows command shell. Help for these
commands is available by entering the command followed by a question mark argument. For example, to get help for
the vfxadmin license command, enter:
vfxadmin license -? or vfxadmin license -help
See also
Refer to Command Reference in the Reference Addendum documentation for additional information about VSI-FAX
commands.
Modifying configuration files
Another way you can perform VSI-FAX administration is by directly modifying one of the various configuration files
with a text editor.
See also
Refer to Configuration Files in the Reference Addendum documentation for additional information about specific
entries in VSI-FAX configuration files.
Starting and stopping the scheduler
Before a fax request can be submitted, the scheduler must be running. Additionally, you must stop the scheduler to
perform certain maintenance activities, then restart it to resume normal operation.
85
INSTALLATION AND ADMINISTRATION GUIDE
Note
To start or stop the scheduler, you must be logged on as root or vsifax on Unix. On Windows, you must be logged
in as Administrator or have Administrator privileges.
To start the fax scheduler, enter:
vfxsched start
A message displays indicating success or failure.
To stop the fax scheduler, enter:
vfxsched stop
A message displays indicating success or failure.
To stop scheduler and restart it with a single command, enter:
vfxsched restart
Getting scheduler status
You can also use the vfxstat command to return status information from the scheduler. This includes confirmation
that the scheduler is running and that a particular device is ready to begin processing fax requests.
When one or more devices have been initialized and the scheduler is waiting to accept fax requests, device states
are shown as idle.
To check device status only, enter:
vfxstat
Although the status of the scheduler is given in the output of almost any option used with vfxstat, the -r option
reports whether the scheduler is running or not.
To check only scheduler status, enter:
vfxstat -r
A message displays indicating success or failure.
You can also verify that the associated scheduler command processes have been successfully started. You will see
at least the following list of processes with the vfxsched list command.
To verify that the scheduler is running, enter:
vfxsched list
Depending on your exact system configuration, you may see additional processes listed. For example, if you set up
the email-to-fax gateway during fax server installation, you will also see a vpopd process in the list.
To show administrator information (i.e., a complete list of devices, classes, and server information), use the vfxstat
-a command.
vfxstat -a
Sending faxes
The simplest vfx command uses just two parameters: the -n (fax number) option followed by the filename. For
example, to fax my_file.txt to local fax number 555-1212, enter:
vfx -n555-1212 my_file.txt
While this very simple fax command line will suffice for very simple applications, generally more control is required.
Tags allow you to include more information and precisely control various fax settings. Each tag must begin with the t (tag) option, followed by the tag/value pair. To send the same fax as the previous example using tags, enter:
vfx -t tfn=555-1212 -t fll=my_file.txt
86
BASIC FAX SERVER ADMINISTRATION
To send this same fax but also include a classic cover page, enter:
vfx -t tfn=555-1212 -t fll=my_file.txt -t cvr=classic
Viewing fax requests
A request submitted with vfx is queued for a fax device or class. The scheduler manages the request until it is
completed, canceled, or until it expires because the maximum number of retry attempts was reached.
You can view the status of all active fax requests with the vfxstat command. Status is displayed in the following
format:
Job Num
Fax Request ID Number. This unique ID number is used to identify each fax request.
Dest
Displays the assigned fax device or class queue for each fax request.
User
The fax server user ID of the person who submitted the fax request.
Submitted
The time the fax request was submitted in MM/DD HH:MM format. For example: 03/28 16:36.
Scheduled The scheduled time for the initial or next fax attempt. For example, if a second (retry) attempt is
necessary, you will see the next time that fax request is scheduled to be sent.
Att
The number of attempts the fax request has initiated.
Pri
The priority of the fax request: Urgent, High, Medium or Low.
Result
Result status of the latest fax request attempt. If the fax request has made several unsuccessful
attempts, it will reflect the result status of the most recent attempt.
Group
When the fax request is part of a Group Broadcast, a number appears in this column. This number is the
Group request ID number associated with that fax request. Both the Group request ID number and the
fax request ID number are unique for tracking purposes.
To view all fax requests currently in the queue, enter:
vfxstat
Canceling fax requests
A request can be canceled using the vfxcancel command. You will need to know the fax request id number. This
can be obtained using the vfxstat command.
Note
A fax request can only be canceled by the fax administrator or the user who originally sent the fax.
To cancel a fax request 1004 using the vfxcancel command, enter
vfxcancel 1004
To confirm the vfxcancel action using the vfxstat command, enter:
vfxstat
You will notice that fax request 1004 is not listed because it has been canceled.
You can use vfxcancel to cancel multiple faxes as well. To cancel requests 1005 and 1009, enter:
vfxcancel 1005 1009
Configuring the email gateway
For an overview on sending emails with VSI-FAX, refer to Sending email messages.
87
INSTALLATION AND ADMINISTRATION GUIDE
The email gateway is defined in the $VSIFAX/lib/vsisrv.ini file, under the [VMAIL] section. The two main flags
to set are:
server : contains the IP address or fully qualified host name of the SMTP server. Default value is set during
installation.
sender : SMTP user name. This is the name that is shown in the fax recipient's email inbox. Default is
VsifaxServer.
See also
Refer to Configuration Files in the Reference Addendum documentation for additional information about how
to edit the vsisrv.ini configuration file.
If you encounter problems when sending emails, refer to Emails problems.
Configuring the profiles to receive email notifications
The following explains how to configure outbound fax notifications and inbound fax notifications:
Outbound fax notifications
Inbound fax notifications
See also
Refer to Tag Reference in the Reference Addendum documentation for details on the tags to set and how you
can set them from the command line, from VSI-FAX Server Administration (MMC), or from from the clients.
Outbound fax notifications
To get an Outbound Fax notification (fax sent successfully or not), you need to set the following tags on the user
profile:
To get the email notification without the .tif file attached:
not (Send Notify Mode): the type of notification (nty-ok or nty-fail to get a notification in success or failure)
mad (From Email Address): the email address of the user
To get an email notification with the .tif file attached:
sfx (Email Copy of Sent Faxes to Sender): notification type (nty-ok or nty-fail to get a notification in success
or failure)
sfe (Sent Fax Email Address): the email address of the user
Note
If the "sfe" and "mad" values are the same, only the notification with the .tif file attached is sent. If the email
addresses are different, two emails are sent, one with the .tif file attached and one without the .tif file attached.
Inbound fax notifications
To set up the inbound notification, you first need to verify that the inbound fax is associated with the proper user
profile (either according to the DID/DTMF extension or because the device is associated with the user profile).
Then, you need to setup the aem and rfe tags.
aem (Automatically Email Routed Fax): controls whether or not to automatically email routed faxes
rfe (Routed Fax Email Address): the email address that should receive routed faxes
The rfm tag corresponds to the format of the routed fax (can be routed as a .tif file or as a .pdf file).
88
BASIC FAX SERVER ADMINISTRATION
License management
A network client is any VSI-FAX application running on a computer with a different IP address than the fax server.
Each client must be registered as a licensed user in the VSI-FAX database to be able to connect to the fax server.
VSI-FAX licenses specify a maximum number of licensed users. When you have reached this limit and want to
register new clients, you have to reactivate the current license with a license that authorizes more users or with an
unlimited-user license.
In the same way, VSI-FAX licenses specify a maximum number of licensed ports available for hardware devices (i.e.
single-channel modems and fax boards). You cannot use more ports than the number of ports allowed by the license
otherwise VSI-FAX Fax Server will stop.
Reactivating VSI-FAX Server license
You can change the VSI-FAX license from the command shell using vfxadmin license or from VSI-FAX Server
Administration on Windows, for example, to change to a production license after an evaluation period or to increase
the number of licensed users, ports or virtual fax servers.
When you reactivate the VSI-FAX license, you need two pieces of information: Serial Number and Activation Key.
Both pieces of information are provided when you buy licenses from Esker or an Esker strategic partner.
Command line
1. Log into the fax server as user vsifax.
2. Reactivate the current license by entering the following:
vfxadmin license
You will be prompted for the new serial number and activation key, as well as the virtual servers' IP addresses
if the license includes Virtual Fax Servers. Once installed, the license table is updated with the number of
users specified by the new license activation key.
Troubleshooting licensing problems due to the number of devices used
When changing licenses, (ex. when going from a VSI-FAX evaluation license to a production license) you must
ensure that you are not using more ports for hardware devices than the number of ports authorized by the new
license.
For example, you are using 28 ports on a VSI-FAX Server running with an evaluation license authorizing an unlimited
number of ports and you purchase a production license authorizing only 24 ports.
In such cases, you must delete the devices you no longer want to use before entering the new license so as not to
exceed the number of ports allowed by the new license.
If you do not delete any devices, VSI-FAX Fax Server will stop when you enter the new license and you will not be
able to start it again until you have deleted devices.
On Windows, when trying to restart the VSI-FAX Fax Server service from the Windows Services panel, you get the
following error message:
Windows could not start the VSI-FAX Fax Server on Local Computer. For more
information, review the System Event Log. If this is a non-Microsoft service, contact
the service vendor, and refer to service-specific error code 1.
The error message written in the VSI-FAX Fax Server logs is as follows:
30 devices exceed license max of 10
Please install a valid license or delete exceeding devices exiting
To solve this problem, you must delete some devices from the system. Note that only hardware devices (i.e. singlechannel modems and fax boards) are licensed. Deleting a loopback (lb), a sendmail (sm), or a Fax on Demand
Connector (FoDC) device will not decrease the license count.
See also
To learn how to delete devices, refer to Adding and removing devices.
89
INSTALLATION AND ADMINISTRATION GUIDE
Displaying license information
Command line
1. Log into the fax server as user vsifax.
2. Display the settings of the current license by entering the following:
vfxadmin license -l
This displays the license table with the following information: the serial number and the activation key, the
license type (real, date, demo or eval), the platforms the license is compatible with (none for all platforms,
linux for Linux platforms and intel for Linux and Windows), the maximum number of licensed users, of ports
used and of virtual fax servers configured, the license expiration date if any, and the version number.
User administration
You must register each user who will be sending or receiving faxes with VSI-FAX as a licensed user in the VSI-FAX
database. The VSI-FAX license installed must allow enough licensed users otherwise you have to reactivate license
to increase the number of licensed users.
Registering users
When a user is registered on the fax server, an account for that user is created in the user database, which is located
in the $VSIFAX/spool/dbs directory. Every individual who uses VSI-FAX to send or receive faxes must be
registered on the fax server, and each user must have a unique VSI-FAX user ID. The VSI-FAX user ID does not
have to be the same as any other login name used by that individual.
Note
Administrators do not have to explicitly register new VSI-FAX users because new users are automatically
registered the first time they connect to the fax server. Outlook and web fax client users are also licensed the first
time they connect to the fax server.
Command line
For example, to register fax user Bill Franks with the user ID billf, enter:
vfxadmin user -n "Bill Franks" billf
The vfxadmin user command can also used to register and license a user at the same time. For example, to
register and license user Bill Franks (user ID billf), enter:
vfxadmin user -L -n "Bill Franks" billf
Changing a user's name and password
A user's VSI-FAX logon information is stored in the fax server user database. Two different command line utilities can
be used to change a user's name or password:
Use vreguser if you want to change your name or password.
Use vfxadmin user if you are a fax administrator and want to change another user's name or password.
Command line
If user billf wants to change his user name from Bill Franks to William Franks, he would enter:
vreguser -n "William Franks"
If the fax administrator wants to change user billf's name from Bill Franks to William Franks, he would enter:
vfxadmin user -n "William Franks" billf
If user billf wants to change his password, he would enter:
vreguser -p
The system will prompt user billf to enter his new password.
90
BASIC FAX SERVER ADMINISTRATION
If the fax administrator wants to change user billf's password, he would enter:
vfxadmin user -p billf
The system will prompt the fax administrator to enter billf's new password.
Deleting a user
To delete user ID billf, enter:
vfxadmin user -x billf
Displaying a list of registered and licensed users
To display a list of registered and licensed users, use the command:
vfxadmin user -l
Assigning a DID or DTMF extension to a user
A Direct Inward Dial (DID) or a Dual Tone Multi-Frequency (DTMF) extension can be used to route inbound faxes.
Fax routing allows each user to have his or her own unique fax number so that faxes can be routed directly to their
personal email inbox.
A fax routed to an email inbox arrives as a formatted TIFF attachment to an email message. TIFF files can be opened
and viewed with any common imaging editing or viewing software.
Command line
To assign a user's DID or DTMF extension, enter:
vfxadmin user -e <ext> <user>
Device administration
Devices are either single-channel modems or Fax boards, which usually provide several output channels on a single
board.
Note
After making modifications on a device like customizing the fax page header, you must restart the scheduler for
the new configuration to be taken into account.
Adding and removing devices
For a physical fax device to send fax requests, it must be added to the system, set to accept requests, and enabled.
Before incoming faxes can be received, receive capability must also be set and it must be enabled. Typically, a
device only needs to be added to the system once.
Notes
You must be logged in as root or user vsifax to add or remove devices.
When a device is added to the system, it is set to "enabled" and "accepting" for both send and receive requests
by default.
Before you add or remove a device, you must stop the fax scheduler. After adding or removing a device, you must
restart the scheduler in order for these changes to take affect.
If you add or remove devices while the scheduler is running, you will be warned that the changes will not take
effect until the scheduler is restarted.
Command line for adding a device
To add a device, you must use the vfxadmin device command:
vfxadmin device -a -i <FIM name> -v <tty device> -n "<comment>" <device name>
91
INSTALLATION AND ADMINISTRATION GUIDE
For example to add a Class 2 modem device named fax2, in Linux/Unix, enter:
vfxadmin device -a -i cx -v /dev/tty01 -n "This is a modem" fax2
In Windows, the command would be:
vfxadmin device -a -i cx -v com1 -n "This is a modem" fax2
Note
If you want the added device to be the default destination, add the -d option to the vfxadmin device
command.
At the time a device is added, you must specify the serial port name. Additional options that can be used include:
Status (enabled, sending, receiving, accepting)
Receive notify procedure
Speaker mode
Once the device is configured, you can use vfxadmin device to list the device information. To list the parameters
for a device fax2, enter:
vfxadmin device -l fax2
You can verify that the device has been added by entering:
vfxstat -t
Important
Before removing a device, be sure that no requests are scheduled for it. You have to cancel or modify existing
requests before removing the device.
To remove a device, enter:
vfxadmin device -x fax2
You can use thevfxstat -t command to verify that fax2 has been successfully removed by entering:
vfxstat -t
Setting a device to receive or not receive incoming faxes
By default, all fax devices are configured to answer incoming calls and therefore receive incoming faxes. You may
want to selectively turn this feature on and off so that some of your fax devices are configured as send-only or
receive-only.
To configure a device fax1 to not answer incoming calls and therefore not to receive incoming faxes, enter:
vfxadmin norecv fax1
Device fax1 now not receiving
To configure device fax1 to receive incoming faxes, enter:
vfxadmin recv fax1
Device fax1 now receiving
Setting a modem or Brooktrout board to detect DTMF
Dual Tone Multi-Frequency DTMF detection is supported for c2 modem FIMs (i.e. Class 2/2.0 fax modems) and for
bm FIMs (i.e. Dialogic Brooktrout TR1034 board). It is disabled by default. You can enable it by editing the
$VSIFAX/lib/vsisrv.ini file.
To turn on DTMF detection for modems, set the enable-did parameter to ON in the [DEVICE] section of
vsisrv.ini file.
To turn on DTMF detection for Brooktrout fax boards, set the dtmf-enable parameter to ON in the [DEVICE]
section of vsisrv.ini file. Three other parameters are available to configure DTMF detection on Brooktrout
boards:
92
BASIC FAX SERVER ADMINISTRATION
DTMF-digit-limit is used to set the maximum number of DTMF digits to detect,
DTMF-interdigit-timeout is used to set the time to wait between two digits,
DTMF-max-collect-time is used to set the time to wait for DTMF events.
See also
For details on these parameters, refer to Configuration Files in the Reference Addendum documentation.
Classes
VSI-FAX can use either a single physical device or a group of devices called a class. For example, a class could be a
group of devices dedicated to long distance calls, or a group of devices used only for high-volume fax requests. A
class can only contain physical devices; classes cannot contain other classes. However, any device can be included
in one or more classes.
When a fax is sent to a class, the fax will be routed to the first available modem.
Note
You must be logged in as root (Unix/Linux), Administrator (Windows), or user vsifax to change device or class
parameters.
Tip
Assign each existing device to a class, then use the class name as the default destination when sending a fax
from a program or script. This will allow you to add devices to this class in the future without having to rewrite your
program or script. Any new devices will be immediately available to service fax requests as soon as you add it to
the existing class.
Creating a new class
Note
You must be logged on as root (Unix/Linux), Administrator (Windows), or user vsifax to create a class. When
creating a class, you must restart the scheduler before the change will take effect.
Command line
A class is created when the first device is added to it with the vfxadmin class command. Use the same command
to add new devices to the class.
For example, to create a new class called sales and assign the fax1 device to it, enter:
vfxadmin class -a fax1 sales
The sales class is created, and the device fax1 is added to it.
Note
If the created class is not the default destination, you must specify it on the command line whenever you want to
use it.
To confirm that the new class was properly created, enter:
vfxstat -t
Removing a device from a class
Note
If a class has no device assigned to it, it is automatically removed from the database.
Command line
To remove device fax1 from class sales, enter:
vfxadmin class -r fax1 sales
93
INSTALLATION AND ADMINISTRATION GUIDE
To confirm that the device was successfully deleted, enter:
vfxstat -t
A message then displays confirming the device was successfully deleted.
Enabling and disabling devices and classes
Enabling or disabling a device is a very high-level decision. When you disable a device, you are essentially taking it
offline; it cannot send or receive any fax submissions until you re-enable it. This may be required if a phone line is out
of service or is needed for a purpose other than faxing.
If the device is accepting requests but is disabled, a request can be submitted and queued, but it will not be sent until
the device or class is re-enabled. You do not have to stop and restart the scheduler for the enable or disable
command to take effect.
Command line
To enable a device, enter:
vfxadmin enable <device>
You can confirm that the change has taken effect with the vfxstat -t command. If the device has been enabled,
the vfxstat -a output will show yes in the Ena column and Idle in the State column.
To disable a device, enter:
vfxadmin disable <device>
You can confirm that the change has taken effect with the vfxstat -t command. If the device has been disabled,
the vfxstat -t output will show dwn in the Ena column and Not Running in the State columns that correspond to
the newly disabled device.
Accepting and rejecting fax requests
Setting a device or class to accept or reject fax jobs is a way to fine-tune device operation.
Important
You must be logged on as root (Unix/Linux), Administrator (Windows), or user vsifax to change accept status.
When a device or class is added to the system, by default its status is accepting.
When changing a device or class accept status, you are not required to stop and restart the scheduler for the
command to take effect.
To set device fax2 to accept requests, enter:
vfxadmin accept fax2
To verify that fax2 is accepting, enter:
vfxstat -t
Thevfxadmin reject command is used to set a fax modem so it will reject outgoing fax requests but accept
incoming faxes. When changing reject status, you are not required to stop and restart the scheduler for the command
to take effect.
To reject fax requests (where the -r option specifies a reason), enter:
vfxadmin reject -r "inbound only" fax2
The -r option allows you to specify a reason the device is rejecting requests. A device that is not accepting requests
does not allow a fax request to be queued.
To verify that the device is rejecting requests, enter:
vfxstat -a
94
BASIC FAX SERVER ADMINISTRATION
System parameters
System parameters allow you to configure SMTP and POP3 connectivity as well as define global default settings for
any new devices added to your system.
Configuration file
System parameters are stored in the $VSIFAX/lib/vsisrv.ini file.
Company information
Company information provides a simple way to customize the default fax cover page templates so that your company
or organization's name and address information automatically appears on your faxes.
Configuration file
Company information is stored in the USERINFO section of the $VSIFAX/lib/vsisrv.ini file.
Server side archiving of sent jobs
To turn on server side archiving of fax jobs, set the flags in each users profile. The flags to set are sar and arc.
The sar flag cannot be set at the time a job is submitted, it can only be set on users, and it does not allow
resubmitting the archived faxes. It allows performing administrator-oriented archive.
The arc tag can be set when a job is submitted. The
vfx ... -t arc="true"command allows archiving the sent fax on the VSI-FAX server and access it from
VSI-FAX LanFax Windows Client. The fax can then be modified and resubmitted either from VSI-FAX LanFax
Windows Client or by issuing a vfxtry command.
To set the sar and arc tags on users profiles, the administrator can issue the command:
vfxadmin user -t arc=yes -t sar=yes <username>
on the fax server. They can also be set using the VSI-FAX Server Administration.
See also
For more details on the sar and arc tags, refer to Tag Reference in the Reference Addendum documentation.
95
Historical Logs
Historical Logs
Historical logs store detailed information about inbound and outbound faxes.
Important
The exact order of historical log tags is subject to change from release to release. Therefore, if you will be
evaluating historical logs via a script, it is best that you explicitly search for a particular tag name rather than use a
tag's current position in the log file. This will ensure that your scripts continue to work after product upgrades.
Outbound historical logs
Information about how outbound faxes were scheduled, sent and re-sent is stored in the ologgrp (for a group of
recipients), ologreg (for single recipient), and ologatt (fax attempts) databases. You can view this information using
the vfxolog command line utility or the VSI-FAX Server Administration plug-in.
If you use the vfxolog command line utility, the following information is displayed for each outbound fax:
Req-id
Unique fax request ID number.
Submitted
Actual transmission time displays in MM/DD HH:MM format. For example: 03/28 16:17
npg/nps
Number of pages in the fax (npg) and number of pages re-sent (nps). Normally, these two numbers
should be the same, indicating that all pages were successfully sent the first time. However, if a
problem occurred during transmission, VSI-FAX will automatically re-send the affected pages.
Clientid
VSI-FAX user who submitted the fax request.
Phone
number
Destination fax number.
Attmpt
Fax attempt status code. This is real-time status for the current fax attempt. Once the fax has been
successfully sent, this entry is blank. Entries will be one of the fax attempt status codes. Refer to
Command Reference in the Reference Addendum documentation for additional information.
Result
Final fax request status. Entries will be one of the fax request status codes. Refer to Command
Reference in the Reference Addendum documentation for additional information.
att
Attempt number. The total number of attempts to send each fax request is controlled by the retry
strategy See Retry Strategies.
An asterisk after the number indicates that this fax request is complete.
Tip
vfxolog typically only displays historical information for your outbound faxes. To view historical information for
all outbound faxes, log in as a user with fax administration privileges (e.g., user vsifax), then enter your vfxolog
command.
Inbound historical logs
Historical information about received (inbound) faxes is stored in the ilog database. You can view this information
using the vfxilog command line utility or the VSI-FAX Server Administration plug-in.
97
INSTALLATION AND ADMINISTRATION GUIDE
See also
For more information, refer to Microsoft Management Console (MMC).
If you use the vfxilog command line utility, the following information is displayed for each received fax:
Req ID
Unique fax request ID number.
Orig ID
The original ID number for this fax if it was routed from another user.
Clientid
The current owner of this fax. Unless you have administrative privileges, you will only see your faxes.
From
the TSI string of the sender, if it is a received fax, or the name of the person who routed it, if it is a routed
fax.
Route
time
The time the fax was received or routed.
pgs
The number of pages in the fax.
src
The source of this fax:
rcv means the fax was received
rte means the fax was routed
del
If the fax has been deleted, the reason the fax was deleted:
adl is auto delete
req is user request
fwd means the fax was forwarded
rnp means user RNP deleted it
DID
98
Display the Direct Inward Dial (DID) number for the fax.
Retry Strategies
Retry Strategies
Retry strategies are an important tool for managing the fax load on your server. A retry strategy defines the number of
times the fax server will try to re-send a fax and how long it will wait between each retry before the fax request is
permanently removed from the active fax queue.
When you send a fax, the retry strategy used for that fax request is either the default retry strategy or another
predefined retry strategy you explicitly assign to that fax request when you create the fax request or via your user
profile.
Basic retry strategies
VSI-FAX provides several basic retry strategies that are optimized for common fax scenarios (e.g., local faxing,
international faxing, etc.). You can also define custom retry strategies to meet your particular needs. This is
accomplished by manually editing the $VSIFAX/lib/retrys.lst file.
The default retrys.lst file, installed with your VSI-FAX server, defines the following basic retry strategies:
default:5,5,5,5
three-attempts:5,5
four-attempts:5,5,5
international:5,5,10,10,60,60,120
The first retry strategy (default), is used whenever no retry strategy is explicitly specified. This retry strategy
defines four retries, five minutes apart.
The three-attempts retry strategy defines two retries, five minutes apart. Notice that although this retry strategy
is named three-attempts that it contains only two entries. This is because these two retries, combined with the
initial send, constitutes three total attempts.
The four-attempts retry strategy is nearly identical to the three-attempts strategy except that an additional retry
is added for a total of four send attempts (i.e., the initial send and three retries) five minutes apart.
The international retry strategy is much more complex because successfully sending an international fax is
much more susceptible to failure. Notice that it defines seven total retries and that the intervals between the
retries gradually increase.
•
The assumption is that if the fax cannot be sent within the first 15 minutes (initial send and two retries,
five minutes apart) that there may be a problem with the international phone lines.
•
The next two retries are ten minutes apart. If the fax server gets this far into the international retry
strategy a total of 35 minutes has elapsed (15 minutes for the initial send and first two retries and 20
minutes for the third and fourth retries). At this point, it makes sense to let even more time elapse
before the fax server retries this fax.
•
The next two retries are an hour (60 minutes) apart. The final retry is two hours from the previous
retry. At this point, the fax server has tried to send the fax a total of eight times in four hours and 35
minutes.
Custom retry strategies
If you find that the basic retry strategies do not meet all your needs, you can easily define new retry strategies by
manually editing the $VSIFAX/lib/retrys.lst file.
Each retry strategy is defined on a separate line. The format of a retry strategy entry is:
99
INSTALLATION AND ADMINISTRATION GUIDE
name>:<minutes>,<minutes>, ...
Where <name > is a user-defined name for this strategy, and each <minutes> entry is one retry. The actual number
of minutes specified determines how long the fax server will wait before executing that retry.
Note
If a retry strategy is defined without any <minutes> entries, the fax server will interpret it as no retries (i.e., initial
send only).
Examples
To define a retry strategy called 24-hours that will re-send a fax nine times during a twenty-four period with
successively longer wait times, enter:
24-hours:5,10,15,30,60,120,120,360,720
To define a retry strategy with no re-sends (i.e., initial send only), enter:
no-retries:
100
Fax Routing
Fax Routing
There are three methods for routing received fax transmissions.
Print received faxes on a centrally located printer and manually hand deliver them to the recipients
Automatically or manually route received faxes to each user's fax box directory
Automatically or manually route received faxes to email addresses
Note
By default, received faxes are routed to the VSI-FAX administrator's fax queue, $VSIFAX/faxq/vsifax.
Specifying a fax box
A received fax is always placed in a fax box, which is either the default fax box for that device or class, or a user fax
box specified by Direct Inward Dial (DID) or Dual Tone Multi-Frequency (DTMF) routing. If a fax box is not specified
for a device, vsifax is the default fax box.
See also
For more information on fax routing, refer to Routing received faxes.
To learn how to assign a DID or DTMF extension to a user, refer to Assigning a DID or DTMF extension to a user.
To learn how to turn on DTMF detection for modems or fax boards, refer to Setting a modem or Brooktrout board to
detect DTMF.
Command line
The vfxadmin device command is used to specify a fax box for a device.
To assign a fax box to a fax device, enter:
vfxadmin device -u -b <user> device
For example, to assign device fax2 to store its received faxes in the sales fax box enter:
vfxadmin device -u -b sales fax2
To assign a fax box called legal to a fax device called fax1, so that any faxes received on fax1 will automatically be
routed to legal, enter:
vfxadmin device -u -b legal fax1
Note
The previous example assumes that the legal fax box has been previously created and that fax1 is a valid device.
Departmental routing
Often, faxes need to be routed for an entire department rather than for an individual user. To do this, you must create
a department in the fax server user database.
Command line
To create a department for general fax distribution, enter:
101
INSTALLATION AND ADMINISTRATION GUIDE
vfxadmin user -d -n "<descriptive_name>" <dept_name>
For example, to create a department called custs for general fax distribution, with the descriptive name Customer
Service, enter:
vfxadmin user -d -n "Customer Service" custs
Note
If you omit the -L option from the vfxadmin user command, the department will not be licensed.
After adding to the user database you can confirm the addition by entering:
vfxadmin user -l
102
Dial String Conversion
Dial String Conversion
"What you see is what you get" is rarely true for telephone numbers. Almost without thinking we include dashes,
spaces and parentheses in typed and written telephone numbers. When we manually dial a telephone number,
however, we know that we must remove these extra characters.
When entering a fax telephone number into a VSI-FAX client program, users will often use unneeded characters such
as dashes, leave out characters that may be required to access long distance or an outside line, etc. Because of this,
the VSI-FAX software must analyze each fax request to determine the exact telephone number the modem needs to
dial. The process of analyzing and modifying an entered telephone number by VSI-FAX is called dial string
conversion.
Dial string conversion is performed by the FIM. Using information in the vsisrv.ini file and the dialcvt.lst file,
or an optional user-defined conversion program, the dial string conversion process evaluates the dial string. Then
based on whether it is internal, local, long distance, or international, it determines whether extraneous characters
exist, decides whether long-distance carrier access code should be used, and adds or subtracts characters as
needed. This section explains what dial string conversion options are available in VSI-FAX and how to use each
option.
Preliminary dial string conversion
If VSI-FAX is interfaced with another application program that performs the dial string conversion, you can disable the
VSI-FAX dial string conversion function by setting DialConvert to off in the $VSIFAX/lib/vsisrv.ini file.
However, steps 2 through 4 will be performed on all dial strings, even if DialConvert is set to off in the vsisrv.ini file.
If the DialcvtProgram entry in the vsisrv.ini file is set to a program name, the dial string conversion will be performed
by that program. None of the other dial string conversions described here will take place. If the DialcvtProgram entry
is blank, the following dial string conversion will be performed:
1. Any dial string that contains an @ followed by an Internet domain name will be passed to the SendMail FIM
and be sent by email.
2. All dashes, spaces, periods and left and right parentheses are removed from the dial string.
3. Any dial string that begins with # will be stripped of the leading # but will not be processed any further by the
dial string conversion function.
4. Any characters following an @ character will be processed as a post dial string. When a post dial string is
encountered, the modem will wait for five seconds of silence before dialing the characters. Note that this does
not affect an email address, which will have been passed to the SendMail FIM and will therefore not reach this
stage of processing.
5. Any characters following a comma, @, W, or ! will be treated as a separate dial sequence. (As in step 4
above, email addresses are not affected.)
6. Any characters contained within square brackets [ ] will be considered to be a credit card number. No
conversion will be performed on these characters and they will not be used by the dial string conversion
function to categorize the call as internal, international, etc. The brackets, however, will be removed.
7. If the dial string begins with the value of the IntlAccess entry (international access code) in the
vsisrv.ini file, no further dial string conversion will be performed.
103
INSTALLATION AND ADMINISTRATION GUIDE
Intermediate dial string conversion
The next part of dial string conversion involves categorizing it as internal, local, long distance, or international based
on the dial string variables stored in the $VSIFAX/lib/vsisrv.ini file.
Note
By default, the dial string variables are set to normal U.S. telephone requirements. If your local telephone system
does not follow U.S. standards, reset these values.
Dial string variables are stored in the DEVICE section of the vsisrv.ini. server configuration file. The fax
administrator should determine the appropriate settings for the dial string variables and edit the
$VSIFAX/lib/vsisrv.ini file in the $VSIFAX/lib directory, as needed.
The dial string variables in the vsisrv.ini file are:
Entry
Default
area-code
Description
Area code for the phone line used by this device.
countrycode
1
The country code for the phone line used by this device.
dialconvert
ON
Set OFF to disable any dial string conversion.
dial-cvtprogram
The name of an external program that will output to standard output the results of its
conversion. Its output is used to create the converted dial string. This program is called with
the following arguments:
-p <prefix> Dial <prefix>, if defined.
-s <suffix> Dial <suffix>, if defined.
-a <code> Area <code>, if defined.
<number> Dial string to convert.
dial-prefix
A prefix, such as "9", or "8," to be prepended to a dial string before sending. This is usually
used to access outside lines.
dial-suffix
intl-access
Suffix appended to a dial string before sending.
011
The dial prefix needed to make international calls.
intl-prefix
An alternate prefix (instead of LongDistPrefix) for dialing an international call.
intl-suffix
An alternate suffix for dialing an international call.
local-numlen
7
The number of digits in the local number for the phone line used by this device.
long-distaccess
1
Dial string needed to make long distance calls.
long-distprefix
Prefix prepended to a dial string (instead of DialPrefix) if the number is determined to be a
long distance number. This is usually used for phone systems that use access codes for long
distance calls.
long-distsuffix
Suffix appended to a dial string (but before DialSuffix) if the number is determined to be a
long distance number. This is usually used for phone systems that use account numbers for
toll calls.
Assuming that D is the number of digits in the dial string, the following logic is used to determine whether it
represents an internal, local, long distance, or international number:
If D < LocalNumLen, then the dial string is an internal telephone extension.
If D = LocalNumLen, then the dial string is a local telephone number.
If LocalNumLen < D < LocalNumLen + AreaCode, then the dial string is a long distance telephone number.
104
DIAL STRING CONVERSION
If LocalNumLen + AreaCode < D, then the dial string is an international telephone number, except if the dial
string is in a long distance access format.
Once it is determined which type of telephone number the dial string represents, dial string variables are prepended
or appended to the dial string as shown on this chart.
Long Dist
Prefix
Dial
Prefix
Intl
Prefix
Intl
Access
LongDist
Access
Dial
String
Dial
Suffix
Intl
Suffix
Long Dist
Suffix
Intl.
X
Loc.
X
X
X
X
X
Non-Loc.
Intl.
X
X
For example, if the dial string is determined to be a long distance number, the dial string conversion function will
prepend the values of LongDistPrefix and LongDistAccess to it and append the value of LongDistSuffix to
it.
Final dial string conversion
In addition to the dial string conversion described so far in the section, supplementary dial string conversion can be
performed by using the dialcvt.lst file. The purpose of the dialcvt.lst file is to accommodate the dynamic
telephone service standards being supplied by providers in theUnited States. Although these additional dial string
conversion features were developed to meet the needs of VSI-FAX users in the United States and the different levels
of phone service available from providers in different U.S. states, they may also be appropriate for use by any users
in similar environments.
Use of the dialcvt.lst file is optional. As installed, the dialcvt.lst file is located in the $VSIFAX/lib
directory. It contains sample entries that have been commented out and are therefore not active. To make use of the
special dial string conversion features that can be implemented with the dialcvt.lst file, edit this ASCII file with a
standard text editor.
Legacy dial string conversion
In versions of VSI-FAX before version 5.1, there was a custom dialstring conversion file, dialcode.lst, located in
the $VSIFAX/lib directory. It is still supported in the current version of VSI-FAX, although the conversion settings in
this file will be ignored if there are any settings in the new dialcvt.lst file.
If you plan to convert your dialstring converstion settings from the old dialcode.lst file to the new dialcvt.lst
dialstring conversion file, please note that use of an externally-supplied conversion routine and the ability to specify
whether to exit the routine immediately upon a match are not supported in the new conversion method.
Testing your dial string conversion
Esker provides a dial string conversion testing program called vdialcvt. You can use this program to test your dial
string conversion setup and determine whether it is correct.
Once you have configured the variables in vsisrv.ini to perform the desired dial string conversion, test the
conversion of several sample dial strings with vdialcvt.
Note
Your exact and complete dial string conversion setup is emulated by vdialcvt, including both the vsisrv.ini
settings and any entries in the dialcvt.lst file. If DialConvert is set to off in the vsisrv.ini file, any dial strings
input to vdialcvt will remain unconverted. If DialcvtProgram is set to a custom program name in the vsisrv.ini
file, vdialcvt will run that program.
105
INSTALLATION AND ADMINISTRATION GUIDE
Custom dial string conversion
All dial string conversion can be disabled by setting the DialConvert option off in the vsisrv.ini file.
If you prefer not to convert dial strings with any of the functions provided with the VSI-FAX software, you can write
your own dial string conversion program. If DialcvtProgram is set to this program name in the vsisrv.ini file,
the dial string conversion function, provided by VSI-FAX, will be completely disabled.
Individual users can specify a prefix and suffix that will be used in the conversion of any dial strings in any fax request
from that user. This prefix and suffix can be used for user-specific information such a credit card number or account
number. The individual prefix and suffix can be set either through one of the VSI-FAX user interface programs or by
editing the user's vsifax.ini file, located in the user's $HOME/.vsifax directory on the fax server.
These are sample entries in the vsifax.ini file, specifying individual Prefix and Suffix settings:
[SENDPARAMS]
Prefix=
Suff ix=1234
106
Event Notify Procedures
Event Notify Procedures
Event notify procedures are an advanced VSI-FAX customization/integration topic. You may skip this section if you
are not interested in customizing event notifications.
Event notify procedures are scripts that trigger various system actions whenever certain events take place. This
entire notification mechanism is designed to be open and easily customized so that you can optimize each VSI-FAX
system to your particular needs.
This section begins with a general functional overview of event notify procedures. Flow diagrams show the various
notification points in the system and the various notify procedures run at each of these points. Immediately following
the functional overview is detailed information about how to write your own custom notify procedures.
Functional overview
At each different notification point in the system, VSI-FAX executes a hierarchy of notify procedures as shown in this
figure:
System notify procedures
System notify procedures are always performed first and automatically. Furthermore, although these scripts are found
in the VSI-FAX directory structure, they are not intended to be modified. If you do modify these system notify scripts,
you will lose your modifications the next time you upgrade your VSI-FAX system.
Site notify procedures
If they exist, site notify procedures are performed after system notify procedures but before any user or device notify
procedures. Site notify procedures are used to customize a particular notification point on a site-wide basis.
Site notify procedures are not supplied with the default VSI-FAX system-you must create them if you want to use
them, preventing unnecessary processing by the fax server.
See also
Refer to Custom notify procedures for additional information.
107
INSTALLATION AND ADMINISTRATION GUIDE
User and device notify procedures
If they exist, user and device notify procedures provide an additional level of granularity and power. Instead of being
limited to customizing a particular notification point for an entire site, you can also customize it on a user-by-user or
device-by-device basis for sent and received faxes, respectively.
As with site notify procedures, user and device are not supplied with the default VSI-FAX system-you must create
them if you want to use them.
See also
Refer to Custom notify procedures for additional information.
Send notification
The send notification mechanism is specialized for two basic scenarios:
Normal (non-group) faxing
Group faxing
This specialization is required because each group fax is split up into individual fax requests by the scheduler, one
fax request for each recipient in the group. Normal (non-group) faxes use a single fax request for the entire fax job.
This figure shows the notification mechanism for normal sent faxes:
Launch notify procedures (LNPs)
Immediately after a fax is submitted to the system, one or more Launch Notify Procedures (LNPs) are run. LNPs run
before the fax is sent to the scheduler (before any fax attempts are initiated).
Notice that this area of the diagram illustrates the hierarchical behavior that is typical of all notify points in the system:
The system LNP is always run without decision (automatically).
108
EVENT NOTIFY PROCEDURES
Next, the system looks for a site LNP. If it finds one, it runs it.
Similarly, the system checks the fax command for a user LNP. If a user LNP was specified, the system runs it.
Note
User LNPs must be specified on a fax-by-fax basis. This is typically done via the -t lnp=<LNP_file> tag.
Similar vfx tags are also provided for other user notify procedures.
See also
Refer to Tag Reference in the Reference Addendum documentation for additional information about using vfx tags
to run user notify procedures.
The LNP notification point is the same for both normal (non-group) and group faxes.
Transmit notify procedures (TNPs)
Transmit Notify Procedures (TNPs) are typically only run for normal (non-group) faxes. As the Normal (Non-Group)
Send Notification Flow Diagram shows, they are run after each fax attempt until the fax job is done. Again, note the
hierarchical behavior: the system TNP is automatically run and if the system finds site or user TNPs, it runs them in
that order.
Look at the final decision block, Fax Done? This can mean one of two things:
The fax was successfully sent.
The maximum number of retries was attempted but the fax was not successfully sent.
Notice also that if the fax job is not done, that it returns to the scheduler for a retry. This loop continues until the fax is
successfully sent or until the maximum number of retries has been attempted (regardless of outcome).
For this reason, most site and user TNPs contain logic that generates one response for a successful fax attempt (i.e.,
fax job completes successfully), another response for an unsuccessful fax attempt and yet another response for a fax
job completing unsuccessfully.
This figure shows the notification mechanism for group sent faxes:
109
INSTALLATION AND ADMINISTRATION GUIDE
The first part of this flow diagram is identical to the normal (non-group) fax send flow diagram. Immediately after a fax
is submitted to the system, the system LNP is automatically run and if the system finds site or user LNPs, it runs them
in that order.
When a group fax reaches the Schedule Fax Attempt block, it is split into individual fax requests, one for each
recipient in the group. From this point forward, the notification mechanism for group faxes is different than the
mechanism for normal (non-group) faxes. The criterion for the Fax Done decision block is whether or not every fax in
the group fax job has either reached the maximum number of retries or been successfully sent.
Notice that the TNP blocks are shown in dashed lines. This is because the default behavior is to not run TNPs
against group fax jobs. The reason for this is that most TNPs email status for all failed fax attempts and a large group
job could generate lots of email. However, you can configure your fax server to run TNPs against group fax jobs by
adding the following setting to the VFXSCHED section of the $VSIFAX/lib/vsisrv.ini file:
group-tnp = YES
Group notify procedures (GNPs)
Group Notify Procedures (GNPs) are only run once after the entire fax job is done (not after each fax attempt). In
other words, this notification point can only provide notification for the entire group fax job (successful or
unsuccessful), it cannot provide notification of each individual fax attempt.
Receive notification
This figure shows the notification mechanism for received faxes:
110
EVENT NOTIFY PROCEDURES
As you can see from the flow diagram, the receive notification mechanism is much simpler than either of the send
notification mechanisms. The receive notification mechanism features a single notification point and is not iterative.
Note
When a fax is routed to a user, any RNP specified in that user's profile will be run.
Immediately after a fax is received by the system, the system Receive Notify Procedures (RNP) is automatically run
and if the system finds site or device RNPs, it runs them in that order.
Receive notify procedures (RNPs)
Receive Notify Procedures (RNPs) are very similar to other notify procedures. The primary difference is that while the
send notification mechanism provides a user level of execution (for customizing a notification point on a user-by-user
basis), the receive notification mechanism implements a device level of execution (for customizing a notification point
on a device-by-device basis).
This is done because when a fax is received, the system does not necessarily know which VSI-FAX user the fax is
intended for. However, the system always knows which device answered the telephone call and received the fax.
Another major difference between user notify procedures and device RNPs is that while user notify procedures are
embedded in the vfx (send fax) command and must be specified for each fax request (they are not permanent),
device RNPs are assigned to each device via the vfxadmin device -P <RNP> command and this assignment is
permanent.
Start, stop, and fail notification
Two special notify procedures, sys-start and sys-stop, provide notification whenever the scheduler is started or
stopped, respectively. A third notification procedure, sys-devfail, provides notification any time a physical fax
device fails. A fourth notification procedure, sys-autofail, provides notification anytime a request in an autosend
directory fails.
These notification mechanisms are much simpler than send and receive notifications. Only the system notify
procedures, mentioned in the previous paragraph, can be run. Site, user, and device notify procedures are not
available.
The sys-start, sys-stop,and sys-devfail notify procedures are not provided with the default VSI-FAX
installation. You must create them according the guidelines described in Custom notify procedures and place them in
the $VSIFAX/lib/enp directory.
Refer to these topics for additional information and sample scripts:
Custom notify procedures
Start and stop notify procedures (Tcl)
Fail notify procedures
111
INSTALLATION AND ADMINISTRATION GUIDE
Custom notify procedures
Event notify procedures are typically Tool Command Language (Tcl) or shell scripts run by the scheduler at a
particular notification point.
All notify procedures must be located in the $VSIFAX/lib/enp directory. This directory is the only place the fax
server looks for notify procedures. In addition to any site, user, or device notify procedures you place there, this
directory also contains the system LNP, TNP, GNP, and RNP scripts (lnp-system, tnp-system, gnpsystem,and rnp-system).
Important
Esker strongly recommends that you do not modify the system LNP, TNP, GNP, and RNP scripts (lnp-system,
tnp-system, gnp-system,and rnp-system). Improper modifications can cause unpredictable system
behavior. Furthermore, any modifications to these scripts will be lost the next time you upgrade your VSI-FAX
system.
Notify procedures are named as follows:
<type>-<name>.<ext>
Where <type> is lnp, tnp, gnp, rnp, or sys ; <name> is a short descriptive name for the notify procedure
and <ext> is tcl, sh or other file extension associated with a command interpreter in the notify.lst file.
The following rules apply to <ext> in the naming convention:
If there is no extension, it is assumed to be a simple executable.
If the extension is .sh, the script is run using the shell interpreter.
If the extension is .tcl, the script is run using the Tcl interpreter.
Note
VSI-FAX installs a Tcl interpreter with all fax server installations. Therefore, Tcl scripts will run on all supported
platforms (Unix, Linux and Windows). However, shell scripts normally only run on Unix and Linux. If you want to
run shell scripts on Windows, you must install a third-party shell interpreter, such as MKS Toolkit.
If the extension is anything else, the fax server looks in the $VSIFAX/lib/notify.lst file for information
about how to process this file.
For example, in order for the fax server to run tnp-site.zz, there must be a line in notify.lst like:
"zz; /<interpreter>/zz"
Where zz is an alias in the notify.lst file that points to the full path and file name of the command
<interpreter> you want to use for that file extension.
Associating a device rnp script with a fax destination
To associate a device rnp script with a fax destination, enter the following:
vfxadmin device -u -P <partofscriptname> <faxdestination>
If the name of the script is rnp-hello.tcl and the fax destination name is fax1, you can use the following
command to associate the script with the fax1 destination:
vfxadmin device -u -P hello fax1
Editing notify.lst to run batch files
Add the following entry to notify.lst to configure VSI-FAX to run batch files:
bat;cmd.exe
Launch notify procedures (LNPs)
Site or user LNPs can be used to archive faxes, transmit accounting codes, or for fax request control.
112
EVENT NOTIFY PROCEDURES
When an LNP is run, the fax request file will always be available to the procedure. This file is
$VSIFAX/spool/temp/f-$REQID.tif for a regular request or $VSIFAX/spool/temp/gf-$GRPID.tif for a
group request.
Syntax
Site and user LNPs are called directly from the system LNP, which passes the following arguments to the site and
user LNPs:
$1 Unique request-ID for this fax. Value is zero (0) for group fax requests.
$2 VSI-FAX user ID who submitted the fax request.
$3 Notification email address specified by the sender.
$4 Time this fax attempt was submitted.
$5
Notification mode specified by the sender. Values are:
none Never notify
ok Notify on success
fail Notify on failure
both Always notify
each Notify on each attempt
$6 Unique group fax request ID. Value is zero (0) for normal (non-group) fax requests.
$7 If a normal (non-group) fax, total number of pages in this fax request (including cover pages). If a group fax,
number of recipients in the group.
$8 Recipient's fax number. Value is a null string ("") for group faxes.
$9 Flag indicating whether Least Cost Routing (LCR) is enabled (1) or disabled (0).
Examples
This shell script archives all regular fax requests to the /usr/fax/archive/reg directory and archives all group
requests to the /usr/fax/archive/grp directory:
#!/bin/sh
# lnp-site.sh
REG_DIR=/usr/fax/archive/reg
GRP_DIR=/usr/fax/archive/grp
REQID=$1
GRPID=$6
if [ $GRPID -eq 0 ]
then
FILE=$VSIFAX/spool/temp/f-$REQID.tif
cp $FILE $REG_DIR/$REQID.tif
else
FILE=$VSIFAX/spool/temp/gf-$GRPID.tif
cp $FILE $GRP_DIR/$GRPID.tif
fi
exit 0
113
INSTALLATION AND ADMINISTRATION GUIDE
This shell script limits any group request to a maximum of 100 members:
#!/bin/sh
# lnp-site.sh
GRPID=$6
NUM=$7
if [ $GRPID -ne 0 ]
then
if [ $NUM -gt 100 ]
then
MAILADDR=$3
echo "Group job GRPID terminated:" \
"too many members" |
mail $MAILADDR
exit 1
fi
fi
exit 0
Transmit notify procedures (TNPs)
TNPs are often used for accounting or user notification of fax request status. Although the file associated with a
request may not be available when a TNP is run, the log file entry for that fax request is available.
Syntax
Site and user TNPs are called directly from the system TNP, which passes the following arguments to the site and
user TNPs:
$1
Unique request-ID for this fax.
$2
VSI-FAX user ID who submitted the fax request.
$3
Notification email address specified by the sender.
$4
Time this fax attempt was submitted.
$5
Notification mode specified by the sender. Values are:
none Never notify
ok Notify on success
fail Notify on failure
both Always notify
each Notify on each attempt
$6
Unique group fax request ID. Value is zero (0) for normal (non-group) fax requests.
$7
Total number of pages in this fax request, including cover pages.
$8
Recipient's fax number.
Fax attempt status code, in string format.
$10 Result status of this request.
$11 Attempt number. Zero (0) if fax request was canceled or otherwise failed during submission.
$9
$12 Flag indicating whether the fax request is complete (TRUE) or not complete (FALSE).
114
EVENT NOTIFY PROCEDURES
Examples
This shell script logs all fax attempts that actually use phone time to an accounting file. The script assumes that all
users put an account number in thetg1 user tag.
#!/bin/sh
# tnp-site.sh
REQID=$1
eval `$VSIFAX/lbin/vfaxreq -F eval $REQID`
if [ $nat -gt 0 ] # nat is >0 if an attempt was made
then
ACCFILE=/usr/vsifax/fax.log
# accountno:request-id:time:elapsed:phonenum
echo "$tg1:$req:$stm:$ela:$tfn" >>$ACCFILE
fi
exit 0
Group notify procedures (GNPs)
Syntax
Site and user GNPs are called directly from the system GNP. The system GNP passes the following arguments to the
site and user GNPs:
$1
Unique request-ID for this fax. Same as Group-ID.
$2
VSI-FAX user ID who submitted the fax request.
$3
Notification email address specified by the sender.
$4
Time this fax attempt was submitted.
Notification mode specified by the sender. Values are:
$5
none Never notify
ok Notify on success
fail Notify on failure
both Always notify
each Notify on each attempt
$6
Unique group fax request ID. Same as Request-ID
$7
Total number of recipients (members) in this group.
$8
Total number of recipient (member) faxes successfully sent.
$9
Total number of recipient (member) faxes that failed.
$10 Any user GNP specified.
Examples
This shell script generates a verbose log file for a group fax job:
#!/bin/sh
# gnp-site.sh
#
REQID="$1"
CLIENTID="$2"
MAILADDR="$3"
115
INSTALLATION AND ADMINISTRATION GUIDE
SENDTIME="$4"
NOTIFY="$5"
GRPID="$6"
NUM_MEMS="$7"
NUM_SENT="$8"
NUM_FAIL="$9"
shift
USER_GNP="$9"
# ------------------------------------------------------# generate a status log for the entire group, and write to file
"$VSIFAX/bin/vfxstat" g-$GRPID > /tmp/GroupFax.log
echo "------------------------- --------------------" >> /tmp/GroupFax.log
echo " " >> /tmp/GroupFax.log
"$VSIFAX/bin/vfxolog" -t gse=$GRPID >> /tmp/GroupFax.log
exit 0
Receive notify procedures (RNPs)
Syntax
Site and device RNPs are called directly from the system RNP, which passes the following arguments to the site and
user GNPs:
Tip
If you require additional information not present in these parameters, thevfxilog command can be used to
access other information about this fax request from the inbound fax log database.
$1 Full path and file name of the received fax file.
$2 Name of the fax device or class that received this fax.
$3 Inbox specified for this device or class or the VSI-FAX user who will receive the routed fax.
$4
Status of the fax. This controls RNP behavior. Values are:
received Run this RNP as soon as a fax is received
(prior to routing)
routed Run this RNP whenever a fax is routed to
a user.
Examples
This shell script automatically removes the header line from received faxes:
# rnp-clrhdr.sh
FILE=$1
vtifftool clear -c -o $FILE $FILE
exit 0
To associate a device rnp script with a fax destination, use the following syntax:
vfxadmin device -u -P <partofscriptname> <faxdestination>
Start and stop notify procedures (Tcl)
Syntax
These arguments are passed to sys-start and sys-stop.
116
EVENT NOTIFY PROCEDURES
$1 is the Numerical Process ID (PID) of the scheduler.
Tip
If the sys-start script exits with a non-zero exit code, the server will shut down. This allows you to make special
checks and ensure that the server will not run unless your criteria are met.
Examples for Unix and Linux platforms
The following sample scripts run on Unix and Linux platforms only (not on Windows platforms).
Below is a sample start Tcl script (sys-start.tcl) that logs each time the fax server is started and what numerical
process ID (PID) is assigned to it:
# Filename: sys-start.tcl
# Description: script that is run startup of the fax scheduler.
#--------------------------------------------------global argv argc env
#--------------------------------------------------# Get all arguments and setup environment
set PID [lindex $argv 0 ]
set f [open $VSIFAX/spool/logs/sys-start.log a+]
#--------------------------------------------------# Update log file
puts $f "The fax scheduler was started at: "
puts $f "The process ID is $PID"
exit 0
This is a sample start shell script (sys-start.sh) that logs each time the fax server is started and what numerical
process ID (PID) is assigned to it:
#!/bin/sh
#
# Filename: sys-start.sh
# Description: Script that is run at startup of the fax scheduler
# ----------------------------------------------------# Get arguments
PID="$1"
LOG="$VSIFAX/spool/logs/sys-start.log"
# ----------------------------------------------------# Update log file
echo "The fax scheduler was started at: `date`" > $LOG
echo "The process ID is $PID" > $LOG
# ----------------------------------------------------#
exit 0
Below is a sample stop Tcl script (sys-stop.tcl) that sends an email message to [email protected] every time
the fax server is stopped:
#
# Filename: sys-stop.tcl
# Description: script that is at shutdown of scheduler
#--------------------------------------------------global argv argc env
#--------------------------------------------------# Get all arguments and setup environment
set PID [lindex $argv 0 ]
set VSIFAX $env(VSIFAX)
set EMAIL "[email protected]"
set SUBJECT "Warning from Esker"
set TMP_DIR "$VSIFAX/spool/temp"
set f [open $VSIFAX/spool/logs/sys-stop.log w]
117
INSTALLATION AND ADMINISTRATION GUIDE
#--------------------------------------------------#
# Update log file
puts $f "The fax scheduler was stopped"
# Email notification to specified mail address
catch { [ exec "$VSIFAX/lbin/vmime -t \
-o$VSIFAX/spool/temp/stopwarn \
$VSIFAX/spool/logs/sys-stop.log" ] }
catch { [ exec "$VSIFAX/lbin/vmail" "$EMAIL" \
"$VSIFAX/spool/temp/stopwarn" ] }
#
exit 0
Below is a sample stop shell script (sys-stop.sh) that sends an email message to [email protected] every time
the fax server is stopped:
#!/bin/sh
#
# Filename: sys-stop.sh
# Description: script that is run at shutdown of scheduler
#------------------------------------------------------# Get arguments
PID="$1"
LOG="$VSIFAX/spool/logs/sys-stop.log"
EMAIL="[email protected]"
SUBJECT="Warning from Esker"
# -----------------------------------------------------# Update log file
echo "The fax scheduler was stopped at: `date`" > $LOG
# Email notification to specified mail address
$VSIFAX/lbin/vmime -t -s "$SUBJECT" \
-o $VSIFAX/spool/temp/stopwarn \
$VSIFAX/spool/logs/sys-stop.log
$VSIFAX/lbin/vmail $EMAIL $VSIFAX/spool/temp/stopwarn
rm $VSIFAX/spool/temp/stopwarn
# -----------------------------------------------------#
exit 0
Examples for Windows platforms
The following sample scripts run on Windows platforms only (not on Unix and Linux platforms).
Below is a sample start Tcl script (sys-start.tcl) that is called when the VSI-FAX server starts. It logs the start
time in %VSI-FAX%/spool/logs/sysstart and sends an email to an administrator.
#-------------------------------------------------------# sys-start.tcl
# VSI-FAX scheduler start notification for Windows
#-------------------------------------------------------#-------------------------------------------------------# Get all arguments and setup environment
#-------------------------------------------------------global argv env
set PID [lindex $argv 0]
set VSIFAX $env(VSIFAX)
set TIMESTAMP [ clock format [ clock seconds ] -format {%Y/%m/%d %H:%M:%S} ]
set ERROR "VSI-FAX scheduler \[$PID\] started"
set EMAIL [email protected]
#------------------------------------------------------# Update log file
#------------------------------------------------------set f [ open $VSIFAX\\spool\\logs\\sysstart a+ ]
118
EVENT NOTIFY PROCEDURES
puts $f "$TIMESTAMP $ERROR"
close $f
#------------------------------------------------------# Create email file
#------------------------------------------------------set g [ open $VSIFAX\\spool\\temp\\sysstart w+ ]
puts $g "$TIMESTAMP $ERROR"
close $g
#------------------------------------------------------# Email notification to specified mail address
#------------------------------------------------------exec "$VSIFAX\\lbin\\vmime" -t -s $ERROR "$VSIFAX\\spool\\temp\\sysstart" | \
"$VSIFAX\\lbin\\vmail" -R $EMAIL $EMAIL
file delete "$VSIFAX\\spool\\temp\\sysstart"
exit 0
Below is a sample stop Tcl script (sys-stop-tcl) that is called when the VSI-FAX server stops. It logs the stoptime
in %VSI-FAX%/spool/logs/sysstop and sends an email to an administrator.
#-------------------------------------------------------# sys-stop.tcl
# VSI-FAX scheduler stop notification for Windows
#-------------------------------------------------------#-------------------------------------------------------# Get all arguments and setup environment
#-------------------------------------------------------global argv env
set PID [lindex $argv 0]
set VSIFAX $env(VSIFAX)
set TIMESTAMP [ clock format [ clock seconds ] -format {%Y/%m/%d %H:%M:%S} ]
set ERROR "VSI-FAX scheduler \[$PID\] stopped"
set EMAIL [email protected]
#-------------------------------------------------------# Update log file
#-------------------------------------------------------set f [ open $VSIFAX\\spool\\logs\\sysstop a+ ]
puts $f "$TIMESTAMP $ERROR"
close $f
#-------------------------------------------------------# Create email file
#-------------------------------------------------------set g [ open $VSIFAX\\spool\\temp\\sysstop w+ ]
puts $g "$TIMESTAMP $ERROR"
close $g
#------------------------------------------------------# Email notification to specified mail address
#------------------------------------------------------exec "$VSIFAX\\lbin\\vmime" -t -s $ERROR "$VSIFAX\\spool\\temp\\sysstop" | \
"$VSIFAX\\lbin\\vmail" -R $EMAIL $EMAIL
file delete "$VSIFAX\\spool\\temp\\sysstop"
exit 0
Fail notify procedures
Syntax
119
INSTALLATION AND ADMINISTRATION GUIDE
These arguments are passed to sys-devfail :
$1 Device name.
$2 Reason for the failure.
Example for Unix and Linux platforms
The following samples run on Unix and Linux platforms only (not on Windows platforms).
Below is a sample device fail Tcl script (sys-devfail.tcl) that automatically re-enables any failed device and
records the incident to a log file:
# Tcl script that runs when a fax device has failed.
#--------------------------------------------------global argv argc env
#--------------------------------------------------# Get all arguments and setup environment
set DEVICE [lindex $argv 0 ]
set REASON [lindex $argv 1 ]
set VSIFAX $env(VSIFAX)
set TMP_DIR "$VSIFAX/spool/temp"
set f [open $VSIFAX/spool/logs/devfail.log a+]
#--------------------------------------------------#
# Update log file
puts $f "Device $DEVICE failed due to $REASON"
exit 0
Below is a sample device fail shell script (sys-devfail.sh) that automatically re-enables any failed device and
records the incident to a log file:
#!/bin/sh
# Description:
# ----------------------------------------------------#exec > $VSIFAX/spool/logs/sysdev.log ; set -x
#-----------------------------------------------------# Get arguments
DEST=$1
CAUSE=$2
LOG="$VSIFAX/spool/logs/devfail.log"
#
# Update log file
echo "Device $DEST was restarted due to $CAUSE" >> $LOG
#
exit 0
Example for Windows platforms
Below is a sample device fail Tcl script (sys-devfail.tcl) that runs only on Windows platforms (not on Unix
and Linux platforms). It is called when a fax device goes down (for instance, after having encountered too many
errors). It logs the device failure and the failure reason in %VSI-FAX%/spool/logs/devfail, it sends a notification email
to an administrator and it re-enables the device.
#-------------------------------------------------------# sys-devfail.tcl
# VSI-FAX Device failure notification and restart for Windows
#-------------------------------------------------------#-------------------------------------------------------# Get all arguments and setup environment
#-------------------------------------------------------global argv env
120
EVENT NOTIFY PROCEDURES
set
set
set
set
set
set
DEVICE [lindex $argv 0]
REASON [lindex $argv 1]
VSIFAX $env(VSIFAX)
TIMESTAMP [ clock format [ clock seconds ] -format {%Y/%m/%d %H:%M:%S} ]
ERROR "Device $DEVICE failed: $REASON"
EMAIL [email protected]
#------------------------------------------------------# Update log file
#------------------------------------------------------set f [ open $VSIFAX\\spool\\logs\\devfail a+ ]
puts $f "$TIMESTAMP $ERROR"
close $f
#------------------------------------------------------# Create email file
#------------------------------------------------------set g [ open $VSIFAX\\spool\\temp\\devfail w+ ]
puts $g "$TIMESTAMP $ERROR"
close $g
#------------------------------------------------------# Email notification to specified mail address
#------------------------------------------------------exec "$VSIFAX\\lbin\\vmime" -t -s $ERROR "$VSIFAX\\spool\\temp\\devfail" | \
"$VSIFAX\\lbin\\vmail" -R $EMAIL $EMAIL
file delete "$VSIFAX\\spool\\temp\\devfail"
#-------------------------------------------------------# Issue command to re-enable fax device
#------------------------------------------------------exec "$VSIFAX\\bin\\vfxadmin" disable $DEVICE
exec "$VSIFAX\\bin\\vfxadmin" enable $DEVICE
exit 0
User-change notification script
Syntax
The sys-usrchg procedure processes changes in the user database. These arguments are passed to sys-usrchg
:
$1
ClientID changed
$2 Type of change (add, delete, or update)
Example for Unix and Linux platforms
The shell script below runs on Unix and Linux platforms only (not on Windows platforms).
This sample sends an email notification whenever the user database is changed:
# ----------------------------------------------# process changes in the user database
#
clientid=$1
action=$2
$VSIFAX/lbin/vmime -t -s "user database change" <<-EOF |
The following user database change has been made:
$action $clientid
121
INSTALLATION AND ADMINISTRATION GUIDE
EOF
$VSIFAX/lbin/vmail <email address>
Example for Windows platforms
The script below runs on Windows platforms only (not on Unix and Linux platforms).
This sample is called when modifying a user profile setting. It logs the modification in %VSIFAX%/spool/logs/usrschg and sends a notification email to an administrator.
#-------------------------------------------------------# sys-usrchg.tcl
# VSI-FAX user change notification for Windows
#-------------------------------------------------------#-------------------------------------------------------# Get all arguments and setup environment
#-------------------------------------------------------global argv env
set CLIENTID [lindex $argv 0]
set CHANGE [lindex $argv 1]
set VSIFAX $env(VSIFAX)
set TIMESTAMP [ clock format [ clock seconds ] -format {%Y/%m/%d %H:%M:%S} ]
set ERROR "VSI-FAX user database change: $CHANGE $CLIENTID"
set EMAIL [email protected]
#------------------------------------------------------# Update log file
#------------------------------------------------------set f [ open $VSIFAX\\spool\\logs\\usrchg a+ ]
puts $f "$TIMESTAMP $ERROR"
close $f
#------------------------------------------------------# Create email file
#------------------------------------------------------set g [ open $VSIFAX\\spool\\temp\\usrchg w+ ]
puts $g "$TIMESTAMP $ERROR"
close $g
#------------------------------------------------------# Email notification to specified mail address
#------------------------------------------------------exec "$VSIFAX\\lbin\\vmime" -t -s $ERROR "$VSIFAX\\spool\\temp\\usrchg" | \
"$VSIFAX\\lbin\\vmail" -R $EMAIL $EMAIL
file delete "$VSIFAX\\spool\\temp\\usrchg"
exit 0
Customizing notification email messages
You can easily customize email messages sent at various points in the notification mechanism using template files.
See also
For more information, refer to Template files.
Simply create a template file, place it in $VSIFAX/lib/templates directory, then associate it with one of the
following notification points in a user profile or by directly setting the appropriate tag in the user database.
The following table shows which notification messages can be customized and which user tags must be set to
accomplish that.
122
EVENT NOTIFY PROCEDURES
Notification Message
User Database Tag
Receive notification
vtp
Routed notification
rtp
Successful send notification sto
Failed send notification
stn
Group send notification
stg
123
LDAP Setup and Configuration
LDAP Setup and Configuration
VSI-FAX supports the use of Lightweight Directory Access Protocol (LDAP) directories to retrieve fax recipient (i.e.,
to) information when sending faxes by placing files in the autosend directory. However, before you can send a fax
using LDAP data, you must configure various VSI-FAX settings that control how to connect to the LDAP server and
map the information in the LDAP directory so VSI-FAX knows where to find certain essential fax information (e.g., fax
number, recipient name, etc.) at send time.
Note
Esker does not provide LDAP software. VSI-FAX simply has the capability of connecting to your LDAP server and
retrieving information from your LDAP directory.
Fundamentals
LDAP is an open standard protocol for accessing information services. Essentially, LDAP is a directory service that is
structured and behaves like a database.
LDAP directories are based on client/server models and use regular TCP/IP networking. LDAP servers typically listen
on port 389. Client programs that can access LDAP directories include Microsoft Outlook, Lotus Notes, Netscape
Communicator and many others.
LDAP documentation
LDAP is an open standard that is documented in various Request For Comments (RFC) white papers. These RFCs
are available from many sources on the World Wide Web. Currently, the OpenLDAP Foundation.
www.openLDAP.org is an excellent source of online LDAP documentation.
Basic LDAP structure and organization
LDAP directories contain records. These records contain various attributes, which are used to store information.
Consider the following simplified LDAP record:
dn: Jim Smith, o=Acme Corp.
givenName: Jim
sn: Smith
mail: [email protected]
c: US
These are the attributes stored in this record:
Attribute
Description
c
Country
dn
Distinguished name. This attribute always stores a unique indentifier for that LDAP record (no two
records in the same LDAP directory can have the same dn value).
givenName Given (first name)
mail
Email address
o
Organization
sn
Surname (last name)
125
INSTALLATION AND ADMINISTRATION GUIDE
Note
The attributes shown in this example are common to most LDAP directories.
Attribute names (dn, cn, givenName, etc.) are loosely defined in various RFCs. Although attribute names are defined
in RFCs, the standard is very informal. Therefore, each LDAP server may use slightly different attribute names to
store data.
One of the setup tasks for using an LDAP directory with VSI-FAX will be to map certain essential LDAP attributes
(e.g., the attributes for fax number, recipient name, etc.) to VSI-FAX tags so that VSI-FAX can find and use them at
send time. This mapping information is stored in the datasource database.
Important
Because attribute names may differ among LDAP servers, it is beyond the scope of this documentation to provide
exact mapping parameters that will work with every LDAP directory. Instead, you must list the attributes in your
LDAP directory and determine which ones store essential fax information. Consult your LDAP administrator to
obtain a list of attributes used on your LDAP server.
Sample LDAP attribute mappings
The following tables shows some sample LDAP attribute mappings. These settings may or may not be compatible
with your LDAP directory. They should only be considered as examples and possible initial settings for your LDAP
directory.
VSI-FAX
Info
LDAP Attribute Name
Microsoft Exchange
Lotus Domino
ldap.vsi.com
First name givenName
Last name sn
givenName
givenname
sn
sn
Company
Company
CompanyName
company
Phone
Phone
telephoneNumber
phone
Fax
facsimileTelephoneNumber facsimileTelephoneNumber facsimiletelephonenumber
Email
mail
Address 1
postalAddress
OfficeStreetAddress
postaladdress
Address 2
l
L
l
Address 3
st
st
st
Country
co
c
co
mail
mail
General LDAP notes
Search Base
LDAP directories are arranged in a tree-like manner. The search base is used to specify which branch of the tree to
start searching on.
For example, using a search base of c=US starts searching on the branch for entries in the US.
If no search base is specified, the search will start looking globally (from the top-most branch), which could take a
long time.
Scope
The values for scope define whether a search can descend into other branches of the LDAP tree. Possible values:
Base: the search will only search the current branch.
One level: allows descending down only one level.
126
LDAP SETUP AND CONFIGURATION
Subtree: allows the search to descend into any branches that exist below the starting point.
Authentication
Most LDAP servers allow anonymous read-only access. If an LDAP server requires authentication, your distinguished
name (dn) and password can be specified in the Directory Properties User ID and Password fields, respectively.
See also
See Modifying LDAP directory settings for additional information.
Administration techniques
The only way to setup and configure VSI-FAX to use an LDAP directory is via VSI-FAX Server Administration-these
features and functions are not available from the command line.
Ensure that you have the VSI-FAX Server Administration software installed on a Windows computer with network
access to the fax server before beginning LDAP setup and configuration.
Adding a new LDAP directory
1. Start Microsoft Management Console (MMC) and load the VSI-FAX Server Administration snap-in.
2. Connect to the fax server by selecting the desired server node and choosing Action > Connect or right mouse
click and select Connect.
The Login dialog box appears.
3. Enter your fax administration user ID and password.
4. Click OK.
The Login dialog box closes.
5. From the VSI-FAX Server Administration snap-in, select the Directories\External node and choose Action >
New > Directory or right mouse and select New > Directory.
The New External Directory Wizard appears.
6. Enter the following:
7. Source ID: enter a unique identifier for this LDAP directory.
8. Source name: enter a common name for this LDAP directory.
9. Data server: enter the fully-qualified network node name or IP address.
10. Select LDAP from the Directory type drop-down list.
11. Click Next to proceed to the next LDAP configuration screen.
12. Enter one or more attribute name/value pairs in the Search base field.
A common search base entry is c=US. The search base is dependant upon the entries within the LDAP
directory itself. Some LDAP directories can use nothing, others may require multiple attribute name/value
pairs.
To enter multiple attribute name/value pairs in this field, separate each name/value pair with a comma.
13. Select a search scope setting from the drop-down list.
Important
Most LDAP directories communicate over data port 389. If yours does not, perform this step, otherwise
skip this step.
14. Set the Custom Port option and enter your LDAP directory data port.
15. Click Next to proceed to the next LDAP configuration screen.
This configuration screen is where you map your LDAP attribute names to VSI-FAX tags so that the LDAP
data can be properly retrieved at send time.
16. Enter your LDAP attribute names in the appropriate fields.
127
INSTALLATION AND ADMINISTRATION GUIDE
Important
The only required attribute mappings are First name, Last name, and either Fax (number) or Email
(address). The first two allow you to locate a specific recipient; either of the remaining two are used to
actually send the fax. The remaining mappings are supplied for your convenience; that information will
appear on your fax cover pages.
17. Click Finish, and the New External Directory Wizard closes.
Testing your LDAP configuration and setup
The external directory properties dialog box provides a Configuration Test feature that allows an LDAP server to be
queried using your current confirmation settings and attribute mappings.
1. From VSI-FAX Server Administration, select the Directories\External node.
A list of available external directories appears in the list pane.
2. Select the LDAP directory node and choose Action > Properties or right mouse click and select
Properties.
The external directory properties dialog box appears.
3. Go to the LDAP tab.
4. Click Configuration Test.
The LDAP Directory Search dialog box appears.
The next part of this procedure involves structuring a simple query. For example, searching for a common last
name such as "smith" is usually successful, provided that the LDAP directory is large enough.
5. Enter a value in one of the available search fields.
6. Select one of the Boolean operators from the drop-down list.
7. Click Search.
If successful, a status dialog box notifies you that the search successfully completed and how many records
met your search criteria.
If you receive an error, modify your current configuration settings and attribute mappings and try again.
8. Click Close.
The LDAP Directory Search dialog box closes.
9. Click OK, and the external directory properties dialog box closes.
Granting users access to LDAP
For normal users to send faxes using an LDAP directory, they must first be granted permission to access that
directory in their VSI-FAX user profile.
1. From VSI-FAX Server Administration, select the user profile and choose Action > Properties or right
mouse click and select Properties.
The Profile Properties sheet appears.
2. Go to the Directories tab.
3. Set or unset the LDAP directories this user is allowed to access.
Note
If you want to use the directory settings in the master profile, set the Use parent directories option.
4. Click OK, and the Profile Properties sheet closes.
See also
For more information, refer to Profiles.
128
LDAP SETUP AND CONFIGURATION
Modifying LDAP directory settings
LDAP directory configuration settings and attribute name mappings can be modified via the directory properties
sheet.
1. From VSI-FAX Server Administration, select the Directories\External node.
A list of available external directories appears in the list pane.
2. Select the LDAP directory node and choose Action > Properties or right mouse click and select Properties.
The external directory properties dialog box appears.
3. Make your changes.
4. Click OK, and the external directory properties dialog box closes.
Using the LDAP directory when sending faxes
Important
External LDAP directories can only be used when sending faxes by placing files in the autosend directory. You
cannot use LDAP Directories when sending faxes from the Command Shell or from VSI-FAX LanFax Windows
Client and VSI-FAX Outlook Client.
Once you have added the LDAP Directory you want to use in VSI-FAX Server Administration (see Adding a new
LDAP directory) and granted users access to this LDAP Directory (see Granting users access to LDAP directories),
you can submit faxes in the $VSIFAX\autosend directory.
For example, submit a.tag file that contains the following tags:
cli=vsifax
pal=Smith, Rebecca
fll=c:\sample.txt
Since the search is done on the cn attribute of the users in the database, you need to indicate the user's full name in
the pal tag.
You need to have mapped at least the Fax and the Email fields in the properties of the LDAP Directory in the MMC
for the server to be able to find destinations for outgoing faxes. The fax will be sent to the fax number that matches
the full name specified, or to the email address specified if no fax number is found.
129
Least Cost Routing
Least Cost Routing
Least Cost Routing (LCR) provides an economical way of sending faxes to the fax server closest to the ultimate
destination. When a fax is submitted, the system looks in the LCR rules file to find a fax destination that handles
faxes for a specific area code and/or country. If no match is found, the fax is sent locally.
The LCR function consists of two tables: an LCR rules file and an LCR routes file. The LCR rules file contains
information about the routes and the associated country codes and area codes for that route. The LCR routes file
contains the routes and their associated email addresses.
Let's assume you have a fax domain in New York and one in London, and your company sends a lot of faxes from
New York to Paris. Rather than sending the Paris faxes from the New York fax domain, you can create an LCR entry
in the LCR rules file that will route the Paris faxes via the London fax domain. As a result you save on the
transatlantic phone costs.
LCR can be turned on or off using the lcr tag. The lcr tag defaults to true, allowing Least Cost Routing of faxes
based on country and area codes. However, you can turn LCR off by setting the lcr tag to false.
Functional overview
Once a fax is submitted for transmission, VSI-FAX determines what type of request you are sending. If the request is
a simple request, the dial string is converted and subsequently examined by the fax server on which the request is
entered. The server checks the LCR rules file to see if the fax number qualifies for routing.
If the number matches the LCR rules file, the fax server builds a tag file containing information from the local fax
request database to describe the fax request. Items such as recipient name, recipient company, from hostname, and
from sequence number are included in this tag file to ensure the remote server's log is as complete as possible.
The vfxolog shows information for both local and LCR routed faxes transmitted on behalf of another fax server. It
should be noted that, for security reasons, all routed faxes are submitted to a remote fax server with a client ID of
vsilcr.
The initiating fax server emails the fax request to the fax server specified in the LCR routes file. The fax servers poll
the mail account specified in the [VPOPD] section of the $VSIFAX/lib/vsisrv.ini file and look for messages.
When the server receives the email message, it drops it into the autosend directory as a tag file and proceeds to
send the fax out. The LCR system does the following:
1. Generates a response for the fax request.
2. Sends the response back to the originating server.
3. Updates the vfxolog status.
4. Completes the fax request.
Note
When vfxolog output is viewed after the fax is complete, two entries will be added. The first is the original fax
request, and the second is the LCR fax request. The LCR request will have a client ID of vsilcr. User vsilcr
is installed by default and should never be removed.
LCR cluster
An LCR cluster is two or more LCR-enabled fax servers configured to route faxes among one another in order to
minimize telephone charges.
131
INSTALLATION AND ADMINISTRATION GUIDE
Each server in the LCR Cluster must be identified with a route name. To do this you must edit the
$VSIFAX/lib/vsisrv.ini file and add the name of the server. This name can either be the hostname for the
server or a descriptive city/location name. Edit the file by making the following entry in the vsisrv.ini file:
[LCR]
route-name=NewYork
Launch Notify Procedure (LNP)
The LNP is a VSI-FAX script when a fax is queued to the system but before it is transmitted. The LCR operation is
accomplished via the standard VSI-FAX LNP procedure. The LCR LNP determines whether the fax request is a
group request (containing multiple recipients) or a normal fax (containing a single recipient).
POP client
In addition to the LNP, LCR functionality requires each fax server to have the email-to-fax gateway installed and
configured in order to retrieve and provide status for routed faxes that are directed to it. It should be noted that the
email-to-fax gateway feature is a standard component included with all fax servers and only requires minimal
configuration to use.
Additionally, each LCR-enabled fax server requires exclusive access to a POP email account. This account can be
shared with the VSI-FAX email-to-fax gateway feature, but cannot be used by any other client application or user. For
purposes of clarity, this email account will be referred to in the rest of this documentation as the autofax account.
Setting up routes
This section describes how the routes and LCR rules files are used by LCR to determine the routing of faxes. Based
on the previous example of two servers, one in New York and one in London, the following explanation shows how
the files would be set up.
The LCR function requires that dialing rules be established to match fax numbers. Fax dialing numbers are matched
based on the patterns and wildcards used to set up the LCR rules file. In addition to the structure of the LCR rules
files, the following rules should be considered:
If the dialing digits contains commas, LCR is not performed.
All non-digits such as parentheses, hyphens, etc., are removed from the phone numbers.
Any dialing digits set in brackets are assumed to be a credit card number and are not used.
Any digits that appear after an @ sign are assumed to be an extension number.
LCR routes file
The LCR routes file (lcrhosts.lst) is used to associate each route to the email account and is located in the
$VSIFAX/lib directory.
The following is an example of an LCR routes file.
# Sample LCR routes fil
#
# <route_owner>:<transport_account>
#
NewYork:[email protected]
LondonUK:[email protected]
Note
LCR is designed to allow all fax servers to share the same routing tables. Once these files are set up, they must
be distributed and copied to all servers in a cluster.
See also
Refer to Command Reference in the Reference Addendum documentation for additional information.
132
LEAST COST ROUTING
LCR rules file
The LCR rules file (lcrrules.lst) is used to associate a country code and area code to a route name and is
located in the vsifax/lib directory.
The following is an example of an LCR rules file.
# Sample LCR rules file
#
# <dial_string-skeleton>:<route_owner>
#
# US rules (by area code)
#
[1]212???????:NewYork
019*:LondonUK
In the first entry of the previous example, the presence of a digit between brackets [ ] indicates that the digit is
optional. That is, any dial string that starts with or without a 1 followed by 212 followed by any seven digits will be sent
through the New York server.
The second entry indicates that any fax sent with the number 019 followed by any digits will be sent through the
London server.
Note
LCR is designed to allow all fax servers to share the same routing and LCR rules files. Once these files are set
up, they must be distributed and copied to all servers in a cluster.
See also
Refer to Command Reference in the Reference Addendum documentation for additional information.
Using wildcards in the LCR rules file
Entering an asterisk (*) in the LCR rules file tells the system to match any value(s) in that portion of the dial string.
For example, in the file shown in LCR rules file, the entry 019*:LondonUK tells the system that any dial string
starting with 019 will be routed to London.
Note
We strongly recommend that any entries using the * be placed at the end of the LCR rules file to eliminate the
possibility of routing a fax to the wrong location. For example, if 1*:LosAngeles were the first entry in the file
all the other entries starting with 1 would be ignored. This is because entering the * after the first digit tells the
system that all dial strings starting with a 1 followed by any digits should be routed to Los Angeles.
Question marks (?) can also be used as wild cards to represent exactly one digit. For example, the entry 17145555??? would match any number starting with 1714555 and ending with four digits between 5000 and 5999. Similarly,
the entry 1714??????? would match any number starting with 1714 followed by 7 digits.
Verifying entries in the routes and LCR rules files
LCR requires that for every route in either of the files, a corresponding setup entry must be in the other file. For
example, if you set up an entry in the LCR routes file for the server in New York, you must also have the New York
entry in the LCR rules file. After you complete the setup of the Routes and LCR rules files you can use the following
command to verify that the two files are consistent. Enter:
vlcrchk -cv
This command compares the entries in the LCR routes file to the entries in the LCR rules file. If the system finds a
route entry that does not have a corresponding route in the other file, it will report it, allowing you to correct the
synchronization of the two files.
An additional check you can run is to verify the route name for a specific fax number by entering:
vlcrchk -n xxx-xxx-xxxx
133
INSTALLATION AND ADMINISTRATION GUIDE
Configuring the email-to-fax gateway
1. Edit the $VSIFAX/lib/vsisrv.ini file and add the entries to the [VPOPD] section for the POP3 mail
server account.
2. Add a password using the vfxadminconfig command. For syntax see the vsisrv.ini password entry is
encrypted, therefore it cannot be directly added via a text editor. You must use the vfxadmin command line
utility to add this entry..
3. Verify the configuration is correct by sending email to the email-to-fax gateway account.
4. Configure the [VMAIL] section of the vsisrv.ini file and confirm it is working by using the vmail -D
command to send an email message.
5. Edit the [LCR] section of the $VSIFAX/lib/vsisrv.ini file as follows:
6. Add a route-name=<name_of_route> entry.
Each machine in a group (cluster) must have a unique route name.
•
Add a debug=on entry (optional).
•
Add entries to specify route names and email addresses to the $VSIFAX/lib/lcrhosts.lst file.
For example:
[email protected]
Important
Note that the email address must be fully qualified.
7. Add entries for rules that will trigger the LCR events to the $VSIFAX/lib/lcrrules.lst file. For example:
[1]714*:lcrsupport
8. Copy both the lcrhosts.lst and lcrrules.lst files to all servers in the cluster.
9. Verify the completeness and correctness of the LCR rules you established using the vlcrchk -v command.
Statusing LCR fax requests
In order to get status of faxes that have been routed to a remote fax server, LCR provides a pseudo-device (lcr)as
well as an SMTP message type (stat_msg), which that are recognized by the VSI-FAX POP client process. The
lcr pseudo-device enables the originating fax server to maintain a tracer for fax requests that have been routed to a
remote fax server. Faxes that have been routed continue to appear in the lcr device queue with current status
information until transmitted by the remote server.
The status information of a routed fax is delivered from the remote fax server system transmit notify procedure to the
originating fax server using SMTP mail messages. These messages are communicated using the same transport, the
email-to-fax gateway.
Upon retrieval of a message having the type stat_msg, the originating fax server decodes and updates the local
databases with the current status of the remotely routed fax.
Status information, while slightly less real-time in nature due to the SMTP transport, is provided by vfxstat in the
same way as it is for non-routed faxes.
Statusing using the Transmit Notify Procedure
LCR uses a pseudo-device (called lcr) to provides status information to the originating fax server of a routed fax
request, through the use of the system transmit notify procedure (TNP).
To accomplish this, upon transmission of a fax, an LCR-enabled server determines if the fax was routed. If it was, an
SMTP message of type stat_msg is constructed and mailed back to the originating fax server's autofax account.
LCR tags
LCR uses five tags in the ologreg and ologgrp database:
134
LEAST COST ROUTING
Tag
Definition
lcr route fax
fhn from hostname
thn to hostname
tsq to sequence number
fsq from sequence number
The lcr tag determines whether a fax should be considered a candidate for being routed. It can also be used to
override the LCR rules and send a fax locally.
For example, the following shows how to set the lcr tag:
vfx -n 949-123-4567 -t lcr=false /etc/group
For a fax request, the fhn, thn, tsq,and fsq tags determine the to and from hostname and the to and from
sequence number. For a routed fax, these fields indicate the node where the fax originated, where the fax was
routed, the originating server's request ID assigned to the request, and the request ID of the remote server assigned
to the request. Faxes that are not routed will contain the local fax server's hostname and the request ID in these tags.
135
Imaging Server Setup and
Configuration
Imaging Server Setup and Configuration
An imaging server provides extended imaging services for a Unix/Linux fax server. If you have both a Unix/Linux fax
server and a Windows fax server on the same network, you can configure them such that the Windows fax server
images the additional file types, not normally available on Unix/Linux, for the Unix/Linux fax server.
In order to implement an imaging server, you must have a full VSI-FAX server installed on both the Unix/Linux and
Windows hosts.
Important
A license is required to implement extended imaging services for your Unix/Linux production fax server. Please
enter the following license during VSI-FAX Server installation on the Windows computer:
Serial number: 961000320211733-061-0
Activation key: 7TGW-DD5O-FB2L-AOBP
To set up an imaging server, perform the following:
1. Verify that VSI-FAX Server is installed with the above license on the Windows computer you intend to use as
the imaging server.
The remainder of the imaging server setup is performed at the Unix fax server.
2. Stop the scheduler.
3. Modify the $VSIFAX/lib/vsisrv.ini file by adding the following entry to the VSINET section:
image-server=<host_name>
Where <host_name> is the network name of the Windows fax server.
4. Start the scheduler.
Image server issues (Unix only)
It is important that the image server be up and running before the VSI-FAX server is started. For this reason:
The vfxsched program checks if an image server is specified when it is starting the fax server, and if so, it
"pings" the image server to ensure that it is running. If the image server is not running, vfxsched will output
an error message and not start the fax server.
If any of the files needed for a fax envelope are on the image server and that server is down, then the job is
queued for later processing when the image server is back up. In this case, the job will stay in a SUBMIT
state. An entry is written to the vnetfax log indicating that the job is queued waiting for the image server to
come up. When it does, all queued jobs are processed.
If the Unix server is shut down, any queued jobs are saved and are reloaded when the server is started again.
Whenever the image server goes down or comes back up, a system notify script imgsvr is run if present. This script
is called as follows:
sys-imgsvr.<ext> <image-server> up|down
This can be used to notify an administrator that the image server needs attention.
137
INSTALLATION AND ADMINISTRATION GUIDE
There are two config entries which control this behavior, both are in the $VSIFAX/lib/vsisrv.ini file, in the
VSINET section:
image-server = <name> Hostname or IP address of the image server. Default is no image server is defined.
image-server-delay = <secs> The number of seconds between pings of the image server if it is detected to be
down. Default is 60 seconds.
Checking the conversion possibilities
Once the Linux/Unix server has been configured to use a Windows Imaging server, you can verify that those two
servers are able to communicate properly.
You can issue a vinfo -D -v filetypes command on the Unix/Linux server and verify that you get the result
from the Windows imaging server with the conversion paths for the Microsoft Office documents.
If this command does not list the appropriate conversion paths, you can verify that the server name defined in the
vsisrv.ini file is correct and you can also verify that the 2996 port used for the communication between the servers is
open.
Using the add-on formatters
There is a known issue with the imaging servers and the add-on formatters: the Unix/Linux server will not be able to
use these add-on formatters for a conversion. They do not appear in the conversion path list when doing a vinfo
command.
Problem
The Windows imaging server has the add-on formatters installed and can convert the doc or xls files correctly with a
vfx -o command line. However, when doing the same command from the Unix/Linux server, the resulting .tif file
has hundreds of garbage characters pages. This happens because the mstotif converter is actually used and the
Word document is converted using an inappropriate application.
Solution
To workaround this problem, you can either install Microsoft Office on the Windows server or the Office Viewers
(freely available on the Microsoft Website). Then, you need to associate the application with the file type and the
conversion will be done with mstotif using an appropriate Windows application to open and print the document on the
VSI-FAX server printer. (external formatter used).
138
Server Maintenance
Server Maintenance
After the installation of a fax server and during its normal use, system resources will be allocated for the various
storage and log operations. Over time, the allocation of resources can cause problems such as poor performance,
running out of disk space, and data corruption. In conjunction with normal system maintenance, we recommend
periodic maintenance on the fax server to ensure smooth and efficient operation. The following describes
recommended processes for use by experienced system administrators.
Note
Most maintenance tasks require a user to be logged in as vsifax, root, or another administrative user.
Purging historical data and maintaining the database files
Regular purging of incoming and outgoing faxes will increase the responsiveness of the clients, which will load and
run slowly if the database files become too large. Regular purging will also speed up processes that create the
outbound and inbound log reports (vfxolog and vfxilog, respectively) while preventing file corruption.
Maintaining log files
The process of maintaining the Outbound and Inbound log files begins with the purging of data from the olog and
ilog reports. This is accomplished using the vfxpurge command. The vfxpurge command will allow you to
select the amount of data you want to purge and how much data to retain. Running a purge process nightly using a
cron or MS-Schedule job or by using the vadmind cron mechanism is recommended.
Maintaining databases
Keeping databases purged can eliminate delays in locating information about sent faxes. If the log files are
excessively large, the information can be difficult to find and errors may occur when running the vfxolog command.
The process of purging the files should also include periodic file unloading and rebuilding. This will help ensure that
the databases contain accurate information, since excessively large database files tend to be more susceptible to
corruption.
Rebuilding database files can be performed using a series of VSI-FAX commands either individually, written into a
script, or through other automated task managers, such as crontab or MS-Schedule. Sample daily and periodic
scripts appear later in this section. The following describes the recommended weekly or monthly process:
1. Stop the VSI-FAX scheduler.
2. Purge old data from the databases.
3. Rebuild the databases.
4. Restart the scheduler.
Note
During the rebuilding process, errors may be displayed that indicate database corruption. This is particularly likely
if rebuilding has not been performed recently. Ignore these error messages because the problems they refer to
will be repaired during the rebuilding process.
139
INSTALLATION AND ADMINISTRATION GUIDE
Sample scripts for maintaining databases and files
Scripts can be used nightly, weekly, or once per month depending on the number of faxes being sent and received by
your fax server. These scripts are intended for use on Unix servers or with the MKS Toolkit.
Tip
If you are running VSI-FAX on a Windows server without the MKS Toolkit, the scripts can be modified to run
correctly by changing each $VSIFAX to %VSIFAX%.
Important
These scripts are examples. They must be modified according to your specific configuration and needs.
Nightly purge script
#!/bin/sh
# This example script purges all three logs,
# It retains any information that is 7 days old or less
. /etc/vsifax.sh
vfxpurge -o7
Weekly or monthly purge/rebuild script
#!/bin/sh
. /etc/vsifax.sh
# Stop the scheduler
vfxsched stop
# Purge the data older than 7 days from the database
vfxpurge -o7
# Rebuild the databases
vfxdb -vf ologatt ologreg ologgrp ologtag ologofn
or
vdbtool rebuild -vf ologatt ologreg ologgrp ologtag ologofn
# Restart the Scheduler
vfxsched start
Maintaining VSI-FAX directories
The fax server uses directories to store inbound and outbound faxes and temporary files. Over time, faxes left in
these directories will eventually consume excessive amounts of space.
Therefore, we recommend that you check the following directories on a regular basis:
When the scheduler is idle (no jobs pending), the $VSIFAX/spool/in directory should be empty. If TIFF
files are found in this directory, a problem occurred while routing an inbound fax to a specified inbox and
caused the fax to remain in the in folder. Use vfxstat to determine if the scheduler is idle, then remove any
files in the directory.
VSI-FAX uses a temporary directory for various operations, such as storage of pending TIFF files. The
directory should be empty when the scheduler is idle. If this directory is not empty, use vfxstat to determine
if the scheduler is idle, then remove any files in the directory. The location of this directory depends on the
operating system of your VSI-FAX server:
140
•
On Windows platforms, the temporary directory used by VSI-FAX is $VSIFAX/spool/temp. If this
directory does not exist on the server, the $TMP directory will be used instead.
•
On UNIX platforms, the temporary directory used by VSI-FAX is /tmp. You can override this setting
and select another directory by setting a value for the $VSITEMP environment variable.
SERVER MAINTENANCE
Important note
Regardless of the platform you are using, you must make sure that the VSI-FAX user has enough rights to
access the above directories. If this user is unable to read or write files in these directories, the VSIFAX scheduler will not be able to run.
Debug log files
Debug files are created each time the scheduler is restarted. These files are self-maintaining, and they will not
become unreasonably large if the scheduler is restarted periodically. We recommend that the scheduler be restarted
once a day to ensure that, along with maintaining the debug log files, any defunct/runaway processes can be
managed. This also ensures that the shared memory segments and resources used by VSI-FAX are reset and
cleaned, which will help to ensure smooth VSI-FAX operation.
The log file names are numerically incremented each time the scheduler is started, up to the number of files set in the
$VSIFAX/lib/vsisrv.ini file, using the max-debug-log entry. The current debug files do not have a number
designation (fax1). However, as new debug files are created, they will be incremented (fax1-0, fax1-1, fax1-2, etc.)
until the maximum number of files are reached.
If the debug option is turned on, the debug log files continue to expand until the scheduler is restarted.
Archiving faxes and maintaining user's inboxes
If you are using VSI-FAX to receive and route inbound faxes, each client user will have an inbox identified by their
user name or user ID. All faxes received for a particular user will be routed to that user's inbox, located in the
$VSIFAX/faxq/<user ID> directory. Every user can save, copy, or delete faxes from their inbox. Faxes that are
not routed to individual inboxes are routed to the inbox of user vsifax.
To maintain manageable levels of faxes in user inboxes, the VSI-FAX administrator should set up a monthly
maintenance cycle or script that checks each user's directory, including user vsifax, and deletes any files older than
a specified date.
Scheduling periodic fax server maintenance
VSI-FAX provides a mechanism for automatically scheduling periodic fax server maintenance (e.g., database
rebuilds, log file purges, etc.). Each periodic event is scripted via an entry in $VSIFAX/lib/crontab.lst.
This scripting mechanism is based on the Unix cron function and employs syntax similar to that used in crontab.lst.
See also
Refer to Command Reference in the Reference Addendum documentation for additional information.
You can also control automatic scheduling of periodic fax server maintenance using the VSI-FAX Server
Administration snap-in. Select the fax server node and choose Action > Properties > Maintenance.
Refer to the VSI-FAX Server Administration help for additional information.
141
Integration Fundamentals
Integration Fundamentals
When most people consider integrating VSI-FAX with another application, they usually want to add one or more of
the following capabilities to their existing business application:
Send a fax : Use VSI-FAX to send faxes directly from another application.
Receive a fax : Use VSI-FAX to receive faxes, then hand them to another application for processing.
Administration : Implement programmatic control and maintenance of the VSI-FAX server.
Because sending a fax is by far the most common capability added via integration, this section will focus primarily on
that aspect of integration.
The fax envelope
Sending a fax is similar to sending a letter via the postal system. Consider that when you send a letter, you must
have at least the following:
Something to send
Someone to send it to
Typically, a message is written or typed on a piece of paper and placed inside an envelope. Of course, you can
include other items such as brochures, price lists, bills, contracts, etc. In fact, some postal mailings can be rather
large and contain many items in the same envelope. Conversely, if your message is brief, you might send a postcard.
Regardless of size or complexity, you must have something to send.
After you have gathered the items you want to send, placed them in the envelope, sealed it and addressed it to the
recipient, you often have several different ways you can get it to the post office. For example, you can take it to your
central post office in person or you can drop it in a local mail box and let a mail carrier deliver it to the post office for
you. You can even request delivery confirmation.
Similarly, when you send a fax, the minimum amount of information you need is:
Something to fax
A recipient (fax number or email address)
As with letters, faxes can contain other items (attachments) or be simple (just a cover page). Once the elements of
the fax are defined, it is assembled into a "fax envelope" so that it can be sent. You also have several different ways
to get it to the "post office" (i.e., fax server) and you can specify types of confirmation (status).
Let's set aside the analogies and metaphors for a moment and take a look at what fax envelopes really contain:
Content : Fax content includes everything you want to fax to your recipient. It can be a simple text message
or multiple files you want to image and send to this person.
Recipient information : This is the person who will receive the fax. At minimum, you must enter a fax number
or an email address. However, most users also will include other details such as the recipient's name and
company information in order to ensure that the right person gets the fax.
Cover page (sender information): Most faxes include a cover page. Cover pages are similar to return
addressees on letters. They almost always include the sender's information and usually include recipient's
addressing information. They can also include short messages. In fact, a fax can consist of only a cover page.
Send parameters : Send parameters are the conditions you specify for sending this fax. For example, this is
where you specify that the fax be sent from a specific fax device or sent at a specific time (e.g., delayed send).
143
INSTALLATION AND ADMINISTRATION GUIDE
Creating the fax envelope
There are two basic underlying methods for creating a fax envelope:
vfx tags
XML-F
It is important to understand that all VSI-FAX integration techniques build on one of these two basic methods.
vfx tags
vfx tags are the most common way to define a fax envelope. These tags are nothing more than name/value pairs that
are passed to the fax server.
Let's consider a simple fax envelope; a local fax number (555-1212) and a simple text file (hello.txt) containing
the message "Hello, World."
The tfn tag specifies the fax number. The actual tag for this fax envelope is:
tfn=555-1212
The fll tag specifies a file attachment. The actual tag for this fax envelope is:
fll=hello.txt
There are many different tags you can use to define the elements of a fax envelope.
XML-F
Extensible Markup Language (XML) is a language specifically designed to share data among applications. Within the
entire XML universe are industry-specific specializations. One of these specializations is XML-F. The XML-F
specification comprises eight public document types that can be used to define a fax envelope and communicate with
a fax server.
Delivering the fax envelope
Once you have defined your fax envelope, you must deliver it to the fax server so that it can be imaged into a fax and
sent via one of your fax devices.
Three things are needed to deliver a fax envelope to the fax server:
Fax envelope
Access to the fax server (host name, IP address, Internet domain, email account)
VSI-FAX user account
VSI-FAX provides many different delivery mechanisms. In fact, virtually any integration situation will have access to at
least one of these delivery mechanisms.
144
INTEGRATION FUNDAMENTALS
Integration techniques
When you combine a specific way of creating a fax envelope with a specific delivery mechanism, you have a
complete fax integration technique.
This figure shows the ways a fax envelope can be created and the delivery mechanisms available for each:
Send integration techniques
Another way to look at integration solutions is to consider a matrix that lists ways to create fax envelopes as rows and
delivery mechanisms are columns.
Delivery Mechanisms
vfx
Comman
d
Ways to
Create
Fax
Envelope
s
autosen
d
Director
y
Email
-toFax
Tags
X
Tag Files
X
X
X
Batch
Files
X
X
X
Embedde
d Tags
X
XML-F
X
X
xmlf
Comman
d
Fax
SD
K
Outloo
k
Fax
Client
LanFax
Window
s Client
WordPerfe
ct
Macros
lp
Spoole
r
X
145
INSTALLATION AND ADMINISTRATION GUIDE
Delivery Mechanisms
vfx
Comman
d
autosen
d
Director
y
Email
-toFax
xmlf
Comman
d
Fax
SD
K
Outloo
k
Fax
Client
LanFax
Window
s Client
WordPerfe
ct
Macros
lp
Spoole
r
X
X
X
X
Documen
t
Email
Message
X
C++
X
Visual
Basic
X
Print to
Fax
X
X
Each way of creating a fax envelope and each delivery mechanism will be discussed in greater detail elsewhere in
the documentation.
Which integration technique is best for me?
As you can see from previous topics, there are many different ways to integrate VSI-FAX into your existing business
application. Some integration solutions are better suited to a distributed environment, while others are relatively
simple and easy to implement. Still others require prior programming experience.
In order to help you choose the best integration strategy for your needs, consider the following:
Does your application client/server run on a different network node than the fax server?
How automated do you need your integration to be?
Do you require fax status or notification?
What are your programming skills?
Is purchasing a new VSI-FAX license an issue?
vfx commands
vfx commands are a simple and powerful delivery mechanism. vfx is simply a command line utility that provides
many options for precisely defining a fax envelope. One of these options is a tag statement (-t <tag>=<value>).
There are many different tags that can be specified in addition to other vfx options.
Advantages
Powerful and flexible. Provides maximum options for creating the fax envelope and full support for all content
parameters, send options, fax status and notifications.
Excellent choice if your application can execute external commands and is running locally on the fax server.
It is still an acceptable choice if your application runs remotely (i.e., from another IP address than the fax server).
However, you must purchase a VSI-FAX license providing support of Virtual Fax Server and install the Virtual Fax
Server on the remote computer or workstation.
Creates a fax request ID you can use to track fax status.
Disadvantages
Additional cost involved with remote integrations-you must purchase a VSI-FAX license providing support of Virtual
Fax Server and have a network connection to the fax server.
Poor choice if your application cannot execute external commands.
146
INTEGRATION FUNDAMENTALS
Ways to create fax envelopes
Tags
Use the vfx -t option to supply a series of tag statements (<tag>=<value>) on the vfx
command line. This normally requires that some sort of macro or script be run from inside your
application.
Tag files
Create an ASCII text file containing tag statements (<tag>=<value>), then pass this "tag file" to
the fax server using the vfx -c <tag_file> command. Tag files are processed as if the tag
statements were entered directly in a command shell.
Batch files
These are similar to tag files, but only appropriate when you want to send multiple personalized
faxes to multiple recipients.
Batch files are divided into sections. A common section contains information sent to all recipients;
recipient sections contain personalized information for that fax recipient.
Embedded tags These are most often used in print-to-fax situations. The fax server will automatically scan PCL and
PostScript files for embedded tags. If it finds them, it will process them as if they were enterd in a
command shell.
A common way to use embedded tags is to enter embedded tag statements directly into a word
processor document, print the document to a PCL or PostScipt file, then pass the file to the fax
server as a vfx command line argument.
XML-F
documents
XML-F provides eight different Document Type Descriptions (DTDs) that describe how to create
files you can pass to the fax server and the responses you can expect back from the fax server.
XML is a completely open data exchange standard without specific requirements regarding platform
or delivery mechanisms. This makes it an excellent choice for heterogeneous environments and
large enterprise-wide faxing solutions.
Print-to-fax
(saved to file)
Print-to-fax is a simple approach that does not lend itself to full automation. However, it works with
almost any application. Open the application, print to a PCL or PostScript file, then pass the file to
the fax server as a vfx command line argument.
However, if you do not specify recipient information with embedded tags, you must supply recipient
tags on the vfx command line.
See also
Refer to Command Reference in the Reference Addendum documentation for complete documentation for the vfx
command.
If you will be creating your fax envelopes via tags, tag files, batch files, embedded tags or print-to-fax, see Using vfx
Tags.
If the application you are integrating does not run on the fax server network node see Virtual Fax Server.
autosend directory
The autosend directory is a specific file system directory that is continuously monitored by the fax server. When the
fax server finds a tag file, batch file or XML-F document, it uses it to send a fax as if the file had been passed to it via
a vfx command (See vfx commands).
The location of the autosend directory is $VSIFAX/autosend.
Files placed in the autosend directory must have the proper file extension.
Tag files must have a .tag extension
Batch files must have a .bat extension
XML-F files must have a .xml extension
Advantages
Excellent choice for situations where you do not have a network or email connection to the fax server but do have
access to the fax server file system (e.g., via NFS).
Disadvantages
147
INSTALLATION AND ADMINISTRATION GUIDE
You are limited to creating fax envelopes with tag files, batch files or XML-F.
This is a "blind send." Therefore:
Fax status and notifications are not available
If errors occur, your fax won't be sent and you will not receive any notification whatsoever that this occurred
Ways to create fax envelopes
Tag files
Create an ASCII text file containing tag statements, then copy or move this "tag file" to the fax server
autosend directory ($VSIFAX/autosend).
Batch files
Batch files are similar to tag files, but only appropriate when you want to send multiple personalized
faxes to multiple recipients.
Batch files are divided into sections. A common section contains information sent to all recipients;
recipient sections contain personalized information for that fax recipient.
XML-F
documents
Create a file according to the XML-F Fax Submit DTD, then move this XML-F document to the fax
server autosend directory ($VSIFAX/autosend).
See also
If you will be creating your fax envelopes via tags, tag files, batch files, embedded tags or print-to-fax, see Using vfx
Tags.
Email-to-fax
When a fax server is networked to a mail server, you can configure a dedicated email account (typically "autofax") for
the express purpose of sending faxes. Then you can configure the fax server to periodically poll this email account.
When the fax server receives email messages at the "autofax" account, it assumes that they are faxes waiting to be
sent and processes the email messages accordingly.
Advantages
Excellent choice for situations where you do not have a network connection to the fax server or have access to the
fax server file system but do have an email connection to the fax server via a POP3 mail gateway.
Disadvantages
Your application must be able to send an email message.
You must have an incoming (POP3) Internet mail server, and it must be networked to the fax server.
Ways to create fax envelopes
Email
message
If you include a valid fax number or email address on the subject line, the fax server assumes that the
remainder of the email message (including any file attachments) is the fax content.
The syntax for including a fax number in the email subject line is:
<fax_number>[<subject_text>]
Where <fax_number> is a valid fax number of Internet email address and <subject_text> is
optional subject line text.
Tag and
batch files
If you do not include a valid fax number or email address on the subject line, the fax server assumes
that the remainder of the email message is a tag or batch file.
See also
Refer to Email-to-fax for a complete discussion of how to set up, configure and use the email-to-fax delivery
mechanism
148
INTEGRATION FUNDAMENTALS
If you will be including tag or batch files in the body of your email message, see Using vfx Tags.
Print-to-fax
Print-to-fax is versatile way to either deliver a fax envelope to the fax server or prepare a fax envelope so that it can
be delivered by another means. While this integration technique is hard to fully automate, it can be used to fax-enable
virtually any application with printing capabilities.
Advantages
Can be used to fax-enable virtually any application on any platform as long as it can print to file.
If one of the VSI-FAX print drivers is used, users will be prompted to enter send information (e.g., fax number,
recipient name) and the fax envelope will be delivered to the fax server.
You can direct your application's output to any PostScript, PCL or ASCII print driver - you are not restricted to using
one of the VSI-FAX print drivers.
Disadvantages
Difficult to fully automate.
If you do not use one of the VSI-FAX print drivers, you must get the PostScript, PCL or ASCII file to the fax server you do not have an integrated delivery mechanism. In most cases, you will need to pass these files to the fax server
using vfx commands (See The vfx command line).
Ways to create fax envelopes
Tags
If you do not specify send information via embedded commands, you must do so when you deliver the
output file to the fax server. In these cases, you must at least supply a fax number using the fnm tag.
Template
files
You can also use template files in place of tag files or embedded commands to create the fax envelope.
This is especially useful for group faxing.
See also
Using vfx Tags
Print-to-fax
xmlf commands
Extensible Markup Language (XML) is emerging as the preferred technique for sharing data among applications. This
is especially true for applications that collect and transport data via the Internet.
Advantages
Any XML-aware application can be configured to send and receive XML documents.
XML is inherently platform and transport independent. This is especially useful for integrating existing business
applications running on platforms not supported by VSI-FAX (e.g., VMS).
Disadvantages
Fax envelopes must be created using the XML-F Fax Submit documents.
If your application cannot issue external commands, you must provide scripting to issue xmlf commands or place
the send document in the autosend directory See autosend directory.
Ways to create fax envelopes
XML-F documents are the only way to create fax envelopes for use with the xmlf delivery mechanism. The
application sends a fax by writing an XML Fax Submit documents and passing it to the fax server via the xmlf
command See The xmlf command.
149
INSTALLATION AND ADMINISTRATION GUIDE
See also
Using XML-F
Software Development Kit (SDK)
The VSI Software Development Kit (SDK) provides Component Object Model (COM) classes and sample code that
can be used by software developers to integrate fax functionality into Windows applications. These applications can
be written using Microsoft Visual Basic 6.0 or Microsoft Visual C++ 6.0 and will run on supported Windows platforms.
Note
With VSI-FAX 5.0, API development has moved to C/C++. This change will not affect your current SDK
development. Java, Visual Basic, XML-F, C and C++ continue to be supported in version 5.1 and up.
The C\C++ Client API Reference is in c_api.pdf. in the \docs folder of the VSI-FAX CD-ROM.
Advantages
Experienced C++ and Visual Basic programmers can leverage existing knowledge to create fax integrations.
Disadvantages
Only works on supported Windows platforms. Unix/Linux users generally integrate via vfxSee vfx commands or
xmlfSee xmlf commands commands rather than at the API level.
Ways to create fax envelopes
C++
Add the fax automation classes to your C++ projects and use them to create custom fax controls and
Graphical User Interfaces (GUIs).
Visual
Basic
Add fax automation classes to your the Visual Basic projects and use them to create custom fax controls
and GUIs.
Printto-fax
After you have installed the VSI-FAX print driver using the InstallPrinter program, you can send faxes from
within any Windows application that supports normal printing.
VSI-FAX print driver only images the information a user wants to fax (via the File > Print...
command). To send a fax, destination information must be supplied. A sample Visual Basic application is
provided that receives the imaged file from the print driver and displays a fax form for entering the fax
destination information.
See also
VSI Software Development Kit (SDK)
lp spooler
This is essentially another kind of print-to-fax integration See Print-to-fax that uses a custom printer interface script
instead of a fax print driver.
Advantages
This technique works on most (but not all) Unix and Linux platforms.
Disadvantages
This technique only works on certain Unix and Linux platforms. You cannot use it on Windows platforms.
Ways to create fax envelopes
The most common method of lp faxing is to use the Unix lp command. Typically, the lp command accepts several
command line options that work well for sending a fax. In order for lp faxing to work correctly, two arguments must be
passed to the interface script:
150
INTEGRATION FUNDAMENTALS
Fax number
Name of the file you want to fax
See also
lp Spooler (Unix Only).
151
Customization Techniques
Customization Techniques
This section describes ways to customize VSI-FAX.
Customizing the fax header
Note
This section does not apply to the Fax on Demand (or FoDC) device. To learn how to customize the page
headers of faxes sent using FoDC, please refer to Customizing the header in outgoing faxes, in the Fax on
Demand Connector section.
Fax header places information at the top of each faxed page in what would normally be the blank top margin.
A default fax page header is used for all outbound faxes sent by VSI-FAX. This header is a combination of fixed text
and variables values:
<date> <time> <TSI string> via VSI-FAX Page <Current page number> of <Total number of
pages> #%<JobID>
By default, the date format is "%m/%d/%y"like in 06/22/06, and the time format is "%I:%M %p"like in 11:22 AM.
You can customize outbound faxes' page headers at various levels and by various ways in the product:
In VSI-FAX Server Administration on Windows platforms, you can customize the date and time formats, the
advertisement string entry (by default, via VSI-FAX) and the left-justififed part of the header, both at the
device's level and in the profiles. For more information, refer to the VSI-FAX Server Administration help.
In the $VSIFAX/lib/vsisrv.ini configuration file, you can overwrite the date and time formats by
changing the DateFormat and TimeFormat entries, you can overwrite the advertisement string by changing
the adstring entries (by default, via VSI-FAX), you can overwrite the left-justified part of the header by
changing the PagehdrString entry and the right-justified part if the header by changing the PagehdrEnd
entry. For more information, refer to Configuration Files in the Reference Addendum documentation.
In VSI-FAX Outlook client and LanFax Windows Client, you can overwrite the default fax page header or the
custom page header set on the profile and on the device on the server. For more information, refer to the VSIFAX LanFax Windows Client help.
Setting the upg tag to true and using the pgh tag, you can overwrite the left-justified part of the header for a
single fax request. For more information, refer to Tag Reference in the Reference Addendum documentation.
Template files
Template files serve as an integration and site customization tool. They allow you to:
Customize email transport (routing) messages sent by the fax server
Customize notification email messages sent by the fax server
Customize the way fax status is displayed with vfxstat
Retrieve fax envelope information from the fax server and use it as part of a group faxing strategy
This topic describes how to use template files for these purposes.
See also
153
INSTALLATION AND ADMINISTRATION GUIDE
See Customizing notification email messages for additional information about customizing notification email
messages.
File structure and syntax
Template files can be plain ASCII text, PostScript, or PCL files. They typically contain a mixture of plain text and tags.
When the fax server processes a template file, it populates any tags it finds in the template file with either the current
value for the tag or default value defined in the template file.
The default value is used only if a current value for that tag is not defined via some other method (e.g., specified on
the command line, in a tag file, or by embedded tag).
It is this conditional behavior (i.e., use the current value or use the default value) that makes template files especially
flexible. Once they are created, they can be shared and re-used throughout your site.
The syntax for defining a tag inside a template file is:
${<tag>[,[<max>].[<length>]][:<default>]}
Where:
Tag name.
<tag>
,[<max>].[<length>] Optional length statement. Tag values exceeding <max> are truncated to that value by
removing characters from the left of the value; tag values shorter than <length> are
made that length by appending trailing spaces to the right of the value
<default>
Optional default value for the tag.
Consider the following example send-notify template:
Your fax request ${seq} to ${tnm:<unknown>} at ${tfn}
was sent at ${sti} with a result of ${rrs}.
Fax info:
# pages : ${npg}
memo : ${ntf}
The first line contains a synopsis of the fax request status, comprising the fax request ID (seq) tag, the recipient
name (tnm) tag, recipient fax number (tfn) tag, send time (sti) tag, and the fax request result code description
(rrs) tag. If the tnm tag has a current value, that value is used. If tnm has not been defined, the default value,
unknown, is used.
The remainder of the message includes the total number of pages (npg) tag and contents of the note file as defined
by the ntf tag.
Special capabilities and limitations
When working with template files, be aware of the following special capabilities and limitations:
Template files must reside in the $VSIFAX/lib/templates directory. Template files in other directories
cannot be used by the system.
The note file (ntf) tag is special. If specified in a template file, the content of that file is inserted into lines
immediately following the ntf reference.
If a tag is specified without a default value and that tag is empty (i.e., it has no associated value), an empty
string is output.
If the <max> value is greater than the <length> value, it is set to <length>.
If a template file is specified and cannot be found, the default message will be silently used.
The vinfo templates command lists all template files in the $VSIFAX/lib/templates directory.
154
CUSTOMIZATION TECHNIQUES
Customizing email transport (routing) messages
When the fax server routes a fax to a user's email inbox, it does so by creating a short email message and including
the fax as a TIFF file attachment.
The default email transport message shows the sender as VSI-FAX server. The subject line shows the total number
of pages in the fax and the originating fax number (i.e., TSI string). The body of the message looks like this:
ID: 16175
clientid : jsmith
TSI : 408 270 9330
rcvd at : 2000/04/13 10:22:59
# pages : 1
To customize all email transport messages sent by the fax server:
1. Create your template file.
2. Place the template file in the $VSIFAX/lib/templates directory.
3. Add this entry to the $VSIFAX/lib/vsisrv.ini configuration file:
[DEVICE:sm]
template=<my_template.tpl>
Where <my_template.tpl> is the template file you want to use for your email transport messages.
Customizing vfxstat output
You can use template files to customize vfxstat status reports by specifying a valid template using the -T option as
follows:
vfxstat -T <template_file> <req_ID>
Consider the following sample template file that could be used to customize vfxstat reports:
Fax request : ${seq}
Num pages : ${npg}
Result : ${rrs}
To name : ${tnm,20.20} From name : ${fnm,20}
To company : ${tco,20.20} From company : ${fco,20}
To fax number : ${tfn,20.20} From fax number : ${ffn,20}
Notice the use of length statements to ensure a pleasing tabular report layout.
155
Troubleshooting
Troubleshooting
This section describes common problems that you may encounter while installing, configuring or using VSI-FAX. If
you do not find your problem described in this section, try to identify it before you contact Esker for help.
Before calling support
Have the following information ready when you call Esker Support:
All hardware components, including brand names and model numbers of the host system and equipment
associated with the fax modem
All applications and third party device drivers associated with the system
Modem type
Serial port (internal, serial card, etc.)
Cabling
Operating system
VSI-FAX release, serial number and build number (enter vfxsched -V)
Application program that caused the error
Complete description of problem
Specific steps to recreate the problem
Any error messages, exactly as they appear
Putting the scheduler in debug mode
Putting the scheduler in debug mode is one of the first things you should do when you encounter any problem.
1. Stop the scheduler
2. Edit the [VFXSCHED] section of the $VSIFAX/lib/vsisrv.ini file by making the following change:
Debug=On
3. Restart the Scheduler.
The data is written to the following log files in the $VSIFAX/spool/logs directory:
fax1
Default fax log
Loopback FIM log
vrsched Scheduler log
vxmld
TCP/IP log
lb
vnetfax Imaging and autosend log
157
INSTALLATION AND ADMINISTRATION GUIDE
These log files are incremented each time the scheduler is restarted. For example, these files may be used if you are
dialing but the faxes fail. You can then put the scheduler in debug mode, try to re-send the fax, and view the default
fax log (i.e.,fax1).
When you no longer need debug on, edit the $VSIFAX/lib/vsisrv.ini file and change the Debug= setting to
off.
Device problems
To keep the fax server working properly, it is important to know when the system is exhibiting a problem and the best
way to recover from an error. Common errors are Modem Server Keeps Dying and Max NoDials Reached.
This error may be caused when a phone line fails, when problems occur with a PBX, and/or when a modem fails to
respond.
VSI-FAX has the ability to send an email message or other notification when a modem has stopped working. A stopnotify script added to the system will notify a user or system administrator that a modem has stopped working. The
fax server can also be set up with a start and stop notification script showing when the server is started or stopped.
This can be used to notify a user or system administrator that the server is running or, in case of an error, how long
the server has been down.
When the script runs, it will check to see if a tmp file exists. This tmp file will contain a value that corresponds to the
number of times the software has attempted to restart the FIM. If the value is three, the script will send a fatal mail
message to the specified user. If the value in the tmp file is less than three, the script will restart the FIM.
DID fax modem support
To determine the version number of a modem that is currently being used by VSI-FAX, examine the log file located in
the $VSIFAX/spool/logs directory. The file is normally called fax1 for the first device, fax2 for the second
device, etc. The log file will contain entries like these:
MTYPE : 7.000 : Modem manufacturer : MULTI-TECH
MTYPE : 8.000 : Modem model
: MT1932ZDX
MTYPE : 8.000 : Firmware version
: 0115
Runaway processes (Unix)
VSI-FAX uses several processes that run during normal VSI-FAX operation. These processes should be selfmaintaining and will need attention only if the server begins to exhibit abnormal behavior, such as failing to restart
after it is stopped.
Runaway processes frequently cause this type of behavior. To identify any runaway VSI-FAX processes, stop the
scheduler and use the command:
ps -ef | grep vsifax
Then, use the kill command to terminate any processes shown.
Loading media error
Problem
Mount could not mount /cdrom : no such file or directory (error 2)
Solution
158
TROUBLESHOOTING
The /cdrom directory is the mount point for the mount command. This error message will occur if the /cdrom
directory does not exist. Use the Unix mkdir command to create the directory and try the mount command again. An
alternate mount point could be the /mnt directory which should exist.
Installation errors
Problem
With a Dialogic Diva Server fax board (formerly Eicon fax board), all lines can submit, but only one line can receive.
Solution
Launch the Diva Server driver configuration tool using the /usr/lib/opendiva/divas/Config command. Set
Capi call distribution policy (group optimization) to "off (broadcast incoming to all applications)".
Problem
Fax device is shown as Initializing or is set to Not Running.
Solution
The VSI-FAX scheduler executes one Fax Interface Module (FIM) process for each fax device on the system. The
Initializing or Not Running state reported most often is due to the failure of the FIM to successfully initialize
the modem, or an inability to communicate with the modem.
Verify the following:
The fax modem is powered on.
The serial modem cable is correct for the specific system.
The FIM process has exclusive use of the serial port and that no other processes are currently running on the
serial port. This includes disabling the port on systems using a serial port manager.
The serial port permissions are rw-rw-rw-(666).
The terminal server serial port for Ethernet terminal servers is set to support full modem control signals and
software flow control, in addition to being set up to accept host system stty configuration.
VSI-FAX includes a utility program that allows you to open the serial port and establish communication with the fax
modem. The program is called vtalk and is located in the $VSIFAX/lbin directory. For example:
vtalk -c -v /dev/tty1A
This program will allow you to troubleshoot serial communication with the fax modem. Once connected, you will not
see a prompt or any other indications that you have successfully opened the serial port. Start by entering the AT&F
modem reset command. You should then receive a response of OK assuming that you are successfully
communicating with the fax modem. Next try dialing out using the fax modem to determine if the modem is actually
responding to commands:
ATDT<fax number>
To exit the program, press CTRL-\.
Problem
Error message: Cannot Login to Server
Solution
This message is displayed when you execute any command that requires a response from the fax server.
The fax scheduler may not be running. You can confirm this with the following command:
vfxstat -r
Scheduler is not running
159
INSTALLATION AND ADMINISTRATION GUIDE
One of the scheduler's Unix server processes may have stopped servicing requests. Stop and restart the fax
scheduler to resolve this problem.
vfxsched restart
Communications and modem problems
Problem
Permissions on the port keep changing.
Solution
This is due to another process attempting to use the port, and this causes failures as the two programs contend for
access to the device. VSI-FAX requires exclusive access to the serial device used to communicate with the fax
modem.
Most commonly, this is due to a getty command attempting to start a login on the port. This must be disabled
permanently. Although methods for doing this vary from machine to machine, we will detail some common
procedures here.
Note
You must be in root to complete these procedures and you usually have to edit the ownership and permissions on
the port one final time once you've disabled the gett y.
Platform
Method
SCO Unix
Disable the getty on the port ttyXX by entering disable ttyXX. This permanently turns off getty
access to the port, leaving it free for VSI-FAX.
System V
Release 2
and 3
The /etc/inittab file contains a list of all programs that are run automatically, and this includes all
the getty entries. One line in this file mentions the tty that is of interest to you. This line must have its
third field changed from respawn to off. Once this file is saved, run init q to make the changes
take effect.
System V
Release 4
These machines use a ttymon process that monitors each port and automatically runs a login when
a connection is established. You must use your system administration facilities to ensure that no
activity is undertaken on your fax device port.
Note
Intel-based machines usually store their per-port getty information in two places. This means that changes
/etc/inittab are lost when the kernel is rebuilt. Look for the getty line in the file,
/etc/conf/cf.d/init.base, or in all the files in the /etc/conf/init.d/ directory. Make the change in
/etc/inittab plus the appropriate /etc/conf file, and run the init q command. A kernel rebuild is not
necessary.
A rogue process may be running on the port. Recall that VSI-FAX must have exclusive control of the port to which the
modem is connected. One way of detecting rogue processes is by the use of the ps and grep commands:
# ps -ef | grep ttyXX
Many operating systems provide a program that helps you track down processes that are using any given file, and
you can use it to find which process is using the device. The /etc/fuser (file-user) command takes a list of
filenames and searches through kernel memory and reports the process ID of any program using that file. Once the
PID is given, run ps -ef <PID> to identify what the process is.
Problem
The fax modem answers calls but terminates during negotiation.
Solution
160
TROUBLESHOOTING
This could be a compatibility issue with the sending fax machine and the fax modem's firmware. Try isolating the
problem to a specific fax machine, which may then require an upgrade of the modem's firmware.
Problem
Log files display time-out errors even though the full document was received at the remote site.
Solution
The fax modem will attempt to send the same page up to a total of three times. If the remote site has a thermal fax
machine, the portions of the page that were successfully received at the remote fax machine will appear, but unless
the remote fax machine responds with a positive acknowledgment, the local fax modem will reject the fax attempt up
to a total of three times. This condition could be caused by transmission errors, or firmware incompatibility between
the fax modem and the remote fax machine. It could also mean that the Unix serial port's software flow control is not
functioning correctly and data is being lost between the FIM software and the fax modem. The acknowledgments
from the remote fax machine received by the fax modem are not making it back to the fax software.
Problem
The received fax transmission speed is no greater than 4800bps.
Solution
The dial line may be contributing to a high degree of errors.
The transmitting fax machine may be limited to or manually configured to transmit at a rate lower than 9600 BPS.
Problem
Every call terminates with NO ANSWER.
Solution
Verify that you are calling a fax machine. Do your initial fax testing in the same room as the modem so you can hear
the call progress yourself. An answer of "Hello" usually means a human has picked up the line.
Verify that the proper dialing codes are used (e.g., some telephone systems require the prefix of 9 to reach an
outside line). To check, turn debug on, then view fax1 (or your default) to see what the dialed number is being
converted to.
Problem
A loud beep is heard about every two seconds on a fax call.
Solution
This is normal. Outgoing fax modems always emit a CNG tone about every two seconds to tell the recipient that the
caller is a fax machine and not a person. This can be disabled by adding the entry speaker-mode=off to the
Devices section of the $VSIFAX/lib/vsisrv.ini file.
Problem
Modem server keeps dying.
Solution
This problem could be due to serial port problems, serial port configuration issues, cable problems, unsupported
modem issues or other modem problems.
VSI-FAX only supports fax Class 2 or Fax Class 2.0 modems. Fax Class 1 modems are not supported.
VSI-FAX provides the vtalk utility for assisting in troubleshooting modem problems.
The vtalk utility is located in the $VSIFAX/lbin directory.
vtalk -c -v /dev/tty1A
After the port opens successfully you can enter modem AT commands
161
INSTALLATION AND ADMINISTRATION GUIDE
ATE1
This enables echo responses from the modem. The modem should return OK.
ATZ
This is the modem reset command. The modem should return OK.
AT&F&W
This is the modem load factory defaults and write to the profile command. The modem should return
OK.
AT+FCLASS=? This is the modem command to query the supported fax classes. The modem will return 2 for Class
2 support, Class 2.0 for Class 2.0 support and 1 for Class 1 support. Other values include 0,
which is data mode, and 8, which is voice mode.
Press CTRL-\ to exit.
If the modem did not respond check the serial port configuration,+ serial port cable and power cycle the modem then
try the vtalk utility again. If the modem does not appear to support Class 2 or Class 2.0, visit our web site
www.esker.com for the list of supported modems.
Emails problems
This section contains a troubleshooting procedure to help in solving common problems.
Activating the traces
When there is an issue with the emails, the first thing to do is to activate the debug and check the contents of the
generated log:
1. Edit the $VSIFAX/lib/vsisrv.ini file and add debug=on in the [VMAIL] section.
2. Restart the scheduler to apply the change.
3. Send a fax on the sm device (email fax) or send a fax on the loopback device in order to generate an email
notification.
4. Get the vmaild log in the %VSIFAX/Spool/logs folder and have a look at its content.
Below is an example of a vmaild log when it is not possible to connect to the mail server:
10/04 17.22.25.437: vmaild daemon version 6.1
10/04 17.22.25.437: Build info = Windows W32 5 00 586
10/04 17.22.25.437: System = LY-5
10/04 17.22.25.437: Debug mode = on
10/04 17.22.25.437: SMTP server = mail.example.com
10/04 17.22.25.437: ----------------------------------------------------------10/04 17.22.25.437: fifo: [8] start processing
10/04 17.39.04.781: fifo: [1] send mailfile mime00232aa.txt to [email protected]
10/04 17.39.04.781: Send mime00232aa.txt to [email protected]
10/04 17.39.04.812: Cannot connect: No error
For additional information, the debug flag located in the vsisvr.ini, under the [VMAIL] section, can be set to 2.
Then, the SMTP commands will be shown in the logs and the issue will be easier to troubleshoot.
1. Edit the $VSIFAX/lib/vsisrv.ini file and add debug =2 in the [VMAIL] section.
2. Restart the scheduler to apply the change.
3. Get the vmaild log in the %VSIFAX%/Spool/logs folder and have a look at its content.
See also
For detailed information about the SMTP protocol and its commands, refer to SMTP Protocol.
The Vmime file
When VSI-FAX attempts to send an email, two files are created and can be retrieved for further troubleshooting:
these files are in the %VSIFAX%/spool/mail/failed folder:
162
TROUBLESHOOTING
mimeXXXXXaa.txt: contains information for the SMTP protocol: From, subject, content...
mimeXXXXXaa.adr: contains the recipient email address
Below is a sample mimeXXXXaa.txt of a fax status notification:
From: [email protected]
Subject: VSI-FAX job 1151: status NORMAL
Mime-Version: 1.0
Content-Type: multipart/mixed; boundary="PART-BOUNDARY.vsifax.boundary.vsifax"
--PART-BOUNDARY.vsifax.boundary.vsifax
Content-Type: text/plain
Status for VSI-FAX fax job: 1151
Submitted by: vsifax E-mail : [email protected]
Submit time : 10/04 17:38 Queue : lb
Result : done Status : Normal
To name : <none> From name : VSIFAX Admin
To company : <none> From company: Example
To fax # : 1111 From fax # : 111111
To voice # : <none> From voice #: 1234
Subject : <none>
Num dialed : 1111
Cover : 1 pg default
Total pgs : 1 pg (actual 2)
Attempt Send-Time Result CSI
------- ----------- ------------------ ---------------1 10/04 17:39 Normal Example Doc
--PART-BOUNDARY.vsifax.boundary.vsifax-
The vmail utility
A vmail command line is actually executed when VSI-FAX has to send an email. This tool can be used manually:
1. Launch a command prompt and issue a Cd command to %VSIFAX%/lbin.
2. Type "vmail -?" to know the possible options.
3. First, do a "vmail -W" to get the sender name and mail server name used in the SMTP protocol (retrieved from
the $VSIFAX/lib/vsisrv.ini file).
4. Then, you can do a "vmail -Dvi <email_address> <mimeXXXXXaa.txt>" to resubmit failed email. The email
address should be the one from the mimeXXXXXaa.adr file. This will show the SMTP commands sent and
received from the mail server to send the email.
163
INSTALLATION AND ADMINISTRATION GUIDE
Comments: This email submission was successful. Here is the detail of the communication:
1. We can successfully connect to the SMTP server as we get the "220 mail-test.esker.fr..." message.
2. Then, the mail server provides some information in answer to the EHLO command
3. We send the MAIL from command with the sender name specified in the $VSIFAX/lib/vsisrv.ini file
and this sender is accepted by the mail server (Sender ok)
4. We send the RCPT to command with the recipient email address and this address is accepted by the mail
server (Recipient ok)
5. Finally, the data is passed to the mail server (subject, content) and the message is delivered by the mail
server
Common issues
Sender denied
The mail server can reject the sender for security reasons (to avoid the spam for instance). In this case, you can test
with some other sender (-U option) and then modify accordingly the sender flag in the $VSIFAX/lib/vsisrv.ini
file once you have a proper sender.
Some mail servers automatically add their domain name to the sender name passed in the MAIL From command if
the sender does not have a domain ("sender" becomes "[email protected]").
However, some mail servers do not do this operation automatically and you need to a fully qualified sender name
such as "[email protected]".
SMTP authentication
Some servers require an SMTP authentication to be used as email gateways. The SMTP authentication is supported
with VSI-FAX from version 4.2.2b and on.
See also
Refer to SMTP Authentication for the steps to follow to configure the SMTP authentication on the VSI-FAX server.
No outbound fax notification when the imaging fails
Problem : When the imaging fails, no .tif file is generated and the "sfx" notification is not sent.
In VSI-FAX version 6.0 and on, an email is also sent if no .tif file is generated. Then, you know that the fax has failed.
164
TROUBLESHOOTING
No inbound fax notification for some faxes
Problem : When routing the inbound faxes as pdf files (fmt-pdf value for the rfm tag), the conversion from .tif to
.pdf can fail for some specific inbound faxes with low resolution. When this conversion fails, no email is sent to the
user and the inbound fax does not reach the mail box of the user.
In VSI-FAX version 6.0 and on, the received .tif files are pre-processed before being converted to .pdf in order to
avoid conversion errors.
Printing problems
Problem
The vfxprint output to an HP LaserJet printer is unreadable.
Solution
The PCL output from vfxprint requires an eight-bit binary interface with no translation of any kind by the printer
driver. This is usually controlled by the stty command, and features such as parity, tab expansion, or NL-to-CRLF
translation will play havoc with the binary data. A completely raw mode must be selected. Tracking this down usually
requires system administration experience, but there are steps you can take to fix this problem.
The line printer spooler system provides a shell script, specifically an interface script, that is responsible for routing
the data to the printer. The lp command has the -o argument that permits the passing of arbitrary options to this
script, and many standard interfaces support some way of selecting this raw mode.
While debugging the lp spooler interface scripts is well beyond the scope of this document, users with administrative
experience can usually look at the script and find the way to do it. Look for raw or graphics options that directly or
indirectly set the-opost stty option.
The normal interface scripts are stored under the /usr/spool/lp directory, in a sub directory that depends on the
operating system version. Before System V Release 3.2, the interface sub-directory contained the scripts, and
after 3.2 they are kept in the admins/lp/interfaces subdirectory.
Some systems support the use of the lp -oraw command to indicate raw data being sent to the printer.
Miscellaneous problems
Problem
A received fax appears stretched or expanded.
Solution
The original fax was probably sent in standard resolution mode and should be resent in fine resolution mode. For
example:
vfx -n555-1212 -E fine file.tif
Problem
Accentuated characters are deleted from the document. For example, you submit a TXT file to be sent by fax and
some accentuated characters are missing from the resulting TIFF file.
Solution
You have to change the symset on the VSI-FAX server. For this, run the
lib/fxpcl/symset 0n (zero n) command on the VSI-FAX server.
165
INSTALLATION AND ADMINISTRATION GUIDE
Formatter errors
Problem
PostScript documents will not fax.
Solution
The PostScript language is highly standardized, but there is enough deviation from the norm that compatibility
problems still arise. The first test is always to send the document to a real PostScript printer. If the document fails to
print there, the VSI-FAX PostScript formatter will normally not process it properly.
The most common cause of these problems is an improperly configured or invalid PostScript driver in the application
software, or the use of Level 2 options. The VSI-FAX PostScript formatter only supports PostScript Level 1 files.
Most new printers support the more recent Level 2 language as defined by Adobe, and their drivers often use these
additional features. Some drivers can have Level 2-specific features disabled, so select this if available. We have
seen the least amount of compatibility problems with the Apple LaserWriter driver.
Alternatively, you can specify a file type of PS2, which will use the Ghostscript formatter, which supports PostScript
level 2.
Before calling technical support, have the exact name and version of the application that generated the PostScript
code. You may be asked to send a copy of the file that produces the error so we can reproduce the problem inhouse. Do not discard your test programs.
Problem
The quality of halftones in gray scale faxes is poor.
Solution
If you are not satisfied with the quality of halftones in your faxes, you can choose to either change the rendering
engine (by default a 300 dpi write-white engine) or parameters used by the Ghostscript engine provided with VSIFAX. To do so, you must open the gs_init.ps configuration file and adjust the settings in the Rendering parameters
section. Refer to the related section in the Ghostscript documentation for more information.
These adjustments can require some trial and error, but it usually involves reducing the halftone frequency.
Note
Altering these settings is not recommended unless you are an advanced Ghostscript user.
Problem
Lines vary in size.
Solution
This is usually caused by the PostScript driver not rounding to device space coordinates properly. At 300 dots per
inch, it is hard to see the difference between a 2-pixel-wide line and one that is 3 pixels wide. However, at 200 dpi, a
1-pixel-wide line looks different. Some common programming techniques completely eliminate these resolutiondependent artifacts, but some drivers choose not to use them. Report this to your application vendor.
Problem
Fax fails with the reason for failure BADIMG.
Solution
This error condition indicates that the file submitted for faxing could not be imaged properly.
It can also be caused by a corrupt input file or submitting an input file that is not in a supported file format.
VSI-FAX supports ASCII, TIFF, PostScript Level 1 and 2, PDF and PCL input files.
VSI-FAX uses the following conversion applications for submitting input files to the appropriate formatter. All of the
conversion applications are located in the $VSIFAX/lbin directory.
166
TROUBLESHOOTING
pcltotif This application converts PCL or ASCII files into TIFF files.
eptotif This application converts Epson format files into TIFF files.
gstotif
This application converts PDF and PostScript level 1 and 2 files into TIFF files.
The following example shows a method of using the conversion application directly to image the input file rather than
submitting the input file from the vfx command line or from one of the other fax submittal methods in VSI-FAX. The
example filename file.* should be replaced with your input file.
For PCL or ASCII files
pcltotif -o /tmp/test.tif -E fine file.pcl
If successful, this will create the /tmp/test.tif output file or return error messages if unsuccessful.
For Epson format files
eptotif -o /tmp/test.tif -E fine file.ep
If successful, this will create the /tmp/test.tif output file or return error messages if unsuccessful.
For TIFF files
vtifftool convert -o /tmp/test.tif -E fine file.tif
If successful, this will create the /tmp/test.tif output file or return error messages if unsuccessful.
Problem
Fax fails with the reason for failure SCHERR.
Solution
VSI-FAX scheduler processes have experienced a permissions problem or a scheduler problem.
To resolve SCHERR conditions, restart the VSI-FAX scheduler in debug mode. After you recreate the problem, go to
the $VSIFAX/spool/logs directory and look for error messages in the vrsched and vnetfax debug logs. Submit
the debug logs to Esker Technical Support if required.
Problem: GNU Ghostscript 7.07: Unrecoverable error
If you encounter the following type of Ghostscript error when converting PDF files into TIFF:
D:\>vfx -o PurchaseOrder10336898.tif PurchaseOrder10336898.pdf
vfx: error imaging envelope: C:\Program Files\VSI-FAX\FaxServer\vsinet\netspool\2820735-1.pdf: gstotif: GNU Ghostscript 7.07: Unrecoverable error, exit code 1
Solution
The solution is to upgrade the Ghostscript 7.07 version used by VSI-FAX to get the Ghostscript latest fixes.
Ghostscript versions superior than 7.07 cannot be delivered with external products like VSI-FAX but you may install
them by yourself. For the detailed procedure, refer to Updating Ghostscript on a Windows platform or Updating
Ghostscript on a Unix platform.
167
Using vfx Tags
Using vfx Tags
This section discusses using vfx tags to fax-enable your existing business applications.
Tags are always three-character mnemonics for the function they accomplish. For example, the tfn tag is used to
define the fax number, the tgf tag is used to define a tag file, etc.
The vfx command line
The easiest way to use tags is to include them with a vfx command by using the -t option. For example, to fax a
text file (hello.txt) containing the message "Hello, World" to local fax number 555-1212, you would enter in a
command shell at the fax server:
vfx -t tfn=555-1212 -t fll=hello.txt
Passing tags to the fax server using vfx commands is a good integration technique for situations where your existing
business application can issue external commands.
See also
Refer to Command Reference in the Reference Addendum documentation for complete vfx command
documentation.
vfx tags
vfx tags are used to pass fax envelope information to the fax server (refer to The fax envelope for more information).
You can use any of the following on a vfx command line, as well as in tag files and batch files:
Tag
aco
Description
From area code
ad1 - ad3 To address lines 1 thru 3
arc
Automatically archive sent faxes
cli
Client ID
cvr
Cover page
Custom date format
fa1 - fa3 From address lines 1 thru 3
fcn
From country name
dtf
fco
From company name
fcv
File conversion options
fdl
Local folder
fds
Server folder
fem
From email address
ffn
From fax number
fll
Local file attachment
169
INSTALLATION AND ADMINISTRATION GUIDE
Tag
Description
fls
Server file attachment
fnm
Custom from name
fpg
TIFF file attachment page range
fpl
File attachment page size
frs
File attachment send resolution
ftp
File attachment type
fvl
Local overlay
fvn
From voice number
fvs
Server overlay
gal
Group name
gnp
Group notify procedure
grp
Group file
icc
Internal CC with cover page
lcr
Allow least cost routing
lnd
Sent fax page orientation
lnp
Launch notify procedure
mad
From email address
ncc
Internal CC without cover page
not
Send notify mode
ntx
Note text
ofn
File attachment original path
oui
Override USERINFO
ovl
Local overlay
ovs
Server overlay
pal
Person alias
pgh
Custom page header for a given fax request (this does not apply to the FoDC device)
pgl
Sent fax page size
pre
From fax number prefix
que
Fax queue
res
Send resolution
ret
Retry strategy
sig
Signature file
stm
Send time
sub
Subject
suf
From fax number suffix
tco
To company name
To fax number
tg1 - tg4 User from tags 1 through 4
tgf
Tag file
tfn
tin
Custom to information
tmf
Custom time format
tnm
To name
tnp
Transmit notify procedure
tsi
Transmitting station ID
tti
Transmitting terminal ID
170
USING VFX TAGS
Tag
Description
tvn
To voice number
udf
User defaults
Issue the following command in the command shell to obtain the compelete list of valid envelope tags:
vfx -help tags
Tag files
Tag files are ASCII text files that contain one vfx tag per line. For example, you could fax the same message as the
previous example by saving this information to tag file hello.tag:
tfn=555-1212
fll=hello.txt
To send the fax, you would pass the tag file to the fax server using the -t tgf=<tag_file> option as follows:
vfx -t tgf=hello.tag
You could easily add a few more tags to include a "classic" cover page (cvr tag) with a subject line (sub tag),
recipient name (tnm tag) and recipient company name (tco tag). That tag file would look like this:
cvr=classic
sub=Sample Hello World Fax
fll=hello.txt
tfn=555-1212
tnm=Billy Bear
tco=Wild Mountain Resorts
Tag files are especially useful for situations where your existing business application can write output to a file but
cannot issue external commands. However, you must write the script that passes the tag file to the fax server. This is
typically done using vfx commands, placing the file in the autosend directory or emailing the file to the fax server.
Tag files with multiple files or recipients
When a tag file defines more than one file to be included with the fax (e.g., using multiple fll tags) or defines more
than one recipient (e.g, using multiple tfn tags), the tag file must be constructed in a particular order, or that fax will
not be sent as intended.
Important
Tag files have one important limitation: they cannot send different faxes to different recipients. You can send the
same fax to more than one recipient (i.e., send a group fax) but the faxes will be identical. If you need to send
different faxes to different recipients, consider using a batch file.
See also
See Advanced Group Faxing for additional information.
Each recipient block must start with a tfn tag. All subsequent information (e.g., name, company name, etc.)
is assumed to be for that recipient until the next tfn tag is encountered.
Each file inclusion block must start with one of the following tags:
Tag
Description
fdl Local folder
fds Server folder
171
INSTALLATION AND ADMINISTRATION GUIDE
Tag
Description
fll Local file attachment
fls Server file attachment
All subsequent file-specific information is assumed to be for that recipient until the next file inclusion tag is
encountered.
Let's extend our previous example even further by including more than one file and sending this identical fax to more
than one recipient.
cvr=classic
sub=Sample Hello World Fax
fll=hello.txt
fvl=hello.tif
tfn=555-1212
tnm=Billy Bear
tco=Wild Mountain Resorts
tfn=556-1313
tnm=Rocky Racoon
tco=Big River Ski Lodge
tfn=557-1414
tnm=Kyle Koala
tco=Down Under Adventures
This tag file will use a classic cover page with the subject line, "Sample Hello World Fax." This cover page will be
populated with the name and company name of each recipient (defined with the tnm and tco tags in each recipient
block, respectively).
The fax will comprise a local file attachment (hello.txt) and a local overlay file (hello.tif). Everything but the
cover page will be identical for all fax recipients.
Here documents
"Here" documents are special cases within tag files and batch files (See Batch files) where a local file, instead of
being referenced externally, is actually embedded directly into the tag or batch file.
"Here" documents can be embedded using any of these vfx tags:
Tag
Description
fll Local file attachment
ntf Note file (memo)
The normal way to use any of these tags is to supply an external file specification (full path and file name you want to
include). When you define a "here" document, you simply define an internal area of the tag or batch that contains the
same information. Consider this example:
fll=<<EOF
Hello, World.
EOF
Instead of the fll tag referencing an external text file (containing the message, Hello, World.), the message is
directly embedded using the <<EOF and EOF statements to define the area between them as a "here" document.
172
USING VFX TAGS
Tip
You are not limited to using End of File (EOF) character strings to define your "here" documents. You can use any
character sequence you like, provided that it does not contain spaces and is not used in the body of your "here"
document. In fact, you will need to use a different character sequence if your "here" document contains an EOF
statement within it.
"Here" documents provide additional flexibility when you need to fax-enable an application that can write output to a
file but cannot issue external commands.
173
Embedded commands
Embedded commands
You can embed vfx commands in ASCII text, PCL, or PostScript files, then pipe or redirect them to the vfx
command as standard input (STDIN). These embedded commands are processed as if you had entered them directly
on the command line.
Embedded commands are typically used to:
Embed images, such as company logos, directly into a file you want to fax
Embed tags that contain fax envelope information See The fax envelope directly into a file you want to fax
Embedded commands are especially useful when integrators are programmatically generating a faxable file directly
from an existing business application. These embedded commands allow you to create the entire fax (including the
fax envelope information) and hand it to the fax server for sending-no additional formatting or intervention is required.
Embedded images
There are two embedded commands available for embedding images into the file you want to fax:
@+IMAGE
@+INCLUDE
The @+IMAGE command embeds the specified image file behind the text while the @+INCLUDE command embeds
the specified image file in line with the text.
The @+INCLUDE embedded image command cannot be passed through STDIN whereas the @+IMAGE embedded
image command can be used with or without passing through STDIN.
@+IMAGE
The @+IMAGE embedded image command allows you to include TIFF files, like your company logo or a personal
signature, in a faxable document. Furthermore, you can control the exact position of each embedded image on the
faxed document. The image is included behind the text.
Note
Using the @+IMAGE embedded image command requires a good working knowledge of the format to modify.
The basic syntax for an embedded image statement is:
@+IMAGE[<file_name.tif>]
Where <file_name.tif> is the name of your TIFF file.
Image positioning
The default location for embedded images is the current location of the embedded image statement in the text, PCL,
or PostScript file. In other words, if you placed your embedded image in the middle of a text, PCL, or PostScript file,
the top-left corner of that embedded image would appear in the middle of the faxed document behind the text.
While this may be sufficient for some applications, in most cases more precise positioning is required. This is
accomplished by including position coordinates in your embedded image statement as follows:
@+IMAGE[<filename.tif>;x=<pos>{i|cm};
y=<pos>{i|cm};
175
INSTALLATION AND ADMINISTRATION GUIDE
ax=<pos>{i|cm};
ay=<pos>{i|cm}]
Where (ax,ay) are absolute coordinates and (x,y) are relative coordinates. If the coordinates are followed by an i, the
coordinates are in inches. If the coordinates are followed by a cm, the coordinates are in centimeters. Otherwise, the
coordinates are in pixels.
Absolute position coordinates define a horizontal and vertical offset from the upper left corner of the fax document,
and relative coordinates are from the current location (i.e., the location of the embedded image statement in the text,
PCL, or PostScript file). In other words, if absolute position coordinates are supplied, the position of the embedded
image statement in the text, PCL, or PostScript file is irrelevant.
Examples
This example shows how to embed a TIFF file (logo.tif) directly into a text, PCL, or PostScript in the default
location (i.e., at the exact point of the embedded image statement in the text, PCL, or PostScript file). It will extend
down from this point to the full height of the image and up to the full horizontal width of the page.
@+IMAGE[logo.tif]
This example shows how to embed a TIFF file logo.tif two inches from the left margin and five inches from the top
margin. The image will extend down from this point to its full height and up to the full horizontal width of the page.
@+IMAGE[logo.tif;ax=2i;ay=5i]
@+INCLUDE
The @+INCLUDE embedded image command allows you to insert TIFF files in a faxable document. The image is
inserted in line with the text at the current location of the embedded image statement in the text, PCL, or PostScript
file.
The basic syntax for an embedded image statement is:
@+INCLUDE [<file_name.tif>,fine|std|trim|box|ul-down|ll-up]
Where
<file_name.tif> is the name of your TIFF file.
fine/std sets the image resolution (fine or standard).
trim trims the image if it goes over the margins
box draws an optional box around the image
ul-down/ll-up sets the display direction (upperleft-down or lowerleft-up)
Examples
The following sample file illustrates the use of the @+INCLUDE embedded image command and its options box
andul-down/ll-up. It also shows the difference with the @+IMAGE embedded image command that includes the
image behind the text:
176
EMBEDDED COMMANDS
Capabilities and limitations
The @+IMAGE and @+INCLUDE embedded commands must be all uppercase. The remainder of the embedded
image statement (e.g., file name, position coordinates, options, etc.) is case-insensitive.
The @+IMAGE and @+INCLUDE statements can only include single-page TIFF image files. Multi-page TIFF files are
not supported, and only the first page will be processed.
Embedded image statements can only refer to files in these directories:
$VSIFAX/lib/images
$VSIFAX/faxq/<user_ID>/images
You must use the vupload command to place image files in these directories. Copying and pasting the files is not
sufficient.
Because these files must be located in one of these directories, full path names are not required nor are they
supported.
Embedded tags
Using vfx Tags describes ways to use tags directly or to pass text files containing tag statements to the fax server.
There is yet another way to use vfx tags that does not require ASCII text files.
You can embed vfx tags directly into ASCII text, PCL, or PostScript files. If vfx encounters specific embedded tag
sequences in these files, it uses them to create the fax envelope.
Embedded tags are a good way to extend print-to-fax functionality and implement more powerful fax integrations.
Capabilities and limitations
Unlike the @+IMAGE command, embedded tags are scanned only if the file is piped or redirected to vfx as STDIN.
177
INSTALLATION AND ADMINISTRATION GUIDE
The @+VFX statement must be all uppercase. However, the tag/value statements are case-insensitive.
The entire embedded tag sequence must be continuous-it cannot contain any spaces or explicit line breaks (hard
returns).
If you need to include a space in a tag value, use the tilde (~) character. Any tilde (~) character encountered is
replaced by a space unless it is escaped (\~).
You can only embed vfx tags that store fax envelope See The fax envelope information. These are sometimes
referred to as cover page tags because their primary purpose is to place fax envelope information on fax cover
pages. This is a list of tags you can embed:
Tag
Description
client ID
fa1-fa3 from address lines 1 thru 3
fcn
from country name
cli
fco
from company name
fem
from email address
ffn
from fax number
fnm
from name
fvn
from voice number
ntf
note file
sub
subject line
sig
signature file
tco
to company name
tfn
to fax number
tg1-tg4 user-defined tages 1 through 4
tin
custom to information
tnm
to name
tvn
to voice number
See also
See Using vfx Tags for detailed information about these and other vfx tags.
Examples
This is an example of an embedded local fax number:
@+VFX[tfn=555-1212]
This is an example of an embedded local fax number, recipient name (with tilde (~) as a space holder) and cover
page:
@+VFX[tfn=555-1212;tnm=Mr.~Smith;cvr=classic]
This example shows how to use both embedded tags and embedded images in a file (sample.txt):
@+VFX[tfn=5551212;tco=TechSupport]
This is an example of how to send a fax using the embedded commands. The embedded command sends the fax
number and the "To Company Name" to the VFX command.
@+IMAGE[<filename.tif>]
This command places an image file in the location where the command is found.
You could redirect this file to the vfx command using any of the following commands:
178
EMBEDDED COMMANDS
vfx < sample.txt
more sample.txt | vfx
$ cat sample.txt | vfx
C:\> type sample.txt | vfx
Note
The first two commands work on any platform, the third command works on Unix/Linux, and the fourth command
works on Windows.
179
Print-to-fax
Print-to-fax
Print-to-fax is a versatile way to either deliver a fax envelope to the fax server or prepare a fax envelope so that it can
be delivered by other means. You can use the print-to-fax features of VSI-FAX to send faxes from any application
where the Print option is available (Microsoft Word, Microsoft Works, Microsoft Excel, Word Perfect, StarOffice, etc.).
There are two primary ways to send faxes from any application with print-to-fax:
Use one of the VSI-FAX print drivers.
Use a normal (non-VSI-FAX) PostScript, PCL or ASCII print driver.
When facing print-to-fax issues, you should consult the troubleshooting section below.
Using VSI-FAX print drivers (Windows only)
The easiest way to implement print-to-fax is to direct your application's print output to one of the fax print drivers
provided with VSI-FAX. A separate print driver is provided with each fax client. The VSI-FAX print drivers are printers
that allow you to send faxes from any print-capable Windows application.
Once a VSI-FAX print driver has been installed on your computer, all you have to do is print your document on this
printer in order to send it to the VSI-FAX server, on which your document will be processed and sent to its recipients.
After you have submitted your documents you will be able to track them, from submission to delivery, using VSI-FAX
Server Administration or LanFax Manager.
When printing a document, the VSI-FAX print driver rasterizes your application information session, prompts you for
essential send information (e.g., fax number, recipient name) and delivers the fax envelope to the fax server. In other
words, the VSI-FAX print drivers provide both a way to create the fax envelope and a delivery mechanism for getting
the envelope to the fax server.
Important note
This print-to-fax mode is only available on Microsoft Windows client systems. However, you can use it to send
faxes from a Windows application to an Unix VSI-FAX server.
Using a normal (non-VSI-FAX) PostScript, PCL or ASCII print driver
The second way to implement print-to-fax is to direct your application's print to a conventional (non-VSI-FAX)
PostScript, PCL or ASCII print driver and save the output to a file.
The advantage to this approach is that you can use any PostScript, PCL or ASCII print driver installed on your
system-you are not restricted to using one of the VSI-FAX print drivers.
The disadvantage to this approach is that you must get the PostScript, PCL or ASCII to the fax server-you do not
have an integrated delivery mechanism. In most cases, you will need to pass these files to the fax server using vfx
commands.
Troubleshooting print-to-fax issues
Standard print-to-fax process
The following provides an explanation of the standard print-to-fax process:
181
INSTALLATION AND ADMINISTRATION GUIDE
1. A document is printed on the VSI-FAX Client printer (VSI-FAX LanFax Windows Client, VSI-FAX Mailmerge
Client or VSI-FAX Outlook Client printers).
2. A pcl file is generated by the printer in a temporary directory. The default location of this directory depends on
the operating system:
•
On Windows XP: C:\Documents and Settings\<user>\Local Settings\Temp\<user>
•
On Windows Vista: C:\Users\<user>\AppData\Local\Temp\<user>
Where <user> is the current Windows user.
3. A printing finished event is emitted and the vfxptof process detects this printing signal
4. The VSI-FAX client is launched with the generated pcl file attached retrieved from the temporary folder.
When confronted to a print-to-fax issue, you should first of all determine what step of the above process is affected.
This will allow you to troubleshoot your problems more efficiently.
Solving common print-to-fax issues
By default, when printing a document from an application to the LanFax printer, the LanFax window is displayed
behind the current application and not on the foreground.
Follow these steps if you want the LanFax windows to appear on top of the printing application:
Click Start > Run... and enter Regedit to start the Registry Editor.
Go to the following registry location:
HKEY_CURRENT_USER\Control Panel\Desktop
Change the value of the ForegroundLockTimeout key to 00000000
Close and reopen your Windows session to validate these changes.
Warning
Changing this registry key will affect all the Windows applications of the current user, not just VSI-FAX LanFax
Windows Client.
Troubleshooting steps
In case of an issue with the print-to-fax, the following things need to be verified depending on where the process fails:
1. First of all, you must check that a pcl file called currentpcl.pcl is generated in the %temp%\%username%
directory. Depending on your operating system, this directory may be:
•
On Windows XP: C:\Documents and Settings\<user>\Local Settings\Temp\<user>
•
On Windows Vista: C:\Users\<user>\AppData\Local\Temp\<user>
Where <user> is the current Windows user.
2. If you cannot find this pcl file:
•
Check the properties of the VSI-FAX printer. To do so:
1.
In the Control Panel, open the Printers and Faxes directory.
2.
Right-click on the VSI-FAX printer and select Properties.
3.
In the Ports tab, select the port currently used by the printer (in most of the cases, it will be
VFXWINCLIENT).
4.
Click on the Configure Port... button.
Click here for a preview of this interface.
182
PRINT-TO-FAX
We strongly recommend that you use the default port parameters.
The table below contains the port parameters that are set by default for the VSI-FAX client
printers (VSI-FAX LanFax Windows Client, VSI-FAX Mailmerge Client and VSI-FAX
Outlook Client):
Field name
Default value for the client printers
Base Directory
%[TEMP]V
Directory
%U
File Name
currentpcl
Extension
pcl
Application
The default value of this field depends on the client printer:
For the VSI-FAX LanFax Windows Client printer:
"C:\Program Files\VSI-FAX\LanFax Windows
Client\Printerdrivers\vfxpostprint.exe" "%2" "%3" "%U"
For the VSI-FAX Mailmerge Client printer:
"C:\Program Files\VSI-FAX\Mailmerge Client\vfxpostprint.exe" "%2" "%3"
"%U"
For the VSI-FAX Outlook Client printer:
"C:\Program Files\VSI-FAX\Outlook Client\vfxpostprint.exe" "%2" "%3"
"%U"
Security Context
User Context
Windows's Show
State
Default
Wait until
application terminated
or
300000
183
INSTALLATION AND ADMINISTRATION GUIDE
The table below contains the port parameters that are set by default for the VSI-FAX Server
printer:
Field name
Default value for the VSI-FAX Server printer
Directory
C:\Program Files\VSI-FAX\FaxServer\spool\temp
File Name
currentpcl
Extension
pcl
Application
"C:\Program Files\VSI-FAX\FaxServer\lbin\vfxpostprint.exe" "%2" "%3" "%U"
Security Context
User Context
Windows's Show State Default
Wait until
application terminated
or
300000
Note
All other port parameters are empty/unchecked by default.
If you have altered these parameters, you must check that:
•
The concatenation of the Base Directory and Directory fields is a valid path that refers to an
existing directory.
•
Any directory path that contains spaces is surrounded by " characters.
•
The file name/prefix and the file extension field values don't contain one of the following
characters: * . " / \ [ ] : ; | = ,
•
If you use environment variables in any fields (for example the Base Directory and/or Directory
fields), you must:
•
Check that their syntax respects the following format:
%[<varname>]V
Where <varname> is the name of the environment variable to use (for example TEMP,
TMP or USERNAME).
Tip
For the USERNAME environment variable, you can supply %U instead of
%[USERNAME]V
•
Check that the contents of your environment variables are either a valid directory name
or a valid path. To do so, you can either run the set command or check your
computer's advanced settings.
Note
Remember that environment variables defined for a specific user override system
variables.
•
If the above properties are correctly set, check that the user has the rights to read and write on the
target temporary folder.
3. If the .pcl file is correctly generated in the relevant directory, you must check that the VSI-FAX client process is
running:
•
184
Check if you can find the vfxptof process in the Windows Task Manager:
PRINT-TO-FAX
Terminal Service considerations
When troubleshooting print-to-fax issues in a Terminal Service environment, you must remember the following facts:
We recommend that you install the latest version of the LanFax client on Terminal Service servers.
By default, in Terminal Service servers, the currentpcl.pcl is generated in the C:\Documents and
Settings\<username>\Local Settings\Temp\<username>\<session number> folder. This
behavior is correctly handled by the vfxptof process.
When verifying if the VSI-FAX client process is running on a Terminal Service server, you must also check the
Show processes from all users to make sure that the vfxptof process is running for the appropriate user.
185
Email-to-fax
Email-to-fax
Email-to-fax is a delivery mechanism ideally suited to remote fax integration because it does not require a direct
network connection to the fax server, nor access to the fax server file system. A network connection from the fax
server to an incoming (POP3) Internet mail server is necessary, and your application must have emailing capability.
Configuration and setup
The email to fax feature is normally setup during VSI-FAX installation. However, if for some reason you did not do this
when your fax server was installed, you can do it now by performing the following:
1. Verify the integrity of the network connection between the fax server and your incoming (POP3) Internet mail
server.
2. Create a dedicated fax email account on your incoming (POP3) Internet mail server.
Tip
We recommend creating this account with the user name autofax as it is unlikely this name is already in
use.
The remainder of this section will assume that you are using autofax for your POP3 email-to-fax account. If
you decide to use another name, substitute that name in our examples.
Important
This email account must be set aside strictly for faxing. The fax server will assume that any message in
this email inbox is a fax and will process it accordingly. Therefore, ensure that the autofax email address
is not added to any email groups or corporate mailing lists.
3. Configure the fax server to monitor the autofax email account.
You can do this using the VSI-FAX Server Administration snap-in or by manually modifying settings in the
$VSIFAX/lib/vsisrv.ini configuration file.
1.
Enter your incoming (POP3) Internet mail server host name, fully qualified Internet domain name or IP
address.
If you are
Using the MMC
snap-in
Do this
Go to the Fax Server Email Gateway properties and enter the host name, domain
name, or IP address in the Pop Host name field.
187
INSTALLATION AND ADMINISTRATION GUIDE
If you are
Modifying
vsisrv.ini
2.
Do this
Go to the VPOPD section and add the host name, domain name or IP address of
your incoming (POP3) Internet mail server to the host-name= entry.
Enter the name of the POP3 user account you created in step 1.
If you are
3.
Do this
Using the MMC
snap-in
Go to the Fax Server Email Gateway properties and enter the user name in
the User name field.
Modifying
vsisrv.ini
Go to the VPOPD section and add the user name to the user-name= entry.
Enter the password for the POP3 user account.
If you did not create a password for this account in step 1, you do not need to enter a password
If you are
Do this
Using the MMC
snap-in
Go to the Fax Server Email Gateway properties and enter the password in the
Password field.
Modifying
vsisrv.ini
The vsisrv.ini password entry is encrypted, therefore it cannot be directly
added via a text editor. You must use the vfxadmin command line utility to add
this entry.
Open a command shell and enter the following:
vfxadmin config -a -e VPOPD password <entry>
Where <entry> is the actual password defined for the POP3 user account you
created in step 1.
Message formats
There are two different acceptable message formats for email messages sent to the autofax account.
Fax number in subject line
If your email message to the autofax account includes a valid fax number or email address in the subject line, the fax
server assumes that the body of the email message is plain text.
The syntax for including a fax number in the email subject line is:
<fax_number>[<subject_text>]
Where <fax_number> is a valid fax number or an Internet email address. The email address must be preceded by a
# sign. <subject_text> is optional subject line text, enclosed in brackets.
The remainder of the mail message is limited to ASCII text and other file attachments that can be natively imaged by
the fax server (e.g., PostScript, PCL, text, etc.). For example, you cannot include tag or batch files in this kind of
email message. The fax server will image the tag and batch files as plain text.
No fax number in subject line
If your email message to the autofax account does not include a valid fax number or email address in the email
subject line, the fax server assumes that the body of the email message is a tag or batch file.
See also
188
EMAIL-TO-FAX
Refer to Tag files and Batch files for additional information about how to define a fax envelope using these
techniques.
Message attachments
For non-tag email coming in via POP3 or VSMTPD, the first attachment (the body of the email) is scanned for any
@+VFX[] lines, and any tags found are added to the job. The rest of the attachment is processed normally.
If the first attachment consists of only @+VFX[] lines, the attachment file is discarded after extracting the tags, and
the tags then apply to all subsequent attachments. This allows a user to specify any embeddable tag in a fax request
submitted via email.
189
SMTP Authentication
SMTP Authentication
Simple Mail Transfer Protocol (SMTP) is a protocol for sending email messages between servers. VSI-FAX supports
the authentication required by some mail servers to receive submitted email messages.
Note
Because of the specialized authentication MSN uses, it is not supported as an ISP.
The following parameters, which support the use of email authentication within VSI-FAX, can be set in
$VSIFAX/lib/vsisrv.ini file, [VMAIL]section.
authtype
The authentication type to use. This must match one of the types recognized by the SMTP server. When
you issue the EHLO SMTP command to the mail server, it will respond with the authentication types
available in the AUTH line.
authrsp
The list of responses to use. This is an encrypted string consisting of a colon-delimited list of responses.
The vmail program will decrypt this entry and send each part as a response to an authentication prompt,
encoding the text in base64 as it sends it.
authdelim
An alternate delimiter to use in case any of the response strings contain a colon.
Configuring VSI-FAX for SMTP Authentication
To configure VSI-FAX for mail server authentication:
1. Determine the type of authentication used by your mail server:
2. Issue the telnet <mailserverIP> 25 command to connect to the SMTP port on the mail server.
3. Issue the EHLO command.
4. Check the AUTH line to see what authentication types are available.
5. Issue the QUIT command to disconnect from the mail server.
6. In $VSIFAX/lib/vsisrv.ini file, [VMAIL] section, add the auth-type=<authtype> linewhere
<authtype> is the type of authentication used by the mail server. For example, if the mail server is using
login authentication, you would add the following line:
auth-type=login
7. Add the response the mail server requires using the vfxadmin config command from a command prompt.
You will be prompted to enter the auth-rsp. You must enter <user>:<pswd> where <user> is the mail
user the way it appears in the $VSIFAX/lib/vsisrv.ini file and <pswd> is that user's password. You will
need to re-enter it. (The entries in the auth-rsp field are colon delimited and encrypted. Since the string is
encrypted, you must add it using the vfxadmin config command instead of entering it directly into the
vsisrv.ini file.) There should now be an encrypted password line in the [VMAIL] section of the vsisrv.ini
file. For example, if the auth-type was login, and a login name (test) and password (hello) were required, you
would execute the following steps:
8. Issue vfxadmin config -a -p -e VMAIL auth-rsp
191
INSTALLATION AND ADMINISTRATION GUIDE
9. Enter test:hello when prompted for the auth-rsp and when prompted to re-enter the auth-rsp.
10. Send an email message from VSI-FAX with either of these two commands:
•
vfx -n <emailaddress> <file>
•
vfx -n <emailaddress> -O -C classic
11. If the email message is not received, you can troubleshoot the problem with the following steps:
12. Set debug to On in $VSIFAX/lib/vsisrv.ini file, [VFXSCHED] section.
13. Set debug to 2 in $VSIFAX/lib/vsisrv.ini file, [VMAIL] section.
14. Send an email message.
15. Check the contents of $VSIFAX/spool/logs/vmail log file to see if errors are reported.
SMTP Protocol
This is a basic explanation of the SMTP protocol: the commands used, the possible answers from the Mail server as
well as how to test it.
The usual SMTP port is 25. To connect to the mail server, open a command prompt and connect with a telnet on the
port 25.
Command Sent to the mail server
Answer from the mail server
telnet <mail.domain.ext> 25
220-mail.domain.ext ESMTP Sendmail <version-number>;
<date+time>
HELO <local.domain.ext>
OR
250-mail.domain.ext Hello [local.ip], pleased to meet you
EHLO <local.domain.ext>
250-mail.domain.ext Hello [local.ip], pleased to meet you
250-ENHANCEDSTATUSCODES
250-8BITMIME
250-SIZE
250-DSN
250-ONEX
250-ETRN
250-XUSR
250 HELP
MAIL FROM: [email protected]
250-2.1.0 [email protected]... Sender ok
RCPT TO: [email protected]
250-2.1.0 [email protected]... Recipient ok
DATA
Subject:<subject>
//press enter twice
type the body
192
SMTP AUTHENTICATION
Command Sent to the mail server
Answer from the mail server
.
//a "." Character followed by enter mlarks the end of
the body
250-2.0.0 <message ID> Message accepted for delivery
Quit
221-2.0.0 mail.domain.ext closing connection
Connection closed by foreign host.
193
Advanced Group Faxing
Advanced Group Faxing
You can send the same fax to a group of recipients using one of our fax clients. You can also do modest amounts of
group faxing directly from the vfx command line.
However, if you need to send faxes to large groups, send personalized faxes tailored to each recipient or re-use your
group faxes, consider one or more of the advanced techniques described in this section.
Which group faxing strategy is best for me?
Before you decide on a particular approach or strategy for your group faxing, consider the following:
Are you using recipient information from a database or spreadsheet program?
Consider using a group file. Export your information to a delimited ASCII text file. This strategy is ideal for semiautomated fax blasting to a large recipient list.
Are you creating your fax document with a word processor?
Consider using your word processor's mail merge feature to create a fax merge using the VSI-FAX Mailmerge client
(for desktop users) or the Fax Merge (for integrators). While you can't fully automate this technique, most modern
word processors have some sort of mail merge feature that can be used to send group faxes.
Do you need to re-use your group fax?
Consider using a template file. You can define the overall layout of your fax with the template file and populate it with
recipient information from a group file. If you need to send another group fax to a different group of recipients, simply
use a different group file.
VSI-FAX MailMerge client
VSI-FAX MailMerge client uses the Microsoft Mail Merge function to create and send faxes. For details on the
MailMerge Client installation and use, refer to VSI-FAX MailMerge Client (page 203).
Mailmerge mechanism
Here are the details on the Mailmerge process:
1. When using the Send to VSI-FAX button, a Word document for each record is generated and printed on the
Mailmerge printer.
2. A file called mailmerge<recordNb>.pcl is created for each Word document by the printer in the temporary
folder of the Mailmerge client. By default:
•
On Windows XP: C:\Documents and Settings\<user>\Local Settings\Temp\<user>
•
On Windows Vista: C:\Users\<user>\AppData\Local\Temp\<user>
Where <user> is the current Windows user.
3. Then, the following command line is executed to submit the fax: mailmerge.exe -n <fax nb> -d
mailmerge<recordNb>.pcl.
195
INSTALLATION AND ADMINISTRATION GUIDE
Fax Merge
Important
The Fax Merge feature is designed to be used by integrators. It is not recommended for desktop faxing. Desktop
users should use the VSI-FAX Mailmerge client instead.
Fax merge is a special kind of print-to-fax operation that uses your word processor's mail merge feature to send
individualized faxes to a group of recipients. Refer to Print-to-fax for more information.
When you print a mail merge job, your word processor creates each individualized document by inserting variable
information, such as the person's name, title and address, from a data source document (list file) into a content
template document (form file). The software repeats this process as many times as necessary to create and print all
the required individualized documents.
This diagram shows how to adapt a basic mail merge feature for fax merge.
Word processor
The first step in creating a fax merge job is to use your word processor's mail merge feature to create a content
template (form file) that will be individualized with information from a data source (list file). In many cases, this data
source is a text file containing entries for each fax recipient. However, some word processors support reading this
recipient information directly from a database.
To adapt your word processor's mail merge feature for fax merging, create your form file using a structure that allows
the fax server to distinguish destination data from the rest of the information that is the actual fax you want to send.
Destination data is embedded into the form file using standard VSI-FAX embedded tags. Embedded fax tags always
use this format:
@+TAG[<tag>=<value>]
Where <tag> is a valid send tag and <value> is a valid value for that tag. For example, this embedded tag is used
to include a classic cover page with a fax:
@+TAG[cvr=classic]
See also
Embedded tags
Important
All embedded tag statements must have 10 pt. Courier typeface applied to them. Otherwise, the fax server will
image the embedded tag statements as plain text.
Example form and list files
These are example Microsoft Word form and list files. They will be used to send a simple fax survey to Mr. Smith and
Mr. Jones.
Word form
196
List files content
ADVANCED GROUP FAXING
Word form
List files content
@+TAG[tfn=<<FaxNumber>>] Name, Location, FaxNumber
@+TAG[cvr=classic]
Smith, London, 5551212
---------Page Break ----------
Jones, New York, 5551213
Hello Mr. <<Name>>
Do you still live in <<Location>>
Notice that the example form file contains an embedded fax number (@+TAG [tfn=«FaxNumber»]) and an
embedded cover page designation (@+TAG [cvr=classic]), followed by a page break. This first page break tells
the fax server that all the information in the document before the page break is destination data, not part of the actual
fax. The embedded fax number value is a field that will be read from the list file.
Note
The entire embedded tag area of the form file (i.e., everything before the first page break) must have the Courier
font applied to it. Otherwise, the fax server will image the embedded tag statements as plain text.
The remainder of the form file is the actual fax template which will be individualized for each recipient. This includes a
salutation using a name field («Name») and the survey question using a location field («Location»).
The sample list file is a text file. Each data record is separated by a hard return; each value within that record is
separated by a comma. Typically, the first record in a list file contains the header labels for the remaining records. In
this case, header labels Name, Location and FaxNumber tell us that each subsequent record (line) will contain
these three pieces of information (values) in this order.
This is how each person's fax survey will look:
Print driver
Normal mail merge jobs are sent to a hardcopy printer. Fax merge jobs must be imaged into a single PCL file. This
PCL file must contain all the individualized pages for all fax merge recipients. There are two ways to accomplish this:
Send your word processor's mail merge output directly to a VSI-FAX print driver. This will automatically create
a single PCL file that can be sent to the fax server via one of the fax clients.
Use your computer's Print to File command to save your word processor's mail merge output to a PCL
file. The advantage to this method is that you can use this with various server integration techniques (e.g.,
vfx commands, tag and batch files, autosend, etc.) to submit the PCL file to the fax server.
Delivery mechanisms
After the PCL file has been created by the print driver, it is ready to be submitted to the fax server for fax merge
processing. In order to have the fax server perform special fax merge processing on it, you must deliver the PCL file
as a fax attachment in a fax envelope with faxmerge as the fax number. There are two basic ways to do this:
If you directed your word processor output to one of the VSI-FAX print drivers, a fax form will be displayed and
the PCL file will be included automatically as an attachment. If you are using the VSI-FAX Outlook Client,
enter the following MAPI command in the To field:
[Fax:FAXMERGE]
197
INSTALLATION AND ADMINISTRATION GUIDE
If you printed your word processor output to a PCL file, you can pass that file to the fax server using various
delivery mechanisms (e.g., vfx commands, autosend, etc.). Two tags are required:
tfn="faxmerge" fll="my_attachment.pcl"
Where my_attachment.pcl is the mail merge PCL file created by the print driver.
Fax server
Anytime the fax server receives a fax with a fax number of faxmerge, the fax server immediately knows that this is a
fax merge job, not a normal fax request. The fax server assigns this job a group fax ID and begins fax merge
processing.
Troubleshooting problems when submitting Fax merge jobs
Problem: You receive the error "could not find any fax destinations" when submitting a fax merge job.
Cause: The "could not find any destination" error is caused by one of the following factors:
The format of the fax merge document is incorrect.
The printer driver that is being used rasterizes the output, which prevents VSI-FAX from recognizing the
embedded tags in the output file.
The embedded tag lines are in a font that is rasterized by the printer driver. This causes the embedded tag
line data to be rasterized, and the embedded tags cannot be recognized by VSI-FAX.
Solution: Execute the following troubleshooting steps to determine the cause of the problem:
1. Verify that the fax merge document is in the correct format. For this, refer to Example form and list files.
2. Verify that you changed the printer driver of your fax client printer (e.g. VSI-FAX Outlook client) to an "HP
LaserJet 4" or "HP LaserJet 4M" printer driver. You can change the printer driver with the following steps:
3. Start > Settings > Printers.
4. Right-click on the printer, and select "Properties".
5. Select an "HP LaserJet 4" or "HP LaserJet 4M" driver in the Driver field. The Driver field is located on the
Advanced tab, the General tab or the Details tab depending on the operating system the fax client is loaded
on:
If there is no "HP LaserJet 4" or "HP LaserJet 4M" driver listed, then click on the New Driver button, and add
the appropriate driver using the Add Printer Driver Wizard.
6. Verify that the embedded tag statements are in a font that won't be rasterized. The 10 point Courier font works
on most machines. If Courier 10 doesn't work, then try changing the font used for the embedded tag lines. The
Arial font often works on machines when the Courier font does not.
Batch files
Batch files are similar to tag files. The primary difference is that they can send entirely different faxes to different
recipients. This is done by defining several sections within the batch file:
A >common section (containing common information for all fax recipients)
One or more recipient sections (containing personalized information for each fax recipient)
See also
Tag files
File structure and syntax
Consider a simple batch file:
fnm=MyName
fco=MyCompany
@+COMMON
tfn=5551212
198
ADVANCED GROUP FAXING
tnm="Mr. Smith"
fll=hello.txt
@+END
tfn=5551213
tnm="Mr. Jones"
fll=goodbye.txt
@+END
Common entries always appear at the beginning of the file and continue thru the @+COMMON entry. These two entries
(fnm=MyName and fco=MyCompany) define the sender's name and company, respectively. A common section is
optional.
The rest of our sample batch file contains two recipient sections, one for Mr. Smith and one for Mr. Jones. Each
recipient section defines a different fax number, fax name and file attachment. Notice that each recipient section ends
with a @+END entry.
Just as with tag files (refer to Tag files with multiple files or recipients), when you define more than one recipient
(which you always do with a batch file) or more than one fax attachment, your batch file must be constructed in a
particular format or that fax will not be properly sent.
1. Each recipient block must start with a tfn tag. All subsequent information (e.g., name, company name, etc.)
is assumed to be for that recipient until the next tfn tag is encountered.
2. Each file inclusion block must start with one of the following tags:
Tag
Description
fdl Local folder
fds Server folder
fll Local file attachment
fls Server file attachment
All subsequent file-specific information is assumed to be for that recipient until the next file inclusion tag is
encountered.
Delivery and processing
There can be only one batch file per fax request (e.g., vfx command).
All other command line arguments and tag files are processed before the batch file is processed. Therefore, any
options or tags following the -B option will actually appear in the fax request tag list before any tags in the batch file.
Files referenced in the batch file are processed before files referenced on the command line (including any files
referenced in any tag file).
Fax envelopes are created for each recipient in the following order:
Tag list from the command line
Tag list from the common section
Tag list from that recipient section
Files referenced in the batch file
Files referenced on the command line
If the last @+END entry is missing from a batch file, one is assumed.
199
INSTALLATION AND ADMINISTRATION GUIDE
Group Files
Often, when you are sending a group fax, your recipient information is actually stored in some sort of database. Most
databases support some sort of data export to a neutral file format, typically some form of "delimited ASCII."
The VSI-FAX group mechanism allows you to pass these delimited ASCII files to the fax server. The fax server will
use recipient information in the file to send the group fax.
File Structure and Syntax
Group files have a very simple structure. Consider the following sample group file:
Delimiter= ,
Tagnames=tnm, tfn
Mr. Smith, 5551212
Mr. Jones, 5551213
The first line contains a delimiter statement. The default delimiter is the pipe (|)character. If your database exports to
pipe-delimited ASCII format, you do not need to add this line to your group file.
The second line contains a tag listing. This defines the tag order that will be used to retrieve information from the
remaining records in this file. In this example, two tags are used: to name (fnm) and fax number (tfn).
The remaining lines in the group file contain the name and fax number for each recipient of this group fax. In this
case, there are two recipients: Mr. Smith and Mr. Jones.
Delivery and Processing
Group files must be identified to the fax server using the vfx -g <srvr_grp_file> or -G
<phonebook_group_alias> options. The -g option is used when the group file is located on the fax server in the
$VSIFAX/lib/groups directory; the -G option is used when a phone book group alias is designated.
Fax merge using group and template files
Although template files are primarily used to customize various email messages sent by the fax server, they work
especially well with group files. The combination of the two is ideally suited for sending highly personalized faxes to
large groups.
You can use the group file to define various personalized pieces of information for each recipient (this information it
typically retrieved from a database and exported to some delimited ASCII text file).
You can then use a template file to merge the information from the group file into a common fax form.
When you send a group fax using a template file, the template file must be the first file attachment defined in the fax
envelope. Otherwise, it will be imaged as a plain ASCII text file.
Because template files can be ASCII text, PostScript or PCL files, all of which can be natively imaged for faxing, the
fax server must have some way of knowing when to perform the special processing needed to interpret tag
statements inside a template file. This is done by specifying tag processing with the vfx -t fcv=tags option. This
can be done using the vfx command line, in a tag or batch file or by using embedded commands.
Consider again the simple group file groups.txt from one of our previous examples:
Delimiter= ,
Tagnames=tnm, tfn
Mr. Smith, 5551212
Mr. Jones, 5551213
Consider also the example template file:
Dear ${tnm:Sir},
A fax was sent to ${tfn} concerning ${sub:your recent order}.
200
ADVANCED GROUP FAXING
Sincerely,
${fnm:VSI-FAX}
To send these files to the fax server, enter:
> vfx -g groups.txt -t fll=confirm.txt -t fcv=tags
This is how each person's fax will look:
Dear Smith,
A fax was sent to 5551212 concerning your recent order.
Sincerely,
VSI-FAX
Dear Jones,
A fax was sent to 5551213 concerning your recent order.
Sincerely,
VSI-FAX
Notice that the actual names and fax numbers were used from the group file. Notice also that because the group file
did not specify a subject (i.e., sub tag) or send name (i.e., fnm tag), the default subject, "your recent order" and send
name VSI-FAX were used, respectively.
201
VSI-FAX MailMerge Client
VSI-FAX MailMerge Client uses the Microsoft Mail Merge function to create and send faxes. The client is made up of
a several components:
A VSI-FAX MailMerge Client printer that is used to send the faxes to VSI-FAX.
A simple program that is used to submit the jobs to the VSI-FAX Server
A Microsoft Word document (.doc) and template (.dot). The document and template are the same; they are
both provided so you can use whichever one is most common in your environment.
Before installing the MailMerge Client, consult the Supported Platforms and Equipment (page 11).
Installing the MailMerge Client
1. Load your VSI-FAX CD-ROM into your CD-ROM drive.
If the installation program does not start automatically, run autorun.exe located in the root directory of your
VSI-FAX CD-ROM.
The VSI-FAX CD browser appears.
2. Choose MailMerge Client under Desktop Client.
3. The Welcome screen appears. Click Next to proceed with the installation.
4. Click Next if you agree with the destination directory for the MailMerge Client program files. To install
MailMerge Client in another directory, click Browse and follow the on-screen instructions.
5. Enter your VSI-FAX user account login name (client ID) and password. Enter the hostname or IP address of
the fax server to use.
6. Click Next to proceed with the installation.
The program files are copied to the your local hard drive. This takes several seconds.
7. When the Setup Complete screen appears, click Finish.
8. After installation is complete, a Word .doc file, template and a sample XLS datasource will be located in the
directory where the client was installed. These files can be copied wherever you want.
9. The Send to VSI-FAX option will not appear in the mail merge wizard if the macro security setting is set to the
higher level. To set the security setting in Word XP or 2003, select Tools > Macro > Security, then select the
Medium level.To check the security setting in Word 2007, click the Office button, then click the Word Options.
Click Trust Center, then click the Trust Center settings button. Select Macro Settings and Disable all macros
with notification. You will be prompted to enable the macro each time you want to use it.
10. To familiarize yourself with the process, you should first test the client with the sample word document
provided. This sample includes MailMerge fields to be filled with data retrieved from the sample Excel file.
Using the MailMerge Client
To use the MailMerge client:
1. In Microsoft Word, open either the provided sample .doc file (located in the MailMerge Client installation
folder), or create a new file from the template.
203
INSTALLATION AND ADMINISTRATION GUIDE
2. When creating the document, you must insert the Work Phone field in your document and in your recipients
list. This is the fax number to send the document to.
The sample document and the XLS file contain the Work Phone field.
3. Use the Mail Merge Wizard to create and send the final documents. If the Mail Merge wizard is not displayed:
•
In Word XP or 2003, select Tools > Letters and Mailing > Mail Merge.
•
In Word 2007, in the Mailings tab, click the Start Mail Merge button and select Step by Step Mail
Merge Wizard.
Warning
You cannot use the VSI-FAX MailMerge client to send faxes from Microsoft Word to a list of Outlook
contacts.
Therefore, during the Select recipients step of the Mail Merge wizard, do not select the Select from
Outlook contacts option.
4. For more information on mail merge, you can follow the Microsoft training to learn how to use mail merge in
Word 2007 or the Microsoft training to learn how to use mail merge in Word 2003.
5. Once the Mail Merge wizard is open, follow the instructions provided by the wizard.
6. During the Completing the Merge step, select the Send to VSI-FAX option. Selecting this option will start the
actual merging and submitting of the final documents.
204
VSI-FAX MAILMERGE CLIENT
During this final step, the desktop will be busy, making other processing somewhat slower.
205
Forms Overlay
Forms Overlay
You can specify forms to be overlaid onto selected pages of the resultant fax file. Form files may be of any type. More
than one overlay file can be specified.
A form file is specified using the tag ovl=<form_name> or ovs=<form_name>, depending on whether the overlay
form is local or on the server. An optional page range can be specified, which will indicate on which pages of the
resultant fax file the form is to be overlaid. If no page range is specified, the form will overlay all pages in the resultant
fax file. The page range is specified with the fpg=<page_range> tag. The first page of the form is the only page
used in the overlay process. This page is overlaid on all specified pages in the resultant fax file.
For example, a letterhead could be overlaid onto the first page of a fax with this command:
vfx ... -t ovl=letterhd.tif -t fpg=1 ...
An invoice form could be overlaid onto all pages except the first one with this command:
vfx ... -t ovl=invoice.tif -t fpg=2- ...
You could overlay both a letterhead and an invoice form with the following command:
vfx ... -t ovl=letterhd.tif -t fpg=1 -t ovl=invoice.tif -t fpg=2 ...
Note
An overlay form can be specified in a tag or batch file (similar to all other VSI-FAX tags).
The management of overlay forms can be simplified by combining them into a single multi-page file. In this way, each
page of the file corresponds to a particular overlay form (such as a purchase order, invoice or past due notice) that
can then be referenced by its page number. This eliminates the need to manage multiple overlay files and allows
integrators to maintain a consistent reference when specifying which overlay form to use. Furthermore, changes can
be made to an existing forms file without requiring it to be rebuilt from scratch, as long as it maintains the same page
order sequence. By consolidating the overlay forms into a single forms file, you have the consistency of a known
filename and the flexibility to specify the overlay page number (or numbers) to be used on the target document.
Now you are ready to integrate the overlay utility into your application's VSI-FAX interface. You can either specify that
a single form be overlaid onto multiple pages of the target file, that multiple overlays be overlaid onto multiple pages
or that a single overlay be overlaid onto a page range or selected pages.
Single overlay
This example begins with two files: form overlay form1.tif (pages F1-7) and text overlay target.tif (pages T19).
Form1.tif
target.tif
result.tif
207
INSTALLATION AND ADMINISTRATION GUIDE
The result.tif output file is created by entering the following on a single line:
vtifftool overlay -E fine -o result.tif form1.tif:2 target.tif:2,4-7
Notice that page 2 of form1.tif has been overlaid onto pages 2, 4, 5, 6, and 7 of target.tif to produce the
result.tif output file When this file is faxed, the fax will appear as if the form overlay and the text overlay are one
a single image.
Multiple overlays
To perform multiple overlays from both forms1.tif andtarget.tif to result.tif, type the following:
form1.tif
target.tif
result.tif
The result.tif output file is created by entering the following on a single line:
vtifftool overlay -E fine -o - forms1.tif:2 target.tif:2,4-6 | vtifftool overlay -E
fine -o result.tif forms1.tif:5 -:7,9
Because the vtifftool overlay utility can only process one overlay operation at a time, the first execution of
vtifftool uses a- character as the argument to its output switch (-o). This redirects output to the standard output
device (stdout). The output is then piped to the second execution of the vtifftool, which reads it in as standard
input (stdin), performs the overlay operation onto it, then writes its output to the file result.tif.
In this example, the - character in the final vtifftool argument (-:7,9) tells vtifftool to read from the standard
input device (stdin) instead of a file.
The result of this procedure is that page 2 of forms1.tif has been overlaid onto pages 2, 4, 5, and 6 of the
target.tif. The output of this operation has then been piped to the second procedure, in which page 5 of
forms1.tif has been overlaid onto its standard input to create the output file result.tif. The original
target.tif and forms1.tif are left in their original state and can therefore be reused later.
208
FORMS OVERLAY
Selective merging
Under certain circumstances, you may need to extract selected pages from one received fax file and merge them with
a second file to create a new output file that can then be faxed from VSI-FAX. In this instance you would use the
merge option of the vtifftool utility, which will allow you to select specific pages from multiple files and merge
them into a single document.
This example begins with three multi-page files, file1.tif (page F1), file2.tif (page F2) and file3.tif
(page F3). A new file combine.tif will comprise pages 2 and 5 from file1.tif, pages 3 through 6 from
file2.tif and pages 2, 4, 5, and 6 from file3.tif.
file1.tif
file2.tif
file3.tif
combine.tif
The combine.tif output file is created by entering the following on a single line:
vtifftool merge -E fine -o combine.tif file1.tif:2,5 file2.tif:3-6 file3.tif:2,4-6
Notice that combine.tif has been created, which contains pages from file1.tif, file2.tif,and
file3.tif arranged in the order was specified. The combine.tif file can now be faxed with VSI-FAX like any
other faxable file.
Creating electronic business forms
Before you begin converting your business forms into electronic image files, organize these forms in a page
sequence for later reference. You can either scan or fax the forms to create the overlays. These methods are
described in:
Manual fax scanning
Scanner support
Note
You must consolidate your forms into a single file and maintain the original page order as they are converted to a
TIFF image file.
Manual fax scanning
Collect your forms together in the proper page sequence, and fax them to your fax server. View the received fax file
to confirm that each page is intact and aligned correctly. You can expect a slight shrinkage (about 1/6 inch) of the
scanned image versus the original document due to the scan line rendering. This is a normal occurrence with any
faxed document. The slight shrinkage should not matter because the size of the text overlays will be in proportion to
the original document.
209
INSTALLATION AND ADMINISTRATION GUIDE
You may need to make small positioning adjustments to the text before it overlays exactly onto your imaged form.
You can do this with either PCL (Hewlett Packard LaserJet) or PostScript (Level 1) codes that use both horizontal
and vertical positioning.
The final step is to remove the fax header that was added to each page during transmission. To do this:
1. Log in as root or vsifax and set the VSI-FAX environment.
Note
This example assumes that you renamed the received form file as form.tif and that this file is located
in ($VSIFAX/faxq/vsifax), which is the Fax Box directory of user vsifax.
2. Use the vtifftool utility to remove the fax header from the multi-page form.tif file as follows:
cd $VSIFAX/faxq/vsifax vtifftool clear -E fine -m 0.3i -o overlay.tif form.tif
The purpose of -m 0.3i is to instruct vtifftool to clear 0.3 inches from the top of the page. You may
have to reduce this amount to 0.2 inches (-m 0.2i)depending on the output of your particular fax machine.
Scanner support
You can also use a document scanner to combine forms into a single TIFF image file that can be saved on the VSIFAX system. Keep in mind that the TIFF file type must be set to one supported by VSI-FAX, as defined by these
parameters:
Compression
CCITT G3 (required)
Aldus G3
Mac PacBits
uncompressed
Maximum Resolution 200x200 dpi
Imaging
Black and White
(No Grayscale Support)
Creating faxable signature and logo files
VSI-FAX supports both shared and private logo and signature files. Files that you want to include in a document must
reside in one of two locations:
Public (globally available) files are stored in the $VSIFAX/lib/images directory.
Private (accessible only by the owning user) files are stored on the user's local hard drive. To create a signature or
logo file, follow these steps:
1. Do one of the following:
If
Do this
Creating a
signature file
Write your signature in black ink on a blank piece of white paper. The signature should be
no less than one inch from the top and one inch from the left of the page.
Creating a logo
file
Copy your logo onto a faxable piece of paper with the logo no less than one inch from the
top and one inch from the left of the page.
2. Fax this page to your VSI-FAX user account from a physical fax machine. Make sure you use fine resolution
mode in order to obtain the best possible image.
210
FORMS OVERLAY
Note
By default, all received faxes will be stored in user vsifax's inbox ($VSIFAX/faxq/vsifax) in TIFF file
format.
3. Open the received TIFF file and measure the x and y coordinates of the upper-left corner of the logo or
signature, as well as the image area width and height.
4. Create a faxable signature or logo file using the vtifftool cut command.
For example, to create a faxable logo file (logo.tif) by cropping all unused white space from the previous
example, enter the following on a single line:
vtifftool cut -E fine -x 1.5i -y 1.0i -w 5.25i -h 2.0i -o logo.tif rawlogo.tif
The output file contains only the signature, so the content of the file is only 5.25" wide and 2" high. All unused
white space and additional file information has been removed.
Alternatively, you can use the vtifftool mksig command as follows:
vtifftool mksig -o logo.tif rawlogo.tif
5. To make this a public image file (available to all VSI-FAX users), upload it to the $VSIFAX/lib/images
directory using the vupload image command.
For example, to upload the logo file from the previous example, enter:
vupload image logo.tif
You are now ready to include your signature or logo file in a faxable document.
211
Virtual Fax Server
Virtual Fax Server
The virtual fax server is a remote vfx command line client. It includes all the functionality of a full fax server except
that you cannot connect fax devices to it or send faxes directly from it. You must connect your virtual fax server to a
full fax server, via a network, to complete your integration.
Do I need this?
If you intend to use vfx commands as your delivery mechanism (Refer to Delivering the fax envelope for more
information) and you need to issue these commands remotely (i.e., from a different IP address than the fax server IP
address), you must install a virtual fax server on the remote computer or workstation.
Capabilities and limitations
Once the virtual fax server is installed, you can issue vfx commands just as if you were logged directly into the fax
server. You have access to all the commands and utilities available in a full fax server (e.g., administrative commands
and reporting utilities).
However, you cannot connect fax devices directly to a virtual fax server.
To submit faxes from the Virtual Fax Server (VFS) machine, the VSI-FAX license installed must support Virtual Fax
Server and the IP Address or the DNS Name of the VFS machine must be enterered in the VSI-FAX database. Any
user submitting faxes from the VFS machine must be a licensed VSI-FAX user.
When issuing VSI-FAX command from the VFS machine you can direct the commands to the full fax server by
adding a -H <hostname or IP> to the command line or by setting the Hostname parameter in the vsifax.ini
file to the hostname or IP address of the full fax server.
Requirements
Virtual fax servers can be installed on any supported platform (e.g., Linux, Unix, or Windows).
Virtual fax servers use a special VSI-FAX license supporting Virtual Fax Server, which you must obtain from your
VSI-FAX authorized reseller or directly from Esker before you can install it.
In order to send or receive faxes, the virtual fax server and the full fax server must share the same local area or wide
area network.
213
INSTALLATION AND ADMINISTRATION GUIDE
Note
If you are using a WAN, make sure that any gateways or firewalls allow port 2996 to pass through.
See also
Refer to Sending a test fax to a fax machine for virtual fax server installation instructions.
Configuring the Virtual Fax Server
To use the VFS software you must install the VFS software and provide its IP address or DNS Name on the full
server. Check that the full server license supports Virtual Fax Server. Verify the hostname to which the VFS directs
VSI-FAX commands. Check that the users who will be submitting VSI-FAX commands from the VFS are registered
as licensed users on the full server.
To configure a Virtual Fax Server:
1. Install the Virtual Fax Server (VFS) software on a supported platform.
2. Check that the installed VSI-FAX license supports Virtual Fax Server by issuing the vfxadmin license -l
command. Check the value for the number of Virtual Fax Servers supported (num vfs). If this is equal to 0 ,
you must contact your Esker Sales Representative and buy a new VSI-FAX license.
3. Edit the VSI-FAX license on the fax server by issuing the vfxadmin license command and entering the
serial number, activation key, and IP address of the VFS machine(s) when prompted.
4. Verify that the hostname parameter in the vsifax.ini file on the Virtual Fax Server is set to the IP address
or hostname of the full fax server.
The VSI-FAX commands issued on the VFS machine are directed to the server named by the Hostname
parameter in the vsifax.ini file. You can check which hostname the commands are currently directed to by
issuing the
vfxstat -W command. The response from vfxstat -W will have the format user@hostname. If the
hostname is incorrect, modify the Hostname parameter in the vsifax.ini file. You can override the hostname
that the commands are directed to by adding the -H <hostname or IP> switch to the command line.
5. Verify that the users who will submit faxes from the VFS machine to the VSI-FAX server are licensed users.
Any user who issues VSI-FAX commands from the VFS machine, other than the vsifax or root user, must be a
licensed user on the VSI-FAX server. You can do any of the following to determine if a user is currently
licensed:
•
Issue the vfxadmin user -l command on the VSI-FAX server.
•
Issue the vadmin user -l command on the Virtual Fax Server and check the value in the Lic
column.
•
Look to see if the Licensed check box under the General tab of the User icon in the VSI-FAX Server
Administration tool is checked.
Notes
A version three VFS can work with a version four VSI-FAX full server if the vsinet process is running on the VSIFAX server. However, the vsinet process is not available on versions above V4.2.1 B304 .
A version four VFS cannot work with a version three VSI-FAX full server.
If you have two VSI-FAX servers, you can use the license from each VSI-FAX server to make the servers into virtual
fax servers of each other. To make a VSI-FAX server, called server1, into a virtual fax server of another VSI-FAX
server, called server2, provide the IP address of server1 in the license table of server2, and then provide the IP
address of server2 in the license table of server1. For this, use the vfxadmin license command on both servers.
214
lp Spooler (Unix Only)
lp Spooler (Unix Only)
The vfx command is modeled after the Unix lp spooler command. The similarities between the two allow you to
submit a fax as easily as printing a document.
Integration is accomplished by using an lp-compatible printer interface script. All Unix and Linux operating systems,
with the exception of IBM AIX, support ASCII text printer interface scripts. IBM AIX systems use a database
architecture that requires their printer interface scripts to be compiled. For AIX IBM interface scripts, refer to the IBM
AIX documentation.
Creating a printer destination for faxing
In order to use the lp spooler for fax interrogations, you need to create a printer destination called fax. The name can
be anything that works for your environment. This printer destination is created the same way a regular printer would
be created. The fax printer that you create should have a device port of /dev/null and a printer type of ASCII (or
another generic type).
When you create the fax printer destination, the operating system automatically puts a default printer script for that
printer in the interfaces directory. On most, but not all Unix and Linux systems, the interfaces directory is:
/usr/spool/lp/admins/lp/interfaces
Refer to your operating system documentation for additional information about adding an ASCII printer to your
system.
Creating a custom printer interface script
Once you have successfully added the new fax printer destination to your system, replace or modify the default
interface script to suit your particular environment and fax requirements. There are two methods for implementing this
interface script, each with its own unique advantages: LP faxing and LP merge faxing.
lp faxing
The first and most common option is to use the Unix lp command. Typically, the lp command accepts several
command line options that work well for sending a fax. In order for lp faxing to work correctly, two arguments must be
passed to the interface script:
Fax number
Name of the file you want to fax
The Unix lp command allows the use of the -o argument, which we will use to specify the fax number. The filename
can either be explicitly listed or a file can be redirected to the lp command. Either method works for lp faxing.
When creating the interface script, the most important line is the vfx command line. This is where options can be
added to make the lp faxing work in your environment. The sample script (Refer to lp faxing sample interface script
for more information) uses only a few options (login name, fax number and the file name). Additional options could be
added that would include a cover page and a user's default profile settings to send the fax. All command line options
available to the vfx command are also available within the interface script.
See also
Refer to Command Reference in the Reference Addendum documentation for additional information about the vfx
command.
215
INSTALLATION AND ADMINISTRATION GUIDE
lp merge faxing
The second method is the lp merge faxing method, which allows you to create a mail merge text stream to
personalize information to send to multiple destinations.
You can use this script to overlay forms onto selected pages of documents, such as purchase orders or quotes.
lp faxing sample interface script
This sample interface script replaces the default script used by the fax printer destination. It allows users to specify
the fax number on the lp command line. This allows the specified document to be faxed.
Important
The sample script that is shown here is a sample. It will not work in every possible instance. It does demonstrate
how and what an interface script should do.
When using the Unix lp command for faxing, a command line would typically be something like:
lp -d fax -o <fax_number> <file_name>
For example, to fax the /etc/motd file to fax number 111-222-3333, enter:
lp -d fax -o 111-222-3333 /etc/motd
Sample script:
# Set the VSI-FAX environment
. /etc/vsifax.sh
# Store the login name of the submitter
LOGIN=$2
# Extract the fax number
FAXNUM="$5"
# Extract the files to be faxed
shift 5
FILES="$*"
# Submit the fax request
vfx -U $LOGIN -n "$FAXNUM" $FILES 2>&1 | mailx -s <subject> $LOGIN
# Exit script
exit 0
Note
In the previous example script, <subject> is any user-defined character string you want for your email subject
line.
lp merge faxing sample interface script
This script allows you to send different sections of the file to different recipients by creating a text stream. VSI-FAX
provides an embedded fax command that allows you to specify the fax dialstring, the coversheet information, and the
coversheet to use for each recipient. The order in which fax commands appear is critical to its successful
implementation. Below is a list of available tag values that can be specified using the @+VFX embedded command:
Tag
Description
cvr Coversheet to use
tfn Recipient's fax number
tnm Recipient's name
tco Recipient's company
ffn Sender's return fax number
fnm Sender's name
216
LP SPOOLER (UNIX ONLY)
Tag
Description
fco Sender's company
fvn Sender's voice number
sub Coversheet subject line limited to a maximum of 63 characters
To utilize embedded commands, include them within the text data stream at the appropriate points within the pages.
See also
Refer to Tag files and Batch files.
The power of lp spooler integration is the ability to specify which pages go to which recipients and create multiple fax
requests when necessary.
Sample Printer Interface Script:
# Set the VSI-FAX environment
. /etc/vsifax3.sh
# Store the login name of the submitter
LOGIN=$2
# Extract the file to be faxed
shift 5
FILE=$1
# Submit the fax request
vfx -U $LOGIN <$FILE 2>&1 | mailx -s <subject> $LOGIN
217
Using XML-F
Using XML-F
Note
With VSI-FAX 5.0, API development has moved to C/C++. This change will not affect your current SDK
development. Java, Visual Basic, XML-F, C and C++ continue to be supported in version 5.1 and on.
The C/C++ Client API Reference in c_api.pdf in the \docs folder of the VSI-FAX CD-ROM.
Extensible Markup Language (XML) comprises various Data Type Definitions (DTDs). Each DTD is a set of tags for
describing a particular collection of data. In XML, one DTD is created for each collection of data that requires
description. For example, to create an XML language for Accounts Payable, one DTD would be required to describe
the venders, one to describe the purchase orders, and another to describe invoices, etc.
A collection of data is generally accompanied by its DTD whenever it is stored or transferred from one place to
another, creating "documents that know themselves." The inclusion of the DTD means that the content or meaning of
the data is embedded in the document in a way that is human-legible and easily interpreted by any XML enabled
software.
Esker has gone one step further and has proposed a set of DTDs for network fax transactions called XML-F. This
interface is a simple, powerful way to pass fax transactions to and from fax servers. It is based on four simple
structures that allow any conforming application to:
Send a fax
Get the status of a sent fax
Cancel a fax
Get fax resources
XML-F uses eight XML document types to implement these four features: four requests and four responses. Each
feature has a corresponding request and response document.
For clarity, the examples in the remainder of this section uses simplified XML-F document types.
See also
Refer to XML-F DTDs in the Reference Addendum documentation for complete DTD listings.
The xmlf command
Synopsis
$VSIFAX/bin/xmlf [-h <URL>] [-o <file>] [-t {html | text | xml}] <file> [<attachment>]
Description
xmlf is the transport that sends a fax file to the server for transmission.
Options
-h <URL>
Fax server Universal Resource Locator (URL). Default is local host.
-o <file>
The name of the file to put the response from the send operation. Default is displaying the
response on the screen.
219
INSTALLATION AND ADMINISTRATION GUIDE
-t {html | text |
xml}
Response format.
<file>
The name of the XML file you are sending to the server.
<attachment>
The name of a file you want to add.
Notes
When entering a URL, the following format is required:
[transport://] <host> [:port number]
Where:
transport:
vxmld.
<host>
Name of the fax server.
port number Port number that the fax server uses to send faxes.
Fax-submit document
The fax-submit document describes the elements necessary to set up and send a fax on an XML-F compliant system.
The fax-submit document has the following basic structure (this example is simplified):
fax-submit
account (required)
id (required)
subid (zero or one)
mail-address (zero or one)
recipient (one or more)
personal-name (zero or one)
company-name (zero or one)
fax-number or canonical-fax (required)
voice-number or canonical-voice (zero or one)
sender (required)
personal-name (required)
company-name (zero or one)
fax-number or canonical-fax (zero or one)
voice-number or canonical-voice (zero or one)
subject (zero or one)
content (required)
body (zero or more)
application-reference (zero or one)
command-reference (zero or one)
Element
Description
account
The account contains the information necessary to identify the user of the service. Authentication is
left to the transport and implementation, the account structure contains an ID intended to identify the
billing entity and a sub-ID to be used for grouping of departments or users within the billing entity. The
account also specifies a mail-address that is an email channel available for the fax service to use for
error or other messages.
recipient
The recipient defines one or more people for whom this fax transmission is ultimately intended. A fax
submission must have at least one recipient, however, the recipient need only have fax-number
defined.
sender
The sender entry is required, with at least the personal name entered for a sender.
subject
The subject is optional.
220
USING XML-F
Element
Description
content
The content element contains zero or more body elements. Body elements must contain a filename
attribute and may specify associated content-type (RFC 2046) and content-transfer-encoding (base64
or none).
application
reference
An application-reference tag is defined to permit the submitting application to provide an arbitrary
application-specific reference to this fax request. This reference tag may be used to request status
information on this fax submission
Finally, in XML-F, all requests carry a command-reference, which is intended for the sending system to uniquely
identify the particular request. This is useful for debugging and matching up particular responses with particular
requests when the system is used asynchronously.
The following is an example of a completed send document:
<?xml version="1.0"?>
<!DOCTYPE fax-submit SYSTEM "fax-submit.dtd">
<fax-submit resolution="fine" coversheet ="yes">
<account>
<id>
Filmore5455
</id>
<subid>
David Filmore
</subid>
<mail-address>
[email protected]
</mail-address>
</account>
<email-notification when="on-success">
[email protected]
</email-notification>
<sender>
<personal-name>
David Filmore
</personal-name>
<company-name>
Willy Wonka Chocolates, Inc.
</company-name>
<fax-number>
237-0998
</fax-number>
<voice-number>
238-9873
</voice-number>
</sender>
<recipient>
<personal-name>
Rob Juergens
</personal-name>
<canonical-fax>
<country-code>
011
</country-code>
<area-code>
987
</area-code>
<local-number>
242-1234
</local-number>
</canonical-fax>
<voice-number>
011-987-242-5678
221
INSTALLATION AND ADMINISTRATION GUIDE
</voice-number>
</recipient>
<subject>
Good Looking XML...
</subject>
<content>
<body filename="inline.txt">
Some people are destined to discover that when they get to the end of
time, there they are.
</body>
<body filename="inline.txt" content-type="text/plain" content-transferencoding="base64">
VGhpcyB3YXMgYmFzZTY0IGVuY29kZWQgPGludmFsaWQ+PC9pbnZhbGlkPg==
</body>
<body filename="inline.txt">
This is some text that we think would make for a wonderfully interesting
fax body had anyone had time to actually think up something fun and interesting to
say. Or should anyone ever decide to read it.
</body>
</content>
<command-reference>
xxs234234s
</command-reference>
</fax-submit>
Upon successful receipt of a valid fax-submit, a fax-submit-response will be returned.
Fax-submit-response document
Upon receipt of a fax-submit request, an XML-F service should respond by providing a fax-submit-response. This
response is used to acknowledge receipt of the fax submission upon parsing and validation of the request. The
response is used to provide a server-side reference. It is comprises the following structure (this example is
simplified):
fax-submit-response
request-results
(required
service-reference (required)
application-reference (zero or one)
command-reference (zero or one)
Element
Description
request
results
The request-results provide information on the results of the fax-submit. Request-results contain
attributes to indicate the status of the request (normal, warning, or failed) and the reason for the
status. The data attached to the request-results entity provides an ad hoc message back to the
application.
service
reference
This is a unique reference assigned to a particular fax submission by the service provider. This is the
best reference for the user application to use when requesting status or when canceling a request.
application
reference
This is the optional (but recommended) reference that the submitting application assigned to the fax
request triggering this response. This reference may be used to get status or to cancel the request if
the application has not received a fax-submit-response (and therefore no service-reference would be
known).
Fax-status document
The fax-status document is used by an application to request status on a service about a particular fax request. The
fax-status request can be used to request short and detailed status reports in either XML or text-formatted form. As
well, the fax-status request can ask the service to mail the resulting report to an email address.
222
USING XML-F
The application can either use the application-reference or the service-reference when referring to this request. This
permits the submitting application to issue status requests without having to wait or process a fax-submit-response
document prior to asking for status. In the event the fax-submit-response is never received, the application must use
the application-reference to get information on the request.
The fax-status comprises the following structure (this example is simplified):
fax-status
account (required)
id (required)
subid (zero or one)
mail-address (zero or one)
email-to (zero or more)
service-reference (must specify either
application-reference service or app ref)
command-reference (zero or one)
This is an example of a completed fax status document:
<?xml version="1.0"?>
<!DOCTYPE fax-status SYSTEM "fax-status.dtd">
<fax-status results-format="xml" report-type="full">
<account>
<id>
Filmore5455
</id>
<subid>
David Filmore
</subid>
<mail-address>
[email protected]
</mail-address>
</account>
<service-reference>
1011
</service-reference>
<command-reference>
xxs234235s
</command-reference>
</fax-status>
Fax-status-response document
The fax-status-response document provides the detailed information about what happened (or is happening) to a fax
request on an XML-F service. The basic structure for the fax-status-response is as follows (this example is
simplified):
fax-status-response
request-results (required)
status (one of...) (required)
{short-status}
job-status (required)
{full-status}
job-status (required)
attempt-status (one or more)
recipient (required)
date (required)
csi (zero or one)
result (required)
short-message (required)
long-message (zero or one)
service-reference (required)
application-reference (zero or one)
command-reference (zero or one)
223
INSTALLATION AND ADMINISTRATION GUIDE
Fax-cancel document
The fax-cancel document is used by a sending application to cancel a previously submitted fax request. This is a
sample fax cancel document:
<?xml version="1.0"?>
<!DOCTYPE fax-cancel SYSTEM "fax-cancel.dtd">
<fax-cancel>
<account>
<id>
Filmore5455
</id>
<subid>
David Filmore
</subid>
<mail-address>
[email protected]
</mail-address>
</account>
<service-reference>
1011
</service-reference>
<command-reference>
xxs234236s
</command-reference>
</fax-cancel>
224
Inbound and Outbound Fax Filter
Inbound and Outbound Fax Filter
VSI-FAX uses a file called rejects.lst to screen incoming and outgoing faxes. This can be useful as a spam filter for
incoming faxes, automatically terminating any call having a pre-listed Transmitting Subscriber ID (TSI) or Caller ID
(ANI). Outbound call rejection is based on dialstring.
Note
ANI rejection is predicated on the ability to collect ANI information, currently available with Dialogic Brooktrout fax
boards.
Creating the reject list
To create the list of all inbound faxes to be rejected based on TSI or ANI
1. Using a text editor, open %VSIFAX%\lib\rejects.lst.
2. At the bottom of the file, enter any TSI or ANI (for inbound calls), or dialstring (for outbound calls) to be
rejected. Use the formatting:
TSI:<inbound tsi-to-reject>
ANI:<inbound callerid-to-reject>
OUT:<outbound dial-string-to-reject>
Notes
Alpha characters used for TSI are not case sensitive.
There can be more than one "out" line in the file. Any job with a dialstring matching any "out" entries are
rejected with a result code of REMREJ.
The filter supports wildcards: ? matches any single character and * matches to end of string. (Any
characters after the * will be ignored.) A TSI of ! indicates match an empty TSI string.
An exact match is required unless you use wildcards.
Examples
TSI:Zebra Pharm*
TSI:XYZ Manufacturing
TSI:222-555-111?
TSI:!
ANI:2223334444
ANI:(222) 333-4*
ANI:222-555-11?4
OUT:2226661111
OUT:(222) 666-2*
Note
ANI string formatting is dependent upon several factors, including board types, PBXs, etc. Check the ANI
format received at your site for use in the rejects.lst file.
3. Save the file. You do not have to restart the server.
225
Font handling
Font handling
Although most PostScript-generating applications are not dependent on the resolution of the output device, some of
these applications will perform better if aware of the output resolution. Since fine fax resolution of 200 x 200 dpi is
lower than the typical laser printer's resolution of 300 x 300 dpi or 600 x 600 dpi, some documents will look different
when printed by different devices. If your application offers a choice of resolutions, select 200 x 200 dots per inch.
PCL5e (Enhanced) Fonts
The fax server supports full PCL5 (HP LaserJet III and LaserJet IIIsi) and PCL5e (HP LaserJet 4/5) features
including:
Bitmaps
Orientation Spacing PtSize Pitch
Style
Stroke
Typeface
Portrait
Fixed
16.67
8.5
Upright Medium Line-Printer (0)
Landscape
Fixed
16.67
8.5
Upright Medium Line-Printer (0)
Symbol Sets
Roman-8 (8U)
Latin-5 (5N)
PC-8 (10U)
Spanish-1 (2S)
PC-8-DN (11U)
German (1G)
US-ASCII 90U)
French (1F)
PC-850 (12U) and ECMA-94 (0N)
Norwegian (0D)
UK (1E, Swedish (0S), Italian (0I), Latin-2 (2N))
Scaleable Typeface
Typeface
Stroke
Style
Regular CG-Times
Italic
(4101)
Regular
Italic
Medium
Medium
Bold
Bold
Regular
Italic
Regular
Italic
Letter Gothic (4102) Medium
Medium
Bold
Regular Antique Olive (4168)
Italic
Regular
Medium Regular
Medium Italic
Bold
Regular
Univers
Regular Univers Condensed
Medium Regular
Courier
(4099)
Stroke
Medium
Medium
Bold
Bold
Medium
Style
Typeface
227
INSTALLATION AND ADMINISTRATION GUIDE
Typeface
Stroke
Style
Typeface
Stroke
Style
(4148)
Medium
Bold
Bold
Italic
(4148)
Regular
Italic
Medium Italic
Bold
Regular
Bold
Italic
CG-Omega
(4113)
Medium
Medium
Bold
Bold
Regular Garamond
Italic
(4197)
Regular
Italic
Medium
Medium
Bold
Bold
Albertus
(4362)
Bold
Regular Coronet
Extra Bold Regular (4116)
Marigold
(4297)
Medium
Regular Clarindon Condensed Bold
(4140)
Symbol
(16686)
Medium
Regular Wingdings
(31402)
Medium Regular
Arial
(16602)
Medium
Medium
Bold
Bold
Regular Times New Roman
Italic
(16901)
Regular
Italic
Medium
Medium
Bold
Bold
Prestige
(4104)
Medium
Regular
Regular
Italic
Regular
Italic
Medium Italic
Regular
Regular
Italic
Regular
Italic
Note
Courier and Letter Gothic are the only mono-spaced (i.e., fixed-width) fonts available. Integrations that require
compressed print may find the output more readable if the Letter Gothic font is used.
PostScript fonts
The fax server supports all Adobe Type 1 fonts, including those provided in a PostScript document. The following is a
list of built-in fonts that are available:
AvantGarde Book
Proportional Bookman Light
AvantGarde Demi
Bookman Demi
AvantGarde BookOblique
Bookman LightItalic
AvantGarde DemiOblique
Bookman DemiItalic
Proportional
Courier
Courier Bold
Fixed-width
Fixed-width
Helvetica
Proportional Helvetica Bold
Helvetica Oblique
Helvetica Narrow Oblique
Helvetica NarrowBoldOblique
Helvetica BoldOblique
Proportional
Helvetica Narrow
Proportional Helvetica Narrow Bold
Proportional
NewCenturySchlbk
Roman
Proportional NewCenturySchlbk Bold
Proportional
NewCenturySchlbk Italic NewCenturySchlbk Bold Italic
Palatino Roman
Palatino Bold
Palatino Italic
Palatino BoldItalic
Proportional Symbol
Proportional
Times Roman
Times Bold
Times Italic
Times BoldItalic
Proportional ZapfChancery MediumItalic
Proportional
228
Courier Oblique
Courier BoldOblique
FONT HANDLING
ZapfDingbatsTimes
Roman
Proportional
229
Ordering DID Service
Ordering DID Service
To order DID Service in the United States:
Determine what your DID requirements are and how many simultaneous calls you are going to support.
How many phone numbers will you need to reserve? The minimum block of phone numbers offered by most
major regional DID service providers is 20.
How many simultaneous inbound calls do you want to support? This will determine the number of DID trunk
lines you need to order. You have the option of picking a block of numbers that will be serviced by a specific
number of DID trunk lines. These DID trunk lines will work in a rollover process whereby if someone dials one
of the numbers in your block and the first trunk line is busy, it will roll over to the next trunk line and so on until
it finds an idle trunk line. This is automatically supported by your DID service provider and does not require
that you purchase any additional equipment.
Before you place your DID service order with your service provider, you need to know how to request the options
described in:
2-Wire DID interface
DTMF signaling
Wink start
Number of DTMF digits to outpoll
2-Wire DID interface
This specifies the physical connection from the DID service provider and your local terminating point.
DTMF signaling
This specifies the type of signaling that your local equipment is expecting. Choices are rotary, pulse and multifrequency.
Wink start
This is a signal from the DID service provider to the DID interface unit that tells it a DID call is ready to be received.
Number of DTMF digits to outpoll
This specifies the number of DTMF digits that you want to receive prior to accepting the call and is used by the fax
software to identify the number being called and resolve a name or department from the DID table. Although you can
specify how many digits you want to receive, the maximum number is 7. The actual number will be based on your
particular environment.
Contact your service provider and specify that you are ordering a DID trunk line.
If your current PBX phone switch does not have provisions for supporting DID service, you need to contact a DID
interface equipment manufacturer to purchase an interface unit. DID trunk lines are dedicated lines from the service
provider that require a special interface at the customer's site. The interface equipment is available in models that
231
INSTALLATION AND ADMINISTRATION GUIDE
support from one to sixteen individual DID trunk lines. Some models also come with an out-dial transfer port that
allows you to connect a standard dial line for outbound dialing using the same modem.
232
Roxbury fonts
Roxbury fonts
VSI-FAX provides a mechanism for using and managing the Roxbury family of fonts. VSI-FAX provides the following
Roxbury fonts:
Roxbury pica (regular) 10 cpi
Roxbury bold 10 cpi
Roxbury italic 10 cpi
Roxbury italic bold 10 cpi
Roxbury compressed 16.7 cpi
These are fixed-width bit-mapped fonts designed to look good at either standard or fine resolution. These fonts are
used in the following places:
eptotif uses them to image text files.
pcltotif uses them for text mode conversion. In this mode, the Roxbury fonts are compiled into PCL softfonts, which can be selected with the appropriate PCL font-selection command.
vtifftool uses them in the header command to add a header to pages of a TIFF file.
FIMs (except FoDC) use them to create the header at the top of sent fax pages.
The Roxbury fonts are a mixture of character sets. The low-order half (chars 0x20 through 0x7f) are the same as the
standard ASCII character set. The top-half (chars 0x80 through 0xff), is a mixture of the PC line-drawing characters
(chars 0xb0 through 0xdf) and various non-standard characters.
These non-standard characters are not the same as the standard PC character set or the standard ISO multi-lingual
character set (ISO8859).
Esker provides these fonts as both the original text files describing these fonts and as compiled font files (.fnt files)
usable by eptotif and the FIMs, as well as compiled PCL soft-fonts (.sft files). Esker also provides a font
compiler program, which will compile the text font descriptions into new .fnt and .sft files.
These various fonts and source files allow you modify the Roxbury font to support special international symbols (e.g.,
Spanish cedilla, the German ess-tsett, etc.)
The compiled Roxbury fonts, source files and font compiler are located in the $VSIFAX/lib/fonts directory:
Font compiler
roxypica.txt Roxbury pica font description file
roxyital.txt Roxbury italic font description file
fontcomp
roxycomp.txt Roxbury compressed font description file
roxypica.fnt Compiled Roxbury pica font
roxybold.fnt Compiled Roxbury bold font
roxyital.fnt Compiled Roxbury italic font
roxybdit.fnt Compiled Roxbury italic bold font
roxycomp.fnt Compiled Roxbury compressed font
233
INSTALLATION AND ADMINISTRATION GUIDE
See also
Refer to Command Reference in the Reference Addendum documentation for additional information about the font
compiler.
The compiled PCL soft-fonts files are located in the $VSIFAX/lib/fxpcl directory:
roxypica.sft Roxbury pica soft-font
roxybold.sft Roxbury bold soft-font
roxyital.sft Roxbury italic soft-font
roxybdit.sft Roxbury italic bold soft-font
roxycomp.sft Roxbury compressed soft-font
Note
The bold and italic bold fonts are generated from the corresponding non-bold font descriptions.
Compiling Roxbury fonts
Typically, you would modify the font files to contain those you specifically need, then enter the following commands:
>cd $VSIFAX/lib/fonts
fontcomp -v -i roxyital
fontcomp -v -i roxypica
fontcomp -v -i roxycom
This compiles the various fonts and installs them into the proper directories.
The eptotif program automatically loads these fonts from the fonts directory, unless it is invoked with the -Z
noloadfonts option, in which case it will use internal linked-in versions of these fonts.
When the pcltotif program is invoked with the -e option (which is done when a file-type of .txt is used), it will
load the corresponding soft (.sft) font for the various font selections.
By default, all FIMs except FoDC image the page header using an internal linked-in version of the roxybdit font
(Roxbury italic bold). However, you can choose a different font for the page header by changing the DEVICE:
font-name=<font> entry in the $VSIFAX/lib/vsisrv.ini file.
Tip
If you choose the Roxbury compressed font for your page headers (i.e., by setting vsisrv.ini DEVICE:fontname=roxycomp), you will be able to display up to 120 characters of user data in the header, as compared with
62 characters using other fonts.
See also
Customizing the fax header
234
Sample Unix and Linux Mount
Commands
These CD-ROM mount commands are only examples. Your command arguments may be different depending on the
file systems you have installed. In particular, if the /cdrom mount point does not exist, use /mnt in place of
/cdrom in these examples. Consult your system administrator for the appropriate command to use for your
installation.
Operating system
Compaq
Command
mount -r /dev/rz4c /cdrom
mount -r -t cdfs -o rrip /dev/rz4c /cdrom
HP
pfs_mount -o xlat=unix /dev/dsk/<device> /cdrom
IBM
mount -r -v cdrfs /dev/cd0 /cdrom
NCR
mount -F cdfs <cdrom-dev> /cdrom
SCO
mount -r /dev/cd0 /cdrom
mount -r -f hsfs /dev/cd0 /cdrom
mount -r HS /dev/cd0 /cdrom
Sun
mount -r hsfs /dev/sr0 /cdrom
235
Fax Server Information Form
See the Annotated fax server information form for detailed information about filling out this form.
Licensing Information
Information
Fax Server Serial Number
Entry
Fax Server Activation Key
Cover Page Information
Information
Company Name
Entry
Address 1
Address 2
Address 3
Country
Voice phone
FAX phone
Email
Dialing Properties
Information
Country Code
Entry
Long Distance Access #
Area Code
Local Number Length
Dial Prefix
Dial Suffix
Called Subscriber ID (CSI)
Transmitting Station ID (TSI)
Internet Email Servers
Information
SMTP Server Name
Entry
SMTP From Name
POP3 Server Name
POP3 User Name
POP3 Password
Fax Modem Properties
Information
Queue name
Entry
Description
COM port
Final Checks
Question
Have you stopped all existing processes running on serial ports that you will be connecting your fax
devices to?
Entry
237
INSTALLATION AND ADMINISTRATION GUIDE
Licensing Information
Is port 2996 dedicated to VSI-FAX?
238