1
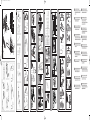
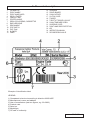
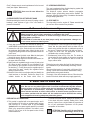
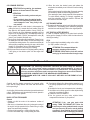
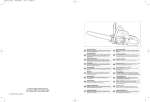
250127_cop
18-06-2007
10:14
Pagina 1
Husqvarna Outdoor Products Italia S.p.A.
Via Como 72 - 23868 Valmadrera (LC) - ITALY
Tel. + 39 0341 203111 - Fax +39 0341 581671
PN. 250127 REV. 00 (06/07)
250127_int_fisarmonica
26-07-2007
17:38
Pagina 1
G
1
H
G9
1
G7
T
I
L
I4
L2
L
M
L3
M2
M1
2
L
3
1
2
2
I5
2
I1
1
2
I
I2
1
3
1
2
3
K
3
M3
1
G8
4
2
I6
M4
4
L4
4
1
5
3
3
STOP
1
5
4
STOP
2
6
2
I3
G10
5
L
L1
3
A
B
2
6
3
6
1
250127_int_fisarmonica
A
26-07-2007
17:38
Pagina 2
B
25
7
C
E
D
C2
F
G
L
G3
1
1
8
G1
5
12
10
23
22
15
17
21
20
16
2
C
C3
A
11
3
C1
2
1
13
14
19
9
C4
G4
24
1
4
D
4
B
3
6
A
18
B
G2
A
C5
STOP
C
B
B
1
A
G5
B
C6
A
STOP
B
STOP
D
-
+
B
C
G6
A. General description
1.
2.
3.
4.
5.
6.
7.
8.
9.
10.
11.
12.
13.
CYLINDER LID
FRONT HANDLE
FRONT HAND GUARD
RECOIL STARTER
CHAIN OIL TANK
STARTER HANDLE
REGULATION SCREWS, CARBURETTOR
ENRICHER/CHOKE
REAR HANDLE
STOP SWITCH
FUEL TANK
SILENCER
CHAIN
14.
15.
16.
17.
18.
19.
20.
21.
22.
23.
24.
25.
GUIDE BAR
SPIKED BUMPER
CHAIN CATCHER
CLUTCH COVER
TRIGGER
THROTTLE TRIGGER LOCKOUT
CHAIN TENSIONER SCREW
GUIDE BAR COVER
RIGHT HAND REAR PROTECTION
KEY
INSTRUCTION MANUAL
DECOMPRESSION VALVE
Example of identification label
LEGEND:
1) Guaranteed noise level according to directive 2000/14/EC
2) Manufacturer's name and address
3) Year of manufacture (last two figures; e.g. 03=2003)
4) Product code
5) Serial no.
6) Model/type
7) CE seal of conformity
ENGLISH - 1
Safety precautions
CAUTION!
Use this unit properly in order to avoid injuries.
Follow the instructions and precautions for reasonably safe, efficient
use of the product.
It is the responsibility of the user to follow the instructions and
precautions provided in the manual supplied with the product.
Note the illustrations at the beginning of the manual. Every section of
the text in the manual refers to the illustration bearing the same letter
Key to simbols
Read the instruction manual
carefully
Protective helmet, hearing protection,
protective glasses or visor
Always grip the machine
with two hands
Kickback danger
Enricher/Choke
Gloves with saw protection
Boots with saw protection,
steel toe-cap and non-slip sole
Switch off the engine by moving the
stop switch to the STOP position
before carrying out any checks
or maintenance.
Chain brake: deactivated, activated
Correct direction of cutter tooth
Do not smoke when refueling or using
the machine
Stopping
Caution!
Chain oil
Oil/petrol mix
ENGLISH - 2
B. General safety rules
WARNING! The saw is intended only for the cutting of wood
The engine group is intended only for use with the recommended cutting equipment.
WARNING! The saw can be dangerous. Improper use can cause injuries or even
fatalities to the user or others.
Before using the machine, read the operating instructions carefully and completely and be sure to have understood all of the content.
1. Do not use this machine if you are tired, under the effect
of medicine, drugs or alcohol or in any other type of
physical/mental altered state that could provoke reduced
vision, dexterity or the capacity to work with potentially
dangerous machinery.
2. Always wear protection accessories: approved clothing
• Protective clothing with anti-cut protection;
• Safety boots with anti-cut protection, steel toed with an
anti-slip sole;
• Work gloves with anti-cut protection;
• Protective visor or glasses;
• Protective ear protections;
• Protective helmet to protect one from falling objects and
protrusion of trees;
3. Do not wear scarves, bracelets or any object that can get
struck in the machine or be dragged by the chain.
4. The saw must be used only by an adult and trained
personnel;
5. Lend the machine only to expert people who know the
correct use of the machine. With the machine always
provide the instructions and be sure that they’ve been duly
read and understood completely.
6. Prolonged use of the saw can expose the operator to
vibrations that can produce “white finger phenomenon”
(Raynaud’s phenomen). This could reduce the sensitivity
of the hands in distinguishing different temperatures and
cause general numbness. The operator should therefore
closely check the condition of his hands and fingers if he
uses the product continuously or regularly. If any of these
symptoms should appear he should immediately contact a
physician.
7. To guarantee maximum safety and long life of the product,
use original accessories and replacement parts. We
advise you to conduct regular checks and if necessary
bring the saw to our authorized repair centre (see chapter
on maintenance).
8. Keep people and animals far from work area, at a distance
of 10 meters or twice the length of the trunk. If necessary
use warning signals to keep people at a safe distance.
Check that the work area is clean and clear. In your area
check for any possible dangers such as: streets, paths, al
cables, trees in dangerous positions etc.
9. Always pay attention to the surrounding environment and
be aware of the possible dangers that couldn’t be
perceived due to noise emitted by this unit.
10.Never use the saw to cut at a height higher than the
shoulders.
11.Hold the saw firmly during the job and always with both
hands. Hold the rear grip with the right hand the front
grip with the left. Always work with stable leg conditions.
12.Please make sure to be able to stop the engine in case
of necessity.
13.Do not work in trees if not specially trained and equipped
(straps, rope, safety hooks, etc) for this type of work.
14.Never use a defective saw or one that is not mounted and
covered correctly.
15.Never use an saw that has undergone modifications that
do not correspond to the original specifications.
16.The gases unloaded by the saw are poisonous. Use the
saw only in areas that are well ventilated. Do not use it in
closed spaces or explosive or flammable environments.
17.Never transport the saw with the motor running. To
transport it, even for short distances, cover the chain with
the suitable sheath (bar cover) and keep the bar turned
towards the rear part. If the saw is to be transported on a
motor vehicle put it in a stable position and avoid it
bouncing around while checking for any loss of fuel.
18.Never touch the chain if the engine is running and even
when it is off be very careful, as the teeth of the saw can
cause serious injury.
19.Keep the grips clean and dry.
20.Do not use the saw if the brake chain device is defective.
Do not touch the chain, even if stopped, when the saw is
running.
21.Make sure that there is someone able to hear you in the
event of an accident. We also recommend, to those who
work in remote areas, to always carry a first aid kit and be
sure that someone knows your position.
22.Always work with a fire extinguisher nearby in order to
intervene in the event of a fire.
23.Do not work in bad weather conditions (rain, wind, fog
etc.). Working in bad weather is often tiring and involves
risky situations, slippery ground for instance. Strong winds
can change the direction of falling trees causing damage
to people and things.
24.Never leave the saw running when it is unattended.
25.The silencer remains very hot even after turning the
engine off; do not touch the silencer if it is still hot.
26.Preserve this manual with care and always consult it
before using the saw.
ENGLISH - 3
C. Safety devices
WARNING! Never use the saw if the safety devices are defective or damaged.
Follow the instructions for checks, maintenance and service.
Your saw is equipped with the following security devices:
C1. CHAIN BRAKE WITH PROTECTION
ATTENTION! Your saw is equipped with a
safety chain brake designed to block the chain,
in case of KICKBACK, in a few milliseconds.
Despite the presence of this useful safety device, the following of the security prescriptions
described in this manual is fundamental.
To prevent and reduce the occurrence of a
KICKBACK, always firmly grip the saw with
both hands.
What is a KICKBACK?
1. The KICKBACK is a violent movement that causes the bar
to suddenly jump up towards the operator when it meets
an object with the upper part of the tip. Such a movement
could cause you to lose control of the machine.
2. A KICKBACK always occurs along the blade’s cutting
edge. Usually the KICKBACK takes place with a sudden
movement upwards, but they can happen in other
situations depending on the position of the saw during
cutting.
3. The KICKBACK occurs when the “risk” area of the bar
meets an object.
ATTENTION! Work carefully and be sure that
the “risk of KICKBACK” area never comes in
contact with any objects..
Verify that the brake chain is working correctly and check
the following on a daily basis:
4. That the chain brake (A) is disconnected when the brake
lever (B) is pulled back and blocked (the chain moves).
5. The chain brake (A) is inserted when the brake lever (B) is
pushed forward (the chain is blocked). The movement
activates a spring device that acts on the brake ribbon (C)
pushing it to block the drive system of the chain (D).
ATTENTION! If excessive strength is necessary
to insert or disconnect the brake or neither of
the positions of the lever moves DO NOT USE
THIS MACHINE ANY REASON! Take it immediately to an authorized assistance center.
Always conduct efficiency checks on the brake before using
the machine (see procedure described in the maintenance
chapter)
The brake chain reduces the risk of accidents, but operator
good sense can avoid them as well.
The protection doesn’t serve only to activate the brake chain:
it also reduces to a minimum the risk of a hand coming into
contact with the chain if you lose hold of the handle.
ENGLISH - 4
The KICKBACK can be produced if the end part of the bar
makes solid contact with the wood or other object. Therefore,
you avoid beginning the cut with the part of chain at the
above-mentioned angle.
ATTENTION! The chain brake doesn’t provide
total protection if the machine is operated
without necessary precautions and maintenance.
ATTENTION! Do not dismantle or tamper with
the chain brake mechanism. In the event of the
machine performing poorly or replacement of
some particular part, please rely exclusively
upon an authorized assistance centre.
The chain brake automatically intervenes due to inertia, in the
case of a violent KICKBACK.
In the event of less violent movements the chain brake is
applied by the left hand. It can also be inserted manually by
pushing the brake lever forward.
If the chain brake is intervened, before restarting it must be
reloaded by bringing the antiKICKBACK protection back
towards the front handle.
ATTENTION! ALWAYS disengage the brake
before every setting in motion of the machine in
order to avoid it breaking.
Use the brake chain as a wait brake during every
moving.
C2. THROTTLE TRIGGER LOCKOUT
The throttle trigger lockout device prevents involuntary
acceleration. When the accelerator block (A) is pushed on the
handle (while gripping the saw) this frees the accelerator (B).
Releasing the handle, the accelerator and the accelerator
block are blocked in the rest position. This mechanism is
activated by two independent return springs. In this position
the engine turns at a minimum.
ATTENTION! Never use the saw with the throttle trigger lockout device pressed with adhesive
tape, string or any other means.
C3. STOP CHAIN CATCHER
This machine is supplied with a stop chain catcher located
under the pinion. The mechanism is designed to stop the
movement behind the chain in the event of breaking or discharge from the bar. These occurrences are avoidable by setting the chain correctly (see chapter “D. Assembling Bar and
Chain”) Always execute correct maintenance for the bar and
chain (see chapter “Maintenance”).
ATTENTION! Never use the saw without the
chain catcher.
C4. REAR PROTECTION OF THE RIGHT HAND
Besides protecting the hand in the event of jumping or chain
breakage, check tightness of grip of the rear handle in
presence of branches.
C5. LESSENING VIBRATIONS
The saw is equipped with a vibration damping system that
develops during the use of the saw.
The antiquiver system reduces vibration propagation
between engine group/cutting group and the handles. The
saw body, including cutting group, is isolated at the handles
through damping elements.
C6. STOP SWITCH
The stop switch turns the engine off. Please ascertain that
you can turn off the machine in any situation.
D. Bar and chain assembly
ATTENTION! Never start the saw before having mounted or regulated the chain.
Wear protective gloves when mounting or regulating the chain.
ATTENTION! Always remember to mount the hinge, which is indispensable for
pulling down operations.
ATTENTION! A chain that is too slow jumps easily and represents a danger as
it can cause serious or fatal injuries.
1. Check that the brake chain isn’t activated by pulling the
antiKICKBACK protection back towards the rear handle.
2. Unscrew the nuts of the Carter clutch cover and remove
the crankcase itself (brake chain). Mount the bar on the
fixing pivots pushing it back as far as possible towards the
clutch cover.
3. Set the chain above the clutch cover. Make the chain pass
through the groove. Begin from the upper part.
Check that the cutting edge of the teeth is turned forward, on
the upper side of the blade.
4. Chain tension is regulated through a screw (A) and a pivot
(B). When the bar is mounted it’s very important for the
pivot located on the regulation screw to fall into line with
the bar hole (C). Turning the screw, the regulation pivot of
goes along the same. Identify this regulation before
starting to mount the bar.
5. Mount the Carter clutch cover (brake chain) and identify the
chain tensioner on the blade. Position the hinge in the
suitable location on the Carter clutch cover, in
correspondence of the 2 fixing pivots as shown in figure.
Check that the chain traction teeth are taken into the
wheel motor and that the chain is positioned correctly in
the groove. Tighten the bar fixing nuts with your fingers.
6. Tighten the chain with the appropriate screw and
combination key, screwing clockwise.
7. Simultaneously raise the tip of the bar. The tension is
correct when the chain remains in the groove around the
bar. The chain must furthermore be able to run with the
fingers, without effort.
Tighten the two nuts, raising the tip of the bar. Always use
the combination key for the assembly and setting of chain
tension.
Often check the tension of a new chain, until the end of its
running. A chain with correct tension means better cutting
characteristics and a greater duration.
The length of the chain increases with use. Often check the
tension of the chain, better with every supply opportunity.
E. Motor and oil chain mix
ATTENTION! The saw is equipped with a two-speed engine. Use only an oil/petrol
mix. Do not use any other type of fuel if not that recommended by this manual.
During all time you are in contact with the fuel smoking is strictly forbidden!
All operations of maintenance, assembly, disassembly and fueling should be
done with the machine on a flat, solid surface so that the motor cannot turn over,
in a stable position with the motor off, the switch turned to O/STOP, the cutting
tool stopped and wearing adequate protective gloves.
PREPARATION OF THE MIXTURE
1. This product is supplied with a two-speed engine and it
must therefore be fed with an unleaded petrol mixture
(with minimum no. of octane equal to 90) and totally
synthetic oil for two-speed engines specific for unleaded
petrol in the proportions indicated in the table in cover
point (D). Do not use oil for four-speed motors for any
reason whatsoever.
To ensure the correct mixture, measure the quantity of oil
to be mixed with petrol carefully. Dealing with a small
amount of petrol, even a slight mistake in proportions of
the oil has considerable importance on the percent
composition of the mixture.
ATTENTION! Carefully verify the specifications
of the oil listed on the package, the use of oils
ENGLISH - 5
without the specifications expressedly shown
in this manual, can cause serious damage to
the engine!
2. Prepare the mixture in a clean can, homologated for the
petrol. Prepare the mixture in an area without sources of
heat or sparks and well aired also.
To obtain the best mixture, pour the oil and then the petrol
in the container before. You avoid turning over the petrol.
Shake the can strongly ( repeat the operation every the
fuel is taken sometimes from the can ).
The characteristics of the mixture are subject to ageing
and therefore change over time. Therefore, we
recommend preparing only the quantity necessary for use.
Beware of using a mixture several weeks old; it could
damage the motor.
REFUELING
ATTENTION! The following precautions
decrease the risk of fire:
• Ensure maximum ventilation.
• Do not smoke or bring sources of heat or
sparks near fuel.
• Always refuel with the motor turned off.
• Open the petrol cap with caution, to remove
possible excessive pressure.
• Do not remove the petrol cap with the motor
running.
• Tightly screw the cap back on after refuelling.
• Move the saw before starting it up.
Always conduct refuelling in a well-ventilated area.
3. Position the saw on a flat, solid surface, so that it can’t fall
over and the petrol caps are turned upward.
To avoid impurities entering, carefully clean the inside of
the tank supply pipe union before removing the cap. Open
the tap of the tank with caution. Unscrew the cap of the
tank containing the mixture and fill it with the necessary
amount with the help of a funnel. Avoid turning over the
fuel. Once the tank is filled, close the cap tightly.
ATTENTION! If you have spilled fuel, dry the
saw well. If you have spilled some fuel on yourself, change clothes immediately.
Avoid contact with skin or eyes.
ATTENTION! The silencer is very hot during use
and soon after the stop of the engine, even if
the motor was on minimum. Pay careful attention to the risk of fire especially in the presence
flammable gasses or materials.
Always check that there are no fuel losses.
CONSERVATION OF FUEL
The petrol is highly flammable. Keep it in a cool, well-aired
environment stored in a container homologated for this
purpose. Never leave the saw idle with fuel in the tank if the
environment is not ventilated or where the gas produced by
the petrol could reach flames, candles, burners, boilers,
switches, al machines, water heaters, dryers etc. The gas
produced by combustible items can cause explosions or fires.
Never keep or store excessive amounts of fuel.
LUBRICATION OF THE CUTTING EQUIPMENT
ATTENTION! Lubrication of the cutting equipment. Insufficient lubrication of the cutting
equipment also causes the chain to break with
heavy risk of serious or fatal personal injury.
The lubrication of the chain is insured by an automatic pump.
The mechanical oil pump for chain lubrication can be
adjusted.
The feed rate of the chain oil pump can be adjusted by means
of the regulating screw (see details in the illustration).
Chain oil
It’s recommended you use new oil (special type) with good
viscosity. The oil for the cutting chain must offer good
adhesion to the chain and good flowing properties, both in
summer and winter.
Where oil for chains is not available use oil for EP 90
transmissions. Never use exhausted oils. These oils are
harmful to you, the saw and the environment. It is important
to use opportune oil for the temperature of the air (correct
viscosity). With temperatures lower than 0 ° some oils get
denser, overload the pump and damage it. For the choice of
the oil contact the service workshop.
Supplying the chain oil
4. Unscrew the cap of the chain oil tank. Fill the tank avoiding
the spilling of any oil; if this occurs clean the saw well.
Screw the cap back on and check there are no losses. Top
it off with every supply opportunity.
ATTENTION! In the event of prolonged storage,
empty and clean the fuel and chain oil tank.
Contact the nearest supply station for the disposal of the excess fuel and oil.
F. Starting and stopping
ATTENTION!
• Never start the saw without mounting the chain and the Carter clutch cover.
The clutch could come off and injure the operator.
• Always move the saw away from the supply area before starting it up.
• Assume a stable position and check that the chain can turn freely.
• Check there are no other people in the work vicinity.
ENGLISH - 6
COLD ENGINE STARTING
ATTENTION! During starting, give maximum
attention to the movement of the chain.
ATTENTION!
• Do not wrap the starting cord around your
hand.
• Do not suddenly leave the starting handle
with the cord completely extracted, since it
could damage the saw. Carry it only in the
rest position.
1. Make certain that the chain brake is disconnected by
pulling the lever (L) towards the front handle. Bring the
stop switch to the opposite position of stop. Pull the air
lever. Press the air purge diaphragm repeatedly until fuel
begins to fill the diaphragm (C). The diaphragm need not
be completely filled. Push the decompression valve (D)
down if your models is fitted with one.
2. Firmly grip the front handle with the left hand. Place a foot on
the lower part of the rear handle. Pull the cord slowly so as
to activate the starting device. Give a decisive and fast pull
while avoiding completely extracting the rope, which could
break it. Do not suddenly let go of the starting handle.
Repeat the operation until the engine crackling.
3. Bring the enricher lever back to its original position pushing
it and giving a few decisive pulls until the engine has
started.
4. When the motor has started, press and release the
accelerator immediately so as to unlock it from the starting
position.
Let the engine heat up for not less than 10 seconds, warming
the machine up allows for better cutting performance.
If the saw doesn’t start, closely repeat all of the operations.
To avoid difficulty starting, it’s strongly suggested you
avoid the exhaustion of the fuel mixture in the tank; this
will conserve the motor longer.
HOT ENGINE STARTING
5. Proceed as for when the engine is cold, but without using the
enricher lever. The restarting gas is obtained by pulling the
enricher lever and bringing it back to the original position.
HOT STARTING AFTER RESUPPLY
In case of complete emptying of the petrol tank and after
having put the resupply in motion, follow the instructions for
cold engine starting.
STOP
6. The engine stops immediately acting on the switch.
(In “Stop” position to the right)
ATTENTION! This command allows the
emergency stopping of the machine.
ATTENTION! Check that the chain will continue
moving by its inertia also after the engine stop.
G. Use of the saw
ATTENTION! The following information concerns the basic safety for working
with an saw. This cannot replace experience and professionalism. In case of
doubts or uncertainty, go to a trusted retailer or a professional. The pulling down
of a tree requires experience and is an operation a beginner must avoid. DO NOT
DO CERTAIN JOBS WITHOUT THE NECESSARY EXPERIENCE.
NEVER WORK WITH THE SAW IF YOU CAN’T GET HELP IN THE EVENT OF AN
ACCIDENT.
Carefully read the chapter concerning the “general safety
rules” and the “safety devices” that come with the machine
before operating it.
Avoid cutting thin branches and bushes (several branches at
a time). The branches could be seized by the chain, placed in
rotation and injure the operator.
BASIC CUTTING TECHNIQUES
General
• Always cut with the motor at the maximum number of
revolutions.
• After every cut decelerate the motor (prolonged running of
the engine at high speeds with the chain turning in empty
space can cause heavy damage).
• Cut from high towards low = when pulling the chain.
• Cut from low towards high = when pushing the chain.
G1. Consider the following five factors before preparing to cut:
1 the cutting equipment must not get stuck in the cutting
itself.
2 the object to be cut must not separate due to breaking
3 the chain must not hit the ground or other objects during
and at the conclusion of cutting.
4 Is there the risk of KICKBACK?
5 Can the ground and any other outside factors
compromise the balance of your position?
ATTENTION! If the saw gets stuck while
cutting: TURN THE ENGINE OFF! Raise the
trunk or move it using a robust branch or a pole
as a lever. Do not try to free the saw by shaking
or pulling it, thus avoiding the risk of injuring
oneself with the chain or damaging the handle.
ENGLISH - 7
USE OF THE SAW
The following list is a theoretical disquisition regarding the
most common situations one using the saw must face.
CUTTING
G2. Trunk on the ground
1. No risk of chain blocking or breaking of the trunk. Cut
from top to bottom through the trunk. Proceed with
caution at the end of cutting to avoid the chain hitting
the ground. Maintain the maximum speed of the chain
but stay prepared to face any possible surprises.
A If possible (is it possible to turn the trunk?) Finish at
2/3 of the thickness of the trunk.
B Rotate the trunk and cut the remaining part from top
towards bottom.
G3. Trunk set on only one part
1. Risk of breaking during cutting
Begin cutting from below by about 1/3 of the diameter.
B Finish cutting from top going to meet the cut already
performed.
G4. Trunk leaning against two extremities
1. The trunk leans against the two extremities. Risk of
squashing the chain.
Begin cutting from above by about 1/3 of the diameter.
B Finish the cut from below going to meet the cut
already executed.
GENERAL ADVICE FOR THOSE CUTTING DOWN TREES
ATTENTION! During pulling down operations,
therefore with the bar parallel to the ground, the
chain brake can be activated only by inertia.
G5. Safety distance
The safety distance from the tree to be knocked down is of
2,5 times the height of the tree itself. Check that there is no
one else in the danger zone before and during the cutting
down.
G6. Direction of cutting down
The purpose of the pulling down is to make the tree fall in the
best position for following cutting off of the branches and the
cutting of the trunk on ground where it is possible walk without
difficulty. Avoid that a falling tree gets entangled in another.
Making an entangled tree fall is a very dangerous operation.
After deciding in what direction you wish to have the tree fall,
evaluate the natural direction of the tree’s fall.
The decisive factors are:
• Inclination of the tree
• Its curvature
• Wind direction
• Concentration of branches
• The weight of any accumulated snow
Another important factor not to be neglected, one that does
not affect the direction of tree’s fall but rather your personal
safety, is the presence of dead or broken branches which
could fall off while cutting down and represent a danger.
ATTENTION! During critical cutting down
operations, raise acoustic ear protection
immediately after cutting, so as to be able to
perceive any unusual noises and possible
warning signals.
ENGLISH - 8
G7. Disbranching before cutting and withdrawal path
For disbranching operations the same principles apply as
they do for normal cutting.
1. Remove the branches that obstruct work. Begin from
bottom to top and keep the trunk between you and the
saw as shown in the Fig. for avoiding the branches that
can strike you. Remove the most difficult branches
subsequently piece by piece. Do not operate machine at a
height above the shoulders.
2. Remove the low vegetation around the tree and look for
possible obstacles (stones, roots, ditches etc.) so as have
a withdrawal path without obstacles.
The path should be at about 135° to the back in respect to the
direction of the trunk’s fall.
FALLING THE TREE
Execute three cuts for falling. First of all the UPPER PART of
the DIRECTIONAL CUT, then THE LOWER PART and then
THE FALLING CUT.
The correct position of these three cuts ensures perfect
control over the direction of the fall.
G8. Directional cut
1. First execute the UPPER PART of the directional cut on
the side towards which the tree will be felled. Stay to the
right of the tree and cut pulling the chain.
Then execute the LOWER PART of the directional cut
which must finish at the end of the upper part.
2. The depth of the directional cut must be 1/4 of the trunk
diameter, with an angle between the upper cut and that
lower than at least 45°.
3. The meeting between the two cuts is called
DIRECTIONAL CUT LINE. The line must be perfectly
horizontal and at a right-angle (90°) in respect to the
direction of the fall.
G9. Tree falling cut
On the other side effect the falling cut, just beyond the line
of the directional cut. Stay to the left of the tree and cut
pulling the chain. .
1. Position the falling cut 3-5 cm above the line of the
directional cut.
Using the harpoon
2. The harpoon is used as a fulcrum in the cutting of trunks
and the falling of trees. For correct use thrust the harpoon
into the bark or the superficial part of the trunk. This is to
have greater control over the direction of the cut
Work with the chain at full speed and advance the blade
slowly into the trunk. Check that the tree doesn’t move
in the opposite direction to that foreseen for the fall.
Insert a FALLING WEDGE or a PICKLOCK as soon as
possible.
3. The FALLING CUT must finish parallel to the
DIRECTIONAL CUT LINE, with a distance between the
two of at least 1/10 of the trunk diameter. The uncut
trunk is the fulcrum.
4. The fulcrum is the hinge that drives the tree in its fall.
5. If the fulcrum is insufficient, if it has been completely
sawed or if the directional cut is badly executed,
controlling the fall of the tree is not possible.
6. As soon as the falling and directional cuts are
completed, the tree must start falling, by itself or with
the help of a PULLING DOWN WEDGE or PICKLOCK.
For the pulling down of a tree we recommend using a bar
longer than the diameter of the trunk, so as to be able execute
the DIRECTIONAL and FALLING cuts with a SIMPLE CUT
(see “technical characteristics” for the recommended length
of the bar).
ATTENTION! We advise against operators with less
experience falling trees with a blade shorter than the
diameter of the trunk!
G10. DISBRANCHING
ATTENTION! Most accidents caused by saw
KICKBACK happen during the disbranching
process.
Observe the position of the blade tip during the
cutting of branches in tension.
Keep a stable position. Work from the left side of the trunk,
with the body near the saw. As soon as possible lean all the
weight of the body against the trunk.
H. Carburettor
ATTENTION! Never start the saw without the blade, chain or clutch cover.
The clutch can otherwise separate and cause injuries.
ATTENTION! During use and immediately after stopping the engine the silencer
reaches very high temperatures.
Avoid the contact with these waves to avoid burns. Lend the maximum attention
to the danger of fire especially in presence of flammable materials or gases.
ATTENTION! It is advisable to regulate the carburettor at an authorized
assistance centre. The regulation of the carburettor is fundamental and if
executed incorrectly it can seriously damage the unit.
H1. WORKING OPERATION
• Through the accelerator the carburetor regulates the
number of motor revolutions. The mixing of air and petrol
occurs in the carburetor. This mixing can be controlled. To
be able to better exploit the power of the saw, the
carburetor regulation must be correct.
• The T screw regulates the accelerator position to the
minimum. Screwing clockwise the slower RPMs rise while
turning anticlockwise the lower RPMs are reduced.
REGULATION
ATTENTION! During regulation of the
carburetor pay particular attention to the
moving chain in that it could provoke injuries.
Regulating the carburettor means conforming the engine to
the local climatic conditions, the available petrol and the type
of two-speed engine used.
The carburettor is set up and tested in the factory. Normally it
shouldn’t need any regulation. If the conditions that affect the
working of the carburettor should be such as to require a new
regulation, closely follow the following instructions.
Before executing any regulation, check that the air filter is
clean and that the cylinder is in place.
FINAL REGULATION OF THE T MINIMUM
The regulation of the minimum is executed with the T screw.
If necessary, screw the T clockwise with the motor running
until the chain starts to turn. Then unscrew counter clockwise
until the chain stops. The minimum is correctly regulated
when the motor turns regularly in every position and with a
good margin before the chain starts turning.
In case of doubts or questions contact an authorized
assistance centre.
I. Maintenance of safety devices
ATTENTION! Closely follow the maintenance instructions shown in this manual.
During maintenance operations the saw must be turned off. Start the motor only
when a procedure requires it and it follows safety norms.
ATTENTION! Do maintenance checks to safety devices before using the saw. If
the saw doesn’t pass one of the checks shown here do not use it under any
circumstances. Contact an authorized assistance centre listed on the packaging
of the saw.
ENGLISH - 9
I1. Brake chain with antiKICKBACK protection
1.
2.
3.
4.
5.
6.
ATTENTION! Do not dismantle or tamper with
the chain brake mechanism under any
circumstances. In the event of improper
functioning or need to replace a part, go only to
an authorized assistance centre.
Periodically clean the clutch brake and drum removing
sawdust, resin and dirt (without dismantling the brake) and
visually check the ribbon wear and tear (if the band brake
thickness is less or equal to 0.60 mm at the point of
greatest use rely upon an assistance centre authorized for
the replacement).
Check that the protection is complete and without evident
defects such as cracks in the material.
Move the protection back and forth to verify that it moves
freely and that you’re anchored well in the clutch cover.
Start up the saw on a stable base. See that the chain
turns freely.
Grip the handles with both hands.
Accelerate activate chain brake using the left hand
antiKICKBACK button without letting go of the handles.
The chain must block immediately (to avoid breaking the
brake itself, don’t insist with the accelerator).
I2. Accelerator Block
1. Check that the accelerator is blocked at the minimum when
in rest position.
2. Press the throttle trigger lockout device and check that it
goes back to rest position as soon as it’s released.
3. Check that the accelerator and the accelerator block move
freely and that the recall springs work correctly.
4. Start up the machine and go to maximum speed. Release
the accelerator and check that once the chain is still it
doesn’t move. If the chain moves, check the minimum
regulation (see “Regulation of the carburettor”).
I3. Chain Brake Pivot
Check that the chain stop pivot is complete and well mounted
on the saw.
I4. Rear right hand protection
Check that the protection of the right hand is complete and
without any obvious faults such as damaged material.
I5. Vibration Dampering System
Check the proper working of the dampers and that aren’t
deformed or damaged in any way.
Check that they’re anchored between the engine group and
handle group.
I6. Stop switch
Start up and check that motor shuts off bringing the switch to
the stop position.
L. Periodic maintenance
CHAIN SHARPENER AND CONTROL OF CUTTING DEPTH
ATTENTION! If the chain isn’t sharpened
correctly, risk increases as a consequence.
The following instructions refer exclusively to
the recommended chain. Always sharpen the
chain with motor turned off.
L1 General instructions on sharpening the chain.
The chain must always be well sharpened. If the chain doesn’t
cut without having to press the bar against the wood and
produces very fine sawdust, it is a sign the chain is not sharp.
If the cutting doesn’t produce sawdust, the chain has
completely lost its thread and in cutting you pulverize the wood.
If the chain is sharp, it moves forward in the wood itself and
produces big and long shavings.
1. The sharp part of the chain is made up of the CUTTING
MESH, with a TOOTH (A) and POINT FOR THE
CUTTING DEPTH (B). The difference in level between
these two determines the cutting depth.
L2 Sharpening of the teeth
ATTENTION! The following deviations from the
instructions for sharpening considerably
increase the tendency of KICKBACK:
• EXCESSIVE SHARPNESS ANGLE
• INSUFFICIENT SHARPNESS ANGLE
• INSUFFICIENT FILE DIAMETER
To obtain good sharpness of the chain you need A FILE
GUIDE and A ROUND FILE. The diameter of the file must be
equal to 3/16” /4,8mm.
ENGLISH - 10
Place the chain on the bar and stretch it using the chain
tensioner and checking that the chain has the correct tension
and that it’s blocked with the safety brake. This impedes that
chain moves sideways making the sharpening operation
more difficult.
1. Always sharpen the cutting tooth from the inside towards
the outside, slackening the pressure on the file during the
return phase.
The operation will be easier using the file guide.
During sharpening the file must be positioned so as
determine the following three corners of the cutting:
“A” upper angle 30° - 35°
“B” external side angle 85° - 90°
“C” internal side angle 60°
2. The file must be positioned and must work perpendicularly
to the bar.
3. To obtain more precise side angles we advise positioning
the file so that you vertically cross over the cutting edge of
about 0,5 mm.
Sharpen all the teeth of one side first then turn the saw over
and repeat the operation.
To obtain a uniform cutting surface in the wood, all the teeth
must be sharpened to the same length.
4. CUTTING DEPTH DELIMITER
With the sharpness of the teeth the cutting depth decreases.
Check the height of the depth delimiters after various chain
sharpenings.
The exact height must be 0,025”/0,65 mm beneath the upper
cutting edge.
Check the height using the file and file down the jutting part.
Round the front part of the delimiter (D).
L3 DAILY MAINTENANCE
ATTENTION! Please be sure that the engine is
switched off before beginning any maintenance
operation.
Air Filter Clean the air filter at least once a day and more
often in difficult environments. Remove the filter as shown in
the figure and clean it using a gentle jet of compressed air.
For more thorough cleansing, you can wash it with soapy
water.
During assembly, check that the filter closes well into its area.
The filter never becomes again completely clean and must
therefore be periodically replaced with a new one.
A damaged filter must be replaced immediately.
M1 Cutting Bar Carefully clean the oil passage flue (K) and
holes (l). Turn the bar periodically to obtain uniform
performance in the event the guide groove is worn or there
are excessive furrows present. Clean the chain guide. Grease
the bar coil with fat for bearings.
M2 Chain Oil Pump Check that the automatic pump for bar
lubrication correctly pumps chain oil. Point the bar against a
clear surface, about twenty centimetres distant. After about a
minute, at ¾ gas, the surface will have to present clear oil
tracks. If the pump doesn’t work correctly contact an
Authorized Assistance Centre.
Fuel Filter
To replace remove the tank cap and extract the filter using a
metal hook. Replace the filter, preferably at least once a year.
M4 Chain Sharpen the chain and check its condition and
tension. If it is worn-out, have it replaced at an authorized
assistance centre. When the cutting tooth is only 4 mm, the
chain is worn and must be replaced.
M3 Chain Drag Coil
Check that the chain drag coil is not worn. If the replacement
is necessary, refer to an authorized assistance dealer.
L4 Starting Device Check the starting device, the cord, and
clean the outside air intake. Check that the cord automatically
returns to its original position.
ATTENTION! In the starting device a tension
spring is present. Do not open the device to
avoid personal injury. If the starting device
turns out to be defective, contact an authorized
assistance centre for repairs.
Nuts and screws
Check that all nuts and screws are well tightened.
L4 Spark Plug
Clean the spark plug and check that the electrode has a
distance of 0.5 mm. Replace it if it is worn, using the suitable
key for the job.
ATTENTION! In the event sparkplug
replacement is necessary, use only the correct
type of spark plug as its replacement. Other
types could damage the engine.
ENGLISH - 11
Technical data
Engine
Cubic capacity cm3
Bore (mm)
Stroke(mm)
Revolutions per minute (min-1)
Recommended maximum revolutions (min-1)
Power (kW@rpm) (ISO7293)
46
43
32
2500
12500
2,2/9000
49
44
32
2500
12500
2,3/9000
51
45
32
2500
12500
2,5/9000
Ignition
Make/type of the ignition
Plug
Plug gap (mm)
Walbro / Phelon - Electronic
Champion RCJ7Y / NGK BPMR7A
0,6 - 0,7
Fuel, lubrication
Type carburettor
Petrol tank capacity (cm3)
Oil tank capacity (cm3)
Weight (without bar, dry) (kg)
Walbro WT 738 / ZAMA C1Q-X5054
450
200
4,9
Combinations of bar and chain
Max number of teeth on sprocket
Chain pitch (inch)
Length (inc/cm)
6
3/8”
14”/35
16”/40
18”/45
17,7
1,3
-
-
7
0,325”
13”/33
15”/38
18”/45
19
1,3
7
0,325”
13”/33
15”/38
18”/45
19
1,3
7
0,325”
13”/33
15”/38
18”/45
19
1,3
Noise level
Sound pressure equivalent to the ear of the operator in dB(A) (ISO 22868)
Guaranteed sound power level LwAav dB(A) (ISO 9207). .
Measured sound power level LwAav dB(A) (ISO 9207). .
99,5
110
109
99,5
110
109
100
109
108
Vibration level
Front handle (m/s2) aw, av (ISO 22867)
Rear handle (m/s2) aw, av (ISO 22867)
5,1
8,7
5
8,5
3,2
9,5
Chain speed at max. power (m/sec)
Thickness of mesh traction (mm)
Max number of teeth on sprocket
Chain pitch (inch)
Length (inc/cm)
Chain speed at max. power (m/sec)
Thickness of mesh traction (mm)
EC declaration of conformity (Only applies to Europe) (Directive 98/37/EC, Annex II, A)
We, H.O.P.I. Via Como 72, 23868 Valmadrera (LC) Italia, declare under sole responsibility that the chain saws CS020 from 2007’s
serial numbers and onwards (the year is clearly stated in plain text on the type plate with subsequent serial number), are in conformity
with the following standards or other normative documents following the provisions in the COUNCIL’S DIRECTIVES: - of 22/6/1998
“relating to machinery” 98/37/EC and applicable supplements; - of 15/12/2004 “relating to electromagnetic compatibility” 2004/108/EC,
and applicable supplements; - of 8/6/2000 relating to the noise emissions in the environment 2000/14/EC, 97/68/EC + 2002/88/EC
gas emission.
For information relating to noise emissions, see chapter Technical data.
The following harmonised standards have been applied: ISO 11681-1:2004 + A1:2007, EN ISO 14982:1998. The supplied chain saw
conforms with the example that underwent EC type examination. The certificates are numbered: 0710002.
Registered body: 0717, Nemko S.p.A. - Via Trento e Trieste, 116 - I-20046 Biassono (Mi), has carried out EC type examination in
accordance with article 8 section 2c.
Valmadrera, 01.06.07
Ing. De Carlo Raffaele (Direttore Tecnico)
H.O.P.I.
ENGLISH - 12