1
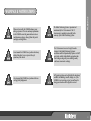
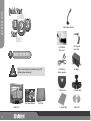
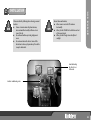
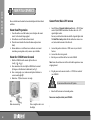
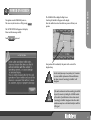
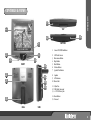
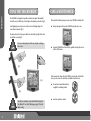
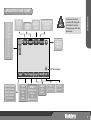
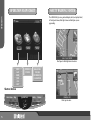
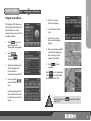
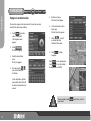
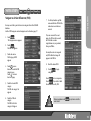
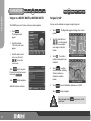
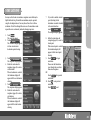
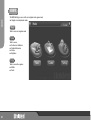
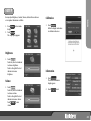
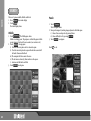
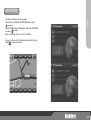
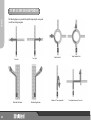
When used correctly, the GNS8600 enhances your
driving experience. The voice and map information
in the GNS8600 cannot be guaranteed accurate as
road layout may change. Always follow the posted
road signs and traffic laws.
The Global Positioning System is operated and
maintained by the US Government. The US
Government is completely responsible for the
accuracy of the Global Positioning System.
Do not mount the GNS8600 in a position which may
obstruct the driver's view or prevent the safe
operation of the vehicle.
The US Government reserves the right to make
changes to the Global Positioning System in
accordance with the Department of Defence civil GPS
user policy and the Federal Radio navigation plan.
These changes along with poor satellite geometry
could cause inaccurate readings.
Do not mount the GNS8600 in a position within an
air bag field of deployment.
GPS signal reception can be affected by the location of
satellites, tall buildings, tunnels, bridges, etc. If the
GNS8600 is not receiving a signal, you will need to
change your location until a signal is received.
WARNINGS
WARNINGS & NOTIFICATIONS
i
QUICKSTART GUIDE
Quick Start
Guide
1
3
2
StartHere
1x Glass Mount Bracket
1 BOX CONTENTS
Please contact your place of purchase if any of the
following items are missing.
GNS8600
+12V Hardwire
Power Cord
+12V Cigarette
Power Cord
USB Cable for
software upgrades
AC Adapter
1 x Mount Cover
Car Navigation System
Owner's Manual
&
1 x Mount Stand
Quick Start
Guide
1
23
Main Unit
ii
This Owners Manual
Carry Case
1 x Alcohol Wipe
Software CD
Please consider the following when choosing a mount
location:
! Choose a location where the fixed antenna,
when extended horizontally will have a clear
view of the sky.
! Do not mount within any Airbag deployment
areas.
! Do not mount where the driver's view will be
obstructed or where safe operation of the vehicle
is may be obstructed.
Ensure the mount location;
! Allows room to raise the GPS antenna
horizontally.
! Allows for the GNS8600 to be slotted in and out
of the mount stand.
! Allows for the tilt angle to avoid reflected
sunlight.
QUICKSTART GUIDE
2 INSTALLATION
Avoid obstructing
the driver's view
of the road.
Avoid air conditioning vents
iii
i
QUICKSTART GUIDE
3 MOUNT & CONNECT
Once a suitable mount location has been decided place the Mount Stand
as follows:
Connect Power/Raise GPS Antenna
i.
Mount Stand Preparation
i.
Clean the surface area of the location you wish to place the mount
stand. Use the alcohol wipe supplied.
ii. Peel adhesive cover off bottom of mount stand.
iii Place the mount stand in the desired location and press down
firmly.
iv. Remove adhesive cover off mount cover and locate over mount
stand base, pressing down evenly to remove any air bubbles.
Mount the GNS8600 onto the stand
i. Slide the GNS8600 onto the mount clip from the rear
(see fig 1; 1 & 2 ).
ii. Once mounted on the swivel clip the GNS8600 can be rotated
360 degrees or tilted forward or backwards (see fig 2).
iii. Once a viewing angle is set, rotate mount clip knob clockwise to
secure mount height 3 .
iv. Rotate base 4 knob to secure view angle.
Insert DC plug of Cigarette Lighter Lead into the +12V DC Power
socket of your GNS8600 and connect the other end to the +12V
cigarette lighter socket.
You may use the hard wire lead instead of the Cigarette Lighter lead.
The Hard Wire Lead provided with the unit has bare wires at one
end, and a small connector at the other end.
ii. Connect the positive red wire to a 12VDC source in your vehicle's
fuse box.
iii. Connect the other wire to ground.
iv. Run the power cord from the fuse box to the GNS8600.
Note: Ensure the cord does not interfere with vehicle operation or cause
a tripping hazard.
iv. Plug the power cord connector into the +12V DC Power socket of
your GNS8600.
Do not connect this unit to a 24V system.
v.
1
2
Fig 1.
Slide onto mount clip
iv
3
4
Fig 2.
Turn or angle the unit to view
the display.
Raise the GPS antenna to a horizontal position.
You are now ready to activate your GNS8600.
\
POWER ON SCREEN
Turn ignition on and GNS8600 will power on,
The screen may be turned on or off by pressing
The CAUTION NOTICE will appear on the display.
Please read this message carefully.
Touch
POWER.
.
The GNS8600 will then display the Map Screen.
'Searching for Satellites' will appear on the display.
Once the satellites have been found the map screen will show your
position.
QUICKSTART GUIDE
4
to proceed.
Your position will be indicated by the pointer in the centre of the
displayed map.
For the initial power up it may take up to 15 minutes
to secure satellite information. When satellite data
has been retrieved 'Searching for Satellites ' will
disappear.
If the unit continues to indicate searching for satellite
beyond 15 minutes try holding the GNS8600 outside
of the vehicle. If satellite data is then retrieved and
'Searching for Satellites' disappears then the vehicle
windscreen may have a tint which interferes with the
GPS signal.
v
CONTENTS
1
CONTENTS
FEATURES
Contents..................................................................................................................1
Features...................................................................................................................1
Controls & Views.......................................................................................................2
Using the Touchscreen.............................................................................................3
Care & Maintenance.................................................................................................3
Operation Flow Chart...............................................................................................4
Safety Warning System..............................................................................................5
Toolbar.....................................................................................................................6
Scale Bar: Zoom In/Out...............................................................................6
Volume.......................................................................................................6
Day/Night....................................................................................................6
Map Mode...................................................................................................7
Turn Guide Mode........................................................................................7
Navigation................................................................................................................8
Navigate to Address......................................................................................8
Navigate to an Intersection..........................................................................9
Navigate to a POI........................................................................................10
Navigate to a Recent Route.........................................................................11
Navigate by Map.........................................................................................11
Mark Location........................................................................................................12
Mark Current Position.........................................................................12
Mark from Map Search..............................................................................12
Mark My POI.............................................................................................13
Trip Computer........................................................................................................14
Menu.....................................................................................................................15
Route Settings...........................................................................................16
MY POI Editor............................................................................................17
Safety Warnings.........................................................................................18
Map Settings..............................................................................................19
Simulations..............................................................................................20
Main Menu............................................................................................................21
Set Up....................................................................................................................22
GPS Status..............................................................................................................23
Games...................................................................................................................23
GPS Status..............................................................................................................24
Turn Guide Descriptions........................................................................................25
Turn Guide Descriptions........................................................................................24
Map Screen Icons...................................................................................................26
Points Of Interest Table...........................................................................................27
Troubleshooting.....................................................................................................28
Warranty................................................................................................................29
Car Navigation
! Navigate to pre-programmed State/City locations
! Navigate to street address
! Navigate to over 500,000 pre-installed points of interest (POI)
! Mark often used destinations as My POI
! Dynamic voice and visual guidance: Constant route verification and
!
re-calculation with turn by turn instructions
Road Map
Speed and Safety Warning System
! Receive audio and visual warnings when you approach:
! Fixed Speed camera
! Red Light camera
! Black spots
! Moving speed alerts
Other Great Features
! 5.6 inch High Definition Non reflective LCD Screen
! Touchscreen or joystick & key operation
! Intuitive technology
! Built in GPS antenna
Updateable Software* for;
! Operation
! Map data
! Safety Warning data
* For software updates please visit www.uniden.com.au or
www.uniden.co.nz.
OPERATION
CONTROLS & VIEWS
1
TOP
2
15
14
BOTTOM
7
3
6
4
FRONT
5
11
8
15
9
12
13
1
Screen ON/OFF/Dim Button
2
3
4
5
6
7
LCD Touch Screen
Main menu Button
Map Button
Mark Button
Volume Button
Joystick/Navi Button
8 Speaker
9 GPS Antenna
10 Mount Slot
11 Stylus Pen
12 USB Cable Connector
13 +12V DC Power Jack
14 Reset Button
15 Not used
10
BACK
SIDE
2
CARE & MAINTENANCE
OPERATION
USING THE TOUCHSCREEN
The GNS8600 is designed to respond to touchscreen input. Momentarily
touch the screen with the tip of your finger when making a selection (fig3).
Avoid applying excessive pressure to the screen or holding a finger for
more than a moment (fig 4).
Please take the following steps to ensure your GNS8600 is looked after.
!
Always transport and store the GNS8600 using the carry case.
!
Keep the GNS8600 free from dust by regularly cleaning the screen
with an LCD cleaner.
You may also use the stylus pen which is located at the top right of the unit
to touch the screen (fig 5).
Do not use sharp objects which may scratch or damage
the screen.
fig 3
fig 5
Take measures to reduce the risk of theft by covering the unit with the
carry case or remove the unit from your dash when not in use.
!
Do not leave unattended in direct
sunlight for extended periods.
!
Avoid any moisture contact.
fig 4
Touchscreen activation is prevented while driving with
Safe Mode ON. See Safety Warnings on page 18 for Safe
Mode setting.
3
15m
30m
60m
120m
600m
1k
2k
8k
30k
100k
400k
MIN-MAX
MUTE
TEST
DAY
NIGHT
3D
HEADING UP
NORTH
Touchscreen activation is
prevented while driving with
Safe Mode ON. See Safety
Warnings on page 18 for Safe
Mode setting.
AUTO SPLIT ZOOM
SPLIT Mode
TEXT Mode
OPERATION
OPERATION FLOW CHART
EXIT
SCREEN
/CLOSE
GPS Icon/Compass
ROUTE SETTINGS
MY POI EDITOR
SAFETY WARNING
MAP SETTINGS
SIMULATION
START
TRANSIT
END
GO
MARK
ADDRESS
INTERSECTION
MY POI
POI
RECENT ROUTES
SPEED
TIME
RESET
SAVE
RENAME
POI list
see page 27
4
OPERATION FLOW CHART
SAFETY WARNING SYSTEM
OPERATION
The GNS8600 will give voice guide and display alert (see displays below)
of Fixed Speed Camera, Red Light Camera or Black Spots you are
approaching.
Fixed Speed or Red Light Camera Location
Shortcut Buttons
Main Menu Map
5
MENU
NAVI
MARK
TRIP
POI
MAP
OTHELLO
PUZZLE
Joystick/Navi
BRIGHTNESS
VOLUME
INFORMATION
CALIBRATION
Mark
Volume
Black Spot Location
TOOLBAR
The TOOL BAR appears at the top and bottom of the Map Screen when
the vehicle is stationary.
The functions available in the Top Toolbar are to help you set your
preferred map viewing settings.
The name of the street you are currently on appears above the Bottom
Toolbar which has available your menu and navigation options.
SET UP
Day/Night
Touch
to switch the map
display colours from a day setting to
a night setting.
!
Day Mode
!
Night Mode
Scale: Zoom In/Out
There are 11 map levels 15m, 30m,
60m, 120m, 600m, 1k, 2k, 8k, 30k,
100k, 400k.
Touch the scale icon
Touch
Touch
to Zoom in.
to Zoom out.
Volume
Touch
to adjust the volume. Touch to the left or right of the
volume indicator to decrease or increase volume. Touch
to
hear a sample voice at the current level.
Touch
to mute the volume.
When MUTE is ON
will show on the map screen.
!
The screen may be turned off of on by pressing
!
The screen dimmer can be turned on of off by
pressing and holding POWER
POWER
6
SET UP
TOOLBAR
Map View
Map View changes the way the onscreen map is displayed. The 3 settings
are below. The current Map View appears in the top toolbar. Touch the
current selection to change to your preferred view.
!
- Heading Up
Shows your position as always
moving towards the top of the
screen.
!
- North Up
Shows your moving direction
with reference to North always
pointing up.
!
7
- 3D
Shows the 3D view of the map
with your position always
moving towards the top of the
display.
Turn Guide Mode
During navigation you may select the
way navigation is shown. The
current Turn Guide Mode appears in
the top toolbar.
!
- Auto Split Zoom
When within 300m of an
intersection that is part of
your route, a pop up screen
with a zoomed in view of the
intersection will appear on the
right side of the display.
!
SPLIT - Split Mode
Always shows information for
the next turn on the right of the
display.
!
TEXT - Text Mode
Always shows information for
the next 3 turns on the right of
the display.
Navigate to an Address
The Navigation (NAVI) feature may
be accessed from the Toolbar. If you
know the address you wish to
navigate to then you may search for
the address as follows:
1.
Touch
or press the
centre of the joystick.
The navigation menu appears.
2.
Touch
.
Then touch State .
The State list appears.
3.
Touch the desired State name.
The City list appears. The
previous address is
remembered when turned off.
4.
You may press the
icons to scroll down the list of
Cities.
Use the keyboard to spell the
name and the list of cities will
be reduced as more letters are
entered.
5.
Touch the city name.
The Street list appears
6.
Use the keyboard to find a
street.
7.
Touch the street name.
The street number display
appears.
8.
If the street number is available
select from the range shown.
Move to next step if street
number is not available
9.
Touch
navigation.
NAVIGATION
NAVIGATION
1
to begin
Touch
to view map location.
Touch
if you wish to Mark
the destination as a My POI.
During navigation touch
entire route.
at any time to view the
8
NAVIGATION
NAVIGATION
Navigate to an Intersection
5. Touch the city name.
The Street list will appear.
If you wish to navigate to the intersection of 2 streets then you may
search for the intersection as follows:
1.
2.
3.
4.
Touch
or press the
centre of the joystick.
The Navigation menu
appears.
Touch
The State list appears.
Touch the desired State
name.
The City list appears.
You may press the
icons to scroll down the
list of Cities.
Intersection
Street2
6.
Use the keyboard to select a
Street name.
The 2nd Street list appears.
7.
Touch
to scroll
to desired 2nd Street.
Touch 2nd Street name.
8.
Touch
navigation.
Street2
to begin
Touch
to view map location.
Touch
if you wish to Mark
the destination as a My POI.
Use the keyboard to spell the
name and the list of cities will
be reduced as more letters are
entered.
During navigation touch
entire route.
9
at any time to view the
Navigate to a Point Of Interest (POI)
You may search for a point of interest to navigate to from the GNS8600
database.
A table of POI categories and sub categories can be found on page 27.
1. Touch
The Navigation menu appears.
2. Touch
The State list appears.
3
Touch state name.
The first page of POI
appears
4. Touch
to move
between 1st and 2nd POI
category pages.
Touch
to return
back to 1st page.
5. Touch the desired POI
category.
The POI sub category list
appears.
6. Touch the POI sub
category.
The POI list for that
category will appear.
NAVIGATION
NAVIGATION
7. Use the keyboard to spell the
name and the list of POI will be
reduced as more letters are
entered.
If you are unsure of the exact
name of a POI or wish to search
for POI within a certain
range(distance to your position)
then press Within.
You may then select a range and
only POI within that range will
appear in the POI list.
8. Touch the desired POI.
9.
Touch
navigation.
to begin
Touch
to view map route.
Touch
if you wish to Mark
the destination as a My POI.
During navigation touch
entire route.
at any time to view the
10
NAVIGATION
NAVIGATION
Navigate to a RECENT ROUTE or REVERSE ROUTE
Navigate by MAP
The GNS8600 stores a list of routes you have previously navigated to.
You may search a destination to navigate to using the map view.
1.
Touch
The Navigation menu
appears.
1.
Touch
position.
2.
2.
Touch Recent Route.
The list of recent routes
appears.
Touch the Scale Bar:Zoom
to view the map and
touch the screen anywhere
on the map to centre that
location.
3.
Touch the desired recent
route or use the scroll
to view other
recent routes.
3.
Touch
if you wish to
include a transit point to your
destination.
4.
Touch
to confirm
an end destination. Including
Transit is traveling to a
destination via another
location.
5.
Touch
if you wish to Mark the destination as a My POI.
Touch
to begin navigation.
Touch
to view map route.
If you wish to return from a recent
route touch
Touch
to begin navigation.
Touch DEL to delete saved route.
. The Map toolbar appears with map of your current
During navigation touch
entire route.
11
at any time to view the
MARK LOCATION
Mark current position
Mark from Map Screen.
You may Mark your present position as follows:
1. Touch
The Save Position display
appears.
2. You may choose a category icon
for this position. The icon will
appear in the map view.
The
icons are
Quick Access icons. Quick
Access icons show in the Navi
menu.
Quick Access icons cannot be
Renamed.
3. Touch
to rename the
position.
a) Use the keyboard to enter
a new name.
b)Touch
to return
to Save Position display.
4. Touch
to confirm.
Mark will save this position in
My POI if you have chosen a
category icon or as a Quick
Access destination available in
the NAVI menu.
From any screen you may use the joystick or zoom in/out to move
around the map to find a position then touch
then follow step 2.
Or you may touch
at any time then follow step 1.
MARK LOCATION
MARK LOCATION
1. Use the Scale Bar Zoom In/Out
to view the map and touch the
screen anywhere on the map to
centre that location. Centre the
desired destination.
2. You may choose a category icon
for this position. The icon will
appear in the map view.
The
icons are
Quick Access icons. QuickAccess
icons show in the Navi menu.
Quick Access icons cannot be
RENAMED.
3. Touch
to rename the
destination.
a) Use the keyboard to enter a
new name.
b) Touch
to return to
Save Position display.
4. Touch
to confirm.
Mark will save this position in My
POI if you have chosen a
category icon or as a Quick
Access destination available in
the NAVI menu.
12
MARK LOCATION
MARK LOCATION
MARK as MY POI
You may Mark important or frequently used destinations as a My POI for
easy access.
To Mark a My POI:
Touch
.
1. Follow the instructions
to select a desired Address,
Intersection or POI.
2. At the last step:
Touch the
option.
The Save Position display
appears.
3. You may choose a category icon
for this position. The icon will
appear in the map view.
The
icons are
Quick Access icons.Quick Access
icons show in the Navi menu.
Quick Access icons cannot be
RENAMED.
13
4. Touch
to
rename the destination.
a) Use the keyboard to enter a
new name.
b) Touch
to return to
SavePosition display.
5. Touch
to confirm.
Mark will save this position in
My POI if you have chosen a
category icon or as a Quick
Access destination available in
the NAVI menu.
SPEED DATA
TIME DATA
The Trip computer shows Average speed, Maximum speed, Driving
distance and your current speed.
There are two displays; Speed Data and Time Data.
1. Touch
1. Touch
The Speed Data display is shown.
2. Touch
to reset the displayed statistics.
The Trip Computer display will remain on the screen until another
display is chosen.
To return to Map Screen touch
. The Speed Data is shown.
2. Touch
.
The Time Data is shown.
3. Touch
TRIP COMPUTER
TRIP COMPUTER
to reset the displayed statistics.
The Trip Computer display will remain on the screen until another
display is chosen.
To return to Map Screen touch
.
.
14
MENU
MENU
The MENU icon gives access to various settings that may be changed to
enhance your driving experience.
MENU is available from the Toolbar.
1. Touch
The MENU list appears.
2. Touch the desired menu option
to view.
Each option is described in the
following pages
Allows you to change settings which affect how the GNS8600 calculates the
route to a selected destination.
Allows you to view and edit the My POI list (including Quick Access).
Allows you to set desired safety alerts ON/OFF and set speed warning
settings.
Allows you to select what appears on the MAP display and the AUTO ZOOM
setting.
Allows simulation of a navigation route.
15
ROUTE SETTINGS
Route Option
1.
2.
3.
Touch
The MENU list appears.
Touch
The Route Settings display with
Route Option list.
The Route Option name shows
on the left and the current
setting shows on the right.
Touch the current setting to change. Adjusting Route Method or
including or excluding road types will increase or decrease your
estimated time of arrival to any destination.
Route Options
Item
Description
Route Method
Select to choose Quickest Route or Shortest Route
method.
Select to include or exclude Toll Roads if required.
Select to include or exclude Highways if required.
Select to include or exclude U-Turns from Route
calculation if required.
Select to include or exclude unpaved roads from Route
calculation if required.
Toll Roads
Highways
U-Turn
Unpaved
Road Speed
1.
2.
3.
Touch
to view road speed settings. The road
type shows on the left and the current road speed setting
shows on the right.
Touch current setting to adjust
to desired level.
The road speed settings
increment in 5km/h steps.
Adjusting road speed will
increase or decrease your
estimated time of arrival
to any destination.
Touch
to exit.
MENU
When you select a destination to Navigate to the GNS8600 will calculate
the route following the guidelines in Route Settings. You may change
route settings to your preference.
Road Speed
Item
Description
Freeway
Highway
Main
Residential
Select to set average speed on Freeway
Select to set average speed on Highway
Select to set average speed on Main Road
Select to set average speed on Residential Road
16
MENU
MY POI EDITOR
You may view and edit the My POI
list. Note: Quick Access locations
may be changed at any time in the
Mark location menu.
Delete My POI
1.
Edit My POI
Touch
The menu list appears.
2. Touch
The My POI list appears.
3. Touch
to find the
desired My POI.
You may use the keyboard to
spell the name of the My POI
and the list will be reduced as
more letters are entered.
4. Touch the desired My POI
name to highlight it.
Touch
to view the map location
of a selected My POI.
Touch
- to return from map
display.
5.
Touch
display appears.
Touch
to change My POI details.
The Modify My POI display shows.
Rename My POI
Touch
. The Rename display
shows. Use the keypad to edit name
then press
.
Touch an icon to change the assigned
icon of the My POI.
Hotpots (Quick Access Location) cannot be be edited.
See Mark Location menu to mark as a different location.
You may choose from the
following to alter the selected
My POI detail.
1. Touch
2. Touch
17
to delete selected My POI the delete confirmation
to save changes.
to exit.
Safety Warning
Speed Warnings provide voice alert when a set speed is exceeded. You
may turn off or select which safety warnings (Fixed Speed Camera, Red
Light Camera or Black Spot) to activate. You may also turn off the
moving speed warning or adjust the speed setting for road types.
Item
Safety Warning
Safe Mode
1. Touch
The menu list appears.
2. Touch
The Safety Warning display with
Safety Warning options show.
3. Touch the desired setting to
change.
The Safe Mode when ON
prevents touchscreen access
while driving.
1. Touch
to view
speed warning options.
2. Touch the desired setting to
change. The speed settings
increment in 5km steps with
each touch.
3. Touch
to exit.
Description
Speed Camera
Red Light Camera
Black Spot
Speed Warning
Speed Warning
Select ON or OFF to enable touchscreen while
driving.
Select ON or OFF to enable or disable Speed
Camera warnings.
Select ON or OFF to enable Red Light Camera
warnings.
Select ON or OFF to enable Black Spot warnings.
Safety Warning
Item
Speed Warning
Freeway
Highway
Main
Residential
MENU
SAFETY WARNINGS
Speed Warning
Description
Select ON or OFF to activate or deactivate speed
warning voice guide. If this item is ON then speed
limits may be configured for the road types below.
Select to set speed used to calculate route
Select to set speed used to calculate route
Select to set speed used to calculate route
Select to set speed used to calculate route
18
MENU
MAP SETTINGS
MAP Settings allows you to select what appears on the MAP display and
the Auto Zoom setting.
See the table for a description of each item.
Map Settings
1. Touch
The menu list appears.
2. Touch
Map Settings list and current
settings appear.
3. Touch current setting to
change.
To Reset
Touch
to return to
factory defaults (as shown).
6. Touch
19
to exit.
Item
POI Icon
Description
Select ON or OFF to enable POI icons to show
on map
POI Name
Select ON or OFF to enable POI names to show
on map
Street Name
Select ON or OFF to enable Street names to show
on map
Auto Zoom in Guide
Select to set map display level in Auto Guide Mode
Auto Zoom over 80km/h Select to set Auto map level when vehicle speed is
faster than 80km/h
Auto Zoom under 40km/h Select to set Auto map level when vehicle speed is
slower than 40km/h
You may use this feature to simulate a navigation route which may be
helpful before driving. Test and Demo simulations may be operated
using the AC adaptor indoors. You may choose from a Test or Demo
simulation. Test will run through the route once. Demonstration mode
repeats the route continuously randomly changing map views.
1. Touch
The menu list appears.
2. Touch
The simulation display appears
with no current start or
destination points showing.
3. Touch
The navigation display appears.
4. Follow the instructions for
navigation (pages 8) to select a
set destination.
When a destination is selected
the Simulation display will
appear with the set destination
showing.
5. Touch
The navigation display appears.
6. Follow the instructions for
navigation (pages 8) to select a
start location.
When a destination is selected
the Simulation display will
appear with the start location
showing.
7.
If you wish to include a transit
point (traveling to final
destination via another location)
in the simulation then
touch
The navigation display appears.
MENU
SIMULATIONS
8. Follow the instructions for
navigation (pages 8) to select a
transit point.
When a transit point is selected
the Simulation display will
appear with the transit point
showing.
9. Touch
to begin
simulation.
Please note that Simulation
runs through the route faster
than actual navigation.
OR
Touch
for repeated
simulation.
10. Touch
to stop current
simulation.
Touch
to end.
20
MODE
MODE
The MODE facility gives access to the car navigation mode, games mode
and display screen adjustments mode.
Mode
Touch to enter car navigation mode
Touch to access;
! Touchscreen Calibration
! Product Information
! Volume
! Brightness
Touch to access these games;
! Othello
! Puzzle
21
You may adjust Brightness, Contrast, Volume, calibrate the touchscreen
or view product information as follows.
Calibration
1. Press Mode to show mode
display.
2. Touch
The setup display appears.
1. Touch
.
Follow the display instructions
to calibrate touchscreen.
MODE
SETUP
Brightness
1. Touch
Touch the yellow level indicator
to decrease brightness.
Touch to the right of the level
indicator to increase
brightness.
Volume
1. Touch
Touch the yellow level indicator
to decrease volume.
Touch to the right of the level
indicator to increase volume.
Touch
to mute
volume.
Information
1. Touch
.
The Product Information
display appears.
2. Touch
to exit.
22
MODE
GAMES
There are 2 games available, Othello and Puzzle.
1. Press Modeto show mode display.
2. Touch
.
The Game display shows.
Othello
1. Touch Othello . The Othello game shows.
Othello is a strategy game. The purpose is to finish the game with the
greater amount of circles of the same colour (user colour is red).
2. Touch
to begin game.
i) Touch the screen to placea circle in a desired square.
ii) If a circle cannot be placed in a square bloack then a sound will
be heard. Choose another block.
iii) The computer will then counter the move.
iv) The last move is shown by yellow markers in the square.
v) Continue until all blocks are filled.
3. Touch
to end game.
23
Puzzle
1. Touch Puzzle
.
The Puzzle game shows.
2. Move puzzle images by touching images adjacent to the blank space.
i) Choose from several puzzles by pressing Picture.
ii) Choose difficulty level by pressing
.
3. Touch
to end game.
Touch
to exit.
The GPS icon always shows on the map screen.
When GPS data is available the GPS ACTIVATED style icon shows.
GPS ACTIVATED
When the GNS8600 displays 'Searching for satellites' the GPS INACTIVE
GPS INACTIVE
icon shows.
If there is no GPS signal move to a clear view of the sky.
GUIDE
GPS STATUS
You may view the current GPS information by touching the GPS icon.
Touch
to return to map screen.
24
GUIDE
TURN GUIDE DESCRIPTIONS
The following figures are provided to help with interpreting the voice guide
you will hear during navigation.
Turn Left
Take the Left Lane
25
Turn Right
Take the Right Lane
Take First Exit
Make a U-Turn if possible
Take Secend Exit
Turn Right followed by Turn Left
etc
Department Store
Boat Launching Ramp
Hotel/Motel
Airport
Golf Course
Petrol Station
Museum
Bank
Sports Centre
Railway Station
Beach
Post Office
Stadium
Place of Worship
Camping Ground
Car Dealer
Swimming Pool
Café/Pub
Caravan Site
Car Repair Facility
Cinema
Restaurant Area
Open Parking Area
Library
Casino
School
Scenic Panoramic
View
College/University
Winery
Fire Brigade
Zoo
Hospital/Polyclinic
Opera House
Police Station
Caltex(Petrol)
GUIDE
MAP SCREEN ICONS
26
31
POINTS OF INTEREST TABLE
My POI
Quick Access
My POI list
Airport Airline
Airline Access
Airport
Bank/Post
Bank
Post
Building
Company
Manufacturers Supplies
Car
Car Dealer
Car Repair Facilities
Cargo Centre
Rent Car Facility
Restaurant
Cafes/Pub
Restaurant
Restaurant Area
Ferry
Boat Launch Ramp
Ferry Terminal
Yacht Basin
Shopping
Government
Court House
Embassy
Government Office
Department Store
Shopping Centre
Wholesale Outlet
Sports
Hotel
Condominium
Hotel or Motel
Museum
Museum
Golf Course
Ice Skating rink
Park Reservation Area
Sport Centre
Stadium
Swimming Pool
Park
Amusement Park
Beach
Camping Ground
Caravan Site
Holiday Area
Theatre
Cinema
Theatre
Education
Kindergarten
Library
School
College/University
Emergency
Doctor
Emergency Medical Services
Fire Brigade
Hospital/Polyclinic
Pharmacy
Police Station
Parking
Open Parking Area
Parking Garage
Petrol
Petrol Station
Railway
Railway Station
Art Centre
Convention Centre
Religion
Monastery
Place of Worship
Exhibition
27
Cultural Centre
Entertainment
Tourist
Information
Other
Casinos
Important Tourist attraction
Scenic/Panoramic View
Tourist Information Office
Travel Agency
Winery
Zoo
Dentist
Nightlife
Traffic Control Camera Location
Veterinarian
Exhibit Centre
TROUBLESHOOTING
PROBLEM
No Display
SOLUTION
!
!
!
Touchscreen not responding
!
!
!
No Sound
'Searching For Satellites' still
showing.
Display Dim
Display too bright when using at
night.
Make sure power supply is
+12V DC
Check power connection.
If touchscreen not responding
while driving then Safe Mode is
on (see page 18).
Turn off power. Wait a moment
and turn back on.
Clean LCD with LCD cleaner.
Make sure you are only
momentarily touching screen.
!
!
Check volume.
Touch
.
!
Make sure GPS antenna is
raised to a horizontal position.
Make sure the unit has a clear
view of the sky.
!
!
!
Check brightness (see page 22)
Check dimmer - press & hold
POWER button.
!
Touch DAY to switch to
NIGHT mode.
PROBLEM
The unit powers on but does not
boot up.
SOLUTION
!
!
Check the power connection.
If unit has been exposed to hot
temperatures for long periods
turn off for a few minutes to
cool down.
28
UNIDEN GNS8600 CAR NAVIGATION
Limited One Year Warranty
Please keep your sales docket as it provides evidence of
warranty.
Warrantor: Uniden Australia Pty Limited ABN 58 001 865 498
Uniden New Zealand Limited
Warranty only available in original country of purchase
Elements of Warranty: Uniden warrants to the original retail owner for
the duration of this warranty, its GNS8600 Car Navigation (hereinafter
referred to as the Product) to be free from defects in materials and
craftsmanship with only the limitations or exclusions set out below.
Warranty Duration: This warranty to the original retail owner only,
shall terminate and be of no further effect ONE (1) Year after the date of
original retail sale. This warranty will be deemed invalid if the Product is;
(A) Damaged or not maintained as reasonable and necessary, (B)
Modified, altered or used as part of any conversion kits, subassemblies,
or any configurations not sold by Uniden, (C) Improperly installed, (D)
Repaired by someone other than an authorised Uniden Repair Agent for
a defect or malfunction covered by this warranty, (E) Used in conjunction
with any equipment or parts or as part of a system not manufactured by
Uniden, (F) Installed, programmed or serviced by anyone other than an
authorised Uniden Repair Agent, or (G) Where the Serial Number label of
the product has been removed or damaged beyond recognition.
Parts Covered: This warranty covers for 1 year, the GNS8600 unit
Accessories: +12V Cigarette Lead, Mount Stand etc is covered for 90
days.
Statement of Remedy: In the event that the product does not conform
29
to this warranty at any time while this warranty is in effect, the warrantor
at its discretion, will repair the defect or replace the product and return it
to you without charge for parts and service.
THIS WARRANTY DOES NOT COVER PROVIDE FOR THE
REIMBURSEMENT OR PAYMENT OF INCIDENTAL OR CONSEQUENTIAL
DAMAGES.
THIS GUARANTEE IS IN ADDITION TO AND DOES NOT IN ANY WAY
AFFECT YOUR RIGHTS UNDER THE CONSUMER GUARANTEE ACT.
Procedure for Obtaining Performance or Warranty: In the event
that the Product does not conform to this warranty, the Product should be
shipped or delivered, freight prepaid, with evidence of original purchase,
(e.g. a copy of the sales docket), to the warrantor at:
UNIDEN AUSTRALIA PTY LIMITED
LIMITED
Service Division
345 Princes Highway,
Rockdale, NSW 2216
Fax (02) 9599 3278
www.uniden.com.au
UNIDEN NEW ZEALAND
Service Division
150 Harris Road,
East Tamaki, Auckland
Fax (09) 274 4253
www.uniden.co.nz
Customers in other states should ship or deliver the Product freight prepaid to the nearest Uniden Authorised Repair Centre. (Contact Uniden for
the Warranty Agent nearest you.)
OPERATION
WARRANTY
30
31
32
THANK YOU FOR BUYING A UNIDEN PRODUCT.
© 2005 Uniden Australia Pty Limited. Uniden New Zealand Ltd. Printed in Korea