1
Wireless Systems
FM Solutions
for Cochlear Implants
FM Guide for Cochlear Implant and Baha Fitters
Table of Contents
Why FM for Cochlear Implants
1
Transmitters for Cochlear Implants
2
MicroLink Receivers for Cochlear Implants
2
Frequency Flexibility
3
Fitting FM Products
4-6
Cochlear Devices
Nucleus Freedom behind-the-ear configuration
7
Nucleus Freedom bodyworn configuration
8
ESPrit 3G
9
ESPrit
10
SPrint
11
Spectra 22 (>340,000)
12
Spectra 22 (<340,000)
13
Advanced Bionics Devices
Auria / Harmony – Fitting with iConnect and MicroMLxS
14
Platinum BTE and CII BTE
15
Platinum Processor (PSP)
16
Clarion S-Series
17
Clarion 1.2
18
MED-EL Devices
TEMPO+, OPUS1 (remote battery pack)
19
TEMPO+, OPUS1(angled battery pack)
20
Neurelec (MXM) Devices
Digi SP’K
21
Digi SP and Digisonic BTE
22
Cochlear Devices
Baha Classic, Baha Compact
23
Baha Cordelle, Baha Divino
24
Programming MicroMLxS or MicroLink Freedom
with FM Successware
25
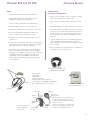
Why FM for Cochlear Implants
FM systems are able to improve the signal-to-noise ratio and thus the user’s ability to understand speech in noise. Three major
factors that influence the signal-to-noise ratio and the quality of the speech signal are: background noise, reverberation,
and distance. By delivering the signal of interest via FM (radio waves), the strength and quality of the sound remains constant
across the distance from the speaker to the hearing impaired individual. FM systems consist of a transmitter with the
microphone and a receiver, which picks up the signal via radio waves directly from the transmitter.
Individuals with Cochlear Implants experience the same difficulty as hearing aid users in challenging listening environments.
These situations usually involve distance from a main sound source (someone with a soft voice), unfavorable positioning in a
room with background noise, or listening to a TV, radio or computer. It is well documented that improving the signal-to-noise
ratio (SNR) for cochlear implant recipients through the use of an FM system improves speech recognition significantly in
the presence of background noise.
The MicroLink FM System dramatically improves performance in noise by providing a much higher SNR (by
transmitting the speaker’s voice via FM directly to the listener). On top of that multi-microphone technology, high resolution
noise cancellation and Smart Noise Blocker technology improve intelligibility and comfort even further.
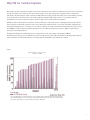
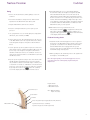
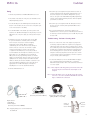
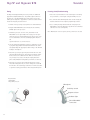
Figure 1
Paired comparisons: Speech in noise
CI-only vs. CI+FM
Use of an FM System in conjunction with the cochlear implant system resulted in significant improvement in
speech understanding in noise. The grey bars represents performance with the CI only in noise and the Purple
bars represents the Best Score obtained when using the CI + FM system.
1
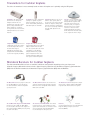
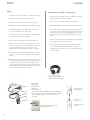
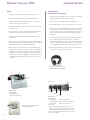
Transmitters for Cochlear Implants
The choice of transmitter is most commonly based on where the implant user is primarily using the FM system.
SmartLink is the first communication device to incorporate
multiple solutions into one
instrument. It offers three microphone settings and bluetooth
link for hands-free cell phone
use. It provides the most versatile
and high tech access to communication.
ZoomLink offers three microphone
settings for optimal reception
angle. ZoomLink is very easy to
use. As in SmartLink, auxiliary mic
and audio inputs are available.
Campus SX is designed for use in
educational systems. The teacher
wears the Campus SX on his or
her belt with a lapel or
MicroBoom microphone. The
Campus SX like the MicroMLxS
receiver has frequency flexibility.
Campus SX TT allows wireless
TeamTeaching, where two teachers
address a classroom at the same
time. The second teacher also wears
a transmitter, e.g. ZoomLink or
Campus SX. This is also popular
option in classrooms where the
students with CIs would benefit
from a pass around microphone.
EasyLink provides an easy-to-use
lavaliere-style option, ideal for
use at home or at leisure. The FM
channel is dispenser changeable
and the transmitter synchronizes
the receiver at start-up. Auxiliary
mic and audio inputs are also
available.
Telcom is most commonly used
at home or in the office, working
directly with the telephone and
any audio device such as the
television, radio, or computer.
This allows the user to watch
television or listen to music
without turning up the volume.
It will switch from an audio device
to the telephone when it rings.
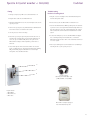
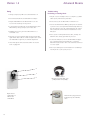
MicroLink Receivers for Cochlear Implants
The miniaturized MicroLink receivers are available in different configurations depending on the speech processor.
All multi-frequency MicroLink receivers include a digital frequency synthesizer and allow Direct Frequency Synchronization
(DFS) with the Phonak transmitters and Automatic Frequency Synchronization (AFS) with the WallPilot.
2
The MicroLink CI S has a plug-in connection
for the MicroMLxS receiver. This allows
for universal FM use with all compatible
speech processors.
The MicroLink Freedom is the world`s first
and only design integrated multi-frequency
FM receiver. It is compatible with Cochlear`s
Nucleus Freedom BTE.
The Nucleus Freedom in bodyworn configuration can be equiped with the MicroMLxS.
A special cable from Cochlear is required.
The 3G MicroLink adapter with MicroMLxS
provides an earlevel FM. The MicroMLxS
receiver attaches directly to the adapter on
the Cochlear ESPrit 3G BTE processor giving
freedom from cables.
The iConnect with MicroMLxS offers Auria
recipients wireless, earlevel FM access. This
special earhook attaches to the Auria so that
users can plug the universal MicroMLxS
receiver directly into their processor.
Neurelec (MXM). The MicroLink receiver
can be attached directly to the Digi SP'K and
Digisonic BTE speech processors from
Neurelec (MXM)
Frequency Flexibility
The key Phonak FM systems use digital frequency synthesizers. The various MicroLink receivers are frequency flexible.
This allows the user to change frequencies or channels, as easily and often as needed. With this break-through multifrequency technology, Phonak successfully meets the demands for flexibility and practicality made by today’s world. One
convenient way to use the system is to set the frequency of the Campus SX and then use that transmitter, with the push of
a button, to set the receiver to the same frequency. SmartLink, ZoomLink and EasyLink automatically synchronize at start-up
nearby receivers to matching channels.
Not only are these products synthesized, but they are also programmable. This provides convenience to both the user and
the audiologist. The default frequency of each receiver can be changed as needed. The transmitters can be programmed to
have up to 40 different frequencies available, if needed. For the user friendly FM Successware programming software and
training, please contact your Phonak FM representative.
MicroLink Frequencies
MicroLink systems include state-of-the-art narrowband FM frequencies, designed for the specific needs of the cochlear
implant user. They operate in the 169-176 MHz (H-Band) and 216 MHz (N-Band) range. All the multi-frequency transmitters and receivers can be programmed easily and quickly with the FM Successware. Use only frequencies which are legally
allowed in your country.
FM Successware
3
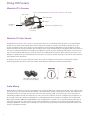
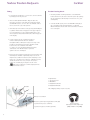
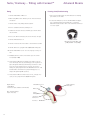
Fitting FM Products
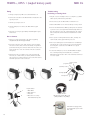
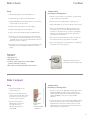
MicroLink CI S: Overview
Battery Compartment (size 13 battery must be inserted ‘+’ side down)
Audio Output
Connecting Cable
Gain Control
MicroMLxS
receiver
Connection to CI Speech Processor
On/Off Switch
(1=on, 0=off)
MicroLink CI S Gain Control
The MicroLink CI S interface has a screw-set or wheel gain control. It is recommended that the gain is set to the minimum
position for the initial system hookup. Gain can be increased by rotating the control in the clockwise direction. Once the
receiver is plugged into the speech processor, some adjustment of the CI Interface MicroLink CI S gain and/or the cochlear
implant speech processor may be required. Speech testing in quiet using the FM transmitter only should yield similar results as
the same test presented through the CI headpiece microphone. If results are poorer through the FM systems, it may be necessary to increase FM level with the gain control on the side of the MicroLink CI S interface. Retest until the input level of the
FM signal is optimized for speech discrimination. If this level is exceeded the patient may begin to experience some distortion
and performance will deteriorate.
For children, the screw-set may be preferred, so that gain can be set without concern that the control will be changed
inadvertently. Adults may prefer to have the volume control wheel for adjustment in different environments.
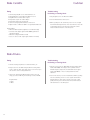
Wheel gain control (left) and
screw set gain control (right)
Audio Mixing
Audio mixing is the ability to keep the CI microphone active when the FM system is being used. On some of the earlier models
speech processors, the cochlear implant microphone is deactivated when the direct audio-input is utilized. This prohibits users
from hearing others in the room as well as their own voice when listening to FM. The processors that do not have built-in
audiomixing capability include early model Spectra and S-series devices. Neurelec offers the audiologist the possibility to set,
for each type of processor, different configurations of audio mixing between the headpiece microphone and the FM system.
Ratio ranges from 0 to 100% (microphone/FM). For each configuration it is possible to set a gain function for both inputs as
required by the patient. It is also possible to turn off the microphone to concentrate on the sound from the FM system only,
although a 30/70 ratio would be more commonly used: the patient will get the benefit from the FM system but remains connected to environmental sounds.
4
MicroLink Channel
Each multifrequency MicroLink receiver comes with a preprogrammed default channel. Every time the system is turned on, it
will come on to this default. If there is a need to temporarily change that channel, this can be done by “synchronizing” the
receiver with the transmitter or WallPilot to a different channel. This change is only temporary, as the receiver will come back
on to the default channel when it has been turned off. The default channel can be reprogrammed internally if necessary with
the Phonak FM Successware.
MicroLink FM Advantage
The MicroLink receivers come with an internal gain setting of 10dB. With most hearing instruments, this provides an optimal
loudness, or “FM Advantage” for the FM signal over environmental inputs. In some cases with hearing instruments and
cochlear implants, this internal gain needs to be adjusted. Gain changes can be made with the FM Successware.
Patch Cables
In order to achieve predicted performance with your MicroLink CI and cochlear implant, the correct patch cable must be
used to connect the devices. Please refer to the following list to confirm that you are utilizing the correct cable.
Blue #10
Nucleus Spectra 22
Nucleus ESPrit BTE
Nucleus ESPrit 3G BTE
Clarion S-series
White #12
MED-EL CIS PRO+
MED-EL TEMPO+
(remote battery pack)
Blue-Red Long #13
Clarion Platinum BTE
Clarion CII BTE
Red #14
MED-EL TEMPO+
(remote battery pack)
Orange #16
Blue-Red Short# 18
Black #11
Blue-White #21
Nucleus SPrint
Clarion PSP
(platinum body worn)
Clarion 1.2 series
Baha Classic
5
Fitting
For each processor, the fitting will consist of 2 basic steps. First, the loudness of the FM system compared to the environmental input must be optimized. With the MicroLink CI S, this can be done with the external gain control. With the MicroMLxS,
this must be done with the internal gain level of the device. A range of -6 to +24dB is available with +10dB as the default FM
advantage. The experienced FM advantage may be different than +10dB, depending on microphone sensitivity settings in the
speech processor. The second step is confirming FM benefit in noise. Adjustments in the relationship between the FM input and
CI headpiece microphone (or environment) may be made to improve performance with the FM System compared to the CI
alone. The adjustment is accomplished differently depending on the implant.
Processor Sensitivity (Cochlear)
The sensitivity control on the Nucleus devices with audio mixing is a crucial variable in FM benefit. This includes most 22
Nucleus sound processors and all sound processors for Nucleus 24 sound processors. This sensitivity adjustment controls the
input from the headpiece microphone, ultimately varying the audio mixing ratio between the cochlear implant microphone and
the Wireless FM system. This control allows the users to adjust the FM advantage to match the conditions. Adults are very
comfortable adjusting their FM advantage based on current conditions. For children, one sensitivity level should be employed
in typical FM/classroom use. In order to optimize the setting, test the patient’s speech understanding in noise (i.e. g. at +5 dB
SNR). If the user’s performance is not improved compared to using cochlear implant alone, the ratio between the FM input and
the headpiece microphone may need to be adjusted. In general, reducing processor sensitivity will result in a greater FM
advantage as a result of reduced input through the cochlear implant microphone. Adults will often tolerate a very low sensitivity with the FM signal in order to focus on the primary signal. Children often prefer higher sensitivity with the FM signal in
order to continue monitoring their environment and their own voice.
If processor sensitivity is not adjustable and a volume map is fit with the FM system, FM advantage is set at one point (controlled by the fixed sensitivity point in the map). The benefit can be evaluated in the same method described above. The
Nucleus Freedom sound processor employs a software selected audio mixing ratio, which can be adjusted to control the
amount of headpiece microphone attenuation when the FM signal is being used.
Audio Mixing (Advanced Bionics)
Advanced Bionics uses fixed audio mixing functions in the map to control the ratio of headpiece microphone compared to the
FM input. In theory both signals are being received at full strength. In practice, however, a slight reduction of -3dB is applied
to both signal pathways in order to avoid loudness summation. Given that the input level may be higher from the audio-appliance (e.g. from the microphone placement of a transmitter at 5 - 15 cm inches from the teacher’s voice) the signal-to-noise
advantage should be maintained. Sound input to the HI microphone should not be perceptibly different with the auxiliary
audio device connected or disconnected. In some cases a 30/70 mixing function will be needed to achieve FM benefit. In a
map with this ratio, less gain than normal will be applied to headpiece inputs but the listener will remain in touch with the
environment. Normal gain is still applied to the FM in 30/70. Note that when the FM is not in use, the listener should return to
a 50/50 map to return input levels to normal.
Sensitivity (MED-EL)
The sensitivity control on the Tempo processor will not affect the audiomixing ratio. When the FM is in use, the patient will
experience equal levels of headpiece microphone and FM input (with a slight reduction to account for loudness summation).
If the sensitivity control is turned to off (turned counter-clockwise past 11:00 position until click is felt), the headpiece
microphone will be turned off, resulting in the FM only condition.
6
Nucleus Freedom
Cochlear
Fitting
1. Remove the Freedom battery rack by pulling it out of the
controller.
2. Insert three 675 batteries designed for use with cochlear
implants into the MicroLink Freedom battery rack.
3. Plug the MicroLink Freedom into the controller.
4. Press the round power button to power up the speech
processor.
5. Use a program that is set to normal signal processing (rather
than beam, auto sensitivity or ADRO)
6. The Freedom processor will automatically detect the presence
of the MicroLink Freedom. The recipient will hear the environment through the headpiece microphone and the FM combined.
7. Test the patient’s speech recognition in quiet at normal sensitivity with the CI alone and then through the FM system only
(out of range of the headpiece microphone). Performance
should be similar between these two conditions. It is not recommended to change the FM level of MicroLink Freedom with
the FM Successware.
8. Repeat speech recognition testing in noise. Performance with
the FM should be significantly improved over the implant
only condition. Cochlear recommends using a sensitivity level
of around 12 for normal use. If FM benefit is not documented
in the noise test, it may be necessary to reduce the sensitivity
by pressing the left side of the
button. The sensitivity
level will be displayed in the LCD panel with the letter S.
9. A default mixing ratio of 3:1 is used with the Nucleus
Freedom. This reduces the headpiece microphone by 9dB
when the MicroLink Freedom is in use. This ratio can be
adjusted in the implant audiologist's programming software.
In some cases the 2:1 or 1:1 ratios may be preferred for more
normal environmental audibility, or higher ratios up to 10:1
for an "FM only" setting. The headpiece microphone reduction
is maintained when the FM transmitter is switched off and
MicroLink Freedom goes into squelch.
10. When FM is not in use, press both sides of the
increase/decrease button
to toggle back to M only. This
will resume normal head piece microphone function. To reengage the FM, toggle with the
button until "EA" flashes
on the display and the M remains active.
Freedom Listening Check:
1. Attach the Cochlear monitoring phones to the receptacle in
the bottom of the MicroLink Freedom. Turn the system on by
pressing the select button on the Nucleus Freedom. Ensure
that the MicroLink Freedom is plugged into the speech
processor, it has been recognized by the processor (EA), and
normal FM settings are being used.
2. While speaking into the transmitter, listen to the signals from
the headpiece mic and FM system.
Note: The signal quality of the monitoring phones does not
necessarily reflect the sound quality experienced by the
implant user.
Required Parts:
1. Nucleus Freedom
2. MicroLink Freedom
Speech Processor
Note: Mapping change
may be necessary
Select button
Controller
Pressed together: Input toggle (between EA, M and T)
MicroLink Freedom
Separate short Presses: Sensitivity
Separate long presses: Volume (optional)
7
Nucleus Freedom Bodyworn
Fitting
Cochlear
Freedom Listening Check:
1. If you haven’t already done so, remove the earlevel controller
by twisting it from the processor.
2. Twist on the Body Worn FM cable. Plug the cable into
the proper receptacle on the body worn controller. Attach
the MicroMLxS to the ear-level end of the FM cable and set
the receiver in the 2 green dot position.
3. Turn the body worn controller on by pressing and holding the
top button. Ensure that an X appears in the upper right corner of the display. If not, press and hold both sides of the
increase/decrease button until “EA” flashes and an X appears
in the display.
1. A hearing aid with a working audioshoe or the MicroLink
headset checker may be used to check the system by speaking
into the transmitter and listening for interference-free, clear
sound quality.
2. To check the FM system, remove the MicroMLxS and plug it
into a working hearing aid and audioshoe or a Phonak
MicroLink Headset checker. Turn on the transmitter and listen
for a clear signal.
4. Test the patient’s speech recognition in quiet at
normal sensitivity with the CI alone and then
through the Wireless FM system only (out of range of the
headpiece microphone). Performance should be similar
between these two conditions. If the FM is
too loud or too soft, the FM programming software
and interface from Phonak may be required to
optimize the level of FM input.
5. Repeat speech recognition testing in noise. Performance with
the FM system should be significantly improved over the
implant only condition. Cochlear recommends using a sensitivity level of around 12 for normal use. If FM benefit is not
documented in the noise test, it may be necessary to
reduce the sensitivity by pressing the left side of the
button. The sensitivity level will be displayed in the
LCD panel with the letter S.
Required Parts:
1. Speech processor
2. MicroMLxS
3. Body Worn Controller
4. Body Worn FM Cable
1
FM Cable
Note: Mapping change may be necessary.
4
2
Select button
Battery release button
Pressed together: Input toggle (between EA, M, T)
Separate short presses: Sensitivity
3
8
Separate long presses: Volume (optional)
Headset Checker
(Phonak part number 052-3126
[110V] and 052-3122 [220V])
ESPrit 3G
Cochlear
Fitting
2. The switch on the bottom of the processor should be in the
‘M’ (microphone) position.
7. Determine speech recognition in quiet with the CI alone at
normal sensitivity. Repeat through the FM transmitter out of
the CI mic range. If scores with the FM signal are poorer,
increase the gain of the MicroMLxS using FM programming
software and a FM programming interface until comparable
performance is achieved.
3. Set the 3G adapter to the FM+M position and attach to the
bottom of the 3G (may need to remove the clear plastic port
cover on the bottom of the BTE).
8. Determine speech recognition with the FM system in noise.
Decrease the mic sensitivity until significant FM benefit is
demonstrated.
4. Set the MicroMLxS in the double green dot position and
attach to the 3G MicroLink adapter. If the patient prefers the
FM signal to be softer, the single green dot position may be
used.
9. It is recommended that the monitoring earphones are
disabled in P1 to conserve power for the FM system. Failure to
do this may result in intermittency for CI or FM. They may still
be used in P2.
1. Turn the 3G, transmitter and MicroMLxS FM receiver off.
5. Switch the processor into program 1 (P1 on the dial).
It is preferred that the sensitivity control is enabled
in P1. It may be necessary to visit the mapping
audiologist for this change. With a sensitivityenabled map, the user can alter the rotary dial up or
down to increase or decrease the amount of signal
from the CI microphone, relative to the amount
of signal from the FM system, as necessary. Cochlear
recommends that the microphone sensitivity level of the
Esprit 3G is set to 21-24dB when it is used with an
FM system. Use the programming software to find the
number on the dial that equates to this level. It will vary
slightly between each speech processor. When this dial
number is known, the 3G user should be counseled to use
this setting with their FM system as it will result in an
appropriate mix of FM and headpiece microphone.
Anything below 1.5 on the dial will be FM only.
Troubleshooting - Perform a listening check
1. There is a socket on the side of the adapter to plug in the
monitoring earphones. When the earphones are plugged in
and activated the map, they allow a hearing person to check
the sound being received from the ESPrit 3G microphone and
the FM system simultaneously. Typically P2 is designated for
the monitoring phones. If you do not hear anything when
using the monitoring earphones turn the processor off and
on to P2 and try again. If still nothing, review the recipients
map or contact your CI audiologist.
2. To check the FM system, remove the MicroMLxS and plug it
into a working hearing aid and audioshoe or a Phonak
MicroLink Headset checker. Turn on the transmitter and listen
for a clear signal.
Note 1: The earphone cable may pick up some interference and
therefore may be noisier than the actual input to the
recipient.
6. Turn the FM transmitter on.
Note 2: If the 3G adapter is lose on the 3G, please take precautions not to loose the attachment. The BTE mic lock will
help to maintain the connection.
MicroMLxS
2
1
Monitoring Earphones
(Cochlear part number Z60123)
Required Parts:
1. MicroMLxS
2. FM 3G adapter
(Cochlear part number Z60409)
Headset Checker
(Phonak part number 052-3126
[110V] and 052-3122 [220V])
Volume or
sensitivity
control
Program
selection
control
Note: mapping changes are recommended with
the ESPrit 3G
9
ESPrit
Cochlear
Fitting
Troubleshooting - Perform a listening check
1. Turn the speech processor, FM receiver, and transmitter off.
2. Attach the ESPrit audio cover to the processor.
1. Plug the receiver and adapter into a test amplifier, e.g. Radio
Shack speaker, with the blue patch cable.
3. Attach the accessories adapter cable to the audio cover.
2. Insert a battery into the MicroLink CI S and turn it on.
4. Plug the blue connector cable into the CI and adapter cable.
3. Put the MicroMLxS receiver in the double green dot position.
5. Plug the MicroMLxS into the MicroLink CI S. Leave the
receiver in the double green dot position.
4. Turn on the transmitter. While speaking into the transmitter,
listen for the clear signal with minimal background noise. This
check will not reflect the sound quality that the patient will
hear but will confirm function and transmission of the FM
system.
6. Turn on the speech processor, transmitter and MicroLink CI S
in that order to avoid transient sounds.
5. Follow the CI audiologist’s recommendations for conducting a
listening check of your speech processor.
7. Select a program that allows for sensitivity adjustment.
8. Determine speech recognition in quiet with the CI alone at
normal sensitivity. Repeat test with FM system. If scores are
poorer with the FM System, increase the gain of the
MicroLink CI S until comparable performance is achieved.
6. To check the FM system, remove the MicroMLxS and plug it
into a working hearing aid and audioshoe or a Phonak
MicroLink Headset checker. Turn on the transmitter and listen
for a clear signal.
9. Determine speech recognition with the FM System in noise.
Decrease mic sensitivity until significant benefit is demonstrated.
10. Most recipients wear their sensitivity control between 3.5 4.5. When using the MicroLink System, optimum sensitivity is
about 18dB. The Cochlear programming software will let
you know what dial position corresponds to this level. This
setting will produce a beneficial audiomixing ratio between
the headpiece mic and the wireless signal.
Headset Checker
(Phonak part number 052-3126
[110V] and 052-3122 [220V])
4
5
3
1
Required Parts:
1. MicroMLxS
2. MicroLink CI S
3. Blue cable
4. ESPrit audiocover
(Cochlear part number Z77015/6/7 beige/brown/black)
5. Accessory adapter cable (Cochlear part number Z77081)
Note: mapping changes are recommended with
the ESPrit
Rotary control
positions
2
MicroLink CI S plugged into the
RadioShack speaker
10
Switch positions
Program Selector
Volume/Sensitivity
Control
SPrint
Cochlear
Fitting
Troubleshooting
1. Turn speech processor, FM receiver and transmitter off.
Listening check #1
2. Plug the orange cable into the MicroLink CI S.
The environmental and FM signal can be heard simultaneously
through the monitoring phones to confirm function of the headpiece mic and the FM system.
3. Plug the MicroMLxS into the MicroLink CI S. Leave the receiver in the double green dot position.
4. Attach the MicroLink CI S to the external input socket on the
speech processor.
Listening check #2
1. Plug the receiver and adapter into a test amplifier, e.g. Radio
Shack speaker, with the orange patch cable.
5. Turn on the speech processor, FM transmitter and MicroLink
CI S in that order to avoid transient sounds.
2. Insert a battery into the MicroLink CI S and turn it on.
6. Select a program that allows for sensitivity adjustment.
3. Put the MicroMLxS receiver in the double green dot position.
7. Determine speech perception in quiet with the CI alone at
normal (12) sensitivity. Repeat test with the FM system. If
scores are poorer with the FM system, increase the gain of the
MicroLink CI S until comparable performance is achieved.
4. Turn on the FM transmitter. While speaking into the transmitter, listen for the clear signal with minimal background noise.
This check will not reflect the sound quality that the patient
will hear but will confirm function and transmission of the
FM system.
8. Determine speech perception with the FM system in noise.
Decrease mic sensitivity in two-unit increments until significant FM benefit is demonstrated.
5. To check the FM system, remove the MicroMLxS and plug it
into a working hearing aid and audioshoe or a Phonak
MicroLink Headset checker. Turn on the transmitter and listen
for a clear signal.
Listening check #3
1. Follow your audiologist’s recommendations for conducting a
listening check of your speech processor.
NOTE: You may choose to disable the volume control. If both
the microphone sensitivity and the volume controls are
available, press the Select button to alternate between
them.
3
1
Program
2
Microphone
sensitivity
Monitoring Earphones
Required Parts:
1. MicroMLxS
2. MicroLink CI S
3. Orange cable
Headset Checker
(Phonak part number 052-3126
[110V] and 052-3122 [220V])
Segment meter
Up
button
MicroLink CI S plugged into
the RadioShack speaker
Down
button
Options button
Program
button
Select button
Autosensitivity
button
On/Off button
Control buttons
11
Spectra 22 (serial number >340,000)
Fitting
Cochlear
Troubleshooting
Perform a listening check
1. Turn speech processor, FM receiver and transmitter off.
1. Plug the receiver and adapter into a test amplifier, e.g. Radio
Shack speaker, with the blue patch cable.
2. Plug the blue cable into the MicroLink CI S.
3. Plug the MicroMLxS into the MicroLink CI S. Leave the
receiver in the double green dot position.
2. Insert a battery into the MicroLink CI S and turn it on.
3. Put the MicroMLxS receiver in the double green dot position.
4. Attach the adapter to the external input socket on the speech
processor.
5. Turn on the speech processor, FM system transmitter and
MicroLink CI S in that order to avoid transient sounds.
4. Turn on the FM transmitter. While speaking into the transmitter, listen for the clear signal with minimal background noise.
This check will not reflect the sound quality that the patient
will hear but will confirm function and transmission of the
FM system.
6. Use the processor in the N setting.
7. Determine speech perception in quiet with the CI alone at
normal (4-5) sensitivity. Repeat test with FM system. If scores
are poorer with the FM signal, increase the gain of the
MicroLink CI S until comparable performance is achieved.
8. Determine speech perception with the FM signal in noise.
Decrease mic sensitivity in single-unit increments until
significant FM benefit is demonstrated. Typically maximum
benefit is achieved at 2-3.5.
3
1
5. To check the FM system, remove the MicroMLxS and plug it
into a working hearing aid and audioshoe or a Phonak
MicroLink Headset checker. Turn on the transmitter and listen
for a clear signal.
6. Follow your audiologist’s recommendations for conducting a
listening check of your speech processor.
Required Parts:
1. MicroMLxS
2. MicroLink CI S
3. Blue cable
2
MicroLink CI S plugged into
the RadioShack speaker
12
Headset Checker
(Phonak part number 052-3126
[110V] and 052-3122 [220V])
Spectra 22 (serial number < 340,000)
Fitting
Cochlear
Troubleshooting
Perform a listening check
1. Turn speech processor, FM receiver and transmitter off.
1. Plug the receiver and adapter into the RadioShack speaker
with the blue patch cable.
2. Plug the blue cable into the MicroLink CI S.
3. Attach the MicroLink CI S to the external input socket on the
speech processor.
4. Turn on the speech processor, FM transmitter and MicroLink
CI S in that order to avoid transient sounds.
5. Use the processor in the N setting.
6. Determine speech perception in quiet with the CI alone at
normal (4-5) sensitivity. Repeat test with the FM system. If
scores are poorer with the FM, increase the gain on the
MicroLink CI S adapter until comparable performance is
achieved.
7. The CI microphone will be deactivated when an external
device is plugged in. For environmental input while utilizing
FM, patient must plug the MicroLink CI S external lapel
microphone into the MicroLink CI S.
2. Insert a battery into the MicroLink CI S and turn it on.
3. Turn on the FM transmitter. While speaking into the transmitter, listen for the clear signal with minimal background noise.
This check will not reflect the sound quality that the patient
will hear but will confirm function and transmission of FM
system.
4. To check the FM system, remove the MicroMLxS and plug it
into a working hearing aid and audioshoe or a Phonak
MicroLink Headset checker. Turn on the transmitter and listen
for a clear signal.
5. Follow your audiologist’s recommendations for conducting a
listening check of your speech processor.
3
1
2
Headset Checker
(Phonak part number 052-3126
[110V] and 052-3122 [220V])
Required Parts:
1. MicroMLxS
2. MicroLink CI S
3. Blue cable
MicroLink CI S adapter plugged
into the RadioShack speaker
13
Auria / Harmony – Fitting with iConnect™
Fitting
Advanced Bionics
Listening Check/Troubleshooting
1. Turn the MicroMLxS or MLxS off.
1. Follow your CI audiologist’s recommendations for checking
performance of the Auria.
2. When using MLxS ensure that the pins are in the horizontal
orientation.
3. Turn the Auria off by sliding the battery back.
2. To check the FM system, remove the MicroMLxS and plug it
into a working hearing aid and audioshoe or a Phonak
MicroLink Headset checker. Turn on the transmitter and listen
for a clear signal.
4. Remove standard earhook by twisting it off.
5. Hold the iConnect at the base and firmly press until it clicks
onto the Auria.
6. Insert a size 10 zinc air battery into the iConnect (+ side up).
7. Turn the FM transmitter on.
8. Turn the volume down on the Auria to avoid transient sounds.
Headset Checker
(Phonak part number 052-3126
[110V] and 052-3122 [220V])
9. Turn the Auria on to a program with a 50/50 audio mixing ratio.
10. Turn the MicroMLxS receiver on to the single green dot position.
11. Gradually turn the volume on the Auria up to the normal
level (usually 12:00).
12. Verify that the FM signal is loud but comfortable for the listener. This may be done by determining speech recognition in
quiet through the FM only. Confirm that performance is similar to the CI only condition. If not, it may be necessary to
change the gain programmed in the MicroMLxS from the +10
default. Further information for practial fittings please see
chapter "Programming FM systems").
13. Verify that the FM is beneficial in noise. If not, it may be necessary to use a program with a 30/70 mixing ratio.
Required Parts:
1. MicroMLxS
2. iConnect™ (also available from Phonak)
Note: mapping change
may be necessary
MicroMLxS receiver
Battery door
Auria
Microphone
iConnect™
Earhook
PowerCel
14
Auria Headpiece
with cable
Platinum BTE and CII BTE
Advanced Bionics
Fitting
Troubleshooting
Performing a Listening Check
1. Turn speech processor, FM receiver and transmitter off.
1. Plug the receiver and adapter into a test amplifier, e.g. Radio
Shack speaker, with the blue-red patch cable.
2. Plug the MicroMLxS into the MicroLink CI S. Keep the
MicroMLxS in the double green dot position.
3. Connect the blue-red long cable to the MicroLink CI S.
2. Insert a battery into the MicroLink CI S adapter and turn it
on.
4. Attach the auxiliary earhook to the speech processor.
3. Put the MicroMLxS receiver in the double green dot position.
5. Plug the blue-red long cable into the auxiliary earhook cable.
4. Turn on the FM transmitter. While speaking into the transmitter, listen for the clear signal with minimal background noise.
This check will not reflect the sound quality that the patient
will hear but will confirm function and transmission of the
FM system.
6. Turn on the FM transmitter, MicroLink CI S and speech
processor in that order to avoid transient sounds.
7. Gradually increase the gain of the MicroLink CI SI to a comfortable level.
8. Determine speech recognition ability in quiet with the FM signal. Ensure that results are similar to implant alone condition.
MicroLink CI S gain may need further adjustment.
9. Determine speech recognition in noise with the FM system.
The default microphone mixing ratio in the map is 50/50
(CI headpiece mic and FM). The ratio may need to be changed
to 30/70 (CI headpiece mic and FM) to realize FM benefit.
If this change is needed, the 30/70 ratio should be implemented in the third program and this program will need to
be used with FM.
5. To check the FM system, remove the MicroMLxS and plug it
into a working hearing aid and audioshoe or a Phonak
MicroLink Headset checker. Turn on the transmitter and listen
for a clear signal.
6. Follow your audiologist’s recommendations for conducting a
listening check of your speech processor.
Headset Checker
(Phonak part number 052-3126
[110V] and 052-3122 [220V])
4
3
Required Parts:
1. MicroMLxS
2. MicroLink CI S
3. Blue-Red long cable
4. Auxiliary audio earhook with cable
(part number CI-5705-10/20 standard/small)
Note: mapping change may be necessary
MicroLink CI S plugged into
the RadioShack speaker
2
1
Microphone
Earhook
Electronic
Module
BTE can be turned off or
reset by sliding the
Rechargeable
PowerCel off
PowerCel
Toggle
Switch
Headpiece
Connector
Toggle switch:
n You can change from one program to the
next by pressing and holding the toggle
switch in the upward direction for more
than one second.
n To decrease the volume or sensitivity you
must press and quickly release the toggle
Headpiece
switch in the downward direction
Cable
15
Platinum Processor (PSP)
Fitting
1. Turn speech processor, FM receiver and transmitter off.
2. Insert the blue-red short cable into the MicroLink CI S.
3. Plug the MicroMLxS into the MicroLink CI S. Leave the receiver in the double green dot position.
Advanced Bionics
Troubleshooting
Performing a Listening Check
1. Plug the receiver and adapter into a test amplifier, e.g. Radio
Shack speaker, with the blue-red patch cable.
2. Insert a battery into the MicroLink CI S and turn it on.
3. Put the MicroMLxS receiver in the double green dot position.
4. Plug the MicroLink CI S into the external input socket on the
speech processor.
5. To avoid transient sounds, turn on the FM transmitter, then
MicroLink CI S, then speech processor in that order.
6. Gradually increase the gain of the MicroLink CI S to a comfortable level.
7. Determine speech recognition ability in quiet with the FM signal. Ensure that results are similar to implant alone condition.
MicroLink CI S gain may need further adjustment.
8. Determine speech recognition in noise with the FM system.
The default microphone mixing ratio in the map is 50/50 (CI
headpiece mic and FM). The ratio may need to be changed to
30/70 (CI head- piece mic and FM) to realize FM benefit. If
this change is needed, the 30/70 ratio should be implemented
in the third program and this program will need to be used
with FM.
4. Turn on the FM transmitter. While speaking into the transmitter, listen for the clear signal with minimal background noise.
This check will not reflect the sound quality that the patient
will hear but will confirm function and transmission of the
FM system.
5. To check the FM system, remove the MicroMLxS and plug it
into a working hearing aid and audioshoe or a Phonak
MicroLink Headset checker. Turn on the transmitter and listen
for a clear signal. Follow your audiologist’s recommendations
for conducting a listening check of your speech processor.
6. Follow your audiologist’s recommendations for conducting a
listening check of your speech processor.
Headset Checker
(Phonak part number 052-3126
[110V] and 052-3122 [220V])
1
3
2
PSP Controls
Required Parts:
1. MicroMLxS
2. MicroLink CI S
3. Blue-Red short cable
Program
MicroLink CI S plugged into the
RadioShack speaker
16
LED
Volume
Sensitivity
LED Indicator
Battery status:
4 quick blinks
battery fully charged
2-3 quick blinks battery sufficiently charged
1 quick blink
battery near depletion
Lock status:
LED will synchronously flash red if lock is lost
Mic/System status: Green LED flickers in response
to loud input (Verifies that mic received sound,
data transmitted to implant & processor received
data from implant)
Clarion S-Series
Advanced Bionics
Fitting
Troubleshooting
Performing a Listening Check
1. Turn speech processor, FM receiver and transmitter off.
2. Insert the blue cable into the MicroLink CI S.
1. Plug the receiver and adapter into a test amplifier, e.g. Radio
Shack speaker, with the blue patch cable.
3. Plug the MicroMLxS into the MicroLink CI S. Leave the
receiver in the double green dot position.
2. Insert a battery into the MicroLink CI S and turn it on.
4. To avoid transient sounds, turn on the FM transmitter, then
MicroLink CI S, then speech processor in that order.
5. Gradually increase the gain of the MicroLink CI S to a
comfortable level.
3. Turn on the FM transmitter. While speaking into the transmitter, listen for the clear signal with minimal background noise.
This check will not reflect the sound quality that the patient
will hear but will confirm function and transmission of FM
system.
6. Determine speech recognition ability in quiet with the FM
signal. Ensure that results are similar to implant alone condition. MLCI gain may need further adjustment.
4. To check the FM system, remove the MicroMLxS and plug it
into a working hearing aid and audioshoe or a Phonak
MicroLink Headset checker. Turn on the transmitter and listen
for a clear signal. Follow your audiologist’s recommendations
for conducting a listening check of your speech processor.
7. The CI microphone will be deactivated when an external
device is plugged in. For environmental input while utilizing
FM, patient must plug the MicroLink CI S external lapel
microphone into the MicroLink CI S.
5. Follow your audiologist’s recommendations for conducting a
listening check of your speech processor.
2
S-Series Controls
LED
1
3
Program
Volume
Sensitivity
LED ( Light-Emitting-Diode):
To assess battery status, turn the speech
processor on and observe the number of red
blinks:
4 quick blinks
indicates the battery is
fully charged
2 to 3 quick blinks indicates the battery is
sufficiently charged to
power the system
1 quick blink
indicates the battery
charge is nearly depleted
Required Parts:
1. MicroLink CI S
2. Blue cable
3. MicroMLxS
A loss of lock will be displayed as a
synchronous flashing of the red light
MicroLink CI S plugged into the
RadioShack speaker
The green light will appear as the system hits
compression
17
Clarion 1.2
Advanced Bionics
Fitting
Troubleshooting
Performing a Listening Check
1. Turn speech processor, FM receiver and transmitter off.
2. Insert the black cable into the MicroLink CI S adapter.
1. Plug the receiver and adapter into a test amplifier, e.g. Radio
Shack speaker, with the blue patch cable.
3. Plug the MicroMLxS into the MicroLink CI S. Leave the
receiver in the double green dot position.
2. Insert a battery into the MicroLink CI S and turn it on.
4. To avoid transient sounds, turn on the FM transmitter, then
MicroLink CI S, then speech processor in that order.
5. Gradually increase the gain of the MicroLink CI S to a
comfortable level.
6. Determine speech recognition ability in quiet with the FM
signal. Ensure that results are similar to implant alone condition. MicroLink CI S gain may need further adjustment.
7. The CI microphone will be deactivated when an external
device is plugged in.
3. Turn on the FM transmitter. While speaking into the transmitter, listen for the clear signal with minimal background noise.
This check will not reflect the sound quality that the patient
will hear but will confirm function and transmission of the
FM system.
4. If the system is working with the blue cable, exchange the
black #11 cable and try again with the processor.
5. To check the FM system, remove the MicroMLxS and plug it
into a working hearing aid and audioshoe or a Phonak
MicroLink Headset checker. Turn on the transmitter and listen
for a clear signal.
6. Follow your audiologist’s recommendations for conducting a
listening check of your speech processor.
2
1
3
Required Parts:
1. MicroLink CI S
2. Black cable
3. MicroMLxS
18
Headset Checker
(Phonak part number 052-3126
[110V] and 052-3122 [220V])
MicroLink CI S plugged into the
RadioShack speaker with Blue
cable.
TEMPO+, OPUS1 (remote battery pack)
Fitting
MED EL
Troubleshooting
Performing a Listening Check
1. Connect the Remote Battery Pack (RBP) to the speech processor.
1. Plug the receiver and adapter into a test amplifier, e.g. Radio
Shack speaker, with the white patch cable.
2 Turn RBP, MicroLink CI S and transmitter off.
2. Insert a battery into the MicroLink CI S and turn it on.
3. Connect the white cable to the MicroLink CI S.
3. Put the MicroMLxS receiver in the double green dot position.
4. Plug the MicroMLxS into the MicroLink CI S. Leave the receiver in the double green dot position.
5. Plug the MicroLink CI S into the remote battery pack.
6. Switch the RBP into MIX-Mode and turn the RBP on.
7. Turn on the FM system and gradually increase FM gain to a
comfortable level.
8. Determine speech perception ability with the FM signal in
quiet and in noise.
4. Turn on the FM transmitter. While speaking into the transmitter, listen for the clear signal with minimal background noise.
This check will not reflect the sound quality that the patient
will hear but will confirm function and transmission of the
FM system.
5. To check the FM system, remove the MicroMLxS and plug it
into a working hearing aid and audioshoe or a Phonak
MicroLink Headset checker. Turn on the transmitter and listen
for a clear signal.
6. Follow your audiologist’s recommendations for conducting a
listening check of your speech processor.
Headset Checker
(Phonak part number 052-3126
[110V] and 052-3122 [220V])
1
3
2
Required Parts:
1. MicroMLxS
2. MicroLink CI S
3. White cable
MicroLink CI S plugged into the
RadioShack speaker
19
TEMPO+, OPUS 1 (angled battery pack)
Fitting
MED EL
Troubleshooting
Performing a Listening Check
1. Turn speech processor, FM receiver and transmitter off.
2. Connect the red cable to the MicroLink CI S and attach to the
speech processor.
1. Plug the receiver and adapter into a test amplifier, e.g. Radio
Shack speaker, with the blue patch cable.
2. Insert a battery into the MicroLink CI S and turn it on.
3. Turn the speech processor on.
3. Put the MicroMLxS receiver in the double green dot position.
4. Turn the FM system on and set the MicroLink CI S gain
to 3-3.5.
5. Determine speech perception ability with FM signal in quiet
and in noise.
4. Turn on the FM transmitter. While speaking into the transmitter, listen for the clear signal with minimal background noise.
This check will not reflect the sound quality that the patient
will hear but will confirm function and transmission of FM
system.
How to Connect
1. Open cover at the angled part of the device by pulling
straight back (A) and lifting upward (B).
2. Insert the connector of the cable into the socket as shown.
The red dot on the cable connector should be on top. When
positioned correctly, the connector slides into the socket easily. Be careful not to force the connector into the socket the
wrong way.
3. Gently lower the cover until it rests on the connector (C).
There may be a “click” when you do this, which means that
the connector is securely locked in to the socket. This ensures
maximum protection of the connector.
5. If the system is working with the blue cable, exchange the
red #14 cable and try again with the processor.
6. Follow your audiologist’s recommendations for conducting a
listening check of your speech processor. You may purchase
the microphone test devices from MED-EL for a speech
processor test.
7. To check the FM system, remove the MicroMLxS and plug it
into a working hearing aid and audioshoe or a Phonak
MicroLink Headset checker. Turn on the transmitter and listen
for a clear signal.
volume switch
program switch
sensitivity control
warning light
microphone
1
2
4
Required Parts:
1. MicroMLxS
2. MicroLink CI S
3. Red cable
4. Blue cable for testing
with RadioShack speaker
Headset Checker
(Phonak part number 052-3126
[110V] and 052-3122 [220V])
3
MicroLink CI S plugged into
the RadioShack speaker with
Blue cable.
20
Digi SP’K
Neurelec
Fitting
Listening Check/Troubleshooting
The Digi SP’K processor provides different programmes that can be
configured for use by any auxiliary system. The first use of the
Phonak FM system will require a visit to the audiologist to adapt
these programmes to different sound environments following the
procedure below:
1. Switch off the speech processor, FM receiver and transmitter.
2. Plug the MicroMLxS FM receiver directly into the auxiliary
(“AUX”) input of the processor.
1. Follow the recommendations of the audiologist for checking
the performance of the Digi SP’K processor.
2. The environmental and FM signals can be checked using the
dedicated function in the implant programming software.
3. Use a working hearing aid and audioshoe and plug the MLxS
to check the FM system. Speak into the transmitter and listen
for clear sound quality.
Note: Modification of the frequency can be performed as needed.
3. Switch the processor on in the position defined for the use
of the auxiliary system, and switch on the MicroLink receiver
(prefererence the single green dot position). The processor
automatically detects the presence of the receiver.
4. Use the implant programming software to adapt these
specific programmes (copy the programmes and authorise
the auxiliary input). Adapt the appropriate audio mixing of
FM and headpiece microphone.
5. Determine speech perception in quiet with the CI alone
and then through the FM system. Performances should be
similar between these two conditions. If the FM is too loud
or too soft, it may be necessary to modify the input gain
(microphone and/or FM) until comparable performance is
achieved.
6. Determine speech perception with the FM system in noise.
The audio mixing ratio may need to be changed to reach FM
benefit.
Required Parts:
1. MicroMLxS
2. Digi SP’K processor
Microphone
2
Indicator light
1
Program selector
21
Digi SP and Digisonic BTE
Fitting
Neurelec
Listening Check/Troubleshooting
The Digi SP and Digisonic BTE processors provide two additional
programmes (P3/P4) dedicated to any auxiliary input connexion.
The first use of the Phonak FM system will require a visit to the
audiologist to adapt these programmes to different sound environments following the procedure below:
1. Switch off the speech processor, FM receiver and transmitter.
2. Plug the MicroMLxS FM receiver directly into the auxiliary
(“AUX”) input of the processor.
1. Follow the recommendations of the audiologist for checking
the performance of the Digi SP or Digisonic BTE processor.
2. The environmental and FM signals can be checked using the
dedicated function in the implant programming software.
3. Use a working hearing aid and audioshoe and plug in the
MicroMLxS to check the FM system. Speak into the transmitter
and listen for clear sound quality.
Note: Modification of the frequency can be performed as needed.
3. Switch the processor on in P1 or P2, and switch on the
MicroMLxS receiver (preferably in the single green dot position). The processor automatically detects the presence of the
receiver and switches from the standard programs P1/P2 to
the
specific P3/P4 to be set for the first use.
4. Use the implant programming software to adapt these specific programs (copy P1/P2 into P3/P4 and authorise the auxiliary input). Adapt the appropriate audio mixing of the FM and
headpiece microphone.
5. Determine speech perception in quiet with the CI alone and
then through the FM system. Performances should be similar
between these two conditions. If the FM is too loud or too
soft, it may be necessary to modify the input gain (microphone and/or FM) until comparable performance is achieved.
6. Determine speech perception with the FM system in noise.
The audio mixing ratio may need to be changed to reach FM
benefit. Note: The sensitivity potentiometer remains accessible
to optimise hearing performances while using the FM system.
Required Parts:
1. MicroMLxS
2. Digi SP’K processor
Microphone
Sensitivity control
2
Program selector
Indicator light
1
22
Direct MicroMLxS
connection
Baha Classic
Cochlear
Fitting
Troubleshooting
Performing a Listening Check
1. Turn hearing aid, FM receiver and transmitter off.
2. Plug the blue-white cable into the MicroLink CI S.
1. Plug the receiver and into a test amplifier, e.g. Radio Shack
speaker, with the blue patch cable.
3. Plug the MicroMLxS into the MicroLink CI S. Leave the receiver in the double green dot position.
2. Insert a battery into the MicroLink CI S and turn it on.
3. Put the MicroMLxS receiver in the double green dot position.
4. Attach the blue-white cable to the audio adapter.
5. Plug the audio adapter into the hearing aid.
6. Turn on the hearing aid, FM transmitter and MicroLink CI S.
7. Determine speech perception in quiet with the hearing aid
alone. Repeat the test with the FM system. If scores are poorer with FM, increase the gain of the MicroLink CI S until comparable performance is achieved.
8. Determine speech perception in noise. Increase FM gain in the
MicroMLxS receiver until significant FM benefit is demonstrated.
Required Parts:
n MicroMLxS
n MicroLink CI S
n Blue-White cable
n Cochlear audio adapter (part number 90065
purchased through Cochlear)
n Blue cable for testing with Radio Shack speaker.
4. Turn on the the FM transmitter. While speaking into the
transmitter, listen for the clear signal with minimal background noise. This check will not reflect the sound quality
that the patient will hear but will confirm function and
transmission of the FM system.
5. If the system is working with the blue cable, exchange the
blue-white cable and try again with the hearing aid.
6. Follow your audiologist’s recommendations for conducting a
listening check of your hearing aid.
MicroLink CI S plugged into the
RadioShack speaker with Blue cable.
Baha Compact
Fitting
Troubleshooting
Performing a Listening Check
1. Turn hearing aid, FM receiver
and transmitter off.
2. Plug receiver into Baha Compact
hearing aid so that the white circled
pin on the receiver lines up to the
red circle on the hearing aid.
3. Turn on the hearing aid,
FM transmitter and receiver.
The single green dot is
FM only; the double green
dot is FM+M.
1
1. Plug the receiver into the MLxS Baha listening adapter (part
number 052-3002). This adapter can be purchased from
Phonak. Plug the adapter into the MicroLink checker (part
number 052-0036) or into a spare hearing aid with
audioshoe.
2
Required Parts:
1. Baha
2. MLxS with BAHA
modification
2. Turn on the checker, receiver and transmitter. While speaking
into the transmitter, listen for a clear signal with minimal
background noise. This checker will not reflect the sound
quality that the patient will hear but will confirm function
and transmission of the FM system.
23
Baha Cordelle
Fitting
1.
2.
3.
4.
5.
6.
7.
Turn hearing aid, FM receiver and transmitter off.
Attach MicroVox cord to MicroVox COM-1 receiver.
Plug MicroVox cord into audio coupler.
Plug audio coupler into audio adapter.
Plug audio adapter into hearing aid.
Turn on hearing aid, FM transmitter and receiver.
Adjust volume of MicroVox COM-1 for significant FM benefit.
Required Parts:
n MicroVox COM-1 (with headphones for troubleshooting)
n Cochlear audio adapter (part number 90067, purchased
through Cochlear)
n MicroVox cord (part number 52114)
n Stereo-to-Stereo audio coupler (part number 274-1555)
Cochlear
Troubleshooting
Performing a Listening Check
1. Plug headphones into the MicroVox COM-1.
2. Turn on FM transmitter and receiver.
3. While speaking into the transmitter, listen for a clear signal
with minimal background noise. This check will not reflect the
sound quality that the patient will hear but will confirm
function and transmission of the FM system.
Baha Divino
Fitting
Troubleshooting
Performing a Listening Check
1. Turn the hearing aid, FM receiver and transmitter, off.
2. Plug receiver into the Baha Compact Divino hearing instrument so that the white circled pin on the receiver lines up to
the red circle on the hearing instrument.
3. Turn on the hearing aid, FM transmitter and receiver. The
single green dot is FM only; the double green dot is FM+M.
Required Parts:
1. Baha
2. MLxS
24
1. Plug the receiver into the MLxS Baha listening adapter (part
number 052-3002). This adapter can be purchased from
Phonak. Plug the adapter into the MicroLink checker (part
number 052-0036) or into a hearing instrument with
audioshoe.
2. Turn on the checker, receiver and transmitter. While speaking
into the transmitter, listen for a clear signal with minimal
background noise. This checker will not reflect the sound
quality that the patient will hear but will confirm function
and transmission of the FM system.
Programming MicroMLxS or MicroLink Freedom with FM Successware
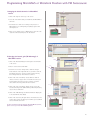
1.
I. Changing the default channel of a MicroMLxS
receiver
1. Click on the flag icon at the top of the screen.
2. Select the new channel that you would like the MicroMLxS to
turn onto.
2.
3.
3. Insert batteries so that receiver and speech processor or
MicroLink CI S are working. Plug everything together and
turn all parts on.
4.
4. Place receiver and processor or MicroLink CI S into the toaster (devices turned on) and press the “Go” button.
2.
1.
3 c.
II. Changing the internal gain (FM Advantage) of
MicroMLxS receiver
3 b.
3 a.
1. Click on the Extended Fitting menu along the left-hand side
of the screen
2. Enter in a client name. Click “Add.”
4 b.
4 c.
4 a.
3. Go down one menu to “Assign device.” Click the “Assign
device” button on the right and choose your device from the
list ("Assign device") or detect your device ("Detect device",
below "Assign device"). Then click “Select device.”
4. Click on the next menu down, “Select channels.” Click on
“Create a New Set.” Type a name in field #1 and select your
desired channel from the list next to field # 2. Select the
same channel from the pull-down list in field # 3.
6 a.
4 d.
5.
5. Click on the next menu down, “Prepare device.” Select the
associated hearing device (MicroLink CI S, MicroLink, Freedom,
etc.) or choose “unknown.”
6. Click on the “FM advantage modification” button. Adjust gain
as needed with the slider bar(s).
6 b.
7.
7. Click on the last menu, “Program device.” Insert batteries and
connect parts so that the FM is powered. Place powered FM in
toaster and click “Save Now.”
For more information about using the Phonak FM Successware,
please contact your local Phonak FM Specialist.
25
Online resources
The Phonak homepage with information for professionals and consumers:
www.phonak.com
Your online comprehensive FM support tool for schools:
www.eSchoolDesk.com
028-0070-02/V1.00 2006 12/ERC Printed in Switzerland © Phonak AG all rights reserved
Latest set-up tips for FM systems in combination with
cochlear implants and hearing instruments:
www.phonak.com\FM_Configurator
Check quickly if your C.I. or hearing instrument is FM compatible:
www.phonak.com\mlx
Cochlear
www.cochlear.com
Advanced Bionics
www.advancedbionics.com
MED EL
www.medel.com
MXM
www.mxmlab.com
www.phonak.com