1
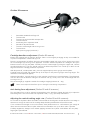
Ortofon AS tonearms
7
3
1
2
6a
6
4
5
1
2
3
4
5
6
7
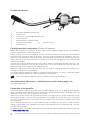
Detachable headshell with finger lift
Tonearm tube
Tonearm rest and removable transport lock
Tonearm lift lever
Anti-skating force adjustment knob
Tonearm counterweight *
6a
Downforce scale
Tonearm base
Cartridge downforce adjustment (Ortofon AS tonearms)
Remove the transport lock (3) from the tonearm. Store it in the original packaging so they are available for
any future transportation. Set the knob (5) to 0.
Pushing carefully, turn the counterweight (6) onto the rear end of the tonearm tube (2), so that the downforce
scale (6a) shows towards the front of the player. Lower the armlift and position the cartridge in the space
between arm rest and platter. Carefully rotate the counterweight (6) until the armtube balances out. The arm
should return to the balanced position if it is moved up or down. Do not forget to remove the cartridge
protection cap if fitted.
Once the arm is correctly balanced return it to the rest (3). Hold the counterweight (6) without moving it, and
gently revolve the downforce scale ring (6a) until the zero is in line with the black line at the rear end of the
tonearm tube (2). Check whether the arm still balances out.
Rotate the counterweight counter clockwise (seen from the front) to adjust the downforce according to the
cartridge manufacturer's recommendations.
The counterweight (6) supplied is suitable for cartridges weighing between 18 - 25g. An alternative weight
for cartridges weighing between 26 - 38g is available as an accessory part.
Please note: Adjust the downforce prior to setting the anti-skating compensation.
Anti-skating force adjustment and Adjusting the vertical tracking angle -vtaSee Ortofon RS tonearms
Connection to the amplifier
Connect the tonearm cables to the Phono input (sometimes labelled gram, disc or RIAA) on your amplifier.
Make sure that the phono input offers correct matching and amplification for the type of cartridge used. Line
inputs (such as CD, Tuner, Tape or Video) are not suitable.
Take care to connect the left and right channels correctly. The right channel is usually marked red, the left
channel black or white. Check the manual supplied with your amplifier for relevant information. An earthing
wire may be connected to the screw terminal on your amplifier if you encounter hum problems when using
the record player.
If your amplifier does not have an input suitable for phono cartridges you will require a separate phono
amplifier stage for MM or MC cartridges which is then connected between the record player and a free line
level input of the amplifier.
For detailed product information regarding Pro-Ject Audio phono amplifiers please refer to the Pro-Ject web
site www.project-audio.com.
8
© Audio Trade GmbH · Pro-Ject Xtension 12 Evolution / Xtension Ortofon RS-309D/AS-309S · Revision 2012.8.1