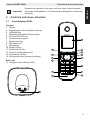
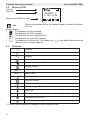
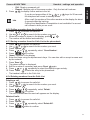
1
COCOON M1450 TWIN CORDLESS TELEPHONE USER GUIDE V2.3 - 7/11 1 14 2 3 ▲ 13 4 R ▲ ▲ INT 12 5 ▲ 11 10 2 4 GHI 5 JKL 6 7 PQRS 8 TUV 9 * 0 ABC DEF MNO # 6 WXYZ 7 8 9 15 Cocoon M1450 3 1 The CE symbol indicates that the unit complies with the essential requirements of the R&TTE directive. The features described in this manual are published with reservation to modifications. Caution This product works with rechargeable batteries only. If you put nonrechargeable batteries in the handset and place it on the base, the handset will be damaged and this in NOT covered under the warranty conditions. Cocoon M1450 TWIN 1 General . . . . . . . . . . . . . . . . . . . . . . . . . . . . . . . . . . . . . . . . . . . . . . . . . 5 1.1 1.2 1.3 1.4 1.5 1.6 1.7 The product: Cocoon M1450 TWIN . . . . . . . . . . . . . . . . . . . . . . . . . . . . . . . . . . .5 Copyright . . . . . . . . . . . . . . . . . . . . . . . . . . . . . . . . . . . . . . . . . . . . . . . . . . . . . . .5 Key words and icons . . . . . . . . . . . . . . . . . . . . . . . . . . . . . . . . . . . . . . . . . . . . . .5 Intended use . . . . . . . . . . . . . . . . . . . . . . . . . . . . . . . . . . . . . . . . . . . . . . . . . . . .5 Box content . . . . . . . . . . . . . . . . . . . . . . . . . . . . . . . . . . . . . . . . . . . . . . . . . . . . .6 Safety instructions . . . . . . . . . . . . . . . . . . . . . . . . . . . . . . . . . . . . . . . . . . . . . . . .6 Instructions on low radiation operation . . . . . . . . . . . . . . . . . . . . . . . . . . . . . . . .8 2 Installation . . . . . . . . . . . . . . . . . . . . . . . . . . . . . . . . . . . . . . . . . . . . . . 9 2.1 2.2 2.3 Setting up the base unit . . . . . . . . . . . . . . . . . . . . . . . . . . . . . . . . . . . . . . . . . . . .9 Setting up the charging station . . . . . . . . . . . . . . . . . . . . . . . . . . . . . . . . . . . . .10 Inserting the batteries in a handset . . . . . . . . . . . . . . . . . . . . . . . . . . . . . . . . . .10 3 Controls and menu structure . . . . . . . . . . . . . . . . . . . . . . . . . . . . . . 11 3.1 3.2 3.3 3.4 3.5 3.6 3.7 Keys/displays/LEDs . . . . . . . . . . . . . . . . . . . . . . . . . . . . . . . . . . . . . . . . . . . . . .11 Display (LCD) . . . . . . . . . . . . . . . . . . . . . . . . . . . . . . . . . . . . . . . . . . . . . . . . . .12 Symbols . . . . . . . . . . . . . . . . . . . . . . . . . . . . . . . . . . . . . . . . . . . . . . . . . . . . . . .12 Display keys . . . . . . . . . . . . . . . . . . . . . . . . . . . . . . . . . . . . . . . . . . . . . . . . . . .13 LED indicator in the base unit . . . . . . . . . . . . . . . . . . . . . . . . . . . . . . . . . . . . . .13 Menu structure . . . . . . . . . . . . . . . . . . . . . . . . . . . . . . . . . . . . . . . . . . . . . . . . . .13 Menu overview . . . . . . . . . . . . . . . . . . . . . . . . . . . . . . . . . . . . . . . . . . . . . . . . .14 4 Handset - settings and operation . . . . . . . . . . . . . . . . . . . . . . . . . . . 14 4.1 4.2 4.3 4.4 4.5 4.6 4.7 4.8 4.9 4.10 4.11 4.12 4.13 4.14 4.15 4.16 4.17 4.18 4.19 4.20 4.21 4.22 4.23 Turning the handset ON/OFF . . . . . . . . . . . . . . . . . . . . . . . . . . . . . . . . . . . . . .14 Selecting the menu language . . . . . . . . . . . . . . . . . . . . . . . . . . . . . . . . . . . . . .14 Making calls . . . . . . . . . . . . . . . . . . . . . . . . . . . . . . . . . . . . . . . . . . . . . . . . . . . .15 Answering a call . . . . . . . . . . . . . . . . . . . . . . . . . . . . . . . . . . . . . . . . . . . . . . . .16 The Calls list . . . . . . . . . . . . . . . . . . . . . . . . . . . . . . . . . . . . . . . . . . . . . . . . . . .16 Redialling options . . . . . . . . . . . . . . . . . . . . . . . . . . . . . . . . . . . . . . . . . . . . . . .18 Activate/deactivate handsfree mode . . . . . . . . . . . . . . . . . . . . . . . . . . . . . . . . .18 “Out of range” warning . . . . . . . . . . . . . . . . . . . . . . . . . . . . . . . . . . . . . . . . . . . .18 Setting the loudspeaker volume . . . . . . . . . . . . . . . . . . . . . . . . . . . . . . . . . . . .18 Call duration display . . . . . . . . . . . . . . . . . . . . . . . . . . . . . . . . . . . . . . . . . . . . .19 Muting the microphone . . . . . . . . . . . . . . . . . . . . . . . . . . . . . . . . . . . . . . . . . . .19 Pause key (dial pause) . . . . . . . . . . . . . . . . . . . . . . . . . . . . . . . . . . . . . . . . . . .19 Using the alphanumeric keypad . . . . . . . . . . . . . . . . . . . . . . . . . . . . . . . . . . . .19 Setting the ringer volume on the handset . . . . . . . . . . . . . . . . . . . . . . . . . . . . .19 Setting the ringer melody on the handset . . . . . . . . . . . . . . . . . . . . . . . . . . . . .20 Setting the key lock . . . . . . . . . . . . . . . . . . . . . . . . . . . . . . . . . . . . . . . . . . . . . .20 Keypad beep On/Off . . . . . . . . . . . . . . . . . . . . . . . . . . . . . . . . . . . . . . . . . . . . .20 Adjust the display contrast . . . . . . . . . . . . . . . . . . . . . . . . . . . . . . . . . . . . . . . . .21 Edit handset name . . . . . . . . . . . . . . . . . . . . . . . . . . . . . . . . . . . . . . . . . . . . . . .21 Temporarily show or hide your telephone number . . . . . . . . . . . . . . . . . . . . . .21 Direct Call . . . . . . . . . . . . . . . . . . . . . . . . . . . . . . . . . . . . . . . . . . . . . . . . . . . . .21 Auto Talk . . . . . . . . . . . . . . . . . . . . . . . . . . . . . . . . . . . . . . . . . . . . . . . . . . . . . .22 Resetting the handset settings to “Default” (Handset reset) . . . . . . . . . . . . . . . . . . . . . . . . . . . . . . . . . . . . . . . . . . . . . . . . .22 5 Clock and alarm functions . . . . . . . . . . . . . . . . . . . . . . . . . . . . . . . . 23 5.1 5.2 5.3 5.4 5.5 5.6 Set the date and time . . . . . . . . . . . . . . . . . . . . . . . . . . . . . . . . . . . . . . . . . . . .23 Select hour format . . . . . . . . . . . . . . . . . . . . . . . . . . . . . . . . . . . . . . . . . . . . . . .23 Auto update time . . . . . . . . . . . . . . . . . . . . . . . . . . . . . . . . . . . . . . . . . . . . . . . .23 Alarm function . . . . . . . . . . . . . . . . . . . . . . . . . . . . . . . . . . . . . . . . . . . . . . . . . .24 Appointments . . . . . . . . . . . . . . . . . . . . . . . . . . . . . . . . . . . . . . . . . . . . . . . . . . .24 Stop watch . . . . . . . . . . . . . . . . . . . . . . . . . . . . . . . . . . . . . . . . . . . . . . . . . . . . .25 3 Cocoon M1450 TWIN 6 The phonebook . . . . . . . . . . . . . . . . . . . . . . . . . . . . . . . . . . . . . . . . . 25 6.1 6.2 6.3 6.4 6.5 6.6 6.7 6.8 Saving a new entry in the phonebook . . . . . . . . . . . . . . . . . . . . . . . . . . . . . . . .25 Finding and calling a number from the phonebook . . . . . . . . . . . . . . . . . . . . . .25 Edit a phonebook entry . . . . . . . . . . . . . . . . . . . . . . . . . . . . . . . . . . . . . . . . . . .25 Delete an entry or all entries . . . . . . . . . . . . . . . . . . . . . . . . . . . . . . . . . . . . . . .26 Display the details of phonebook entries . . . . . . . . . . . . . . . . . . . . . . . . . . . . . .26 Copy a phonebook entry to another handset . . . . . . . . . . . . . . . . . . . . . . . . . .26 Copy all phonebook entries to another handset . . . . . . . . . . . . . . . . . . . . . . . .26 Add all phonebook entries to another handset . . . . . . . . . . . . . . . . . . . . . . . . .27 7 Base operation . . . . . . . . . . . . . . . . . . . . . . . . . . . . . . . . . . . . . . . . . . 27 7.1 7.2 7.3 7.4 Setting the ringer melody and ringer volume on the base unit . . . . . . . . . . . . .27 The recall key (R) . . . . . . . . . . . . . . . . . . . . . . . . . . . . . . . . . . . . . . . . . . . . . . .27 Changing the PIN (system PIN) . . . . . . . . . . . . . . . . . . . . . . . . . . . . . . . . . . . .28 Setting the dialling mode . . . . . . . . . . . . . . . . . . . . . . . . . . . . . . . . . . . . . . . . . .28 8 Additional handsets and base units . . . . . . . . . . . . . . . . . . . . . . . . 28 8.1 8.2 8.3 8.4 8.5 Registering an additional handset . . . . . . . . . . . . . . . . . . . . . . . . . . . . . . . . . . .29 Deregistering a handset . . . . . . . . . . . . . . . . . . . . . . . . . . . . . . . . . . . . . . . . . .29 Selecting a base unit . . . . . . . . . . . . . . . . . . . . . . . . . . . . . . . . . . . . . . . . . . . . .29 Using multiple handsets . . . . . . . . . . . . . . . . . . . . . . . . . . . . . . . . . . . . . . . . . .30 Voice mail indicator . . . . . . . . . . . . . . . . . . . . . . . . . . . . . . . . . . . . . . . . . . . . . .31 9 Answering machine . . . . . . . . . . . . . . . . . . . . . . . . . . . . . . . . . . . . . . 31 9.1 9.2 9.3 9.4 9.5 9.6 9.7 9.8 9.9 9.10 9.11 9.12 Answering machine status . . . . . . . . . . . . . . . . . . . . . . . . . . . . . . . . . . . . . . . .32 Outgoing messages . . . . . . . . . . . . . . . . . . . . . . . . . . . . . . . . . . . . . . . . . . . . . .32 Switching the answering machine on/off . . . . . . . . . . . . . . . . . . . . . . . . . . . . . .33 Call Screening . . . . . . . . . . . . . . . . . . . . . . . . . . . . . . . . . . . . . . . . . . . . . . . . . .34 Setting the number of rings . . . . . . . . . . . . . . . . . . . . . . . . . . . . . . . . . . . . . . . .34 Setting the answering machine language . . . . . . . . . . . . . . . . . . . . . . . . . . . . .34 Programming the VIP code . . . . . . . . . . . . . . . . . . . . . . . . . . . . . . . . . . . . . . . .34 Recording a memo . . . . . . . . . . . . . . . . . . . . . . . . . . . . . . . . . . . . . . . . . . . . . .35 Playback incoming messages and memos . . . . . . . . . . . . . . . . . . . . . . . . . . . .35 Delete messages . . . . . . . . . . . . . . . . . . . . . . . . . . . . . . . . . . . . . . . . . . . . . . . .35 Clear full memory . . . . . . . . . . . . . . . . . . . . . . . . . . . . . . . . . . . . . . . . . . . . . . .36 Operating the answering machine remotely . . . . . . . . . . . . . . . . . . . . . . . . . . .36 10 Abbreviations and terminology . . . . . . . . . . . . . . . . . . . . . . . . . . . . 37 11 Troubleshooting . . . . . . . . . . . . . . . . . . . . . . . . . . . . . . . . . . . . . . . . . 38 12 Servicing . . . . . . . . . . . . . . . . . . . . . . . . . . . . . . . . . . . . . . . . . . . . . . . 40 12.1 12.2 12.3 12.4 Maintenance . . . . . . . . . . . . . . . . . . . . . . . . . . . . . . . . . . . . . . . . . . . . . . . . . . .40 Cleaning . . . . . . . . . . . . . . . . . . . . . . . . . . . . . . . . . . . . . . . . . . . . . . . . . . . . . .40 Decommissioning, storage . . . . . . . . . . . . . . . . . . . . . . . . . . . . . . . . . . . . . . . .40 Disposal (environmental protection) . . . . . . . . . . . . . . . . . . . . . . . . . . . . . . . . .40 13 Technical characteristics . . . . . . . . . . . . . . . . . . . . . . . . . . . . . . . . . 41 14 Warranty . . . . . . . . . . . . . . . . . . . . . . . . . . . . . . . . . . . . . . . . . . . . . . . 42 14.1 14.2 14.3 14.4 Warranty period . . . . . . . . . . . . . . . . . . . . . . . . . . . . . . . . . . . . . . . . . . . . . . . . .42 Warranty claim processing . . . . . . . . . . . . . . . . . . . . . . . . . . . . . . . . . . . . . . . .42 Warranty exclusions . . . . . . . . . . . . . . . . . . . . . . . . . . . . . . . . . . . . . . . . . . . . .42 Service address and hotline . . . . . . . . . . . . . . . . . . . . . . . . . . . . . . . . . . . . . . .42 15 Declaration of conformity and manufacturer . . . . . . . . . . . . . . . . . 42 4 Cocoon M1450 TWIN General This user guide contains all the information you need to install, set up and operate your device. It also contains information and important notes for your safety and help in the event of problems. 1.1 The product: Cocoon M1450 TWIN This product has been manufactured in accordance with the uniform digital standard for cordless telephones (DECT). DECT technology is characterised by high-security protection against interception as well as high-quality digital transmission. This telephone is intended for various fields of application, for a network of base units and handsets, constituting a telephone system: thus it is possible to use up to five handsets on one base unit and also to use one handset on up to four base units. Internal calls are also possible between two handsets. This phone can also display the caller number and use the network provider's SMS services, if available on your line. If you use these services, the telephone number of the caller appears on the handset display. Important 1.2 The Calling Line Identifier service feature must be enabled on your telephone line to use calling number display. Contact your telephone network provider for more information on activating this feature. The numbers of incoming calls WILL NOT be shown in your telephone's display if this feature has not been activated. Copyright This document is protected by copyright. All rights are reserved, including rights of photo mechanical reproduction, copying or distribution (e.g. using data processing, data storage media or data networks) either in full or in part, as well as technical changes and changes to the contents. 1.3 Icon none 1.4 Key words and icons Key word Meaning Warning Warning of possible severe risk of injury or death if ignored. Caution Warning of possible risk of minor injury if ignored. Caution Risk of damage or environmental pollution. Important Important information for the use of the device is given here. Info, tip General information or particular tips. Intended use This product is intended for making telephone calls on a landline connection within a telephone network. The prerequisite for proper use is professional installation taking account of the information in this user guide. Any other use is deemed improper and is not permitted. 5 ENGLISH 1 General General Cocoon M1450 TWIN Any modifications or conversions by the user that are not described in this user guide are deemed improper and are not permitted. 1.5 Box content Check that the contents are complete and undamaged. Contact your dealer immediately if parts are missing or faulty. Save the packaging in case you need to return the device or have it repaired. 1 base unit 1 charger with power supply 1 power supply plug for the base unit 1 phone cable for the base unit 2 handset, including 2 rechargeable batteries (AAA, 1.2 V / 500 mAh, NiMH), and a battery compartment cover 1 service card 1 user guide 1.6 Warning Risk of suffocation! Keep packaging films out of the reach of children. Important Dispose of packaging material in an environmentally responsible manner. Safety instructions The following safety advice must always be followed when using electrical equipment. Please read carefully through the following information concerning safe and proper use of the device. Familiarise yourself with all the functions of the device. Keep this User guide in a safe place near the device and pass it on to another user if necessary. Only pass the telephone on to a third party with the user guide. Electrical hazards: Warning • • • • • • 6 Risk of injury or death due to electrical current! In the event of danger, disconnect the device from the 230 V mains immediately. Do not start using the device if the power supply plug, the cable or the device are damaged. Take care not to drop the device as it could be damaged. Dangerous voltages are present inside the equipment. Never open the casing or insert objects through the ventilation slots. Do not allow liquids to get into the equipment. Should this happen, immediately pull the power supply plug from the socket and the telephone cable plug from the socket in the wall. Similarly, if a fault develops during use or before you start to clean the device, pull the power supply plug out of the mains socket and telephone plug out of the wall socket. Do not touch the charger or plug contacts with sharp or metal objects. Do not carry out any modifications or repairs to the unit yourself. Only have the equipment or the mains cable repaired by a specialist service centre. Unsatisfactory repairs can pose considerable risk to the user • • • • • General Children frequently underestimate the dangers of handling electrical devices. Never leave children unsupervised in the vicinity of electrical equipment. The equipment must not be used in a damp environment (e.g. bathrooms) or rooms where there is a lot of dust. Equipment connected to the mains during a thunderstorm can be damaged by lightning. Therefore, you should always pull the power supply plug from the socket and the telephone cable from the telephone socket during a thunderstorm. The power supply plug should be pulled out of the mains socket to fully disconnect the device from the mains. Always pull the power supply plug and never the cable. Check cables regularly for damage, protect them from hot surfaces and other hazards, unwind them fully, lay them so that nobody can trip over them and do not constrict them. Fire risks: Warning Risk of injury or death from fire! Never expose the device to excessive heat and disconnect from the 230 V mains immediately in the event of a hazard. Heat building up inside the equipment can lead to faults and/or fires inside the equipment. Therefore, do not expose this equipment to extreme temperatures such as: – direct exposure to sunlight or heat from a heater. – Do not cover the ventilation slots in the device. Risk of explosion: Warning • • Risk of injury from explosion! Pay particular attention to rechargeable or disposable batteries. Never throw disposable or rechargeable batteries into a fire. Do not use the device in potentially explosive environments. Risk of poisoning: Warning • Risk of injury from poisoning! Pay particular attention to children. Keep batteries away from small children. Risk of suffocation: Warning • • Risk of injury from suffocation! Pay particular attention to children. Keep packaging films out of the reach of children. Consider possible risks to children (strangulation) when routing the cables. Faults: Warning • Possible risk of injury due to faults in the device! Take particular care with medical electrical devices. The function of medical electrical devices may be affected by electromagnetic radiation from your device. Therefore make sure that the device is installed and operated sufficiently far away from medical electrical devices. The same applies to implanted medical devices such as pacemakers. 7 ENGLISH Cocoon M1450 TWIN General • Cocoon M1450 TWIN The handset can cause an unpleasant humming noise in hearing aids, therefore keep a sufficient distance away from hearing aids. Possible damage: Caution • • • Use only the power supply plug supplied. Do not use other power supply plugs, as this may damage the rechargeable batteries. The wall outlet for the power supply plug must be close and easy accessible. Only use the rechargeable batteries supplied. Only replace the rechargeable batteries with the same type. Insert the batteries with correct polarity (polarity is marked in the battery compartment in the handset). Never use ordinary disposable batteries. Important 1.7 Possible damage to the device! Please observe the instructions in this user guide. As this telephone cannot be used in the event of a power cut, you should use a telephone that is not connected to the mains for emergency calls, e.g. a mobile phone. Instructions on low radiation operation This cordless telephone (complying with the DECT standard) allows low-radiation operation (ECO mode). The handset reduces its transmitting power according to the distance from the base unit while you are making a call. The handset reduces its radio output to a minimum if you are not making a call. The device also supports low radiation operation with the base unit reducing its radio output to zero in standby after 30 seconds. This does not mean that the normal DECT radiation is harmful to health, but that low radiation operation avoids unnecessary radiation exposure. Set the base up in a place where you do not spend a lot of time, in the hall, for example. Do not set the base unit up in children's rooms, bedrooms or the living room. 8 Cocoon M1450 TWIN Installation 2.1 Caution Take note of the safety instructions regarding the environment and circumstances of the device's location and installation. Do not use in potentially explosive environments. Important You must make sure that the batteries are charged before you use the telephone for the first time. The device will not work at its best if you do not do this. ENGLISH 2 Installation Setting up the base unit Carry out the following steps: 1. Plug the power supply plug into a 230 V socket. Plug the connector into the connector socket on the underside of the base unit. 2. Connect the telephone socket on the underside of the base unit to the telephone connection socket using the telephone cable provided. 3 4 1 2 1.Telephone wall socket 2.Telephone cable 3.Underside of the base unit 4.Cable from the power supply plug 9 Installation 2.2 Cocoon M1450 TWIN Setting up the charging station Plug the power supply plug into a 230 V socket to start using the charging unit.. 1 2 1 Underside of the charging unit 2 Power supply plug 2.3 Inserting the batteries in a handset Risk of injury from explosion. Only use the batteries supplied or their equivalent. Do not use disposable batteries, Warning 1. 2. 3. 4. Open the battery compartment (see below). Insert the batteries in the correct polarity (+ and -). Close the battery compartment. To charge the rechargeable batteries for the first time, place the handset in the base unit or charging unit for 16 hours. The Charge/In use indicator (LED) 15 on the base unit lights up. The Charge/In use indicator (LED) 15 flashes at the start (base unit registration mode, see section “8.1 Registering an additional handset”). Info 1 - 3 2 1.Battery compartment cover 2.Batteries 3.Rear of handset 10 + - Cocoon M1450 + Important 3.1 Replace the handsets in the base unit after use to avoid complete discharge of the batteries. The batteries are designed for continuous charging. Controls and menu structure Keys/displays/LEDs 1 14 2 3 ▲ 13 4 R INT ▲ Handset 1. Display 2. Right display button (display functions) 3. Up/Redial key 4. Right/Recall key/Hide-Show number 5. On-hook/ON-OFF key 6. Alphanumeric keypad 7. Keypad lock key 8. Dial pause key 9. Microphone 10. Ringer Off-key 11. Down/Calls list key 12. Off-hook key/Handsfree key 13. Left/Internal call key 14. Left display button (display functions) ▲ 3 Controls and menu structure 12 5 ▲ Base unit 15. Charge/In use indicator (LED) 11 10 9 1 2 4 GHI 5 7 PQRS 8 * 0 ABC 3 DEF JKL 6 TUV 9 MNO 6 WXYZ # 7 8 15 Cocoon M1450 11 ENGLISH Cocoon M1450 TWIN Controls and menu structure 3.2 Cocoon M1450 TWIN Display (LCD) Icon line Text line Display menu/Options menu Info There is a protective film on the handset display. Remove this before first use. Battery display: The batteries are fully charged. • The batteries are 75% charged. • • The batteries are half charged (50%). • The batteries are only 25% charged. The batteries are almost flat. The battery icon • “Battery Low!” message appears. 3.3 in the display flashes and the Symbols On hook Off hook Ringing Internal call Handsfree speaker ON Keypad locked ABC Upper case abc Lower case Direction to further menu items Calls list entries* New voice mail message Handset ringer off Alarm set Aerial icon: in range (steady) - out of range (flashing) Answering machine off Answering machine on * If Caller Line Identification is enabled on your telephone line. 12 Cocoon M1450 TWIN Display keys The display keys are the keys immediately below the display: 2 and 14 . Their function changes depending on the current context. Their current function is shown directly above in the display. The most important display key functions are: Phone book Mute function OK/Confirm Previous Menu Cancel Delete 3.5 LED indicator in the base unit The Charge/In use indicator (LED) 15 indicates the following: • Off: The handset is not located in the base unit • On: The handset is charging. • Slow flashing: Off hook or during ringing. • Rapid flashing: During registration. 3.6 Menu structure The handset has an easy-to-use menu structure. Every menu opens a list of options. 1. To open the main menu, press the right display key when the handset is on and in 2 standby mode. 3 key or 2. Press the 11 key to scroll to the menu option you require. The instructions in this user guide show the key symbols and the item number on the device overview. 3. Then press 2 to select further options or confirm the setting displayed. Exit menu or go up a menu level 14 . To go to the previous menu item, press 5 key at any time to cancel and return to standby mode. If you do You can press the not press any key, the handset automatically reverts to standby mode after 20 seconds. 13 ENGLISH 3.4 Controls and menu structure Handset - settings and operation 3.7 Menu overview Menu Submenu items Ans Machine Play Msgs Delete Msgs Ans On/Off Record Memo Outgoing Msg Ans Settings Phonebook Handset Base Settings Time Tools 4 4.1 Cocoon M1450 TWIN Ring Tone Ringer Volume Handset Name Keypad Beep Contrast Auto Talk Direct Call Select Base Language Registration Ring Tone Ringer Volume Dial Mode Recall System PIN Set Alarm Date and Time Set Time Format Auto Update Appointment Stop Watch Handset - settings and operation Caution Possible hazards from faults in the device! Take note of the safety instructions. Info The operating steps below show the key and display symbols and the item numbers on the device overview. Turning the handset ON/OFF 5 to turn the handset on. 1. Press the OFF button 2. To switch the handset off, press and hold the OFF key switches off. 4.2 5 until the handset Selecting the menu language The telephone has a number of menu languages, see the packaging. Proceed as follows to set the language: 14 1. 2. 3. • 4. • 5. 4.3 Handset - settings and operation 2 . Press 3 and 11 to ‘Handset’ and press Scroll with 2 to confirm. 3 and 11 to ‘Language’ and press Scroll with 2 to confirm. The language setting appears on the display. 2 to confirm. 3 and 11 to the required language and press Scroll with You will hear a beep to confirm and the display will show: ‘Saved’. 14 to quit the menu without saving the setting. Or press Making calls 4.3.1 External calls 12 . 1. Press • The Charge/In use indicator (LED) 15 on the base unit flashes and the call icon appears in the display. 2. Dial the number you want once you hear the dialling tone. • The number appears on the display and is dialled. 5 or replace the handset in the base unit or the handset 3. To finish the call, press charging unit. 4.3.2 Block dialling 1. Dial the telephone number you want to call. 4 to access the 14 to correct the number. Use 2. Press 13 or position required. 12 . 3. Press • The Charge/In use indicator (LED) 15 on the base unit flashes and the call icon appears in the display. • The number will be dialled automatically. 5 or replace the handset in the base unit or the handset 4. To finish the call, press charging unit. 4.3.3 Redialing the last number dialled 1. Press 3 . 12 . 2. Press • The number you last called will be dialled automatically. 4.3.4 Redialling one of the last 10 numbers called 1. Press 3 . • The number you have most recently called appears in first place in the display. 3 or 11 to search for the number you need. 2. Use 12 . 3. Press • The number shown in the display is dialled automatically. 5 or replace the handset in the base unit or the handset 4. To finish the call, press charging unit. 4.3.5 Calling a number from the phonebook The phone has a phonebook in which you can save numbers and names (see also section “6 The phonebook”). To call a number from the phonebook: 14 . 1. Press • The first number in the phonebook appears on the display. 15 ENGLISH Cocoon M1450 TWIN Handset - settings and operation 2. 3. • 4. 4.4 Cocoon M1450 TWIN 3 or 11 repeatedly to select the number you require. Press 12 . Press The number shown in the display is dialled automatically. To finish the call, press 8 or replace the handset in the base unit or the handset charging unit. Answering a call The handset starts to ring during an incoming external or internal call. You can switch off the ringer temporarily by pressing ‘Silent’ 14 . • All registered handsets ring when there is an incoming call. • The call symbol appears in the display. • The caller's number appears in the display if your telephone line has Caller ID (CLIP). Consult your telephone company. The name of the caller also appears on the display if: – the number is programmed into the phonebook with name. – the network transmits the name along with the phone number. 1. You have the following options for answering a call: 12 to pick up the call. – Press – Pick up the handset from the base unit or from the handset charging unit (function only possible if Auto Talk has been activated) see “4.22 Auto Talk”). icon, the caller's number or the name and call duration are • During the call, the shown in the display. 5 or replace the handset in the base unit or the handset 2. To finish the call, press charging unit. 4.5 The Calls list When you receive a call, the telephone number of the caller, the date and time appear in the handset display. The name will also be shown if it is in the phonebook. Your network provider must enable Calling Line Identification Presentation before a call can be entered in the calls list. Important The “Calling Line Identification Presentation (CLIP)” feature is only available to you if is enabled for your line. Consult your service provider for further information. The calls received are stored in a calls list (maximum of 30 numbers). When the memory is full, the new calls automatically replace the oldest calls in the log. The upper icon in the flashes if there are new missed calls in the calls list, and the number of new calls display is shown in the middle of the display next to the icon. If the calls list is empty and you press , ‘Calls List Empty’ appears. 11 4.5.1 To consult the list of calls 1. Press 11 to retrieve the most recent entry. • The phone number of the most recent caller appears. If the caller's name is entered in the phonebook, the name will be shown in the first line. If there is no entry and the calling number is not transmitted ‘Withheld’ is shown. The date and time for each call show when the call was received in the second and third line. The following information is also displayed in the third or fourth line: – ‘New’: Unread or unanswered call. 16 Handset - settings and operation – ‘Old’: Read or answered call. – ‘Repeat’: Multiple calls of the same number. Only the last call is shown. 2. Press 11 to display further entries in the list. Info 3 or 11 keys for 20 seconds If you do not press either of the the telephone will revert to standby mode. After a call, the number of the caller remains on the display for about 4 seconds after the last ring. Calling Line Identification Presentation is not available if a second call comes in while you on a call. 4.5.2 Calling a number from the Calls list 1. Press 11 to access the calls list. 3 or 11 to search for the number you need. 2. Use 12 . 3. When the number is shown in the display, press • The number will be dialled automatically. 4.5.3 Saving a number from the Calls List to the phonebook. 1. Press 11 to access the calls list. 3 or 11 to search for the number you need. 2. Use 3. Press ‘Option’ 2 . 3 or 11 repeatedly, select ‘ Save Number’. 4. Press 5. Press 2 to confirm. • ‘Name:’ appears in the display. 6. Enter the name using the alphanumeric keys. You can also edit or accept a name sent by the network. 7. Press ‘Save’ 2 . • The phone number is displayed. 8. Edit the number if necessary and press ‘Save’ 2 again. 3 or 11 repeatedly to select the desired ringer melody. 9. Press 10. Press ‘Save’ 2 to save the entry to the phonebook. • The handset returns to the Calls List. 4.5.4 Deleting numbers from the Calls List Deleting a call 1. Press 11 to access the calls list. 3 or 11 to search for the number you need. 2. Use 3. Press ‘Option’ 2 . 3 or 11 repeatedly, select ‘Delete’. 4. Press 5. Press 2 to confirm. • The call is deleted and the next call appears on the display. Delete all calls 1. Press 11 to access the calls list. 2. Press ‘Option’ 2 . 3 or 11 repeatedly, select ‘Delete All’ . 3. Press 4. Press 2 twice to confirm. 17 ENGLISH Cocoon M1450 TWIN Handset - settings and operation • All calls are deleted. Important 4.6 Cocoon M1450 TWIN Only the old calls are deleted. New calls, i.e. calls that have not been read or answered, are retained. Redialling options You have the following options when you are scrolling through the redial memory (see section “4.3.4 Redialling one of the last 10 numbers called”): 3 If the phone number you need is shown in the display, press ‘Option’ 2 and use 11 to select from the following options: or 1. ‘Save Number’: saves the number to the phonebook. Press 2 to confirm. Enter a name (see also section “6.1 Saving a new entry in the phonebook”) and press ‘Save’ 2 . Edit the phone number and press ‘Save’ 2 . Select the ringer melody you require and press ‘Save’ 2 . 2. ‘Delete’ : Deletes an entry from the redial list. Press 2 to confirm. 3. ‘Delete All’: Deletes all entries from the redial list. Press twice 2 to confirm. 4.7 Activate/deactivate handsfree mode This function allows you to make a call without having to hold the handset in your hand. 12 while you are making a call to activate handsfree mode. 1. Press 12 again to deactivate the handsfree function. 2. Press 4.8 Info If you are calling in handsfree mode and wish to change the volume 3 or 11 several times. press Important The batteries will be drained more quickly if you use the handsfree function for some time. “Out of range” warning When the handset is out of range of the base unit during communication: icon flashes in the display. • ‘Searching’ appears in the display and the 1. Move closer to the base unit. • The no longer flashes and is shown steadily. • You are back within the base unit's range. 4.9 Setting the loudspeaker volume 3 or 11 while you are making a call to set the volume of the loudspeaker. Press You can choose between 5 different settings. The default setting is level 3: Volume 1 Volume 2 Volume 3 Volume 4 Volume 5 Info 18 The volume is adjusted in the same way in handsfree mode. Cocoon M1450 TWIN Handset - settings and operation During an external call, the call duration is shown on the display: “10:40” in the display means: 10 minutes and 40 seconds. The call duration is shown in the display for a further two seconds after the end of the call. 4.11 Muting the microphone 2 display key to switch off the microphone during a call. You can now Press the talk freely without the caller on the telephone hearing you. Press ‘Off’ 2 again to switch the microphone back on. 4.12 Pause key (dial pause) Press the pause key P 8 until a P appears in the display at the appropriate point if you wish to insert a pause while you are dialling a number. When you then dial this phone number (or select it from the redial list), the dialling pause (approximately 3 seconds) is automatically dialled. 4.13 Using the alphanumeric keypad Use the alphanumeric keypad to enter text. Press the appropriate alphanumeric key to select a letter. Info The following example relates to the English character set (ABC). If, for instance, you press the ‘5’ number key, first the letter ‘J’ appears in the display. Press the key again to enter a different character from this key. Press the ‘2’ key once to select the letter ‘A’. If you wish to enter ‘A’ and then ‘B’, first press the ‘2’ key once to select ‘A’. Then wait until the display of all the letters for the key pressed (bottom left) goes out and press the ‘2’ twice to enter ‘B’. You can delete letters entered 14 . The character in front of the cursor will be deleted. incorrectly with the delete key All the characters in a string entered can be deleted if you press and hold the delete key 14 for two seconds. 4 . Use the Move the cursor using the Left/Right keys 13 or 10 to switch between upper and lower case letters. The mode is shown at the top right of the display by the letters “abc” or “ABC”. To change the character set from English (ABC) to Latin (AÀÁ), Greek (AB) or Russian (AB) press the # 7 key and hold for 2 seconds. Umlauts "Ä", "Ö" and "Ü" are found in the Latin character set. * 4.14 Setting the ringer volume on the handset You can adjust the ringer volume for an incoming call (internal or external) to one of 6 levels (level 1 to 5 and ‘Off’). If you select ‘Off’, the icon appears in the display. The handset will not ring for an incoming call. Level 5 is the highest level. (The telephone is set to level 3 by default. 4.14.1 Setting the ringer volume for internal and external calls (0-5) 2 . 1. Press 3 or 11 repeatedly, select ‘Handset’. 2. Press 3. Press 2 to confirm. 3 or 11 repeatedly, select ‘Ringer Volume’. 4. Press 5. Press 2 to confirm. 19 ENGLISH 4.10 Call duration display Handset - settings and operation Cocoon M1450 TWIN • The current volume is displayed and can be heard. 3 or 11 repeatedly to set the desired volume. 6. Press 14 to quit the menu without 7. Press ‘Save’ 2 to confirm your selection or press saving the setting. Info Press the ‘Silent’ display key to switch off the ringer on the handset during a call. To turn off the handset ringer permanently, press and hold 10 for approximately 2 seconds. The icon and the ‘Ringer Off’ message appear in the display. To reactivate the ringer, press and hold 10 again for 2 seconds. 4.15 Setting the ringer melody on the handset You can change the ringer melody for an incoming call (internal or external). The device has 18 different ringer melodies for you to choose from (1-18). The default setting for the ring tone for an external call is melody 10. The default setting for the ring tone for an internal call is melody 1. 4.15.1 Setting a ringer melody for internal and external calls (1-18) 2 . 1. Press 3 or 11 repeatedly, select ‘Handset’. • Press 2. Press 2 to confirm. 3 or 11 repeatedly, select ‘Ring Tone’. 3. Press 4. Press 2 to confirm. 5. Select ‘External’ or ‘Internal’ and press 2 . • The current melody is displayed and can be heard. 3 or 11 repeatedly, to select the desired melody. 6. Press 14 to quit the menu without 7. Press ‘Save’ 2 to confirm your selection, or press saving the setting. 4.16 Setting the key lock You can lock the keypad against unintentional entries. It is, however, still possible to pick up incoming calls even with the keypad locked. Enabling or disabling the keypad lock: 1. Enable: press 7 and hold for approximately 2 seconds. • The display shows ‘Keypad Locked’ briefly and the key lock icon appears in the display. 2. Disable: press ‘Unlock’ 14 , then 7 to unlock the keys again. • ‘Keypad Unlocked’ appears briefly in the display. 4.17 Keypad beep On/Off You can set the handset so that a beep is heard every time a key is pressed. 2 . 1. Press 3 or 11 repeatedly, select ‘Handset’. 2. Press 3. Press 2 to confirm. 3 or 11 repeatedly, select ‘Keypad Beep’. 4. Press 5. Press 2 to confirm. 6. Select 20 Handset - settings and operation – ‘On’: switches keypad beep on. – ‘Off’: switches keypad beep off. 7. Press 2 to confirm your selection or press without saving the setting. 14 to quit the menu ENGLISH Cocoon M1450 TWIN 4.18 Adjust the display contrast 1. 2. 3. 4. 5. 6. 7. 2 . Press 3 or 11 repeatedly, select ‘Handset’. Press Press 2 to confirm. 3 or 11 repeatedly, select ‘Contrast’. Press Press 2 to confirm. 3 or Select the contrast (8 contrast levels) using Press 2 to confirm your selection or press 11 . 14 to quit the menu. 4.19 Edit handset name The procedure for changing the name of your handset shown in the display in standby mode is as follows: 2 . 1. Press 3 or 11 repeatedly, select ‘Handset’. 2. Press 3. Press 2 to confirm. 3 or 11 repeatedly, select ‘Handset Name’. 4. Press 2 to confirm. 5. Press 6. Press 14 repeatedly to delete the letters one after the other and use the alphanumeric keys to enter a new name. 7. Press ‘Save’ 2 to set the new handset name. 4.20 Temporarily show or hide your telephone number When you call someone, your telephone number will be shown at your corresponded phone. When you have disabled this function permanent at your telephone provider side you can temporarily show your number: 1. 2. 3. 4. 5. Press R 4 . 3 or 11 repeatedly, select ‘Show Number’ Press Press 2 to confirm. Dial the telephone number you want to call. 12 . Press If you always show your number you can hide it temporarily: 1. 2. 3. 4. 5. Press R 4 . 3 or 11 repeatedly, select ‘Hide Number’. Press Press 2 to confirm. Dial the telephone number you want to call. 12 . Press 4.21 Direct Call By setting a Direct Call number, the phone will automatically take the line by any key press and dial out this number. This function is useful to use the phone as a emergency phone or to prevent unauthorized use. 21 Handset - settings and operation Cocoon M1450 TWIN 4.21.1 Programming the direct number 1. 2. 3. 4. 5. Press Press Press Press Press 2 3 or . 11 repeatedly, select ‘Handset’. 2 to confirm. 3 or 11 repeatedly, select ‘Direct Call’. 2 to confirm. 3 or 11 repeatedly, select ‘Edit’. 1. Press 2. Press 2 to confirm. 3. Dial the telephone number you want to dial out. 1. Press 2 to confirm. 4.21.2 Turning the Direct Call ON/OFF 1. 2. 3. 4. 5. 6. 2 . Press 3 or 11 repeatedly, select ‘Handset’. Press Press 2 to confirm. 3 or 11 repeatedly, select ‘Direct Call’. Press Press 2 to confirm. Select ‘ON’ or ‘OFF’ and press 2 . Info If you have turned on the direct call function, you can turn it of by 2 and select ‘OFF’. pressing the 4.22 Auto Talk If the handset is in the base unit and an incoming call is received, the call will be picked up automatically by picking the handset up from the base unit. You can choose whether this function should be enabled or not. 2 . 1. Press 3 11 repeatedly, select ‘Handset’. 2. Press or 3. Press 2 to confirm. 3 or 11 repeatedly, select ‘Auto Talk’. 4. Press 5. Press 2 to confirm. Select ‘On’ or ‘Off’ and press 2 to confirm.’ or 4.23 Resetting the handset settings to “Default” (Handset reset) You can reset all handset settings to the factory settings and thereby delete all the entries from the phonebook, the calls list and the redial memory. The default settings are as follows: Base Select: Auto select Key Beep: On External Melody: Melody 10 Internal Melody: Melody 1 Ringer volume: Volume 3 Earpiece Volume: Volume 3 Handsfree: Volume 3 22 Cocoon M1450 TWIN 6 24 hour Handset Empty Empty Empty Off ENGLISH LCD Contrast: Time Format: Handset Name: Phone Book: Calls list: Redial list: Auto Answer: Clock and alarm functions To restore the default settings: 1. Press the recall key R 4 and hold for approximately 10 seconds until ‘Handset Reset?’ is displayed. 14 to cancel or quit the menu without resetting. 2. Press 2 to confirm or 5 5.1 Clock and alarm functions Set the date and time Info If you have Caller ID (CLIP) on your telephone line and the provider sends date and time, your clock will be set automatically on an incoming call unless you have turned this function off (see “5.3 Auto update time”). The year is not set automatically. Once you have set the time on one handset this will be transferred to all the handsets automatically. 2 . 1. Press 3 or 11 repeatedly, select ‘Time’. 2. Press 3. Press 2 to confirm. 3 or 11 repeatedly, select ‘Date and Time’. 4. Press 5. Press 2 to confirm. 6. Enter the last two digits of the year and press ‘Save’ 2 . 7. Enter two digits for the month and press ‘Save’ 2 . 8. Enter the day and press ‘Save’ 2 . 9. Enter the hour and press ‘Save’ 2 . 10. Enter the minutes and press ‘Save’ 2 . Important 5.2 1. 2. 3. 4. 5. 6. 5.3 The date and time are lost if there is a power failure at the base unit. Select hour format 2 . Press 3 or 11 repeatedly, select ‘Time’. Press Press 2 to confirm. 3 or 11 repeatedly, select ‘Set Time Format’. Press Press 2 to confirm. Select the time format (12 hour or 24 hour display) and press 2 . Auto update time Normally the time and day/month is updated by the network. If you want to disable this function: 2 . 1. Press 23 Clock and alarm functions 2. 3. 4. 5. 6. 5.4 Cocoon M1450 TWIN 3 or 11 repeatedly, select ‘Time’. Press Press 2 to confirm. 3 or 11 repeatedly, select ‘Auto Update. Press Press 2 to confirm. Select ‘ON’ or ‘OFF’ and press 2 . Alarm function Important Set the data and time before you use this function so that the alarm goes off at the correct time. You can set different alarms for the handsets registered to the base unit. The alarm rings only on the relevant handset and not at the base unit or on any other handset. appears in the display in standby mode if an alarm has been set. The alarm icon 5.4.1 Setting an alarm 2 . 1. Press 3 or 11 repeatedly, select ‘Alarm/Clock’. 2. Press 3. Press 2 to confirm. 3 or 11 repeatedly, select ‘Set Alarm’. 4. Press 5. Press 2 to confirm. 3 or 11 repeatedly and select one of the four possible settings: ‘Once’, 6. Press ‘Every Day’, ‘Mon to Fri’ or ‘Off’. Confirm with 2 . When you select ‘Once’, ‘Every Day’ or ‘Mon to Fri’ , the display shows: Time (24hr): 07:00 7. Enter the alarm time required using four digits and press ‘Save’. 3 or 11 repeatedly and select one of the 18 possible alarm melodies and 8. Press press ‘Save’ 2 . 9. Select ‘Off’ to turn off the alarm function. Confirm with 2 . 5.4.2 Switching the alarm off 1. Switch the alarm off when it sounds by pressing ‘Stop’ 14 . 2. Press ‘Snooze’ 2 to repeat the alarm function 5 minutes later. 5.5 Appointments You can set five appointments or reminders to which you can assign a name and an alarm by date and time. 2 . 1. Press 3 or 11 to ‘Tools’ and press 2. Scroll with 2 . 3. The ‘Appointment’ menu item is already highlighted. Press 2 . 3 or 11 to one of the five appointments and press 4. Scroll with 2 . 3 or 11 and then 5. Using 2 select from the following options: – ‘Edit’ to edit the settings for the appointment. Edit the name of the appointment and press ‘Save’ 2 . Enter the date for the appointment and press ‘Save’ 2 . Enter the 3 or 11 select the alarm melody required time and press ‘Save’ 2 . Using (18 melodies) and press ‘Save’ 2 . – ‘Delete’ to delete the selected appointment. Press 2 to confirm or 14 to cancel. 24 Cocoon M1450 TWIN 6. Switch the appointment reminder off when it sounds by pressing Stop watch 1. Press 2. Scroll with 3. Scroll with 4. Press ‘Start’ 5. Press ‘Start’ Press ‘Reset’ 2 6 14 . ENGLISH 5.6 The phonebook 2 . 3 to ‘Tools’ and press 2 . 3 or 11 to ‘Stop Watch’ and press 2 . 14 to stop it. 2 , to start the stop watch and ‘Stop’ 14 again to allow the stop watch to continue to run. to reset the stop watch to 00:00. The phonebook You can store 200 numbers (up to 24 digits long) with an associated name (up to 16 characters long) in the phonebook. 6.1 1. 2. • 3. 4. 5. 6. 6.2 1. 2. • 3. 4. 6.3 Saving a new entry in the phonebook 14 . Press Press ‘Option’ 2 and confirm the ‘New Entry’ with 2 to add a new entry. ‘Name:’ appears in the display. Enter the name using the alphanumeric keys. Press ‘Save’ 2 and enter the phone number. Press ‘Save’ 2 and select the ringer melody required. 14 to cancel Press ‘Save’ 2 , to save the entry to the phonebook or press without saving the entry. Finding and calling a number from the phonebook 14 . Press Enter the initial letter of the name using the alphanumeric keys. The first name in the list with this letter appears in the display. 3 or 11 repeatedly to scroll through the other numbers in the phonebook. Press 12 . Calling a listed person: the phone number required is highlighted. Press Edit a phonebook entry 1. 2. • 3. 4. 14 . Press Enter the initial letter of the name using the alphanumeric keys. The first name in the list with this letter appears in the display. 3 or 11 repeatedly to scroll through the other numbers in the phonebook. Press Once the number you require appears in the display and is highlighted, press ‘Option’ 2 . 3 or 11 repeatedly and select ‘Edit Entry ’. 5. Press 2 to confirm. 6. Press 7. Press 14 to delete each letter individually and use the alphanumeric keys to enter the correct name. 8. Press ‘Save’ 2 . 14 to delete each individual digit and use the alphanumeric keys to enter 9. Press the correct phone number. 10. Press ‘Save’ 2 and select the ringer melody you require. 11. Press ‘Save’ 2 to save the changes entered. 25 The phonebook 6.4 Cocoon M1450 TWIN Delete an entry or all entries 14 . 1. Press 2. Enter the initial letter of the name required using the alphanumeric keys and/or scroll 3 or 11 to the entry required. using 3. Press ‘Option’ 2 . 3 or 11 to ‘Delete Entry?’ to delete the current entry only. 4. Scroll with 5. Or ‘Delete All’ to delete all entries. 6. Press 2 . 14 to cancel without deleting. 7. Press 2 again to confirm or 6.5 Display the details of phonebook entries 14 . 1. Press 2. Enter the initial letter of the name required using the alphanumeric keys and/or scroll 3 or 11 to the entry required. using 3. Press ‘Option’ 2 . 3 or 11 to ‘Show Details’ and press 4. Scroll with 2 . • The nameand phone number you have assigned to the entry appear in the display. 14 to return to the list of entries. 5. Press 6.6 Copy a phonebook entry to another handset Info The functions described below are only possible if more than one handset is registered to the base unit. 14 . 1. Press 2. Enter the initial letter of the name required using the alphanumeric keys and/or scroll 3 or 11 to the entry required. using 3. Press ‘Option’ 2 . 3 or 11 to ‘Copy Entry’ and press 4. Scroll with 2 . • All available handsets (i.e. all the handsets that are registered to the base unit and can be reached) are shown. 4 to select the handset required and press 5. Use 13 or 2 . • The display shows ‘Copying to Handset x’. • The display of the destination handset shows ‘Receive Phonebook Record?’. 14 to cancel without 6. On the destination handset, press 2 to confirm or sending the phonebook entry. 6.7 Copy all phonebook entries to another handset Important 1. 2. 3. 4. • When you copy all the entries from one handset to another, you will delete all the existing entries in the destination handset. 14 . Press Press ‘Option’ 2 . 3 or 11 to ‘Copy All’. Scroll with Press 2 . All available handsets (i.e. all the handsets that are registered to the base unit and can be reached) are shown. 4 to select the handset required and press 5. Use 13 or 2 . • The display shows ‘Copying to Handset x’. 26 Base operation • ‘Replace All Phonebook Record?’ appears in the display on the destination handset . 14 to cancel without 6. Press 2 on the destination handset to confirm or sending the phonebook entries. 6.8 Add all phonebook entries to another handset This function may be used to add the phonebook entries on one handset to the phonebook on another handset without deleting the existing entries on the destination handset. 14 . 1. Press 2. Press ‘Option’ 2 . 3 or 11 to ‘Copy Append’ . 3. Scroll with 4. Press 2 . • All available handsets (i.e. all the handsets that are registered to the base unit and can be reached) are shown. 4 to select the handset required and press 5. Use 13 or 2 . • The display shows ‘Copying to Handset x’. • ‘Receive Phonebook Record?’ appears in the display of the destination handset . 14 to cancel without 6. Press 2 on the destination handset to confirm or sending the phonebook entries. 7 7.1 Base operation Setting the ringer melody and ringer volume on the base unit 7.1.1 Setting the base unit ringer melody 2 . 1. Press 3 or 11 repeatedly, select ‘Base Settings’. 2. Press 3. Press 2 to confirm. 3 or 11 repeatedly, select ‘Ring Tone’. • Press 4. Press 2 to confirm. • The current melody is displayed and can be heard. 3 or 11 repeatedly, select the desired melody (1-9). 5. Press 14 to quit the menu. 6. Press ‘Save’ 2 to confirm your selection or press 7.1.2 Setting the base unit ringer volume 2 . 1. Press 3 or 11 repeatedly, select ‘Base Settings’. 2. Press • Press 2 to confirm. 3 or 11 repeatedly, select ‘Ringer Volume’. 3. Press 4. Press 2 to confirm. • The current volume is displayed and can be heard. 3 or 11 repeatedly, set the volume (0-5). 5. Press 14 to quit the menu. 6. Press ‘Save’ 2 to confirm your selection or press 7.2 The recall key (R) You can use the Recall key R 4 to use or activate certain services on your outside lines, such as ‘Call waiting’ (assuming that your phone provider offers this feature). The Recall key is also used for internal recall or for forwarding a call when the telephone is being used in a 27 ENGLISH Cocoon M1450 TWIN Additional handsets and base units Cocoon M1450 TWIN private exchange. The Recall key R 4 causes a brief interruption on the line. You can set this interruption to 100 ms or 300 ms 2 . 1. Press 3 or 11 repeatedly, select ‘Base Settings’. 2. Press 3. Press 2 to confirm. 3 or 11 repeatedly, select ‘Recall’. • Press 4. Press 2 to confirm. 3 or 11 repeatedly to select the desired flash time: 5. Press – ‘Long’ = 300 ms – ‘Short’ = 100 ms 14 to quit the menu. 6. Press ‘Save’ 2 to confirm or press 7.3 Changing the PIN (system PIN) Some functions are only available if you know the PIN for the base unit. The PIN has four digits. The default setting for the PIN is ‘0000’. The procedure for changing the default PIN or to enter a new PIN is as follows: 2 . 1. Press 3 or 11 repeatedly, select ‘Base Settings’. 2. Press 3. Press 2 to confirm. 3 or 11 repeatedly select ‘System PIN’. • Press 4. Press 2 and enter the old PIN. 5. Press 2 . ‘Incorrect PIN’ will appear in the display if the wrong PIN is entered. Once you have entered the correct PIN, you are prompted to enter a new PIN. Enter the new System PIN and press 2 . 6. Enter the new PIN again and press 2 to confirm. 7.4 Setting the dialling mode There are two different dialling modes that may be used in telephones. • Multifrequency dialling (DTMF) or tone dialling (current, modern dialling method) • Pulse dialling (for older equipment). Modern equipment is equipped with both functions, these can be changed depending on the application. Tone dialling is needed for programming or operating functions, for instance, if you are using the telephone on a private exchange. Where pulse dialling is used, malfunctions can occur even in normal operation on private exchanges as the system interprets the pulse dialling signals incorrectly. Changing the dialling method: 2 . 1. Press 3 or 11 repeatedly, select ‘Base Settings’. 2. Press 3. Press 2 to confirm. 3 or 11 repeatedly, select ‘Dial Mode’. 4. Press 5. Press 2 to confirm. 3 or 11 and press ‘Save’ 2 to confirm. 6. Select the dial mode required using 8 Additional handsets and base units Up to 5 handsets can be registered to one base unit. Each handset can, for its part, be registered to up to four base units and the user can choose which base unit he wishes to use. In the default setting as supplied, each handset is registered as Handset 1 to Base unit 1. 28 Cocoon M1450 TWIN Registering an additional handset Info Important This is only required if you have deregistered a handset or have bought a new handset. It is not possible to make or receive calls while the base unit is in registration mode. ENGLISH 8.1 Additional handsets and base units 1. The base unit has to be restarted. Unplug the base unit power supply unit and plug it back in again. The Charge/In use indicator 15 starts flashing rapidly. Registration mode on the base unit is now activated for approximately 3 minutes. You must work through the following steps to register a handset: 2 . 2. Press 3 or 11 repeatedly, select ‘Handset’. 3. Press 4. Press 2 to confirm. 3 or 11 repeatedly, select ‘Registration’. 5. Press 6. Press 2 to confirm. 7. Select ‘Register’ and press 2 . 3 or 8. Select the base unit (1-4) desired using 2 . 11 and press 9. Enter the base unit PIN (System PIN; default: 0000) and press 2 . • “Restart Base” appears in the display. • The handset will now search for the base unit and register when it has found it. The display shows standby mode after a successful registration and the handset name and handset number appear. Info 8.2 You can register each handset to up to 4 different DECT base units. The base units are numbered 1 to 4 within a handset. When you register a new handset you will be able to assign it to a base unit. Deregistering a handset It is possible to deregister a handset from a base unit. For example, you should do this if a handset is damaged and has to be replaced by a new one. Important 1. 2. 3. 4. 5. 6. 7. 8. 9. 8.3 You can only deregister another handset, i.e. you cannot deregister the handset you are using for deregistration. 2 . Press 3 or 11 repeatedly, select ‘Handset’. Press Press 2 to confirm. 3 or 11 repeatedly, select ‘Registration’. Press Press 2 to confirm. Select ‘De-register’ and press 2 . Enter the System PIN (base unit PIN) and press 2 . Select the handset you wish to deregister using the number keys (1-5). Press 2 to deregister. Selecting a base unit If your handset is registered to several base units (maximum of 4), you must select one of these base units because the handset only communicates with one base unit at a time. There are two options: 29 Additional handsets and base units Cocoon M1450 TWIN 8.3.1 Automatic selection If you set the handset to automatic selection, the handset will automatically choose the closest base unit in standby mode: 2 . 1. Press 3 or 11 repeatedly, select ‘Handset’. 2. Press 3. Press 2 to confirm. 3 or 11 repeatedly, select ‘Select Base’. • Press 4. Press 2 to confirm. 5. Select ‘Auto’ and press 2 to confirm. Info When you have activated Automatic base selection and the handset is out of range on the current base, the handset will only search for the strongest base in standby (not during communication). 8.3.2 Manual selection If you set the handset to 'manual selection', the handset will only search for the base unit you have set. 2 . 1. Press 3 or 11 repeatedly, select ‘Handset’. 2. Press 3. Press 2 to confirm. 3 11 repeatedly, select ‘Select Base’ . 4. Press or 5. Press 2 to confirm. 6. Select ‘Manual’ and press 2 to confirm. 3 or 11 and press 7. Select the base unit using 2 to confirm. Important 8.4 The handset must be registered to a base unit before you can select that base unit. Using multiple handsets Info The functions described below are only possible if more than one handset is registered to the base unit. 8.4.1 Calling another handset 1. Press INT 13 . • ‘Internal’ appears in the display. 2. Select the number of the handset (keys 1-5) you wish to call. 3. When you have completed your call, press 8 to hang up. 8.4.2 Accepting an internal call • The internal call icon and the number of the calling handset appear in the display. 12 to pick up the internal call. 1. Press OR 1. Lift the handset off its base (as long as the Auto Talk option is enabled, see section “4.22 Auto Talk”) icon will appear in the display • The handset number of the calling handset and the during the call. 2. When you have completed your call, press 8 to hang up. 30 Answering machine 8.4.3 Receiving an external call during an internal call When you receive an external call during an internal call, you will hear the call waiting tone (double beep) in both of the handsets participating in the internal call. 1. Press 8 . • The internal communication is ended. 12 . 2. Press • You are now in communication with the outside caller. 8.4.4 Transferring a call to another handset • You have an external caller on the line. 1. Press INT 13 . • ‘Internal’ appears in the display. 2. Dial the number of the handset to which you would like to transfer the call. EITHER • The handset dialled answers, you can then have an internal conversation. 3. Press 8 to connect the external caller to the handset you have called. OR • The internal subscriber does not answer. 4. Press ‘End’ 2 to return to the external caller or to swap from one call to the other. 8.4.5 Conference call (two internal handsets and one external caller) You can have a telephone conversation with one internal and one external caller at the same time. 1. Press INT 13 , while you are talking to an external caller. • The outside line is put on hold. 2. Dial the number of the handset you would like to include in the call. You can switch back and forth between the internal line and the external line by pressing INT 13 . 3. When the dialled handset picks up, press ‘Conf.’ 2 . • You are now connected to an external and an internal caller and you can talk to them both at the same time (conference call). 8.5 Voice mail indicator This indicator only works if you have enabled a voicemail or telephone messaging service and your network provider sends this information together with Calling Line Identification Presentation. icon appears in the display if you have a new message in your voicemail box. The icon disappears once you have listened to your message. The 9 Answering machine The Cocoon M1450 has an integrated digital answering machine with a recording capacity of approximately 20 minutes. This recording capacity is reduced by the duration of the outgoing messages you record. The answering machine can be operated remotely and you are able to record two outgoing messages (OGM 1 and OGM 2, maximum length 2 minutes each). The outgoing messages' functions differ as follows: • With OGM 1, the caller can leave a message. • With OGM 2, only the outgoing message is played, without leaving the caller the opportunity to leave a message. The maximum recording time for each incoming message is 3 minutes. 31 ENGLISH Cocoon M1450 TWIN Answering machine Cocoon M1450 TWIN An internal voice will add further information, such as day and time of the call. Info 9.1 Messages are played in handsfree mode. Press the pickup call 12 key to swap between handset and handsfree. Answering machine status The display on the handset will indicate how many messages you have received. The icon appears when it is icon is displayed if the answering machine is switched off. The switched on. ‘Memory Full’ will be shown on the display when the internal memory is full and no new messages can be recorded. The display backlighting will indicate by flashing that no new messages can be saved to the answering machine. 9.2 Outgoing messages You can record two outgoing messages of two minutes each. • Outgoing message 1 (OGM1) is linked with the answering machine function and also offers callers the opportunity to leave a message. • Outgoing message 2 (OGM2) is also linked with the answering machine function, although callers do not have the opportunity to leave messages. 9.2.1 Recording outgoing messages (OGM1 or OGM2) Info A message has been stored for outgoing message 1 in the factory, but you can replace it with your own message. 2 . Press 3 or 11 repeatedly, select ‘Ans machine’. Press Press 2 to confirm. 3 or 11 repeatedly, select ‘Outgoing Msg.’. Press Press 2 to confirm. 3 or 11 repeatedly, select ‘Record Message’. Press Press 2 to confirm. Select ‘Answer & Record’ for outgoing message 1 or ‘Answer Only’ for outgoing message 2. 9. Press 2 to confirm. 10. Start speaking after the beep and press ‘Save’ 2 to confirm. The message will be played back. 1. 2. 3. 4. 5. 6. 7. 8. 9.2.2 Play back or delete outgoing messages 2 . 1. Press 3 or 11 repeatedly, select ‘Ans Machine’. 2. Press 3. Press 2 to confirm. 3 or 11 repeatedly, select ‘Outgoing Msg.’. 4. Press 5. Press 2 to confirm. 3 11 repeatedly, select ‘Play Msgs’. or 6. Press 7. Press 2 to confirm. 8. Select ‘Answer & Record’ for outgoing message 1 or ‘Answer Only’ for outgoing message 2. 9. Press 2 to confirm. The message will be played back. 32 Cocoon M1450 TWIN Answering machine 9.2.3 Selecting outgoing message for answering machine operation 2 . 1. Press 3 or 11 repeatedly, select ‘Ans Machine’. 2. Press 3. Press 2 to confirm. 3 or 11 repeatedly, select ‘Ans Settings’. 4. Press 5. Press 2 to confirm. 3 or 11 repeatedly, select ‘Answer Mode’. 6. Press 7. Press 2 to confirm. 8. Select ‘Answer & Record’ for outgoing message 1 or ‘Answer Only’ for outgoing message 2. 9. Press 2 to confirm. If the memory is full, only outgoing message 2 will be played (answering machine only, without the opportunity to record a caller's Important message). When a call is received and if the answering machine is switched on, the answering machine picks up the call automatically after the preselected number of rings in the operating mode selected (see above, outgoing message 1 or 2). If • outgoing message 1 has been selected, a beep is heard after the outgoing message and the caller is able to leave a message (maximum 3 minutes). • outgoing message 2 has been selected, it is played. After the beep, the line will automatically be disconnected. The caller does not have the opportunity to leave a message. Info 9.3 If nothing is said in the +/-7 seconds after the call is picked up, the line is automatically disconnected. Switching the answering machine on/off The icon is displayed if the answering machine is switched off. If the answering machine icon is displayed and the answering machine picks up the call after is switched on, the a specified number of rings (see “9.5 Setting the number of rings”). 2 . 1. Press 3 or 11 repeatedly, select ‘Ans Machine’. 2. Press 3. Press 2 to confirm. 3 or 11 repeatedly, select ‘Ans On/Off’. 4. Press 5. Press 2 to confirm. 3 or 11 repeatedly, select ‘ON’ or ‘OFF’. 6. Press 7. Press 2 to confirm. Info Even if the answering machine is off, the machine will automatically pick up calls after 10 rings to allow remote activation (see “9.12 Operating the answering machine remotely”). Info Press and hold numeric key ‘1’ to switch the answering machine on or off quickly. 33 ENGLISH 10. Press ’Delete’ to delete or ‘Stop’ to interrupt. Answering machine 9.4 Cocoon M1450 TWIN Call Screening During the outgoing message playback or incoming message recording, you can hear the 12 . The display will show “Call other side of the line by pressing the off-hook key 2 to stop the answering machine and Screening” and you can press the right-soft key to talk to the caller 9.5 Setting the number of rings The number of rings after which the answering machine picks up calls can be set between 2 and 9 and ‘Toll Saver’. The default setting is 5 rings. ‘Toll Saver’: In Toll saver mode, the machine will answer after 5 rings if there are no new messages, and after 2 rings if there are new messages. If you call your answering machine with the remote operation function and the ‘Toll Saver’ function to listen to your new messages (see “9.12 Operating the answering machine remotely”), you can therefore hang up after 3 rings. You do not need to pay for the call and you know that you don’t have any new messages. Tip 1. 2. 3. 4. 5. 6. 7. 8. 9. 9.6 1. 2. 3. 4. 5. 6. 7. 8. 9. 9.7 2 . Press 3 or 11 repeatedly, select ‘Ans machine’. Press Press 2 to confirm. 3 or 11 repeatedly, select ‘Ans Settings’. Press Press 2 to confirm. 3 or 11 repeatedly, select ‘Answer Delay’. Press Press 2 to confirm. Select the number of rings (2-9 or ‘Toll Saver’). Press 2 to confirm your selection or press 14 to quit the menu. Setting the answering machine language Press Press Press Press Press Press Press Press Press 2 . 3 or 11 repeatedly, select ‘Ans machine’. 2 to confirm. 3 or 11 repeatedly, select ‘Ans. Settings’ . 2 to confirm. 3 or 11 repeatedly, select ‘Language’. 2 to confirm. 3 or 11 repeatedly to select the language required. 14 to quit the menu. 2 to confirm your selection or press Programming the VIP code The VIP code is a 3-digit code used to operate the machine remotely (see “9.12 Operating the answering machine remotely”). The VIP code is set to ‘321’ by default. 9.7.1 Changing the VIP code 2 . 1. Press 3 or 11 repeatedly, select ‘Ans machine’. 2. Press 3. Press 2 to confirm. 3 or 11 repeatedly, select ‘Ans Settings’. 4. Press 5. Press 2 to confirm. 34 Answering machine 3 or 11 repeatedly, select ‘Security Code’. 6. Press 7. Press 2 to confirm. ‘Old PIN:’ is displayed. Enter the old VIP code. 8. Press 2 . You are prompted to enter a new VIP code. Enter the new VIP code and press 2 . 9. Enter the new VIP code again and press 2 to confirm. Info 9.8 If you do not press any keys for 20 seconds, the previous VIP code remains stored and the telephone automatically exits the VIP setting mode. Recording a memo You can record memos on the Cocoon M1450. These memos are treated as incoming messages that can be listened to later by the user. The maximum recording time for a memo is 3 minutes. 2 . 1. Press 3 or 11 repeatedly, select ‘Ans machine’. 2. Press 3. Press 2 to confirm. 3 or 11 repeatedly, select ‘Record Memo’. 4. Press 5. Press 2 to confirm. 6. Speak after the beep and press ‘Save’ 2 to end recording. 9.9 Playback incoming messages and memos When there are new messages you can playback all new messages by using 14 key. the Alternatively, you can play back the messages via the menu: 2 . 1. Press 3 or 11 repeatedly, select ‘Ans machine’. 2. Press 3. Press 2 to confirm. 3 or 11 repeatedly, select ‘Play Msgs’. 4. Press 5. Press 2 to confirm. 3 or 11 repeatedly, select ‘Play new Msgs’ to play the new message or 6. Press ‘Play All Msgs’ for both old and new messages. 7. Press 2 to play the messages and memos. • The messages are played one at a time. If there are new messages that have not yet been listened to, only these messages are played. 8. During playback you can: once. – go to the beginning of the current message by pressing – go to the previous message by pressing twice. – cancel playback by pressing . – interrupt playback by pressing . Press again to restart playback. – go to the next message by pressing . 9.10 Delete messages 9.10.1 Deleting messages one at a time during playback Start message playback as explained above. Press ‘Delete’ 14 when the message you wish to delete begins. 9.10.2 Delete all old messages You can also delete all the messages you have listened to at once. This erases only the 35 ENGLISH Cocoon M1450 TWIN Answering machine Cocoon M1450 TWIN messages that have already been heard. New messages are not erased. 2 . 1. Press 3 or 11 repeatedly, select ‘Ans machine’. 2. Press 3. Press 2 to confirm. 3 or 11 repeatedly, select ‘Delete Msgs’. 4. Press 5. Press 2 to confirm. 14 to quit the menu. 6. Press 2 to confirm your selection or press 9.11 Clear full memory When the memory is full ‘Memory Full’ appears in the display. If the answering machine is switched on and a call is received, the machine will automatically play OGM 2 (answering machine function without recording a caller message). 1. Erase all the messages after listening to them. • The memory is free again. 9.12 Operating the answering machine remotely The answering machine can only be operated remotely using a touch-tone telephone (DTMF). 1. Call your machine. • The answering machine picks up the call, you hear the outgoing message and a beep. 2. Key ‘*’ twice. • You hear a voice asking you to enter the VIP code. 3. Key in the VIP code slowly (default: 321). • You will hear a short beep as confirmation. 4. Enter the codes below to use the function you require: a) Listening to messages ß Press ‘2’ (listen to messages). The answering machine will play the messages. You can choose from the following options by pressing a key during playback: ß key ‘2’ to stop playback. ß key ‘2’ again to continue playback. ß key ‘3’ to jump to the next message. ß key ‘1’ to jump back to the previous message. ß key ‘6’ to quit playback. ß key ‘7’ to delete the current message. b) Delete all old messages Press ‘0’ to delete all messages. c) Playing outgoing message Press ‘4’ to play the current outgoing message. Info Use the ’9’ key to change between the outgoing messages (outgoing message 1 or 2). d) Recording a new outgoing message 1. Press ‘9’ to select outgoing message 1 or outgoing message 2. 2. Press ‘5’ to start recording. 36 Cocoon M1450 TWIN Abbreviations and terminology Info ENGLISH • A beep confirms that recording has started. 3. Speak your outgoing message. 4. Press ‘6’ to finish recording. The recording will be ended automatically after 2 minutes. e) Recording a memo 1. Press ‘#’ to start recording. • A beep confirms that recording has started. 2. Speak your memo message. 3. Press ‘6’ to finish recording. Info The recording will be ended automatically after 3 minutes. f) Switching the answering machine on/off You can switch the answering machine on or off remotely. 1. Call your machine. • The answering machine picks up the call, you hear the outgoing message and a beep. 2. Key ‘*’ twice. • You hear a voice asking you to enter the VIP code. 3. Key in the VIP code slowly (default: 321). 4. You will hear a short beep as confirmation 5. You can now choose from the following options by pressing a key: – Key ‘9’ to switch the answering machine on. – Key ‘8’ to switch the answering machine off. g) Ending remote control When you wish to end remote operation: Press the ‘6’ key after playback has ended Info If you do not press any key for 10 seconds, the connection is dropped automatically and you will hear the engaged signal. 10 Abbreviations and terminology CLIP Calling Line Identification Presentation; transmission of the caller's number and display in the in the called party's display. DECT Digital Enhanced Cordless Telecommunication; European telecommunications standard for digital cordless telephones. ECO Mode Economy Mode; in DECT telephony this refers to low radiation operation. Recall key Interrupts the line briefly to activate features such as call holding or forwarding. In private exchanges, the Recall key is used for internal consultation. 37 Troubleshooting Cocoon M1450 TWIN GAP Generic Access Profile; interface between base unit and handset allowing wireless connection. GFSK Gaussian Frequency Shift Keying; digital modulation technique to reduce crosstalk problems in telephony. INT Internal party; additional handset or extension in a private exchange. LD Pulse dialling; old, analogue dialling method (clattering dialling noises). LCD Liquid Crystal Display. LED Light Emitting Diode DTMF Dual tone multifrequency dialling method; modern, digital dialling method OGM Outgoing Message; term for announcements from an answering machine. PIN Personal Identification Number. R key Recall key Standby When a device is “idle”, without being completely switched off. VIP Very Important Person; function reserved exclusively to authorized users, e.g. by password protection. Dialling pause You need a dialling pause, for example, when using your telephone on a private exchange if the system does not correctly recognised that your telephone has sent the exchange identification code (e.g. “0”). In this case, you need to insert a dialling pause after entering the exchange identification code. 11 Troubleshooting Warning 38 Risk of injury or death due to electrical current! In the event of danger, disconnect the device from the 230 V mains Cocoon M1450 TWIN Troubleshooting Possible cause Display remains dark. Batteries inserted incorrectly. Check the position of the batteries (see “2 Installation”). No tone. The icon is flashing. Solution ENGLISH Symptom Batteries not charged. Charge batteries Handset switched off. Switch on the handset No power supply. Check that power is getting to the unit correctly. Telephone cable incorrectly connected or faulty. Check the connection of the telephone cable (see “2 Installation”). Another handset is using the line. Wait until the other handset hangs up. Handset out of range. Take the handset closer to the base unit. The base has no power supply. Check the power supply to the base unit. The handset is not registered Register the handset to the to the base. base unit (see “8.1 Registering an additional handset”). Base unit or handset not ringing. The ringer volume is off or too low. Adjust the ringer volume (see “4.14 Setting the ringer volume on the handset” and “7.1 Setting the ringer melody and ringer volume on the base unit”). No connection despite good tone quality. The dialling mode is wrong. Check the dialling mode (see “7.4 Setting the dialling mode”). Not possible to forward calls The flash time is too short. in a private exchange. Adjust the telephone to a long flash time (see “7.2 The recall key (R)”). Telephone does not react when a key is pressed. Remove the batteries, wait 1 minute and reinsert them. Program error. "Incorrect PIN" in the display. An incorrect PIN has been entered. Check PIN. Two warning beeps from the The maximum number of base unit when it is plugged handsets has already been registered. No more into the 230V mains. handsets can be registered. See “8.2 Deregistering a handset” 39 Servicing Cocoon M1450 TWIN Do not carry out any modifications or repairs to the unit yourself. Only have the equipment or the mains cable repaired by a specialist service centre. Unsatisfactory repairs can pose considerable risk to the user. 12 Servicing 12.1 Maintenance The device is maintenance-free. Check the condition of the batteries from time to time and replace them with equivalent new rechargeable batteries if their performance is beginning to wane or they are beginning to leak. Risk of burns! Warning Wear protective gloves when removing leaking batteries. If the unit has come into contact with liquids, remove the batteries immediately and disconnect the unit from the power supply (base unit) and dry it carefully. Check its operation after 2-3 days. Send it into the service centre if it is defective. 12.2 Cleaning Electrical hazards: Warning Risk of electrocution or short circuit from contact with electrically conductive components! Do not allow liquids to get into the equipment. Should this happen, immediately pull the power supply plug from the socket and the telephone cable plug from the socket in the wall or remove the batteries. Similarly on damage to the unit, the cable or to the power supply unit: Avoid direct contact with liquids and disconnect the unit from the 230V mains immediately. Clean the telephone with a cloth moistened with lukewarm water or an antistatic cloth. Never use cleaning agents or abrasive solvents. 12.3 Decommissioning, storage If you will not be using the unit temporarily, unplug the telephone cable from the wall socket and from the telephone socket in the base unit. Unplug the power supply plugs for the base unit and the handsets from the 230 V sockets. Remove the batteries from the handsets. If the unit has not been used for some time, replace the rechargeable batteries with equivalent new batteries when bringing the unit back into use. Store the devices and the batteries in a dry place that is not too warm. 12.4 Disposal (environmental protection) The unit and the rechargeable batteries must not be disposed of in normal household refuse at the end of its service life. This is indicated by this symbol on the product and/or on the packaging. Take the device to a collection point for recycling electrical and electronic devices. Some of the materials in the product can be recycled there. You can help the environment by recycling some parts or raw materials from used products. Also dispose of packaging materials in an environmentally 40 Cocoon M1450 TWIN Technical characteristics ENGLISH friendly way. Please contact your local authorities if you need more information about collection points in your area. 13 Technical characteristics Telephony standards: Frequency range: Number of channels: Modulation: Speech coding: Emission power: Range: Power supply to base unit: Handset, batteries: Handset battery life: Talk time: Charging time: Dialling options: Flash time: Temperature range (operation): Temperature range (storage): Relative air humidity (operation): Dimensions: (height x width x depth) Weight: Standby power consumption: DECT / GAP 1880 MHz to 1900 MHz 120 duplex channels GFSK 32 kbit/s 10 mW (average power per channel ) up to 300 m outdoors maximum of 50 m in buildings Input: 100-240V~ 50/60Hz 0.15A /500 mA Output: 6 V 2 AAA (NiMH) batteries, 1.2 V/500 mAh 100 hours in standby mode 10 hours 16 hours DTMF (dual-tone multifrequency method) LD (loop disconnect, pulse dialling) 100 ms or 300 ms +5 °C to +45 °C 0 °C to 60 °C Maximum 70 % (non-condensing) Handset: 161 mm x 46 mm x 22 mm Base unit: 75 mm x 105 mm x 85 mm Charger: 53 mm x 75 mm x 60 mm Handset including 2 batteries: 107 g Base unit including power supply plug: 173 g Charger including power supply plug: 101 g Base unit with handset: approximately 1.4 W Charger unit with handset: approximately 0.8 W 41 Warranty Cocoon M1450 TWIN 14 Warranty 14.1 Warranty period The devices have a 36-month warranty. The warranty period starts on the day the new unit is acquired. Warranty does not cover standard or rechargeable batteries (AA/AAA type). Parts hat are subject to wear or defects causing a negligible effect on operation or value of the equipment are not covered. A claim under warranty shall be backed up by submission of the original proof of purchase or a copy which shows the date of purchase and the model of the equipment. 14.2 Warranty claim processing Send the faulty unit to an authorized service centre, in the original packaging where possible, including a valid receipt. If the unit develops a fault during the warranty period, the authorized service centre will repair any defects caused by material or manufacturing faults free of charge, by either repairing or exchanging the faulty unit or parts of the faulty unit. In the event of replacement, colour and model may differ from the original purchased unit. The original date of purchase determines the start of the warranty period. The warranty period is not extended if the unit is exchanged or repaired by the appointed service centres. 14.3 Warranty exclusions Damage or defects caused by incorrect handling or use and defects caused by the use of non-original parts or accessories, are not covered by the warranty. The warranty does not cover damage caused by external factors, such as lightning strike, water and fire, nor any damage caused during transportation. No warranty can be claimed if the serial number on the unit has been changed, removed or rendered illegal. Any warranty claims will be invalid if the unit has been repaired, altered or modified by the buyer. This product works with rechargeable batteries only. If you want to replace the batteries originally supplied, please check whether the batteries you are using are suitable and rechargeable. Disposable batteries may under NO circumstances be used in the handsets. If you use disposable batteries and place the handset on the base unit, the batteries will heat up and may explode. Any damage caused by the use of disposable batteries cannot be recovered from the manufacturer and the damage thus caused to the appliance is not covered by the warranty conditions. Any repairs will be charged to you. 14.4 Service address and hotline See the Service address and support numbers sheet or visit www.ucom.be. 15 Declaration of conformity and manufacturer Topcom Europe Nv. Grauwmeer 17 3001 Heverlee Belgium 42 ENGLISH Cocoon M1450 TWIN 43 Cocoon M1450 TWIN visit our website www.ucom.be MD2500377