1
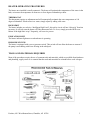
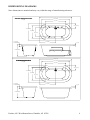
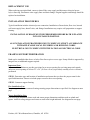
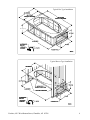
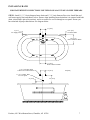
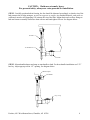
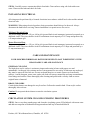
CALLA II SERIES
WHIRLPOOL AND BATH
Operating and Installation Instructions
For Calla II Whirlpool and Bath
INTRODUCTION
Thank you for selecting our Porcher product. To ensure that your installation proceeds smoothly, read
these instructions carefully before you begin. Also, review the recommended tools and materials section.
Carefully unpack and examine your new plumbing fixture.
Porcher, 6615 West Boston Street, Chandler, AZ 85226
1
IMPORTANT SAFETY PRECAUTIONS
NO UNATTENDED CHILDREN
To reduce the risk of injury, do not permit children to use the bath unless they are closely supervised at all
times.
NO SMALL OBJECTS
Keep small objects away from the whirlpool. Never drop or insert any object into any opening. Objects
may be drawn into the circulation system and cause system to malfunction. Do not operate this bath
without the guard over the suction fitting. Do not use attachments not recommended by the manufacturer.
NO SOAP OR OILS
Do not operate the whirlpool circulation system when using soap, bath oil, or bubble bath, or if such
substances are in solution in the bathwater. If introduced into the circulation system the substances are
likely to cause excessive foaming. Bathe with soap or oil only when whirlpool circulation system is OFF.
Drain whirlpool after each use.
NO FOOD OR ALCOHOLIC BEVERAGES
Avoid using whirlpool immediately after meals. Avoid alcohol consumption before bathing. Alcoholic
beverages can cause drowsiness resulting in loss of consciousness or even drowning. The same
precautions apply to certain medications.
PREGNANCY
Consult your physician before using to obtain advice on water temperature and immersion time.
WHIRLPOOL OPERATING PROCEDURES
AIR SWITCH
The air switch push button is mounted on the deck of the tub. To start whirlpool push on center of button,
button will depress and whirlpool will start. To stop whirlpool depress button again and release and
whirlpool will stop.
Important Note:
Always fill the whirlpool before operating the pump. “Dry running” the system will cause pump damage
and void the pump warranty. Water level must be at least one inch (25mm) above all inlet jets.
AIR VOLUME CONTROL
Water turbulence is determined by the amount of air mixed with the water. Rotate the air volume control
counterclockwise for more turbulence, clockwise for less.
JET ADJUSTMENTS
The direction of water flow can be adjusted manually by moving the jet to the desired position. The
amount of water flow may be adjusted from vigorous to soft by rotating the nozzle. Rotate nozzle
clockwise for vigorous flow and counterclockwise for soft flow. You may need to balance the air volume
control and the water flow for the most desirable condition
Porcher, 6615 West Boston Street, Chandler, AZ 85226
2
HEATER OPERATING PROCEDURES
The heater once installed is totally automatic. The heater will maintain the temperature of the water in the
bath, or increase the temperature at about two to four degrees Fahrenheit per hour.
THERMOSTAT
The thermostat requires no adjustment and will automatically maintain the water temperature at 104
degrees Fahrenheit. If bath water is to warm, simply adjust by adding cold water.
HIGH LIMIT
The heater includes an exclusive “Intelligent High Limit”; this safety circuit will not “false-trip” from hot
tap water. It will only turn the heater off if the thermostat fails. To re-set, simply press the RED re-set
button. If the high-limit “trips” frequently, call a service person.
INDICATOR LIGHT
The heater indicator light turns on when heater is operating.
PRESSURE SWITCH
The heater is equipped with a pre-set pressure switch. This switch will not allow the heater to turn on if
the pump is not running with water flowing in the whirlpool.
TOOLS AND MATERIALS REQUIRED
Most of the procedures require the use of common tools and materials, which are available from hardware
and plumbing, supply stores. It is essential that the tools and materials be on hand before work is begun.
Porcher, 6615 West Boston Street, Chandler, AZ 85226
3
DIMENSIONING DIAGRAMS
Note: dimensions are nominal and may vary within the range of manufacturing tolerances.
70" [177.8]
60" [152.4]
IN [CM]
39" [99.1]
9 3/4" [24.8]
34 3/4" [88.3]
26" [66.0]
18" [45.7]
35" [88.9]
4 1/4" [10.8]
C/L Overflow
2" [5.1]
24 1/2" [62.2]
70" [177.8]
60" [152.4]
IN [CM]
39" [99.1]
9 3/4" [24.8]
34 3/4" [88.3]
26" [66.0]
18" [45.7]
4 1/4" [10.8]
C/L Overflow
35" [88.9]
2" [5.1]
24 1/2" [62.2]
Porcher, 6615 West Boston Street, Chandler, AZ 85226
4
REPLACEMENT USE
When replacing an original bath, ensure to shut off the water supply and disconnect electrical power
before removing. Disconnect water supply lines and drain fittings. Original supplies and fittings should be
replaced on installation.
INSTALLATION PROCEDURES
Typical installation includes electrical power connection. Installation of house drain, floor riser, hot and
cold water supply lines, shutoff vales, and fittings. Installations may require wall preparation or support
framing.
INSTALLATION OF DRAIN MUST BE PERFORMED BEFORE BATH IS PLACED
INTO INSTALLED POSITION.
ALL INSTALLATION PROCEDURES MUST COMPLY IN STRICT ACCORDANCE
WITH APPLICABLE LOCAL PLUMBING AND BUILDING CODES
ELECTRICAL MUST COMPLY WITH THE NATIONAL ELECTRICAL CODE
FRAMING SUPPORT PREPERATION
Baths can be installed either above or below floor line as pier or recess type. Sump of bath is supported by
integral feet, no additional support required.
Important Note:
Ensure in all installations to provide provisions for an access opening for servicing pump and controls
unless an access opening of at least 12” x 24” (30.5cm x 61cm) is provided, warranty service will not be
performed.
STEP 1. Determine type and location of installation and ensure that you have the proper room for the
specified dimensions. Ensure to include proper room for the access opening.
STEP 2. Construct support framing.
Pier Installation Note
For pier type installation construct framing ensuring proper dimensions as specified. See diagram on next
page.
Recess Installation Note
For recess type installation locate studs and ensure proper dimensions and that studs are plumb and
square. Attach leveling stringers and cutout to studs at the height indicated. See diagram on next page.
Porcher, 6615 West Boston Street, Chandler, AZ 85226
5
Typical Pier Type Installation
22 1/2" [57.2]
Typical Recess Type Installation
Porcher, 6615 West Boston Street, Chandler, AZ 85226
6
INSTALLING BATH
FOR WATERTIGHT CONNECTIONS USE TEFLON SEALANT TAPE ON PIPE THREADS
STEP 1. Install 1 ½” (3.8cm) diameter house drain and ½” (1.3cm) diameter floor riser. Install hot and
cold water supply lines and shutoff valves. Ensure when installing house drain that it is centered with bath
drain, (when bath is placed in position), and is accessible for service through access panel. Ensure you
have matched all proper dimensions. See diagram below.
8" [20.3]
1" [2.5]
C/L Supply Lines
1 3/4" [4.4]
C/L Drain Outlet
14" [35.6]
Floor Cutout For Drain
9" [22.9]
Floor Cutout For Drain
1 3/4" [4.4] DIA. Holes
2 Places For Control Valves
8" [20.3]
IN [CM]
1 1/4" [3.2] DIA. Hole
For 1/2" Spout
4" [10.2]
Porcher, 6615 West Boston Street, Chandler, AZ 85226
12" [30.5]
7
CAUTION: Baths are extremely heavy.
For personal safety, always use extra personal for installation.
STEP 2. Carefully position bath in framing, the feet should be shimmed accordingly, so that he rim of the
bath contacts the leveling stringers, or pier, but supports no weight. Any finished material, such as tile or
wallboard, must be self-supporting if it contacts the rim of the bath. Mount drain and overflow fittings to
bath and connect assembly and house drain with tee and hand tighten EZ-nut. See diagram below.
Overflow
Tee With EZ-nut
Drain
STEP 3. Mount handle adapter and snap on turn handle to bath. For brass handle installation use 5/32”
hex key. Adjust pop-up to min. 1/2” opening. See diagram below.
Handle Adaptor
Turn Handle
1/2" [1.3cm]
Porcher, 6615 West Boston Street, Chandler, AZ 85226
8
STEP 4. Carefully remove construction debris from bath. Clean surfaces using soft cloth with warm
water. Water-test the bath and check for leaks.
INSTALLING ELECTRICAL
All wiring must be performed by a licensed electrician in accordance with all local codes and the national
electrical code.
WARNING- When using electrical products, basic precautions should always be observed. Always
disconnect the bath before servicing. Ensure installation is to permit access for service.
Whirlpool Electrical Note
The power supply shall be a 120 vac, 60 hz gfci (ground-fault circuit interrupter) protected receptacle on a
dedicated circuit. The wires shall be sized for a minimum circuit ampacity of 19.5 amps and protected by
a 20 amp maximum gfci.
Heater Electrical Note
The power supply shall be a 120 vac, 60 hz gfci (ground-fault circuit interrupter) protected receptacle on a
dedicated circuit. The wires shall be sized for a minimum circuit ampacity of 15 amps and protected by a
15 amp maximum gfci.
CARE AND MAINTENANCE
YOUR PORCHER WHIRLPOOL BATH IS DESIGNED TO LAST INDEFINITELY WITH
REASONABLE CARE AND MAINTANCE
GENERAL CLEANING
The high-gloss acrylic surface is resistant to impact and retains its luster with proper care and
maintenance. An integral, slip-resistant surface is incorporated for user safety. It bath mats are employed,
they must be removed after each use. Do not use harsh abrasives or caustic cleaners to clean fixture
surfaces. A mild detergent, warm water, and a soft cloth will remove normal dirt and soap accumulations
from fittings and surfaces. Rinse thoroughly after cleaning and polish with a soft dry cloth to restore
original luster of material.
DRAIN CLEANERS
Caustic drain cleaners can damage the acrylic surface if allowed to stand in bath. Clean acrylic surface
thoroughly after each use.
Caution: Do not permit drain cleaner to enter the circulation system.
CIRCULATION SYSTEM CLEANING-PURGING PROCEDURES
STEP 1. Once every three months purge and clean the circulating system. Fill whirlpool with warm water
and add two teaspoons of dishwasher detergent and one-half cup of household bleach
Porcher, 6615 West Boston Street, Chandler, AZ 85226
9
STEP 2. Activate whirlpool system in accordance with operating instructions for two minutes.
STEP 3. Drain and refill whirlpool with cool water and circulate for additional five minutes.
STEP 4. Drain whirlpool completely.
FIXTURE LIMITED WARRANTY
If inspection of this Porcher plumbing product, within one year after its initial purchase, confirms that it is
defective in materials or workmanship, Porcher will repair or, at its option, exchange the product for a
similar model. This warranty applies to the original customer only and does not cover and gold platinum
or custom hand painting. The re-firing of any china product by purchaser will null and void this warranty.
This limited warranty does not apply to local building code compliance. Since local building codes vary
considerably, the purchaser of this product should check with a local building or plumbing contractor to
insure local code compliance before installation.
This warranty shall be void if the product has been moved from its initial place of installation; if it has
been subjected to faulty maintenance, abuse, misuse, accident or other damages; if it was not installed in
accordance with Porcher’s instructions; or if it has been modified in a manner inconsistent with the
product as shipped by Porcher.
Porcher’s option to repair or exchange the product under this warranty does not cover any labor or other
costs of removal or installation, nor shall Porcher be responsible for any other incidental or consequential
damages attributable to a product defect or to the repair or exchange of a defective product, all of which
are expressly excluded from this warranty. (Some states or provinces do not allow the exclusion or
limitation of implied warranties, so this exclusion may not apply to you.)
This warranty gives you specific legal rights. You may have other statutory rights that vary from state to
state or from province to province, in which case this warranty does not affect such statutory rights.
For customer inquiries, please contact 1-800-359-3261.
Porcher, 6615 West Boston Street, Chandler, AZ 85226
10