1
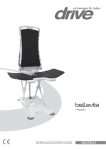
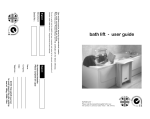
INSTRUCTIONS & TECHNICAL MANUAL
BATHLIFT
BATHLIFT
MODEL CRM2015
INDEX
Important Safety information................... 2
Operation......................................................... 4
Floor Anchor Fixing...................................... 8
The product.................................................... 3
Indicator Lights............................................. 6
Contained in your Delivery Carton.......... 8
The battery and Charger............................ 3
Maintenance.................................................. 6
Guarantee/Weights & Measurements.... 8
Temperature Gauge and probe................. 4
Installation..................................................... 7
CE and EMC Approval.................................. 8
Hand Held Controller................................... 4
Wall Mounting the Unit.............................. 7
Environmental Information........................ 8
MADE IN UK
USE
nThe battery charger must not be used
in the bathroom.
nThe battery weighs 1.5 Kgm (3.3 lbs)
and should be handled carefully.
IMPORTANT SAFETY
INFORMATION
nKeep the battery well charged.
It is important this instruction manual
is retained with the bath lift for future
reference. Should the bathlift be sold or
transferred to another owner or should
you move house and leave the bathlift,
always ensure this instruction manual is
available for the new owner to know the
functioning of the bathlift and the relevant
warnings. These warnings are important
and MUST be read before installing or
using the bathlift.
nThe belt must be located in the floor
anchor correctly. Make sure the
retaining discs prevent the belt from
coming out.
nAlways be aware of the floor anchor
fitting. DO NOT TRIP OVER IT.
nIf you have any doubt as to your ability
to use the bathlift totally unattended
you should ensure that you have a
capable carer present.
INSTALLATION
nMake use of the grab rail to steady
yourself when entering or exiting the
bath.
nIt is imperative the installation is
carried out safely and correctly and
is undertaken by an experienced
professional familiar with building
construction.
nThe maximum lifting weight of 127 kgm
(280 lbs) should not be exceeded and
the bathlift used only for the purpose it
is intended.
nEnsure there are no pipes or electrical
cables that could be damaged when
fixing the unit to the wall and floor.
nThe bather should take care to keep
fingers away from where the belt
enters the bathlift cover.
nWhen fixing to a “studded” or non-solid
wall, reinforcement may be required
to ensure the bathlift will take the
person’s weight and operate safely.
nWhen used for the first few times the
bather should accustom themselves
to the lifting and lowering motion
particularly the sideways re-adjustment
as the belt is being fed from one side
only.
nThe maximum lifting weight is 127 kgm
(280 lbs) and MUST not be exceeded.
CHILD SAFETY
nEnsure the battery charger lead is
plugged into the small socket on the
battery shown by the arrow and NOT
in the large central socket.
nDo not allow children to play with the
bathlift. It is not a toy.
nRemove the battery to a safe and
secure place if there is a possibility
children will have access to the
bathlift.
nDo not clean the belt with bleach or
similar skin irritating substance.
2
THE PRODUCT
THE BATTERY AND BATTERY CHARGER
Following the installation the battery
should be charged for a minimum of 15
hours
The bathlift is a motorised device
designed for the use of the elderly and
those who find that getting into and out
of a bath has become increasingly more
difficult. With its use, access becomes
safe and easy.
Operated by two control buttons it will
gently lower and raise the bather into and
out of the bath when the user is seated on
the reinforced polypropylene seating belt.
This flexible belt is firmly secured to a
winding shaft within the cabinet case and
the other end anchored to a sturdy floor
fitting at the side of the bath.
IMPORTANT
Ensure the charger lead is plugged
into the small socket indicated by the
arrow. NOT the large central socket.
The charger must not be used in the
bathroom.
Features
nThe unit is powered by a 24-volt DC
rechargeable battery pack. No mains
electricity supply is required in the
bathroom. Operation is by control
buttons to raise and lower the bathlift
as required.
To charge the battery, plug the charger
into a 13-amp mains socket and the
charger connector lead into the small
socket of the battery.
nIndicator lights in green and red shows
the battery is in operation and the
battery condition. An audible alarm
warns of a low battery.
The charger has a red and green
indicator light. When the charger is
switched on and it is connected to the
battery, the green indicator light will
change to red. This indicates that the
battery is being charged and the state
of the battery is low. As the battery
receives its full charge the red light will
fade and the green light will come on
until only the green light is seen. Since
the charging rate is small the battery may
be left on charge without any detriment
to the battery. Indeed it is important for
batteries to be fully charged as under
charged batteries can deteriorate much
quicker.
nA water thermometer with immersible
probe is fitted which states the
temperature of the water, to avoid the
risk of scalding.
nHand held remote controller, which is
water-resistant.
nA safety feature is built into the bathlift
which prevents excessive tensioning
if the control button is held down too
long when stretching the belt across
the bath.
nA belt reversal device is also fitted
to prevent the belt from rolling up in
reverse.
It is important that the battery is charged
regularly as this will prolong the life of
the battery cells. It is recommended that
the battery is charged at least once a
week. As the battery becomes older so
the number of charges per week should
increase.
nA micro switch prevents the bar being
taken into the unit if the UP button is
pressed too long.
nStainless steel is used to fabricate
the interior of the cabinet to provide
improved corrosion resistance.
3
TEMPERATURE GAUGE AND PROBE:
OPERATION
The probe is located on the bottom right
hand side of the unit. The probe has a
small plastic disc attached and should
be attached to the side of the bath
under the water line. Briefly press either
button and the gauge will show the water
temperature for about 20 seconds.
With the battery fully charged and the
temperature probe in position the bathlift
can be used.
STEP 1
Place the battery in the hole on the lefthand side of the bathlift. Ensure it is firmly
pushed into position.
STEP 2
Press the down button and feed out
the belt sufficiently for it to reach the
mounting bar. When the hand held
remote controller is used – either by the
bather or by an assistant, the device will
operate the bathlift without the need to
use the control buttons on the cabinet
face.
STEP 3
HAND HELD CONTROLLER
To fit the belt sleeve, fold the belt as
shown and slip on the sleeve.
The Hand Held controller has ‘UP’ and
‘DOWN’ buttons and operates in the same
way as the control buttons on the unit
itself. It can be operated by the bather
or by a helper. For easy recognition the
GREY arrowed button is for DOWN into
the water. There is a suction pad on the
controller to attach it to the bathlift or
bathroom wall, whichever is convenient.
The Hand control is also water tight
should it fall in the bathwater.
4
STEP 4
STEP 6
By rotating the discs the anchor bar can
be located into the mounting bar itself.
Turn the discs to ensure the anchor bar
is positively locked in. THIS IS VERY
IMPORTANT.
The bathlift is now ready for the bather
to sit on the belt, ease their legs over
the side of the bath and into the water
holding on to the inbuilt grabrail for extra
support.
STEP 5
Tension up the belt by pressing the ‘UP’
button until the belt is tight across the
bath. The automatic cut out will stop the
belt when it is tight.
STEP 7
Now press the DOWN button which will
slowly and gently lower the user to the
bottom of the bath. You can now relax
and enjoy a refreshing bath.
5
off the button the screen will show the
temperature of the water.
STEP 8
When bathing is finished press the UP
button and this will raise and return the
user back to the original bath height, so
that the bather can again hold on to the
grabrail and place their feet over the bath
edge and onto the floor.
A red light will appear on the front of the
bath lift to indicate that the battery is low,
together with two beeps of an audible
alarm. After hearing the alarm you should
charge the battery IMMEDIATELY. If
you continue to use the bath lift without
charging the battery, the red light will
continually flash and the alarm will sound
constantly. An empty battery symbol will
appear on the screen. The bath lift will
not work in the down position. However it
will work in the up position, thus enabling
the bather to get back to the top of the
bath and get out of the bath safely.
STEP 9
With the belt slackened, free the end
secured to the floor bracket and remove
the belt sleeve. By pressing the up
button once more the seating belt will
retract back into the cabinet, ready for
future use. Leave about 75 mm (3”) of
the belt outside the unit.
MAINTENANCE
With attention to regular recharging the
battery should provide about 4 years of
reliable service. A replacement battery
pack can be obtained from the supplier of
the bath lift.
It is important to mention that batteries
at the end of their working life must be
disposed of environmentally safely – e.g.
they must NOT be disposed of on an open
fire or by any other hazardous means.
INDICATOR LIGHTS
When the buttons are pressed, the unit
will ‘come to life’ and the green indicator
light will illuminate together with the
temperature module. If the unit is not in
use for more than 30 seconds it will ‘go
to sleep’. This conserves the battery.
When the button is pressed the unit will
again illuminate and the direction the
belt is moving will be shown as arrows
on the screen. When your finger is taken
Whilst stainless steel is used to totally
eliminate rust on the interior of the cabinet
it is important to understand that as the
unit must have entry points for the battery
and belt it is NOT waterproof WATER CAN
GAIN ACCESS.
6
When showering, care must be taken to
avoid soaking the unit with an excess of
water which could damage the interior
electronics. There is a purpose made
shower cover protection cap which your
Supplier can supply, which would help to
protect the bath lift.
The chassis backplate is machined with 6
keyhole slots which allow this steel plate
to slot tightly down over the projecting
studs. Both plates should fit together
flush and level at the bottom edge.
The bath lift should be fitted so that the
centre line of the lower three studs are
130mm (approx. 5”) above the rim of the
bath, allowing a 75mm (3”) gap under the
bathlift. The edge of the belt is usually
positioned near the change from the
slope at the back of the bath to the flat
bottom of the bath and best positioned to
suit the user’s comfort.
If a shelf is fitted between the bath
and the wall, the bathlift will operate
satisfactory up to 100mm (4”). For wider
shelves, please contact your supplier for
advice and special attachments.
Apart from the above, the bathlift needs
no maintenance other than normal good
housekeeping attention to cleanliness.
However, do not use bleach or other skin
irritant substance to clean the belt. The
bathlift will give constant service for many
years to its user.
INSTALLATION
Because it is imperative that the
installation is carried out safely and
correctly, it is strongly suggested
that this work be undertaken by an
experienced professional, familiar with
building construction.
WALL MOUNTING THE UNIT
Fitting to a solid brick wall with sound
tile or plaster finish:
Walls of various constructions each
require different treatment and different
fixings. By the operation of the bathlift
with its lifting weight of up to 127 kilos
(280 lbs) the wall supporting this item and
the securing fittings used therewith must
be sufficiently robust to meet the purpose.
Position the wall plate as described
above. Use 6 off 6mm screws with
sleeves of sufficient length to fix to
this type of wall ( MINIMUM LENGTH
80mm). Follow the screw manufacturers
instructions for correct fitting. Make
certain that all six fastenings are securely
fitted.
Note: this bathlift will not operate
100% efficiently against a bath with a
curved exterior.
Fitting to a ‘studded’ or non-solid wall:
THE CHASSIS BACKPLATE AND THE
WALL PLATE:
An absolutely secure fixing to this type
of wall is vital. Reinforcement of or the
insertion of a solid area is essential.
Consult a builder experienced in this
work. If screwed rods with nuts are used
to fix right through the wall together with
a load spreading plate on the rearside
then make certain that the rods finish
FLUSH with the nuts inside the unit –
OTHERSWISE THE BELT COULD BE
DAMAGED WHEN USED. Position as
above.
The wall plate has six projecting studs
which have provision for screws, bolts or
other suitable fixings to pass through the
centre of the stud to secure the wall plate
firmly to the wall.
7
FLOOR ANCHOR FIXING
GUARANTEE
The manufacturers undertake to provide
a full one year’s guarantee effective
from the date of purchase of the Bathlift
subject to (A) the bathlift being unable
to fulfil its function due to proven faulty
components or faulty workmanship and
(B) that the faulty product is returned
direct to the factory.
Fitting to a stone or concrete floor:
First make certain that there are no
services that might be damaged by drilIing
into the floor. With the unit soundly fixed
to the wall extend the belt square across
the bath and vertically down the side and
position the anchor floor bracket snugly
against the bath panel. Use 7 off No: 10
stainless steel screws into suitable rawl
plugs to fix to this type of floor. Follow the
plug manufacturers instructions for correct
fitting.
ENVIRONMENTAL INFORMATION
At the end of its useful life, this product
contains materials which when processed
correctly can be recovered and recycled.
By participating in the responsible
recycling of this product you will be
reducing the requirement for new raw
materials and reducing the amount of
material that would otherwise end up in
landfill.
Fitting to a wooden boarded floor
Procedure as above. Use 7 off of No: 10
screws to fasten the mounting bar to the
floor. If it is thought that the flooring is
not adequate to take the strain then add
a cross baton under the floor to reinforce
the boarding.
The bath lift etc can be taken to your
local recycling centre. The local authority
will advise you of the collection facilities
available for waste electronic products in
your area.
WEIGHTS AND MEASUREMENTS
Dimensions:
Length 55.5cm (21.8”)
Height 32.5 cm (12.8”)
Depth 11.8 cm (4.6”)
Weight unpacked 11 kilos (24 3/4 lbs)
Weight packed 15.9 kilos (353/4 lbs)
CONTAINED IN YOUR DELIVERY CARTON
n1
n1
n1
n1
n1
n1
n1
Bathlift with remote control
Wall mounting Plate
Belt Sleeve
Floor Anchor Bar
Manual (fixing and fixing screws are NOT included)
Battery Box
Charger
(In the light of continuous improvement the company reserves the right to change the specification of the product and manual)
MANUFACTURED BY:
AND EMC APPROVED
EEE Producer Registration No. GA0292UQ
™
C R Manufacturing
Frederick Street
Waddesdon
Aylesbury
Bucks HP18 0LU
03/15
8