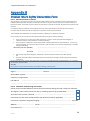
1
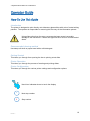
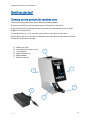
Pi Slide Printer Operator Manual Model P21001-E Pyramid Innovation Ltd 12-08-2014 Legal Information Copyright 2014. Pyramid Innovation Ltd. All rights reserved. Pyramid Innovation Ltd is an ISO 9001:2008 Accredited Company. Pyramid Innovation Ltd is the trading name of Pyramid Innovation Ltd. All other trademarks are the property of Pyramid Innovation Ltd and its subsidiaries Pyramid Innovation Ltd makes every endeavour to ensure that the information contained in its support documentation is correct and clearly stated but does not accept responsibility for any errors or omissions. The development of Pyramid Innovation Ltd products and services is continuous. Make sure that any published information that you use for reference is up to date and relates to the status of the product. If necessary, check with Pyramid Innovation Ltd or your local Pyramid Innovation Ltd representative. This manual may not, in whole or in part, be copied, photocopied, reproduced, translated, or converted to any other electronic or instrument readable form without prior written consent of Pyramid Innovation Ltd. All information contained in this manual is proprietary and confidential, and the exclusive property of Pyramid Innovation Ltd. This manual is protected by copyright and any reproduction is prohibited. This manual is for use only by the individuals to whom it has been made available by Pyramid Innovation Ltd. Standards The Pyramid Innovation Ltd Pi Slide Printer meets the following CE Mark requirements: Low Voltage Directive 2006/95/EC. Contact Addresses: Pyramid Innovation Ltd, Homestead farm, Darwell Hill, Netherfield TN33 9QL, UK +44 (0) 1424 837032 +44 (0) 1424 400061 www.PyramidInnovation.com 2 Issue 7 Pyramid Innovation Ltd 12-08-2014 Symbols The following symbols and conventions may be used throughout this document and on the instrument: This symbol is used on the equipment, or in a document, to indicate that instructions must be followed for safe and correct operation. If this symbol appears on the instrument, always refer to the operator guide. This symbol is used on the equipment, or in a document, to indicate that harmful chemicals are used. Refer to the Material Safety Data Sheets for the chemicals used. Always act with common sense and be aware of local laboratory procedures. Take suitable precautions. A WARNING IS GIVEN IN THE DOCUMENTATION IF THERE IS A DANGER OF PERSONAL INJURY OR DAMAGE TO THE EQUIPMENT OR SAMPLES. Note Notes give additional information about a job or instruction, but do not form part of the instruction. 3 Issue 7 Pyramid Innovation Ltd 12-08-2014 Contents Legal Information .......................................................................................................................... 2 Standards ........................................................................................................................... 2 Contact Addresses: ................................................................................................................ 2 Symbols........................................................................................................................................ 3 Safety Information ...................................................................................................................... 7 Introduction ............................................................................................................................. 7 General Safety ....................................................................................................................... 7 Intended Use .......................................................................................................................... 8 Chemical Safety ..................................................................................................................... 8 Environment ........................................................................................................................... 9 Warranty Statement ............................................................................................................... 9 Product Return Safety ............................................................................................................ 9 Operator Guide ........................................................................................................................ 10 How To Use This Guide ....................................................................................................... 10 Getting started ......................................................................................................................... 11 Turning on the printer for the first time ................................................................................ 11 Back panel and connections ................................................................................................ 12 Printer status Indication........................................................................................................ 12 Registration procedure ......................................................................................................... 13 IQOQ Print Test Slide .......................................................................................................... 14 Printer Operation...................................................................................................................... 15 Changing Tape ..................................................................................................................... 16 Main User Interface .............................................................................................................. 17 Editing Label Field Data ....................................................................................................... 18 Selecting a Different Template............................................................................................. 19 Printing a slide ...................................................................................................................... 20 See Creating a sequence of slides.............................................................................................. 21 See Deleting a slide from a sequence of slides .......................................................................... 22 Editing a slide in a sequence of slides ................................................................................. 23 Editing Label Field Data ................................................................................................... 23 Changing Template .......................................................................................................... 23 Printing a sequence of slides ............................................................................................... 24 Printing a slide within a sequence of slides ......................................................................... 25 Saving a Protocol ................................................................................................................. 26 Selecting a Protocol ............................................................................................................. 27 Administrator Configuration Menus ......................................................................................... 28 4 Issue 7 Pyramid Innovation Ltd 12-08-2014 Admin Settings menu ........................................................................................................... 28 Admin Data Menu.................................................................................................................... 29 Add a Data Item ................................................................................................................... 31 List data type .................................................................................................................... 32 Data - Translators ........................................................................................................................ 33 Delimited data ................................................................................................................... 33 Fixed length data .............................................................................................................. 33 Adding a Translator- Delimited data ........................................................................................ 34 Modifying Data Assignments ............................................................................................... 35 Adding a Translator- Fixed length data ................................................................................... 36 Dividing up the data string ................................................................................................... 37 Assigning data items ............................................................................................................ 38 Data - Templates ..................................................................................................................... 39 Adding a Template ............................................................................................................... 40 Editing a Template ............................................................................................................... 41 Moving a data field - Changing font and size ................................................................... 41 Editing a template data item properties ................................................................................. 42 Adding a data item to a template........................................................................................... 43 Adding a barcode to a template............................................................................................. 44 Settings - Network settings ...................................................................................................... 47 Settings - Wi-Fi - WEP ............................................................................................................. 48 To turn WiFi on and select a network. ............................................................................. 48 To disconnect from the WiFi network ............................................................................... 49 Settings - Bluetooth.................................................................................................................. 50 Turn Bluetooth on ............................................................................................................. 50 Clone Printer Setting ........................................................................................................ 50 Accept Clone Printer Setting ............................................................................................ 51 Settings - Printer settings......................................................................................................... 53 Manual Print........................................................................................................................ 53 Heat profiles ...................................................................................................................... 53 Index Tape ........................................................................................................................ 53 Reset Printer ..................................................................................................................... 53 IQOQ Test ........................................................................................................................ 53 Heat Profiles ..................................................................................................................... 53 Admin General Menu ............................................................................................................... 54 General – About ................................................................................................................... 55 General – Software .............................................................................................................. 56 5 Issue 7 Pyramid Innovation Ltd 12-08-2014 Upgrade software ............................................................................................................. 56 Export Printer setting (XML) ............................................................................................. 57 Import Printer setting (XML).................................................................................................. 59 General – International......................................................................................................... 61 General – Date & Time ........................................................................................................ 62 General – Keyboard ............................................................................................................. 63 General – Display ................................................................................................................. 63 General – Sound .................................................................................................................. 64 General – Scanner ............................................................................................................... 64 Icon Glossary ....................................................................................................................... 65 Printer Specifications ............................................................................................................... 66 Consumables and accessories ................................................................................................ 67 Appendix A ............................................................................................................................... 68 Appendix B ............................................................................................................................... 69 Product return Safety Declaration Form .............................................................................. 69 6 Issue 7 Pyramid Innovation Ltd 12-08-2014 Safety Information Introduction Pyramid Innovation Ltd products are designed for convenient and reliable service; however, incorrect actions by a user may damage the equipment, or cause a hazard to health. The following sections contain important information for the safe setup and use of the instrument. All users must read and understand the following sections before using the instrument. General Safety This instrument, as supplied, conforms with IEC61010-1 issue 2010; however, the addition of chemical introduces potential hazards. As with all scientific equipment, due care and good laboratory practice must be employed when dealing with these chemicals, and consideration must be given to the potential for hazard when dealing with particular chemicals. Do not remove any panels or covers. The instrument does not have any user serviceable parts. The instrument must be properly connected to a good earth (ground) via the Mains input supply. The instrument is only to be connected to the mains power supply using the supplied power adaptor and detachable mains lead. For replacement power adaptor or mains lead see the Consumables and accessories list or ask you distributor. Position the instrument such that it is possible to interrupt the Mains supply at the source by removing the plug from the socket. If the equipment is used in a manner not specified by Pyramid Innovation, the protection offered by the equipment may be impaired. In compliance with statutory requirements all our equipment is designed to accepted standards of safety. Its use does not entail any hazard if operated in accordance with the instructions given in the documentation. However, the following safety precautions must be obeyed: All users must have read and understood the Operator Guide and these safety instructions; and only operate the unit in accordance with the instructions. Potentially lethal voltages above 100V a.c. or 50V d.c. are present inside the power adaptor. Do not remove any access covers or tamper with the mains lead. It is important that normal standards of safety and good laboratory practices are employed. Always use common sense when operating the instrument. Any problems and queries should be referred to your Pyramid Innovation supplier. Correct maintenance procedures are essential for consistent performance. It is recommended that a Maintenance Contract is taken out with our Service Department. Any maintenance or service work required may only be carried out by trained personnel. The instrument should be placed on a suitable level surface and not in direct sunlight. Use only factory approved accessories or replacement parts with this instrument. Only use cleaning agents recommended in the Operator Guide 7 Issue 7 Pyramid Innovation Ltd 12-08-2014 Intended Use The instrument is intended for use in laboratories by operator’s familiar with labelling techniques and laboratory equipment. The instrument should be operated with the environmental limits stated in the printer specification within this document. Chemical Safety Do not use harmful chemicals or solvents to clean the instrument. The operator is fully aware of the contents of the specification documents detailing the properties of the chemicals they are using. The operator has carried out any legally required assessment of chemicals used and is using good laboratory practice. 8 Issue 7 Pyramid Innovation Ltd 12-08-2014 Environment This product is required to comply with the European Union’s Waste Electrical and Electronic Equipment (WEEE) Directive 2002/96/EC. It is marked with the following symbol: At the end of the product life it must be recycled in accordance with local regulations. It can be returned to a Municipal Collection Facility or to the retailer when a replacement is purchased. Where applicable this facility will be offered by the Product dealer. Further information on Pyramid Innovation’s compliance with these Directives, the recyclers in your country, and information on Pyramid Innovation products which may assist the detection of substances subject to the RoHS Directive are available from your distributor. www.PyramidInnovation.com Warranty Statement Pyramid Innovation are proud of our quality, reliability and of our after-sales service. We continuously strive to improve our service to our customers. Please ask you distributor or Pyramid Innovation representative about Service Contracts which can keep your purchase in peak condition for many years to come. Warranty provisions necessarily vary to comply with differences in national and regional legislation. Specific details can be found in the delivery documentation or from your dealer or representative. Please note that your warranty may be invalidated if: This instrument is modified in any way. Accessories and reagents which have not been approved by Pyramid Innovation Ltd are used. The instrument is not operated or maintained in accordance with the instructions in the Operator Guide. Product Return Safety In the event that the instrument has to be returned to the factory the Product Return Safety Declaration form must be completed and included with the instrument. Contact your supplier or see Appendix B. 9 Issue 7 Pyramid Innovation Ltd 12-08-2014 Operator Guide How To Use This Guide Introduction The printer is designed to print directly onto laboratory glass slides with colour frosted writing patches. The operator is responsible for ensuring the accuracy of the information printed. Using slides other than the ones recommended may cause irrevocable damage to the instrument. Please see Appendix A for a list of recommended slides. Recommended cleaning method Use damp soft cloth or paper towel with a mild detergent. Getting Started This takes you through from opening the box to printing a test slide. Printer Operation This takes you through the process of creating and printing slides. Printer Configuration This takes you through the various printer settings and configuration options. Hand icon indicates where to touch the display 1 Next step number 1 Step number 10 Issue 7 Pyramid Innovation Ltd 12-08-2014 Getting started Turning on the printer for the first time Connect the appropriate mains power lead to the power adaptor. Plug the round 24V plug into the power socket at the back of the printer. Plug the mains lead into the wall socket, the printer will automatically power up when plugged in to mains power. To turn the printer on or off, press the power button on the back of the printer. Wait for the printer to run through its initialisation process which checks that the internal mechanism is operating correctly. A. B. C. D. E. F. Slide input guide Connections and power input Touch display Slide collection tray Mains adaptor Barcode scanner A C B D E F 11 Issue 7 Pyramid Innovation Ltd 12-08-2014 Back panel and connections At the back of the printer there are a number of connections including the 24v DC power adaptor. Signal connections suitable only for connection to equipment meeting the requirements of clause 6.3 of IEC 61010-1 or the SELV requirements of IEC 60950-1, 2014. Press and hold for 5 seconds to turn the printer off. Press to turn the printer on. Used to connect the printer to a PC running the Windows driver or the Gateway application. Used to connect the printer to a PC running the Gateway or the Hub (printer manager). USB 2 ports used to connect external keyboard or USB drive. Used to connect to printer controlled accessories. Only connect the supplied or specified 24v power adaptor. Printer status Indication The top bar of the display shows the printers status. Ready Printer is ready to print vials. Busy The printer is printing a vail. Offline The user is in printer setup and the printer is offline. 12 Issue 7 Pyramid Innovation Ltd 12-08-2014 Registration procedure Once the printer initialisation is complete the Warrantee Registration page will be displayed. Enter the Authorisation Code and press the Tick button. If you do not have an authorisation code contact your distributor. To skip the registration process press the X button. The printer can be used to print up to 100 slides without registering after which the skip option is no longer available. The printer is supplied with demonstration templates. You can edit the data by touching the white label on the slide image (See Editing Label Field Data). 13 Issue 7 Pyramid Innovation Ltd 12-08-2014 IQOQ Print Test Slide The first time the printer is run it is important to run the IQOQ test. Press the Setup button - Enter the password Then press the Printer button Then press the IQOQ button The printer is ready to print a test slide. Ensure the slide is 76mm x 26mm x 1.0 – 1.2mm with a coloured marking area, preferably white. Drop a blank slide into the opening at the top of the printer. The slide orientation should be as shown on the display with the writing surface facing forwards. If the slide is not the correct way up the slide will drop through unprinted and you will hear a warning sound. The printed slide will drop into the collection tray. The print quality of the first may not be good as the tape may have moved in transit. If this is the case print another slide. Hold the printed slide under the front left corner of the printer so the blue lines of the scanner meet. When the barcode is scanned will show OK and save the the display test result. Press the Tick button to end the IQOQ test. The IQOQ test can be run at any time. 14 Issue 7 Pyramid Innovation Ltd 12-08-2014 Printer Operation The printer is designed to print slides ondemand. The display shows you what will be printed. To print a slide you drop it into the opening in the black plastic guide on the top of the printer. The writing surface should be at the top facing forward. Once you have the bottom of the slide in the guide let it drop into the printer. If the printer is printing the guide will be closed. Do not force the slide or you will damage the printer. The built in software enables you to: Print individual slides Create and print sequences of slides Edit slide data Change the template used to print slides Design your own templates using different fonts and barcode types Set fields to automatically increment Setup templates to accept data from scanned barcodes or LIS input Edit and delete slides within a sequence of slides Print individual slides within a sequence of slides Save a sequence of slides as a Protocol to be used again Optional Accessories (available soon) Slide delivery system Holds 50 slides Replaces the input guide on the top of the printer Slide collection system Holds 50 slides Replaces the printer stand 15 Issue 7 Pyramid Innovation Ltd 12-08-2014 Changing Tape Only use Pyramid Tape Product Ref: P21101-E A B C E A. B. C. D. E. F. F Tape matt side Sliding door Tape guide pin Print head Collection spool Supply spool D 16 Issue 7 Pyramid Innovation Ltd 12-08-2014 Main User Interface The printer is now ready to print slides. The default Template is displayed which has three fields. A B A. Tape level B. Printer status C. Scanned data C D. Template Shows the data that will be printed on the slide. To edit you touch the middle of the template. D E. Eject button Pressing the clear part of the slide will initiate a slide eject sequence. If a hopper is attached it will initiate a print sequence. E F. Setup Open the administration menus. G. Create sequences See - Creating a sequence of slides H. Open Protocol See - Selecting a protocol and Saving a protocol I. Increment / Decrement The up arrow increments an index field and the down arrow decrements an index field. F G H i J J. Status Bar Displays status information. 17 Issue 7 Pyramid Innovation Ltd 12-08-2014 Editing Label Field Data 1 2 3 4 . 2 18 Issue 7 Pyramid Innovation Ltd 12-08-2014 Selecting a Different Template 1 2 2 3 3 4 4 19 Issue 7 Pyramid Innovation Ltd 12-08-2014 Printing a slide 1 2 3 4 If a field has been set up to increment the next value will be automatically displayed. 20 Issue 7 Pyramid Innovation Ltd 12-08-2014 Creating a sequence of slides 2 1 3 1 2 3 See Saving a Protocol 1 21 Issue 7 Pyramid Innovation Ltd 12-08-2014 Deleting a slide from a sequence of slides 2 1 2 1 4 3 4 22 Issue 7 Pyramid Innovation Ltd 12-08-2014 Editing a slide in a sequence of slides 2 1 2 1 3 See Changing Template See Editing Label Field Data 23 Issue 7 Pyramid Innovation Ltd 12-08-2014 Printing a sequence of slides 1 2 3 2 24 Issue 7 Pyramid Innovation Ltd 12-08-2014 Printing a slide within a sequence of slides 2 1 2 1 5 3 4 25 Issue 7 Pyramid Innovation Ltd 12-08-2014 Saving a Protocol Any sequence of slides can be saved as a Protocol with a unique name. For example you may have a given pre-set sequence of slides for a given sample type. When a sequence of slides are displayed the Protocol button opens the Save Protocol layer. If a single slide is displayed the Protocol button opens the Protocol selection List (see Selecting a Protocol). 1 2 2 1 1 26 Issue 7 Pyramid Innovation Ltd 12-08-2014 Selecting a Protocol To select a protocol the display should only have a single slide displayed. 2 1 1 2 3 3 27 Issue 7 Pyramid Innovation Ltd 12-08-2014 Administrator Configuration Menus Admin Settings menu Pressing this HOME button, returns to the main printing screen from anywhere in the software that the HOME button is shown Pressing this BACK button, goes back on screen level in the software from anywhere a BACK button is shown. 28 Issue 7 Pyramid Innovation Ltd 12-08-2014 Admin Data Menu Press to Modify or add a new TEMPLATE Press to Modify or add a new TRANSLATOR Press to Modify or add a new DATA ITEM Note: Selecting any of the options will reset the Operation Screen to a single slide with default data. 29 Issue 7 Pyramid Innovation Ltd 12-08-2014 Data - Items – Adding, editing and deleting Data items are used to store data and display data in templates. List of available Data Items A. B. C. D. E. F. Scroll buttons Selected item Delete selected item Edit selected item Add item Save and close A B C D E F 30 Issue 7 Pyramid Innovation Ltd 12-08-2014 Add a Data Item 1 2 2 1 3 3 Data Types Text (default) Numeric – Number only List – see List data type Character count Field length in characters Default text Text that will be displayed in the field as default. Touch to edit. Example text Used in Template design only. Touch to edit 31 Issue 7 Pyramid Innovation Ltd 12-08-2014 List data type 2 1 2 3 3 2 4 4 32 Issue 7 Pyramid Innovation Ltd 12-08-2014 Data - Translators Translators are used to control how incoming and outgoing data is filtered and formatted. Incoming data is passed through a Translator to extract sections of data and move it into data items. Outgoing data is created by using a Translator to build a text string out of data items, with or without delimiters. Example incoming data from a scanned barcode Prefix = H14 H14-12345-01-0A Translator CaseNo = 12345 Suffix1 = 01 Suffix2 = 0A Example outgoing data used to create a printed barcode Prefix = H14 CaseNo = 12345 Translator Suffix1 = 01 Suffix2 = 0A H14-12345-01-0A Delimited data Delimiters are used to separate data elements; in this case, dashes are used as delimiters. The data elements can vary in length. H14-12345-01-01 Fixed length data Fixed length data has data elements of fixed length. H14123450101 33 Issue 7 Pyramid Innovation Ltd 12-08-2014 Adding a Translator- Delimited data 2 1 2 1 3 4 3 5 1 Issue 7 4 34 Pyramid Innovation Ltd 12-08-2014 5 Delimiters are automatically detected and used to separate the data into elements. The data is automatically assigned to a default set of data items. To change the assignment select the item in the list and then click on the edit button see Changing Data Assignments 6 Modifying Data Assignments 6 5 7 7 35 Issue 7 Pyramid Innovation Ltd 12-08-2014 Adding a Translator- Fixed length data 2 1 2 1 3 1 4 5 1 4 36 Issue 7 Pyramid Innovation Ltd 12-08-2014 Dividing up the data string The Data string has to be divided up into the required data elements. A A. B. C. D. E. B C Select next divider Add a new divider Remove selected divider Move divider one character to the left Move divider one character to the right D E Data Divider Selected Divider 5 6 + Once you have divided up the data string into the required elements, you need to assign each element to a data item. See Assigning data items 37 Issue 7 Pyramid Innovation Ltd 12-08-2014 Assigning data items 7 8 7 8 9 9 All data elements assigned to data items. 38 Issue 7 Pyramid Innovation Ltd 12-08-2014 Data - Templates Templates determine how the data fields and barcodes are printed. You can design the layout utilising fonts, font sizes and barcodes. It is important to try and keep some white space around the edge of the template and around barcodes. F A B G C D E A. B. C. D. E. F. G. H. I. J. K. L. Back one step Next page Next field Template area Delete selected Rotation buttons Movement buttons Font size Font selection Template setup Data Items Save and exit H I J K L 39 Issue 7 Pyramid Innovation Ltd 12-08-2014 Adding a Template 2 1 3 2 3 4 4 40 Issue 7 Pyramid Innovation Ltd 12-08-2014 Editing a Template 1 2 1 2 Moving a data field - Changing font and size 4 1 3 1 4 1 41 Issue 7 Pyramid Innovation Ltd 12-08-2014 Editing a template data item properties 1 2 1 1 3 3 A 1 B C 1 A. B. C. D. E. Show item on template Update from Translator Auto increment value Make a Barcode Enable user to edit value D 1 E 1 42 Issue 7 Pyramid Innovation Ltd 12-08-2014 Adding a data item to a template 1 2 2 1 3 3 4 1 5 1 4 43 Issue 7 Pyramid Innovation Ltd 12-08-2014 5 1 Once you have added the data item you can move it and change its properties. Adding a barcode to a template Add a data item to the template (it is a good idea to use a data item named Barcode). See Adding a data item to a template. Move it to where you want the barcode to be positioned. With it still highlighted click on the Edit button. 1 1 2 2 1 3 44 Issue 7 Pyramid Innovation Ltd 12-08-2014 4 1 3 1 5 4 6 1 5 1 7 1 6 45 Issue 7 Pyramid Innovation Ltd 12-08-2014 7 1 8 1 There are three barcode sizes 8 You can now move the barcode in the same way as a data field. 46 Issue 7 Pyramid Innovation Ltd 12-08-2014 Settings - Network settings Make Hub should be ticked if you want to connect the printer to a Pi Gateway. If you are not connecting the Gateway leave unticked. 47 Issue 7 Pyramid Innovation Ltd 12-08-2014 Settings - Wi-Fi - WEP The default setting if off. To turn WiFi on and select a network. 1 1 1 2 2 1 3 1 To connect to the selected network. 3 4 48 Issue 7 Pyramid Innovation Ltd 12-08-2014 4 1 The printer is now connected to the selected network. To disconnect from the WiFi network 1 1 2 1 1 49 Issue 7 Pyramid Innovation Ltd 12-08-2014 Settings - Bluetooth Default setting is off. If set to on there will be a delay while the Bluetooth searches for other devices to connect to when entering this screen. It is best to activate Bluetooth when you want to clone a printers setting to other printers. Only activate Bluetooth on th eprinter you want to accept the setting. Turn Bluetooth on 1 1 2 1 2 . The printer will connect to any other Pi Printers it finds Clone Printer Setting The clone settings button will copy the printer setting from the current printer to any other printer connected via Bluetooth. Connected Printers will show the In Tray icon to alert the user that new settings have arrived. 50 Issue 7 Pyramid Innovation Ltd 12-08-2014 Accept Clone Printer Setting If the top bar shows the In Tray icon new settings have been copied to the printer. 1 1 2 1 . 3 2 4 1 3 1 4 5 51 Issue 7 Pyramid Innovation Ltd 12-08-2014 6 1 6 6 1 7 6 1 6 7 Touching the Yes button will over right the printer setting with the printer settings from the initiating printer. Touching the No button clears the cloned settings and keeps the printers settings. 52 Issue 7 Pyramid Innovation Ltd 12-08-2014 Settings - Printer settings Manual Print Toggles manual print mode on and off. Used to enable printing onto plain or frosted slides. Heat profiles Heat profiles are used to control the print darkness. Templates can have specific heat profiles. You can set a heat profile to have heat history on or off and one of three heat settings. Heat history is normally used if you are printing barcodes. Templates with just text will print faster without heat history. Index Tape Moves the tape on by one. Reset Printer The printer mechanism will run through a reset. IQOQ Test Opens the IQOQ test screen. The IQOQ test can be run at any time to check the print quality. Heat Profiles Warning: Heat history should always be used (checked) if a barcode is being printed on the slide. Turning off heat history when using barcodes could result in tape breakage and more frequent print head cleaning. 53 Issue 7 Pyramid Innovation Ltd 12-08-2014 Admin General Menu . 54 Issue 7 Pyramid Innovation Ltd 12-08-2014 General – About Provides information on the printer’s network and hardware settings. Shows: Software version Firmware version Number of slides printed Machine ID 55 Issue 7 Pyramid Innovation Ltd 12-08-2014 General – Software Upgrade software Plug the USB stick with the new software version into 1 1 one of the SUB sockets in the back of the printer. 2 2 1 3 1 3 56 Issue 7 Pyramid Innovation Ltd 12-08-2014 Export Printer setting (XML) 2 1 Plug the USB stick into one of the SUB sockets in the back of the printer. Go to setting. 1 1 3 4 1 3 1 4 5 57 Issue 7 Pyramid Innovation Ltd 12-08-2014 5 1 6 1 6 The XML files will be saved onto the USB stick in a folder called XML. You can copy them onto a PC as a backup or to another printer (see Importing XML files). 58 Issue 7 Pyramid Innovation Ltd 12-08-2014 Import Printer setting (XML) 2 1 Plug the USB stick with the xml folder into one of the SUB sockets in the back of the printer. Go to setting. 1 1 3 4 1 3 1 4 5 59 Issue 7 Pyramid Innovation Ltd 12-08-2014 5 1 6 1 6 The XML files will be copied from the USB stick from the folder called XML. 60 Issue 7 Pyramid Innovation Ltd 12-08-2014 General – International Provides the ability to change the language used. The default language is English. If this is correct press the Tick button to move to the next step. To select a different language press the grey bar and a list will be displayed. Select the required language and press the Tick button to move to the next step. To move back to the previous step press the grey chevron at the top left of the display. 2 1 2 61 Issue 7 Pyramid Innovation Ltd 12-08-2014 General – Date & Time Provides the ability to change the date and time. Use the up and down arrows to set the correct values. The Date and Time Data Items use the system date and time. 62 Issue 7 Pyramid Innovation Ltd 12-08-2014 General – Keyboard If ticked the first character typed will be uppercase and then switch to lower case. General – Display Calibrate display – Password protected Screen grab If this is ticked you can save the screen image to a USB stick by touching the bottom left corner of the display. 63 Issue 7 Pyramid Innovation Ltd 12-08-2014 General – Sound There are three sound levels: 1. 2. 3. No sound Low High General – Scanner There are currently no scanner settings. 64 Issue 7 Pyramid Innovation Ltd 12-08-2014 Icon Glossary 65 Issue 7 Pyramid Innovation Ltd 12-08-2014 Printer Specifications Instrument Dimensions 140mm Width x 200mm Deep x 295mm High Weight 3.78Kg Input Voltage 24V DC Current 1.5A Print resolution 300 dpi Print speed 3-5 seconds typical (full area print) Slide tolerances 76.0mm – 76.2mm x 25.55mm – 26.00mm x 1.00mm – 1.20mm Altitude up to 2,000m Temperature 5 ˚C to 40 ˚C Recommended +15˚C to +30 ˚C (+59 ˚F to +86 ˚F) Performance may deteriorate if operated outside recommended range. -25 ˚C to +45 ˚C (-13 ˚F to 113 ˚F) Short period only Environment Storage environment Relative Humidity Pollution Max. 80% RH up to 31°C Decreasing linearly to 50% RH at 40°C Level 2 Over voltage category II 66 Issue 7 Pyramid Innovation Ltd 12-08-2014 Consumables and accessories Description Part Ref Printer Tape - Black Power adaptor SP50008 Input:100-240V ~ 1.1A, 50-60Hz Output: 24V DC 1.5A Mains lead UK Mains lead EU Manse lead USA Screen guard Gateway Software Hub – Printer manager SP50009 SP50010 SP50007 67 Issue 7 Pyramid Innovation Ltd 12-08-2014 Appendix A Slides TBD 68 Issue 7 Pyramid Innovation Ltd 12-08-2014 Appendix B Product return Safety Declaration Form Part1 Decontamination Certificate Any instrument or part of any instrument must be clean before being returned, and where necessary accompanied by a completed Decontamination Certificate. Should the instrument or any part of it be received in an unclean condition, or Pyramid Innovation Ltd consider it to be a hazard, the instrument or part will be returned unrepaired at the expense of the customer. It is important that the certificate is forwarded by post or fax, and a copy attached to the exterior of the container. Containers will not be opened until the company is in possession of the required certificate. This form MUST be completed by the customer and NOT by a Distributor or distributor employee. If an instrument or part is to be returned to Pyramid Innovation Ltd, please note the following. 1. 2. If the instrument or any part of it has been exposed to, or been in contact with potential pathogenic or radioactive material, it is essential that it is decontaminated. Set procedures are laid down in the European Health and Safety Directives for decontamination. To avoid any misunderstanding, we request that all instruments or parts returned to us must be accompanied by a certificate stating the following: We certify that this (Model) Serial No ……………………………………………………………….. ……………………………………………………………….. Has not been exposed to pathogenic, radioactive or other hazardous material and has been cleaned. OR Has been decontaminated and cleaned (if exposed to the above) according to approved procedures following exposure to: Has the instrument been used for work with human or animal Transmissible Spociform Encephalopathies, e.g. CreutzfeldJacob disease, Scrapie or BSE? YES / NO If yes, please contact Pyramid Innovation service before taking any further action. Signed ……………………………………………………………. Position …………………………………………………………. Name (Block Capitals) …………………………………………………………………………………………………………….. Company or Organisation …………………………………………………………………………………………………………. Full Address ………………………………………………………………………………………………………………………….. ……………………………………………………………………………………………………………………………………………………. Part 2 Guidelines for Returning Instruments Please use the checklist below to ensure that the instrument being returned is ready for collection. All reagents / wax removed from instrument, including vapour traps (if applicable)………………… Accessories are secured / itemised ………………………………………………………………………………………….. Instrument has had transit clamps fitted as per Operator Guide (if applicable) ………………………. Instrument is packed in original packaging………………………………………………………………………… YES / NO RMA No ……………………………………… Carrier ……………………………………………………………………………….. For Attention of ………………………………………………………………………………………….. 69 Issue 7