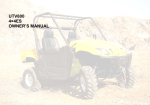
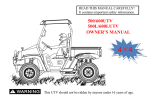
1
OWNER’S
MANUAL
APU06E/APU06EL
(EFI
READ THIS MANUAL CAREFULLY!
It contains important safety information.
4×4 WD)
WARNING!
● Operation of this UTV by children under the age of 16 Increase of the risk of severe
injury or death.
● An adult supervision required always.
● Never permit children under age 16 to operate this UTV.
● Overloading can adversely affect vehicle handling.
● Operator use only, passengers prohibited.
● This vehicle is designed and manufactured for OFF-ROAD use only.
● Driving on public streets, roads or highways is illegal.
● Always wear helmet and other protective equipment.
● Do not operate this vehicle after consuming Alcohol or Drugs.
● Gasoline is flammable, when refueling. Pis shut off engine to avoid sparks and
open flame.
● Read owner's manual carefully before riding. Keep owner's manual with vehicle.
● Operator and passengers must fasten the seat belt,passengers should hold the
armrest with your right hand,please keep your body inside the machines.
FOREWORD
Dear Customer:
Congratulations and thank you for your purchase our All-Terrain Vehicle (UTV). It
was designed and built to provide you with a superior ride, comfort, reliability, utility
and safety.
Your UTV was designed as a recreational UTV, for off-road use by one rider only.
This Operator’s Manual is furnished to familiarize the operator of all proper operating
procedures. It also includes information about the general care and maintenance of
your UTV.
Most importantly, carefully read the following pages regarding safety warnings and
active riding skills, and precautions. Children and adults differ in skills, physical
abilities, and judgment. Some children may not be able to operate an UTV safely.
Parents should always supervise their child’s use of the UTV at all times. Parents
should permit continued use of the UTV, only if they have determined that the child
has the ability to operate the UTV, safely and responsibly.
All of the information in this manual is based on the latest product data and
specifications available at the time of printing, the manufacturers of UTV’s reserve
the right to make product changes and improvements, which may effect the
illustrations or explanations without notice.
If you have any other questions regarding our UTV’s operation or maintenance, any
authorized dealer can readily answer them.
Enjoy your UTV. And, if you respect your UTV, respect the environment, the local
and state laws, and act responsibly. You will gain the respect of others.
※ Product and specifications are subject to change without notice.
DIRECTORY
PAY ATTENTION TO YOUR SAFETY ..................................................................... 1
GUIDELINES ON SAFE DRIVING............................................................................ 5
INTRODUCTION ...................................................................................................... 6
IMPORTANT MANUAL INFORMATION ................................................................... 7
IMPORTANT NOTICE .............................................................................................. 8
HOW TO IDENTIFY YOUR UTV .............................................................................. 9
Engine and Vehicle Identification Number Location................................................ 10
LOCATION OF THE WARNING AND SPECIFICATION LABELS.......................... 11
SAFETY INFORMATION ........................................................................................ 16
DESCRIPTION AND VEHICLE IDENTIFICATION ................................................. 22
CONTROL FUNCTIONS......................................................................................... 24
Indicators & Display ................................................................................................ 29
Auxiliary DC jack(Cigarette lighter) ......................................................................... 34
Accelerator pedal .................................................................................................... 35
Brake pedal............................................................................................................. 36
Parking brake leve .................................................................................................. 37
Drive select lever .................................................................................................... 38
Seat belts ................................................................................................................ 39
Glove compartment................................................................................................. 41
Trailer hitch bracket ................................................................................................ 41
ARE YOU READY TO DRIVE…………………………………………………………...42
IS YOUR VEHICLE READY TO DRIVE.................................................................. 45
Pre-drive Inspection ................................................................................................ 46
Safe driving precautions Off-road use only ............................................................. 48
PRE-OPERATION CHECKS .................................................................................. 53
OPERATION........................................................................................................... 59
Engine break-in....................................................................................................... 62
Parking on a slope .................................................................................................. 64
Accessories and loading ......................................................................................... 65
DRIVING YOUR VEHICLE ..................................................................................... 68
PERIODIC MAINTENANCE AND ADJUSTMENT .................................................. 79
Periodic maintenance/lubrication ............................................................................ 80
Engine use and maintenance ...................................................................................... 92
Troubleshooting charts………………………………………………………………….102
MAINTENANCE CHART………………………………………………………………..104
CLEANING AND STORAGE………………………………………………………………109
SPECIFICATIONS………………………………………………………………………113
ATTACHMENT……………………………...…………………………….……………..118
Electrical schematic……………………………………………………………………..128
PAY ATTENTION TO YOUR SAFETY
This section presents some of the most important information and recommendations
to help you ride your UTV safely. Please take a few moments to read these pages.
This section also includes information about the location of safety labels on your
UTV.
Important safety information
Your UTV can provide many years of service and pleasure-if you take responsibility
for your own safety and understand the challenges you can meet while riding.
There is much that you can do to protect yourself when you ride. You’ll find many
helpful recommendations throughout this manual. The following are a few that we
consider most important.
Follow the age recommendation
The minimum recommended age of this UTV model is 16. Children under age 16
should never operate this vehicle.
-1-
Always wear a helmet
It’s a proven fact: helmets significantly reduce the number and severity of head
injuries. So always wear an approved motorcycle helmet.
Protection, sturdy boots, gloves, and other protective gear.
Ride off-road only
Your UTV is designed and manufactured for off-road use only. The tires are not
made for pavement, and the UTV does not have turn signals and other features
required for use on public roads. If you need to cross a paved or public road, get off
and walk your UTV across.
Take time to learn & practice
Even if you have ridden other UTVs, take time to become familiar with your skills and
get accustomed to the UTV is size and weight.
Because many accidents involve inexperienced or untrained riders, we urge all riders
to take
a training course approved by the UTV safety institute.
Contact an authorized UTV dealer to find out about the training courses nearest you.
-2-
Be alert for off-road hazards
The terrain can present a variety of challenges when you ride off-road. Continually
“read” the terrain for unexpected turns, drop-offs, rocks, ruts, and other hazards.
Always keep your speed low enough to allow time to see and react to hazards.
Ride within your limits
Pushing limits is another major cause of UTV accidents. Never ride beyond your
personal abilities or faster than conditions warrant.
Remember that alcohol, drugs, fatigue, and inattention can significantly reduce your
ability to make good judgments and ride safely.
Don’t drink and ride
Alcohol and riding don’t mix. Even one drink can reduce your ability to respond to
changing conditions, and your reaction time gets worse with every additional drink.
So don’t drink and ride, and don’t let your friends drink and ride either.
-3-
Keep your UTV in safe condition
It’s important to keep your UTV properly maintained and in safe riding condition.
Having a breakdown can be difficult, especially if you are stranded off-road far from
your base. To help avoid problems, inspect your UTV before every ride and perform
all recommended maintenance.
Your UTV comes with a hangtag and several labels containing important safety
information. Anyone who rides the vehicle should read and understand this
information before riding.
The labels should be considered permanent parts of the vehicle. If a label comes off
or becomes hard to read, contact your dealer for replacements.
-4-
GUIDELINES ON SAFE DRIVING
1. when approaching corners or bends to reduce speed. Upon the completion of
turn, may gradually increase the speed.
2. when crossing the vehicles parked in front of, to be very careful. Because the
driver of the vehicle may be invisible to you and the door opened, the forward
block in your way.
3. Brake Lining may Motorcycle rinsing wetting lose their role, so when cleaning
End after walking ago, should check all brake system.
-5-
INTRODUCTION
Congratulations on your purchase of the UTV. It represents the result of many years
of experience in the production of fine sporting, touring, and pace-setting racing
vehicles. With the purchase of this, you can now appreciate the high degree of
craftsmanship and reliability that have made a leader in these fields.
This manual will provide you with a good basic understanding of the features and
operation of this vehicle. It also includes basic maintenance and inspection
procedures. If you have any questions regarding the operation or maintenance of
your vehicle, please consult an dealer.
!WARNING
Please read this manual carefully before operating this vehicle. Do not attempt
to operate this vehicle until you have attained adequate knowledge of its
controls and operating features. Regular inspections and careful maintenance,
along with good operating techniques, will help ensure that you safely enjoy
the capabilities and reliability of this vehicle.
-6-
IMPORTANT MANUAL INFORMATION
FAILURE TO FOLLOW THE WARNINGS CONTAINED IN THIS MANUAL CAN
RESULT IN SERIOUS INJURY OR DEATH.
Particularly important information is distinguished in this manual by the following
notations:
! WARNING: The Safety Alert Symbol means ATTENTION! BECOME ALERT!
YOUR SAFETY IS INVOLVED!
! WARNING:
Failure to follow WARNING instructions could result in severe
injury or death to the vehicle operator, a bystander or a person
inspecting or repairing the vehicle.
CAUTION:
A CAUTION indicates special precautions that must be taken to
avoid damage to the vehicle.
NOTE:
A NOTE provides key information to make procedures easier or
*Product and specifications are subject to change without notice.
-7-
IMPORTANT NOTICE
●
This vehicle is designed and manufactured for off-road use only. It is illegal to
operate this vehicle on any public street, road, or highway. Such use is prohibited by
law.
●
Check the laws and regulations in force before choosing where to operate this
vehicle. It is illegal to operate this vehicle on public lands where vehicles its size are
prohibited.
●
This vehicle complies with almost all state off-highway noise level and spark
arrester laws and regulations.
-8-
HOW TO IDENTIFY YOUR UTV
The main components of your vehicle(engine and frame) are identified by different
serial numbers. It may sometimes become necessary to locate these numbers for
warranty purposes or to trace your vehicle in the event of loss. These numbers are
required by the authorized UTV dealer to complete warranty claims properly. No
warranty will be allowed by if the engine identification number(EIN) or vehicle
identification number(VIN) is removed or mutilated in any way. We strongly
recommend that you take note of all the serial number on you vehicle and supply
them to your insurance company.
-9-
Engine and Vehicle Identification Number Location
TYPICAL
1.EIN(Engine Identification Number on left side/under of the crankcase)
2.VIN(Vehicle Identification Number on right side/under of the frame )
3.ENGINE NUMBER
- 10 -
LOCATION OF THE WARNING AND SPECIFICATION
LABELS
- 11 -
Read and understand all of the labels on you vehicle. They contain important
information for safe and proper operation of your vehicle.
Never remove any labels from your vehicle. If a label becomes difficult to read or
comes off, a replacement label is available from your dealer.
(1)
(3)
- 12 -
(2)
(4)
- 13 -
(6)
(5)
(7)
- 14 -
(8)
- 15 -
SAFETY INFORMATION
This off-highway utility vehicle handles differently from other vehicles including
cars and UTVs.
SEVERE INJURY OR DEATH can result if you do not follow these instructions:
● Read this manual and all labels carefully and follow the operating procedures
described.
● This vehicle is designed to carry the driver and one passenger. Never carry
passengers in the cargo bed.
● Always be sure the driver and passenger are wearing seat belts.
● Never give a ride to a passenger who is too small to reach and hold the handgrip on
the enclosure.
● Always avoid operating the vehicle on any paved surfaces, including sidewalks,
driveways, parking lots, and streets.
● Never operate this vehicle on any public street, road, or highway, even a dirt or
gravel one.
● Never operate this vehicle without wearing an approved motorcycle helmet that fits
- 16 -
properly. You should also wear eye protection (goggles or a face shied), gloves,
over-the-ankle boots, long-sleeved shirt or jacket, and long pants.
● Never consume alcohol or drugs before or while operating this vehicle.
● Never operate at speeds too fast for your skills or the conditions. Always go at a
speed that is proper for the terrain, visibility, operating conditions, and your
experience.
● Never attempt jumps or other stunts.
● Always inspect your vehicle each time you use it to be sure it is in safe operating
condition. Always follow the inspection and maintenance procedures and schedules
described in this manual.
● Always keep both hands, arms, feet, and legs in side the vehicle at all times during
operation. Keep your feet on the floorboard. Never hold onto the enclosure except
when using the handgrip inside the enclosure. Otherwise, your hand could be
injured if it is caught between the enclosure and an obstacle outside the vehicle.
● Always keep both hands on the steering wheel when driving.
● Never wrap your thumbs and fingers around the steering wheel. This is particularly
important when driving in rough terrain. The front wheels will move right and left as
they respond to the terrain, and this movement will be felt in the steering wheel. A
- 17 -
sudden jolt could wrench the steering wheel around, and your thumbs or fingers
could be injured if they are in the way of the steering wheel spokes.
● Always go slowly and be extra careful when operating on unfamiliar terrain. Always
be alert to changing terrain conditions when driving the vehicle.
● Never operate on excessively rough, slippery, or loose terrain until you have
learned and practiced he skills necessary to control the vehicle on such terrain.
Always be especially cautious on these kinds of terrain.
● Never turn at excessive speed. Practice turning at slow speeds before attempting to
turn at faster speeds. Do not attempt turns on steep inclines.
● Never operate the vehicle on hills that are too steep for it or for your abilities. Go
straight up and down hills where possible. Maximum slope angle:15°
● Never operate on hills that are slippery or ones where you will not be able to see far
enough ahead of you. Never go over the top of a hill at sped if you cannot see what
is on the other side.
● Always follow proper procedures for going uphill. If you lose momentum and cannot
continue up a hill, back down the hill with the engine in reverse gear. Use engine
braking to help you go slowly. If necessary, use the brakes gradually to help you go
slowly.
- 18 -
Always check terrain carefully before going down hills. Go as slowly as possible.
Never go down a hill at high speed.
● Always check for obstacles before operating in a new area.
● Never operate the vehicle in fast flowing water or water deeper than the floorboards
on this model . Remember that wet brakes may have reduced stopping ability. Test
your brakes after leaving water. If necessary, apply them several times to let friction
dry out the linings.
● Always be sure there are no obstacles or people behind you when you operate in
reverse. When it is safe to proceed in reverse, go slowly. Do not brake abruptly
when carrying loads in the cargo bed.
● Always use the size and type of tires specified in this manual.
● Always maintain proper tire pressure as described in this manual.
● Never exceed the stated load capacity. Cargo should be as far forward in the bed
as possible, and distributed evenly from side to side. Be sure cargo is secured so
that it cannot move around during operation. Reduce speed and follow instructions
in this manual for carrying cargo or pulling a trailer. Allow greater distance for
braking.
●
- 19 -
ignition such as the pilot lights of
water heaters Otherwise, fuel may
leak out of the fuel tank.
WHAT CAN HAPPEN
Gasoline is poisonous and can cause
injuries.
HOW TO AVOID THE HAZARD
If you should swallow some gasoline
or inhale a lot of gasoline vapor, or
get some gasoline in your eyes, see
your doctor immediately. If gasoline
spills on your skin, wash with soap
and water. If gasoline spills on your
clothing, change your clothes.
! WARNING
POTENTIAL HAZARD
Improper handling of gasoline.
WHAT CAN HAPPEN
Gasoline can catch fire and you
could be burned.
HOW TO AVOID THE HAZARD
Always turn off the engine when
refueling. Do not refuel right after the
engine has been running and is still
very hot. Do not spill gasoline on the
engine or exhaust pipe/muffler when
refueling. Never refuel while smoking,
or while in the vicinity of sparks, open
flames, and clothes dryers. When
transporting the vehicle in another
vehicle, be sure it is kept in an
upright position. or other sources of
20
! WARNING
POTENTIAL HAZARD
Starting or running the engine in a
closed area.
WHAT CAN HAPPEN
Exhaust fumes are poisonous and may
cause loss of consciousness and death
within a short time.
HOW TO AVOID THE HAZARD
Always operate your vehicle in an area
with adequate ventilation.
21
DESCRIPTION AND
VEHICLE IDENTIFICATION
1 2
3
4
5
6
7
8
9 10
11
12
22
13
14 15
16
17
18
19
20
1. Headlights
2. Maintenance window cover lock
3. Front shock absorber assembly adjusting
ring
4. Brake fluid reservoir
5. Parking brake lever
6. Steering wheel
7. Drive select lever
8. Driver seat
9. Air filter element (engine and air intake
duct)
10. Cargo bed push rod switch
11. Rear shock absorber assembly adjusting
ring
12. Tail/brake lights
13. Engine exhaust pipe
14. Cargo bed
15. Cargo bed push rod
16. Refueling mouth
17. Passenger seat
18. Fuses
19. Compensation water kettle
20. Batter
21. 2WD-4WD switch
22.Switch combination
23. Indicators & Display
24. MP3 switch
25. Auxiliary DC jack(Cigarette lighter)
26. Glove compartment lock
27. Accelerator pedal
28. Brake pedal
NOTE:
The vehicle you have purchased may
differ slightly from those shown in the
figures of this manual
23
S:
CONTROL FUNCTIONS
All electrical circuits are switched off.
The key can be removed in this position.
Mains switch
D:
All electrical circuits are switched off
Y:
1
All electrical circuits are supplied with
power, and the headlights and taillights
come on when the light switch is on.
Q:
The electric starter is engaged by
turning and holding the key in this
position. Release the key when the
engine starts.
Functions of the respective switch
positions are as follows:
24
CAUTION
Switches combination
Do not operate the electric starter
●
1
continuously for more than 5
2
3
seconds, or starter damage could
occur. Wait at least 5 seconds
between each operation of the
electric starter to let it cool.
Do not turn the key to the “Q”
●
1. Horn switch
2. Winch switch
Release wire rope
position with the engine running, or
damage to the electric starter can
result.
See
●
starting instructions prior to
Contraction wire rope
starting the engine.
3. Dangerous warning lights switch
25
Switches combination
1. Direction indicator
2. Headlamp Switch
3. Lighting Switch
4. Wiper Switch
26
On–Command four-wheel drive
and differential gear lock
switches
1.On-Command four-wheel-drive switch
“2WD”/“4WD”
2WD—Pop-up the button
4WD—push the button
2.On-Command differential gear lock
switch “4WD”/“LOCK”
4WD—push the button
1
LOCK—Pop-up the button
This vehicle is equipped with an
On-Command four-wheel-drive
switch “2WD”/“4WD”and a differential
gear lock switch “4WD”/“LOCK”. Select
the appropriate drive according to
terrain and conditions.
2
27
Electric plunger switch of cargo
1、The switch is automatic, hold the
switch upward, the cargo box will be
up, stop the holding, the cargo box
will be stopped.
box
2、hold the switch downward, the
cargo box will be down, stop the
holding, the cargo box will be
stopped.
28
Indicators & Display
29
by continuing press button of mode of
“ Set/Reset” ,user can clean the record
to zero for particular period of working
mileage and time by pressing the mode of
“Set/Reset “ while showing mode of
“TRIP A and HRA” in the speedometer .
Odometer
When selected, the odometer registers
total distance traveled in miles while the
ignition is ON A. To change the display
from trip meter to odometer, press and
release the Odometer/Trip meter select
button .
Functions switch:
Press the button of “ Mode “, the mode
of “ODO, TRIP A, TRIP B, HRA and HRB
will display in the odograph and be
switched betweens, the figure of speed
will display and update synchronous
while switching between “KM/H and
MPH” in unit of pedometer. Press the
button of “Time Set “, the user can set
1、Speed meter
2、Time/Engine speed
3、Trip meter
the hour and minute. Then adjust hours
or minute by ascending or descending
30
the temperature is above 102℃,stop
engine immediately. Check coolant
lever and add if low, see authorized
dealer if temperature indicator stay on
and overflow tank is full of coolant.
Km/h & mph mode change
Press the MODE button, choose either
Km/h or mph needed.
2、quantity of fuel indicator light
“
”
When the last segment clears, a low fuel
warning is activated, the fuel gauge will
blink, refuel immediately, otherwise the
vechile will be stopped and can not start
again.
Other indicator light
1、Coolant temperature indicator light
“
”
It indicates the temperature of coolant, If
31
3、Check engine indicator lamp“
”
4、2WD/4WD indicator
After turning the ignition switch on, the
lamp shall be on, and the lamp shall be
off after starting the engine. If the lamp
is on while the engine working, it
indicates that the system failed.
----2WD
----4WD
----4WD/LOCK
When some electric jet parts are found
fault, check engine indicator lamp will
also be ON, the vehicle still can keep
running, the driving performance is
getting worse, which reminds the driver
should send the vehicle to repair.
32
5、Gear Indicator
L----- Low Gear
H---- High Gear
N---- Neutral
R---- Reverse Gear
8、Headlight Indicator
Means headlight is in the
working.
6、Direction Indicator
---- Turn Left
---- Turn Right
7、Parking Indicator
Means the vechile is in the
parking,before start driving, remind the
driver to release the park brake and
move the lever downward,then start
driving.
33
3. Pull out the cigarette lighter, and then
insert the accessory power plug into
the jack.
4. When the auxiliary DC jack is not
being used, put back the Cigarette
lighter.
Maximum rated capacity for the auxiliary
DC jack: DC 12V, 120W (10A)
CAUTION:
●Do not use accessories requiring
move than the above maximum
capacity. This may overload the
circuit and cause the fuse to blow.
●If accessories are used without
the engine running or with the
headlights turned on, the battery
will lose its charge and engine
starting may become difficult.
Auxiliary DC jack(Cigarette
lighter)
The auxiliary DC jack is located at the
right side of the front panel.
The auxiliary DC jack can be used for
suitable work lights, radios, etc.
The auxiliary DC jack should only be
used when the engine is running.
1. Set the light switch to “OFF”.
2. Start the engine.
Cigarette lighter
Auxiliary DC jack
34
Before starting the engine, check the
accelerator pedal to be sure it is
operating smoothly. Make sure the
accelerator pedal fully returns to the idle
position as soon as it is released.
Accelerator pedal
Press the accelerator pedal down to
increase engine speed. Spring pressure
returns the pedal to the rest position
when released. Ways check that the
accelerator pedal returns normally
before starting the engine
! WARNING
POTENTLAL HAZARD
Malfunction of the accelerator pedal.
WHAT CAN HAPPEN
The accelerator pedal could be hard to
operate, making it difficult to speed up or
slow down then you need to. This could
cause an accident.
HOW TO AVOID THE HAZARD
Check the operation of the accelerator
pedal before you start the engine. If it
does not work smoothly, check for the
cause. Correct the problem before
operating the vehicle. Consult an dealer
if you can’t find or solve the problem
yourself.
1. Accelerator pedal
35
Brake pedal
Press the brake pedal to slow or stop
the vehicle.
1. Brake pedal
36
Parking brake lever
Pull the parking lever up so that the unit
can engage park brake. To release the
unit, press button in the front end of
parking lever, then push the parking
lever to the bottom.
Parking brake leve
Pull the parking lever up so that the unit
can engage park brake. To release the
unit, press button in the front end of
parking lever, then push the parking
lever to the bottom
CAUTION
● Never use parking brake lever then
the vehicle don’t stop fully.
● Adjust the parking cable if necessary.
●
Parking brake lever
Be sure to fully release the parking
brake lever before starting the
vehicle.
Release button
37
“L” means Low Gear, “H” means the
High Gear, “N” means Neutral,”R”
means Reverse Gear.
When shift gear, must press the Unlock
button first, then start shifting.
When start the engine, must shift the
gear to the “N” first, otherwise can not
start the engine. If the gear not in the
“N” position,press the brake pedal,also
can start the engine.
CAUTION
When parking the vehicle,the gear must
be shifted into “N” position.
When shift the gear(especially for the
“R” gear), must press the brake pedal
first, then shifting after Vehicles
completely stopped.
Drive select lever
Drive select lever
Unlock button
38
Seat belts
This vehicle is equipped with three-point
seat belts for both the operator and
passenger. Always wear the seat belt
while riding in the vehicle
To wear the seat best belt properly, do
the following:
1. Hold the latch plate as you pull the
belt across your lap and chest. Make
sure the belt is not twisted and is not
caught on any portion of the vehicle,
your clothing, or any equipment you
are carrying.
2. Push the latch plate into the buckle
until it clicks. Pull up on the latch plate to
make sure it is secur
1. Buckle
2. Latch plate
3. Put the lap portion of the belt low on
your hips. Push down on the buckle end
of the belt as you pull up on the
shoulder part so the belt is snug across
your hips
4. Position the shoulder belt over your
shoulder and across your chest. The
shoulder belt should fit against your
chest. If it is loose, pull the belt out all
39
the way and then let it retract.
5. To release the buckle, firmly press
the release button
1. Buckle
! WARNING
POTENTIAL HAZARD
Not wearing the seat belt.
Wearing the seat belt improperly.
WHAT CAN HAPPEN
There is increased risk of being killed
or seriously injured in an accident.
HOW TO AVOID THE HAZARD
Always wear your seat belt when
riding in the vehicle.
Be sure the seat belt is close-fitting
across your hips and chest and is
2. Release button
latched securely.
40
Glove compartment
Trailer hitch bracket
CAUTION:
This vehicle is equipped with a 5cm (2in)
receiver bracket for a standard trailer
hitch. Trailer towing equipment can be
obtained at an dealer.
To protect from damage, do not put
metal products, like tools or sharply
edged products directly in the glove
compartment. If they must be stored,
wrap them in appropriate cushion
material.
b
a
1
a. Unlock
1.
b. Open
41
Trailer hitch bracket
you drive. Although complete protection
is not possible, wearing proper gear can
reduce the chance of injury then you
drive. The following suggestions will
help you choose the proper driving
gear.
Helmets and eyes protection
Your helmet is your most important
piece of driving gear because it offers
the beat protection against head injuries.
A helmet should fit your head
comfortably and securely.
An open-face helmet offers some
protection, but a full-face helmet offers
more. Regardless of the style, look for a
DOT(Department of Transportation)
sticker in any helmet you buy. Always
wear a face shield or goggles to protect
your eyes and help your vision
ARE YOU READY TO DRIVE
Before each drive, you need to make
sure you and your UTV are both ready
to drive. To help get you prepared, this
section discusses how to evaluate your
driving readiness, what items you
should check on your UTV, and
adjustments to make for your comfort,
convenience, or safety.
Protective apparel
For your safety, we strongly recommit
end that you always wear an approved
motorcycle helmet, eye protection,
boots, gloves, long pants, and
long-sleeved shirt or jacket whenever
42
Additional driving gear
In addition to a helmet and eye
protection ,we also recommend:
● sturdy off-road motorcycle boots to
help protect your feet, ankles, and lower
legs.
● off-road motorcycle gloves to help
protect your hands.
● driving pants with knee and hip pads, a
driving jersey with padded elbows,
chest/shoulder protector.
Drive training
Developing your driving skills is an
on-going process. Even if you have
driven other UTVs , take time to become
familiar with hoe this UTV in a safe area
to build your skills. Do not drive in rough
! WARNING
Operating this without wearing an
approved motorcycle helmet, eye
protection and protective clothing
could increase your chances of
head or eye injury, possibly death in
the event of
severe accident.
Always wear approved motorcycle
helmet that fits properly and wear
eye
protection(goggle
or
face
shield), gloves, boots, long-sleeved
shirt or jacket and long pants
43
terrain you get accustomed to the UTV’s
controls, and feel comfortable with its
size and weight.
Age Recommendation
It is strongly recommended that is not
one under the age of 16 be permitted
this UTV without adult supervision.
! WARNING
A child driving a UTV that is not
recommended for his/her age could
lose UTV control and result in
server injury or death.
A child under 16 years holed have
adult supervision when operate on
the UTV
! WARNING
Operating UTV without proper
instruction could increase your risk of
an accident which could lead to
serious injury or death.
! WARNING
Attempt supporting with your hands
to the ground then the off highway
recreational cubicle turning over
could lead to serious injury or death.
Never support with your hands to
ground when the off highway
recreational vehicle will turn over.
No Alcohol or Drugs
Alcohol, drugs and driving don’t mix.
Even a small amount of alcohol can
impair your ability to operate a UTV
safely. Likewise, drugs, even if
44
prescribed by a physician, can be
IS YOUR VEHICLE READY
dangerous whiles operating a UTV.
TO DRIVE
consult your to be sure it is safe to
operate a vehicle after taking
Before each drive, it is important to
medication.
inspect your UTV and make sure any
problems you find are corrected. A
predrive inspection is a must, not only
! WARNING
for safely, but because having a
Operating this UTV after consuming
breakdown, or even a flat tine, can be a
alcohol or drugs can seriously affect
major inconvenience.
your judgment, cause you to react
If your UTV has overturned or has been
more slowly, affect your balance and
involved in a collision, do not drive it
perception, and could result in
until your UTV has been inspected by
serious injury or death.
your dealer. There maybe damages or
Never consume alcohol or drugs
other problems you can not see.
before or while operating this UTV.
45
Check for leaks.
● Coolant
Check the coolant add coolant if
needed. Check for the leaks
● Fuel
Check the level and add fuel if
needed. Also make sure the fuel cap
is securely fastened. Check for leaks.
● Tires
Use a gauge to check the air
pressure. Adjust if needed. Also look
for signs of damages or excessive
wear.
● Nut &Bolts
Check the wheels to see that the axle
nuts are tightened, use a wrench to
make sure all accessible nuts, bolts,
and fasteners are tight.
! WARNING
mproperly maintaining this UTV or
failing to correct a problem before
driving can cause a crash in which
you can be seriously hurt or even
dead.
Always
perform
a
reprieve
inspection before every drive and
correct any problems.
Pre-drive Inspection
Check the following items before you
get on the UTV :
● Engine oil
Check the level and add oil if needed.
46
● Underbody & Exhaust System
Check for, and remove any dirt,
vegetation or other debris that could
be fire hazard or interfere with the
proper operation of the UTV
● Air Cleaner
Check the air filter. Replace it if
needed.
● Leaks, Loose Part
Walk around your UTV and look
for anything that appears unusual,
such as a leak or loose cable.
check for proper brake pedal free
play. Make sure there is no brake
fluid leakage.
● Engine stop
When engine is running, turn the
switch key counterclockwise. Make
sure engine stops.
● Steering Wheel
Check that the wheels turn properly
as you turn the steering wheel.
●Cable
Check the cable housing for wear.
Check the fittings are tight. Replace
or tighten as needed.
●Tie rod
Check the tie rod housing for wear.
Check the fittings are tight. Replace
● Lights
Make sure the headlight, brake light
and tail light are working properly.
● Brakes
Press the brake pedal several times,
47
can affect handling and control. You
should not drive your UTV on pavement
! WARNING
Operating this UTV on paced surfaces
may seriously affect handling and
control of the UTV, and may cause the
vehicle to go out of control
Never operate the on any paved
surfaces,
including
sidewalks,
driveways, parking lots and strata.
When driving off-road, also remember
to always obey local off-road driving
laws and regulations. Obtain permission
to drive on private property. Avoid
posted areas and obey “no trespassing”
or tighten ad needed.
signs.
You should never drive your UTV on
public streets, roads or highways, even
Safe driving precautions
Off-road use only
if they are not paved. Drivers of street
vehicles may have difficulty seeing and
You’re UTV and its tires are designed
and manufactured for off-road use only,
not for pavement. Driving on pavement
avoiding you, which could lead to a
collision. In many states it is illegal to
48
operate UTV on public streets, roads
Keep hands and feet on controls
Always keep both hands on the steering
wheel and both feet on controls. When
driving your UTV, it is important to
maintain your balance and control of the
UTV. Removing hands or feet away
from the controls can reduce your ability
to react and control the off highway
recreational vehicle.
and highways.
! WARNING
Operating this UTV on paced surfaces
may seriously affect handling and
control of the UTV, and may cause the
vehicle to go out of control.
Never operate the on any paved
surfaces,
including
sidewalks,
Operating this UTV on paced surfaces
may seriously affect handling and
control of the UTV, and may cause the
vehicle to go out of control.
Never operate the on any paved
surfaces,
including
sidewalks,
driveways, parking lots and strata.
49
Control speed
Driving at excessive speed increases
the chance of an accident. In choosing a
proper speed, you need to consider the
capability of your UTV, the terrain,
visibility and other operating conditions,
plus your own skills and experience.
! WARNING
Removing hand from steering
wheel or feet from foot controls
during operation can reduce your
ability to control the UTV
Always keep both hands on the
steering wheel and both feet on the
foot controls of your UTV during
operation.
! WARNING
Operating this UTV at excessive
speeds increases your changes of
losing control of the UTV, which can
result in an accident.
Always drive at a speed that is proper
for your UTV, the terrain, visibility and
other operating conditions, and your
experience.
Take Care on Unfamiliar or Rough
Terrain
Before driving in a new area, always
check the terrain thoroughly. Don’t drive
fast on unfamiliar terrain or when
visibility is limited. (It’s sometimes
difficult to see and react obstructions,
50
such as hidden rocks, bumps, or holes.)
Never drive past the limit of visibility.
Maintain a safe distance between your
and other off-road vehicles. Always
exercise caution and take extra care on
rough, slippery and loose terrain.
! WARNING
Failure to take extra care when
operating this UTV on unfamiliar
terrain could result in the UTV,
overturning or going out of control.
Go slowly and be extra careful when
operating on unfamiliar terrain.
Always be alert to changing terrain
conditions when operating the UTV.
terrain. Always be especially cautious
on these kinds of terrain.
! WARNING
Failure to take extra care when
operating on excessively rough,
slippery or loose terrain could cause
loss of traction or vehicle control,
which could result in an accident,
including an overturn.
Do not operate on excessively rough,
slippery or loose terrain until you have
learned and practiced the skills
necessary to control the UTV on such
Do Not Perform Stunts
You should always operate your UTV in
a safe and reasonable manner. When
driving always keep all wheels on the
ground.
51
from your new vehicle. The following
guidelines explain proper break-in
procedures.
1、After the engine starts, the engine is
not allowed in high speed in the
neutral gearshift.
2、Drive vehicle from stop to low speed
slowly.
3、 Avoid braking strongly.
4、Do not exceed the vehicle speed on
the below schedule.
! WARNING
Attempting wheelies and other
stunts increases the chance of an
accident, including an overturn.
Never attempt stunts, such as
wheelies or jumps. Don’t try to
show off.
Break-in
Starting and Operating Instructions
● Before starting the engine, be sure
that the driver is seated properly in
the UTV and tighten the seat belts.
● Testing the UTV in an open place at
The first month is most important in the
life of your vehicle. Proper operation
during this break-in period will help
assure maximum life and performance
52
the beginning to learn how to start,
turn and stop.
● Operate the UTV slowly until you are
familiar with it.
● The turning radius of this UTV is small
and agile, so the centrifugal force is
very high when turning at high speed.
Slow down to a more controllable
speed when turning to prevent the
UTV from rolling over.
● To prevent vehicle from rolling over,
be sure to only turn the vehicle at a
slow more controllable speed.
following points
PRE-OPERATION CHECKS
Front and rear brakes
Before using this vehicle, check the
Brake fluid leakage
Check to see if any brake fluid is leaking
! WARNING
POTENTIAL HAZARD
Failure to inspect the vehicle before
operating. Failure to properly maintain
the vehicle.
WHAT CAN HAPPEN
Increases the possibility of an
accident or equipment damage.
HOW TO AVOID THE HAZARD
Always inspect your vehicle each time
you use it to make sure the vehicle is
in safe operating condition. Always
follow the inspection and maintenance
procedures and schedules described
in the Owner’s Manual.
53
! WARNING
POTENTIAL HAZARD
Driving with improperly operating
brakes.
WHAT CAN HAPPEN
You could lose braking ability, which
could lead to an accident.
HOW TO AVOID THE HAZARD
Always check the brakes at the start
of every ride. Do not operate the
vehicle if you find any problem with
the brakes.
If a problem cannot be corrected by
the adjustment procedures provided
in this manual, have the vehicle
inspected by an dealer.
out of the pipe joints or the brake fluid
reservoir. Apply the brakes firmly for
one minute. If there is any leakage,
have the vehicle inspected by an dealer.
Brake operation
Test the brakes at slow speed after
starting out to make sure they are
working properly. If the brakes do not
provide proper braking performance,
inspect the brake system.
54
Fuel
Make sure there is sufficient gasoline in
the tank.
CAUTION:
Use only unleaded gasoline. The use of
leaded gasoline will cause severe
damage to internal engine parts, such
as the valves and piston rings, as well
as to the exhaust system.
Gasohol
There are two types of gasohol; gasohol
containing ethanol and that containing
methanol. Gasohol containing ethanol
can be used if ethanol content does not
exceed
10%.
Gasohol containing
methanol is not recommended by
because it may cause fuel system
damage
or
vehicle
performance
problems.
55
Accelerator pedal
! WARNING
Check to see that the accelerator pedal
operates correctly. It must operate
smoothly and fully spring back to the
idle position when released. Have an
dealer repair as necessary for proper
operation.
POTENTIAL HAZARD
Improper care when refueling.
WHAT CAN HAPPEN
Fuel can spill, which can cause a fire
and severe injury.
Fuel expands when it heats up.
If the fuel tank is overfilled, fuel could
spill out due to heat from the engine or
the sun.
HOW TO AVOID THE HAZARD
Do not overfill the fuel tank. Be careful
not to spill fuel, especially on the
engine or exhaust pipe. Wipe up any
spilled fuel immediately. Be sure the
fuel tank cap is closed securely.
Seat belts
Make sure that both seat belts are not
frayed or damaged.
The seat belt must move smoothly when
pulled. The latch plate should click
securely into the buckle and release
when the release button is pushed firmly.
Wash off any dirt or mud which could
affect operation. Have an dealer repair
as necessary for proper operation.
56
Steering
condition. Repair as necessary for
Park on level ground. Turn the steering
proper operation.
wheel right and left. Check for excessive
Switches
free play, abnormal noises, or a rough
Check the operation of all switches.
Have an dealer repair as necessary for
proper operation.
feeling. Have an
dealer repair as
necessary for proper operation.
Tires
Fittings and fasteners
! WARNING
POTENTIAL HAZARD
Operating this vehicle with improper
tires, or with improper or uneven tire
pressure.
WHAT CAN HAPPEN
Use of improper tires on this vehicle,
or operation of this vehicle with
improper or uneven tire pressure,
may cause loss of control, increasing
your risk of accident.
Always check the tightness of chassis
fittings and fasteners before a ride. Take
the vehicle to an dealer or refer to the
Service Manual for correct tightening
torque.
Lights
Check the headlights and tail/brake
lights to make sure they are in working
57
How to measure tire pressure
Use the tire pressure gauge.
NOTE:
The tire pressure gauge is included as
standard equipment. Make two
measurements of the tire pressure and
use the second reading. Dust or dirt in
the gauge could cause the first reading
to be incorrect.
HOW TO AVOID THE HAZARD
1 The tires should be set to the
recommended pressure:
● Recommended tire pressure
Front & Rear
50Ka (0.5 kgf/cm2, 7.3Psi)
Check and adjust tire pressures
when the tires are cold.
Tire pressures must be equal on
both sides.
2.Tire pressure below the minimum
specified could cause the tire to
dislodge from the rim under severe
riding conditions. The following are
minimums:
Front & Rear
45Kpa(0.45kgf/cm2, 6.5Psi)
Higher pressures may cause the tire to
burst. Inflate the tires very slowly and
carefully. Fast inflation could cause the
tire to burst.
Front
&
Rear
58
Recommende
d
pressure
50kpa
0.5 kgf/cm2,
7.3psi)
Minimum
Maximum
45kpa
0.45
kgf/cm2
6.5psi
52kpa
0.52
kgf/cm2
7.6psi
Manufacturer
size
Front
FAR EAST
25x8-12
Rear
FAR EAST
25x10-12
OPERATION
! WARNING
POTENTIAL HAZARD
Operating vehicle without being
familiar with all controls.
1. Tire pressure gauge
WHAT CAN HAPPEN
Tire wear limit
When the tire groove decreases to 3
mm (0.12 in) due to wear, replace the
tire.
Loss of control, which could cause
an accident or injury.
HOW TO AVOID THE HAZARD
Read the Owner’s Manual carefully.
If there is a control or function you
do not understand, ask your dealer.
a. Tire wear limit
59
Jump-starting
Jump-starting the vehicle should be
avoided. The battery should be
removed and charged instead. however,
if the vehicle must be jump-started,
proceed as follows.
1、Turn the key to “OFF”.
2、Open the hood. Remove the battery
compartment cover.
3、Using a charged 12V battery, connect
the positive lead of the jumper cable to
the positive terminal of the battery in the
vehicle and the
4、Connect the negative lead of the
jumper cable to the negative terminal of
the negative lead to an unpainted metal
surface of the vehicle.
1. Jumper cable positive lead
2. Jumper cable negative lead
! WARNING
Do nor connect the negative lead of the
jumper cable to the negative terminal of
the battery in the vehicle.
● Be especially careful not to:
●touch the positive lead of the jumper
cable to the negative lead.
●reverse the polarity of the jumper cables
when connecting to the batteries-battery
explosion and/or serious damage to the
electrical system may occur.
60
5、Start the engine.
the throttle normally with the starter
6、After the engine starts, disconnect the
(choke) turned off.
negative lead of the jumper cable
from the vehicle and charged battery,
Shifting: Neutral to Reverse
and then disconnect the positive lead
1. Stop the vehicle. Keep your foot off
of the jumper cable from the charged
the accelerator pedal.
battery and the battery in the vehicle.
2. Apply the brake pedal.
3. Shift from neutral to reverse or vice
7、Install the battery compartment cover.
8、Close the hood.
versa by moving the drive select lever
along the shift guide.
Warming up
4. Check behind for people or obstacles,
To get maximum engine life, always
then release the brake pedal.
warm up the engine before starting off.
5. Press the accelerator pedal gradually
Never accelerate hard with a cold
and continue to watch to the rear
engine! To see whether or not the
while backing.
engine is warm, check if it responds to
61
R
N
H
L
Engine break-in
There is never a more important period
in the life of your vehicle than the period
between zero and 20 hours.
! WARNING
POTENTIAL HAZARD
Improperly operating in reverse.
WHAT CAN HAPPEN
You could hit an obstacle or person
behind you, resulting in serious
injury.
HOW TO AVOID THE HAZARD
When you shift into reverse, make
sure there are no obstacles or people
behind you. When it is safe to
proceed, go slowly.
For this reason, we ask that you
carefully read the following material.
Because the engine is brand new, you
must not put an excessive load on it for
the first several hours of running. During
the first 20 hours, the various parts in
the engine wear and polish them- selves
to the correct operating clearances.
During this period, prolonged full throttle
operation or any condition which might
62
result in excessive engine heating must
operation. Vary the speed of the vehicle
be avoided. However, momentary (2-3
from time to time. Do not operate it at
seconds maximum) full throttle
one set throttle position.
operation under load does not harm the
10-20 hours:
engine.
Avoid prolonged operation above 3/4
Each full throttle acceleration sequence
throttle. Rev the vehicle freely but do not
should be followed with a substantial
use full throttle at any time.
rest period for engine by cruising at
After break-in:
lower r/min so the engine can rid itself of
The vehicle can now be operated
the temporary build up of heat. If any
normally.
abnormality is noticed during this period,
Parking
When parking, stop the engine and shift
the drive select lever into the neutral
position. Apply the parking brake to help
prevent the vehicle from rolling.
consult an dealer.
0-10 hours:
Avoid continuous operation above half
throttle. Allow a cooling off period of five
to ten minutes after every hour of
63
Parking on a slope
! WARNING
POTENTIAL HAZARD
Parking on a hill or other incline.
WHAT CAN HAPPEN
The vehicle could roll out of control,
increasing the chance of an accident.
HOW TO AVOID THE HAZARD
Avoid parking on hills or other
inclines. If you must park on an
incline, apply the parking brake, and
block the front and rear wheels with
rocks or other objects. Do not park
the vehicle at all no hills that are so
steep you could not walk up them
easily.
1. Bring the vehicle to a stop by applying
the brakes,
2. Stop the engine.
3. With the brakes applied, set the
parking brake.
64
design and quality.
Accessories and loading
●
Accessories should be rigidly and
Accessories
securely mounted. An accessory which
Accessories can affect the handling and
can shift position or come off while you
control of your vehicle. Keep the
are operating could affect your ability to
following in mind when considering an
control the vehicle.
accessory or operating a vehicle which
●
Do not mount an accessory where it
has accessories.
could interfere with your ability to control
Choose only accessories designed for
the vehicle. Examples include (but are
your vehicle. Your
not limited to) an object that limits your
●
dealer has a variety
of genuine accessories. Other
ability to turn the steering wheel or one
accessories may also be available on the
that limits your view.
market. However, it is not possible for
●
Use extra caution when driving a
to test all control over the quality or
vehicle with accessories. The vehicle
suitability of them. Choose a genuine
may handle differently than it does
accessory, or one that is equivalent in
without accessories.
65
Loading
the trailer, if you are carrying cargo and
Cargo or a trailer can change the
towing a trailer, include the tongue
stability and handling of a vehicle.
weight in the maximum vehicle load
You must use common sense and good
limit.
judgment when carrying cargo or towing
●
a trailer.
to the center of the vehicle as possible
Keep the following points in mind:
and tie it down using the cargo hooks
●
equipped on the cargo bed.
Never exceed the weight limits shown.
An overloaded vehicle can be unstable.
●
●
Choose a trailer hitch drawbar designed
The down cargo securely in the trailer.
Make sure cargo in the trailer cannot
move around.
for use with a 5 cm (2in) receiver.
●
Load cargo in the cargo bed as close
Do not exceed the maximum tongue
A shifting load can cause an accident.
weight. You can measure tongue weight
●
with a bathroom scale. Put the tongue of
with controls or your ability to see where
the loaded trailer on the scale with the
you are going.
tongue at hitch height. Adjust the load in
●
66
Make sure the load does not interfere
Drive more slowly than you would
without a load. The more weight you
! WARNING
POTENTIAL HAZARD
Overloading this vehicle or carrying or
towing cargo improperly.
WHAT CAN HAPPEN
Could cause changes in vehicle
handling which could lead to an
accident.
HOW TO AVOID THE HAZARD
Never exceed the stated load
capacity for this vehicle.
Cargo should be properly distributed
and securely attached.
Reduce speed when carrying cargo
or pulling a trailer. Allow greater
distance for braking.
carry, the slower you should go.
Although conditions vary, it is good
practice not to exceed low range
whenever you are carrying heavier
loads or when towing a trailer.
●
Allow more braking distance.
A heavier vehicle takes longer to stop.
●
Avoid making sharp turns unless at
very slow speeds.
●
Avoid hills and rough terrain. Choose
terrain carefully. Added weight affects
the stability and handling of the vehicle.
67
DRIVING YOUR VEHICLE
! WARNING
POTENTIAL HAZARD
GETTING TO KNOW YOUR VEHICLE
This off-highway utility vehicle will
handle and maneuver differently from
an ordinary passenger car or other
vehicle.
Before you begin to use your vehicle, be
sure you have read this Owner’s Manual
completely and understand the
operation of the controls. Please also
read all caution and warning labels on
your vehicle.
This vehicle is designed for the operator
and one passenger. The driver and
passenger must always wear a seat belt.
Never carry passengers in the cargo
bed.
Not wearing the seat belt.
Wearing the seat belt improperly.
WHAT CAN HAPPEN
There is increased risk of being
killed or seriously injured in an
accident.
HOW TO AVOID THE HAZARD
Always wear your seat belt when
riding in the vehicle.
Be sure the seat belt is close-fitting
across your hips and chest and is
latched securely.
68
! WARNING
POTENTIAL HAZARD
Carrying a passenger in the cargo
bed.
WHAT CAN HAPPEN
The passenger could fall or be struck
by objects in the cargo bed.
HOW TO AVOID THE HAZARD
Never carry a passenger in the cargo
bed. The cargo bed is designed to
carry cargo only.
! WARNING
POTENTIAL HAZARD
Overloading this vehicle orcarrying
or towing cargo improperly.
WHAT CAN HAPPEN
Could cause changes in vehicle
hand-ling which could lead to an
accident.
HOW TO AVOID THE HAZARD
Never exceed the stated load
capacity for this vehicle.
Cargo should be properly distributed
and securely attached.
Reduce speed when carrying cargo
or pulling a trailer. Allow greater
distance for braking.
Always follow the instructions in your
Owner’s Manual for carry cargo or
pulling a trailer.
69
! WARNING
POTENTIAL HAZARD
Operating this vehicle without
wearing an approved motorcycle
helmet,
eye
protection,
and
protective clothing
WHAT CAN HAPPEN
Operating without an approved
motorcycle helmet increases your
chances of a severe head injury or
death in the event of an accident.
Operating without eye protection
can result in an accident and
increases your chances of a severe
injury in the event of an accident
HOW TO AVOID THE HAZARD
Always
wear
an
approved
motorcycle helmet that fits properly.
You should also wear:
eye protection(goggles or face shield)
ong-sleeved shirt or jacket、gloves、
boots、long pants.
The driver and passenger must always
wear a seat belt and an approved
motorcycle helmet. Also wear eye
protection and protective clothing,
including over-the –ankle boots, gloves,
a long-sleeved shirt or jacket, and long
pants. Keep hands and feet inside the
vehicle at all times.
70
injured if they are in the way of the
steering wheel spokes.
TURNING YOUR VEHICLE
It is possible for the vehicle to roll over
or go out of control if you attempt sharp,
high-speed turns. You should also be
careful making sharp turns on rough
terrain. Do not attempt to turn around or
make abrupt maneuvers on slopes.
Position your hands on the steering
wheel so that your thumbs and fingers
do not wrap around the wheel. This is
particularly important when driving in
rough terrain. The front wheels will
move right and left as they respond to
the terrain, and this movement will be
felt in the steering wheel. A sudden jolt
could wrench the steering wheel around,
and your thumbs or fingers could be
Braking
Braking ability is affected by the type of
terrain. In most cases, gradually
application of the brakes is more
effective than abrupt braking,
particularly on loose surfaces like gravel.
Always allow for greater braking
71
Maximum slope angle: 15°
distance on rough, loose, or slippery
surfaces.
Going uphill
Do not attempt to climb hills until you
have mastered basic maneuvers on flat
ground. Use proper driving techniques
to avoid overturns on hills and slopes.
Drive straight up hills, and avoid
crossing the side of a hill, which
increases your chance of rollover.
Practice first on gentle slopes before
attempting steeper hills. Always check
the terrain carefully before attempting
any hill. Use common sense and
remember that some hills are too steep
for you to climb.
15°M
axi mu
m
Choose carefully which hills you attempt
to climb. Avoid hills with slippery
surfaces or ones where you will not be
able to see far enough ahead of you.
72
! WARNING
If you start to lose traction or momentum
POTENTIAL HAZARD
Operating on excessively steep hills.
WHAT CAN HAPPEN
The vehicle can overturn move easily
on extremely steep hills than on lever
surfaces or small hills.
HOW TO AVOID THE HAZARD
Never operate your vehicle on hills
too steep for it or your abilities.
Never operate vehicles on hills
steeper than 15°.
Do not drive across the face of a hill.
Go straight up the hill.
Practice on smaller hills before
attempting large hills.
when climbing, and you decide you will
be unable to continue, use the brakes to
come to a stop. Do not attempt to turn
the vehicle around. With your foot on
the brake, look behind you and plan
your descent. Shift the drive select lever
in reverse so you can use the engine
brake if necessary to slow your descent.
Release the brake and begin to coast
down the hill. Use engine braking as
much as possible, gently applying the
brakes when necessary.
73
Going downhill
! WARNING
POTENTIAL HAZARD
Going down a hill improperly.
WHAT CAN HAPPEN
Could cause loss of control or cause
the vehicle to overturn.
HOW TO AVOID THE HAZARD
Always check the terrain carefully
before you start down any hill. Never
go down a hill at high speed. Avoid
going down a hill at an angle that
would cause the vehicle to lean
sharply to one side. Go straight
down the hill where possible.
Check the terrain carefully before going
down a hill. When possible, choose a
path that lets you drive your vehicle
straight downhill. Avoid sharp angles
that could allow the vehicle to pitch or
roll over. Carefully choose your path
and drive no faster than you will be able
to react to obstacles that may appear.
74
Crossing through shallow WATER
On most slopes, this will let you use
engine braking to help you go downhill
slowly. Go as slowly as possible. If you
are starting to go too fast, apply the
brakes gently. Avoid sudden application
of the brakes, which could cause the
vehicle to start sliding.
If you are sliding or skidding, try to steer
in the direction the vehicle is sliding to
help you regain control.
If you must turn on the hill to avoid an
obstacle, do so slowly and carefully. If
the vehicle starts to tip, gradually steer
in the downhill direction if there are no
obstacles in your path. As you regain
proper balance, gradually steer again in
the direction you want to go.
If you must cross shallow, slow moving
water up to the depth of the vehicle’s
floorboards, choose your path carefully
to avoid sharp drop-offs, large rocks, or
slippery surfaces that could cause the
vehicle to overturn. Never operate
through water deeper than 33 cm (13 in)
or fast flowing water.
Wet
brakes
may
have
reduced
effectiveness. After leaving the water,
test your brakes. If necessary, apply the
brakes several times to let friction dry
out the linings.
75
CAUTION:
! WARNING
POTENTIAL HAZARD
Operating this vehicle through deep
or fast-flowing water.
WHAT CAN HAPPEN
Loss of control, which could result in
an accident including overturn, which
could increase the risk of drowning.
HOW TO AVOID THE HAZARD
Never operate this vehicle in fast
flowing water or in water deeper than
33 cm (13 in).
Remember that wet brakes may have
reduced stopping ability. Test your
brakes after leaving water. If necessary,
apply them several times to let friction dry
out the linings.
After riding your vehicle in water, be
sure to drain the trapped water by
removing the check hose at the bottom
of the air filter case , the drive select
button . Wash the vehicle in fresh water
if it has been operated in salt water or
muddy conditions.
Riding over rough terrain
Operating over rough terrain should be
done with caution. Look for obstacles
that could cause damage to the vehicle
or could lead to a rollover or accident.
Avoid jumping the vehicle as injury, loss
of control, and damage to the vehicle
could occur.
76
Riding in brush or wooded areas
! WARNING
When operating in areas with brush or
POTENTIAL HAZARD
Failure to use extra care when
operating this vehicle on unfamiliar
terrain.
WHAT CAN HAPPEN
You can come upon hidden rocks,
bumps, or holes, without enough time
to react. Could result in the vehicle
overturning or going out of control.
HOW TO AVOID THE HAZARD
Go slowly and be extra careful when
operating on unfamiliar terrain.
Always be alert to changing terrain
conditions when operating the
vehicle.
trees, watch carefully on both sides and
above the vehicle for obstacles such as
branches that the vehicle might hit,
causing an accident, or for brush that
might enter the vehicle as you pass and
strike the driver or passenger. Never
hold onto the enclosure so your hand is
outside the vehicle. Hold only onto the
handgrip inside the enclosure.
Encountering obstacles on the trail
If you cannot go around an obstacle
such as a fallen tree trunk or a ditch,
stop the vehicle where it is safe to do so.
77
Set the parking brake and get out to
! WARNING
inspect the area thoroughly. Look from
both your approach side and the exit
POTENTIAL HAZARD
side. If you believe you can continue
Improperly
safely, decide the path that will allow
obstacles.
you to a right angle as possible to
WHAT CAN HAPPEN
minimize vehicle tipping. Go only fast
Could cause loss of control or a
enough to maintain your momentum but
collision. Could cause the vehicle to
still give yourself plenty of time to react
overturn.
to changes in conditions. If there is any
operating
over
HOW TO AVOID THE HAZARD
question about your ability to maneuver
Before operating in a new area,
safely over the obstacle, you should turn
check for obstacles.
around, if the ground is flat and have the
Use extreme caution when operating
room, or back up until you find a less
over large obstacles, such as large
difficult path.
rocks or fallen trees.
78
PERIODIC MAINTENANCE
AND ADJUSTMENT
! WARNING
POTENTIAL HAZARD
Servicing an engine while it is
Periodic inspection, adjustment and
running.
lubrication will keep your vehicle in the
WHAT CAN HAPPEN
safest and most efficient condition
Moving parts can catch clothing or
possible. Safety is an obligation of the
parts of the body, causing injury.
vehicle inspection, adjustment and
Electrical components can cause
lubrication are explained in the following
shocks or can start fires.
pages.
HOW TO AVOID THE HAZARD
Turn off the engine when performing
maintenance
unless
otherwise
specified. Have an dealer perform
service if you are not familiar with
vehicle service.
79
Periodic maintenance/lubrication
NOTE :
● For vehicles not equipped with an odometer or hour meter, follow the month
maintenance intervals.
● For vehicles equipped with an odometer or an hour meter, follow the km(mi) or
hours maintenance intervals. However, keep in mind that if the vehicle isn’t used for
a long period of time, the month maintenance intervals should be followed.
● Items marked with an asterisk should be performed by a dealer as they require
special tools, data and technical skills.
80
INTIAL
ITEM
ROUTINE
Whichever
Comes first
→
EVERY
month
1
3
6
6
12
Km
(mi)
320
(200)
1,200
(750)
2,400
(1,500)
2,400
(1,500)
4,800
(3,000)
hours
20
75
150
150
300
Cooling system
●Check coolant leakage.
●Repair if necessary.
●Replace coolant every 24 months.
○
○
○
○
○
Spark plug
●Check condition.
●Adjust gap and clean.
○
○
○
○
○
Air filter elements
(engine and air intake
duct)
●Clean.
●Replace if necessary.
Crankcase
system*
●Check breather hose for cracks or damage.
●Replace if necessary.
○
○
○
Exhaust system*
●Check for leakage.
●Tighten if necessary.
●Replace gasket(s) if necessary.
○
○
○
Spark arrester
●Clean.
○
○
○
Fuel line*
●Check fuel hose for cracks or damage..
●Replace if necessary.
○
○
○
○
○
○
○
○
○
breather
Engine oil
Engine
cartridge
●Replace (warm engine before draining) .
oil
Front gear oil
Rear gear oil
Every 20-40 hours
(More often in wet or dusty areas.)
filter
●Replace.
●Check oil level/oil leakage.
●Replace.
○
81
○
○
ITEM
Front brake*
Rear brake*
Accelerator pedal*
Wheels*
Wheel bearings*
Front and rear
Suspension*
Steering system*
Drive shaft universal
joint*
Engine mount*
Front and rear axle
boots*
Fittings and fasteners*
Whichever
Comes first
→
month
ROUTINE
Km
(mi)
hours
●Check operation/brake pad wear/fluid leakage.
●Correct if necessary. Replace pads if worn to the
limit.
●Check operation/brake pad wear/fluid leakage.
●Correct if necessary. Replace pads if worn to the
limit.
●Check operation and free play.
●Check balance/damage/ runout .
●Repair if necessary.
●Check bearing assemblies for looseness/damage..
●Replace if damaged.
●Check operation and for leakage.
●Correct if necessary.
● Check operation and for looseness/Replace if
damage.
●Check toe-in/Adjust if necessary.
1
320
(200)
20
INTIAL
3
6
1,200
2,400
(750)
(1,500)
75
150
○
○
○
○
○
○
○
○
○
○
○
○
○
○
○
○
○
○
○
○
○
○
○
○
○
○
●Lubricate with lithium-soap-based grease.
●Check for cracks or damage.
●Correct bolt tightness.
●Check operation.
●Replace if damage.
●Check all chassis fittings and fasteners.
●Correct if necessary.
82
EVERY
6
12
2,400
4,800
(1,500) (3,000)
150
300
○
○
○
○
○
○
○
○
○
○
○
○
○
○
○
○
○
NOTE :
● Recommended brake fluid: DOT4
● Brake fluid replacement:
● Replace the brake hoses every four years, or if cracked or damaged.
● When disassembling the master cylinder or caliper, replace the brake fluid.
Normally check the brake fluid level and add fluid as required.
● On the inner parts of the master cylinder and caliper, replace the oil seals every
two years.
83
Gear Box Oil
drain plug.
Type
Hypoid gear oil
Viscosity
(weight)
SAE 85w/90
Suggested
oil
Shaft drive oil of original
manufacturer or
equivalent
(1)
Changing Oil
(2)
Changing the oil with the gear box at
normal operating temperature to
assure complete and rapid draining.
1、Park the UTV on level ground.
2、Place an oil drain pan under the oil
drain plug (1).
3、Remove the oil filler cap (2) and the
(1)oil drain plug
(2)oil filler cap
Gearbox Oil Level
The oil should be level with the
bottom of the oil level bole. Refill as
required until gearbox oil level flows
through oil level hole.
84
Rear knuckle upper and lower
pivot lubrication
Steering shaft lubrication
Lubricate the pivot points.
Lubricate the knuckle upper and
lower pivots with a grease gun.
Recommended lubricant:
Lithium-soap-based grease
(all purpose grease)
Recommended lubricant:
Lithium-soap-based grease
85
Wheel removal
Wheel installation
1. Loosen the wheel nuts.
2. Elevate the vehicle and place a
suitable stand under the frame.
3. Remove the nuts from the wheel.
4. Remove the wheel.
1、Install the wheel and the nuts.
NOTE:
● The arrow mark on the tire must
point toward the rotating direction
of the wheel.
● Tapered nuts are used for both the
front and rear wheels. Install the
nut with its tapered side towards
the wheel.
1. Nut (x4)
1. Arrow mark
86
Battery
This vehicle is equipped with a
sealed-type battery. Therefore it is
not necessary to check the electrolyte
or add distilled water in the battery. If
the battery seems to have discharged,
consult dealer.
CAUTION:
Do not try to remove the sealing
caps of the battery calls. You may
damage the battery.
1. Tapered nut
2. Lower the vehicle so that the wheel
is on the ground.
3. Tighten the wheel nuts to the
specified torque.
! WARNING
POTENTIAL HAZARD
Failure to handle batteries or battery
electrolyte carefully.
WHAT CAN HAPPEN
You could be poisoned. You could
be severely burned by the sulfuric
Wheel nut to Rear: rque:
Front & Rear:
64 Nm (6.4 kgf.m, 47 ft. lbf)
87
Battery maintenance
acid in battery electrolyte. Batteries
produce explosive gases.
HOW TO AVOID THE HAZARD
Avoid contact with skin, eyes or
clothing. Always shield eyes when
working near batteries. Keep out of
reach of children.
Antidote:
EXTERNAL : Flush with water.
INTERNAL : Drink large quantities
of water or milk. Follow with milk of
magnesia, beaten egg or vegetable
oil. Get prompt medical attention.
EYES : Flush with water for 15
minutes and get prompt medical
attention. Keep batteries away from
sparks, flames, Ventilate when
charging or using in a closed space.
1. When the vehicle is not used for
a month or longer, remove the battery
and store it in a cool, dark place.
Completely recharge the battery
before reinstallation.
CAUTION:
The carburetor was set at the
factory after many tests. If the
settings are disturbed by someone
without sufficient technical
knowledge, poor engine
performance and damage may
result.
2. Always make sure the connections
are correct when putting the battery
back in the vehicle.
88
! WARNING
flow ) short circuit or overload).
If something electrical on your UTV
stops working, the first thing you
should check for is a blown fuse (1).
Check all the fuses before looking
elsewhere for another possible cause
of the problem. Replace any blown
fuses and check component
operation.
Do nor connect the negative lead
of the jumper cable to the negative
terminal of the battery in the
vehicle.
● Be especially careful not to:
●touch the positive lead of the
jumper cable to the negative lead.
●reverse the polarity of the jumper
cables when connecting to the
batteries-battery explosion and/or
serious damage to the electrical
system may occur.
If a fuse blows
All of the electrical circuits on your
UTV have fuses to protect them from
damage caused by excess current
(1) Blown fuse
89
Troubleshooting
Fuse replacement
The main fuse and the fuse boa are
located under the hood. If a fuse is
blown, turn off the main switch and
install a new fuse of the specified
amperage. If a fuse is blown, replace
it as follows.
1. Remove the battery compartment
cover by lifting it up and pulling it out.
2.Turn the key to “OFF” and turn off
the electrical circuit in question.
CAUTION:
To prevent accidental short- circuiting,
turn off the main switch when
checking or replacing a fuse.
Although vehicles receive a rigid
inspection before shipment from the
factory, trouble may occur during
operation. Any problem in the fuel,
compression, or ignition systems can
cause poor starting and loss of power.
The troubleshooting chart describes a
quick, easy procedure for making
check. If your vehicle requires any
repair, take it to dealer.
The skilled technicians, at dealership
have the tools, experience, and
know-how to properly service your
vehicle. Use only genuine parts on
your vehicle. Imitation parts may look
like parts, but they are often inferior.
3. Remove the blown fuse, and then
install a new fuse of the specified
amperage.
90
Consequently, they have a shorter
service life and can lead to expensive
repair bills.
! WARNING
POTENTIAL HAZARD
Checking the fuel system while
smoking or near an open flame.
WHAT CAN HAPPEN
Fuel can ignite or explode, causing
severe injury or property damage.
HOW TO AVOID THE HAZARD
Do not smoke when checking the
fuel system. Make sure there are no
open flames or sparks in the area,
including pilot lights from water
heaters or furnaces.
91
Engine use and maintenance
roadside, it could cause a fair.
●Do not make modification on the
engine or its parts. it will resault in
the human injury ,engine damage
and warranty terminated.
●exhaust gas which from the engine
exhaust pipe may lead to cancer,
death, or other unknown physical
injuries
! WARNING
●Without the reasonable training,
the improper operation may cause
injury, death and engine damage.
●The improper installation and
operation will cause injury, death
and engine damage.
●Because of the high, temperature
Engine is strictly prohibited to touch
without any protective measure.
●To Avoid the injury and engine
damage, should take some proective
measures when making assembly or
using the engine ratation parts.
●No maintenance or use the engine
in a closed room.
●No repair the engine in the
T
92
a)Lubricants capacity:
he use of the engine
New machine ----2.2L
preparation of starting
Engine overhaul ---2.2L
(1) When opening the package,
Replace the oil filter----2.0L
check all the exposed fasteners are
tightened,
fixing
the
loose
Replace the engine oil----1.9L
and
b)Use high quality ethylene glycol
missing parts.
base
(2) Add fuel, lubricants and antifreeze
antifreeze
and
mixed
with
distilled water. Never mix alcohol
liquid according to the instruction.
base anti-freeze and different brands
Warning!
of anti-freeze. The ratio of antifreeze
Engine must use the genuine oil and
should not be more than 60% or less
coolant. When adding coolant, must
50%
fill in the cooling pipe and remove the
Warning!
air from the cooling system, otherwise
Do not open the radiator cap when
it will cause the engine overheated
the engine is still hot. Or you may be
and high pressure of cooling system.
injuired by scalding fluid or steam.
93
(3) Turn on the ignition switch, inspect
the fuel pressure, the pressure is
3Bar.
(4) Remove the spark plug, check if
has the flash fire.
Starting
(1) Keep oil passage in stable and
reliable.
(2) Keep the ignition system is in
working condition.
(3) Keep the gear lever in neutral.
(4) Keep the idle speed control valve
and intake pressure sensor is
connected correctly.
(5) Turn off the accelerator
completely, press the start switch
switch few seconds, then start
again(not more than 5 seconds)
(6) Turn off the throttle, shift the gear
into “H”,”L” and “R” after the
vehicle completely stopped.
Warning!
When shift, must stop the car and
turn off the throttle, otherwise will
damage the machine and cause
the accident.
Warning!
●Keep the engine warn up few
minutes before start the driving.
●When the engine start, should
release the electric switch
immediately, each start time lasting
Attention!
If fail to start, turn off the start
94
screws.
(3) Check the oil leakage, air leakage,
and
compression
pressure
whether is in the normal
condition.
(4) If the lubricants level is under MIN
scale, should add the oil and
enusre the oil level reaches in
the scale line. no more, no less.
not moren than 5 seconds
●Do not press the electric switch
again once the engine start.
●Do not keep the engine long time
running in the idling condition.
Stop the machine
(1) Parking the vechile on safety area
and turn off the accelerator.
(2) Keep the engine running 2-3 mins
in the idling condition.
(3) Turn off the electric switch.
Engine Maintenance
Daily maintenance
(1) Clean the oil, mud and dust.
(2) Check the fastening external
parts,tighten the bolts, nuts and
95
(1)
Under carved line
(2)
Up carved line
combination 6 and put it into the
body.
Regular Maintenance
(1)finish Daily maintenance
(2) To avoid the poor ventilation,
should clean , wash and change the
air filter on time.
■Check and clean the air filter as
fllowing:
●Loosen clamp 3, remove the filter
cap 2
●Loosen bolt 4, take down the filter
assy 5
●Take out the filter element 6
●Fill a wash pan of a proper size with
a cleaning solvent, Immerse the
filter element 6 in cleaning solvent
and wash it. Press the filter element
6 to remove the excess solvent;
Damaged
element
must
be
replaced; Assemble the the air filter
1、 Plastic cover
2、 Air filter cover
3、 Clamp
4、 Bolt
5、 Filter Assy
96
6、 Filter
Spark plug gap:
0.8-0.9 mm (0.031-0.035 in)
●Tighten the bolt 4,Put on the cover
2, tighten the clamp 3.
Warning!
Never use with gasoline or low
flash point solvents to clean the
filter element.
(3) Specified spark plug::DPR7EA-9
(NGK)
●Clean the surface of the spark plug
gas ket and its mating surface,
and then wipe off any grime from
the spark plug threads.
●Measure the electrode gap with a
wire thickness gauge and, if
necessary, adjust the gap to
specification.
● Install the spark plug and tighten it
to the specified torque.
Tightening torque:
Spark plug:
17.5 Nm (1.75m.kgf, 12.7ft.lbf)
97
⑷Oil changes
■Oil changes a s f o l l o w i n g :
●Remove the oil dip rod 5,bolt 3,
washer 2.
●Drain out the engine oil while the
engine is still warm.
●Clean oil dip rod 5,drain bolt 3 and
washer 2 with solvent.
●Install washer 2 and drain bolt 3.
●Fill engine oil, the oil level should
be on the oil dip rod 5 upper limit.
●Start the engine and alow it to run
for several minutes at idling
speed, then turn off the engine.
●Make sure no oil leakage.
1、Left Crankcase
2、Washer
3、Bolt
4、Cover
5、Oil dip rod
6、Oil filter
98
⑸Replacing the oil filter
⑹Check the cooling system
● Check radiator, reservior tank and
water hose leakage.
● Check the reservior tank water
level if between upper and lower
limit, if the water is insufficient,fill
the coolant until the upper limit.
● Replace the coolant every two
years.
⑺Check the valve clearance, adjust
the clearance if necessary.
■Check and adjust the valve
clearance as following:
●Remove cover plate,recoil starter.
●Remove the inspection cap on left
crankcase.
●Remove 2 valve adjusting cover.
●Turn the crankshaft until the line of
T.D.C. on rotor is aligned with
mark of inspection hole on left
cankcase.
●Insert feeler gauge to check the
clearance between the valve stem
end and the adjust bolt on the
rocker arm.
Valve Clearance
IN:0.05-0.10mm
EX:0.17-0.22mm
Warning! Engine must use of
recommendation coolant ,fill the
cooling system and drain out the
air, otherwise will cause the
engine high temperature or water
spalashing.
99
●Loosen valve adjust bolt and nut,
insert
a
feeler
gauge(IN:0.05mm,EX:0.17mm)
between the valve stem end and
valve adjusting bolt, tighten valve
valve adjust bolt, make sure it
slightly contacts the feeler gauge,
tighten bolt and nut.
● Take out the feeler gauge,
measure the clearance, if the
clearance is incorrect, repeat the
above steps until the proper
clearance is obtained.
●2 valve adjusting cover; Inspection
cap; Recoil starter; Cover plate;
a、exhaust valve
b、intake valve
1、valve adjusting cover
2、valve
3、rocker arm
4、valve adjusting bolt
5、nut
100
⑻Inspection drive belt for wear and
damage(remove the right cover),If
any cracks or damages are found,
replace drive belt with a new one.
⑼Start the engine, check the running
voice and exhaust pipe
condition( If anything different,
must find the reason and solve it),
inspect the idling speed according
to the specification, Otherwise,
must be adjusted.
101
Troubleshooting charts
Starting problems or poor engine performance
1.Fuel
There is fuel.
Remove the fuel hose
from the fuel pump.
No fuel.
Supply fuel.
Check if there is fuel
in the fuel tank.
Check the
fuel flow.
Restart the engine.
2.Compression
Use the electric
starter to see if
there is compression
There is compression.
No compression.
Fuel pump
is clogged.
Ask an dealer to
inspect.
Compression normal.
Ask an dealer to
inspect.
Spark is good.
3.Ignition
Remove the
spark plug and
check the electrodes.
No fuel.
Wet
Wipe clean with dry cloth.
Dry
Attach spark plug cap and
ground to chassis.
Use the electric
starter.
Spark is weak.
No spark.
4. Battery
Engine turn over
quickly.
Battery is good.
Engine turn over
slowly.
Check the connections
rechatge.
Use the electric starter
102
Ignition system
is normal.
Adjust the spark
plug gap or replace
the spark plug.
Ask an dealer to
inspect.
Engine overheating
! WARNING
POTENTIAL HAZARD
Removing the radiator cap when the engine and radiator still hot.
WHAT CAN HAPPEN
You can be burned by hot fluid and steam blown out under pressure.
HOW TO AVOID THE HAZARD
Wait for the engine to cool before removing the radiator cap. Always use a thick
rag over the cap. Allow any remaining pressure to escape before completely
removing the cap.
103
NOTE :
If it is difficult to get the recommended coolant, tap water can be temporarily used,
provided that it is changed to the recommended coolant as soon as possible.
MAINTENANCE CHART
The maintenance is very important, if you are not familiar with safe service practices
and adjustment procedures, see your authorized dealer.
104
105
106
107
108
CLEANING AND STORAGE
CLENANING
Frequent, though cleaning of your
vehicle will not only enhance its
appearance but will improve its
general performance and extend the
useful life of many components.
1. Before cleaning the vehicle:
a. Block off the end of the exhaust
pipe to prevent water entry. A
plastic bag and strong rubber
band may be used.
b. Make sure the spark plug and all
filler caps are properly installed.
2. If the engine case is excessively
greasy, apply degreaser with a paint
brush. Do not apply degreaser to the
wheel axles.
3. Rinse the dirt and degreaser off with a
garden hose. Use only enough
pressure to do the job.
CAUTION :
Excessive water pressure may cause
water seepage and deterioration of
wheel bearings, brakes, transmission
seals and electrical devices. Many
expensive repair bills have resulted
from improper high pressure
detergent applications such as those
available in coin-operated car washers.
- 109 -
4. Once the majority of the dirt has been
hosed off, wash all surfaces with warm
water and mild, detergent- type soap.
An old toothbrush or bottle brush is
handy for hard-to-get-at places.
which may scratch the paint or
protective finish. When finished, start
the engine and let it idle for several
minutes.
5. Rinse the vehicle off immediately with
clean water and dry all surfaces with a
chamois, clean towel or soft absorbent
cloth.
! WARNING
POTENTIAL HAZARD
Operation with wet brakes after
washing.
WHAT CAN HAPPEN
Wet brakes may have reduced
stopping ability, increasing the
chance of an accident.
HOW TO AVOID THE HAZARD
Test the brakes after washing. Apply
the brakes several times at slow
speeds to let friction dry out the
linings.
6. Clean the seats with a vinyl
upholstery cleaner to keep the cover
pliable and glossy.
7. Automotive type wax may be applied
to all painted and chrome plated
surfaces. Avoid combination
cleaner-waxes. Many contain abrasives
110
STORAGE
NOTE :
Long term storage 60 days or more of
Use of fuel stabilizer and conditioner
your vehicle will require some
eliminates the need to drain the fuel
preventive procedures to guard against
system. Consult an dealer if the fuel
deterioration. After thoroughly cleaning
system needs to be drained instead.
the vehicle, prepare for storage as
2. Remove the spark plug, pour about
follows:
one tablespoon of SAE 10W30 or
1. Fill the fuel tank with fresh fuel and
add the specified amount of
20W40 motor oil in the spark plug.
Fuel
Stabilizer and Conditioner or
Ground the spark plug wire and turn
equivalent product. Operate treated
the engine over several times to coat
fuel through the fuel system.
the cylinder wall with oil.
3. Lubricate all control cables.
Specified amount:
1 oz of stabilizer to each gallon of fuel
(or 7.5 cc of stabilizer to each liter of fuel)
4. Block up the frame to raise all
wheels off the ground.
111
5. Tie a plastic bag over the exhaust
NOTE :
pipe outlet to prevent moisture from
Make any necessary repairs before
entering.
storing the vehicle.
6. If storing in a humid or salt-air
atmosphere, coat all exposed metal
surfaces with a light film of oil. Do
not apply oil to any rubber parts or
the seat covers.
7. Remove the battery and charge it.
Store it in a dry place and recharge it
once a month. Do not store the
battery in an excessively warm or cold
place (less than 0℃ (30℉ ) of move
than 30℃( 90℉)).
112
SPECIFICATIONS
Model
APU06E
APU06EL
2905 mm (114.4 in)
3500 mm (137.8 in)
Overall width
1450 mm (57.1 in)
1480 mm (58.3 in)
Overall height
1,854 mm (73.0 in)
1800 mm (70.9 in)
Wheelbase
1,910 mm (75.2 in)
2580 mm (101.6 in)
320 mm (12.6 in)
260 mm (10.2 in)
3,900 mm (153.5 in)
3,900 mm (153.5 in)
540.0 kg (1,190 lb)
640kg (1,410 lb)
Dimensions:
Overall length
Ground clearance
Minimum turning radius
Basic weight:
With oil and full fuel tank
Engine:
Engine type
Liquid-cooled 4-stroke, SOHC
Cylinder arrangement
Displacement
Forward-inclined single cylinder
Bore×stroke
594 cm3
Compression ratio
96×82.0 mm (3.78×3.23 in)
Starting system
10.2 :1
Lubrication system
Electric starter
113
Wet sump
Model
APU06E
APU06EL
Engine:
Maximum power
28 kw/7100r/min
Maximum torque
Engine oil:
Type
46N.m/5500r/min
0°
10°
30°
50°
70°
90°
110° 130° F
LUBE 4 (20W40) or SAE 20W40
LUBE 4 (10W30) or SAE 10W30
SAE 5W30
Recommended
classification
Quantity:
Without oil
replacement
With
oil
engine
oil
-20°
-10°
0°
10°
20°
30°
40°
50° C
API.Service SE, SF, SG type or higher
CAUTION:
In order to prevent clutch slippage (since the engine oil
also lubricates the clutch), do not mix any chemical
additives. Do not use oils with a diesel specification of
"CD" or oils of a higher quality than specified. In
addition, do not use oils labeled "ENERGY
CONSERVING II" or higher.
filter
filter
cartridge
1.80 L (1.58 Imp qt, 1.90 US qt)
cartridge
2.00 L (1.76 Imp qt, 2.11 US qt)
114
replacement
Model
APU06E
APU06EL
Final gear case oil:
Type
Quantity:
SAE80 API GL-4 Hypoid gear oil
Differential gear case oil:
Type
Quantity:
SAE80 API GL-4 Hypoid gear oil
Radiator capacity (including
all routes):
Fuel:
Type
Fuel tank capacity
Spark plug:
Type/manufacturer
Spark plug gap
Transmission
Primary reduction system
Secondary reduction system
Final stage system
0.25 L (0.22 Imp qt, 0.26 US qt)
0.32 L (0.28 Imp qt, 0.34 US qt)
2.50 L (2.20 Imp qt, 2.64 US qt)
UNLEADED GASOLINE ONLY
27.0 L (5.9 lmp gal, 7.14 US gal)
DPR8EA-9/NGK
0.8-0..9 mm (0.031-0.035 in)
CVT ( reduction ratio: 0.7~2.88
Gear ( reduction ratio:
low
High
Reverse
Shaft drive (
115
)
3.514
5.857
3.828
reduction ratio: 3.667 )
Model
APU06E
APU06EL
Tire:
Tubeless
Type
Size
front
25×8-12NHS
rear
25×10-12NHS
Brakes
Front and rear unified
System
Type
front
Dual disc brake
Rear
Dual disc brake
Foot operation
Operation
Suspension:
Front suspension
Double wishbone
Rear suspension
Double wishbone
Shock absorber:
Front shock absorber
Coil spring/oil damper
Rear shock absorber
Coil spring/oil damper
Electrical:
ECU
Ignition system
A.C. magneto
Generator system
Battery type
Colloid free maintenance battery
12VDC 34Ah
Battery capacity
116
Model
APU06E
Headlight type Type
APU06EL
Krypton bulb
Bulb voltage, wattage×quantity
12V35W×2
Headlight
12V5W/21W×2
Tail/brake light
117
ATTACHMENT
一、ECS PARTS LIST
Engine Family: DUSTX.594CFM
Importer: U-STORM POWER CORPORATION
Manufacturer: ZHEJIANG APPLESTONE VEHICLE CO.,LTD.
Model Numbers: APU06E\APU06EL
Part Nomenclature
Catalytic Converter
Part Manufacturer Name
NANJING DEPURATE
CATALYST
Part Number
CO.,LTD
DP2G16
O2 Sensor
ZHEJIANG CFMOTO POWERCO.,LTD
107011
Muffler
YONGKANG DUWEI MUFFLER FACTORY
APU05E-0802000
CDI(ECU)
ZHEJIANG CFMOTO POWERCO.,LTD
ECU-065-11
Spark Plugs
NGK SPARK PLUG (SHANGHAI) CO.,LTD
DPR7EA-9(NGK)
Fuel Tank
ZHEJIANG APPLESTONE VEHICLE CO., LTD
APSD
Fuel Tank Cap Cover
RUIAN CHUANLONG VEHICLE PARTS
CO.,LTD
LZ111-110300
Air Cleaner
ZHEJIANG CFMOTO POWERCO.,LTD
CF188-110000
fuel line
XIAMEN JINBEIDE RUBBER SCIENCE &TECHNOLOGY CO., LTD.
EPA-XJR-A15-AAA
118
二、THE SKETCH MAP OF CRANKCASE WASTE RECYCLING
119
三、EMISSION CONTROL SYSTEM WARRANTY
YOUR WARRANTY RIGHTS AND OBLIGATIONS
The emission control system warranty period for this vehicle begins on the date the
vehicle is delivered to the first purchaser other than an authorized dealer, or the date
it is first used as a demonstrator, lease, or company vehicle, which ever comes first
and continues for 60 months after that date, or 10,000 which ever comes first,
provided there has been no abuse, neglector improper maintenance of your vehicle.
Where a warrantable condition exists, the Distributor will repair your vehicle at no
cost to you, including diagnosis, parts and labor. If an emission-related part on your
vehicle is defective, the part will be repaired or replaced by the Distributor. This is
your emission control defects warranty.
120
OWNER’S WARRANTY RESPONSIBILITIES
As the vehicle owner, you are responsible for the performance of the required
maintenance. You should maintain a record of all maintenance performed on your
vehicle and retain all receipts covering maintenance on your vehicle. You may not be
denied a warranty claim solely because of your failure to ensure the performance of
all scheduled maintenance or lack of maintenance records or receipts. You are
responsible for presenting your vehicle to an authorized dealer as soon as a problem
exists. The warranty repairs should be completed in a reasonable amount of time,
not to exceed 30 days.
As the vehicle owner, you should be aware that you may be denied your warranty
coverage if your vehicle or a part has failed due to abuse, neglect, improper
maintenance, or unapproved modifications.
121
WARRANTY COVERAGE
The Distributor warrants that each new 2009 and later vehicle:
• is designed, built, and equipped so as to conform at the time of initial retail
purchase with all applicable regulations of the United States Environmental
Protection Agency, and the California Air Resources Board; and
• is free from defects in material and workmanship which cause such vehicle to fail to
confirm with applicable regulations of the United States Environmental Protection
Agency or the California Air Resources Board for the periods specified above.
Your emission control system warranty covers components whose failure would
increase an engine’s emission, including electronic controls, fuel injection system,
carburetor, the ignition system, catalytic converter, or any other system utilized in
this vehicle to control emission if it is originally equipped. Also included may be
hoses, connectors and other emission-related assemblies. Replacing or repairing
122
other components (including parts, labor, and other costs) not covered by this
emission control system warranty or the standard warranty is the responsibility of the
owner.
Coverage of repairs under this warranty applies only when repairs are completed at
an authorized dealer or repair facility. The Distributor will not cover repairs performed
outside of an authorized dealer or repair facility, except in an emergency situation.
The use of replacement parts not equivalent to the original parts may impair the
effectiveness of your vehicle’s emission control system. If such a replacement part is
used and an authorized dealer determines it is defective or causes a failure of a
warranted part, your claim for repair to bring your vehicle into compliance with
applicable standards may be denied.
If an emergency situation exists when a warranted part or a dealer is not reasonably
available to the owner, repairs may be performed at any available service
establishment, or by the owner, using any replacement part. The Distributor shall
123
reimburse the owner for the expenses, including diagnostic charges, not to exceed
the Distributor’s suggested retail price for all warranted parts replaced and labor
charges based on the Distributor’s recommend time allowance for the warranty
repair and the geographically appropriate hourly labor rate. The owner may
reasonably be required to keep receipts and failed parts in order to receive
compensation.
This Emission Control System Warranty is in addition to the standard Limited
Warranty.
EXCLUSIONS AND LIMITATIONS
This warranty does not cover the following:
• Failures or malfunctions of the emission control systems caused by abuse,
alteration, accident, misuse, the use of leaded gasoline.
• Replacement of expendable maintenance items unless they are original equipment
124
defective in material or workmanship under normal use, and the first required
replacement interval for the item has not been reached. Expendable maintenance
items include but not limited to spark plugs, filters, coolant, lubricants, gaskets,
hoses, and belts.
• Replacements of parts and other services and adjustments for required
maintenance.
• Any vehicle equipped with an odometer or hour meter where the reading is altered
so that actual mileage cannot be readily determined.
• Repairs or replacements as a result of:
○ Accident
○ Misuse
○ Use of replacement parts or accessories not conforming to the original
specifications which adversely affect performance
• Physical damages, corrosions, or defects caused by fire, explosions or similar
125
causes beyond the control of the Distributor.
• Failures not caused by a defect in material or workmanship.
Use of the vehicle in any type of competitive racing or related events immediately
and completely voids this and all other warranties.
LIMITED LIABILITY
The liability of the Distributor under this Emission Control System Warranty is
limited solely to the remedying of defects in material workmanship by an authorized
dealer at its place of business during customary business hours. This warranty does
not cover in convenience or loss of use of the vehicle or transportation of the vehicle
to/from the authorized dealer. The Distributor is not liable to any person for incidental,
consequential or special damages of any description, whether arising out of express
or implied warranty or any other contract, negligence or other tort or otherwise.
No express emission control system warranty is given by the Distributor except as
126
specifically set forth herein. Any emission control system warranty implied by law,
including any warranty of merchant ability or fitness for a particular purpose is limited
to the express emission control system warranty terms stated in this warranty. The
foregoing statements of warranty are exclusive and in lieu of all other remedies. All
express warranties not stated in this warranty are disclaimed. Some states do not
allow limitations on how long an implied warranty lasts, so the above limitations may
not apply if it is inconsistent with the controlling state law.
No dealer is authorized to modify this Emission Control System Warranty. If you
have any questions regarding your warranty rights and responsibilities, you should
contact 3500 South DuPont Highway in the City of Dover, County of Kent, DE 19901,
855-717-7416 or the California Air Resources Board, 9528 Telstar Avenue, El Monte,
CA 91731 (for California registered vehicles only).
127
Electrical schematic
128