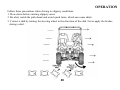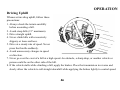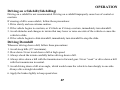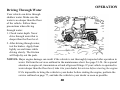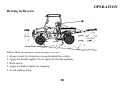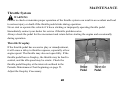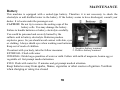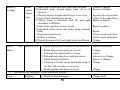
1
READ THIS MANUAL CAREFULLY!
It contains important safety information.
500/600UTV
500L/600LUTV
OWNER’S MANUAL
4×4
This UTV should not be ridden by anyone under 16 years of age.
INTRODUCTION
Congratulations on your purchase of the 500/600UTV. With the purchase of this UTV, you can now
appreciate the high degree of craftsmanship. This manual will provide you with a good basic
understanding of the features and operation of this UTV. This manual includes important safety
information. It provides information about special techniques and skills necessary to ride your
UTV. It also includes basic maintenance and inspection procedures. If you have any questions
regarding the operation or maintenance of your UTV, please consult you dealer.
AN IMPORTANT SAFETY MESSAGE:
● READ THIS MANUAL FOR THE UTV RIDER CAREFULLY AND COMPLETELY
BEFORE OPERATING YOUR UTV. MAKE SURE YOU UNDERSTAND ALL INSTRUCTIONS.
● PAY CLOSE ATTENTION TO THE WARNING AND CAUTION LABELS ON THE UTV.
● NEVER OPERATE A UTV WITHOUT PROPER TRAINING OR INSTRUCTION. FREE
TRAINING IS AVAILABLE TO ANYONE WHO BUYS A NEW UTV.
● THIS UTV, AND ANY OTHER UTV OVER 90cc, SHOULD NOT BE RIDDEN BY
ANYONE UNDER 16 YEARS OF AGE.
INFORMATION
FAILURE TO FOLLOW THE WARNINGS CONTAINED IN THIS MANUAL CAN
RESULT IN SERIOUS INJURY OR DEATH.
Particularly important information is distinguished in this manual by the following notations:
The Safety Alert Symbol means ATTENTION! BECOME
ALERT!
Failure to follow WARNING instructions could result in severe
injury or death to the machine operator, a bystander or a person
inspecting or repairing the machine.
A CAUTION indicates special precautions that must be taken to avoid
damage to the machine.
NOTE:
A NOTE provides key information to make procedures easier or clearer.
IMPORTANT NOTICE
This UTV is designed and manufactured for OFF-ROAD use only. It is illegal and unsafe
to operate this UTV on any public street, road or highway. This UTV complies with all
applicable OFF-ROAD noise level and spark arrester laws and regulations in effect at the
time of manufacture. Please check your local riding laws and regulations before operating
this UTV.
TABLE OF CONTENTS
Introduction……………………………………………………………………………………1
SAFETY………………………………………………………………………………………3
Features and Controls…………………………………………………………………………21
Component Locations…………………………………………………………………………21
Indicator and warning lights…………………………………………………………………23
Main stitch of light……………………………………………………………………………24
Dump Bed and winch……………………………………………………………………26
4×2,4×4WD and differential locking exchangeable……………………………………27
The Other Switch……………………………………………………………………………28
Seats……………………………………………………………………………………………30
Driver’s seat adjustment……………………………………………………………………30
Seat Belts………………………………………………………………………………………30
Seat Belt Inspection……………………………………………………………………………30
Fuel cap …………………………………………………………………………………31
Ignition Switch ………………………………………………………………………………32
Gear Selector…………………………………………………………………………………33
Parking Brake………………………………………………………………………………33
Brake Pedal…………………………………………………………………………………34
Throttle Pedal…………………………………………………………………………………34
OPERATION…………………………………………………………………………………35
Vehicle break-in period………………………………………………………………………35
Pre-ride inspection……………………………………………………………………………37
Safe operation practices………………………………………………………………………38
Starting the engine……………………………………………………………………………39
Stopping the engine……………………………………………………………………………40
Braking…………………………………………………………………………………………40
Parking the vehicle……………………………………………………………………………40
New operator driving procedures……………………………………………………………41
Driving with a passenger………………………………………………………………………43
Driving on slippery surface……………………………………………………………………44
Driving uphill…………………………………………………………………………………46
Driving on a sidehill…………………………………………………………………………47
Driving downhill………………………………………………………………………………47
Driving through water…………………………………………………………………………48
Driving over obstacles…………………………………………………………………………49
Driving in reverse………………………………………………………………………………50
Parking on an incline…………………………………………………………………………51
MAINTENANCE………………………………………………………………………………52
Periodic maintenance chart …………………………………………………………………52
Engine oil ……………………………………………………………………………………55
Transmission (main gearcase)………………………………………………………………59
Spark plugs……………………………………………………………………………………60
Constant variable transmission (CVT)system ………………………………………………61
Filter system …………………………………………………………………………………63
Cooling system …………………………………………………………………………………65
Throttle system ………………………………………………………………………………68
Carburetor ……………………………………………………………………………………70
Throttle body………………………………………………………………………………72
Brakes…………………………………………………………………………………………73
Steering wheel inspection ……………………………………………………………………75
Shock spring adjustment ……………………………………………………………………75
Tires……………………………………………………………………………………………76
Vehicle immersion……………………………………………………………………………77
Battery…………………………………………………………………………………………78
Clearing and storage…………………………………………………………………………81
Malfuncation analysis and elimination ………………………………………………………83
WARRANTY………………………………………………………………………98
SPECIFICATIONS…………………………………………………………………………101
Circuit Diagram…………………………………………………………………108
INTRODUCTION
Failure to follow the warnings and safety precautions contained in this manual can result in severe
injury or death. Your vehicle is not a toy and can be hazardous to operate. This vehicle handles
differently than cars, trucks or other off-road vehicles. A collision or rollover can occur quickly, even
during routine maneuvers like turning, or driving on hills or over obstacles, if you fail to take proper
precautions.
● Read this owner’s manual. Understand all safety warnings, precautions and operating procedures
before driving the vehicle. Keep this manual with the vehicle.
● Never operate this vehicle without proper instruction.
● Always follow the age guidelines for your vehicle. Operation is prohibited for anyone age 16 and
under. Never operate with a passenger age 12 and under.
1
INTRODUCTION
Identification number records
Record the vehicle identification number and engine number in the spaces provided for assistance
when ordering spare parts from your dealer or for reference in case the vehicle is stolen.
NOTE:The vehicle identification number is used to
identify your machine.
2
SAFETY
Equipment Modifications
Your vehicle is designed to provide safe operation when used as directed. Modifications to your
vehicle may negatively impact vehicle stability. Failure of critical machine components may result
from operation with any modifications, especially those that increase speed or power. This vehicle
may become less stable at speeds higher than those for which it is designed. Loss of control may
occur at higher speeds. Do not install on a vehicle any equipment that may increase the speed or
power of the vehicle, or make any other modifications to the vehicle for these purposes. Any
modifications to the original equipment of the vehicle create a substantial safety hazard and increase
the risk of bodily injury. The warranty on your vehicle is terminated if any equipment has been added
to the vehicle, or if any modifications have been made to the vehicle, that increases its speed or power.
The addition of certain accessories may change the handling characteristics of the vehicle. Use only
our company approved accessories, and familiarizes yourself with their function and effect on the
vehicle.
3
SAFETY
Safe Riding Gear
Always wear appropriate clothing when riding this vehicle. Wear protective clothing for comfort and
to reduce the chance of injury.
4
SAFETY
Safe Riding Gear
Helmet
Wearing a helmet can prevent a severe head injury. Whenever riding this vehicle, always wear a
helmet that meets or exceeds established safety standards.
Approved helmets in the USA and Canada bear a U.S. Department of Transportation (DOT) label.
Eye Protection
Do not depend on eyeglasses or sunglasses for eye protection. Whenever riding a vehicle, always
wear shatterproof goggles or use a shatterproof helmet face shield.
Gloves
Wear gloves for comfort and for protection from sun, cold weather and other elements.
Boots
Wear sturdy footwear. Do not ride a vehicle with bare feet.
Clothing
Wear long sleeves and long pants to protect arms and legs.
5
SAFETY
Safety Warnings
Failure to operate this vehicle properly can result in a collision, loss of control, accident or overturn,
which may result in serious injury or death. Be sure to read all of the following warnings about driving
hazards and how to avoid them. These warnings are provided for your safety.
Operating Without Instruction
Operating this vehicle without proper instruction increases
the risk of an accident. The operator must understand how to
operate the vehicle properly in different situations and on
different types of terrain.
Age Restrictions
Operation is prohibited for anyone age 16 and under. Never
operate with a passenger age 12 and under. Make sure any
passenger is tall enough to comfortably and safely reach the
hand holds and place both feet on the floor.
6
SAFETY
Safety Warnings
Failure to Inspect Before Operating
Failure to inspect and verify that the vehicle is in safe
operating condition before operating increases the risk
of an accident. Always inspect the vehicle before each
use to make sure it's in safe operating condition. Always
follow the inspection and maintenance procedures and
schedules described in the owner's manual.
Accessories
Installing non-approved accessories may seriously affect
vehicle handling and stability, which could result in loss
of control or an accident. Never install accessories not
approved by our company for use on this vehicle.
7
SAFETY
Safety Warnings
Protective Apparel
Riding in this vehicle without wearing an approved
helmet and protective eyewear increases the risk of
serious injury in the event of an accident. Operator
and passenger must always wear an approved helmet
that fits properly and eye protection (goggles or face
shield).
Seat Belts
Riding in this vehicle without wearing the seat belt increases the risk of serious injury in the event of
an accident or sudden stop. Riders must wear seat belts at all times. Seat belts reduce the severity of
injury in the event of a sudden stop or accident. Always make sure the seat belts are secured for both
the operator and passenger before riding.
Using Alcohol or Drugs
Riding in this vehicle after consuming alcohol or drugs
could adversely affect operator judgment, reaction time,
balance and perception. Never consume alcohol or drugs
before or while operating or riding in this vehicle.
8
SAFETY
Safety Warnings
Carrying a Passenger
Never carry a passenger until you have operated this vehicle for at least four hours.
Carrying Multiple Passengers
Carrying more than one passenger in the 500/600UTV or carrying
more than three passengers in the 500L/600LUTV can affect the
operator’s ability to steer and operate the controls, which
increases the risk of loss of control and accident or overturn.
Never carry more than stipulate passenger in this vehicle.
Operating on Pavement
Operating this vehicle on paved surfaces (including sidewalks, paths,
Parking lots and driveways) may seriously affect handling and control of the vehicle, and may cause
the vehicle to go out of control. This vehicle's tires are designed for off-road use only, not for use on
pavement. Avoid operating the vehicle on pavement. If you must operate on a paved surface, travel
slowly and do not make sudden turns or stops.
Operating on Public Roads
Operating this vehicle on public streets, roads or highways
could result in a collision with another vehicle. Never
operate this vehicle on any public street, road or highway,
including dirt and gravel roads. In many areas it's unlawful
to operate vehicles of this type on public streets, roads and
highways.
9
SAFETY
Safety Warnings
Operating at Excessive Speeds
Operating this vehicle at excessive speeds increases the
operator's risk of losing control. Always operate at a speed
that's appropriate for the terrain, the visibility and operating
conditions, your skills and your passenger’s skills.
Turning Improperly
Turning improperly could cause loss of traction, loss of control, accident or overturn. Never turn
abruptly or at sharp angles. Never turn at high speeds. Practice turning at slow speeds before
attempting to turn at faster speeds.
Physical Control of the Vehicle
Removing hands from the steering wheel or hand holds or removing feet from the floor while riding
increases the risk of loss of control and accident or overturn. The operator should always keep both
hands on the steering wheel during operation. A passenger should always be seated in the passenger
seat with both feet on the floor and with both hands securely grasping the hand holds. Always keep
hands and feet inside the vehicle at all times.
10
SAFETY
Safety Warnings
Jumps and Stunts
Exhibition driving increases the risk of an accident or
overturn. DO NOT do power slides, “donuts”, jumps
or other driving stunts. Avoid exhibition driving.
Driving Downhill Improperly
Driving down a hill improperly could cause
loss of control or overturn. Always follow
proper procedures for driving down a hill as described in the owner's manual.
● Always drive down a hill with the transmission in
forward gear. Never drive down a hill with the
transmission in neutral.
● Never operate the vehicle on hills steeper
than 15 degrees.
● Always check the terrain carefully before driving down a hill
● Never travel down a hill at high speed.
● Avoid traveling down a hill at an angle, which would cause the vehicle to lean sharply to one side.
Travel straight downhill.
11
SAFETY
Safety Warnings
Improper Hill Climbing
Improper hill climbing could cause loss of control or overturn.
Use extreme caution when operating on hills. Always follow
proper procedures for hill climbing as described in the owner's
manual.
Stalling While Climbing a Hill
Stalling or rolling backwards while climbing a hill could cause
an overturn. Maintain a steady speed when climbing a hill.
If you lose all forward speed:
Apply the brakes gradually until the vehicle is fully stopped.
Place the transmission in reverse and slowly allow the vehicle
to roll straight downhill while applying light brake pressure to
control speed.
Crossing Hillsides
Driving on a sidehill is not recommended. Improper procedure
could cause loss of control or overturn. Avoid crossing the side
of any hill unless absolutely necessary.
12
SAFETY
Safety Warnings
Operating in Unfamiliar Terrain
Failure to use extra caution when operating on unfamiliar terrain
could result in an accident or overturn.
Unfamiliar terrain may contain hidden rocks, bumps, or holes that
could cause loss of control or overturn.
Travel slowly and use extra caution when operating on unfamiliar
terrain. Always be alert to changing terrain conditions.
Operating on Sand or Slippery Terrain
Operating on sand or on excessively rough, slippery or loose
terrain could cause loss of traction, loss of control, accident
or overturn. Always use extra caution when operating on
sand or on rough, slippery or loose terrain. Do not operate on
excessively rough, slippery or loose terrain.
13
SAFETY
Safety Warnings
Operating Improperly in Reverse
Improperly operating in reverse could result in a collision with
an obstacle or person. Always follow proper operating procedures
as outlined in this manual. Before shifting into reverse gear, always
check for obstacles or people behind the vehicle. When it's safe to
proceed, back slowly.
Operating Over Obstacles
Improperly operating over obstacles could cause loss of control or
overturn. Before operating in a new area, check for obstacles. Never
attempt to operate over large obstacles such as rocks or fallen trees.
Always follow the proper procedures outlined in this manual when
operating over obstacles.
Skidding or Sliding
Skidding or sliding can cause loss of control or overturn (if tires regain traction unexpectedly).
Always follow proper procedures for operating on slippery surfaces as described in the owner's
manual. When operating on slippery surfaces such as ice or loose gravel, reduce speed and use extra
caution to reduce the chance of skidding or sliding. Do not operate on excessively slippery surfaces.
14
SAFETY
Safety Warnings
Operating Through Water
Operating through deep or fast-flowing water can cause loss
of traction, loss of control, overturn or accident. Never operate
in fast-flowing water or in water that exceeds the floor level.
Always follow proper procedures for operating in water as
described in the owner's manual. Wet brakes may have reduced
stopping ability. After leaving water, test the brakes. Apply them
lightly several times while driving slowly. The friction will help
dry out the pads.
Overloading the Vehicle
Overloading the vehicle may cause changes in stability and handling, which could cause loss of
control or an accident.
● Never exceed the maximum weight capacity for this vehicle.
15
SAFETY
Safety Warnings
Operating a Damaged Vehicle
Operating a damaged vehicle can result in an accident with serious injury or death. After any overturn
or accident, have a qualified service dealer inspect the entire vehicle for possible damage, including
(but not limited to) brakes, throttle and steering systems.
Operating on Frozen Bodies of Water
Operating on frozen bodies of water can result in the vehicle
and/or riders falling through the ice. Never operate this
vehicle on a frozen body of water.
16
SAFETY
Safety Warnings
Handling Gasoline
Gasoline is highly flammable and is explosive under certain conditions. Always exercise extreme
caution whenever handling gasoline.
● Never allow a child to refuel or handle gasoline.
● Always stop the engine when refueling.
● Always refuel outdoors or in a well ventilated area.
● Do not smoke or allow open flames or sparks in or near the refueling area or where gasoline is
stored.
● Never refuel while a person is in the vehicle.
● Do not over fill the tank. Do not fill the tank neck.
● If gasoline spills on your skin or clothing, immediately wash it off with soap and water and change
clothing.
● Turn the fuel valve off whenever the vehicle is stored or parked.
Exposure to Exhaust
Engine exhaust fumes are poisonous and can cause loss of consciousness or death in a short time.
Never start the engine or let it run in an enclosed area. Operate this vehicle only outdoors or in
well-ventilated areas.
17
SAFETY
Safety Warnings
Hot Exhaust Systems
Exhaust system components are very hot during and after use of the vehicle. Hot components can
cause burns and fire. Do not touches hot exhaust system components. Always keep combustible
materials away from the exhaust system.
Use caution when traveling through tall grass, especially dry grass. Always inspect the underside of
the vehicle and areas near the exhaust system after driving through tall grass, weeds, brush and other
tall ground cover. Promptly remove any grass or debris clinging to the vehicle.
Unauthorized Use of the Vehicle
Leaving the keys in the ignition can lead to unauthorized use of the vehicle, which could result in an
accident or overturn. Always remove the ignition key when the vehicle is not in use.
Safety Labels and Locations
Warning labels have been placed on the vehicle for your protection. Read and follow the instructions
on each label carefully. If any of the labels shown in this manual differ from the labels on your vehicle,
always read and follow the instructions of the labels on the vehicle. If an informational or graphic
label becomes illegible or comes off, contact your dealer to purchase a replacement.
18
SAFETY
Safety Labels and Locations
Warning Label
WARNING
Improper vehicle use can result in SEVERE INJURY or DEATH
NEVER allow vehicle to be operated:
● Without all occupants first viewing and understanding safety
warning labels.
● With more than stipulate passenger.
● On hills steeper than 15 degrees.
● On paved surfaces - pavement may seriously affect handling
and control.
● With non-approved accessories, they may seriously
affect stability.
● At speeds that are too fast for the operator’s skills, the conditions
and/or the terrain.
ALWAYS require operator and passenger to:
● Wear seat belts, grab hand holds (passenger) and plant feet firmly
on the floor.
● Keep hands and feet inside vehicle.
● Avoid quick turns of the steering wheel and driving stunts such as
jumps, donuts or power slides.
● Reduce speed and use extra caution when carrying a passenger.
● Watch for branches or other hazards that could enter vehicle.
19
SAFETY
Safety Labels and Locations
Warning Label
WARNING
Operation of this vehicle by children age 16 and under increases the risk of severe injury or death.
NEVER permit children age 16 and under to operate or ride in this vehicle.
WARNING
VEHICLE OVERTURN could cause severe injury or death. The cab frame is not designed or
intended to provide rollover protection.
TIRE PRESSURE IN PSI (KPa):
Front: 21±1(145±6.9)
Rear: 28±1(193±6.9)
LOADING CAPACITY:660 lbs. (300 Kg)
INCLUDES WEIGHT OF OPERATOR, PASSENGER AND ACCESSORIES.
LOCATE AND READ OWNER’S MANUAL. FOLLOW ALL INSTRUCTIONS AND
WARNINGS. IF OWNER’S MANUAL IS MISSING, CONTACT YOUR DEALER FOR
A REPLACEMENT.
20
FEATURES AND CONTROLS
Component Locations
21
FEATURES AND CONTROLS
Component Locations
22
FEATURES AND CONTROLS
Indicator and warning lights
1、Thermometer 2.3.、Turning Indicators 4、Fuel indicator 5、High beam
6、odometer
7、Speed indicator
8、2 and 4 wheel drive.
9. Brake liquid warning light.
10. Reverse over speed alarm light 11.Parking brake light 12.engine oil warning light
13.Engine trouble light 14. Battery conditional warming light 15. Tachometer
(a)Speedometer 7:Display the speed of vehicle.
(b) Odometer 6 :Display the accumulated driving distance.
(c) High beam 5:Light when high beam is on.
23
FEATURES AND CONTROLS
(d).Turning Indicators 2, 3 :Blink when the relative direction indicators light. Blink in same times
when warning light is on.
(e).Fuel meter 4 :Display the quantity of fuel.
(f).Gear display:The corresponding indicating (L, H, N, R) will be displayed when the gear
changed.
(g).Thermometer 1:Display the temperature of engine coolant..
(h). 2WD/4WD transfer and differential lock display 8: When single axle indicator lights, it is only
the rear axle is in driving. When two axles indicator lights, the both front and rear axles are
in driving. When display “X” in the middle, it means the both front and rear axles are in
driving. Meanwhile the front differential will be locked up.
( i). Alarm light of brake fluid level 9: The alarm light is on when brake fluid level is lower (need
add more) .
( j).Low range over speed alarm light 10: The light will be on when press down the over speed button.
Main switch of lights
(a). When ignition switch is at “ACC” or “ON” position,
rear small light and meter light is on. Press down
press down
at the first step, front and
at the second step, headlight, meter light
and tail light is on.
(b). When ignition switch is at “ACC” or “ON” position, press down
down “
at the second step, press
” at same time, The headlight (high beam), meter light, and tail light is on. Press
24
FEATURES AND CONTROLS
Main switch of lights
down“
”, headlight(low beam), meter light and tail light is on.
(c). When ignition switch is at “ON”, “ACC”or“ON”position, press down“
(d). When ignition switch is at “ACC” or “ON” position, press down“
indicator lights.
25
”, alarm light blinks.
”or“
”,The left or right
FEATURES AND CONTROLS
Dump Bed and winch
When need to dump, firstly, open the rear door of
cargo box, then press main switch to“ON” position,
and press “DUMP” to “UP”, cargo box will be up
backwards; And stop after releasing the press; While
press “DUMP”to” DOWN”, the cargo box will be back.
And stop after when release the press.
When vehicle stuck in the mud, the self-rescue could be done by utilizing the front fix stuff or peg.
Press “SWITCH” to “ON” position, and then press “WINCH” to “OUT” or “IN”, the winch cable can
be strech out and in.
Warning: Set the main switch back to “OFF” when finish dumping and winching in void being power
wasting.
When cargo box reaches the top or bottom, or the winch cable to the ends, please stop pushing the
button at once in case to damage the motor switch.
26
FEATURES AND CONTROLS
4×2、4×4WD and differential locking exchangeable
When select “4X2”, it is rear wheel drive mode (this is the normal driving
mode). When select “4X4”, the front and rear wheels will be drove at same
times( normally, this drive mode will be used on muddy and rugged road.
When select “4X4 lock” mode, it is 4 wheel drive mode and also the front
differential locked (this drive mode only used on very rough road or when
the car got stuck).
Warning: 1. Engine is matched with stepless automatic clutch. There is no any
assistant unit in gear changing. So the vehicle must be stopped when change 2WD
from 4WD.
2. The corresponding gear position will be displayed on meter when
change gears. But sometimes this is not the meaning that the gear is in its position.
You just need step on the accelerator pedal lightly, and then the gear will be in its
position. (Please note that better do not step on pedal hard before the gear is in its
position in case to damage the transmission gear).
Note:It will increase the wear and tear when use four wheel drive. Please use two wheel drive
on the normal road. In case to prolong the usage of the vehicle, four wheel drive could only be
used on muddy, slippery, snow or up-slope road.
27
FEATURES AND CONTROLS
The Other Switch
Cigarette light
The cigarette light installed on the vehicle. The socket also can
be used for phone charging and external power supply.
Note: The voltage of the socket is 12V, DC.
sure the voltage matches your electro-set’s.
Please make
Windshield and wiper(optional)
When ignition switch is at “ACC” or “ON” position, press down
at the first step, the wiping speed is low. Press down
the second step, the wiping speed is high.
28
at
FEATURES AND CONTROLS
The Other Switch
CHOKE
When start the vehicle in cold weather, pull out the “CHOKE SWITCH”
a little bit. Push it back after the engine started.
Note: Once the engine started, push the SWITCH back in time.
Never leave the SWITCH out when driving. Or it might reduce the
power and increase more fuel consumption and pollution.
REVERSE OVER SPEED BUTTON
The engine has the speed limit for the safety when gear is on
“R” and/or differential lock. Press the button you can release
the limitation.
Note: Normally do not press down the button to release the limitation.
MP3 PLAYER
When turn the ignition key to“ON”or“ACC”, switch on the power
button on the middle of MP3 you could listen to the radio and music.
The USB socket is under the meter .
29
CHOCK SWITCH
FEATURES AND CONTROLS
Seats
Driver’s Seat Adjustment
If you want to adjust the backrest of the seat forward
or rearward, rotate the 1 which locates at the inneredge
of the seat in clockwise or anticlockwise direction .
Seat Belts
This vehicle is equipped with three-point lap seat belts for the operator and passenger. Always make
sure the seat belts are secured for both the operator and passenger before riding. To wear the seat belt
properly, follow this procedure:
1. Pull the seat belt latch downward and across your chest toward the buckle at the inneredge of the
seat. The belt should fit snugly across your hips and diagonally across your chest. Make sure the belt is
not twisted.
2. Push the latch plate into the buckle until it clicks.
3. Press the red release latch on the buckle to release the seat belt.
Seat Belt Inspection
Inspect all seat belts for proper operation before each use of the vehicle.
1.Push the latch plate into the buckle until it clicks. The latch plate must slide smoothly into the
buckle. A click indicates that it's securely latched.
30
FEATURES AND CONTROLS
2. Push the red release latch in the middle of the buckle to make sure it releases freely.
3. Inspect the full length for any damage, including cuts, wear, fraying or stiffness. If any damage is
found, or if the seat belt does not operate properly, have the seat belt system checked and/or
replaced by an authorized dealer.
4. To clean dirt or debris from the seat belts, sponge the straps with mild soap and water. Do not use
bleach, dye or household detergents.
Fuel Cap
Never allow a child to refuel or handle gasoline.
The fuel tank filler cap is located on the left-hand
side of the vehicle behind the operator seat. When refueling,
always use unleaded gasoline.
31
FEATURES AND CONTROLS
Ignition Switch
Ignition switch has four positions:
“OFF”(close)position:All circuits are turnoff except emergency light, electric fan and
cigarette lighter.
“ACC” position: lights, MP3, horn, windshield wiper
“ON”(open)position:All circuits except engine are connected, and they could start at any
moment or make engine keep running status.
“ST”(start)position:Connect engine and ignition circuit, and start engine. Handle returns to
“ON” position automatically after engine starts.
Note: You can start the engine when gear is in “N” position or step down the brake
pedal when gear is in “H”, “L” and “R” positions.
32
FEATURES AND CONTROLS
Gear Selector
L: Low gear
H: High gear
N: Neutral
R: Reverse
The gear selector is located between the seats. To change
gears, stop the vehicle, and with the engine idling, move
the lever to the desired gear. Do not attempt to shift gears
with engine speed above idle or while the vehicle is moving.
Tip: Maintaining shift linkage adjustment is important to assure proper transmission function. See
your dealer if you experience any shifting problems.
NOTICE: Do not attempt to shift the transmission while the vehicle is moving or damage to the
transmission could result. Always shift when the vehicle is stationary and the engine is at idle.
Parking Brake
1. Apply the brakes.
2. When the vehicle is fully stopped, pull the parking brake lever rearward as far as possible to set the
parking brake.
3. Stop the engine.
4. To release the parking brake, apply the brakes and push the lever toward the passenger seat and
forward.
33
FEATURES AND CONTROLS
Tip: Always set the parking brake whenever the vehicle is left unattended.
Operating the vehicle while the parking brake is engaged could cause an accident resulting in
serious injury or death. It could also result in driveline or engine damage. Always be sure to
disengage the parking brake before operating the vehicle.
Brake Pedal
Depress the brake pedal to slow or stop the vehicle. Apply
the brakes while starting the engine.
Throttle Pedal
Push the pedal down to increase
engine speed. Spring pressure
returns the pedal to the rest position when released. Always
check that the throttle pedal returns normally before starting
the engine. Make sure there's adequate throttle pedal freeplay.
See page 68 for throttle pedal adjustment procedures.
If the throttle cable should stick in an open position when the
operator releases the throttle pedal, the engine will stop and power to the rear wheels will cease.
34
OPERATION
Failure to operate the vehicle properly can result in a collision, loss of control, accident or overturn,
which may result in serious injury or death. Read and understand all safety warnings outlined in the
safety section of this owner’s manual.
Vehicle Break-in Period
The break-in period for your new vehicle is defined as the first ten hours of operation, or the time it
takes to use the first two full tanks of gasoline.
No single action on your part is as important as a proper break-in period. Careful treatment of a new
engine and drive components will result in more efficient performance and longer life for these
components. Perform the following procedures carefully.
NOTICE: Excessive heat build-up during the first three hours of operation will damage close-fitted
engine parts and drive components. Do not operate at full throttle or high speeds during the
first three hours of use.
Mixing brands or using a non-recommended oil may cause serious engine damage. Always use the
recommended oil. Never substitute or mix oil brands.
35
OPERATION
Vehicle Break-in Period
Engine and Drivetrain Break-in
1. Fill the fuel tank with gasoline. Always exercise extreme caution whenever handling gasoline.
Never allow a child to handle gasoline.
2. Check the oil level. See page 56. Add the recommended oil as needed to maintain the oil level in
the safe operating range.
3. Complete the New Operator Driving Procedures outlined on pages41-42.
4. Avoid aggressive use of the brakes. See Brake System Break-in below.
5. Vary throttle positions. Do not operate at sustained idle.
6. Perform regular checks on fluid levels, controls and areas outlined on the daily pre-ride inspection
checklist. See page37.
7. Change the engine oil at 10 hours or one month.
Brake System Break-in
Apply only moderate braking force for the first 50 stops. Aggressive or overly forceful braking when
the brake system is new could damage brake pads and rotors.
CVT Break-in (Clutches/Belt)
A proper break-in of the clutches and drive belt will ensure a longer life and better performance.
Break in the clutches and belt by operating at slower speeds during the break-in period as
recommended. Avoid aggressive acceleration and high speed operation during the break-in period.
36
OPERATION
Pre-Ride Inspection
Failure to inspect and verify that the vehicle is in safe operating condition before operating increases
the risk of an accident. Always inspect the vehicle before each use to make sure it's in safe operating
condition.
Item
Remarks
Page
Brake
Ensure proper operation
73
Steering
Engine oil
Air filter
Ensure free operation
Ensure proper levels
Inspect, clean
75
56 57 58
63 64
30 31
Brake fluid
Check length of belt for damage,
check latches for proper operation
Ensure proper level
Tires
Inspect condition
76
Ensure proper operation
68
Gearcase fluid
Ensure proper levels
59
Spark plug
Inspect condition
60
Seat Belts
Throttle system
37
74
69
OPERATION
Safe Operation Practices
1. Complete the New Operator Driving Procedures outlined on pages41-42.
2. Do not ride at night or when visibility is poor (rain, fog, dusk). Your vehicle doesn't have lights that
are designed for driving in these conditions.
3. Engine exhaust fumes are poisonous. Never start the engine or let it run in an enclosed area. Never
allow a child to handle gasoline.
4. Never install accessories not approved by our company for use on this vehicle.
5. Never operate the vehicle on pavement or on any public street, road or highway, including dirt and
gravel roads.
6. Drive in a manner appropriate for your skills and operating conditions. Never operate at excessive
speeds. DO NOT attempt to do power slides, “donuts”, jumps or other driving stunts. Keep both
hands on the steering wheel at all times.
7. Never consume alcohol or drugs before or while operating this vehicle.
8.Always use the size and type of tires specified for your vehicle. Always maintain proper tire
pressure.
9.Never operate a damaged vehicle. After any overturn or accident, have a qualified service dealer
inspect the entire machine for possible damage.
10. Never operate the vehicle on a frozen body of water.
11. Do not touch hot exhaust system components. Always keep combustible materials away from the
exhaust system.
12. Always remove the ignition key when the vehicle is not in use to prevent unauthorized use.
38
OPERATION
Starting the Engine
1. Sit in the driver's seat and fasten the seat belt.
2. Place the transmission in neutral. Set the parking brake.
3. Apply the brakes.
4. Do not press the throttle pedal while starting the engine.
5. Turn the ignition key to the “ST” position. Engage the starter for a maximum of five seconds.
Release the key when the engine starts.
NOTICE: Operating the vehicle immediately after starting could cause engine damage. Allow the
engine to warm up for several minutes before operating the vehicle.
6. If the engine does not start within five seconds, return the ignition switch to the “ON” position and
wait five seconds. Repeat steps 5 and 6 until the engine starts.
Tip: If a warm engine has cooled to a point where it does not readily start, intermittent use of the
choke (pulled half way out) may be necessary. If the engine is over-choked when warm, depress
the throttle lever fully while cranking to aid in starting. Release the throttle lever immediately
after the engine starts. If the engine does not start and all conditions are favorable, change the
spark plug and try again.
7. Vary the engine RPM slightly with the throttle to aid in warm-up until the engine idles smoothly.
8. Release the parking brake before driving.
39
OPERATION
Stopping the Engine
1. Release the throttle pedal completely and brake to a complete stop.
2. Place the transmission in neutral.
3. Set the parking brake.
4. Stop the engine.
5. Turn the fuel valve off.
Braking
1. Release the throttle pedal completely. (When the throttle pedal is released completely and engine
speed slows to near idle, the vehicle has no engine braking.)
2. Press on the brake pedal evenly and firmly. Practice starting and stopping (using the brakes) until
you're familiar with the controls.
Parking the Vehicle
1. Stop the vehicle on a level surface. When parking inside a garage or other structure, be sure that the
structure is well ventilated and that the vehicle is not close to any source of flame or sparks,
including any appliance with pilot lights.
2. Place the transmission in neutral.
3. Set the parking brake.
4. Stop the engine.
5. Remove the ignition key to prevent unauthorized use.
40
OPERATION
New Operator Driving Procedures
1. Read and understand the owner's manual and all warning and instruction labels before operating this
vehicle.
2. Review the section of this owner’s manual about starting the engine, stopping the engine, braking
and parking (pages39-40).
3. Perform the pre-ride inspection (page 37).
4. Wear appropriate riding gear, including an approved helmet and eye protection (goggles or face
shield).
5. Select a level open area to practice driving.
6. Sit in the driver's seat and fasten the seat belt.
7. Do not carry a passenger until you have at least four hours of driving experience with this vehicle.
(See page43).
8. Set the parking brake.
9. Place the transmission in neutral.
10. Start the engine.
11. Apply the brakes and shift into gear.
12. Release the parking brake.
41
OPERATION
13. Check your surroundings. Make sure the area is clear of people and obstacles.
14. Keeping both hands on the steering wheel, slowly release the brakes and press the throttle with
your right foot to begin driving.
15. Drive slowly at first. Practice starting, stopping, turning, using the throttle and brakes and driving
in reverse. Learn how the vehicle handles when making both left and right turns at a slow speed.
16. Increase speed only after mastering all maneuvers at a slow speed.
17. After you become skilled at making turns and begin to operate at faster speeds, follow these
precautions:
● Avoid sharp turns. Make turns gradually.
● Never turn while applying heavy throttle.
● Never turn the steering wheel abruptly.
● Operate at speeds appropriate for your skills, the conditions and the terrain.
● Do not attempt to do power slides, “donuts”, jumps or other driving stunts.
42
OPERATION
Driving with a Passenger
1. Complete the New
Operator Driving
Procedures outlined on
Pages 41-42.
2. Perform the pre-ride
inspection. See page 37.
3. Do not carry a
passenger until you
have at least four hours
of driving experience
with this vehicle.
4. Never operate with a passenger age 12 and under. Make sure the passenger is tall enough to
comfortably and safely sit in the passenger seat with the seat belt secured, put both feet on the
floor and grasp the hand holds.
5. Never carry more than one passenger in the 500/600UTV or carrying more than three passengers in
the 500L/600LUTV.
6. Never allow a passenger to ride on the cargo box. Allow passenger to ride only in the passenger
seat.
43
OPERATION
7. Make sure the passenger is wearing appropriate riding gear, including an approved helmet and eye
protection. See page 5.
8. Make sure the passenger secures the seat belt.
9. Tell your passenger to always keep hands and feet inside the vehicle at all times.
10. Drive slowly. Vehicle handling may change with a passenger on board. Always travel at a speed
appropriate for your skills, your passenger's skills, and operating conditions. Avoid unexpected or
aggressive maneuvers that could cause discomfort or injury to a passenger.
11. Always follow all operating guidelines as outlined on safety labels and in this manual.
Driving on Slippery Surfaces
When driving on slippery surfaces such as wet trails, loose gravel, sand or ice, be alert for the
possibility of skidding and sliding.
Skidding or sliding can cause loss of control or overturn, especially if tires regain traction
unexpectedly. When operating on slippery surfaces such as ice or loose gravel, slow down and
use extra caution to help prevent skidding or sliding. Always use extra caution when operating on
sand or on rough, slippery or loose terrain. Do not operate on excessively rough, slippery or loose
terrain.
44
OPERATION
Follow these precautions when driving in slippery conditions:
1. Slow down before entering slippery areas.
2. Be alert, watch the path ahead and avoid quick turns, which can cause skids.
3. Correct a skid by turning the steering wheel in the direction of the skid. Never apply the brakes
during a skid.
45
OPERATION
Driving Uphill
Whenever traveling uphill, follow these
precautions:
1. Always check the terrain carefully
before ascending a hill.
2. Avoid steep hills (15° maximum).
3. Drive straight uphill.
4. Never climb hills with excessively
slippery or loose surfaces.
5. Drive at a steady rate of speed. Never
press the throttle suddenly.
6. Avoid unnecessary changes in speed
or direction.
7. Never go over the crest of a hill at a high speed. An obstacle, a sharp drop, or another vehicle or
person could be on the other side of the hill.
8. If the vehicle stalls while climbing a hill, apply the brakes. Place the transmission in reverse and
slowly allow the vehicle to roll straight downhill while applying the brakes lightly to control speed.
46
OPERATION
Driving on a Sidehill (Sidehilling)
Driving on a sidehill is not recommended. Driving on a sidehill improperly cause loss of control or
overturn.
If crossing a hill is unavoidable, follow these precautions:
1. Drive slowly and use extreme caution.
2. If the vehicle begins to overturn, or if it feels as if it may overturn, immediately turn downhill.
3. Avoid obstacles and changes in terrain that may lower or raise one side of the vehicle or cause the
vehicle to slide.
4. If the vehicle begins to slide downhill, immediately turn downhill to stop the slide.
Driving Downhill
Whenever driving down a hill, follow these precautions:
1. Avoid steep hills (15° maximum).
2. Slow down. Never travel down a hill at high speed.
3. Always check the terrain carefully before driving down a hill.
4. Always drive down a hill with the transmission in forward gear. Never “coast” or drive down a hill
with the transmission in neutral.
5. Avoid driving down a hill at an angle, which would cause the vehicle to lean sharply to one side.
Always drive straight downhill.
6. Apply the brakes lightly to keep speed slow.
47
OPERATION
Driving Through Water
Your vehicle can drive through
shallow water. Make sure the
water is no deeper than the floor
of the vehicle. Follow these
precautions when driving
through water:
1. Check water depth. Never
drive through water that is
deeper than the floor level.
2. After driving through water,
test the brakes. Apply them
lightly several times while
driving slowly. The friction
will help dry out the pads.
NOTICE: Major engine damage can result if the vehicle is not thoroughly inspected after operation in
water. Perform the services outlined in the maintenance chart. See page 53-54. Give special
attention to engine oil, transmission oil and all grease fittings. If your vehicle is operated in
water deeper than the floor level, take it to your dealer for service before starting the engine.
If it's impossible to bring the vehicle to your dealer before starting the engine, perform the
service outlined on page 77, and take the vehicle to your dealer as soon as possible.
48
OPERATION
Driving Over Obstacles
Follow these precautions when driving over obstacles:
1. Always check for obstacles before driving in a new area.
2. Look ahead and watch the terrain. Always be alert for hazards such as logs, rocks and low hanging
branches.
3. Drive slowly and use extra caution when driving on unfamiliar terrain. Obstacles are not always
clearly visible.
4. Do not drive over large obstacles such as rocks and fallen trees. If it’s unavoidable, use extreme
caution and drive slowly.
5. Always have a passenger dismount and move away from the vehicle before driving over an obstacle that could cause an overturn.
49
OPERATION
Driving in Reverse
Follow these precautions when driving in reverse:
1. Always check for obstacles or people behind the vehicle.
2. Apply the throttle lightly. Never apply the throttle suddenly.
3. Back slowly.
4. Apply the brakes lightly for stopping.
5. Avoid making sharp
50
OPERATION
Parking on an Incline
A rolling vehicle can result in serious injury. Avoid parking on an incline. If parking on an incline is
unavoidable, follow these precautions:
1. Place the transmission in neutral.
2. Set the parking brake.
3. Stop the engine.
4. Turn the fuel valve off.
5. Always block the rear wheels on the downhill side.
51
MAINTENANCE
Periodic Maintenance Chart
Careful periodic maintenance will help keep your vehicle in the safest, most reliable condition.
Inspection, adjustment and lubrication of important components are explained in the periodic
maintenance chart. Inspect, clean, lubricate, adjust and replace parts as necessary. When inspection
reveals the need for replacement parts, use genuine parts available from your dealer.
Service and adjustments are important for proper vehicle operation. If you're not familiar with safe
service and adjustment procedures, have a qualified dealer perform these operations. Maintenance
intervals in the following chart are based upon average riding conditions and an average vehicle speed
of approximately ten (10) miles per hour. Vehicles subjected to severe use must be inspected and
serviced more frequently.
Severe Use Definition
● Frequent immersion in mud, water or sand
● Racing or race-style high RPM use
● Prolonged low speed operation
● Extended idle
● Short trip cold weather operation
Pay special attention to the oil level. A rise in oil level during cold weather can indicate contaminants
collecting in the oil sump or crankcase. Change oil immediately if the oil level begins to rise. Monitor
the oil level, and if it continues to rise, discontinue use and determine the cause or see your dealer.
52
MAINTENANCE
Periodic Maintenance Chart
Perform all services at whichever maintenance interval is reached first.
Maintenance Interval
(whichever comes first)
Item
Ⅱ
Ⅰ
Hours
Calendar
Miles(Km)
Steering
-
Daily
-
Tires
-
Daily
-
-
Daily
-
-
Daily
-
Brake fluid level
Brake system
Remarks
Check each day before driving the vehicle. Make
adjustments as needed. See the Pre-Ride Checklist
on page37.
Ⅰ
Brake pedal travel
-
Daily
-
Ⅰ
Engine oil level
-
Daily
-
Ⅰ
Engine oil change
30
6M
300 (480)
-
Weekly
-
Drain water as needed,check often if driving in wet
conditions
Ⅰ Air filter, main element
-
Weekly
-
Inspect; replace as needed
Ⅰ
Ⅱ
10
Monthly
100 (160)
Inspect periodically
10
Monthly
100 (160)
Check; adjust as needed
50H
6M
500 (800)
CVT housing (if
equipped)
Brake pad wear
Idle speed
Ⅰ
Front Suspension
53
Perform a break-in oil change at one month
Lubricate
MAINTENANCE
Periodic Maintenance Chart
Maintenance Interval
(whichever comes first)
Item
Hours
Calendar
Remarks
Miles(Km)
Ⅰ
Rear Suspension
50H
6M
500 (800)
Ⅰ
Spark plug
100
12M
600 (1000)
Inspect; replace as needed
Ⅱ
Front wheel bearings
100 H
12M
-
Inspect; replace as needed
50H
6M
500 (800)
Shift Linkage
Battery
Ⅱ
Ⅱ
Ⅰ
25
Monthly
250 (400)
Lubricate
Inspect, lubricate, adjust
Check terminals; clean; test
Toe adjustment
-
Inspect periodically; adjust when parts are replaced
Headlight aim
-
Adjust as needed
Choke
Main gearcase oil
10
Monthly
100 (160)
25
Monthly
250 (400)
Check for proper operation;see dealer for
adjustments
Inspect level; change yearly
Ⅰ Perform these procedures more often for vehicles subjected to severe use.
Ⅱ Have an authorized dealer perform these services.
Remark:1.If the Odometer indication is large, please repeat this maintenance.
2.If operate this vehicle at special wet or dusty area, you had better shorten the maintenance
interval.
54
MAINTENANCE
3.If you vehicle often operate on rough terrain ,you must maintenance to maintain
your vehicle’s performance.
4.Change every two years , have a qualified dealer perform these operations.
Engine Oil
Always check and change the engine oil at the intervals outlined in the Periodic Maintenance Chart
beginning on page 53. Oil may need to be changed more frequently if the recommended oil is not
used.
Oil Recommendations
NOTICE: Mixing
brands or using a non-recommended
oil may cause serious engine damage. Always
use the recommended oil. Never substitute or
mix oil brands.
Engine oil classification of the UTV
55
MAINTENANCE
Engine Oil
Oil Check
Maintain the oil level within the
safe range on the dipstick. Do not overfill.
1. Position the vehicle on a level surface.
2. Remove the dipstick. Wipe it dry with
a clean cloth.
3. Reinstall the dipstick completely.
4. Remove the dipstick and check the oil level.
Tip: A rising oil level between checks in cool
weather driving can indicate contaminants
such as gas or moisture collecting in the
crankcase. If the oil level is over the full/safe
mark, change the oil immediately.
5. Add the recommended oil as needed.
6. Reinstall the dipstick.
56
MAINTENANCE
Engine Oil
Oil and Filter Change
Always change the oil and filter at the intervals outlined in the Periodic Maintenance Chart
beginning on page 53 .Always change the oil filter wheneven changing oil.
The engine drain plug is located on the bottom of the crankcase.
1. Position the vehicle on a level surface. Set the parking brake.
2. Start the engine. Allow it to idle for two to three minutes, Stop the engine.
3. Clean the area around the drain plug.
CAUTION: Hot oil can cause burns to skin. Do not allow hot oil
to contact skin.
4. Place a drain pan under the engine crankcase.
5. Remove the drain Screw. Allow the oil to drain completely.
NOTE:The sealing surfaces on drain plug and crankcase
should be clean and free of burrs or scratches.
6. Using a cap-style oil filter wrench,turn the oil filter cartridge to
remove it.
7. Using a clean dry cloth,clean the filter sealing surface on the crankcase.
8. Lubricate the o-ring on the new filter with a film of fresh engine oil.Check to make sure the o-ring
is in good condition.
57
MAINTENANCE
Engine Oil
Oil and Filter Change
9. Install the new oil filter cartridge with an oil filter wrench ,and then tighten it to the specifiec torque
with a torque wrench .Oil filter cartridge tightening torque:17N·m (17m·kgf,12ft·lbf).
10. Reinstall the sealing washer on the drain plug
11. Reinstall the drain plug.Add the recommended engine oil.
12. Place the transmission in PARK.Apply the brakes.
13. Start the engine.Allow it to idle for one to two minutes.
14. Stop the engine.Inspect for leaks.
15. Re-check the oil level on the dipstick and add oil as necessary to bring the level to the upper mark
on the dipstick.
16. Dispose of used filter and oil properly.
58
MAINTENANCE
Transmission (Main Gearcase)
Fluid Check
The fill plug is located on the rear of the gearcase. Access the
fill plug through the left rear wheel well. Maintain the fluid
level at the bottom of the fill plug hole.
1. Position the vehicle on a level surface.
2. Remove the fill plug.
3. Check the fluid level.
4. Add the recommended fluid as needed.
5. Reinstall the fill plug.
Fluid Change
The drain plug is located on the bottom of the gearcase.
1. Remove the fill plug.
2. Place a drain pan under the drain plug.
3. Remove the drain plug. Allow the fluid to drain completely.
4. Clean the drain plug.
5. Reinstall the drain plug with a new o-ring.
6. Add SAE15W/40 SF or SAE 80W/90 GL-4 of the recommended fluid to the fill hole. Maintain the
fluid level at the bottom of the fill plug hole. Do not overfill.
7. Reinstall the fill plug.
8. Check for leaks.
9. Discard used fluid properly.
59
MAINTENANCE
Spark Plugs
Spark Plug Gap/Torque
Plug Tightening Torque
Electrode Gap
0.8-0.9 mm
12.5 ft. lbs. (17.5 Nm)
NOTICE: Using non-recommended spark plugs can result in serious engine damage. Always use our
company recommended spark plugs.
Spark plug condition is indicative of engine operation. The spark plug firing end condition should be
read after the engine is warmed up and the vehicle is driven at higher speeds. Immediately check the
spark plug for correct color.
A hot exhaust system and engine can cause burns. Wear protective gloves when removing a
spark plug for inspection.
Specified spark plug: DPR7EA-9.
Spark Plug Removal and Replacement
1.Remove the spark plug cap.
2.Using the spark plug wrench provided in the tool kit, remove the plug by rotating it
counterclockwise.
3.Reverse the procedure for spark plug installation.
60
MAINTENANCE
Constant Variable Transmission (CVT) System
WARNING
Failure to comply with the instructions in this warning can result in severe injury or death.
Do not modify any component of the CVT system. Doing so may reduce its strength so that a failure
may occur at a high speed. The CVT system has been precision balanced. Any modification will cause
the system to be out of balance, creating vibration and additional loads on components. The CVT system rotates at high speeds, creating large amounts of force on clutch components. Extensive engineering and testing has been conducted to ensure the safety of this product. However, as the owner, you
have the following responsibilities to make sure this system remains safe:
● This CVT system is intended for use on our company products only. Do not install it in any other
product.
● Always make sure the CVT housing is securely in place during operation.
61
MAINTENANCE
CVT Drying
There may be some instances when water is accidently ingested into the CVT system. Use the
following instructions to dry it out before operating. The drain plug is located on the bottom of the
CVT cover.
1. Remove the drain plug. Allow the water to drain. Reinstall the drain plug.
2. Shift the transmission to neutral. Set the parking brake.
3. Start the engine. Apply varying throttle for 10-15 seconds to expel the moisture and air-dry the belt
and clutches. Do not hold the throttle wide open for more than 10 seconds.
4. Allow the engine RPM to settle to idle speed.
5. Test for belt slippage. If the belt slips, repeat the process.
6. Take the vehicle to your dealer for service as soon as possible.
NOTICE: Exposure to salt water will cause corrosion to metal components. If your vehicle is
operated in salt water areas, rinse it off frequently with fresh water.
62
MAINTENANCE
Filter Systems
Air Filter
Always change the air filter at the
intervals outlined in the Periodic
Maintenance Chart beginning on
page 53. Access the air box
through left rear wheel well.
1.Remove the air filter fixed card 1
and the cover 2 .
2. Loose screw 3.
3.Remove the filter element of the air filter 4
from the air box
4.Wash the filter element in warm soapy
water, then rinse and let dry. If the filter
element is damaged, install a new filter.
1. Fixed card
2. Cover
3.Screw
4. Filter Element
63
MAINTENANCE
Filter Systems
Air Filter
5. Clean away any oil or sediments in the air box.
6. Reinstall the filter element and air box cover. Secure the fixed card.
NOTICE: Never operate the vehicle with the filter element removed. Dirt will enter the engine,
causing rapid wear and severe damage to the engine.
64
MAINTENANCE
Cooling system
1.Place the vehicle on a level surface.
2.Check the coolant level in the coolant reservoir when the engine is cold as the coolant level will vary
with engine temperature.
3.If the coolant is at or below the minimum level mark, open the cover 1 which locates on the engine
cover ,you will see the coolant cap , remove the cap, add coolant to the maximum level mark, install
the reservoir cap.
NOTE: The coolant should be between the minimum and maximum level marks.
Don’t removing the radiator cap when the engine and radiator are still hot, or you could be burned
by hot fluid nd steam blown out under pressure. Wait for the engine to cool before removing the
radiator cap. Always use a thick rag over the cap. Allow any remaining pressure to escape before
completely removing the cap.
65
MAINTENANCE
Cooling system
Correctly fill up the coolant and release the air inside:
1. Under the situation of whole empty
As showed in the picture, pull out the small circulating pipe
on the temperature adjusting set. Full up the coolant from the intake
of radiator. Connect back the pipe when coolant overflew.
Continue filling up untill the coolant is full. Cap the radiator,
Tighten the hoop of the pipe.
2.Add more coolant.
If only a little coolant needed, fill up from the intake of
radiator till it is full, and then cap the radiator.
3.Method of release the air.
If the engine is still overheat when the radiator is full, also the
water pump, Temperature Adjusting Set (TAS), fan is working
properly. So it might be some air in pipe.
The method of releasing the air is: pull out the small circulating pipe, keep adding coolant
from intake of radiator. Connect back the pipe when the coolant spilled out from the pipe.
Then fill up the radiator till it is full. Cap the radiator and tighten the hoop on the pipe.
66
MAINTENANCE
Cooling system
The trobleshooting method of coolant circulation:
Touch the in and out coolant pipe by hand (make sure do not burn your hand), if the
temperature is close to the engine’s, and also the temperature of coolant-in pipe is higher than
coolant-out pipe, this means the circulation is ok. If the temperature is cold there, this means
the circulation is not working.
67
MAINTENANCE
Throttle System
WARNING
Failure to check or maintain proper operation of the throttle system can result in an accident and lead
to serious injury or death if the throttle pedal sticks during operation.
Never start or operate this vehicle if it has a sticking or improperly operating throttle pedal.
Immediately contact your dealer for service if throttle problems arise.
Always check the pedal for free movement and return before starting the engine and occasionally
during operation.
Throttle Freeplay
If the throttle pedal has excessive play or misadjustment,
it will cause a delay in throttle response, especially at low
engine speed. The throttle may also not open fully. If the
throttle pedal has no freeplay, the throttle may be hard to
control, and the idle speed may be erratic. Check the
throttle pedal freeplay at the intervals outlined in the
Periodic Maintenance Chart beginning on page 53.
Adjust the freeplay if necessary.
68
MAINTENANCE
Throttle System
Throttle Freeplay Inspection
1. Place the transmission in neutral. Set the parking brake.
2. Start the engine. Allow it to warm up thoroughly.
3. Measure the distance the throttle pedal moves before the engine begins to pick up speed. Freeplay
should be 1/16 to 1/8 inches (1.5-3 mm).
69
MAINTENANCE
Carburetor
Common sense:
Install the carburetor, the carburetor must ensure that engine to connect with sealing flange
department, in order to avoid leakage, resulting in engine starts hard, no idling or idling
unstable failure.
1. Carburetor Idle Adjustment: carburetor factory has been idle mixture screw fine adjustment,
the general initial use, the user without the need for any adjustments, so as to avoid
unnecessary trouble.
2. Carburetor idling monsoonal adjustment: vehicle engine performance according to differences and
seasonal changes, can be properly adjusted idle screw air-fuel ratio. The changes in the 1/2 circle
range.
3. Regularly inspect the carburetor, cleaning and maintenance, under normal circumstances,
should be looking for an experienced professional service personnel better, should not have
their own repair arbitrary random tune.
4. Long time (a week or more) do not use your vehicle, be sure to let the residual net carburetor
to prevent the corrosion of copper parts residual oil deterioration, resulting in carburetor
failure.
70
MAINTENANCE
Carburetor
Carburetor/Engine Idle RPM Adjustment
If the engine idle speed is not satisfactory, and all other conditions are favorable, the carburetor can be
adjusted.
1. Place the transmission in neutral.
2. Set the parking brake.
3. Start the engine and allow it to warm up for approximately five minutes.
4. Turn the carburetor idle screw in (clockwise) to raise RPM. Turn the screw out (counterclockwise)
to lower RPM.
71
MAINTENANCE
Throttle body
Connect air filer and engine, control the throttle
switch angle of valve through throttle cable, Corner
from the throttle position sensor signals to ECU.
NOTE: The idle speed limit screw does not allow the
adjustment, the engine idle speed depend on the EFI system
adjustment completely, does not hand adjust the idle speed
limit screw.
72
MAINTENANCE
Brakes
Always check brake pedal travel and the brake fluid reservoir level before each use of the vehicle.
When applied, the brake pedal should feel firm. Any sponginess would indicate a possible fluid leak or
low brake fluid level, which must be corrected before riding. See page 74 for brake fluid information.
If you discover any irregularities in brake system operation, including excessive pedal travel,
contact your dealer for proper diagnosis and repairs.
Operating the vehicle with a spongy brake pedal can result in loss of braking, which could cause an
accident resulting in severe injury or death. Never operate the vehicle with a spongy-feeling brake pedal.
Brake Inspection
1. Check the brake system for fluid leaks.
2. Check the brake pedal for
excessive travel or a spongy
feel.
3. Check the friction pads for
wear, damage and looseness.
4. Inspect the brake pad wear
surface for excessive wear.
5. Change pads when worn to
3/64" (1 mm).
73
MAINTENANCE
Brakes
Brake Fluid
Inspect the level of the brake fluid before each operation. If the Alarm light 9 is on add DOT 3 or
DOT 4 brake fluid.
After opening a bottle of brake fluid, always discard any unused portion. Never store or use a
partial bottle. Brake fluid is hygroscopic, meaning it rapidly absorbs moisture from the air. The
moisture causes the boiling temperature of the brake fluid to drop, which can lead to early brake
fade and the possibility of accident or severe injury.
Change the brake fluid every two years and any time the fluid becomes contaminated. Alarm light of
brake fluid level 9 on the meter will on if the brake fluid is lower (need add more). Open the cover 1
which locates on the engine cover, you will see the brake fluid intake.
74
MAINTENANCE
Steering Wheel Inspection
1. Position the vehicle on level ground.
2. Lightly turn the steering wheel left and right.
3. There should be 0.8"-1.0" (20-25 mm) of freeplay.
4. If there is excessive freeplay or strange noises, or the steering feels rough or catchy, have the
steering system inspected by an authorized dealer.
Shock Spring Adjustment
The front and rear shock absorber springs are adjustable to increase or decrease spring tension. Rotate
the adjuster either clockwise or counterclockwise to make adjustments. Always apply the same
adjustment setting to all four wheels.
WARNING! Uneven adjustment may cause
poor handling of the vehicle, which could
result in an accident. Always adjust both the
left and right spring preloads equally or have
your dealer perform the adjustments.
75
MAINTENANCE
Tires
Operating your vehicle with worn tires will increase the possibility of skidding, loss of control and an
accident, which could result in serious injury or death. Always replace tires when the tread depth measures 1/8" (3 mm) or less. Improper tire inflation or the use of non-standard size or type of tires may
adversely affect vehicle handling, which could result in vehicle damage or personal injury. Always
maintain proper tire pressure. When replacing tires, always use original equipment size and type.
Tire Tread Depth
Always replace tires
when tread depth is
worn to 1/8" (3 mm)or less.
Front Wheel Hub Tightening
Front wheel bearing tightness and spindle nut
retention are critical component operations.
All service must be performed by your authorized dealer.
Wheel Removal
1. Position the vehicle on a level surface.
2. Place the transmission in neutral. Set the parking brake. Stop the engine.
3. Loosen the wheel nuts slightly.
4. Elevate the side of the vehicle by placing a suitable stand under the frame.
5. Remove the wheel nuts. Remove the wheel.
76
MAINTENANCE
Vehicle Immersion
NOTICE: If your vehicle becomes immersed, major engine damage can result if the machine is not thoroughly inspected.
Take the vehicle to your dealer before starting the engine.
If it's impossible to take your vehicle to a dealer before starting it, follow the steps outlined below.
1. Move the vehicle to dry land.
2. Check the air box. If water is present, dry the air box and replace the filter with a new filter. Thoroughly dry the air filter. See page 63.
3. Remove the spark plugs.
4. Loosen the carburetor drain screw.
5. Turn the engine over several times.
6. Dry the spark plugs and reinstall
them, or install new plugs.
7. Tighten the carburetor drain screw.
8. Attempt to start the engine. If necessary,
repeat the drying procedure.
9. Take the vehicle to your dealer for service as soon as possible,
whether you succeed in starting it or not.
10. If water has been ingested into the transmission follow the procedure on page 61 for drying.
77
MAINTENANCE
Battery
This machine is equipped with a sealed-type battery. Therefore it is not necessary to check the
electrolyte or add distilled water in the battery. If the battery seems to have discharged, consult your
dealer. It is locate under the passenger seat.
CAUTION: Do not try to remove the sealing caps of the
battery cells. You may damage the battery.
Failure to handle batteries or battery electrolyte carefully.
You could be poisoned and severely burned by the
sulfuric acid in battery electrolyte. Batteries produce
explosive gases. So you should avoid contact with skin, eyes
or clothing. Always shield eyes when working near batteries.
Keep out of reach of children.
1. Negative battery terminal
If contract with you body, take the follow measures:
2. Positive battery terminal
EXTERNAL: Flush with water
INTERNAL: Drink large quantities of water or milk. Follow with milk of magnesia, beaten egg or
vegetable oil. Get prompt medical attention.
EYES: Flush with water for 15 minutes and get prompt medical attention.
Keep batteries away from sparks, flames, cigarettes or other sources of ignition. Ventilate
when charging or using in a closed.
78
MAINTENANCE
Battery
CAUTION:A special battery charger (constant voltage/ampere or constant voltage) is required for
recharging a sealed type battery. using a conventional battery charger may shorten the
battery life.
Fuse replacement
1.The fuses are under the meter cover.
2. If a fuse is blown, turn off the main switch and the switch of the circuit in question. then, install a
new fuse of the specified amperage. Turn on the main switch. If the fuse immediately blows again,
consult your dealer.
Specified fuses:
Battery fuse: 30A
Fan fuse: 10A
Brake light Fuse: 10A
Light power fuse: 15A
Ignition fuse:10A
Cigarett light fuse:15A
Winch/dump pump fuse:10A
Turning light fuse:5A
Horn fuse:5A
2/4 WD fuse:5A
79
Fuel pump fuse:10A
High beam fuse:10A
Low beam fuse:10A
Wiper fuse:15A
MP3 fuse:5A
MAINTENANCE
Battery
1. When the machine is not used for a month or longer, removes the battery and stores it in a cool,
dark place. Completely recharge the battery before reinstallation.
2. Always make sure the connections are correct when putting the battery back in the machine.
WARNING: Do not use an improper fuse, because an improper fuse can cause damage to the
electrical system which could lead to a fire. Always use a fuse of the specified rating.
Never use a material in place of the proper fuse.
CAUTION: To prevent accidental short-circuiting,
turn off the main switch when checking
or replacing a fuse.
80
MAINTENANCE
Cleaning and Storage
Washing the Vehicle
Keeping your vehicle clean will not only
improve its appearance but it can also extend
the life of various components.
Before washing the vehicle, locate the CVT
inlet and outlet duct. The inlet duct is located under the passenger
seat and the outlet duct is located at the right side of the vehicle.
Avoid spraying water directly toward the ducts when
washing the vehicle from the rear.
NOTICE: Water in the CVT system could cause the drive belt to become wet
and slip in the clutches. Always avoid spraying water directly toward
the CVT inlet and outlet ducts when washing the vehicle from the rear.
High water pressure may damage components. We recommend
washing the vehicle by hand or with a garden hose, using mild soap.
Certain products, including insect repellents and chemicals, will damage
plastic surfaces. Do not allow these types of products to contact the vehicle.
The best and safest way to clean your vehicle is with a garden hose and
a pail of mild soap and water.
1. Use a professional-type washing cloth, cleaning the upper body first and the lower parts last.
2. Rinse with clean water frequently.
3. Dry surfaces with a chamois to prevent water spots.
81
MAINTENANCE
Cleaning and Storage
Storage
Long term storage (60 days or more) of your machine will require some preventive procedures to
guard against deterioration. After thoroughly cleaning the machine, prepare for storage as follows:
1. Drain the fuel system.
2. Remove the spark plug, pour about one tablespoon of SAE 10W30 or 20W40 motor oil in the spark
plug hole and reinstall the spark plug. Ground the spark plug wire and turn the engine over several
times to coat the cylinder wall with oil.
3. Block up the frame to raise all wheels off the ground.
4. Tie a plastic bag over the exhaust pipe outlet to prevent moisture from entering.
5. If storing in a humid or salt-air atmosphere, coat all exposed metal surfaces with a light film of oil.
Do not apply oil to any rubber parts or the seat cover.
6. Remove the battery and charge it. Store it in a dry place and recharge it once a month. Do not store
the battery in an excessively warm or cold place (less than 0 °C (30 °F) or more than 30 °C (90 °F)).
82
Malfunction analysis and elimination
(I)Engine malfunction
Malfunction
Malfunction
phenomenon
system
Start
1. pressure in
difficultly or
cylinder is too
could not start low.
2. No ignition
generated from
plug
Reason
Solving method
① Cylinder wear out
② Piston wear out.
③ Leakage on Washer of cylinder.
④ Wearing on Pipe of air valve or
seat of valve is not suitable.
⑤ plug is loose.
⑥ Starting motor is too slow.
⑦ Air circulation is not right.
⑧ Gap of valve is not suitable.
① Dirt on spark plug
② Wet on plug or smudge
③ Ignition coil problem
④ Touch loop got open or short
circuit
⑤ Magneto problem
⑥ CDI problem
83
change
change
change
Repair or change
Tighten
Check electric system.
Adjust
Adjust
Clean or change
Clean, dry or Change
Change
Change
Change
Change
Start
difficultly or
could not start
3. No fuel in
carburetor
4. No fuel in
Throttle body
Engine has no
idle speed or
uneven
5.Miscellaneous
1. Mechanic
problem
① Vent hole on tank jammed
② Problem or blocked in fuel pipe.
③ Problem on needle valve of
carburetor
④ Blocked in fuel tank
⑤ Blocked in fuel filter
Clean or change
Clean or change
Change
Change
Clean or Change
Clean or change
① Vent hole on tank jammed
Clean or change
②Problem or blocked in Injector
③Hight-pressure fuel pump do not
Clean or change
work.
④Low-pressure in hight-pressure
Clean or change
fuel pump
⑤blocked in hight-pressure fuel
Clean or change
pump strainer
Gear is not in neutral
Put gear on neutral
① Valve gap no suitable
Adjust
② Valve base is not suitable
Repair or Change
③ Problem on air pipe
Change
④ Broken on bush of swing arms
Change
⑤IAC valve blocked in inlet 、
84
2. Electric
problem
Engine middle
and
high
rotate speed is
uneven
Mechanical
problem
parts
exhaust pipe.
⑥Fuel level of bobber cab is not
right
⑥ Jam on muzzle of carburetor
⑦ Adjust screw of idle sets wrong.
① Dirt on plug
② Gap of plug not correct
③ Ignition loop problem
④ CDI problem
⑤ Magneto problem
① The force of Valve spring is
weak.
② Cam axle worn out
③ Plug is dirty.
④ Gap of plug is too small.
⑤ Air circulation is not right.
⑥ Ignition loop problem
⑦ Floater of carburetor is too
lower.
⑧ Air filter is dirty.
⑨ Block in fuel pipe cause fuel
supply problem
⑩ Fuel pipe problem
⑾ Underpressure in hight-pressure
85
Adjust or Change
Adjust the height of bobber
Clean
Clean
Adjust
Clean or Change
Change or Adjust
Change
Change
Change
Change
Change
Clean or Change
Adjust or change
Adjust or change
Change
Adjust the height of floater
Clean or change
Clean
Change
Exhaust blue
smoke
Mechanical fault
1. Fuel supply
system fault
Engine power
is not enough
2. Electrical parts
problem
3.Mechanical
problem
fuel pump
① too many lube
② Piston ring worn out
③ Valve pipe worn out
④ Cylinder wall scratched
⑤ Valve rod worn out
⑥ Seal of valve rod broken
① Blocked in muzzle of carburetor
② Level of Floater not correct
③ Air filter is dirty
④ Leakage on air intake pipe
⑤ Too many lube
⑥ Problem or blocked in Injector
⑦Low-pressure in hight-pressure
fuel pump
Adjust or change
Drain the extra lube
Change
Change
Change
Change
Change
Clean or change
Adjust the height of floater
Clean or change
Tighten or change
Drain the extra lube
Clean or Change
① Dirt on plug
② Gap of plug not correct
③ Ignition loop problem
④ CDI problem
⑤ Magneto problem
① Gap of Valve is not correct
② The force of valve spring is
Clean or Change
Change or Adjust
Change
Change
Change
Change operation method
Check, remove or change
86
Adjust or Change
1. Fuel system fault
Engine
overheats
2. Electric System
problem
3. Air pass problem
4. Engine cooling
system
weak.
③ Air circulation is not right.
④ Cylinder worn out
⑤ Piston Ring worn out
⑥ Valve base not correct
⑦ Swing arm or cam shaft worn
out
① Octane number is lower
② Fuel pass blocked
③ Fuel pump problem
④ Fuel level in floater is lower
① Ignition time is late or early
②Spark is weak or no spark
① Air mixture is too thick or thin
② Leakage on engine
③ Air filter is dirty
④ Cylinder, piston, ring worn out
⑤ Leakages on connecting face
⑥ Block in exhaust pipe
⑦ Leakage on Air inlet pipe
① Block in water channel or radiator
② Air in Cooling system or coolant
87
Adjust
Change
Change
Change or repair
Change
Use the right fuel
Clean the fuel pass
Change
Adjust the height of floater
Adjust ignition time
Check from plug to magneto
Adjust carburetor
Repair
Clean or change filter
Repair or change
Repair or change
Dredge
Repair or change
Clear
is Release
air,
refill
5. Miscellaneous
Noise
engine
from
Noise on air valve
Noise from piston
Noise from chain
of circulation
Noise from clutch
not enough
③ Water pump problem
④ Unsuitable coolant
⑤ Constant temperature unit problem
⑥ Fault on motor of fan or switch of
heat-sensor
① Carbon accumulated on top of
piston
② Too many or less lube
③ Unsuitable lube used
① Gap on valve is too big
② Spring on valve is broken
③ Swing arm or cam shaft worn out
① Piston worn out
② Cylinder worn out
③ Carbon gathered in firebox
④ Piston pin or pin hole worn out
⑤ Piston ring or ring notch worn out
① Chain elongated
② Chain worn out
③Adjustor of chain problem
① Spline of crankshaft damaged
②Spline of clutch damaged
88
coolant
Change
Change
Change
Change
Clear
Drain or Refill
Change
Adjust
Change
Change
Change
Change
Clean
Change
Change
Change chain & sprocket
Change chain & sprocket
Repair & Change
Change crankshaft
Change clutch
Noise
Crankshaft
from
Noise from CVT
Noise
from
transmission
system
Gasoline
engine lacks
power
and
accelerating
Clutch skiding
1.Fuel
system
happens
malfunction
Clutch skiding
Transmission
system
Gear change
not smooth or
got stuck
Gear box or Gear
change system
Starting problem
① Bearing noise
②Needle bearing damaged
③ Gap too big
① Belt loose or worn out
② Roller or main wheel damage
① Gear damaged
② Input and output shaft damaged
③ Bearing worn out
④ Bush worn out
①Octane number is too low
Change
Change
Change
Change
Change
Change
Change
Change
Change
Change with gasoline
whose Octane number
accords with regulation
②Oil routine is blocked and oil supply
is not smooth
Clean oil routine
① Hoof of clutch worn out
② Spring on clutch is weak
③ Out wheel worn out
④ Belt worn out & loose
① Operating gear damaged
② Shift rod twisted
③ Shift drum worn out
④Shift pulling stick unsuitable
① Blocked in muzzle
Change
Change
Change
Change
Change
Change
Change
Adjust
Clean
89
Carburetor
works not
properly
Idle and low speed
not stable
Not stable in high
and middle speed
Spill over or fuel
level fluctuated
② Blocked in muzzle channel
③Leakage on connecting part of
carburetor and starting part
④ Starting pin not work properly
① Reducer valve blocked or loose
② Valve channel Blocked
③ Air inlet channel blocked
④ Air inlet bypass Blocked
⑤ Starting pin not closed completely
⑥ Idle screw not suitable
⑦ Height of floater not correct
① Muzzle blocked
② Main air channel blocked
③ Needle valve blocked
④ Throttle not work well
⑤ Fuel filter blocked
⑥ Height of floater not right
⑦ Starting pin not closed
① Needle valve worn out or damaged
② Spring on valve broken
③ Floater not work well
④ Dirt or scale in valve
90
Clean
Tighten,
Adjust
change
Adjust
Clean or tighten
Clean
Clean
Clean
Adjust
Adjust
Adjust
Clean
Clean
Clean
Adjust
Clean or change
Adjust
Adjust
Change
Change
Adjust or change
Clean
or
Engine
coolant
temperature is
lower
Spark weak
Cooling System
Ignition System
① Fault on heat sensor switch on fan
② Cold weather
③ problem on constant temperature
meter
① Fault on starter
② problem on spark plug
③ Magneto problem
④ Voltage of battery is weak
⑤ Ignition loop problem
⑥ Starting loop problem
Change
Cover the radiator
Change
Change
Change
Change
Change
Change
Change
(II)Malfunction in transmission system
Vehicle speed
does not
increase by
engine speed
Transmission
system
Out of gear
Gear Box or Gear
shifting system
①Shift belt slips
Change
②Speed adjusting plate abrasion is too Change
much
③Speeding adjusting plate slipping is Repair or Change
blocked
④Spring force of adjuster is short
Repair or Change
① Speed changing drum groove Change
worn out
② Right and Left gear changing rods Change
91
bended
③High and Low driven gear groove
wear to taper
④Speed changing principal and
countershaft worn out
⑤Sector gear tooth worn out
⑥The force of spring of sector gear is
weak or broken.
(III)Malfunction in running system, suspension and steering organization
Running
is Running
①Air pressure in left and right wheel is different
leaning
system
②Load of left and right wheel is different
③Spring force of left and right absorbing spring
④Front wheel location is wrong
⑤One side wheel is locked or brake could not
release
⑥Front and rear suspension parts have been
loosened, bent or damaged
Tyre is
Steering
①Left and right absorber has been damaged,
abraded
organizaspring force is short
92
Change
Repair or Change
Repair or Change
Change
Adjust air pressure in tyre
Adjust load
Adjust or Change
Check or adjust
Repair arrester
Screw or Change
suspension parts
Adjust or Change
abnormally or
greatly
Front wheel
shakes,
swing
or
jump
tion,
running
system,
suspension
②Tyre is not balance, and wheel hub is distorted
③Front wheel location is wrong
④Vehicle is over-load
⑤Tyre has not change its position
⑥Wheel hub bearing has been damaged or
adjustment is wrong
⑦Wheel assembly jump (axial, radial) is too
great
⑧Air pressure in tyre is too hig or too low
Steering
organization,
running system
①Tyre and wheel is not balance
②Wheel hub bearing has been damaged or
adjustment is wrong
③Left and right swing arm ball head has been
abraded or loosened
④Drag pole tie-in has been abraded or
loosened
⑤Front wheel location is wrong
⑥Wheel (axial, radial)jump is too big
93
Change
Check or adjust
Check load
Change
Adjust or Change
Change
Adjust air pressure in tyre
Balance
wheel
Change tyre
Change or adjust
or
Change
Change
Check、adjust
Change tyre or wheel
hub
Steering is
heavy
Steering
organization
running system
⑦Tyre has tympanic bag
⑧Free travel of redirector is too big
⑨Fixed bolts on each part of steering
organization has been loosened
Change tyre
Change or adjust
Fasten
①Air pressure in tyre is short
Charge the tyre to
applicable air pressure
Change
②Ball head of left and right swing arm and
drag pole is blocked
③Front wheel location is wrong
④Steering pole pipe is blocked
⑤Mesh clearance of redirector is too small
(IV)Malfunction in brake system
Brake is not
Brake
①Brake pipeline leaks oil
hard enough
system ②Brake disk and brake hoof contacts badly or dirt
on surface
③Brake drum and brake hoof wear badly
④Brake main pump is damaged or leaks oil
⑤Brake branch pump is damaged or leaks oil
⑥Brake liquid is short
⑦Brake pipeline has air
⑧Arrester is too hot
94
Check and adjust
Repair or Change
Adjust
Repair
Repair or clean the dust
Change
Repair or change
Repair or Change
Add
Eliminate air
Repair or Change
Brake is
leaning
Brake
block
Brake
system
suspen
-sion
clip
①Some brake drums and hoof pads have oil stain
②Individual brake branch pump leaks oil or is
blocked
③The air pressure in right and left tyre is not even
④Front wheel adjustment is wrong
⑤Vehicle frame is distorted, and left and right
wheelbase is different
⑥Some brake pipelines is not smooth
⑦Individual brake drum and brake hoop contacts
badly
⑧Suspension parts loose
⑨Vehicle is leaning
⑩Thread abrasion of left and right wheel is different
Brake system
①Brake main pump could not return correctly
②Brake hoop return spring is too soft
③Parking brake adjustment is wrong
④Parking brake drag line could not return
⑤Brake branch clip block
⑥Abrasion of brake drum and brake hoop is
too big, and clearance is too great
⑦Brake pipeline has been concaved
(V)Malfunction in lamplight, circuit and meter system
Front
Lighting
①Bulb has been damaged
95
Clean or Change
Repair or Change
Equalize the air pressure
Adjust as the stipulation
Repair or Adjust
Repair or adjust
Repair
Check, repair and fasten
Verify, repair and adjust
Change
Repair main pump
Change
Adjust
Lubricate or Change
Repair or Change
Change
Change
Change bulb
headlight does
not illuminate
Only one front
headlight does
not illuminate
Steering light
does not
illuminate
Starter does not
rotate when
starting
system
Lighting
system
②Adjuster has been damaged(adjusting
voltage is too high to burn bulb)
③Fuse has been burned
④Headlight relay has been damaged
⑤Lead or grounding happens malfunction
⑥Combination switch has been damaged
⑦Storage cell has been damaged(incur bulb is
burned)
Change adjuster
Check、Change
Change
Repair circuit
Repair、Change
Change
①Bulb has been damaged
②Lead or grounding happens malfunction
Change
Repair circuit
①Steering relay has been damaged
②Individual steering bulb has burned
③Grounding is bad
④Fuse burn out
⑤Switch damaged
①Starter has been damaged
②Starting relay has been damaged
③Grounding of starter is bad
Change
Change
Repair
Change
Change
Repair or Change
Change
Repair
96
All electric
apparatuses do
not work
Circuit
system
Some kind of
lamplight
is
bad or complete
lamplights are
damaged (not
including
headlight)
Lamplight
、circuit
Meter works
badly
Meter and
wire
④Ignition switch has been damaged
①Total fuse has been burned
②Ignition switch has been damaged
③General wire or grounding wire has been cut off
④Electric bottle contacts badly or happens
oxygenation
①Switch has been damaged
②Bulb has been burned
③Circuit has been cut off, linking parts contact
badly
④Fuse has been burned.
⑤Grounding wire contacts badly
Change
Check and Change
Change
Repair circuit
Repair
①Fuse has been burned.
②Route has been cut off, tie-in contacts badly
③Instrument has been damaged
④Sensor has been damaged
Change
Repair route
Change
Change
97
Change
Change
Repair circuit
Change
Repair
WARRANTY
LIMITED WARRANTY
Company gives a SIX MONTH LIMITED WARRANTY on all components of your vehicle against
defects in material or workmanship. This warranty is transferable to another consumer during the
warranty period through a company dealer.
REGISTRATION
At the time of sale, the Warranty Registration Form must be completed by your dealer and submitted
to company within ten days. Upon receipt of this registration, Company will record the registration for
warranty. NO WARRANTY COVERAGE WILL BE ALLOWED UNLESS YOUR VEHICLE IS
REGISTERED WITH COMPANY. Initial dealer preparation and set-up of your vehicle is very
important in ensuring trouble-free operation.
WARRANTY COVERAGE :
LIMITATIONS OF WARRANTIES AND REMEDIES
The limited warranty excludes any failures that are not caused by a defect in material or workmanship.
This warranty does not cover accidental damage, normal wear and tear, abuse or improper handling.
This warranty also does not cover any vehicle that has been altered structurally, modified, neglected,
improperly maintained, used for racing, or used for purposes other than for which it was manufactured,
or for any damages which occur during trailer transit or as a result of unauthorized service or the use
of unauthorized parts. In addition, this warranty does not cover physical damage to paint or finish,
stress cracks, tearing or puncturing of upholstery material, corrosion, or defects in parts, components
or the vehicle due to fire, explosions or any other cause beyond company' control.
98
WARRANTY
LIMITATIONS OF WARRANTIES AND REMEDIES
ALL IMPLIED WARRANTIES (INCLUDING BUT NOT LIMITED TO THE IMPLIED
WARRANTIES OF MERCHANTABILITY AND FITNESS FOR A PARTICULAR PURPOSE)
ARE LIMITED IN DURATION TO THE ABOVE SIX MONTH WARRANTY PERIOD.
COMPANY FURTHER DISCLAIMS ALL EXPRESS WARRANTIES NOT STATED IN THIS
WARRANTY. Some states do not allow limitations on how long an implied warranty lasts, so the
above limitation may not apply to you if inconsistent with controlling state law.
HOW TO OBTAIN WARRANTY SERVICE
If your vehicle requires warranty service, you must take it to a company Servicing Dealer.When
requesting warranty service you must present your related proof form to the dealer. (THE COST OF
TRANSPORTATION TO AND FROM THE DEALER IS YOUR RESPONSIBILITY). Company
suggests that you use your original selling dealer; however, you may use any Company Servicing
Dealer to perform warranty service.
Please work with your dealer to resolve any warranty issues. Should your dealer require any additional
assistance they will contact the appropriate person at company.This warranty gives you specific legal
rights, and you may also have other rights which vary from state to state.If any of the above terms are
void because of state or federal law, all other warranty terms will remain in effect.
EMISSION:
Reach Euro II emission standard.
99
WARRANTY
LIMITATIONS OF WARRANTIES AND REMEDIES
In the Country where your vehicle was purchased:
Warranty or Service Bulletin repairs must be done by an authorized Company dealer. If you move or
are traveling within the country where your vehicle was purchased, Warranty or Service Bulletin
repairs may be requested from any authorized Company dealer who sells the same line as your
vehicle.
Outside the Country where your vehicle was purchased:
If you are traveling temporarily outside the country where your vehicle was purchased,you should
take your vehicle to an authorized Company dealer. You must show the related proof. Upon
verification, the servicing dealer will be authorized to perform the warranty repair.
Notice
If your vehicle is registered outside of the country where it was purchased, and you have not followed
the procedure set out above, your vehicle will no longer be eligible for warranty or service bulletin
coverage of any kind. (Vehicles registered to Government officials or military personnel on
assignment outside of the country where the vehicle was purchased will continue to be covered by the
basic warranty.)
For questions call company Customer Assistance:
China:+86(0)579 82258522
100
SPECIFICATIONS
MODEL
500/600UTV
500L/600LUTV
Dimensions:
Overall length
2600 mm
(102.4in)
3200 mm(126in)
Overall width
1280mm
(50.4in)
1300mm(51.2in)
Overall height
1960mm
(77.2in)
1880mm(74.0in)
Seat height
870mm
Wheelbase
1760mm (69.3in)
Minimum ground clearance
210mm
Minimum turning radius
4200mm
Maximum speed
80 km/h
(34.3in)
830mm(32.7in)
2440mm(96.0in)
(8.3in)
(165.4in)
4900mm(192.9in)
Basic weight:
Mass of whole equipments (Not include
driver)
Engine:
Engine type
Cylinder arrangement
590kg
635kg
Water-cooled 4-stroke, CF188/ CF 188-B/CF196
single cylinder
Displacement
500:493 ml
Bore × stroke
87.5×82.0 mm
Compression ratio
10.2:1
101
600:594 ml
(3.4×3.2 in)
MODEL
Starting system
Lubrication system
500/600UTV
500L/600LUTV
Electric
Pressure spray
Engine oil:
Type
Recommended engine oil classification
Quantity:
Without oil filter cartridge replacement
1.8L(1.90 US qt)
With oil filter cartridge replacement
1.9L(2.01 US qt)
Final gear case oil:
Type
SAE15W-40/SF or SAE 80W-90/GL-4
Quantity:
102
MODEL
Periodic oil change
500/600UTV
500L/600LUTV
0.25L(0.26 US qt)
Front gear case oil:
Type
SAE15W-40/SF or SAE 80W-90/GL-4
Quantity:
Periodic oil change
Air filter:
0.28L(0.30 US qt)
Dry element
Fuel:
Type
UNLEADED GASOLINE ONLY
Fuel tank capacity
22.0 L (5.8Gal)
Fuel reserve amount
about 4 L (1Gal)
Carburetor:
Type/quantity
Manufacturer
Vacuum Film
MIKUNI
EFI System :
Type/quantity
MSE 3.0
Manufacturer
BOSCH
Spark plug:
Type/manufacturer
DPR7EA-9(NGK)
103
MODEL
500/600UTV
Spark plug gap
0.8-0.9 mm (0.032–0.035 in)
Clutch type:
wet, hoof centrifugal type
Transmission:
Primary reduction system
V-belt
Secondary reduction system
Shaft drive
Transmission type
V-belt automatic
Operation
Right hand operation
High gear
3.514
Low gear
5.857
Reverse gear
3.828
Chassis:
Frame type
Steel tube frame
Caster angle
4°
Trail
Tire:
Type
Size
Tubeless
front
25×8.00-12
rear
25×10.00-12
104
500L/600LUTV
MODEL
500/600UTV
500L/600LUTV
Brake:
Front brake
Rear brake
type
Dual disc brake
operation
Left foot operation
type
operation
Dual disc brake
Left foot operation
Suspension:
Front suspension
McPherson independent suspension
Rear suspension
Double swing arm independent suspension, two shock
absorbers on each side
Shock absorber:
Front shock absorber
Coil spring / oil damper
Rear shock absorber
Coil spring / oil damper
Electrical:
Ignition system
DC. C.D.I./ECU
Generator system
A.C. magneto
Battery type
Battery capacity
12V 36Ah
Headlight type:
Bulb voltage, wattage × quantity:
105
MODEL
500/600UTV
Headlight
12 V 35 W/35.0 W × 2
Tail/brake light
12 V 5 W/21.0 W × 2
Indicator light
Neutral indicator light
LED × 1
High gear indicator light
LED × 1
Low gear indicator light
LED × 1
Reverse gear indicator light
LED × 1
Coolant temperature warning light
LED × 1
4WD-Lock drive indicator light
LED × 1
Fuses:
Power fuse
30A
Brake light fuse
10A
Light power fuse
15A
Winch/dump pump fuse
10A
E-fan fuse
10A
Ignition fuse
10A
2/4WD fuse
5A
Fuel pump fuse
10A
106
500L/600LUTV
MODEL
500/600UTV
Low beam fuse
10A
High beam fuse
10A
Wiper fuse
15A
Turning light fuse
5A
Cigarett light fuse
15A
MP3 fuse
5A
Horn fuse
5A
107
500L/600LUTV