1
Wireless Assistant
SAGEM WA 3050
Owner’s Guide
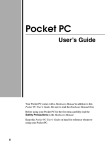
WA 3050
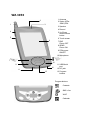
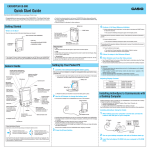
1 Antenna
2
1
2 Status LEDs:
GSM | PDA
3
3 Speaker
4 Record
4
5 Up/Down
control/Action
button
5
6 Touch screen
6
7 END
Phone OFF
8 SEND /
Phone ON
9 PDA power
ON/OFF
10 Microphone
8
7
10
9
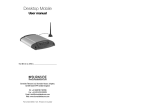
12
11
13
11 USB/Serial
port
12 DC jack
13 Program
buttons
Program buttons
Contacts
SMS + fax
WAP
Calendar
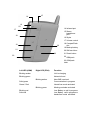
14
15
16
23
14 Infrared port
17
15 Stereo
headphone
jack
18
16 Stylus
17 Volume control
19
20
18 CompactFlash
slot
19 Backup battery
21
20 SIM card door
22
23
21 Reset button
22
GSM pack
23 GSM pack
latch
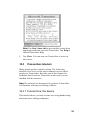
Left LED (GSM)
Right LED (PDA)
Function
Blinking amber
Unit is charging
Blinking green
Network found
Blinking amber
Solid green
New SMS received
Communication in progress
Green / Red
Hands-free mode activated
Blinking green
Meeting reminder activated
Blinking red
Low Battery no call in progress
Solid red
Low Battery call in progress or
hands-free mode activated.
Copyright
The information contained in this manual is subject to change without notice.
Sagem shall not be held liable for technical or editorial errors or omissions
contained herein; nor for incidental or consequential damages resulting from
the furnishing, performance, or use of this material.
© Sagem SA 2001.
This document contains proprietary information that is protected by
international copyright laws. All rights are reserved. No part of this document
may be photocopied, reproduced, adapted, or translated to another language
without the prior written consent of Sagem, except as allowed under the
copyright laws.
The programs that control this product are copyrighted and all rights are
reserved. Reproduction, adaptation, or translation of those programs without
prior written permission of Sagem is also prohibited.
Microsoft, ActiveSync, Outlook, Pocket Outlook, Transcriber, Windows,
Windows NT, the Windows logo, and the Windows CE logo are either
registered trademarks or trademarks of Microsoft Corporation in the United
States and other countries. Microsoft products are licensed to OEMs by
Microsoft Licensing, Inc., a wholly owned subsidiary of Microsoft
Corporation.
All other brand names and product names used in this document are trade
names, service marks, trademarks, or registered trademarks of their
respective owners.
Contents
Welcome
How to use the information in this manual
Conventions
Where to find information
Using online help
WA 3050 components
Setting up the WA 3050
Information on the SIM card
Important safety information
Specific precautions
Charging device
European Union Notice
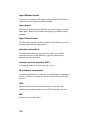
Accessories
USB cradle and external power adapter
Serial cable
Stereo headphones with built-in microphone
Optional accessories
Guidelines for general use
13
14
16
17
18
19
20
21
22
23
24
24
25
25
25
26
26
27
Getting started
Configuring your WA 3050 device
WA 3050 basics
Hardware buttons
Stylus
Today screen
Dialing screen
Programs
Switching among programs /tasks
Navigation bar and command bar
Pop-up menus
Modes of operation
Notifications
Entering information
Typing using the input panel
Writing on the screen
31
32
32
33
34
35
37
40
41
42
44
44
46
47
48
50
v
Drawing on the screen
Recording a message
Finding and organizing information
54
56
57
Basic calling features
Turning the phone on and off
Making a call
Making an international call
Making an emergency call
Answering a call
Placing a call on hold
Rejecting a call
Adjusting speaker volume
Setting the microphone to mute
Activating hands-free mode
Activating silent mode
Ending a call
61
62
62
63
63
64
64
64
65
66
66
66
67
Advanced calling features
Viewing the last number dialed
Making a call using rapid redial
Making a call from Contacts
Setting up a three-way conference call
68
68
68
69
70
Call-related features
71
Accessing voice mail
72
Activating or deactivating automatic redial when busy 72
Reviewing the status of caller ID settings
73
Blocking outgoing caller ID until the phone is powered
off
73
Activating or deactivating call waiting
74
Forwarding voice, data, or fax calls
74
Using Call Status
Monitoring the status of calls in progress
Viewing summary-level Contacts information
Switching between different calls in progress
vi
76
77
77
78
Using the Call Log
Reviewing calls made, received, or missed
Deleting the information in the Call Log
79
81
82
Using the security features of your phone
83
Locking the
and
phone keys
Activating the use of a PIN code
Changing the PIN code
Changing the PIN2 code
Activating call barring
Activating fixed dialing numbers
Activating cost limitations
Turning off transmission of DTMF tones
83
84
86
87
88
90
92
93
Using the Sync SIM utility
Using wireless data applications
Configuring SMS & fax settings
Configuring WAP settings
SMS
Sending an SMS message
Reading and replying to SMS messages
WAP
Viewing WAP-enabled sites
Fax
Sending and receiving faxes
Viewing and annotating a fax
Resending a fax
Getting connected
Connecting to an ISP
Connecting to your network
Ending a connection
Connecting directly to an e-mail server
Getting help on connecting
Inbox: sending and receiving e-mail messages
Synchronising messages
Sending and receiving e-mail remotely
94
101
102
105
106
106
108
110
111
113
113
117
118
119
120
121
125
126
128
129
129
130
vii
Receiving messages
Composing messages
Managing messages and folders
Folder behaviour using ActiveSync
Folder behaviour for remote services
Pocket Internet Explorer
The Mobile Favorites folder
Favorite links
Mobile favorites
Channels
Transferring items using Infrared
131
133
135
135
136
137
137
137
138
139
144
Microsoft ActiveSync
149
Microsoft Pocket Outlook
Calendar: scheduling appointments and meetings
Summary screen
Meetings
Contacts: tracking friends and colleagues
Summary screen
Tasks: keeping a To Do list
Summary screen
Notes: capturing thoughts and ideas
151
151
154
154
155
158
158
161
161
Companion programs
Pocket Word
Typing mode
Writing mode
Drawing mode
Recording mode
Pocket Excel
Tips for working in Pocket Excel
Microsoft Money
Opening and/or creating a new file
Navigating within Microsoft Money
Creating, editing, and deleting accounts
Creating, editing, and deleting categories, payees
Adding and working with transactions
Creating, editing, and updating your investments
164
165
167
168
169
170
170
172
174
174
175
176
178
178
179
viii
Synchronising with Microsoft Money on your desktop
PC
181
Configuring Money for Pocket PC
183
Windows Media Player for Pocket PC
185
Using the playlist manager
185
Microsoft Reader
187
Getting books onto the WA 3050
187
Using the Library
188
Microsoft Transcriber
Features
Starting the program
Transcriber tutorials
Tutorial One: the basics
Tutorial Two: editing gestures
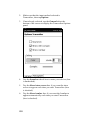
Customizing Transcriber
Adjusting program settings
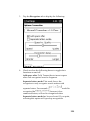
Personalising handwriting recognition capabilities
Editing text
Using the iconbar functions
Using control gestures
Selecting text
Using the alternative list
Adding words to the dictionary
189
190
191
193
193
197
201
201
204
206
207
211
214
215
216
Customizing your WA 3050 device
219
Customizing screens and menus
220
Using Pocket PC security features
222
Adjusting Pocket PC device settings
223
Customizing system settings
226
Setting options for answering calls
229
Setting options to show call length and cost, and delete
the call log
230
Causing the display to be turned off during a call
232
Selecting options for ring tone and vibrating alert
233
Specifying voice mail and other personal numbers
235
Selecting an alternative radio speed (GSM network) 236
Selecting GSM network preferences
236
Adding or removing programs
237
ix
Configuring your WA 3050 device to use as a modem
for your PC
240
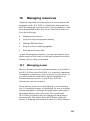
Managing resources
Managing power
Adjusting storage and program memory
Managing SMS and faxes
Stopping or activating a running program
Backing up and restoring data
Monitoring phone usage
243
243
245
248
249
250
252
Appendix A: Troubleshooting
Resetting your device and clearing memory
Battery loses power
If you need to check the software version
If you forget your Pocket PC password
If you run out of memory
Screen freezes or responds slowly
Screen is blank
Screen is dark
Screen is hard to read
Inaccurate response to stylus taps
Slow or no response
No sound
Infrared (IR) connection problems
Modem connection problems
Network connection problems
Cable connection problems
Travel guidelines
International travel guidelines
Shipping guidelines
Caring for your device
254
254
255
257
258
258
258
259
259
259
260
260
260
260
261
263
264
265
265
266
266
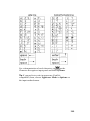
Appendix B: Character Recognizer
Tips for writing characters
267
270
Appendix C: Transferring Palm-size PC data
271
x
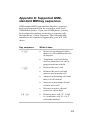
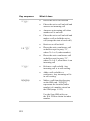
Appendix D: Supported GSM-standard MMI key
sequences
273
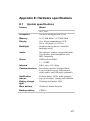
Appendix E: Hardware specifications
System specifications
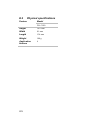
Physical specifications
277
277
278
Glossary
279
Index
299
xi
1
Welcome
Congratulations on purchasing a WA 3050 device, the
complete Microsoft® Windows®-powered organiser and
communications solution for the mobile professional. The
WA 3050 device helps you stay in touch, keeping vital
business and personal information current and close at hand.
Integrated into your device is a next-generation GSM phone
with a full range of voice and data capabilities, including the
ability to send and receive SMS and fax, and a WAP browser
for access to the mobile Internet. Microsoft Pocket Outlook
lets you read and write e-mail and manage your appointments
and contacts. Microsoft ActiveSync allows you to
synchronize information on your device with a PC or
notebook computer.
Picture yourself in the following situations:
§
Your cell phone rings, and the boss asks if you are free
this afternoon for a meeting. You scramble through your
briefcase, looking for your digital organiser.
§
You are meeting friends for dinner and a movie. You
download movie listings from the Internet to your PC,
then synchronize it with your organiser. By the time you
arrive for dinner, your friends have already ordered
dessert.
§
You grab your digital organiser to catch the bus. On the
way home, you review your task list, make notes about
new CDs you want to buy, and read and write responses
to e-mail. Then you remember an important fax you
forgot to send before you left the office.
Now imagine how much easier it might be in each of these
situations if you had a single device that:
§
Is both a cell phone and digital organiser
§
Provides fast access to the “wireless web”
13
§
Enables you to respond immediately to e-mail
§
Lets you send SMS messages or faxes on the spot
Your WA 3050 device can do all of this and more.
1.1
How to use the information in this
manual
Use as little or as much of the information in this manual as
you think you need. If you are familiar with the way GSM
phones work, you may be able to scan the calling
procedures to quickly grasp how to complete a familiar task
using the WA 3050 device.
You may not need to consult some of the appendices at all,
which contain reference information useful in some
situations. For example, the procedure for transferring
Palm-size PC data may be of interest if you previously
owned a Palm-size PC.
This owner’s guide has been written to meet the broadest
set of needs of users who will have different reasons for
purchasing and using the WA 3050 device. You are
probably interested in using some of its capabilities right
away more than others.
Recognizing this, chapters have been grouped into several
major divisions or topic clusters.
“Getting started” reviews WA 3050 setup information,
provides an overview of product features, and explains the
basics of the Pocket PC and dialing screen features.
“Voice communication” covers what you need to know to
use WA 3050 phone features.
14
“Data communication” explains how to configure, access,
and use applications on your WA 3050 device that transmit
and receive data with external resources such as your
carrier network, the Internet, fax machines, and remote
servers.
“Organiser, pocket computing, multimedia” describes how
to get started using ActiveSync, Pocket Outlook,
companion programs such as Word, Microsoft Money,
Excel, Windows Media Player, and Microsoft Reader. The
section on using Transcriber contains information from the
Microsoft Transcriber User Guide.
“Customizing your device” covers procedures for
customizing Pocket PC and phone program settings,
installing additional software, and configuring your WA
3050 device to use as a modem for your PC or notebook
computer.
“Managing resources” describes some tools and procedures
you can use to perform preventive maintenance and track
phone costs.
The appendices present reference information on various
topics.
A glossary defines terms that may be unfamiliar to you.
15
1.2
Conventions
§
The names of menus, commands, toolbar buttons, tabs
in a dialog box, dialog box titles, items within a dialog
box, and icons are shown in bold type.
§
The names of function keys or key sequences on a
standard PC keyboard are shown in uppercase.
Examples: TAB, BACKSPACE, ENTER, CTRL+V.
§
The
§
“Tap” describes the use of the stylus on a Pocket PC.
§
“Click” describes the use of a mouse on a PC or
notebook computer.
§
“Press” indicates that you can enter data or select
options on the touch screen with your fingers. For
example, the “keys” and options on the soft dialing pad
are finger-activated. You can use your fingers or the
stylus to select them.
§
“Dialing” refers to pressing or tapping keys on the soft
dialing pad.
§
Unless noted otherwise, “writing” refers to any method
of character input using the soft input panel. These
methods include typing using the soft keyboard,
printing using Character Recognizer, or writing cursive
using Transcriber (if installed).
§
“Phone component” refers to hardware and software
features that, collectively, comprise the WA 3050
phone function. “Phone” and “your phone” are
synonymous with “phone component”.
§
“PDA component” refers to hardware and software
features that, collectively, define WA 3050 organiser
and Pocket PC computing functions. “PDA” is
synonymous with “PDA component”.
16
symbol identifies cautions or warnings.
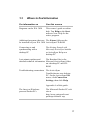
1.3
Where to find information
For information on
See this source
Programs on the WA 3050
This owner’s guide or online
help. Tap Help on the Start
menu to view Help for the
active program.
Additional programs that can The Extras folder on the
be installed on your WA 3050 ActiveSync CD-ROM
Connecting to and
synchronizing with a
desktop PC
The Getting Started with
Microsoft ActiveSync booklet
or ActiveSync Help on a
desktop PC
Last-minute updates and
The Readme files in the
detailed technical information Microsoft ActiveSync folder
on a desktop PC and CDROM
Troubleshooting connections The ActiveSync
Troubleshooter on a desktop
PC. On the ActiveSync File
menu, click Connection
Settings, then click Help.
Appendix A of this guide.
The latest on Windowspowered Pocket PCs
The Microsoft Pocket PC web
site at
http://www.microsoft.com/
pocketpc/default1.asp
17
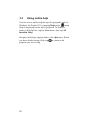
1.4
Using online help
You can access online help for specific programs and for
Windows for Pocket PC by tapping Help on the
menu.
Help is displayed for the active program. To display a
menu of all help files, tap the View menu, then tap All
Installed Help.
Navigate in Help by tapping links or the
button. When
you have finished using Help, tap
to return to the
program you were using.
18
1.5
WA 3050 components
Your WA 3050 device includes the following components:
§
PDA and stylus
§
Main battery pack
§
Main battery (attaches to main battery pack)
§
CD-ROM
§
Backup battery
§
Documentation, consisting of this owner’s guide, an
installation guide, and a safety notice
§
Pouch (carrying case)
§
External power adapter
§
USB cradle
§
Stereo headphones with built-in microphone
§
Serial cable.
19
1.6
Setting up the WA 3050
Complete the procedures for setting up your WA 3050 as
described in the WA 3050 Wireless Assistant Installation
Guide.
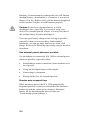
Caution Following are some important points to
consider during the setup process and whenever you
repeat any of the setup procedures:
§
Your WA 3050 device cannot be used if the main
battery has not been installed. Verify that the battery is
present before connecting your unit to external power
or before placing it in the cradle.
§
It is imperative that the main battery is fully charged
(no blinking LEDs) before using your device for the
first time, or before turning it on after an extended
period of disuse (longer than one month) without
having recharged the battery. Make sure that the
device is charging when it is connected to external
power or inserted in the cradle. You may need to
remove and reinsert the adapter plug several times
before the charging LED indicates that the device is
charging (GSM LED blinking amber).
§
Above all, the main battery must be charged and
installed before the installation or replacement of the
backup battery.
§
On the back of your WA 3050 device is a small door
that provides access to the connector for CompactFlash
support. This door must be kept shut at all times
except during the use of the CompactFlash support
feature.
20
1.7
Information on the SIM card
Your WA 3050 device includes a small electronic device
called a SIM card. This card contains all of the information
the GSM network needs for you to use your phone as well
as some storage space for personal information, such as
frequently dialed phone numbers, which you can create and
modify as needed.
Handle and store your SIM card with care to avoid
excessive stresses or scratches that could damage it.
Contact your carrier immediately if your SIM card is lost,
stolen, or damaged.
Do not leave your SIM within the reach of small children.
Note Your WA 3050 device is only compatible with
SIM card 3V.
21
1.8
Important safety information
Main battery and backup battery
Due to the type of batteries used in your WA 3050 device,
follow the laws in your country concerning their recycling.
Used batteries must be taken to the proper facilities for
recycling.
Some important things to keep in mind
§
There is a risk of explosion and injury if batteries are
not replaced correctly or handled with caution.
§
Do not attempt to open the battery, or dispose of it in
fire or water.
§
Replace the battery pack only with the battery pack
designated for the WA 3050 device.
§
Discard used batteries according to the manufacturer’s
instructions.
§
Only use external power adapters available from the
manufacturer. The charging of the main battery is
accompanied by a light warming.
§
The installation of the battery must be carried out in
conformance with the instructions provided by the
manufacturer (see the installation guide). The GSM
pack is an element that must be handled with care.
22
Specific precautions
Caution Your WA 3050 device contains a lithium ion
(LI) battery pack. There is a risk of fire and burns if the
battery pack is handled improperly. Do not disassemble,
crush, puncture, short external contacts, or dispose of in
fire or water. Do not attempt to open or service the
battery pack. Replace only with the battery pack
designated for this product. Discard used batteries
according to the manufacturer's instructions.
Caution Your WA 3050 device also contains a coin cell
lithium battery powered Real-Time Clock circuit. There
is a danger of explosion, and risk of personal injury if the
battery pack is incorrectly replaced or mistreated. Do not
attempt to disassemble, crush, puncture, short external
contacts, or dispose of in fire or water. Do not attempt to
open or service the battery pack. Replace only with the
battery pack designated for this product. Discard used
batteries according to the manufacturer's instructions.
23
Charging device
Use only the appropriate charging devices (power adapters)
contained in the manufacturer’s catalogue. The use of
another charging device could prove to be dangerous and
will void the warranty of your WA 3050 device. The main
plug socket must be easily accessible. The main voltage
should correspond to that given on the manufacturer’s plate
on the charging device.
European Union Notice
This marking indicates that your WA 3050 device complies
with directives 91/263/CEE 89/336/CEE - 73/23/CEE,
modified 93/68/CEE.
24
1.9
Accessories
In addition to the basic unit , battery pack, and carrying
case, your WA 3050 device includes a number of
accessories that increase its versatility and usefulness.
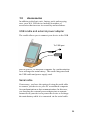
USB cradle and external power adapter
The cradle allows you to connect your device to the USB
To USB port
port on your PC or notebook computer for synchronization
or to recharge the main battery. The cradle integrates both
the USB cable and power supply cord.
Serial cable
If necessary, you have the option of using the serial cable
to connect your device to your PC or notebook computer
for synchronization or data communication. In this case,
you can plug the external power adapter into a separate
connector on your device to power the device or recharge
the main battery while it is connected via the serial cable.
25
Stereo headphones with built-in microphone
Stereo headphones with built-in microphone enable you to
listen to your favorite audio files and use your phone in
automatic-answer mode.
Optional accessories
A number of accessories are available as additional options
for your WA 3050 device, mainly:
§
CompactFlash support
§
In-car cradle
§
Vehicle charger
§
Car kit (cradle + hands free kit for the car)
§
26
1.10
Guidelines for general use
The use of your phone is controlled by safety regulations
intended to protect both the user and his/her environment.
Airplane safety
In an airplane, your phone must be switched off to ensure
that it does not interfere with the plane’s systems. Its use is
illegal, and you could be prosecuted or banned from air
travel or using cellular networks in the future if you do not
abide by these regulations.
Areas containing combustibles
§
It is highly advisable to switch your phone off in the
vicinity of petrol depots.
§
Regulations limit the use of radio equipment in
chemical factories, petrol depots, and any area where
there are mines. You are advised to abide by these
rules.
Road safety
§
Except in an emergency, do not use your phone when
driving without a hands-free kit that enables you to
maintain your freedom of movement. Stop safely to
make a call. Abide by the current laws and use
common sense.
§
Without sufficient protection, some of the electronic
equipment in your vehicle may be affected by the
microwaves given off by the WA 3050 phone
component.
§
Installation of your WA 3050 device in a vehicle must
only be performed by qualified personnel.
27
Non ionising radiation
To ensure your personal safety and obtain maximun
satisfaction from your phone, use it in a vertical position.
Electronic medical equipment
Your phone emits radio waves that could possibly interfere
with electronic medical equipment such as an auditory
prosthesis or pacemaker. Consult with your doctor or
contact the manufacturer for precautions on the use of other
electronic devices in the vicinity of electronic medical
equipment.
General precautions
§
Do not try to open your WA 3050 device and repair it
yourself. The manufacturer cannot be held responsible
for any damage/accident that may result from this.
§
Any work carried out by non-authorised personnel will
result in your guarantee being rendered invalid.
§
Do not use your WA 3050 device in damp areas
(bathroom, swimming pool). Protect it from water and
other liquids.
§
Do not expose your WA 3050 device to extreme
temperatures.
§
Do not leave your WA 3050 device within the reach of
small children.
§
Only use your WA 3050 device with original
accessories. If you do not, your guarantee will be
rendered invalid.
§
The physicochemical processes created by chargers
impose temperature limits when charging the battery.
Your WA 3050 device automatically protects the
batteries in the event of extreme temperatures.
28
§
To avoid the risk of demagnetisation, do not place
diskettes, credits cards etc. close to your unit.
Warning The manufacturer will not be held
responsible for failure to follow any of the preceding
recommendations or for improper use of the product.
29
2
Getting started
“Getting started” provides an overview of the features and
capabilities of your device. Read this section to help you do
the following:
§
Learn how your device operates
§
Navigate in Windows for Pocket PC
§
Recognize features of the dialing screen.
31
2.1
Setting up your WA 3050
Follow the setting up procedure described in the WA 3050
Wireless Assistant Installation Guide.
2.2
WA 3050 basics
Review the diagrams inside the front cover to identify
hardware features of your device. Then read the following
sections for an overview of these features and a quick look
at Pocket PC and dialing interface basics.
32
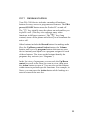
2.2.1 Hardware buttons
Your WA 3050 device includes a number of hardware
buttons for easy access to programs and features. The PDA
power ON/OFF button turns the Pocket PC on and off.
The
key initially turns the phone on and enables you
to place a call. (This key also supports many other
functions in different contexts.) The
key (long
contact) turns off the phone and allows you to terminate the
active call.
Other buttons include the Record button for making audio
files, the Up/Down control/Action button, the Volume
button, and a set of 4 program buttons that turn on your
device instantly and open it to a program assigned to each
of these buttons. The icons on the buttons identify the
programs they activate (see “Programs ”).
In the list view of a program, you can rock the Up/Down
control to scroll to the item you want to view, then press
the Action button to open it. You can also use the buttons
within items to perform specific functions. For example, in
Notes, you can press the Action button while looking at a
note to return to the note list.
33
2.2.2 Stylus
The WA 3050 includes a stylus for selecting items and
entering information. The following actions are available
with the stylus:
§
Tap. Touch the screen once with the stylus to open
items and select options.
§
Drag. Hold the stylus on the screen and drag across
the screen to select text and images. Drag within a list
to select multiple items.
§
Tap-and-hold. Tap and hold the stylus on an item to
see a list of actions available for that item. Tap the
action you want to perform on the pop-up menu that
appears.
Note The stylus tip can also be used to press the Reset
button and open the doors for the main and backup
batteries.
34
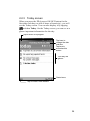
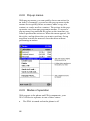
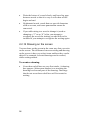
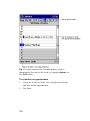
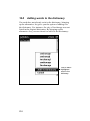
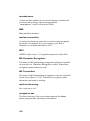
2.2.3 Today screen
When you press the PDA power ON/OFF button for the
first time each day (or after 4 hours of inactivity), you will
see the Today screen. You can also display it by tapping
and then Today. On the Today screen, you can see at a
glance important information for the day.
Tap to switch to a program
Tap here to
change the date
and time
Tap here to
customise this
screen
Your day at a
glance
Status icons
Tap to create a new element
35
You may see the following status icons on the command
bar in the Today screen:
Icon
Meaning
Turns all sounds on and off
Backup battery is low
Backup battery is very low
Main battery is charging
Main battery is low
Main battery is very low
External power source is connected
Dial-up connection
Direct connection
36
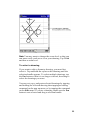
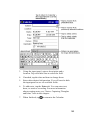
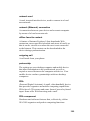
2.2.4 Dialing screen
When you press
the first time after your device has
been completely powered down or when the PDA is
running, the dialing screen appears. This screen and the
hard dialing keys (
and
) provide access to the
basic calling features of your phone. (Authorisation for
specific services accessible through the phone interface is
contained in the SIM card supplied by your carrier when
you purchased your phone.)
Tap to switch to a
different program
Status icons
Message area
Soft dialing pad
Like the Welcome screen, the dialing screen includes the
icon, which you can tap to switch to other programs
while talking on the phone. The dialing screen does not
include the command bar (see “Navigation and command
bar”).
37
To the right of the
status icons:
Icon
icon on the dialing screen are several
Function
Battery level indicator
Voice call in progress
Data call in progress
Fax call in progress
New message in your voice mail box
Silent mode active (if selected)
Hands-free mode active (during a call if selected)
Signal strength and roaming (5 progressively higher
vertical bars and a small antenna). If roaming, a
“running” script “R” replaces the antenna. A
flashing antenna indicates the absence of a steady
signal.
Beneath the row of status icons is the message area.
Information such as the caller’s name and the number, and
the status messages such as “Emergency call mode”, are
displayed in this part of the dialing screen. The message
area expands to reveal information about multiple calls in
progress when you press the Call Status button (
38
).
Situated around the message area are several buttons for
selecting options before or during a call:
Button
Name
Function
Call Log
Display information for up to
20 of the last calls made or
received using your phone
Audio
Display a pop-up menu with
finger-activated controls for:
silent mode, hands-free mode,
microphone mute, and speaker
volume
Contact
Display summary-level
information from Contacts if
the caller ID matches one in
Contacts
Call Status
Display information about the
status of all calls in progress
(up to four at a time) and select
other options
Additional information about the function of these buttons
is provided in the context of specific procedures in which
they are accessed or in other sections of this manual.
Below the messages area is the soft dialing pad. Press or
tap “keys” on this part of the dialing screen to dial a
number and select other options. For example, you can dial
your voice mail number with speed dialing by holding
down the
key.
39
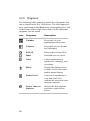
2.2.5 Programs
The following table contains a partial list of programs that
can be found on the WA 3050 device. The icons appear as
they would look on the Start menu or navigation bar. Look
in the Extras folder on the ActiveSync CD for additional
programs you can install.
Icon
40
Programs
Description
Calendar
Keep track of your
appointments and events
Contacts
Keep track of your friends
and colleagues
EzWAP
Browse the wireless Web
Inbox
Send and receive e-mail
Notes
Create handwritten or
typed notes, drawings, and
recordings
Phone
Display the dialing screen
to make a call or use other
mobile phone features
Pocket Excel
Create new workbooks or
view and edit Excel
workbooks created on your
desktop computer
Pocket Internet
Explorer
Browse the Web anytime,
anywhere with wireless
access
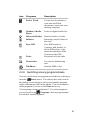
Icon
Programs
Description
Pocket Word
Create new documents or
view and edit Word
documents created on your
desktop computer
Windows Media
Player
Listen to digital audio files
Microsoft Reader
Read or listen to e-books
Solitaire
Entertain yourself while on
the road
Sync SIM
Save SIM entries to
Contacts; add, modify, or
delete SIM entries; copy
names and numbers from
Contacts to the SIM
Keep track of your tasks
Tasks
Transcriber
WinPhone
Use cursive handwriting
tool
Send an SMS or fax
2.2.6 Switching among programs/tasks
You can switch from one program to another by selecting it
from the
(Start) menu. You can tap this same icon on
the dialing screen during a call to open another program
while continuing to talk on the phone. You can customise
which programs you see on the Start menu (see
“Customizing screens and menus”). For some programs ,
you will need to tap
, Programs , then a program name
to switch to another program.
41
Note Tapping
, then Phone displays the dialing screen,
but you will be unable to make a call until the phone has
been turned on (see “Turning the phone on and off”).
You can also switch to some programs by pressing one of
the program buttons located on the front or side of your
device. The icons on the buttons identify the programs they
display. You can select options for customizing which
programs these buttons display (see “Adjusting Pocket PC
device settings”).
2.2.7 Navigation bar and command bar
The navigation bar is located at the top of Pocket PC
program screens when you tap the
icon. It displays the
title of the active program and the current time, and allows
you to switch to other programs and close screens.
42
Tap to select a program
Tap here to close the
screen
Tap here to switch to
another program
Use the command bar at the bottom of the screen to
perform tasks in programs . The command bar includes
menu names, buttons, and the input panel button. To create
a new item in the current program, tap New. To see the
name of a button, tap and hold the stylus on the button.
Drag the stylus off the button so that the command is not
carried out.
43
2.2.8 Pop-up menus
With pop-up menus, you can quickly choose an action for
an item. For example, you can use the pop-up menu in the
contact list to quickly delete a contact, make a copy of a
contact, or send e-mail to a contact. The actions in the popup menus vary from one program to another. To access a
pop-up menu, tap and hold the stylus on the item that you
want to perform the action on. When the menu appears, lift
the stylus, and tap the action you want to perform. Or tap
anywhere outside the menu to close the menu without
performing an action.
2.2.9 Modes of operation
With respect to the phone and PDA components, your
WA 3050 device operates in one of three states:
§
44
The PDA is turned on but the phone is off
§
The PDA is turned off but the phone is on
§
Both the phone and PDA are on
Different capabilities are available and certain restrictions
apply in each of these states. Understanding each of these
states and some of the restrictions can help you get a better
understanding of how your device works at a basic level as
well as decide when and whether you need to operate the
phone and PDA components at the same time.
When the PDA is on but the phone is off, you can access
Pocket PC programs but are unable to make or receive
voice calls, receive or reply to SMS messages, or use any
of the other programs that utilise data transmission such as
EzWAP and Inbox. You may find it useful to work in this
mode when you just want to use organizer features or
programs and do not want to be interrupted by incoming
calls.
In the second state, the PDA is turned off to conserve
power. You are unable to access Pocket PC programs or the
dialing screen (to make outgoing calls), but you can still
receive incoming calls because the phone component is
operating in standby mode. When an incoming call is
received, the PDA powers automatically on, the dialing
screen is displayed automatically, and you can accept or
reject the call. Work in this mode when you want to use
your device to answer incoming calls.
When the phone and PDA components are on at the same
time, you can access and work in Pocket PC programs and
answer incoming calls. If you are working in a Pocket PC
program and you receive a call, the display changes
automatically to the dialing screen, and you can answer or
reject the call. When you are done with the call, you can
switch back to the program you were working in and wait
for the next incoming call.
45
Note If you switch to one of the programs that utilises
wireless data transmission, you will be unable to receive
incoming calls during the time that your device is
connected.
If you must work with both the PDA and phone on, keep in
mind that you will have to charge the battery more often
and may not be as productive using organiser or other
Pocket PC programs if you are interrupted frequently by
incoming calls.
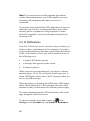
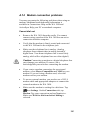
2.2.10 Notifications
Your WA 3050 device uses a variety of ways to notify you
when you have something to do. For example, if you have
set up an appointment in Calendar, a task with a due date in
Tasks, or an alarm in Clock, you will be notified in any of
the following ways:
§
A status LED flashes (green)
§
A message box appears on the screen
§
A sound is played.
When you receive an incoming call, your device vibrates
and may play a .WAV file or sound a default ring tone. A
status LED flashes amber and a .WAV file plays when you
receive an SMS message.
When the battery is charging, the GSM status LED flashes
amber. When the battery is fully charged, the status LED
remains lit until you disconnect the external power supply.
For more information about LED notification, refer to the
page facing the inside front cover.
To choose reminder types and sounds, tap , then
Settings. In the Personal tab, tap Sounds & Reminders.
46
To choose the .WAV file that plays when you receive an
incoming call, refer to the section “Selecting options for
ring tone and vibrating alert”. To choose the .WAV files
that play when you receive an incoming SMS or fax, refer
to “Configuring SMS & fax settings”.
Caution Be sure to tap
and close any dialogue
boxes when they appear. Failure to do so may result in
a loss of your WA 3050 device’s audio capabilities.
2.2.11 Entering information
The number “keys” and other “buttons” on the WA 3050
soft dialing pad are designed to be finger-activated. You
can use your fingers or the stylus (if you prefer) to dial a
number and select context-sensitive buttons and other
options while using your phone.
You have a variety options for entering information on
other screens:
§
Use the soft keyboard or Character Recognizer to enter
typed text in the input panel
§
Write directly on the screen
§
Draw pictures on the screen
§
Speak into the microphone to record a message
§
Synchronize or copy information from your computer
to your WA 3050 device using ActiveSync. For more
information on ActiveSync, see the booklet
accompanying the ActiveSync CD or refer to the
ActiveSync Help.
47
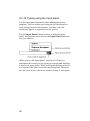
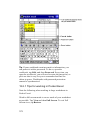
2.2.12 Typing using the input panel
Use the input panel button to enter information in any
program. You can either type using the soft keyboard or
write using Character Recognizer. In either case, the
characters appear as typed text on the screen.
Tap the Input Panel button to show or hide the input
panel, then tap the arrow next to the Input Panel button to
see your choices.
When you use the input panel, your WA 3050 device
anticipates the word you are typing or writing and displays
it above the input panel. When you tap the displayed word,
it is inserted into your text at the insertion point. The more
you use your device, the more words it learns to anticipate.
48
To change word suggestion options, such as the number of
words suggested at one time, tap
, Settings, Personal
tab, Input, then the Word Completion tab.
To type with the soft keyboard
1.
Tap the arrow next to the Input Panel button, then
Keyboard.
2.
Tap the keys with your stylus on the soft keyboard that
is displayed.
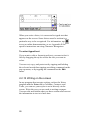
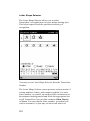
To use Character Recognizer
1.
Tap the arrow next to the Input Panel button, then
Character Recognizer.
2.
Write a letter in the box.
49
When you write a letter, it is converted to typed text that
appears on the screen. Some letters must be written in a
particular way to be recognized. For information, tap
to see an online demonstration, or see Appendix B for
specific instructions on using Character Recognizer.
To select typed text
If you want to edit or format typed text, you must select it
first by dragging the stylus across the text you want to
select.
You can cut, copy, and paste text by tapping and holding
the selected words then tapping an editing command on the
pop-up menu, or by tapping the command on the Edit
menu.
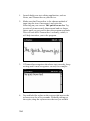
2.2.13 Writing on the screen
In any program that accepts writing, such as the Notes
program and the Notes tab in Calendar, Contacts, and
Tasks, you can use your stylus to write directly on the
screen. Write the way you are used to writing on paper.
You can edit and format what you have written and convert
the information to text at a later time.
50
To write on the screen
§
Tap the Pen button to switch to writing mode. This
action displays lines on the screen to help you write.
Note Some programs that accept writing may not have the
Pen button. See the documentation for that program to find
out how to switch to writing mode.
To select writing
If you want to edit what you write, you must first select it.
1.
Tap and hold the stylus next to the text you want to
select until the insertion point appears.
51
2.
Without lifting the stylus, drag it across the text you
want to select.
If you accidentally write on the screen, tap Edit then Undo
and try again. You can also select text by tapping the Pen
button to deselect it then dragging the stylus across the
screen.
You can cut, copy, and paste written text in the same way
you work with typed text: tap and hold the selected words,
then tap an editing command on the pop-up menu, or tap
the command on the Edit menu.
To convert writing to text
§
Tap Tools and then Recognize.
If you want to convert only certain words, select them
before tapping Recognize on the Tools menu (or tap and
hold the selected words then tap Recognize on the pop-up
menu). If a word is not recognized, it is left as writing.
52
If the conversion is incorrect, you can select different
words from a list of alternates or return to the original
writing. To do so, tap and hold the incorrect word (tap one
word at a time). On the pop-up menu, tap Alternates. A
menu with a list of alternate words appears. Tap the word
you want to use, or tap the writing at the top of the menu to
return to the original writing.
Tips for getting good recognition:
§
Write neatly.
§
Write on the lines and draw descenders below the line.
Write the cross of the “t” and apostrophes below the
top line so that they are not confused with the word
above. Write periods and commas above the line.
§
For better recognition, try increasing the zoom level to
300% using the Tools menu.
53
§
Write the letters of a word closely and leave big gaps
between words so that it is easy to tell where words
begin and end.
§
Hyphenated words, words that use special characters
such as accents, and some punctuation cannot be
converted.
§
If you add writing to a word to change it (such as
changing a “3” to an “8”) after you attempt to
recognize the word, the writing you add will not be
included if you attempt to recognize the writing again.
2.2.14 Drawing on the screen
You can draw on the screen in the same way that you write
on the screen. The difference between writing and drawing
on the screen is how you select items and how they can be
edited. For example, selected drawings can be resized,
while writing cannot.
To create a drawing
§
54
Cross three ruled lines on your first stroke. A drawing
box appears. Subsequent strokes in or touching the
drawing box become part of the drawing. Drawings
that do not cross three ruled lines will be treated as
writing.
Note You may want to change the zoom level so that you
can more easily work on or view your drawing. Tap Tools
and then a zoom level.
To select a drawing
If you want to edit or format a drawing, you must first
select it. Tap and hold the stylus on the drawing until the
selection handle appears. To select multiple drawings, tap
the Pen button so that it is no longer selected, then drag to
select the drawings you want.
You can cut, copy, and paste selected drawings by tapping
and holding the selected drawing then tapping an editing
command on the pop-up menu, or by tapping the command
on the Edit menu. To resize a drawing, make sure the Pen
button is not selected and drag a selection handle.
55
2.2.15 Recording a message
In any program where you can write or draw on the screen,
you can also quickly capture thoughts, reminders, and
phone numbers by recording a message. In Calendar,
Tasks, and Contacts, you can include a recording in the
Notes tab. In the Notes program, you can either create a
stand-alone recording or include a recording in a written
note. If you want to include the recording in a note, open
the note first.
To create a recording
1.
Hold theWA 3050 so that the microphone is near the
audio source.
2.
Press and hold the Record button until you hear a
beep.
3.
Make your recording while holding down the Record
button.
4.
Release the Record button to stop recording. Two
beeps will sound. The new recording appears in the
note list or as an embedded icon.
Note You can also make a recording by tapping the
Record button on the Recording toolbar.
To play a recording, tap it in the list, or tap its icon in the
note.
56
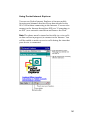
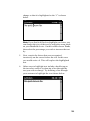
2.2.16 Finding and organizing information
You can find and organise the files and information on
your WA 3050 device in much the same way you do on
your desktop PC: by using the Find utility or by using File
Explorer. Use the Find utility to locate files that contain a
specified text string or that match specific criteria. Use File
Explorer to find files on your device and to organise these
files into folders.
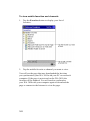
To use the Find utility
1.
Tap
then Find.
2.
In the Find box, type the text you want to find.
3.
To narrow your search to files of a certain type, select
the file type in the Type list.
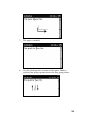
57
Tip To locate files that are taking up storage space,
select Larger than 64 KB in Type .
4.
Tap Go.
To access File Explorer
§
58
Tap
and Programs , then tap File Explorer.
Voice communication
3
Basic calling features
Once you know a little bit about how your device operates
and can find your way around the Pocket PC and soft
dialing interface, you are ready to start using the basic
calling features of the WA 3050 device. You can:
§
Turn the phone on and off
§
Make a call
§
Make an international call
§
Make an emergency call
§
Answer a call
§
Reject a call
§
Adjust the speaker volume
§
Set the microphone to mute
§
Select hands-free mode (use speaker phone)
§
Turn off the ringer
§
Put a call on hold
§
End a call.
61
3.1
Turning the phone on and off
The first thing to know about using your phone is how to
turn it on and off. You must turn it on before you can use
calling features and access phone settings. (In addition, a
SIM card for a valid subscription must be inserted in order
to access settings or do anything other than make
emergency calls).
To turn the phone on
§
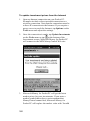
Press and hold down
At the first switch on of your phone or after a memory
dump , there's a data exchange with the message
"Retrieving information from the phone…". Please be
patient while this exchange is running.
To turn the phone off
§
3.2
Press and hold down
for a few seconds until the
message “The phone is now off” is displayed.
Making a call
When the phone is on, you can make a call by typing a
phone number on the soft dialing pad with your fingers or
by tapping each key with the stylus.
To make a call
1. When the dialing screen is displayed, enter a phone
number by pressing each corresponding number key
on the soft dialing pad.
2.
If you make an error, press
to delete the last digit
typed, or hold down
to delete everything you typed
and reenter the entire number.
62
3.
Press
.
You can also dial a number from Contacts (see “Placing a
call from the Contacts list”) or the Call Log (see “Using the
Call Log”).
3.3
Making an international call
Your WA 3050 device includes support for making
international calls. The phone keypad includes the “+”
character needed to make this type of call.
Note The ability to make international calls may require
authorisation from your carrier provided as part of your
subscription.
To make an international call
§
3.4
Follow local dialing instructions. Press and hold
to enter the “+” symbol when it is required.
Making an emergency call
You can make an emergency call on any network when the
SIM card is absent or a PIN code is activated, or when call
barring or fixed dialing is in effect (see “Using the security
features of your phone”).
To make an emergency call
1.
When the dialing screen is displayed, enter the
emergency phone number by pressing each key on the
keypad.
2.
Press
.
63
3.5
Answering a call
You must leave your phone on to receive incoming calls.
The dialing screen does not have to be displayed, and the
PDA component does not have to be powered on for you to
receive them. If the phone is on and you receive an
incoming call, the dialing screen is displayed and you can
proceed to answer the call.
To answer a call
1.
If there is no call in progress, press
or tap the
message area to answer an incoming call.
2.
If a call is in progress, you can choose to end the
current call, or you can place the caller on hold and
answer the incoming call at the same time by tapping
the message area.
3.6
Placing a call on hold
If you receive an incoming call when a call is in progress,
you can place the current call – which can be a conference
call – on hold, then answer the incoming call.
To place a call on hold
§
3.7
Tap
to place the current call on hold, then tap the
message area notifying you of the incoming call to
accept it.
Rejecting a call
If you do not want to answer an incoming call, you can
choose to reject it by simply ignoring it. The phone will
continue to ring until the caller hangs up or is switched into
voice mail (if supported as part of your subscription). If the
caller is switched into voice mail, the call is recorded in the
64
Call Log as a missed call. You also have the option of
actively rejecting the call, which causes the phone to stop
ringing and sends the caller immediately to voice mail.
To reject a call
§
Press or tap
to reject an incoming call. If the phone
is on but no calls are underway, pressing
displays the dialing screen with the message area
unchanged from the previous call. If the phone is on
and an incoming call is received while a call is in
progress, pressing
ends all calls in progress and
causes the incoming call to ring through.
3.8
Adjusting speaker volume
You can adjust your phone’s speaker volume before or
during a call. Use the Volume button or select a volume
setting using a finger-activated audio control. The speaker
volume settings during handset, hands-free, and headset
operation are independent of one another, so you may need
to readjust the volume when you switch from one mode to
another. Note that the speaker volume setting does not
affect the system loudness specified as part of configuring
the Pocket PC settings (see “Adjusting Pocket PC device
settings”).
To adjust the speaker volume
Do one of the following:
§
Press the Volume button up and down.
§
When the dialing screen is displayed, press or tap
Drag the slider on the Volume slide up or down.
.
65
3.9
Setting the microphone to mute
Sometimes you may want to turn off the receiver
(microphone) while you have a caller on the line to speak
with someone privately or as a courtesy if your call is
interrupted for some reason. Microphone service is restored
when you turn it back on or when you end the call.
To set the microphone to mute
1.
When the dialing screen is displayed, press or tap
2.
Press or tap
3.10
.
.
Activating hands-free mode
When you need to talk with someone on the phone and use
your hands at the same time, you can work in hands-free
mode. In this mode, the speaker volume is turned up loud
enough so that you do not need to hold your WA 3050 up
to your ear to hear the other person’s voice. The red LED
flashes when hands-free mode is active. You can choose a
car kit that makes it easy and safe for you to use your
device in hands-free mode while you are driving. Handsfree mode ends when you turn it off or when you end a call.
To activate hands-free mode
1.
When the dialing screen is displayed, press or tap
2.
Press or tap
3.11
.
Activating silent mode
If you do not want to hear the ringer when you receive an
incoming call, you can turn it off before or during a call in
progress by activating silent mode. Turning off the ringer
does not affect settings specified for vibrating alert (see
66
.
“Selecting options for ring tone and vibrating alert”). If you
turn the ringer back on, any vibrating alert settings
specified previously are again in effect.
To activate silent mode
1.
When the dialing screen is displayed, press or tap
2.
Press or tap
3.12
.
.
Ending a call
When you are finished talking, be sure to end your call.
To end a call
§
Press
to end the currently active call (details
visible in the message area).
Caution Pressing
progress.
will end all calls in
67
4
Advanced calling features
Your WA 3050 device includes a number of advanced
calling features that enable you to:
§
View the last number dialed
§
Redial the most recent incoming or outgoing call
§
Select a call for rapid redial
§
Place a call from Contacts
§
Set up a three-way conference call.
4.1
Viewing the last number dialed
When the phone is on but no call is in progress, the
message area normally displays the message “All calls are
ended”. You can access the Call Log to view the last
number dialed (see “Using the Call Log”). You can select a
call for rapid redialing from the Call Log if there is a
matching number in Contacts.
4.2
Making a call using rapid redial
You can use rapid redial to call the most recent incoming or
outgoing call.
To redial the most recent call
1.
Press
(switches to the dialing screen, or turns on
the phone and switches to the dialing screen if both the
phone and PDA are turned off).
2.
Press
(displays the Call Log).
3.
Press
(dials the first entry).
68
To select a call for rapid redialing
1.
Press
to display the dialing screen (if necessary).
2.
Press
3.
Press the Up and Down button, or tap the up and
down arrow buttons until an entry you want is
highlighted.
4.
Do any one of the following to automatically redial the
number shown in the highlighted entry:
in order to access the Call Log.
§
Press the action button
§
Tap the entry
§
Press or tap Call
§
Press
4.3
.
Making a call from Contacts
You can browse information in Contacts, highlight an
entry, then place a call to the selected individual if the entry
includes a phone number.
To make a call from Contacts
1.
Tap
then Contacts.
2.
Select an entry on the list.
3.
Tap Tools then Call Contact.
69
4.4
call
Setting up a three-way conference
Your WA 3050 device provides support for a caller and
two other parties to participate in a three-way conference
call.
Conferencing can occur when there are two calls in
progress: one active and one on hold. When that call status
configuration occurs, the
caller with another party.
button lets you conference a
A conference call is equivalent to a single call, even though
it is shown with two separate Call Status entries, each of
which says “Conference”. Putting a conference call on hold
puts all of the parties on hold.
To set up a three-way conference
1.
Make a call.
2.
Place the caller on hold and make a second call.
3.
Tap
.
The status for each call changes from “Active call” or
“On hold” to “Conference”. If call costs are being
shown, the message area includes total call cost (the
sum of the costs for the two connected parties).
70
5
Call-related features
The WA 3050 supports a number of call-related features:
§
One-touch access to voice mail
§
Activate or deactivate automatic redial when busy
§
Review the status of caller ID services
§
Block outgoing caller ID until phone powered off
§
Activate or deactivate call waiting
§
Call forwarding.
71
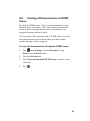
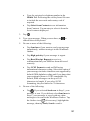
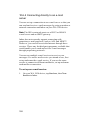
5.1
Accessing voice mail
Your WA 3050 device provides one-touch access to your
voice mail.
1.
Tap
then tap on Settings. In Personal tab tap on
Phone then tap on Ring&Phone numbers.
2.
Tap on My numbers tab.
3.
Set up the voicemail number (see your operator GSM).
4.
Tap on
.
To access voice mail
§
Press and hold down
.
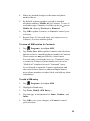
5.2
Activating or deactivating
automatic redial when busy
If you receive a busy signal when you make a call, you can
choose to have the number redialed automatically or end
the call. Settings enable you to specify whether and how
automatic redialing should occur.
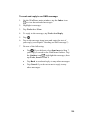
To activate or deactivate automatic redial when
busy
1.
Tap
then Settings. On the Personal tab, tap
Phone, then Call Services.
2.
Tap the Other tab.
3.
By default, Automatic redial when busy / Ask before
redialing is enabled. This option enables you to
specify whether to redial an individual call when the
72
line is busy. To have a call redialed automatically
within ten seconds when there is a busy signal, tap
Redial without asking. (If you select this option, you
can still cancel an automatic redial within ten seconds.)
4.
If you do not want to use automatic redial, tap
Automatic redial when busy so that it is deactivated
(not selected).
5.
Tap
.
5.3
Reviewing the status of caller ID
settings
Your WA 3050 device enables you to review the status of
caller ID settings.
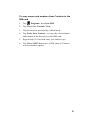
To review the status of caller ID settings
1.
Tap
then Settings. On the Personal tab, tap
Phone, then Call Services.
2.
Review caller ID settings.
3.
Tap
.
5.4
Blocking outgoing caller ID until
the phone is powered off
You can select the option of blocking outgoing caller ID. If
enabled, this option causes a request to be sent to the
network to block caller ID on outgoing calls when you
make a call. If you want to use this feature, you can select it
any time after you turn on the phone but before making a
call. Unlike Block your caller ID for outgoing calls, this
option gives you some control over the blocking of your
caller ID but must be set each time you turn on your phone
if you want to use it.
73
To block caller ID until the phone is powered off
(anonymous call)
1.
Tap
then Settings. On the Personal tab, tap
Phone, then Call Services.
2.
Tap Block your caller ID for outgoing calls
(anonymous calls).
3.
Tap
.
5.5
Activating or deactivating call
waiting
For most phone subscriptions, call waiting is enabled by
default. If you deactivate this feature, you will not be able
to answer any incoming calls received during a call in
progress. Callers will hear a busy signal, and calls will not
be recorded as missed.
To activate or deactivate call waiting
1.
Tap
then Settings. On the Personal tab, tap
Phone, then Call Services.
2.
Tap the Other tab.
3.
Tap Allow call waiting to activate or deactivate it.
4.
Tap
5.6
.
Forwarding voice, data, or fax calls
The WA 3050 enables you to customise call forwarding for
voice, data, and fax calls. It provides basic forwarding for
any type of call and additional forwarding options for voice
calls if a line is busy, or if a caller is unavailable (phone is
turned off) or not answering calls.
To forward voice, data, or fax calls
74
1.
Tap
then Settings. On the Personal tab, tap
Phone, then Call Services.
2.
Tap the Forward tab.
3.
Tap on the Call type box and tap Voice, Data, or
Fax.
4.
To specify a forwarding destination to use all the time
for the type of call selected, tap Always forward to.
Tap at the right and tap Voice, Data, or Fax. These
options equate to the numbers shown when you review
the phone numbers associated with your personal
subscription (see “Specifying voice mail and other
personal numbers”).
5.
To specify multiple forwarding options for voice calls,
tap Forward to the following numbers. (This option
is disabled for Data or Fax calls.)
6.
Do one or more of the following:
7.
§
Tap If busy, then tap at the right to enter or
select a phone number to which calls will be
forwarded when the line is busy.
§
Tap If unavailable, then tap at the right to enter
or select a phone number to which calls will be
forwarded when a voice call is received during a
data call, when the modem is in use, or when your
phone is turned off.
§
Tap If no answer after, then tap at the right and
select a time interval after which calls will be
forwarded. Tap to the right of forward to and
enter or select a phone number to which voice
calls will be forwarded when there is no answer
after the time interval has passed.
Tap
.
75
6
Using Call Status
The message area on the dialing screen displays
information about the status of calls in progress. When you
make a call, it displays some or all of the following:
§
The number you are dialing
§
The name of the party you are calling if there is a
matching caller ID in the Contacts list
§
Other information such as call length and cost if
activated.
If you receive an incoming call during a call in progress,
the message area announces the incoming call and may
include the caller’s name and number if the caller ID is
available and it matches one in the Contacts list.
76
The contents of the message area changes depending on the
status of calling activity. The Call Status feature enables
you to monitor the status of two or more calls in progress
(up to four at a time) and to perform an action based on the
information in the entry, the type of call, and available
options. Call Status lets you switch among multiple calls
without ending any of them.
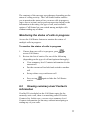
Monitoring the status of calls in progress
Access the Call Status feature to monitor the status of
multiple calls in progress.
To monitor the status of calls in progress
1.
2.
If more than one call is in progress, press
to
access Call Status.
Review the list of entries. Do one of the following
(depending on the type of call and options that apply):
§
View summary-level Contacts information for the
current call
§
Put the current call on hold and switch to another
call
§
Set up a three-way conference call
§
Press or tap
entries.
again to hide the Call Status
6.2
Viewing summary-level Contacts
information
If caller ID is included on the Call Status entry for the
currently active call, there is a matching caller ID in the
Contacts list. In this case, you can view summary-level
Contacts information for an entry without interrupting or
ending any of your calls.
77
To view summary-level Contacts information for
the currently active call
1.
Press or tap
.
2.
Review the list of entries.
3.
If the currently active entry includes a caller ID, press
to view summary-level Contacts information.
4.
Press
or tap
to return to the dialing screen.
6.3
Switching between different calls in
progress
As part of monitoring the status of calls in progress, you
can put the current caller on hold and answer an incoming
call or switch to another call on hold.
To switch between different calls in progress
1.
Press or tap
.
2.
Review the list of entries.
3.
Tap the entry announcing an incoming call to put the
current call on hold and answer the incoming call.
4.
If there are no incoming calls and you would like to
switch to another call on hold, let your caller know that
you are putting them on hold, then tap
to put your
caller on hold and make the call that has been on hold
the active call.
78
7
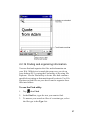
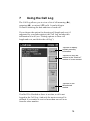
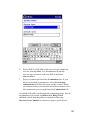
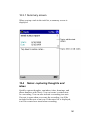
Using the Call Log
The Call Log allows you to view a list of all incoming (ç),
outgoing (è), or missed (x) calls. It can hold up to
20 entries showing the date and time of each call.
If you choose the option for showing call length and cost (if
supported by your subscription), the Call Log includes this
information as well (see “Setting options to show call
length and cost, and delete the call log”).
Tap here to display
contact summary
information
Tap here to save the
number in the “Work tel.”
number of a new contact
Tap here to call
the selected
number
If caller ID is blocked or there is no data, a call is not
logged in the Call Log. And only the most recent call is
retained if you make or receive more than one call to or
from the same number.
79
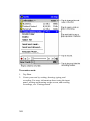
If there is a matching contact for an entry highlighted in the
Call Log, the Contact button is active. Press the Call
button to make a call to a highlighted number, or press the
Contact button to display the Contact Summary screen.
If there is no matching contact for a highlighted entry, the
Save button is active. Press Save to save the number in the
“Work tel.” number of a new Contact with the name
“Unnamed”. You can later open the Contacts application
and modify that entry by moving the phone number to
another field, and add the caller’s name and any notes you
wish to make.
80
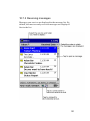
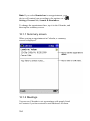
7.1
Reviewing calls made, received, or
missed
Access the Call Log to review all calls made (è), received
(ç), or missed (x).
To review calls made, received, or missed
1.
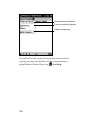
When the phone is turned on, press or tap
access the Call Log.
to
2.
Press or tap á and â or rock the Up/Down control to
scroll the list and highlight successive entries. If there
is a matching contact for a highlighted entry, the Call
and Contact buttons are activated.
3.
Do one or more of the following:
§
Review the length and cost of calls if this
information is available (see “Setting options to
show call length and cost, and delete the call log”)
§
Tap an entry, tap or press the Call button, or press
to place a call to the highlighted or selected
number
4.
§
Press the Contact button to display the Contact
Summary screen
§
Press Save to create a new entry in Contacts
§
Delete all of the information in the Call Log (see
“Deleting the information in the Call Log”).
When you are done using the Call Log, tap
.
81
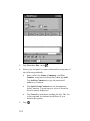
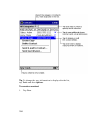
7.2
Log
Deleting the information in the Call
Your WA 3050 device gives you the option of deleting the
information in the Call Log after the phone is turned off.
By default, the information in the Call Log is retained when
the phone is powered off unless you change this setting
(see “Setting options to show call length and cost, and
delete the call log”). In addition, you have the option to
delete all of the information in the Call Log while the
phone is turned on.
To delete all of the information in the Call Log
(while phone is on)
1.
When the phone is turned on, press or tap
2.
Press or tap á and â or rock the Up/Down control to
scroll the list of entries.
3.
If you are sure you want to delete the contents of the
Call Log, press or tap Clear All.
4.
Tap
82
.
.
8
Using the security features of
your phone
For your protection, the WA 3050 provides a number of
security features to prevent unauthorised activation, access,
and use of your device. It includes a Pocket PC standard
option for setting a user-defined password to access the
PDA (see “Setting a PDA password”). In addition, it
includes a number of options that let you customise the
type of security you want for your phone:
§
Locking the
§
Activating the use of a PIN code
§
Call barring
§
Fixed dialing
§
Cost limitations.
and
keys
Note Although phone security features are configured by
selecting options from the Settings panel, your SIM card
must be inserted into the back of your device to change
security and other phone settings and to activate any
changes you make.
8.1
Locking the
keys
and
phone
To prevent your phone from being turned on
unintentionally, the WA 3050 includes an option for
locking the
and
keys. If you press one of these
keys when this option has been enabled, a pop-up window
appears asking you if you want to unlock the keys to use
the phone. You can unlock the keys by selecting “Yes” or
by pressing the Action button, or you can leave them
locked and proceed to use the phone. If you leave the keys
83
locked and use the phone, the keys are locked again
automatically in 30 seconds. You may find this feature
useful if you store your device in a briefcase or purse or
carry it in your coat pocket for extended periods of time
when travelling.
To lock the
and
phone keys
1.
Tap
then Settings. On the Personal tab, tap
Phone, then General.
2.
Tap Other.
3.
Tap Lock Green and Red keys. Tap this option again
to cancel your selection.
4.
Tap
8.2
.
Activating the use of a PIN code
Your WA 3050 device includes an option for activating the
use of a PIN code whenever the phone is turned on. If your
device is lost or stolen, it cannot be used to make or receive
calls if this option is enabled.
To activate the use of a PIN code
1.
Tap
then Settings. On the Personal tab, tap
Phone, then Security.
2.
Tap Require PIN code when the phone is powered
on so that it is selected.
3.
On the PIN entry window, press the keys or use the
stylus to type a PIN code. PIN codes must be from 4 to
8 characters in length. If you make an error, press and
hold
to delete what you typed and reenter your PIN
code.
Note If you make three incorrect entries, the SIM card
is blocked and must be replaced or unlocked by your
84
carrier, who may provide a PIN Unlock Key (PUK). If
you select Cancel, you will only be able to place
emergency calls (no PUK required) until your card is
replaced.
4.
Tap OK on the PIN entry window to enter the PIN
code.
5.
Tap
.
To deactivate the use of a PIN code
1.
Tap
then Settings. On the Personal tab, tap
Phone, then Security.
2.
Tap Require PIN code when the phone is powered
on so that it is no longer selected.
3.
Enter your phone PIN code.
4.
Tap OK.
5.
Tap
.
85
8.3
Changing the PIN code
Occasionally, you may want to change your PIN code for
security reasons.
To change the PIN code
1.
Tap
then Settings. On the Personal tab, tap
Phone, then Security.
2.
Tap Change PIN code .
3.
Enter the current PIN code on the PIN entry screen.
4.
On the PIN entry window, use the stylus to type a new
PIN code. PIN codes must be from 4 to 8 characters in
length. If you make an error, press and hold
to
delete what you typed and reenter your PIN code.
Note If you make three incorrect entries, the SIM card
is blocked and must be replaced or unlocked by your
carrier, who may provide a PIN Unlock Key (PUK) . If
you select Cancel, you will only be able to place
emergency calls (no PUK required) until your card is
replaced.
5.
Tap OK, then enter the new PIN code again.
6.
Tap
86
.
8.4
Changing the PIN2 code
A PIN2 code is required to access and activate call cost
options. You may want to update it periodically for security
reasons.
To change the PIN2 code
1.
Tap
then Settings. On the Personal tab, tap
Phone, then Security.
2.
Tap Change PIN2 code.
3.
On the PIN entry window, use the stylus to type a new
PIN2 code. PIN2 codes must be from 4 to 8 characters
in length. If you make an error, press and hold
to
delete what you typed and reenter your PIN2 code.
Note If you make three incorrect entries, the SIM card
is blocked and must be replaced or unlocked by your
carrier, who may provide a PIN Unlock Key (PUK). If
you select Cancel, you will only be able to place
emergency calls (no PUK required) until your card is
replaced.
4.
Tap OK on the PIN entry window to enter the new
PIN2 code.
5.
Tap
.
87
8.5
Activating call barring
Call barring prevents you or another individual from using
your phone to make or receive different types of calls.
Depending on your subscription, no call-barring restrictions
may be in effect when your phone service is established,
but the WA 3050 provides you with options for restricting
incoming and outgoing calls. When outgoing call-barring
restrictions are in effect, the message “The phone is not
allowed to call that number.” is displayed if you attempt to
call a restricted number.
Note You will need to use a password issued to you by
your carrier to complete the procedure for activating call
barring. This password is different from both the PIN and
PIN2 codes.
To activate call barring
1.
Tap
then Settings. On the Personal tab, tap
Phone, then Security.
2.
Tap the Barring tab.
3.
Tap on the Call type box and tap Voice, Data, or
Fax.
4.
Tap the options you want to define call barring for
incoming and outgoing calls.
5.
Tap
6.
On the PIN entry window, use the stylus to type your
call barring password. Unlike the PIN or PIN2 codes,
this password is only 4 characters long. If you make an
.
error, press and hold
to delete what you typed and
reenter your call barring password.
Note If you make three incorrect entries, the SIM card
is blocked and must be replaced or unlocked by your
88
carrier, who may provide a PIN Unlock Key (PUK). If
you select Cancel, you will only be able to place
emergency calls (no PUK required) until your card is
replaced.
7.
When you have typed your password correctly, tap
OK to enter it and close the PIN entry window.
8.
Complete Steps 3-7 for each type of call – Voice,
Data, or Fax – for which you want to activate call
barring.
9.
When you are done activating call barring, tap
.
89
8.6
Activating fixed dialing numbers
Your WA 3050 device gives you the option of using fixed
dialing to restrict the numbers that can be dialed from your
phone. Fixed dialing numbers are stored in a special
directory on the SIM card (separate from other numbers
that may be stored on the SIM). The message “The phone
is not allowed to call that number.” is displayed if you
attempt to call a number that is not on the list when fixed
dialing is in effect.
To activate fixed dialing numbers
1.
Tap
then Settings. On the Personal tab, tap
Phone, then Security.
2.
Tap Fixed Numbers to display the Fixed Numbers
screen.
3.
Tap Only allow calls to fixed numbers.
4.
Tap in the Name box to enter the name of a contact.
Names can have a maximum of 241 characters. Note
that a number can be entered without a name, but a
name must have a number entered for it.
5.
Tap in the Number box, then type the contact number.
Numbers can have a maximum of 20 digits.
6.
Tap Add to add the name and number to the list of
fixed dialing numbers.
Note The PIN entry screen is displayed the first time
Add or Remove is selected. Use the stylus to type
your PIN2 code. PIN2 codes must be from 4 to 8
characters in length. If you make an error, press and
hold
code.
to delete what you typed and reenter your
If you make three incorrect entries, the SIM card is
blocked and must be replaced or unlocked by your
90
carrier, who may provide a PIN Unlock Key (PUK). If
you select Cancel, you will only be able to place
emergency calls (no PUK required) until your card is
replaced.
7.
Repeat Steps 4-7 to create additional entries. The
number of entries you can create will depend on the
capacity of the SIM card. After the last available spot
in the fixed number list (maximum determined by SIM
card), a horizontal line indicates how many numbers
can still be entered.
8.
Tap Remove to move a highlighted number from the
list to the number input area where you can edit or
delete it. Enter the PIN2 code if the PIN entry screen is
displayed. Tap Add to apply your changes.
9.
Tap
.
10. To deactivate the use of fixed dialing numbers, repeat
Steps 1-3 and select Only allow calls to fixed
numbers so that this option is not selected, then
tap .
91
8.7
Activating cost limitations
In addition to call barring and fixed dialing, the WA 3050
includes an option for setting cost limitations to restrict
phone usage. This option enables you to authorise a fixed
amount of phone service, which could be useful if your
device is on loan to a friend or coworker.
To activate cost limitations
1.
Complete the procedure for showing call cost (see
“Setting options to show call length and cost, and
delete the call log”) if you have not done so.
2.
Before closing the Cost window, enter an amount not
to exceed a fixed cost of service in the box to the right
of Limit cost to.
3.
Tap Limit cost to if it is not selected.
4.
Tap .
Note The PIN entry screen is displayed the first time
any value is changed. Use the stylus to type your PIN2
code. PIN2 codes must be from 4 to 8 characters in
length. If you make an error, press and hold
delete what you typed and reenter the code.
to
If you make three incorrect entries, the SIM card is
blocked and must be replaced or unlocked by your
carrier, who may provide a PIN Unlock Key (PUK). If
you select Cancel, you will only be able to place
emergency calls (no PUK required) until your card is
replaced.
5.
Tap OK on the PIN entry screen.
6.
Tap
92
.
8.8
Turning off transmission of DTMF
tones
By default, DTMF tones (“bips”) are transmitted over the
network when you make a call. These tones are necessary
to use features of applications such as automated voice
response systems and voice mail.
You can turn off the transmission of DTMF tones if you do
not want someone to hear them when you dial another
number during a call in progress.
To turn off transmission of network DTMF tones
1.
Tap
then Settings. On the Personal tab, tap
Phone, then Call Services.
2.
Tap the Network tab.
3.
Tap Network transmits DTMF tones so that it is not
selected.
4.
Tap
.
93
9
Using the Sync SIM utility
In addition to subscription information, your SIM card
contains a directory for storing frequently dialed phone
numbers. The number of phone numbers you can store
depends on the capacity of the card issued by your carrier.
If you know its location (index number) in the directory,
you can dial a number by keying in its index number
followed by the pound sign (#) on the dialing screen.
You can remove the SIM card, insert it into a compatible
phone or another WA 3050 unit, and continue to access the
directory of frequently dialed phone numbers to place a
call.
On a Pocket PC device, Contacts is the main place for
storing names and phone numbers and other contact
information. If you use another phone or WA 3050 unit,
you can use the Sync SIM utility installed on your
WA 3050 device to:
§
Save SIM entries to Contacts
§
Add, modify, or delete entries on the SIM
§
Copy names and numbers from Contacts to the SIM
card.
Note Your phone must be powered on for you to access
any of the Sync SIM functions.
To save a SIM entry to Contacts
1.
Tap
2.
Tap an entry not preceded by a check mark.
3.
Tap Tools, Save SIM Entry… to update Contacts
with the selected entry. The Save SIM Entry to
Contact view is displayed.
94
, Programs , then Sync SIM.
4.
Make any needed changes to the name and phone
number shown.
5.
By default, a phone number is saved as a mobile
telephone number (Mobile tel) in Contacts. To save it
as another type of number, hold the stylus on next to
Mobile tel, then tap Work tel or Home tel.
6.
Tap OK to update Contacts, or Cancel to cancel your
selection.
7.
Repeat Steps 2-6 for each entry you want to save to
Contacts, or select another option.
To save all SIM entries to Contacts
1.
Tap
, Programs , then Sync SIM.
2.
Tap Tools, Save All to update Contacts with all entries
that do not have a matching phone number in Contacts.
These entries are not preceded by a check mark.
For each entry saved in this way, an “Unnamed” entry
is created in Contacts. Phone numbers are saved as
“Mobile tel” numbers for each “Unnamed” entry.
You will need to open the Contacts application and
edit each of these entries to add meaningful names,
move phone numbers to other fields, and add any other
information.
To add a SIM entry
1.
Tap
, Programs , then Sync SIM.
2.
Highlight a blank entry.
3.
Tap Tools, Modify SIM Entry….
4.
Tap and type in information for Name , Number, and
Index.
5.
Tap OK to save your changes, or Cancel to cancel
your selection.
95
6.
Save the new entry to Contacts, or select another
option.
7.
Tap Tools, Refresh to refresh the listing of SIM
entries.
To modify a SIM entry
1.
Tap
, Programs , then Sync SIM.
2.
Tap an entry.
3.
Tap Tools, Modify SIM Entry….
4.
Tap Name and Index and make any needed changes.
5.
Tap OK to save your changes, or Cancel to cancel
your selection.
6.
Tap Tools, Refresh to refresh the listing of SIM
entries.
To delete a SIM entry
1.
Tap
, Programs , then Sync SIM.
2.
Tap an entry.
3.
Tap Tools, Delete SIM Entry.
4.
Tap OK to delete the selected entry, or Cancel to
cancel your selection.
Note If there is an entry for the same phone number in
Contacts, you will need to open Contacts to modify or
delete it. An entry already exists in Contacts for each
item that is preceded by a check mark.
5.
96
Tap Tools, Refresh to refresh the listing of SIM
entries, or select another option.
To copy names and numbers from Contacts to the
SIM card
1.
Tap
, Programs , then Sync SIM.
2.
Tap View, then Contacts View.
3.
Tap an entry not preceded by a check mark.
4.
Tap Tools, Save Contact… to copy the selected name
and number to the directory on the SIM card.
5.
Repeat Steps 2-4 for each entry you want to copy.
6.
Tap View, SIM View to save a SIM entry to Contacts,
or select another option.
97
SMS § fax § WAP § e-mail § Web browser
10 Using wireless data
applications
Your WA 3050 device provides built-in support for several
forms of wireless data communication. For example, an
on-board Infrared transceiver enables you to send and
receive information with another IR-compatible Windowspowered device (see “Transferring items using Infrared”).
A combination of Windows and specialised third-party
software enables you to accomplish the following when the
phone is turned on but idle (no calls in progress):
§
Send SMS and faxes
§
Browse the Web and view WAP-enabled sites
§
Send and receive e-mail.
Some additional services must be available before you can
take advantage of these capabilities. First, your GSM
network phone subscription must include support for data
transmission. If you are unsure whether your subscription
includes this support, check with your carrier. You will also
need to establish an account with an Internet Service
Provider (ISP) for Web access and e-mail service. In some
cases, your wireless phone carrier may also serve as your
ISP by providing dial-up access to the Internet. The way
you access WAP-enabled sites also may depend on whether
or not your carrier or ISP provides a WAP Gateway.
Once support for data transmission and Internet access are
in place, you need to complete some set-up tasks to ensure
that software is properly configured, and to define at least
one dial-up connection.
101
10.1
Configuring SMS & fax settings
Before attempting to send or receive SMS, review SMS
settings to select an SMS Service Center, choose a
recording that plays when you receive an incoming SMS,
and select event log options. Review fax settings to specify
sender information, transmission properties, and formatting
options.
To configure SMS settings
Tap
, Programs , then SMS & Fax.
1.
To display the WinPhone main window:
2.
Tap Tools, Settings.
102
3.
Tap the Service Center tab.
4.
Tap
5.
Tap the Rings tab to select recordings that will play
when you have an incoming SMS or fax.
6.
Tap the Technical support tab to select event log
options.
7.
Tap
and select an SMS Service Center number.
.
103
To configure fax settings
1.
Tap
, Programs , then SMS & Fax.
2.
Display the WinPhone main window.
3.
Tap Tools, then Settings.
4.
On the Sender tab, enter your personal contact
information or tap Copy Owner Properties to copy it
from the Pocket PC Owner properties window. This
information will appear on a fax cover page.
5.
Tap the Transmission tab. Configure the following
settings:
§
Default Cover page
§
Logo of the cover page
Tap Browse to select a file containing the logo
you want to use. Select Auto size if you want the
logo to fill the whole area assigned to it. Select
Center if you want the logo centered in the area
assigned to it.
§
Send in Fine Mode
§
Receive in Fine Mode
The quality of a fax is enhanced by the selected
options but the transmission time doubles if you
select either of these options.
§
Use Dialing Properties
Select this option to use Dialing Properties defined
in Pocket PC Settings.
6.
Tap the Layout tab to select a Font and specify
Margins.
7.
Tap
104
.
10.2
Configuring WAP settings
Depending on your Internet Service Provider, you may
connect to WAP sites through a Gateway or individually by
entering specific WAP-enabled URLs. Access WAP
settings to configure connection preferences accordingly.
To configure WAP settings
1.
Do one of the following:
§
Press the
§
Tap
program button, or
, Programs , then WAP Browser.
2.
On the EzWAP main window, tap
.
3.
Tap Preferences.
4.
Tap
5.
Tap the Connection tab.
6.
Select a connection from the Connection drop-down
list. If no connections are listed, you must define one
(see “Getting connected”). Tap Connect
automatically to activate the connection when you
activate EzWAP.
7.
Do one of the following:
to conceal the soft keyboard if necessary.
§
Tap Proxy if you need access through a Proxy
server. Enter the Proxy server IP address, port, and
authentication user ID and password (if required).
§
Tap Gateway if you need access through a
Gateway. Enter the IP address and port, then
select Connectionless gateway if the gateway
operates in connectionless mode and
Digital gateway (v110) if applicable.
§
Tap None if you do not need access through a
Proxy server or Gateway.
105
8.
Tap
10.3
.
Sending and receiving SMS
With Winphone you can create multiple SMS messages
and send them at once, or you can send each message as
you create it. You can obtain recipient information from
Contacts, modify recipient information if you need to, and
create messages that have multiple recipients.
Note Before attempting to send or receive messages, be
sure that you have selected an SMS Service Center number
(see “Configuring SMS and fax settings”).
10.3.1 Sending an SMS message
You can create and send an SMS message whenever the
WA 3050 phone component is turned on and available (no
voice calls or Internet session in progress).
Note The phone must be turned on to send or receive
SMS messages or to use any of the other programs that
utilise data transmission such as EzWAP, Pocket Internet
Explorer, and Inbox. You will be unable to make or receive
voice calls during the time that your device is connected.
To send an SMS message
1.
Do one of the following:
§
Press the
§
Tap
program button, or
, Programs , then SMS & Fax
Note You can also tap New then SMS , or tap
when the WinPhone main window is displayed.
2.
106
Enter your recipient’s contact information using one of
the following methods:
§
Type the recipient’s telephone number in the
Mobile Tel. field using the soft keyboard. Be sure
to include the area code and country code if
required.
§
Tap Select from Contacts to use information
from Contacts. Tap an entry to select it from the
list of contacts displayed.
3.
Tap
4.
Type your message. When you are done, tap
conceal the soft keyboard.
5.
Do one or more of the following:
6.
.
to
§
Tap Send now if you want to send your message
immediately, without storing it in the WinPhone
Outbox.
§
Tap High priority if your message is urgent.
§
Tap Read Receipt Request to receive a
confirmation that your SMS has been delivered
correctly.
§
Tap UCS2 Format to send an SMS using
international character coding. Select this option if
your message includes characters not supported by
default GSM alphabet coding and if you know that
your recipient's phone is UCS2-compatible. By
default, SMS messages can be up to 160
characters in length. If you select UCS2
formatting, they are limited to 70 characters.
Do one of the following:
§
Tap . If you selected Send now in Step 5, your
message is sent. If you did not select Send now in
Step 5, your message is saved with any other
messages to be sent in the WinPhone Outbox. Tap
the Outbox icon
(if necessary), highlight the
message, then tap Tools, Send to send it.
107
§
Tap Back to modify recipient information, to
specify additional recipients (if sending a message
to multiple recipients), or to prepare another
message to send.
§
Tap Cancel if you do not want to send the
message. Your message is not sent and its contents
are deleted if you select this option.
To modify recipient information
1.
On the Create a new SMS screen, tap a recipient’s
number which displays in the Mobile Tel. field.
2.
Edit the phone number using the soft keyboard. When
you are done, tap
to conceal the soft keyboard, then
tap Modify to apply your changes.
3.
Tap
to send the message (if you selected Send
now) or to have it added to the WinPhone Outbox for
later delivery.
To specify an additional recipient
1.
On the Create a new SMS screen, tap a recipient’s
number, tap in the Mobile Tel. field, then type an
additional recipient’s phone number.
2.
Tap
3.
Tap
to send the message (if you selected Send
now) or to have it added to the WinPhone Outbox for
later delivery.
to conceal the soft keyboard, then tap Add.
10.3.2 Reading and replying to SMS
messages
108
To read and reply to an SMS message
1.
On the WinPhone main window, tap the Inbox icon
to view downloaded messages.
2.
Highlight a message.
3.
Tap Tools then View.
4.
To reply to the message, tap Tools then Reply.
5.
Tap
6.
Tap in the message input area and enter the text of
your reply (see chapter "Sending an SMS message").
7
Do one of the following:
.
§
Tap . If you did not select Send now in Step 7,
your reply is saved in the WinPhone Outbox. Tap
the Outbox icon
, highlight the message, then
tap Tools, Send to send it
§
Tap Back to read and reply to any other messages
§
Tap Cancel if you do not want to reply to any
other messages.
109
WAP Browser
Activate or switch to the EzWAP program to browse WAPenabled sites from your device. EzWAP is pre-installed. All
you need to do is configure a dial-up connection to an
Internet Service Provider (see “Connecting to an ISP”) and
configure program settings (see “Configuring WAP
settings”) before activating it.
Note The phone must be turned on but idle (no calls in
progress) to browse WAP sites using EzWAP. You will be
unable to make or receive voice calls during the time that
your device is connected.
To activate the EzWAP microbrowser
§
Press the
§
Tap
, Programs , then WAP Browser to display
the main window:
110
program button, or
Address zone
Reload document
Forward and
Back
Menu icon
10.4.1 Viewing WAP-enabled sites
EzWAP offers many features similar to standard HTML
browsers. Among these features are Stop, Reload, Home,
Forward, and Back buttons. The EzWAP menu offers
options for bookmarking sites, configuring the display for
better viewing of WML content (“Phone behavior”), and
additional configuration settings (see “Preferences”
option). The basic procedure for viewing a WAP-enabled
site is similar to that for a standard HTML browser.
Note When you are done using EzWAP, be sure to close
the connection (see “Ending a connection”). You will be
unable to make or receive calls or to use applications such
as WinPhone, Pocket Internet Explorer, or Inbox if you
leave the connection open.
111
To view a WAP-enabled site
1.
Tap in the address zone, then type the URL you want
to view.
2.
Tap
.
To display the EzWAP menu
§
Tap
.
To display the contextual pop-up menu
§
112
Tap
.
10.5
Fax
Activate or switch to the WinPhone application to send or
receive faxes.
10.5.1 Sending and receiving faxes
WinPhone uses the number defined in Settings / My
Phone numbers as the number at which faxes will be
received (see “Specifying voice mail and other personal
numbers”). If you have defined fax call forwarding (see
“Forwarding voice, data, or fax calls”), you must remember
where to retrieve incoming faxes when forwarding is in
effect.
Note The phone must be turned on but idle (no calls in
progress) to send or receive a fax. You will be unable to
make or receive voice calls during the time that your device
is connected.
To send a fax
1.
2.
Do one of the following:
§
Press the
§
Tap
program button, or
, Programs , then SMS & Fax.
Tap
to conceal the soft keyboard, then Cancel to
display the WinPhone main window:
113
3.
Tap New then Fax, or tap
4.
Enter your recipient’s contact information using one of
the following methods:
5.
114
.
§
Enter values for Name, Company, and Fax
Number using the soft keyboard, then tap Add.
Tap Add to Contacts to copy the name and
number to Contacts
§
Tap Select from Contacts to use information
from Contacts. Tap an entry to select it from the
list of contacts displayed
§
Tap Cancel to terminate sending the fax. The fax
is not sent and its contents are deleted if you
choose this option.
Tap
.
6.
Type the text of any message you want to include as
part of your fax.
7.
Select a Cover Page if you want a separate cover
page.
8.
Tap Browse to attach a separate document.
9.
Tap Fine Mode to send your fax with high resolution.
Note The quality of a fax is enhanced but the
transmission time doubles if you select this option.
10. Tap Send now if you want to send your fax
immediately, without storing it in the WinPhone
Outbox.
11. Tap Preview to preview the fax you are creating.
Select additional options from the command bar while
previewing your fax. For example, tap View, Zoom
out to decrease magnification.
When you are done previewing your fax, tap File,
Send to send it and return to the WinPhone main
window, or File, Close to close the preview window
and return to the previous screen.
12. Tap
to send the fax immediately (if you selected
Send now in Step 10) or return to the WinPhone main
window.
13. On the WinPhone main window, do one of the
following:
§
Repeat Steps 3-12 to create additional faxes, or
highlight the information shown about the fax you
just created and tap Tools, Send to send it
§
Repeat Steps 3-12 to create additional faxes. Tap
Tools, Send all faxes to send all of the faxes
waiting to be sent in the Outbox folder.
115
14. Sometimes a fax machine is busy or off-line and you
are unable to send a fax. Repeat Step 13 to send an
individual fax or any unsent faxes if this happens.
To receive a fax
1.
On the WinPhone main window, tap Tools then
Receive a fax, or tap . WinPhone switches to fax
reception mode and waits for the incoming
transmission.
Caution Do not attempt to switch to another program
during receipt of an incoming fax. Tap Cancel if you
need to interrupt fax reception mode.
2.
When fax transmission is complete, WinPhone closes
the connection automatically. If necessary, tap OK to
close the dialogue box.
3.
Select Inbox (if necessary) to display the list of faxes
received. Highlight the most recent item, then tap
Tools, View to view it.
Note You will not be able to retrieve and view in the
WinPhone Inbox any incoming faxes received when
fax call forwarding is in effect (see “Forwarding voice,
data, or fax calls”). In this case, you will have to
retrieve incoming faxes at the location to which faxes
are being forwarded, which could be a hotel lobby fax
machine, another fax-capable PDA, or other device.
116
10.5.2 Viewing and annotating a fax
You can view a fax you have created, sent, or received and
select options for zooming magnification, rotating it 180
degrees, or adding an annotation. You can use the stylus to
add your signature, a note, or responses to a fax you
received before sending it back to the sender.
To view and annotate a fax
1.
On the WinPhone main window, select Inbox,
Outbox, or the Sent folder as needed, then highlight a
fax you want to view.
2.
When the fax is displayed in preview mode, tap Tools
then View.
3.
Tap Zoom in or Zoom out to increase or decrease
magnification, Zoom factor to select a different zoom
factor, or Full page to view it in full-page mode. Tap
Rotate 180°° to rotate it 180 degrees.
4.
Tap Edit then Annotate to add an annotation. Tap
Edit, Undo last note to erase an annotation, or Edit,
Clear page notes to erase all annotations if there is
more than one.
5.
Tap File, Send to send a fax in preview mode, or File,
Close to end preview mode and return to the
WinPhone main window. You can later send any
unsent faxes from the WinPhone main window.
117
10.5.3 Resending a fax
Sometimes you may need to resend a fax that was sent
successfully.
To resend a fax
1.
On the WinPhone main window, make sure that the
Sent folder is selected.
2.
Highlight a fax you want to resend.
3.
Tap Tools, Resend.
118
10.6
Getting connected
Before you can use the Wireless Assistant to browse the
Web, view WAP content, or send and receive e-mail,
communication must be established between your
WA 3050 device and the Internet or a private network. To
establish communication, you must define at least one dialup connection, then select that connection (or another one
you define) when you configure or activate Pocket Internet
Explorer, the WAP browser, or Inbox.
You have the following connection options:
§
Connect to your Internet service provider (ISP).
Once connected, you can send and receive e-mail
messages using Inbox and view Web pages using
Pocket Internet Explorer and WAP-enabled sites using
EzWAP. If this is the method you want to use, see
“Connect to an ISP.” The communication software for
creating an ISP connection is already installed. Your
service provider may furnish software needed to install
other services, such as paging and fax services.
§
Connect to the network at your company or
organisation. Once connected, you can send and
receive e-mail messages by using Inbox, view Web
pages by using Pocket Internet Explorer, and
synchronize with your computer. If this is the method
you want to use, see “Connect to Your Network.”
§
Connect to your computer to synchronize remotely.
Once connected, you can synchronize information
such as your Pocket Outlook data. If this is the method
you want to use, see ActiveSync Help on your
computer or the Connections tab (Settings) Help on
your WA 3050 device.
119
10.6.1 Connecting to an ISP
You can connect to your ISP by creating a modem
connection. Once connected, you can send and receive email messages and view Web pages and WAP-enabled
sites.
Note The phone must be turned on but idle (no calls in
progress) to connect to an ISP. You will be unable to make
or receive calls during the time that your device is
connected.
To create a modem connection to an ISP
1.
Get the following information from your ISP:
ISP dial-up access telephone number, user name
password, and TCP/IP settings. Some ISPs require
information in front of the user name, such as
MSN/username.
2.
Tap
then tap Settings. On the Connections tab, tap
Modem.
3.
Tap New connection.
4.
Tap "Enter a name for the connection", activate the
keyboard and enter a name for the new connection you
create, such as “ISP Connection.”
5.
Select your modem type in the Select a modem list.
("GSM modem on COM2" to use the integrated
modem)
Note You should not need to change any settings in
Advanced. Most ISPs now use a server-assigned
address. If the ISP you are connecting to does not use a
server-assigned address, tap Advanced then the
TCP/IP tab and enter the address. When you are
finished, tap OK then Next.
Avoid to modify "Baud rate" fields
120
6.
Enter the access phone number, and tap Next.
7.
Select other desired options, and tap Finish.
8.
Specify your current location and phone type (most
phone lines are tone) on the Dialing tab. These settings
will apply to all connections you create. Tap .
Once you have created the connection, it appears in
,
Programs , Connections. To start the connection, remove
the WA 3050 from the cradle. Make sure that the phone is
turned on. Tap the connection icon, enter your user name
and password, then tap Connect. Once connected, you can:
§
Send and receive e-mail messages by using Inbox.
Before you can use Inbox, you need to provide the
information it needs to communicate with the e-mail
server. For specific instructions, see “Connecting
directly to an e-mail server”.
§
Visit Web pages by using Pocket Internet Explorer
and WAP pages by using EzWAP. For more
information, see “Pocket Internet Explorer” and
“WAP”.
Note You can quickly return to Modem Settings to
change connection settings by tapping the Modem link at
the bottom of the Connections folder. To return to the
Connections folder, tap the Connections link.
10.6.2 Connecting to your network
If you have access to a network, you can send e-mail, view
intranet pages, synchronize your WA 3050 device with
your notebook or desktop computer, and possibly access
the Internet. You can connect to your network in one of
two ways:
§
Create a modem connection by using a RAS
account. Before you can create this modem
121
connection, your network administrator will need to
set up a RAS account for you.
§
Use an Ethernet card and a network connector to
connect to the network.
Note The phone must be turned on but idle (no voice
calls or dial-up session in progress) to connect to your
network using a modem. You will be unable to make
or receive calls during the time that your device is
connected.
To create a modem connection to a network
1.
Get the following information from your network
administrator: dial-up access telephone number, user
name, password, domain name, and TCP/IP settings.
2.
Tap
, Settings. On the Connections tab, tap
Modem.
3.
Tap New connection.
4.
Tap "Enter a name for the connection", activate the
keyboard and enter a name for the new connection you
create, such as “Company Connection.”
5.
Select your modem type in the Select a modem list.
Note You should not need to change any settings in
Advanced. Most servers now use a server-assigned
address. If the server you are connecting to does not
use a server-assigned address, tap Advanced then the
TCP/IP tab and enter the address. When you are
finished, tap OK then Next.
Avoid to modify "Baud rate" field.
6.
Enter the access phone number, and tap Next.
7.
Select other desired options, and tap Finish.
122
8.
Specify your current location and phone type (most
phone lines are tone) on the Dialing tab. These settings
will apply to each network connection you create.
Once you have created the connection, it appears in
,
Programs , Connections. To start the connection, remove
the WA 3050 from the cradle. Make sure that the phone is
turned on and available (no calls or dial-up session in
progress). Tap the connection icon, enter your user name
and password, and tap Connect. Once connected, you can:
§
Send and receive e-mail messages using Inbox.
Before you can use Inbox, you need to provide the
information it needs to communicate with the e-mail
server. For specific instructions, see “Connecting
directly to an e-mail server”.
§
Visit Internet or intranet Web pages using Pocket
Internet Explorer or EzWAP. You may need to set
up a proxy server to visit Internet Web pages. For
more information on setting up a proxy server, see
Pocket Internet Explorer Help on your WA 3050
device.
§
Synchronize. For more information, see ActiveSync
Help on the computer.
To create an Ethernet connection to a network
You do not need to create a new connection on your
WA 3050 device. Instead, you must purchase and configure
an Ethernet card that is compatible with your device.
1.
Get the following information from your network
administrator: user name, password, and domain name.
2.
Install a CompactFlash Ethernet card into the
WA 3050 unit. For instructions on inserting and using
the Ethernet card, see the owner’s manual for the card.
123
Caution Inserting any CompactFlash card without
taking precautions to ground yourself may result in
permanent damage to your device.
Network Settings will appear automatically the first
time you insert the card, so that you can configure the
Ethernet card. Most networks use DHCP, so you
should not have to change these settings unless your
network administrator instructs you to do so.
3.
Tap . (If Network Settings does not appear, tap
then Settings. On the Connections tab, tap Network
then the adapter you want to change.)
4.
Connect the Ethernet card to the network by using a
network cable. For information, see your owner’s
manual.
If you want to synchronize your WA 3050, tap
, then
Programs . Tap the Connections folder, then ActiveSync.
Tap Network Connection as the connection method then
tap Connect. Remote synchronization with a computer will
work only if you have set up a partnership with that
computer through ActiveSync and have set ActiveSync to
allow remote connections. Other restrictions apply. For
more information on synchronizing remotely, please refer
to the ActiveSync Help on the computer.
If you want to access your e-mail server or the intranet, tap
then Settings. On the Connections tab, tap Network
then the Identification tab. Enter your user information. If
you need assistance, see your network administrator.
Once connected, you can do the same activities described
at the end of “To create a modem connection to a network”.
124
10.6.3 Ending a connection
When you finish using EzWAP, Inbox, or Pocket Internet
Explorer, be sure to close the connection before switching
to another program so that the modem is available for
making and receiving voice calls or for other data
transmission events.
To end a connection
1.
If you start a connection from a program such as
EzWAP, disconnect from within that program first
before ending a connection. For example, in EzWAP,
tap
, then Disconnect to disconnect from within
that program. In Pocket Internet Explorer, tap Tools,
then Disconnect. In Inbox, tap Services, then
Disconnect.
2.
After you have disconnected from within a program,
tap
3.
then Today.
Do one of the following:
§
If the connection status dialogue box is displayed,
tap Disconnect.
§
If the connection status dialogue box is not
displayed, tap
or
at the bottom of the
screen, then tap Disconnect.
4.
To end a network connection, remove the
CompactFlash Ethernet card from the WA 3050
device.
125
10.6.4 Connecting directly to an e-mail
server
You can set up a connection to an e-mail server so that you
can send and receive e-mail messages by using a modem or
network connection and Inbox on your WA 3050 device.
Note The ISP or network must use a POP3 or IMAP4
e-mail server and an SMTP gateway.
Inbox does not currently support connecting with
proprietary e-mail protocols, such as AOL and MSN™.
However, you can still access the Internet through these
services. There may be third-party programs available that
would enable you to send and receive e-mail messages
through proprietary protocols.
You can use multiple e-mail services to receive your
messages. For each e-mail service you intend to use, first
set up and name the e-mail service. If you use the same
service to connect to different mailboxes, set up and name
each mailbox connection.
To set up an e-mail service
1.
126
On your WA 3050 device, tap Services, then New
Service in Inbox.
2.
Select POP3 or IMAP4 as the service type, name the
service, and tap Next. For information on which
service type to select, ask your ISP or network
administrator.
3.
Select a connection from the Connection list. If you
have not created a connection, select Create new
connection and follow the steps in the wizard. When
you return to this screen at the end of the wizard, select
the connection you created from the Connection list.
A wizard will walk you through the remaining steps. For an
explanation of a screen, tap Start then Help. When
finished, check that the phone is turned on, then tap
Services then Connect to connect to your e-mail server.
127
For more information on using the Inbox program, see
“Inbox: sending and receiving e-mail messages”.
10.6.5 Getting help on connecting
More information on the procedures described here, as well
as information on additional procedures, can be found in
the following locations:
§
“Inbox: sending and receiving e-mail messages”
§
WA 3050 online Help. Tap
, Help. Tap View, All
Installed Help, then Inbox, or Connections
§
ActiveSync online Help on the PC or notebook
computer. In ActiveSync, click Microsoft ActiveSync
Help on the Help menu
§
“Appendix A: Troubleshooting”.
128
10.7 Inbox: sending and receiving email messages
Use Inbox to send and receive e-mail messages in either of
these ways:
§
Synchronize messages with Microsoft Exchange or
Microsoft Outlook on your desktop computer
§
Send and receive messages using a remote connection
to an ISP or a network
10.7.1 Synchronising messages
E-mail messages can be synchronized as part of the general
synchronization process. First, you will need to enable
message synchronization in ActiveSync.
During synchronization:
§ Messages are copied from the Inbox folder of
Exchange or Outlook on your desktop computer to the
Inbox folder on your device. The messages on the two
computers are linked, so when you delete a message on
your device, it is also deleted from your desktop
computer the next time you synchronize.
§
Messages in the Outbox folder on your device are
transferred to Exchange or Outlook, and then sent from
those programs .
Features available on your desktop computer, such as
scheduling meetings and selective downloading of file
attachments, are also available on your device.
Tip You can also synchronize mail with your desktop
computer from a remote location. For more information,
see “Getting connected”.
129
10.7.2 Sending and receiving e-mail
remotely
In addition to exchanging e-mail messages with your
desktop computer, you can send and receive e-mail from a
remote mail server by using a modem or network card
connected to your device. You will need to set up a remote
connection to a network or an Internet service provider
(ISP) and a connection to your mail server. For more
information, see “Getting connected”.
Messages that you receive remotely are linked to your mail
server rather than your desktop computer. You can see the
mail you receive remotely by selecting the service in the
folder list.
You can work online or offline. When working online, you
read and respond to messages while connected to the
server. Messages are sent as soon as you tap Send, which
saves space on your device.
When working offline, once you have downloaded new
message headers or partial messages, you can disconnect
from the server and then decide which messages to
download completely. The next time you connect, Inbox
downloads the complete messages marked for retrieval and
sends the messages you have composed.
When you connect to the mail server, new messages are
downloaded to the device Inbox folder, messages in the
device Outbox folder are sent, and messages that have been
deleted on the server are removed from the device Inbox.
130
10.7.3 Receiving messages
Messages you receive are displayed in the message list. By
default, the most recently received messages are displayed
first in the list.
131
When you receive a message, tap it in the list to open it.
Unread messages are displayed in bold.
When you connect to your Internet mail service or
synchronize with your desktop computer, Inbox downloads
only the first 100 lines of each new message by default. No
mail attachments are downloaded. The original messages
remain on the mail server or your desktop computer.
You can mark the messages that you want to retrieve in
their entirety the next time you synchronize or connect to
your mail service. In the message list, tap and hold the
message you want to retrieve. On the pop-up menu, tap Get
132
Full Copy. The icons in the Inbox message list give you
visual indications of message status.
You specify your downloading preferences when you set
up the service or select your synchronization options. You
can change them at any time:
§
To change Inbox delivery options for mail
synchronization, see ActiveSync Help
§
To change Inbox delivery options for remote mail, in
Inbox on your device, tap Tools and then tap Options.
On the Service tab, tap the service you want to change.
You must download a full message before you can view its
attachments.
Microsoft Exchange users can use Inbox to schedule
meetings remotely. Set up the meeting in Calendar. Your
network administrator must enable Microsoft rich text
support (.rtf) for any accounts that will be accessed by
mobile device users.
10.7.4 Composing messages
To compose a message
1.
Tap New.
2.
Enter an e-mail address in To, or select a name from
the contact list by tapping the Address Book button in
the command bar.
All e-mail addresses entered in the e-mail fields in
Contacts appear in the Address Book.
133
3.
Compose your message.
4.
Tap Send when you have finished your message.
Messages are placed in your Outbox folder on your device
and will be delivered in one of two ways:
§
134
They are transferred to the Outbox folder in Exchange
or Outlook on your desktop computer the next time
you synchronize.
§
They are transmitted to your mail server the next time
you connect remotely. In Inbox, make sure the
appropriate service is selected on the Services menu.
Then tap the Connect button (or Connect on the
Services menu).
Note When you are done composing and sending e-mail
messages, be sure to close the connection (see “Ending a
connection”). You will be unable to make or receive calls,
SMS, or fax if you leave the connection open.
10.8
Managing messages and folders
By default, messages are displayed in one of four folders
for each service you have created: Inbox, Deleted (local),
Outbox, and Sent. The Deleted folder contains messages
that have been deleted on the device. If you are using
IMAP4, you may see a Deleted Items folder. This folder is
for messages deleted on the server. The behavior of the
Deleted and Sent folders depends on the options you have
chosen. In the message list, tap Tools and then Options.
On the Message tab, select your options.
If you want to organise messages into additional folders,
tap Tools, and then New Folder to create new folders. To
move or copy a message to another folder, in the message
list, tap and hold the message to display a pop-up menu
with a list of options. Then tap Move to or Copy to and
select the folder.
10.8.1 Folder behaviour using ActiveSync
If you move messages into a folder you create, the link is
broken between these messages and their copies on the
desktop computer. When you synchronize next, the
messages in the folder you created will not be
synchronized. In addition, the desktop computer will see
that the messages are missing from the device Inbox folder
135
and delete them from the Inbox folder on the desktop so
that both Inbox folders match. This prevents you from
getting duplicate copies of a message, but it also means that
you will no longer have access to the messages you move
out of Inbox except from the device.
10.8.2 Folder behavior for remote services
The behavior of the folders you create depends on whether
you are using POP3 or IMAP4:
§
If you are using POP3, folders will behave like they do
when using ActiveSync.
§
If you are using IMAP4, the folders you create and the
messages you move are mirrored on the server. For
example, if you move two messages from the Inbox
folder to a folder called Family, the server will create a
copy of the Family folder and copy the messages into
that folder. Therefore, messages are available to you
anytime you connect to your mail server, whether it is
from your WA 3050 device, a PC, or notebook
computer. This synchronization of folders occurs when
you create a new folder, move messages into a folder,
or select Synchronize Folders on the Services menu.
If you want to view the messages in a folder while
disconnected from your mail server, select the folder
and then select Folder Available Offline on the
Services menu.
136
10.9
Pocket Internet Explorer
Use Pocket Internet Explorer to view Web pages in either
of these ways:
§
During synchronization with your computer, download
your favorite links, mobile favorites, and mobile
channels that are stored in the Mobile Favorites
subfolder in Internet Explorer on the computer.
§
Connect to an Internet service provider (ISP) or
network and browse the Web. To do this, you will
need to create the connection first, as described in
“Getting connected”.
To switch to Pocket Internet Explorer, tap
Internet Explorer.
then
10.9.1 The Mobile Favorites folder
Only items stored in the Mobile Favorites subfolder in the
Favorites folder in Internet Explorer on your computer will
be synchronized with your WA 3050 device. This folder
was created automatically when you installed ActiveSync.
10.9.2 Favorite links
During synchronization, the list of favorite links in the
Mobile Favorites folder on your PC or notebook computer
is synchronized with Pocket Internet Explorer on your
WA 3050 device. Both computers are updated with
changes made to either list each time you synchronize.
Unless you mark the favorite link as a mobile favorite, only
the link will be downloaded to the WA 3050, and you will
need to connect to your ISP or network to view the content.
137
For more information on synchronization, see ActiveSync
Help on the computer.
10.9.3 Mobile favorites
If you are using Microsoft Internet Explorer 5 on your
computer, you can download mobile favorites. (You can
install Microsoft Internet Explorer 5 from the Extras folder
on the ActiveSync CD.) Synchronizing mobile favorites
downloads Web content to your WA 3050 device so that
you can view Web pages while you are disconnected from
your ISP and computer.
Use the Internet Explorer 5 plug-in installed with
ActiveSync to create mobile favorites quickly.
To create a mobile favorite
1.
Click Tools then Create Mobile Favorite in Internet
Explorer 5 on your PC or notebook computer.
2.
Enter a new name in the Name box to change the link
name.
3.
Select a desired update schedule in Update.
4.
Click OK. Internet Explorer downloads the latest
version of the Web page to your computer.
Note If you want to download the pages that are
linked to the mobile favorite you just created, in
Internet Explorer on the computer, right-click the
mobile favorite then click Properties. On the
Download tab, specify the number of links deep you
want to download. To conserve memory, only go one
level deep.
5.
Synchronize your WA 3050 device and computer.
Mobile favorites that are stored in the Mobile Favorites
folder in Internet Explorer 5 are downloaded to your
device.
138
Note If you did not specify an update schedule in
Step 3, you will need to manually download content to
keep the information updated on your computer and
WA 3050 device. Before synchronizing, in Internet
Explorer on your computer, click Tools then
Synchronize. You will see the last time content was
downloaded to the computer, and you can manually
download content if needed.
You can add a button to the Internet Explorer toolbar
for creating mobile favorites. In Internet Explorer 5 on
your computer, click View, Toolbars, then
Customize.
To minimise memory used by mobile favorites
To minimise the amount of storage memory used by
Mobile favorites, do the following:
§
In the settings for the Favorites information type in
ActiveSync options, turn off pictures and sounds or
stop some mobile favorites from being downloaded to
the WA 3050. For more information, see ActiveSync
Help.
§
Limit the number of downloaded linked pages. In
Internet Explorer on a PC or notebook computer, rightclick the mobile favorite you want to change then
Properties. On the Download tab, specify 0 or 1 for
the number of linked pages you want to download.
10.9.4 Channels
Channels are Web sites designed specifically for offline
viewing on your WA 3050 device. You can subscribe to
mobile channels at no fee.
139
Using mobile channels
Mobile channels are sites you subscribe to on your
computer. They are stored in the Channels subfolder in the
Mobile Favorites folder in Internet Explorer 4.0 or later and
are downloaded to your WA 3050 during synchronization.
To see a list of mobile channels you can subscribe to at no
fee, visit the Windows CE Mobile Channel List Web page
(http://www.microsoft.com/windowsce/channels). Click the
name of the channel you want to subscribe to, then click
Add Mobile Channel and select Make available offline to
download the channel to your computer. The mobile
channel will be transferred to your device the next time you
synchronize. For more information on synchronization, see
ActiveSync Help on the computer.
140
Using Pocket Internet Explorer
You can use Pocket Internet Explorer to browse mobile
favorites and channels that have been downloaded to the
WA 3050 without connecting to the Internet. You can also
connect to the Internet through an ISP (see “Connecting to
an ISP”) or a network connection and browse the Web.
Note The phone must be turned on but idle (no voice calls
or data session in progress) to connect to the Internet. You
will be unable to make or receive calls during the time that
your device is connected.
141
To view mobile favorites and channels
1.
Tap the Favorites button to display your list of
favorites.
2.
Tap the mobile favorite or channel you want to view.
You will see the page that was downloaded the last time
you synchronized your WA 3050 with your PC or notebook
computer. If the page is not stored on the WA 3050, the
favorite will be dimmed. You will need to synchronize
your WA 3050 with your computer again to download the
page or connect to the Internet to view the page.
142
To browse the Web
1.
Connect to the Internet or your network in either of the
following ways:
§
Connect using Connections, as described in
“Getting connected”. Then switch to Pocket
Internet Explorer by tapping it on the menu
§
Connect in Pocket Internet Explorer. First, make
sure that the phone is turned on. Then, select a
service or type of connection by tapping Tools,
then Options. Tap the Connections tab and select
the connection type. Then, whenever you want to
connect to the selected service, tap Tools then
Connect.
Note You can have Pocket Internet Explorer
automatically connect to the Internet when you attempt
to access a page that is not stored on the WA 3050 by
specifying a connection in the Connection tab in
Options and selecting Access remote content
automatically.
2.
3.
Go to a specific Web page in either of these ways once
connected:
§
Tap the Favorites button, then tap the favorite you
want to view
§
Tap View then Address Bar. In the address bar
that appears at the top of the screen, enter the Web
address you want to visit, then tap OK. Tap the
arrow to choose from previously entered
addresses.
Tap Tools then Disconnect to end the connection. You
will be unable to make or receive calls, or to send or
receive SMS or faxes, if you leave the connection
open.
143
Note To add a favorite link while using the WA 3050,
go to the Web page you want to add, tap the Favorites
button, tap the Add/Delete tab, tap the Add button,
and enter a name for the favorite link.
10.10 Transferring items using Infrared
You can use the IR port to send and receive information, such
as contacts and appointments, with another IR-compatible
Windows-powered device at speeds of up to 115.2KB per
second.
Note You do not need to turn on the phone to use the infrared
transfer capabilities of your device.
To send information
1.
Switch to the program where you created the item you
want to send and locate the item in the list. If you want
to send more than one item, drag the stylus across the
items you want to send.
2.
Align the IR ports so that they are unobstructed and
within a range of 30 centimeters.
3.
Tap and hold the item, and tap Send via Infrared on
the pop-up menu.
Note You can also send items, but not folders, from
File Explorer. Tap and hold the item you want to send,
then tap Send via Infrared on the pop-up menu.
To receive information
1.
Align the IR ports so that they are unobstructed and
within a range of 30 centimeters.
2.
Tap
144
, Programs , then Infrared Receive .
Note You can also receive items from Tasks, Contacts,
Calendar, and Notes by tapping Tools then Receive via
Infrared in list view.
145
Organizer § mobile computing § multimedia
11
Microsoft ActiveSync
Using Microsoft ActiveSync, you can synchronize the
information on your computer with the information on your
WA 3050. Synchronization compares the data on the
WA 3050 with your computer and updates both computers
with the most recent information.
For example:
§
Keep Pocket Outlook data up-to-date by synchronizing
your WA 3050 with your choice of Microsoft Outlook,
Microsoft Schedule+, or Microsoft Exchange on your
computer
§
Synchronize Microsoft Word and Microsoft Excel
documents between your WA 3050 and your
computer. Your files are automatically converted to the
correct format.
Note By default, ActiveSync does not automatically
synchronize all types of information. For example, it does
not synchronize e-mail messages. Use ActiveSync options
to turn synchronization on and off for specific information
types.
With ActiveSync, you can also:
§
Back up and restore WA 3050 data (see “Backing up
and restoring data”)
§
Copy (rather than synchronize) files between your
WA 3050 Pocket PC and computer
§
Control when synchronization occurs by selecting a
synchronization mode. For example, you can
synchronize continually while your WA 3050 is in the
cradle or only when you choose the synchronize
command
149
§
Select which information types are synchronized and
control how much data is synchronized. For example,
you can choose how many weeks of past appointments
you want synchronized.
For information on installing ActiveSync, please see the
booklet accompanying the ActiveSync CD. For information
on using ActiveSync, see ActiveSync Help on the
computer.
150
12
Microsoft Pocket Outlook
Microsoft Pocket Outlook includes Calendar, Contacts,
Tasks, Inbox, and Notes. You can use these programs
individually or together: for example, e-mail addresses
stored in Contacts can be used to address messages in
Inbox.
Using ActiveSync, you can synchronize information in
Microsoft Outlook, Microsoft Schedule+, or Microsoft
Exchange on your desktop computer with your device.
Each time you synchronize, ActiveSync compares the
changes you made on your device and desktop computer
and updates both computers with the latest information. For
information on using ActiveSync, see ActiveSync Help on
the desktop computer.
You can switch to any of these programs by tapping them
on the
menu.
12.1 Calendar: scheduling
appointments and meetings
Use Calendar to schedule appointments, meetings, and
other events. You can check your appointments in one of
several views (Agenda, Day, Week, and Month) and easily
switch views by using the View menu.
151
Tip You can customise the Calendar display, such as
changing the first day of the week, by tapping Options on
the Tools menu.
To schedule an appointment
1.
If you are in Day or Week view, tap the desired date
and time for the appointment.
2.
Tap New.
152
3.
Using the input panel, enter a description and a
location. Tap each label first to select the field.
4.
If needed, tap the date and time to change them.
5.
Enter other desired information. You will need to hide
the input panel to see all available fields.
6.
To add notes, tap the Notes tab. You can enter text,
draw, or create a recording. For more information
about creating notes, see “Notes: Capturing Thoughts
and Ideas” later in this chapter.
7.
When finished, tap
to return to the Calendar.
153
Note If you select Remind me in an appointment, your
device will remind you according to the options set in
Settings, Personal tab, Sounds & Reminders.
,
To change the appointment later, tap it in the Calendar, and
then tap the summary screen.
12.1.1 Summary screen
When you tap an appointment in Calendar, a summary
screen is displayed.
12.1.2 Meetings
You can use Calendar to set up meetings with people listed
in Contacts if you have entered e-mail addresses for them.
154
The meeting notice will be created automatically and sent
either when you synchronize messages or when you
connect to your ISP. Indicate how you want meeting
notices sent by tapping Tools and then Options. If you
send and receive mail via ActiveSync, select ActiveSync.
To schedule a meeting
1.
Create an appointment.
2.
In the appointment details, tap Attendees.
3.
From the list of e-mail addresses you have entered in
Contacts, select the meeting attendees.
The meeting notice is created automatically and placed in
the Outbox folder.
12.2 Contacts: tracking friends and
colleagues
Contacts maintains a list of your friends and colleagues so
that you can easily find the information you are looking for,
whether you are at home or on the road. Using the device
IR port, you can also quickly share Contacts information
with other Windows CE-based mobile device users.
155
Tip To change the way information is displayed in the list,
tap Tools and then Options.
To create a contact
1.
156
Tap New.
2.
Using the input panel, enter a name and other contact
information. You will need to scroll down to see all
available fields.
3.
To assign the contact to a category, scroll to and tap
Categories and select a category from the list. In the
contact list, you can display contacts by category.
4.
To add notes, tap the Notes tab. You can enter text,
draw, or create a recording. For information, see
“Notes: Capturing Thoughts and Ideas.”
5.
When finished, tap
to return to the contact list.
157
12.2.1 Summary screen
When you tap a contact in the contact list, a summary
screen is displayed.
12.3
Tasks: keeping a To Do list
Use Tasks to keep track of what you have to do. In the task
list, overdue tasks are displayed in bold.
158
Note To change the way information is displayed in the
list, tap Tools and then Options.
To create a task
1.
Tap New.
159
2.
Using the input panel, enter a description.
3.
Select the start date and due date, and enter other
information by first tapping the field. If the input panel
is open, you will need to close it to see all available
fields.
4.
To assign the task to a category, tap Categories and
select a category from the list. In the task list, you can
display tasks by category.
5.
To add notes, tap the Notes tab. You can enter text,
draw, or create a recording. For more information, see
“Notes: Capturing Thoughts and Ideas.”
6.
When finished, tap
160
to return to the task list.
12.3.1 Summary screen
When you tap a task in the task list, a summary screen is
displayed.
12.4 Notes: capturing thoughts and
ideas
Quickly capture thoughts, reminders, ideas, drawings, and
phone numbers with Notes. You can create a written note
or a recording. You can also include a recording in a note.
If a note is open when you create the recording, it will be
included in the note as an icon. If the notes list is displayed,
it will be created as a stand-alone recording.
161
To create a note
1.
Tap New.
2.
Create your note by writing, drawing, typing, and
recording. For more information about using the input
panel, writing and drawing on the screen, and creating
recordings, see “Getting started”.
162
163
13
Companion programs
Companion programs consist of Microsoft Pocket Word,
Microsoft Pocket Excel, Microsoft Money, and Windows
Media Player. Pocket Word, Microsoft Money, and Pocket
Excel work with the Windows versions of the same
programs on a desktop computer to give you easy access to
copies of your files. You can create new files on your
device, or you can copy files from your desktop computer
to your device. Synchronize documents between your
desktop computer and your device so that you have the
most up-to-date content in both locations. Use Media
Player to listen to digital audio files downloaded to your
device. For more information on synchronizing and
transferring files, see ActiveSync Help.
To switch to a companion program on your device, tap
Programs on the
want to open.
menu, and then tap the program you
Because the companion programs work in similar ways to
the desktop versions, only information specific to using the
programs on your device is provided here. Additional
procedures are provided in online Help on the device.
When in a program, tap
and then Help. If you need
more information on using an Office program, see the
documentation that came with the desktop version of the
program.
164
13.1
Pocket Word
Use Pocket Word to create documents, such as letters,
meeting minutes, and trip reports. To create a new file, tap
, Programs , Pocket Word, and then New. A blank
document appears. Or, if you have selected a template for
new documents in the Options dialog box, that template
appears, with appropriate text and formatting already
provided. You can open only one document at a time; when
you open a second document you will be asked to save the
first.
You can also use Pocket Word to open and edit documents
created in the desktop version of Word. You can save a
document you create or edit in a variety of formats,
including Pocket Word (.psw), rich text format (.rtf), and
plain text (.txt).
Pocket Word contains a list of the files stored on your
device. Tap a file in the list to open it. To delete, make
copies of, and send files, tap and hold a file in the list. Then
select the appropriate action from the pop-up menu.
165
You can enter information in Pocket Word in one of four
modes, displayed on the View menu. Each mode has its
own toolbar, which you can display and hide by tapping the
Show/Hide Toolbar button in the command bar.
Tip You can change the zoom magnification by tapping
View and then Zoom. Then select the magnification
percentage you want. Select a higher percentage to enter
text and a lower one to see more of your document.
If you are opening a Word document created on a desktop
computer, make sure Wrap to Window is selected on the
View menu so that you can see the entire document.
166
13.1.1 Typing mode
Using the input panel, enter typed text into the document.
You can do this by tapping keys on the soft keyboard or by
using handwriting recognition software. For more
information on typing, see “Getting started”.
To format existing text and to edit text, first select the text.
You can select text as you do in a Word document, using
your stylus instead of the mouse to drag through the text
you want to select. You can search a document to find the
text you want by tapping Edit and then Find/Replace.
167
13.1.2 Writing mode
In writing mode, use your stylus to write directly on the
screen. Ruler lines are displayed as a guide, and the zoom
magnification is greater than in typing mode to allow you
to write more easily. For more information on writing, see
“Getting started”.
Tip If you cross three ruled lines in a single stylus stroke,
the writing becomes a drawing, and can be edited and
manipulated as described in the following section.
168
Written words are converted to graphics (metafiles) when a
Pocket Word document is converted to a Word document
on your desktop computer.
13.1.3 Drawing mode
In drawing mode, use your stylus to draw on the screen.
Gridlines appear as guides. When you lift your stylus off
the screen after the first stroke, you will see a drawing box
indicating the boundaries of the drawing. Every subsequent
stroke within or touching the drawing box becomes part of
the drawing.
169
13.1.4 Recording mode
In recording mode, embed a recording into your document.
Recordings are saved as WAV files. For more information
on recording, see “Getting started”.
13.2
Pocket Excel
Use Pocket Excel to create workbooks, such as expense
reports and mileage logs. To create a new file, tap
170
,
Programs , Pocket Excel, and then New. A blank
workbook appears. Or, if you have selected a template for
new workbooks in the Options dialog box, that template
appears, with appropriate text and formatting already
provided. You can open only one workbook at a time;
when you open a second workbook, you will be asked to
save the first.
You can also use Pocket Excel to open and edit workbooks
created in the desktop version of Excel. You can save a
workbook you create or edit in a variety of formats,
including Pocket Excel (.pxl) and Excel (.xls).
Pocket Excel contains a list of the files stored on your
device. Tap a file in the list to open it. To delete, make
copies of, and send files, tap and hold a file in the list. Then
select the appropriate action from the pop-up menu.
Pocket Excel provides fundamental spreadsheet tools, such
as formulas, functions, sorting, and filtering. To display the
toolbar, tap View and then Toolbar .
171
Tip If your workbook contains sensitive information, you
can protect it with a password. To do so, open the
workbook, tap Edit, and then Password. Every time you
open the workbook, you will need to enter the password, so
pick one that is easy for you to remember but hard for
others to guess. Workbooks with password protection
cannot be synchronized.
13.2.1 Tips for working in Pocket Excel
Note the following when working in large worksheets in
Pocket Excel:
Work in full-screen mode to see as much of your worksheet
as possible. Tap View and then Full Screen. To exit Full
Screen view, tap Restore.
172
§
Display and hide window elements. Tap View and
then tap the elements you want to display or hide.
§
Freeze panes on a worksheet. First select the cell
where you want to freeze panes. Tap View and then
Freeze Panes. You might want to freeze the top and
leftmost panes in a worksheet to keep row and column
labels visible as you scroll through a sheet.
§
Split panes to view different areas of a large
worksheet. Tap View and then Split. Then drag the
split bar to where you want it. To remove the split, tap
View and then Remove Split.
§
Display and hide rows and columns. To hide a hidden
row or column, select a cell in the row or column you
want to hide. Then tap Format, then Row or Column,
then Hide. To display a hidden row or column, tap
Tools, then Go To, and then type a reference that is in
the hidden row or column. Then tap Format, then
Row or Column, and then Unhide.
173
13.3
Microsoft Money
Microsoft Money for Pocket PC is designed to allow you to
quickly enter and view transactions, easily check on your
account balances, and seamlessly synchronize with
Microsoft Money on your desktop PC. It even includes an
investment portfolio that allows you to update your
portfolio’s value with the latest market quotes from the
MSN MoneyCentral Web site.
The following pages summarise some of the features of
Microsoft Money for Pocket PC. Please refer to the online
help for more information about these and other topics.
13.3.1 Opening and/or creating a new file
To open a new file in Microsoft Money for Pocket PC, tap
, Programs , Microsoft Money, and then New.
Microsoft Money for Pocket PC only allows you to have
one file on your Pocket PC at any time. As a result, you are
not able to create a second Microsoft Money for Pocket PC
file or open any existing Microsoft Money files from your
desktop PC directly on your Pocket PC.
174
13.3.2 Navigating within Microsoft Money
Microsoft Money for Pocket PC contains five basic
screens, called views. The views are Account Manager,
Account Register, Investments, Payees, and Categories.
The current view is always displayed at the top of the
screen.
View menu
To select a view
1.
Tap on the View menu.
2.
Select the view you want.
175
The Account Manager is the main view in Microsoft
Money for Pocket PC. It displays the name and balance of
each of your accounts, as well as the total balance for all of
your accounts. The Account Register displays a detailed list
of all of the transactions in a particular account.
To move between the Account Manager and the
Account Register
1.
Tap on the View menu, and then tap Account
Manager.
2.
To open an account and view its register, tap the
account.
3.
To return to the Account Manager, repeat Step 1.
13.3.3 Creating, editing, and deleting
accounts
Accounts are listed in the Account Manager. To open the
Account Manager view, tap Account Manager on the
View menu.
Note You can create as many accounts in Microsoft
Money for Pocket PC as you want, up to the amount of
storage memory you have available on your Pocket PC.
Remember, however, that the speed of Microsoft Money
for Pocket PC will be affected if you choose to store a great
deal of information on your Pocket PC.
If you are synchronizing Microsoft Money for Pocket PC
with Microsoft Money on your desktop PC, your existing
accounts will be transferred to your Pocket PC. In this case,
make sure you synchronize with your desktop PC before
attempting to enter any new accounts in Microsoft Money
for Pocket PC so you do not accidentally create duplicates.
176
To create a new account
1.
On the View menu, tap Account Manager.
2.
Tap New.
3.
In the Account Type box, select the type of account
that you want to create.
4.
In the Account Name box, enter a name for the
account.
5.
Enter other information if you want; however, only the
account type and account name are required.
6.
Tap OK.
Once you have created an account, you can edit the details
on your Pocket PC. You can also edit some of the account
details for accounts created in Microsoft Money on your
desktop PC and synchronized to your Pocket PC. If you
change any of the details, they will be sent back to your
desktop PC the next time you synchronize. Note that
information for accounts that are enabled for online
banking in Microsoft Money on your desktop PC cannot be
edited.
You can delete any account in Microsoft Money for Pocket
PC. Note that deleting an account will also delete all of the
transactions it contains. However, you cannot delete an
account once it has been synchronized with Microsoft
Money on your desktop PC. To permanently delete an
account that has been synchronized, use Microsoft Money
on your desktop PC.
177
13.3.4 Creating, editing, and deleting
categories, payees
Categories are a way of organizing your transactions. When
you create a new transaction, you assign a category to it.
Categories stored in Microsoft Money for Pocket PC are
listed in the Categories view. To open the Categories view,
tap Categories on the View menu. Tap New to create a
new category.
Payees are people or organizations to whom you pay
money or by whom you are paid. When you create a new
transaction, you assign a payee to it. Payees stored in
Microsoft Money for Pocket PC are listed in the Payees
view. To open the Payees view, tap Payees on the View
menu. Payees are listed alphabetically in the Payees view.
Tap New to create a new payee.
13.3.5 Adding and working with transactions
Microsoft Money for Pocket PC is designed for fast entry
so you can create new transactions when they occur,
whether in a taxi or in a supermarket. You can create a new
transaction in the Account Register by tapping New.
There are three types of transactions:
§
Withdrawal - A withdrawal is a transaction that
removes money from an account. Examples include
ATM withdrawals, checks, and credit card purchases.
Checks have their check numbers displayed in the
Number field.
§
Deposit - A deposit is a transaction that adds money to
your account. Examples include paychecks, cash
deposits, and interest earned on savings accounts.
Deposits are sometimes called credits.
178
§
Transfer - A transfer moves money from one account
to another.
13.3.6 Creating, editing, and updating your
investments
Microsoft Money for Pocket PC can be used to track the
value of your investment portfolio. To open the
Investments view, tap Investments on the View menu.
Microsoft Money for Pocket PC can even update the value
of your investments with the latest market prices from the
MSN MoneyCentral Web site over any Internet connection.
To enter investments
1.
Tap on the View menu, and then tap Investments.
2.
Tap New.
3.
Enter the market symbol for your investment and the
number of shares you own. You can also enter a name
for the investment and the current price.
4.
Tap OK. Microsoft Money for Pocket PC will
multiply the investment price by the number of shares
and display the market value of the investment.
To edit investments and investment prices
1.
Tap the investment that you want to edit.
2.
Edit the information you want, and then tap OK.
3.
If you have manually altered the price, Microsoft
Money for Pocket PC will multiply the new price by
the number of shares and display the new market value
of that investment as well as the market value of your
entire portfolio. Be aware that price updates made to
your investments in Microsoft Money for Pocket PC
will not be synchronized with Microsoft Money on
your desktop PC, and investment account balance
changes will not be reflected in the Account Manager.
179
To update investment prices from the Internet
1.
Open an Internet connection on your Pocket PC.
Examples include a direct network connection or a
wireless connection. Note that the connection must be
a direct IP connection to the Internet. If you require a
proxy server to reach the Internet, tap Options on the
Tools menu and adjust the settings.
2.
Once the connection is made, tap Update Investments
on the Tools menu or tap
at the bottom of the
Investments screen. Microsoft Money for Pocket PC
will connect to the MSN MoneyCentral Web site:
3.
180
Microsoft Money for Pocket PC will get the latest
market prices for your investments. If you enter a
market symbol that refers to an investment that
MoneyCentral cannot find, Microsoft Money for
Pocket PC will replace the market value with “Invalid
Symbol.” You should check the symbol for your
investment and try again.
4.
If the update is successful, Microsoft Money for
Pocket PC will update the value of each of your
investments based on the market prices. Microsoft
Money for Pocket PC will record the time when the
investments are updated and display the time with the
title “Quotes last updated at:” Note that if any of the
investments have invalid symbols or you manually edit
any of the prices, Microsoft Money for Pocket PC will
display the quotes update time as “Not available.”
To delete investments
1.
Tap and hold the investment you want to delete.
2.
On the pop-up menu, tap Delete Investment.
3.
You will be asked to confirm that you want to
permanently delete the investment. Tap Yes to
permanently delete the investment.
13.3.7 Synchronising with Microsoft Money
on your desktop PC
Microsoft Money for Pocket PC data can be synchronized
with Microsoft Money on your desktop PC using
ActiveSync. With a few exceptions, Money data on the two
computers is linked. When you delete, add, or edit
information from Microsoft Money for Pocket PC, it is
deleted, added, or edited in Microsoft Money on your
desktop PC the next time you synchronize. Note that
synchronization with your desktop PC is only supported
with Microsoft Money 2000 or versions available after
Microsoft Money 2000.
If you ever intend on synchronizing between your Pocket
PC and your desktop PC and you own Microsoft Money
2000, you should synchronize before entering any
181
information on your Pocket PC. Synchronizing first will
ensure that information on your mobile device is not lost.
To check whether synchronization is currently
enabled
1.
Connect your Pocket PC to your desktop PC so that
ActiveSync can connect to your mobile device.
2.
Once ActiveSync on your desktop PC has connected to
your Pocket PC, open ActiveSync and click Details
and see if “Microsoft Money Data” is listed under
Information Type.
3.
If “Microsoft Money Data” is not listed, you can
enable synchronization by clicking Options… on the
Tools menu. On the Sync Options tab, select the
“Microsoft Money Data” in the list of information
types and check the check box next to it. Click OK.
4.
Microsoft Money will select the last Money file you
used on your desktop PC and synchronize with that file
each time you connect your Pocket PC.
5.
For more information on synchronization, see
ActiveSync Help on your desktop PC.
182
13.3.8 Configuring Money for Pocket PC
Microsoft Money for Pocket PC has a few options that can
be set in the Options dialog box, found on the Tools menu.
General options
As described in “Adding and working with transactions”
section, AutoComplete+ will automatically enter the most
recently used amount, category, and subcategory for the
last transaction with the same payee when you are entering
transactions. If the previous transaction for the payee was a
check, the next available check number for the current
account will also be entered.
1.
To turn off AutoComplete+, tap Options on the Tools
menu, and clear the Use AutoComplete+ check box.
2.
Microsoft Money for Pocket PC will continue to
attempt to determine which payee you are entering, but
it will not automatically enter information into other
fields.
You can also have Microsoft Money for Pocket PC display
information in a larger font so that you can read the screen
more easily.
1.
Select the Use large font check box.
2.
Where possible, Microsoft Money for Pocket PC will
display all information in a larger font.
Proxy Server
Some networks require a proxy server to connect to the
Internet. If this is the case, you must enter your proxy
server settings on the Proxy Server tab in the Options
dialog box for the investment updating to work properly.
Investments will then connect to the MoneyCentral Web
183
site using your proxy server to update your investment
quotes. If investment updating is not working properly, ask
your ISP or your corporate MIS department if you require a
proxy server and enter the settings.
184
13.4
PC
Windows Media Player for Pocket
Use Windows Media Player for Pocket PC to listen to
digital audio files. To switch to Windows Media Player,
tap
, Programs , then Windows Media Player.
Active playlist
Indicates progress
of the current track
Track information
Skip forward
Skip back
Play/Pause
Repeat playlist
Shuffle playlist
Stop
Volume
13.4.1 Using the playlist manager
Use the playlist manager to set the track playback order.
All My Music is the default playlist. It contains all digital
audio files available for playback on the WA 3050 and
storage card. To see a list of recently selected playlists, tap
Select Playlist. To create or edit playlists, tap All Playlists.
185
Default playlist of all tracks
Previously selected playlists
Playlist management
Tap and hold a track or playlist to perform actions such as
copying, moving, and deleting. For more information on
using Windows Media Player, tap
186
then Help.
13.5
Microsoft Reader
Use Microsoft Reader to read or listen (with Audible) to
electronic books on your WA 3050 device.
Download books to your computer from your favorite
eBook website. Then, use File Explorer and ActiveSync to
copy the book files to the WA 3050. The books appear in
the Reader Library, where you can tap them in the list to
open them.
Each book consists of a cover page, an optional table of
contents, and the pages of the book. Page through the book
by using the Direction key or by tapping the page number
on each page. You can annotate the book with highlighting,
bookmarks, notes, and drawings. You can also search for
text and look up definitions for words.
The Reader Guidebook contains all the information you
will need to use the software. To open the Guidebook, tap
Guidebook on the Reader command bar. Or, on a book
page, tap the book title then tap Guidebook on the pop-up
menu.
To switch to Microsoft Reader, tap Programs, then tap
Microsoft Reade r.
13.5.1 Getting books onto the WA 3050
You can download book files from the Web. Just visit your
favorite eBook retailer and follow the instructions to
download the book files. Sample books and a dictionary are
also included in the MSReader folder in the Extras folder
on the ActiveSync CD. Use ActiveSync to download the
files from your computer to your WA 3050 as described in
the Read Me file in the MSReader folder.
187
13.5.2 Using the Library
The Library is your home page. It displays a list of all
books stored on the WA 3050 or a storage card. You can go
to the Library by tapping Library on the Reader command
bar. Or on a book page, tap the book title then tap Library
on the pop-up menu.
Tap the title in the Library list to open a book.
188
Microsoft Transcriber
Microsoft Transcriber for Windows® CE is a natural
handwriting recognition program that enables you to use
or a
of cursive and printed characters whenever you use the
stylus to write directly on your WA 3050 device screen.
Transcriber lets you jot down a phone number, take notes
and more, just as easily and naturally as writing on a piece
of paper.
Caution Transcriber is a pre-installed program. If a
version of Transcriber is included on the ActiveSync CD
shipped with your device, do not attempt to install it.
189
14.1
Features
Transcriber is a powerful handwriting recognition engine.
Some of its advanced features include:
§
Natural handwriting recognition: Transcriber
recognizes print, cursive, and mixed script as well as
arbitrary symbol strings and control “gestures”.
§
Immediate usability: Unlike many handwriting
recognition programs, Transcriber is ready to run right
out of the box with no training required. You can,
however, customise Transcriber to your personal
handwriting style, thereby increasing Transcriber’s
already superb accuracy and speed.
§
Built-in dictionary: Transcriber recognizes words from
its integrated dictionaries. This includes a main
dictionary containing approximately 65K words.
Transcriber also recognizes non-vocabulary words like
personal names, geographical names, and arbitrary
handwritten symbol strings.
§
Extensive correction interface: By pointing out
Transcriber’s mistakes, you can improve its
performance.
190
14.2
Starting the program
Because Transcriber is designed to work with text-editing
software, you must open a program such as Notes, then
select Transcriber as the input method to start it.
To start Transcriber
1.
When a text-editing application such as Notes or
Pocket Word is open, tap New in the lower left corner
of the application window.
2.
Depending on what input method your handheld
device is set to, one of the following icons will appear
on the Windows taskbar:
If the icon is…
the input method is:
The soft keyboard
Character Recognizer
Transcriber
191
Note In the Notes application there is a fourth entry
method, the Cursive Recognizer, which is also
represented by a pen icon located in the center of the
taskbar. The Cursive Recognizer is the method
selected when the background for the icon is white:
Tap here to
display the input
panel menu
3.
Tap the arrow to the right of the input method icon to
display the input panel menu:
4.
Tap Transcriber to select it as the input method. The
following information appears:
192
Note Tap Don’t show this to prevent this screen from
appearing each time you start Transcriber. Tap Help to
launch Transcriber Help.
5.
Tap Close. You can now use Transcriber to write on
the screen.
14.3
Transcriber tutorials
Many people prefer to learn by doing. The following
tutorials cover a few of the most common ways in which
people use Transcriber. Read the rest of this chapter for
complete details on how Transcriber works once you are
finished with the tutorials.
Note The tutorials are designed to be generic. Transcriber
will function with any text editing software.
14.3.1 Tutorial One: the basics
This tutorial shows you how to enter text using handwriting
and some basic editing techniques.
193
1.
Launch both your text editing application, such as
Notes, and Transcriber on your device.
2.
Make sure that Transcriber is the chosen method of
input (tap the icon if necessary) and write the
following on your screen: The quick brown fox. Try
to write a bit more neatly than normal and use larger
letters until you get used to how the program responds.
This will not affect Transcriber’s accuracy; rather, it
will help introduce you to the program.
3.
If Transcriber recognizes the above text correctly, keep
writing until it mis-recognizes a word, for example:
4.
Tap and hold the stylus on the screen right next to the
incorrect text for a few seconds. Without picking up
the stylus, drag the stylus across the text you wish to
194
change so that it is highlighted as the “f” is shown
below.
Note If you find it difficult to highlight one letter, you
can change the size of the text by using the zoom mode
on your handheld device. On the toolbar choose Tools,
then select the percentage you wish to increase the text
by.
5.
Next, rewrite the letters that were recognized
incorrectly on the screen below the text. In this case
you would write a b. This will replace the highlighted
text.
6.
Other ways to highlight text include a double tap on
the incorrect word or by drawing a line through the
text you wish to change. Try drawing a line through
your sentence to highlight the text shown below:
195
7.
196
Write a new sentence, The lazy dog, and the
highlighted text will be replaced by the new sentence.
14.3.2 Tutorial Two: editing gestures
In addition to replacing incorrect text, there are also several
gestures you can use to edit your text. This tutorial will
teach you Backspace, Enter, Space, Undo, and Case change
gestures.
1.
Launch both your text editing application and
Transcriber on your device and write The quick
brown fox jumps over a lazy dog.
2.
Select jumps over a lazy dog and use the Backspace
gesture by drawing a line from right to left as shown
below. The selected text will be erased.
3.
Now, insert a carriage return by using the Enter
gesture. Make sure that the horizontal part of the
gesture is at least two times longer than the vertical
part.
197
4.
Note that the cursor moves down one line.
5.
Use the Backspace gesture again (straight line from
right to left) to erase the carriage return and move back
to the top line.
6.
Tap the word brown between the r and the o to
position the cursor, and use the Space gesture. The
space gets inserted.
198
7.
The space is added.
8.
Use the Undo gesture to remove the space. Make a
vertical line going up and retrace the line going down.
199
9.
Select the word quick and use the Case Change
gesture.
10. This turns the word quick to QUICK.
200
14.4
Customizing Transcriber
Transcriber can be customized to suit your individual needs
and preferences. Settings enable you to do the following:
§
Adjust program settings
§
Personalise the program’s handwriting recognition
capabilities.
14.4.1 Adjusting program settings
You can modify program settings that control functions
such as the thickness of the line and color of the “ink”.
Note Your WA 3050 has a monochrome screen .
Consequently, color choices mentioned in help topics or in
program options are rendered in varying shades of gray
scale.
To adjust program settings
1.
Tap the arrow to the right of the hand icon
then tap Options.
The Transcriber Settings window appears:
,
201
2.
Make sure that the input method selected is
Transcriber, then tap Options.
3.
If not already selected, tap the General tab at the
bottom of the screen to display the Transcriber Options
panel:
4.
Tap the Sound on check box to mute your device (box
is unchecked).
5.
Tap the Show intro screen box if you want the intro
screen to appear each time you start Transcriber (box
is checked).
6.
Tap the Show iconbar box if you want the Iconbar to
appear automatically each time you start Transcriber
(box is checked).
202
7.
Tap Color to select a different “ink” color.
Note This will not change the color of the recognized
typed print, only the ink written on the screen.
8.
Tap the name of a color listed on the pop-up menu that
appears:
9.
Tap the up or down arrow in the Inking box
to increase or decrease the width of the
ink.
10. Tap
to return to the Transcriber Settings panel.
11. Tap
if you are done configuring Transcriber
settings.
203
14.4.2 Personalising handwriting recognition
capabilities
The recognizer is the software module that actually
recognizes your handwriting. Transcriber includes options
for customising how the program recognizes your
handwriting.
To personalise handwriting recognition
capabilities
1.
Tap the arrow to the right of the hand icon
then tap Options.
2.
Make sure that the input method is Transcriber, then
tap Options.
204
,
3.
Tap the Recognizer tab to display the following:
4.
Check or clear the following boxes to toggle their
functions on and off:
Add space after Tells Transcriber to insert a space
after each recognized word or fragment.
Separate letters mode This mode forces the
recognizer to only recognize words written with
separate letters. For example,
would be
recognized but
, because it has
connected letters, will not be recognized when
Separate letters mode has been selected. If you print,
selecting this option will speed up recognition.
205
5.
Drag the slider to adjust the value of Speed vs.
Quality to customise how you want Transcriber to
trade off in speed versus quality of recognition.
Moving the slider towards the speed end of the
spectrum will make Transcriber recognize your
handwriting very quickly, but it may contain more
errors. Moving the slider to the quality end of the
spectrum makes Transcriber very accurate, but at a
substantial cost in speed. The default slider position is
usually acceptable for most applications, providing
excellent accuracy with a reasonable delay.
6.
Drag the slider to adjust Recognition delay. This
slider allows you to adjust how quickly Transcriber
converts your handwriting into text. If Transcriber
converts your handwriting into typed text too quickly,
you might become confused, because your writing
would disappear too quickly. Also, you would not have
enough time to write multi-stroke letters (such as
crossing the letter “t”). Therefore, setting an
appropriate delay allows you to write comfortably.
7.
When you have all of your settings adjusted, tap
8.
Tap
14.5
again to start using Transcriber.
Editing text
In addition to its remarkable recognition capabilities,
Transcriber features some advanced editing tools:
§
Iconbar editing functions
§
Control gestures.
206
.
14.5.1 Using the iconbar functions
You can select a number of functions from the Transcriber
iconbar. These functions are summarised as follows:
Icon
Description
Control of Writing Orientation Tap this
icon to change the screen orientation.
This allows you to write at a comfortable
angle without sacrificing recognition
accuracy.
Recognition Mode Tap this icon to have
Transcriber recognize in upper case,
lower case or numbers.
Microsoft Transcriber Keyboard Tap
this icon to display the Microsoft
Transcriber Keyboard.
Letter Shape Selector Tap this icon to
access the Letter Shape Selector, a way to
tailor Transcriber to your own personal
handwriting style. Please refer to the
section below for a more thorough
explanation.
Help Tap on this icon to display the
Transcriber help menu.
Close Tap on this icon to close the
Transcriber Iconbar.
207
Control of Writing Orientation
Use Control of Writing Orientation to help Transcriber
recognize your handwriting if you write at an angle. You
can also use it if you find it more comfortable to write on
the screen with it in a landscape position.
208
Recognition mode
The recognition mode icon has three modes, lower case,
upper case and numerical. If the Iconbar shows the lower
case “a”, then Transcriber will recognize both upper and
lower case, capitalizing at the beginning of a sentence. The
capital “A” denotes that Transcriber is in the upper case
mode. Transcriber will recognize your writing as all upper
case text. Transcriber numerical mode is helpful when
writing math equations.
Microsoft Transcriber Keyboard
The Microsoft Transcriber Keyboard can be used for
punctuation and special symbols. Simply tap on the
punctuation you wish to insert. The character will be
inserted at the point of the cursor. You can lock it in place
by tapping the “pin” button in the upper left corner. To
close the keyboard, tap the Close button (X) in the upper
right corner of the keyboard.
209
Letter Shape Selector
The Letter Shape Selector allows you to tailor
Transcriber’s recognition to suit your unique writing style.
This helps improve both the speed and accuracy of
recognition.
You may access Letter Shape Selector from the Transcriber
Iconbar.
The Letter Shape Selector screen presents various means of
writing numbers, letters, and common symbols. For each
letter, number, or symbol, tap each possible variation to see
the animated writing pattern and check the appropriate box
to tell Transcriber if you use that variation Often, Rarely,
or Never. You may tap the letter, number, or symbol you
wish to customise, or you may use the scroll arrows to
210
move through the list. Disabling unused letter forms helps
Microsoft Transcriber work faster and more accurately,
since the program will not have to search for unused letter
shapes. For example, if you do not use a triangle-shaped
“A” as a lower case letter, check Never. This helps
Microsoft Transcriber select the right capitalisation, as it
will now consider this shape to be a capital “A” most of the
time. Close Letter Shape Selector when finished by tapping
the OK button in the upper right corner. Your settings are
automatically saved.
If you accidentally enter erroneous settings, you can tap
File>Use Original Settings to restore the factory defaults.
You may use two sets of settings: Master and Guest. This
allows you to share your Windows CE device with another
person and tailor Transcriber to each unique style of
writing. To select a list, tap File>Master or File>Guest.
14.5.2 Using control gestures
Control gestures are specially shaped strokes that signal
Transcriber to perform the appropriate edit functions. You
may use gestures for common operations such as pressing
the Enter and Backspace keys. The desired action will be
applied at the current cursor location.
Note You do not need to draw the arrows that appear on
the gesture depictions. They merely serve to illustrate the
direction that a particular gesture is made. Gray arrows
next to a gesture also depict the proper method of drawing
the gesture.
Enter gesture
211
This gesture is the functional equivalent of pressing
ENTER. This action occurs at the current cursor location.
Space gesture
This gesture is the functional equivalent of pressing
SPACE. This action occurs at the current cursor location.
Tab gesture
This gesture is the functional equivalent of pressing TAB.
This action occurs at the current cursor location.
Backspace gesture
Draw the line from right to left. This gesture is the
functional equivalent of pressing BACKSPACE.
Quick correct gesture
Draw the line straight down then retrace the same line back
up.
212
§
If a word is highlighted, the menu will prompt you to
either add the selected word to the dictionary (if it is
not already in either the main dictionary or the user
specific dictionary) or to select an alternative word
from the list.
§
If no word is selected, the Quick Correct gesture opens
the Microsoft Transcriber Keyboard.
Case change gesture
Highlight the desired letter, word or block of text. Use this
gesture to change a letter’s case.
Undo gesture
Undoes the previous action. It is the equivalent of pressing
CTRL+Z in most Windows applications.
Copy gesture
Copies highlighted text to the Windows Clipboard while
leaving the original text in place. It is the equivalent of
pressing CTRL+C in most Windows applications.
213
Cut gesture
This gesture removes highlighted text from the current
application and places it in the Windows Clipboard. It is
the equivalent of pressing CTRL+X in most Windows
applications.
Paste gesture
This gesture copies text previously placed in the Windows
Clipboard into the current application while leaving the text
available in the Clipboard for repeat pasting, if desired. It is
the equivalent of pressing CTRL+V in most Windows
applications.
14.6
Selecting text
Because Transcriber tries to recognize all strokes as
handwriting, you must modify the stroke to select and drag
text. There are two ways to do this:
§
Tap and hold the stylus still for a moment until you
hear a sound. At the sound, Transcriber suspends
recognition activities, and your stylus may be used as a
mouse functions. Drag the stylus across the text you
wish to select, just as you would with a mouse.
§
Draw a line across the desired text then hold the pen or
mouse for a moment. The desired block will be
highlighted, and the stroke you used to select the text
will disappear.
214
14.7
Using the alternative list
The alternative list can be used as a faster method to correct
an error if Transcriber does not recognize a word. Simply
highlight the incorrect word and use the Quick Correct
Gesture, a vertical line from top to bottom and retracing the
line back to the top. (See “Using control gestures” for an
example.) This will bring up the alternative list. Tap the
correct word and Transcriber automatically replaces the
highlighted text with your choice from the list.
Click here to
substitute
“brown” for
“frown”
215
14.8
Adding words to the dictionary
If a word does not already exist in the dictionary, bringing
up the alternative list gives you the option of adding it to
the dictionary. For instance, the city of Anchorage was not
listed in the original dictionary. By bringing up the
alternative list, you can choose to add it to the dictionary:
Click to add a
highlighted
word to the
dictionary
216
Customising your device § managing resources § appendices
15 Customizing your WA 3050
device
After you have used WA 3050 for the first time, you may
want to customise or at least become familiar with Pocket
PC and phone program settings to make some features
available every time you make an appointment, check your
schedule, or use your phone. You also may want to install
additional software or learn how to configure the WA 3050
to use as a modem for your PC or notebook computer when
a wall jack is unavailable. Settings include options for
customizing the following:
§
Screens and menus
§
Pocket PC security features
§
Pocket PC device and system settings
§
Regional settings
§
Phone answering settings
§
Options for displaying call length and cost
§
Ring tone and vibrating alert
§
Network transmission speed (GSM)
§
Network and roaming order preferences
§
Configuring the WA 3050 for use as a modem.
Note You can modify phone Settings only when the SIM
card is inserted into the back of your device, the phone is
turned on, and no calls are in progress.
219
15.1
Customizing screens and menus
If you did not do so during the setup process, you can
customise the appearance of the Today screen. You can
also select items to appear on the
menu and turn on the
New button menu. The New button in specific programs
enables you to open new items for the corresponding
program only. Adding the New button menu gives you the
additional option of opening or switching to other
programs .
To customise the appearance of the Today screen
1.
Do one of the following:
§
Tap
§
Tap the Today screen header.
, Settings, then tap Today.
2.
Check or uncheck items to appear on the Today
screen.
3.
Highlight an item, then tap Move Up or Move Down
to change its position on the Today screen.
4.
With an item highlighted, tap Options to select
additional options for that item, then tap .
5.
When you are done, tap
.
To select items to appear on the
menu
1.
Tap
2.
Tap items to appear on the Start menu. If you do not
see a program listed, you can use either File Explorer
on the WA 3050 to move the program to the Start
Menu folder or use ActiveSync on your PC or
notebook computer to create a shortcut to the program
220
, Settings, then tap Menus.
and place the shortcut in the Start Menu folder on the
WA 3050.
3.
Tap
.
To use File Explorer on the WA 3050 to move a
program
1.
Tap
, Programs , File Explorer.
2.
Tap the folder list labeled My Documents, then My
Device to see a list of all folders on the WA 3050.
3.
Tap the Program Files folder. Continue to open
folders until the program file you want is listed.
4.
When you have located the program file, tap and hold
the stylus on the program name, then tap Cut on the
pop-up menu.
5.
Open the Start Menu folder located in the Windows
folder.
6.
Tap and hold a blank area of the window, then tap
Paste on the pop-up menu. The program should now
appear on the
menu.
To use ActiveSync to create a shortcut
1.
On your PC or notebook computer, open ActiveSync.
2.
Use the Explorer feature of ActiveSync to explore files
on the WA 3050 and locate the program you want.
3.
When you have found the program, right-click it, then
click Create Shortcut.
4.
Move the shortcut to the Start Menu folder in the
Windows folder. The shortcut should now appear on
the
menu. For more information, please see the
ActiveSync help.
221
To turn on the new button menu
1.
Tap
2.
Tap the New Menu tab.
3.
Tap Turn on New button menu so that the box is
checked.
4.
Tap items to appear in the New button menu.
5.
Tap
15.2
, Settings, then Menus.
.
Using Pocket PC security features
You can specify ownership information so that someone
can identify you as the owner of your device and return it
to you if it becomes lost. You can also set a password to
prevent someone from accessing the PDA features of your
device without your permission. If you set a password, you
must enter it each time you turn on the PDA component or
if you access Password Settings to deactivate it. This
password is different from the password you can set for
accessing the phone (see “Activating the use of a PIN
code”).
Note If you forget your password for accessing the PDA,
you will need to clear memory on your device to access it
(see “Resetting your device and clearing memory”).
To specify/update owner information
1.
Tap
2.
Tap in the box next to each item of information you
want to provide and type the information using the soft
keyboard. Tap Show information when device is
turned on if you want it displayed when the Pocket
PC is turned on.
222
, Settings, then Owner Information.
3.
Tap the Notes tab, then tap in the Notes box and type
any other information. Tap Show information when
device is turned on to display this information when
the Pocket PC is turned on.
4.
Tap
.
To set a password for the PDA component
1.
Tap
, Settings, System tab then Password.
2.
Tap on the keypad to enter a 4-digit PIN code. If you
make a mistake, press and hold
typed and start over.
to erase what you
3.
Tap Require password when device is turned on.
4.
Tap
.
To lock Turn on buttons of your Pocket PC
1.
Tap
, Settings, System then Turn on buttons.
2.
Choose the start option.
3.
Tap
.
15.3 Adjusting Pocket PC device
settings
From time to time, you may wish to adjust a number of
Pocket PC device settings. These settings include options
for:
§ Assigning programs other than the defaults to the
program buttons
§
Adjusting input settings to improve speed and
accuracy
§
Customizing system sounds and reminders.
To assign programs to buttons
223
1.
Tap
, Settings, then Buttons.
2.
Tap the name of a button in the left-hand column.
3.
Tap on the Button assignment box, then tap the
name of a program to assign to the button.
4.
Tap Restore Defaults to return button assignments to
their defaults.
5.
Tap the Up/Down Control tab to customise the way
the Up/Down control repeats.
6.
Tap
.
To adjust input settings to improve speed and
accuracy
1.
Tap
, Settings, then Input.
2.
Tap on the Input method box and select an input
tool.
3.
Follow the on-screen instructions to make any
customisations for input methods, including size of the
soft keyboard keys, word completion rules, writing and
typing zoom levels, and voice recording format.
4.
When you are done, tap
.
To adjust system sounds and reminders
1.
Tap
2.
Drag the System volume slider to adjust the system
volume. (This setting does not affect the loudness of
the phone ringer.)
3.
Select options for enabling or disabling sounds for
events, programs , screen taps, and hardware buttons.
4.
Tap the Sounds tab to select sounds for event names.
224
, Settings, then Sounds & Reminders.
5.
Tap the Reminders tab to select options for system
reminders.
6.
When you are done, tap
.
225
15.4
Customizing system settings
As part of customizing PDA system settings, you may want
to specify a device name and align the touch screen if these
steps were not done when the Setup Wizard was run. You
may need to repeat the alignment process if your device is
not responding accurately to screen taps. You also may
want to adjust:
§
PDA turn-on button settings
§
Backlight settings
§
Power settings
§
Clock settings
§
Regional settings.
To specify a device name
1.
Tap
, Settings. On the System tab, tap About.
2.
Tap the Device ID tab.
3.
Tap the Device name box and type a name for your
device. This name appears in the ActiveSync window
when your device is in the cradle and ActiveSync
recognizes it.
4.
Tap the Description box and type a description for
your device.
5.
Tap
.
To align the touch screen
1.
Tap
, Settings. On the System tab, tap Align
Screen.
2.
Follow the on-screen instructions to complete the
process.
3.
When you are done, tap
226
.
To adjust PDA turn-on button settings
1.
Tap
, Settings. On the System tab, tap Turn-On
Buttons.
2.
By default, you can turn on the PDA component of
your WA 3050 device by pressing the PDA Power
ON/OFF button, or the
,
, Record, or any of
the program buttons. To prevent the PDA from being
powered on by any button other than the PDA Power
ON/OFF button, tap Press only the power button.
3.
Tap
.
To adjust backlight settings
1.
Tap
, Settings. On the System tab, tap Backlight.
2.
Select backlight options when the unit is on battery
power. For example, specify the amount of idle time
before the backlight turns off.
3.
Tap the External Power tab and select backlight
options when the unit is on external power.
4.
Tap
.
To adjust power settings
1.
Tap
, Settings. On the System tab, tap Power.
2.
Select power options when the unit is on battery power
and external power.
3.
Tap
.
227
To specify clock settings
1.
Tap
, Settings. On the System tab, tap Clock.
2.
Select options to specify the local time and date and
that for a travel destination.
3.
Tap Home or Visiting to set the default time and date
to one of these locations.
4.
Tap the Alarms tab to define up to four alarms.
5.
Tap
.
To adjust the display contrast
1.
Tap
, Settings. On the System tab, tap Contrast.
2.
Drag the slider to adjust the screen contrast.
3.
Tap
.
To specify regional settings
1.
Tap
, Settings. On the System tab, tap Regional
Settings.
2.
Select options for specifying local language, number
format and currency, and time and date.
Note Regional settings will affect the format of call
cost, date, and time information shown in the phone
application’s Call Status and the Call Log.
3.
Tap
228
.
15.5
Setting options for answering calls
Normally you answer a call by pressing
. The
WA 3050 gives you the option of answering a call by
pressing any of the hardware buttons – the program
buttons, and the Volume,
, Record, and Action
buttons. (Pressing
would still reject an incoming
call.) In addition, you can select options for answering calls
automatically when the WA 3050 is connected to a car kit
or the headset is in use.
To set options for answering calls
1.
Tap
then Settings. On the Personal tab, tap
Phone, then General.
2.
Tap Connected to car kit if you want to answer calls
automatically when the WA 3050 is connected to a car
kit. When calls are answered this way, there is no
ringing to announce your caller, and he or she is
connected instantly.
3.
Tap Headset in use if you want to answer calls
automatically when using the headset.
4.
Tap the Any key option if you want to be able to
answer incoming calls by pressing the
,
Record, Action, or any of the program buttons.
5.
Tap
,
.
229
15.6 Setting options to show call length
and cost, and delete the call log
Call Status and the Call Log display the date, time, and
phone number of each incoming or outgoing call. If there is
a match between a number and one stored in Contacts, the
name associated with the caller in Contacts is included if
Caller ID is supported as part of your subscription.
If you want more detail about call activity, you can select
options for showing the length and cost (if supported by
your subscription) of each call as well as the total length
and cost of all calls. Time and cost are formatted according
to Regional Settings (see “Customizing system settings”).
Other options enable you to specify whether to delete the
Call Log after the phone is turned off. By default, the Call
Log is retained when the phone is turned off. You can
access the Call Log to retrieve information for up to 20 of
the most recent calls made or received. If you choose to
delete the Call Log, you will not be able to retrieve this
information. When there are 20 calls in the Call Log, any
new call causes the oldest call to be deleted automatically.
To set the option for showing call length
1.
Tap
then Settings. On the Personal tab, tap
Phone, then General.
2.
Tap the Other tab.
3.
Tap Show call length.
4.
Tap the Reset button next to Total talk time if you
want to reset the total talk time to zero.
5.
Tap
230
.
To set the option for showing call cost
1.
Tap
then Settings. On the Personal tab, tap
Phone, then Security. .
2.
Tap Cost, which displays the PIN entry screen.
Use the stylus to type your PIN2 code. PIN2 codes
must be from 4 to 8 characters in length. If you make
an error, press and hold
and reenter the code.
to delete what you typed
If you make three incorrect entries, the SIM card is
blocked and must be replaced or unlocked by your
carrier, who may provide a PIN Unlock Key (PUK). If
you select Cancel, you will only be able to place
emergency calls (no PUK required) until your card is
replaced.
3.
Tap Display call cost.
4.
Tap and select a value for Currency.
5.
Tap Phone units. Type the unit cost you pay as part of
your phone service in Price per phone unit.
6.
Tap the Reset button next to Total call cost to reset
the total call cost to zero.
7.
Tap
.
To delete the Call Log when phone is turned off
1.
Tap
then Settings. On the Personal tab, tap
Phone, then General.
2.
Tap Other.
3.
Tap Delete Call Log when the phone is completely
off to activate this option.
4.
Tap
.
231
15.7 Causing the display to be turned
off during a call
A number of power-saving features are built into your
device. If enabled, these options apply whether you are
using the PDA or phone features (see “ Managing power”).
The WA 3050 includes an additional option to turn off the
display screen during a phone call to conserve power. The
display screen reappears when you end a call if the phone is
still turned on.
To cause the display to be turned off during a call
1.
Tap
then Settings. On the Personal tab, tap
Phone, then General, then Other.
2.
Tap Turn off display during call to save power.
3.
Tap
232
.
15.8 Selecting options for ring tone and
vibrating alert
Another group of phone settings enables you to choose
a.WAV file to use instead of the default ring tone as the
ring type, and to adjust the ringer volume. This .WAV file
can be one you download from the Web or another source.
You can also select the vibrating alert pattern.
To select options for ring tone and vibrating alert
1.
Tap
then Settings. On the Personal tab, tap
Phone, then Ring & Phone Numbers.
2.
Drag the slider on the Ring volume slide bar to adjust
the ring volume. Speaker volume is independent of
ring volume and is adjusted separately.
3.
Place the stylus on the Play this .WAV file to ring
box to select a .WAV file to use instead of the default
ring tone. Tap the Play button to preview a WAV file
and Stop to end previewing it.
Note You can customise this list to include .WAV
files downloaded from the Web or other source. Use
File Explorer on your PC or notebook computer to
copy any .WAV files to Mobile Device/My Melodies
on your device when it is connected to your computer
(see “Finding and organising information”).
4.
Select Vibrating alert to select a vibrating alert type.
By default, the phone uses both vibration and ringing
to notify you of an incoming call.
If you select Vibrate only, the Ring volume slider is
disabled, and the phone will vibrate only to notify you
of an incoming call.
If you select Vibrate + ring, the phone will vibrate at
the same time that it rings (the default). The phone
vibrates for about 1½ seconds, followed by no
233
vibration for about 3 seconds, and is independent of
the ring pattern.
If you select Vibrate then ring, two vibration cycles
are followed by one cycle of vibration and ringing at
low volume, followed by a cycle of ringing at the
Ring volume setting.
If you turn off the ringer (silent mode), it does not
affect the settings for vibrating alert. When the ringer
is turned back on, any vibrating alert settings specified
previously are again in effect. Similarly, none of the
vibrating alert settings changes the ring volume setting.
5.
234
Tap
.
15.9 Specifying voice mail and other
personal numbers
You should review the list of phone numbers associated
with your personal subscription and if necessary enter your
voice mail number as part of configuring your phone
settings. These numbers may be stored on the SIM card
given to you when your mobile phone service was
established. If they are absent but you have inserted the
SIM card, you can add them when you specify your voice
mail number. Contact your carrier to obtain the correct
numbers if necessary.
To specify voice mail and other personal numbers
1.
Tap
then Settings. On the Personal tab, tap
Phone, then Ring & Phone Numbers.
2.
Tap My Numbers.
3.
Review the numbers listed. If no numbers are present,
you can enter them in the spaces provided.
4.
If some of the numbers are displayed, review and enter
your voice mail number and other numbers as needed.
5.
Tap
.
235
15.10 Selecting an alternative radio
speed (GSM network)
By default, the radio speed of your device is set to 9600
bps, the speed most commonly used by GSM carriers. If
your carrier uses a different speed, you can set your
WA 3050 device accordingly to operate at the different
speed.
To select an alternative radio speed
1.
Tap
, Settings. On the Personal tab, tap Phone,
then General.
2.
Tap the Data tab.
3.
Tap on the Radio speed box and select another
speed from the list.
4.
Tap
.
15.11 Selecting GSM network
preferences
As part of Call Services, you can:
§
Review a list of available GSM networks
§
Customise the roaming order among networks that can
be used by your phone.
You may want to perform these procedures when travelling
outside of your normal calling area or if you are having
problems placing a call.
To show available networks
1.
236
Tap
then Settings. On the Personal tab, tap
Phone, then Call Services.
2.
Tap the Network tab.
3.
Tap Show available networks. After several seconds,
a list is displayed.
4.
Select a network other than the first one on the list to
make it the one currently in use. Any networks within
the range of the phone but that can be used only to
place emergency calls are shown with “!!!” before and
after the network name.
5.
Tap
.
To choose a preferred roaming order
1.
Complete the procedure for showing available
networks.
2.
Select a network to add from the list next to the Add
button, or type a network LAI in the space provided,
then tap the Add button to add it to the networks listed
in Roaming order.
3.
Select the name of a network in Roaming order then
tap Move up or Move down to change its position in
the roaming order. Select a network then tap Remove
to remove it from the list.
4.
When you are satisfied with the roaming order, tap
.
15.12 Adding or removing programs
Programs added to the WA 3050 at the factory are stored in
ROM (read-only memory). You cannot remove or modify
this software, and you will never accidentally lose ROM
contents. Programs and data files added after factory
installation are stored in RAM (random access memory).
You can install any program created for the WA 3050 as
long as the device has enough memory. The most popular
place to find software for Pocket PCs is on the World Wide
237
Web. Be sure that you have a backup copy of a program if
you remove it in case you want to re-install it later.
To add a program
You will need to install the appropriate software on your
PC or notebook computer before installing it on your
WA 3050 device.
1.
Download the program to your PC or notebook
computer (or insert the CD or disk that contains the
program into your computer). You may see a single
*.exe file, a *.zip file, a Setup.exe file, or several
versions of files for different manufacturers and
processors. Be sure to select the program designed for
the Pocket PC.
2.
Read any installation instructions, Read Me files, or
documentation that comes with the program. Many
programs provide special installation instructions.
3.
Connect your WA 3050 device to your computer using
either the serial cable or cradle.
4.
Double-click the *.exe file.
238
§
If the file is an installer, the installation wizard
will begin. Follow the directions on the screen.
Once the software has been installed on your
computer, the installer will automatically transfer
the software to the WA 3050.
§
If the file is not an installer, you will see an error
message stating that the program is valid but it is
designed for a different type of computer. You
will need to move this file to the WA 3050. If you
cannot find any installation instructions for the
program in the Read Me file or documentation,
use ActiveSync Explore to copy the program file
to the Program Files folder on your WA 3050. For
more information on copying files using
ActiveSync, please see the ActiveSync Help.
Once installation is complete, tap
program icon to switch to it.
, Programs , then the
To remove a program
1.
Tap
, then tap Settings.
2.
Tap the System tab, then tap Remove Programs .
3.
If the program is not listed as an installed program, use
File Explorer on the your WA 3050 device to locate
the program.
4.
Tap and hold the program name.
5.
Tap Delete on the pop-up menu.
239
15.13 Configuring your WA 3050 device
to use as a modem for your PC
If you need to connect to the Internet, send or receive
e-mail, or access a network or remote system from your PC
or notebook computer when a wall jack is unavailable, you
can configure your WA 3050 device for use as a modem
when it is connected to your computer via the serial cable
or cradle. The following conditions must be met to use this
feature:
§
The phone must be turned on
§
The COM port must be disconnected (in ActiveSync)
§
The option for using the phone as a modem must be
selected
By default, you can browse files on your WA 3050 device
from your desktop or notebook system and perform a
synchronization using ActiveSync when your device is
connected to your computer and a partnership has been
established. You cannot, however, browse files on your
WA 3050 device while using it as a modem.
When you are done using the WA 3050 as a modem, you
must reconfigure it for use as a phone to make or receive
calls. You will need to restart ActiveSync and reconnect
the COM port to synchronize files.
To configure your WA 3050 device for use as a
modem
1.
In the ActiveSync window on your desktop or
notebook system, click File, then Connection
Settings.
2.
Click Allow serial cable or infrared connection to
this COM port so that it is unchecked.
240
3.
Click OK.
4.
In ActiveSync, click File, then Close.
5.
On the WA 3050, tap
then Settings. On the
Personal tab, tap Phone, then General.
6.
Tap the Data tab.
7.
Under Use product as, tap Modem.
8.
Leave Use RLP error correction selected to use error
correction mode for transmitting data.
9.
Tap
.
10. Connect your WA 3050 device to your desktop or
notebook system using the serial cable or cradle, then
check that the phone is turned on so that the modem is
available for use.
To reconfigure your WA 3050 device for use as a
phone
1.
On your WA 3050 device, tap
then Settings. On
the Personal tab, tap Phone, then General.
2.
Tap the Data tab.
3.
Under Use product as, tap Phone.
4.
Tap . You can now use your WA 3050 device to
make and receive calls.
5.
On the desktop or notebook system, click Start, point
to Programs , then click Microsoft ActiveSync to
restart ActiveSync.
6.
In the ActiveSync window on your desktop or
notebook system, click File, then Connection
Settings.
7.
Click Allow serial cable or infrared connection to
this COM port so that it is checked.
241
8.
Click OK.
9.
In ActiveSync, click File, then Close.
10. Before attempting a synchronization in ActiveSync,
you will need to reestablish a partnership between the
WA 3050 and the PC or notebook computer.
242
16
Managing resources
Almost as important as learning how to access and use the
programs on the WA 3050 is a familiarity with some basic
tools for managing system resources to stay productive and
prevent problems before they occur. These tools help you
to do the following:
§
Manage power sources
§
Adjust storage and program memory
§
Manage SMS and faxes
§
Stop or activate running programs
§
Back up and restore data.
As part of managing resources, you can also monitor your
phone usage to keep track of costs and estimate how much
airtime you are using each month.
16.1
Managing power
Because the data you save and any programs you install on
the WA 3050 are stored in RAM, it is extremely important
to maintain a continuous source of power to your device. If
you allow both the main battery and backup battery to
become drained of power, you will lose all of the
information you have entered.
Check battery power levels periodically to avoid running
low. If warning messages are displayed, be sure to respond
to them promptly to recharge the main battery and replace
the backup battery when necessary. Just connect the
WA 3050 to external power to recharge the main battery
automatically. The amber status LED flashes while the
battery is charging and remains lit when it is fully charged.
243
If you cannot connect to external power, turn off your
device to conserve energy until you can connect to it.
Warning Your WA 3050 device contains a lithium-ion
polymer battery pack. There is a risk of fire and burns if
the battery pack is handled improperly. Do not
disassemble, crush, puncture, short external contacts, or
dispose of in fire or water. Do not attempt to open or
service the battery pack. Replace only with the battery pack
designated for this product. Dispose of batteries properly.
Your device also contains a coin-cell lithium battery. The
same precautions apply to handling this battery. There is a
danger of explosion and risk of personal injury if this
battery is incorrectly replaced or mistreated. Do not attempt
to recharge it, disassemble it, or immerse it in water or
dispose of in fire. Replace the coin-cell battery only with
the battery designated for this product. Dispose of used
batteries properly.
A simple way to conserve power is to turn off the backlight
whenever your device is idle. You can do this by holding
down the PDA power ON/OFF button. You can also
adjust an interval after which the backlight is automatically
turned off. Review the procedures for adjusting the
backlight and power settings in “Customizing system
settings”.
Tip When you finish making a call, press the PDA power
ON/OFF button to turn off the display and save power.
The phone will still be on and you will be able to receive
incoming calls.
To check power levels
§
244
Tap
, Settings. On the System tab, tap Power.
16.2 Adjusting storage and program
memory
Windows automatically manages the allocation of storage
and program memory on your device. More memory may
be used for storage as you install additional programs and
generate data files. Programs accessed the least of all
programs residing in memory are closed automatically as
new programs are opened.
Note Specialized software that communicates with the
phone and PDA components prevents Windows from
closing the phone application automatically as part of
memory management. Once you turn it on, your phone is
available for making or receiving calls until you turn it off
or it loses power.
Sometimes the operating system may not be able to adjust
the memory allocation, and a message may appear
informing you that memory is low or unavailable. When
this occurs, you can try one or more of the following to
increase storage memory temporarily:
§
Manually adjust the amount of storage and program
memory
§
Install a CompactFlash memory card and move files
from storage to the card
§
Delete files you no longer need or transfer them to
your PC or notebook computer
§
Move e-mail attachments to a storage card
§
Periodically check the WinPhone Inbox, Outbox, and
Sent folders to delete SMS messages and faxes you no
longer need (see “Managing SMS and faxes”)
§
In EzWAP, select options to clear history and
temporary files
245
§
Remove Web pages stored for offline viewing
(Active Channels)
§
Minimize memory used by mobile favorites (see
“Mobile favorites”)
§
In Pocket Internet Explorer options, delete all files and
clear history
§
Remove programs you no longer use (see “Adding or
removing programs ”)
§
Clear program memory by stopping some programs ,
which clears some storage memory so that it can be
reallocated as program memory, or by resetting your
device (see “Resetting your device and clearing
memory”).
246
To move e-mail attachments
1.
In Inbox, tap Tools, then Options.
2.
On the Storage tab, tap Store attachments on storage
card. All attachments are moved to the storage card,
and new attachments are automatically stored on the
card.
To delete EzWAP history and temporary files
1.
On the EzWAP main window, tap
2.
Tap Preferences.
3.
Tap
4.
Tap Clear history and Clear cache.
5.
Tap
.
to conceal the soft keyboard if necessary.
.
To delete Internet Explorer files and history files
1.
Open Pocket Internet Explorer.
2.
Tap Tools, then Options.
3.
Tap Delete Files and Clear History.
To adjust storage and program memory
1.
Tap
, Settings. On the System tab, tap Memory.
2.
Drag the slider to adjust the amounts of Storage and
Program memory.
3.
To obtain more storage memory, tap Remove
programs to free storage memory.
4.
If there are programs listed that you no longer use,
consider removing them to create more storage
memory. If you think you may want to use a program
in the future, be sure you have a backup copy of it or
know where to locate one before deleting it. See
247
“Backing up and restoring data” for instructions on
making backup copies of programs . To remove a
program that you no longer use, tap the name of the
program, then tap Remove to delete it from storage
memory.
5.
Tap Adjust memory allocation to return to the
memory allocation screen.
6.
If you want to create additional storage memory, tap
Find large files to free storage to display a list of files
larger than 64 KB. Make notes about large files you no
longer want or need, then delete them later using
Windows Explorer.
7.
If you have deleted or archived some programs and
data files, you may want to repeat Steps 1-2 to readjust
storage and program memory if necessary.
8.
Tap
16.3
.
Managing SMS and faxes
Copies of SMS messages and faxes are stored in memory
on your device. If you do not move them to another system
or delete them, incoming messages and faxes are retained
in the WinPhone Inbox, and any unsent messages or faxes
accumulate in the WinPhone Outbox. Copies of items that
have been sent are retained in the Sent folder.
To keep memory from becoming cluttered with information
you no longer need, periodically check the WinPhone
Inbox to review and delete messages and faxes you have
received. Send or delete any unsent messages and faxes
stored in the Outbox, and delete unneeded items from the
Sent folder.
248
To delete SMS and faxes you no longer need
1.
Press the
program button, or tap
, Programs ,
then SMS & Fax to activate WinPhone.
2.
On the WinPhone main window, check that the Inbox
folder
is selected, then highlight items you no
longer need. SMS items are identified by the
icon.
Faxes are identified by the icon.
3.
Tap Tools, then Delete to delete the selected items.
To send or delete unsent messages and faxes
§
When the WinPhone Outbox
is selected, highlight
individual messages and faxes, tap Tools, then tap
Send all SMS , Send all faxes, or Send all to send all
selected unsent items. (Highlight any individual items
you no longer want to send first, then tap Delete to
delete them.)
§
In the Sent folder, highlight unneeded items, then tap
Tools and Delete.
16.4 Stopping or activating a running
program
Manually adjusting the amount of storage and program
memory can temporarily alleviate a shortage of program
memory, and removing programs from storage memory
releases memory that can be reallocated as program
memory.
A more direct way of creating additional program memory
when you need it is to stop a running program. You can
reactivate a stopped program later to resume using it.
249
To stop or activate a running program
1.
Tap
2.
Tap the Running Programs tab.
3.
Do one of the following:
§ Tap one of the programs listed, then tap Stop so
that it is no longer active in memory, or tap
Activate to switch to that program.
§
4.
Tap
16.5
, Settings. On the System tab, tap Memory.
Tap Stop All to stop all running programs .
.
Backing up and restoring data
To prevent loss of data, it is essential that you transfer or
backup files periodically to a CompactFlash card or to
external storage on a PC or notebook computer. In any
case, SAGEM cannot be responsible for the loss (partial or
otherwise) of your data. If you do not use your device for
an extended period, be careful about the level of the backup
battery. If the backup battery is low, SAGEM cannot be
responsible for any loss of your data.
When your device is connected to a PC or notebook
computer, you can use File Explorer to copy files between
the WA 3050 and the computer by dragging icons to or
from the Mobile Device window. This is a quick way to
make a backup copy of a document you are working on.
Backups using ActiveSync provide a comprehensive
approach to data protection and retrieval. The backup file
can be created automatically each time you connect to your
PC or notebook computer. It is stored on your computer
and contains all the files, databases, PIM information, and
copies of any programs you have installed on the
WA 3050.
250
To back up data with ActiveSync
1.
Connect your WA 3050 device to a PC or notebook
computer.
2.
In the ActiveSync window on the PC or notebook
computer, on the Tools menu, click Backup/Restore,
then click the Backup tab.
3.
Select either Full Backup (to backup all information
every time) or Incremental Backup (to backup only
new or updated information).
4.
Click Change to change the name of your backup file
or to specify a location for your backup file.
5.
Click Back Up Now.
To restore data with ActiveSync
Caution Restoring data from ActiveSync replaces all
information stored on the WA 3050. Any data added after
the last backup file was created will be lost. Move any files
you do not want deleted to your PC or notebook computer.
1.
Connect your WA 3050 device to a PC or notebook
computer.
2.
Close all running programs on the WA 3050.
3.
In the ActiveSync window on the PC or notebook
computer, on the Tools menu, click Backup/Restore,
then click the Restore tab.
4.
Click Restore Now. Do not use your device until the
restore process is complete.
5.
When the process is complete, remove the WA 3050
from the cradle, remove the CompactFlash card (if
installed), and reset the WA 3050 (see “Resetting your
device and clearing memory”).
If you have made incremental backups, you must restore
each backup file individually, starting with the original
251
(full) backup and progressing in sequence from oldest to
most recent.
To select the backup file to restore, connect the WA 3050
to a PC or notebook computer as a guest. If you have
already established a partnership with the computer, you
must delete it first, then set up the guest connection. (In
ActiveSync, on the File menu, click Delete Partnership.)
16.6
Monitoring phone usage
If you select options for showing call length and cost (see
“Setting options to show call length and cost, and delete the
call log”), you can monitor your phone usage to keep track
of how much airtime you are using and estimate its cost.
Costs shown are based on the price per phone unit you pay
for your phone service. Total call length and cost will likely
differ from information on billing statements from your
carrier, which may include setup fees, taxes, and other
charges.
Monitoring your phone usage can help you decide whether
to activate cost limitations, call barring, or fixed dialing
(see “Using the security features of your phone”), or to use
some other measures to manage your telecommunication
costs.
To monitor total call length (airtime)
1.
Tap
then Settings. On the Personal tab, tap
Phone, then General.
2.
Tap the Other tab.
3.
Observe the amount of Total talk time.
4.
If you want to restart the timer, tap Reset to set the
total talk time to zero.
5.
Tap
252
.
To monitor total call cost
1.
Tap
then Settings. On the Personal tab, tap
Phone, then Security.
2.
Tap Cost, which displays the PIN entry screen.
Use the stylus to type your PIN2 code. PIN2 codes
must be from 4 to 8 characters in length. If you make
an error, press and hold
and reenter the code.
to delete what you typed
If you make three incorrect entries, the SIM card is
blocked and must be replaced or unlocked by your
carrier, who may provide a PIN Unlock Key (PUK). If
you select Cancel, you will only be able to place
emergency calls (no PUK required) until your card is
replaced.
3.
Observe the amount of Total call cost. If you have not
selected the option for showing call cost (by tapping
Display call cost), this field is blank and inactive.
4.
If you want restart the process, tap Reset to set the
total call cost to zero.
5.
Tap
.
253
Appendix A: Troubleshooting
This chapter contains troubleshooting information that can
help you to solve problems you might experience when
using your WA 3050 device. It also has a tips section that
may help you to get better service from your device.
If you are unable to solve a particular problem, see
“Finding Information”. The various documents and
websites listed there may have the information you need to
solve the problem.
If you encounter a problem that you cannot solve, contact
SAGEM technical support or your service provider for
assistance.
A.1 Resetting your device and clearing
memory
If your device responds slowly, stops responding as
expected, or “freezes,” try resetting it. A reset causes the
WA 3050 to restart and re-adjust memory allocation.
Unsaved data in open windows may be lost.
To reset your device
§
Use the stylus to press and hold the Reset button for
about two seconds.
Note Do not turn off the PDA component when
resetting your device. Power must remain on in order
to reset it.
If you forget your password for accessing PDA features or
want to clear all data from the WA 3050 and return it to its
factory settings, you should clear the memory.
254
Caution Clearing memory deletes all data and restores
the WA 3050 to its default settings. Any data you have
created and any programs you have installed are erased.
To clear memory
1.
Disconnect the WA 3050 from external power.
2.
Turn over the device.
3.
Remove first the main battery, then the backup battery.
4.
Wait at least one minute, then replace both batteries.
5.
Turn over your device, then press the PDA power
ON/OFF button to restart it.
6.
Run through the Welcome Wizard again to reestablish
your system and calibration settings.
Note Use ActiveSync to keep a backup copy of your data
available so that if you need to clear memory, you can
restore the data. See “Backing up programs and data” and
the ActiveSync help on your PC or notebook computer.
A.2
Battery loses power
When the batteries are low, you will see a battery icon in
the status bar of the Today screen. Replace or recharge low
batteries as soon as possible. If the main battery is
discharged, your data will be preserved by the backup
battery. If the backup battery is discharged, you may lose
data.
Warning Do not disassemble, crush, puncture, short
external contacts, or dispose of the main battery pack in
fire or water. Do not attempt to open or service the
battery pack. Replace only with the battery pack
designated for this product. Dispose of batteries properly.
255
Similarly, do not attempt to recharge the coin-cell lithium
(backup) battery, disassemble it, or immerse it in water or
dispose of in fire. Replace only with the battery designated
for this product. Dispose of used batteries properly.
Caution Do not leave the main battery in a fully
discharged state, especially if you are not using your
device for extended periods of time. You may lose data if
the backup battery becomes discharged.
You want your battery charge to last as long as possible,
especially when you are travelling. Under normal
conditions, you can get many hours of use from a full
charge. Refer to the following tips to help you get the most
from them:
Use external power whenever possible
Use the adapter to connect the WA 3050 to external power
whenever possible, especially when:
§
Establishing a remote connection (some modems use a
lot of power)
§
Using the backlight feature of the display
§
Connecting to a computer
§
Playing audio files for extended periods
Shorten auto-suspend time
While on battery power, the WA 3050 automatically
suspends operation if you have not touched the hardware
buttons or used the stylus for two minutes. Maximize
battery life by shortening this interval time (see
“Customizing system settings”).
256
Turn off sounds
Your WA 3050 device produces sounds in response to a
number of events, such as warnings, appointments, and
screen taps. To optimize battery life, turn off any sounds
you do not need. Refer to the procedure for adjusting
system sounds and settings in “Adjusting Pocket PC device
settings”.
Turn off the notification light
You can also turn off the notification light to conserve
power. Refer to the procedure for adjusting system sounds
and settings in “Adjusting Pocket PC device settings”. On
the Reminders tab, clear the Flash light for check box to
turn off the notification light.
A.3 If you need to check the software
version
If you need to know the version of a software component
on the WA 3050, do one or more of the following:
§
Select the About option from a program menu to
display the most current version information. This
option is often available from the Help menu but may
be accessed differently in some programs. For
example, in EzWAP, tap
then About. In
WinPhone, tap Tools, then About.
§
View the readme.txt file to confirm versions of the
dialing program and other “factory-installed” custom
components.
Note The readme.txt file will not reflect the correct
version data for any third-party programs you have
upgraded from factory-installed versions.
257
To display the readme.txt file
1.
Tap
, Programs , then File Explorer.
2.
In File Explorer, tap My Documents, My Device, then
the Windows folder.
3.
Scroll the list of items and tap readme when it
appears.
A.4 If you forget your Pocket PC
password
If you forget your Pocket PC password, you will need to
clear memory on your device. See “Resetting your device
and clearing memory”.
If you have used ActiveSync to create a backup file, all of
your program data can be restored. Your Pocket PC
password is removed and you can set a new one.
A.5
If you run out of memory
The operating system automatically adjusts the allocation
of memory for storage and program needs on your device.
If you receive a message indicating that memory is low,
refer to the procedures in “Adjusting program and storage
memory” to adjust memory manually.
A.6
Screen freezes or responds slowly
If the screen freezes or the system responds slowly, try
resetting your device (see “Resetting your device and
clearing memory”). If the symptom continues, the device
may have run out of memory. Check the memory usage
and clear storage memory.
258
A.7
Screen is blank
If the WA 3050 does not respond when you briefly press
the Power button, press and hold the button for a full
second. If that does not work, try the following in order
until the problem is resolved:
§
Connect the WA 3050 to external power
§
Reset the device (see “Resetting your device and
clearing memory”).
A.8
Screen is dark
Prolonged exposure to direct sunlight may cause the screen
to darken temporarily. This is normal for LCD screens and
is not permanent.
A.9
Screen is hard to read
§
Turn on the backlight by holding down the Power
button for one second.
§
Adjust the backlight brightness level (see
“Customizing system settings”).
§
Position a lamp so that the light shines directly on the
screen.
§
If it is difficult to view a document in Notes, try
changing the size of the view. To do this, tap a zoom
percentage on the Tools menu. In Pocket Word and
Pocket Excel, on the View menu, tap Zoom then select
a zoom percentage. In Pocket Internet Explorer, on the
View menu, tap Text Size then select a size.
§
If it is difficult to view Pocket Outlook data, try
enlarging the display font. To do this within Calendar,
Tasks, or Contacts, tap Tools, then Options, then tap
Use large font.
259
A.10 Inaccurate response to stylus taps
Adjust the touch screen to respond more accurately to
screen taps (see “Customizing system settings”).
A.11 Slow or no response
Reset your device as described in “Resetting your device
and clearing memory”.
A.12 No sound
If you lose audio capabilities, you may have forgotten to
close a dialog box before switching to another program.
If this problem occurs, try resetting your device to regain
audio capabilities (see “Resetting your device and clearing
memory”).
A.13 Infrared (IR) connection problems
If you are unable to use IR to transfer information, try the
following:
§
Transfer only one file or no more than 25 contact cards
at a time.
§
Line up the IR ports so that they are unobstructed and
within a range of 30 centimeters.
§
Make sure nothing is between the two IR ports.
§
Adjust the room lighting. Some types of light interfere
with IR connections. Try moving to a different
location or turning off some lights.
260
A.14 Modem connection problems
You may encounter the following problems when using an
modem. Additional troubleshooting information is
available in Connections Help on the WA 3050 and
ActiveSync Help your PC or notebook computer.
Cannot dial out
§
Remove the WA 3050 from the cradle. You cannot
connect using a modem if the WA 3050 has an active
connection with the computer.
§
Verify that the modem is firmly seated and connected
to the WA 3050 and to the telephone jack.
§
Make sure the telephone line is analog. (Analog
telephone lines transmit data in analog instead of
digital form. Your home telephone line is most likely
analog, while office telephone lines are often digital.)
Caution Connecting a modem to a digital telephone line
may damage your modem. If unsure, ask a
knowledgeable person before connecting the modem.
§
If you create a modem connection for an external
modem, select Hayes Compatible on COM1 as your
modem. If you are using a modem card, select the
modem card as your modem.
§
To use an external modem, you need to use a NULL
modem cable and appropriate adapters to connect the
external modem to the WA 3050.
§
Make sure the modem is waiting for a dial tone. Tap
then Settings. On the Connections tab, tap
Modem. Tap your connection and tap Next twice.
Make sure Wait for dial tone before dialing is
selected.
261
§
For international calls, allow more time for the call to
go through. Tap
then Settings. On the
Connections tab, tap Modem. Tap your connection
and tap Next twice. Clear Cancel the call if not
connected within or increase the number of seconds
allowed. For information on dialing patterns, see
Connections Help on the WA 3050.
Can dial out but unable to make a proper
connection
§
Make sure the network to which you are trying to
connect supports the Point-to-Point Protocol (PPP).
Your Internet service provider or network
administrator can verify this.
§
Verify that the location is correct. Tap
then
Settings. On the Connections tab, tap Modem. On the
Dialing tab, make sure that Location reflects your
current location.
§
Tap Dialing Patterns to make sure the correct
sequence of numbers is being dialed.
§
For information on dialing patterns, see Connections
Help on the WA 3050.
§
Verify that you are using the right phone number for
the modem you are trying to reach. Tap
then
Settings. On the Connections tab, tap Modem. Tap
the connection, then tap Next and double-check the
phone number you are trying to reach.
Connection is unreliable
§
Make sure the modem is firmly seated and connected
to the WA 3050 and to the telephone jack.
§
Disable call waiting. Tap
then Settings. On the
Connections tab, tap Modem. On the Dialing tab, tap
262
Disable call waiting , then enter the disable code
specified by your telephone company.
A.15 Network connection problems
The following solutions may help if you encounter
problems when using a network card for network
connections. Additional troubleshooting information is
available in Connections Help on the WA 3050 and
ActiveSync Help on your PC or notebook computer.
§
Verify that you have an Ethernet card that is
compatible with the WA 3050.
§
Verify that you have added necessary server
information. Tap
then Settings. On the
Connections tab, tap Network. Tap your installed
adapter (usually your Ethernet card’s name) and enter
any necessary information. Most networks use DHCP,
so you should not have to change these settings unless
your network administrator instructs you to do so.
§
If Network Connection is not listed as a connection
method in the ActiveSync dialog box when starting
synchronization, wait a few minutes and try again.
Also, if synchronization does not start right away, the
network is probably busy, and it may take a minute for
the WA 3050 to connect to the network.
§
Make sure that the proper drivers for your card are
installed on the WA 3050. For more information, see
the owner’s manual for the network card.
§
Verify with your network administrator that your user
name and password are correct.
§
Verify with your network administrator that the
network you are trying to connect to is available, or try
to connect to it from another computer.
263
§
You may need to change the device name if you are
trying to connect to a network and cannot because
another device with the same name is already
connected. To change the device name, refer to the
procedure in “Customizing system settings”.
A.16 Cable connection problems
The following solutions may help if you encounter
problems when connecting the WA 3050 to a PC or
notebook computer. Additional troubleshooting
information is available in Connections Help on the
WA 3050 and ActiveSync Help on your PC or notebook
computer.
§
Ensure that the WA 3050 is turned on.
§
If a modem or Ethernet card is inserted into the
WA 3050, remove it.
§
Ensure that you do not have any other active
connections. Tap
then Today. Tap
or
the bottom of the screen, then Disconnect.
at
§
Ensure that the cradle’s cable is securely plugged into
a serial port on the back of the PC or notebook
computer. Use the cable that came with the cradle
without any extra cables or extenders attached.
§
Ensure that the WA 3050 is securely placed into the
cradle.
264
A.17 Travel gu idelines
For safety and convenience when traveling with your
WA 3050 device, follow these guidelines:
§
Back up your data before you leave.
§
Take a backup copy of your data with you.
§
Disconnect all external equipment.
§
Take the external power supply adapter and new
batteries with you.
§
Hand-carry your device in a protective case. Do not
check it with your luggage.
§
Be aware of potential effects of airport security devices
on your device.
Caution There are three types of airport security
devices: X-ray machines, magnetic detectors (the device
you walk through), and security magnetic wands. You
can send your device through airport X-ray machines.
However, we recommend that you do not send your
device through magnetic detectors or expose it to security
magnetic wands.
§
Check with the airline if you plan to use your
WA 3050 device on the plane. In-flight use of
electronic devices is at the discretion of the airline.
A.17.1 International travel guidelines
Before traveling abroad with the WA 3050, be sure to:
§
Check local customs regulations.
§
If using an external modem or CompactFlash/PCMCIA
card modem, be sure to have the correct modem and
265
cable for the country you are visiting. Telephone lines
differ from one country to another.
A.17.2 Shipping guidelines
When shipping your device, follow these guidelines:
§
Safeguard your data by making a backup copy.
§
If shipping the backup copy, be sure that the medium
(diskette, tape, or CompactFlash card) is not exposed
to electrical or magnetic impulses while stored or in
transit.
§
Turn off your device and disconnect all external
devices.
§
Pack the WA 3050 and all external devices (such as
the cradle, cords, and cables) in their original packing
boxes or in similar packaging with sufficient packing
material to protect them.
A.18 Caring for your device
Clean your WA 3050 device using a soft, slightly damp,
non fluffy cloth.
Caution Certain chemical products can damage plastic.
Do not use aerosols, certain special cleaning products,
corrosive products, solvents, alcohol or detergents to clean
your device.
Leave your WA 3050 device in the cradle or carrying case
when not using it for an extended period of time.
266
Appendix B: Character Recognizer
Using Character Recognizer, you can write characters
directly on your device screen with your stylus, just as you
would on a piece of paper. The characters you write are
translated into typed text. Use Character Recognizer
anywhere you want to enter text, for example to write a
note or to fill in fields in a dialog box.
The Character Recognizer input panel is divided into three
writing areas. Letters written in the left area (labeled ABC)
will create uppercase letters, even if you write them in
lowercase, and letters written in the middle area (labeled
abc) will create lowercase letters, even if you write them in
uppercase. The right area (labeled 123) is for writing
numbers, symbols, special characters, and punctuation.
267
By default, Character Recognizer will recognize letters
written in lowercase (Jot-compatible) form. The following
is a partial chart of the characters you can write (the dot is
the starting point). Remember that even though you write a
letter in its lowercase form, the case of the text that is
displayed depends on where you write the letter. For
example, if you write a lowercase “a” in the ABC area, an
uppercase “A” is displayed on the screen.
268
For a demonstration of each character, tap
on the
Character Recognizer input panel and then tap Demo.
Tip If you prefer to write in uppercase (Graffiticompatible) form, choose Uppercase Mode in Options on
the input method menu.
269
B.1
Tips for writing characters
While in lowercase mode, the dotted midline and the solid
baseline on the writing panel are used to help Character
Recognizer correctly translate shorter letters and letters
with descenders or ascenders:
§
Write letters such as “o” and “c” between the midline
and baseline.
§
Write descenders below the baseline. For example,
write the top of a “p” between the midline and
baseline, and extend the descender below the baseline.
§
Write ascenders above the midline. For example, write
the ascender of a “b” above the midline, and write the
bottom of a “b” between the midline and baseline.
§
In addition to the 123 area, you can use the Symbols
keyboard to enter punctuation marks and symbols. Tap
and tap the desired character.
For more information on using Character Recognizer and
for demonstrations on writing all characters, tap
Character Recognizer input panel.
270
on the
Appendix C: Transferring Palm-size
PC data
If you are currently using a Palm-size PC and want to
transfer organiser data to the WA 3050, follow this upgrade
procedure:
1.
Install Microsoft ActiveSync 3.1 on your PC or
notebook computer. For information on installing
ActiveSync, see the booklet accompanying the
ActiveSync CD.
2.
Synchronize your Palm-size PC with your computer so
that the information on your computer is current.
Note If you have files on your Palm-size PC that you
want to transfer, such as Note Taker notes and
recordings, turn file conversion off in ActiveSync
options so that the files stay in device format, and use
the ActiveSync Explorer to copy the files to your
computer. For specific instructions, see ActiveSync
Help on the computer.
3.
Synchronize the WA 3050 with your computer. This
will update your device using the current data on your
computer (Step 2).
4.
Reinstall programs . Check whether new versions are
available that have been optimized for Pocket PC
devices.
5.
Copy any files you transferred to your computer to the
WA 3050 using the ActiveSync Explorer.
6.
Turn file conversion on again in ActiveSync.
7.
Enter your settings and connection information on the
WA 3050.
271
If you have offline folders in Inbox on your Palm-size PC
that contain e-mail messages you want to transfer to your
WA 3050 device, follow this procedure:
1.
Connect your Palm-size PC to your computer then
click Windows CE Inbox Transfer on the Microsoft
Outlook Tools menu.
2.
Tap Copy or move selected messages to your
computer then click the Browse button.
3.
Select the offline folder that contains the messages you
want to transfer to your computer, then click OK.
4.
Click the Transfer button and select the folder you
want to transfer the messages to or, click New Folder
to create a new folder. Click OK to transfer the
messages. Now you must transfer the messages from
your computer to the WA 3050.
5.
Tap Tools then New Folder and create a folder for the
messages you are going to transfer in Inbox on the
WA 3050
6.
Select the messages you want to transfer in Outlook on
your computer.
7.
Connect your WA 3050 device to your computer then
click Windows CE Inbox Transfer on the Outlook
Tools menu.
8.
Tap Copy selected messages to your mobile device
then click the Browse button.
9.
Select the offline folder on the WA 3050 to which you
want to transfer the messages, then click OK.
10. Click the Transfer button. The selected messages are
moved to the WA 3050.
272
Appendix D: Supported GSMstandard MMI key sequences
GSM standard MMI (man-machine interface) sequences
are keypad commands that are required to work on all
GSM mobile phones. If you own a GSM phone, you may
be accustomed to making, answering, or rejecting calls
through the use of these sequences. The following table
summarizes the sequences supported by your WA 3050
device.
Key sequence
0
1
1X
What it does
§
Rejects an incoming call when
there is a call on hold and/or one
in progress
§
Terminates a call on hold by
itself or when there is a call in
progress and one on hold
§
Releases the active call
§
Releases the active call and
answers any incoming call
§
Answers an incoming call when
there is a call on hold
§
Answers an incoming call and
releases active call
§
Releases an active call and
retrieves a call on hold
§
Releases active call “X”. If call
is a conference call, X=1 or 2
(call order number).
273
Key sequence
2
2X
3
N[N][N]#
What it does
§
Places the active call on hold
§
Places the active call on hold and
answers an incoming call
§
Answers an incoming call when
another call is on hold
§
Places the active call on hold and
makes a call on hold the active
call (swaps the state of each call)
§
Retrieves a call on hold
§
Places the active conference call
on hold except for party “X”,
where X=1 or 2 (order number)
§
Places the active conference call
on hold except for party “X”,
where X=1 or 2, when there is an
incoming call
§
Releases a call on hold. Any
incoming call is in call waiting.
§
Adds a call on hold to a
conference. Any incoming call is
in call waiting.
§
Makes a call from the directory
on the SIM card. “N[N][N]”
represents the location (index
number) of a number stored on
the SIM (range 1-255).
Use the Sync SIM utility on
the WA 3050 to obtain an index
number.
274
Key sequence
What it does
**04OLDPIN*
NEWPIN*
NEWPIN#
§
Changes the PIN when the phone
is in an idle state
**042*OLDPIN*
NEWPIN*
NEWPIN#
§
Changes the PIN2 when the
phone is in an idle state
**05*PUK*
NEWPIN*
NEWPIN#
§
Applies the PIN Unlock Key
(idle state only)
**052*PUK2*
NEWPIN2*
NEWPIN2#
§
Applies the PIN Unlock Key2
(idle state only)
275
Appendix E: Hardware specifications
E.1
System specifications
Feature
Model
WA 3050
Processor
206 MHz StrongARM SA1110
Memory
16-32 MB RAM, 16-32 MB flash
Display
60 x 80 mm monochrome LCD
240 x 320 pixels (1/4 VGA)
Backlight
Hardware and software controlled
backlight on/off
Audio
Microphone, headset, integrated handsfree speaker, stereo headphone jack,
MP3 compatible
Phone
GSM dual band M42
3 + 1 GPRS
Infrared
IrDA, up to 115.2 kbps
Communications
Serial port, optional CompactFlash
Type I card accessory, Infrared port,
serial cradle, and USB cable (optional)
Notification
alarms
Red and amber LEDs, audio prompts,
pop-up messages, ringing and vibration
Battery charge
light
Flashing/solid amber LED
Main battery
920mAh Lithium/Polymer
Backup battery
CR2016
277
E.2
Physical specifications
Feature
Model
WA 3050
Height
16.8 mm
Width
81 mm
Length
136 mm
Weight
180 g
Application
buttons
4
278
Glossary
Action button
The button that carries out a specified action, similar to the
ENTER key on a keyboard.
active call
The currently active call of all calls in progress. Call details
are displayed in the message area.
ActiveSync
The desktop computer program used to synchronize,
transfer, and manage information and files between your
mobile device and desktop computer.
backup file
A duplicate copy of program data. This file does not
include settings and information stored in ROM, such as
factory-installed software. Use your backup file to return
your device to its previous state if data is damaged or
destroyed, or if you clear memory.
baud rate
The speed at which a modem transmits data.
call barring
A service that prevents you or another individual from
using your phone to make or receive different types of
calls.
call-barring password
A code required to modify call-barring settings.
279
call blocking
See call barring.
call forwarding
The rerouting of incoming calls to a different phone
number by choice, when a line is busy, or when no one
answers a call.
call in progress
Any call that has an entry in Call Status.
Call Log
A feature that enables you to view up to 20 of the last
incoming, (ç), outgoing (è), or missed (x) calls with
options for redialing a number, viewing summary-level
Contacts information, or creating a new Contacts entry.
Call Status
A feature that enables you to monitor the status of all calls
in progress (up to four at a time) and to perform actions
based on the types of calls and available options.
call waiting
A service that informs you of an incoming call during a call
in progress.
caller ID
A service that lets you know who’s calling by displaying
the number of the caller on your phone.
carrier
Your mobile telephone service provider.
280
clear memory
A process that erases all data stored in RAM.
COM port
See communications port.
communications port
A serial communications port used to connect equipment,
such as mobile devices, modems, and printers.
CompactFlash card
A type of modem, network, or storage card that you can
plug into your device. This card conforms to the
CompactFlash specification.
conference call
A call in which three parties participate simultaneously.
connection
The ability to interact with another device, computer, or the
Internet by means of a serial, IR, network, or dial-up
connection.
cradle
An accessory that connects your WA 3050 device to
external power for recharging and to your PC or notebook
for synchronization or communication when the WA 3050
is configured for use as a modem. The cradle incorporates a
serial cable for compatibility with all versions of the
Windows operating system, including Windows NT. A
USB cable is available as an optional accessory.
281
currently active call
A call whose details are visible in the message area. Any
call that has an entry in Call Status can become the
currently active call.
desktop computer
A computer, running Microsoft Windows 95/98 or
Windows NT to which you connect your mobile device to
exchange information via synchronization, copying, or
moving.
DHCP
Dynamic Host Configuration Protocol.
dialing screen
The screen displayed when you power on your phone. You
can press or tap the soft keys on this screen to place a call
or select a call function. See soft dialing pad.
direct connection
A connection between your device and another computer
by means of a serial cable or IR ports.
double call
See call waiting.
download
The process of transferring data from a server to your
mobile device.
drawing
The action of using the stylus to draw directly in a note or
document.
282
drawing mode
A mode in Pocket Word where you draw using the stylus.
In Pocket Word, you select this mode from the View menu.
This mode does not exist in Notes.
DTMF
(Dual Tone Multi-Frequency) The sounds you hear when
you dial a telephone number.
e-mail
Messages and other items that you send and receive with
Inbox.
external power supply adapter
A piece of equipment that provides external (not battery)
power to your device.
field
A space in an on-screen form where you can enter a
specific item of information.
file conversion
The process of converting Windows-compatible files on
your desktop computer to Windows CE-compatible files on
your device, and vice versa.
fixed dialing numbers
A list of the only numbers your phone is allowed to call if
fixed dialing is activated. A PIN2 is required to activate,
deactivate, or edit the contents of the fixed dialing list.
GPRS
(General Packet Radio Service) A high-speed wireless data
connection for GSM phones.
283
GSM
(Global System for Mobile communication) The type of
mobile communications system used by your phone.
GSM standard MMI key sequence
A dialing sequence completed by pressing one of the
numeric keys on the soft dialing pad one or more times,
followed by pressing the
key. These sequences
support the GSM standard for making, answering, or
rejecting calls.
guest
A temporary connection between a desktop computer and a
device for the purpose of viewing, copying, and moving
files.
handset
The WA 3050 mobile phone.
handset mode
The mode in which you normally use your phone by
holding it to your ear.
hands-free mode
The mode in which you use your phone when the
speakerphone has been activated.
handwriting recognition software
An input method that turns the characters you write into
typed text.
284
HTML
(Hyper Text Markup Language) The language in which
Web pages are encoded.
IMEI
(International Mobile Equipment Identity) A number that
uniquely identifies your phone.
IMAP4
(Internet Mail Access Protocol) An e-mail protocol.
Inbox synchronization
A feature in Windows CE Services that enables you to
synchronize mail between your device and desktop
computer. Your computer must be on and running
Microsoft Exchange 5.5 or Outlook 97 or later.
Inbox Transfer
A feature in Microsoft Outlook and Microsoft Exchange
that enables you to transfer specific e-mail messages
between your device and desktop computer.
incoming call
A call received by your phone.
index number
The location (position) of a phone number stored on the
SIM card.
input method
A method for entering data on your device. Examples of
input methods include the soft keyboard, handwriting
recognition software, and the soft dialing pad.
285
Input Method arrow
The arrow, located to the right of the Input Panel button,
used to select a different input method.
input panel
The area at the bottom of the device screen that is used to
enter data. Data can be entered using any available input
method.
Input Panel button
The button, located on the far right of the taskbar, used to
display and hide the input panel.
Internet connection
A connection between your device and a server that
provides access to the Internet, typically through an
Internet service provider.
Internet service provider (ISP)
A company that provides Internet access.
IR (infrared) connection
A connection between your device and another computer or
device (such as a printer) by means of the IR port on each
device.
IrDA
(Infrared Data Association protocol) A standard for
infrared communication between PCs and other devices.
ISP
Internet Service Provider.
286
item
An entry in a list that, when tapped, opens the associated
entry with more details displayed.
LA
(Location Area) A group of cells in a GSM network served
by a single Mobile Services Switching Centre (MSC).
LAI
(Local Area Identity) A number that identifies a Location
Area (LA) in a GSM network.
LCD
(Liquid Crystal Display) The technology associated with
small display screens found in many handheld “smart”
devices such as PDAs, calculators, and mobile phones.
LED
(Light emitting diode) An electronics component that emits
light of a specific color when a current is passed through it.
main memory
The RAM built into the device hardware.
message area
A window on the dialing screen that makes information
about the currently active call visible.
message header
A line of summary information, such as sender and subject,
for an e-mail message.
287
microbrowser
A browser that enables you to access Internet content and
services from wireless clients such as mobile
“smartphones” and WAP-enabled PDAs.
MMI
Man-machine interface.
modem connection
A connection between your device and a remote computer
by means of a modem. You can connect to an ISP, a
network, or a modem attached to a PC.
MP3
(MPEG Audio Layer 3) A popular format for audio files.
MS Character Recognizer
The name of the handwriting recognition software installed
on your device. Character Recognizer, unlike Transcriber,
recognizes print characters only.
MS Transcriber
The name of the handwriting recognition software included
on the ActiveSync 3.1 CD. Transcriber recognizes print
characters and cursive writing.
multi-conferencing
See conference call.
navigation bar
The bar at the top of the screen that contains the Start
menu, program title, and status information.
288
network card
A card, inserted into the device, used to connect to a local
area network.
network (Ethernet) connection
A connection between your device and a remote computer
by means of a local area network.
offline favorite content
A feature of Internet Explorer 5 that downloads Web
content on a user-specified schedule and stores it locally so
that it can be viewed even when the user is not connected
to the Internet. This content can be downloaded to the
device during synchronization.
outgoing call
A call made from your phone.
partnership
The settings on your desktop computer and mobile device
that allow information to be synchronized, as well as
copied or moved between the computer and device. Your
mobile device can have partnerships with two desktop
computers.
PDA
(Personal Digital Assistant) A small, often handheld, device
that provides organiser and mobile computing capabilities.
PDAs have LCD screens and some form of pen or keyboard
input. Some offer Web browsing and e-mail.
PDA component
Hardware and software features that, collectively, define
WA 3050 organiser and pocket computing functions.
289
personal information manager (PIM)
A program that stores and organizes information such as
appointments, contacts, and notes.
phone component
Hardware and software features that, collectively, comprise
the WA 3050 phone function.
PIM
See personal information manger.
PIN
(Personal Identification Number) A security code you will
need, if activated, to access most features of your cellular
phone service whenever you turn on your phone.
PIN2
A carrier-supplied security code required to activate fixed
dialing, to display call cost information in Call Status or the
Call Log, or to set cost limitations.
Pocket PC
The name of a class of devices powered by Microsoft®
Windows® CE 3.0.
POP3
(Post Office Protocol) An e-mail protocol supported by
most mail servers.
pop-up menu
The context menu that appears when you tap and hold an
item or object.
290
PPP
(Point-to-Point Protocol) The protocol that your device
uses to communicate with your Internet service provider’s
network server.
program buttons
Buttons that switch to specific programs on your device.
PUK
(PIN unlock key) A code that unlocks the use of your SIM
card. If you fail to enter a correct PIN or PIN2 after three
tries, your SIM card is blocked, and a PUK or PUK2 is
required to unlock it.
RAS account
(Remote Access Service) The network account that enables
your device to access your corporate network remotely.
Record button
A button that creates a recording when the button is held
down.
recording mode
A mode in Pocket Word and Notes where you create
recordings. In Pocket Word, you select this mode from the
View menu. In Notes, you select this mode by tapping the
Record button.
remote connection
A connection between your device and a remote computer
by means of a modem or network card.
reset
A process that causes your device to restart.
291
Reset button
A button that activates a reset when pressed.
restore
To return your device to the state it was in when it was last
backed up. This involves copying your backup data to your
device.
roaming
The use of telecommunications services outside the area
served by your carrier.
serial cable
A cable provided by your manufacturer to connect your
device to your desktop computer.
serial connection
A connection between your device and a desktop computer
or external modem by means of a serial cable or the cradle
accessory.
silent mode
The mode of operation after you turn off your phone’s
ringer.
SIM or SIM card
(Subscriber Identity Module) A smart card that identifies a
mobile phone in the GSM network, provides access to
carrier services to which you have subscribed, and contains
subscription information and storage space for phone
numbers and security codes.
292
Sync SIM
A utility you can use to: 1) update Contacts with names and
phone numbers stored on your SIM card; and 2) copy
names and phone numbers from Contacts to the directory
of names and numbers on your SIM card.
SMS
(Short Message Service) A service that utilizes the GSM
network for the delivery and receipt of short text messages.
In effect, SMS is an e-mail system for the mobile digital
network.
SMTP
Simple Mail Transport Protocol.
soft dialing pad
The input method on the dialing screen.
soft keyboard
An input method where you tap keys on a soft keyboard.
speakerphone
A feature that lets you make and answer calls in hands-free
mode.
Start menu (flag)
The menu in the upper left corner of the navigation bar that
lets you switch between programs and settings.
status LEDs
Small lights that flash when an event occurs that requires
your attention.
293
storage card
A card, inserted into the device, used to store device
information.
stylus
A pointing device, similar to a pen, used to make selections
(tap) and enter information on the touch screen.
synchronization
The process of comparing the information on your mobile
device with the corresponding information on your desktop
computer and updating either computer with the most
recent information.
tap
The action of using the stylus to quickly touch the device
screen to perform an activity (such as choosing an action
from a menu or opening an item). This action is analogous
to clicking with the mouse on a desktop computer.
tap and hold
The action of holding the stylus on the device screen to
open a pop-up menu. This action is analogous to rightclicking with the mouse on a desktop computer.
TCP/IP
(Transmission Control Protocol/Internet Protocol) The
protocol that your device uses to communicate remotely.
Today screen
A feature that displays current appointments, tasks, and
other information on your device.
294
touch screen
A touch-sensitive screen on your device that can recognize
the location of a touch on its surface (typically done by
using a stylus) and translate that touch into a desired action
(such as opening an item or moving the cursor).
Touch tones
DTMF tones.
typing
The action of entering text on the device, via the input
panel, using any input method (including handwriting
recognition software).
typing mode
A mode in Pocket Word and Notes where you enter text by
using the input panel. In Pocket Word, you select this mode
from the View menu. In Notes, you select this mode by
opening the input panel.
UCS2
(Universal Character Set 2) An international standard for
character coding in which every character is represented as
two bytes.
Up/Down control
A control (often a rocker switch) that enables you to scroll
through a list and select an item.
295
USB
(Universal Serial Bus) A standard for connecting
specialized devices, such as flat bed scanners, inkjet
printers, and game consoles, to desktop systems or to other
USB-connected devices. USB is not supported by
Windows NT.
VGA
The de facto standard for PC graphics display. Introduced
by IBM in 1987, VGA provides a resolution of 720 by 400
pixels in text mode and either 640 by 480 (with 16 colors)
or 320 by 200 (with 256 colors) in graphics mode.
vibrating alert
A method used to notify you of an incoming call that uses
vibration in addition to or instead of ring tones.
voice mail
A service provided by your carrier for storing and
retrieving voice messages left for you.
WAP
(Wireless Application Protocol) A standard used for
providing Internet content and services to wireless clients
such as cell phones equipped with WAP-enabled
microbrowsers.
WML
(Wireless Markup Language) The language in which WAP
content is encoded. WML represents a modified version of
HTML.
296
writing
The action of using the stylus to write words directly in a
note or document.
writing mode
A mode in Pocket Word and Notes where you enter text by
writing using the stylus. In Pocket Word, you select this
mode from the View menu. In Notes, you select this mode
by tapping the Pen button.
297
Index
B
and
keys
description
33
locking
83–84
turning the phone ON |
OFF
33
#
use in dialing
94, 274
use in dialing
275
use in dialing
63
*
+
A
accessories
25–26
Action button
33
ActiveSync
149–50
backing up data
250
creating a shortcut 221
sending and receiving
messages via
synchronization 129
transferring Palm-size
PC data
271
troubleshooting
17
alternates, list of
53
alternative list (Transcriber)
215
appointments
scheduling
152–54
Audio button
39
automatic redial
activating
72
auto-suspend time
shortening
255
backlight settings
adjusting
226
backup battery
precautions
243
backups
using ActiveSync
250
using File Explorer 249
battery
managing power levels
254
battery level indicator 38
battery pack
precautions
23, 243
buttons, hardware
and
keys 33
Action
33
PDA ON | OFF
33
program
33
Record
33
Up/Down control
33
Volume
33
buttons, soft
Audio
39
Call Log
39
Call Status
39
Contact
39
dialing screen
39
Input panel
48
Pen
51
Record (recording
toolbar)
56
C
cable connections
troubleshooting
263
299
Calendar
151–55
program icon
40
scheduling appointments
152–54
scheduling meetings154–
55
call barring
activating
88–89
call cost
showing
230
call forwarding
activating
74–75
call length
showing
229
Call Log
79–82
accessing
39, 81
button
39
deleting information
from
82
deleting when the phone
is turned off
230
overview
79–80
reviewing calls
81
Call Status
76–78
accessing
39, 77
button
39
monitoring calls in
progress
77
overview
76–77
switching to another call
78
viewing Contacts data 77
call waiting
activating
74
caller ID
blocking outgoing
73
reviewing settings
73
calling features, advanced
68–70, 274
dialing a number stored
on the SIM
274
making a call from
Contacts
69
300
rapid redial
68
selecting a call for rapid
redial
69
setting up a conference
call
70
viewing last number
dialed
68
calling features, basic 61–67
answering a call
64
ending a call
67
hands-free mode
66
making a call
62
making an emergency
call
63
making an international
call
63
muting the microphone
66
placing a call on hold 64
rejecting a call
64
silent mode (no ring) 66
speaker volume,
adjusting
65
turning the phone
ON | OFF
62
call-related features 71–75
accessing voice mail 72
automatic redial
72
blocking outgoing caller
ID
73
call forwarding
74–75
call waiting
74
reviewing caller ID
settings
73
calls
answering options 228
Character Recognizer267–
70
tips for using
53–54
tips for writing
characters
270
clock settings
adjusting
227
command bar
43
CompactFlash
memory card 244, 249
modem
264
companion programs 164–
76
Media Player
185–86
Microsoft Money 174–84
overview
164
Pocket Excel
171–73
Pocket Word
165–70
Reader
187–88
connections
connecting to an ISP
120–21
connecting to your
network
121–24
creating an Ethernet
connection to a
network
123–24
e-mail server
125–28
ending
125
getting help
128
overview
119
troubleshooting
ActiveSync
17
troubleshooting cable
problems
263
troubleshooting external
modem problems 260–
62
troubleshooting infrared
problems
259
troubleshooting network
problems
262–63
Contact button (dialing
screen)
39
Contacts
155–58
copying numbers to a
SIM card
97
creating entries 156–57
making a call from 69
program icon
40
saving a SIM entry to94–
95
saving all SIM entries to
95
contrast, display. See
display contrast
conventions
PC keyboard keys
16
terminology
16
typographical
16
cost limitations (phone)
activating
92
Cursive Recognizer
192
customisation, WA 3050
219–41
adding | removing
programs
236–38
adjusting the size of soft
keyboard keys
224
aligning the touch screen
225
assigning programs to
buttons
223
backlight settings
226
call answering options
228
call cost, showing
230
call length, showing 229
Call Log, deleting 230
clock settings
227
configuring your device
for use as a modem
239–41
device name, specifying
225
display contrast
227
GSM network
preferences
235
input speed and accuracy
224
new button menu
222
Pocket PC security
features
222–23
301
power settings
226
radio speed (GSM
network)
235
regional settings
227
ring tone and vibrating
alert
232–33
roaming order
236
screens and menus220–
22
showing available
networks
235
specifying personal
numbers
234
Start menu
220
system sounds and
reminders
224
Today screen
220
turning off the display
during a call
231
turn-on buttons
226
voice mail number,
specifying
234
volume, adjusting
224
D
data
backing up | restoring
249–51
backing up using
ActiveSync
250
transferring from a Palmsize PC
271–72
data call in progress
status icon
38
data communication. See
wireless data
applications
device name
specifying
225
dialing screen
Audio button
39
buttons
39
302
Call Log button
39
Call Status button
39
Contact button
39
illustration
37
message area
38
overview
37–39
soft dialing pad
39
status icons
38
turning off during a call
231
display
turning off during a call
231
display contrast
adjusting
227
drag
defined
34
drawing. See input
methods, drawing
drawings
selecting
55
DTMF tones
muting
93
E
e-mail server
connecting to
125–28
e-mail.
See Inbox
emergency calls
making
63
Ethernet
creating a network
connection
123–24
EzWAP. See WAP
browser
F
fax
annotating
117
configuring settings 104
deleting
248
managing
247–48
previewing
115
program icon
41
receiving
116
resending
118
sending
113–16
viewing
117
fax call in progress
status icon
38
fax notification
selecting a recording 103
File Explorer
57
accessing
58
using to "back up" files
249
using to move a program
221
files
backing up using
ActiveSync
250
making backup copies
using File Explorer
249
files and information
organising
57–58
Find utility
57
fixed dialing
activating
90–91
folders, e-mail
managing
135–36
Forget your password?
what you can do
257
G
GSM network preferences
selecting
235
GSM-standard MMI key
sequences
273–75
H
activating
66
status icon
38
handwriting recognition
See also Transcriber
control gestures 211–14
modes
209
personalising
204–6
hardware buttons
33
hardware buttons. See also
buttons, hardware
help
accessing
18
navigating
18
viewing all help files 18
I
icons, program. See
program icons
icons, status. See status
icons
Inbox
129–36
composing & sending a
message
133–35
managing messages &
folders
135–36
moving attachments 246
program icon
40
receiving messages 131–
33
sending and receiving
messages remotely 130
sending and receiving
messages via
synchronization 129
index number
94, 274
infrared technology
connection problems 259
sending and receiving
data
144
input methods
47–57
audio recording 56–57
hands-free mode
303
Character Recognizer
267–70
creating a drawing
54
Cursive Recognizer 192
dialing a number
62
drawing
54–55
Transcriber
189–216
typing using the input
panel
48
typing with the soft
keyboard
49
writing on the screen 50
input panel
48
input speed and accuracy
adjusting
224
international calls
making
63
international travel
guidelines
264
ISP
connecting to
120–21
L
Letter Shape Selector
210
M
Media Player
185–86
playlist manager
185
program icon
41
meetings
scheduling
154–55
memory
adjusting
244–47
clearing
254
memory management
adjusting storage and
program memory 244–
47
mobile favorites
139
message area
38
304
messages, e-mail. See
Inbox
messages, SMS. See SMS
microphone
muting
66
Microsoft Media Player for
Pocket PC. See Media
Player
Microsoft Money
overview
174
Microsoft Money 174–84
accessing
174
accounts
176–77
categories
178
configuring
183–84
creating & updating
investments 179–81
navigating
175–76
opening a new file 174
payees
178
proxy server
183
synchronising
181–82
transactions
178
views
175
Microsoft Reader. See
Reader
mobile channels
viewing
142
mobile channels
140
mobile favorites
creating
138–39
minimising memory 139
viewing
142
Mobile Favorites folder137
modem, external
troubleshooting
connection problems
260–62
modes of operation
31
N
navigation bar
42
network
connecting to
121–24
network connection
troubleshooting 262–63
network speed (GSM)
specifying
235
network, Ethernet
creating a connection
123–24
networks, wireless
showing available 235
new button menu
222
Notes
161–63
creating
162–63
program icon
40
notification
methods
46
notification light
turning off
256
notification, fax
selecting a recording 103
notification, phone. See
ring tone
notification, SMS
selecting a recording 103
O
online help.
See help
operation
modes of
31
owner information
specifying
222
P
password
if you forget it
257
PDA component
definition
16
PDA ON | OFF button 33
Pen button
51
phone
and
call barring
cost limitations,
activating
dialing screen
fixed dialing
hands-free mode
locking the
keys 33
88–89
92
37–39
90–91
66
and
keys
83–84
muting DTMF tones 93
muting the microphone
66
PIN code activation84–
85
PIN, changing
86
PIN2, changing
87
rapid redial
68
security features 83–93
silent mode, activating66
speaker volume,
adjusting
65
turning ON | OFF
62
Phone
program icon
40
phone component
definition
16
PIN code
activating
84
changing
86, 275
PIN2 code
changing
87, 275
playlist manager
185
Pocket Excel
171–73
program icon
40
tips
172
Pocket Internet Explorer
137–44
browsing the Web 143
deleting files and
clearing history 246
favorite links
137
mobile channels
140
305
mobile favorites 138–39
Mobile Favorites folder
137
program icon
40
viewing mobile favorites
and channels
142
Pocket Outlook
151–63
Calendar
151–55
Contacts
155–58
Inbox
129–36
Notes
161–63
overview
151
Tasks
158–61
Pocket PC security
customising
222–23
setting a password 223
specifying owner
information
222
Pocket Word
165–70
drawing mode
169
overview
165–67
program icon
41
recording mode
170
typing mode
167–68
writing mode
168–69
pop-up menus
44
accessing
44
power
checking levels
243
managing 242–43, 254
power management
255
power settings
adjusting
226
power-on button settings
adjusting
226
program icons
description
40
program memory
adjusting
244–47
programs
adding | removing236–
38
assigning to buttons 223
306
list of installed programs
40
stopping | activating 248
switching among
41
PUK (PIN Unlock Key)
252, 275
when required84, 86, 87,
89, 91, 92
PUK2
275
R
radio speed (GSM network)
specifying
235
rapid redial
68
Reader
187–88
downloading books 187
guidebook
187
program icon
41
using the library
188
readme.txt
displaying
257
Record button (hardware)33
Record button (recording
toolbar)
56
recording toolbar
56
redial, automatic
activating
72
regional settings
specifying
227
regulatory notice
24
resource management
adjusting storage and
program memory 244–
47
backing up | restoring
data
249–51
checking the software
version
256
if you forget your
password
257
managing power 242–43
managing SMS & fax
247–48
monitoring phone usage
251–52
shortening auto-suspend
time
255
stopping | activating a
running program 248
turning off sounds 256
turning off the
notification light 256
ring tone
adjusting
232–33
downloading your own
232
ring tones
SMS & fax
103
RLP error correction 240
roaming order
customising
236
S
safety information 22–24
screen contrast
adjusting
227
security features, PDA. See
Pocket PC security
security, phone
83–93
call barring
88–89
cost limitations
92
fixed dialing
90–91
locking the
and
keys
83–84
muting DTMF tones 93
overview
83
PIN, activating
84–85
PIN, changing
86
PIN2, changing
87
security, Pocket PC
customising
222–23
setting a password 223
specifying owner
information
222
serial cable
25
setup procedures
20
shipping guidelines
265
signal strength and roaming
status icon
38
silent mode (no ring)
activating
66
status icon
38
SIM (card)
about
21
adding an entry
95–96
copying numbers from
Contacts to
97
deleting an entry
96
dialing a number stored
on the SIM
274
index number
94
modifying an entry
96
saving all entries to
Contacts
95
saving an entry to
Contacts
94–95
SMS
configuring
102–3
deleting
248
managing
247–48
modifying recipient
information
108
program icon
41
reading
108–9
recipients, specifying
additional
108
replying to
108–9
sending
106–8
service centre, selecting
103
UCS2 format 107, 109
SMS notification
selecting a recording 103
SMS service centre
selecting
103
307
soft dialing pad
39
software
checking the version 256
Solitaire
program icon
41
sounds
turning off
256
sounds and reminders,
system
adjusting
224
speaker
adjusting volume
65
status icons
battery level
38
data call
38
dialing screen
38
fax call
38
hands-free mode
38
signal strength and
roaming
38
silent mode
38
Today screen
36
voice call
38
voice mail
38
storage memory
adjusting
244–47
stylus
how to use
34
writing on the screen 50
Sync SIM. See SIM (card)
T
tap
defined
34
tap-and-hold
defined
34
Tasks
158–61
creating
159–60
program icon
41
To Do list.
See Tasks
Today screen
35–36
customising
220
308
illustration
35
status icons
36
touch screen
aligning
225
Transcriber
189–216
activating
191–93
adjusting settings 201–3
alternative list
215
control gestures 211–14
customising
201–6
dictionary
216
editing tools
206–14
features
190
handwriting recognition,
personalising
204
iconbar functions 207–11
keyboard
209
Letter Shape Selector
210–11
overview
189
program icon
41
recognition mode
209
selecting text
214
tutorials
193–200
writing orientation 208
travel guidelines
264
turn-on button settings
adjusting
226
U
UCS2
107, 109
Up/Down control button 33
usage guidelines
27–29
user assistance.
See help
V
vibrating alert
adjusting
232–33
voice call in progress
status icon
38
voice mail
accessing
39, 72
specifying a voice mail
number
234
status icon
38
Volume button
33
volume, phone speaker
adjusting
65
volume, system
adjusting
224
W
WA 3050
accessing help
18
adjusting storage and
program memory 244–
47
backing up | restoring
data
249–51
checking the software
version
256
clearing memory
254
components
19
configuring for use as a
PC modem 239–41
customisation. See WA
3050, customisation
entering information47–
57
GSM-standard MMI key
sequences
273–75
hardware buttons
33
hardware specifications
277–78
input methods
47–57
international travel
guidelines
264
managing power242–43,
254–56
managing SMS & fax
247–48
modes of operation 31
monitoring phone usage
251–52
notification methods 46
power management 255
programs
40
resetting your device 253
setup procedures
20
shipping guidelines 265
stopping | activating a
running program 248
transferring data from a
Palm-size PC 271–72
travel guidelines
264
troubleshooting 253–65
WA 3050 customisation.
See customisation, WA
3050
WAP browser
110–12
activating
110
configuring
105–6
deleting history and
temporary files 246
program icon
40
viewing a WAP site 112
Web
browsing
143
WinPhone See SMS or fax
wireless data applications
101–45
configuring fax
104
configuring SMS 102–4
configuring WAP 105–6
connecting to a network
121–24
connecting to an e-mail
server
125–28
connecting to an ISP
120–21
ending a connection 125
fax
113–18
Inbox
129–36
infrared transfer
capability
144
309
Pocket Internet Explorer
137–44
prerequisites for using
101
SMS
106–9
WAP
110–12
WML
111
World Wide Web. See
Web
310
writing mode
converting writing to text
52–54
displaying a list of
alternates
53
working in
51–52
writing orientation
controlling
208