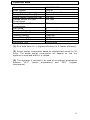
1
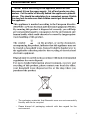
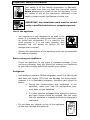
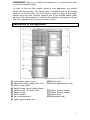
TRIO.BL 323 Litre 3 door combi frost free fridge freezer s USER MANUAL FOR YOUR BAUMATIC TRIO.BL 323 Litre 3 door combi frost free fridge freezer NOTE: This User Instruction Manual contains important information, including safety & installation points, which will enable you to get the most out of your appliance. Please keep it in a safe place so that it is easily available for future reference, for you or any person not familiar with the operation of the appliance. JW 13/09/12 2 Contents Environmental note 4 Important safety information 5-6 Specifications of your fridge freezer Description of the appliance Product features (fridge section) Product features (freezer section) 7-11 8 9-11 11 Using your Baumatic fridge freezer Before switching on During first use 12-13 12 12 Control panel Switching on the appliance Manually setting the temperature (fridge section) Manually setting the temperature (freezer section) Manually setting the temperature (chiller drawer) Switching on Zero Fresh mode Switching on Super Cool mode Switching on Super Freeze mode Switching on Energy Saving mode Switching on Intelligent mode Returning the appliance to normal operation Switching on the control panel lock Open door alarm Temperature rise alarm 13-18 14 14 14 15 15 16 16 17 17 18 18 18 18 Arranging and storing food in the fridge section 19-20 The **** freezer section Freezing fresh food Tips on freezing Storing commercially frozen food Defrosting frozen food In the event of power failure Normal operating noises Important user information 20-23 21 21 22 22 22 23 23 Saving energy when using your fridge-freezer 24-25 Cleaning and maintenance General cleaning Replacing the light bulb 25-27 25-27 27 Installation Electrical connection Positioning 28-30 28 29 Troubleshooting Baumatic consumables Technical data 30-31 32 33 Contact details 35 3 Environmental note Note: Before discarding an old appliance, switch off and disconnect it from the power supply. Cut off and render any plug useless. Cut the cable off directly behind the appliance to prevent misuse. This should be undertaken by a competent person. Disable the door lock to make sure that children cannot get stuck inside the appliance. o The packaging materials that Baumatic uses are environmentally friendly and can be recycled. o Please discard all packaging material with due regard for the environment. 4 Important safety information Your safety is of the utmost importance to Baumatic. Please make sure that you read this instruction booklet before attempting to install or use the appliance. If you are unsure of any of the information contained in this booklet, please contact the Baumatic Advice Line. IMPORTANT: Any installation work must be carried out by a qualified electrician or competent person. Use of the appliance o Your appliance is only designed to be used in the home. It is suitable for storing food that needs to be chilled and refrigerated. If it is used for any other purpose or it is not used correctly, then Baumatic Ltd. will accept no liability for any damage that is caused. o Altering the specification of the appliance must not be attempted for reasons of safety. Before using your appliance o Check the appliance for any signs of transport damage. If you notice any damage, then you should not connect your appliance to your mains supply and should contact your retailer. Refrigerant o Your appliance contains R600a refrigerant, which is a natural gas that does not contain CFCs that can damage the environment. However it is a flammable substance, therefore care should be taken: During the transportation and installation of the appliance, make sure that the refrigeration pipework does not get damaged. If it does become damaged then sources of ignition and open flames should be avoided. Also the room that the appliance is situated in should be thoroughly ventilated. o Do not place any objects on top of the appliance, as this may damage the table top. 5 Child safety o Packaging material should be kept away from children. o Children should not be allowed to touch the controls or play with the appliance. General safety o Do not pull on the power supply cable to remove the plug from your mains supply socket. o Do not pull out or insert the plug with wet hands. o Do not attempt to use your appliance outdoors or any place where it is likely to come into contact with the elements. o Before cleaning the appliance or performing maintenance work, ensure that the appliance has been disconnected from your mains supply. o Never allow the back coils of the appliance to come into contact with the wall surface. o Always ensure that the location where you are installing your appliance is free of stored items such as papers and other flammable materials. o Never block the ventilation openings of the appliance, either on the inside or its exterior. o It is vital to keep your appliance well ventilated, so that there is proper air flow between the bottom of the unit and the plinth/kick plate which it is sitting on. o Do not place electrical devices inside of the appliance, such as mixers or ice cream makers. o Do not store aerosol cans with a flammable propellant in this appliance. Service You should not attempt to repair the appliance yourself, as this could cause injury or a more serious malfunction. If you require a service call then please contact the Baumatic Customer Care Department. 6 Specifications of your fridge freezer Dimensions of your appliance o Height: o Width: o Depth: 1913 629 651 mm mm mm (excluding handles) Energy efficiency class o Energy class: A+ Cubic capacities o Total gross/net capacity: o Gross capacity (fridge/freezer): o Net capacity (fridge/freezer): 323/312 litres 244/79 litres 235/77 litres Specifications of the appliance o o o o o o o o o o o o o Frost free fridge and freezer Star rating **** Multi airflow cooling system Electronic temperature control Digital control panel Adjustable thermostat Fast cooling switch Fast Freeze switch Fast freeze indicator light Door open warning indicator Temperature rise warning indicator Adjustable feet Reversible door o o o o o o o o 2 1 1 1 1 2 1 1 Adjustable fridge safety glass shelves Salad crisper shelf (Safety glass) Salad crisper Chiller drawer Bottle rack General door racks Butter and cheese compartment Egg rack o 2 Non-transparent freezer drawers o 1 Ice cube tray 7 IMPORTANT: When you install your appliance it is important to bear in mind its climatic rating. In order to find out the climatic rating of your appliance, you should check the rating plate. The rating plate is located inside of the fridge section, on the left side. You will need to open the door of the fridge section and you may need to remove one of the middle safety glass shelves. The rating plate will indicate the ambient temperature range that your appliance will function correctly within. Description of the appliance 1) 2) 3) 4) 5) 6) 7) 8) 9) Light switch (door close) Adjustable safety glass shelf (x2) Interior side lights Salad Crisper cover (safety glass) Salad Crisper UV-fresh light Salad Crisper Chiller drawer Dairy compartment Upper general door rack 10) Bottle rack 11) Lower general door rack 12) 13) 14) 15) Upper freezer drawer Lower freezer drawer Power lead Adjustable feet 8 Description of the product features (fridge) Adjustable safety glass shelves o The shelves may be placed in any of the guide slots within the interior of the appliance. They are protected from sliding out. o To remove a shelf: Take off all of the items that are stored on the shelf that you want to remove. Then lift the back of the shelf and carefully pull it out of the grooves. Salad crisper drawer and cover o The crisper drawer is suitable for storing fruits, salad and vegetables. They are designed to keep the contents fresh for as long as possible. o The crisper cover helps to prevent fruit and vegetables from drying out prematurely, and can also be used as a shelf. o Care should be taken when storing tropical fruit (bananas and pineapples etc) and tomatoes. As these types of items can easily deteriorate at a lower temperature. o To remove the safety glass crisper cover, remove the salad crisper drawer, lift up the front of the shelf and then pull it towards you. Salad crisper with UV-light technology o The salad crisper drawer contains a unique UV light which helps to keep fruit and vegetables fresh for longer. o The UV light works by promoting photosynthesis and assists in locking in vitamins and nutrients by stimulating growth and slowing decay. 9 Chiller drawer o The chiller drawer has its own temperature regulation with a range from -2°C to 3°C enabling you to carefully chill foods to your required preference. o For the storage of fresh meat and fish, we would recommend that they are stored in a foil cover or a vinyl wrap at a temperature of approximately 0°C. o If used for chilling drinks, we would recommend that they are stored at approximately 2°C to 3°C o Care should be taken when storing tropical fruit (bananas and pineapples etc) and tomatoes. As these types of items can easily deteriorate in a lower temperature. IMPORTANT: You should only chill similar types of food in the chiller drawer at a time because different food types should be stored at different temperatures. This will help to avoid freezing liquid or inadvertent frost damage, etc. The dairy compartment o The top rack on the fridge door should be used to store eggs, butter, cheese, yogurts etc. IMPORTANT: You should take care not to trap your fingers when opening and shutting the cover of the dairy compartment. General door racks* o The door liners hold various racks, which are suitable for storing eggs, cheese, butter, yogurt, smaller packages, tubes, cans etc. Bottle rack* o The lower middle door rack should be used for storing reasonably sized bottles. o IMPORTANT: IT IS IMPORTANT THAT NONE OF THE SHELVES THAT SIT IN THE DOOR ARE OVERLOADED, AS THIS WILL DRASTICALLY REDUCE THEIR WORKING LIFE. 10 Door rack height adjustment* It is possible to adjust the height of the upper general door rack or the bottle rack. o Remove all items from the rack that you want to adjust the height of. o Hold both sides of the rack then lift it upwards and pull it towards you. o Place the rack back into the door at the height that you require and then push it downwards until it locates into position. *NOTE: By adjusting the position of the door racks you will increase / decrease the storage height of adjacent racks. Please adjust to your preference. Description of the product features (freezer) The freezer section consists of an upper and lower drawer. o The top freezer drawer contains an internal shallow storage tray which can be used to store smaller items or items which are more regularly used for ease of access. o Opening the top drawer will pull out both the drawer and the shallow tray. If you wish to retrieve or store something in the main compartment of the top freezer drawer then simply push the shallow tray back into the freezer allowing access to the main drawer. o Should you be storing something for a longer period of time or a larger item then we would recommend using the main drawer compartment, located below the top drawer tray or in the larger lower freezer drawer. IMPORTANT: DO NOT pull the drawers out with too much force, or overload them. As this may cause food to fall out when you are opening the drawer. 11 Using your Baumatic fridge freezer Before switching on o Remove all packaging materials before using the fridge freezer. This includes the foam base and all adhesive tape holding the refrigerator accessories in place both inside and outside the appliance. o Make sure that it has been installed by a suitably qualified person, as per the information contained in Baumatic’s installation instructions. o After delivery, wait for six hours before connecting the appliance to your mains supply. This means that any refrigerant gasses that may have been disturbed during the transportation process are allowed to settle. o The outside of the appliance and the removable accessories contained within it, should be cleaned with a solution of liquid detergent and water. o The interior of the appliance should be cleaned with a solution of sodium bicarbonate dissolved in lukewarm water. The interior and accessories should be thoroughly dried, after the cleaning process has been completed. o There can be an odour when you first switch on the appliance. It will lessen as the appliance starts to cool. During first use You switch on your appliance by connecting it to your mains supply and setting the thermostat. o When you first switch on the appliance, the compressor may run continuously for approximately 24 hours or until the fridge freezer reaches a cool enough temperature. o During this period of time, you should try not to open the door frequently or place a large amount of food within the appliance. o If the unit is switched off or unplugged, you must allow at least 5 minutes before reconnecting it to your mains supply. o If there is a power cut, the appliance will remember the temperature settings that were set previously. 12 Control panel The control panel is located outside the refrigerator and is used to control the fridge and freezer. Operation buttons A. Temp Area. Use this button to select either the fridge, freezer or chiller chamber. This button will also select the Super Cool (fridge) and Super Freeze (freezer) functions. B. Zero Fresh. Use this button to select the Zero Fresh function (chiller compartment). C. Mode. Use this button to select from Energy Saving mode, Intelligent mode (Auto) or none (user specified temperatures). D. Plus button (“+”). Increase selection button. E. Minus button (“-“). Decrease selection button. F. Child Lock. Use this button to lock the control panel from accidental misuse. Display icons 1. Fridge icon (REF.), chiller icon (CHILL), freezer icon (FRZ.) 2. Temperature display 3. Alarm icon 4. Light Fresh icon 13 5. Super Cool icon 6. Super Freeze icon 7. Zero Fresh icon 8. Auto icon (Intelligent mode) 9. Energy Saving icon 10. Child lock icon Switching on the appliance o You switch on your appliance by connecting it to your mains supply. o When first turned on the appliance will automatically set the fridge to 5°C, and the freezer to -18°C. You can set the temperature in the fridge and freezer sections manually at any time. Manually setting the fridge temperature. o Press the ‘TEMP AREA’ button (A) once (or until the refrigerator icon (1) illuminates). o Then press the plus (D) or minus (E) button to adjust the temperature of the refrigerator. o The temperature will change 1°C each time the plus or minus button is pressed and will scroll through a range of 2°C to 8°C. The chosen temperature will take effect after 5 seconds. Manually setting the freezer temperature. o Press the ‘TEMP AREA’ button (A) three times (or until the freezer icon (1) illuminates). o Then press the plus (D) or minus (E) button to adjust the temperature of the freezer. o The temperature will change 1°C each time the plus or minus button is pressed and will scroll through a range of -16°C to -24°C. The chosen temperature will take effect after 5 seconds. IMPORTANT: The ambient temperature of the room, the temperature of food and the amount of food that has been placed in the fridge / freezer and how often the door is opened, will all affect the temperature being maintained by the appliance. 14 Manually setting the Chiller temperature. o Press the ‘TEMP AREA’ button (A) twice (or until the CHILL icon (1) illuminates). o Then press the plus (D) or minus (E) button to adjust the temperature of the chiller. o The temperature will change 1°C each time the plus or minus button is pressed and will scroll through a range of -2°C to 3°C. The chosen temperature will take effect after 5 seconds. Switching on Zero Fresh mode (Chiller drawer) This setting should be used if you want to chill something specifically at 0°C, such as fresh fish or meat. o Press the ‘ZERO FRESH’ button (B) on the control panel. The Zero Fresh icon (7) will illuminate. o The temperature will be set to 0°C until the mode is turned off or another temperature is set. NOTE: You can manually return the appliance to normal operation by unlocking the control panel (if required) and pressing the Zero Fresh button (B) once. The Zero Fresh icon (7) will turn off. You can also turn off Zero Fresh mode by manually selecting a temperature for the Chiller as outlined above. Ensure that the Zero Fresh icon (7) is off. 15 Switching on Super Cool mode (Refrigerator) This setting should be used if you want to chill something quickly, it will ensure that a powerful supply of cold air enters the fridge section. o Press the ‘TEMP AREA’ button (A) once on the control panel (or until the refrigerator icon (REF.) is highlighted on the display (1). o Press the ‘TEMP AREA’ button (A) for 3 seconds on the control panel (or until the Super REF. icon (5) is highlighted on the display). o The temperature will be set to 2°C for 2.5 hours. NOTE: You can manually return the appliance to normal operation by unlocking the control panel (if required) and pressing the TEMP AREA button (A) once (or until the fridge chamber has been selected (REF.) on the control panel (1). Press TEMP AREA button for 3 seconds or until the Super REF. icon (5) turns off. IMPORTANT: You should not run the appliance in rapid cooling mode for prolonged periods. After the food is sufficiently chilled you should allow the appliance to return to normal operation. Switching on Super Freeze mode This setting should be used before and whilst you are freezing fresh food, it will ensure that a powerful supply of cold air enters the freezer section. o Press the ‘TEMP AREA’ button (A) three times on the control panel (or until the freezer icon (FRZ.) is highlighted on the display (1). o Press the ‘TEMP AREA’ button (A) for 3 seconds on the control panel (or until the Super FRZ. icon (6) is highlighted on the display. o The temperature will be set to -24°C for 6 hours. NOTE: You can manually return the appliance to normal operation by unlocking the control panel (if required) and pressing the TEMP AREA button (A) three times (or until the freezer chamber has been selected (FRZ.) on the control panel (1). Press TEMP AREA button for 3 seconds or until the Super FRZ. icon (6) turns off. IMPORTANT: This mode should only be used prior to and when freezing fresh food. You should not run the appliance in fast freeze mode for prolonged periods. 16 Switching on energy saving mode This setting should be used if you wish to save energy when using your appliance. It will increase the temperature slightly in the fridge and freezer sections to save energy. o Press the ‘MODE’ button on the display to turn energy saving mode on and off. o Pressing the ‘MODE’ button will scroll through: ‘AUTO’ (Intelligent mode) - Energy Saving mode - None o When it is on the energy saving symbol (9) will be illuminated. The fridge will be set to 7°C and the freezer to -15°C. IMPORTANT: You should not run the appliance in energy saving mode if you want to freeze fresh food in the freezer section. Before attempting to freeze fresh food you should return the appliance to normal operation and use the fast freeze mode. Switching on intelligent mode (AUTO) This setting should be used if you want your appliance to regulate its own temperature. It will set and maintain a normal/standard temperature range for each chamber. o Press the ‘MODE’ button on the display to turn intelligent mode on and off. o Pressing the ‘MODE’ button will scroll through: ‘AUTO’ (Intelligent mode) ~ Energy Saving mode ~ None o When intelligent mode (AUTO) is selected the intelligent mode symbol (8) will be illuminated. The fridge will be set to 5°C and the freezer to -18°C. 17 Locking and unlocking the control panel The control panel lock prevents the accidental misuse of the control buttons/functions. o Press the ‘CHILD LOCK’ button (F) for three seconds to lock the control panel. The Child lock icon (10) will illuminate on the control panel. o Press and hold the ‘CHILD LOCK’ button (F) for 3 seconds to unlock the control panel. The Child lock icon (10) will turn off. NOTE: The control panel will automatically lock after 20 minutes of inactivity. IMPORTANT: If the control panel is locked when buttons are pressed then the lock icon (10) will flash and beep but no action will be taken until the control panel is unlocked. Returning the appliance to normal operation o Please see the relevant section for turning operational modes on/off. o IMPORTANT: If you have fast freeze and rapid cooling modes active simultaneously, then you will need to cancel them separately. o Manually changing the temperature or setting a new function will deactivate any relevant operating mode. Door left open alarm (fridge) o If the fridge door is left open for more than 90 seconds then an alarm will sound once per second and the temperature display will show error code “Ed”. o Closing the door and pressing any button will stop the alarm. Temperature rise alarm (freezer) o If the internal temperature of the freezer rises above -8°C for over 6 hours then an alarm will sound and an error code “E9” will show on the temperature display. o Ensure that the freezer drawers are closed properly. Once the freezer temperature falls below -12°C the alarm will stop. o Pressing any button will stop the alarm for 30 minutes, or permanently if/when the temperature falls below -12°C. 18 NOTE: When you hear the audible alarm, you should immediately check that all of the doors/drawers are closed properly. IMPORTANT: Once you have ensured the doors/drawers are closed properly, please wait for the fridge/freezer to cool. If the temperature does not lower and/or the alarm continues to sounds after 1 hour following the doors/drawers being closed, then you should contact the customer service department. Arranging and storing food in the fridge section o Warm food or evaporating liquids should not be stored in your refrigerator, as this will increase the humidity inside of the appliance. o All foods should be wrapped or covered, this is particularly important if the food has a strong flavour. You should use polythene bags or sheets, aluminium foil, wax paper. Liquids should be stored in covered containers or bottles. o To maximise the space inside of the fridge section, any excessive packaging on the food should be removed. o Quickly perishable food should be stored at the back of the refrigerator, which is the coldest part of the appliance. o No food items should be allowed to come into contact with the back wall of the refrigerator. o Make sure that you arrange food in such a way that the door can close completely. Particular attention should be given to bottles that may protrude when placed on shelves inside the main section of the refrigerator. o Some organic solutions, such as the oils in lemon/orange peel and acid in butter, can cause damage to the plastic parts contained inside of the refrigerator. o Do not open the refrigerator door too often or leave the door open for long periods of time, as this will increase the temperature inside of the appliance. o Meat should be wrapped in polythene bags and then placed on the glass shelf above the salad crisper drawer or in the chiller drawer. 19 o Cold dishes/cooked food should be covered and can be placed on any shelf. o Fruit and vegetables should be cleaned thoroughly and placed in the salad crisper drawer. o Cheese and butter should be placed in airtight containers, or they can be wrapped in aluminium foil or polythene bags. As much air as possible should be removed from the bags. o Milk bottles should have a cap on them and be stored on the bottle rack that sits in the door. o Garlic, potatoes, onions and bananas should only be stored in a refrigerator IF they are stored in airtight containers. The **** freezer section The freezer section is suitable for storing and freezing food. o The freezer section temperature must have already reached -18 degrees centigrade (or lower) before you attempt to store food that is already frozen or freezing fresh food. o The freezer section is only able to freeze a certain quantity of fresh food at one time. The maximum amount of fresh food (in kilograms) that can be frozen in a 24 hour period is 12 kg. o Warm food should be allowed to cool down before you attempt to freeze it. If you place warm food in the freezer section, then the increased humidity will cause quicker ice formation and increase the amount of power that the appliance uses. o The guidance of the food manufacturer should be followed, in regard to the maximum storage time. o Thawed foods must not be frozen for a second time. 20 Freezing fresh food o To freeze fresh food you should set the freezer to super freeze mode (see page 16) 6 hours prior to attempting freezing. o Once you have added the food, you should then run the super freeze mode again for another 6 hours. o Fresh food should be packed into airtight containers or packaging. This will help to make sure that the food doesn’t dry out or lose its flavour. It will also ensure that flavour does not transfer from other foods. o Do not allow fresh food to touch items that are already frozen. o After 6 hours you should check that the fresh food is satisfactorily frozen. If it is then you should allow the appliance to return to normal temperature settings. If it is not, then run super freeze mode for another 6 hours. Tips on freezing o Freezer bags, polythene wraps, aluminium foil (extra thick) and special cans for frozen foods are suitable packaging for storing frozen goods in. o Tape, rubber bands or plastic clips are suitable for sealing bags and wrappings. o Before sealing a suitable bag, you should compress the air out of it, as this will help the food to freeze more easily. o Flat packages freeze more easily. o If you are freezing liquid, then do not fill the container to the brim. Liquids will expand when being frozen. o Do not place bottles (glass or tin) containing liquids (especially sparkling liquids) into the freezer as this could cause the bottle to burst during freezing. 21 Storing commercially frozen food o The storage time and recommended temperature for storing commercially frozen foods are indicated on the packaging. o Always follow the manufacturer’s instructions for storage and use of frozen food. o When shopping, be careful to choose food which is adequately packed and is provided with complete storage instructions. It should have been stored in a freezer where the temperature does not rise above -18°C. o Do not buy packages of food that are covered with frost. This could indicate that the package has thawed at least once before. o Take care that your frozen food packages do not start to thaw before you place them in your freezer. This will shorten the length of time that you can safely store the food for. Defrosting frozen food o Partially thawed or defrosted foods should be used as soon as possible. o Cold air preserves the food but it does not destroy the micro organisms which rapidly activate themselves after defrosting and make foods perishable. o Partial defrosting reduces the nutritional value of food, especially fruits, vegetables and readymade meals. In the event of a power cut o If there is a power cut, then food inside of the appliance will remain at a safe temperature for approximately 13 hours. o If the power cut is short, then the best place to leave the frozen food is inside of the freezer compartment. Particularly if there are ice cubes inside the of the upper freezer drawer, as this will help to maintain the temperature. o If there is a prolonged power cut, then you may need to remove food from the freezer section and store it in a cold place. To preserve the temperature, you should wrap the food in layers of newspaper. o Once power is restored, if the food has not started to defrost, then it should be returned to the freezer section. 22 o If any of the food has started to defrost, then you should not return it into the freezer section, it should be consumed within a short period of time. o The appliance will return to normal operation and will remember the previously set modes/temperatures for each chamber. Please check that any operational modes are displayed on the control panel. Normal operating noises Ice cracking noise o Can be heard during the automatic defrosting process. Short cracking noise o Can be heard when the thermostat turns the compressor on and off. Compressor noise o There will be an operating noise when the compressor is running. o After installation, the compressor may be noisier for a short period of time. Bubbling and burbling sound o This noise is emitted as the coolant flows through the pipework within the fridge. Water flowing sound o This is caused by water flowing into the evaporating tray during the defrosting process and can be heard whilst the fridge is defrosting. Important user information IMPORTANT: Care should be taken to make sure that the airflow duct vents on the rear interior wall of the fridge and freezer sections are not blocked. IMPORTANT: If your mains power supply fails, then the food inside of the freezer section will be preserved for a 13 hour period. After 13 hours the food should be removed from the freezer section and consumed as quickly as possible. 23 Saving energy when using your fridge-freezer Installing: o Install the appliance in a cool position. If it is placed in direct sunlight or next to an oven or other heat source, the energy consumption can increase substantially. o Ensure the appliance is installed with the correct ventilation requirements. Restricting ventilation can increase the energy consumption by 15%. Cleaning and Maintenance: o Occasionally clean the condenser coils (if present) at the back of the appliance to maintain a high performance level. o Clean the door gasket with warm water or a neutral detergent that leaves no residue. A tight-sealing door gasket is critical to the efficiency of your appliance. Usage: o Do not open the door repeatedly or more frequently than you have to. o Do not set the thermostat too low. A change of just one degree can effect the energy consumption by 5%. Use a thermometer to check the temperature. o The freezer compartment should operate at -15 to -18 degrees Celsius. The refrigerator should operate at around 3 to 4 degrees Celsius. o Allow food to sufficiently cool before putting it in the appliance (but don’t let it sit at room temperature for too long). o In the freezer compartment, food packages should be scattered and never grouped or stacked together until they are completely frozen. o If you are going away for a long period of time, turn off the appliance, empty and clean it and leave the door ajar. o If you have a second appliance that is not used, make sure that it is stored with the power off and the door left ajar until it is actually required. 24 Disposing: o If you're going to throw out your old fridge, see if there's a chlorofluorocarbons (CFCs) recycler in your area. The government department which looks after the environment in your area may be able to help you. Cleaning and maintenance WARNING: PLEASE ENSURE THAT YOUR APPLIANCE IS DISCONNECTED FROM YOUR MAINS SUPPLY BEFORE ATTEMPTING TO CLEAN IT. o Do not clean the appliance by pouring water onto it or spraying water over it. o The refrigerator and freezer section should be cleaned periodically, using a solution of bicarbonate of soda and lukewarm water. o Clean the accessories separately with soap and water. Do not clean them in a dishwasher. o Do not use abrasive products, detergents or soaps. o After washing the appliance, wipe over the area that you have cleaned with a damp cloth and then dry it thoroughly. o When cleaning is complete, dry your hands and then reconnect the plug to your mains supply. IMPORTANT: Before attempting any of the cleaning steps shown below, you should remove all items from the shelves and sections that you are cleaning. 25 Fridge and freezer sections Door rack o To remove a door rack: Take off all of the items that are stored on the shelf that you want to remove. Pull the shelf upwards (1) and then carefully pull it away from the inside of the door (2). Fridge shelves o To remove a shelf: Take off all of the items that are stored on the shelf that you want to remove. Then lift the back of the shelf and carefully pull it out of the grooves. Salad crisper drawer o To remove the drawer, lift up a little and pull forward. Chiller Drawer o To remove the drawer, lift up a little and pull forward. Freezer Drawers o To remove a freezer drawer container: Take out all of the items that are stored in the drawer container that you want to remove. Grip the top edge of the drawer and carefully pull it upwards out of the drawer. 26 Interior parts o Use a cloth that has been wetted with water and mild (neutral) detergent and wipe over the interior parts of the appliance. Door seal o Use a cloth that has been wetted with water and mild (neutral) detergent and wipe around the door seal. Rear grill o At least once a year, remove any dust that has gathered on the grill at the rear of the appliance, using a vacuum cleaner. DO NOT USE ANY FORM OF ASOLINE (PETROL) OR BENZENE (BENZOL) THINNERS ON ANY AREA OF THE APPLIANCE. AS THESE CHEMICALS CAN DAMAGE THE SURFACES. The light bulb WARNING: This product is fitted with durable LED bulbs which last for approximately 10,000 hours. Therefore, there is no need to change the bulb unless it is faulty or damaged. If a bulb does need replacing, do not change the fuse or LED lamp on your own. Please call the Baumatic Customer Care Department to arrange an engineer visit. 27 Installation IMPORTANT: Before installation and usage read all the instructions and make sure that the voltage (V) and the frequency (Hz) indicated on the rating plate are exactly the same as the voltage and frequency in your home. The rating plate can be found behind the salad crisper drawers. The manufacturer declines all responsibility in the event of the installer failing to observe all the accident prevention regulations in force, which are necessary for normal use and the regular operation of the electric system. Electrical connection YOUR FRIDGE FREEZER IS INTENDED FOR FITTED AND PERMANENT INSTALLATION. We recommend that the appliance is connected by a qualified electrician, who is a member of the N.I.C.E.I.C. and who will comply with the I.E.E. and local regulations. o Your refrigerator comes supplied with a 13 amp plug fitted. If in future you need to change the fuse in this plug, then a 13 amp ASTA approved (BS 1362) fuse must be used. o The refrigerator should not share a multi-purpose socket with other electrical appliances. o The wiring in the mains lead is coloured as follows: Brown Blue Green and yellow Live Neutral Earth o As the colours of the wires in the appliance’s mains lead may not correspond with the coloured markings identifying the terminals in your spur box, please proceed as follows: The brown wire must be connected to the terminal marked “L” (live), or coloured red. The blue wire must be connected to the terminal marked “N” (neutral), or coloured black. The green and yellow wire must be connected to the terminal marked “E” (earth), or by the earth symbol, or coloured green and yellow. 28 o When the connection is completed, no stray strands or cut wire should be present. The cord clamp must be secured over the outer sheath. Positioning o It is advisable that your appliance is only installed in a location where the ambient temperature of the room, corresponds with the climate classification that is stated on the rating plate of your appliance. Your appliance may not function correctly if the ambient temperature falls outside of the following ranges. Climate classification Appropriate ambient temperature SN +10 to +32 degrees centigrade N +16 to +32 degrees centigrade ST +18 to +38 degrees centigrade T +18 to +43 degrees centigrade o Positioning the appliance requires two persons in order to avoid injuries or damage to the appliance. o Your appliance should not be located in direct sunlight or exposed to continuous heat or extremes of temperature (e.g. next to a radiator or boiler). If this is not feasible, then you should install an insulation plate between the appliance and the adjacent heat source. o You should check whether there is an electrical socket available, which will be accessible after your appliance is installed. o Place the appliance flatly and firmly on a solid base. The appliance is fitted with adjustable feet on the front side, which can be used to level the appliance. o The rear side of the appliance is fitted with wheels which facilitate the positioning of the appliance into its final location. o Anything positioned above the appliance must be at least 30 cm away to allow sufficient cooling of the condenser. You must allow a 10 cm gap either side of the appliance and a 15 cm gap to the rear. o If you are placing another cooling appliance next door to this product, then there must be a gap of at least 10 cm between the appliances. This will help to prevent condensation from forming. o Be sure to leave enough space for the opening of the door, to avoid damage to the appliance or personal injury. 29 Troubleshooting IMPORTANT: If your fridge freezer appears not to be operating properly, before contacting the Baumatic Customer Care Department, please refer to the checklist below. My fridge freezer does not appear to be working/there is no power to my appliance. o Check that the plug is fully inserted into the power socket. o Check that there is power to your mains supply (e.g. that there hasn’t been a power cut or that the fuse hasn’t blown). o Check that your mains supply voltage, corresponds to the voltage stated on the rating plate of your appliance. My fridge freezer appears to be performing poorly. o Check that the appliance isn’t overloaded and that food hasn’t been packed too tightly into it. o Either the fridge or freezer temperature is not set to a low enough temperature. You should set the fridge and/or freezer temperature to a lower temperature. o Ensure that the doors are closing properly and that the doors have not been opened for a prolonged period in error. o Ensure that there is adequate ventilation for your appliance. My fridge freezer is noisy. o The refrigerant gas that circulates the pipe-work of the appliance may make a slight noise, even if the compressor is not running. o If the noise worsens or the appliance gets louder than normal; check that it is levelled off correctly, that nothing is touching the rear of the fridge freezer and that nothing placed inside the appliance is rattling. 30 Ice has formed on the inner back wall of my fridge o Check that food has not been pushed too far back inside the appliance, so that it is in contact with the inner back wall. o IMPORTANT: It is normal to get some ice droplets forming on the back wall of the appliance. The formation of ice droplets does not indicate an appliance fault. The interior light is not working. o The interior light of the fridge is made up of LED lights and should be long lasting. Please contact the Customer Service Department. IMPORTANT: If your appliance appears not to be operating correctly, then you should disconnect it from your mains supply and then contact Baumatic Customer Care on telephone number (0118) 933 6911. DO NOT ATTEMPT TO REPAIR THE APPLIANCE YOURSELF. Please note that if an engineer is asked to attend whilst the product is under guarantee and finds that the problem is not the result of an appliance fault, then you may be liable for the cost of the call out charge. The appliance must be accessible for the engineer to perform any necessary repair. If your appliance is installed in such a way that an engineer is concerned that damage will be caused to the appliance or your kitchen, then he will not complete a repair. This includes situations where appliances have been tiled in, sealed in with sealant, have wooden obstructions placed in front of the appliance, like plinths. Or any installation other than the one specified by Baumatic Ltd. has been completed. Please refer to the conditions of guarantee that appear on the warranty card that you receive with the appliance. IMPORTANT: Baumatic Ltd. operates a policy of continuous improvement and reserves the right to adjust and modify its products without prior notification. 31 Baumatic consumables o BC001 Degreaser for Dishwashers (200g) o BC002 Descaler for Washing Machines and Dishwashers (200g) o BC003 Ceramic Hob Cleaner (250ml) o BC004 Oven Cleaner (250ml) o BC005 Stainless Steel Cleaner and Protector (250ml) o BC007 E-Cloth – General Purpose Cloth o BC008 Microwave Cover To order a Baumatic consumable product please call 0123 5437 244 and quote the product code. You can also order online from eshop.baumatic.co.uk 32 Technical Data Manufacturer Model Number Product Category Energy Efficiency Class (1) Annual Energy Consumption (2) Storage Volume of Fridge Compartment Storage Volume of Freezer Compartment Star Rating Frost Free Compartments Temperature Rise Time Freezing Capacity Climate Class (3) Noise Level Installation Type BAUMATIC LTD TRIO.BL 7 – Refrigerator-Freezer A+ 318 kWh 235 litres 77 litres 4 Fridge and Freezer 13 hours 12kg/24hr SN, N, ST 45 dB Freestanding (1) On a scale from A+++ (highest efficiency) to G (lowest efficiency). (2) Annual energy consumption based on standard test results for 24 hours. The actual energy consumption will depend on how the appliance is used and where it is located. (3) This appliance is intended to be used at an ambient temperature between “10°C” (lowest temperature) and “38°C” (highest temperature). 33 34 United Kingdom Baumatic Ltd., Baumatic Buildings, 6 Bennet Road, Reading, Berkshire RG2 0QX United Kingdom Sales Telephone (0118) 933 6900 Sales Fax (0118) 931 0035 Customer Care Telephone (0118) 933 6911 Customer Care Fax (0118) 986 9124 Spares Telephone (01235) 437244 Advice Line Telephone (0118) 933 6933 E-mail: [email protected] [email protected] [email protected] [email protected] Website: www.baumatic.co.uk Facebook: www.facebook.com/baumatic.uk Republic of Ireland Service Telephone 1-890 812 724 Spares Telephone 091 756 771 Czech Republic Baumatic CR spol s.r.o. Lípovà 665 460 01 Liberec 4 Czech Republic +420 483 577 200 www.baumatic.cz Slovakia Baumatic Slovakia, s.r.o. Panenská 34 811 03 Bratislava - Staré Mesto Slovakia +421 255 640 618 www.baumatic.sk Germany Baumatic Gmbh Bachstr.10-12 D-32 257 Bünde Deutschland +49 (0) 5223 99408 0 www.baumatic.de Italy Baumatic Italia S.R.L. Via Galvani N.3 35011 Campodarsego (PD) +3904 9920 2297 www.baumatic.it Holland Baumatic Benelux B.V. Dukdalfweg 15d 1332 BH ALMERE Nederland +31(0)36 549 1553 www.baumatic.nl 35 36