1
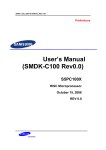
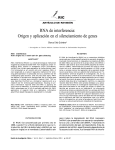
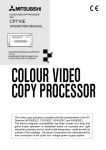
RT-12 Digital Gateway Owner’s Manual Manuel de l’utilisateur Bedienungsanleitung Manual de Instrucciones Gebruiksaanwijzing Manuale di istruzioni Instruktionsbok àÌÒÚÛ͈Ëfl ÔÓθÁÓ‚‡ÚÂÎfl Register your product at http://rotelradio.com RT-12 DIGITAL GATEWAY 2 This symbol means that this unit is double insulated. An earth connection is not required. RT-12 1 2 3 QUEUE BACK REPLY 4 5 6 PLAY STOP PAUSE 7 8 9 SKIP POWER 0 MEMORY NETWORK AUX FM DAB - SKIP + i-RADIO PUSH SELECT DAB Rotel products are designed to comply with international directives on the Restriction of Hazardous Substances (RoHS) in electrical and electronic equipment and the disposal of Waste Electrical and Electronic Equipment (WEEE). The crossed wheelie bin symbol indicates compliance and that the products must be appropriately recycled or processed in accordance with these directives. English Notice The rear mini USB connection should be handled by authorized persons only. FCC Information This equipment has been tested and found to comply with the limits for a Class B digital device, pursuant to Part 15 of the FCC Rules. These limits are designed to provide reasonable protection against harmful interference in a residential installation. This equipment generates, uses and can radiate radio frequency energy and, if not installed and used in accordance with the instruction, may cause harmful interference to radio communications. However, there is no guarantee that interference will not occur in a particular installation. If this equipment does cause harmful interference to radio or television reception, which can be determined by turning the equipment off and on, the user is encouraged to try to correct the interference by one or more of the following measures: • Reorient or relocate the receiving antenna.(TV, radio, etc.) • Increase the separation between the equipment and receiver • Connect the equipment to an outlet on circuit different from that to which the receiver is connected. • Consult the dealer or an experienced radio/TV technician for additional help. Caution This device complies with part 15 of the FCC Rules. Operation is subject to the following to conditions: (1) This device may not cause harmful interference, and (2) this device must accept any interference received, including interference that may cause undesired operation. NOTE TO CATV SYSTEM INSTALLER: Call the CATV system or antenna installer’s attention to Article 820-40 of the NEC. This provides guidelines for proper grounding and, in particular , specifies that the cable ground shall be connected to the grounding system of the building, as close to the point of cable entry as practical. See installation diagram. NOTE: This equipment has been tested and found to comply with the limits for a Class B digital device, pursuant to Part 15 of the FCC Rules. These limits are designed to provide reasonable protection against interference in a residential installation. This equipment generates and can radiate radio frequency energy and, if not installed and used in accordance with the instructions, may cause interference to radio or TV communications. There is no guarantee that interference will not occur in a particular installation. If this equipment does cause interference to radio or television reception, which can be determined by turning the equipment off and on, try to correct the interference by one or more of the following measures: • Reorient or relocate the receiving antenna. • Increase the separation between the unit and the television tuner. • Connect the unit to an AC power outlet on a different electrical circuit. • Consult your authorized Rotel retailer for assistance. 3 Important Safety Instructions WARNING: There are no user serviceable parts inside. Refer all servicing to qualified service personnel. WARNING: To reduce the risk of fire or electric shock, do not expose the unit to moisture or water. Do not expose the unit to dripping or splashing. Do not place objects filled with liquids, such as vases, on the unit. Do not allow foreign objects to get into the enclosure. If the unit is exposed to moisture, or a foreign object gets into the enclosure, immediately disconnect the power cord from the wall. Take the unit to a qualified service person for inspection and necessary repairs. Read all the instructions before connecting or operating the component. Keep this manual so you can refer to these safety instructions. Heed all warnings and safety information in these instructions and on the product itself. Follow all operating instructions. Clean the enclosure only with a dry cloth or a vacuum cleaner. Do not use this unit near water. You must allow a minimum 10 cm or 4 inches of unobstructed clearance around the unit. Do not place the unit on a bed, sofa, rug, or similar surface that could block the ventilation openings. If the unit is placed in a bookcase or cabinet, there must be ventilation of the cabinet to allow proper cooling. Keep the component away from radiators, heat registers, stoves, or any other appliance that produces heat. RT-12 1 2 3 QUEUE BACK REPLY PLAY STOP PAUSE POWER 4 5 7 8 0 6 9 MEMORY SKIP NETWORK AUX FM DAB - SKIP + i-RADIO PUSH SELECT WARNING: The rear panel power cord connector is the mains power disconnect device. The apparatus must be located in an open area that allows access to the cord connector. The unit must be connected to a power supply only of the type and voltage specified on the rear panel. (USA: 120 V/60Hz, EC: 230V/50Hz) Connect the component to the power outlet only with the supplied power supply cable or an exact equivalent. Do not modify the supplied cable. A polarized plug has two blades, with one wider than the other. A grounding plug has two blades plus a third grounding prong. These are provided for your safety. Do not defeat grounding and/or polarization safety provisions. If the supplied plug does not fit your outlet, please consult an electrician for replacement of the obsolete outlet. Do not use extension cords. The main plug of the power cord set is a disconnect device of the apparatus. In order to completely disconnect the apparatus from the supply mains, the main plug of the power cord set should be unplugged from the mains (AC) outlet. The stand-by LED indicator will not be lit up to show the power cord is unplugged. The disconnect device shall remain readily operable. Do not route the power cord where it will be crushed, pinched, bent, exposed to heat, or damaged in any way. Pay particular attention to the power cord at the plug and where the cord exits the back of the unit. The power cord should be unplugged from the wall outlet during a lightning storm or if the unit is to be left unused for a long period of time. Use only accessories specified by the manufacturer. Use only with a cart, stand, rack, bracket or shelf system recommended by Rotel. Use caution when moving the unit in a stand or rack to avoid injury from a tip-over. Immediately stop using the component and have it inspected and/or serviced by a qualified service agency if: • The power supply cord or plug has been damaged • Objects have fallen or liquid has been spilled into the unit • The unit has been exposed to rain • The unit shows signs of improper operation • The unit has been dropped or damaged in any way The batteries in remote control shall not be exposed to excessive heat such as sunshine, fire or the like. 4 Figure 1: 1 Controls and Connections Commandes et Branchements Bedienelemente und Anschlüsse Controlli e connessioni Controles y Conexiones De bedieningsorganen en aansluitingen Funktioner och anslutningar 鄇Ì˚ ÛÔ‡‚ÎÂÌËfl Ë ‡Á˙ÂÏ˚ 2 5 8 90- RT-12 1 2 3 QUEUE BACK REPLY 4 5 6 PLAY STOP PAUSE 7 8 9 SKIP POWER 0 MEMORY NETWORK AUX FM DAB - SKIP + i-RADIO PUSH SELECT 3 4 w 6 e r t q y u 7 i A B D F TUNE+ C E G ENT TUNE - H I J - PRESET + L K M RDS N MONO RR-T97 O = o English Figure 2: 5 Hook-up Illustration Branchements principaux Diagrama de Conexiones Schema di collegamento Anschlussdiagramm De in- en uitgangsaansluitingen Inkoppling èÓ‰Íβ˜ÂÌË PRE AMPLIFIER DIGITAL AUDIO DEVICE RT-12 DIGITAL GATEWAY 6 Figure 3: Rotel-Link Hook up (Black) and 12V Trigger (Gray) Digital Gateway RT-12 Amplifier RA-12 CD Player RCD-12 English 7 Important Notes When making connections be sure to: 4 Turn off all the components in the system before hooking up any components, including loudspeakers. 4 Turn off all components in the system before changing any of the connections to the system. It is also recommended that you: 4 Turn the volume control of the amplifier all the way down before the amplifier is turned on or off. Remarques importantes Pendant les branchements, assurez-vous que : 4 Tous les maillons sont éteints avant leur branchement, quels qu’ils soient, y compris les enceintes acoustiques. 4 Éteignez tous les maillons avant de modifier quoi que ce soit au niveau de leurs branchements, quels qu’ils soient. Il est également recommandé de : 4 Toujours baissez le niveau sonore via le contrôle de volume, avant d’allumer ou d’éteindre l’amplificateur. Wichtige Hinweise Achten Sie beim Herstellen der Verbindungen auf Folgendes: 4 Schalten Sie alle Komponenten im System ab, bevor Sie Geräte (einschließlich Lautsprecher) anschließen. 4 Schalten Sie alle Komponenten im System ab, bevor Sie Anschlüsse im System verändern. Ferner empfehlen wir, dass 4 Sie die Lautstärke herunterdrehen, bevor Sie den Verstärker ein- oder abschalten. Notas Importantes: Cuando realice las conexiones, asegúrese de que: 4 Desactiva todos los componentes del equipo, cajas acústicas incluidas, antes de conectar cualquier nuevo componente en el mismo. 4 Desactiva todos los componentes del equipo antes de cambiar cualquier conexión del mismo. También le recomendamos que: 4 Reduzca el nivel de volumen de su amplificador a cero antes de activarlo o desactivarlo. Héél belangrijk: Bij het maken van de verbindingen: 4 Zorg dat niet alleen maar de gehele installatie uitstaat, als nog niet alle verbindingen gemaakt zijn. 4 Zorg dat niet alleen maar de gehele installatie ook uitstaat, als u verbindingen gaat wijzigen. Wij raden u ook aan om 4 de volumeregelaar van de voorversterker geheel dicht te draaien (volkomen naar links) wanneer u uw eindversterker aan- of uitzet. Note importanti Quando effettuate i collegamenti assicuratevi di: 4 Spegnere tutti i componenti del sistema prima di collegare qualsiasi componente, inclusi i diffusori. 4 Spegnere tutti i componenti del sistema prima di modificare qualsiasi connessione nel sistema. Vi raccomandiamo inoltre di: 4 Portare il volume a zero prima di accendere o spegnere l’amplificatore. Viktigt Tänk på följande när du gör anslutningar: 4 Stäng av alla apparater i anläggningen innan du ansluter nya komponenter eller högtalare. 4 Stäng av alla apparater i anläggningen innan du ändrar någon anslutning. Vi rekommenderar också att du: 4 Vrider ner volymen helt och hållet innan förstärkaren slås på eller av. LJÊÌ˚ Á‡Ï˜‡ÌËfl è‰ ÔÓ‰ÒÓ‰ËÌÂÌËÂÏ: 4 Ç˚Íβ˜ËÚ ‚Ò ÍÓÏÔÓÌÂÌÚ˚, ‚Íβ˜‡fl ÍÓÎÓÌÍË. 4 Ç˚Íβ˜ËÚ ‚Ò ÍÓÏÔÓÌÂÌÚ˚ ‚ ‚‡¯ÂÈ ÒËÒÚÂÏÂ, ÔÂʉ ˜ÂÏ ˜ÚÓ-ÚÓ ‚ ÌÂÈ ÏÂÌflÚ¸. êÂÍÓÏẨÛÂÚÒfl Ú‡ÍÊÂ: 4 Ç˚‚ÂÒÚË „ÓÏÍÓÒÚ¸ ÛÒËÎËÚÂÎfl ̇ ÏËÌËÏÛÏ, Ô‰ ÚÂÏ Í‡Í ‚Íβ˜‡Ú¸ ËÎË ‚˚Íβ˜‡Ú¸ „Ó. RT-12 DIGITAL GATEWAY 8 Contents About Rotel Important Safety Instructions. . . . . . . . . . . . . . . . . . . . . . . . . . . . . . . . . . . . . . . . 3 Figure 1: Controls and Connections 4 Figure 2: Hook-up Illustration 5 Figure 3: Rotel-Link Hook up (Black) and 12V Trigger (Gray) 6 About Rotel. . . . . . . . . . . . . . . . . . . . . . . . . . . . . . . . . . . . . . . . . . . . . . . . . . . . . 8 Overview – the Rotel internet radio tuners/digital gateway products.. . . . . . . . . . 9 DAB and FM radio 9 Internet radio 9 Network access 9 The Rotelradio website – managing your stations 9 Playback from network servers 9 Getting Started. . . . . . . . . . . . . . . . . . . . . . . . . . . . . . . . . . . . . . . . . . . . . . . . . 10 Features 10 A Few Precautions 10 Placement 10 AC Power and Control . . . . . . . . . . . . . . . . . . . . . . . . . . . . . . . . . . . . . . . . . . . . 10 AC Power Input o 10 Power Switch and Indicator Light 1 10 2 12V Trigger Input i 10 12V Trigger Output i 10 Connection Overview. . . . . . . . . . . . . . . . . . . . . . . . . . . . . . . . . . . . . . . . . . . . . 10 DAB/FM Broadcasting w 10 DIGITAL INPUT-AUX t 11 Network Connection qr 11 UPGRADE USB mini socket y 11 OUTPUT e 11 ROTEL LINK u 11 Internet Radio. . . . . . . . . . . . . . . . . . . . . . . . . . . . . . . . . . . . . . . . . . . . . . . . . . 11 What you need before starting 11 First Time Connection To The Network 11 Selecting A Radio Station 12 Internet Radio Station Playing 12 Storing a radio station in a preset 12 Playing a preset radio station 12 Media Player. . . . . . . . . . . . . . . . . . . . . . . . . . . . . . . . . . . . . . . . . . . . . . . . . . . 13 UPnP Servers 13 Clear Queue 13 Playback Mode 14 FM RADIO. . . . . . . . . . . . . . . . . . . . . . . . . . . . . . . . . . . . . . . . . . . . . . . . . . . . . 14 FM Radio Station Playing 14 Storing a radio station in a preset 14 Playing a preset radio station 14 FM Settings Menu 14 RDS Button O 15 MONO Button O 15 DAB RADIO. . . . . . . . . . . . . . . . . . . . . . . . . . . . . . . . . . . . . . . . . . . . . . . . . . . . 15 DAB Radio Station Playing 15 Storing a DAB station in a preset 15 Playing a preset DAB station 15 DAB Settings Menu 15 Scan for Networks 16 Wired/Wireless 16 Configure “My Stuff”. . . . . . . . . . . . . . . . . . . . . . . . . . . . . . . . . . . . . . . . . . . . 16 Configure “My Stations”. . . . . . . . . . . . . . . . . . . . . . . . . . . . . . . . . . . . . . . . . . 17 Configure “My Streams”. . . . . . . . . . . . . . . . . . . . . . . . . . . . . . . . . . . . . . . . . . 17 Remote Unit Advanced Buttons. . . . . . . . . . . . . . . . . . . . . . . . . . . . . . . . . . . . . . 17 Troubleshooting. . . . . . . . . . . . . . . . . . . . . . . . . . . . . . . . . . . . . . . . . . . . . . . . . 18 Specifications . . . . . . . . . . . . . . . . . . . . . . . . . . . . . . . . . . . . . . . . . . . . . . . . . . 18 Our story began over 50 years ago. Over the decades, we have received hundreds of awards for our products and satisfied hundreds of thousands of people who take their entertainment seriously- like you! A Rotel was founded by a family whose passionate interest in music led them to manufacture high-fidelity components of uncompromising quality. Through the years, that passion has remained undiminished and the family goal of providing exceptional value for audiophiles and music lovers, regardless of their budget, is shared by all Rotel employees. Rotel’s engineers work as a close team, listening to, and fine tuning, each new product until it reaches their exacting musical standards. They are free to choose components from around the world in order to make that product the best they can. You are likely to find capacitors from the United Kingdom and Germany, semiconductors from Japan or the United States, while toroidal power transformers are manufactured in Rotel’s own factory. We all have concerns about our environment. And, as more and more electronics are produced and later discarded, it is especially important for a manufacturer to do all it can to engineer products that have a minimum negative impact on landfill sites and water tables. At Rotel, we are proud to do our part. We have reduced the lead content in our electronics by using special RoHS solder, while our new Class D (not digital) amplifiers are up to five times more efficient than our legacy designs and still deliver power and performance. These products run cool, give minimum wasted energy, are good for the environment and give better sound too. Finally, we have printed this brochure on recycled paper stock. While we understand that these are small first steps, they are still important ones. And we continue to pursue new methods and materials for a cleaner and greener manufacturing process. All of us at Rotel thank you for buying this product. We are sure it will bring you many years of enjoyment. English Overview – the Rotel internet radio tuners/ digital gateway products. 9 Registering the radio at www.rotelradio.com will allow you to search for and save internet radio stations, as well as set up other music services when available for your region. This Rotel product brings together conventional radio reception facilities for FM and DAB+, plus from the world of computers the ability to access literally thousands of radio stations available on the internet. In addition to this, this new range of Rotel tuners/digital gateways offers the facility to interface with your music files stored on a network server. The Rotelradio website – managing your stations Note: The internet radio and network server features will not operate without a local area network. The URL for this site is http://rotelradio.com. These notes expand on the detailed instructions later in this manual. DAB and FM radio This is the most conventional part of the product and if you have previous experience of tuning, memorizing and selecting radio stations from the present DAB+ and FM radio services you will be familiar with the way the tuner is operated to receive these services. All of this is explained under the relevant sections. Keep in mind to select the antenna (aerial) input socket to use, find this option in the set-up menu. This does not obviate the need to install correctly designed antenna (aerials) to maximise reception on FM and DAB+ services. Internet radio Using internet radio requires the use of two additional services – access to the internet via a computer network and once this works a feed via one of the internet-based services which allows access to internet radio stations. This latter requirement is built into the tuner; we will deal with access to your network first. Network access The installation of computer networks are beyond the scope of these notes, so we assume that you have a working LAN or Wi-Fi network in your home. At start-up, the unit looks for Wi-Fi networks, and once the search has been completed you will find one or more listed networks listed in the display to choose from. You need to select the network name which applies to your installation. This will have been assigned when your network was installed and is often pre-allocated by the router central to your network. The next requirement is to enable your tuner to ‘log-on’ to your network and you allow this by entering the wireless ‘WEP key’ (or WPA, WPA2 key) appropriate to your network. It is likely that you will have used the key code when setting up a computer to log onto your network and it is often contained in the instructions for your router. This is a first-time only setting, so just carefully scroll though the alpha-numeric characters selecting the correct upper or lower case characters to create your WEP key. When completed, scroll through to and select END or press the REPLY key on the front panel or remote, to complete the process. You can use the UP and DOWN keys of the remote to help you enter this information. Do not confuse the letter ‘O’ with the numeral ‘0’. When successfully logged on to your network, the tuner will automatically log in to the website where you to be able to select the area of the world that interests you and choose radio stations by country, genre and name. Managing the thousands of radio stations available via the internet would be impossible without being able to organise and manage stations to suit your particular needs. Rotel have provided an easy way to accomplish this by means of a dedicated website where you can pre-select stations. Like many websites you will need to register a user name and password in order to create an account on the site. Before you can do so, you will need to register the product on the site and there is a special registration key in the Rotel which you will need to copy to the website registration form. This registration key will be found under the settings>register menu. You need to be connected to the internet to access this one time only key. After registration, the website will show the radio serial number of your Rotel unit. This is different from the serial number of your Rotel unit. The radio serial number can be found in the menu of the Rotel unit under Settings --> Version. Note that to update the display of the Rotel to indicate your choices, you will need to power-cycle and re-select ‘internet radio’. Your new list of ‘My Stuff’ will be updated automatically. Playback from network servers Music playback from computers configured as music servers provides another opportunity to link replay via the Rotel unit and thus make use of the audiophile decoding stages designed into these products. As with internet radio, a prerequisite is a working network, plus the music server connected to it. A server will have been configured to share files and two methods of achieving this with appropriate software are shown under ‘Media Player’ section later in this manual. RT-12 DIGITAL GATEWAY 10 Getting Started AC Power and Control Thank you for purchasing the Rotel Digital Gateway. When used in a high-quality music or home theater system, your Rotel Digital Gateway will provide years of musical enjoyment. AC Power Input o Features Your unit is configured at the factory for the proper AC line voltage in the country where you purchased it (USA: 120 volts/60 Hz, Europe: 230 volts/50 Hz). The AC line configuration is noted on a label on the back panel. • Access UPnP PCs and music with ‘Media Player’ Mode. The unit is supplied with the proper AC power cord. Use only this cord or an exact equivalent. Do not modify the supplied cord. Do not use an extension cord. • Listen to DAB+, FM broadcasting station. • Serve as the gateway for the Rotel-Link feature to control other components in the system. • Wireless or wired connection to access internet radio and premium stations. A Few Precautions Please read this manual carefully. In addition to basic installation and operating instructions, it provides valuable information on various system configurations as well as general information that will help you get the optimum performance from your system. Please contact your authorized Rotel dealer for answers to any questions you might have. In addition, all of us at Rotel welcome your questions and comments Save the shipping carton and all enclosed packing material for future use. Shipping or moving the unit in anything other than the original packing material may result in severe damage to your unit and void the warranty. Fill out and send in the owner’s registration card packed with the unit. Also be sure to keep the original sales receipt. It is your best record of the date of purchase, which you will need in the event warranty service is ever required. Placement Place the unit on a solid, level surface away from sunlight, heat, moisture, or vibration. Don’t stack other components or objects on top of the unit. Don’t let any liquid fall into the unit. Note the weight and size of the unit. If placing the unit on a shelf, cabinet or rack, make sure the full weight of the unit can be supported. The unit generates heat during normal operation. Do not block ventilation openings. Allow a minimum of 10 cm or 4 inches of unobstructed space around the unit. If installed in a cabinet, make sure that there is adequate ventilation. Be sure the power switch on the front panel is turned off. Then, plug one end of the cord into the AC power connector on the back panel of the unit. Plug the other end into an appropriate AC outlet. If you are going to be away from home for an extended period of time, it is a sensible precaution to unplug your digital gateway. Note: Some products are intended for sale in more than one country and as such are included with more than one AC cord. Please use only the one appropriate for your country/region. Power Switch and Indicator Light 1 A 2 The power switch is located on the left side of the front panel. To turn the unit ON (or to activate the automatic power-on modes), push the switch in. The indicator light above the switch will light, indicating that the unit is turned on. To turn the unit off, push the button again and return it to the out position. 12V Trigger Input i An input jack for connecting the wires carrying a +12 volt trigger signal from a Rotel preamp or surround sound processor to turn the unit on and off. The TRIGGER INPUT accepts any control signal (AC or DC) ranging from 3 volts to 30 volts. Use a cable with mono 3.5 mm mini-plugs on both ends. The +12V DC signal appears at the “tip” connector. 12V Trigger Output i The 12V TRIG jack labeled OUT is used to pass the remote turn-on signal to another Rotel unit. Any 12V Trigger signal at the INPUT jack will be passed through to the OUT jack. Connection Overview Before continuing further to other sections in the manual, please make sure all the cable connections are made properly. Refer to figure 2. DAB/FM Broadcasting w Please use the supplied indoor antenna to connect the DAB and FM connector on the rear panel. To receive the best FM signal, make sure there is enough room for the T-shaped indoor antenna to fully extend. Eyelets at both ends of the T allow tacking the antenna to a wall if desired. Experiment with different positions to maximize reception. English DIGITAL INPUT-AUX t The unit can receive digital music signal from other sources and convert them to analog signals then output to a pre-amplifier or processor connected through OUTPUT e jacks. There are two connector on the AUX Digital Input area on the rear panel, labeled with coaxial and optical. Connect the coaxial or optical output of your source to the coaxial or optical input of the unit. Network Connection qr 11 Internet Radio What you need before starting Before you can use your Internet radio, you need the following: • A broadband Internet connection. • Access point to internet through wired or wireless LAN. This unit can connect to a wired or wireless network. If using a wired network, connect your internet cable to the socket marked ETHERNET q. If using a wireless network, please connect the WiFi antenna (supplied) to the connector marked WiFi r. With wireless LAN connection, internet radio should work within 100 metres of the wireless access point, subject to the router/Wi-Fi gateway being placed in the optimum area for your location. The user can confirm the WiFi Strength under the settings menu. (Settings-->WiFi Strength) UPGRADE USB mini socket y The software of this unit can be updated through this socket, if upgrades become necessary. Make sure that your LAN is connected properly and is able to access the internet. To access internet radio stations an internet connection is required. OUTPUT e First Time Connection To The Network The unit outputs a stereo analog signal. Use the supplied audio cable to connect it with input jacks of your pre-amplifier or processor. Be careful and make sure that connections correspond to each other. Right channel output must be connected to right channel of pre- amplifier’s or processor’s right channel and vice versa. ROTEL LINK u These 2 Rotel Link Out connections can be made with the stereo 3.5 mm cable (supplied) to a Rotel integrated amplifier and CD player. These connections link the Digital Gateway, Amplifier and CD player into one IP controllable system via the Rotel Remote application. See Figure 3. When you turn on the unit for the first time, it starts by searching for LAN connections. If both wired and wireless connections are present, the wired connection will be the default, unless a “wireless only” selection was made in the setup menu. The following example illustrates a wireless connection. Starting ... ... SCANNING NETWORK.. ... After a few seconds, it will start to scan for networks. If no wireless network is found, it will display no network found. NO NETWORK FOUND When the unit finds your network, it will display the ESSID for the access point on the screen – this is a name that is allocated to the access point by the person who set up the network – for example: < MY NETWORK > It is possible, and in some locations highly likely, that your unit will find more than one wireless access point if using wireless connection, in which case you can choose which one you want to connect to. Turn the knob on the panel to see the ESSID for each access point the radio has found. If the screen displays “Enter WEP key” or “Enter WPA key” then the network is using one of the encryption systems, Wired Equivalent Privacy (WEP) or Wi-Fi Protected Access (WPA). Please obtain the access code from the person who set up your wireless network, or check the user manual of your router for this information. Input the code into the Rotel unit to gain access to the wireless LAN. Note: If you would like to use a static IP address, or if the unit can not automatically get an IP address, then please see the ‘Network config’ section under the ‘Settings’ section at the end of the manual. RT-12 DIGITAL GATEWAY 12 Selecting A Radio Station Once a network is found and the network connections made, The toplevel menu will be displayed, please select “Internet Radio”, the display will show as < Internet Radio My Stuff Media Player Setting > < Location Genre Search Note: Internet Radio stations and other music services can be easily set up at www.rotelradio.com Internet Radio Station Playing After connecting to a station, the display will display station name, type of audio file and bit rate. > BBC RADIO BUFFERING xx% BBC RADIO xxx kbPs WMA XX:XX Now you can select internet radio stations to listen to by turning and pushing the PUSH-SELECT knob = on the front panel or using the navigation keys on the remote control. <LOCATION> enables you to choose radio stations provided in the specific area and countries: < Africa America Asia Caribbean < > XXX1 LIVE RADIO XXX2 LIVE RADIO XXX3 LIVE RADIO XXX4 LIVE RADIO > < XXX1 LIVE RADIO XXX2 LIVE RADIO XXX3 LIVE RADIO XXX4 LIVE RADIO > 1. Turn the PUSH-SELECT knob = until the display highlights the type of content desired, then press the knob to select. 2. Turn the knob to highlight the station desired, then press knob to select. 3. Wait until the radio connects to that station. <SEARCH> enables you to search for a specified type of radio with a short keyword. Station Name END <> A BCDEFGHIJKLNO ART BBC RADIO xxx kbit WMA Assign to Preset # M Preset # <GENRE> enables you to choose radio stations according to their content, for example Classic Rock, Sport, News, etc. 80S 90S Adult Adult contemporary While a radio station is playing, hold down the memory button 4I, then press the number preset to assign from numeric pad 3H, the display will show > 1. Turn the PUSH-SELECT knob = until the display shows the area and country you want to search in, then press on the knob. 2. Turn the knob until the display highlights the desired station. Push knob to select. 3. Wait until the unit connects to that station. < Storing a radio station in a preset xxx ART xx Radio1 x ARTxx xx Radio2 ARTxxxx xx Radio3 1. Turn the PUSH-SELECT knob = until the display moves to the character to input, then press the knob to select. 2. Repeat step 1 to input the complete keyword. Select “END” to confirm the keyword or push the REPLY -E key. 3. Press the knob to enable searching. The display will show stations which match the keyword. 4. Turn the knob to highlight the desired station, press knob to select and connect to that station. Store this current radio station into the preset number, and you can store up to 30 preset radio stations for Internet Radio. Playing a preset radio station While a radio station is playing, you can switch to other preset stations as below: 1. From the numeric pad 3H, press the number button of the preset number for desired station. Or. 2. Press QUEUE 9B button to call out preset number and corresponding station, turn the knob to choose the station, then press the knob to select it. The display will show as 01 02 > 03 04 preset preset preset preset radio radio radio radio 1 2 3 4 Press QUEUE button again to exit the queue menu and back to playing status. Note: You can review stored radio stations by using the Queue feature. This will help you avoid accidently overwriting a preset. English Media Player The Media Player feature allows you to play audio files (AAC, AIFF, AU, FLAC, MP3,WAV and WMA (except lossless)) and playlists (M3U) created by your computer’s Media Player, such as Window Media Player 11 or 12. It has been verified to work on Windows 2000, Windows XP, Windows Vista and Windows 7. 13 3. Go into ‘Media Player’ menu, and select ‘UPnP Servers’ sub menu by turning and pressing the PUSH-SELECT knob =. The unit will scan for all available UPnP servers. It will display ‘[Empty]’ if no UPnP servers are found. Internet Radio My Stuff Media Player Settings < Note: File sharing may need to be enabled on your computer, and not all Media Players will allow sharing of music files. Please refer to your computer’s manual for instructions. UPnP Servers Setting up UPnP Server in PC 1. Use Windows Media Player 11(or 12 if you use Windows 7)to setup the PC as an UPnP Sever, click the ‘Library’ tab from Windows Media Player 11 and select ‘Media Sharing’ to open the ‘Media Sharing’ window to set the option. < > UPnP Servers Playback Mode Queue > Play media files using UPnP Server. 1. After a successful scan, select your UPnP server by rotating the knob if there is more than one UPnP server, highlight, then press the knob to select the desired server. 2. RT-12 will list the options or folders available. This varies depending on the setup of your music server, and version of software you are using. It will typically show Music, Playlists options and [Search] as per examples below. Enter “Music”, and it will show the different options to find your tracks, sorted by Artists, Albums, Genre etc.. < Music Playlists [Search] > <All music All Artists Album Artists Genre > 3. Once the desired track is found, push the knob to select. The selected track will be displayed on the menu as the unit attempts to connect to the music server. Before play starts, the track title, type of file, bit rate will be shown. When play starts, elapsed time will be displayed instead of file type. 2. Your PC will now prompt you that a device has attempted to connect to your UPnP server. Please click Allow button. “Track Title” 317kbps WMA “Track Title” 01:12 317kpbs 07:49 07:49 4. You can select more tracks or folders while the current track is still playing by going to the desired track and pressing the ENT button on the remote or the PUSH-SELECT knob = for 5 seconds. The selected track(s) will be added to QUEUE and will be played in the order selected. Push QUEUE 9B button to call up the tracks waiting to be played. Clear Queue You can clear QUEUE by pressing the QUEUE button and selecting [Clear Queue] or by going into QUEUE menu from the Media Player submenu. < Note: As of this writing, Windows Media Player 11 does not support AAC decoding used by Apple as the default selection in iTunes. We recommend that you change the default import setting to WAV, AIFF, or MP3 formats for maximum compatibility across many devices. You can set Windows Media Player to mirror your iTunes folders. Windows Media Player 12 (for Windows 7) does support AAC. UPnP Servers Playback Mode Queue < [Clear Queue] > > You can also clear individual tracks in QUEUE by selecting the track and press STOP 8J button for 5 seconds. RT-12 DIGITAL GATEWAY 14 Playback Mode < UPnP Servers Playback Mode Queue 1. From the numeric pad station. < > Repeat Shuffle 3H, press preset number of the desired *> Turn the knob to select sub-menu ‘Media Player’ -->‘Playback Mode’, there are 2 sub-menus, “Repeat” and “Shuffle”. Select either Repeat, Shuffle or both. A mark will indicate the selection made REPEAT: Tracks are played one after another and will start from the first track again when the last track is finished. 2. Press SKIP +/- 7 button on the front panel or PRESET +/- K to call out preset numbers and corresponding station. Turn the knob to choose the desired station, then press the knob to select it. Press FM 6N button again to exit the preset menu and back to playing status. 3. Press the FM selections 6N button. This toggles between the following 3 1. Display FM station currently tuned to. 2. Display Preset Menu. 3. Display FM settings Menu SHUFFLE: Plays tracks in random. Note: If both REPEAT and SHUFFLE are on, The unit will first play the list in random, after all tracks are played one time, it will continue to play the list in random until STOP is pressed Note: Using shuffle feature with large music libraries may not be possible or may take an excessively long time. We recommend that you create shorter playlists in Windows Media Player and then shuffle these. FM RADIO Before listening to FM radio, make sure that the FM antenna have been properly connected. FM Radio Station Playing 1. Select FM Button from the source buttons 6N. The display will show as below 95.25MHz [No RadioText] 2. Turn the PUSH-SELECT knob = to change the frequency of radio station. Turning it up or down one step at a time changes the frequency one step. Turning it faster and the unit will scan for stations. 3. Use the UP/DOWN keys on the remote to manually search for FM stations. Toggle to the Preset Menu and scroll through all the presets with the PUSH-SELECT = knob. Press the PUSH-SELECT = key to select. From the remote, use the +/- PRESET press the ENT key to select. K keys to select a PRESET and FM Settings Menu Press the FM 6N button and toggle to the FM settings Menu. There are 3 sub-menu under FM setting 1. Scan Settings - Select between ALL STATION or Strong Stations Only. 2. Audio Settings - Allow Stereo or Forced Mono 3. System - Select Factory default and shows the current software. To make changes in the FM settings menu, turn the knob = on the front panel or the UP/DOWN keys on the remote. To make a change press the knob = on the front panel. From the remote control, press the ENT key. RDS Broadcast Reception This Rotel unit is equipped with RDS (Radio Data Systems) reception capabilities. The RDS broadcast system provide additional functionality to FM radio reception by transmitting encoded information along with the radio signal. This signal is decoded by an RDS receiver and can provide a range of informational features including: 4. Press and hold the UP/DOWN keys on the remote to auto scan for FM stations. 1. A display of the station’s identifying name (e.g. BBC1) Storing a radio station in a preset 2. A display of the station’s program content (e.g. ROCK or NEWS). While a radio station is playing, push the memory button 4I, then press the number of preset assigned from numeric pad 3H, the display will show preset saved. Up to 30 preset FM radio stations may be stored. 3. Traffic information broadcasts. 4. A scrolling text display for announcements or information. Playing a preset radio station When a radio station is playing, you can switch to a preset station in one of the following ways. 5. Current time and date. RDS broadcasting has been widely available in many European markets for years. There are a large number of RDS stations and most users will be familiar with the features and operation. English 15 Note: The RDS features are entirely dependent on the broadcaster sending properly encoded signals. Thus, they will only be available in markets where RDS is currently implemented and where stations are broadcasting these data signals. RDS Button O Storing a DAB station in a preset While a DAB station is playing, hold down the memory button 4I, then press the number of preset assigned from numeric pad 3H. Up to 30 preset DAB radio stations may be stored. The RDS button on the remote control can step through the various displays. Press the RDS button on the remote to step through the following displays. Playing a preset DAB station 1. Radio Text 1. From the numeric pad station. When a DAB station is playing, you can switch to a preset station in one of the following ways. 3H, press preset number of the desired 2. PTY, or the type of content. 4. Stereo or Mono station. 2. Press SKIP +/- 7 button on the front panel or PRESET +/- K on the remote to call out preset numbers and corresponding station. Turn the knob to choose the desired station, then press the knob to select, or press the ENT key on the remote. 5. Current time. DAB Settings Menu 3. Name of station. Press the DAB 6N on the front panel or remote to toggle to the DAB settings Menu. There are 6 sub-menus. Turn the knob on the front panel or use the UP/DOWN keys on the remote to go through each sub-menu. 6. Today’s date. MONO Button O The MONO button on the remote control changes the FM mode from stereo reception to mono reception. In stereo mode, a stereo signal will be heard if the station is broadcasting a stereo signal and there is sufficient signal strength. Note: Switching to mono mode can be a useful way to improve the reception of weak or distant FM signals. Less signal strength is required for clean mono reception than for stereo reception. DAB RADIO 6 2. <Full Scan> Start a full range scan by pressing the ENT key. 3. <Manual Scan> Press ENT and select stations manually by using the Up/Down keys. 4. <DRC> Dynamic Range Control Select between “off”, “high” and “low”. Press ENT and select Up/Down keys to change. 5. <Prune> Select between “Yes” or “No”. The Prune setting allows you to remove stations that are not active or can not be received. Make sure that your local area can receive Digital Audio Broadcast (DAB) broadcasting signal. Press the DAB 1. <Station List>, shows station list. button on the front of the panel, or remote N. DAB channels are categorized into ensembles, which are also known as multiplexes. Each multiplex provides a number of stations and each service contains a primary service that can contain secondary services. DAB technology allow broadcasters to transmit additional data along with the audio, which can include other audio channels, text and even images and computer data in the future. DAB Radio Station Playing 1. Select DAB Button from the front panel and the unit will scan for available stations. After scanning you will see the following menu. DAB <Station list> Push the PUSH-SELECT knob = to see available stations. 6. <System>, Select the Factory Default and show Software Version. RT-12 DIGITAL GATEWAY 16 NETWORK SETTINGS To enter the value, press knob, then rotate the knob to adjust the value up or down. Press again to enter the value and move on to the next field. Continue until all information has been entered. Network Config This section covers the setup procedue for wired or wireless LAN in more detail. Signal Warning ( only for wireless connection) Push the Network below. Wired/Wireless < 6N button to enter the main menu as shown Internet Radio My Stuff Media Player Settings Select Auto (defaults to wired if both are connected), Wired only, or Wireless only. > Version This menu displays software and hardware information of the unit. Upgrade Firmware Note: If you are unable to return to the above menu automatically after entering Network mode, push the BACK 0D button to get to the above menu. Scan for Networks From the main menu, select the Settings option then select Network Config. Then select Scan for Networks option.(only available in wireless setup) . Once the network is found, the display will show the network ID. Turn the knob to select, push to confirm. < Scan for networks > Enter network name View Config Edit Config Use the knob to keep selecting letters of the device name by turning and pressing, and select “END” word to confirm the name Network Name < END <> A BCDEFGHIJK > NAME1 Register Set you local time and date. Push knob to start entering value, rotate knob to change value. Press again to confirm value entered and move on to the next field. UPnP Use this setting to set any UPnP device name. This is the name that your music server will pickup in Media Player mode. Use the knob to keep selecting letters of the device name by turning and pressing, and select “END” word to confirm the name, or simply press the REPLY key. DEVICE NAME < END <> A BCDEFGHIJ > DEVICE View Config Show current network configuration details. Turn the knob to see next/ previous page of “Mode”-->”ESSID”-->”MAC Address”--> “IP Address” -->”Netmask”-->”Gateway”-->”DNS Servers”. Display as below: > Note: At this stage, you can press the BACK button to cancel the firmware upgrade. A firmware upgrade may take several minutes, do not switch off the power to the unit or put it into standby until the operation is complete, otherwise, the unit may become permanently damaged. Upgrading can take 15 to 60 mins, depending on the speed of your internet connection. Set Time/Date If the unit can not find any networks, the network ESSID can be entered manually . Mode Auto DHCP Use this option to download new firmware for the internet radio. If new firmware is available, there will be a prompt to download. This will display a key that can be used to register the unit on the Rotel Radio Customer portal: www.rotelradio.com Enter network name ( only for wireless connection) < Select YES or NO to enable or disable warning of low Wi-Fi signal. < ESSID XXXXXX > WiFi Strength Shows a percentage to indicate the WiFi strength. Configure “My Stuff” Register an account on http://rotelradio.com website Edit Config This menu can be used to edit the current network configuration. This menu is useful for entering a static IP address. Select this function with the knob and enter the static IP address, MAC address, DNS of the selected network. A personalized menu “My Stuff” can be setup in the top level menu. Open the website, http://rotelradio.com, from your internet browser. Please enter the registration key, this can be found in ‘Settings > Register’ menu. Enter this registration key into the website and follow the instructions to setup an user name and password. Remember the user name and password, you will need this to access the site. English After logging into your account, you will be able to edit your information for ‘My Stations’, ‘My Streams’, ‘My Podcast’ and ‘My Radios’. 17 2. DIMMER controls the brightness of the front panel display, it can be dimmed with seven steps. You can access this control directly with the DIM button on the remote control. Follow the instructions on the website to personalize your menu. Configure “My Stations” There are an enormous choice of stations that are available in the database from the website. Please follow instructions on the website to search for stations. When search results are displayed, there will be a link to ‘Add to my stations’, Click on this and the station selected will be added to My Stations. A new top level menu ‘My Stuff’ will appear on the display, with a sub-menu ‘My Stations’. After the initial registration, you can add to ‘My stations’ while connected to a radio station by pressing the REPLY key. The display will ask if you want to add selection to ‘My stations’ press the push select knob to add selection. Configure “My Streams” While logged into your website account, you can add your own internet radio streams to the ‘My Streams’ section which will be listed under ‘My Account’. Click on ‘My Streams’, a prompt will appear to enter the station’s name and its media stream URL. The media stream URL should be a link to the website’s actual audio stream. . Note: ‘My Stuff’ menu and stations under ‘My Stations’,’My Streams’ will appear after the unit has updated the stations list. Please power OFF then ON and enter ‘Internet Radio’ from the top level menu for the unit to update the stations list. Remote Unit Advanced Buttons Setup menu To enter the setup menu, press the SETUP C button on the remote control and you will see the following display: <1 2 3 4 5 6 7 8 POWER OPTION > DIMMER FACTORY DEFAULT VERSION ANTENNA SELECT SIPORT UPGRADE DISPLAY CONTRAST EXIT 1. POWER OPTION, select between NORMAL or QUICK. In NORMAL mode, the network connection is turned OFF when the unit is in STANDBY. This consumes less power in STANDBY mode. Setting this to QUICK leaves the network connection active during STANDBY mode. Use QUICK mode if you are controlling the unit using the IP Remote control through the Rotel Link u sockets. 3. FACTORY DEFAULT sets the unit into the original state as when it left the factory. Presets and network configurations will be lost, and sets the remote code to 1 (see below). 4. VERSION shows this unit’s software version. 5. ANTENNA SELECT choose AUTO(default), FM or DAB antenna. 6. SIPORT UPGRADE is used to upgrade the software that controls the FM and DAB features of this unit. This should not be used by the end user. 7. DISPLAY CONTRAST can be used to adjust the contrast on the front panel display. Step through the vaious steps with the LEFT/RIGHT buttons on the remote and find the one that best suits you. 8. EXIT, exits the setup menu. Or push the SETUP remote at anytime to EXIT. C button on the Second Amplifier Code The factory setting is remote code 1. If you find that the remote is conflicting with other Rotel amplifiers, you can change to remote code 2 with the following steps: 1. While pointing the remote at the unit, press on the remote control ‘FM’ N , release, then immediately press ‘2’H and continue to press the ‘2’ key for 5 seconds. The unit will show ‘Audio Custom Code 1--> 2’. The unit is now changed to Audio remote code 2. 2. You must now change the remote to output code 2. To do this ,press ‘FM’ N and ‘2’H at the same time, then release both keys. 3. Repeat the above procedure and press ‘1’ key instead of ‘2’ to change the unit back to Code 1. Second CD Code The factory setting is CD code 1, but the transport buttons J (play, stop pause) used in Network mode may conflict with other Rotel CD players in your system. You can change the CD codes by following the steps below. 1. While pointing the remote at the unit, press on the remote control ‘NETWORK’ N , release, then immediately press ‘2’H and continue to press the ‘2’ key for 5 seconds. The unit will show ‘CD Custom Code 1--> 2’. The unit is now changed to CD remote code 2. 2. You must now change the remote to output code 2. To do this ,press ‘NETWORK’ N and ‘2’H at the same time, then release both keys. 3. Repeat the above procedure and press ‘1’ key instead of ‘2’ to change the unit back to Code 1. RT-12 DIGITAL GATEWAY 18 Troubleshooting Specifications Most difficulties in audio systems are the result of incorrect connections, or improper control settings. If you encounter problems, isolate the area of the difficulty, check the control settings, determine the cause of the fault and make the necessary changes. If you are unable to get sound, refer to the suggestions for the following conditions: FM Tuner Power Indicator Is Not Lit The power Indicator should be lit whenever the unit is plugged into the wall power outlet and is pushed in. If it does not light, test the power outlet with another electrical device, such as a lamp. Be sure the power outlet being used is not controlled by a switch that has been turned off. Network Does Not Work If you have trouble connecting to your wireless network, check your network setting carefully, these steps may help to resolve the problem. 1. Confirm that a Wi-Fi network works, ie, PC can access the Internet using the same network. 2. Check that a DHCP server is available, or that you have configured a static IP address on the unit. Please refer to Network Config section. 3. Check that your network’s firewall is not blocking any outgoing ports. Usable Sensitivity 50dB Quieting Sensitivity Signal to Noise Ration (at 65 dBf) Harmonic Distortion (at 65 dBf) Frequency Response Stereo Separation (100Hz/1kHz/10kHz) Output level Antenna Input DAB Tuner Sensitivity Tuning Range Audio Data Rate Frequency Response Analog Output Antenna Input 22.2dBf 27.2dBf(mono) 63 dBf (mono) 60 dBf (stereo) 0.2% (mono) 0.3% (stereo) 10 Hz-15kHz, ±3dB 40dB/45dB/35dB 1.0V 75 ohms unbalanced -80dBm Band III (174-240MHz) 224Kbps (Max) 20 - 20KHz +/- 1.0dB 2.1V at 0dBFS 75 ohms F connector General 2. Music played from Internet Radio stations are affected by the speed of your internet connection. If you find that music is cutting out regularly, contact your internet service provider. Network connection 802.11b/g Security WEP, WPA1 (TKIP) WPA2 (TKIP) File formats (UPnP Music Server) AAC, MP3, WMA (except lossless) OGG vorbis, WAV, AIFF,FLAC, and AU. Power Consumption 16 watts Standby Power Consumption(normal mode) 0.5 watts Power Requirements (AC) 120V, 60Hz(USA) 230V, 50Hz(Europe) Weight 5.1 kgs (11.24 lbs) Dimensions (W x H x D)430 x 93 x 330 mm (17 x 35/8 x 13 in) Front panel height 80 mm, 31/8 3. Make sure the station you selected is operating at the current hour. The station can be broadcasting from a different time zone. All specifications are accurate at the time of printing. Rotel reserves the right to make improvements without notice 4. Make sure you select the correct type of internet connection either wired or wireless. Rotel and the Rotel Hifi logo are registered trademarks of The Rotel Co., Ltd. Tokyo, Japan. 4. Do a hard power off (unplug the AC mains) and let the unit restart the network scanning cycle. 5. If using Wi-Fi connection, make sure the placement of your unit allows it to receive the Wi-Fi signal. No Sound 1. Check the cables between the output and the pre-amplifier inputs, be sure they are connected properly. Refer to Fig. 2. English Glossary Bit rate – Speed of data transfer – how many bits of information are sent each second. 19 Network adapter – A hardware device, installed inside computers that connect computer devices together to create a network. Podcast – An audio file delivered via an RSS feed over the Internet to a subscriber. Buffering – data downloading and being assembled before playback. Router – A device that joins multiple networks or computers together. Codec – [Coder/Decoder] software capable of encoding and/or decoding a digital data stream or signal. RSS feed – [Really Simply Syndication feed] used to publish content on the web which people can then subscribe to and receive updates. Data Encryption – the encryption of data for security purposes. For wireless networks this is normally WEP and WPA. Server – A computer that provides client computers with access to files and printers as shared resources on a computer network. DHCP [Dynamic Host Control Protocol] – A protocol for assigning IP addresses to devices on a network. Subnet mask – A method of splitting IP networks into subgroups. DNS Server – A remote server that provides the translation of web addresses into the corresponding numeric IP addresses. UPnP – [Universal Plug and Play] a method of auto configuration used in devices such as PCs, peripherals, wireless devices and intelligent appliances. ESSID – [Extended Service Set Identifier] The ESSID is a unique identifier for your wireless network. URL – [Uniform Resource Locator] the format of the address for a particular page of a website. Ethernet – Network technology for local area networks. Cat5 cable carries information between computers at a rate of 10/100/1000 megabits per second. USB – [Universal Serial Bus] Connection commonly used with computer peripherals. File format – The type of file e.g. a music file in the format of .mp3. File Server – A computer or device that provides workstations on a network with controlled access to shared files. Firmware – embedded software in a device that provides the devices with operational instructions. WAN – [Wide Area Network] computer network that spans a wider area than a local area network e.g. the Internet. WEP – [Wired Equivalent Privacy] a wireless security protocol to prevent access to the network by “intruders” using similar wireless LAN equipment and capture of wireless LAN traffic through eavesdropping. WPA – [WiFi Protected Access] a wireless security protocol that replaced the weaker WEP. Gateway –The access point from LAN to WAN. Internet – a computer network consisting of a worldwide network of computer networks. IP Address – is a numerical label that is assigned to devices in a computer network. ISP – Internet service provide. Kbps – Short for kilobits per second, a measure of data transfer speed. LAN – [Local Area Network] a local computer network for communication between computers. MAC – [Media Access Control] is a unique identifier assigned to network adapters or network interface cards by the manufacturer for identifcation. Modem – [Modulator/Demodulator] device used to connect computers by a telephone line. Network – A system of interconnected electronic components or computers. WiFi – [Wireless Fidelity] – a radio frequency standard that is used to connect devices, such as computers and iPods, together using a wireless connection. The Rotel Co. Ltd. Endo TN Building 2F., 6-12-21, Meguro-Honcho, Meguro-Ku, Tokyo 152-0002 Japan Rotel of America 54 Concord Street North Reading, MA 01864-2699 USA Phone: +1 978-664-3820 Fax: +1 978-664-4109 Rotel Europe Dale Road Worthing, West Sussex BN11 2BH England Phone: + 44 (0)1903 221 761 Fax: +44 (0)1903 221 525 Rotel Deutschland Vertrieb: B&W Group Germany GmbH Kleine Heide 12 D-33790 Halle/Westf., Deutschland Tel.: 05201 / 87170 Fax: 05201 / 73370 E-Mail: [email protected] www.rotel-hifi.de www.rotel.com 082 OMRT12 020912 English