1
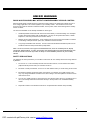
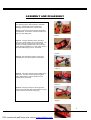
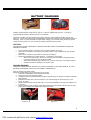
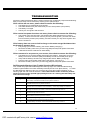
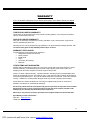
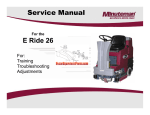
OWNER’S & OPERATING MANUAL
Please read this manual before operating your scooter
“Simplicity in Mobility”
zip’r3
zip’r4
zip’r xtra
PDF created with pdfFactory trial version www.pdffactory.com
Zip’r™ Mobility
(800) 760-9107
TABLE OF CONTENTS
SAFETY INFORMATION……………………………………………… Pg. 3
EMI/RFI WARNING..…………………………………………………… Pg. 4
YOUR ZIP’R………………………………………………………………. Pg. 5
ASSEMBLY & DISASSEMBLY……………………………………... Pg. 6-7
BATTERY CHARGING………………………………………………... Pg. 8
OPERATING YOUR ZIP’R…………………………………………... Pg. 9
SPECIFICATIONS …………………………………………………….. Pg. 10
CARE & MAINTENANCE………………………………………….…. Pg. 11
TROUBLESHOOTING……………………………………………….… Pg. 12
WARRANTY…………………………………………………………….… Pg. 13
ZIP’R MOBILITY CONTACT INFORMATION
(800) 760 – 9107
www.zipr.com
MY AUTHORIZED DEALER:
_______________________________
DEALER TELEPHONE #:
_______________________________
ZIP’R SERIAL #:
_______________________________
(Located underneath the scooter battery box)
2
PDF created with pdfFactory trial version www.pdffactory.com
SAFETY INFORMATION
Please read and understand these warnings and the entire manual before using your Zip’r
Mobility Scooter.
IMPORTANT – This vehicle is not intended for use as a medical device.
Important DOs
•
Always turn the key switch OFF
before getting on/off your scooter.
•
Always turn the power off when
the unit is not in use.
•
Always Unlock tiller lock (located
at the bottom of the tiller) prior to
operating scooter.
•
Always make sure your seat is
locked before driving your scooter.
•
Always remain seated while
driving your scooter.
•
Always keep legs and arms within
the confines of the scooter.
•
Always drive straight up and
down inclines.
•
Always be extra cautious when
operating the scooter on wet
surfaces and steep inclines or
ramps.
Important DO NOTs
•
Never modify the scooter in anyway or
use it for a purpose other that
intended.
•
Never attempt to drive over or off
obstacles higher than 1 inch. This
could be unsafe and could damage the
scooter.
•
Never operate this scooter after
consuming alcoholic beverages.
•
Never operate this scooter if your
health or medications you are taking
cause you to feel dizzy, affect your
vision, or in anyway effect your ability
to safely operate the scooter.
•
Never reverse down a steep hill or
incline.
•
Never park on inclines or declines.
•
Never stop on an incline. If you must
stop on an incline, then always lean
forward to shift the center of gravity
and prevent the scooter from tipping
over backwards.
•
Always drive slowly while turning.
•
Always come to a complete stop
before attempting to reverse.
•
Never attempt to turn on an incline or
decline.
•
Always use a grounded power
receptacle when charging. Use of
a non-grounded receptacle could
result in an electrical shock.
•
Never turn off the power while the
scooter is moving. Doing so will cause
the scooter to come to an abrupt stop.
•
•
Always remember scooter
capacity is limited to one person
only. This scooter is not approved
for towing or for weights in excess
of the published maximum.
Never operate your scooter on streets
or other areas with vehicular traffic.
•
Never operate your scooter near steps
or curbs where you might accidentally
drop a wheel off of the edge.
•
Always avoid sudden starts while
the handle is turned sharply.
•
Never hose off your scooter or leave
your scooter uncovered in heavy rain.
•
Always be aware of mechanical
pinch points when assembling and
disassembling your scooter.
•
Never charge batteries that may be
frozen.
3
PDF created with pdfFactory trial version www.pdffactory.com
EMI/RFI WARNING
RADIO WAVE SOURCES MAY AFFECT POWERED MOBILE VEHICLE CONTROL.
Electromagnetic (EMI) or Radio Frequency Interference (RFI) refers to the effects that outside sources of
such energy might have on the control systems of your mobility vehicle. The interference from these
sources could cause the vehicle to release its brakes, move by itself, and/or cause damage to the mobility
vehicle controller.
The sources of EMI/RFI can be broadly classified into three types:
•
Handheld portable transceivers with antenna mounted directly on the transmitting unit. Examples
include: citizens band radios (CB), “walkie talkies”, security, fire and police transceivers, cellular
telephones, and other personal communication devices.
•
Medium range mobile transceivers. These usually have the antenna mounted outside of a vehicle
or a building. Examples include: police, fire, ambulance and taxi receivers.
•
Long range transmitters and receivers, such as commercial broadcast transmitters (radio and TV
broadcast antenna towers) and amateur (HAM) radios.
Note: So far as we know, other types of handheld devices, such as cordless phones, laptop
computers, AM/FM radios, TV sets, CD players and cassette players and small appliances such
as electric shavers and hair dryers are not likely to cause EMI/RFI problems to your mobility
vehicle.
SAFETY PRECAUTIONS
The following are some precautions you can take to reduce the risk of a mobility vehicle from being affected
by EMI/RFI.
1.
Do not turn on or use hand held personal communication devices, such as citizens band radios
(CB) and cellular phones while your vehicle is turned on.
2.
Be aware of nearby transmitters, such as TV or radio stations and try to avoid coming close to them.
3.
Be aware that adding accessories and/or components, or modifying your mobility vehicle in any
way, may change its EMI/RFI resistance level, thus making it more susceptible to interference from
radio wave sources.
4.
Turn off your mobility vehicle by removing the key from the key switch when you are getting onto or
off of your mobility vehicle and never leave the key in the key switch of an unattended mobility
vehicle.
5.
Report all incidents of unintended movement or unexpected brake releases to Zip’r Mobility.
4
PDF created with pdfFactory trial version www.pdffactory.com
YOUR ZIP’R3
Components
The Zip’r3 consists of the following major components shown below.
Dash assembly controls
`
Removable &
adjustable folding seat
Headlight
Free-wheel switch
(Yellow lever)
Adjustable
tiller
Drive unit & anti-tip
wheels
Tiller lock
One step removable battery
with on/off board charging
Flat free tires
Charging port,
Circuit breaker reset button
Dash Assembly Controls Detail
Headlight switch
Speed control
Battery Indicator
Horn Button
Trouble shooting
Indicator Light
Reverse Throttle
Forward Throttle
5
PDF created with pdfFactory trial version www.pdffactory.com
ASSEMBLY AND DISASSEBLY
The following are the steps required to assemble
your Zip’r. Disassembly can be achieved by
following all of the steps in the reverse order.
Figure 1. There are five main sections that need to
be assembled: Front frame, rear frame, battery box,
seat post, and folding seat.
Figure 1.
Figure 2. To begin assembly, tilt the rear frame
back so it is freely standing on the rear bumper. Lift
the front frame up and set it down onto the rear
frame by connecting (setting down) the front frame
curved locking brackets (one on each side) onto the
rear frame bracket pegs (one on each side).
Figure2.
Figure 3. After the steps in Figure 2 have been
completed, the scooter should be in this position.
Figure 3.
Figure 4. Take note of the latch in the middle of the
rear frame. This latch must be pressed together
during disassembly in order to release the rear
frame from the front frame.
Figure 4.
Figure 5. Holding the seat post, slowly pivot the
rear frame forward and down until the latch in Figure
4. locks onto the front frame locking peg.
Figure 5.
6
PDF created with pdfFactory trial version www.pdffactory.com
…assembly/disassembly continued,
Figure 6. Loosen tiller adjustment knob, raise the
tiller to the desired angle, and then retighten the tiller
adjustment knob. Unlock tiller lock located at the
bottom front of the scooter tiller by pushing and
turning knob. (WARNING scooter will not turn if lock
is not released. The tiller lock should only be locked
during transportation of scooter)
Figure 6.
Figure 7. Carefully place the battery box into
battery compartment. Lightly press down on the
front and rear of the battery box to ensure that the
front to rear power connections have engaged.
Figure 7.
Figure 8. Insert the chrome seat post extension into
the seat post. Insert the seat post pin at the desired
seat height.
Figure 8.
Figure 9. Install the seat by lowering the seat into
the seat post extension and rotating until it locks into
the correct position. Note: The scooter seat rotates
by pulling on the seat release lever (located at the
right of the seat) while rotating the seat in either
direction.
Figure 9.
Figure 10. The fully assembled Zip’r Scooter.
Disassembly of your scooter can be accomplished
by following the above steps in reverse order.
Figure 10.
7
PDF created with pdfFactory trial version www.pdffactory.com
BATTERY CHARGING
Figure 11.
Figure 12.
A Battery Charger similar to that shown in Figure 11. above is supplied with your Zip’r. Your Zip’r is
equipped with two sealed, maintenance free 12 AH batteries.
The battery condition can be monitored on the battery indicator meter located on the tiller console, see
Figure 12., Green color indicates fully charged battery and red color indicates that an immediate recharge is
necessary. Note: To check the battery strength during charging, you must first unplug the charger power
cord and turn the power on to your scooter by inserting and turning the key switch.
CAUTION
FAILURE TO FOLLOW THESE SAFETY INSTRUCTIONS MAY RESULT IN PERSONAL INJURY OR
PROPERTY DAMAGE.
•
•
•
•
Do not operate charger in a closed-in area or restrict ventilation in any way.
Never use an extension cord to plug in your battery charger. Plug charger directly into standard
wall outlet.
Never smoke or allow an open flame in the vicinity of the battery.
Sparks near the battery may cause explosion. To reduce the risk of spark:
o When connecting charger, connect DC charging cord to the battery charge plug before
connecting Charger AC cord to electrical outlet.
o When disconnecting charger, always do so in reverse order of the connecting procedure.
o Always avoid/prevent damage to AC and DC cords.
HAZARD WARNING
UNDER NO CIRCUMSTANCE SHOULD YOU TOUCH BATTERIES IF THEY ARE LEAKING. IF YOUR
BATTERY IS DAMAGED, CONCTACT ZIP’R MOBILITY IMMEDIATELY.
Steps in charging your battery safely:
(Note that your Zip’r battery can be charged on or off- board)
1. Place the scooter/battery near a standard wall outlet.
2. Remove key from the scooter key switch.
3. Confirm that the manual freewheel lever (yellow cap) (see Figure 13. below) is in the drive (pushed
back) position.
4. Remove the charger port cover and insert the 3-pin off-board plug into the charger port. (see
Figure 14. below)
5. Plug the battery charger into the wall outlet. It is recommended that you charge your batteries for 8
to 10 hours.
6. When the battery is fully charged, unplug the off-board plug from the wall outlet and then the 3-pin
plug from the charger port. Replace the charger port cover.
Figure 13.
Figure 14.
8
PDF created with pdfFactory trial version www.pdffactory.com
OPERATING YOUR ZIP’R
Check The Following Before Operating Your Scooter
•
•
•
•
•
•
•
•
•
Verify that the freewheel brake lever is in the rear (drive) position.
Verify that the front till lock is UNLOCKED
Verify that the seat is in the correct position and is securely locked.
Verify that the steering tiller is tightened securely.
Sit down on your scooter.
Insert the key only after you have completed the above steps.
Verify that the horn and head light work properly.
Plan your route to avoid numerous inclines and obstacles.
Observe your surroundings for other safety concerns.
WARNING
•
•
•
•
ALWAYS REMOVE THE KEY FROM THE KEY SWITCH PRIOR TO ENTERING OR
EXITING YOUR SCOOTER. THIS WILL PREVENT SCOOTER MOVEMENT IF THE
THROTTLE LEVERS ARE ACCIDENTALLY PRESSED.
ALWAYS VERIFY THAT SCOOTER TILLER LOCK IS UNLOCKED BEFORE
OPERATING SCOOTER.
ALWAYS BRING YOUR SCOOTER TO A COMPLETE STOP BEFORE ENTERING OR
EXITING THE SCOOTER.
THE ZIP’R3 IS EQUIPPED WITH ANTI-TIP WHEELS, BUT THE SCOOTER SHOULD
NEVER EXCEED A CLIMBING SLOPE OF 12 DEGREES.
Operating Procedures
1. Set the speed adjustment dial to the desired speed (Turtle = Slower and Rabbit = Faster).
2. Press your thumb against the appropriate throttle control lever (Right = Forward and Left
= Reverse).
3. Release the throttle control lever to decelerate and come to a complete stop (Note:
There is no external break control – the scooter will come to quick and complete stop
when the throttle control lever is released).
4. Pull on the left hand grip to turn left and on the right hand grip to turn right.
Driving Basics
•
•
•
•
•
Always use caution when driving your scooter in reverse. Note that the reverse speed is
50% slower than the forward speed.
Avoid shortcutting sidewalk corners as it can cause the back wheel to drive off of the
sidewalk.
Enter narrow driving paths/doorways slowly and with caution and always look out for
additional obstacles such as car mirrors or door knobs.
It is recommended that the scooter speed be reduced when driving down or up hills.
Avoid obstacles higher than 1 inch as this may cause damage to your scooter.
9
PDF created with pdfFactory trial version www.pdffactory.com
PDF created with pdfFactory trial version www.pdffactory.com
10 miles
4.25 mph
Per-Charge Range (Max)
Maximum Speed
Foldable foam filled
Red/Blue
Body Colors
Seat Type
250 lbs
30"
Turning Radius
Maximum Weight Capacity
2.1"
155 W, .21 hp
Off board, 2A current
Ground Clearance
Power Rating of Motor
Battery Charger
12 V, 12 AH, 2pcs
29 lbs
Weight - Heaviest Piece
Battery
102 lbs
2 pcs 2.5" x 7.5"
Rear Tires
Weight - Total
1 pcs 2.0" x 7.5"
Zip'r3
36.4" x 19.5" x 27"
Front Tires
Overall Dimensions: L x W x H
4.25 mph
10 miles
Foldable foam filled
Red/Blue
250 lbs
38"
2.1"
155 W, .21 hp
Off board, 2A current
12 V, 12 AH, 2pcs
29 lbs
106 lbs
2 pcs 2.5" x 7.5"
2 pcs 2.0" x 7.5"
Zip'r4
36.4" x 19.5" x 27"
4.25 mph
10 miles
Upgraded Foldable foam filled
Red/Blue Gloss Paint
250 lbs
40"
3"
155 W, .21 hp
Off board, 2A current
12 V, 12 AH, 2pcs
33 lbs
107 lbs
2 pcs 2.5" x 7.5"
2 pcs 2.0" x 7.5"
Zip'r3 Xtra
40.5" x 19" x 28"
4.25 mph
10 miles
Upgraded Foldable foam filled
Red/Blue Gloss Paint
250 lbs
43"
3"
155 W, .21 hp
Off board, 2A current
12 V, 12 AH, 2pcs
33 lbs
111 lbs
2 pcs 2.5" x 7.5"
2 pcs 2.0" x 7.5"
Zip'r4 Xtra
40.5" x 19" x 28"
SPECIFICATIONS
10
CARE AND MAINTENANCE
Your Zip’r3 requires a minimal amount of maintenance. The following are the maintenance items
that should be followed to ensure that your scooter is safe and reliable.
Daily
•
•
Charge your battery daily if your scooter is used for more than twenty minutes.
Always store your scooter in a warm and dry environment.
Cleaning
•
•
•
The scooter shroud is made from durable ABS plastic with a high gloss type finish.
Therefore, the body can be cleaned like a car (cool water and mild soap to remove
dirt/oils). DO NOT SPRAY THE ENTIRE SCOOTER WITH WATER AS THIS WILL
DAMAGE ELECTRICAL PARTS AND UPHOLSTERY. A light application of car wax will
help the shroud retain its high gloss.
Use a rubber conditioner on your scooter’s tire sidewalls to help preserve them.
Bumpers and trim benefit from an occasional application of rubber or vinyl conditioner.
HAZARD WARNING
•
•
DO NOT APPLY RUBBER CONDITIONER ON TIRE TREAD; THIS MAY CAUSE THE
TIRES TO BECOME DANGEROUSLY SLIPPERY. ALSO DO NOT USE A RUBBER OR
VINYL CONDITIONER ON THE SCOOTER’S VINYL SEAT OR FLOORBOARD. THEY
WILL BECOME DANGEROUSLY SLIPPERY AND RESULT IN PERSONAL INJURY
AND/OR DAMAGE YOUR SCOOTER.
ALWAYS PROTECT BATTERIES FROM FREEZING TEMPERATURES AND NEVER
CHARGE A FROZEN BATTERY. THIS DAMAGES THE BATTERY AND CAN CAUSE
PERSONAL INJURY.
Maintenance
•
•
•
•
•
Regularly check your scooter tires for wear.
Regularly check you scooter seat posts for wear.
All axle bearings and motor/transaxle assembly are prelubricated, sealed and require no
subsequent lubrication.
Keep the console, charger, battery, and electronics free of moisture.
For prolonged storage, you may wish to place several boards under the frame of your
scooter to raise off of the ground. This reduces the possibility of flat spots developing on
the flat free tires.
11
PDF created with pdfFactory trial version www.pdffactory.com
TROUBLESHOOTING
As with any electromechanical device, electric scooters may occasionally require troubleshooting.
Many of such issues can be resolved by referring to the options below.
If the vehicle will not move, please check to ensure the following:
•
•
•
•
The battery box is inserted fully and correctly.
The brake release lever (free wheel lever) is in the drive position (rear position).
The battery is charged.
The key is in the ignition and turned on.
If the scooter has power but does not move, please check to ensure the following:
•
The scooter may have been left in free wheel mode (brake release lever in forward
position). If this is the case then remove your key from the ignition, push the free-wheel
lever to the drive position (rear position), and then reinsert your key into the ignition and
turn the scooter on.
If the battery does not seem to hold a charge or the motor surges/hesitates when
the throttle is pressed, then:
•
•
•
Fully charge your scooter’s battery (see section “Battery Charging”).
Remove the battery case cover (via removing philips screws) and replace fuse inside.
A load test should be conducted on each battery.
If there seems to be no power to your scooter, then check to ensure the following:
•
•
•
•
The battery box is correctly seated and pressed into position. Press each end of the
battery into its seat. Check the quality and stability of male and female power plugs.
Verify that the battery has been fully charged (see section “Battery Charging”).
Push the main circuit breaker reset button (see section “Your Zip’r3 “).
Remove the battery case cover (via removing philips screws) and replace fuse inside.
Self Diagnostic Warning Light (Trouble Shooting LED Indicator)
Your scooter is equiped with a Self-Diagnostic Warning Light, also called Trouble Shooting
Indicator Light llocated on the Dash Assembly Controls (see the Your Zipr3 section). To check
the Self-Diagnostic Warning Light, turn on the key and count the number of flashes on the
Warning Light and refer to the chart below. If the LED indicator blinks continously without
stopping but the scooter operate appropriately then this is a warning that the battery will
soon need a full charge.
No. of Flashes
Explanation
1
Battery needs charging or there is a poor battery connection. Charge the battery fully and
check battery connections and then turn key switch off and on.
2
Poor Motor Connection. Check all connections between the motor and dash board
controller and then turn key switch off and on.
3
Potential short circuit between motor and battery. Contact Zipr Mobility for assistance.
6
The scooter has entered drive inhibited mode, this may be a result of the battery charger
still being connected to the scooter. Disconnect and turn the key off an on.
7
A throttle fault has occurred. Verify that the throttle is not stuck in forward/reverse and
then turn the key switch off and on.
8
A controller fault has occurred. Check to see that all connections from the controller are
secure and then turn the key switch off and on.
9
10
Free wheel lever (parking brake) is not in the drive position. Firmly push the lever to the
rear position and then turn the key switch off and on.
An excessive amount of voltage has been applied to the controller. This is usually caused
by a poor battery connection. Check connections and turn key off and on.
12
PDF created with pdfFactory trial version www.pdffactory.com
WARRANTY
If you purchased a warranty from a dealer then contact your dealer directly for details
and warranty service. If you purchased a Zip’r Mobility manufacturer’s warranty with
your product then the warranty below applies to your scooter. If you did not purchase a
warranty with your product and you need service please contact Zipr Mobility or an
authorized dealer for assistance.
THREE-YEAR LIMITED WARRANTY
Three years on all structural frame components; including platform, fork, seat post, and frame.
100% or replacement parts cost.
ONE-YEAR LIMITED WARRANTY
One year on drive train components, including: transaxle, motor, and electronic components.
100% of replacement parts cost.
Warranty service can be performed by Zip’r Mobility or an authorized Zip’r Mobility provider. Do
not return faulty parts to Zip’r Mobility without prior consent.
WARRANTY EXCLUSIONS
The following are wear items and not warranted:
• ABS plastic shrouds and footrest
• Motor brushes
• Break pads
• Tires
• Upholstery and seating
• Batteries
OTHER ITEMS NOT WARRANTED:
Repairs and/or modifications made to any part of the scooter without specific and prior consent
from Zip’r Mobility, circumstances beyond control of Zip’r Mobility, labor service calls, and
shipping costs and other charges incurred for repair of the product.
There is no other express warranty. Implied warranties, including those of merchantability and
fitness for a particular purpose, are limited to one (1) year from the date of original purchase and
to the extent permitted by law. Any and all implied warranties are excluded. This is the exclusive
remedy. Liabilities for consequential damages under any and all warranties are excluded.
Some states do not allow limitations on how long an implied warranty lasts or exclusion of
limitation of incidental or consequential damages.
All warranty claims must be accompanied by proof of purchase and product serial number
Please keep a copy of your original purchase receipt and serial number (located under
battery box) for warranty claims and/or product reference.
Warranty is only valid for products purchased and shipped within the continental USA.
Zipr Mobility contact information :
Web site: www.Zipr.com
Telephone: (800) 760 - 9107
13
PDF created with pdfFactory trial version www.pdffactory.com