1
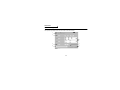
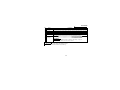
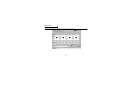
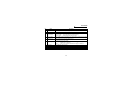
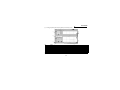
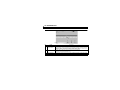
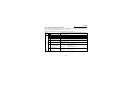
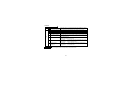
VECTOR INVERTER
VECTOR INVERTER
VECTOR INVERTER
-INSTRUCTION MANUAL-
ETHERNET COMMUNICATION OPTION
FR-V5NE
HEAD OFFICE:MITSUBISHI DENKI BLDG MARUNOUCHI TOKYO 100-8310
Printed in Japan
Specifications subject to change without notice.
INSTRUCTION MANUAL
IB-0600108E-A (0208) MEE
FR-V5NE-E
Thank you for choosing the Mitsubishi inverter option unit.
This instruction manual gives handling information and precautions for use of this equipment. Incorrect handling
might cause an unexpected fault. Before using the equipment, please read this manual carefully to use the equipment
to its optimum.
Please forward this manual to the end user.
This section is specifically about safety matters
Do not attempt to install, operate, maintain or inspect this product until you have read through this instruction
manual and appended documents carefully and can use the equipment correctly. Do not use this product until you
have a full knowledge of the equipment, safety information and instructions.
In this instruction manual, the safety instruction levels are classified into "WARNING" and "CAUTION".
WARNING
Assumes that incorrect handling may cause hazardous conditions, resulting in
death or severe injury.
CAUTION
Assumes that incorrect handling may cause hazardous conditions, resulting in
medium or slight injury, or may cause physical damage only.
Note that the CAUTION level may lead to a serious consequence according to conditions. Please follow the
instructions of both levels because they are important to personnel safety.
SAFETY INSTRUCTIONS
1. Electric Shock Prevention
WARNING
! While power is on or when the inverter is running, do not open the front cover. You may get an electric shock.
! Do not run the inverter with the front cover removed. Otherwise, you may access the exposed high-voltage
terminals and charging part and get an electric shock.
! Even if power is off, do not remove the front cover except for wiring or periodic inspection. You may access the
charged inverter circuits and get an electric shock.
! Before starting wiring or inspection, switch power off, wait for more than 10 minutes, and check for no residual
voltage with a tester or the like.
A-1
WARNING
! Any person who is involved in the wiring or inspection of this equipment should be fully competent to do the work.
! Always install the option unit before wiring. Otherwise, you may get an electric shock or be injured.
! Handle this option unit with dry hands to prevent an electric shock.
! Do not subject the cables to scratches, excessive stress, heavy loads or pinching. Otherwise, you may get an electric shock.
2. Injury Prevention
CAUTION
! While power is on or for some time after power-off, do not touch the inverter as it is hot and you may get burnt.
3. Additional instructions
Also note the following points to prevent an accidental failure, injury, electric shock, etc.:
(1) Transportation and mounting
CAUTION
! Do not install or operate the option unit if it is damaged or has parts missing.
! Do not stand or rest heavy objects on the product.
! Check that the mounting orientation is correct.
! Prevent screws, metal fragments or other conductive bodies or oil or other flammable substance from entering the inverter.
(2) Test operation and adjustment
CAUTION
! Before
starting operation, confirm and adjust the parameters. A failure to do so may cause some machines to
make unexpected motions.
A-2
(3) Usage
WARNING
! Do not modify the equipment.
CAUTION
! When parameter clear or all parameter clear is performed, each parameter returns to the factory setting. Re-set
the required parameters before starting operation.
! For prevention of damage due to static electricity, touch nearby metal before touching this product to eliminate
static electricity from your body.
(4) Maintenance, inspection and parts replacement
CAUTION
! Do not test the equipment with a megger (measure insulation resistance).
(5) Disposal
CAUTION
! Treat as industrial waste.
(6) General instruction
All illustrations given in this manual may have been drawn with covers or safety guards removed to provide indepth description. Before starting operation of the product, always return the covers and guards into original
positions as specified and operate the equipment in accordance with the manual.
A-3
CONTENTS
1.PRE-OPERATION INSTRUCTIONS
1.1
1.2
1.3
Unpacking and Product Confirmation ..................................................................................................1
Packing Confirmation...........................................................................................................................1
Structure ..............................................................................................................................................2
2.INSTALLATION
2.1
2.2
2.3
3
Pre-Installation Instructions..................................................................................................................3
Installation ...........................................................................................................................................3
Removal...............................................................................................................................................5
3. OPERATION OVERVIEW
3.1
3.2
3.3
3.4
1
6
System Configuration...........................................................................................................................6
Cable Specification ..............................................................................................................................7
Precautions for System Configuration .................................................................................................7
General Procedure...............................................................................................................................8
4. INVERTER SETTING
9
4.1 Communication Parameter List............................................................................................................9
4.1.1 Parameters .................................................................................................................................10
4.2 Inverter Operation Mode ....................................................................................................................11
5. FUNCTION OVERVIEW
12
5.1 Software Specifications......................................................................................................................13
5.1.1 Software configuration ................................................................................................................13
6. SOFTWARE START AND SCREEN DESCRIPTION
14
6.1 Software Start ....................................................................................................................................14
6.1.1 Login ...........................................................................................................................................14
6.2 Main Screen.......................................................................................................................................15
6.2.1 Functions ....................................................................................................................................16
6.2.2 Parameter setting........................................................................................................................16
6.2.3 Parameter No and range ............................................................................................................16
6.2.4 Parameter setting button.............................................................................................................16
7. PARAMETER SETTING
7.1
7.2
7.3
7.4
7.5
7.6
Parameter Setting on All List Format Page........................................................................................18
Parameter Setting on Functional List Format Page ...........................................................................19
Parameter Setting on Individual List Format Page ............................................................................21
Parameter Setting on Basic Settings Page........................................................................................23
DA1/DA2 Calibration..........................................................................................................................25
Bias/Gain of Speed Setting Voltage (Current) ...................................................................................26
8. PARAMETER FUNCTION BUTTONS
8.1
8.2
8.3
8.4
8.5
29
Change List........................................................................................................................................29
Parameter Initialization ......................................................................................................................30
Block Read/Block Write .....................................................................................................................31
Save...................................................................................................................................................32
Upload and Change Value Display ....................................................................................................33
9. MONITORING
9.1
9.2
9.3
9.4
9.5
17
34
Monitor List ........................................................................................................................................34
Data Display......................................................................................................................................35
Meter Display ....................................................................................................................................37
Oscilloscope......................................................................................................................................39
Alarm History ....................................................................................................................................43
10. DIAGNOSTICS
44
10.1 VFD Status.........................................................................................................................................44
10.2 Diagnostics ........................................................................................................................................45
11. MAIL SETTING
46
12.ERROR CODES
47
12.1 Error Code Lists .................................................................................................................................47
APPENDIX
48
Inverter Operation Mode ....................................................................................................................48
MEMO
1.PRE-OPERATION INSTRUCTIONS
1.1 Unpacking and Product Confirmation
Take the option unit out of the package, check the unit name, and confirm that the product is as you ordered and
intact.
This product is an inboard option unit designed for exclusive use in the Mitsubishi FR-V500 series vector inverter.
Before using it, check the type and SERIAL number of the inverter.
" SERIAL number check
•This product may be used with the FR-V500 series manufactured in and after July 2002. Any of the models
may be used with this unit if its SERIAL number indicated on the rating plate and package has
"#27######" or later version. For details on the SERIAL number, please contact your sales
representative.
SERIAL is made up of 1 version symbol, 1 alphabet letter or numeric character indicating month, and 7
numeric characters indicating year and control number as shown below. (Only the first three digits of the
control number are printed on the package.)
#
2
7
######
Symbol Year Month Control number
SERIAL number
1.2 Packing Confirmation
Make sure that the package includes the following
• Instruction manual ...........................................................................1
• Mounting screws M3 × 10 ...............................................................2 (Refer to page 3.)
• Ferrite core ......................................................................................1 (Refer to page 6.)
• Dedicated option cover....................................................................1 (Refer to page 3.)
• Windows is a registered trademark of Microsoft Corporation in the United States and other countries.
• Netscape Communications is a registered trademark of Netscape Communications Corporation.
• Internet Explorer is a registered trademark of Microsoft Corporation in the United States and other countries.
• Ethernet is a registered trademark of Xerox Co. Ltd.
• No part of this manual may be copied or reproduced without the permission of Mitsubishi Electric Corporation.
• Other product and company names herein may be either trademarks or registered trademarks of their
respective owners.
1
PRE-OPERATION INSTRUCTIONS
1.3 Structure
3) Dip switch
2) LED
Front view
TX
RX
LNK
Mounting
hole
1) RJ-45 modular jack
Rear view
Mounting
holes
Mounting
hole
FR-V5NE
Option fixing holes
Name
1) RJ-45 modular jack
2) LED
TX
RX
LNK
3) Dip Switch
Connector
Function
Connect the 10BASE-T cable for Ethernet communication to make communication
with a personal computer.
Lit during send operation.
Lit during receive operation.
Indicate the connection status of the Ethernet cable, option board, etc. Lit when they
are properly connected.
Switches set by the manufacturer. Do not change. (All switches are factory-set to the
LOW side. Check for correct setting.)
2
2.INSTALLATION
2.1 Pre-Installation Instructions
Make sure that the input power of the inverter is off.
CAUTION
With input power on, do not install or remove the option unit. Otherwise, the inverter and
option unit may be damaged.
2.2 Installation
(1) Remove the inverter front cover refering to the inverter manual.
(2) Install the option unit to Slot 3.
(3) Insert the option unit connector into the Slot 3 connector of the inverter securely. At this time, also insert
the option fixing holes securely.
Refer to the following diagram for the position of Slot 3. Push the option unit securely into the option
fixing hook.
(4) Fix the two right and left places of the option unit to the inverter securely with the accessory mounting
screws. If the screw holes do not line-up, the connector may not have been inserted securely. Check
for insecure insertion.
(5) Remove the option wiring port cover (DATA PORT) from the inverter front cover by pushing it from the
back of the front cover, then fit the dedicated option cover on the front cover and reinstall the front
cover.
3
INSTALLATION
Slot 1
Inverter
(without cover)
W iring cover
for option
(D ATA PO RT)
Slot 2
Accessory screw
(2pcs.)
Inverter
(with cover)
Inverter side connector
Slot 3
.
.
O ption fixing hook
D edicated option
cover
Ethernet com m unication
option FR-V 5N E
The option fixing hooks are
provided for slots 1,2,3
CAUTION
When installing the inverter front cover, the cables to the inverter's control circuit terminals
and option terminals should be routed properly in the wiring space to prevent them from
being caught between the inverter and its cover.
4
INSTALLATION
2.3 Removal
(1) How to remove the control circuit terminal block
Loosen the two mounting screws in both ends of the control circuit terminal block. (The screws cannot
be removed.) Pull down the terminal block from the back of the control circuit terminals by one hand.
erminal block fixing screw
(2) After removing two screws on the right and left places, hold the option unit and pull the lower part
upward as shown below. (The option unit is attached with the inverter hooks.)
5
3. OPERATION OVERVIEW
By fitting the Ethernet communication option (FR-V5NE) to the FR-V500 series inverter, you can perform
parameter setting, monitoring, diagnostics and mail send/receive efficiently via a LAN using a Web browser.
3.1 System Configuration
Operating environment
Web browser:
Netscape Communicator Ver. 6.0 or later
or Internet Explorer Ver. 5.5 or later
(When using Windows 2000, Netscape
CommunicatorVer. 4.7 or later is compatible.)
OS: Windows operating system under which
the Web browser runs
CAUTION
You cannot construct a network where a
router is located on the host network.
HUB
Web browser
Parameter setting
Monitoring
Diagnostics
Mail
FR-V5NE
FR-V5NE
FR-V5NE
Screen: Resolution 800 x 600 or more, color
display of 256 or more display color
*
* Use enclosed ferrite cores to prevent noises from
Inverter
Inverter
Inverter
6
the inverter from affecting Ethernet communication.
Wind the ferrite core around the LAN cable one
time.
CAUTION
When the inverter installed on a cart, etc. is
affected by vibration, perform wiring in such a way
that the ferrite cores are secured.
OPERATION OVERVIEW
3.2 Cable Specification
Connect the option unit (FR-V5NE) to the Ethernet using the LAN cable indicated below.
Cable used:
Use cables whose category is TPCC3 (Twisted Pair Communication Cable for
LAN Category 3) or higher and shape is UTP(Unshielded Twisted Pair).
(according to the10BASE-T(IEEE802.3) standard)
Maximum wiring length:
The maximum length between HUB and card is 100m. (according to the
10BASE-T(IEEE802.3) standard)
3.3 Precautions for System Configuration
1)
2)
Access to the Internet must be fully safeguarded.
Consult the network access provider, Internet service provider or network manager (person who does
network planning, IP address management, etc.).
We have no liability for any system problems that occur at the time of access to the Internet.
Pr. 466 "password" (Refer to page 10.) is the password used only to log in to the inverter, and does not
prevent illegal access completely. Take other preventive measures when safety must be secured.
7
OPERATION OVERVIEW
3.4 General Procedure
Start
Get
(sub-network
mask,
gateway
address
as necessary)
for the inverter
the network
Get the
theIP
IPaddress
address
(sub-network
mask,
gateway
address
as necessary)
for the from
inverter
from the network
manager.
manager.
Set Pr. 434 to Pr. 437 (IP address) with the operation panel (FR-DU04-1). (Also set the sub-network mask
and gateway address parameters as required.)
(Refer to page 9.)
Power on after powering off the inverter once or reset the inverter. The IP address setting of the inverter is made
valid after a power-on reset. (Refer to the inverter manual for inverter reset.)
Start the Web browser on the personal computer and enter the IP address set to the inverter to read the screen.
End
..... (Refer to page 14.)
8
4. INVERTER SETTING
4.1 Communication Parameter List
Fitting the FR-V5NE to the inverter enables the following parameters to be set. Use the PU (FR-DU04-1/
FR-PU04V) to set them.
You cannot make access from the personal computer without setting the following parameters.
For the addresses, consult the network manager (person who does network planning, IP address
management, etc.).
POINT
The IP address setting of the inverter is valid after a power-on reset. After setting the following
parameters, make an inverter reset once. (Making PU reset or terminal reset also makes the setting
valid.)
• When using the PU for setting, select the PU operation mode.
Parameter
Number
434
435
436
437
438
439
440
441
442
443
444
445
446
Name
IP address 1
IP address 2
IP address 3
IP address 4
Sub-network mask 1
Sub-network mask 2
Sub-network mask 3
Sub-network mask 4
Gateway address 1
Gateway address 2
Gateway address 3
Gateway address 4
Password
Factory Setting Setting Range
0
0
0
0
0
0
0
0
0
0
0
0
0
0 to 255
0 to 255
0 to 255
0 to 255
0 to 255
0 to 255
0 to 255
0 to 255
0 to 255
0 to 255
0 to 255
0 to 255
0 to 9999
9
Minimum
Setting
Increments
1
1
1
1
1
1
1
1
1
1
1
1
1
INVERTER SETTING
4.1.1 Parameters
(1) Pr. 434 to Pr. 437 (IP address)
Set the IP address of the FR-V5NE. (Set the IP address that was assigned by the sub-network manager.)
http://* * *. * * *. * * *. * * * /
IP address 4 (Pr. 437)
IP address 3 (Pr. 436)
IP address 2 (Pr. 435)
IP address 1 (Pr. 434)
(2) Pr. 438 to Pr. 441 (sub-network mask)
Set these parameters when there is an address block (sub-network) where the IP address of the FR-V5NE belongs.
* * *. * * *. * * *. * * *
Sub-network mask 4 (Pr.441)
Sub-network mask 3 (Pr.440)
Sub-network mask 2 (Pr.439)
Sub-network mask 1 (Pr.438)
(3) Pr. 442 to Pr. 445 (gateway address)
Set the address when the network of a different host is used.
* *. * * *. * * *. * * *
Gateway address 4 (Pr.445)
Gateway address 3 (Pr.444)
Gateway address 2 (Pr.443)
Gateway address 1 (Pr.442)
(4)Pr. 446 "password"
Set the password in four digits. Use it when logging in to the inverter.
10
INVERTER SETTING
4.2 Inverter Operation Mode
Change the operation mode to the network operation mode to write, initialize, or reset parameters with the
FR-V5NE. When changing to the network operation mode, set "0, 2, 6, 7, or 8 " in Pr. 79 to change to the
external operation mode. (It is not necessary to set Pr. 79 in the factory-set condition. Parameter reading
and monitoring with Ethernet software can be performed in any operation mode.)
(1) Switch over with Ethernet software
After starting of Ethernet software, select network operation mode by the operation mode switching
button. (Refer to page 15.)
(2) Pr. 340 "link startup mode selection"
Power on the inverter in the network operation mode with "1" set in Pr. 340. (Refer to page 50.)
REMARKS
Refer to Appendix " Inverter operation mode" for the inverter operation mode.
11
5. FUNCTION OVERVIEW
You can perform the following functions efficiently using the Web browser of the personal computer.
All list format
Parameter
setting
function
Monitoring
Function-by-function Displays the parameters on a function-by-function basis so that the parameters
are read or written.
list format
Individual list format
Lists the user-selected parameters so that the parameters are read or written.
Simple setting
Sets the parameters automatically when you enter the items necessary for
operation, e.g. motor capacity and rated current, without a need to know the
specific parameters.
Data display
Displays the data and maximum values of the items, which were selected to be
monitored, at fixed intervals.
Meter display
Displays the monitor data and maximum values of the items, which were
selected to be monitored, in the form of analog meters.
Oscilloscope
Samples and graphs data.
Alarm history
Batch-displays the alarm history.
VFD status
Monitors the output current, output voltage, etc. at fixed intervals and
displays them as values or %.
Diagnostics
Displays the definition of the latest alarm and the output speed, current, voltage
and energization time at alarm occurrence.
Diagnostics
Mail
Displays the names, setting ranges and factory settings of all parameters in a list
format so that the parameters are read or written.
Sends the alarm definition by mail when an alarm occurs.
12
FUNCTION OVERVIEW
5.1 Software Specifications
5.1.1 Software configuration
In Ethernet communication, the software consists of the applet program, servlet program and inverter
communication program are as shown below. Start operation after enabling JavaScript on the used
Web browser.
Personal computer
Inverter
FR-V5NE
CPU
Inverter
communication
program
Servlet program
Compact
Web server
Applet program
LAN
Web browser
(1) Applet program
Runs on the Web browser of the computer.
Specifying the URL of the FR-V5NE on the Web browser of the personal computer loads the applet
program (Java program) from the compact Web server of the FR-V5NE to the Web browser of the
personal computer.
By GUI operation, the applet program sends a data request to, or receives data from, the servlet
program of the FR-V5NE via the HTTP connection.
(2) Servlet program
Runs on the compact Web server of the FR-V5NE.
This program receives a data request from the applet program, sends data to the applet program,
requests the inverter communication program to perform inverter operation, or receives data from the
inverter program, via the HTTP connection.
(3) Inverter communication program
Communicates with the inverter CPU.
This program receives a data request from the servlet program, sends data to the servlet program,
reads or writes the inverter parameters, or receives monitor data, for example.
13
6. SOFTWARE START AND SCREEN DESCRIPTION
6.1 Software Start
Start the Ethernet software by specifying the IP address of the FR-V5NE that was set in the parameters
(Pr.434 to Pr.437) from the Web browser of the personal computer.
Enter the IP address into the Address field of the Web browser (Internet Explorer or Netscape
Communicator) to open the title screen of the Ethernet software.
http://xxx.xxx.xxx.xxx
CAUTION
・At power-on or restart of the inverter, it will take several minutes to start the software. Starting
time varies depending on the line condition.
・Note that clicking a browser change button will restart the V5NE.
6.1.1 Login
(1) Login dialog
Specifying the IP address (address set in Pr.434 to Pr.437) of the
inverter (FR-V5NE) displays the title screen of the software.
Enter your user name and password.
User name......................Enter "freqrol".
Password........................Enter the password that was set in Pr. 446 of the
inverter (FR-V5NE).
(Enter it in four digits. (Example: "0123"))
CAUTION
The setting of the inverter's IP address is made valid after a
power-on reset.
14
freqrol
Login dialog
SOFTWARE START AND SCREEN DESCRIPTION
6.2 Main Screen
When you login, the following screen appears.
5)
2)
3)
1)
6)
7)
8)
4)
CAUTION
Normally it takes 2 to 3 mins to start the software. However, starting time varies depending on the
line condition.
15
SOFTWARE START AND SCREEN DESCRIPTION
6.2.1 Functions
Name
Description
1) Function screen switchover Used to switch between the function (parameter setting, monitoring, diagnostics, mail) displays.
U sed to sw itch betw een the operation m odes (E XT, LN K). (Refer to page 48 for operation m ode of the inverter.)
External operation mode
2) Operation mode switchover EXT:
LNK: Network operation mode (Ethernet communication mode)
(Note) will result in an error in the PU operation mode
3) Operation mode indication
Indicates the current operation mode.
EXT: External operation, PU: PU operation, EXT JOG: external JOG operation, PU JOG: PU JOG
operation, LNK: Network operation mode (Ethernet communication mode), PU EXT: PU-external
combined operation. (Note) The operation mode will not be changed, if the PU and such other than
Ethernet software was used to change the operation mode.
4) Information
Shows the current condition, e.g. input error. (Refer to page 47 for error indications.)
5) Software version
The software version is displayed on the title label of the Web browser.
6.2.2 Parameter setting
Name
All List Format
6)
Description
Used to display all parameters.
18
Functional List Format Used to display specific parameters on a function-by-function basis.
Individual List Format Used to list the frequently used parameters or necessary parameters freely.
Basic Settings
U sed to set the operation specifications roughly w ithout a need to know the specific param eters.
6.2.3 Parameter No and range
Name
7)
Parameter No
Range
Refer to Page
Description
Shows the parameter number of the selected parameter.
Shows the setting range of the selected parameters.
6.2.4 Parameter setting button
Refer to page 18 for details of the parameter setting button 8)
16
19
21
23
7. PARAMETER SETTING
Set the parameters.
Refer to the inverter manual for details of the parameters.
After changing any parameter value(s), click 8) [Blk Write] or 9) [Write] to store it (them) into the inverter.
(Refer to page 18.)
REMARKS
1. Write can be inhibited by setting "1" in Pr. 77 "parameter write disable selection".
2. Write the set values to the inverter and initialize parameters in the [LINK] operation mode. Writing is invalid in any
other operation modes except for certain parameters.
Refer to the inverter manual for parameters of the inverter. (Refer to page 16 for operation mode switch-over.)
17
PARAMETER SETTING
7.1 Parameter Setting on All List Format Page
No.
Name
1) Change List
2) Pr Init
3) Blk Read
4) Read
1)
2)
3)
4)
5)
6)
7)
8)
9)
5) Blk Write
Display all parameters of the inverter being connected.
(1) Click the Updated Val field on the row of the parameter you want
to change.
(2) Enter the value within the setting range and press
confirm your entry.
(3) Click [6) Write] to store the value into the inverter.
to 6) Write
7) Save
REMARKS
1.
2.
Two or more parameter values can also be changed at
once. To block-write new values to the inverter, click [5)
Blk Write].
When the Updated Val field has [Click], refer to page 25
or 26.
18
8) Upload
9) Chg Val Disp
Description
Used to list the
parameters that have
been changed from the
factory settings.
Used to initialize the
parameters to the
factory settings.
Used to read all
parameters in the list
from the inverter.
Used to read the
parameter selected in
the list from the inverter.
Used to write all values
entered in the Updated
Val field of the list to the
inverter.
Used to write the new
parameter value
selected in the list to the
inverter.
Used to save the
parameter list data into
a file.
Used to upload the list
data saved in the file.
Used to reflect the
uploaded data on the
Updated Val field after
uploading.
Refere
nce
Page
29
30
31
æ
31
æ
32
33
33
PARAMETER SETTING
7.2 Parameter Setting on Functional List Format Page
This page displays specific parameters on a function-by-function basis from among a number of available
parameters. Refer to page 18 for the way to change the parameter values.
19
PARAMETER SETTING
!Function button outline
Motor
S Settings
Acc/Dec
Protection
Monitor
Brake
Terminal
Alloc
V/F Control
Used to display the parameter list related to motor setting.
Used to display the parameter list related to speed setting.
Used to display the parameter list related to acceleration/deceleration operation.
Used to display the parameter list related to the protective functions.
Used to display the parameter list related to the monitor functions.
Used to display the parameter list related to brake operation.
I/O terminal function selection
Used to display the parameter list that is made valid for V/F control.
Used
to display the parameter lists that are available to adjust the biases and gains of the
Calibration DA1/DA2,
AM/FM, and 1, 2, 3 terminals. (Refer to pages 25, 26)
Option
Used to display the parameter list related to option unit fitting.
Used to display the parameter list related to the other functions that are not covered by the
Sp Running function buttons.
S. Control Used to display the parameter list related to speed control.
Trq. Control Used to display the parameter list related to torque control.
P. Control Used to display the parameter list related to position control.
20
PARAMETER SETTING
7.3 Parameter Setting on Individual List Format Page
This page can be used to list the
frequently used parameters
or necessary parameters freely. Refer
to page 31 for write to the inverter.
(1) Creation of individual list
Click [1) Edit], choose the listregistered parameter, and click [2)
Add] to move it to the Individual List
side. Clicking [OK] registers it to the
Individual List format page and
returns to the Individual List format
page.
1)
2)
REMARKS
Clicking [Cancel] returns to the
Individual List format without registering
the parameter.
Clicking [Delete] returns to the
Parameter List side and clicking [OK]
further deletes the parameter from the
Individual List format page.
21
PARAMETER SETTING
(2) Save in the Individual List
Save parameter No. currently
displayed in the individual list in the
file.
Click [Save format] to save a file.
(3) Display the individual list
(load/ reflection)
Click [Format upload] to load the file
saved with [Save format] and click
[Reflect format] to display the list.
REMARKS
A file is saved in the CSV format.
22
PARAMETER SETTING
7.4 Parameter Setting on Basic Settings Page
You can set the operation specifications roughly without a need to know the specific parameters. Refer
to page 31 for write to the inverter.
(1) Set all items. (For [Click], make selection from the choices on the right side.)
REMARKS
An error is displayed if the entered value is outside the setting range.
23
PARAMETER SETTING
(2)
Clicking [Confirmed] sets the parameters automatically and displays the parameter list.
REMARKS
You can also change the parameter values on this page. (Refer to page 18.)
Click [Pre. page] to return to the previous page (Basic Settings page).
24
PARAMETER SETTING
7.5 DA1/DA2 Calibration
Pressing [Click] in the Change Value field of Pr. 900 or Pr. 901 on the parameter setting page displays the
following page. For details, refer to the inverter manual (detailed "calibration function") and make setting.
1)
2)
Scale adjustment
3)
5)
4)
No.
Name
1)
2)
DA1/DA2 setting
Selected
3)
Scale adjustment
4)
Comp-Pr54 reset
5)
Cancel-Pr54 reset
Description
Shows the Pr. 54/Pr. 158 setting.
Used to set "21 (reference voltage output)" in Pr. 54/Pr. 158.
For calibration. Press the UP button to start upward calibration or the DOWN button to start
downward calibration.
Complete DA1/DA2 calibration after writing the calibration value into the inverter. (Return the Pr. 54/
Pr. 158 setting to the value changing to "21".)
Complete DA1/DA2 calibration without writing the calibration value into the inverter. (Return the Pr.
54/Pr. 158 setting to the value changing to "21".)
25
PARAMETER SETTING
7.6 Bias/Gain of Speed Setting Voltage (Current)
Pressing [Click] in the Change Value field of any of Pr. 902 to Pr. 905 and Pr. 917 to Pr. 920 on the
parameter setting page displays the following page. For details, refer to the inverter manual (basic) and
make setting.
(1) Choose the adjusting method from the following ones.
• Calibration without application of voltage.
• Calibration with application of voltage (Refer to page 27.)
• Calibration at any point without application of voltage (Refer to page 28.)
Choose the adjusting method "Without the voltage source" (1)) and set the Setting Speed (2)). Clicking
the "OK" button writes the speed to the inverter.
1)
2)
26
PARAMETER SETTING
(2) Calibration with application of voltage
Choosing the adjusting method "With the voltage source" (1)) monitors the Present Setting Voltage (3)).
Set the Setting Speed (2)) and adjust the external potentiometer on the basis of the currently set
voltage monitor. Clicking the "OK" button writes the current volume setting voltage to the inverter.
2)
)
3)
27
PARAMETER SETTING
(3) Calibration at any point without application of voltage
Choose the adjusting method "Any points without voltage source" (1)) and set the Setting Speed (2))
and Setting Voltage (3)). Clicking the "OK" button writes the setting speed and current volume setting
voltage to the inverter.
2)
1)
3)
28
8. PARAMETER FUNCTION BUTTONS
8.1 Change List
Clicking [Change List] displays the following screen.
The parameters whose values have been changed from the factory setting are displayed.
Click [OK] to return to the parameter list.
29
PARAMETER FUNCTION BUTTONS
8.2 Parameter Initialization
Clicking [Pr Init] initializes the parameters.
The parameters can be initialized by "Parameter Clear" or "All Clear".
CAUTION
• Clicking "parameter clear" or "All clear" erases the IP addresses (Pr. 434 to Pr. 437)
30
PARAMETER FUNCTION BUTTONS
8.3 Block Read/Block Write
Clicking [Blk Read] or [Blk Write] reads or writes data and displays the progress.
CAUTION
• Clicking the [Cancel] button during read/write displays in the parameter list only the parameter
values that have been read/written until then.
• Use [Read] or [Write] to read or write the parameter values individually from or to the inverter.
31
PARAMETER FUNCTION BUTTONS
8.4 Save
Used to save parameter No., parameter setting (in the present setting column), and unit in the parameter
list. Save can be performed on the "All List Format", "Functional List Format" or "Basic Settings 2" page of
the parameter setting screen.
REMARKS
・A file is saved in the CSV format.
You can edit the CSV format file using spreadsheet software, and the like.
After this file has been edited, it cannot be returned to the inverter.
・When no value is displayed in the present setting cell, the setting value at an inverter startup (reset) or at the last
batch reading is saved
32
PARAMETER FUNCTION BUTTONS
8.5 Upload and Change Value Display
Used to read the parameter list file saved and display on the change value field. Upload can be performed
on the "All List Format", "Functional List Format", "Individual List" or "Basic Settings 2" page of the
parameter setting screen.
After uploading, click [Chg Val Disp] to reflect the uploaded data on the Updated Val field.
33
9. MONITORING
9.1 Monitor List
The following items can be monitored on the data display, meter display, oscilloscope and VFD status
screens.
(#.....Can be monitored, ×.....Cannot be monitored)
Monitor Name
Data
Display
Speed (r/min) *3
Output current (A) *3
Output voltage (V) *3
Set speed (r/min)
Output frequency (Hz
Motor torque (%)
Converter output voltage (V)
Regenerative brake duty (%)
Electronic thermal protection load factor (%)
Input terminal
Output terminal
Load meter (%)
Motor excitation current (A)
Position pulse
Energization time (Hr)
Operation time (Hr)
Motor load factor (%)
Torque command (%)
Torque current command (%)
Motor output (kW)
Feedback pulse
Trace status
#
#
#
#
#
#
#
#
#
#
#
#
#
#
#
#
#
#
#
#
#
#
*1
*2
*3
*4
Meter Display
#
#
#
#
#
#
#
#
#
×
×
#
#
×
×
×
×
#
#
#
×
×
(Pr. 55(3600r/min))*4
(Pr. 56(rated current))*4
(400V/800V)*4
(Pr. 55(3600r/min))*4
(120 Hz)*4
(Pr. 866(300%))*4
(500V/900V)*4
(100%)*4
(Pr. 866(100%))*4
(Pr. 56(rated current))*4
(Pr. 866(100%))*4
(Pr. 866(100%))*4
(rated motor capacity)*4
Oscilloscope
#
#
#
#
#
#
#
#
#
#*1
#*2
#
#
×
×
×
×
#
#
#
×
×
VFD Status
×
#
#
×
×
×
#
#
#
×
×
×
×
×
#
#
×
×
×
×
×
×
(Pr. 56(rated current))*4
(Pr. 83(200V/400V))*4
(400V/800V)*4
Select the input terminal of the oscilloscope from among DO1, DO2, DO3 and ABC.
Select the output terminal of the oscilloscope from among STF, STR, RES, D11, D12, D13, D14 and OH.
If an inverter alarm occurs during monitoring, each monitor holds the value at an alarm occurrence.
Values in parenthesis indicate full scale values.
34
MONITORING
9.2
Data Display
Up to four different signals are displayed as numerical values in real time.
The input and output states of the control terminals can also be monitored.
1)
2)
3)
2)
5)
6)
4)
35
MONITORING
No.
Name
Monitor function
1) switchover
Description
Used to switch between the monitor functions (data display, meter display, oscilloscope, alarm history).
Choosing the item to be monitored displays the status, the current value and maximum value, etc. of
the monitor item. The maximum value is cleared when the monitoring is stopped.
3) Input/output status Shows the ON/OFF states of the input/output status. (ON: red, OFF: gray)
Used to start monitoring. During monitoring, this button acts as the "Stop" button.
4) Start/Stop
Used to hold the data being monitored. Valid only during monitoring.
5) Hold/On Hold
During hold, this button acts as the "On Hold" button, and clicking it cancels hold.
Displays alarm descriptions when an alarm occurs in the inverter during monitoring.
2) Monitor item
6) Alarm display
REMARKS
You can see the detailed information on alarms in "Alarm history" on page 43.
For inverter alarm details, refer to the inverter manual.
REMARKS
・Different signals for data display are updated every 5s.
・It can not move to other screen during monitoring.
36
MONITORING
9.3
Meter Display
Up to four different signals are displayed as meters at regular time intervals.
1)
2)
3)
4)
5)
)
37
MONITORING
No.
Name
1)
Display item
2)
Meter display
3)
Monitor value
4)
Start/Stop
5)
Hold/On Hold
6)
Alarm display
Description
Select the item to be monitored.
The monitor value is displayed as a meter (current value... black, maximum value... red).
The full-scale value of the meter can be changed by entering a new value directly.
The current value and maximum value of the monitor item are displayed. The maximum value
is cleared when the monitoring is stopped. (Refer to page 34 page for the full scale value.)
Used to start monitoring. During monitoring, this button acts as the "Stop" button.
Used to hold the data being monitored. Valid only during monitoring.
During hold, this button acts as the "On Hold" button, and clicking it cancels hold.
Displays alarm descriptions when an alarm occurs in the inverter during monitoring.
REMARKS
・Data is collected every 5 to 6s. (Note that time differs depending on the line conditions.)
・It can not move to other screen during monitoring.
38
MONITORING
9.4
Oscilloscope
Up to four different signals, which have been received from the inverter in advance, are displayed on the
personal computer screen as waveforms.
4)
1)
5)
7)
2)
6)
3)
8)
10)
9)
39
MONITORING
No.
Name
1)
Sampling item
2)
Sampling time
3)
Trigger selection
4)
Trigger condition
5)
Trigger terminal
6)
Trigger timing
7)
Status panel
Description
Select the item to be sampled.
<Sampling item>
Refer to the Monitor List (Refer to page 34.)
Enter the sampling interval. (50 to 30000ms)
Choose the external or internal trigger.
External trigger ...... Data sampling starts after start of measurement.
Internal trigger ....... Depending on trigger condition and timing.
Alarm trigger .......... Alarm occurrence is used as a trigger.
Select whether sampling will be started on the leading edge or trailing edge of the trigger
terminal signal.
Select the trigger terminal from the following items.
STF, STR, RES, DI1, DI2, DI3, DI4, OH, D01, D02, D03, ABC
Choose the timing for trigger waiting.
Before ...... 10240 pieces of data before establishment of trigger are displayed.
During ...... 5120 pieces of data before establishment of trigger and 5120 pieces after
establishment are displayed.
After ......... 10240 pieces of data after establishment of trigger are displayed.
Shows the status during sampling.
8)
Measurement start
Used to start measurement.
9)
Monitor
Used to monitor the measured data.
10) Alarm display
Displays alarm descriptions when an alarm occurs in the inverter during monitoring.
40
MONITORING
(1) The following status panel appears at start of sampling.
41
MONITORING
(2) Clicking [Play Back] after sampling displays the following screen.
1)
3)
2)
6)
5)
7)
No.
1)
2)
3)
4)
5)
6)
7)
2)
4)
Name
Data waveform selection
Data name
Data waveform
Current value
Scroll bar
Vertical scale knob
Settings
Description
Used to display or hide the data waveform.
Shows the input/output data name.
Shows the input/output data waveform of the monitor item.
Shows the center value in the waveform display region.
Used to scroll the waveform left to right.
Used to change the vertical scale of the monitored waveform.*
Used to return to the oscilloscope screen 1.
*The full scale value of the speed is the Pr. 55 setting. Change the Pr. 55 setting to change the speed to 1500r/min or
higher.
42
MONITORING
9.5
Alarm History
Past eight alarms history can be displayed.
1)
OHT
OHT
2)
No.
OP3
OLT
OLT
4)
3)
Name
OLT
OLT
5)
Description
1)
Alarm History
2)
Alarm Read
Used to display past eight alarms. Displays the name of alarm selected and output speed,
output current, output voltage and power on time below.
Used to read the alarm history from the inverter.
3)
Alarm Clear
Used to clear the alarm history of the inverter.
4)
Save
Used to save the alarm information into a file. (saved in a text format)
5)
VFD Reset
Used to reset the inverter. Made valid in the [LINK] mode. (Refer to page 16.)
43
10. DIAGNOSTICS
The output current, output voltage and other data are monitored at fixed intervals.
10.1 VFD Status
1)
2)
3)
4)
5)
No.
Name
1) Monitor Value
2)
Absolute Value/%
3)
Hold/On Hold
4)
5)
Monitor Start/Stop
Description
Shows the monitor value.
Used to switch the monitor display unit of the output current, output voltage or DC bus
voltage between the absolute value and %.
When the display unit is the absolute value, this button acts as the "%" button, and when
the display unit is %, this button acts as the "Absolute Value" button.
(N ote) F or % disp lay, fu ll sca le value is disp laye d as 10 0% . (R e fe r to pag e 34 fo r fu ll sca le valu e.)
Used to hold the data being monitored. Valid only during monitoring.
During hold, this button acts as the "On Hold" button, and clicking it cancels hold.
Monitoring is also performed during hold.
Used to start monitoring. During monitoring, this button acts as the "monitor stop" button.
Alarm Display
Displays alarm descriptions when an alarm occurs in the inverter during monitoring.
44
DIAGNOSTICS
10.2 Diagnostics
Various status at inverter error occurrences can be displayed.
1)
2)
No.
Name
1) Alarm History
2) Read
3) Alarm Clear
4) VFD Reset
3)
4)
Description
Shows the latest alarm and the output speed, output current, output voltage and energization
time at alarm occurrence.
Used to read the latest alarm from the inverter.
Used to clear the alarm history of the inverter.
Used to reset the inverter. Made invalid in the [LINK] mode. (Refer to page 16.)
45
11. MAIL SETTING
At the occurrence of an inverter alarm, its definition is sent to the preset mail address.
Mail is sent when the protective function of the inverter is activated, and the alarm definition, speed, output
current, output time and energization time at that time are sent.
xxx.xxx.xxx xxx
.
xxx@ xxx.xxx.xx.xx
2)
No.
1)
3)
Name
Description
1)
Main Settings
Enter the IP address of the mail server and the mail address of the transmission destination.
2)
Settings
Used to set the mail server and mail address settings in the inverter. (Save in the E2PROM)
3)
Cancel
Used to cancel the setting.
46
12.ERROR CODES
12.1 Error Code Lists
When an error occurs, following error codes are displayed in the Information column 4) in the screen on
page 15).
(1) Error codes related to an inverter error
Error Code
(HEX)
Error Name
22(16H)
23(17H)
Outside
parameter range
Operation mode
error
Running
Parameter write
disable
No parameters
No options
24(18H)
Narrow error
17(11H)
18(12H)
19(13H)
20(14H)
26(1AH)
33(21H)
34(22H)
35(23H)
36(24H)
37(25H)
Instruction code
error
Running in
present mode
With STF
With STR
Operation mode
specified
Pr. 75 specified
Definition
Data outside the setting range was specified for the running frequency (running
speed), parameter write or the like.
The present operation mode is not allowed to perform. Change the operation modes.
The inverter is running.
Parameter write is inhibited.
There are no parameters or related parameters have not been set.
The preset option is not connected to the inverter.
There is no difference between analog value settings of Pr. 902 (Pr. 904) and Pr. 903 (Pr.
905).
A non-existing instruction code was sent to the inverter.
Mode change etc. cannot be made since the inverter is running in the present
operation mode.
Mode change etc. cannot be made since the forward rotation command is entered.
Mode change etc. cannot be made since the reverse rotation command is entered.
Cannot be executed in the present operation mode.
Since Pr. 75 is specified, inverter reset cannot be executed.
47
APPENDIX
Inverter Operation Mode
(1)Operation mode switching conditions
Before switching the operation mode, check that:
1) The inverter is at a stop;
2) Both the STF and STR signals are off; and
3) The Pr. 79 "operation mode selection" setting is correct.
(For setting, use the inverter's operation panel or optional parameter unit.)
Pr. 79 Setting
0
1
2
3, 4
5
6
7
8
Operation Mode Selection
Switching to Network Operation Mode
Disallowed when the PU mode is selected. Allowed when
the external mode is selected.
Disallowed
Allowed
Disallowed
Disallowed
Allowed
Allowed only in the external operation mode when the
PU interlock signal (X12) is on.
Allowed only in the external operation mode (X16 on).
PU or external operation
PU operation
External operation
External/PU combined operation
Program operation
Switch-over
External operation
(PU operation interlock)
PU or external (signal switching)
REMARKS
When making a parameter setting using the Ethernet software, the operation mode needs to be switched to the
network operation mode. Set any of "0, 2, 6, 8" in Pr. 79 "operation mode selection" when changing the operation
mode to the network operation mode. (Refer to the inverter manual for details of Pr. 79.)
48
APPENDIX
(2)Operation mode switching method
Operation mode
switching button
C
Ethernet
D
External
operation
Switched
from PU
A
PU operation
B
E
(Switching disallowed)
F
Symbol
Switching Type
A
PU operation → External operation
B
External operation → PU operation
C
External operation → Network operation
D
Network operation → External operation
E
PU operation → Network operation
F
Network operation → PU operation
Switching Method
Operate the external operation key on the PU.
Operate the PU operation key on the PU.
Operate the operation mode switching button on the PC
screen. (Refer to page 16.)
Operate the operation mode switching button on the PC
screen. (Refer to page 16.)
Switching disallowed. Allowed if external operation is selected
in A and network operation is then selected in C. *1
Switching disallowed. Allowed if external operation is selected
in D and PU operation is then selected in B. *1
*1 In the switch-over mode (Pr. 79 = 6), switching in E and F is allowed.
CAUTION
1. When "1" is set in Pr. 340 "link startup mode selection", the operation mode is network
operation at power on or inverter reset.
2. When setting "1" in Pr. 340, the initial settings (station number setting, etc.) of the inverter
must be made without fail.
49
APPENDIX
(3) Pr. 340 "link startup mode selection"
You can select the operation mode at power-on or automatic restart after instantaneous power failure.
When choosing the network operation mode, set "1" in Pr. 340.
After the link has started, you can write the parameter value using software.
Pr. 340
Operation Mode
Setting Pr.79
0 PU or external operation
1 PU operation
2 External operation
External/PU combined
3
operation
External/PU combined
4
operation
0
(Factory 6 Switchover
setting)
7
PU operation interlock
8
Operation mode
external signal
switchover
Mode at Power-on or Automatic Restart after Instantaneous Power
Failure
External operation mode
PU operation mode
External operation mode
The running speed is set in the PU operation mode and the start signal in the
external operation mode.
The running speed is set in the external operation mode and the start signal
in the PU operation mode.
External operation mode
The operation mode is switched over with the operation continued.
X12 signal ON ......... External operation mode
(Can be switched to the PU operation mode using the
parameter unit.)
X12 signal OFF........ External operation mode
X16 signal ON ......... External operation mode
X16 signal OFF........ PU operation mode
50
APPENDIX
Pr. 340
Operation Mode
Setting Pr.79
0 PU or network operation
1 PU operation
2 Network operation
External/PU combined
3
operation
External/PU combined
4
operation
1(2)
6 Switchover
*
7
PU operation interlock
8
Operation mode
external signal
switchover
Mode at Power-on or Automatic Restart after Instantaneous Power
Failure
Network operation mode (Switchover using software is not needed.)
PU operation mode
Network operation mode (Switchover using software is not needed.)
The running speed is set in the PU operation mode and the start signal in the
external operation mode.
The running speed is set in the external operation mode and the start signal
in the PU operation mode.
Network operation mode
The operation mode is switched over with the operation continued.
For details, refer to the inverter manual.
X12 signal ON ......... PU operation mode (Can be switched to the external
operation mode using a program.)
X12 signal OFF........ External operation mode
X16 signal ON ......... Network operation mode (Can be switched to the
external operation mode using a program.)
X16 signal OFF........ PU operation mode
REMARKS
The Pr. 340 setting can be changed from the PU independently of the operation mode.
51
APPENDIX
(4) Pr. 338 "operation command source", Pr. 339 "speed command source"
In the network operation mode, commands from the external terminals and network variables are as listed
below:
POINT
Selecting external for operation command source (Pr. 338=1) enables the forward rotation command,
reverse rotation command, etc. from the external terminal even in the NET mode.
Fixed functions
(Functions equivalent
to terminals)
Control
location
selection
Pr. 338 "operation control command source"
0: NET
0: NET
1: External 1: External
Pr. 339 "speed command source"
0: NET
1: External
0: NET
1: External
—
—
—
—
External
External
External
External
Combined
Combined
Combined
Combined
External
—
—
Compen
sation
External
—
External
External
—
—
Compensat
ion
External
—
External
REMARKS
Forward rotation command (STF)
Reverse rotation command (STR)
Reset (RES)
External thermal relay (OH)
Network operation speed
2
Speed setting auxiliary
1
3
Magnetic flux command/regeneration torque
restriction
External
External
External
External
External
External
External
External
External
External
52
APPENDIX
Selective functions
Pr. 180 to Pr. 183, Pr. 187 settings *1
Selective functions
Pr. 180 to Pr. 183, Pr. 187 settings *1
Control
location
selection
Pr. 338 "operation control command source"
0: NET
0: NET
Pr. 339 "speed command source"
0: NET
1: External
1: External 1: External
REMARKS
operation command,
0 Low-speed
Remote setting (setting clear) (RL)
operation command, Remote setting
1 Middle-speed
(deceleration) (RM)
High-speed
operation
2 (acceleration) (RH) command, Remote setting
3 Second function selection (RT)
5 Jog operation selection (JOG)
0: NET
1: External
—
External
—
External
—
External
—
External
—
External
—
External
—
—
External
External
—
—
External
External
8 15-speed selection (REX)
—
External
—
External
9 Third function (X9)
10 FR-HC connection, FR-CV connection (inverter
operation enable) (X10)
FR-HC connection (instantaneous power failure
11 detection) (X11)
12 PU operation external interlock (X12)
14 PID control enable terminal (X14)
15 Brake sequence opening completion signal (BRI)
16 PU-external operation switchover (X16)
20 S-pattern acceleration/deceleration C switchover (X20)
22 Orientation command(X22)
23 Pre-excitation/servo ON (LX)
24 Output stop (MRS)
25 Start self-holding selection (STOP)
26 Control mode changing (MC)
27 Torque restriction selection (TL)
42 Torque bias selection 1 (X42)
43 Torque bias selection 2 (X43)
—
—
External
External
External
External
External
External
External
External
External
External
External
—
—
External
—
—
—
External
—
—
—
—
—
External
External
—
External
—
—
—
External
—
—
—
—
—
External
—
External
External
External
External
External
External
External
External
External
External
External
External
External
External
External
External
External
External
External
External
External
External
External
External
—
—
External
External
44 P control selection (P/PI control switchover) (X44)
53
Pr. 59 ≠ 0:
Remote setting
*2
APPENDIX
External
NET
Combined
—
Compensation
: Control by signal from external terminal is only valid.
: Control from network is only valid.
: Control from both external terminal and network is valid.
: Control from both external terminal and network is invalid.
: Control by signal from external terminal is only valid if Pr. 28 "multi-speed input compensation" setting is 1.
CAUTION
1. For details of Pr. 180 to Pr. 183, Pr. 187 (input terminal function selection), refer to the inverter manual.
2. When the MRS signal is assigned for both network and external, the output stop command is as
indicated in the following table.
Network
External
ON
ON
OFF
OFF
ON
OFF
ON
OFF
Output Stop Command
Pr.17="0"
Pr.17="2"
Output stopped
Output stopped
Output stopped
Output not stopped
Output not stopped
Output stopped
Output stopped
Output stopped
54
APPENDIX
(5) Inverter Reset
Which resetting method is allowed or not allowed in each operation mode is described below.
Operation Mode
Network
External
PU
operation operation operation
Resetting Method
Ethernet Inverter reset (command request network variable)
software •The inverter can be reset any time.
Turn on the signal across terminals RES-SD.
Power off the inverter.
Allowed
Allowed
Allowed
Disallowed Disallowed
Allowed
Allowed
Allowed
Allowed
CAUTION
1. The inverter can not be reset using the Ethernet software (PC) at a communication line fault.
2. Resetting the inverter in the network operation mode places it in the external operation mode.
To resume network operation, therefore, the operation mode must be switched to the network
operation again. (This switchover is not needed when "1" is set in Pr. 304 "link startup mode
selection". Refer to page 51.)
3. During an inverter reset, communication is interrupted about 1 to 2 mins.
55
MEMO
REVISIONS
*The manual number is given on the bottom left of the back cover.
Print Date
August, 2002
*Manual Number
IB(NA)-0600108E-A First edition
Revision