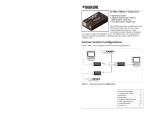
1
®
10Base-T Hub
Installation and Maintenance Practice
Document Number: 61181012L1-5C
CLEI: SIM3FG0D_ _
November 2007
10Base-T Hub Installation and Maintenance Practice
Trademarks
Front Matter
Any brand names and product names included in this document are trademarks, registered
trademarks, or trade names of their respective holders.
To the Holder of the Document
The contents of this document are current as of the date of publication. ADTRAN® reserves the
right to change the contents without prior notice.
In no event will ADTRAN be liable for any special, incidental, or consequential damages or
for commercial losses even if ADTRAN has been advised thereof as a result of issue of this
document.
®
901 Explorer Boulevard
P.O. Box 140000
Huntsville, AL 35814-4000
(256) 963-8000
©2007 ADTRAN, Inc.
All Rights Reserved.
ii
61181012L1-5C
Revision History
Revision
Date
Description
A
January 2001
Initial release
B
February 2007
Correct CLEI code; update compliance information
C
November 2007
Updated to show there are two mounting brackets that ship with
this unit.
Conventions
The following typographical conventions are used in this document:
This font indicates a cross-reference link.
This font indicates screen menus, fields, and parameters.
THIS FONT indicates keyboard keys (ENTER, ESC, ALT). Keys that are to be pressed simultaneously are shown with a plus sign (ALT+X indicates that the ALT key and X key should be
pressed at the same time).
This font indicates references to other documentation and is also used for emphasis.
This font indicates on-screen messages and prompts.
This font indicates text to be typed exactly as shown.
This font indicates silkscreen labels or other system label items.
This font is used for strong emphasis.
NOTE
Notes inform the user of additional, but essential, information or
features.
CAUTION
Cautions inform the user of potential damage, malfunction, or disruption to equipment, software, or environment.
WARNING
Warnings inform the user of potential bodily pain, injury, or death.
61181012L1-5C
iii
10Base-T Hub Installation and Maintenance Practice
Training
ADTRAN offers training courses on our products. These courses include overviews on product
features and functions while covering applications of ADTRAN’s product lines. ADTRAN
provides a variety of training options, including customized training and courses taught at our
facilities or at customer sites.
For inquiries concerning training, contact ADTRAN:
Training Phone:
800-615-1176, ext. 6996
Training Fax:
256-963-6217
Training Email:
[email protected]
iv
61181012L1-5C
Contents
introduction . . . . . . . . . . . . . . . . . . . . . . . . . . . . . . . . . . . . . . . . . . . . . . . . . . . . . . . . . . . . . . . . . . . . . . . . . . . . . .
Description . . . . . . . . . . . . . . . . . . . . . . . . . . . . . . . . . . . . . . . . . . . . . . . . . . . . . . . . . . . . . . . . . . . . . . . . . . . .
Mounting . . . . . . . . . . . . . . . . . . . . . . . . . . . . . . . . . . . . . . . . . . . . . . . . . . . . . . . . . . . . . . . . . . . . . . . . . .
Connections . . . . . . . . . . . . . . . . . . . . . . . . . . . . . . . . . . . . . . . . . . . . . . . . . . . . . . . . . . . . . . . . . . . . . . . .
Controls . . . . . . . . . . . . . . . . . . . . . . . . . . . . . . . . . . . . . . . . . . . . . . . . . . . . . . . . . . . . . . . . . . . . . . . . . . .
Features . . . . . . . . . . . . . . . . . . . . . . . . . . . . . . . . . . . . . . . . . . . . . . . . . . . . . . . . . . . . . . . . . . . . . . . . . . . . . .
Compliance . . . . . . . . . . . . . . . . . . . . . . . . . . . . . . . . . . . . . . . . . . . . . . . . . . . . . . . . . . . . . . . . . . . . . . . . . . . .
1
1
1
2
3
3
4
Installation . . . . . . . . . . . . . . . . . . . . . . . . . . . . . . . . . . . . . . . . . . . . . . . . . . . . . . . . . . . . . . . . . . . . . . . . . . . . . . . 5
Shipping Contents . . . . . . . . . . . . . . . . . . . . . . . . . . . . . . . . . . . . . . . . . . . . . . . . . . . . . . . . . . . . . . . . . . . . . . 5
Installation Prerequisites . . . . . . . . . . . . . . . . . . . . . . . . . . . . . . . . . . . . . . . . . . . . . . . . . . . . . . . . . . . . . . . . . 5
Installing the 10Base-T Hub . . . . . . . . . . . . . . . . . . . . . . . . . . . . . . . . . . . . . . . . . . . . . . . . . . . . . . . . . . . . . . . 6
Wall-Mount Installation . . . . . . . . . . . . . . . . . . . . . . . . . . . . . . . . . . . . . . . . . . . . . . . . . . . . . . . . . . . . . . . . 6
Tools Required . . . . . . . . . . . . . . . . . . . . . . . . . . . . . . . . . . . . . . . . . . . . . . . . . . . . . . . . . . . . . . . . . . 7
Wall-Mount Instructions . . . . . . . . . . . . . . . . . . . . . . . . . . . . . . . . . . . . . . . . . . . . . . . . . . . . . . . . . . . . 7
Rack-Mount Installation . . . . . . . . . . . . . . . . . . . . . . . . . . . . . . . . . . . . . . . . . . . . . . . . . . . . . . . . . . . . . . . 8
Tools Required . . . . . . . . . . . . . . . . . . . . . . . . . . . . . . . . . . . . . . . . . . . . . . . . . . . . . . . . . . . . . . . . . . 8
Chassis-Mount Instructions . . . . . . . . . . . . . . . . . . . . . . . . . . . . . . . . . . . . . . . . . . . . . . . . . . . . . . . . . 8
Bay Framework-Mount Instructions . . . . . . . . . . . . . . . . . . . . . . . . . . . . . . . . . . . . . . . . . . . . . . . . . . . 9
Desk-Mount Installation . . . . . . . . . . . . . . . . . . . . . . . . . . . . . . . . . . . . . . . . . . . . . . . . . . . . . . . . . . . . . . . 9
Connections . . . . . . . . . . . . . . . . . . . . . . . . . . . . . . . . . . . . . . . . . . . . . . . . . . . . . . . . . . . . . . . . . . . . . . . . . . 10
Maintenance . . . . . . . . . . . . . . . . . . . . . . . . . . . . . . . . . . . . . . . . . . . . . . . . . . . . . . . . . . . . . . . . . . . . . . . . . . . . . 11
Specifications. . . . . . . . . . . . . . . . . . . . . . . . . . . . . . . . . . . . . . . . . . . . . . . . . . . . . . . . . . . . . . . . . . . . . . . . . . . . 11
Appendix A
Warranty . . . . . . . . . . . . . . . . . . . . . . . . . . . . . . . . . . . . . . . . . . . . . . . . . . . . . . . . . . . . . . . . . . . . . . . A-1
Warranty and Customer Service . . . . . . . . . . . . . . . . . . . . . . . . . . . . . . . . . . . . . . . . . . . . . . . . . . . . . . . .
ADTRAN Sales . . . . . . . . . . . . . . . . . . . . . . . . . . . . . . . . . . . . . . . . . . . . . . . . . . . . . . . . . . . . . . . . . . .
ADTRAN Technical Support . . . . . . . . . . . . . . . . . . . . . . . . . . . . . . . . . . . . . . . . . . . . . . . . . . . . . . . . .
ADTRAN Repair/CAPS . . . . . . . . . . . . . . . . . . . . . . . . . . . . . . . . . . . . . . . . . . . . . . . . . . . . . . . . . . . . .
Repair and Return Address . . . . . . . . . . . . . . . . . . . . . . . . . . . . . . . . . . . . . . . . . . . . . . . . . . . . . . . . . .
61181012L1-5C
A-1
A-1
A-1
A-1
A-1
v
10Base-T Hub Installation and Maintenance Practice
Figures
Figure 1.
Figure 2.
Figure 3.
Figure 4.
10Base-T Hub . . . . . . . . . . . . . . . . . . . . . . . . . . . . . . . . . . . . . . . . . . . . . . . . . . . . . . . . . . . . . . . . .
Rear Panel RJ-45 Jacks . . . . . . . . . . . . . . . . . . . . . . . . . . . . . . . . . . . . . . . . . . . . . . . . . . . . . . . . . .
Side Panel Terminal Block . . . . . . . . . . . . . . . . . . . . . . . . . . . . . . . . . . . . . . . . . . . . . . . . . . . . . . . .
Wall-mount Attachment Assembly . . . . . . . . . . . . . . . . . . . . . . . . . . . . . . . . . . . . . . . . . . . . . . . . . .
1
2
2
6
Tables
Table 1.
Table 2.
Table 3.
Table 4.
vi
Front Panel Description . . . . . . . . . . . . . . . . . . . . . . . . . . . . . . . . . . . . . . . . . . . . . . . . . . . . . . . . . . 3
Compliance Codes . . . . . . . . . . . . . . . . . . . . . . . . . . . . . . . . . . . . . . . . . . . . . . . . . . . . . . . . . . . . . . 4
–48 VDC Connections . . . . . . . . . . . . . . . . . . . . . . . . . . . . . . . . . . . . . . . . . . . . . . . . . . . . . . . . . . 10
10Base-T Hub Specifications . . . . . . . . . . . . . . . . . . . . . . . . . . . . . . . . . . . . . . . . . . . . . . . . . . . . . 11
61181012L1-5C
10Base-T Hub
INTRODUCTION
The ADTRAN 10Base-T Hub is a compact, lightweight hub that delivers 10Base-T connectivity. The 10Base-T Hub can also be used to increase the density of existing services.
Figure 1 illustrates the 10Base-T Hub (P/N 1181012L1) front panel.
Figure 1. 10Base-T Hub
Description
The 10Base-T Hub has eight 10Base-T Ethernet ports that support up to seven platforms or
equipment. It is housed in a metal enclosure and can be mounted in three different ways.
Mounting
The 10Base-T Hub can be mounted using one of the following three methods:
• Wall-mount (mounting to a vertical surface)
• Rack-mount (mounting to the outside of an ADTRAN multi-service access platform or to the
relay rack itself
• Desk-mount (mounting to a desk or similar horizontal surface)
61181012L1-5C
1
10Base-T Hub Installation and Maintenance Practice
Connections
The 10Base-T Hub incorporates eight 10Base-T Ethernet ports (including one cross-over LAN
connector/daisy-chain port). Up to seven platforms, or other equipment, can be connected to
the hub using its 10Base-T Ethernet ports.
• All Ethernet equipment connections to the 10Base-T Hub are made using modular RJ-45
jacks (labeled 1 through 8) located on the rear panel (see Figure 2).
• Power connections are made to a terminal block located on the side panel of the 10Base-T
Hub (see Figure 3).
• A cross-over switch allows the first port to connect directly to the LAN, or allows the daisychaining of multiple hubs.
Figure 2. Rear Panel RJ-45 Jacks
Figure 3. Side Panel Terminal Block
2
61181012L1-5C
introduction
Controls
The 10Base-T Hub has nine front panel LEDs for power and port status, and a front panel
reset button. The reset button can be used without removing power.
Table 1 describes the LEDs and the reset button on the front panel).
Table 1. Front Panel Description
Label
PWR
PORTS
(1 – 8)
RESET
Status
Description
{
Off
No power to the unit
z
Green
Power is present
{
Off
No Ethernet link
z
Green
Normal operation
2
Green Flashing
Data is being transferred
N/A
Resets the unit, without removing power
Features
The basic features of the 10Base-T Hub include the following:
• Uses –48 VDC; no power adapters required for Telco environment
• Supports eight 10Base-T Ethernet ports
• Provides a reset button on the front panel
• Provides front panel LEDs for power and port status
• Provides modular RJ-45 jacks for equipment connections
• Can be mounted on a wall, in a rack, or on a desk
• Complies with UL 60950 requirements
• Complies with NEBS Level 3
61181012L1-5C
3
10Base-T Hub Installation and Maintenance Practice
Compliance
CAUTION
Electrostatic discharge (ESD) can damage electronic modules.
When handling modules, wear an antistatic discharge wrist strap
to prevent damage to electronic components. Place modules in
antistatic packing material when transporting or storing. When
working on modules, always place them on an approved antistatic
mat that is electrically grounded.
Figure 2 shows the compliance codes for the 10Base-T Hub. The 10Base-T Hub is NRTL-listed
to the applicable standards. It meets or exceeds all the applicable requirements of NEBS,
Telcordia GR-63-CORE, and GR-1089-CORE.
The 10Base-T Hub is intended for deployment in Central Office (CO) type facilities, EEEs,
EECs, and locations where the NEC applies.
Table 2. Compliance Codes
Code
Input
Output
Power Code (PC)
A
–
Telecommunication Code (TC)
–
X
Installation Code (IC)
F
C
CAUTION
Per GR-1089-CORE, the 10Base-T Hub is designed and intended
for installation as part of a Common Bonding Network (CBN). The
10Base-T Hub is not designed nor intended for installation as part
of an Isolated Bonding Network (IBN).
CAUTION
Per GR-1089-CORE Section 9, the 10Base-T Hub is designed and
intended only for installation in a DC-C (common) bonding and
grounding system. The 10Base-T Hub is not intended or designed
for installation in a DC-I (isolated) bonding and grounding system.
NOTE
The 10Base-T Hub (P/N 1181012L1) does not require the use of an
external AC Surge Protection Device. However, for highly exposed
AC mains environments, an external AC Surge Protection Device is
recommended.
4
61181012L1-5C
Installation
INSTALLATION
C A U T I O N !
SUBJECT TO ELECTROSTATIC DAMAGE
OR DECREASE IN RELIABILITY.
HANDLING PRECAUTIONS REQUIRED.
After unpacking the 10Base-T Hub, inspect it for damage. If damage has occurred, file a
claim with the carrier then contact ADTRAN Customer Service. Refer to “Appendix A,
Warranty” for further information. If possible, keep the original shipping container for
returning the 10Base-T Hub for repair or for verification of shipping damage.
Shipping Contents
The contents include the following items:
• 10Base-T Hub
• 10Base-T Hub Installation and Maintenance Practice (P/N 61181012L1-5)
• An external mounting bracket that is shipped assembled to the hub and is used for wall
mount and chassis mount
• An internal mounting bracket that is shipped unassembled with the hub and is used to bay
framework-mount the unit
• Rubber desk mounts
• Four 6-32 × 3/16 flathead screws, one cable tie, and five 12-24 × 3/8 screws
Installation Prerequisites
Before installing the 10Base-T Hub, observe the following:
• Never install telephone wiring during a lightning storm.
• Never install telephone jacks in wet locations unless the jack is specifically designated for
wet locations.
• Never touch uninsulated telephone wires or terminals unless the telephone line has been
disconnected at the network interface.
• Use caution when installing or modifying telephone lines.
• When installed, this unit is intended to be used behind devices that provide primary
lightning protection.
The 10Base-T Hub ships pre-assembled to the external mounting bracket, and unassembled
from the internal mounting bracket. It is necessary to disassemble the 10Base-T Hub before
installing on a wall or in a rack. See Figure 3 and Figure 4 for details on disassembling and
assembling the 10Base-T Hub.
61181012L1-5C
5
10Base-T Hub Installation and Maintenance Practice
Installing the 10Base-T Hub
The 10Base-T Hub can be mounted using any one of the following three methods:
• “Wall-Mount Installation” on page 6
• “Rack-Mount Installation” on page 8
• “Desk-Mount Installation” on page 9
Wall-Mount Installation
Use the wall-mount method of installation to secure the 10Base-T Hub to a vertical surface.
Figure 4. Wall-mount Attachment Assembly
6
61181012L1-5C
Installation
Tools Required
NOTE
Wall-mounting hardware and tools are not included.
The following tools are required to mount the 10Base-T Hub to a wall.
• Small flat-tip screwdriver
• #1 Phillips-head screwdriver
• Depending on the mounting surface: wood screws, dry-wall fasteners, or cement-type wall
fasteners
• Awl or drill with assorted wood or cement bits
• Hammer
• Pliers
• Line cutters
Wall-Mount Instructions
To mount the 10Base-T Hub to a wall, complete the following steps:
NOTE
The 10Base-T Hub ships pre-assembled to the external mounting
bracket, and unassembled from the internal mounting bracket.
The 10Base-T Hub must be disassembled before performing the
following instructions. See Figure 3 and Figure 4 for details on disassembling and assembling the 10Base-T Hub.
1. Remove the hub from the external mounting bracket by removing the flathead screw near
the power connector that secures the hub to the bracket. Slide the hub away from the tab
and lift off the bracket (see Figure 4).
2. Locate a place to mount the 10Base-T Hub that allows for sufficient slack in the RJ-45
cables.
3. Use the external mounting bracket as a template, and mark the location of the mounting
holes for the 10Base-T Hub to be installed.
4. After marking the hole locations, remove the mounting plate from the wall. Drill a hole
into the wall to accommodate the wall fasteners being used. Do not make the holes too
large.
5. Mount the bracket to the wall.
6. Attach the 10Base-T Hub to the mounting bracket through the keyholes on the bottom of
the 10Base-T Hub. The front panel of the 10Base-T Hub must be facing the side flange.
7. Use the flush-mount phillips-head screw to secure the 10Base-T Hub to the bracket
through the small lip on the side of the bracket. The orientation is correct if the lip is flush
against the 10Base-T Hub on the side containing the power connection terminals.
61181012L1-5C
7
10Base-T Hub Installation and Maintenance Practice
8. Put the 10Base-T Hub on the wall-mounted bracket.
9. Connect the RJ-45 cables. Refer to the “Connections” on page 10 in this practice.
Rack-Mount Installation
There are two procedures for mounting the 10Base-T Hub to a rack.
• “Chassis-Mount Instructions” on page 8
• “Bay Framework-Mount Instructions” on page 9
Tools Required
The following tools are require to mount the 10Base-T Hub to a rack:
• Small flat-tip screwdriver
• #1 Phillips-head screwdriver
• Line cutters
Chassis-Mount Instructions
To mount the 10Base-T Hub to a chassis, complete the following steps:
NOTE
The 10Base-T Hub ships pre-assembled to the external mounting
bracket, and unassembled from the internal mounting bracket.
The 10Base-T Hub must be disassembled before performing the
following instructions. See Figure 3 and Figure 4 for details on disassembling and assembling the 10Base-T Hub.
1. Remove the hub from the external mounting bracket by removing the flathead screw near
the power connector that secures the hub to the bracket. Slide the hub away from the tab
and lift off the bracket (see Figure 4).
2. The external mounting bracket is designed to replace either of the side flanges that mount
the chassis to the bay. Carefully remove either of the side flanges attached to the chassis
and replace them with the mounting bracket provided with the10Base-T Hub. Tighten the
chassis to the bay. Ensure two phillips-head screws are attached to the center two holes
closest to the edge opposite the flange on the bracket.
3. Attach the 10Base-T Hub to the mounting bracket through the keyholes on the bottom of
the 10Base-T Hub. The front panel of the 10Base-T Hub must be facing the side flange.
4. Use the flush mount phillips-head screw to secure the 10Base-T Hub to the bracket
through the small lip on the side of the bracket. The orientation is correct if the lip is flush
against the 10Base-T Hub on the side containing the power connection terminal block.
5. Put the 10Base-T Hub on the rack-mounted bracket.
6. Connect the RJ-45 cables. For more information, refer to the “Connections” on page 10 in
this practice.
8
61181012L1-5C
Installation
Bay Framework-Mount Instructions
To mount the 10Base-T Hub to the bay framework, complete the following steps:
NOTE
The 10Base-T Hub ships pre-assembled to the external mounting
bracket, and unassembled from the internal mounting bracket.
The 10Base-T Hub must be disassembled before performing the
following instructions. See Figure 3 and Figure 4 for details on disassembling and assembling the 10Base-T Hub.
1. Remove the hub from the external mounting bracket by removing the flathead screw near
the power connector that secures the hub to the bracket. Slide the hub away from the tab
and lift off the bracket (see Figure 4).
2. The external mounting bracket, removed from the 10Base-T Hub in step 1, will not be
used in this application. The internal mounting bracket, shipped unassembled from the
10Base-T Hub, will be used instead.
3. Mount the internal bracket through the flange to anywhere on the bay framework.
4. Attach the 10Base-T Hub to the mounting bracket via the keyholes on the bottom of the
10Base-T Hub. The front panel of the 10Base-T Hub must be facing the side flange.
5. Use the flush mount phillips-head screw to secure the 10Base-T Hub to the bracket
through the small lip on the side of the bracket. The orientation is correct if the lip is flush
against the 10Base-T Hub on the side containing the power connection terminal block.
6. Put the 10Base-T Hub on the bay framework-mount bracket.
7. Connect the RJ-45 cables. For more information, refer to the “Connections” on page 10 in
this practice.
Desk-Mount Installation
To mount the 10Base-T Hub to a desk, complete the following steps:
1. Remove the 10Base-T Hub from the bracket, as it will not be used in this application.
2. Attach the rubber desk mounts to the bottom of the 10Base-T Hub.
3. Plug in cables and set the unit on a flat surface. Allow adequate slack in the RJ-45 cables.
For more information, refer to the “Connections” on page 10 in this practice.
61181012L1-5C
9
10Base-T Hub Installation and Maintenance Practice
Connections
All Ethernet connections are made using the RJ-45 jacks (labeled 1 through 8) located on the
rear panel. The first jack is also designated as the cross-over jack; it is controlled by the crossover switch located at the far right of the rear panel.
NOTE
To daisy-chain the 10Base-T Hub to other hubs, place the rear
panel switch (see Figure 2) in the left cross-over position (×). To use
as a LAN port, put in the right position (=).
The 10Base-T Hub provides for a single voltage input, a single voltage return, and a frame
ground. Table 3 shows the connections.
Table 3. –48 VDC Connections
Label
Connections
–
–48 VDC
+
–48 VDC Return
Frame Ground
10
61181012L1-5C
Maintenance
MAINTENANCE
The 10Base-T Hub does not require routine maintenance for normal operation.
Do not attempt repairs in the field. Repair services may be obtained by returning the defective
unit to ADTRAN. Refer to “Appendix A, Warranty” for further information.
SPECIFICATIONS
Table 4 lists the specifications for the 10Base-T Hub.
Table 4. 10Base-T Hub Specifications
Specification
Description
Environmental
Operating Temperature:
Storage Temperature:
Relative Humidity:
–0°C to +50°C
–40°C to +85°C
95 percent maximum @ +50°C, noncondensing
Power
Maximum Current Draw:
Maximum Heat Dissipation:
–48 VDC
2 watts
Physical
Dimensions:
Weight:
Height: 1.25 inches
Width: 3.78 inches
Depth: 5.56 inches
< 1 pound
Part Number
10Base-T Hub:
61181012L1-5C
1181012L1
11
10Base-T Hub Installation and Maintenance Practice
This page is intentionally blank.
12
61181012L1-5C
Appendix A
Warranty
WARRANTY AND CUSTOMER SERVICE
ADTRAN will replace or repair this product within the warranty period if it does not meet its
published specifications or fails while in service. Warranty information can be found at
www.adtran.com/warranty.
Refer to the following subsections for sales, support, Customer and Product Service (CAPS)
requests, or further information.
ADTRAN Sales
Pricing/Availability:
800-827-0807
ADTRAN Technical Support
Pre-Sales Applications/Post-Sales Technical Assistance:
800-726-8663
Standard hours: Monday - Friday, 7 a.m. - 7 p.m. CST
Emergency hours: 7 days/week, 24 hours/day
ADTRAN Repair/CAPS
Return for Repair/Upgrade:
(256) 963-8722
Repair and Return Address
Contact CAPS prior to returning equipment to ADTRAN.
ADTRAN, Inc.
CAPS Department
901 Explorer Boulevard
Huntsville, Alabama 35806-2807
61181012L1-5C
A-1
®
Carrier Networks Division
901 Explorer Blvd.
Huntsville, AL 35806