1
4. CONTROLS (CONT’D)
4.2 ELECTRICAL CONNECTION TO OPTIONAL WALL CONTROL
For more convenience, this unit can also be controlled using an optional main wall control.
! WARNING
Always disconnect the unit before making any connections. Failure in disconnecting power could result in electrical
shock or damage of the wall control or electronic module inside the unit.
CAUTION
Never install more than one optional main wall control per unit. Make sure that the wires do not short-circuit
between themselves or by touching any other components on the wall control. Avoid poor wiring connections. To
reduce electrical interference (noise) potential, do not run wall control wiring next to control contactors or near
light dimming circuits, electrical motors, dwelling/building power or lighting wiring, or power distribution panel.
B
A
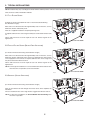
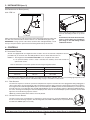
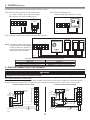
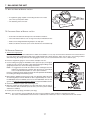
Use the terminal connector included in the installation kit to perform the electrical connection
for main and optional wall controls. Check if all wires are correctly inserted in their
corresponding holes in the terminal block. (A wire is correctly inserted when its orange
receptacle is lower than another one without wire. On illustration at right, wire A is
correctly inserted, but not wire B.)
VE0272
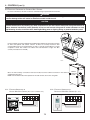
Once the wall control(s) connections have been made, insert the terminal connector in the electrical
compartment front face.
NOTE: For information about the operation of the wall controls, refer to the user guide.
TERMINAL
CONNECTOR
LOCATION
VD0278
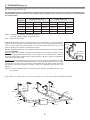
4.2.1 ELECTRICALCONNECTION TO
ALTITUDE MAIN WALL CONTROL (EXCLUSIVELY FOR SOLO UNITS)
4.2.2 ELECTRICAL CONNECTION TO
DECO-TOUCH MAIN WALL CONTROL (ALL UNITS)
NO C NC I OC OL Y R G B
MODE
PREF
SET
NO C NC I OC OL Y R G B
SMART
VE0250
VE0175
14