1
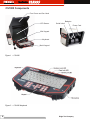
Operator’s Manual
Table of Contents
Recording Form for Machine Serial Number ��1
Safety Symbols ��������������������������������������������������2
General Safety Rules ����������������������������������������2
Work Area Safety���������������������������������������������������� 2
Electrical Safety ������������������������������������������������������ 2
Personal Safety ������������������������������������������������������ 3
Equipment Use and Care ��������������������������������������� 3
Battery Use and Care ��������������������������������������������� 3
Service�������������������������������������������������������������������� 4
Specific CS1000 Safety Information ����������������4
Description, Specifications, and Standard
Equipment ����������������������������������������������������������5
Description�������������������������������������������������������������� 5
Specifications ��������������������������������������������������������� 5
Standard Equipment ����������������������������������������������� 5
CS1000 Components�����������������������������������������6
Icon Legend �������������������������������������������������������8
Pre-Operation Inspection����������������������������������8
Work Area and Equipment Set Up ������������������8
Equipment Set Up ���������������������������������������������9
Placement �������������������������������������������������������������� 9
Tilt Stand ���������������������������������������������������������������� 9
Front Cover������������������������������������������������������������� 9
Connecting the CS1000 ����������������������������������10
System Connector ������������������������������������������������ 10
Additional CS1000 Ports �������������������������������������� 10
Powering the CS1000 ��������������������������������������11
Battery Operation ������������������������������������������������� 11
External Power ����������������������������������������������������� 12
CS1000 Operating Instructions ����������������������12
Powering ON the CS1000 ������������������������������������ 12
Interface Overview�������������������������������������������13
Software Interface ������������������������������������������������ 13
Live View �������������������������������������������������������������� 13
Dashboard ������������������������������������������������������������ 13
Status Bar ������������������������������������������������������������� 14
Keypad Overviews�������������������������������������������16
Mini Keypad ���������������������������������������������������������� 16
Main Keypad��������������������������������������������������������� 16
Additional Controls ����������������������������������������������� 17
Using the Zero Key ���������������������������������������������� 18
Using the Sonde Key ������������������������������������������� 18
Starting a New Job ���������������������������������������������� 19
Documenting an Inspection ���������������������������20
ii
Performing Inspections with Autolog ������������������� 20
Recording Video ��������������������������������������������������� 20
Taking Still Photos ������������������������������������������������ 21
Adding Notes to Photos ���������������������������������������� 21
Adding Issue Tags to Photos �������������������������������� 21
Annotating an Inspection by Voice ����������������������� 23
Adding a New Session ����������������������������������������� 23
Adding Job Information����������������������������������������� 24
Reviewing Jobs ���������������������������������������������������� 24
Previewing Reports ���������������������������������������������� 26
Closing a Job �������������������������������������������������������� 28
Resuming a Closed Job ��������������������������������������� 28
Powering OFF the CS1000 ���������������������������������� 28
Recycling Jobs ����������������������������������������������������� 29
Configuring the CS1000 ����������������������������������29
Main Menu ������������������������������������������������������������ 29
Customizing Settings ������������������������������������������� 30
Delivering Reports ������������������������������������������32
Customer Direct Reports �������������������������������������� 32
HQ Compatible Reports ��������������������������������������� 34
Do More with SeeSnake HQ �������������������������������� 35
Maintenance Instructions �������������������������������36
Cleaning ��������������������������������������������������������������� 36
Accessories ���������������������������������������������������������� 36
Transport and Storage ������������������������������������������ 37
Service and Repair ����������������������������������������������� 37
Disposal������������������������������������������������������������37
Battery Disposal ��������������������������������������������������� 37
Appendix A: Issue Tags ����������������������������������38
Trouble Shooting ���������������������������������������������39
Notes
Lifetime Warranty ����������������������������Back Cover
Ridge Tool Company
Record the Serial Number of your unit below and retain for your records�
See nameplate for serial number�
Serial
Number
Safety Symbols
In this operator’s manual safety symbols and signal
words are used to communicate important safety
information� This section is provided to improve
understanding of these signal words and symbols�
This is the safety alert symbol. It is
used to alert you to potential personal
injury hazards� Obey all safety
messages that follow this symbol to
avoid possible injury or death�
DANGER indicates a hazardous
situation which, if not avoided, will
result in death or serious injury�
WARNING indicates a hazardous
situation which, if not avoided, could
result in death or serious injury�
CAUTION indicates a hazardous
situation which, if not avoided, could
result in minor or moderate injury�
NOTICE indicates information that
relates to the protection of property�
This symbol means read the operator’s
manual carefully before using the
equipment� The operator’s manual
contains important information on
the safe and proper operation of the
equipment�
This symbol means always wear safety
glasses with side shields or goggles
when handling or using this equipment�
This symbol indicates risk of electrical
shock�
General Safety Rules
WARNING
Read all safety warnings and instructions. Failure to
follow the warnings and instructions may result in
electric shock, fire, and/or serious injury.
SAVE ALL WARNINGS AND INSTRUCTIONS
FOR FUTURE REFERENCE!
Work Area Safety
• Keep your work area clean and well lit� Cluttered
or dark areas invite accidents�
• Do not operate equipment in explosive
atmospheres, such as in the presence of
flammable liquids, gases or dust. Equipment
can create sparks which may ignite the dust or
fumes�
• Keep children and bystanders away while
operating equipment� Distractions can cause
you to lose control�
Electrical Safety
• Power Tool Plugs must match the outlet.
Never modify the plug in any way� Do not use
any adapter plugs with earthed (grounded) power
tools.Unmodifiedpugsandmatchingoutletswill
reduce the risk of electric shock�
• Avoid body contact with earthed or grounded
surfaces such as pipes, radiators, ranges
and refrigerators� There is an increased risk
of electrical shock if your body is earthed or
grounded�
• Do not expose equipment to rain or wet
conditions� Water entering equipment will
increase the risk of electrical shock�
• Do not abuse the cord. Never use the cord for
carrying, pulling or unplugging the power tool�
Keep cord away from heat, oil, sharp edges
or moving parts. Damaged or entangled cords
increase the risk of electric shock�
• If operating equipment in a damp location
is unavoidable, use a ground fault circuit
interrupter (GFCI) protected supply. Use of a
GFCI reduces the risk of electric shock�
• Keep all electrical connections dry and off
the ground� Do not touch equipment or plugs
with wet hands� This reduces the risk of electrical
shock�
2
Ridge Tool Company
Personal Safety
• Stay alert, watch what you are doing and use
common sense when operating equipment� Do
not use equipment while you are tired or under
the influence of drugs, alcohol or medication. A
moment of inattention while operating equipment
may result in serious personal injury�
• Use personal protective equipment. Always
wear eye protection� Protective equipment such
as dust mask, non-skid safety shoes, hard hat or
hearing protection used appropriately will reduce
personal injuries�
• Do not overreach. Keep proper footing and
balance at all times� This enables better control
of the equipment in unexpected situations�
• Dress properly� Do not wear loose clothing or
jewelry. Keep your hair, clothing and gloves
away from moving parts. Loose clothes, jewelry
or long hair can be caught in moving parts�
Equipment Use and Care
• Do not force equipment� Use the correct
equipment for your application� The correct
equipment will do the job better and safer at the
rate for which it is designed�
• Do not use equipment if the power switch
does not turn it ON and OFF� Any equipment
that cannot be controlled with the power switch is
dangerous and must be repaired�
work to be performed� Use of the equipment for
operations different from those intended could
result in a hazardous situation�
• Use only accessories that are recommended
by the manufacturer for your equipment�
Accessories that may be suitable for one piece
of equipment may become hazardous when used
with other equipment�
• Keep handles dry, clean, and free from oil
and grease� This allows for better control of the
equipment�
Battery Use and Care
• Recharge only with the charger specified by
the manufacturer� A charger that is suitable for
onetypeofbatterypackmaycreateariskoffire
when used with another battery pack�
• Use equipment only with specifically
designated battery packs� Use of any other
batterypacksmaycreateariskofinjuryandfire.
• Do not probe battery with conductive objects.
Shorting of battery terminals may cause
sparks, burns or electrical shock� When battery
pack is not in use, keep it away from other
metal objects, like paper clips, coins, keys,
nails, screws or other small metal objects that
can make a connection from one terminal to
another� Shorting the battery terminals together
maycauseburnsorafire.
• Disconnect the plug from the power source
and/or the battery pack from the equipment
before making any adjustments, changing
accessories or storing� Such preventive safety
measures reduce the risk of injury�
• Under abusive conditions, liquid may be
ejected from the battery; avoid contact. If
contact accidentally occurs, flush with water. If
liquid contacts eyes, additionally seek medical
help� Liquid ejected from the battery may cause
irritation or burns�
• Store idle equipment out of the reach of
children and do not allow persons unfamiliar
with the equipment or these instructions to
operate the equipment� Equipment can be
dangerous in the hands of untrained users�
• Use and store batteries and chargers in dry,
appropriate temperature areas� Extreme
temperatures and moisture can damage batteries
and result in leakage, electrical shock, fire or
burns� See charger manual for more information�
• Maintain equipment� Check for misalignment or
binding of moving parts, missing parts, breakage
of parts and any other condition that may affect
the equipment’s operation� If damaged, have the
equipment repaired before use� Many accidents
are caused by poorly maintained equipment�
• Do not cover charger while in use. Proper
ventilation is required for correct operation�
Coveringchargerinusecouldresultinfire.
• Use the equipment and accessories in
accordance with these instructions, taking
into account the working conditions and the
Ridge Tool Company
• Properly dispose of batteries� Exposure to high
temperatures can cause the batteries to explode,
so do not dispose of in a fire. Some countries
have regulations concerning battery disposal�
Please follow all applicable regulations�
3
Service
Have your equipment serviced by a qualified repair
person using only identical replacement parts�
This will ensure that the safety of the power tool is
maintained� Remove the batteries and refer servicing
toqualifiedservicepersonnelunderanyofthefollowing
conditions:
• If liquid has been spilled or objects have fallen into
product�
• If the product does not operate normally by following
the operating instructions�
• If the product has been dropped or damaged in any
way�
• When the product exhibits a distinct change in
performance�
Specific CS1000 Safety Information
WARNING
This section contains important safety information
that is specific to the CS1000. Read these
precautions carefully before using the CS1000
to reduce the risk of electrical shock, fire or other
serious personal injury.
SAVE THESE INSTRUCTIONS!
Keep this manual with the equipment for use by the
operator� If you have any questions concerning this
RIDGID product:
-
Contact SeeSnake Support at HQSupport@
seesnake�com for questions relating to HQ or the
CS1000
-
Contact your local RIDGID® distributor�
-
Visit www.RIDGID.com or www.RIDGID.eu to find
your local Ridge Toll contact point�
-
Contact Ridge Tool Technical Services Department
at rtctechservices@emerson�com, or in the U�S�
and Canada call (800)-519-3456�
• An improperly grounded electrical outlet
can cause electrical shock and or severely
damage equipment� Always check work area for
a properly grounded electrical outlet� Presence of
a three-prong or GFCI outlet does not insure that
the outlet is properly grounded� If in doubt, have
the outlet inspected by a licensed electrician�
• Do not operate this equipment if operator
or CS1000 are standing in water. Operating
CS1000 while in water increases the risk of
electrical shock�
• The CS1000 is not waterproof. It is dustresistant and splash-resistant� Do not expose the
equipment to water or rain� This increases the risk
of electrical shock�
• Do not use where a danger of high voltage
contact is present� The equipment is not
designed to provide high voltage protection and
isolation�
• Read and understand this operator’s manual,
the reel operators’ manual, the instructions for
any other equipment in use and all warnings
before operating the CS1000� Failure to follow
all instructions and warnings may result in property
damage and/or serious personal injury�
• Always use appropriate personal protective
equipment while handling and using equipment
in drains� Drains may contain chemicals, bacteria
and other substances that may be toxic, infectious,
cause burns or other issues� Appropriate personal
protective equipment always includes safety
glasses and may include equipment such as
drain cleaning gloves or mitts, latex or rubber
gloves, face shields, goggles, protective clothing,
respirators and steel toed footwear�
• If using drain cleaning equipment at the same
time as using drain inspection equipment,
only wear RIDGID drain cleaning gloves.
Never grasp the rotating drain cleaning cable with
anything else, including other gloves or a rag�
They can become wrapped around the cable,
causing hand injuries� Only wear latex or rubber
gloves under RIDGID drain cleaner gloves� Do not
use damaged drain cleaning gloves�
• Practice good hygiene� Use hot, soapy water
to wash hands and other exposed body parts
exposed to drain contents after handling or using
drain inspection equipment� Do not eat or smoke
while operating or handling drain inspection
equipment� This will help prevent contamination
with toxic or infectious material�
• Power the CS1000 only with a specifically
designated battery or a double insulated
power supply� This minimizes the risk of electrical
hazards from moisture or faulty electrical outlets�
4
Ridge Tool Company
Description, Specifications, and
Standard Equipment
Description
The CS1000 is designed to provide a convenient
accessible portal for all your pipe inspection recording,
monitoring and report generation needs�
The CS1000 will help you organize your inspections by
grouping all the associated still photos, videos, autolog
videos as well as text notes, job location information
and customer information into “Jobs�” Jobs give you
a convenient way to transfer inspection data from the
CS1000, and they form the basis for creating “Reports”
in the CS1000� As you work with your CS1000, Jobs
are automatically assembled from the information
you collect during the inspection process, making
organization easy to understand and automatic�
LCD Display
Working Resolution����������������VGA 640 x 480 pixels
Display Size (HxV)���������������������������12�1” (30�7 cm)
Contrast Ratio��������������������������������������������������700:1
Brightness������������������������������������������������500 cd/m2
Standard Equipment
• CS1000
• Operator’s Manual
• Instructional DVD
The CS1000 is protected under U�S� and international
patents�
Your CS1000 is fully compatible with SeeSnake HQ�
SeeSnake HQ is a new report generating software that
you can use to quickly generate customized reports
for your customer that can then be emailed, printed,
burned onto DVD or exported for viewing online in a
web browser�
You can download the latest version of SeeSnake HQ
for free from http://www�hq�seesnake�com�
Specifications
Weight without batteries�������������14�65 lbs (6�64 kg)
Weight with 2 batteries�����������������17�3 lbs (7�84 kg)
Closed Dimensions:
Length����������������������������������������14�5” (36�8 cm)
Width������������������������������������������11�6” (29�5 cm)
Height��������������������������������������������12” (30�4 cm)
Power Source������������������������100-240VAC/50-60Hz
1�5A or 18 VDC
Battery Type����������������������������2x 18 V Li-Ion, 2�2Ah
Operating Environment
Temperature�����������������32°F to 104°F (0°C to 40°C)
Humidity��������������������������������������������5% to 95% RH
Storage Temp� ���������14°F to 158°F (-10°C to 70°C)
Altitude����������������������������13120 feet (4000 meters)
Ridge Tool Company
5
CS1000 Components
Front Cover and Sun Hood
Batteries
LCD Screen
Serial Label
Power Cord
Mini Keypad
Keyboard
Main Keypad
Figure 1 – CS1000
Figure 2 – CS1000 Keyboard
6
Ridge Tool Company
Figure 3 – CS1000 Keypad
Figure 4 – Additional Keys and Connections
Figure 5 – Keyboard Connections
Ridge Tool Company
7
Icon Legend
Mini Keypad
Main Keypad
Power Key
Select Key
LED Brightness Key
Arrow Keys
Menu Key
Photo Key
Sonde Key
Zero Key
Pre-Operation Inspection
WARNING
Photo Tag Key
Autolog Key
Video Key
Job Review Key
Job Manager Key
LED Brightness Key
Sonde Key
Before each use, inspect your CS1000 and correct
any problems to reduce the risk of serious injury
from electrical shock or other causes and prevent
machine damage.
1� Confirmthatthepowerisoff,anyexternalpower
and cords are disconnected and the battery
is removed� Inspect the cords, cables and
connectorsfordamageormodification.
2� Clean any dirt, oil or other contamination from
the CS1000 to aid in inspection and to prevent
the unit from slipping from your grip while
transporting or using�
3� Inspect the CS1000 for any broken, worn,
missing, misaligned or binding parts or any
other condition which might prevent safe, normal
operation�
Zero Key
4� Inspect any other equipment being used per its
instructions to make sure it is in good, usable
condition�
Microphone Mute Key
5� If any problems are found, do not use the
equipment until the problems are corrected�
Work Area and Equipment Set Up
Image Flip Key
WARNING
Power Key
Set up the CS1000 and work area according to
8
Ridge Tool Company
these procedures to reduce the risk of injury from
electrical shock, fire and other causes and prevent
damage to the CS1000.
1� Check work area for:
• Adequate lighting�
during use� In brightly lit areas, point the screen away
from bright light sources and/or use the monitor’s sun
shade to reduce glare� Make sure that the location is
not wet and will not let the CS1000 and other equipment
get wet during use� The CS1000 is not waterproof and
exposure to wet conditions can cause electrical shock
or equipment damage�
• Flammable liquids, vapors or dust that may
ignite� If present, do not work in area until
sourceshavebeenidentifiedandcorrected. Place camera and reel as instructed in their Operator’s
The CS1000 is not explosion proof� Electrical Manual�
connections can cause sparks�
• Clear, level, stable dry place for operator� Do
not use the machine while standing in water�
Tilt Stand
• Clear path to electrical outlet that does not
contain any potential sources of damage for
the power cord, when using external power�
Use the tilt stand to customize the viewing angle of the
CS1000’s screen and the positioning of its keyboard�
Whether or not you use the tilt stand will depend on the
inspection environment and personal preference�
2� Inspect the work to be done� If possible,
determine the drain access point(s), size(s)
and length(s) and presence of drain cleaning
chemicals or other chemicals, etc� If chemicals
are present, it is important to understand the
specific safety measures required to work
around those chemicals� Contact the chemical
manufacturer for required information�
1� Place the CS1000 in the desired location�
2� Tilt the unit back slightly and pull forward on the
tilt stand located underneath the device until it
locks in place�
3� Determine the correct equipment for the
application� The CS1000 is made to view and
record inspections done with a SeeSnake
inspection camera� Inspection equipment for
other applications can be found by consulting
the Ridge Tool Catalog, online at http://www�
RIDGID�com or http://www�RIDGID�eu�
4� Make sure all equipment has been properly
inspected�
5� Evaluate the work area and determine if any
barriers are needed to keep bystanders away�
Bystanders can distract the operator during
use.Ifworkingneartraffic,erectconesorother
barriers to alert drivers�
6� If needed, remove fixture (water closet, sink, Figure 6 – Front Cover, Tilt Stand, Release Buttons
etc�) to allow access�
3� To store the tilt stand, tilt the unit back slightly
Equipment Set Up
and push the tilt stand toward the back of the unit
untilitisflatagainstthebottom.
The CS1000 can be set up quickly and easily to keep
yourworkflowmoving.
Front Cover
Placement
Place the CS1000 allow easy access and viewing
while manipulating the camera and pushrod for an
inspection� Set-up the CS1000 so its screen is easy to
see and adjust the controls so they are easy to reach
Ridge Tool Company
The CS1000 Front Cover serves two purposes� It
protects the unit during transportation and storage
when not in use, and provides a sun hood to reduce
glare during inspections�
9
Opening the Front Cover
1� Locate the orange Front Cover Release Buttons
on each side of the unit� Depress these buttons�
2� After depressing the buttons, you will feel the
cover release� Allow the cover to swing upward�
3� Raise the front cover to its uppermost position
where it will lock securely into place�
4� Lower the keyboard into its operating position�
5� (Optional) Use the Keyboard Latches to adjust
and secure the position of your keyboard� Pull
the red T-shaped latches toward you to lock the
keyboard into an upwardly angled position�
Connecting the CS1000
NOTICE
Do not plug the System Cable into
the covered System Connector located below the
screen (shown with cover in Figure 8).
System Connector
1� Unwrap the SeeSnake System Cable from its
holder and insert the System Cable plug into the
matching SeeSnake System Connector on the
front edge of the keyboard�
Figure 9 – SeeSnake System Connector
2� To join the connectors, align the guide pin to the
guide socket, push the connector straight in and
tighten the outer locking sleeve� A guide ridge
molded into the top of the cable connector will
point up when the plug is correctly aligned�
Figure 7 – CS1000 Cover Opened, Keyboard Lowered
Closing the Front Cover
1� Disconnect any and all connections (System
Cable, USB)�
2� Fold up the keyboard�
3� KeepingfingersclearoftheFront Cover, depress
the orange Front Cover Release Buttons on both
sides of the unit to drop the cover to the lower
position� Press cover into place until it locks�
Figure 10 – Connecting SeeSnake System Cable to
CS1000 System Connector
NOTICE
When connecting or disconnecting
the System Cable, turn only the locking sleeve. To
prevent damage to pins, do not bend or twist the
connector or cable.
Additional CS1000 Ports
NOTICE
The area behind the Connector
Cover, containing the USB Ports, Video Out Port
and Factory Interface Port is not internally sealed.
Keep the Connector Cover in place in wet or moist
conditions to prevent damage to the ports.
There are four ports located behind the red rubber
Connector Cover on the front edge of the keyboard�
Figure 8 – Adjust the Keyboard using the Keyboard
Latch
10
Ridge Tool Company
approximately 1�75 hours with a single, fully
charged battery, and approximately 4�5 hours
with two fully charged batteries�
3� Recharge the batteries only with the approved
charger� Attempting to charge batteries with the
wrong charger can damage the batteries�
Figure 11 – CS1000 Ports
USB Ports
The two USB ports are both suitable for inserting thumb
drives or other storage devices, however at this time,
only one of the USB ports should be used at a time�
The equipment has been designed with two USB ports
to make future expansion possible�
Figure 12 – Rear Battery Docks
Video Out Port
The Video Out Port enables you to connect the
CS1000 to an external monitor for video display� The
Video Out Port only outputs audio on video playback�
It does not loop audio through from the microphone
during recording�
Factory Interface Port
The Factory Interface Port is used for manufacturer
diagnostics and should not be used for other devices�
Powering the CS1000
The CS1000 can either be powered with RIDGID LiIon rechargeable battery or plugged into an outlet using a supplied AC/DC power converter� Battery power
is the preferred powering method to reduce the risk
of electrical shock� Additionally, the power converter
is not rated for outdoor use and should only be used
indoors�
Figure 13 – Batteries with Approved Charger
Checking Battery Status: Icons
You can monitor your battery levels using the two
battery icons in the bottom left corner of the screen�
Table 1 shows the on-screen battery indicator icons�
Full Charge
Partial Charge
Battery Low
No Charge
AC Power
Battery Operation
1� With dry hands, insert 1 or 2 18-volt Li-Ion
batteries into the battery docks in the back of the
unit� The unit can be tilted forward and rested on
the closed face for convenience�
Table 1: CS1000 Battery Icons
2� The batteries are rated for 2�2 amp-hours each�
Actual operation time on batteries will vary
depending on use� The CS1000 will run for
Ridge Tool Company
11
Checking Battery Status: LEDs
The CS1000 has four battery indicator LEDs, two for
each battery, located just below the screen�
Sometimes you may need to move locations during a
job� If you are running your CS1000 using AC Power
but have a battery in the rear battery docks you can
unplug the CS1000 to move it without powering it OFF�
To remove all power to the unit, unplug the
power cord and remove the batteries from the
battery docks.
Figure 14 – Battery Indicator LEDs
Operating Instructions
WARNING
When the unit is turned ON and there are batteries in
thebatterydocks,theLEDsontheCS1000willreflect
the state of each battery as shown in Table 2�
LED Behavior
Meaning
Green-Green
Battery Full Charge.
Green-Red
Battery Partial Charge.
Red-Red
Battery Low.
Blinking Red and
Beeps
Replace batteries immediately;
shutdown in one minute.
Solid Red and
Continuous Tone
Dead batteries; shutdown in
five seconds.
Slow Blink
External Power is in use.
Beeps when disconnected.
Table 2: CS1000 Battery LED Indicators
External Power
NOTICE The provided external power supply
Always wear eye protection to protect your eyesagainst dirt and other foreign objects.
When inspecting drains that might contain hazardous chemicals or bacteria, wear appropriate protective equipment, such as latex gloves, goggles, face
shields or respirators, to prevent burns and infections.
Do not operate this equipment if operator or machine is standing in water. Operating machine while
in water increases the risk of electrical shock. Rubber soled, non-slip shoes can help prevent slipping
and electric shock, especially on wet surfaces.
Follow operating instructions to reduce the risk of
injury from electrical shock and other causes.
is intended for indoor use only.
For plug in operation, a double insulated AC/DC power
supply is supplied to reduce wall outlet voltage to the
correct voltage for the CS1000�
1� To power the system using AC power with the
power cord, locate the power cord on the back of
the unit� Unhook the Velcro® strap and remove
the plug from its holder�
2� With dry hands, plug the power cord into an
approved outlet� If using an extension cord
ensure it is of adequate wire gauge� For cords of
25 feet a minimum gauge of 18 AWG is required�
For cords greater than 25 feet a minimum gauge
of 16 AWG is required�
3� Never power the unit from AC using the
power cord in a wet environment.
12
Starting Up the CS1000
1� Connect the CS1000 to both a power source and
a SeeSnake camera inspection system�
2� Place the camera head into the inspection start
point, typically the pipe entrance�
3� Power the CS1000 and camera ON by doing
one of the following:
• Pressing the Power Key
keypad�
• Pressing the Power Key
screen�
on the CS1000
below the
• Pressing the Autolog Key
on the
CS1000 keypad� This will power on the
Ridge Tool Company
CS1000 and camera, start a new Job File,
and start recording an autolog video� For
more information about the Autolog Key to
quick start an inspection, turn to page 17�
• Dashboard - The Dashboard is located on the
right side of the screen� It contains icons which
change dynamically in response to key presses
on the CS1000’s Mini and Main Keypads�
4� Push the camera head through the line� You will
see the live feed from your camera in the Live
View area of your CS1000’s screen� Zero the
counter, if necessary, by pressing and holding
the Zero Key �
• Status Bar - The Status Bar is located at the
bottom of the screen� It is visible from every screen
and menu� The Status Bar lets you keep an eye on
your batteries and internal drive’s storage space,
among other things� When the CS1000 is on, the
status bar is visible from every screen and menu�
5� Proceed with pipe inspection as described in
your SeeSnake manual�
Interface Overview
Navigating the Menus and Screens
The CS1000 keypad Arrow Keys
and
can both be used to navigate
keyboard arrow keys
through menus and screens in the equipment’s
or the keyboard’s
interface� Use the Select Key
Enter Key
to make selections and apply changes�
Use the CS1000’s Menu Key
or the keyboard’s Esc
Key to move backwards through the various menus
and screens�
Live View
The largest area of the screen, where the live video
feed appears is referred to in this manual as “Live
View�”
Dashboard
The Dashboard is visible when you are viewing live
video and in the Menus and Job Manager� The two
columns in Figure 16 are as follows:
• In column one (1): The Dashboard of the CS1000
is shown in its default state�
• In column two (2): The alternate state for each of
the icons in the Dashboard in column one�
Throughout the manual we will use the CS1000 keypad
when referring to the interface�
Software Interface
First we will discuss the software interface of the
CS1000� The on-screen interface has three regions:
Live View, Dashboard and Status Bar�
Figure 16 – Dashboard and CS1000 Keys
Figure 15 – Live View, Dashboard and Status Bar
• Live View - The largest area of the screen, where
the live video feed appears is referred to in this
manual as “Live View�”
Ridge Tool Company
The following is a more in depth look at how the
Dashboard icons behave in response to key presses�
13
A� Photo: Highlights red when a photo is being taken
or when a photo tag is created� The on-screen
iconwillalsobrieflyhighlightredatthebeginning
of autolog and video recordings�
B� Video: Highlights red when a video recording is in
progress� A splash screen will appear in the Live
view, at the beginning of a video recording�
E� Sonde: Highlights green when Sonde is activated�
Additionally, when the sonde is activated, an
overlay will appear on bottom of the Live Video�
F� Image Flip: Highlights red and flips when the
screen image is flipped vertically and mirrored
horizontally�
C. Autolog: Highlights red when an autolog video
recording is in progress� A splash screen will
appear in the Live view�
D� Microphone Mute: Highlighted yellow when
microphone is ON� When muted, the icon will
be gray with a slash through it� The Microphone
Mute Key can be used to disable audio recording
during an inspection or to mute audio during video
or autolog video playback�
Status Bar
The Status Bar is located at the bottom of the screen� It is visible from every screen and menu� The Status
Bar lets you keep an eye on your batteries, and internal drive’s storage space, among other things� When the
CS1000ison,thestatusbarisvisiblefromeveryscreenandmenu.Thefigurebelowshowstwoexamplesof
what the Status Bar can look like on a CS1000�
Figure 17 – Bar Examples
14
Ridge Tool Company
Example #1
A� The CS1000 in this example is running on battery
power� It has one battery in each of the two battery
docks� One of the batteries is fully charged and
the other is partially charged�
B� The current time and date�
C� Status: The amount of storage space remaining
on your internal drive�
D� The count distance in Feet�
• The number that appears on the piece of paper
in the folder tells you how many Jobs you have
stored on your internal hard drive�
• The red dot tells you that you currently have a Job
open�
• The pause symbol indicates that you have a Job
open but it is paused� To learn more about pausing
a Job turn to page 28�
• A black square on the folder indicates that a Job
has been stopped�
E� The CS1000 in this example has a job open� Any
mediacapturedwillbeaddedtotheopenjobfile.
There are eleven jobs, including the open job,
stored on the internal drive of this CS1000�
Example #2
A� The CS1000 in this example is running on AC
power�
B� The current time and date�
C� Status: As you navigate around the CS1000’s
screen you may notice that text appears in the
Status Bar� This text tells you what will happen if
you press the Select Key�
D� The count distance in Meters�
E� No Job currently open� Six jobs are stored on the
internal drive�
Status Bar Folder Icon
In the bottom right corner of the screen you will see a
folder� This folder can communicate useful information
to you about the number of jobs being stored on your
internal hard drive and the status of your current job�
Figure 18 – Status Folder Variations
Ridge Tool Company
15
Keypad Overviews
Now let’s cover what the different keys on the CS1000
do� This section will include: the Mini-Keypad, the
Main Keypad, and how to navigate the menus and
screens using the Main Keypad and select keys on the
keyboard�
See page 18 for more information on using the Sonde
Keys and Zero Keys�
Main Keypad
Mini Keypad
In addition to the keypad located on the fold-out
keyboard, the CS1000 has four keys located just below
the screen�
Figure 20 – CS1000 Keypad
Select Key: Used to select menu items� The
keyboard’s Enter Key may also be used to make
selections and apply changes�
Figure 19 – Additional Keys
Arrow Keys: Used to navigate menus and
screens� The keyboard’s arrow keys can also be used
to navigate menus and screens�
The Mini Keypad’s keys are:
Power Key: This Power Key closely resembles
the Power Key on the Main Keypad� Both can be
used to turn the CS1000 ON and OFF� The Mini
Keypad’s Power Key has a blue LED to the right of it
that lights up whenever the unit is powered ON�
LED Brightness Key: Press the key to step
through the various levels of brightness� The blue
LED next to The Mini Keypad’s LED Brightness
Key indicates the level of brightness by blinking�
At minimum brightness the LED will be off, and at
maximum brightness the LED will be on steadily� In
between it will blink faster the brighter the setting�
Sonde Key: Both this Sonde Key and the one
on the Main Keypad can be used to toggle the Sonde
ON and OFF� The Mini Keypad’s Sonde Key has a
blue LED to the right of it that lights up whenever the
Sonde is ON�
Zero Key: Works exactly the same as the Zero
Key on the Main Keypad despite a slightly different
appearance�
16
Menu Key: Brings up the system menu�
Photo Key: Takes a photo�
Photo Tag Key: Takes a photo and opens a form
where custom text or issue tags can be added� Issue
tagsareasetofdescriptionsanddefinitionsofcommon
problems encountered during pipe inspections�
Autolog Key: Starts and stops autolog video
recording� Autolog videos are made up of continuous
audio recording and still image frames taken at regular
intervals and saved in a compressed format�
Video Key: Starts and stops video recording�
When a video is recording, the LED located on the
bottom of the Video Key will be illuminated red�
Job Review Key: Allows review of any photos
or clips in the currently open Job, as well as editing
Ridge Tool Company
Report Fields and selecting clips or photos for inclusion
in reports� A preview of the report can also be accessed
from this screen�
Job Manager Key: Opens the Job Manager
where you can choose to close a job, add a new
session, preview the report, edit job information, or
access the Job Browser�
LED Brightness Key: Press to step up or down
through various brightness levels or press once and
then use the arrow keys to step through the brightness
levels� An indicator bar will appear in the progress bar
at the bottom of the screen�
Using the LED Brightness Key
The LED Brightness Key
modulates the camera’s
LED brightness� The levels of brightness can be
selected gradually by pressing the LED Brightness
one step at a time, or selected rapidly by
Key
down until the
holding the LED Brightness Key
desired step is reached�
When pressed and held down, the LED Brightness
Key will continue to gradually increase the brightness
until it reaches maximum, and will then decrease
brightness until it reaches minimum� At each end of the
scale, a beep will be heard indicating the progression
is changing direction� Single-step mode (individual
key presses) will increase the brightness step by step
until it reaches maximum and then decrease it until it
reaches minimum�
Sonde Key: Toggles the Sonde on or off�
Zero Key: Pressing the Zero Key once resets
a temporary relative zero point for intermediate
measurement� Relative zero will appear in parenthesis�
Press the Zero Key a second time to stop relative zero
and return to your actual count� You can also press and
hold the Zero Key to reset the count to zero�
Microphone Mute Key: Toggles the sound
recording microphone on or off� Can also be used to
mute audio on video playback�
Image Flip Key: Flips the image top to bottom
but not left to right�
Power Key: Turns the CS1000 on or off�
Additional Controls
Figure 21 – Adjusting Brightness
The LED next to the LED Brightness Key
below
the screen indicates the level of brightness by blinking�
At minimum brightness the LED will be off, and at
maximum brightness the LED will be a solid blue light�
In between it will blink faster the brighter the setting�
LED Brightness can also be controlled by pressing
the LED Brightness Key
once and then using the
�
keypad Arrow Keys
Using the Image Flip Key
The CS1000 can be used to control the distance
counter, the built-in Sonde of your SeeSnake system,
the orientation of your video feed, and the brightness
of the LEDs�
Ridge Tool Company
The image on the screen will be oriented according
to the camera’s position and view� If the camera gets
turned, the image will also turn on the screen, which
may make it awkward to view� The Image Flip Key
17
willflipthecameraimagetoptobottomforeasier point during your inspection� To reset the count to zero
press and hold the Zero Key
until the display clears
interpretation of the situation in the line�
to read either 0” or 0 cm� This is a hard reset and will
zero the temporary counter as well�
Using the Zero Key
If your SeeSnake has the CountPlus distance counter
will act in a similar manner
installed, the Zero Key
on the CountPlus�
as the Zero Key
The Zero Key
enables you to measure two things:
1� The distance from the access point to the
camera’s current position�
2� The distance between any two points in the line�
The CS1000 has two zero keys� There is a Zero Key
on the keypad as well as a Zero Key
located
just below the screen� Though different in appearance
these keys function in exactly the same way�
Using the Sonde Key
Modern SeeSnake cameras have a built-in 512 Hz
transmitter, or Sonde, which can be controlled from
the CS1000� The built-in Sonde is not always activated
even though the system is ON�
The Sonde can be toggled ON and OFF using the
on the keypad or the Sonde
either the Sonde Key
below the screen�
Key
Relative Zero
Pressing the Zero Key
once will set a temporary
“Relative Zero” point for intermediate measurement�
This enables you to start a distance count from a
preferred point such as the entry to a pipe or a particular
branch line within a pipe� Relative zero will display in
parenthesis on the Status Bar�
Figure 23 – Sonde enabled
When the Sonde is ON, the blue LED by the Sonde
will be lit up, indicating the system is sending
Key
a signal to the Sonde� The LED will be lit even if the
Sonde is missing or not operational�
Locating the Camera with the Sonde
Figure 22 – Relative Zero in Parenthesis on Status Bar
Absolute Zero
When you are ready to activate the Sonde, simply
press the Sonde Key � When the Sonde is activated
you may notice horizontal lines of interference on the
will show a
monitor� The LED by the Sonde Key
steady light�
You can also reset the count to absolute zero at any
When you are finished locating the Sonde, press the
Press the Zero Key
one more time to exit “Relative
Zero” and return to the original count�
18
For normal camera operation, the Sonde should be
turned OFF to save power until you want to locate the
camera head underground using a locator�
Ridge Tool Company
Sonde Key
again to turn it OFF, and resume normal
camera operation�
the locator to Sonde mode� Pick the 512 Hz signal up
from where the line-trace frequency started to weaken
and zero in on the in-line Sonde�
Line Tracing the SeeSnake Pushrod
Because locating frequencies from transmitters can
cause distortion of the image on the monitor, it is best
to turn Sonde and line transmitters off while inspecting
the interior of a line, and turn them on only when ready
to do a locate�
In addition to being able to locate the Sonde built into
the system camera, it is possible to trace the path of the
pushrod underground, using a RIDGID locator such as
the NaviTrack II, Scout, SR-20, or SR-60�
CS1000 Operating Instructions
To line-trace the SeeSnake pushrod:
1� Connect a line transmitter with one connector
well-grounded to the grounding stake, and
the other connector clipped to the CS1000’s
Transmitter Clip-on Terminal�
A video pipe inspection conducted using a SeeSnake
reel and CS1000 can be done almost exclusively using
the keypad�
Figure 24 – Sonde Key and Transmitter Clip-on
Terminal
2� Set the line transmitter and the locator to the
same desired frequency, such as 33 kHz, and
use the locator to trace the line�
The built-in 512 Hz Sonde may be on at the same time,
and if your locator is equipped with SimulTrace dualfrequency capability, you can follow the pushrod all
the way to the camera’s location and then detect the
Sonde in the camera as you approach it above ground�
Figure 26 – CS1000 Connected to a SeeSnake Reel
Starting a New Job
Once your CS1000 is turned on there are several ways
to begin a new Job� If no Job File is open at the time, a
new Job can be started by pressing one of the following
keys:
This will open a new job and start
• Autolog Key
recording an Autolog video�
• Video Key
This will open a new job and start a
video recording�
• Photo Key
a photo�
This will open a new job and take
• Photo Tag Key
This will take a photo and bring
up the Issue Tag and Note screen�
Figure 25 – Line Tracing the Pushrod
• Job Manager Key
This will open the Job
Manager screen where you can use the Select
to choose “Start Job” from the list�
Key
Alternatively, use a line transmitter and a locator to
line-trace the pushrod� When the signal fades, switch
Ridge Tool Company
19
Figure 27 – “Start New Job” from the Job Manager
Documenting an Inspection
Once you have an open Job File, you can start adding
media elements� This section of the manual will cover
the differences between Autolog Video and standard
Video; the difference between Photos and Photo Tags,
using Issue Tags and Notes; annotating inspections by
voice and adding new sessions�
Press the Photo Key
to take a photo� Press the
to take a photo and open the Issue
Photo Tag Key
to start
Tag and Note form� Press the Video Key
to start
recording a video or press the Autolog Key
recording an Autolog Video�
Performing Inspections with Autolog
Recording an Autolog video is an great way to capture
a highly compressed video of an entire inspection� A
key benefit of recordingAutolog video over standard
video is the smaller file size. The smaller file size
makes exporting faster�
Press the Autolog Key
once to start recording an
Autolog video� A splash screen will appear at the start
of each Autolog recording� Notice that the Autolog icon
on the Dashboard is highlighted in red indicating that
an Autolog video recording is in progress�
Figure 28 – Autolog Splash Screen
Audio records continuously during autolog video
recording even if the camera is not capturing new
frames� To record an Autolog video without audio
� This will mute
press the Microphone Mute Key
the microphone, and record the Autolog video without
audio�
You can capture additional photos or higher-quality
video clips while recording an Autolog video by pressing
the Photo Key , Photo Tag Key , or the Video
Key � To stop the Autolog video recording, press the
one more time�
Autolog Key
Recording Video
Press the Video Key
to start recording a video� A
splash screen will appear at the start of each Video
recording� Notice that the Video icon on the Dashboard
is highlighted in red indicating that an Autolog video
recording is in progress�
To record video without audio press the Microphone
� This will mute the microphone, and
Mute Key
record video without audio�
An Autolog recording saves screen images in a motion
JPEG video format at the rate of four frames per
second� If no change in position or view is detected
from the counter because the camera is not moving,
the CS1000 will stop adding new frames until the
camera moves again�
20
Ridge Tool Company
You can add notes to Photos during Job Review or
you can integrate annotating your photos into your
inspection process by using the Photo Tag feature�
Adding Notes to Photos
Pressing the Photo Tag Key
will take a photo and
open the Issue Tag and Note screen� This screen has a
text box where you can use the keyboard to add notes
to your customer� Notes entered here will be included
in reports alongside the photo they are associated with�
Figure 29 – Video Splash Screen
Video and Autolog video can be recorded simultaneously
on the CS1000� To start recording an Autolog video
� The two recordings are
press the Autolog Key
independent of each other so if you start recording a
Video and then start recording Autolog video, you can
start and stop both video types without affecting the
other�
You can also capture additional photos by pressing the
Photo Key
and/or Photo Tag Key � To stop the
one more
Video recording, press the Video Key
time�
Taking Still Photos
To take a Photo press the Photo Key
� A splash
screen containing your photo will appear each time you
take one� Notice that the Photo icon on the Dashboard
is highlighted in red indicating that a Photo has just
been taken�
Figure 31 – Issue Tag and Note Screen
Add a Note
1� Press the Photo Tag Key
�
2� Use the keyboard to type a note about the photo�
3� Press the the Select Key
on the keypad to
Save your note and return to Live View�
Adding Issue Tags to Photos
The CS1000 has a built-in library of “Issue Tags”
which can be attached to images to describe common
conditions found during pipe inspections, such as
cracks, root intrusions, collapsed pipes, and others�
Refer to Appendix A at the end of this manual for a chart
containing the Issue Tags in your CS1000’s library�
Add an Issue Tag
1� Press the Photo Tag Key
�
2� Use the left Arrow Key
to navigate to the
Add Issue Tag button� When the blue highlight
is around the Add Issue Tag button
press the
to open up the Issue Tag Library�
Select Key
Figure 30 – Photo Splash Screen
Ridge Tool Company
21
Figure 32 – Adding an Issue Tag
3� Use the keypad’s Arrow Keys
tofind
the Issue Tag that describes the problem in the
photo� The name of the Issue Tag will appear
below the photo and the description will show up
in the text box�
Figure 34 – Adding Specific Details with Issue Tags
5� Add details to Issue Tag if necessary�
• To skip this step, just press the Select Key
� This will save the Issue Tag without any
additional details�
• To include specific details, use the up and
down Arrow Keys
on the keypad to
navigate to your choice and then press the
to save it�
Select Key
Figure 33 – Issue Tag Library
4� When the blue highlight is around the Issue Tag
you want to choose press the Select Key �
Some of the Issue Tags have a second level of detail you
can specify� For example, with the Issue Tag for Crack,
you can further specify if the crack is Longitudinal,
Circumferential, or if there are multiple cracks visible
in the photo�
22
Figure 35 – Confirm Issue Tag Screen
6� FromtheConfirmIssueTagscreenyouhavea
few options� You can save the Issue Tag as it is,
customize it, add a note or additional Issue Tags�
• To save the Issue Tag as is, just press the
Select Key � The Save button is selected
automatically so pressing the Select Key
will quickly save the Issue Tag without any
Ridge Tool Company
additional details and return you to Live View�
• To customize or add on to an Issue Tag’s
description use the right Arrow Key
to
navigate into the text box and the keyboard to
make your edits� After making your changes
to Save the edited
press the Select Key
Issue Tag return to Live View�
The microphone can be muted and unmuted by
, which will
pressing the Microphone Mute Key
make the screen icon will toggle on and off to indicate
the state of the microphone�
Figure 38 – Microphone on keyboard
When the microphone is ON, any comments made
during Autolog or Video capture will be recorded and
attached to the video clip in the report�
Figure 36 – Adding a Text Note to an Existing Issue Tag
• You can add multiple issue tags to a single
photo� After selecting your first Issue Tag,
again
instead of pressing the Select Key
to commit it and return to Live View, press
to navigate from the
the up Arrow Key
Save button to the Add Issue Tag button
and press the Select Key
to add as many
issue tags to the photo as you would like�
These will show up in the report in the order
added�
Photos can be saved to the job without adding a note or
when
issue tag by simply pressing the Select Key
youfirstgettotheIssueTagandNoteScreen.
You can mute the microphone at any point during a
video or Autolog recording, without affecting the video�
This enables you to turn the sound recording off during
portions of the video where you are not speaking
directly to the customer, thus eliminating unwanted
sounds or remarks from becoming part of the report or
Jobfile.
Adding a New Session
It will sometimes occur that you want to do more than
one inspection for the same job� For example, you
may want to inspect a homeowner’s kitchen drain,
basement drain and roof vent all in one visit to discover
the cause of a problem�
To add a new session to a job:
1� Press the Job Manager Key
2� Use the down Arrow Key
Session�”
�
to navigate to “New
3� With the blue highlight around “New Session”
press the Select Key �
You can also exit the Issue Tag and Note Screen without
saving the photo, any notes, or tags by using the down
Arrow Key
to move to highlight the Cancel button
and then pressing the Select Key .
Annotating an Inspection by Voice
Whenever the CS1000 microphone is on, the screen
icon for the microphone will be gold to indicate its state�
Figure 37 – Microphone Icon (ON - left, Muted - right)
Ridge Tool Company
23
Table 3 lists the five categories and their
availablefields.
3� Use the keypad’s Arrow Keys
navigatebetweenfieldsoneachpage.
, to
4� Whenyouaresatisfiedwiththeinformationyou
have entered use the down Arrow Key
to
navigate to “Save” and select it by pressing the
Select Key �
Categories
Figure 39 – Adding a New Session
Available Fields
Job
Information
•
•
•
•
Job Name
Job ID
Inspection Type
Purpose
Customer
•
•
•
•
•
Name
Company Name
Street Address, City, State, Zip
Phone Number (Home/Cell)
Email Address
Inspector
•
•
•
•
•
•
Your Name
Your Company Name
Company Website
Street Address, City, State, Zip
Phone Number (Work/Cell)
Email Address
Job Address
• Street Address, City, State, Zip
Job Results
• Summary
• Recommended Action
• Quote
Adding Job Information
Job Information can be added, edited, and deleted
from two screens: Job Manager and Job Review�
Job Manager
Thefirstwaytoadd,edit,andremoveajob’sinformation
is to open the Job Manager and choose which of the
fivejobcategoriesyouwanttoaddinformationto.
Table 3: Report Categories and Fields
Reviewing Jobs
The Job Review screen is where you can go to playback
video and autolog clips you have recorded�
Pressing the Job Review Key
during an inspection
will open this screen with the most recent capture
(photo, video, or autolog) highlighted�
Figure 40 – Job Manager Screen
1� Press the Job Manager Key
.
2� Then use the Arrow Keys
and Select
Key topickwhichofthefivecategoriesofjob
data you want to edit in the right column�
24
Ridge Tool Company
Figure 43 – Status Bar Changes during Video Playback
1� The time and date on the status bar will change
toreflectthevideodateandframe’stimestamp.
Toindicatethatitisreflectingplaybacktimeand
date instead of current time and date, the text
will change from green to red�
Figure 41 – Last Capture Highlighted on Job Review
2� The count value displayed on the status bar also
changesduringplaybacktoreflectthedistance
being covered in the video or autolog video you
are watching� The text will change from black
to red to indicate that it is reflecting playback
distance count�
Playback Video
Adding and Editing Notes and Issue Tags
To watch a recently recorded video from the Job Review
to navigate from
screen� Use the right Arrow Key
the thumbnail of the video you want to play to the Play
button and then press the Select Key �
You can also add notes and edit Issue Tags from the
Job Review screen�
To edit a note or Issue Tag’s description press the right
Arrow Key
to navigate to the text box� Make your
to navigate
edits and then use the down Arrow Key
to the Save button and press the Select Key �
Figure 42 – Video and Autolog Playback Controls
You can mute the audio on video or autolog playback
by pressing the Microphone Mute Key � From the
playback screen you can use the left and right Arrow
to move between the playback controls�
Keys
Job Review Status Bar
The appearance of status bar will change during video
or Autolog video playback in the following ways:
Ridge Tool Company
Figure 44 – Editing Notes from the Job Review Screen
You can also add notes to photos taken using the
Photo Key � Follow the same steps you would take
to edit notes or Issue Tag descriptions above�
Excluding Media from Reports
From the Job Review screen you can choose which
media elements you want to include and exclude in
25
reports� Use the Select Key
to check or uncheck
the box of a selected media element in the left column�
To preview a report from the Job Review screen use
the down Arrow Key
to move all the way to the
bottom of the left column to where it says “Preview
to generate a
Report” and press the Select Key
preview of what your customer report will look like�
Figure 45 – Included (left) and Excluded (right)
Elements
Excludedmediaelementswillremaininthejobfilebut
will not show up in reports you create for your customer�
Editing Job Information During Job Review
A Job’s information can also be added, edited, and
deleted from the Job Review screen�
1� Press the Job Review Key
2� Use the up Arrow Key
to navigate to the top
of the left column where it says “Report�”
Figure 47 – “Report Preview” from Job Review Screen
You can also preview your report anytime from the Job
Manager screen by pressing the Job Manager Key
and then using the down Arrow Key
to navigate to
to
“Preview Report” and pressing the Select Key
generate a preview of what your customer report will
look like�
Figure 46 – Report Fields in Job Review Screen
3� With “Report” in blue outlined, press the right
tonavigatetothefirstinformation
Arrow Key
fieldofthelist.
4� Move between fields as you add and/or edit Figure 48 – Preview Report in Job Manager
information using the Arrow Keys
�
Previewing Reports
Reports can be easily previewed from the Job Review
screen�
26
Customer Report Preview
Figure 50 shows what your customer will see if you
export their report directly to a thumb drive�
Ridge Tool Company
Inspector’s company name and address
Inspector’s name and contact information
Customer’s name, address, and contact
information
Job address
Job Information, including Job Name, ID,
and Purpose
Start of “Session Number 1”
Sample Video
Sample Photo Tag
Start of “Session Number 2”
Job Results, including summary,
recommended action, and quote
This is strictly a report preview and therefore is not
editable� To edit the information and media elements
to go
included in your report, press the Menu Key
back one page to the Job Review Screen and make
your changes from there�
As mentioned in the section that covered Issue Tags,
multiple Issue Tags can be added to a single photo� In
reports, the Issue Tags will appear stacked one on top
of the other�
Figure 49 – A Photo with Multiple Issue Tags
Figure 50 – Expanded Customer Report Preview
Ridge Tool Company
27
Closing a Job
When you have completed the inspection, and added
all the desired images, text comments and video clips
needed, you can close the Job by pressing the Job
Manager Key and then, with “Close Job” highlighted
� All the data associated
pressing the Select Key
with the job will be saved in a Report�
3� Use the up and down Arrow Keys
to
navigate to the Job you want to resume� When
the blue outline is around the “Resume Job”
of the job you want to resume press the
icon
Select Key �
Figure 53 – Resuming a Closed Job
Figure 51 – Closing a Job
Resuming a Closed Job
If you have closed a job, you can still re-open it to
modify the contents� To resume a closed job:
1� Press the Job Manager Key
2� Use the down Arrow Key
to navigate to
“Resume Job” and press the Select Key �
If a Job has been interrupted by the unit being shut
down unexpectedly, such as by a power outage, a
prompt asking you if you want to resume the job will
appear when the unit is started up again�
Powering OFF the CS1000
There are two ways to power OFF your CS1000� There
will be a 3 second power down countdown after you
press the power key� The power down countdown
can be cancelled by pressing any of the keys on the
CS1000’s keypad�
• Pressing the Power Key
keypad�
• Pressing the Power Key
on the CS1000
below the screen�
Abnormal Shutdown
In the event that the CS1000 is powered off abnormally,
the equipment will need to perform a systems check to
inspect and repair any damage the next time it powers
on� A systems check can take a few minutes� Events
that can require a systems check can be:
• An unexpected power outage during use�
Figure 52 – Resume Job from Job Manager
28
• Unplugging the CS1000 when it is still ON�
Ridge Tool Company
Close or Pause a Job
If you try to power OFF the CS1000 when a Job is
open you will be asked if you want to Close or Pause
the job before powering down� Your choice will depend
on what you want to have happen the next time you
power ON the CS1000�
2� Use the Select Key
to check and uncheck
the boxes in the left column� Check the Jobs you
want to recycle and uncheck the Jobs you want
to leave in the Job Browser�
Figure 55 – Select Jobs to Recycle
Figure 54 – Close or Pause a Job
• Close Job and Power Down - Choosing this will
close the job and turn OFF the CS1000� If you
want to resume the job after this you will need to
select if from your Resume Job list�
• Pause Job and Power Down - Choosing this will
Pause the job and turn OFF the CS1000� The next
time you turn the CS1000 ON you will be asked
automatically if you want to resume your paused
job� This is especially convenient if you want to
take a quick break without using your batteries up
or when you want to move to a new inspection
entry point at the same job location�
3� Then use the right Arrow Key
to navigate to
the Recycle button and press the Select Key �
To exit the Job Browser without recycling any Jobs,
navigate to the Back button in the lower right corner,
press the Menu Key
on the keypad�
Configuring the CS1000
OnceyourCS1000isconfigureditwillsavethesettings
you have chosen and use them every time you start
the system up�
Main Menu
Press the Menu Key
to access the Main Menu�
Recycling Jobs
Jobs can be removed from the Job Browser by sending
them to the Recycle Bin�
1� Open the Job Browser by either pressing the:
• Menu Key
, and then using the right
Arrow Key , navigate to the Job Browser
� Then press the Select Key
to
icon
open the Job Browser�
• Job Manager Key
, and then using the
, navigate to “Browse
down Arrow Key
to
Reports�” Then press the Select Key
open the Job Browser�
Ridge Tool Company
Figure 56 – Main Menu
29
Use the left and right Arrow Keys
to move
between the three icons that appear on the Main
, About
, and
Menu (from left to right): Settings
� Press the Select Key
to open the
Job Browser
to exit the Main Menu
Menus� Press the Menu Key
and return to the Live View�
Customizing Settings
Edit Video Options
Selecting Edit Video Options will open the Video Menu�
From here you are given a choice between MPEG4
and MJPEG Capture Mode�
MPEG4 has a higher compression rate and smaller
filesasaresult,butmaynotbecompatiblewithyour
computersystemwhenyouwanttotransferthefiles.
Selecting the Settings icon
will bring up a set of
configuration menus. From these menus you can
modify various preferences and settings�
Figure 59 – Video Menu
MJPEG format is a less compressed format, but is more
widely compatible on different PC and MAC platforms�
It is the CS1000’s default capture mode�
Size
Description
Medium
Figure 57 – Settings Menu
MediumHigh
High
Edit Target Media
From this menu you can use the up and down Arrow
to choose how you want your jobs stored�
Keys
Your choices are to store jobs to the internal drive, a
USB drive, or both� The default setting is to write jobs
to the internal drive only�
Figure 58 – Set Job Storage Mode
• Smallest file size
• Good for long inspections
• Average file size
• Good for most inspections
• Largest file size
• Uses memory quickly, not recommended
Table 4: MJPEG File Size Settings
You can specify your MJPEG settings further by using
to move into the MJPEG
the down Arrow Key
Settings box and then the left and right Arrow Keys
tomovethroughthreefilesizeoptions.Referto
Table 4 to learn more about the differences between
thefilesizeoptions.
To apply changes use the down Arrow Key
to
navigate to “Save” at the bottom of the screen and
� This will take you back to
press the Select Key
on the
the Settings Menu� Pressing the Menu Key
keypad will take you back one level to the Settings
Menu�
If you have selected to write new job data to “USB Drive
Only” or “USB + Internal Drive” you will not be able to
open a new job or capture any new media unless you
have inserted a USB drive into one of the two USB
Ports on the front of the CS1000�
30
Ridge Tool Company
View Recycled Jobs
Selecting the Recycle Bin icon brings up a list of jobs
you have recycled� From here you can recover or
permanently delete Jobs� Restoring a job will return it
to the Job Browser� Permanently deleted Jobs are not
recoverable�
Control Reel Overlay
Selecting Control Reel Overlay will open the CountPlus
Settings screen� This screen has a video preview in
the left column and a CountPlus Overlay in the right
column� You can toggle between enabling and disabling
the overlay by pressing the Select Key �
Figure 62 – Enable Overlay
Figure 60 – Restore Selected Job(s)
Figure 63 – Disable Overlay
Press the Menu Key
to return to the Settings Menu�
Edit Count Units
Selecting Edit Count Units will open the Reel Settings
Menu� From here you can use the left and right Arrow
to toggle between Feet and Meters� Your
Keys
choice will appear with a blue highlight and outline�
Figure 61 – Permanently Delete Selected Job(s)
Use the Select Key
to check boxes in the left
column to select which Job(s) you want to work with�
to navigate to the
Then use the right Arrow Key
to select either
right column and the Select Key
Restore or Permanently Delete�
Ridge Tool Company
Figure 64 – Set Count Units
Save your preference by using the down Arrow Key
to navigate to Save at the bottom of the screen and
� This will take you back
pressing the Select Key
to the Settings Menu� Alternatively you can press the
to return to the Settings Menu�
Menu Key
31
Edit Time/Date
Selecting Edit Time/Date will open the Date and Time
Menu� From here you can set the current time and date
as well as the format you want the date to appear in�
To navigate in this space use the TAB key
or the
to move to the field you
keyboard’s arrow keys
want to change and use the number keys on the
on the
keyboard or the up and down Arrow Keys
keypad to set the correct values�
Figure 65 – Set Time and Date
Save your changes by using the left and right Arrow
to navigate to Save at the bottom of the
Keys
screen and pressing the Select Key � This will take
you back to the Settings Menu� Alternatively you can
to return to the Settings Menu�
press the Menu Key
Delivering Reports
One of the most valuable features of the CS1000 is the
ability to generate comprehensive formatted reports
easily and quickly� In many cases you will be able to
hand your customer a USB drive containing a report
before leaving the job site�
Figure 66 – Customer Report viewed in Web Browser
These “Direct Customer Reports” include photos,
video, autolog, audio, Issue Tags, and text notes� You
can also use the SeeSnake HQ software to create
reports for printing, emailing, uploading to the internet,
or for burning to DVD�
Customer Direct Reports
To save the current inspection as a report to be
delivered directly to a customer on a USB drive:
1� Close the Job�
2� Insert an empty USB drive into one of the USB
ports�
32
Ridge Tool Company
3� You will be asked what you want to do with the
USB: “Export Jobs” or “Start USB Job�” Press
to choose “Export Jobs”�
the Select Key
Figure 69 – Job Browser
Figure 67 – Select USB Function, Export
5� Use the arrow keys to navigate to the Customer
Report icon in the far right column� With the
Customer Report icon highlighted, press the
Select Key �
If you still have a Job open when you insert the USB
drive you will be asked if you want to close the Job
or keep it open� If the open Job is the one you want
to
to export, make sure you use the Select Key
choose “Close Job�”
Figure 70 – Select to Export a Customer Direct Report
Figure 68 – Close Job Prompt
6� After you press the Select Key
you will see an
export progress screen� The CS1000 will write a
report to the thumb drive� The report will be in a
format that can be read by most web browsers�
4� The Job Browser
will open automatically� A
list of Jobs/Reports on the CS1000’s internal
� Choose
drive will appear in the Job Browser
the one you want to deliver to the customer and
to check its selection box�
use the Select Key
Make sure to uncheck the boxes next to any
Jobs/Reports you do not want to export�
Ridge Tool Company
33
9� Remove USB drive and hand it to your customer�
Instruct your customer to double-click the file
called “report�html” which will open it in their
default web browser�
HQ Compatible Reports
The process for exporting reports to HQ is very similar
to exporting Customer Direct reports� The main
difference is that you will want to choose the “Export to
HQ” option from the Job Browser�
1� Close the Job�
2� Insert an empty USB drive into one of the USB
ports�
Figure 71 – Exporting Jobs to a USB Drive
7� Exporting has finished successfully when
“Copying Job” changes to “Copied Job” and the
OK button has a blue outline� Press the Select
to select OK and continue�
Key
3� You will be asked what you want to do with the
USB: “Export Jobs” or “Start USB Job�” Press
the Select Key
to choose “Export Jobs”�
Figure 72 – Export Complete
8� Next you will be asked if you want to recycle the
Jobs you just copied�
• If you want to move the Jobs to your
Recycle Bin press the Select Key �
Figure 75 – Select USB Function, Export
4� This will open the Job Browser automatically�
Figure 73 – Recycle Copied Jobs
• To keep the Jobs in your Job Browser
press the right Arrow Key
to navigate
to the “Cancel” button and press the Select
Key �
Figure 74 – Do Not Recycle Copied Jobs
Figure 76 – Job Browser
34
Ridge Tool Company
5� A list of Jobs/Reports on the CS1000’s internal
drive will appear in the Job Browser� Choose
the one you want to deliver to the customer and
to toggle its selection
use the Select Key
box checkmark on� Make sure to uncheck the
boxes next to any Jobs/Reports you do not want
to export�
6� Use the arrow keys to navigate to the HQ icon in
the far right column� With the HQ icon highlighted,
press the Select Key �
Figure 79 – Export Complete
9� Next you will be asked if you want to recycle the
Jobs you just copied�
• If you want to move the Jobs to your
Recycle Bin press the Select Key �
Figure 80 – Recycle Copied Jobs
• To keep the Jobs in your Job Browser
press the right Arrow Key
to navigate
to the “Cancel” button and press the Select
Key �
Figure 77 – Export to HQ
7� The export process will begin� The export process
for an HQ Compatible Report is the same as for
a Customer Direct Report�
Figure 81 – Do Not Recycle Copied Jobs
10� Remove USB drive from your CS1000 and insert
it into your PC laptop or desktop�
Do More with SeeSnake HQ
SeeSnake HQ is software that you can use on a laptop
or desktop PC� With SeeSnake HQ you can organize
“Jobs” and customize “Reports”, generate CD/DVD
versions for customers, and put reports into a variety
offileformatsforvariousdistributionmethods.
Figure 78 – Exporting Jobs to a USB Drive
8� Exporting has finished successfully when
“Copying Job” changes to “Copied Job” and the
OK button has a blue outline� Press the Select
to select OK and continue�
Key
Ridge Tool Company
35
Figure 82 – SeeSnake HQ
Figure 84 – Report Preview in SeeSnake HQ
SeeSnake HQ offers you an array of tools to edit the
Job’s information, and modify the report using a prebuilt report style� You can create shorter video clips of
Video and Autolog Video for your customers� You can
also add audio notes to photos�
SeeSnake HQ also allows you to upload reports to
RIDGIDConnect, an online service for storing and
sharing inspection reports To learn more visit http://
www�ridgidconnect�com�
For a complete description of what SeeSnake HQ is
and how to use it see the documentation online� You
can also contact the SeeSnake HQ support team at
HQSupport@SeeSnake�com�
SeeSnake HQ can be downloaded for free at http://
www�hq�seesnake�com�
Maintenance Instructions
Cleaning
WARNING
Figure 83 – Review and Edit Media in SeeSnake HQ
Make sure all cords and cables are disconnected
and the batteries removed prior to cleaning the
CS1000 to reduce the risk of electrical shock.
Do not use liquid or abrasive cleaners on the CS1000�
The printable version of the report can be made into Clean the CS1000 with damp cloth� Only use cleaners
aPDFfile,printedoremailed.Thereportcanalsobe approved for use on LCD screens to clean the screens�
generated as a web-page multimedia report (HTML) or Do not allow any liquid to enter the CS1000�
formatted to be burned onto a DVD�
Accessories
WARNING
The following accessories have been designed
to function with the CS1000. Other accessories
suitable for use with other equipment may become
hazardous when used with the CS1000. To reduce
36
Ridge Tool Company
the risk of serious injury, only use accessories
specifically designed and recommended for use
with the CS1000, such as those listed below.
Cat # Cat #
US
EU
32743 28218
32068 32073
32648 32693
32708 32713
Various
Various
Various
Description
18 V Li-Ion rechargeable battery
Battery charger
Dual battery kit with charger
Single battery kit with charger
RIDGID SeekTech® or NaviTrack® Locator
RIDGID SeekTech® or NaviTrack®
Transmitters
CountPlus Cable Counter cablemeasurement system, normally built in to
SeeSnake Pipe Inspection Systems.
Transport and Storage
Remove batteries before shipping. Do not expose
to heavy shocks or impacts during transport� If storing
for an extended period, remove batteries� Store within
temperature range of 14°F to 158°F (-10°C to� 70°C)�
Store electrical devices in a dry place to reduce risk of
electrical shock�
Protect against excessive heat� The unit should be
situated away from heat sources such as radiators,
heat registers, stoves or other products (including
amplifiers)thatproduceheat.
Service and Repair
WARNING
Improper service or repair can make the CS1000
unsafe to operate.
Service and repair of the SeeSnake CS1000 must
be performed by a RIDGID Independent Authorized
Service Center�
For information on your nearest RIDGID Independent
Service Center or any service or repair questions:
• Contact your local RIDGID distributor�
• Visit www�RIDGID�com or www�RIDGID�eu to
findyourlocalRidgeToolcontactpoint.
Disposal
For US and Canada: Parts of the unit contain valuable
materials and can be recycled� There are companies
that specialize in recycling that may be found locally�
Dispose of the components in compliance with all
applicable regulations� Contact your local waste
management authority for more information�
For EU countries: Do not dispose of
electrical equipment with household
waste! Defective or used battery packs/
batteries must be recycled according to
the guideline 91/157/EEC� According to
the European Guideline 2002/96/EC for Waste
Electrical and Electronic Equipment and its
implementation into national legislation, electrical
equipment that is no longer usable must be collected
separately and disposed of in an environmentallycorrect manner�
Battery Disposal
For US and Canada: The RBRC™
(Rechargeable Battery Recycling
Corporation) Seal on the battery packs
means that RIDGID has already paid
the cost of recycling the Lithium-Ion
battery packs once they have reached
the end of their useful life�
RDRC™, RIDGID®, and other battery suppliers have
developed programs in the USA and Canada to collect
and recycle rechargeable batteries� Normal and
rechargeable batteries contain materials that should
not be directly disposed of in nature and contain
valuable materials that can be recycled� Help to protect
the environment and conserve natural resources by
returning your used batteries to your local retailer or
an authorized RIDGID service center for recycling�
Your local recycling center can also provide you with
additional drop-off locations�
RBRC™ is a registered trademark of the Rechargeable Battery
Recycling Corporation.
For EU countries: Defective or used battery packs/
batteries must be recycled according to the guideline
2006/66/EC�
• Contact Ridge Tool Technical Service Department
at rtctechservices@emerson�com, or in the U�S�
and Canada call (800) 519-3456�
Ridge Tool Company
37
Appendix A: Issue Tags
Crack - Cracks found in pipes can be the cause of leaks and/
or eventually lead to other, more serious problems (fractures,
breaks, root intrusions, etc�)�
1� Longitudinal
2� Circumferential
3� Multiple
Open Joint - Joint is completely open�
1� Medium
2� Large
Hole - Holes, for example, can be formed in pipes during
construction/work performed near the pipe (excavation, running
cables, etc�)�
Fracture - Fractures found in pipes are causes of leaks and
severe structural integrity loss�
1� Longitudinal
2� Circumferential
3� Multiple
Broken - A broken pipe generally needs to be replaced�
Deformed - Deformed pipes are usually caused by pressure
and indicate structural integrity loss�
Collapsed - Collapsed drain or sewer�
Joint Displaced - Joints are not lined up correctly, possibly
because of ground movement�
1� Medium
2� Large
Surface Damage - Surface damage on the inner or outer
surface of a pipe�
Roots - Roots from trees can penetrate the tiniest openings in
pipes and lead to cracks/blockage�
Attached Deposits - Deposits attached to pipe (grease,
calcium, etc�)� Deposits can lead to blockages�
38
Ridge Tool Company
Trouble Shooting
Problem
Probable Fault
Solution
Camera video image not seen�
No power to SeeSnake�
Check power is correctly plugged in or
battery is charged� Press power key on
CS1000 body or keypad�
Check connections to CS1000 unit from
SeeSnake� Make sure system cable is
firmlyconnectedtotheSystemConnector
on the front left edge of the keyboard�
Recharge batteries or connect to external
power supply�
Recharge batteries� Switch to AC power
(110/220VAC)�
Connections faulty�
Batteries low�
Flashing Battery Warning Appears� 18 V- Li-Ion batteries low�
Notes
Ridge Tool Company
39
Notes
Notes
What is covered
RIDGID® tools are warranted to be free of defects in workmanship and material�
How long coverage lasts
This warranty lasts for the lifetime of the RIDGID® tool� Warranty coverage ends when the product becomes
unusable for reasons other than defects in workmanship or material�
How you can get service
To obtain the benefit ofthis warranty, deliver via prepaid transportation the complete product toRIDGE
TOOL COMPANY, Elyria, Ohio, or any authorized RIDGID® INDEPENDENT SERVICE CENTER� Pipe
wrenches and other hand tools should be returned to the place of purchase�
What we will do to correct problems
Warranted products will be repaired or replaced, at RIDGE TOOL’S option, and returned at no charge; or,
if after three attempts to repair or replace during the warranty period the product is still defective, you can
elect to receive a full refund of your purchase price�
What is not covered
Failures due to misuse, abuse or normal wear and tear are not covered by this warranty� RIDGE TOOL shall
not be responsible for any incidental or consequential damages�
How local law relates to the warranty
Some states do not allow the exclusion or limitation of incidental or consequential damages, so the above
limitationorexclusionmaynotapplytoyou.Thiswarrantygivesyouspecificrights,andyoumayalsohave
other rights, which vary, from state to state, province to province, or country to country�
No other express warranty applies
This FULL LIFETIME WARRANTY is the sole and exclusive warranty for RIDGID® products� No employee,
agent, dealer, or other person is authorized to alter this warranty or make any other warranty on behalf of
the RIDGE TOOL COMPANY�
Ridge Tool Company
400 Clark Street
Elyria, Ohio 44036-2023
E M E R S O N . C O N S I D E R I T S O LV E D TM.
© 2010 RIDGID, Inc.
Printed in U.S.A 9-10
742-042-603-0A-P3
REV. B