1
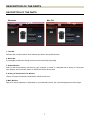
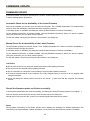
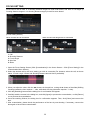
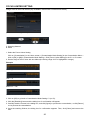
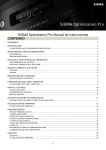
SIGMA Optimization Pro Instruction Manual TABLE OF CONTENTS TABLE OF CONTENTS 1 INTRODUCTION 2 WHAT YOU CAN DO IN SIGMA OPTIMIZATION PRO .......................................................................................................................... 2 NOTICES AND TRADEMARK 3 NOTICES ................................................................................................................................................................................................. 3 TRADEMARKS ........................................................................................................................................................................................ 3 INSTALLING THE SOFTWARE ONTO YOUR COMPUTER 4 SYSTEM REQUIREMENTS .................................................................................................................................................................... 4 INSTALLING AND UNINSTALLING SOFTWARE ................................................................................................................................... 5 STARTING AND CLOSING OF SOFTWARE 6 STARTING ............................................................................................................................................................................................... 6 CLOSING ................................................................................................................................................................................................. 6 DESCRIPTION OF THE PARTS 7 DESCRIPTION OF THE PARTS ............................................................................................................................................................. 7 CONNECTING USB DOCK AND A LENS 8 CONNECTING USB DOCK AND A LENS............................................................................................................................................... 8 HOME SCREEN 10 HOME SCREEN..................................................................................................................................................................................... 10 LENS INFORMATION ............................................................................................................................................................................ 10 SERVICE MENU .................................................................................................................................................................................... 10 HISTORY OF CONNECTED LENS WINDOW 11 HISTORY OF CONNECTED LENS WINDOW ...................................................................................................................................... 11 FIRMWARE UPDATE 12 FIRMWARE UPDATE ............................................................................................................................................................................ 12 CUSTOMIZATION 13 CUSTOMIZATION MENU ...................................................................................................................................................................... 13 FOCUS SETTING .................................................................................................................................................................................. 14 FULL-TIME MF SETTING ...................................................................................................................................................................... 16 CUSTOMIZATION MODE SETTING ..................................................................................................................................................... 18 AF SPEED SETTING ............................................................................................................................................................................. 19 FOCUS LIMITER SETTING ................................................................................................................................................................... 20 OS SETTING.......................................................................................................................................................................................... 22 RESET ALL CUSTOMIZATION ............................................................................................................................................................. 23 COMBINATION WITH TELE CONVERTER .......................................................................................................................................... 24 USB DOCK 25 USB DOCK ............................................................................................................................................................................................. 25 FIRMWARE UPDATE ............................................................................................................................................................................ 26 1 INTRODUCTION WHAT YOU CAN DO IN SIGMA OPTIMIZATION PRO It is possible to do the following operations in Sigma Optimization Pro. Lens firmware update Lens firmware can be updated to the latest version via the internet. Lens customization Focus Setting Focus can be set at each of 4 shooting distance ranges for fixed focal lenses, and each of 16 ranges (4 focusing distance ranges in x 4 shooting distance ranges) in total for zoom lenses. Full-time MF Setting It is possible to select Full-time MF function ON / OFF, and adjust the timing to operate Full-time MF function. AF Speed Setting AF speed can be selected from 3 modes (only available in lenses with a custom mode switch). Focus Limiter Setting Range of the AF drive can be set (only available in lenses with a custom mode switch). OS Setting For the Optical Stabilizer, 3 unique view modes are available. This offers the most suited OS (Optical Stabilizer) function for any shooting style (only available in lenses with a custom mode switch). CAUTION !! To access information about lens firmware updates and customization using this software, your computer must be connected to the internet. To operate lens firmware updates and customization using this software, the available USB DOCK is required. USB DOCK is dedicated for each mount. Please use a USB DOCK which corresponds to your lens mount. USB DOCK for different mounts cannot be used. USB DOCK for different mounts cannot be connected using mount adapter etc. Firmware update and customization using this software can only be operated on lenses from SIGMA’s new product lines (Art, Contemporary and Sports), and not on older Sigma lenses or lenses from other manufacturers. 2 NOTICES AND TRADEMARK NOTICES It is forbidden to use the contents of this manual or commit other acts (including transfer, lease, duplication, alteration, use for public transmission, etc) without the prior approval from SIGMA. The contents of this manual are subject to change without notice. Although we have made all possible efforts to produce a very accurate manual, if you find any mistakes, please contact our customer support. No liability can be accepted for any errors. The specification and performance of this product are subject to change without notice. SIGMA does not take any responsibility for direct or indirect damage due to malfunction of software and hardware of your computer, any other peripheral devices, and network environment caused by using this software. TRADEMARKS Microsoft and Windows are either registered trademarks or trademarks of Microsoft Corporation in the United States and/or other countries. Macintosh and MAC OS are registered trademarks or trademarks of Apple Inc. in the U.S.A. and /or other countries. All other company or product names used in documents are trademarks or registered trademarks of their respective holders. 3 INSTALLING THE SOFTWARE ONTO YOUR COMPUTER SYSTEM REQUIREMENTS Windows This software, SIGMA Optimization Pro, operates in the condition that meets with the following criteria; Core2Duo or faster processor Windows 7 or Windows 8 1GB of RAM 1GB of available hard disk space 24bit or more graphics card 1024 x 768 or higher screen resolution PC with USB 1.1 port Mac OS This software, SIGMA Optimization Pro, operates in the condition that meets with the following criteria; Mac OS X Ver.10.7 or 10.8 and Intel Core Processor 1GB of RAM 1GB of available hard disk space 24bit or more graphics card 1024 x 768 or higher screen resolution PC with USB 1.1 port 4 INSTALLING AND UNINSTALLING SOFTWARE Windows How to install CAUTION !! If you have previous version of [SIGMA Optimization Pro] installed on your computer, uninstall it by using “Add or Remove Programs” on a computer. It is not possible to install [SIGMA Optimization Pro] properly if previous version of [SIGMA Optimization Pro] is already installed. 1. Please download the installer program according to instructions given on our website. 2. Double click on downloaded file [SOP_x.x.x_setup.exe] to start program installation. 3. First, you have to choose the language of the program you install. Select the language and push the OK button. 4. Then, carry out the install according to the procedures displayed in the screen. How to uninstall To uninstall the software, please uninstall it from Programs and Features in the Control Panel (for Windows 7). Mac OS How to install CAUTION !! If previous version of [SIGMA Optimization Pro] already has been installed on your computer, please delete the [SIGMA Optimization Pro] folder in the “Application” folder before installing. 1. Please download the installer program according to instructions given on our website. 2. To start the installation drag and copy SIGMA Optimization Pro folder from [SIGMA Optimization Pro] Disk Image to applications folder. Installation will be complete after being copied to this folder. 3. Select and open the Applications folder from “Go” in the Finder menu. How to uninstall Drag and drop the SIGMA Optimization Pro icon in the Applications folder into the trash box. 5 STARTING AND CLOSING OF SOFTWARE STARTING Windows Starting from the desktop Please click on the shortcut icon of SIGMA Optimization Pro in the desktop. (When SIGMA Optimization Pro is installed to your computer, the shortcut icon will be created in the desktop automatically.) Starting from the Start Menu 1. Please open All Programs > [SIGMA] > [SIGMA Optimization Pro] from the Start Menu. 2. Click on [SIGMA Optimization Pro]. Mac OS Starting from the Applications Menu 1. Open [SIGMA Optimization Pro] from [Applications]. 2. Click on the [SIGMA Optimization Pro]. (Startup screen) CLOSING Windows Select [Exit] from the [File] menu in the Menu Bar. Click on the [Close] button in the Title Bar. Mac OS Select [Exit] from [SIGMA Optimization Pro] menu in the Menu Bar. Click on the [close] button in the Title Bar. 6 DESCRIPTION OF THE PARTS DESCRIPTION OF THE PARTS Windows Mac OS 1. Title Bar Software title, minimize button, and software quit button are positioned here. 2. Menu Bar It is possible to select the setting of each function from [File] and [Help]. 3. Status Window Name of the lens presently connected to your computer, or name of a selected lens in history of connected lens window, and connection status of USB DOCK will be shown here. 4. History of Connected Lens Window History of lenses connected to USB DOCK will be shown here. 5.Main Window Space for various operations. Depending on your selected function, the content displayed here will change. 7 CONNECTING USB DOCK AND A LENS CONNECTING USB DOCK AND A LENS 1. Start up the software (Display to encourage connection of USB DOCK and a lens appears in the Main window). 2. Connect a lens to USB DOCK. 3. Connect USB DOCK and your computer using a USB cable. CAUTION !! Please position the lens on a stable surface with the front facing down. In case of a large lens, please ensure the lens does not fall down by laying it laterally. Please use the dedicated USB cable supplied with USB DOCK. Using another cable may cause a malfunction. 8 When the connection process has been completed, the display will be shown as below. Main window changes to Home screen. (Home screen) Name of the connected lens appears in orange in the History of connected lens window. Name of the connected lens appears in orange in the Status window. The connection lamp display of USB DOCK in the Status window turns on. → LED lamp of USB DOCK turns on. Memo When there is a newer version of firmware available for the connected lens, message [Latest firmware of the lens is available…] appears in the dialogue. Please read the [FIRMWARE UPDATE] section for details of firmware updates. CAUTION !! Please do not connect more than one USB DOCK to a computer at a time. It may lead to improper operation. 9 HOME SCREEN HOME SCREEN The [Lens Information] field in the Home Screen provides the current setting of the lens connected to the USB DOCK. The [Service Menu] field in the Home Screen leads to various options for customization. (Home Screen) LENS INFORMATION The [Lens Information] field in the Home Screen provides the current setting of the lens connected to the USB DOCK. The following is information of the lens presently connected to the USB DOCK. Mount Serial Number Firmware Version SERVICE MENU Firmware Update Click the [Firmware Update] button and SIGMA Optimization Pro will start checking if the latest firmware update is available or not. If there is, you can process the update. (Refer to [FIRMWARE UPDATE] for the further details). Customization Click the [Customization] button, and the [Customization Menu] screen appears. From the [Customization Menu] screen, [Focus Setting] and [Customization Mode Setting] are available. (Refer to [CUSTOMIZATION] section ) 10 HISTORY OF CONNECTED LENS WINDOW HISTORY OF CONNECTED LENS WINDOW The name of those lenses that have been processed on SIGMA Optimization Pro will appear in the [History of Connected Lens] window. (The name of the lens currently connected will appear in orange). (History of Connected Lens window) Memo The information of those lenses in the [History of Connected Lens] window will be saved in the software, and it is possible to customize those items off-line. If you connect the same type of lens with different serial numbers and mounts, each will be listed with the same name, but the difference will be displayed in the [Home Screen]. Deleting History To delete the name of the lens in the “History of Connected Lens” window. 1. Click the × icon beside the name of the selected lens. 2. Click [Yes] to delete, or [No] to cancel in the confirmation dialog box. CAUTION !! It is not possible to delete the lens in orange color text from the window, as it is currently connected. Once the name of the lens in the window is deleted, off-line customization is no longer available for the product. It is necessary to revive the information of the lens through the internet if you wish to customize it off-line. 11 FIRMWARE UPDATE FIRMWARE UPDATE A firmware update can improve performance of lenses. SIGMA Optimization Pro is the multipurpose software to satisfy photographers’ preference. Automatic Check for the Availability of the Latest Firmware Start up the software and connect your lens with the computer. Then, SIGMA Optimization Pro automatically starts to check the availability of the latest firmware through the internet. If the latest version is available, the dialog box shows [Latest firmware of the lens is available.]. For the detailed information of firmware update, click the [Detailed information]. When you start the update, click [Yes], and when you do it later, click the [Later]. To start the update, click [Yes] and follow the instructions in the dialog box. Manual Check for the Availability of the Latest Firmware Click [Firmware Update] in the Home Screen. Then, SIGMA Optimization Pro starts to check the availability of the latest firmware through the internet. If the latest version is available, the dialog box shows [Latest firmware of the lens is available.]. For the detailed information of firmware update, click the [Detailed information]. When you start the update, click [Yes], and when you do it later, click the [Later]. To start the update, click [Yes] and follow the instructions in the dialog box. CAUTION !! Do not remove the lens or press the detachment button while updating firmware. Do not turn off the computer while updating firmware. Do not customize or change the current setting of the lens while updating firmware. To ensure the performance of the computer, use a fully charged battery or connect to an AC adapter while using this software. When the dialog box shows [Cannot connect to the server…], make sure that the computer has internet access. Should the firmware update not finish successfully If the firmware update does not finish successfully, the dialog box shows [Firmware update is incomplete....]. Remove the lens and execute the recovery work as instructed in the dialog box. Should the recovery process fail, contact your nearest Sigma authorized service station. Memo Click [Update Information] in the Status Window and it displays the webpage for SIGMA Optimization Pro Download in the Sigma website. Update information for the connected lens and other lenses is available. 12 CUSTOMIZATION CUSTOMIZATION MENU Click the [Focus Setting] button in the [Customization Menu] screen to start customization of the focus setting. Click [Customization Mode Setting] to show the screen for customization mode setting. (Customization Menu Screen) Focus Setting To set the AF focusing position. Full-time MF Setting It is possible to select Full-time MF function ON / OFF, and adjust the timing to operate Full-time MF function. Customization Mode Setting It is possible to save 2 sets of the customization status in [C1] and [C2]. CAUTION !! If the text appears in gray, it means the customization is unavailable. 13 FOCUS SETTING Focus can be set at each of 4 shooting distance ranges for fixed focal lenses, and each of 16 ranges (4 focusing distance ranges in x 4 shooting distance ranges) in total for zoom lenses. (Focus Setting Screen) When a zoom lens is connected When a fixed focal length lens is connected 1. Cell 2. Shooting Distance 3. Focal Length 4. Spin Box 5. Slider 1. Open the Focus Setting Screen (Click [Customization] in the Home Screen > Click [Focus Setting] in the Customization Menu Screen). 2. Select the desired cell for the focus setting you wish to customize (For instance, select the cell, as shown below, if Focal Length 150mm and Shooting Distance around 10m is preferable). 3. When you adjust the value, click the ◄► buttons in the spin box, or drag the ▼ button of the slider (Shifting focusing towards the front requires “-“ side, while back focusing orientation requires “+” side). 4. Click the [Rewriting] button and the dialog box for confirmation will appear. 5. Carefully read the content in the dialog box, and click [Agree] to process the customization, or click [Return] to not process the customization. 6. Once the rewriting finishes, the dialog box for confirmation appears. Then, click [Close] and remove the lens. 7. After customization, please check the performance of the lens by test shooting. If necessary, connect the lens again to have further customization. 14 CAUTION !! Do not remove the lens or press the detachment button while updating firmware. Do not turn off the computer while updating firmware. Do not customize or change the current setting of the lens while updating firmware. In case updating firmware finishes unsuccessfully, a message [Rewriting the setting of the lens is incomplete.] appears in the dialog box. Follow the instructions [RESET ALL CUSTOMIZATION] and proceed resetting the customization. To Reset the Customization 1. Click [Reset to Default] and the confirmation dialog box will appear. 2. Click [Yes] and all values become 0. 3. Click the [Rewriting] button and the dialog box for confirmation will appear. 4. Carefully read the content in the dialog box, and click [Agree] to process the customization, or click [Return] to not process the customization. 5. Once the rewriting finishes, the dialog box for confirmation appears. Then, click [Close] and remove the lens. 15 FULL-TIME MF SETTING It is possible to select Full-time MF function ON / OFF, and adjust the timing to operate Full-time MF function. (Full-time MF Setting Screen) Setting Full-time MF function ON / OFF It is possible to select the Full-time MF function ON / OFF. (When the shutter button is half-pressed while auto focusing is in operation, Full-time MF is activated by rotating the focus ring.) CAUTION !! There is a difference in the default setting of Full-time MF function for each mount. Default setting of Full-time MF function ON [Full-time MF ON] Mount SIGMA, NIKON, SONY OFF [Full-time MF OFF] CANON, PENTAX 1. Open the Full-time MF Setting Screen (Click [Customization] in the Home Screen > Click [Full-time MF Setting] in the Customization Menu Screen). 2. To activate the function, please click the button [Full-time MF ON], or select [Full-time MF OFF] to deactivate it. 3. Click the [Rewriting] button and the dialog box for confirmation will appear. 4. Carefully read the content in the dialog box, and click [Agree] to process the customization, or click [Return] to not process the customization. 5. Once the rewriting finishes, the dialog box for confirmation appears. Then, click [Close] and remove the lens. CAUTION !! Do not remove the lens or press the detachment button while updating firmware. Do not turn off the computer while updating firmware. Do not customize or change the current setting of the lens while updating firmware. In case updating firmware finishes unsuccessfully, a message [Rewriting the setting of the lens is incomplete.] appears in the dialog box. Follow the instructions [RESET ALL CUSTOMIZATION] and proceed resetting the customization. 16 Adjust Timing to Operate Full-time MF Function It is possible to adjust the timing to operate the Full-time MF function by customizing how much rotation of the focus ring is required. 1. In the Full-time MF Setting Screen, click [Full-time MF ON] to activate the function. (For SIGMA, NIKON and SONY, it is activated by default.) 2. When you adjust the value, click the ◄► buttons in the spin box, or drag the ▼ button of the slider (Adjust the value toward for less, and toward for more rotation.). 1. Spin Box 2. Slider It is possible to return to the default setting by clicking on the [Reset to Default] button. (Default setting may vary from lens to lens.) 3. Click the [Rewriting] button and the dialog box for confirmation will appear. 4. Carefully read the content in the dialog box, and click [Agree] to process the customization, or click [Return] to not process the customization. 5. Once the rewriting finishes, the dialog box for confirmation appears. Then, click [Close] and remove the lens. 6. Attach the lens to your camera body, and check the operation. If necessary, connect the lens again to have further customization. CAUTION !! Do not remove the lens or press the detachment button while updating firmware. Do not turn off the computer while updating firmware. Do not customize or change the current setting of the lens while updating firmware. In case updating firmware finishes unsuccessfully, a message [Rewriting the setting of the lens is incomplete.] appears in the dialog box. Follow the instructions [RESET ALL CUSTOMIZATION] and proceed resetting the customization. 17 CUSTOMIZATION MODE SETTING For the lenses that have a customization mode switch, SIGMA Optimization Pro can offer further varieties of customization. (Customization Mode Setting Screen) (Customization Mode Setting C1 (C2) Screen) It is possible to save 2 sets of the customization status in [C1] and [C2]. At the flick of the Custom Mode Switch on the lens, it is possible to apply the saved setting on the lens at [C1] and [C2]. The following are the functions offered for further customization. AF Speed Setting Focus Limiter Setting OS Setting CAUTION !! If the text appears in gray, it means the customization is unavailable. Customization Mode: The Sequence of Registration The following are the steps to customize functions such as [AF Speed Setting], [Focus Limiter Setting] and [OS Setting]. Click the [Customization] in the Home Screen. ↓ Click the [Customization Mode Setting] in the Customization Menu Screen. ↓ Select either [C1] or [C2] to save the customization in the Customization Mode Setting Screen. ↓ In the selected Customization Mode Setting, click [AF Speed Setting], [Focus Limiter Setting] or [OS Setting]. ↓ Customize the lens to reflect the preference, and click [OK] once it is finished. ↓ In the selected Customization Mode Setting, click [Rewriting] to process the customization. ↓ Click [Agree] in the dialog box. ↓ Click [Close] and remove the lens once the rewriting has finished successfully. 18 AF SPEED SETTING AF speed can be selected from 3 modes (only available in lenses with a custom mode switch). (AF Speed Setting Screen) 1. Select the AF Speed Setting. Click on [Customization] in the Home screen > [Customization Mode Setting] in the Customization Menu > click on [C1] or [C2] in Customization Mode Setting > Click [AF Speed Setting] in the C1 or C2 screen. 2. Select the desired mode. Motor's drive speed-priority Prioritize the AF speed to reach the point of focus. It can offer very fast initial speed for focusing. Standard Switch to default setting, which achieves both smooth operation and fast AF drive speed. Focus accuracy-priority Prioritize smooth focusing. It can offer very smooth operation around the point of focus. CAUTION !! Selectable mode depends on mounted lens. 3. Click on [OK] to go back to Customization Mode Setting C1 (or C2). 4. Click the [Rewriting] button and the dialog box for confirmation will appear. 5. Carefully read the content in the dialog box, and click [Agree] to process the customization, or click [Return] to not process the customization. 6. Once the rewriting finishes, the dialog box for confirmation appears. Then, click [Close] and remove the lens. CAUTION !! Do not remove the lens or press the detachment button while updating firmware. Do not turn off the computer while updating firmware. Do not customize or change the current setting of the lens while updating firmware. In case updating firmware finishes unsuccessfully, a message [Rewriting the setting of the lens is incomplete.] appears in the dialog box. Follow the instructions [RESET ALL CUSTOMIZATION] and proceed resetting the customization. 19 FOCUS LIMITER SETTING Range of the AF drive can be set (only available in lenses with a custom mode switch). (Focus Limiter Setting Screen) 1. Shooting distance 2. Slider 1. Select the Focus Limiter Setting. Click on [Customization] in the Home screen > [Customization Mode Setting] in the Customization Menu > click on [C1] or [C2] in Customization Mode Setting > Click [Focus Limiter Setting] in the C1 or C2 screen. 2. Set the range of the AF drive with two sliders (the driving range of AF is highlighted in orange). Example Full range 10m ~ ∞ Minimum ~ 10m 10m ~ 30m 3. Click on [OK] to go back to Customization Mode Setting C1 (or C2). 4. Click the [Rewriting] button and the dialog box for confirmation will appear. 5. Carefully read the content in the dialog box, and click [Agree] to process the customization, or click [Return] to not process the customization. 6. Once the rewriting finishes, the dialog box for confirmation appears. Then, click [Close] and remove the lens. 20 It is possible to return to the default setting (the range of the AF drive is set to the full range) by clicking on the [Reset] button. CAUTION !! The setting of SIGMA Optimization Pro is prioritized and the focus limiter switch which is incorporated in the lens is disabled when the Customization mode is effective. Do not remove the lens or press the detachment button while updating firmware. Do not turn off the computer while updating firmware. Do not customize or change the current setting of the lens while updating firmware. In case updating firmware finishes unsuccessfully, a message [Rewriting the setting of the lens is incomplete.] appears in the dialog box. Follow the instructions [RESET ALL CUSTOMIZATION] and proceed resetting the customization. 21 OS SETTING For the Optical Stabilizer, 3 unique view modes are available. This offers the most suited OS (Optical Stabilizer) function for any shooting style (only available in lenses with a custom mode switch). (OS setting screen) 1. Select the OS setting. Click on [Customization] in the Home screen > [Customization Mode Setting] in the Customization Menu > click on [C1] or [C2] in Customization Mode Setting > Click [OS Setting] in the C1 or C2 screen. 2. Select the desired mode. Dynamic View Mode This mode offers a recognizable OS effect to the image in the viewfinder. This helps to ensure the composition of images quickly. Standard This is the default setting. The OS effect is well-balanced and suitable for various scenes. Moderate View Mode This mode offers an excellent compensation of camera shake, and achieves very smooth transition of the image in the viewfinder. The composition of the image remains natural even when the angle of view keeps changing. CAUTION !! Selectable mode depends on mounted lens. 3. Click on [OK] to go back to Customization Mode Setting C1 (or C2). 4. Click the [Rewriting] button and the dialog box for confirmation will appear. 5. Carefully read the content in the dialog box, and click [Agree] to process the customization, or click [Return] to not process the customization. 6. Once the rewriting finishes, the dialog box for confirmation appears. Then, click [Close] and remove the lens. CAUTION !! Do not remove the lens or press the detachment button while updating firmware. Do not turn off the computer while updating firmware. Do not customize or change the current setting of the lens while updating firmware. In case updating firmware finishes unsuccessfully, a message [Rewriting the setting of the lens is incomplete.] appears in the dialog box. Follow the instructions [RESET ALL CUSTOMIZATION] and proceed resetting the customization. 22 RESET ALL CUSTOMIZATION It is possible to reset all the changed settings in the [Focus Setting] and the [Customization Mode Setting] to default. When the rewriting process does not finish successfully, it is required to reset all the customization. (Customization Menu Screen) 1. Click [Reset All] and the confirmation dialog box will appear. 2. Click [Yes] and the confirmation dialog box will appear again. 3. Carefully read the content in the dialog box, and click [Agree] to reset, or click [Return] to not process it. 4. Once it finishes resetting, the confirmation dialog box will appear. Then, click [Close] and remove the lens. CAUTION!! While it is possible to reset all the customized settings to default, once it is updated, this function does not downgrade the firmware to the previous version. 23 COMBINATION WITH TELE CONVERTER Cautions for customization of lenses that corresponds to SIGMA APO TELE CONVERTER EX DG (herein after, Tele Converter) will be explained as below. When a lens attached to a Tele Converter is connected, the name of the lens that will be shown on Status Window, as well as History of Connected Lens Window will appear and be recognized as a different lens as below. In case of 120-300mm F2.8 DG OS HSM S013 Lens only 120-300mm F2.8 DG OS HSM S013 Tele Converter 1.4x attached 120-300mm F2.8 DG OS HSM S013 (1.4x) Tele Converter 2x attached 120-300mm F2.8 DG OS HSM S013 (2x) Focus setting Focus setting data will be saved in the CPU of the lens as [Lens only], [Tele Converter 1.4x attached], and [Tele Converter 2x attached]. Therefore, focus setting should be processed using each combination, according to the condition of use. For example, if focus setting of a lens was only processed as [Lens only], when you use the lens with Tele Converter 1.4x, the adjusted value that was processed as [Lens only] will not be reflected, and auto focusing will operate unadjusted. Other customization What you can set on Customization mode (AF Speed Setting, Focus Limiter setting, OS Setting) remain the same regardless of whether the lens is attached or not attached to the Tele Converter. 24 USB DOCK USB DOCK To operate lens firmware updates and customization using this software, the available USB DOCK is required. USB DOCK is dedicated for each mount. Please use a USB DOCK which corresponds to your lens mount. USB DOCK for different mounts cannot be used. LED lamp It is possible to confirm the connection status to your computer from the light of the LED lamp embedded to the USB DOCK. Lights-out : Only the USB DOCK is connected to your computer. Lighting : The lens and the USB DOCK are connected to your computer. Blinking : The USB DOCK is rewriting the firmware of the lens or reading the information from the lens. CAUTION !! Do not do following acts while the LED lamp is blinking. It could cause the damage to your lens and USB Dock. Remove the lens from the USB DOCK. Remove the USB cable. Turn off the computer. Confirmation of the USB DOCK information It is possible to confirm your USB DOCK information by selecting the [USB Dock Information] from [File] in the menu bar and display the USB DOCK information. It is possible to confirm the following information in USB Dock Information screen. Mount Firmware version 25 FIRMWARE UPDATE CPU of the USB DOCK equips the firmware to operate the USB DOCK. Firmware of the USB DOCK will be updated for improvement of stability, correction of error and being compatible with new lenses. It is possible to update the firmware through the Internet via SIGMA Optimization Pro. Confirm the latest firmware automatically Sigma Optimization Pro confirms if the latest firmware is available automatically through the Internet when you connect the USB DOCK to your computer and run the software. If newer firmware is available for the USB DOCK, [Latest firmware for USB Dock is available…] will be displayed in the dialog. To update the firmware immediately, please click on [Yes]. If you don’t wish to update the firmware immediately, please click on [Later]. To start the update, click [Yes] and follow the instructions in the dialog box. Confirm the latest firmware manually It is possible to confirm if the latest firmware is available by clicking on [Availability of latest firmware] in the USB Dock Information screen by connecting the USB DOCK to your computer. If newer firmware is available for the USB DOCK, [Latest firmware for USB Dock is available…] will be displayed in the dialog. To update the firmware immediately, please click on [Yes]. If you don’t wish to update the firmware immediately, please click on [Later]. To start the update, click [Yes] and follow the instructions in the dialog box. CAUTION !! Do not turn off the computer while updating firmware. To ensure the performance of the computer, use a fully charged battery or connect to an AC adapter while using this software. When the dialog box shows [Cannot connect to the server…], make sure that the computer has internet access. We recommend you to update to the latest firmware. Old firmware could cause failure of firmware updates to the lens and customization. 26