1
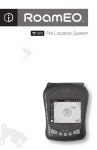
RoamEO PuPpod
TM
GPS MANUAL
1
THANK YOU for purchasing the RoamEO PuPpod GPS Pet Locator system. The PuPpod
TM
TM
system consists of the PuPpod hand-held Black and White Display unit, the RoamEO
TM
TM
GPS/Radio Collar, and a battery charger for use with both Display unit and Collar. The RoamEO
TM
system works by having the RoamEO GPS Collar obtain a fix from several GPS satellites in orbit,
and transmitting those coordinates via radio to the PuPpod display unit, which will provide a
TM
bearing/direction to your dog and a range/distance from 1 to 3 miles away.
+
RoamEOTM
dog collar
=
RoamEO PuPpodTM
Your Pet
2
If you need assistance anytime please call
our toll free number 1-888-371-2596
GPS Basics
3
The Global Positioning System (GPS) was launched in 1995 by the United States Defense Department. Twentyfour satellites orbit at 10,900 nautical miles above the Earth, passing overhead twice daily. At least four of these
satellites are in view nearly anywhere on the Earth at all times.
GPS requires signal reception from three satellites in order to determine a latitude and longitude position,
known as a 2D fix. Four satellites are needed to determine position and elevation. This is a 3D fix. In 2003, in
order to provide an additional degree of accuracy to GPS, the Federal Aviation Administration developed a
program called Wide Area Augmentation System (WAAS) that complements GPS. WAAS is not always available
to GPS users because of the position of the satellites. RoamEO will automatically receive WAAS signals, if available.
Please remember: for GPS to work effectively, it must have a clear view of the satellites in the sky in order
to receive their signals. Unlike television or radio signals, GPS works at very high frequencies. As a result,
GPS reception can be easily effected by tree foliage, buildings, your body, and any other cover that blocks
the sky.
To help achieve the maximum performance from RoamEO, we recommend:
1. If possible, power up RoamEO outdoors.
2. If powering up RoamEO outdoors, maintain some distance from buildings and stay out from under foliage
if possible. After gaining an initial GPS lock, RoamEO will probably maintain a lock even if operating
under these operating under these conditions.
3. If indoors, it may require a few minutes to acquire a GPS lock. To improve your ability to gain a GPS fix,
stand as close to a window as possible so that RoamEO has at least a partial view of the sky. It is unlikely
that you will be able to achieve a GPS fix from an interior room in the house or the basement.
4
Receiver Functions
Power Switch: This button
powers the GPS
Receiver on and o≠.
( pg 16 )
1
Collar
Enrollment:
Used for
enrolling
Collars with
the GPS
Receiver.
( pgs 8, 17 )
2
Indoor Mode:
( pgs 13, 14,
15, 18 )
3
LCD Screen
( pgs 10, 19,
20, 20 )
4
The RoamEO Collar and
PuPpodTM hand-held
Display unit are powered
by rechargeable, removable Lithium-Ion (li-ion)
batteries. After purchase,
please place the Li-ion
batteries in the RoamEO
Battery Charger for two
hours to fully charge the
batteries. Match the
arrow on the Battery with
the arrow on the Battery
Charger cradle. When
fully charged, the Battery
Charger will display a
green LED (red LED while
charging). The batteries
are interchangeable
between the RoamEO
Collar and the PuPpodTM
Display unit.
Powering up the RoamEO
Collar and PuPpod Display
TM
1
( pgs 19, 20 )
2
( pg 21 )
5
Charge for 2 HOURS before using
fully charged
charging
6
To insert a
RoamEO Battery
into the RoamEO
Collar, unlatch
the Collar battery
compartment
cover and place
the battery with
the arrow on the
battery face
aligned with the
arrow on the
side of battery
compartment.
7
To insert a RoamEO
Battery into the PuPpod
Display Unit, flip up the
metal ring on the back of
the Display unit, turn the
ring counter-clockwise,
and pull the battery cover
off the Display unit from
the top and tilting off the
bottom where it is held in
place with a slotted clip.
1 Align the arrow on the
battery with the location
shown by the arrow on
page 7. Close the battery
compartment by aligning
the slotted clip on the
battery cover with the
bottom of the unit, and
tilting the cover closed.
Secure the battery cover
by turning the metal ring
clockwise to ensure the
unit is weatherproof.
TM
1
A RoamEO collar needs to
be registered to the
PuPpod in order for the
two components to work
as a system. This process
may have already been
accomplished if the two
components were
purchased as a system. If
the two components were
purchased separately or if
you wish to enroll an
additional or new collar,
complete the following
procedure. 1 Turn on your
PuPpodTM Display unit by
pressing the Top button on
the left side. 2 Press and
hold the Middle Button
until the number 1 circle is
blinking on the display.
3 Press and hold the
Middle Button again until
both the number 1 Circle is
blinking AND the Paw
outline is blinking.
Registering the RoamEO
Collar to the PuPpod Display
8
TM
1
2 3
9
Now turn on the RoamEO
Collar by clipping the
collar ends together; the
RoamEO Collar and
PuPpodTM Display will
automatically register.
To register a second
collar, follow the same
procedure until the
number 2 circle is blinking
on the display, and clip
the second collar ends
together.
Once your RoamEO
Collars have been
registered, you now
should take your
RoamEO Collar and
PuPpodTM Display unit
outside to obtain a
GPS lock. 1 A series
of five dots will strobe
on the Display screen
until the PuPpodTM unit
obtains a GPS lock.
2 The display screen
has 8 directional
segments to point like
a compass in the
direction of your dog.
To locate your dog
using the PuPpodTM
Display unit, look at
the display screen
and see which
Directional Segment
is highlighted. Turn
the PuPpodTM Display
unit until the Directional Segment on
the top of the Display
Screen begins to
strobe; that is the
bearing and direction
to your dog. If the
top 3 segments
illuminate you are
getting very close.
Locating your Dog
with the PuPpod Display
10
TM
1
2
Segmented
Directional
Edges
11
12
The Range Readout
will tell you the
distance. Move
toward your dog,
changing directions
if different Directional
Segments light up. If
you are closer than
the GPS accuracy of
the unit (within 20
feet, or that day’s
GPS accuracy of the
satellite constellation),
all of the Directional
Segments are
highlighted and the
word NEAR will
appear.
NEAR
Using the Indoor Mode
2
13
The PuPpod Display normally uses it’s own unique input from GPS satellites to compare the
TM
location of the RoamEO Collar on your dog, and its own GPS location. However, if you want to
simply monitor your dogs outside while remaining inside your house (with no access to a GPS
signal), the PuPpod display can help you monitor your dogs.
TM
14
To establish an Indoor
Mode GPS location, take
your PuPpodTM Display unit
outside. 1 Press and hold
the bottom button until the
house outline and house
interior alternatively flash.
Release the button; the
PuPpodTM display unit will
automatically search for an
accurate GPS fix.
1
15
The distance display will
show GPS accuracy (e.g.
“acc50”) and will likely
improve over a short time.
When the GPS accuracy is
down to 15ft or less (e.g.
“acc15”), the PuPpodTM
will now automatically go
into Indoor Mode.
1 Toggling the bottom
button will turn Indoor
Mode on and off.
1
Top Button Function
16
Top
Button/Power:
turns the unit on
and off; holding the
Top Button down
for 5 seconds turns
the PuPpod unit
off. Pressing the
Top Button will
also turn on the
backlighting for
30 seconds.
TM
Middle Button Function 17
Middle
Button/Collar
selection and
registration:
pressing the Middle
Button selects
between locating
Dog #1 and Dog #2
(if two collars are
registered). Pressing and holding the
Middle Button
begins the collar
registration process.
17
Bottom Button Function 18
Bottom
Button/Indoor
Mode: Pressing
the Bottom Button
turns the Indoor
Mode on and off.
Pressing and holding the Bottom
Button outside with
a good GPS lock
(under 15ft) will
establish the Indoor
Mode GPS location.
19
Icons
- The distance
indicator, up to five
digits, contains either
five dashes if there is
not a GPS lock on
the selected collar
and the handheld
(when not in Indoor
Mode).
- The selected collar
indicators: The little
number circles when
the collar is not enrolled. When the
RoamEO Collar is
enrolled, the paws
are illuminated
around the numbered
circles.
20
- The Collar radio
indicator: Illuminated
when a radio packet
from the selected
collar is received. Will
stop displaying after
90 seconds if another
packet is not
received within
that period.
- The collar battery
level Icon: Shows
the battery level of
the selected collar.
The battery outline
indicates battery
information is available: 4 bars (full) to
0 bars (empty).
- The Collar GPS
Icon: Illuminated
when the collar has
a GPS lock. Will
show only when
validGPS lock is
received within the
last 90 seconds.
21
- PuPpod Display
battery level Icon:
Shows the battery
level of the handheld
unit. The battery
outline indicates that
battery information is
available: 4 bars (full)
to 0 bars (empty).
TM
- Indoor Mode Icon:
Home outline indicates a home location has been saved.
If the interior
is also illuminated,
then the handheld is
in home mode.
- PuPpod
Display GPS Icon:
Illuminated when
the collar has
a GPS lock. Will
show only when
PuPpod GPS lock
is received within
the last 90 seconds.
TM
TM
22
FCC Compliance
This device complies with Part 15 of the U.S. Federal Communications Commission (FCC) Rules. Operation is
subject to the following conditions:
1. This device may not cause harmful interference.
2. This device must accept any interference that may cause undesired operation.
Changes or modifications not expressly approved by the manufacturer could void the user’s authority to operate
the equipment.
This equipment has been tested and found to comply with the limits for a Class B digital device, pursuant to Part
15 of he FCC rules. These limits are designed to provide reasonable protection against harmful interference in a
residential installation. This equipment generates, uses and can radiate radio frequency energy and, if not
installed and used in accordance with the instructions, may cause harmful interference to radio communications.
Threr is no guarantee that interference will not occur in a particular installation. If this equipment does cause
harmful interference to radio or television reception, which can be determined by turning the equipment off and
on, the user is encouraged to try to correct the interference by one or more of the following means:
1.
2.
3.
4.
Rotate or relocate the receiving antenna
Incease the separation between the equipment and receiver.
Connect the equipment into an outlet on a circuit different from that which the receiver is connected.
Consult the manufacturer customer service department for help.
Under normal operating conditions, the antenna is designed to maintain a separation distance of 20cm from all
persons. The EUT is mobile and fixed.
That’s how
you found
me!
www.RoamEOforPets.com
For more information visit www.RoamEOforPets.com or call toll free at 1.888.371.2596
© 2008 WHITE BEAR TECHNOLOGIES
900 LONG LAKE ROAD, SUITE 110,
MINNEAPOLIS, MN 55112, 651.636.5695