1
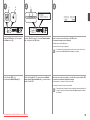
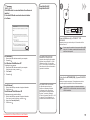
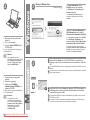
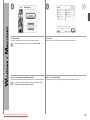
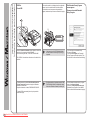
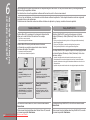
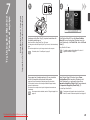
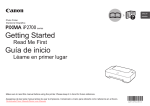
ENGLISH
ESPAÑOL
Canon Inkjet Office All-In-One
Equipo multifunción para oficina Canon Inkjet
series
Getting Started
Read Me First
Guía de inicio
Léame en primer lugar
Make sure to read this manual before using the machine. Please keep it in hand for future reference.
Asegúrese de leer este manual antes de usar el equipo. Consérvelo a mano para utilizarlo como referencia en el futuro.
Downloaded from ManualsPrinter.com Manuals
On-screen manuals can be viewed on a computer. They are included on the Setup CD-ROM and are installed during the software installation. Some parts of the manual may be displayed in English.
For details on opening the on-screen manuals, refer to page 22.
Los manuales en pantalla se pueden ver en un ordenador. Se incluyen en el CD-ROM de instalación (Setup CD-ROM) y se instalan durante el proceso de instalación del software. Algunas partes del manual
pueden aparecer en inglés. Para obtener información sobre cómo se abren los manuales en pantalla, consulte la página 22.
Getting Started
(this manual)
Basic Guide
Guía de inicio
(este manual)
Guía básica
Describes how to set up and use your machine.
Describe cómo configurar y usar el equipo.
Model Number: K10364 (MX360)
Número de modelo: K10364 (MX360)
Downloaded from ManualsPrinter.com Manuals
Describes basic operations and media,
and gives an introduction to other
functions available.
Describe las operaciones básicas y los
soportes y ofrece una introducción a otras
funciones disponibles.
Advanced Guide
Troubleshooting
Guía avanzada
Solución de problemas
Describes various operating procedures
to make full use of machine.
Describe distintos procedimientos de
funcionamiento para aprovechar al
máximo todas las funciones del equipo.
Describes troubleshooting tips for
problems you may encounter when using
the machine.
Proporciona consejos para solucionar los
problemas que puedan surgir al utilizar
el equipo.
■ Contents
1
2
3
4
5
6
7
Preparation P.2
Install the FINE Cartridges P.8
Load Paper P.12
Set Up for Fax Reception P.13
Install the Software P.16
Application Software P.22
Try Using the Machine P.23
Print Photos from a Computer P.23
Try Copying P.25
Send Faxes P.26
■ Symbols Used in This
Document
Prohibited actions.
Instructions including important
information.
• In this guide, Windows 7 operating system is
referred to as Windows 7 and Windows Vista
operating system as Windows Vista.
• In this guide, the screens are based on
Windows 7 Home Premium and Mac OS X
v.10.6.x. (Unless noted otherwise, the screens
are those of Windows 7.)
8 Maintenance P.28
9 Specifications P.29
■ Contenido
1 Preparación P.2
2 Instalación de los cartuchos FINE
(FINE Cartridges) P.8
3 Carga del papel P.12
4 Configuración del equipo para la
recepción de fax P.13
5 Instalación del software P.16
6 Software de aplicación P.22
7 Pruebe el equipo P.23
Impresión de fotografías desde un ordenador P.23
Realice una prueba de copia P.25
Envío de faxes P.26
■ Símbolos utilizados en este
documento
Acciones prohibidas.
Instrucciones que incluyen
información importante.
• En esta guía, para referirse al sistema operativo
Windows 7 se utiliza el término Windows 7
y para referirse al sistema operativo Windows
Vista se utiliza el término Windows Vista.
• Las pantallas de esta guía se basan en
Windows 7 Home Premium y Mac OS X
v.10.6.x. (A menos que se indique lo contrario,
las pantallas serán de Windows 7).
8 Mantenimiento P.28
9 Especificaciones P.30
• Microsoft is a registered trademark of Microsoft
Corporation.
• Windows is a trademark or registered trademark
of Microsoft Corporation in the U.S. and/or other
countries.
• Windows Vista is a trademark or registered
trademark of Microsoft Corporation in the U.S.
and/or other countries.
• Internet Explorer is a trademark or registered
trademark of Microsoft Corporation in the U.S.
and/or other countries.
• Macintosh and Mac are trademarks of Apple
Inc., registered in the U.S. and other countries.
• Safari is a trademark of Apple Inc., registered in
the U.S. and other countries.
Downloaded from ManualsPrinter.com Manuals
• Microsoft es una marca comercial registrada
de Microsoft Corporation.
• Windows es una marca comercial o una marca
comercial registrada de Microsoft Corporation
en EE UU y/u otros países.
• Windows Vista es una marca comercial o una
marca comercial registrada de Microsoft
Corporation en EE UU y/u otros países.
• Internet Explorer es una marca comercial
o una marca comercial registrada de
Microsoft Corporation en EE UU y/u otros
países.
• Macintosh y Mac son marcas comerciales
de Apple Inc., registradas en EE UU y en otros
países.
• Safari es una marca comercial de Apple Inc.,
registrada en EE UU y en otros países.
Preparation
Preparación
1
1
1
3
2
4
5
6
A
• Do not install the machine where an object may fall on it. In
addition, do not place any object on the top of the machine. It may
fall into the machine when opening covers, resulting in malfunction.
• Paper Output Tray (A) automatically opens when printing starts. Do
not place anything in front of the Paper Output Tray.
Make sure all the following items
are supplied.
• No instale el equipo donde le pueda caer algún objeto. Además,
no coloque ningún objeto encima del equipo. Podría caerse en éste
al abrir las cubiertas y provocar fallos en el funcionamiento.
• La bandeja de salida del papel (A) se abre automáticamente
cuando comienza la impresión. No coloque nada frente a la
bandeja de salida del papel.
Compruebe que no falta ninguno
de los elementos siguientes.
Downloaded from ManualsPrinter.com Manuals
1.
2.
3.
4.
FINE cartridges (Color, Black)
Power cord
Telephone line cable
Manuals
1. Cartuchos FINE (FINE cartridges)
(Color, Negro)
2. Cable de alimentación
3. Cable de línea telefónica
4. Manuales
5. Setup CD-ROM (containing the
drivers, applications and on-screen
manuals)
6. Other documents
• A USB cable is necessary to
connect the machine with your
computer.
5. CD-ROM de instalación (Setup
CD-ROM) (que contiene los
controladores, las aplicaciones
y los manuales en pantalla)
6. Otros documentos
• Se necesita un cable USB
para conectar el equipo al
ordenador.
Do not connect
the power cord
yet.
2
3
B
B
3
2
D
1
A
Remove all the protective materials
and orange tape from the outside of the
machine.
C
1. Open the Paper Output Tray (A).
2. Make sure the Document Cover (B) is closed, then lift to open the Scanning Unit (Cover) (C).
3. Fix it with the Scanning Unit Support (D).
• The tape and protective materials may
differ in shape and position from those
shown here.
Aún no conecte
el cable de
alimentación.
Retire la cinta naranja y todos los
materiales protectores del exterior
del equipo.
• La forma y la posición de la cinta y los
materiales protectores pueden variar
respecto a las que se muestran aquí.
Downloaded from ManualsPrinter.com Manuals
1. Abra la bandeja de salida del papel (A).
2. Asegúrese de que la cubierta de documentos (B) esté cerrada y, a continuación, levante la
unidad de escaneado (cubierta) (C).
3. Sujétela con el soporte de la unidad de escaneado (D).
4
5
F
1
2
3
E
Remove both the orange tape (E) and the protective material (F)
carefully.
1. Lift the Scanning Unit (Cover) slightly.
2. Fold the Scanning Unit Support.
3. Close the Scanning Unit (Cover) gently.
Retire la cinta naranja (E) y el material protector(F) con cuidado.
1. Levante la unidad de escaneado (cubierta) ligeramente.
2. Pliegue el soporte de la unidad de escaneado.
3. Cierre después la unidad de escaneado (cubierta) con cuidado.
Downloaded from ManualsPrinter.com Manuals
6
1
7
I
Only when
connecting a
telephone or
an answering
machine
G
H
Connect one end of supplied telephone line cable (G) to
the lower connector labeled “L” on the machine, and then
connect the other end to the telephone jack on the wall (H).
Use fax features?
Yes
No
Go to
.
Go to
on
page 6.
• If you cannot send faxes after installing the machine, check the
following:
1. The telephone line cable is connected to connector labeled “L”
on the machine.
2. The dial tone at the telephone jack on the wall.
3. The telephone line type. For details, refer to “Confirming the
Telephone Line Connection” in the on-screen manual: Basic Guide
after installation is complete.
Sólo al conectar
un teléfono o un
contestador
automático
2
Remove the Cap (I) (1), then connect a telephone or an answering
machine with the telephone line cable (2).
• Do not use a telephone jack line duplexer to connect the machine and a
telephone in parallel. The machine may not operate properly.
• The basic connection method is described here. For other
connection methods, refer to the on-screen manual: Basic Guide
after installation is complete.
¿Utiliza las funciones de fax?
Sí
Vaya a
No
Vaya a
en la
página 6.
.
Conecte un extremo del cable de línea telefónica
suministrado (G) al conector inferior con la etiqueta “L” del
equipo y, a continuación, conecte el otro extremo a la clavija
de línea telefónica de la pared (H).
• Si no logra enviar faxes tras instalar el equipo, compruebe lo
siguiente:
1. El cable de línea telefónica está conectado al conector con la
etiqueta “L” del equipo.
2. El tono de marcación en la clavija de línea telefónica de la pared.
3. El tipo de línea telefónica. Para obtener más información,
consulte “Comprobación de la conexión de la línea de teléfono”
en el manual en pantalla: Guía básica después de finalizar la
instalación.
Retire la tapa (I) (1) y, a continuación, conecte un teléfono o un
contestador automático mediante el cable de línea telefónica (2).
• No utilice un adaptador de clavija de línea telefónica doble para conectar
el equipo y el teléfono en paralelo. Puede que el equipo no funcione
correctamente.
• El método básico para conectarla se describe aquí. Para obtener
información sobre otros métodos, consulte el manual en pantalla:
Guía básica después de finalizar la instalación.
Downloaded from ManualsPrinter.com Manuals
8
9
Insert the power cord into the connector on the left
side of the machine and into the wall outlet firmly.
• Do NOT connect the USB cable at this stage.
• Make sure that the Document Cover is closed.
Conecte el cable de alimentación en el conector
situado en la parte izquierda del equipo y enchúfelo
firmemente a la toma de corriente.
• NO conecte el cable USB en este momento.
• Asegúrese de que la cubierta de documentos esté
cerrada.
Downloaded from ManualsPrinter.com Manuals
J
Press the ON button (J) to turn on the
machine.
• It takes about 5 seconds for the ON button to
work after the power cord is plugged in.
Pulse el botón ACTIVADO (ON) (J) para
encender el equipo.
• Una vez conectado el cable de corriente, el
botón ACTIVADO (ON) tarda unos 5 segundos
en ponerse en funcionamiento.
10
M
K
L
Use the [ or ] button (K) on the Operation Panel to select
the language for the LCD (Liquid Crystal Display) (L), then
press the OK button.
• If you want to change the language shown on the LCD, press the
Back button (M) to return to the Language selection screen.
Utilice el botón [ o ] (K) del panel de control para
seleccionar el idioma de la pantalla LCD (pantalla de cristal
líquido) (L) y, a continuación, pulse el botón OK.
• Si desea cambiar el idioma de la pantalla LCD, pulse el botón
Atrás (Back) (M) en el panel de control para volver a la pantalla
Selección idioma (Language selection).
11
When this screen is displayed, proceed to the next step.
Cuando aparezca esta pantalla, continúe con el paso siguiente.
When it is necessary to turn off the machine
Cuando sea necesario desconectar el equipo
Be sure to follow the procedure below.
1. Press the ON button to turn off the
machine.
2. Make sure that the lamp (N) of the ON
button is not lit.
1
Operating noise may continue for up to 30
seconds until the machine turns off.
N
2
• Before removing the power plug, make sure that the lamp of the ON button is not lit.
Removing the power plug while the lamp of the ON button is lit or flashing may cause drying
and clogging of the FINE Cartridges, resulting in poor printing.
When using the fax features
• Removing the power plug deletes all faxes stored in memory. Before removing the power
plug, send faxes, print them, or save them to USB flash drive as necessary.
• The specification of the power cord differs for each country or region.
Asegúrese de seguir el procedimiento que se
explica a continuación.
1. Pulse el botón ACTIVADO (ON) para
desconectar el equipo.
2. Asegúrese de que la luz (N) del botón
ACTIVADO (ON) no está iluminada.
Hasta que el equipo se apague, 30 segundos
como máximo, se puede seguir escuchando el
ruido de funcionamiento.
• Antes de retirar el cable de alimentación, asegúrese de que no esté encendida la luz del
botón ACTIVADO (ON). Si se retira el cable de alimentación mientras la luz del botón
ACTIVADO (ON) esté encendida o parpadea, los cartuchos FINE (FINE Cartridges) se
pueden secar y obstruir teniendo como resultado una impresión de mala calidad.
Cuando utilice las funciones de fax
• Si se retira el cable de alimentación, se eliminan todos los faxes almacenados en la
memoria. Envíe, imprima o guarde los faxes en una unidad flash USB según convenga
antes de retirar el cable de alimentación.
• Las especificaciones del cable de alimentación varían según el país o la región de uso.
Downloaded from ManualsPrinter.com Manuals
Install the FINE Cartridges
Instalación de los cartuchos FINE (FINE Cartridges)
2
1
2
3
A
H
G
A
2
1
F
E
D
1. Make sure the Document Cover (A) is closed, then lift to open the Scanning
Unit (Cover) (D).
2. Fix it with the Scanning Unit Support (E).
• When you lift the Scanning Unit (Cover), do not touch the buttons on the Operation Panel (F)
or the LCD (G). May result in unintended operation.
1. Asegúrese de que la cubierta de documentos (A) esté cerrada y, a continuación,
levante la unidad de escaneado (cubierta) (D).
2. Sujétela con el soporte de la unidad de escaneado (E).
• Cuando levante la unidad de escaneado (cubierta), no toque los botones del panel de control
(F) ni de la pantalla LCD (G). Puede producirse un funcionamiento imprevisto.
Downloaded from ManualsPrinter.com Manuals
The FINE Cartridge
Holder (H) moves to the
installation position.
If the FINE Cartridge Holder
does not move, make sure
that the machine is turned on.
For details, refer to
to
on
page 6 in "1 Preparation".
El soporte de cartucho
FINE (FINE Cartridge
Holder) (H) se
desplazará a la posición
de instalación.
Si el soporte de cartucho FINE
(FINE Cartridge Holder) no
se mueve, compruebe que el
equipo esté encendido. Para
conocer todos los detalles,
consulte de
a
en la página
6 de "1 Preparación".
Follow the next
procedure to insert the
Black
and Color
FINE Cartridges into their
corresponding slots
and .
Siga el procedimiento que
se indica a continuación
para insertar los cartuchos
FINE (FINE Cartridges)
negro
y de color
en sus ranuras
y
correspondientes.
4
5
J
J
I
Open the Ink Cartridge Locking Cover
on the right side.
Pinch (I) firmly and pull up the cover.
After removing the Black FINE Cartridge
from its box, pull the orange protective tape (J) in the
direction of the arrow and remove it carefully.
•
•
•
•
Abra la tapa de bloqueo del cartucho de tinta
del lado derecho.
Sujete (I) firmemente y levante la tapa.
Downloaded from ManualsPrinter.com Manuals
Handle the FINE Cartridges carefully. Do not drop or apply excessive pressure to them.
Be sure to use the supplied FINE Cartridges.
Be careful not to stain your hands or surrounding work area with ink on the removed protective tape.
Do not touch the metal parts of the FINE Cartridges. The machine may not print properly if you touch them.
Después de extraer el cartucho FINE (FINE Cartridge)
negro de su caja, tire de la cinta
protectora naranja (J) en la dirección que indica la flecha y quítela con cuidado.
• Instale los cartuchos FINE (FINE Cartridges) con cuidado. No los deje caer ni les aplique una presión excesiva.
• Asegúrese de usar los cartuchos FINE (FINE Cartridges) suministrados.
• Tenga cuidado para no mancharse las manos ni manchar el área de trabajo circundante con tinta de la cinta
protectora retirada.
• No toque las partes metálicas de los cartuchos FINE (FINE Cartridges). Si los toca, puede que el equipo no
imprima correctamente.
6
7
Place the Black FINE Cartridge
.
into the right slot
Push down
of the Ink Cartridge Locking Cover until it snaps into place.
View the Ink Cartridge Locking Cover
straight on and check that it is locked correctly (not at an angle).
• Do not knock the FINE Cartridge against the sides of the
holder.
• Install in a well-lit environment.
• Install the Black FINE Cartridge
into the right slot ,
and the Color FINE Cartridge
into the left slot .
Coloque el cartucho FINE (FINE Cartridge)
en la ranura
derecha.
negro
• Procure que el cartucho FINE (FINE Cartridge) no golpee
los lados del soporte.
• Instálelo en un entorno bien iluminado.
• Instale el cartucho FINE (FINE Cartridge)
negro en la
ranura
derecha y el cartucho FINE (FINE Cartridge)
de color en la ranura
izquierda.
Downloaded from ManualsPrinter.com Manuals
10
Presione en
de la tapa de bloqueo del cartucho de tinta hasta que encaje.
Compruebe que la tapa de bloqueo del cartucho de tinta
esté derecha y correctamente cerrada, es decir, que no esté inclinada.
8
9
10
1
2
3
Insert the Color FINE
Cartridge
into the left
FINE Cartridge Holder
in the same way as the
Black FINE Cartridge.
1. Lift the Scanning Unit (Cover) slightly.
2. Fold the Scanning Unit Support.
3. Close the Scanning Unit (Cover) gently.
Wait for about 1 minute until the LCD changes as shown in the illustration, then
proceed to the next step.
• Once you have installed the FINE Cartridges, do not remove them unnecessarily.
• If an error message is displayed on the LCD, make sure that the FINE Cartridges are correctly
installed.
• The LCD will turn off if the machine is not operated for about 5 minutes. Pressing any button
other than the ON button will restore the display.
Introduzca el cartucho
FINE (FINE Cartridge)
de color en el soporte
de cartucho FINE (FINE
Cartridge Holder)
izquierdo del mismo
modo que lo hizo con
el cartucho FINE (FINE
Cartridge) negro.
1. Levante la unidad de escaneado (cubierta)
ligeramente.
2. Pliegue el soporte de la unidad de escaneado.
3. Cierre después la unidad de escaneado (cubierta)
con cuidado.
Downloaded from ManualsPrinter.com Manuals
Espere aproximadamente 1 minuto hasta que la pantalla LCD cambie como se
muestra en la ilustración y continúe con el paso siguiente.
• Cuando haya instalado los cartuchos FINE (FINE Cartridges), no los retire si no es necesario.
• Si aparece un mensaje de error en la pantalla LCD, asegúrese de que los cartuchos FINE
(FINE Cartridges) estén correctamente instalados.
• Si no se utiliza el equipo durante unos 5 minutos, se desconectará la pantalla LCD.
Pulse cualquier botón excepto el botón ACTIVADO (ON) para restaurarla.
11
Load Paper
Carga del papel
3
1
2
1
2
3
4
D
C
A
B
Open the Paper Support
(A).
Abra el soporte del papel
(A).
Move the Paper Guides
(B) to both edges.
Desplace las guías del
papel (B) hasta ambos
bordes.
Load paper in the center
of the Rear Tray (C).
Slide the left and right Paper Guides against both
edges of the paper.
Load paper in portrait
orientation with the printing
side facing up.
Make sure that the height of the paper stack does not exceed the
line (D).
Cargue el papel en el
centro de la bandeja
posterior (C).
Deslice las guías de papel izquierda y derecha contra
ambos bordes del papel.
Cargue el papel con
orientación vertical con la cara
de impresión hacia arriba.
Downloaded from ManualsPrinter.com Manuals
12
• For details on how to handle paper, refer to "Loading
Paper" in the on-screen manual: Basic Guide after
installation is complete.
Compruebe que la altura de la pila de papel no supere la línea (D).
• Para obtener más información sobre cómo manipular
el papel, consulte “Carga de papel” en el manual en
pantalla: Guía básica después de finalizar la instalación.
Set Up for Fax Reception
Configuración del equipo para la recepción de fax
4
Read this section only when using
the fax features.
Depending on your needs, select one of the following three modes for receiving
faxes. You can change the receive mode after installation is complete. For details,
refer to “Setting the Receive Mode” in the on-screen manual:Basic Guide.
If not using the fax features, go to
“5 Install the Software” on page 16.
En función de sus necesidades, seleccione uno de estos tres modos para la
recepción de faxes. Puede cambiar el modo de recepción después de finalizar la
instalación. Para obtener más información, consulte “Establecimiento del modo de
recepción” en el manual en pantalla: Guía básica.
Intended Use
Uso previsto
• Use a single telephone line
for both voice and fax calls.
• Prioritize voice calls over fax
reception.
• Connect an answering machine.
Lea esta sección sólo si utiliza las
funciones de fax.
• Utilice una línea de teléfono para
las llamadas de voz y los faxes.
• Dé prioridad a la recepción de
llamadas de voz respecto a la
recepción de llamadas de fax.
• Conecte un contestador
automático.
De lo contrario, vaya a “5 Instalación
del software” en la página 16.
Downloaded from ManualsPrinter.com Manuals
• Use a dedicated fax line.
• Receive only faxes.
• Utilice una línea de fax dedicada.
• Utilícela sólo para la recepción
de faxes.
• Use a Distinctive Ring Pattern
Detection (DRPD) service.
• Utilice un servicio de detección
de patrones de sonido (DRPD).
Receive Mode
Modo de recepción
TEL priority mode
Modo prioridad tel.
Voice calls cannot be received unless a telephone
is connected.
No se pueden recibir llamadas de voz a menos
que haya conectado un teléfono.
FAX only mode
Modo sólo fax
DRPD
DRPD
13
Responses to Calls in Each Mode
Respuestas a llamadas en cada modo
When a fax call arrives
Si recibe una llamada de fax
FAX only mode
Modo sólo fax
TEL priority mode
Modo prioridad tel.
While the telephone's ringtone
sounds, pick up the handset.
When the fax reception
starts, replace the handset.
If an answering machine is
connected, the fax is received
automatically.
Mientras suene el tono de
llamada del teléfono, descuelgue
el auricular. Cuando se inicie
la recepción de fax, cuelgue el
auricular. Si está conectado un
contestador automático, el fax
se recibe automáticamente.
The fax is received
automatically.
El fax se recibe
automáticamente.
DRPD
DRPD
The telephone’s ringtone
sounds. The fax is received
automatically when the machine
detects the fax ring pattern.
DRPD must be supported by
your telephone service provider.
Please contact them for service
details.
Suena el tono de llamada
del teléfono. El fax se recibe
automáticamente cuando el
equipo detecta el patrón de
sonido de fax.
Su proveedor del servicio
telefónico debe ofrecer DRPD.
Póngase en contacto con él
para obtener más información
del servicio.
Downloaded from ManualsPrinter.com Manuals
14
When a voice call arrives
Si recibe una llamada de voz
While the telephone's ringtone
sounds, pick up the handset to
answer the call.
Mientras suene el tono de
llamada del teléfono, descuelgue
el auricular para responder a la
llamada.
The call cannot be answered.
No se puede responder a la llamada.
The telephone continues to ring.
Pick up the handset to answer
the call.
Sigue sonando el teléfono.
Descuelgue el auricular para
responder a la llamada.
• Even when a telephone is connected to
the machine, the telephone’s ringtone
may not sound for an incoming call
depending on the telephone type or
settings.
• Aunque esté conectado al equipo
un teléfono, puede que no suene el
tono de llamada del teléfono para una
llamada entrante en función del tipo
o de la configuración del teléfono.
1
A
B
Press the FAX button (A), then press
the Menu button (B).
2
C
Use the [ or ] button (C) to select Receive mode
set., then press the OK button.
3
Select a receive mode, then press the OK button.
If the advanced settings screen is displayed
Select No, then press the OK button.
The selected receive mode is displayed.
• For details on the advanced settings on the receive mode, refer to the onscreen manual: Basic Guide after installation is complete.
Pulse el botón FAX (A) y,
a continuación, Menú (Menu) (B).
Utilice el botón [ o ] (C) para seleccionar Modo
recep. ajust. (Receive mode set.) y, a continuación,
pulse el botón OK.
Seleccione un modo de recepción y, a continuación, pulse el botón OK.
Si se muestra la pantalla de configuración avanzada
Seleccione No y, a continuación, pulse el botón OK.
Se mostrará el modo de recepción seleccionado.
• Para obtener más información sobre la configuración avanzada del modo de
recepción, consulte el manual en pantalla: Guía básica después de finalizar
la instalación.
Downloaded from ManualsPrinter.com Manuals
15
Install the Software
Instalación del software
5
Do not connect the USB cable yet.
Aún no conecte el cable USB.
For Spanish Users in the U.S.A.
Para los usuarios de habla hispana en EE. UU.
To use the machine by connecting it to a computer, software
including the drivers needs to be copied (installed) to the
computer's hard disk. The installation process takes about
20 minutes. (The installation time varies depending on the
computer environment or the number of application software to
be installed.)
•
•
•
•
Quit all running applications before installation.
Log on as the administrator (or a member of the Administrators group).
Do not switch users during the installation process.
Internet connection may be required during the installation. Connection
fees may apply. Consult the internet service provider.
• It may be necessary to restart your computer during the installation
process. Follow the on-screen instructions and do not remove the
Setup CD-ROM during restart.
The installation resumes once your computer has restarted.
• For the system requirements, refer to "9 Specifications".
Refer to the "Información adicional para usuarios españoles"
sheet to install the Spanish version of the software.
Para poder utilizar el equipo conectado a un ordenador, se
debe copiar (instalar) el software, incluidos los controladores,
en el disco duro del ordenador. El proceso de instalación lleva
unos 20 minutos. (El tiempo necesario para instalar varía en
función del entorno del ordenador o de cuánto software de
aplicación se vaya a instalar).
• Cierre las aplicaciones que se estén ejecutando antes de la instalación.
• Inicie la sesión como administrador (o miembro del grupo
de administradores).
• No cambie de usuario durante el proceso de instalación.
• Durante la instalación, es posible que se tenga que conectar a Internet.
Esto puede implicar gastos de conexión. Consulte con el proveedor de
servicios de Internet.
• Es posible que deba reiniciar el ordenador durante el proceso de
instalación. Siga las instrucciones en pantalla y no retire el CD-ROM
de instalación (Setup CD-ROM) mientras se reinicia el equipo.
La instalación se reanudará una vez reiniciado el ordenador.
• Para obtener información sobre los requisitos del sistema, consulte
"9 Especificaciones".
Downloaded from ManualsPrinter.com Manuals
16
Consulte la hoja "Información adicional para usuarios españoles"
para instalar la versión en español del software.
If the USB cable is connected before the software is
installed
Si el cable USB está conectado antes de instalar
el software
Easy-WebPrint EX
Easy-WebPrint EX
1
A
Press the ON button (A) to TURN OFF THE
MACHINE.
Operating noise may continue for up to 30 seconds until the
machine turns off.
• Do not connect the machine to the computer with the USB
cable yet. If it is already connected, disconnect the USB
cable from the computer.
For Windows 7
1. Remove the USB cable connected to your computer.
2. Proceed to .
For Windows Vista/Windows XP
This dialog box may appear.
1. Remove the USB cable connected to your computer.
If the dialog box closes, proceed to
2. Click Cancel.
3. Proceed to .
.
Easy-WebPrint EX is Web print
software that is installed on the
computer when installing the supplied
software. Internet Explorer 7 or later
(Windows) or Safari 4 or later (Mac
OS X v.10.5 or later) is required to use
this software. An Internet connection is
required for installation.
Pulse el botón ACTIVADO (ON) (A) para APAGAR EL
EQUIPO.
Para Windows 7
1. Quite el cable USB que conecta el equipo al ordenador.
2. Continúe con .
Para Windows Vista/Windows XP
Puede aparecer este cuadro de diálogo.
1. Quite el cable USB que conecta el equipo al ordenador.
Si se cierra el cuadro de diálogo, continúe con
2. Haga clic en Cancelar (Cancel).
3. Continúe con .
.
Downloaded from ManualsPrinter.com Manuals
Easy-WebPrint EX es un software
de impresión para web que se
instala en el ordenador al instalar
el software incluido. Para utilizar
este software es necesario Internet
Explorer 7 o posterior (Windows)
o Safari 4 o posterior (Mac OS X v.10.5
o posterior). Para la instalación, es
necesario estar conectado a Internet.
Hasta que el equipo se apague, 30 segundos como máximo,
se puede seguir escuchando el ruido de funcionamiento.
• Aún no conecte el equipo al ordenador mediante el
cable USB. Si ya está conectado, desconecte el cable
USB del ordenador.
17
2
3
Windows 7/Windows Vista
Windows XP
Click Run Msetup4.exe on the
AutoPlay screen, then click Yes
or Continue on the User Account
Control dialog box.
If the User Account Control dialog box
reappears in following steps, click Yes or
Continue.
Haga clic en Ejecutar Msetup4.exe
(Run Msetup4.exe) en la pantalla
Reproducción automática (AutoPlay)
y, a continuación, haga clic en Sí (Yes)
o en Continuar (Continue) en el
cuadro de diálogo Control de cuentas
de usuario (User Account Control).
1. Make sure that the machine has
turned off.
2. Turn on the computer.
3. Insert the Setup CD-ROM into the
CD-ROM drive.
Si vuelve a aparecer el cuadro de diálogo
Control de cuentas de usuario (User Account
Control) en los pasos siguientes, haga clic en
Sí (Yes) o en Continuar (Continue).
If you are using Windows, the setup program
starts automatically.
For Windows
• If the program does not start
automatically, double-click the CD-ROM
icon in Computer or My Computer.
When the CD-ROM contents appear,
double-click MSETUP4.EXE.
1. Compruebe que el equipo esté
apagado.
2. Encienda el ordenador.
3. Introduzca el CD-ROM de
instalación (Setup CD-ROM) en la
unidad de CD-ROM.
Si usa Windows, el programa de instalación se
inicia automáticamente.
Para Windows
• Si el programa no se inicia
automáticamente, haga doble clic
en el icono del CD-ROM en Equipo
(Computer) o Mi PC (My Computer).
Cuando aparezca el contenido
del CD-ROM, haga doble clic
en MSETUP4.EXE.
Downloaded from ManualsPrinter.com Manuals
18
3
Double-click the Setup icon of the CD-ROM folder to proceed to the
following screen. Enter your administrator name and password, then click
OK.
If the CD-ROM folder does not open automatically, double-click the CD-ROM icon on the
desktop.
If you do not know your administrator name or password, click the help button, then follow
the on-screen instructions.
Haga doble clic en el icono Setup de la carpeta del CD-ROM para pasar a la
pantalla siguiente. Introduzca el nombre de administrador y la contraseña;
a continuación, haga clic en OK.
Si la carpeta del CD-ROM no se abre automáticamente, haga doble clic en el icono del
CD-ROM del escritorio.
Si no sabe su nombre o contraseña de administrador, haga clic en el botón el Ayuda y,
a continuación, siga las instrucciones que aparezcan en pantalla.
4
5
Click Easy Install.
Click Install.
The drivers, application software, and on-screen manuals are installed.
Follow any on-screen instructions to proceed with the software installation.
• If you want to select particular items to install, click Custom Install.
Haga clic en Instalación simple (Easy Install).
Haga clic en Instalar (Install).
Se instalarán los controladores, el software de aplicación y los manuales en pantalla.
Siga cualquier instrucción en pantalla para llevar a cabo la instalación del software.
• Si desea seleccionar unos elementos concretos para instalarlos, haga clic
en Instalación personalizada (Custom Install).
Downloaded from ManualsPrinter.com Manuals
19
Important Information for the Installation
Información importante para la instalación
USB Port
Puerto USB
If the serial number is not displayed on the registration
screen, input the number found inside the machine.
Si el número de serie no aparece en la pantalla de
registro, introduzca el que viene en el interior del equipo.
If the Extended Survey Program
screen appears
Si aparece la pantalla Extended
Survey Program
B
Serial No. * * * * * * * * *
When the Printer Connection screen appears, connect the
machine to the computer with a USB cable.
After connecting the cable, TURN ON THE MACHINE.
• If the power is on, the FINE Cartridge Holder
will move when the Scanning Unit (Cover) (B)
is opened.
If you can agree to Extended Survey
Program, click Agree.
If you click Do not agree, the Extended
Survey Program will not be installed. (This
has no effect on the machine's functionality.)
• Si está encendido, el soporte de cartucho FINE
(FINE Cartridge Holder) se desplazará cuando
se abra la unidad de escaneado (cubierta) (B).
Si desea admitir Extended Survey Program,
haga clic en Aceptar (Agree).
Si hace clic en No aceptar (Do not agree),
Extended Survey Program no se instalará.
(Esto no afecta al funcionamiento del equipo).
The USB Port is located near the center on the back of the
machine.
Cuando aparezca la pantalla Conexión de impresora
(Printer Connection), conecte el equipo al ordenador
mediante un cable USB.
Después de conectar el cable, ENCIENDA EL EQUIPO.
El puerto USB se encuentra junto a la parte posterior
central del equipo.
Downloaded from ManualsPrinter.com Manuals
20
6
7
Installing the XPS Printer Driver
Instalación del Controlador de impresora
XPS (XPS Printer Driver)
Click Exit to complete the installation.
For Macintosh
It is necessary to restart the computer before scanning
using the Operation Panel on the machine for the first
time.
For Windows
Solution Menu EX starts.
For Macintosh
Solution Menu EX starts when clicking OK in the Canon Solution
Menu EX dialog.
Remove the Setup CD-ROM and keep it in a safe place.
In Windows 7 and Windows Vista SP1 or later, the
XPS Printer Driver can be installed additionally. To
install, perform from
on page 17 in "5 Install the
Software". Click Custom Install in , then select
XPS Printer Driver in the Custom Install screen.
For details on useful functions of the XPS Printer
Driver, refer to the on-screen manual: Advanced
Guide.
• The buttons displayed on Solution Menu EX may vary depending on the
country or region of purchase.
Congratulations! Setup is complete.
To learn more about the Solution Menu EX and on-screen
manual, proceed to page 22. To start using the machine,
proceed to page 23.
Haga clic en Salir (Exit) para finalizar la
instalación.
Para Windows
Para Macintosh
Es necesario reiniciar el ordenador antes de escanear
por primera vez mediante el panel de control del equipo.
Para Macintosh
Se iniciará Solution Menu EX.
Solution Menu EX se iniciará al hacer clic en OK en el cuadro
de diálogo Canon Solution Menu EX.
Extraiga el CD-ROM de instalación (Setup CD-ROM) y guárdelo en un lugar seguro.
• Los botones que muestre Solution Menu EX pueden variar en función del
país o la región de adquisición.
En Windows 7 y Windows Vista SP1 o posterior,
también se puede instalar el Controlador de
impresora XPS (XPS Printer Driver). Para
instalarlo, ejecute a partir de
de la página
17 de "5 Instalación del software". Haga clic en
Instalación personalizada (Custom Install) en
y, a continuación, seleccione Controlador de
impresora XPS (XPS Printer Driver) en la pantalla
Instalación personalizada (Custom Install).
Para conocer todos los detalles sobre las prácticas
funciones del controlador de impresora XPS (XPS
Printer Driver), consulte el manual en pantalla:
Guía avanzada.
Enhorabuena. El proceso de instalación ha finalizado.
Para obtener información sobre Solution Menu EX y el manual
en pantalla, consulte la página 22. Para empezar a utilizar el
equipo, consulte la página 23.
Downloaded from ManualsPrinter.com Manuals
21
Application Software
Software de aplicación
6
Various application software are installed on the computer along with the drivers. You can print creative items by correcting/enhancing
photos using the application software.
For details on how to use the application software and the machine, refer to the on-screen manual.
Junto con los controladores, en el ordenador se instala diverso software de aplicación. Puede imprimir elementos creativos corrigiendo/
mejorando fotos con las aplicaciones.
Para obtener más información sobre cómo utilizar el software de aplicación y el equipo, consulte el manual en pantalla.
Solution Menu EX
Solution Menu EX is a gateway to functions and information that
allow you to make full use of the machine! For example,
• Open the on-screen manual.
• Open various application software.
Solution Menu EX es una puerta de acceso a funciones
e información que permiten aprovechar al máximo todas las
funciones del equipo. Por ejemplo,
• Apertura del manual en pantalla.
• Inicio de diverso software de aplicación.
Easy-WebPrint EX
Use Easy-WebPrint EX to easily print web pages in Internet
Explorer (Windows) or Safari (Macintosh). Some of its features
include:
• Printing a web page by reducing its size to fit the paper width automatically
without cropping edges.
• Printing only the pages you want by selecting them from preview.
• Printing selected portions of various pages after editing them.
Con Easy-WebPrint EX se pueden imprimir fácilmente páginas web
en Internet Explorer (Windows) o Safari (Macintosh). Entre otras
funciones, incluye:
• Impresión de páginas web reduciendo el tamaño para que se ajuste
automáticamente a la anchura del papel sin tener que recortar los bordes.
• Impresión únicamente de las páginas deseadas mediante su selección en la
vista preliminar.
• Impresión de partes seleccionadas de varias páginas después de editarlas.
How to open the on-screen
manual
How to start Solution
Menu EX
Cómo abrir el manual en
pantalla
Cómo iniciar Solution
Menu EX
Click Help & Settings, then click
this icon to open the on-screen
manual.
Haga clic en Ayuda y configuración
(Help & Settings) y, a continuación,
haga clic en este icono para abrir el
manual en pantalla.
Click this icon on the desktop
(Windows) or on the Dock (Macintosh)
to start Solution Menu EX.
Haga clic en este icono del
escritorio (Windows) o del Dock
(Macintosh) para iniciar Solution
Menu EX.
For details on Solution Menu EX, refer to the on-screen manual:
Basic Guide.
For details on Easy-WebPrint EX, refer to the on-screen manual:
Basic Guide.
Para conocer todos los detalles sobre Solution Menu EX, consulte
el manual en pantalla: Guía básica.
Para conocer todos los detalles sobre Easy-WebPrint EX, consulte
el manual en pantalla: Guía básica.
Downloaded from ManualsPrinter.com Manuals
22
Print Photos from a Computer
Impresión de fotografías desde un ordenador
Try Using the Machine
Pruebe el equipo
7
1
2
A
B
Load paper in the Rear Tray (A) in portrait orientation with
the printing side facing up.
Make sure that the Paper Output Tray (B) is open.
If printing starts while the Paper Output Tray is closed, it will automatically
open.
This section explains how to print images stored on the computer.
• For details, refer to "3 Load Paper" on page 12.
Cargue papel en la bandeja posterior (A) con orientación
vertical y la superficie de impresión hacia arriba.
Asegúrese de que la bandeja de salida del papel (B) está abierta.
Si la impresión comienza con la bandeja de salida del papel cerrada,
se abre automáticamente.
En esta sección se explica cómo imprimir imágenes almacenadas en
el ordenador.
• Para conocer todos los detalles, consulte "3 Carga del papel" en la
página 12.
Downloaded from ManualsPrinter.com Manuals
C
Start Solution Menu EX from the Canon Solution
Menu EX icon on the desktop (Windows) or on the
Dock (Macintosh), click Photo Print, then click Photo
Print (C).
Easy-PhotoPrint EX starts.
• For details on starting Solution Menu EX, refer to “6
Application Software” on page 22.
Inicie Solution Menu EX desde el icono Canon
Solution Menu EX del escritorio (Windows) o del
Dock (Macintosh) y, a continuación, haga clic en
Impresión fotográfica (Photo Print) y, seguidamente,
en Impresión fotográfica (Photo Print) (C).
Se inicia Easy-PhotoPrint EX.
• Para obtener más información sobre cómo iniciar Solution
Menu EX, consulte “6 Software de aplicación” en la página 22.
23
3
Select a folder containing images, then
select an image you want to print.
When an image is selected, the number of
copies is set to “1”.
4
Click Select Paper, then select the
Paper Size and Media Type settings
that match the loaded paper.
5
Click Layout/Print, then select a layout
for the image.
6
Click Print.
If you are using Windows, printing will start.
If you are using Macintosh, click Print on the
Print dialog box to start printing.
• The machine may make operating noise
when feeding paper. This is normal
operation.
For more information, refer to the
on-screen manual: Advanced
Guide.
Seleccione una carpeta que contenga
imágenes y, a continuación seleccione
la imagen que desee imprimir.
Cuando se selecciona una imagen, el número
de copias se establece en “1”.
Haga clic en Seleccionar papel
(Select Paper) y, a continuación,
seleccione la configuración de Tamaño
de papel (Paper Size) y Tipo de
soporte (Media Type) que coincida con
el papel cargado.
Haga clic en Diseño/Imprimir (Layout/
Print) y, a continuación, seleccione un
diseño para la imagen.
Haga clic en Imprimir (Print).
Si utiliza Windows, se iniciará la impresión.
Si utiliza Macintosh, haga clic en Imprimir (Print)
en el cuadro de diálogo Imprimir (Print) para
iniciar la impresión.
• Es posible que el equipo haga ruido al
suministrar el papel. Esto es normal.
Para obtener más información,
consulte el manual en pantalla:
Guía avanzada.
Downloaded from ManualsPrinter.com Manuals
24
1
2
3
B
C
E
Try Copying
Realice una prueba de copia
1
3
2
G
F
A
D
Load A4 or Letter-sized
plain paper.
Make sure that the Paper
Output Tray (A) is open.
If printing starts while the
Paper Output Tray is closed, it
will automatically open.
This section describes how to
perform a standard copy.
Open the Document Cover (B), then place
the document face-down and align it with the
Alignment Mark (C).
• Do not place objects weighing 4.4 lb / 2.0 kg or
more on the Platen Glass (D), or do not apply
pressure to the document by pressing on it with a
force exceeding 4.4 lb / 2.0 kg.
The scanner may malfunction or the glass may
break.
1. Close the Document Cover.
2. Press the COPY button (E).
The copy standby screen is displayed.
3. Press the Color button (F) to make color copies or the Black
button (G) to make black-and-white copies.
Copying will start. Do not open the Document Cover until copying is complete.
Remove the document after printing.
• Close the Document Cover gently, holding it firmly, because it is heavy.
• For details, refer to
“3 Load Paper” on
page 12.
For the procedure to copy on paper other than plain paper, refer
to "Copying" in the on‑screen manual: Advanced Guide.
Cargue papel normal de
tamaño A4 o Carta.
Asegúrese de que la bandeja
de salida del papel (A) está
abierta.
Si la impresión comienza
con la bandeja de salida
del papel cerrada, se abre
automáticamente.
En esta sección se describe
cómo se realiza una copia
estándar.
• Para conocer todos
los detalles, consulte
"3 Carga del papel"
en la página 12.
Downloaded from ManualsPrinter.com Manuals
Abra la cubierta de documentos (B) y coloque
después el documento boca abajo y alinéelo
con la marca de alineación (C).
• No coloque ningún objeto que pese 4,4 lb/2,0 kg
o más en el cristal de la platina (D), ni presione el
documento con una fuerza superior a 4,4 lb/2,0 kg.
El escáner podría funcionar incorrectamente o
romperse el cristal.
1. Cierre la cubierta de documentos.
2. Pulse el botón COPIA (COPY) (E).
Aparece la pantalla de espera de copia.
3. Pulse el botón Color (F) para hacer copias en color o el botón
Negro (Black) (G) para hacer copias en blanco y negro.
Comenzará la copia. No abra la cubierta de documentos hasta que finalice la
copia. Retire el documento después de imprimir.
• Cierre la cubierta de documentos con cuidado, sujetándola firmemente
porque es pesada.
Para obtener información sobre el procedimiento de copia en
papel distinto del papel normal, consulte “Copia” en el manual
en pantalla: Guía avanzada.
25
1
2
A
Send Faxes
Envío de faxes
C
D
B
Press the FAX button (A).
This section explains how to send a fax in black and white from the ADF (Auto
Document Feeder) (B).
• Make sure that the telephone line type is set correctly. For the setting
procedure, refer to "Preparing for Faxing" in the on-screen manual: Basic
Guide.
• The setting may not be available depending on the country or region of your
residence.
Pulse el botón FAX (A).
En esta sección se explica cómo enviar un fax en blanco y negro desde el ADF
(alimentador automático de documentos) (B).
• Asegúrese de que el tipo de línea telefónica está configurado correctamente.
Para obtener información sobre el procedimiento de configuración, consulte
“Preparativos para el envío de faxes” en el manual en pantalla: Guía básica.
• Puede que la configuración no esté disponible en función del país o la
región de residencia.
Downloaded from ManualsPrinter.com Manuals
26
Open the Document Tray (C), then move the Document Guides (D) to both
edges.
• For details on supported documents and settings for image quality, density
(brightness), etc., refer to the on-screen manual: Basic Guide.
Abra la bandeja de documentos (C) y, a continuación, desplace las guías
de documentos (D) hacia ambos bordes.
• Para obtener información sobre los documentos admitidos y la configuración de la calidad
de imagen, la densidad (brillo), etc., consulte el manual en pantalla: Guía básica.
3
E
4
Insert the document until a beep sounds, then slide the left and right Document
Guides against both ends of the document.
• Place the document face-up.
Use the Numeric buttons (E) to enter
the fax number.
5
F
Press the Black button (F).
The fax is sent.
• If fax sending is unsuccessful, make sure that the telephone line is connected correctly and
start again from
on page 26. To connect the telephone line correctly, refer to
to
on
page 5 in “1 Preparation”.
• For details on sender information, refer to "Specifying the Basic Settings for Faxing" in the onscreen manual: Basic Guide.
For other procedures to send
faxes, refer to "Faxing" in the onscreen manual: Basic Guide.
Inserte el documento hasta que suene un pitido y, a continuación, deslice las
guías de documentos izquierda y derecha hacia ambos extremos del documento.
• Coloque el documento boca arriba.
Utilice el teclado numérico (E) para
introducir el número de fax.
Pulse el botón Negro (Black) (F).
Se envía el fax.
• Si no se envía el fax, asegúrese de que la línea telefónica está conectada correctamente
y comience de nuevo desde
en la página 26. Para conectar la línea telefónica
correctamente, consulte de
a
en la página 5 de “1 Preparación”.
• Para obtener detalles sobre la información del remitente, consulte “Especificación de la
configuración básica del fax” en el manual en pantalla: Guía básica.
Para conocer otros procedimientos
de envío de fax, consulte
“Funciones de fax” en el manual en
pantalla: Guía básica.
Downloaded from ManualsPrinter.com Manuals
27
Maintenance
Mantenimiento
8
After a period of use, the inside of the machine may become stained with ink.
To avoid staining your hands or clothes with ink, it is recommended that you clean the Ink Cartridge Locking Cover (A) and the inside of the
tray (B) with a facial tissue or the like as required.
If the Scanning Unit (Cover) is left open for more than 10 minutes, the FINE Cartridge Holder moves to the right automatically.
Después de un período de uso, la parte interior del equipo se puede manchar de tinta.
Para evitar mancharse las manos o la ropa de tinta, se recomienda limpiar la tapa de bloqueo del cartucho de tinta (A) y el interior de la
bandeja (B) con un pañuelo de papel o un material similar según convenga.
Si la unidad de escaneado (cubierta) se queda abierta durante más de 10 minutos, el soporte del cartucho FINE (FINE Cartridge Holder)
se desplaza a la derecha automáticamente.
A
B
Downloaded from ManualsPrinter.com Manuals
28
Copy Specifications
General Specifications
Specifications
9
Printing resolution (dpi)
Multiple copy
4800* (horizontal) X 1200 (vertical)
* Ink droplets can be placed with a pitch of 1/4800 inch at minimum.
max. 99 pages
Interface
Intensity adjustment
9 positions, Auto intensity (AE copy)
USB Port:
Hi-Speed USB *1
Direct Print Port:
PictBridge
Bluetooth v2.0 (Option) *2*3*4
USB flash drive
*1A computer that complies with Hi-Speed USB standard is required.
Since the Hi-Speed USB interface is fully upwardly compatible with
USB 1.1, it can be used at USB 1.1.
*2Maximum speed: 1.44 Mbps
*3JPEG/PNG only
*4Bluetooth connection is for printing only.
Print width
8 inches/203.2 mm
(for Borderless Printing: 8.5 inches/216 mm)
Operating environment
Temperature: 5 to 35 °C (41 to 95 °F)
Humidity: 10 to 90 % RH (no condensation)
Storage environment
Temperature: 0 to 40 °C (32 to 104 °F)
Humidity: 5 to 95 % RH (no condensation)
Power supply
AC 100-240 V, 50/60 Hz
Power consumption
Printing (Copy): Approx. 11 W
Standby (minimum): Approx. 2.0 W *1*2
OFF: Approx. 0.3 W *1
*1USB connection to PC
*2The wait time for standby cannot be changed.
External dimensions
Approx. 18.1 (W) X 16.4 (D) X 7.8 (H) inches
Approx. 458 (W) X 415 (D) X 198 (H) mm
*With the Paper Support and Paper Output Tray retracted.
Weight
Approx. 8.5 kg (Approx. 18.7 lb)
*With the FINE Cartridges installed.
Canon FINE Cartridge
Total 1472 nozzles (BK 320 nozzles, C/M/Y each 384 nozzles)
ADF capacity
A4 or Letter size: max. 30 sheets (20 lb/75 gsm paper), up to
0.16 inches/4 mm in height
Legal size: max. 5 sheets (20 lb/75 gsm paper), up to 0.04 inches/1 mm
in height
Other sizes: 1 sheet
Reduction/Enlargement
25 % - 400 % (1 % unit)
Fax Specifications
Applicable line
Public Switched Telephone Network (PSTN)
TWAIN/WIA (for Windows 7/Windows Vista/Windows XP)
Maximum scanning size
A4/Letter, 8.5'' X 11.7''/216 X 297 mm (Platen Glass) /8.5'' X 14.0''/216 X 356 mm (ADF)
Scanning resolution
Optical resolution (horizontal X vertical) max: 1200 X 2400 dpi
Interpolated resolution max: 19200 X 19200 dpi
Gradation (Input/Output)
Gray: 16 bit/8 bit
Color: 48 bit/24 bit (RGB each 16 bit/8 bit)
Communication mode
Super G3, G3
Data compressing system
Black: MH, MR, MMR
Color: JPEG
Modem speed
max. 33.6 kbps
(Automatic fallback)
Transmission speed
Black: Approx. 3 seconds/page at 33.6 kbps
(Based on ITU-T No.1 chart for US specifications and Canon FAX
Standard chart No.1 for others, both in standard mode or Canon FAX
Standard chart No.1, standard mode.)
Color: Approx. 1 minute/page at 33.6 kbps
(Based on Canon COLOR FAX TEST SHEET.)
Gradation
Black: 256 levels
Color: 24 bit Full Color (RGB each 8 bit)
Density adjustment
3 levels
Memory
Transmission/reception: approx. 50 pages
(Based on ITU-T No.1 chart for US specifications and Canon FAX
Standard chart No.1 for others, both in standard mode.)
Fax resolution
Black Standard: 203 pels/inch X 98 lines/inch
(8 pels/mm X 3.85 lines/mm)
Black Fine, Photo: 203 pels/inch X 196 lines/inch
(8 pels/mm X 7.70 lines/mm)
Black Extra Fine: 300 X 300 dpi
Color: 200 X 200 dpi
Dialing
Automatic dialing
Coded speed dial (max. 20 destinations)
Group dial (max. 19 destinations)
Regular dialing (with Numeric buttons)
Automatic redialing
Manual redialing (with the Redial/Pause button: max. 10 destinations)
Others
Activity report (after every 20 transactions)
Sequential broadcasting (max. 21 destinations)
Rejected numbers (max. 10 destinations)
About Consumables
Consumables (ink tanks / FINE Cartridges) are available for 5 years after production has stopped.
Downloaded from ManualsPrinter.com Manuals
Scan Specifications
Scanner driver
Minimum System Requirements
Conform to the operating system’s requirements when higher than those
given here.
Operating System/Processor/RAM
Windows 7
1 GHz or faster 32-bit (x86) or 64-bit
(x64) processor
1 GB (32-bit)/2 GB (64-bit)
Windows Vista, Vista SP1, Vista SP2
1 GHz processor
512 MB
Windows XP SP2, SP3
300 MHz processor
128 MB
Mac OS X v.10.6
Intel processor
1 GB
Mac OS X v.10.5
Intel processor, PowerPC G5, PowerPC
G4 (867 MHz or faster)
512 MB
Mac OS X v.10.4.11
Intel processor, PowerPC G5, PowerPC
G4, PowerPC G3
256 MB
Browser
Internet Explorer 6 or later
Safari 3 or later
Hard Disk Space
1.5 GB
Note: For bundled software
installation.
The necessary amount of hard disk
space may be changed without notice.
1.5 GB
Note: For bundled software installation.
The necessary amount of hard disk
space may be changed without notice.
CD-ROM Drive
Required
Required
Display
SVGA 800 x 600
XGA 1024 x 768
• Windows: Operation can only be guaranteed on a PC with Windows 7,
Windows Vista or Windows XP pre-installed.
• Windows: Uninstall software bundled with the Canon inkjet printer before
upgrading from Windows Vista to Windows 7, then, install the bundled
software again.
• Some functions may not be available with Windows Media Center.
• Macintosh: Hard Disk must be formatted as Mac OS Extended (Journaled) or
Mac OS Extended.
• Macintosh: After upgrading from Mac OS X v.10.5 or lower to Mac OS X
v.10.6, install software bundled with the Canon inkjet printer.
• Internet Explorer 7 or later (Windows), or Safari 4 or later (for Mac OS X
v.10.5 or later) is required to install Easy-WebPrint EX.
Specifications are subject to change without notice.
29
Especificaciones de copia
Especificaciones
Especificaciones generales
Resolución de impresión (ppp)
Copia múltiple
4800* (horizontal) x 1200 (vertical)
* Las gotas de tinta se pueden situar con una separación
de 1/4800 pulgadas como mínimo.
Ajuste de intensidad
Interfaz
Puerto USB:
Hi-Speed USB *1
Puerto de impresión directa:
PictBridge
Bluetooth v2.0 (opcional) *2*3*4
unidad flash USB
*1Es necesario un ordenador compatible con el estándar Hi-Speed USB.
Puesto que la interfaz Hi-Speed USB es totalmente compatible con
USB 1.1, también se puede utilizar con USB 1.1.
*2Velocidad máxima: 1,44 Mbps
*3Sólo JPEG/PNG
*4La conexión Bluetooth sólo sirve para imprimir.
Ancho de impresión
8 pulg./203,2 mm
(para la impresión sin bordes: 8,5 pulg./216 mm)
Entorno de funcionamiento
Temperatura: de 5 a 35 °C (41 a 95 °F)
Humedad: del 10 al 90% (humedad relativa sin condensación)
Entorno de almacenamiento
Temperatura: de 0 a 40 °C (32 a 104 °F)
Humedad: del 5 al 95% (humedad relativa sin condensación)
Suministro eléctrico
100 a 240 V de CA, 50 a 60 Hz
Consumo
Impresión (copia): 11 W aprox.
En espera (mínimo): 2,0 W aprox. *1*2
Apagado: 0,3 W aprox.*1
*1Conexión USB al ordenador
*2No se puede modificar el tiempo para que el equipo entre en espera.
Dimensiones externas
18,1 (An) X 16,4 (Pr) X 7,8 (Al) pulgadas aprox.
458 (An) X 415 (Pr) X 198 (Al) mm aprox.
*Con el soporte del papel y la bandeja de salida del papel retraídos.
Peso
8,5 kg (18,7 lb) aprox.
*Con los cartuchos FINE (FINE Cartridges) instalados.
Cartucho FINE (FINE Cartridge) de Canon
Total: 1472 inyectores (BK 320 inyectores, C/M/Y 384 inyectores cada uno)
Capacidad del ADF
Tamaño A4 o Carta: 30 hojas máx. (papel de 20 lb/75 gsm),
hasta 0,16 pulg./4 mm de alto
Tamaño Legal: 5 hojas máx. (papel de 20 lb/75 gsm), hasta 0,04 pulg./1 mm
de alto
Otros tamaños: 1 hoja
Especificaciones de escaneado
Controlador del escáner
99 páginas máximo
9 posiciones, intensidad automática (copia AE)
Reducción/ampliación
25 - 400% (unidad de 1%)
Especificaciones de fax
Línea aplicable
Red telefónica conmutada pública (PSTN, Public Switched Telephone Network)
Modo de comunicación
TWAIN/WIA (para Windows 7/Windows Vista/Windows XP)
Tamaño máximo de escaneado
A4/Carta, 8,5'' X 11,7''/216 X 297 mm (cristal de la platina) /8,5'' X 14,0''/
216 X 356 mm (ADF)
Resolución de escaneado
Resolución óptica (horizontal x vertical) máx: 1200 ppp x 2400 ppp
Resolución interpolada máx: 19 200 ppp x 19 200 ppp
Gradación (Entrada/Salida)
Gris: 16 bits/8 bits
Color: 48 bits/24 bits (RGB cada uno 16 bits/8 bits)
Requisitos mínimos del sistema
Super G3, G3
Sistema de compresión de datos
Negro: MH, MR, MMR
Color: JPEG
Cumple los requisitos del sistema operativo cuando son mayores que los
mencionados aquí.
Velocidad del módem
Máx. 33,6 kbps
(Sistema alternativo automático)
Velocidad de transmisión
Negro: Aprox. 3 s/pág. a 33,6 Kbps
(Basado en el cuadro nº 1 de ITU-T para especificaciones de EE UU y en el
cuadro nº 1 del estándar de Canon para el resto, ambos en modo estándar,
y en el cuadro nº 1 del estándar de FAX de Canon, modo estándar.)
Color: Aprox. 1 min/pág. a 33,6 Kbps
(Basado en la HOJA DE PRUEBA DE FAX EN COLOR de Canon).
Gradación
Negro: 256 niveles
Color: 24 bits a todo color (RGB cada 8 bits)
Ajuste de la densidad
3 niveles
Memoria
Transmisión/recepción: aprox. 50 páginas
(Basado en el cuadro nº 1 de ITU-T para especificaciones de EE UU y en
el cuadro nº 1 del estándar de FAX de Canon para el resto, ambos en
modo estándar).
Resolución de fax
Negro Estándar: 203 píxeles/pulg. x 98 líneas/pulg.
(8 píxeles/mm. x 3,85 líneas/mm)
Negro Fino, Foto: 203 píxeles/pulg. x 196 líneas/pulg.
(8 píxeles/mm x 7,70 líneas/mm)
Negro Extra fino: 300 x 300 ppp
Color: 200 x 200 ppp
Marcación
Marcación automática
Marc. abreviada cod. (máx. 20 destinos)
Marcación por grupo (máx. 19 destinos)
Marcación normal (con teclado numérico)
Rellamada automática
Rellamada manual (con botón Remarcación/Pausa: 10 destinos máx.)
Otros
Informe de actividad (cada 20 transacciones)
Difusión secuencial (21 destinos máx.)
Números rechazados (10 destinos máx.)
Sistema operativo/Procesador/RAM
Windows 7
Procesador a 1 GHz o superior de 32
bits (x86) o 64 bits (x64)
1 GB (32 bits)/2 GB (64 bits)
Windows Vista, Vista SP1, Vista SP2
Procesador a 1 GHz
512 MB
Windows XP SP2, SP3
Procesador a 300 MHz
128 MB
Zona de búsqueda
Internet Explorer 6 o posterior
Safari 3 o posterior
Espacio en el disco duro
1,5 GB
Nota: para instalar el software incluido.
El espacio disponible en el disco duro
puede cambiar sin aviso.
1,5 GB
Nota: para instalar el software incluido.
El espacio disponible en el disco duro
puede cambiar sin aviso.
Unidad de CD-ROM
Necesaria
Necesaria
Pantalla
SVGA 800 x 600
XGA 1024 x 768
• Windows: sólo se garantiza el funcionamiento en un PC con Windows 7,
Windows Vista o Windows XP preinstalado.
• Windows: desinstale primero el software incluido con la impresora de
inyección de tinta Canon antes de actualizar de Windows Vista a Windows 7
y, a continuación, vuelva a instalar el software.
• Es posible que algunas funciones no estén disponibles con Windows Media Center.
• Macintosh: el disco duro debe estar formateado como Mac OS Plus (con
registro) o Mac OS Plus.
• Macintosh: después de actualizar de Mac OS X v.10.5 o inferior a Mac OS X
v.10.6, instale el software incluido con la impresora de inyección de tinta Canon.
• Se necesita Internet Explorer 7 o posterior (Windows), o Safari 4 o posterior
(para Mac OS X v.10.5 o posterior) para instalar Easy-WebPrint EX.
Especificaciones sujetas a cambios sin previo aviso.
Acerca de los consumibles
Los consumibles (depósitos de tinta/cartuchos FINE (FINE Cartridges)) estarán disponibles durante 5 años después de haber dejado de fabricar el producto.
Downloaded from ManualsPrinter.com Manuals
30
Mac OS X v.10.6
Procesador Intel
1 GB
Mac OS X v.10.5
Procesador Intel, PowerPC G5,
PowerPC G4 (867 MHz o más rápido)
512 MB
Mac OS X v.10.4.11
Procesador Intel, PowerPC G5,
PowerPC G4, PowerPC G3
256 MB
Getting Help from Canon
Ayuda de Canon
Email Tech Support — www.usa.canon.com/support
Soporte técnico por correo electrónico —
www.usa.canon.com/support
Please note, from there you will need to select your product, then click on
the "Support by Email" link under Service & Support.
Toll-Free Tech Support— 1-800-OK-CANON
Tenga en cuenta que, desde esa página, tendrá que seleccionar el
producto y a continuación hacer clic en el vínculo "Support by Email"
situado bajo "Service & Support".
This option provides live telephone technical support, free of service
charges, Monday-Friday (excluding holidays), during the warranty period.
Telephone Device for the Deaf (TDD) support is available at
1-866-251-3752.
Soporte técnico telefónico gratuito — 1-800-OK-CANON
Ordering Information
Información de pedidos
The following ink cartridges are compatible with this machine.
PG-210XL
CL-211XL
PG-210
CL-211
Esta opción proporciona soporte técnico telefónico, libre de cargos, de
lunes a viernes (excepto festivos), durante el periodo de garantía.
El soporte mediante dispositivo telefónico para personas con discapacidad
auditiva (TDD) está disponible en 1-866-251-3752.
Este equipo es compatible con los cartuchos de tinta siguientes.
Order #
2973B001
2975B001
2974B001
2976B001
PG-210XL
CL-211XL
PG-210
CL-211
Call 1-800-OK-CANON to locate a dealer near you, or visit the Canon
online store at www.shop.usa.canon.com
N.º de referencia
2973B001
2975B001
2974B001
2976B001
Llame a 1-800-OK-CANON para localizar un distribuidor cercano o visite
la tienda en línea Canon en www.shop.usa.canon.com
CANON U.S.A. INC.
One Canon Plaza, Lake Success, NY 11042 U.S.A.
www.usa.canon.com
QT5-3449-V01
XXXXXXXX
Downloaded from ManualsPrinter.com Manuals
©CANON INC.2011
PRINTED IN XXXXXXXX