1
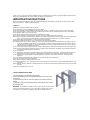
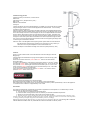
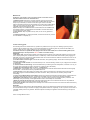
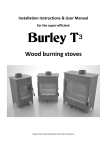
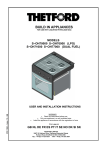
Operating instructions
For Models in the
Electric Fire Range
Insight
Burley Appliances Ltd., Lands End Way, Oakham, Rutland. U.K.
LE15 6RB. Telephone +44 (0)1572 756956. Fax +44 (0)1572 724390.
E-mail [email protected] Website www.burley.co.uk
Thank you very much for purchasing a Magiglo electric fire. Please spend a couple of minutes reading these instructions
before using the appliance, they are to ensure your safety and convenience.
IMPORTANT INSTRUCTIONS
When using electrical appliances, basic precautions should always be followed to reduce the risk of fire, electric shock
and injury to persons. These include the following:
Installation.
Read all the instructions before using this heater.
Do not locate this heater immediately below a socket outlet.
Do not use this heater in the immediate surround of a bath, shower, or swimming pool. Avoid any contact with water.
Do not cover this heater, or allow curtains etc to obstruct the air inlet or outlet, otherwise there is a risk of overheating.
Do not lead the cable in front of the air outlet.
Do not trap the cable. Ensure that the fire is not standing on the cable.
Do not use an extension cord because the extension cord may overheat and cause a risk of fire.
Before use, the appliance must be securely fixed by the method described in the following pages. Until it has been fixed in
place, do not leave it in a location where it could be accidentally knocked over by children or pets etc.
Do not permanently fix the appliance, it will need removing for servicing.
Parts of this heater are hot when in use. To avoid burns, do not touch hot surfaces.
This appliance must not be used by children or other persons without assistance or supervision if their physical, sensory
or mental capabilities prevent them from using it safely. Children must be supervised to ensure that they do not
play with or touch the appliance. Use an approved fixed fire screen or safety guard if there is any chance that the
appliance could be inadvertently touched.
Do not run the cable under a carpet or rug etc. Arrange cable away from traffic areas and where it will not be tripped over.
Extreme caution and a guard is necessary when any heater is used near children, the elderly or the infirm and whenever
the heater is left operating and unattended.
Do not use outdoors.
Do not operate any heater with a damaged cable or plug or after the heater malfunctions, or after it has been dropped or
damaged in any manner. Return the appliance to an authorised service agent for examination and repair.
Do not insert or allow foreign objects to enter the appliance as this may cause electric shock, fire, or damage to the
appliance.
This is an imitation log and flame effect electric fire and must not be used as a real fire.
Do not sit or put loads on top of the appliance.
Switch off and unplug the appliance when not in use.
This heater is hot when in use. To avoid burns, do not let bare skin touch hot surfaces. Keep combustible materials, such
as furniture
pillows, bedding, papers, cloths and curtains at least 0.9m from the front of the heater and keep them away from the sides
and rear.
Always unplug heater when not in use.
SAVE THESE INSTRUCTIONS
Your fire will come with two spacers attached.
To use freestanding, leave the spacers attached on the rear of the
front frame.
To use semi-inset remove one of the spacers by removing the four
screws.
To use fully inset remove both spacers by removing the four screws
On both spacers.
WARNING: Do not inset this appliance into an open chimney, the draw of the
chimney will cause the heater to cut out. Block off the chimney first or leave
the spacers on to position the appliance in front of the fireplace opening.
Commissioning your fire
Carefully unpack your electric fire, it will consist of:
Electric fire.
Cast ashpan cover ( Except Harmony Trim )
Bag of coal
Remote Control Handset
A fixing kit.
Position the electric fire in the intended position. For stability you must fix the fire into position
using the fixing kit, this is to ensure that the appliance will not fall forward. It is not usually
necessary to have the wire taut.
Using the wall plug, attach the eye-bolt to the wall or the back of the fireplace behind the fire.
Screw the fixing screw and washer partway into the hole shown in the diagram. Wrap one end
of the wire half way around the screw and tighten so the wire is trapped between the washer
and the chassis. Now pass the other end of the wire through the eye bolt. Thread the wire
through one of the two fixing holes in the other side of the chassis, position the fire, then pull
through the wire to take up the slack and thread the wire all the way back through the other
hole. Check it is secure by tipping the fire forwards so the wire is supporting the weight. Give
it a small tug to ensure that it is secured.
Place the coals on the fibreglass fuel bed, putting thinner pieces down the front behind the
bars first and then putting a layer across the top of the bed. If for any reason you
need more coal it is quite acceptable to use normal washed coal.
Position the ashpan cover between the legs of the cast front. (Except Harmony Trim)
Controls.
There is a main isolation switch on the left hand side of the air outlet grill, under the
Magigo logo.
Control switches are located at the top right of the appliance under the canopy (refer
to picture →).
There are two buttons on the fire, ON/C/H and OFF. There is also a thermostat
above the buttons.
To switch on the appliance, make sure the main isolation switch is in the on ‘I’ position
and press the ON/C/H button. This will start the flame effect only. To turn on the cold
fan, press the ON/C/H button again and turn the thermostat up to 10. To turn on the
heater, press the ON/C/H button again and turn the thermostat up to 10. The heater
is now on and controlled by the thermostat.
At any time the fire can be turned off using the OFF button. You will then need to
press the ON/C/H button once to reset.
These controls are duplicated on the handset provided.
Be vigilant and keep the handset out of reach of children or other potential risks.
Due to the location of the infrared sensor, the remote works best from a position predominantly in front of the appliance.
It should work from a distance of approximately 10 to 12 feet.
Thermostat
The heater is automatically controlled by a thermostat to regulate the room temperature. The easiest way to set the
thermostat to your level of comfort is as follows:
a. Turn the heater on by following the instructions above.
b. Leave the heater running until the room has reached your desired comfortable temperature.
c. Slowly turn the thermostat down until it clicks and the heater fan stops.
d. The heater will now cycle on and off to keep the room at the chosen temperature. Each time the heat is turned on, it will
return the room to this preset temperature and then start cycling on and off. Should you wish to raise or lower the room temperature,
i.e. during particularly cold spells, simply turn the thermostat up or down accordingly.
Note: The thermostat switches the heater fully on or fully off as the room temperature fluctuates. You do not get 30% of the heat
when the dial is turned 30% of the way round and 70% when it is turned 70% of the way round.
Maintenance.
WARNING - DISCONNECT THE APPLIANCE FROM THE POWER SUPPLY
BEFORE UNDERTAKING ANY MAINTENANCE.
1) Replacing lamp. Remove the coal from the back of the fire (to prevent it
falling into the fire). Lift up the two retaining tabs (located either side of the fuel
bed) it may be necessary to remove some coal to gain access to the tabs.
Pull the Left hand side of the front fret forwards in a circular motion whilst lifting it
slightly to avoid marking the hearth. (Note: The Harmony trim will need to be
completely removed to change the bulb)
Replace the lamp with a 40/60 Watt clear candle bulb, these are available from
most electrical shops or supermarkets. Re-assemble in reverse order before
reconnecting to the power supply.
2) Care of brass. Wipe only with a soft dry cloth, do not use any polishes or
abrasives.
3) Cleaning the hearth. If cleaning the hearth, remove the fire and only return it
once the hearth is completely dry.
Trouble shooting guide.
The following instructions should solve any questions or problems which you may have. Although your first point of
contact is with the retailer from whom you purchased the appliance, should the guide not provide the information you
require, please call us for further guidance on your next course of action.
To find the cause of an operational fault, plug the fire into the wall socket, turn on the 0-I isolating switch, turn
the thermostat up to 10 and press the ON/C/H switch 3 or 4 times slowly.
Symptoms.
a) No heat or light. This will almost certainly mean that the fuse has blown or the wall socket is faulty. Fit a new 13 amp
fuse in the plug having first checked that it works in a table lamp. Check that the wall socket works by also plugging in a
table lamp. Is the fire on an extension lead? Heaters must not be used on extension leads as most have their own cut out
and are not rated for the power required.
b) The heat comes on but no light. The bulb will have blown, see (replacing lamps). Check that a new lamp works by
testing it in a table lamp.
c) Light comes on but no heat. Turn the thermostat up to 10. Is the fan blowing cold air? If yes, unplug the fire and leave
for 10 minutes.
d) “The thermostat is not working.” The thermostat works by monitoring the room temperature, it is either on or off, you
do not get 10% of the heat on number 1 and 60% on number 6. See (Thermostat).
e) Heater cuts out and blows cold. See below - f) Cleaning fan.
f) Cleaning fan. Approximately every year or two the blades of the heater fan and the flame effect fan should be gently
brushed clean. This should be done by a qualified electrician.
g) Plug gets hot. This is nearly always the socket which is at fault. Check the fire in another socket, it will not get as
warm. Stop using the socket immediately and call an electrician. Many house fires are caused by faulty sockets
overheating.
h) Light is on but flame effect is not working. Remove the coals and fuel bed see (changing lamps), check that the fan
is not being obstructed and turns freely, gently brush the blades of the fan to remove any dust and reassemble.
i) Blemishes in the castings. All the castings used on the fire are hand poured into moulds styled by craftsmen. The
individuality of the process may create slight blemishes which unfortunately are unavoidable.
j) Bulbs do not seem to last very long. If the bulbs keep blowing there is not a fault with the fire. It is not possible to
predict the life of a lamp, some burn out more quickly than others.
k) Noise from the fans. Unfortunately there is always some noise from the fans. We do our utmost to reduce this but they
will never be silent.
Guarantee.
Any fault, other than that caused by abnormal treatment, which occurs within twelve months of the date of purchase, will
be corrected without charge. This does not apply to lamp failures whose life, regretfully, we can not predict. In the event of
complaint, please phone us for guidance. Should a repair be necessary the appliance will need returning to the point of
purchase.
Issue 1.0 Insight Electric 1/9/10