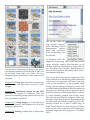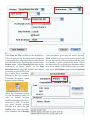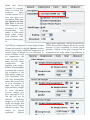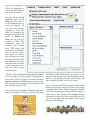
1
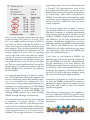
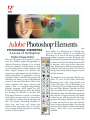
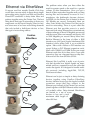
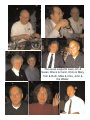
20
02
doubleclick
january
Executive Contact List
Please feel free to contact any of the following individuals
if you have comments or questions relating to Macintosh
Users East or Macintosh computing in general.
Position/Name
Phone#
Mac Evangelist
Bruce Cameron
Hm: (905) 983-9205 Orono
Email: [email protected]
Past President
Hugh Amos
Bus: (905) 683-4760 Ajax
Hm: (905) 683-4320
Meeting Coordinators
Mark Fenton
Jim Foster
Hm: (905) 430-8234
Email: [email protected]
Hm: (905) 432-0921 Courtice
Email: [email protected]
From the Editor
Its hard to believe that 2001 is finally over. Welcome to
2002. This season will get off to a big start with our own Jim
Foster running the first meeting of the new year, 7:30 P.M.
on January 23rd, at Henry Street High School. He will be
bringing his newest Mac accessory, his iPod. If any of you
other club members have new neat & nerdy Mac stuff to
“show and tell” feel free to bring it to the January MaUsE
meeting and share it with the rest of us. Hopefully it will be
something portable! Jim will demonstrate how files can
move between iPod and iMac. Should be interesting. Be
there and bring a friend or two.
Treasurer
Hm: (905) 683-3214 Ajax
Membership Chairman
Doug Kettle
BBS Administrator
Jim Foster
Hm: (905) 432-0921 Courtice
Email: [email protected]
MaUsE BBS - The Source(905) 404-9874 ....56k
Courtice
Special Events
Chris Greaves
(705) 887-2508 Fenelon Falls
Email: [email protected]
Executive at Large
John Field
Hm:905-885-8718
Mary McCarthy Greeter/Blithe Spirit
Macintosh Users East [MaUsE]
eMail: [email protected]
P.O. Box 30530, Oshawa Centre P.O.
Oshawa, Ontario, L1J 8L8 Canada
MaUsE Message Line: 905-433-0777
Double Click
Small Print
What you are looking at is the latest edition of the Double Click
monthly newsletter from the Macintosh Users East, (MaUsE), a
motley collection of old and new Mac users who reside in
Southern Ontario with a motley collection of old and new
Macintosh computers. What more do you need to know ? Oh, yes.
This Newsletter is created by Michael Shaw, Double Click Editor,
on a Sonnet-accelerated Macintosh PowerPC 6500/400 and a
Daystar Genesis MP 800+. Submissions from MausE Club members, ‘though rare, are always welcome. Send them to:
[email protected]. I have never refused a submission
yet. There's always room for another piece on ANY Mac-related
topic and I’ll make room if there isn’t. I would like your submissions. But I won’t beg.
Apple, Macintosh, and the Apple logo are trademarks of Apple
Computer, Inc., registered in the U.S. and other countries. The
MaUsE (Macintosh Users East) is an independent user group and
has not been authorized, sponsored, or otherwise approved by
Apple Computer, Inc.
Double Click on the web at: www.mause.ca
Double Click Editor
Hm: (905) 576-2097 Oshawa
Michael Shaw
Email: [email protected]
[email protected]
FAX: 905-576-5527
Printing & Distribution Hm: (905) 683-3214 Ajax
Doug Kettle
Cover Design
Sean Murphy
Contents
Interleave Memory nPower
Adobe Photoshop Elements
Adobe Acrobat
Ethernetting Techniques
2001 Executive Dinner
SCSI Connectors
Interleaving Memory
Since RAM prices have dropped in the States I
have taken the opportunity to beef up my PCI
Daystar Genesis MP 800+. Velocity Upgrades on
the internet at www.velocityupgrades.com has
128 meg 168-pin FPM DIMMs on sale for $21.99
U.S. each, a price drop that’s just too good to pass
up. (They also have 64-Meg 168-pin FPM DIMMs
in sets of four for $34.99!!) To put this into perspective, MacWarehouse is flogging ONE 64meg DIMM this month for $119.99 Canadian
each. Even that is incredibly cheap compared to
RAM prices of a few years ago. The saturation
and resulting softening of the entire computer
market has made its way to RAM prices.
The nPower Utility on the Daystar shows memory configuration and interleave conditions. If
nPower determines that the position of the RAM
DIMMs can be changed to achieve better effect
the nPower application will suggest which
DIMMs to move and to which slots they should
be moved to for best results. The Daystar Genesis
MP 800+ has a Apple Computers “Tsunami” logic
board like the one in the PowerPC 9500. Many
other Macintosh mother boards (i.e. 8500, 8600
,9600, PowerTowers, S900's to name a few) have
RAM slots that are identified with a letter and
number ID. For example A1, B1, A2, B2, C1, C2
performance speed. On a Power Macintosh with
a PowerPC 601 microprocessor, such as the
Power Macintosh 7500 series, you may get only a
slightly better performance gain by using memory interleaving rather than non-interleaved
DIMMs. Some third-party benchmarking applications may report exaggerated performance differences between interleaved and non-interleaved computers.
and so on. By installing identical RAM modules
in the matching A & B slots (i.e. A1 & B1, A2 &
B2...), you enable interleaved access to RAM as
two banks (A and B). Basically the benefit is to
reduce wait states and contention when accessing
main memory. This provides potentially higher
bandwidth (throughput) on the memory bus. An
analogy might be of a box with two openings
(one on each side) versus one with only a single
opening. If someone were putting items into or
removing them from one opening, another person could still have access via the second opening. This is a crude simplification but you get the
general idea. By interleaving memory the two
partner DIMMs can be accessed a one really big
fat wide DIMM.
For increased performance it is better to configure a PCI-based Power Macintosh computer for
memory interleaving rather than installing memory in a non-interleaved configuration. This
means that you will get better performance if you
configure your system with two 16 MB DIMMs
rather than one 32 MB DIMM. This applies to all
other combinations of same-sized DIMMs. My
128-Meg DIMMs partner up to form 256-Meg
DIMMs through the magic of interleaving.
The actual performance will vary from computer
to computer. In general, though, a Power
Macintosh with a PowerPC 604 microprocessor,
such as the Power Macintosh 8500 or 9500 series
computer, or any clone that has the same board in
it, gets anywhere from a 5% to 15% boost in performance. The average is about an 8% increase in
The question which comes to mind is, how do
you populate DIMMs in your PCI-based Power
Macintosh Computer to maximize performance
using memory interleaving. If you have an odd
number of DIMMS, where should you place the
odd DIMM to get the best performance from
memory interleaving? Interleaving is accomplished by 'pairing' two DIMMs in corresponding
slots. That is, one DIMM in A1, and another
DIMM in B1 will set the machine up to use memory interleaving. What about the DIMMs that
don’t have identical partners?
If you have an odd number of DIMMs, the
matched pairs will run the memory interleaved.
The odd DIMM will then run non-interleaved.
For the interleaving to be most effective, the
DIMMs must be the same size and speed, (usually, should be of the same manufacturer, but not
necessary). In reference to the memory addressing, the A1/B1 will be the lower addresses, going
up to the A6/B6 being the highest address.
In relation to performance, it really does not matter where the DIMMs are placed. The software is
intelligent enough to figure out which banks are
being used, and is able to "stitch" the memory
together as required.
Note: Memory interleaving is only available in
the Power Macintosh 7500, 8500, and 9500 series
computers. The Power Macintosh 7200 uses a different memory controller which does not support
interleaving.
Photoshop Elements
A Course for the Beginner
Digital Image Editor
This new program was designed to introduce the amateur digital photographer to
Adobe's Photoshop software. It is an ideal
choice for someone with the desire or need
to work with photos, scanned pictures and
other digital images but without the
resources or requirements for the full-blown
Adobe Photoshop 6.0 application. Having
said that I'd like to add that this program is
definitely not simply a more fully-featured
version of the free Adobe Photo Deluxe that
comes bundled with many scanners and
printers. This is a complete image-editing
software program which retails for only
$134.99 at MacWarehouse. With Photoshop
6.0 retailing for $964.99 its obvious that
Photoshop Elements is meant to introduce
the budget-conscious and new, non-professional users to Adobe's lineup. Having said
that, I'll examine Photoshop Elements to
show how and how well Adobe has
achieved this. its actually more of a scaleddown version of Photoshop than a scaled-up
version of Photo Deluxe.
This program is definitely not Photo Deluxe but
then neither is it Photoshop 6.0. Nothing like.
Even for free Photo Deluxe is no bargain and
Photoshop 6.0 is one of the most powerful and
complex programs around, designed with
the educated, experienced commercial digital artist in mind. Photoshop Elements falls
in between, with easy-to-use robust features designed for amateur photographers,
hobbyists, and business users who want to
create professional-quality images for print
and the internet.
The emphasis is on learning with this program. To cover all the bases Photoshop
Elements comes with a big printed User
Guide, (280 pages, lots of illustrations), an
on-line help site accessible from the Menu
bar, and Hints, Recipes, Tutorials and Tool
Tips accessible from within the program.
Immediately after I installed and registered
the program I logged onto the free Adobe
on-line service and downloaded the latest
updated Photoshop Elements resource file
to make sure my Hints, Tips and Tutorials
have the latest improvements. By selecting
my Photoshop Elements folder as the destination, these files were automatically
installed.
The assistance provided with Photoshop
Elements presumes an understanding of basic
computer commands, like how to Open, Close,
and Save files. Everything beyond that is provided. Learning the application is simply a matter of
paying attention to the information on your
screen. The Hints pallet automatically displays
an illustration of or brief description about any
pallet or tool your cursor is on. The Recipes pallet guides you through typical frequently
encountered image-editing tasks such as removing red-eye from photos, adding effects to text,
and adding GIF animations to your work.
Extensive tutorials are available through the Help
system and make use of included sample files to
take you step-by-step through the basics of working with layers, building animated GIFs, and
merging photos. The Tutorial on Layers is especially valuable since understanding Layers is an
important step in understanding many other
Photoshop and Photoshop Elements tools and
techniques.
The focus of this program is learning how to
work with images. From the first time you launch
Photoshop Elements it is instantly obvious that
educating the user is just as important as the
effects that can be achieved. For users who can't
take the classroom time to learn Photoshop this
program is a bargain. The recent emergence of
popular and affordable digital photography has
created the need for a program like this, in which
all of the steps of acquiring images from digital
cameras, scanners or off photo CDs, importing
them into the software and transforming them
are clearly presented.
Besides describing how to use the program itself,
the Photoshop Elements User Guide is a very
readable general explanation of all of the terms,
methods, features and considerations of image
editing, with each chapter describing how and
why images can be manipulated and to what
effect. Since the software is presented on screen as
a program and as a course in photo-editing its
important to look at both of these aspects.
Chapter 1, Looking at the Work Area, describes
how to become familiar with the work area and
configure the program. Viewing images, doing
and undoing changes, saving changes and closing files are covered.
Chapter 2, Getting Images into Photoshop
Elements, explains how to create and import
images into the program and the meaning and
importance of the resolution, size, type and presentation of your images.
Chapters 3 and 4, Working with Colour, and,
Making Colour and Tonal Corrections, provides
a clear explanation of colour theory and terminology as it pertains to computer graphics, with
information about colour management systems
and using the Adobe Color Picker. Correcting
images by adjusting the colour tone and tonal
range are described.
Chapters 5 and 6, Selecting, and, Transforming
and Retouching, describes the processes of taking exactly what aspect or attribute of an image
you wish to alter and separating it for working
on. These chapters deal with what types of things
are possible to correct and how to target them.
Problem pictures and their fixes are described.
Chapter 7, Painting and Drawing, explains the
distinction between these two terms and activities as they pertain to Photoshop Elements and
computer graphics in general. The use of Tools,
Shapes and Patterns are presented, with examples.
Chapter 8, Using Layers, one of the most important chapters in the User Guide, describes the
Layers Pallet, how to create a layered image and
the acts of editing, managing and grouping layers.
Chapter 9, Applying Filters and Effects, gets into
the many, many special powerful tools that make
this program deserve the name, "Photoshop". For
those of us already familiar with Photoshop filters there isn't much new here but for the beginner photographer this is a wonderful selection of
filters and effects. In keeping with the simplified
presentation and the "on-screen" theme, filters
and effects can be accessed from the Menu bar or
displayed on the screen as alphabetically
arranged thumbnail images in the Filters and
Effects pallets. Their use is also described in the
User Guide, with instructions and advice where
applicable. Here's a list of the Photoshop Filters
and a brief explanation of the Effects included
with Photoshop Elements:
Artistic Filters
•Coloured Pencil
•Cutout
•Dry Brush
•Film Grain
•Fresco
•Neon Glow
•Paint Daubs
•Palette Knife
•Plastic Wrap
•Poster Edges
•Rough Pastels
•Smudge Stick
•Sponge
•Underpainting
•Watercolour
Blur Filters
•Blur and Blur More
•Gaussian Blur
•Motion Blur
•Radial Blur
•Smart Blur
Brush Stroke Filters
•Accented Edges
•Angled Strokes
•Crosshatch
•Dark Strokes
•Ink Outlines
•Spatter
•Sprayed Strokes
•Sumi-e
Distort Filters
•Diffuse Glow
•Displace
•Glass
•Ocean Ripple
•Pinch
•Polar Coordinates
•Ripple
•Shear
•Sperize
•Twirl
•Wave
•ZigZag
•Liquify
Noise Filters
•Add Noise
•Despeckle
•Dust & Scratches
•Conte Crayon
•Graphic Pen
•Halftone Pattern
•Note Paper
•Photocopy
•Plaster
•Reticulation
•Stamp
•Torn Edges
•Water Paper
Sharpen Filters
•Sharpen and Sharpen More
•Sharpen
Edges
and
Unsharp Mask
Stylize Filters
•Diffuse
•Emboss
•Extrude
•Find Edges
•Glowing Edges
•Solarise
•Tiles
•Trace Contour
•Wind
Pixelate Filters
•Colour Halftone
•Crystallize
•Facet
•Fragment
•Mezzotint
•Mozaic
•Pointilize
Texture Filters
Render Filters
Video Filters
•3D Transform
•Clouds
•Difference Clouds
•Lens Flare
•Lighting Effects
•Texture Fill
•De-Interface
•NTSC Colours
Sketch Filters
•Bas Relief
•Chalk
•Charcoal
•Chrome
•Craquelure
•Grain
•Mosaic Tiles
•Patchwork
•Stained Glass
•Texturizer
Other Filters
•Custom
•DitherBox
•High Pass
•Lighting Effects
•Minimum and Maximum
•Offset
Effects let you achieve complex effects through
best results when setting output options,
print encoding, colour
management
preferences and considerations for printing over
the internet.
the automatic sequencing of filters, layer styles,
and program functions. Like the Filters, they can
be accessed from their own Pallet. the tiny
thumbnail gives an indication of the end result of
the effect.
Chapter 10, Using Type, describes creating type
and working with type layers as part of your
images.
Chapter 11, Optimizing Images for the Web
describes the creation of animated GIFs, the
process of controlling image format and size, and
how and when to optimize.
Chapter 12, Saving Images, is a description of
various file formats and explains how to set the
program's preferences.
Chapter 13, Printing, outlines how to achieve the
In keeping with the
emphasis on learning, one of the Menu items
opens a Recipe window that functions as yet
another source of information. A single click on
the “Download New Recipes” button takes you
out onto the internet to the Adobe site to download updated help files.
You can see from the scope and approach of the
Users Guide that at Adobe the general education
of the user is as important with entry level software as the mechanics of the program itself.
Along with everything presented on screen with
colourful pallets and menus Adobe has made this
program very friendly with an attractive price,
powerful selection of filters and effects, extremely visual interface, printed User Guide, Hints,
Tips, Tutorial and Help files and more online support than most other programs. Requirements for
the Macintosh are modest enough: Any PowerPC
running System 8.6 or above with64 megs of
RAM should be fine for this software. If Adobe
wants to get a foot in the door with digital photography beginners this program is a brilliant
move.
Adobe Acrobat 5.0
How do I do it ? Publish this little newsletter, I
mean. Well...I get a lot of help from Adobe. The
Double Click newsletter is created in Quark
XPress and then turned into the .PDF (Portable
Document Format) that you just downloaded
with Adobe software. The Acrobat Distiller program creates the documents and Acrobat Reader
is needed to open and read them. I did a short
piece about Acrobat a year ago but this new
release, Acrobat 5, warrants another little piece.
This is concerning the mechanics of HOW I make
a .PDF from the Quark XPress document.
Acrobat cannot read Quark documents. In order
for Acrobat to work I first have to turn my Quark
document into a PostScript file. To do this I open
the Chooser from the Apple Menu and select the
PostScript printer Chooser Extension LaserWriter
8. Since this extension ships with the Macintosh
OS, everybody should already have a copy.
Then I open my copy of the Double Click by
launching Quark XPress and then using the File
Menu Open command to find the latest Double
Click. Once I have the document completed the
way I want it, with all articles written and pictures where I want them, I choose Print from the
File Menu in Quark. In the Print dialog box I
select Save As File and File as the destination.
This will prevent the document from being sent
to the printer but will ensure that it can be saved
and translated into a PostScript file instead. In the
Format menu I select Postscript Job and set the
Preferences as shown above. In the Font
Inclusion menu I select All. Acrobat can’t embed
your fonts in your .PDF if you
don’t make them available.
Printing in this way creates a
Postscript document which
appears on the Desktop.
When the PostScript version
of your document is ready its
time to launch Acrobat
Distiller and convert the document into a .PDF. To do this
you must launch Acrobat
Distiller and select the Job
Option that best describes
your intended use. Choosing
Screen will yield the most compressed version of
your document, good only for screen viewing.
Print will yield a larger final product but it will
be one that can be viewed onscreen and also sent
to a printer to yield a satisfactory result. This is
the best choice if you think your document might
ever see a printer. With Distiller open you must
now select Job Options again from the Settings
Menu and choose
Acrobat 3.0 compatibility to ensure that
everyone
using
Acrobat version 3.0 or
later can open your
documents. Make sure
that Optimise for Fast
Web View is selected.
This compresses your
document for faster
downloading
and
makes it load much
faster when viewed
with Acrobats webbrowser internet plugin.
All .PDFs are compressed to some degree but the
Compression panel in the Job Options window
allows you to apply additional compression to
various types of images in you document to
reduce it further. Using
no compression can
yield too-large documents and too much
compression
can
degrade your images.
Bicubic Downsampling
automatically reduces
the resolution of the
high-quality images in
your document. This
will only dramatically
reduce the over-all size
of your document if
there are really big
high-resolution images
in your document.
Low-res images you
have imported at 72 or
144 dpi will not be
affected.
Reducing
images to 72 dpi only
works for images that
will be viewed at their
full size on screen. They
cannot
be
viewed
expanded
without
jagged pixels appearing. 300 dpi works best for
colour and greyscale images and leaves enough
resource in your document to ensure proper
printing . Getting a firm grip on proper use of
compression can really make a big difference in
the size and quality of
.PDFs. Its important to
know the final destination of the document
The next tab in the Job
Options panel is the
Fonts tab. The .PDF is
an all-included self-contained document. All
the fonts and images
required to view and
print the document are
wrapped in a single file.
Select to Embed all
Fonts and set the percentage to 100%. This
guarantees that the
Acrobat will display
your .PDF using only
the fonts you’ve embedded in the file. Unless
this option is checked
font conflicts can occur
if fonts used in the .PDF
are different but have
the same name as those
in the computer of anyone who tries to open
the document.
When you have finished setting these job options
you are ready to convert your PostScript document into a .PDF. You can use Acrobat Distillers
Open command in the File menu or you can simply drag the postscript file into the Distiller window to print it into a .PDF.
One of the most noticeable differences between
the two documents, which is actually the same
document transformed from .ps to.pdf, is the
immense reduction in size. The document shown
below is last month’s Double Click before and
after Acrobat Distiller has done its thing.
Now I can open the .PDF document with Acrobat
Reader and check to make sure that it physically
resembles the Quark XPress document I started
with. If the text appears normal and all of the pictures look as they should I can rename the new
document and post it to the Source BBS for all of
you to download and thoroughly enjoy, every
article and paragraph.
Ethernet via EtherWave
If anyone read last months Double Click they
would have seen an article in there about simple
networking using Apple LocalTalk and Farallon
PhoneNET connectors to daisy-chain Macs and
printers together using the Printer Port. The best
thing about that type of networking is that every
component can be found cheaply, often for free,
and since most of us have networking demands
that only include a half-dozen devices or less,
that type of networking suffices.
Farallon
EtherWave
The problem arises when you have either the
need for greater speed or the need for a greater
volume of data transmission. Once you get a
bunch of Macs networked together and you start
moving files and documents in excess of 4 or 5
megabytes, the bottlenecks become obvious.
LocalTalk via the Printer Port is limited to about
230 Kilobits per second. Fortunately there are
other Ports besides the Printer Port that can be
used for networking. There is a port called the
Ethernet port that provides access to a much
faster network setup. Ethernet has a standard rate
of data exchange of about 10 Megabits per second
and the newer Macs can transmit and receive 100
or 1000 Megabits per second. Many Macs have
Built-in Ethernet in the form of either a RJ45
interface or a AAUI port (Apple Attachment Unit
Interface) while others have it as an added-in
option . Macs with a Nubus or PCI interface can
accept Nubus or PCI Ethernet expansion cards.
Macs with COMM I or COMM II slots can accept
Ethernet cards that fit in these slots. Once quite
expensive, they are a frequent item on eBay auctions and sell for from $10.00 to $25.00.
Ethernet, like LocalTalk, is really a set of protocols that describe how digital signals are transmitted and how computers access the cable that
carries the signals. It is designed to handle multiple protocols including AppleTalk, TCP/IP,
Netware and others.
Ethernet can be just as simple as daisy-chaining
devices together using Farallon EtherWave
devices, identical in set-up to the Apple Localtalk
connectors except that they connect to the
Ethernet port instead of the Printer Port and are
joined together with RJ45 Ethernet cables instead
of Localtalk cables. Daisy-chained EtherWaves
are limited to a net of seven
devices or less and a total
maximum cable length of
about 300 feet.
Ethernet via Hub
Usually, though, ethernet requires that you purchase and install an ethernet hub with ports for
anywhere from 4 to a hundred or more connections. All of the Macs connected to the hub can
see each other and all of the printers connected to
the hub can be seen by all the Macs. Unless your
Mac is of very recent manufacture, your Ethernet
will use RJ45 connectors and will be limited to 10
Megabits per second. This is usually referred to
as 10BaseT Ethernet. There are a few other seldom seen types of Ethernet cables and connectors
for special applications, such as 10Base2
(Thin)and 10 Base5, (Thick), but the most common and popular Ethernet connectors are the
RJ45 that look like an enlarged telephone wire
connector. Each Mac or printer has its own ethernet cable that connects the ethernet hub to the
Mac and most modern hubs have the ability to
recognize the highest connection speed that the
devices are capable of and setting that as the standard for file sharing. When you have a central
hub in your 10 BaseT network each ethernet cable
is limited to abut 100 meters, or 300 feet.
One of the best applications of Ethernet is its use
when high-speed modems are connected to a
special type of Ethernet hub called a DSL Router.
With this device in your network all of the Macs
you have connected to it, up to 256 of them, can
share the same high-speed internet access for the
cost of one account.
Ethernet components used to be hideously
expensive, but then everything for computers
used to be expensive before home computer systems became popular and common. Now you can
pick up networking hardware like ethernet hubs
and cables reasonably at every electronics shop. I
prefer to get my networking equipment on eBay.
Cables, routers, ethernet hubs and Etherwaves
appear regularly at bargain prices.
If you aren't sure whether or not you need to set
up a Ethernet network in your home then you
probably don't need to. But if sharing a highspeed internet connection, moving big files
between Macs, sharing a printer among Macs and
Ethernet Hub
PCs, sharing a program between Macs, or playing on-line games is on your agenda now or in
the near future, then get ready to learn about how
Ethernet can expand and extend the reach of your
Macs.
POWER CHARGE
(1000691 Ontario Inc.)
Toner Cartridge Remanufacturing
and Imaging Supplies
APRIL NABEEH
Tel: (905) 433-1106
Fax: (905) 579-1469
FREE PICK UP & DELIVERY
December 2001 MaUsE
Executive Dinner
This year the Exec dinner was held December 6 at
the Keg Restaurant in the Oshawa Center.
The usual suspects were Jim &
Susan, Bruce & Carol, Chris & Mary,
Tom & Ruth, Mike & Irma, John &
the Waiter.
Outbound Clones
The Outbound is a Macintosh Clone Portable that
was designed and manufactured in Boulder,
Colorado a long time ago. There are two different
models of portable Outbounds, the Notebook
and the Laptop. They are a rarity among clones
because Apple was very cautious about allowing
its technology to appear in portables. All of the
other clone-makers did desktop models but only
Outbound did a pair of portables.
The Outbound clones were fairly low-performance in some respects but were adequate for their
time. Both Outbound models use the ROMs from
a Macintosh Plus or SE and run Macintosh
System software versions 6.0.7 thru 7.1 so- both
machines have the look and feel of an Apple
Macintosh computer. Here’s a picture of Mac SE
ROMs,
top;
Mac
Classic ROMs, bottom.
ROMs from both the
Mac SE and Mac
Classic ) can be used in
the Outbound Notebook. In order to make the
Notebook functional, Apple ROMs had to be
installed. If the user already owned a Macintosh,
pulling the ROMs from that unit was the most
cost-effective way to go.
Outbound Systems is the only pre-PPC clone
manufacturer to actually receive Apple's blessing. Not coincidentally, the Notebook is the most
plentiful clone, and Outbound Systems the most
successful clone manufacturer.
The Outbound Notebook's processor, RAM, and
ROM are all stored on a removable daughter
card. This is very fortunate, as the rest of the system is nearly impossible to get apart. Access is
easily provided to all components that the user
may want to swap out.
The Outbound Notebook uses generic videocamera batteries, an incredible advantage over
other laptops. Batteries for the Notebook are
cheap ($30 at Radio Shack) and plentiful.
Compare this to Powerbook 100 batteries, which
must be specially ordered through an Apple
Authorized Dealer for $80, and are often depleted beyond recovery on arrival.
Perhaps the best known early portable Mac clone
came from Outbound in August 1989, just weeks
before Apple announced the Portable. The
Portable Plus used the same 68000 CPU as the
Plus and SE, but runs it at 15 MHz. It had a
unique built-in pointing device, the Isopoint
TrackBar, that rolled to scroll up and down,
moved sideways to scroll right and left. The
TrackBar was part of the detachable keyboard.
Still, at $3,995 with a 20 MB hard drive and a 10
pound weight, it was an attractive alternative
even after Apple's Portable shipped.
SCSI Connectors
There are lots of different types of SCSI hard
drives with different types of connectors.
Externally there isn’t much variety: 25-pin,Dshell, 50-pin Centronics, or high density pretty
well covers it all. For internal connectors it gets
much more complicated. Type of interface is an
attribute always mentioned for SCSI drives.
SCA 80-pin interface
board and into the single hard drive. Later Macs
could accept several of these drives on one fiftypin ribbon as long as each had its own SCSI ID.
As SCSI technology changed to meet the
demands of faster data transfer and faster types
of SCSI drives became available SCSI branched
out into fast SCSI I, II, and II and often got designations like Wide, Fast, and UltraWide.
SCSI I and II with 50-pin interface
Fortunately there are SCSI adapters available,
like those shown on this page, that will enable
you to marry up different types of SCSI drives to
your system by standardising the interface of all
of the drives in your Mac. If you see bargain
drives for your Mac but can’t match up the cables
you will find that all things are possible once you
find out what type of connectors you need.
In order to patch the connector cables your Mac
uses into the drive you might find available it
may be necessary to use an adapter that matches
your drive on one side and your Mac interface on
the other.
Most of our older Macs have small single SCSI
drives with a 50-pin interface. The flat ribbon
cables simply connect directly into the logic
SCSI III with 68-pin interface