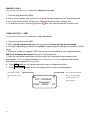
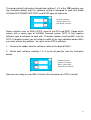
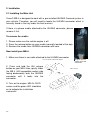
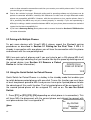
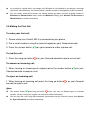
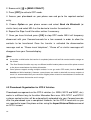
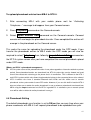
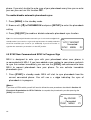
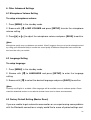
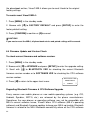
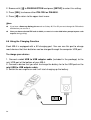
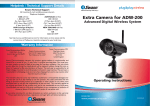
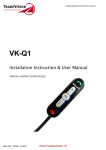
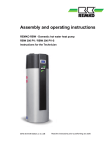
1
User Manual
Preface
This publication, including all photographs, illustrations and software, is protected
under international copyright laws, with all rights reserved. Neither this manual, nor
any of the material contained herein, may be reproduced without the express
written consent of the manufacturer, Jan 2012.
Trademarks
Other product names mentioned herein are used for identification purpose only
and may be trademarks and/or registered trademarks of their respective
companies.
Limitation of Liability
While reasonable efforts have been made to ensure the accuracy of this manual,
the manufacturer and distributor assume no liability resulting from errors or
omissions in this manual, or from the use of the information contained herein.
Foreword & Important Note on Safety!! (MUST READ)
Please read this note before you install and use MB-4 Bluetooth Upgrade Adaptor!
Congratulation on your MB-4!
ViseeO MB-4 is the latest and one of the simplest Bluetooth Handsfree System
ever designed for your Mercedes Benz. You will be able to connect the latest
mobile phones to the handsfree system, sync phonebook and dial/answer a call
from vehicle's original steering wheel control or headunit keypads. Moreover, it has
an USB charging port which allows you to recharge the battery of your mobile
phone or electronic gadget. Although ViseeO MB-4 is very easy to install and
operate it is still recommended that you read all chapters in this manual before
using the adaptor.
Road Safety
We strongly advise that full attention is to be paid to the traffic conditions whenever
the vehicle is moving. Distraction of attention can lead to dangerous traffic situation.
Even when using a handsfree car kit driver is always advised to avoid phone call
during a difficult and complex traffic situation.
Use Only Approved Replacement Parts
Please always use official parts for your ViseeO unit as unknown spare or
replacement parts may lead to malfunction.
2
QUICK START GUIDE
CAUTION!! DO NOT ATTEMPT TO INSTALL THE UNIT WHILE THE CAR IS IN MOTION!
INSTALLING MB-4
(For detailed instruction please see Section 2.1 Installing the Main Unit)
1. Make sure the engine is off.
2. Locate your UHI/MHI connector (It is usually
situated in the tray under the front armrest).
3. Make sure there is no cradle attached to the
UHI/MHI connector.
4. Press and hold MB-4 UHI release button then,
gently slides MB-4 onto the UHI/MHI connector until in
lock into the connector.
5. Turn on the engine and make sure MB-4’s OLED
screen and green LED is on.
* If you have a NTG 4 you will need to set the dip switch 1 & 2 to off position before installing the unit (For further
information please see Section 1.5 Software Dip Switch and NTG 4 Vehicles)
CONNECTING MB-4 TO YOUR MOBILE PHONE FOR THE 1ST TIME
(For detailed instruction please see Section 3.1 Pairing for the First Time)
1. Press [PAIR] on MB-4 in the standby mode. (If you do not see the PAIR function in the main screen
please refer to the manual Section 3.1 Pairing for the First Time for further information)
2. MB-4 should display “PAIRING NOW... Search ViseeO on your phone”.
6. Enable Bluetooth on your phone and search for a new Bluetooth device.
7. Select MB-4 when displayed a list of available Bluetooth devices nearby.
8. Enter 1234 on your mobile phone when the pass-code is requested. (If you have a Samsung
Galaxy phone please refer to manual instruction Section 6.5 PIN Selection for further information)
9. The signal sign on your vehicle's screen should become solid when the connection is
successful.
Telephone Number
<<
No Phone Device
SYNC
MENU PAIR
PAIRING NOW…
Search ViseeO
on your phone..
Redial
Calls
Delete
VISEEO1
TEL
Signal sign on a Comand APS Screen
3
MAKING A CALL
(For detailed instruction please see Section 3.4 Making the First Call)
1. Connect your phone with MB-4.
2. Dial a set of numbers you wish to call using the numeric keypad on your Comand console.
3. Press the answer button
on your Comand console to make a phone call.
4. To end the call, press the hang up button
on your Comand console to end the call.
SYNC FOR THE 1ST TIME
(For detailed instruction please see Section 4.1 Sync Phonebook)
1. Connect your phone with MB-4.
2. MB-4 should automatically sync with your phone as soon as they are connected.
3. During the uploading you will see the symbol > appearing on the top right of the MB-4’s OLED
panel.
4. When the symbol > disappears MB-4 will transfer the phonebook to your Comand console.
MB-4 will temporary disconnect from your Comand console.
5. After the connection comes back wait for a while for Comand console to organize the
phonebooks. (If you have large phonebook such as 500 entries or even more it will take some time for
Comand console to organize your phonebook).
6. Press TEL button on the Comand console to access telephone function.
7. Press Phonebook button on the Comand console to access your phonebook.
This symbol indicate
This symbol indicate that
that Automatic Sync is
MB-4 is now uploading
on
4
<<
>
HTC 7 MOZART
Connected
SYNC MENU
P2
phonebook form your
phone memory
Preface................................................................................................................................. 1
Foreword & Important Note on Safety!! (MUST READ) .................................................................... 2
QUICK START GUIDE .............................................................................................................. 3
1. Understanding Your MB-4 ..................................................................................................... 6
1.1 Package Contents ........................................................................................................ 6
1.2 MB-4 Main Unit & Descriptions ........................................................................................ 7
1.3 MB-4 OLED Display & Main Screen Icon Descriptions........................................................... 7
1.4 MB-4 Keypads and Functions.......................................................................................... 8
1.5 Software Dip Switch and NTG 4 Vehicles (W204, W212, W207, etc.) ......................................... 8
2. Installation ....................................................................................................................... 10
2.1 Installing the Main Unit ................................................................................................ 10
3. Basic Operation ................................................................................................................ 11
3.1 Pairing for the First Time.............................................................................................. 11
3.2 Pairing with Multiple Phones......................................................................................... 12
3.3 Using the Quick Switch for Paired Phones ....................................................................... 12
3.4 Making the First Call ................................................................................................... 13
4. Phonebook Function .......................................................................................................... 14
4.1 Sync Phonebook ........................................................................................................ 14
4.2 Manually Upload Phonebook......................................................................................... 15
4.3 Phonebook Organization for NTG 4 Vehicles .................................................................... 16
4.4 Phonebook Setting ..................................................................................................... 17
4.5 SYNC Now Command and SYNC in Progress Sign............................................................. 18
5. Advanced Bluetooth Setting ................................................................................................ 19
5.1 Disconnect from the Current Connected Device ................................................................ 19
5.2 Reconnect a Paired Device ........................................................................................... 19
5.3 Remove a Paired Device .............................................................................................. 20
6. Other Advanced Settings .................................................................................................... 21
6.1 Microphone Volume Setting.......................................................................................... 21
6.2 Language Setting ....................................................................................................... 21
6.3 Factory Default Setting (Master Reset) ............................................................................ 21
6.4 Firmware Update and Version Check .............................................................................. 22
6.5 PIN Selection............................................................................................................. 23
6.6 Using the Charging Function ........................................................................................ 24
7. Miscellaneous................................................................................................................... 25
7.1 Trademark ................................................................................................................ 25
7.2 Product Information .................................................................................................... 25
5
1. Understanding Your MB-4
1.1 Package Contents
1. MB-4 main unit.
2. USB to mini USB cable.
3. ViseeO Software Upgrade Cable.
6
1.2 MB-4 Main Unit & Descriptions
Power Indicator
OLED Display
Menu/Confirm Button
SYNC now/
Return/Cancel Button
Quick Switch for Paired Phones/Menu
Browsing Button
5V Mini USB Charging Port
Software Dip Switch
UHI Compatible Socket
UHI Release Button
CPU Software Upgrade Port
1.3 MB-4 OLED Display & Main Screen Icon Descriptions
Auto SYNC Status
Phone Device Name
Phonebook Upload
Status
<<
>
HTC 7 MOZART
Connected
SYNC MENU
P2
Left Button Function
Connection Status
Right Button Function
Middle Button Function
7
1.4 MB-4 Keypads and Functions
Each key corresponds to a designated command shown on the display
Left Key
Middle Key
Right key
SYNC Now, Return to Upper Level Menu, Cancel,
Mic Volume Down
Main Menu, Confirm, Save, Setup, OK, Delete
Switch to Next Paired Phone, Browse Next Menu
Item, Yes, Mic Volume Up
<<
HTC 7 MOZART
Connected
SYNC MENU
P2
1.5 Software Dip Switch and NTG 4 Vehicles (W204, W212, W207, etc.)
Different years of Mercedes Benz vehicles are equipped with different types of the
UHI interface system. MB-4 is designed to work with different type of Comand
systems via the software dip switch at the back of the unit.
8
The factory default setting has the both dip switches 1 & 2 at the “ON” position (see
the illustration below) and this software setting is designed to work with Audio
20/Audio 50/COMAND APS NTG1 and NTG2 types of head units
Original software
switch position for
Non-NTG4 vehicles
Newer vehicles such as W204, W212, some of the GLK and W207 Coupe which
comes with a newer type of UHI/MHI Comand system (NTG 4) that requires
different type of software to work with. Therefore, before inserting MB-4 into the
NTG 4 Comand system you will need to switch to the right software before MB-4
can work without any problem. To switch to the NTG 4 software:
1. Remove the rubber from the software switch at the back of MB-4.
2. Switch both software switches 1 & 2 to the off position (see the illustration
below)
Software switch
position for W204,
W212, W207 and
other NTG 4 vehicles
Now you are ready to insert MB-4 into the UHI connector of a NTG 4 vehicle.
9
2. Installation
2.1 Installing the Main Unit
ViseeO MB-4 is designed to work with a pre-installed UHI/MHI Comand system in
your vehicle. Therefore, you will need to locate the UHI/MHI connector which is
normally found in the tray under the front armrest.
If there is a phone cradle attached to the UHI/MHI connector, please
remove it first.
To remove the cradle:
1. Please make sure the vehicle engine is off.
2. Press the release button on your cradle (normally located at the top).
3. Remove the cradle from UHI/MHI connector with care.
Now install your MB-4:
1. Make sure there is no cradle attached to the UHI/MHI connector.
Press & hold the UHI Release Button
2. Press and hold the UHI release
button on your MB-4 then, gently slides
the MB-4 (UHI compatible socket side
facing downwards) onto the UHI/MHI
connector until it locks into the
connector.
3. Turn on the engine. MB-4's OLED
screen and the green LED should be
on to indicate the installation
successful.
10
Original phone
cradle and UHI
connector
UHI Connector
3. Basic Operation
3.1 Pairing for the First Time
Once you have installed your MB-4 in the vehicle, you need to pair it with your
mobile phone.
To pair your mobile phone with MB-4 for the first time:
1. Press [MENU] in standby mode.
2. Browse with [] to BLUETOOTH and press [SETUP] to enter the Bluetooth
setting.
3. Browse with [] to PAIRING and press [SETUP] to enter pairing mode. The
OLED screen should display 'PAIRING NOW... Search ViseeO on your phone'.
4. Enable your mobile phone's Bluetooth and search for a new Bluetooth device as
instructed in the phone’s manual.
5. Select MB-4 when your phone displays a list of available Bluetooth devices
nearby.
Note:
Depending on your mobile phone model you may require to set ViseeO MB-4 as the 'trusted device'
in your phone. Please refer to your mobile phone manual for further information.
Telephone Number
8. Enter 1234 on your mobile phone when prompted by
the password request.
9. When the connection is established the signal sign on
the Comand system will become solid bars.
Redial
Calls
Delete
VISEEO
TEL
Note:
Once your mobile phone is paired with MB-4, depending on the phone you may be asked whether to
“authorize the device to make connection automatically” or to “accept connection from MB-4”. In
11
order to allow automatic reconnection each time you re-enter your vehicle please select “Yes” when
you see this type of messages.
Due to the variation in phone’s Bluetooth setting and its operating software not all phones can be
paired or connected with MB-4 smoothly. We endeavour to make sure all major Bluetooth mobile
phones are compatible with MB-4. However, with the new phones or less popular phones there is
still a possibility that MB-4 may not pair, connect properly or smoothly. If you are experiencing a
difficulty in making a stable connection between MB-4 and your phone please contact our technical
support for the latest compatibility list.
If you have a Samsung Galaxy phone please refer to manual instruction Section 6.5 PIN Selection
for further information
3.2 Pairing with Multiple Phones
To pair more devices with ViseeO MB-4, please repeat the Bluetooth pairing
procedures as described in Section 3.1 Pairing for the First Time. If MB-4 is
already in connection with one phone you will lose the connection with this phone
and connect with the new paired phone.
MB-4 can pair up to 4 phones and if you are trying to pair a fifth phone MB-4 will
display a message indicating that you need to free up the space by deleting one of
the paired device (see Section 5.3 Remove a Paired
DEVICE FULL!
Device for further information).
FREE UP SPACE?
3.3 Using the Quick Switch for Paired Phones
YES
Quick Switch for Paired Phones is a hotkey in the standby mode that enables you
to switch between paired phones with one click. To use this function you must have
at least two phones paired to MB-4 and you can have up to 4 paired phones to take
the advantage of this useful function. The first paired phone will be assigned to P1,
the second paired phone will be assigned P2, and so on. To use the Quick
Switch:
1. Press [P1] (or [P2], [P3], [P4] depending on which phone is in connection). This
will force MB-4 to disconnect with the current phone and attempt to connect with
next phone device that is assigned to P1.
<<
Note:
12
My iPHONE
Connected
SYNC MENU
P1
If you switch to a phone that is not nearby or its Bluetooth is not switched on you will get a message
“Not found” and followed by “No Phone Device” after 90 seconds of attempting to make connection.
You can always check what phones are already paired and what are their assigned number in
Reconnect a Paired Device menu under the Bluetooth Setting (see Section 5.2 Reconnect a
Paired Device for further information)
3.4 Making the First Call
To make your first call:
1. Please make sure ViseeO MB-4 is connected to your phone.
2. Dial a set of numbers using the numeric keypad on your Comand console.
3. Press the answer button
on your console to make a phone call.
To end this call:
1. Press the hang up button
on your Comand console to end a current call.
To answer an incoming call:
1. When hearing an incoming call ringtone press the answer button
Comand console to receive a call.
on your
To reject an incoming call:
1. When hearing an incoming call press the hang up button
console to reject a call.
on your Comand
Note:
The answer button
and hang up button
icons may vary on different types of Comand
systems. Please consult your original car manual for further information.
You can also dial a call using the phonebook synchronized into the Comand system (see Section
4.1 Sync Phonebook for further information).
13
4. Phonebook Function
4.1 Sync Phonebook
If your phone supports the phonebook sync protocol provided by MB-4 you will be
able to take the advantage of the automatic phonebook upload function. The
phonebook sync process is divided into two stages:
1. From phone to MB-4.
2. From MB-4 to Comand console.
As soon as your phone is connected with MB-4 it will upload contacts in your
phone memory to the MB-4’s memory. When this is completed MB-4 will then
transfer the contacts to the Comand system. This will cause a temporary
disconnection between MB-4 and Comand system (you will see a message such
as ‘Please insert telephone’ or ‘Phone not available’, etc. on the screen) please just
wait until the connection comes back. As soon as the connection is reinstated
MB-4 will begin to transfer the contacts from MB-4’s memory to your Comand
system and you can check whether the transfer is done by accessing the
phonebook function on the Comand system to see if the contact emerges.
To access your phonebook:
1. Press TEL button on the Comand console.
2. Press Phonebook button on the Comand console.
3. Search the name using the navigation buttons on your Comand console.
4. Press the answer button
on the Comand console to dial a call to the
selected contact.
Note:
Some phones may not support automatic phonebook synchronization. If your phone does not
synchronize after establishing the connection with MB-4 please always check if MB-4’s Phonebook
SYNC function is ON first (see Section 4.4 Phonebook Setting for further information). If this
function is already on and you are still unable to sync it is very likely that your phone does not
support MB-4 phonebook sync protocol. You can check your phone model against MB-4’s
compatibility list available at ViseeO’s website. Alternatively, you can try manually uploading
14
phonebook entries under Object Push Profile (OPP) mode (see Section 4.2 Manually Upload
Phonebook for further information).
Phonebook sync speed varies between phone models and size of the phonebook. For some
phones, the synchronization to MB-4 is almost instant but for others it may take longer.
The transfer from MB-4 to Comand APS may take a while depending on the phonebook size. Once
transfer is completed you will be able to see the phonebook entries when accessing the Phonebook
screen.
Contacts are sent in the order according to the phone's memory slot distribution via Bluetooth.
Different head units will have different way of sorting the phonebook nonetheless, you will be able to
quickly access the contact entry you desired by searching through the alphabetic index.
Auto sync will only sync the phonebook entries stored in phone memory. If you wish to sync the
phonebook stored in the SIM card please copy the contact entries to your phone memory and
sync again (by pressing [SYNC] now button in the standby mode).
Depending on the Comand system, for each paired phone you will be able to transfer up to 1000
or 650 entries to the Comand APS console from MB-4. Therefore, if you have 4 paired phones
you can upload up to a total of 4000 phonebook entries (with each entry contain only one
telephone number). If your phone has more than 1000 entries Command APS will randomly pick up
1000 entries to be displayed on your screen. For further information regarding the phonebook
management in the Comand APS console please contact your vehicle manufacturer or refer to the
car manual.
When transferring phonebooks from a Samsung Galaxy Phones (W, R, S2, and etc.) you will be
asked whether to accept an outside access to your phonebook (normally this is notified by your
phone’s notification bar at the top of the display). You will need to accept the access to your
phonebook in order to allow the phonebook to be downloaded by MB-4 (This can be done by
dragging down the notification bar when your phone alerts you that an outside device is trying to
access your phonebook, and then select this notification to accept). If you are not sure how to use
the notification bar please refer to your phone manual for further information.
4.2 Manually Upload Phonebook
Not all phones support automatic phonebook sync, therefore, if your phone does
not support this function you will need to send the required contact entries
manually from your mobile phone to MB-4 under the Object Push Profile (OPP)
mode.
To send contact entry manually:
1. Press [MENU] in the standby mode.
15
2. Browse with [] to [SEND CONACT].
3. Press [OPP] to activate OPP mode.
4. Access your phonebook on your phone now and go to the required contact
entry.
5. Choose Option on your phone screen and select Send via Bluetooth (or
similar term) and select MB-4 as the device to transfer the contact to.
6. Repeat the Step 4 and 5 for other entries if necessary.
7. Once you have finished, press [OK] to stop OPP mode. MB-4 will temporary
disconnect with your Comand console for a few seconds in order to allow the
contacts to be transferred. Once the transfer is activated the disconnection
message such as “Please insert telephone”, “Phone off” or similar messages will
disappear from your Comand display.
Note:
It may take a while before the transfer is completed please wait until the contact entries emerge on
the screen.
The Send Contact function may vary on different mobile handset please consult the phone manual
or the phone manufacturer for further information.
Some phones support sending multiple contacts in one go under OPP mode (such as Mark All
function on Nokia handsets). However, some phones are unable to deal with too many contacts at
once. It is recommended that you consult the original phone manual or manufacturer to confirm the
quantity of contacts that can be sent in one go.
4.3 Phonebook Organization for NTG 4 Vehicles
Phonebook management on the NTG 4 vehicles (i.e. W204, W212 and W207, etc.)
works in a different way to the other Mercedes Benz cars. With NTG 1 and NTG 2
systems contact entries will be automatically uploaded into your Comand console
after the phonebook sync is completed. However, for the NTG 4 head units as you
are required to import the phone entries using the Import External Data command
on NTG 4 screen.
16
To upload phonebook entries from MB-4 to NTG 4:
1. After connecting MB-4 with your mobile phone wait for “Activating
Telephone…” message to disappear from your Comand screen.
2. Press Telephone command on the Comand console.
3. Select Import External Data command on the Comand console. Comand
console will now begin the phonebook transfer. Once completed the entries will
emerge in the phonebook on the Comand screen.
This works the same for uploading the phonebook under the OPP mode. If you
transfer the phonebook entries to MB-4 under the OPP mode you will also be
required to select Telephone then, follow by Import External Data command on
the NTG 4 system screen after you have completed the manual phonebook upload
under OPP mode.
Notes on NTG 4’s phonebook management:
NTG 4 system stores all the phonebook entries in one place regardless of transfer methods or phone
paired. Once phonebook entries are transferred into NTG 4 system they can be viewed and used
even if the contacts do not belong to the phone that is in connection. This is different to the NTG 1
and NTG 2 systems which only allows the phonebooks belong to the connected phone to be viewed.
NTG 4 vehicles also have a standard Bluetooth built inside and this allows user to transfer
phonebook to the system under its own OPP mode. However, if you use this built-in function NTG 4
does not allow user to delete the entire phonebook in one go whereas phonebook transferred from
MB-4 using the Import command on the NTG 4 regardless it is automatic sync or manual upload
user will be able to delete the entire phonebook in one go.
4.4 Phonebook Setting
The default phonebook sync function is set to ON position so every time when your
phone reconnects with MB-4 it will request phonebook to be uploaded from your
17
phone. If you wish to skip the auto sync of your phonebook every time you re-enter
your car you can turn this function OFF.
To enable/disable automatic phonebook sync:
1. Press [MENU] in the standby mode.
2. Browse with [] to PHONEBOOK and press [SETUP] to enter the phonebook
setting.
4. Press [ON]/[OFF] to enable or disable automatic phonebook sync function.
Tips: You can instantly tell whether automatic sync is on from the << sign in the
standby mode. If you see the << sign on the top left screen in standby mode this
means the automatic sync is now on (i.e. SYNC:ON). If you do not see the <<
sign then the automatic sync function is in the OFF position.
<<
HTC 7 MOZART
Connected
SYNC MENU
P2
4.5 SYNC Now Command and SYNC in Progress Sign
MB-4 is designed to auto sync with your phonebook when ever phone is
re-connected with MB-4. If you have added a new number to your phone and wish
to sync the number immediately you can use the [SYNC] now command to force
MB-4 to request phonebook from your phone. To use activate immediate
phonebook sync:
1. Press [SYNC] in standby mode. MB-4 will start to sync phonebook from the
current connected phone. You will see a > sign indicating the sync of
phonebook is in progress.
Notes:
If you have a NTG4 vehicle you will still need to follow the same procedures described in Section 4.3
Phonebook Organization for NTG 4 Vehicles to complete the phonebook sync after pressing the
[SYNC] now command.
<<
My iPHONE
Connected
SYNC MENU
18
>
P1
5. Advanced Bluetooth Setting
5.1 Disconnect from the Current Connected Device
To disconnect from the current connected device:
1. Press [MENU] in the standby mode.
2. Browse with [] to BLUETOOTH and press the [SETUP] to enter the Bluetooth
setting.
3. Browse with [] to ACTIVE DEVICE and press [SETUP] to enter this setting.
4. Press [YES] to disconnect current device.
Note:
This function will only temporary disconnect the link between MB-4 and your phone. If you wish to remove
the device from the paired list permanently please use DELETE A PAIRED DEVICE function (see
Section 5.3 Remove a Paired Device for further information)
5.2 Reconnect a Paired Device
To reconnect a paired device
1. Press [MENU] in the standby mode.
2. Browse with [] to BLUETOOTH and press the [SETUP] to enter the Bluetooth
setting.
3. Browse with [] to RECONNECT A PAIRED DEVICE and press [SETUP] to
enter this setting.
4. Scroll with [] to select the device you wish to reconnect and press [
]
to
re-establish the connection.
Note:
In case you do not see reconnection after pressing the [
]
to reconnect, please retry Step 4 again.
19
5.3 Remove a Paired Device
To remove a paired device:
1. Press [MENU] in standby mode.
2. Browse with [] to BLUETOOTH and press the [SETUP] to enter the Bluetooth
setting.
3. Browse with [] to DELETE A PAIRED DEVICE and press [SETUP] to enter
this setting.
4. Scroll with [] to select the device you want to remove and press [] to delete.
20
6. Other Advanced Settings
6.1 Microphone Volume Setting
To setup microphone volume:
1. Press [MENU] in the standby mode.
2. Browse with [] to MIC VOLUME and press [SETUP] to enter the microphone
volume setting.
3. Press [+] or [-] to adjust the microphone volume and press [SAVE] to confirm.
Note:
Microphone quality may vary between car models. ViseeO suggests that you set up the microphone level
by calling your friend and family to confirm the sound quality at different microphone level and find the
best one that suits your vehicle.
6.2 Language Setting
To setup language:
1. Press [MENU] in the standby mode.
2. Browse with [] to LANGUAGE and press [SETUP] to enter the language
setting.
3. Browse with [] to select the desired language and press [SAVE] to confirm.
Note:
Currently only English is available. Other languages will be available soon via software update. Please
check the download section on our website at www.viseeo.com for future announcement.
6.3 Factory Default Setting (Master Reset)
If you are unable to get automatic reconnection or are experiencing some problem
with the Bluetooth connection or simply would like to erase all paired settings and
21
the phonebook entries, ViseeO MB-4 allows you to reset it back to the original
factory settings.
To master reset ViseeO MB-4:
1. Press [MENU] in the standby mode.
2. Browse with [] to FACTORY DEFAULT and press [SETUP] to enter the
factory default setting.
3. Press [CONFIRM] to confirm or [Ø]to cancel.
CAUTION!!
If you master reset the MB-4, all phonebook entries and paired settings will be erased.
6.4 Firmware Update and Version Check
To check current firmware and software version:
1. Press [MENU] in the standby mode.
2. Browse with [] to UPGRADE and press [SETUP] to enter the upgrade setting.
3. Scroll with [] to BLUETOOTH VER for checking the current Bluetooth
firmware version number or to SOFTWARE VER for checking the CPU software
version number.
4. Press [
] to return to the upper level menu.
BLUETOOTH VER
HW200-SW322
UPDATE
Regarding Bluetooth Firmware & CPU Software Upgrade
Every season new mobile phones or new mobile operating systems (e.g. iOS,
Android, Symbian, WP7.5, etc.) are released by the phone manufacturers.
Sometimes the new phones or operating software may not be compatible with
MB-4's current software hence, ViseeO offers CPU software (MB-4’s operating
software) and Bluetooth firmware updates to keep your MB-4 up-to-date. Bluetooth
firmware is related to the MB-4 Bluetooth connectivity where as the CPU software
22
is the operating system of MB-4. Both types of updates may be revised from time
to time and available for you to download from www.viseeo.com.
You can always check your firmware and software version number on MB-4
against the latest firmware and software updates on www.viseeo.com to see if you
have the most up-to-date Bluetooth firmware and CPU software. To upgrade your
unit simply download the upgrade platform, the firmware and software updates and
follow the instructions described in the MB-4 Firmware & Software Upgrade
Instruction available from the download section of www.viseeo.com.
Note:
For upgrading MB-4’s Bluetooth firmware you will need a PC computer with Bluetooth hardware as
the update is done wirelessly via a computer.
To upgrade CPU software of the unit you will need to use the
software upgrade cable included in the package (as shown on
the left).
If you have entered Bluetooth update mode by unintentionally,
please power reset of MB-4 either by removing the MB-4 from
UHI and re-insert it or by switching the engine off and on.
MB-4 will return to standby mode after the power reset.
For further information regarding software and firmware
upgrade please refer to the “MB-4 Firmware & Software
Upgrade Instruction” available at our official website at
http://www.viseeo.com.
6.5 PIN Selection
MB-4’s default Bluetooth connection PIN code is 1234 however, some of the latest
Android phones such as Samsung Galaxy Phones may not be able to recognize
this PIN code format and requires the PIN code to be set to 0000. Hence, MB-4
provides a mechanism for you to switch between 1234 or 0000.
To change PIN code:
1. Press [MENU] in the standby mode.
23
2. Browse with [] to PIN SELECTION and press [SETUP] to enter this setting.
3. Press [SEL] to choose either PIN:1234 or PIN:0000.
4. Press [
] to return to the upper level menu.
Note:
If you have a Samsung Galaxy phone such as Galaxy W, R or S2 you must change the PIN code to
0000 before you can use it.
Once you have selected PIN code to 0000 you must also enter 0000 when prompt a pass code
request during pairing.
6.6 Using the Charging Function
Each MB-4 is equipped with a 5V charging port. You can use this port to charge
most devices that their batteries can be charged through the computer USB port.
To charge your device:
1. Connect a mini USB to USB adapter cable (included in the package) to the
mini USB port at the bottom of your MB-4.
2. Connect a device that you wish to charge the battery for to the USB port on the
mini USB to USB adapter cable.
3. Switch the car engine on and it will start charging up the battery.
24
7. Miscellaneous
7.1 Trademark
The Bluetooth logos are registered trademarks owned by Bluetooth SIG, Inc,
and any use of such marks in this document is under license.
All other trademarks are the property of their respective owners, and are solely
used to identify their respective products, and have no indication of any
affiliation or relationship.
7.2 Product Information
Model No.: MB-4
Product Description: ViseeO Bluetooth Upgrade Adaptor
Main Unit:
Dimension: 125mm x 50mm x 27mm (Approx.)
Weight: 83.5 g (Approx.)
Compatible Vehicle: MB with UHI/MHI Interface
Display: 128X64 pixels Monochrome White OLED Display
Bluetooth Module: CK-5050+
Triamp Technology Ltd.
3F No.2 Alley 16 Lane 235 Bao Chiao Road,
Hisn-Tien District, New Taipei City, Taiwan
E-Mail: [email protected]
Website: www.viseeo.com
25
26