1
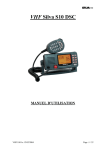
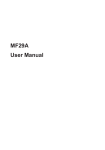
PM-1200 WP
Manuel d'utilisation / Manual del usuario
Owner's manual / Handbuch
Manuel d'utilisation .................................................. 4
Manual del usuario ................................................. 14
Owner's manual ...................................................... 24
Handbuch ................................................................ 34
1.
2.
3.
4.
5.
6.
7.
8.
9.
10.
11.
12.
Introduction ...................................................................................... 4
Afficheur .......................................................................................... 4
Commandes .................................................................................... 5
Fonctionnement ............................................................................... 8
4.1. Réception ................................................................................ 8
4.2. Balayage (double-veille) .......................................................... 9
4.3. Balayage prioritaire (scan) ....................................................... 9
4.4. Effacement des mémoires ....................................................... 9
4.5. Transmission ........................................................................... 9
Canal d’urgence 16 ....................................................................... 10
Utilisation simplex /duplex canal 16............................................... 10
Autres fonctions ............................................................................. 10
7.1. Appeler un autre bateau ........................................................ 10
7.2. Faire des appels téléphoniques ............................................. 10
7.3. Rétro-éclairage ...................................................................... 11
Maintenance .................................................................................. 11
8.1. Entretien batterie ................................................................... 11
Spécifications ................................................................................ 12
Garantie ......................................................................................... 12
Dépannage .................................................................................... 13
Tableau des canaux de la marine internationale VHF .................. 45
1. Introduction
Le PRESIDENT PM-1200 WP est une radio portable marine, étanche et
robuste. Elle fonctionne sur la bande de fréquences de 156.050 à 162.025
MHz et sur tous les canaux couramment alloués à la marine.
Le PRESIDENT PM-1200 WP a un canal d’urgence, le 16, lequel peut être
sélectionné immédiatement en appuyant sur la touche rouge CH16. Le PRESIDENT PM-1200 WP est garanti 2 ans.
2. Afficheur
4
Affichage canaux ou L0~L4 / P0~P7 :Indique le canal en mode d’émission
et réception.
En mode squelch, le niveau de contrôle est indiqué par les valeurs L0~L4.
En mode volume, le niveau de contrôle est indiqué par les valeurs P0~P7.
Indicateur Hi/Lo : « HI » indique une puissance élevée (4 Watt) et « LO »
indique une faible puissance (1 Watt).
MEM : Indique que le canal affiché est stocké en mémoire.
SQ : Indique le niveau de contrôle SQUELCH sélectionné
16 : En mode SCN ou PSC, indique que le canal 16 (canal de sécurité) est
balayé en alternance.
: indique que le clavier est verrouillé
3. Commandes
1. antenne amovible
2. Touche Monitor
3. Commutateur PTT
4. Touche UP
5. Touche DOWN
6. Touche MON
7. Touche SCN
8. Microphone interne
9. Touche S/D
Désactive le Squelch
Touche PTT
Sélection de tous les canaux internationaux
Sélection de tous les canaux internationaux
Désactive le Squelch
Balayage programmable à haute vitesse
Mode sélection squelch, rétro-éclairage
5
10. Touche power on/off
11. Touche H/L
Puissance d’émission HI/LO
12. Prise micro externe/haut-parleur
13. Prise charge externe
14. Touche V/L
Contrôle volume et verrouillage clavier
15. Touche CLR
Effacement
16. Touche R/D
Rappel/Annuler balayage des canaux
17. Touche PSC
Canal prioritaire à balayer 16
18. CH16
Accès instantané Canal 16
19. Voyant RX/TX
20. Afficheur cristaux liquides
TOUCHE POWER ON/OFF (10)
Allume et éteint la radio.
VOYANT ÉMISSION/OCCUPÉ (19)
Indique que le PRESIDENT PM-1200 WP est en émission lorsque le voyant
est rouge. Indique que le canal sélectionné est occupé en réception lorsque
le voyant est vert.
[S/D] SQUELCH ET DIM/TOUCHE DE CONTRÔLE RETRO-ÉCLAIRAGE (9)
Appuyez sur cette touche pour entrer le mode de contrôle squelch.
Lorsque cette touche est enfoncée pendant 2 secondes, elle allume l’afficheur.
En mode contrôle squelch, utilisez la touche UP/DN jusqu’au point où le
bruit de fond disparaît. Ce point est appelé le seuil de squelch.
COMMUTATEUR PUSH-TO-TALK (PTT) (3)
Sert à émettre un message
TOUCHE [UP] (4)
Sélectionne le canal désiré et les niveaux de contrôle squelch ou volume.
Chaque pression sélectionne le numéro ou niveau du canal supérieur suivant. Lorsque vous la maintenez enfoncée, elle fait défiler les canaux rapidement dans le sens croissant.
TOUCHE [DOWN] (5)
Sélectionne le canal désiré et les niveaux de contrôle squelch ou volume.
Chaque pression sélectionne le numéro ou niveau du canal inférieur suivant. Lorsque vous la maintenez enfoncée, elle fait défiler les canaux rapidement dans le sens décroissant.
6
TOUCHE [CH16] (18)
Pour un accès instantané au canal 16 (canal de sécurité)
TOUCHE [MON] (6)
Voir “Commutateur Monitor”
TOUCHE [SCN] (7)
Surveille le canal 16 (canal de sécurité) lors de la réception d’un canal sélectionné.
Fonction connue comme dual watch (double veille) sur certains appareils.
TOUCHE [PSC] (17)
Appuyez sur cette touche pour balayer le canal 16 (canal de sécurité) en
alternance avec chaque canal programmé et sauvegardé en mémoire (voir
touche [R/D] ci-dessous)
TOUCHE [R/D] (16)
Pour sauvegarder des canaux dans la mémoire de la radio. Appuyez une
fois pour sauvegarder un canal et appuyez à nouveau pour effacer un canal
de la mémoire.
TOUCHE [H/L] (11)
Sert à alterner la puissance d’émission entre High (4 Watt) et Low (1 Watt).
TOUCHE [CLR] (15)
Retourne au canal précédent en appuyant sur cette touche après avoir appuyé sur [CH16].
Appuyez et maintenez la touche CLR et UP en allumant et le microprocesseur se remet à zéro et efface tous les canaux programmés de la mémoire.
TOUCHE [V/L] (14)
Appuyez sur cette touche pour entrer le mode contrôle volume.
Dans ce mode, utilisez les touches UP et DN pour sélectionner votre meilleur
niveau de sortie audio (volume)sur une échelle de P0 à P7.
En appuyant pendant 2 secondes, la fonction de verrouillage de clavier est
activée ou désactivée.
COMMUTATEUR MONITOR (2)
Appuyer temporairement sur la touche MONITOR désactive la fonction
SQUELCH ; Ceci augmente la sensibilité de l’appareil permettant d’entendre des signaux distants/faibles.
Le réglage squelch redevient normal lorsque cette touche est relâchée.
7
PRISE MICRO/HAUT-PARLEUR EXTERNE (12)
Cette prise sert à brancher un haut-parleur/micro optionnel ou casque vox.
La prise accepte un haut-parleur externe de 8 ohms ou un casque vox et
désactive le haut-parleur interne.
CONNECTEUR EXTERNE ET CHARGEUR (13)
Permet de brancher une alimentation externe ou chargeur (chargeur mural
standard 220 V ou cordon 12 VDC optionnel)
CONNECTEUR D’ANTENNE (1)
Accepte une antenne flexible.
4. Fonctionnement
4.1. Réception
Installez l’antenne sur la radio.
Appuyez sur POWER « ON/OFF » pour allumer la radio.L’afficheur montre
le dernier canal sur lequel se trouvait la radio.
Remarque : le bloc accus devrait être entièrement chargé avant d’utiliser la radio. Voir page 11 pour les infos sur charge batterie.
Appuyez sur Up ou DN pour sélectionner le canal désiré. Voir le tableau des
canaux, à la fin de ce manuel, pour les canaux disponibles.
Pour verrouiller le canal en mode de fonctionnement afin qu’il ne soit pas
modifié accidentellement, appuyez sur la touche « V/L » pendant 2 secondes. Ceci verrouille la touche UP/DN et toutes les touches sur la face avant
de la radio, à l’exception de Power ON/OFF et S/D (éclairage). Appuyez sur
V/L pendant 2 secondes pour déverrouiller le canal.
Appuyez sur V/L pour entrer le mode de contrôle de volume, l’afficheur indiquera P0~P7 qui indique la position de contrôle volume. Appuyez sur UP ou
DN pour sélectionner un niveau approprié.
Appuyez sur S/D pour entrer le mode contrôle de squelch, l’afficheur indiquera L0~L4 qui indique le niveau de squelch.
Réglez le niveau de squelch au seuil où le bruit de fond disparaît.
Lorsqu’un message est reçu, réglez le niveau de volume au niveau d’écoute
désiré comme ci-dessus. Le voyant vert TX/RX s’allume en vert pour indiquer qu’un signal est reçu.
8
4.2. Balayage (double-veille)
Sélectionnez le canal désiré en utilisant la touche UP ou DN.
Appuyez sur la touche SCN pour commencer la double-veille entre le canal
désiré et le canal 16.
4.3. Balayage prioritaire (scan)
Le balayage prioritaire se fera entre les canaux stockés en mémoire et le
canal 16. Le canal 16 est le canal prioritaire et il sera balayé après chaque
canal stocké en mémoire.
Sélectionnez un canal désiré à balayer en utilisant UP ou DN. Appuyez sur
R/D pour sauvegarder le canal dans la mémoire de la radio. MEM apparaîtra
sur l’afficheur.
Répétez la première étape pour tous les canaux désirés à être balayés.
Pour effacer un canal de la mémoire de la radio, appuyez sur R/D lorsque le
canal mémorisé s’affiche. « MEM » disparaît de l’afficheur.
Les canaux stockés en mémoire restent même si la radio est éteinte. Voir
paragraphe ci-dessous « Effacement des mémoires »
Pour commencer le balayage prioritaire, appuyez sur la touche « PSC ».Le
balayage se fera du numéro de canal le plus bas vers le numéro de canal le
plus élevé en mémoire et s’arrêtera lorsqu’un signal sera reçu.
Pour arrêter le balayage, appuyez à nouveau sur la touche « PSC ».
4.4. Effacement des mémoires
Pour effacer tous les canaux stockés en mémoire pour le balayage :
Appuyez et maintenez les touches CLR et UP et allumez en même temps.
4.5. Transmission
Avant d’émettre, assurez-vous que le canal n’est pas utilisé.
Sélectionnez la puissance désirée en appuyant sur la touche H/L. L’afficheur
indiquera HI pour une puissance élevée ou LO pour une faible puissance.
Appuyez sur « PTT » (Push-to-talk). L’indicateur TX (voyant rouge) s’allume
en émission. Parlez lentement et clairement devant la radio.
Lorsque vous recevez un appel, attendez jusqu’à ce que l’appel se termine
avant d’émettre. La radio ne peut pas émettre et recevoir simultanément.
Relâchez toujours immédiatement la touche PTT pour terminer l’émission.
9
5. Canal d’urgence 16
Pour sélectionner le canal d’urgence, appuyez sur la touche CH16.
Transmettez votre appel d’urgence
Pour revenir au canal précédent du canal 16, appuyez sur la touche « CLR ».
6. Utilisation simplex/duplex canal 16
Simplex est utilisé pour des communications de bateau à bateau. Les fréquences d’émission et réception sont les mêmes.
Duplex est une correspondance publique, canal du bateau vers la côte, utilisé principalement par les Opérateurs de Téléphone Marine. Un canal duplex ne peut pas être utilisé pour des communications de bateau à bateau
parce que les fréquences d’émission et de réception ne sont pas les mêmes.
REMARQUE : Tous les canaux sont préréglés d’usine en accord avec
les réglementations internationales et le mode d’utilisation ne peut pas
être modifié du simplex au duplex ou vice versa.
7. Autres fonctions.
7.1. Appeler un autre bateau
Assurez-vous que la radio est allumée.
Appuyez sur la touche CH 16 pour aller au canal 16. Ouvrez le squelch
(monitor) le canal pour être sur que le canal n’est pas occupé
Lorsque le canal n’est pas occupé, appuyez et maintenez la touche PTT et
appelez le bateau avec lequel vous voulez communiquer. Enoncez clairement le nom du bateau, ensuite identifiez-vous.
Dès que vous avez établi le contact, arrangez-vous pour passer sur un autre
canal de bateau à bateau (voir le tableau des canaux maritimes dans le
manuel pour les canaux disponibles) pour continuer votre conversation. Appuyez sur les touches UP of DN pour aller vers le canal convenu.
7.2. Faire des appels téléphoniques
Pour faire un appel radio téléphonique, utilisez un canal approprié. Appuyez
et maintenez le commutateur PTT et appelez l’opérateur marine, ensuite
identifiez-vous. Vous atteindrez l’opérateur de marine qui commutera alors
votre émission radio sur les lignes téléphoniques.
10
7.3. Rétro-éclairage
Appuyez et maintenez la touche [SD] pendant deux secondes pour activer le
rétro-éclairage.
8. Maintenance
La qualité des composants utilisés dans cette radio permet une utilisation
continue sur plusieurs années. Cependant, prenez les précautions suivantes pour éviter d’endommager la radio.
Couvrez la prise micro à tout moment avec le capuchon étanche pour éviter
l’oxydation des contacts électriques.
Ne manipulez pas l’émetteur sauf si une antenne ou une charge adaptée est
branché sur la prise antenne
Utilisez seulement des blocs accus, accessoires et pièces de remplacement
agréés.
Ne déchargez pas complètement la batterie fréquemment , ce qui pourrait
l’endommager.
Ne branchez pas l’appareil via la prise (charge) sur une sortie AC ou une
alimentation supérieure à 13 V DC. Ne démontez pas la radio.
Pour charger par la prise de charge externe (13), utilisez uniquement le
chargeur fourni avec l’appareil. D’autres chargeurs pourraient l’endommager.
Evitez l’utilisation d’agents chimiques comme l’essence ou l’alcool, pour le
nettoyage car ils peuvent endommager la surface de l’appareil.
8.1. Entretien batterie
Dans des conditions normales, la batterie peut être rechargée jusqu’à 300
fois. Pour vous assurer d’avoir la durée de vie maximale de la batterie de
cette radio, il est important de suivre les instructions ci-dessous :
Evitez la surcharge. La durée de charge de batteries vides ne doit pas dépasser 12 heures.
La durée de charge normale devrait être de 8 -10 heures.
En utilisant l’appareil régulièrement, il est conseillé de décharger la batterie
complètement toutes les 6 à 8 semaines et ensuite de la recharger complètement avant de l’utiliser à nouveau.
11
9. Spécifications
Gamme de fréquences
Canaux
Puissance de sortie
Tension d’utilisation
Economie de batterie
Stand-by
Réception
Emission
Dimensions (mm)
Poids
156.050 à 162.025 MHz
tous les canaux internationaux courants alloués
4 W (puissance élevée)
1 W (faible puissance)
batterie DC 9.6 V ou alimentation externe 13 V DC
0.06 A
0.18 A
1.2 A (puissance élevée)
0.6 A (faible puissance)
143 (H) x 65 (L) x 40 (P)
320 g
10. Garantie
Ce poste est garanti 2 ANS pièces et main d’oeuvre dans son pays d’achat
contre tout vice de fabrication reconnu par notre service technique. Il est
recommandé de lire attentivement les conditions ci-après et de les respecter
sous peine d’en perdre le bénéfice.
• Pour être valable, la garantie doit nous être retournée au plus tard 1 mois
après l’ achat.
• Toute intervention effectuée dans le cadre de la garantie sera gratuite et
les frais de réexpédition pris en charge par notre Société.
• Une preuve d’achat doit être jointe obligatoirement avec le poste à réparer.
• Ne pas procéder à l’installation de votre appareil sans avoir lu ce manuel
d’instructions.
• Aucune pièce détachée ne sera envoyée ni échangée par nos services au
titre de la garantie.
Ne sont pas couverts :
• Le bloc accumulateur.
• Les dommages causés par accident , choc, emballage insuffisant ou utilisation d’accessoires non conformes
• La garantie ne peut être prorogée par une immobilisation de l’appareil
dans nos ateliers, ni par un changement d’un ou plusieurs composants ou
pièces détachées.
• Les interventions ayant modifié les caractéristiques de conformité, les réparations ou modifications effectuées par des tiers non agréés par notre Société.
• Toute ouverture du boîtier annule la garantie.
12
11. Dépannage
Symptôme
Cause
Solution
La touche [PSC] ne fait Pas de canal sauve- Utilisez la touche [R/D]
gardé dans la mémoire pour stocker les canaux
pas le scan
désirés dans la mémoire
de la radio
de la radio
Sortie de bruit continu
Le squelch n’est pas ré- Réglez le squelch jusqu’à
ce que le bruit dispaglé
raisse.
Impossible de changer Le verrouillage clavier Eteignez le verrouillage
(OFF).
est activé (ON)
de canaux
Un autre bateau peut
vous contacter mais
vous ne pouvez pas répondre
Fonctionnement sur un Utilisez un canal simplex
canal duplex. Les ca- pour communiquer de
naux duplex sont utilisés bateau à bateau.
pour contacter des opérateurs de marine. Les
fréquences d’émission
et de réception sont différentes et ne permettent pas des communications de bateau à bateau.
Le LED n’affiche pas La batterie doit être dé- Rechargez la batterie et
faites un reset Mémoire :
correctement (caractè- chargée.
appuyez et maintenez
res aléaotires)
UP et CLR, en allumant
l’appareil
13
1.
2.
3.
4.
5.
6.
7.
8.
9.
10.
11.
12.
Introducción ................................................................................... 14
Display ........................................................................................... 14
Funciones ...................................................................................... 15
Operación ...................................................................................... 18
4.1 Recepción .............................................................................. 18
4.2 Barrido (doble-escucha) ........................................................ 18
4.3 Barrido prioritario (scan) ........................................................ 19
4.4 Borrado de memorias ............................................................ 19
4.5 Transmisión ........................................................................... 19
Canal de urgencias 16 .................................................................. 20
Utilización simplex/duplex canal 16 ............................................... 20
Otras funciones ............................................................................. 20
7.1 Llamar a otro barco ............................................................... 20
7.2 Realizar llamadas telefónicas ................................................ 20
7.3 Retro-alumbrado .................................................................... 21
Mantenimiento ............................................................................... 21
8.1 Mantenimiento de la batería .................................................. 21
Especificaciones ............................................................................ 22
Garantía........................................................................................ 22
Reparación .................................................................................... 23
Cuadro de los canales de marina internacional VHF .................... 45
1. Introducción
El PRESIDENT PM-1200 WP es una emisora marina portátil, estanca y robusta. Funciona en la banda de frecuencias de 156.050 a 162.025 MHz y en
todos los canales usualmente reservados a la marina.
El PRESIDENT PM-1200 WP tiene un canal de urgencia, el 16, que puede
seleccionarse de forma inmediata pulsando la tecla roja CH16. El
PRESIDENT PM-1200 WP posee una garantía de 2 años.
Este equipo requiere licencia administrativa.
2. Display
14
Canales o LO-L4/PO-P7 : Indica el canal en modo de emisión y recepción.
En modalidad squelch, los valores LO-L4 indican el nivel de control.
En modalidad volumen, los valores PO-P7 indican el nivel de control.
Indicador HI/LO : “HI” indica una potencia elevada (4 Watt) y “LO” indica
una potencia débil (1 Watt).
MEM : Indica que el canal que aparece en el display se ha almacenado en
memoria.
SQ : Indica el nivel de control SQUELCH seleccionado.
16 : En la modalidad SCN o PSC, indica que el canal 16 (canal de seguridad) es escaneado alternativamente.
: indica que el teclado está bloqueado.
3. Funciones
1. Antena integrada removible
2. Tecla Monitor
desactiva el squelch
3. Conmutador PTT tecla PTT
4. Teclas UP
Selección de todos los canales internacionales
5. Teclas DOWN
Selección de todos los canales internacionales
6. Tecla MON
desactiva el squelch
7. Tecla SCN
Barrido programable a alta velocidad
8. Micrófono interior
9. Tecla S/D
Modo selección squelch, retro-encendido
15
10. Tecla Power ON/OFF
11. Tecla H/L
Potencia de emisión Alta /Baja
12. Toma micro externo /altavoz
13. Toma de carga externa
14. Tecla V/L
Control de volumen y bloqueo del teclado
15. Tecla CLR
Borrado
16. Tecla R/D
Reiniciar/anular barrido de los canales
17. Tecla PSC
Canal prioritario para barrido 16
18. CH16
acceso instantáneo al canal 16
19. Display RX/TX
20. Display de cristales líquidos
TECLA POWER ON/OFF (10)
Enciende y apaga la radio
VISOR DE EMISION/OCUPADO (19)
Indica que el PRESIDENT PM-1200 WP está emitiendo cuando el visor se
ilumina de color rojo. Indica que el canal seleccionado está ocupado en
recepción cuando el visor se ilumina de color verde.
[S/D] SQUELCH Y DIM TECLA DE CONTROL RETRO-ILUMINACIÓN (9)
Pulsar esta tecla para entrar en modo de control de squelch.
Cuando esta tecla se mantiene pulsada durante dos segundos, se ilumina el
display.
En modo control de squelch, utilice la tecla UP/DOWN hasta que desaparezca el ruido de fondo. Este punto se denomina el umbral de squelch
CONMUTADOR PUSH-TO-TALK [PTT] (3)
Sirve para emitir un mensaje
TECLA [UP] (4)
Selecciona el canal deseado y los niveles de control de squelch o volumen.
Con cada presión de la tecla se selecciona el número o nivel del canal superior siguiente. Si se mantienen pulsados los canales desfilan rápidamente
en sentido creciente.
TECLA [DOWN] (5)
Selecciona el canal deseado y los niveles de control de squelch o de volumen. Cada presión selecciona el número o nivel del canal inferior siguiente.
Cuando se mantiene pulsada los canales desfilan en sentido decreciente.
TECLA [CH 16] (18)
Accede de forma inmediata al canal 16. (canal de seguridad)
16
TECLA [MON] (6)
Ver tecla “Conmutador Monitor”
TECLA [SCN] (7)
Vigila el canal 16 (canal de seguridad) durante la recepción de una canal
seleccionado. Esta función se denomina DUAL WATCH (doble escucha ) en
ciertos equipos.
TECLA [PSC] (17)
Presione esta tecla para barrer el canal 16 (canal de seguridad) alternando
con cada canal programado y guardado en memoria (ver tecla (R/D) a continuación).
TECLA [R/D] (16)
Para guardar los canales en la memoria de la emisora Pulse una vez para
guardar un canal y presione de nuevo para borrar un canal de la memoria.
TECLA [H/L] (11)
Sirve para alternar la potencia de la emisión entre HIGH (4Watt) y LOW
(1Watt).
TECLA [CLR] (15)
Regresa al canal precedente presionando sobre una tecla previa presión
sobre (CH16). Presione y mantenga pulsada la tecla CLR y UP poniendo en
funcionamiento y el microprocesador se coloca nuevamente a cero y borra
de la memoria todos los canales programados.
TECLA [V/L] (14)
Presione este tecla para entrar en modo de control de volumen.
En este modo, utilice las teclas UP y DOWN para seleccionar su mejor nivel
de salida de audio (volumen) en una escala de P0 a P7.
Presionando esta tecla durante dos segundos, la función de cierre del teclado se activa o desactiva.
CONMUTADOR MONITOR (2)
Presionar momentáneamente la tecla MONITOR desactiva la función la función SQUELCH. Esto aumenta la sensibilidad del equipo y permite oír las
señales distantes/débiles. La regulación vuelve a ser normal cuando se deja
de presionar esta tecla.
TOMA MICRO/EXTERNO (12)
Esta toma permite conectar un altavoz/micro opcional o casco vox. Esta
toma acepta un altavoz externo de 8 ohmios o un casco vox y desactiva el
altavoz interno.
17
CONECTOR EXTERNO Y CARGADOR (13)
Permite conectar una alimentación externa o cargador (cargador mural
estándar 220 V o cable 12 V DC opcional).
CONECTOR DE ANTENA (1)
Acepta una antena flexible.
4. Operación
4.1
Recepción
Instale la antena sobre la emisora
Pulse POWER “ON/OFF” para poner la emisora en funcionamiento. El display muestra el
último canal en el que se encontraba la emisora.
Observación: El bloque de acumuladores debe estar completamente
cargado antes de utilizar la emisora. Ver pág. 21 para información sobre la carga de batería.
Pulsar UP o DOWN para seleccionar el canal deseado. Ver el cuadro de los
canales al final de este manual para los canales disponibles.
Para bloquear el canal en modo de funcionamiento afín que no se modifique
accidentalmente, pulsar la tecla “V/L” durante 2 segundos. Esto asegura la
tecla UP/DOWN y todas la teclas del frontal de la emisora, exceptuando el
POWER ON/OFF y S/D (alumbrado). Pulse sobre V/L durante 2 segundos
para desbloquear el canal.
Pulse V/L para entrar el modo de control de volumen, el display indicará POP7 que muestra la posición de control de volumen. Pulse UP o DOWN para
seleccionar un nivel apropiado.
Pulse S/D para entrar el modo de control de squelch, el display indicará LOL4 que muestra el nivel de squelch.
Regule el nivel de squelch en el nivel en que desaparece en ruido de fondo.
Cuando se recibe un mensaje, regule la potencia de volumen según el nivel
de escucha deseado como antes. El visor verde TX/RX se enciende en
verde para indicar que se ha recibido la señal.
4.2
Barrido (doble-escucha)
Seleccione el canal deseado utilizando la tecla UP o DOWN.
18
Pulse la tecla SCN para comenzar la doble escucha entre el canal deseado
y el canal 16
4.3
Barrido prioritario (scan)
El barrido prioritario se realiza entre los canales guardados en memoria y el
canal 16. El canal 16 es el canal prioritario y será barrido después de cada
canal guardado en memoria.
Seleccione un canal que desee barrer utilizando UP o DOWN. Pulse R/D
para salvaguardar el canal en la memoria de la emisora. MEM aparecerá en
el display.
Repita la primera etapa para todos los canales que desee barrer.
Para borrar un canal de la memoria de la radio, pulse R/D cuando el canal
memorizado aparece “MEM” se borra del display.
Los canales guardados en memoria permanecen aunque la radio esté apagada. Ver el párrafo a continuación “vaciar la memoria de la radio”.
Para iniciar el barrido prioritario, pulse ta tecla “PSC”. El barrido se realiza
desde el número de canal bajo hasta el número más elevado en memoria y
se detendrá cuando se reciba una señal.
4.4
Borrado de memorias
Para borrar todos los canales almacenados en memoria:
Pulsar y mantener pulsadas las teclas CLR y UP y encender al mismo tiempo.
4.5
Transmisión
Antes de emitir, asegúrese que el canal no está siendo utilizado.
Seleccione la potencia deseada pulsando la tecla H/L. El display indicará HI
para una potencia elevada o LO para una potencia débil.
Presione “PTT” (PUSH-TO-TALK). El indicador TX (visor rojo) se ilumina en
emisión. Hable frente a la emisora, de forma pausada y vocalizando las
palabras con claridad.
Cuando reciba una llamada, no interrumpa y espere hasta que esta llamada
termine. Recuerde que la emisora no le es posible emitir y recibir simultáneamente.
Suelte la tecla “PTT” inmediatamente al finalizar su emisión.
19
5. Canal de urgencias 16
Para seleccionar el canal de urgencia, pulsar la tecla CH16
Transmitir su llamada de emergencia
Para regresar al canal precedente al canal 16, pulsar la tecla “CLR”
6. Utilización simplex/duplex canal 16
El modo simplex se utiliza para las comunicaciones entre barcos. Las frecuencias de emisión y de recepción son las mismas.
Duplex es una correspondencia pública, canal del barco hacia la costa, que
se utilizan principalmente los Operadores de Teléfono Marino. Un canal duplex
no puede utilizarse para comunicaciones entre barcos porque las frecuencias de emisión y recepción no son las mismas.
Observación: Todos los canales vienen preestablecidos de fábrica de
acuerdo las reglamentaciones internacionales y el modo de utilización
no puede modificarse de simplex a duplex o viceversa.
7. Otras funciones
7.1
Llamada a otro barco
Asegúrese que la radio está encendida.
Presione la tecla CH16 para conectar con el canal 16. Abra el squelch (monitor) para cerciorarse que el canal no esté ya abierto.
Cuando el canal no está ocupado, presione y mantenga presionada la tecla
PTT y llame al barco con el que quiera comunicar. Anuncie con claridad el
nombre del barco y seguidamente identifíquese.
En cuanto haya establecido contacto, pase a otro canal de barco a barco (
véase en el manual el cuadro de canales disponibles) para continuar la conversación. Pulse las teclas UP y DOWN para conectar con el canal convenido.
7.2
Realizar llamadas telefónicas
Para realizar una llamada telefónica, utilice un canal apropiado. Pulse y
mantenga pulsado el conmutador PTT y llame al operador marino, seguidamente identifíquese. Vd. contactará con el operador marino que conmutará
entonces su emisión de radio hacia la línea telefónica.
20
7.3
Retro-alumbrado
Presione y mantenga presionada la tecla SD durante dos segundos para
activar el retro-alumbrado.
8. Mantenimiento
La calidad de los componentes utilizados en esta emisora permite una utilización contínua de la misma durante años. Sin embargo, a fin de evitar
dañar el equipo tome las siguientes precauciones.
Mantenga cubierta la toma del micro con el capuchón estanco para evitar
que se oxiden los contactos eléctricos.
No manipule la emisora sin conectar la antena o sin conectar en la toma de
antena una carga adaptada.
Utilice únicamente las baterías, accesorios y piezas de recambios
homologados.
Evite que la batería se descargue totalmente a menudo, esto podría estropearla.
No conecte el equipo por la toma sobre una salida AC o con una alimentación superior a 12 V DC. No desmonte la emisora.
Para cargar por la toma externa, utilice unicamente el cargador suministrado con el equipo. Pues otros cargadores podrían dañarlo.
Evite utilizar agentes químicos como la gasolina o el alcohol para la limpieza
del equipo pues pueden dañarlo.
8.1
Mantenimiento de la batería
En condiciones normales la batería puede recargarse hasta 300 veces. Para
asegurarse de lograr una duración máxima de dicha radio, se recomienda
seguir las siguientes instrucciones.
Evite la sobrecarga. La duración de carga de la baterias vacias no debe
sobrepasar 12 horas.
La duración de la carga normal deberia oscilar entre 8 y 10 horas.
Utilizando el equipo regularmente, se aconseja descargar la batería completamente cada 6 u 8 semanas, recargarla completamente antes de utilizarse de nuevo.
21
9. Especificaciones
Gama de frecuencias
Canales
Potencia de salida
Tensión de utilización
Economía de Batería
Stand-by
Recepción
Emisión
Dimensiones (mm)
Peso
156.050 a 162.025 MHz
todos los canales internacionales aprobados
4 W (potencia elevada)
1 W (potencia débil)
Batería DC 9.6 V o alimentación externa 13 V DC
0,06 A
0,18 A
1,2 A (potencia elevada)
0,6 (potencia débil)
143 (H) x 65 (L) x 40 (P)
320 gr.
10. Garantía
Esta emisora tiene una garantía de 2 años en el país de compra por componentes y mano de obra contra cualquier defecto de fabricación reconocido
por nuestro servicio técnico. Se recomienda leer atentamente las condiciones siguientes y observarlas bajo riesgo de invalidar la garantía.
• Para ser válida, la garantía nos debe ser remitida hasta un mes después
de la compra, a lo sumo.
• Toda intervención efectuada y cubierta por la garantía será gratuita y los
gastos de devolución al titular serán por cuenta de nuestra sociedad.
• Una copia de la factura de compra debe adjuntarse obligatoriamente con
la emisora a ser reparada.
• Antes de instalar el equipo es imprescindible leer este manual de instrucciones,
• A título de garantía no remitiremos ni cambiaremos componente ni pieza
alguna.
No están cubiertos por la garantía:
• El boque acumulador.
• Los daños causados por accidente, golpe, embalaje insuficiente o la utilización de accesorios no conformes.
• Las intervenciones que hayan modificado las características de conformidad, las reparaciones o modificaciones efectuadas por terceros no aprobados por nuestra sociedad.
• La apertura del cajetín del equipo anula la garantía.
22
13. Reparación
Síntoma
Causa
Solución
La tecla PSC no esca- No hay canal salvaguar- Utilice la tecla R/D para
dado en memoria de la almacenar los canales
nea
deseados en la memoria
emisora
de la radio
Salida de ruido continuo El squelch no está gra- Regular el squelch hasta que el ruido desapaduado
rezca
Imposibilidad cambiar El cierre del teclado está Cierre el seguro (OFF)
activado ON
de canal
Un barco puede contac- Funcionamiento en un Utilice un canal simplex
tarle pero Vd. no puede canal duplex. Los cana- para comunicar de barco
les duplex se utilizan a barco.
contestarle
para contactar los operadores de marina. Las
frecuencias de emisión
y de recepción son diferentes y no permiten las
comunicaciones entre
barcos.
El display no aparece La bateria deve estar Recargue la batería y
haga un reset Memoria:
correctamente(caracteres descargada
pulse y mantenga pulsaaleatórios)
do UP y CLR encendiendo el equipo.
23
1.
2.
3.
4.
5.
6.
7.
8.
9.
10.
11.
12.
Introduction .................................................................................... 24
Display ........................................................................................... 24
Controls ......................................................................................... 25
Operation ....................................................................................... 28
4.1. Receiving ............................................................................... 28
4.2. Scanning ................................................................................ 28
4.3. Priority Scanning ................................................................... 29
4.4. Clearing The Radios Memory ................................................ 29
4.5. Transmitting ........................................................................... 29
Emergency Channel 16 ................................................................. 30
Simplex / Duplex Channel Use ...................................................... 30
Other Functions ............................................................................. 30
7.1. Calling Another Boat .............................................................. 30
7.2. Making Telephone Calls ........................................................ 30
7.3. Backlighting ........................................................................... 31
Maintenance .................................................................................. 31
8.1. Battery Care .......................................................................... 31
Specifications ................................................................................ 32
Warranty ........................................................................................ 32
Troubleshooting ............................................................................. 33
International VHF Marine Channel Chart ...................................... 45
1. Introduction
The PRESIDENT PM-1200 WP is a waterproof, rugged marine handheld
VHF radio. The PRESIDENT PM-1200 WP marine radio operates in the
156.050 to 162.025 MHz frequency range. The PM-1200 WP operates on all
currently allocated marine channels. The PM-1200 WP has an emergency
channel 16 which can be immediately selected by pressing the red CH16
key. The PRESIDENT PM-1200 WP is covered with a full 2 years warranty.
2. Display
24
Channel Display or L0~L4/P0~P7 : Shows the channel in both the transmit
and receive modes.
In Squelch mode, control level indicated by figures L0~L4.
In Volume mode, control level indicated by figures P0~P7.
Hi / Lo Indicator : “HI” indicates high power (4 Watt) and “LO” indicates low
power (1 Watt).
MEM : Indicates that the displayed channel is stored in memory.
SQ : Indicates SQUELCH level control selected.
16 : For SCN or PSC mode, indicates the channel 16 (safety channel) is
scanned alternately
: Key lock – Indicates that keyboard is locked
3. Controls
1. Detachable Antenna
2. Monitor Button
3. Push To Talk Switch
4. Up button
5. Down button
6. MON key
7. SCN Button
8. Internal Microphone
9. S/D Button
Disables Squelch
PTT Button
Selection Of All International Channels
Selection Of All International Channels
Disables Squelch
High Speed Programmable Scan
Squelch Select Mode, Backlight Switch Button
25
10. Power ON/OFF Button
11. H/L Key
HI / LO Transmit Power
12. External Mic / Speaker Jack
13. External Charge Jack
14. V/L Button
Volume Control And Key Lock Button Mode
15. CLR Button
Clear Button
16. R/D Button
Recall / Delete Scan Channel Programming
Button
17. PSC Button
Priority Scan Channel 16
18. CH16
Channel 16 Instant Access
19. Transmit/Busy Light
20. Large LCD Display
POWER ON/OFF BUTTON (10)
Turns the radio on and off.
TRANSMITT/BUSY LED (19)
Indicates that the PM-1200 WP is transmitting when the light is red. Indicates that the selected channel is busy during reception when the light is
green.
[S/D] SQUELCH AND DIM BACKLIGHT CONTROL KEY (9)
Pressing this key enters the SQUELCH CONTROL mode.
When this key is pressed for 2 seconds it turns the LCD backlight on.
In SQUELCH CONTROL mode use UP/DN key to set the point at which
random noise on the channel does not activate the audio circuits but a normal signal does. This point is called the squelch threshold.
PUSH-TO-TALK (PTT) SWITCH (3)
Keys the transmitter allowing you to transmit a message.
[UP] UP KEY (4)
Selects the desired channel, squelch or volume control levels. Each press
selects the next higher channel number or level. When held depressed, selects channels quickly.
[DN] DOWN KEY (5)
Selects the desired channel, squelch or volume control levels. Each press
selects the next lower channel number or level. When held depressed, selects channels quickly.
[CH16] KEY (18)
Used to instantly access channel 16 (The Safety Channel).
26
[MON] KEY (6)
See “Monitor Switch”
[SCN] KEY (7)
Monitors channel 16 (safety channel) while receiving a selected channel.
Feature known as dual watch on some sets.
[PSC] KEY (17)
Press this key to scan channel 16 (safety channel) alternately in between
every programmed scan channel saved in the PM-1200 WP’s memory (see
[R/D] key below).
[R/D] KEY (16)
Used to save channels into the radio’s memory. Press once to save a channel and press again to delete a channel from memory.
[H/L] KEY (11)
Used to alternate transmitted power between High (4 Watt) and Low (1 Watt).
[CLR] KEY (15)
Returns to previous channel when pressed after [CH16] key is pressed.
Pressing and holding the CLR key and the UP key while turning the power
on will cause the microprocessor to reset and erase all the programmed
channels from memory.
[V/L] KEY (14)
Pressing the [V/L] key enters the VOLUME CONTROL mode.
In VOLUME CONTROL mode use the UP and DN keys to select your best
audio output (Volume) level over a scale of P0 to P7.
When pressed for 2 seconds the ‘keypad lock function’ is activated/de-activated.
MONITOR SWITCH (2)
Pressing the MONITOR SWITCH temporarily disables the SQUELCH function. This increases the receiver sensitivity allowing distant/weak signals to
be heard.
SQUELCH settings will return to normal when this control is released.
MICROPHONE / EXTERNAL SPEAKER JACK (12)
This jack is used to connect optional speaker/ microphone or headset.
The jack accepts an 8-ohm external speaker or headphone and disables the
internal speaker.
27
EXT DC IN AND CHARGER (External Power Connector) (13)
Provides connection for external power or charger (either standard 240VAC
wall charger or optional 12VDC operation cord).
ANTENNA CONNECTOR (1)
Accepts flexible antenna.
4. Operation
4.1. Receiving
Install the antenna on the radio
Press the POWER “ON/OFF” Button to turn the Radio on. The display will
show the last channel the transceiver was on before power was turned off.
Note:The battery pack should be fully charged before using the radio.
Refer to page 31 for battery charging information.
Press the “UP” or “DN” key to select the desired channel. Refer to the channel chart at the back of this manual for available channels.
To lock the channel in the operating mode so that it is not accidentally changed,
press the “V/L” KEY for 2 seconds. This locks the “UP”/“DN” key and all the
keys on the front of the radio, with the exception of the Power “ON/OFF
”Button key and S/D (backlight). Press the “V/L” KEY for 2 seconds again to
unlock the channel.
Press “V/L” key to enter the Volume control mode, the display will show
P0~P7 which indicates the volume control position. Press “UP” or “DN” key
to select an appropriate level.
Press “S/D” KEY to enter SQUELCH CONTROL mode, the display will show
L0~L4 which indicates the SQUELCH level. Press “DN” key to select a level
at which background noise is heard.
Adjust the SQUELCH level to the threshold point where background noise
disappears.
When a message is received, adjust the volume level to the desired listening
level as above. The “TX/RX” (BUSY) LED will light green to indicate that the
channel is busy.
4.2. Scanning
Select a desired channel to be scanned by using the “UP” or “DN” key.
Press the “SCN” key to start scanning the desired channel and Channel 16.
28
4.3. Priority Scanning
Priority Scanning will switch between the channels stored in memory and
channel 16. Channel 16 is the priority channel and will be scanned after each
channel stored in memory.
Select a desired channel to be scanned by using the “UP” or “DN” KEY.
Press the “R/D” KEY to save the channel into radio’s memory. “MEM” will
appear in the LCD.
Repeat the first step for all the desired channels to be scanned.
To delete a channel from the radio’s memory, press the “R/D” KEY again
while the memorized channel is displayed on the LCD. The “MEM” will disappear from the LCD.
The channels programmed into the radio’s memory will remain even if the
power is turned off. See section below on “Clearing The Radios Memory”.
To start priority scanning press the “PSC” KEY. Scanning will advance from
the lowest to the highest channel number in memory and will stop where a
signal is received.
To stop scanning press again the “PSC” KEY.
4.4. Clearing The Radios Memory
To erase all the channels that are stored in memory for scanning:
Press and hold the “CLR” KEY and the “UP” KEY while simultaneously switching on the power.
4.5. Transmitting
Before transmitting, be sure that the channel is not being used.
Select desired power by pressing the “H/L” KEY. The display will show “HI”
for high power or “LO” for low power.
Press the “PTT” (Push-To-Talk) switch on the radio . The TX indicator (red
LED) will light while transmitting. Speak slowly and clearly into the unit.
When receiving a call, wait until the call is finished before transmitting. The
radio cannot transmit and receive simultaneously.
Always release the “PTT” KEY immediately upon completion of transmission.
29
5. Emergency Channel 16
To select the emergency channel, press the “CH16” KEY
Transmit your emergency call
To revert to previous channel from channel 16, press the “CLR” KEY.
6. Simplex/Duplex Channel Use
Simplex is used for ship-to-ship communications. The transmit and receive
frequencies are the same.
Duplex is a public correspondence, ship-to-shore channel which is mainly
used by Marine Telephone Operators. A duplex channel cannot be used for
ship-to-ship communications because the transmit and receive frequencies
are not the same.
NOTE : All channels are factory pre-programmed in accordance with
International regulations, and mode of operation cannot be altered from
simplex to duplex or vice versa.
7. Other Functions
7.1. Calling Another Boat
Make sure the radio is on.
Press the “CH16” KEY to go to channel 16. Monitor the channel to make
sure that it is clear.
When the channel is not busy, press and hold the “PTT” switch and call the
boat you want to communicate with. State the name of the boat clearly, then
identify yourself. End the message with “OVER”.
Once you have established contact, arrange to meet on another ship-to-ship
channel (refer to the Marine Channel Charts on the back of the manual for
available channels) to continue your conversation. Press the “UP” or “DN”
KEYS to go to the agreed channel.
7.2. Making Telephone Calls
To make a radiotelephone call use a channel designated for this purpose.
Press and hold the “PTT” switch and call the marine operator then identify
yourself. You will reach the marine operator who will then connect your radio
transmission to the telephone lines.
30
7.3. Backlighting
Press and hold [SD] key for two seconds to activate backlighting on PM1200 WP.
8. Maintenance
The quality of the solid-state components used in this radio will provide many
years of continuous use. However please take the following precautions to
prevent damage to the radio.
Keep the microphone jack covered at all times with the rainproof cap to
prevent corrosion of electrical contacts.
Never key the transmitter unless an antenna or suitable dummy load is connected to the antenna receptacle.
Use only approved battery packs, accessories and replacement parts.
Do not fully discharge the battery frequently or battery damage may result.
Do not connect the transceiver via the (CHARGE) jack to an AC outlet or to
a power source of more than 13 V DC. These connections will ruin the transceiver.
When charging from AC outlet, use only the charger provided do not
use any other charging device as it may damage your radio.
Avoid the use of chemical agents, such as benzine or alcohol, when cleaning
as they can damage the transceiver surface.
8.1. Battery Care.
The battery, under normal conditions, can be recharged up to 300 times. In
order to ensure you get the maximum battery life from this unit, it is important
to follow the instructions below:
Avoid overcharging. Charging times of empty batteries shouldn’t exceed 12
hours.
Normal charging time should be 8-10 hours.
When using the unit regularly, it is advisable to completely discharge the
battery every 6 - 8 weeks then fully recharge it before using it again.
31
9. Specifications
Frequency Range
Channels
RF Power Output
Operating Voltage
Current Drain
Standby
Receive
Transmit
Dimensions (mm)
Weight
156.050 to 162.025 MHz
All currently allocated International channels
4W (high power)
1W (low power)
9.6V DC battery or 13V DC external power.
0.06A
0.18A
1.2A (high power)
0.6A (low power)
143(H) x 65(W) x 40(D)
320g
10. Warranty
This transceiver has a 2 YEARS warranty for materials and workmanship in
its country of purchase against any manufacturing defect recognized by our
technical department. It is recommended to read carefully following conditions and to respect them in order not to loose it.
• In order to be valid, the warranty must be sent back to us at the latest 1
month after the purchase.
• Any repair under warranty will be free of charge and the transport costs for
sending back will be on charge of our company.
• A proof of purchase must compulsorily be added to the transceiver in need
of repair.
• Don’t install your transceiver without having read this instructions manual.
• Our technical department won’t send nor exchange any spare parts as
part of warranty.
Are not covered
• The battery pack.
• Damages caused by accident , shock , inadequate packing or the use of
accessories that are not in conformity.
• The warranty cannot be extended by an immobilization of the transceiver
in our offices, neither by a change of one or more components or spare
parts.
• Interventions that modified the conformity features, repairs or modifications done by third parties which are not agreed by our company.
• Any opening of the housing cancels the warranty.
32
11. Troubleshooting.
Symptom
Cause
Solution
The [PSC] key does not No channel SAVED into Use the [R/D] key to
memorize desired chanthe radio’s memory
make the radio scan
nels into the radio’s
memory
Constant noise output
Squelch is not adjusted Adjust the squelch to
threshold or to the point
where noise just disappears.
Cannot change chan- KeyLock [V/L] is ON
nels
Turn KeyLock [V/L] off
Other vessel can contact Operating on a duplex Use a simplex channel
you but you cannot com- channel. Duplex chan- when communicating
nels are used to contract ship-to-ship
municate back
marine operators. The
transmit and receive frequencies are different
and will not allow shipto-ship communications.
LCD not displaying cor- Battery allowed to go Reset Memory-Press
and hold UP and CLR
rectly (random Charac- completely flat.
key, while turning the
ters).
power on.
33
1.
2.
3.
4.
5.
6.
7.
8.
9.
10.
11.
12.
Einführung ..................................................................................... 34
Die Anzeige ................................................................................... 34
Bedienelemente............................................................................. 35
Betrieb ........................................................................................... 38
4.1. Empfang ................................................................................ 38
4.2. Suchlauf ................................................................................. 39
4.3. Vorzugskanal-Überwachung.................................................. 39
4.4. Löschen der Speicherinhalte ................................................. 39
4.5. Senden .................................................................................. 40
Notruf-Kanal 16 ............................................................................. 40
Simplex- und Duplex-Kanäle ......................................................... 40
Andere Funktionen ........................................................................ 40
7.1. Anrufen eines anderen Schiffes ............................................ 40
7.2. Telefonieren ........................................................................... 41
7.3. Hintergrund-Beleuchtung....................................................... 41
Wartung ......................................................................................... 41
8.1. Akku-Pflege ........................................................................... 42
Spezifikationen .............................................................................. 42
Garantiebestimmungen ................................................................. 42
Fehlersuche ................................................................................... 44
Internationale VHF-Marinefunkkanäle ........................................... 45
1. Einführung
Das PRESIDENT PM-1200 WP ist ein wasserdichtes, robustes VHF-Marine-Handfunkgerät. Es arbeitet im Frequenzbereich zwischen 156,050 und
162,025 MHz. Das PRESIDENT PM-1200 WP kann auf allen dem Seefunkdienst gegenwärtig zugewiesenen Kanälen arbeiten. Der Notrufkanal
16 lässt sich durch Drücken der roten Taste CH16 unmittelbar aktivieren.
Für das PRESIDENT PM-1200 WP wird eine Garantie von 2 Jahren gewährt.
2. Die Anzeige
34
Kanal-Anzeige oder L0 ~ L4 / P0 ~ P7 : Zeigt sowohl beim Senden als auch
Empfangen die Kanal-Nummer an.
Im Squelch-Modus wird die eingestellte Schwelle (L0 ~ L4), bei der die
Rauschsperre öffnet, angezeigt.
Im Lautstärke-Modus zeigt P0 ~ P7 die eingestellte Lautstärke an.
HI/LO-Anzeige : Wird Hi angezeigt, beträgt die Leistung 4W, bei Lo 1W.
MEM : Wird MEM angezeigt, so ist der angezeigte Kanal gespeichert.
SQ : Zeigt an, dass der Squelch-Modus eingestellt ist.
16 : In den Suchlaufmodi zeigt 16 an, dass der Sicherheitskanal überwacht
wird.
: Das Schlüsselsymbol weist auf die Verriegelung des Tastenfeldes hin.
3. Bedienelemente
1. Abnehmbare Antenne
2. Monitor-Taste deaktiviert und aktiviert die Rauschsperre
3. PTT
Taste zur Sende-Empfangsumschaltung
4. UP-Taste
aufsteigende Anwahl aller intern. Kanäle
5. DN-Taste
absteigende Anwahl aller intern. Kanäle
6. MON-Taste
deaktiviert und aktiviert die Rauschsperre
7. SCN-Taste
startet schnellen programmierbaren Suchlauf
8. eingebautes Mikrofon
9. S/D-Taste
wechseln in den Squelch-Mode/Hintergrundbeleuchtung
35
10. ON/OFF-Taste Ein-/Ausschalter
11. H/L-Taste
schaltet zwischen hoher und niedriger Sendeleistung um
12. Buchse für externe Sprechgarnitur
13. externe Akku-Ladebuchse
14. V/L-Taste
wechseln in den Lautstärke-Modus und Tastaturverriegelung
15. CLR-Taste
Lösch-Taste
16. R/D-Taste
liest Einstellungen aus dem Speicher, löscht
Suchlaufeinstellungen
17. PSC-Taste
fügt CH16 als Vorzugskanal in den Suchlauf ein
18. CH16
direkter Zugriff auf Kanal 16
19. Sende-Empfangsanzeige
20. Große LCD-Anzeige
ON/OFF-Taste (10)
Schaltet das Handfunkgerät ein und aus
TRANSMIT/BUSY-LED (19)
Sendet das PRESIDENT PM-1200 WP, so leuchtet die LED rot. Grünes Licht
beim Empfang eines Signals zeigt an, dass der Kanal belegt ist.
S/D-Taste (9)
Kurzes Drücken der Taste schaltet das Gerät in den Squelch-Modus, um die
Ansprechschwelle mit Hilfe der UP/DN-Tasten ändern zu können. Mit der
UP-Taste wird die Schwelle erhöht, mit der DN-Taste erniedrigt. Für optimalen Empfang wird die Ansprechschwelle so eingestellt, dass normales Rauschen die Rauschsperre nicht öffnet, aber ein normales Signal gut zu hören
ist.
Wird die Taste länger als 2 Sekunden betätigt, so schaltet sich die Hintergrundbeleuchtung ein oder aus.
PTT-Taste (3)
Wenn diese Taste gedrückt wird, kann das PRESIDENT PM-1200 WP Ihre
Nachricht senden.
UP-Taste (4)
Wählt den gewünschten Kanal, die Höhe der Ansprechschwelle für Rauschen (Squelch) sowie die Lautstärke. Mit jedem Tastendruck wird der jeweils nächst höhere Wert eingestellt.
Bleibt die Taste gedrückt, so werden die Kanäle schnell angewählt.
DN-Taste (4)
Wählt den gewünschten Kanal, die Höhe der Ansprechschwelle für Rauschen (Squelch) sowie die Lautstärke. Mit jedem Tastendruck wird der je36
weils nächst niedrigere Wert eingestellt.
Bleibt die Taste gedrückt, so werden die Kanäle schnell angewählt.
CH16-Taste (18)
Mit dieser Taste ist der Sicherheitskanal 16 unmittelbar zugänglich.
MON-Taste (6)
s. “Monitor-Taste”
SCN-Taste (7)
Wird diese Taste gedrückt, so wird automatisch der Sicherheitskanal 16 überwacht, während das Gerät auf einem anderen Kanal empfängt (dual-watch
Funktion).
PSC-Taste (17)
Mit dieser Taste kann der Sicherheitskanal 16 in den Suchlauf des
PRESIDENT PM-1200 WP zur Überwachung eingefügt werden (siehe auch
R/D-Taste in der nächsten Zeile.
R/D-Taste (16)
Mit Hilfe dieser Taste können eingestellte Kanäle im Speicher des
PRESIDENT PM-1200 WP abgelegt und gelöscht werden. Einmaliges Drükken speichert den eingestellten Kanal, erneutes Drücken löscht ihn aus dem
Speicher.
H/L-Taste (11)
Mit dieser Taste schaltet man zwischen hoher Sendeleistung (4 W) und niedriger Sendeleistung (1W) um.
CLR-Taste (15)
Drückt man diese Taste bei eingestelltem Kanal 16, so kehrt das Handfunkgerät wieder zu dem zuvor eingestellten Kanal zurück.
Wird diese Taste zusammen mit der UP-Taste gedrückt gehalten und anschließend das Gerät mit der ON/OFF-Taste eingeschaltet, so wird der Mikroprozessor des PRESIDENT PM-1200 WP zurückgesetzt und alle programmierten Speicherinhalte werden gelöscht.
V/L-Taste (14)
Mit dieser Taste wechselt man in den Lautstärke-Modus, in welchem die
Lautstärke des PRESIDENT PM-1200 WP mit den UP- und DN-Tasten eingestellt wird. Die Lautstärken-Regelung erfolgt in 24 Schritten, die als P0 bis
P7 angezeigt werden.
Wird die Taste länger als 2 Sekunden gedrückt, so wird dadurch die Tastatur
für Eingaben gesperrt oder entriegelt.
37
Monitor-Taste (2)
Mit der MON-Taste kann vorübergehend die Rauschsperre ausgeschaltet
werden. Dadurch sind dann auch sehr schwache Signale noch hörbar. Wird
die Taste losgelassen, so empfängt das PRESIDENT PM-1200 WP wieder
mit der eingestellten Rauschsperre.
MICROPHONE / EXTERNAL SPEAKER (12)
An diesem Anschluss kann ein externes Mikrofon, ein 8-Ù-Lautsprecher oder
eine Sprechgarnitur angeschlossen werden. Dabei wird der eingebaute Lautsprecher des PRESIDENT PM-1200 WP abgeschaltet.
EXT DC IN AND CHARGER (13)
An diesem Anschluss kann das PRESIDENT PM-1200 WP extern mit Strom
versorgt (12V =) oder der Akku des Gerätes mit einem normalen Ladegerät
(240V-Steckernetzteil mit 12V=) aufgeladen werden.
ANT (1)
Diese Buchse wird mit der mitgelieferten flexiblen Antenne verbunden.
4. Betrieb
4.1. Empfang
Verbinden Sie die Antenne mit dem Gerät.
Schalten Sie das Gerät mit der Taste ON/OFF ein.Das Anzeigefeld zeigt den
zuletzt eingestellten Kanal an, bevor das PRESIDENT PM-1200 WP ausgeschaltet wurde.
Hinweis : Der Akku sollte voll aufgeladen sein bevor Sie das Handfunkgerät benutzen. Informationen zum Laden des Akkus finden Sie
auf Seite 42.
Drücken Sie die UP- oder DN-Taste zur Einstellung des gewünschten Kanals. In der Tabelle am Ende dieser Anleitung finden Sie Hinweise zu den
verfügbaren Kanälen.
Um unbeabsichtigte Änderungen der Einstellungen zu verhindern, drücken
Sie die Taste V/L zwei Sekunden lang. Dadurch werden alle Tasten der Tastatur, mit Ausnahme von ON/OFF und S/D (Hintergrundbeleuchtung), verriegelt. Erneutes Betätigen der Taste V/L für 2 Sekunden entsperrt das Tastenfeld wieder.
Drücken der Taste V/L gestattet mit den UP- und DN-Tasten die gewünschte
Lautstärke einzustellen. Das Display zeigt den eingestellten Lautstärkepegel
zwischen P0 und P7 an.
38
Betätigen Sie die Taste S/D, um mit den UP- und DN-Tasten die Schwelle
der Rauschsperre einzustellen. Stellen Sie mit der DN-Taste den Wert so
ein, dass das Hintergrundrauschen zu hören ist. Der eingestellte Wert liegt
zwischen L0 und L7 und wird im Display angezeigt.
Stellen Sie mit der UP-Taste den Wert jetzt so ein, dass das Hintergrundrauschen gerade verschwindet.
Ist ein Signal zu hören, so stellen Sie die Lautstärke, wie zuvor beschrieben,
ein. Dabei leuchtet die TX/RX-LED grün und zeigt, dass der Kanal belegt ist.
4.2.
Suchlauf
Suchen Sie mit Hilfe der UP- und DN-Tasten einen Kanal, der regelmäßig
beobachtet werden soll.
Drücken Sie die SCN-Taste, um den ausgewählten sowie Kanal 16 ständig
zu beobachten.
4.3. Vorzugskanal-Überwachung
Die Vorzugskanal-Überwachung schaltet zwischen den im Speicher abgelegten Kanal-Frequenzen und der von Kanal 16 hin und her. Kanal 16 ist der
Vorzugskanal und wird nach Abfrage eines jeden Speicherkanals auf Aktivität geprüft.
Suchen Sie mit Hilfe der UP- und DN-Tasten einen Kanal, der regelmäßig
beobachtet werden soll. Drücken Sie dann die Taste R/D, um die Information im Handfunkgerät zu speichern. In der Anzeige erscheint MEM..
Wiederholen Sie Schritt (1) für alle Kanäle, die Sie beobachten wollen.
Um einen Kanal aus dem Speicher zu entfernen, stellen Sie ihn ein und
betätigen dann die Taste R/D. MEM verschwindet von der Anzeige.
Auch wenn Sie das Gerät ausgeschaltet haben, bleiben die programmierten
Kanaldaten im Speicher erhalten. Zum Löschen des Speicherinhaltes beachten Sie bitte Abschnitt “Löschen der Speicherinhalte”.
Zum Starten der Vorzugskanal-Überwachung müssen Sie die Taste PSC
drücken. Der Suchlauf startet bei der niedrigsten Kanalnummer zu höheren
hin und hält an, wenn er ein Signal findet.
Der Suchlauf kann durch Drücken von PSC angehalten werden.
4.4. Löschen der Speicherinhalte
Um alle abgespeicherten Kanäle aus dem Speicher des Gerätes zu löschen:
Drücken Sie gleichzeitig die CLR- und UP-Tasten, während Sie das Gerät
mit der ON/OFF-Taste einschalten.
39
4.5. Senden
Bevor Sie senden vergewissern Sie sich, dass der Kanal nicht belegt ist.
Stellen Sie die erforderliche Leistung ein, indem Sie die Taste H/L drücken.
In der Anzeige erscheint HI für die hohe (4W) und LO für die niedrige (1W)
Ausgangsleistung.
Drücken Sie zum Senden die PTT-Taste des Handfunkgerätes. Die TX/RXLED leuchtet rot. Sprechen Sie klar und langsam in das Mikrofon.
Wenn Sie gerufen werden warten Sie mit Ihrer Antwort solange, bis Ihr Partner geendet hat. Das Gerät kann nicht gleichzeitig senden und empfangen.
Wenn Sie nicht mehr sprechen, so lassen Sie bitte immer die PTT-Taste
sofort los.
5. Notruf-Kanal 16
Mit der Taste CH16 können Sie unmittelbar auf den Notruf-Kanal zugreifen.
Setzen Sie Ihren Notruf ab.
Um zu dem vorigen Kanal zurückzukehren, drücken Sie die Taste CLR.
6. Simplex- und Duplex-Kanäle
Simplex-Betrieb wird im Verkehr von Schiff zu Schiff benutzt. Sende- und
Empfangsfrequenz sind dabei die gleich.
Duplex-Betrieb wird im Verkehr mit der Öffentlichkeit beim Betrieb zwischen
Schiffen und Land, meist über eine Küstenfunkstelle vermittelt, eingesetzt.
Ein Duplex-Kanal darf nicht für die Kommunikation zwischen Schiffen benutzt werden, da die Sende- und Empfangsfrequenzen nicht gleich sind.
Hinweis: Alle Kanäle sind hinsichtlich ihrer Betriebsart entsprechend
den internationalen Bestimmungen fest vorprogrammiert. Sie können
nicht von Simplex- zu Duplex-Betrieb oder umgekehrt umprogrammiert
werden.
7. Andere Funktionen
7.1. Anrufen eines anderen Schiffes
Stellen Sie sicher, dass das Funkgerät eingeschaltet ist.
Betätigen Sie die Taste CH16 und hören, ob Kanal 16 frei ist.
Ist er frei, so halten Sie die PTT-Taste gedrückt und rufen das Schiff, mit
40
dem Sie kommunizieren wollen. Geben Sie den Namen des Schiffes klar an
und identifizieren sich gegenüber Ihrem Partner. Beenden Sie den Durchgang mit “OVER”.
Ist die Verbindung hergestellt, so vereinbaren Sie einen anderen Schiff-zuSchiff-Kanal, um Ihr Gespräch fortzusetzen. Hinweise zu verfügbaren Kanälen finden Sie am Ende dieser Bedienungsanleitung. Benutzen Sie die UPund DN-Tasten, um den vereinbarten Kanal einzustellen.
7.2. Telefonieren
Um ein Telefongespräch zu führen, benutzen Sie einen entsprechenden
Kanal. Halten Sie die PTT-Taste gedrückt, rufen Sie die maritime Vermittlung und identifizieren Sie sich ihr gegenüber. Die Vermittlung wird Ihr Funkgespräch in das öffentliche Telefonnetz vermitteln.
7.3. Hintergrund-Beleuchtung
Halten Sie die S/D-Taste für etwa 2 Sekunden gedrückt, um die Hintergrundbeleuchtung einzuschalten.
8. Wartung
Die Qualität der Halbleiterbauteile, die in diesem Funkgerät Verwendung
fanden, sichern über viele Jahre hindurch eine ununterbrochene Nutzung.
Beachten Sie aber bitte die folgenden Hinweise, um Schäden an Ihrem Gerät zu vermeiden:
Achten Sie darauf, dass der externe Mikrofonanschluss immer mit der Regen dichten Verschlusskappe abgedeckt ist, um Korrosion der elektrischen
Kontakte durch eindringendes Wasser zu vermeiden.
Betätigen Sie bei eingeschaltetem Gerät niemals die PTT-Taste, wenn keine
Antenne oder ein entsprechender Lastwiderstand angeschlossen ist.
Verwenden Sie nur anerkannte Akkupacks, Zubehör und Ersatzteile.
Vermeiden Sie häufiges und vollständiges Entladen des Akkus, da dies zu
seiner Zerstörung führt.
Verbinden Sie niemals das Funkgerät über die externe Stromversorgungsbuchse mit einer Spannung von mehr als 13 V=. Höhere Spannungen führen
zu dessen Zerstörung.
Bitte nur das gelieferte Ladegerät anwenden weil andere Ihres Funkgerät beschädigen möchten.
41
Vermeiden Sie beim Reinigen des Gehäuses Chemikalien wie Benzin oder
Alkohol, da dies zu Beschädigungen der Oberfläche führen kann.
8.1. Akku-Pflege
Damit der Akku die größtmögliche Lebensdauer erreicht, befolgen Sie bitte
die folgenden wichtigen Hinweise:
Vermeiden Sie eine Überladung.
Die Ladezeit bei leerem Akku darf 12 Std. nicht überschreiten; bei AkkuRestkapazität reicht eine Ladezeit von 8-10 Std.
Wird das Gerät regelmäßig benutzt, sollte der Akku einmal alle 6 - 8 Wochen
vollständig entladen und vor der Benutzung wieder völlig aufgeladen werden.
9. Spezifikationen
Frequenzbereich:
156,050 bis 162,025 MHz
Kanäle:
alle gegenwärtig international zugewiesenen Kanäle
HF-Ausgangsleistung: 4 W (hohe Leistung)
1 W (niedrige Leistung)
Betriebsspannung:
9,6-V-Akku oder 13 V= extern
Stromverbrauch:
Standby:
0,06 A
Empfang:
0,18 A
Senden:
1,20 A (hohe Leistung)
0,60 A (niedrige Leistung)
Abmessungen (mm): 143(H) x 65(B) x 40(T)
Gewicht:
320 g
10. Garantiebestimmungen
Für diesen Transceiver leisten wir in dem Land, in dem er gekauft wurde,
eine Garantie auf einwandfreie Materialbeschaffenheit und Herstellung für
die Dauer von zwei Jahren ab Kaufdatum, sofern ein Fehler durch unsere
Technische Abteilung anerkannt wurde. Es wird empfohlen, die folgenden
Bedingungen sehr sorgfältig durchzulesen und zu beachten. Wie nicht werden Sie die Garantie verlieren.
• Damit diese Garantie wirksam wird, muss die ausgefüllte Garantie-Karte
spätestens einen Monat nach dem Kaufdatum an uns eingesandt werden.
• Jede Garantie-Reparatur erfolgt kostenfrei, ebenso die Rücksendung.
42
• Für eine erforderlich werdende Reparatur des Transceivers ist die Vorlage eines Kaufnachweises unabdingbar.
• Benutzen Sie Ihren Transceiver nicht, bevor Sie nicht die Bedienungsanleitung gelesen haben.
• Unsere Technische Abteilung wird keine Ersatzteile austauschen oder im
Rahmen der Garantie versenden.
Nicht durch die Garantie abgedeckt werden:
• Der Akku-Pack.
• Schäden, die durch Unfall, Stoss, unsachgemäße Verpackung oder durch
nicht zugelassenes Zubehör hervorgerufen werden.
• Die Garantie wird nicht dadurch verlängert, dass sich der Transceiver bei
uns unbenutzt zum Austausch eines oder mehrerer Ersatzteile befindet.
• Handlungen, die die Konformitätseigenschaften veränderten; Reparaturen oder Modifikationen, die durch Dritte, nicht durch unsere Gesellschaft
autorisierte, durchgeführt wurden.
• Jegliches Öffnen des Gerätes führt zum Erlöschen der Garantie.
43
11. Fehlersuche
Symptom
Ursache
Abhilfe
Drücken der PSC-Taste Es wurde kein Kanal im Speichern Sie mit Hilfe
der Taste R/D Kanäle in
führt zu keinem Suchlauf. Gerät abgespeichert.
den Speicher des Handfunkgerätes.
Rauschsperre Stellen Sie die RauschEs ist nur Rauschen zu Die
(Squelch) ist nicht rich- sperre richtig oder so ein,
hören.
dass das Rauschen getig eingestellt.
rade verschwindet.
Es kann kein Kanal- Die Tastatur ist gesperrt. Drücken Sie die Taste V/
L zum Entriegeln.
wechsel vorgenommen
werden.
Sie arbeiten auf einem
Duplex-Kanal. DuplexKanäle werden für den
Verkehr mit SeefunkVermittlungsstellen benutzt. Empfangs- und
Sendefrequenzen sind
dabei verschieden und
erlauben keine Schiffzu-Schiff-Verbindungen.
Benutzen Sie einen Simplex-Kanal, wenn Sie mit
einem Schiff Kontakt aufnehmen wollen.
Die LCD-Anzeige zeigt Der Akku ist wahrscheinnicht korrekt an. Es er- lich vollständig entladen.
scheinen beliebige Zeichen im Display.
Setzen Sie den Prozessor zurück. Drücken Sie
dazu gleichzeitig die Tasten CLR und UP und
schalten dabei mit der
ON/OFF-Taste das Gerät
ein. Laden Sie den Akku.
Ein anderes Schiff kann
gehört, aber es kann keine Verbindung mit ihm
aufgenommen werden.
44
12. International Marine VHF Channel Chart.
Function
Chl
Transmitter
Frequency
Receiver
Frequency
Mode
S/D
Channel Assignment
Ship
To
Ship
Ship
To
Shore
1
2
3
4
5
6
7
8
9
10
11
12
13
14
15
16
17
18
19
20
21
22
23
24
25
26
27
28
60
61
62
63
64
65
66
67
68
69
70
71
72
73
74
77
78
79
80
81
82
83
84
85
86
87
88
156.050
156.100
156.150
156.200
156.250
156.300
156.350
156.400
156.450
156.500
156.550
156.600
156.650
156.700
156.750
156.800
156.850
156.900
156.950
157.000
157.050
157.100
157.150
157.200
157.250
157.300
157.350
157.400
156.025
156.075
156.125
156.175
156.225
156.275
156.325
156.375
156.425
156.475
160.650
160.700
160.750
160.800
160.850
156.300
160.950
156.400
156.450
156.500
156.550
156.600
156.650
156.700
156.750
156.800
156.850
161.500
161.550
161.600
161.650
161.700
161.750
161.800
161.850
161.900
161.950
162.000
160.625
160.675
160.725
160.775
160.825
160.875
160.925
156.375
156.425
156.475
156.525
156.575
156.625
156.675
156.725
156.875
161.525
161.575
161.625
161.675
161.725
161.775
161.825
161.875
161.925
161.975
162.025
D
D
D
D
D
S
D
S
S
S
S
S
S
S
S
S
S
D
D
D
D
D
D
D
D
D
D
D
D
D
D
D
D
D
D
S
S
S
S
S
S
S
S
S
D
D
D
D
D
D
D
D
D
D
D
Public Correspondence, Port Operation
Public Correspondence, Port Operation
Public Correspondence, Port Operation
Public Correspondence, Port Operation
Public Correspondence
Safety (Compulsory)
Port Correspondence, Port Operation
Commercial, Inter-Ship
Commercial/Non-Commercial
Commercial
Commercial, VTS
Port Operation, VTS
Bridge To Bridge,(1W) Navigational
Port Operation, Vts
Recv Only-Coast To Ship
Calling&Safety, Compuisory
State Controlled Ship To Coast (1W)
Port Operation
Port Operation
Port Operation
Public Correspondence
Public Correspondence
Public Correspondence
Public Correspondence
Public Correspondence
Port Operation,Vts
Public Correspondence, Port Operation
Public Correspondence, Port Operation
Public Correspondence, Port Operation
Public Correspondence, Port Operation
Public Correspondence, Port Operation
Public Correspondence, Port Operation
Public Correspondence, Port Operation
Public Correspondence, Port Operation, VTS
Public Correspondence, Port Operation
Non-Commercial, VTS
Non-Commercial
Non-Commercial
DSC Distress, Urgency, Safety And Calling
Intership, Port Operation, On Commercial
Non-Commercial
Port Operation, Vts
Port Operation, Vts
Intership, Port Operation
Port Operation, Public Correspondence
Port Operation, Public Correspondence
Port Operation, Public Correspondence
Port Operation, Public Correspondence
Port Operation, Public Correspondence
Port Operation, Public Correspondence
Public Correspondence
Public Correspondence
Public Correspondence
Public Correspondence
Port Operation, Public Correspondence
YES
YES
YES
YES
YES
YES
YES
YES
YES
YES
YES
NO
YES
YES
YES
YES
YES
YES
NO
NO
NO
NO
NO
YES
YES
YES
YES
YES
NO
YES
NO
YES
YES
YES
YES
YES
YES
YES
YES
YES
YES
YES
YES
YES
YES
YES
YES
YES
YES
YES
YES
YES
YES
YES
YES
YES
YES
YES
YES
YES
YES
YES
YES
YES
NO
NO
NO
NO
YES
YES
NO
YES
YES
NO
YES
NO
YES
YES
NO
YES
YES
YES
YES
YES
YES
YES
YES
YES
YES
YES
156.575
156.625
156.675
156.725
156.875
156.925
156.975
157.025
157.075
157.125
157.175
157.225
157.275
157.325
157.375
157.425
45
DÉCLARATION DE CONFORMITÉ
DECLARACIÓN DE CONFORMIDAD
CERTIFICATE OF CONFORMITY
KONFORMITÄTSERKLÄRUNG
Nous, GROUPE PRESIDENT ELECTRONICS, Route de Sète, BP 100 – 34540 Balaruc –
FRANCE,
Nosotros, GROUPE PRESIDENT ELECTRONICS, Route de Sète, BP 100 – 34540 Balaruc
– FRANCIA,
We, GROUPE PRESIDENT ELECTRONICS, Route de Sète, BP 100 – 34540 Balaruc –
FRANCE,
Wir, GROUPE PRESIDENT ELECTRONICS, Route de Sète, BP 100 – 34540 Balaruc –
FRANCE,
Déclarons, sous notre seule responsabilité que l’émetteur-récepteur de
radiocommunication VHF Marine,
Declaramos bajo nuestra propia responsabilidad que el emisor receptor de VHF para
radiocomunicaciones marítimas,
Declare, on our own responsibility that the Marine VHF radio-communication transceiver,
Erklären, auf eigene Verantwortung daß der Marine VHF Sender-Empfänger,
Marque / Marca / Brand / Marke : PRESIDENT
Modèle / Modelo / Model / Modell : PM-1200 WP
Fabriqué / Fabricado / Manufactured / Hergestellt
en Chine / en China / in China / in die China
est conforme aux exigences essentielles de la Directive 1999/5/CE (Article 3) transposées à la législation nationale, ainsi qu’aux Normes Européennes suivantes:
Es conforme a las exigencias esenciales de la Directiva 1999/5/CE ( Artículo 3 ) transpuesto
a la legislación nacional, así como a las Normas Europeas siguientes:
is in conformity with the essential requirements of the Directive 1999/5/CE (Article 3) adapted
to the national law, as well as with the following European Standards:
in Konformität ist mit den wesentlichen Anforderungen der R & TTE Richtlinie 1999/5/CE (Artikel
3) auf die nationale Gesetzen umgestellt, wie mit den folgenden europäischen Normen:
EN 301 178 / EN 60215 / EN 60945
Balaruc, le / el / the / den 16/01/2003
Jean-Gilbert MULLER
Directeur Général
Director General
General Manager
Geschäftsführer
Siège Social / Head Office France – Route de Sète
BP 100 – 34540 BALARUC
Site internet : http://www.president-electronics.com
E-mail : [email protected]
0456/02-03