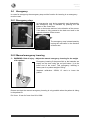
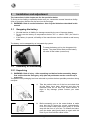
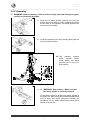
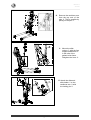
1
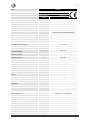
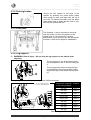
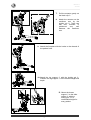
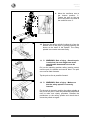
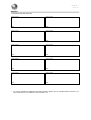
VERMEIREN
Albatros II
INSTRUCTION
MANUAL
Instructions to the specialist dealer
This instruction manual is part and parcel of the product and must accompany every product sold.
Version: A, September 2012
All rights reserved, including translation.
No part of this manual may be reproduced in any form what so ever (print, photocopy, microfilm or any other process) without
written permission of the publisher, or processed, duplicated or distributed by using electronic systems.
© N.V. Vermeiren N.V. 2012
Albatros II
2012-09
Contents
Preface ................................................................................................. 2
1
Product description ................................................................. 3
1.1
1.2
1.3
1.4
1.5
2
Use ............................................................................................. 7
2.1
2.2
2.3
2.4
2.5
2.6
3
General notes ............................................................................................................... 7
Use of the JUMBO system (battery, control box + included battery charger) ......... 10
Operating the lift ....................................................................................................... 11
Slings ......................................................................................................................... 14
Safety rules ................................................................................................................ 14
Emergency ................................................................................................................. 15
Installation and adjustment .................................................. 16
3.1
3.2
4
5
Intended Use ................................................................................................................ 3
Technical specifications .............................................................................................. 4
Drawing ....................................................................................................................... 6
Explanation of the symbols ......................................................................................... 7
Delivery ....................................................................................................................... 7
Swapping the battery ................................................................................................. 16
Assembly or dismantling........................................................................................... 16
Maintenance ........................................................................... 23
Ordernumbers ....................................................................... 23
Page 1
Albatros II
2012-09
Preface
First of all we want to thank you for putting your trust in us by selecting one of our products.
The Vermeiren patient hoists are the result of many years of research and experience.
During the development, special attention was given to the ease of use and the serviceability
of the patient hoist.
The expected lifetime of your patient hoist is strongly influenced by the care and
maintenance of the patient hoist.
This manual will help you get acquainted with the operation of your product.
Following the user instructions and the maintenance instructions are an essential part of the
guarantee.
This manual reflects the latest product developments. Vermeiren has the right to introduce
changes without the obligation to adapt or replace previously delivered models.
For any further questions, please consult your specialist dealer.
Page 2
Albatros II
2012-09
1
Product description
1.1
Intended Use
The patient hoist is intended for people with walking difficulties or no walking abilities.
The patient hoist is designed to transport 1 person.
The patient hoist is suited for indoor use.
The user must lifted in the patient hoist by an attendant.
The different possibilities/positions allow the application of the patient lift in case of unability
or impossibility to walk based on:
• paresis
• limb deformations
• cachexia
• atrophy
• and also for aged persons.
When providing for individual requirements:
• body size and weight (max. 150 kg)
• physical and psychological condition
• residential circumstances
• environment
should be taken into consideration.
Your patient hoist should only be used on flat surfaces and with all four casters in contact
with the ground.
The patient hoist can be used for transferring in and out of the shower or the bath, but not
during showering or bathing.
Riding over obstacles while transferring the patient is completely forbidden.
The patient hoist should not be used as a ladder, nor is it a transport for heavy or hot
objects.
When used on mats, carpeted floors or loose floor coverings, the floor covering can get
damaged.
Use only Vermeiren approved accessories.
Make sure that the end of the adjustment motor has a safety measurement. Therefore, use
the patient hoist only in the middle of the adjustment range and not at the end of the hoist
motor.
Compliance with the user and maintenance instructions are an essential part of the
guarantee conditions.
Visually impaired people can contact the dealer for the instructions for use.
The patient hoist is suitable for re-use.
Page 3
Albatros II
2012-09
1.2
Technical specifications
Forward
direction
Page 4
Albatros II
2012-09
Brand
Address
Type
Model
Vermeiren
Vermeirenplein 1/15, B-2920 Kalmthout
Patient hoist
Albatros II
Measurement in
Dimensions
drawing
Lowest CAP position*
l
1060 mm
Highest CAP position*
k
1687 mm
Lifting range (range of heights)
m
637 mm
Leg length
1000 mm
Total length
1115 mm
Total width
Folded / Dismantled length
685 mm
1380 mm (actuator lowest position)
1687 mm (actuator highest position)
1115 mm (not foldable)
Folded / Dismantled width
685 mm (not foldable)
Folded / Dismantled height
500 mm
Total height
Minimum leg separation
r
467 mm
Maximum leg separation
q
769 mm
Leg height / Frame height
n
117 mm
Overall width (closed), external dimension
Overall width (opened), castors forwards
Min. distance between wall / CSP*
(minimum height)
Min. distance between wall / CSP*
(maximum reach)
Min. distance between wall / CSP*
(maximum height)
Turning circle
584 mm
P
945 mm
w3 (=w2)
285 mm
w2 (=w3)
285 mm
w1
870 mm
1160 mm
Total weight
50,60 kg
Weight of chassis + motor + control box
34,50 kg
Weight of battery
2,90 kg
Weight of footplate
5,10 kg
Weight of thorax support
1,40 kg
Weight of legsupport
Weight attachment of legsupport and lifting
column
Maximum load
3,00 kg
3,60 kg
150 kg
Free height, minimum
Maximum reach at 600 mm with legsupport
Maximum reach at 600 mm without
legsupport
Maximum reach from support
Reach from support at separation 700 mm
57 mm
a1
300 mm
a2
360 mm
b
c
495 mm
375 mm
Power outlet
24V
Supply voltage
max. 250 VA
100-240V ~ max. 37-53 VA
Maximum current drawn
max. 400 mA
Operating temperature
+5 to +40°C
Relative humidity
20% to 90% at 30°C, non-condensing
Noise level
< 50 dB(A)
Air pressure
700 to 1060 hPa
Control box
Linak CBJ2
Battery
Linak BAJ1
Manual control
Linak HB5X (< 5N force required to operate)
Motor
Linak LA34 (7500N)
Control box protection class
IPX4
Page 5
Albatros II
2012-09
Brand
Address
Type
Model
Vermeiren
Vermeirenplein 1/15, B-2920 Kalmthout
Patient hoist
Albatros II
Measurement in
Dimensions
drawing
Battery protection class
IPX5
Manual control protection class
IPX5
Motor protection class
IP54
Insulation class
II - Type B
Operational performance
Battery capacity
approx. 40 lifts per charge
max. 10%, or 2 min. continuous
operation/18 min. pauses
2.9 Ah
Emergency stop
Yes
Manual lowering in emergency
Yes
Periodic operation
Electrical lowering in emergency
No
We reserve the right to introduce technical changes. Measurement tolerance ± 15 mm / 1,5 kg
1 = Highest position, 2 = Maximum reach, 3 = Lowest position
* CSP = Central suspension point
Table 1: Technical specifications
The patient hoist complies to the requirements set up in:
ISO 7176-8: Requirements and test methods for static, impact and fatigue strengths.
ISO 7176-16: Resistance to ignition of upholstered parts.
1.3
Drawing
1
2
3
4
5
6
7
8
9
10
11
12
13
14
15
16
17
18
19
20
21
22
23
24
25
Page 6
= Buttons for mounting
straps
= Cantilever arm
= Thorax cushion
= Slide holder
= Slide column
= Transport holder for motor
= Motor
= Leg belt
= Leg support
= Chassis
= Footplate
= Caster
= Caster with brake
= Chassis expansion pedal
= Footrests with velcro
fastening
= Safety spindle
= Foldaway lock
= Power cable
= Handle for pushing
= Manual control
= Pole
= Control box
= Emergency stop
= Battery
= Table
Albatros II
2012-09
1.4
Explanation of the symbols
Observe the safety instructions!
Read the instruction manual before use!
Separate recovery and recycling of electric and electronic devices.
CE declaration of conformity
1.5
Delivery
The Vermeiren Albatros II patient hoist shall be delivered with:
• chassis including 4 casters (2 with brakes)
• pole, including handles for pushing
• cantilever arm with attachment for sling
• control box (+ included battery charger)
• battery
• manual control
• motor
• instruction manual
• foot plate + footrests with velcro fastening
• leg support
• thorax support
Before use check if everything is included and that no products are damaged (example by
transport, ...).
Please note that the basic configuration may vary from one European country to another.
Please contact the specialist dealer in your country for more information.
2
Use
This chapter describes the everyday use. These instructions are for the user and the
specialist dealer.
The patient hoist is delivered fully assembled by your specialist dealer. The instructions
intended for the specialist dealer on how to set up the patient hoist are given in § 3.
2.1
General notes
The patient hoist must only be operated by qualified staff who have been instructed or
trained in its specific application.
The use of the patient hoist is restricted to indoors only. Please ensure that it is only used on
flat surfaces. It must be used strictly indoors only.
We would like to point out that sources of electromagnetic radiation (e.g. mobile phones,
etc.) can cause interference and that the lift's electronics can also affect other electrical
appliances.
Even if you have been instructed by your dealer about the operational elements of your lift
and their use, we recommend that you read the following pages carefully.
Page 7
Albatros II
2012-09
2.1.1 Instructions for lifting patient
Phase I – Preparation. In this phase, the patient should stay on the footplate and put his feet
in the special footrests with the velcro fastening. Then stabilize your feet and legs under your
knees by using the velcro belt on the foot- and leg support. Make sure that the feet and legs
are firmly touching the pillow from the foot- and leg support. Fasten the thorax belt with the
four straps to the patient hoist.
Buttons for attachment
of the thorax belt.
Phase II- Lifting. Use the manual control slowly to lift the patient up. The patient must hold
the handgrips during lifting.
Phase III – Stabilization. In the last step after lifting to the vertical position, the patient is
stabilized by thorax belts. Thorax belts are mounted on both sides of the thorax support.
Afterwards you can remove the vest. To complete stabilization you should use the waist belt
which stabilizes the hip and trunk of the cross section. In this way, the patient is fully
protected in four support points: feet, knees, hips and thorax.
Page 8
Albatros II
2012-09
Buttons for waist belt attachment
View properly how the patient is stabilized.
Page 9
Albatros II
2012-09
2.2
Use of the JUMBO system (battery, control box + included
battery charger)
JUMBO is a modular system combining an actuator, a control box and a battery in a flexible
solution, specially developed for patient hoists.
2.2.1 Battery
The battery is above the control box and is replaceable with an
integrated clip system.
Primary voltage
Ambient temperature
Ambient storage temperature
Relative storage humidity
Conformity
24 VDC
+5°C to +40°C
-10° to +50°C
max. 90% (non-condensing)
tested in accordance with IEC 60601-1
2.2.2 Control box + included battery charger
The control box is designed with a red
emergency stop and an internal battery charger.
Primary voltage
Secondary voltage
(charging voltage)
Secondary current
(charging current)
Safeguards
100 - 240 VAC / 50/60 Hz
24 VDC, max. 250 VA
Ambient temperature
Ambient storage
temperature
Relative storage
humidity
Conformity
+5°C to +40°C
-10° to +50°C
max. 10 A
Protected against reverse
polarisation, electrical surges
and extreme temperature
max. 90% (non-condensing)
tested in accordance with
IEC 60601-1
We reserve the right to introduce technical changes.
2.2.3 External charger (OPTIONAL)
The external charger shall be mounted on the
wall. It is possible to charge the spare battery
(optional) with this external charger and you
have no waiting time to use the patient hoist
when charging the batteries.
Primary voltage
Charging current
Ambient temperature
Ambient storage
temperature
Relative storage
humidity
Page 10
100 - 240 VAC / 50/60 Hz
max. 650 mA
+5°C to +40°C
-10° to +50°C
max. 90% (non-condensing)
Albatros II
2012-09
2.2.4 Charging the batteries
Use only the control box with included battery charger on the Albatros II or the external
charger meant to be mounted on the wall.
We recommend that you should regularly recharge the batteries in order to ensure that the
hoist remains usable and to extend the lifespan of the batteries. The control box will give a
warning sound to tell you when the battery charge is on 50% capacity.
•
FIRST USE
First, insert the supply cable with the connector side into the appropriate connector on the
control box. The plug side of the supply cable must be insert in the socket outlet. The loading
time is about 24 hours.
•
RECHARGING
L WARNING: Risk of injury – Do not use the lift when the supply cable is
connected to the socket outlet.
When the batteries are recharging there will burn a yellow light (above
on) and an orange light (above charge).
After the recharging process is completed, you should always remove the mains plug from
the socket first and then remove the connector plug from the control box.
Do not use the lift while it is being recharged!
If the batteries are not used for a significant period, they discharge slowly by themselves
(deep discharge). It then becomes impossible to recharge them with the battery charger
supplied. You should therefore recharge the batteries at least once a month even if they are
not being used.
2.3
Operating the lift
Please observe the technical information according to which the patient hoists (Albatros II)
may be operated. The patient hoist must only be operated by authorised staff who have
been trained in its use and operation.
L WARNING: Risk of burns – Be careful when driving in hot or cold environments
(sunshine, extreme cold, saunas, etc.) for a sufficient amount of time and when
touching - Surfaces can assume environment temperatures.
2.3.1 Altering the chassis width
To get the lift around a wheelchair or other
seating furniture, or to increase the stability of
the lift in the standing position, the separation of
the chassis legs can be increased.
Stand behind the assembled lift and take hold of
the handles for pushing the patient hoist (on the
left and right, next to the control box). Press the
lever at the bottom of the chassis (left or right)
down with your foot, and the separation of the
legs of the chassis can be increased or
decreased.
Page 11
Albatros II
2012-09
2.3.2 Parking brakes
Secure the two casters at the back of the
chassis by pressing the caster brake plates
down gently to their end stops with the tip of
your foot. To release the brake, push the brake
plate gently back up again with the front of your
foot until the casters are free.
2.3.3 Foot plate
The footplate can be mounted or removed
with the hooks to/from the chassis of the
patient hoist. If it is required for a greater
stabilization of your feet you can use the special
footrests with velcro straps for stabilization.
2.3.4 Leg support
L WARNING: Risk of injury – Do not drop the leg support on the patient when
adjusting.
The leg support can be mounted on the
bar of the patient hoist with the safety pin
.
The leg support is meant to keep the legs
of the patient in the correct position and to
support the legs of the patient during stand
up.
The leg supports can be adjusted in depth and 9 different heights.
1 = Bar for height adjustment
2 = Lever for depth adjustment
Height from footplate
to top of leg support
Position
690 mm
Hole 1
665 mm
Hole 2
640 mm
Hole 3
Do not use
Hole 4
Do not use
Hole 5
495 mm
Hole 6
470 mm
Hole 7
445 mm
Hole 8
420 mm
Hole 9
Table 2: Height adjustment leg support
Page 12
Albatros II
2012-09
2.3.5 Thorax support
To stabilize and support your thorax, the lift is
equipped with thorax pillow and velcro belts
to stabilize.
The thorax support can be adjusted in 2
different positions 1045 mm, 1200 mm.
These positions are measured from the
footplate until the top of the thorax support.
1. Remove the safety pin .
2. Adjust the thorax support in the
desired position. The position from
attachment plate shall be like
shown in figure.
3. Mount the safety pin securely.
2.3.6 Raising and lowering the cantilever arm
The manual control allow the cantilever arm to be adjusted
smoothly to any point.
1
2
1
= Raise the cantilever arm
2
= Lower the cantilever arm
L
When using the lift function until the end of the hoist
motor the limit switch is activated by electronics (security
function). Use the lifting function only in the middle of the
adjustment range.
Force required to activate the pushbutton: < 5N
Position the manual control to the top tube of the handles for moving the patient hoist. This is
the most ergonomic position.
Page 13
Albatros II
2012-09
2.3.7 Moving the patient hoist
L WARNING: Risk of clamping – Be careful passing through restricted passages
(e.g. doors).
1.
Stand behind the patient hoist and grasp the handles (left and right, next to the battery
and control box) with both hands.
2.
Make sure that both back caster brakes have been released.
3.
Push the patient hoist slowly into the desired position.
When it is not loaded, we advise you to pull the patient hoist backwards, which makes it
easier to get round any obstacles (door frames, corners of rooms or furniture).
To move the patient hoist use only the handles for pushing and no other components
(actuator, manual control, ...) .
2.4 Slings
L WARNING: Risk of injury – Only use appropriate slings for the patients.
L WARNING: Risk of injury – Do not use damaged slings.
The Albatros II patient hoist must only be used with slings designed for the Vermeiren
Albatros II patient hoists.
The applicability and instructions for use for the specific slings should be followed.
2.5
Safety rules
Some safety tips are given below for your security:
L
Only authorised staff who have been trained in using the lift must use and operate the
patient lift.
L
Make sure when using the lift that there is sufficient room around and above it, as the
adjustment movements could otherwise lead to damage or injury.
L
Always be aware of the lifting arm to avoid injury.
L
The patient lift must only be used on level surfaces, with all 4 casters contacting the
ground evenly.
L
It must not be used in humid environments.
L
Only slings that have been designed and approved for the patients must be used
(see usage instructions for the various slings). Use of any other slings is at your own
risk.
L
Please follow the instructions of the nursing staff or suitably trained persons, so that
no injuries are caused during use of the lift.
L
Check the medical condition of the patient and be sure that it is possible to lift the
patient with this patient hoist. (Refer to intended use)
L
Be careful with sources of ignition such as lit cigarettes as they may set the sling
alight.
L
Never exceed the maximum load (150 kg). The control box is disabled if the lift is
overloaded.
L
When using slings with a maximum load, the lowest load is used between the
patients hoist and sling.
L
The manufacturer accepts no liability for damages and injury caused by inappropriate
actions or by not observing the instructions given in this manual.
L
Use only the handles for pushing to move the patient hoist and no other components
(actuator, manual control, ...).
L
Pull the lifting arm before use manually upwards and check that the lifting arm falls
down by himself. If not, contact your specialist dealer.
Page 14
Albatros II
2012-09
2.6
Emergency
In cases for emergency the emergency stop and the function for lowering in an emergency
must be used.
2.6.1 Emergency stop
In emergencies, and during assembly and disassembly,
the emergency stop is activated by pressing the red
button on the control box.
Push on the button and turn in the direction of the arrows.
If the button is fully pressed to the back turn back in the
opposite direction of the arrows.
The emergency stop is deactivated by
turning the red button in the direction
of the arrows.
2.6.2 Manual emergency lowering
L WARNING: Risk of injury – Adjust the manual emergency lowering for the weight
of the patient.
Emergency lowering if the power fails or the batteries are
empty can be done using the red pull button (1) at the
lower end of the motor. This emergency lowering is
factory-set for a patient weight of 50 kg.
Standard calibration: 2500N, 15 mm/s to lower the
patiënt.
1
Please note that the manual emergency lowering is only possible when the patient is sitting
in the patient lift.
Pull force: 10 mm for force from 80 à 100N.
Page 15
Albatros II
2012-09
3
Installation and adjustment
The instructions in this chapter are for the specialist dealer.
To find a service facility or specialist dealer near you, contact the nearest Vermeiren facility.
A list of Vermeiren facilities can be found on the last page.
L WARNING: Risk of unsafe limitations - Use only the limitations described in this
manual.
3.1
•
•
•
Swapping the battery
We shall decline all liability for damage caused by the use of improper battery.
Do not use the battery at temperatures below +5°C o r above +50°C (the ideal is
+20°C).
If the battery is opened, all liability of the manufacturer shall be voided as well as any
claim.
The battery can be swapped by an integrated clip system.
To swap the battery pull on the integrated clip
system. The plate will be lifted and the battery
can take off the holder (control box).
3.2
Assembly or dismantling
3.2.1 Unpacking
L WARNING: Risk of injury - After unpacking and before further assembly, always
first confirm that the emergency stop (the red pushbutton on the control box) is
pressed in.
The patient hoist packaging has been selected to provide the best possible protection during
transport.
1.
Take the patient hoist out of the box and check that
all the items have been delivered and that the
individual parts do not have any visible defects. If
there is any damage, please contact your sales
office.
2.
Before assembly, put on the caster brakes to make
sure that the lift cannot be moved unintentionally.
Push the caster brake plate down gently to its end
stop with the front of your foot. To release the brake,
push the brake plate gently back up again with the
front of your foot until the caster is free.
Page 16
Albatros II
2012-09
3.2.2 Assembly
L WARNING: Risk of clamping - Take care that no body parts and wires get trapped,
crushed or cut during assembly.
1. Remove the safety spindle (locking pin) from the
bottom end of the pole by gently pressing the button
at the head of the spindle. The safety spindle can
now be removed easily.
2. Undo the transport lock (wing screw) gently and the
pole can now be raised.
2.a The
standing
position
safety (traction screw)
clicks audibly into place
once the pole is put in its
final position.
klick
3.
L WARNING: Risk of injury - Make sure that
the safety spindle is correctly inserted.
Fix the pole in place by pushing the safety spindle at
the end of the pole in with the pushbutton depressed
until its other end clearly protrudes. Release the
pushbutton on the safety spindle and check that it
cannot be pulled out.
Page 17
Albatros II
2012-09
4. Remove the cantilever arm
from the top end of the
pole . This is possible by
pulling on the pen .
5. Mount the slide
column with the foot
support attachment
in the tube of the
patient hoist frame.
Retighten the lever .
6. Attach the slide and
slide holder to the
cantilever arm with
the locking pin .
Page 18
Albatros II
2012-09
7. Pull the actuator gently out
the black clip
8.
.
Attach the actuator on the
cantilever arm by the
locking pin . Take care
that
the
actuator
is
positioned
very
well
between the cantilever
arm.
9. Attach the footplate with the hooks to the chassis of
the patient hoist.
10. Attach the leg support
Position the leg support
depth.
with the locking pin .
to the desired height and
11. Mount the thorax
support to the slide
column with the
locking pin in a
comfortable height for
every patient.
Page 19
Albatros II
2012-09
3.2.3 Dismantling
L WARNING: Risk of clamping - Take care that no body parts and wires get trapped,
L
crushed or cut during dismantling.
WARNING: Risk of injury - Check the emergency stop (red pushbutton on the
control box) is activated, to avoid unintentional adjustment movements.
1. Secure the two casters at the back of the chassis by
pressing the caster brake plates down gently to their
end stops with the tip of your foot. To release the
brake, push the brake plate gently back up again with
the front of your foot until the casters are free.
2. Remove the thorax support
from the slide column
with the locking pin .
3. Remove the leg support
by the locking pin
.
4. Remove the footplate from the chassis of the patient
hoist.
Page 20
Albatros II
2012-09
5. Dismantle
the
actuator
(motor) from the cantilever
arm by removing the locking
pin .
6. Move the actuator to the
bottom position and place
the actuator in the black clip
.
7. Remove the slide and slide
holder
from the cantilver
arm
with the locking pin
.
8. Loosen
the
lever
.
Remove the slide column
and foot support attachment
out the tube of the patient
hoist frame.
Page 21
Albatros II
2012-09
9. Move the cantilever arm to
the bottom position
.
Fasten the pen on the top
end of the pole in the hole of
the cantilever arm .
10. Remove the safety spindle (locking pin) from the
bottom end of the pole by gently pressing the
button at the head of the spindle. The safety
spindle can now be removed easily.
11.
L WARNING: Risk of injury - Once the pole
is unlocked, its own weight can cause
considerable downward forces to be
exerted.
Pull out the standing position safety (traction screw)
until the pole is released and can be tilted. The pole
can now be tilted forwards.
Tip the pole as far as possible forward.
12.
L WARNING: Risk of injury - Make sure
that the safety spindle is correctly
inserted.
Fix the pole in place by pushing the safety spindle at
the end of the pole in with the pushbutton depressed
until its other end clearly protrudes. Release the
pushbutton on the safety spindle and check that it
cannot be pulled out again.
Page 22
Albatros II
2012-09
4
Maintenance
For the maintenance manual of the patient hoists refer to the Vermeiren website:
www.vermeiren.be.
5
Ordernumbers
Casters (ø 100 mm)
Braked casters (ø 100 mm)
E Control box Albatros
E Motor 7,5KN Albatros
E Handcontrol Albatros
E Battery Albatros
E Construction plate Albatros
E Grey plug controlbox Albatros
E Cable Albatros
E External charger CHJ2 for Albatros
E Construction plate external charger Albatros
1903403
1903402
1906137
1906229
1906138
1906139
1906230
1906232
1906233
1906423 (OPTIONAL)
1906424 (OPTIONAL)
Slings
Sling
Sling SU
Right thorax belt
Left thorax belt
Mousse thorax support
2991605
2991627
2991603
2991604
2991600
Page 23
Albatros II
2012-09
SERVICE
The patient hoist was serviced:
Dealer´s stamp:
Dealer´s stamp:
Date:
Date:
Dealer´s stamp:
Dealer´s stamp:
Date:
Date:
Dealer´s stamp:
Dealer´s stamp:
Date:
Date:
Dealer´s stamp:
Dealer´s stamp:
Date:
Date:
Dealer´s stamp:
Dealer´s stamp:
Date:
Date:
•
For service checklists an additional technical information, please see our specialist dealers nearest to you.
More information on our website at: www.vermeiren.com.
Adres/Adresse/Address
Adresse/Indrizzo
Woonplaats/Domicile/Home
Wohnort/Citta
E-mail
Artikel/Article/Article
Artikel/Articolo
Reeks nr./N° de série/Serie nr.
Serien-Nr./No. di serie
Aankoopdatum/Date d’achat/Date of purchase
Kaufdatum/Data di acquisto
Stempel verkoper/Timbre du vendeur
Dealer stamp/Händlerstempel
Timbro del rivenditore
Tel.: 00 32 (0)3 620 20 20
Fax: 00 32 (0)3 666 48 94
www.vermeiren.com
Naam/Nom/Name
Name/Nome
B
N.V. VERMEIREN N.V.
VERMEIRENPLEIN 1-15
B-2920 Kalmthout
WAARBORG
GARANTIE
WARRANTY
GARANTIE
GARANZIA
VERMEIREN
Naam/Nom/Name
Name/Nome
✂
- danno dovuto al cattivo ed improprio utilizzo della
carrozzina,
- danno subito durante il trasporto,
- incidente o caduta,
- smontaggio, modifica, o riparazione effettuate in proprio,
- usura abituale della carrozzina,
- invio del tagliando di garanzia con la data di acquisto.
Questa garanzia non potra’ essere applicata nei seguenti
casi:
RISERVE
Per far valere la garanzia, e’ necessario indirizzarla al vostro
distributore di fiducia che presentera’ al produttore il
tagliando.
CONDIZIONI
La carrozzine manuali sono garantite 5 anni, la carrozzine
ultra leggera 4 anni. Le carrozzine elettroniche, tricicli, letti e
altri prodotti: 2 anno contro tutti i difetti di costruzione o di
materiale (batterie 6 mesi). Multiposizioni 3 anni. Questa
garanzia e’ limitata alle sostituzione di parti riconosciute difettose.
GARANZIA CONTRATTUALE
ITALIANO
A
Om aanspraak te kunnen maken op de waarbord, bezorgt u
het garantiecertificaat dat u heeft bewaard, aan uw Vermeiren dealer. De waarborg is enkel geldig in de zetel van de
onderneming.
TOEPASSINGSVOORWAARDEN
Op de manuele rolstoelen geven wij 5 jaar, lichtgewicht rolstoelen 4 jaar. Op de elektronische rolstoelen, driewielers,
bedden en andere producten : 2 jaar waarborg op constructie - of materiaalfouten (batterijen 6 maanden). Op multipositie rolstoelen geven we 3 jaar waarborg. Deze garantie
is uitdrukkelijk beperkt tot de vervanging van defecte stukken
of onderdelen.
CONTRACTUELE GARANTIE
Cette garantie ne pourra être appliquée en cas de:
RESERVES
Pour prétendre à cette garantie, il faut présenter le certificat
de garantie que vous avez conservé à votre distributeur Vermeiren. La garantie est uniquement valable au siège de la
société.
CONDITIONS D’APPLICATION
Les fauteuils manuels standard sont garantis 5 ans, les fauteuils ultra légers 4 ans. Les fauteuils électroniques, tricycles, lits et d’autres produits: 2 ans contre tous vices de
construction ou de matériaux (batteries 6 mois). Fauteuils
multiposition 3 ans. Cette garantie est expressément limitée
au remplacement des éléments ou pièces détachées reconnues défectueuses.
GARANTIE CONTRACTUELLE
GARANTIEERKLÄRUNG
DEUTSCH
CONTRACTUAL WARRANTY
Wir garantieren, dass für unsere Rollstühle hochwertige Produkte verwendet werden, die in sorgfältiger Verarbeitung
nach dem neuesten Stand der Technik montiert werden.
Bevor Ihr Rollstuhl unser Werk verlassen hat, wurde er einer
eingehenden Endkontrolle unterzogen, um auch letzte,
eventuell vorhandene Mängel aufzuspüren.
ENGLISH
We offer 5 years of warranty on standard wheelchairs, lightweight wheelchairs 4 years. Electronic wheelchairs, tricycles,
beds and other products: 2 years (batteries 6 months) and
multiposition wheelchairs 3 years. This warranty is limited to
the replacement of defective or spare parts.
APPLICATION CONDITIONS
In order to claim tis warranty, part “B” of this card has to be
given to your official Vermerien dealer. The warranty is only
valid when parts are replaced by Vermeiren in Belgium.
EXCEPTIONS
This warranty is not valid in case of:
Auf Standardrollstühle gewähren wir eine Garantie von 5
Jahren, auf Leichtgewichtrollstühle 4 Jahre, auf elektronische Rollstühle, Dreiräder, Betten und andere Produkte: 2
Jahre (Batterien 6 Monate), auf Multifunktionsrollstühle 3
Jahre.
In dieser Garantie eingeschlossen sind alle Mängel, die auf
einen Produkt- oder Verarbeitungsfehler zurückzuführen
sind, Dieser Garantie unterliegen keine Schäden aus unsachgemäßer Benutzung. Ebenfalls sind Verschleißteile von
der Garantie ausgenommen.
Sollte einmal der Fall eingetreten sein, dass Sie aus
berechtigtem Grunde mit Ihrem Rollstuhl unzufrieden sind,
so wenden Sie sich bitte unverzüglich an Ihren Fachhändler.
Er wird sich in enger Zusammenarbeit mit uns darum bemühen, eine für Sie zufriedenstellende Lösung zu finden.
prodotto al nostro web site, http://www.vermeiren.be/registration
- terugsturen binnen de 8 dagen na aankoop of registreer uw product via
onze website, http://www.vermeiren.be/registration
- à renvoyer dans les 8 jours après achat ou régistrer votre produit sur
notre site, http://www.vermeiren.be/registration
- please return within 8 days of date of purchase or register your product at
our website, http://www.vermeiren.be/registration
- zurückschicken innerhalb von 8 Tagen nach kauf oder registrieren Sie
Ihr Produkt auf unserer website, http://www.vermeiren.be/registration
- da restituire entro 8 giorni dalla data di acquisto o registri il vostro
- damage due to incorrect usage of the wheelchair,
- damage during transport,
- involvement in an accident,
- a dismount, modification or repair carried outside
of our company and/or official Vermeiren
dealership,
- normal wear of the wheelchair,
- non-return of the warranty card
A
B
- in geval van herstelling, kaart “B” bijvoegen.
- en cas de réparation, veuillez ajouter la carete “B”.
- in case of repair, please add part “B”.
- im Falle einer Reparatur, Karte “B” beifügen
- in case di riparazione, rispediteci la carta “B”.
✂
UITZONDERINGEN
FRANCAIS
Deze garantie is niet van toepassing in geval van:
- dommage dû à la mauvaise utilisation du fauteuil,
- endommagement pendant le transport,
- accident ou chute,
- démontage, modification ou réparation fait en
dehors de notre société,
- usure normale du fauteuil,
- non retour du coupon de garantie.
NEDERLANDS
- schade te wijten aan het verkeerd gebruik
van de rolstoel,
- beschadiging tijdens het transport,
- een val of een ongeval
- een demontage, wijziging of herstelling uitgevoerd
buiten onze firma,
- normale slijtage van de rolstoel,
- niet inzenden van de garantiestrook.
N.V. VERMEIREN N.V.
Vermeirenplein 1/15
B-2920 Kalmthout
BELGIUM
✂
Notes
....................................................................................................................................................
....................................................................................................................................................
....................................................................................................................................................
....................................................................................................................................................
....................................................................................................................................................
....................................................................................................................................................
....................................................................................................................................................
....................................................................................................................................................
....................................................................................................................................................
....................................................................................................................................................
....................................................................................................................................................
....................................................................................................................................................
....................................................................................................................................................
....................................................................................................................................................
....................................................................................................................................................
....................................................................................................................................................
....................................................................................................................................................
....................................................................................................................................................
....................................................................................................................................................
....................................................................................................................................................
....................................................................................................................................................
....................................................................................................................................................
....................................................................................................................................................
....................................................................................................................................................
!
Germany
N.V. Vermeiren N.V.
Vermeirenplein 1 / 15
B-2920 Kalmthout
Tel: +32(0)3 620 20 20
Fax: +32(0)3 666 48 94
website: www.vermeiren.be
e-mail: [email protected]
Vermeiren Deutschland GmbH
Wahlerstraße 12 a
D-40472 Düsseldorf
Tel: +49(0)211 94 27 90
Fax: +49(0)211 65 36 00
website: www.vermeiren.de
e-mail: [email protected]
France
Austria
Vermeiren France S.A.
Z. I., 5, Rue d´Ennevelin
F-59710 Avelin
Tel: +33(0)3 28 55 07 98
Fax: +33(0)3 20 90 28 89
website: www.vermeiren.fr
e-mail: [email protected]
L. Vermeiren Ges. mbH
Winetzhammerstraße 10
A-4030 Linz
Tel: +43(0)732 37 13 66
Fax: +43(0)732 37 13 69
website: www.vermeiren.at
e-mail: [email protected]
Italy
Switzerland
Reatime S.R.L.
Vermeiren Suisse S.A.
Viale delle Industrie 5
I-20020 Arese MI
Tel: +39 02 99 77 07
Fax: +39 02 93 58 56 17
website: www.reatime.it
e-mail: [email protected]
Hühnerhubelstraße 59
CH-3123 Belp
Tel: +41(0)31 818 40 95
Fax: +41(0)31 818 40 98
website: www.vermeiren.ch
e-mail: [email protected]
Poland
The Netherlands
Vermeiren Polska Sp. z o.o
ul. Łączna 1
PL-55-100 Trzebnica
Tel: +48(0)71 387 42 00
Fax: +48(0)71 387 05 74
website: www.vermeiren.pl
e-mail: [email protected]
Vermeiren Nederland B.V.
Domstraat 50
NL-3864 PR Nijkerkerveen
Tel: +31(0)33 2536424
Fax: +31(0)33 2536517
website: www.vermeiren.com
e-mail: [email protected]
Spain
Czech Republic
Vermeiren Iberica, S.L.
Trens Petits, 6. - Pol. Ind. Mas Xirgu.
17005 Girona
Tel: +34 902 48 72 72
Fax: +34 972 40 50 54
website: www.vermeiren.es
e-mail: [email protected]
Vermeiren ČR S.R.O.
Sezemická 2757/2 - VGP Park
193 00 Praha 9 - Horní Počernice
Tel: +420 731 653 639
Fax: +420 596 121 976
website: www.vermeiren.cz
e-mail: [email protected]
R.E.: N.V. Vermeiren N.V., Vermeirenplein 1/15 - 2920 Kalmthout - Belgium – 2012-09- Instruction Manual Albatros II- vA
Belgium