1
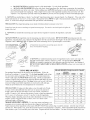
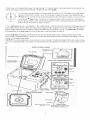
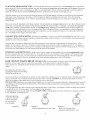
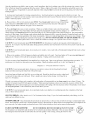
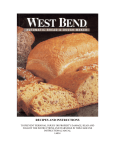
WEST BEND - AUTOMATIC
RECIPES
BREAD
& DOUGH
AND INSTRUCTIONS
MAKER
-L5231
REGISTER THIS AND OTHER WEST BEND@ PRODUCTS THROUGH OUR WEBSITE
www.westbend.com
TO PREVENT PERSONAL INJURY OR PROPERTY DAMAGE, READ AND FOLLOW THE INSTRUCTIONS
WARNINGS IN THIS CARE/USE INSTRUCTIONAL MANUAL
IMPORTANT
INFORMATION
ON PROTECTING
ELECTRONIC
CONTROL
AND
- To protect bread maker's
electronic control against possible damage caused by surges in electrical power line, we recolrnnend using a surge protector device,
available in the electronic department of most discount/hardware stores. Simply plug surge protector into the electrical outlet, then
plug bread maker cord into receptacle of surge protector.
IMPORTANT
SAFEGUARDSWhen using electrical appliances, basic safety precautions should always be followed to
reduce the risk of fire, property damage, electrical shock and/or personal injury, including the following:
•
•
•
•
•
•
Read all instructions before using.
Do not touch hot surthces. Use handles or knobs. Always use potholders or oven mitts to handle hot bread pan or hot bread.
Do not put hand inside oven chamber after bread pan is removed. Heating unit will still be hot.
To protect against electric shock, do not place cord, plug or appliance in water or other liquid.
Close supervision is necessary when any appliance is used by or near children.
Unplug fioln outlet when not in use and before cleaning. Allow to cool beiSre putting on or taking offparts and before
cleaning appliance.
Avoid contacting moving parts.
Do not operate appliance with a damaged cord or plug or after the appliance malfunctions or has been damaged in any
manner.
The use of accessory attachments not recolnlnended by The West Bend Company may result in fire, electrical shock or
personal injury.
Do not use outdoors.
•
•
•
•
•
Do not let cord hang over edge of table, counter or surface area, or touch hot surfaces.
Do not place appliance on or near a hot gas or electrical burner, or in a heated oven.
Do not use appliance for other than intended use.
To disconnect power, press stop button to turn control off; then remove plug tiom walt outlet. Never pull on the cord.
Extreme caution must be used when moving appliance during operation.
•
•
•
SAVE THESE
INSTRUCTIONS
- Your bread maker needs no special care other than cleaning. See ,a_arranty section in this
booklet for sela_ice details. Do not attempt to repair it yoursel£ For household use only. An offodor from motor may be noted with
first use, which is normal and will disappear with use. WARNING: To prevent personal injury or property damage caused by fire,
always unplug this and other appliances when not in use.
ELECTRIC
CORD STATEMENT
- CAUTION:
Your bread maker has a short cord as a safety precaution to prevent
personal injury or property damage resulting fiom pulling, tripping or becoming entangled with the cord. Do not allow children to be
near or use this bread maker without close adult supela_ision. If you must use a longer cord set or an extension cord when using the
bread maker, the cord must be arranged so it wilt not drape or hang over the edge of a counter-top,
tabletop or surface area where it
can be pulled on by children or tripped over. To prevent electrical shock, personal injury or fire, the electrical rating of the extension
cord you use must be the same or more than the wattage of the bread maker (wattage is stamped on backside of bread lnaker).
IMPORTANT
SAFETY
INSTRUCTIONS
- This appliance has a polarized plug (one blade is wider than the other). As a
safety feature, this plug wilt fit in a polarized outlet only one ,a_ay. If the plug does not fit fully in the outlet, reverse the plug. If is still
does not fit, contact a qualified electrician.
Never use with an extension cord unless plug can be fully inserted. Do not attempt to
defeat this safety feature. Your West Benda) Automatic Bread & Dough Maker ,a_as designed for use with 120 volt, 60 hz electrical
sela_ice ONLY. Use of your bread and dough maker with a converter or transformer will destroy the electronic control and will void
your warranty.
"QUICK
START"
STEPS
FOR
1. WHAT YOU WILL NEED
FOR MEASURING
•
•
•
•
•
See-through liquid measuring cup with graduated markings
Set of solid, nesting type measuring cups for dry ingredients
Set of measuring spoons
Kitchen spoon
Table knife
THE
FIRST
LOAF
FOR MAKING
Water
BREAD
Butter or Margarine
Bread Flour
Sugar
Dry Milk
Salt
Active Dry Yeast
2. HOW TO MEASURE - Measuring ingredients the right way with the correct measuring cups and spoons is the most important
step to f\_llow when making bread. See measuring section for more inforlnation.
REMEMBER
TO:
Ahvays measure liquid ingredients in see-through measuring cup with graduated markings. Liquid should
just reach marking on cup at "eye-level", not above or below. For easier measuring, set cup on inside of top kitchen
cabinet.
Ahvays spoon dlT ingredients, like bread flour, into solid, nesting D'pe measuring
table kaaife.
cups, then level off with
Never scoop measuring cups into dry ingredients as this will pack down the ingredients, causing the dough to
be dl3" and the loaf to be short.
Ahvays use set of measuring spoons to measure smaller quantities of dry and liquid ingredients, measuring
level, not rounded or heaping.
3. MAKING BASIC WHITE BREAD - 1½ LB. LOAF
9 ounces lukewarm water (1 cup + 2 tablespoons), about 75-85 ° F.
2 tablespoons butter or margarine
3 cups bread flour
1½ tablespoons sugar
1½ tablespoons dry milk
1½ teaspoons salt
2 teaspoons active dry yeast
1. Put kalead bar in pan over shaft. Twist if needed to slide do,a_ all the way.
2. Measure water and add to pan with butter.
3. Measure bread flour, sugar, dry milk and salt; add to pan. Level ingredients.
4. Make shallow welt in center of dry ingredients; add yeast.. Lock pan into machine.
way to turn.
See directional arrow on edge of pan for which
4. PROGRAMMING CONTROL FOR MAKING BREAD
1. Plug cord into electrical outlet. Machine is already programmed for making basic/specialD bread at the medium crust setting.
Anows will point to basic/specialD and medium settings on control.
2. Press start/stop button to turn machine on. Red light will come on. Bread making process will begin. Bread will be done in 3
hours and 10 minutes. Timer will count down in minutes so you always know how much time remains until bread is done.
3. When done, alert will sound and 0:00 will appear in display. Turn machine offby holding start/stop button down until red light
goes out, about 4 seconds.
4. Unlock pan and remove with hot pads. Shake loaf out and place on rack to cool 15 to 30 minutes before slicing. Wash pan
following cleaning instructions in this book.
KNOW
YOUR
INGREDIENTS
Although bread making seems very basic, it is a science in which the proportions of ingredients are critical. Read the following
inforlnation to better understand the importance of each ingredient in the bread making process. Also, always make sure ingredients
are fresh.
• FLOURisthemainingredient
inmaking
bread.It provides
structure
andfoodfortheyeast.Several
different
typesofflour
canbeusedinyourbreadmaker,
butDONOTUSEall-purpose
flour,cakeflourorself-rising
flouraspoorresults
will be
obtained.
BREADFLOURSHOULD
beusedinyourbreadmakerasit contains
moregluten-forming
proteins
thanall-purpose
flourandwillprovidetall,wellforlnedloaves
withgoodstructure.
Several
different
brands
ofbreadflourareavailable
forusein
yourbreadmaker.
•
WHOLE WHEAT FLOUR can be used in your bread maker at the whole wheat setting. This flour contains the entire
wheat kernel, including the bran and germ; therefore, breads made with 100% or a high percentage of whole wheat flour will be
lower in height and heavier in texture than bread made with bread flour. The whole wheat setting on your machine has a longer
knead time to better develop the structure of wheat breads for optimum results.
•
RYE FLOUR can be used in combination with bread flour in the preparation of rye or pumpernickel bread. But, it cannot be
used alone as it does not contain enough protein to develop adequate gluten for structure.
SPECIAL NOTE ON FLOUR - How to make minor adjustments for dough: All flours are affected by growing conditions, milling,
storage, hmnidity and even the manufacturer. While not visibly different, you may need to make some minor adjustments when using
different brands of flora as well as compensating for the humidity in your area. Always store flour in an air-tight container. Store
whole grain flours (whole wheat, rye) in retiigerator to prevent them from becoming rancid. Measure the amount of flour as directed
in each recipe but make any adjustment after the first 8 to 10 minutes of continuous kneading. FeelJ?ee to check the condition oflthe
do_@ during
the knead c;vcle as this' is the only time you can make al_v minor adjustment:
•
Open cover and touch dough. If it feels a little sticky and there is a slight smear under the knead bar, no adjustment is
necessary.
•
If dough is very sticky, clinging to the sides of pan or in one comer, and is lnore like a batter than a dough, add one
tablespoon flour. Allow it to work in before making any further adjustment.
•
If dough is dry and the machine seelns to be laboring dm-ing kneading, add one-teaspoon lukewarm water at a time. Once
again, allow it to work in before making any further adjustments.
•
The dough is just right near the end of the kneading cycle when it is soft to the touch, smooth in appemance and just a bit
sticky, leaving a slight residue on your fingers-the feel of perfect dough. The bottom of the bread pan will also be clean of any
dough residue.
•
DO NOT EXCEED 3 cups of bread flora for the 1½ pound loaf or 2 cups bread flora t\)r the 1 pound loaf. Breads
containing whole wheat, cereals or oats should not exceed a total of 3½ cups for the 1½ pound loaf or 2½ cups for the 1 pound
loaf.
•
SUGAR AND OTHER SWEETENERS provide food for the yeast, add height and flavor to the bread and give the crest a
golden color. Types of sweeteners that can be used include sugar, brown sugar, honey, molasses, maple syrup, corn syrup and
fiuits, whether dried or fresh. When using a liquid sweetener such as honey or molasses, the total alnount of liquid in the recipe
will need to be reduced slightly by the same measurelnent of liquid sweetener used. A special tip when measuring sticky liquid
sweeteners is to coat the measuring spoon with vegetable oil before measuring. This will help the liquid sweeteners slide right
out. DO NOT USE ARTIFICIAL SWEETENERS as a substitute for sugar and other natural sweeteners as the yeast will not
react properly and poor results wilt be obtained.
•
MILK enhances flavor and increases the nutritional value of bread. Any type of milk (whole, 2%, 1%, skim, buttermilk or
canned evaporated milk) can be used. Retiigerated milk must al,a_aysbe warmed to 75-85 ° F before adding to bread pan. Warm
in a glass-measuring cup in microwave or in a small pan on top of the range. DO NOT HEAT MILK ABOVE 110 ° F AS THIS
COULD AFFECT THE YEAST.
•
WATER used in combination with dry milk is a good substitute for regular milk and must be used when using the timer
feature as regular milk can spoil when left at room temperature for several hours. Use luke,a_arln ,a_ater,about 75-85 ° F, for best
results. DO NOT USE WATER ABOVE 110° F AS THIS COULD AFFECT THE YEAST.
Using too much liquid can cause the bread to collapse during the bake
needed as the flour wilt absorb moisture fiom the air. In dry weather,
moisture. When you experience a severe change in weather, it is best
as noted in the FLOUR paragraph for any minor adjustment that may
cycle. During hmnid weather, slightly less liquid may be
slightly lnore liquid may be needed as flour can lose
to check the condition of the dough during the knead cycle
be needed.
Water and milk are mostly interchangeable in recipes. Eliminate dry milk in recipes when substituting milk for water. Check
dough during the knead cycle for any minor adjustments. Slightly more milk may be needed when substituting for water.
•
BUTTER,
MARGARINE,
SHORTENING
and OILS serve several purposes as they tenderize the bread, add flavor and
richness and contribute to the storage life of bread by retaining moisture.
An excess of fat, however, can inhibit rising, so
accuracy is critical.
Butter, margarine and solid shortening are interchangeable in recipes. You may wish to cut butter and margarine into four (4)
pieces for faster blending during the knead cycle. Do not use reduced tat margarines as they contain more water and can affect
the size of the loaf'.
If substituting oil for a solid tat, reduce the amount of liquid in recipe by V2to 1 tablespoon, making aW minor adjustment during
the kalead cycle to obtain the right dough consistency.
Low-fat or fat-tiee bread can be made by substituting equal amounts of unsweetened applesauce or plain nonfat yogurt for the
amount of tat in the recipe. Watch dough as it kaleads for any minor adjustment.
•
EGGS add color, richness and leavening to bread. Use large eggs. No premixing is needed. Egg substitutes can be used in
place of tiesh eggs. One egg equals ¼ cup of egg substitute. To reduce cholesterol, you can substitute two (2) egg whites for each
large egg in the recipes without affecting the end result. Watch the dough during the kalead cycle for any needed adjustments. A
special tip when using eggs' is to run them m_der warm waterJor about one re#rote before cracking, as this helps the egg slide out
of the shell better.
•
SALT has several functions in making bread. It inhibits the yeast mowth while strengthening the gluten structure to make
the dough more elastic, plus it adds flavor. Use ordinary table salt in your bread maker. Using too little or eliminating the salt
will cause the dough to over-rise. Using too much can prevent the dough tiom rising as high as it should. "Light" salt can be
used as a substitute tbr ordinary table salt, providing it contains both potassium chloride and sodium. Use same amount as
recmrnnended for table salt. When adding salt to pan, add to one corner to keep it awco' f_om yeast, especially when using timer
as the salt can retard its'growth.
•
YEAST is a living organism, which, through fermentation, feeds on carbohydrates in flour and sugar to produce carbon
dioxide gas that makes the bread rise. Active dry, fast rising or bread machine yeast can be used in your bread maker. Use only
the amount stated in the recipe. Using a little more can cause the dough to over-rise and bake into the top of bread maker. Fast
rising yeast and bread machine yeast are virtually the same and interchangeable. DO NOT USE COMPRESSED CAKE
YEAST. Recipes in this book were tested using only active dry, fast rising and bread machine yeast.
Keep yeast stored in the reliigerator. You may find it handy to purchase yeast in glass jars so as to measure the exact amount
without having to ,a_asteany. If using yeast packed in a ¼-ounce toil envelope, it is best to open a tiesh envelope every time you
bake. If you save the unused alnount from the open envelope, store in a dry, airtight container in the refrigerator. Date the
container and use promptly. Do not mix old and new yeast in a recipe. A ¼-ounce foil envelope of yeast contains 2¼ teaspoons.
ALWAYS MAKE SURE YEAST IS FRESH AND HAS NOT EXPIRED THE "USE BY" DATE PRINTED ON THE
JAR OR ENVELOPE.
VITAL WHEAT GLUTEN is the gluten protein, which has been rinsed from wheat flour and then dried. Vital gluten will
increase the protein content in flour to produce a higher loaf of bread with lighter texture. About the only time you may wish to
consider adding vital gluten is for 100% whole wheat bread or recipes containing a high percentage of whole wheat or other
whole _ain floms or cereals. As a guideline, add one (1) teaspoon vital gluten per cup of flour used in the recipe. Check the
dough during kaleading; you may need to add a little water as the vital gluten absorbs liquid. Vital gluten can be obtained at
most health food stores. Do not use gluten flour, as this contains less protein and is less effective.
Or, to increase the protein content, you can use a large egg as a substitute for vital gluten. Just add it to the liquid in the
bottom of pan and reduce the recommended amount qfliquid in recipe by two (2) ounces (¼ clip). Again, check the
condition of the dough during the kalead cycle.
•
CINNAMON AND GARLIC: Adding too much cinnamon or garlic can affect the texture and size of the loaf'. Cinnamon
can break down the structure of the dough, affecting height and texture, and garlic can inhibit the yeast activity. Use only the
amount of cinnamon and garlic recommended in the recipe; don't be generous.
MEASURING
INGREDIENTS:
THE KEY TO SUCCESSFUL
BREAD
MAKING
- The most important
part of bread making is to MEASURE THE INGREDIENTS PRECISELY AND ACCURATELY. You may need to adjust your
measuring habits, but the rewards for doing so will be great. Follow these very important tips:
•
READ the recipe first and organize the ingredients in the order in which they are added to the pan. Many bread disasters
occur because an in_edient was left out or added twice.
•
DO NOT EXCEED the ingredient capacity of the bread maker. Use only fiesh ingredients.
•
ALWAYS ADD INGREDIENTS
in the order listed: liquid ingredients first, then butter or margarine, dry ingredients
next and finally yeast in the very center. Before adding yeast, ALWAYS tap the pan to settle dry ingredients into corners of
pan to prevent liquid fiom seeping up. Make a slight well in center of dry ingredients and place the yeast in the well. This
sequence is very important, especially when using the timer to prevent yeast fioln getting wet before bread making begins.
1. ALWAYS use standard glass or plastic "see-through" liquid measuring cups to measure liquids. See Diagram 1. Place cup on flat
surface and measure at "eye level", not at an angle. The liquid level line MUST be right to the measurement marking, not above or
below. A "looks close enough" measurement can spell disaster in bread making.
SPECIAL
TIP: Place liquid measuring cup on inside of kitchen cabinet to measure at eye level.
Liquid level must be exact to markings
height of the loaf
on liquid measuring
cups.
Too lmtch or too little liqltid will q[]ect the
2. ALWAYS use standard dry measuring cups (cups that nest together) to measure dry ingredients, especially
flour.
ALWAYS SPOON dry ingredients into the measuring cup, then level with a kafife. DO NOT SCOOP measuring cups into dry
ingredients, especially flour, as it compresses the ingredients into the cup and causes the dough to be dry and result in a short toa£ See
Diagrams 2 and 3. SPECIAL TIP: To lighten flour before measuring, move a spoon through it several times.
All ingredients measured in measuring si_oons mltst be
level, not rounded or heaping.
_i_! _
L
_.Z_
4
3. ALWAYS use standard measuring spoons for ingredients such as yeast, salt, sugar, dry
milk and small amounts of honey, molasses or ,a_ater. The measurelnents MUST BE
LEVEL, not rounded or heaping as a little difference can affect the bread. See Diagram 4.
DO NOT USE TABLEWARE AS MEASURING SPOONS as these vary in size and will
not be accurate.
USING
BREAD
MIXES
Pre-packaged bread mixes can be used in your bread maker. Follow the
directions for making a 1V2pound loaf. Use the basic/specialD" bread setting
for most mixes unless preparing a 100% whole wheat or natural grain mix,
which would require the whole wheat bread setting. Add the recommended
amount of liquid to the bread pan first, then flour mixture and finally the yeast.
Select desired crust color and start. The timer feature can be used with bread
mixes providing no perishable ingredients are used such as milk and eggs,
which can spoil when left at room temperature for several hours.
M_JAN[ R
_N,'T
X_NJLEN t'(HAN
_
SPECIAL NOTE: If using a mix that makes a one (1) pound loaf of bread,
you may wish to add additional flour and water to increase the amount of
dough to better fill the pan and obtain a nicer loaf of bread. If bread mix
weighs 12 ounces or less, increase the amount of water or liquid recommended
I©
by 1½ om_ces (3 tablespoons) and add ½ cup flour to the dry ingredients.
When the dough is ka_eading, check if any minor adjustment in water or flour is
needed. If mixes weigh more than 12 ounces, use as is as there will be
sufficient dough to fill the pan.
MAKE
YOUR
OWN MIXES
- To save time, 1honey and energy, you
an prepare your own mixes and store them in the refiigerator until ready to use.
Simply measure all dry ingredients in the recipes EXCEPT YEAST into a plastic bag or sealable container. Label the type of bread
and loaf size. When ready to use, let the flour mixture stand at room temperature 15 minutes. Add recommended liquids, then the dry
flour mixture to pan. Level and add yeast to the center. Program and start the bread maker. Use timer if recipe recommends its use.
ADAPTING
YOUR FAVORITE
BREAD/DOUGH
RECIPES
- After you have prepared some of the recipes in this
book, you may wish to adapt your own conventional bread recipes. Some experimentation will be required and you wilt need to check
the condition of the dough during the knead cycle for any adjustments needed. Either use one of the recipes in this book that is similar
to your recipe as a guide, or use this forlnuta:
For each cup of flour used in recipe use:
For Example,
based on the t\_rlnula to the left using 3 cups of flour start with:
3 ounces liquid, 75-85 ° F
½ tablespoon tat
½ teaspoon salt
½ tablespoon sweetener
scant 3/4teaspoon active dry or
½ teaspoon bread machine/fast rise yeast
9 ounces liquid, 75-85 ° F
1½ tablespoons tat
3 cups of bread flour
1V_,teaspoons salt
1½ tablespoons sweetener
2 teaspoons active dry or 1½ teaspoons bread lnachine/fast rise yeast
Add in_edients to pan in recommended sequence: liquids first, then fat, then all dry in_edients except yeast. Level dry in_edients in
pan. Make a slight well and add yeast to well. Pro_aln t\_rbasic/specialty setting, medium crust color. After 10 minutes of
continuous kneading, check the condition of dough. It should be soft, a bit sticky with a slight smear under the knead bar. If too wet
and sticky, add one (1) tablespoon of flour at a time until dough gathers into a ball and does not cling to sides of pan. If too dry and
motor is laboring, add one (1) teaspoon liquid at a time until the dough becomes lnore pliable.
DO NOT EXCEED 3 CUPS OF BREAD FLOUR FOR A 1½ POUND LOAF; 2 CUPS OF FLOUR FOR A 1 (ONE) POUND
LOAF.
HIGH ALTITUDE
ADJUSTMENT
- Reduced air pressure at high altitudes causes yeast gases to expand more rapidly and
the dough to rise more quickly. The dough can rise so much that when it begins to bake, it wilt collapse due to overstretching of the
gluten structure. To slow the rising of the dough at high altitudes, reduce the amount of yeast by ¼ teaspoon at a time until you find
the right amount. You can also reduce the amount of liquid by a teaspoon or two. Some experimentation will be needed when using
your bread maker at high altitudes. Make notes on the amount of yeast and liquid used for future reference.
BECOME
FAMILIAR
Please review it carefully
Maker".
WITH
CONTROL
PANEL
to better understand each button.
- The bread maker's control panel was designed to be very easy to use.
Either look at the control panel on the bread maker or see "Parts of Bread
BREAD
SELECT
BUTTON
- The bread select button lets you choose the bread settings as well as the dough setting. With each
press of the bread select button, the indicator arrow wilt point to a bread or dough setting on the control panel. The time required to
complete each setting will also appear in the display. The bread select settings offered are:
basic/specialty
whole wheat
dough
3:10 (medium crust)
3:40 (medium crust)
1:20
The basic/special D"bread setting can be used tbr ahnost any bread recipe containing at least 50% bread flour. Ifa recipe contains less
than 50% bread flour, then use the whole wheat setting as this features a longer knead cycle which is beneficial for whole _ain flour,
such as whole wheat. See "Basic Steps in Making Bread".
The dough setting prepares dough t\_rhand shaping and baking in your own oven.
When using the basic/specialD,
whole wheat and dough settings, an audible alert will sound during the knead cycle as a reminder
add in_edients,
such as nuts or raisins, if recmrnnended
in recipe. If not adding extra ingredients,
iguore this alert or use it as a
checkpoint to check the condition of the dough for any needed adjustlnent.
See "Special Notes on Flour".
to
CRUST COLOR BUTTON - The crust color button lets you choose three (3) different crust colors tbr breads made at
basic/specialty and whole wheat settings. With each press of the button, the indicator arrow will point to light, medium or dark on
the control panel. The crust color button does not apply to the dough setting.
TIMER BUTTONS
- The timer lets you program the bread maker to start at a later time, which is convenient if you wish to wake
to a fresh loaf of bread in the morning or come home to a fresh loaf for dinner. The timer can be pro_alnlned to delay the start of the
bread maker for up to 13 hours. When using the timer feature, no perishable ingredients should be used, such as milk, eggs, cheese,
yogurt, etc., as these foods can spoil when held at room temperature for several hours. Use timer only with recipes with the
@ symbol as these do not contain any perishable ingredients.
6
1.Followsteps1-4formaking
breadonpage9 ordough
onpage19.Countthenumber
ofhoursandminutes
between
thetimeyou
will startthemachine
to,ahen
youwantthebreadordough
tobedone.Forexample:
Youarereadytostartthemachine
at9:30andwantthebreaddoneat6:00.Thenumber
ofhoursandminutes
between
9:30and6:00is 8'/_,
hoursor8:30.8:30isthetimeyouenterintothetimer.Press
andholdthe(up)
timerbuttontoscrollthetimeupin 10minuteincrements
until8:30appears
indisplay.If yougopast8:30,
usethe(do,a_)T timerbuttontoscrolldownin 10minuteincrements
untilyoureach8:30.Themaxilnum
timefortimeris 13hours(13:00).Thebreadordough
process
timeisautomatically
figuredintothedelaytime
asthisis thetimefiomwhichyoubegintocountup.
2. Press start/stop
button once to turn machine on. The red light wilt glow, colon between hour and minutes will flash and timer will
begin counting down in minutes. When timer reaches the programmed bread or dough process time, the machine will begin making
bread or dough. When done, 0:00 will appear in display and audible alert will sound that it is done. If in bread mode, the machine
will automatically go into keep warm cycle for up to three horns or until the machine is turned oft'.
If in the dough mode, the machine will automatically turn itself off when the dough is done. Unplug
Relnove bread or dough from machine. Always use oven mitts when removing hot bread fiom bread
on rack 15 to 30 minutes before slicing.
CAUTION: To prevent personal injury, do not touch cover, vent or sidewalls of bread maker during
are hot. Do not put hands inside oven chamber or touch the heating unit after completion of the bake
hot.
cord from electrical outlet.
maker after baking. Cool loaf
the bake cycle, as these surfaces
cycle, as these surfaces are also
START/STOPORON/OFFBUTTON- (Wording
for this button varies with model.) Use the start/stop button to turn bread
maker on and oft'. Before starting the machine, you must first progranl the bread select and crust color, plus the timer if being used.
Press start/stop button once to turn machine on. When on, red signal light by button will glow and remain lit until bread maker is
turned off. To turn oft; press and hold start/stop button down for about four (4) seconds or until light goes out.
When the machine is on, the colon between hours and nlinutes will flash and minutes will begin to count down the time remaining
until bread is done. When process time elapses, 0:00 will appear in display and audible alert will sound. Turn offby pressing
start/stop button until red light goes out. Remove bread pan using oven mitts and shake loaf out of pan onto cooling rack. Cool
before slicing.
If pan is not removed ilrnnediately after baking, machine will automatically go into keep warnl mode for up to three (3) hours to keep
bread warm. The red light will relnain lit during this time and 0:00 will appear in display. Ifnlachine is not turned offduring keep
warm period, machine will automatically turn off. If using dough setting, machine will automatically turn offupon completion of
cycle, alert will sound and display wilt reset to dough setting. Remove dough and finish as recommended in recipe being prepared.
Do not leave pan-containing dough inside machine after completion of cycle as dough will continue to rise and could overflow the
pan. See Dough section on page 19 t\_r more detail.
TOO HOT/TOO
COLD WARNINGIf inside of oven chanlber is too hot or too cold for bread making, the word "hot" or "col"
will appear in display along with alert sounding to indicate that machine cannot be turned on. You will need to relnove pan and allow
chamber to cool or warm accordingly.
Typically "hot" will appear in display when you make consecutive loaves and forget to turn machine offbetween loaves. Allow
chanlber to cool with cover open 10 to 15 minutes or until nlachine can be turned on without warning going oft_ If"col" appears in
display, move bread maker to a warmer area for 15 minutes or until nlachine can be turned on without warning going ofl_ If oven is
too hot, the yeast can be killed; if too cold, the growth of the yeast will be retarded.
POWER OUTAGE PROTECTION
- In the event of a power outage, the bread maker will turn offand autonlatically resume
the cycle in progress if power is restored within 5 to 10 seconds, If power is not restored in 5 to 10 seconds it will remain offwhen
power is restored. In this case, you must remove the contents from pan and start over with fiesh ingredients. The red on light will
remain off and the display will reset to the default setting; basic/specialty, medium crust, with 3:10 in display.
BASIC
STEPS IN MAKING BREAD - BEFORE USING your bread maker for the first time, wash inside of pan and
knead bar with hot soapy water and a soft cloth, rinse and dry. Twist pan clockwise to unlock from bread
maker, then lift out. The knead bar lifts off shaft in bottom of pan. You may need to twist the bar slightly to
relnove.
Place knead bar onto shaft in pan,
nlatching hub shape with shaft shape.
Push bar down all the way.
Do not use any abrasive scouring pads or cleansers on pan or knead bar as danlage can occur. Wipe the inside of chanlber and outside
surfaces of nlachine with a soft damp cloth if necessary, dry with a soft cloth. CAUTION: To prevent personal injury or electric
shock, do not immerse bread maker base, its cord or plug in water or other liquid.
SPECIAL NOTE: Bread pan is not inllnersible and should never be washed in an automatic dishwasher. Ilnnlersing pan in water can
cause damage to the bearing that turns the knead bar. Dishwasher cleaning can reduce the non-stick qualities of the coating, causing
sticking of the bread.
1. Position knead bar onto shaft in bottom of pan, matching hub shape to shaft shape. See Diagram 6. Make sure knead bar is pushed
onto shaft all the way. You may need to twist bar slightly to drop into place.
2. Add ingredients to pan in order listed in recipe, MAKING SURE to add all liquids to pan first, then butter or margarine, tbllowed
by dry ingredients. See Diagrams 7-9.
Add liquid ingredients
to pan first. Then add
butter or lnargarine,
cut into pieces for
taster blending.
Diagranl 7
Diagram 8
Add dry ingredients next. Level in pan.
Diagranl 9
Make a well in enter of dry
ingredients and add yeast to well.
Afterdryingredients
areadded
topan,tappantosettleingredients,
thenlevel,pushing
some
ofthedrymixtureintocorners
ofpan.
Thiswill prevent
liquidfromseeping
upfromthecorners.
Makeaslightwellincenter
ofdryingredients
andaddtheyeasttothe
well.Thissequence
ofingredients
isespecially
inlportant
whenusingthetimertoprevent
theyeastfionlgetting
wetbefore
bread
making
begins.
3.Lockpanintobreadmaker
bytwisting
counterclockwise.
Seedirectional
arrowonedgeofpanforwhichwaytoram.See
Diagram
10.If pandoes
notlocksecurely,
relnove
panandreposition
untilsecured.
Panmustalways
belockedinplaceforbread
maker
tofunction
properly.Closecover.
Diagranl
10
4.Plugcordintoa 120voltACelectrical
outletONLY.Press
breadselectbuttonfortypeofbread
being
made.
Thenpresscrustcolorbuttonfordesired
color.Thetotaltimefortheselections
will appear
in
display.
Progranl
timerif desired.
Seepages
7-9forinstruction.
g.Press
start/stop
buttononcetoturnonmachine.
Whenon,redlightwill glowandcolonbetween
hours
andnlinutes
will flash.Oncebreadmaker
hasbeenturned
onprogranlnled
settings
cannot
bechanged.
To
change
setting,
holdstart/stop
buttondownuntilredlightgoesout.Thenreprogranl
controlandturnbackon.Thebreadmaking
process
wiltthenbegin.Faintclickingsounds
indicate
gentleheatbeingprovided
to,a_arnl
thechamber.
Duringtheknead
cycle,an
alertwill siNmltoaddextraingredients
if thereciperecommends.
Opencoverandaddingredients
tothepanontopofdough.These
ingredients
will bemixedduringtheremainder
ofthekalead
cycle.DONOTSTOPMACHINETOADDINGREDIENTS.
If no
ingredients
aretobeadded,
iNlorealertoruseit tocheckthecondition
ofdough.See"Special
NotesonFlour"onpage3.
CAUTION:Toprevent
personal
injuryDONOTREMOVEthebreadpanortouchanymovingpartswhenbread
makerisin
operation.
If youneedtostopthebreadmakerduringoperation,
holdthestart/stop
buttondownforf\3ur(4)seconds
oruntilthered
lightgoes
out.
CAUTION:Toprevent
personal
injury,donottouchcover,window,
ventorside,a_alls
ofbreadmakerduringthebakecycleasthese
surfaces
arehot.
6.Whencyclecompletes,
0:00will appear
indisplayandaudible
alertwill sound.Turnbreadmaker
offbypressing
start/stop
until
lightgoesout.Melnorywillrecallthelastprogram
indisplay.Unplug
cordfionlelectrical
outlet.
It isbesttorenlove
breadinllnediately
fiolnmachine
f\3ra crispier
crust.Opencoverandremove
breadpanusingovenmitts.To
unlockpan,twistclockwise,
thenrelnove
panfionlmachine.
Handle
breadpancarefully
asit ishot.SeeDiagranl11.
Diagranl
11
Twist pan clockwise
to relnove.
CAUTION: To prevent personal injury, always use oven mitts to relnove the hot bread pan from bread
maker and when relnoving the baked loaf of bread fronl pan.
Invert bread pan and shake until loaf falls out on cooling rack. Knead bar should stay in place when bread
is removed, but may slide out with bread. If bar is inside loaf; relnove before slicing. Cool bread for at
least 15 to 30 minutes.
If bread is not removed when cycle completes, the bread maker will automatically go into keep warm for up to three (3) hours. The
on light will remain lit and 0:00 will appear in display. When relnoving bread pan, al,a_aysuse oven mitts, as pan is still hot. Hold
start/stop button down until on light goes out to turn bread maker off. Unplug cord fionl electrical outlet. If bread maker is not turned
offduring keep warm, it will automatically shut offafter three (3) horns.
CAUTION: To prevent personal injury, do not put hands inside oven chamber or touch heating unit after completion of the bake
cycle, as these surfaces are hot.
SLICING
BREAD - Allow bread to cool 15 to 30 nlinutes before slicing. If you slice bread ilrnnediately after baking, it will be
sticky and very difficult to slice.
STORING
BREAD - Since honlelnade bread contains no preselwatives, it does not stay as fiesh for as long as commercially made
bread. Store bread in a plastic bag or sealed container to keep it fronl drying out. Keep bread at room temperature or in retiigerator for
up to one week. For longer storage, put bread in freezer. Slice bet\3re fieezing so slices can be relnoved when needed.
CLEAN
AFTER
EACH
USE
DO NOT IMMERSE BOTTOM OF BREAD PAN" IN"WATER!
The bread pan is not inllnersibte and should never be washed in an automatic dishwasher. This can cause damage to
the bearing that turns the knead bar and reduce the non-stick qualities of the coating, causing the bread to stick.
9
l.
2.
Unplug cord fiom electrical outlet and allow bread maker to cool before cleaning.
The bread pan and kalead bar must be cleaned after each use to ensure perforlnance. After bread is relnoved from pan, fill pan
half full with warm water and small amount of dish soap. Set pan in empty sink or on hot pad and allow to soak for 5 to 10
minutes or until kalead bar can be lifted off shaft. Twist bar slightly to loosen. The kalead bar must soak in water before it can
be relnoved. Wash inside of pan and knead bar with a soft cloth, rinse and dry. Replace bar on shaft.
Be sure that shaft in pan is kept clean so that kalead bar fits properly. DO NOT use any type of utensil or tool to clean the gasket
around the shaft as damage will occur and result in leakage. DO NOT use any abrasive scouring pads or cleansers on bread pan or
kalead bar as damage to finish can occur. The coating inside of bread pan may change color over time, which is normal and does not
affect the bread or dough. CAUTION: To prevent personal injury or electric shock, do not immerse bread maker base, its cord or
plug in water or other liquid.
3.
Wipe inside of chamber and outside surthces of bread maker with a damp cloth if necessary. The cover is relnovable for
cleaning if needed. Simply open it 45 degrees and pull toward you. Wipe cover with a damp, soapy cloth and dry. DO NOT
immerse cover in water or place in automatic dish,a_asher as water will get in between the parts and cause damage.
Replace cover by aligning attachment hooks into hinge on back of bread maker. Cover should move fieely up and do,a_ after being
replaced. See "Parts of Bread Maker".
OTHER HELPFUL
TIPS FOR USING YOUR BREADMAKER
1. BE SURE to allow adequate ventilation around the bread maker when it is in operation. Keep it out of drafts and direct sunlight and
at least tour (4) inches away from walls, cabinets and other appliances, especially heating and cooling appliances which interfere with
the internal bread maker temperatures and affect the loaf of bread being prepared.
2. ALWAYS place bread maker on a DRY, STABLE heat-proof countertop or table during use. Since the bread maker contains a
motor, some vibration occurs during the kalead cycle.
3. DO NOT cover bread maker with anything during operation as this can cause malfunction.
4. DO NOT TOUCH control panel buttons after bread maker has been turned on as this can interrupt the cycle. Turn bread maker off
after completion of cycle.
5. DO NOT LEAVE bread maker plugged into electrical outlet when not in use to prevent it fiom being accidentally turned on.
BREAKDOWN OF BREAD/DOUGH
CYCLES - To help you understand the bread making process, the following chart breaks
down each cycle's time in minutes and seconds. These times are approxilnate and should be used only as a guide. The total process
time is given in hours and minutes, depending on the crust selection made.
BREAKDOWN OF
BREAD /DOUGH
CYCLES
MIX
REST
KNEAD
BASIC/SPECIALTY
WHOLE WHEAT
DOUGH
5 min.
15 min.
20 min.
5 min.
15 min.
30 min.
5 rain.
0 min.
20 min.
RISE (1)
34 min.
50 min.
55 min.
STIR-DOWN (1)
RISE (2)
STIR-DOWN (2)
RISE (3)
BAKE (LIGHT)
(MEDIUM)
(DARK)
16 sec.
15 min.
16 sec.
50 min.
40 min.
50 min.
60 min.
16 sec.
14 min.
16 sec.
55 min.
40 rain.
50 rain.
60 min.
16 sec.
Total Time (Hour-
1:20
Minutes)
(LIGHT)
(MEDIUM)
(DARK)
REGULAR
MIX
3:00
3:10
3:20
3:30
3:40
3:50
BREAD
AND
DOUGH
CYCLES
When turned on, the bread maker mixes ingredients about 5 minutes. The knead bar will start and stop during mixing.
Rest The dough is allowed to rest about 15 minutes bel\3re kaleading, fhint clicking sounds indicate the bread maker is keeping the
dough warm.
10
KNEAD
Knead time varies by setting: basic/special
D is 20 minutes; whole wheat is 30 minutes
wheat requires the longest kalead time to better develop the gluten in whole-wheat
flour.
and dough is 20 minutes.
Whole
SPECIAL NOTE: An audible alert will sound during the knead cycle to siNlal when to add special in m'edients such as raisins or nuts,
if called for. Adding these ingredients at the alert prevents them fiom becoming over mixed or crushed. If these ingredients are not
required, iNlore this alert. The audible alert during the kalead cycle can be used as a reminder to check the dough for any needed
adjustment. See "Special Notes n Flour" on page 3.
RISE (1)
The dough is allowed to rise. Faint clicking sounds indicate gentle heat being provided to keep the chamber warm.
STIR-DOWN
(1)
Next, the dough is stirred do,a_ by the kalead bar to relnove excess carbon dioxide gas created by the yeast.
SPECIAL NOTE: If using dough setting, an audible alert will sound and bread maker will turn oft; as the cycle is complete. The
dough is ready for hand shaping, rising and baking in your o,a_ oven.
RISE (2) - The dough is allowed to rise again, but for a shorter period of time.
STIR-DOWN (2) - The dough is again stirred down by the kalead bar to relnove excess gas and to shape for the final rise. This final
stir-down ensures that the bread will have good texture.
RISE (3) - A final rise helps the dough achieve lnaximum height. Faint clicking sounds indicate gentle heat being provided to keep
the chamber warm.
BAKE
- Bake time varies by crust color. An audible alert indicates
turned ofl; it automatically
goes into keep warm for up to 3 hours.
bread is done and 0:00 appears
TROUBLESHOOTING
PROBLEM
POSSIBLE
CAUSE
3. Top inflated,
mushroom-like in
appearance.
4. Top and sides cave in
is not
GUIDE
SIZE AND SHAPE
- Wheat breads wilt be shorter due to less glutenforlning protein in whole wheat flour.
- Not enough liquid
- Sugar omitted or not enough added.
- Wrong type of flour used.
- Not enough yeast used or too old.
- Wrong type of yeast used.
2. Flat loaves, no rising
If bread maker
SOLUTION
LOAF
1. Short loaves.
On average, 1 lb.
loaves will be 4
inches high; 1½ lb.
loaves 5 to 6 inches
high at regular
bread settings.
in display.
-Yeast omitted.
-Yeast too old.
-Liquid too hot.
-Too much salt added.
-Sugar or other sweetener omitted.
-If using timer, yeast got wet before bread making
process started.
-Too much yeast.
-Too much sugar.
-Too much flour.
-Substituted active dry yeast for bread machine/fastrising yeast.
-Not enough salt.
-Warm, humid weather.
-May be caused by high altitude.
-Too much liquid.
-Too much yeast.
11
- Normal situation, no solution.
- Increase liquid by 1 tablespoon.
- Add in medients as listed in recipe.
- Do not use all-purpose flour.
- Measure amount recommended and check
fieshness date on package.
- Use correct type of yeast, especially
important for bread machine/fiast-rising
yeasts.
-Add ingredients as listed in recipe
-Check expiration date.
-Use lukewarm liquid, about 75-85 ° F.
-Use amount recommended.
-Add in_edients as listed in recipe.
-Push dry in_edients into corners of pan.
-Make well in center for yeast.
-Reduce yeast by ¼ to ½ teaspoon.
-Reduce sugar by 1 teaspoon.
-Reduce flour by 2 to 3 tablespoons.
-Use correct amount of bread machine/fastrising yeast.
-Use amount recomlnended in recipe.
-Reduce liquid by 1 tablespoon and reduce
yeast by ¼ to ½ teaspoon.
-See "High Altitude" section on pg. 7
-Reduce liquid by 1 tablespoon.
-Use alnount recolnlnended in recipe.
5.Gnarly,knotted
top,
notsmooth.
-Notenough
liquid.
-Toomuchflour.
-Topsmaynotallbeperfectly
shaped,
butwiltnot
affectflavor.
6.Collapsed
while
baking.
-Maybecaused
byhighaltitude.
-Exceeding
capacity
ofbreadpan.
-Notenough
saltusedoromitted.
-Toomuchyeastor,aTong
typeused.
-Warm,
hmnidweather.
7.Loafuneven.
-Dough
toodryandnotallowed
toriseevenly
in pan.
BREADTEXTURE
8.HeaxT,
dense
texture. -Toomuchflour.
-Notenough
yeast.
-Notenough
sugar.
9.Open,coarse,
holey -Saltomitted.
texture.
-Toomuchyeast.
-Toomuchliquid.
10.Center
ofloafis
-Too much liquid.
raw,notbakedthrough. -Power outage during
-Increase liquid by 1 tablespoon.
-Measure
accurately.
Seepg.5.
-Measure
recomlnended
amount.
-Measure
accurately.
Seepg.5
-Addingredients
aslistedinrecipe.
-Measure
recomlnended
amount.
-Reduce
liquidby 1tablespoon.
-Reduce liquid by 1 tablespoon.
-Bread maker will turn off automatically if power
not restored within 10 seconds. You must relnove
the unbaked loaf and start over with fiesh
ingredients.
-Always put knead bar on shaft in pan before adding
ingredients.
-Let cool on rack 15 to 30 minutes.
-Use a good bread knife or electric knife.
operation.
-Forgot to put knead bar in pan.
11. Doesn't slice well,
very sticky.
-Increase
liquidby1tablespoon.
-Measure
flouraccurately,
levelingoff
measuring
cup.Seepg.5.
-Having
doughatpropercondition
iskeyto
perfect
loaves.
Seepg.3.
-See"HighAltitude"section
onpg.6.
-Donotusemoreingredients
than
recommended
forIV_,
poundloa_
-Useamount
recommended
inrecipe.
-Measure
righttypeofyeastaccurately.
-Reduce
liquidby 1tablespoon
andreduce
yeastby¼to V_,teaspoon.
-Sliced while too hot.
-Not using proper knife.
CRUST
COLOR
THICKNESS
AND
12. Dark crest color/too
thick,
-DARK crest setting used.
-Use LIGHT or MEDIUM crest color setting the
next time.
13. Loaf is burned.
-Bread maker malfunctioning.
-See Warranty section for servicing.
14. Crust too light.
15. Knead bar cannot be
removed,
-Bread not baked long enough.
-Water must be added to bread pan tbr knead
bar to soak before it can be relnoved,
-Use darker crust color setting.
-Follow cleaning instructions after use. You may
need to twist bar slightly after soaking to loosen.
PAN PROBLEMS
16.Bread sticks to
pan/difficult to shake
-Can happen over prolonged use.
-Wipe inside of bread pan, from ribs down, lightly
with vegetable oil or solid shortening. Or, add 1
teaspoon vegetable oil to liquid in pan before adding
dry ingredients. Do not use a vegetable spray as
sticking can worsen. Or, let bread sit in pan 10
minutes before shaking out.
out.
-Replacement pan may be ordered. See Warranty
section.
MACHINE
17. Ingredients not
mixed,
MECHANICS
-Did not start bread maker.
-After programlning control panel, press start/stop
button.
-Knead bar must be on shaft in bottom of pan belbre
adding ingredients.
-Forgot to put knead bar in pan.
12
18.Burning
odornoted -Ingredients
spilledinsideoven.
duringoperation.
-Becareful
nottospillwhenadding
topan.
Inm'edients
canbumontoheating
unitandcause
smoke.
-Replacement
panmaybeordered.
-Donotusemorein_edients
thanrecolrnnended
in
recipeandalways
measure
accurately.
Seepage5.
-Panleaks.
-Exceeding
capacity
ofbreadpan.
19.WHOOPS!
Machine
unplugged
by
mistake
orpowerwas
lost.
-Machine
haspoweroutage
protection
forupto 10seconds.
If powernotrestored
within10seconds,
thenfollowmlidelines
belowforcycleinpro_ess
whenpowerwaslost.
-If machine
inkneadcycle,repro_aln
tosame
breadsetting
andcolorandturnmachine
backon.
-If machine
inrisecycle,remove
doughfrompan,shape
andplacein _eased
9-by-5-inch
loafpan,
coverandallowtoriseuntildoubled.
Bakeinpreheated
conventional
ovenat350°Ffor40to45
minutes
oruntilgolden
brown.
-If inbakecycle,preheat
conventional
ovento350°Fandrelnove
toprack.Carefully
remove
pan
frommachine
andplaceonbottomovenrack.Bakeuntilgolden
brown.
HowcanI save
the
bread?
NUTRITIONAL
INFORMATION
- Nutritional
information
was calculated
using butter and whole milk
when called for in the recipes and is based on a ½-inch thick slice of bread. For less calories and total tat, you may
substitute margarine for butter and low-fat milk for whole milk.
100% Whole Wheat Bread Total Calories:
Honey Oatmeal Bread Total Calories:
127.5 Total Fat(g):2.0 Total Carb(g):23.5 Total
134.1 Total Fat(g):2.0 Total Carb(g):24.7 Total
Protein(g):4.6
Fiber(g):3.4 Chol(mg):3.8
Protein(g):4.5
Fiber(g): 1.0 Chol(mg):3.8
Sodium(mg):202.4
Sodium(mg): 199.7
50% Whole
Wheat
Bread Total Calories:
126.5 Total Fat(g): 1.9 Total Carb(g):23.3
Protein(g):4.3
Fiber(g):2.0 Chol(mg):3.8
Sodium(mg):200.9
Basic Dinner
Rolls/Bread
Italian
Total
Sticks Total Calories:
Herb
Bread Total Calories:
137.3
Total Fat(g):2.3 Total Carb(g):24.3 Total
Protein(g):4.9
Fiber(g): 1.1 Chol(mg):4.4
Sodium(mg):213.7
Old Fashioned
White
Bread
Total Calories:
115.5 Total Fat(g):2.5 Total Carb(g): 19.8 Total
Protein(g):3.7
Fiber(g):0.7 Chol(mg):5.7
Sodium(mg): 146.8
Total Fat(g):2.7 Total Carb(g):25.0 Total
Protein(g):5.0
Fiber(g):0.9 Chol(mg):6.7
Sodium(mg):205.6
Basic White
Raisin Bread Total Calories:
Bread
Total Calories:
133.5 Total Fat(g):l.9 Total Carb(g):24.5
Protein(g):4.5
Fiber(g):0.9 Chol(mg):3.8
Sodium(mg): 199.9
Cinnamon
Rolls Total Calories:
Total
Wheat Bread Total Calories:
133.0 Total Fat(g): 1.7 Total Carb(g):25.3
Protein(g):4.4
Fiber(g): 1.9 Chol(mg):2.8
Sodium(mg):297.8
Total
177.4
Total Fat(g):3.4 Total Carb(g):32.7 Total
Protein(g):5.1
Fiber(g): 1.4 Chol(mg):3.8
Sodium(mg):231.3
Traditional
177.3 Total Fat(g):7.9 Total Carb(g):22.8
Protein(g):5.5
Fiber(g):0.9 Chol(mg):28.6
Sodium(mg): 126.2
Cracked
Total
143.9
French
Bread
Total Calories:
107.3
Total Fat(g): 1.2 Total Carb(g):20.2 Total
Protein(g): 3.6 Fiber(g):0.8 Chol(mg): 1.8
Sodium(mg): 158.1
Traditional
Pizza Dough Total Calories:
Total Fat(g): 1.9 Total Carb(g): 10.7 Total
Protein(g): 1.5 Fiber(g):0.5 Chol(mg):0.1
S odium(mg): 108.8
65.7
French Bread Total Calories:
131.0 Total Fat(g): 1.6 Total Carb(g):24.5 Total
Protein(g):4.3 Fiber(g):0.9 Chot(mg):2.8
Sodium(lng): 191.7
Wheat Dinner Rolls Total Calories: 105.3
Total Fat(g):2.5 Total Cmb(g): 18.1 Total
Protein(g):3.7 Fiber(g): 1.6 Chol(mg):5.7
Sodium(mg): 147.3
Garlic
Whole Wheat Pizza Dough Total Calories: 64.6
Total Fat(g): 1.1 Total Cmb(g): 11.5 Total
Protein(g):2.3 Fiber(g): 1.9 Chol(mg):0
Sodium(mg):61.9
13
Bread
Total Calories:
133.1 Total Fat(g):2.2 Total Carb(g):24.3
Protein(g):4.6
Fiber(g):0.9
Chot(mg):3.8
Sodium(lng):200.2
Total
RECIPES
RAISIN
1 Pound
BREAD
_i_
_ Basic/specialD_
Loaf
6V_-ounces (3/4cup + 1 tbsp.)
1 tablespoon
2 cups
1 tablespoon
1 tablespoon
1 teaspoon
½ teaspoon
1½ teaspoons
or
1 teaspoon
½ cup
% cup
INGREDIENTS
I_ Pound
WATER, 75-85 ° F
BUTTER or MARGARINE
BREAD FLOUR
DRY MILK
SUGAR
SALT
GROUND CINNAMON
ACTIVE DRY YEAST
-ORBREAD MACHINE/FAST RISE YEAST
RAISINS***
CHOPPED NUTS, optional
9½ ounces (1 cup + 3 tbsp.)
2 tablespoons
3 cups
1½ tablespoons
1½ tablespoons
1g_,teaspoons
1 teaspoon
2 teaspoons
- or1½ teaspoons
3Acup
¼ cup
Loaf
Add in_edients to bread pan in order listed, making well in center of dry in_edients for yeast. Program for basic/specialty bread
setting, desired crust color and timer, if being used. Turn on. Add raisins and nuts when alert sounds. When done, turn of! unlock
pan and relnove with oven mitts. Shake bread out and allow to coot on rack before slicing.
**SPECIAL TIP**: To make raisin bread overnight or without being present to add raisins and nuts, place around outside of edge of
pan on top of dry in_edients away fiom yeast and not in contact with water in pan.
OLD
basic/specialD
FASHIONED
WHITE
BREAD
6 ounces (3Acup)
1 tablespoon
2 cups
1 tablespoon
1 teaspoon
1½ teaspoons
MILK 75-85 ° F
BUTTER or MARGARINE
BREAD FLOUR
SUGAR
SALT
ACTIVE DRY YEAST
9 ounces (1 cup + 2 tbsp.)
2 tablespoons
3 cups
1V2tablespoons
1½ teaspoons
2 teaspoons
-or-
-or-
-or-
BREAD MACHINE/FAST RISE YEAST
1 teaspoon
1V2teaspoons
Add ingredients to bread pan in order listed, making well in center of dry ingredients for yeast. Program for basic/special D"bread
setting, desired crust color. Turn on. When done, turn oft; unlock pan and remove with oven mitts. Shake bread out and allow to cool
on rack before slicing.
basic/specialty
HONEY
1 Pound Loaf
OATMEAL
BREAD ¢_)
.....
INGREDIENTS
1½ Pound Loaf
5½ ounces (V3cup)
2 tablespoons
1 tablespoon
1½ cups
_/_cup
1 tablespoon
3Ateaspoon
1½ teaspoons
MILK 75-85 ° F
HONEY
BUTTER or MARGARINE
BREAD FLOUR
OATS, quick or old-fashioned
DRY MILK
SALT
ACTIVE DRY YEAST
7½ ounces (_Acup + 3 tbsp.)
3 tablespoons
2 tablespoons
2 cups
1 cup
2 tablespoons
1¼ teaspoons
2 teaspoons
-or-
-or-
-or-
1 teaspoon
BREAD MACHINE/FAST
RISE YEAST
1½ teaspoons
Add ingredients to bread pan in order listed, making well in center of dry ingredients for yeast. Program for basic/specialty bread
setting, desired crust color and timer, if being used. Turn on. When done, turn oft; unlock pan and relnove with oven mitts. Shake
bread out and allow to cool on rack before slicing.
14
basic/specialD
_
1 Pound Loaf
6 ounces (3/4cup)
1 tablespoon
2 cups
1 tablespoon
1 teaspoon
2 teaspoons
V2- 1 teaspoon
1V2teaspoons
GARLIC
BREAD
_?
INGREDIENTS
WATER 75-85 ° F
BUTTER or MARGARINE
BREAD FLOUR
SUGAR
SALT
DRIED PARSLEY FLAKES
GARLIC POWDER
ACTIVE DRY YEAST
-or-
9 ounces (1 cup + 2 tbsp.)
2 tablespoons
3 cups
1V_,tablespoons
1V_,teaspoons
1 tablespoon
3/4- 1 teaspoon
2 teaspoons
-or-
-or-
1 teaspoon
1½ Pound Loaf
BREAD MACHINE/FAST
RISE YEAST
1V_,teaspoons
Add ingredients to bread pan in order listed, making well in center of dry ingredients for yeast. Program for basic/special D"bread
setting, desired crust color and timer, if being used. Turn on. When done, turn oft; unlock pan and relnove with oven mitts. Shake
bread out and allow to cool on rack before slicing.
basic/special_ _
1 Pound Loaf
7 ounces (3/4cup + 2 tbsp.)
1 tablespoon
2V2cups
1 teaspoon
3/4teaspoon
1 teaspoon
-or-
FRENCH
BREAD@
INGREDIENTS
WATER 75-85 ° F
BUTTER or MARGARINE
BREAD FLOUR
SUGAR
SALT
ACTIVE DRY YEAST
1 ½ Pound Loaf
9V2ounces (1 cup + 3 tbsp.)
1 tablespoon
3 V2cups
1g_,teaspoons
1¼ teaspoons
2 teaspoons
-or-
-or-
BREAD MACHINE/FAST RISE YEAST
3/4teaspoon
11/_,teaspoons
Add ingredients to bread pan in order listed, making well in center of dry ingredients tbr yeast. Program for basic/special D"bread
setting, desired crust color and timer, if being used. For thicker, chewier crest, use medium or dark crust setting. Turn on. When
done, turn oft; unlock pan and relnove with oven mitts. Shake bread out and allow to cool on rack before slicing.
basic/special D"
1 Pound Loaf
6 ounces (3/4cup)
1 tablespoon
2 cups
1 tablespoon
1 tablespoon
1 tablespoon
1V_,teaspoons
1 teaspoon
1¼ teaspoons
-OI"-
INGREDIENTS
WATER 75-85 ° F
BUTTER or MARGARINE
BREAD FLOUR
GRATED PARMESAN CHEESE
DRY MILK
SUGAR
ITALIAN SEASONING
SALT
ACTIVE DRY YEAST
-or-
1 ½ Pound Loaf
9 ounces (1 cup + 2 tbsp.)
2 tablespoons
3 cups
3 tablespoons
1 tablespoon
1 tablespoon
2 teaspoons
1V_,teaspoons
2 teaspoons
-OI"-
BREAD MACHINE/FAST RISE YEAST
3/4teaspoon
1V_,teaspoons
Add ingredients to bread pan in order listed, making well in center of dry ingredients for yeast. Program for basic/specialty bread
setting, desired crust color and timer, if being used. For thicker, chewier crust, use medium or dark crust setting. Turn on. When done,
turn oft; unlock pan and relnove with oven mitts. Shake bread out and allow to coot on rack be*\_re slicing.
15
whole wheat
1 Pound Loaf
6 ounces (3/4 cup)
1 tablespoon
1 tablespoon
1 tablespoon
2 <3cups
1 tablespoon
1 teaspoon
1½ teaspoons
100%
WHOLE
BREAD
INGREDIENTS
d,,
1½ Pound Loaf
WATER, 75-85 ° F
MOLASSES
HONEY
BUTTER or MARGARINE
WHOLE WHEAT FLOUR
DRY MILK
SALT
ACTIVE DRY YEAST
-or-
1 teaspoon
WHEAT
9 ounces (1 cup + 2 tbsp.)
1 tablespoon
2 tablespoons
2 tablespoons
31/_,cups
2 tablespoons
1½ teaspoons
2 teaspoons
-or-
-or-
BREAD MACHINE/FAST
RISE YEAST
1½ teaspoons
Add ingredients to bread pan in order listed, making well in center of dry ingredients for yeast. Program for whole wheat bread setting
and desired crust color and timer, if being used. Turn on. When done, turn oft; unlock pan and remove with oven mitts. Shake bread
out and allow to cool on rack bel\_re slicing.
whole wheat
1 Pound Loaf
6 ounces (3/4cup)
1 tablespoon
1 tablespoon
1 cup
1 cup
1 tablespoon
1 tablespoon
1 teaspoon
1½ teaspoons
50 % WHOLE
WHEAT
BREAD
INGREDIENTS
1½ Pound Loaf
Milk, 75-85 ° F
HONEY
BUTTER or MARGARINE
BREAD FLOUR
WHOLE WHEAT FLOUR
BROWN SUGAR, packed
DRY MILK
SALT
ACTIVE DRY YEAST
- or-
ii'_
8V_,ounces (1 cup + 1 tbsp.)
1 tablespoon
2 tablespoons
IV_,cups
1V_.cups
1½ tablespoons
1½ tablespoons
1½ teaspoons
2 teaspoons
- or
-or-
BREAD MACHINE/RAST RISE YEAST
1 teaspoon
1½ teaspoons
Add ingredients to bread pan in order listed, making well in center of dry ingredients for yeast. Program for whole wheat bread setting
and desired crust color and timer, if being used. Turn on. When done, turn oft; unlock pan and relnove with oven mitts. Shake bread
out and allow to cool on rack be*\_re slicing.
whole wheat
1 Pound Loaf
6 ounces (3/4cup)
2 teaspoons
1¼ cups
2/3cups
1/3cup
1½ tablespoons
3Ateaspoon
1½ teaspoons
- or
CRACKED
WHEAT
BREAD'_
INGREDIENTS
WATER, 75-85 ° F
BUTTER or MARGARINE
BREAD FLOUR
WHOLE WHEAT FLOUR
CRACKED WHEAT CEREAL
BROWN SUGAR, packed
SALT
ACTIVE DRY YEAST
-or
1½ Pound Loaf
8½ ounces (1 cup + 1 tbsp.)
1 tablespoons
13/4cups
1 cup
½ cup
2 tablespoons
1½ teaspoons
2 teaspoons
-0I"-
-
BREAD MACHINE/FAST RISE YEAST
1 teaspoon
1½ teaspoons
Add in_edients to bread pan in order listed, making well in center of dry ingredients for yeast. Pro_am for whole wheat bread setting,
desired crust color and timer, if being used. Turn on. When done, turn oft; unlock pan and relnove with oven mitts. Shake bread out
and allow to cool on rack before slicing.
16
DOUGH SETTING
The dough setting will prepare dough for hand shaping and baking dinner rolls, cinnamon rolls, donuts, bread sticks or your own dough
recipes in your own oven.
INSTRUCTIONS
1. Position knead bar onto shaft in bottom of pan, making sure it is pushed down all the way. Twist slightly if needed to drop bar in
place.
2. Add ingredients to pan in order listed in recipe, MAKING SURE to add liquids first, butter or margarine next, then dry in_edients
and the yeast on top. After dry in_edients are added, tap pan to settle in_edients, then level in_edients, pushing some of the dry
mixture into corners of pan. This will prevent any liquid from seeping up from the corners. Make a slight well in center of dry
ingredients and add the yeast to the well. This sequence is very important when using the timer to prevent the yeast from getting wet too
soon.
3. Lock pan into bread maker. Pan must always be locked in place for bread maker to function properly. Close cover.
4. Plug bread maker cord into a 120 volt AC electrical outlet ONLY. Program for dough setting. Program timer if being used. See
instructions on page 7.
5. Press start/stop button once to turn machine on. The dough will be mixed, kaleaded and allowed to rise before being stirred down.
When done, 0:00 will appear in display and audible alert will sound. Unlock pan and relnove. It is important to relnove dough prolnptly
as it will continue to rise if left in oven chamber. Machine will automatically turn offupon completion of the dough cycle. Unplug cord
tioln outlet after cycle completes. Follow recipe instructions.
SPECIAL
NOTES
•
•
The timer can be used for recipes with the _)_ symbol. The crust color button cannot be activated at the dough setting.
Active dry, bread machine or fast rising yeast may be used. Use recomlnended amount for the type of yeast used. Bread machine
and fast rising yeast are interchangeable.
•
Most yeast dough recipes can be prepared at this setting; however, do not exceed t\mr (4) cups of flour as the dough may not be
kaleaded properly. Minor adjustments may be needed during kaleading for proper condition of the dough. See "Special Notes on
Flour" on page 3.
•
Use lukewarm water, 75-85 ° F, to activate the yeast. DO NOT USE HOT WATER, above 110° F, as this can affect the yeast.
•
MILK MUST BE WARMED TO 75-85 ° F to activate the yeast. DO NOT USE MILK DIRECTLY FROM THE
REFRIGERATOR.
Warm milk in microwave at low power or on range over low heat. Use therlnometer to measure correct
temperature. DO NOT OVERHEAT MILK, above 110° F, as this can affect the yeast. Allow to cool if too hot or add a little cold
milk to cool.
•
•
If cold butter or margarine is used, cut into four (4) pieces, placing bottom of pan with liquid for faster blending.
An audible alert will sound during kneading to signal when to add in medients such as raisins or nuts. This prevents the
ingredients fiom becoming over mixed or crushed. Simply open cover when alert sounds, add ingredients and close cover. Do not
turn bread maker off. If these in medients are not required, iNlore the alert.
•
If machine labors during kneading, the dough is too dry. Add one (1) teaspoon warm water at a time until dough softens. Do not
add too much water, as dough can get too sticky. Dough should be soft to the touch after kneading.
•
Dough can be refrigerated up to three (3) to four (4) days for later use. Simply remove dough and place in an oiled bowl. Turn
dough over to oil top and cover tightly. Or, put dough in an oiled plastic bag and seal. Check daily and punch down if needed. When
ready to use, shape, rise and bake as recipe directs.
•
To freeze dough, shape as recipe directs and wrap tightly. Dough can be frozen for up to one month. When ready to use, relnove
from freezer and thaw in refi_igerator or at room temperature. Keep covered to prevent from drying out. Once thawed, allow dough
to rise until doubled in size, then bake as directed.
17
dough
BASIC DINNER
ROLLS/BREAD
STICKS
@
INGREDIENTS
8 ounces (1 cup)
3 tablespoons
3 cups
3 ½ tablespoons
2 tablespoons
1 teaspoon
2 teaspoons
WATER, 75-85 ° F
BUTTER or MARGARINE
BREAD FLOUR
SUGAR
DRY MILK
SALT
ACTIVE DRY YEAST
-or-
Makes 2 to 3 dozen rolls depending
made.
Freeze leftover rolls for another time.
-or-
BREAD MACHINE/FAST RISE YEAST
SOFTENED BUTTER or
SLIGHTLY BEATEN EGG WHITE
1½ teaspoons
dough
WHEAT
DINNER
INGREDIENTS
8½ ounces (1 cup + 1 tbsp.)
3 tablespoons
1½ cups
1½ cups
3 ½ tablespoons
2 tablespoons
1 teaspoon
2 teaspoons
ROLLS
WATER, 75-85 ° F
BUTTER or MARGARINE
BREAD FLOUR
WHOLE WHEAT FLOUR
BROWN SUGAR, packed
DRY MILK
SALT
ACTIVE DRY YEAST
-or-
See instructions below.
_'_
Shape in cloverleaf or t\_ur-leaf clover rolls.
Makes 172dozen.
See instructions below.
-or-
BREAD MACHINE/FAST RISE YEAST
SOFTENED BUTTER or
SLIGHTLY BEATEN EGG WHITE
1Y2teaspoons
Add ingredients
to bread pan in order listed, making well in center of dry ingredients for yeast. Prograln
if being used. Turn on. When done, turn off! unlock pan and place dough on floured suri_ace. Let rest 15
shaping directions below. Cover and let rise in warm, draft-fiee place until double in size, 45 minutes to
slightly beaten egg white and bake in preheated 3500 F oven for 15 to 20 minutes or until golden brown.
CRESCENT
on shape
ROLLS
1. Divide dough into 4 equal pieces.
into a circle ¼-inch thick.
Roll each piece
2. Cut each circle into 6 pie-shaped wedges. Roll
each wedge fiom wide end to narrow tip.
3. Culwe ends to form crescent. Place 1 inch apart on
greased cookie sheet. Continue recipe instructions.
Makes 2 dozen.
FOUR-LEAF (;LOVER ROLLS
1. Roll dough into a rectangle, ½-inch thick. Cut into
18 equal-sized pieces.
2. Shape each piece into a ball. Place each ball into a
greased lnuffin cup.
3 .With scissors, snip each ball completely into quarters.
Continue recipe instructions. Makes 1½ dozen.
for dough setting and timer,
minutes. Follow desired
1 hour. Brash with butter or
Sel-ve warm.
CLOVERLEAF ROLLS
1. Divide dough into 54 equal-sized pieces. Roll each piece into a ball.
2. Place 3 balls into greased muffin cup. Continue recipe instructions.
Makes 1½ dozen.
BREAD STICKS - makes 2 dozen
1. Divide dough into 4 equal pieces. Divide each piece into 6 portions.
2. Roll each piece into a rope 8 inches long. Place 1 inch apart on
greased cookie sheet.
3. Brush with egg white/,a_ater mixture and sprinkle with sesame or
poppy seeds, grated Parmesan cheese, garlic salt or other topping.
Continue recipe instructions. For drier breadsticks, reduce heat to
3000 F after baking 10 minutes and bake 25 to 30 minutes longer.
18
dough
CINNAMON
I
ROLLS
INGREDIENTS
DOUGH:
8 ounces (1 cup)
1
4 tablespoons
373 cups
3 tablespoons
½ teaspoon
2 teaspoons
-or-
1½ teaspoons
FILLING:
¼ cup
¼ cup
2 teaspoons
V_,teaspoon
½ cup
These can be made the night before,
retiigerated and baked in the morning. Rolls
must sit at room temperature at least 30
minutes bet\3re baking. Makes 12 large rolls.
WATER, 75-85 ° F
EGG, large
BUTTER or MARGARINE
BREAD FLOUR
SUGAR
SALT
ACTIVE DRY YEAST
-or-
BREAD MACHINE/FAST
RISE YEAST
BUTTER or MARGARINE, melted
SUGAR
GROUND CINNAMON
GROUND NUTMEG, optional
(;HOPPED NUTS
1. Add ingredients for dough to bread pan in order listed, making well in center of dry ingredients for yeast. DO NOT ADD
FILLING INGREDIENTS.
Program for dough setting. Turn on. When done, unlock pan and place dough on floured surfhce.
Knead 1 minute, then rest 15 minutes. Roll dough into a rectangle, about 15 x 10 inches. Spread ¼ cup melted butter over dough to
within 1 inch of edges. Then evenly sprinkle ¼ cup sugar, the cinnamon, nutmeg and chopped nuts over dough.
2. Roll dough tightly on long side. Press edges to seal and form into a 12-inch long, evenly shaped roll.
3. With a kalife or 8-inch long piece of thread or dental floss, cut roll into 1-inch pieces. (If using thread or dental floss, slide under roll
and criss-cross ends to cut neatly through dough).
4. Place rolls into a greased 13x9 inch baking pan. Cover and let rise in ,a_arln, draft-fiee place until double in size, 30 to 45 minutes.
Bake in preheated 375° F oven f\_r 20 to 25 minutes or until golden brown. Cool in pan on rack for 10 to 15 minutes, then drizzle with
powdered sugar icing made by combining 1 cup powdered sugar with 1 to 2 tablespoons milk and ½ teaspoon vanilla. Blend until
smooth. If too thin or thick, add more powdered sugar or milk. Cut apart and relnove fiom pan.
dough
8 ounces (1 cup)
1 tablespoon
3 ½ cups
1½ teaspoons
1¼ teaspoons
2 teaspoons
-or-
1½ teaspoons
TRADITIONAL
FRENCH
INGREDIENTS
BREAD
WATER, 75-85 ° F
BUTTER or MARGARINE
BREAD FLOUR
SUGAR
SALT
ACTIVE DRY YEAST
Shape dough into traditional French bread
shape and bake in your own oven.
Makes 1 large loaf'.
-Of
BREAD MACHINE/FAST
_
RISE YEAST
TOPPING:
1
1 teaspoon
EGG WHITE, slightly beaten
WATER
POPPY or SESAME SEEDS
1. Add ingredients f\)r dough to bread pan in order listed, making well in center of dry ingredients for yeast. Program for dough and
timer, if being used. Turn on. When done, turn of'l; unlock pan and place dough on floured surface. Knead about 1 minute, then let
rest 15 minutes.
2. Roll into a 15xl2-inch rectangle. Roll tightly fiom long side, seal and taper ends. Place seam side down on greased baking sheet
sprinkled with cornmeal. Cover and let rise in warm, draft-free place for 45 to 55 minutes or until double in size.
3. With sharp kalife, make 3 or 4 ¼-inch deep diagonal cuts on top of loaf. Combine egg white with water and brush mixture on top of
loaL Sprinkle with poppy or sesame seeds or leave plain. Bake in preheated 375 ° F oven for 40 minutes or until golden brown. Coot
slightly before slicing.
19
dough
SINGLE
TRADITIONAL
7 ounces (3/4cup + 2 tbsp.)
2 tablespoons
2V_,cups
½ teaspoon
½ teaspoon
2 teaspoons
PIZZA
DOUGH
INGREDIENTS
CRUST
DOUBLE
101/_,ounces (1¼ cups + 1 tbsp.)
4 tablespoons
4 cups
1 teaspoon
1 teaspoon
2¼ teaspoons
WATER, 75-85" F
VEGETABLE OIL
ALL PURPOSE FLOUR
SUGAR
SALT
ACTIVE DRY YEAST
-0I"-
-or-
-or-
1½ teaspoons
BREAD MACHINE/FAST
CRUST
RISE YEAST
2
teaspoons
TOPPING:
6 to 8 ounces
12 to 16 ounces
PIZZA SAUCE
FAVORITE
MEAT TOPPINGS
and CHEESE
The single crust recipe makes enough for one 12 to 14-inch pizza; double crust recipe makes enough for two 12 to 14-inch
pizzas. Crust will be thicker in a 12-inch pan, thinner in a 14-inch pan. Cookie sheets can also be used.
1.Add ingredients for dough in order listed, making well in center of dry ingredients for yeast. Prograln for dough and timer, if being
used. Turn on. When done, place dough on floured surface. Knead about 1 minute, then let rest 15 minutes.
2. Roll dough to fit 12 or 14-inch pizza pan. Place dough onto greased pan sprinkled with comlneat. Press dough into pan, forlning an
edge. Let dough rise in warm, draft-free place for 20 to 25 minutes.
3. Spread pizza sauce evenly over crust, then top with favorite meat, toppings and shredded cheese. Bake in preheated 4250 F oven for
20 to 25 minutes until nicely browned on top. Let rest 5 minutes be_\3re cutting.
dough
SINGLE
WHOLE
CRUST
8½ ounces (1 cup + 1 tbsp.)
1 tablespoon
2½ cups
½ teaspoon
½ teaspoon
2 teaspoons
-0I"-
1½ teaspoons
WHEAT
PIZZA
INGREDIENTS
WATER, 75-85 ° F
VEGETABLE OIL
WHOLE WHEAT FLOUR
SUGAR
SALT
ACTIVE DRY YEAST
DOUBLE
CRUST
13 ounces (1½ cups + 2 tbsp.)
2 tablespoons
4 cups
1 teaspoon
1 teaspoon
2¼ teaspoons
-or-
-or-
BREAD MACHINE/FAST
®
DOUGH
RISE YEAST
2 teaspoons
TOPPING:
6 to 8 ounces
PIZZA SAUCE
FAVORITE MEAT TOPPINGS
and CHEESE
12 to 16 ounces
The single crust recipe makes enough for one 12 to 14-inch pizza; double crust recipe makes enough for two 12 to 14-inch
pizzas. Crust will be thicker in a 12-inch pan, thinner in a 14-inch pan. Cookie sheets can also be used.
1.Add ingredients for dough in order listed, making well in center of dry ingredients for yeast. Program for dough and timer, if being
used. Turn on. When done, place dough on floured surface. Knead about 1 minute, then let rest 15 minutes.
2. Roll dough to fit 12 or 14-inch pizza pan. Place dough onto greased pan sprinkled with cornmeal. Press dough into pan, forlning an
edge. Let dough rise in warm, draft-fiee place for 20 to 25 minutes.
3. Spread pizza sauce evenly over crust, then top with favorite meat, toppings and shredded cheese. Bake in preheated 425° F oven for
20 to 25 minutes until nicely browned on top. Let rest 5 minutes be_\_re cutting.
2O
90 DAY
WARRANTY
Your West Bend,_R)Warranty covers failures in the materials and workmanship of this Bread Maker for 90 days liom the date of
original purchase. Any failed part of the Bread Maker will be repaired or replaced without charge.
This warranty gives you specific legal rights and you may also have other rights which vary liom state to state. This warranty does not
cover alleged damaged caused by misuse, abuse, accidents or alterations to the Bread Maker.
BONUS!
RECIPE
BOOK
A recipe book (book nmnber L5146) containing dozens of recipes developed exclusively for West Bend,_r9Bread Makers is available.
To order, write to the address below. Include $6.95 (plus your area tax for Wisconsin, Illinois and Georgia residents) with your
request. Payment must accompany order. Make check or money order payable to The West Bend Company. Please allow two weeks
for delivery. Price subject to change without notice.
The West Bend Company
Attn: Housewares Customer Service
P.O. Box 2780
West Bend, WI. 53095-2780
REPLACEMENTS
PARTS
AVAILABLE
Replacement bread pans and knead bars may be ordered directly from The West Bend Company. To order, write to the address above
or order online at www.westbend.com.
Be sure to include the catalog nmnber of your Bread Maker (#410--), found on the back
of your machine, a description of what you want and the quantity. Along with this information please include your name, mailing
address (Post Office boxes will not be accepted as we ship via UPS and need a physical address) and your Visa, MasterCard or
Discover credit card nmnber (debit cards not accepted), expiration date, for the billing of the part(s) to you. Your (state's sales tax
for Wisconsin, Illinois and Georgia residents) and a handling fee will be added to your total charge. Or, to send a check or
money order, call 262-334-6949 to obtain purchase amount. Please allow 2 weeks for delivery.
SPECIFICATIONS:
120 V AC, 60 Hz
Heater
Motor
WEST
BEND®
430 Watts
145 Watts
NOT VALID IN MEXICO
IMPORTANT
IMFORMATION
Please file this booklet for reference to instructions for proper use and care, and warranty information. For your records, attach a dated
sales receipt for warranty purposes and complete the following inforlnation:
Date purchased or received as gift:
Where purchase and price, if known:
Date of Manufacture (on back of bread maker):
Cat/Model Nmnber:
L5231 Care/Use Book
21