1
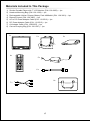
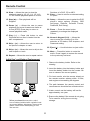
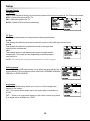
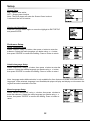
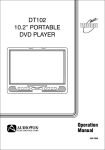
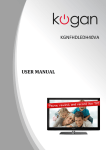
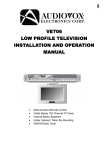
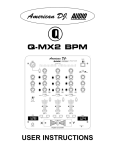
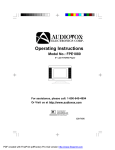
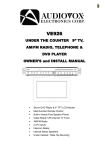
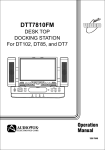
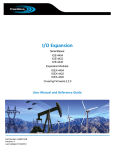
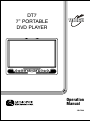
DT7
7” PORTABLE
DVD PLAYER
®
Operation
Manual
128-7344
Introduction
Thank you for choosing the DT7 portable DVD player. The unit applies the
latest state of the art electronics and is designed to be used in a variety of
applications. It can be used as portable DVD player or when installed into
the available docking stations as a home or mobile DVD player. The DVD
Player is constructed to provide years of reliable, trouble-free service, and is
compact so that you can take it with you anywhere and is designed for quick
and easy setup. Please read all documentation prior to using this product.
The documentation will assist you in obtaining the best equipment
performance. Save this manual for later use.
Important Notice
It is unlawful in most jurisdictions for a person to drive a motor vehicle which
is equipped with a television viewer or screen that is located in the motor
vehicle at any point forward of the back of the driver’s seat, or that is visible,
directly or indirectly, to the driver while operating the vehicle. In the interest
of safety, this system should never be installed where it will be visible,
directly or indirectly, by the operator of the motor vehicle.
Safety Precaution
For safety reasons, when changing video media, it is recommended that
the vehicle is not in motion, and that you do not allow children to unfasten
seat-belts to change video media or make any adjustments to the system.
Enjoy your entertainment system but always remember-safety of all
passengers remains the number one priority.
2
Cautions And Warnings
RISK OF ELECTRIC SHOCK
DO NOT OPEN
The lightning flash with arrowhead symbol, within an equilateral triangle, is intended to
alert the user to the presence of un-insulated “dangerous Voltage” within the product’s
enclosure that may be of sufficient magnitude to constitute a risk of electric to persons.
The exclamation point within an equilateral triangle is intended to alert the user to the
presence of important operating and maintenance (servicing ) instructions in the
literature accompanying the appliance.
1. Placement
To prevent fire or electric shock, do not expose this appliance to rain or moisture. Do not place
the set on an unstable cart, stand, tripod, bracket or table to prevent it from falling. Keep the
DVD Player away from strong magnets, heat sources, direct sunlight, and excessive dust. If
the DVD Player is brought directly from a cold to a warm location, moisture may condense
inside the DVD Player. When you move it from a cold to a warm location, wait for about one
hour before operating the DVD Player, or remove the disc and leave the DVD Player turned
ON until the moisture evaporates.
2. Caution
Do not spill or spray liquid of any kind on or in the system (this may result in a fire or electric
shock). Do not place anything heavy on the DVD Player. To ensure proper ventilation and
proper operation, never cover or block the slots and openings with a cloth or other material.
Keep the DVD Player away from an open flame such as fire, candle etc.
It is hazardous to replace the battery incorrectly. Replace the battery only with the same or
equivalent type, in order to protect the environment, please dispose the dispose the battery
properly.
3. Warning
To reduce the risk of electric shock, do not perform any servicing other than that contained in
the operating instructions unless you are qualified to do so. There are no user-serviceable
parts inside. Refer all servicing to qualified service personnel. Servicing should be done only
by qualified service personnel.
4. Cleaning DVD Player
When cleaning, make sure the system is unplugged from the power source. Do not use liquid
cleaners or aerosol cleaners. Use a cloth lightly dampened with water for cleaning the exterior
of the system only.
5. Disc
Do not use irregularly shaped discs such as heart or star-shaped discs as they may cause the
DVD Player to malfunction. Do not stick paper, tape or glue on the disc. Do not expose the disc
to direct sunlight or heat sources. Do not touch the surface of disc. Handle the disc by its edge.
Clean the disc by wiping the disc from the center out with a cleaning cloth. Remove the disc from
the DVD Player and store it in its case after playing. Software producers may intentionally fix
some playback operations of discs. Since this DVD Player plays discs according to the disc
contents the software producers designed, some playback features may not be available. Also
refer to the instructions supplied with the discs.
3
Materials Included In This Package
1)
2)
3)
4)
5)
6)
7)
8)
Shuttle Portable Player with 7" LCD Monitor (P/N: 136-3950) ~ 1pc
Headrest Mounting Bag (P/N: 126-1328) ~ 1pc
Rechargeable Lithium Polymer Battery Pack 4000mAH (P/N: 136-3951) ~ 1pc
Remote Control (P/N: 136-3887) ~ 1pc
AC to DC Power Adaptor Cable (P/N: 112-3513) ~ 1pc
DC Power Adaptor Cable (P/N: 112-3515) ~ 1pc
AV Adapter Cable (P/N: 112B3227) ~ 1pc
Canvas Carrying Bag (P/N: 126-1327) ~ 1pc
1
.
2
.
3
.
ON
4
.
5
.
VOL
6
7
.
8
.
4
.
OFF
Main Features
• 7” Active Matrix TFT LCD Monitor
• Built-in DVD Player
• DVD/CD/MP3 Compatible
• On Screen Display
• Selectable Screen Aspect Ratio 16:9, 4:3 & Screen Off
• AC and DC Power Adapters
• Last Position Memory for Disc Playback
• Switchable AUX AV In/Out
• Picture Controls
• IR Sensor
• Headphone Jacks
• Built-in IR Transmitter for Wireless headphone
• Full Function Remote Control
5
Main Features
Front Panel Controls
12
1 2 3 4
5 6 7 8 9 10 11
1. Power ON/OFF* — Press and hold for one second to switch the DT7 on or off.
2.
Screen Mode — To select the screen mode aspect ratio and to turn the screen off (16:9, 4:3
or Off).
3. Pause — Allows the user to pause playback and move forward one frame at
a time (STEP). Press play to return to normal playback mode.
4. Previous — Go to the previous track / chapter.
5. Volume (-) — To decrease the volume of the speakers. Also used for reducing levels in the
Picture adjustment mode.
6. Picture Select — Used to access the DT7 picture adjustments, select from picture adjust,
volume level.
7. Volume (+) —To increase the volume of the speakers. Also used for reducing levels in
the picture adjustment mode.
8. Next — Go to the next track or Chapter.
9. Play — This button is used to enter the play mode.
10. Stop — This button is used to stop playback.
11. Eject* — Press and hold for one second to Eject the Disc.
12. Infrared Transmitter and sensor — Used to transmit audio to the optional wireless
Headphones. Also allows the remote control to operate the DT7.
Note: The power and eject function require the button to be pressed for one second to prevent
accidentally accessing these functions.
6
System Controls and Connections
Left Side Controls and Connections
2
1
3
2
AUDIO
VIDEO
IN/OUT
IN/OUT
IN
OUT
ON
AV
4
OFF
IRT
DC 9V
1. Headphone Jacks — Used to connect wired headphones. The sound from the speakers will
be automatically cut off when the headphones are connected.
2. AV In/Out Switch
Input Mode
When the AV In/Out switch is set to IN* the unit is ready to accept an auxiliary audio/video
signal via the audio video inputs.
*Note: The A/V input is auto-switching. Even though the switch is set to IN it will only be active
when a A/V source is connected. When an auxiliary A/V signal is input the OSD will display
“AUX”.
Connect an external A/V Source using the supplied A/V adapter cable to the A/V input jacks. The
source can be any external A/V device (i.e. Camcorder, digital camera video game etc)
Output Mode
This output will provide an audio/video signal that duplicates the signal displayed on the DT7.
This can be used to connect the DT7 to another monitor or amplifier.
3. IR Transmitter On/Off Switch — Used to turn the IR Transmitter on or off. When operating
the player with the battery if wireless headphones are not being used set this switch to the Off
position to increase the playback time.
4. 9V DC Input Jack — Used to connect power from either the supplied AC to DC adapter or the
vehicle power adapter.
Right Side Panel Controls and Connections
1
2
1. DVD Disc Slot — for loading and removing discs.
2. Built-in Stand — for desktop use when the battery is not being used.
7
Remote Control
26
25
1
2
24
3
4
5
6
23
VOL
22
21
7
8
9
10
11
12
13
14
15
20
19
18
17
16
1. Power — Turn the DT7 on and off.
adjustments are made within 6 seconds,
or if any other button is pressed.
2. Display — Display disc information (title,
chapter, time, track, etc.)
7. Volume pq — To increase or decrease
the volume level and the picture levels in
the picture adjustment mode.
3. Angle — Displays and selects the
available camera angles. Each time you
press the button, The angle changes. The
number of angles varies from disc to disc.
8. DVD Menu — Allows the user to access
the DVD root menu.
4. Subtitle — Display the subtitle language of
the DVD disc (if the disc was created with
subtitles). Each time you press the button,
the subtitle language will change.
9. Cursor (3634) — Use these buttons to
Navigate the DVD menu and the set up
options.
10. Return — Not used in this model .
5. Audio — Press to access the available
Audio languages, when the DVD
disc contains multiple audio languages.
11. A-B — Allows the user to repeat playback
of a DVD or CD from point A to point B.
12. Rew (7) — Allows the user to search in a
backward direction at 2, 4, 8 and 20 times
the normal playback speed of a DVD.
6. PIX (Picture Select) — Each time this
button is pressed, the unit will display the
“adjustment bars” for Contrast, Brightness,
Color or Tint. Once the desired adjustment
bar is displayed, use the Volume Up and
Down buttons to adjust the setting. The
display will automatically turn off if no
13. Fwd (8) — Allows the user to search in a
forward direction at 2, 4, 8 and 20 times the
normal playback speed of a DVD.
8
Remote Control
14. Slow — Allows the user to slow the
playback speed to 1/2,1/3, 1/4, 1/5, 1/6,
1/7 the normal playback speed of a DVD.
Sections of a DVD, CD or MP3.
21. Enter — Used to confirm a selected setting
or option.
15. Stop (<) — Disc playback will be
Stopped.
22. Setup — Allows the user to select the DVD
player’s setup options (Display, OSD
Language, Defaults, Parental Control,
Password, Exit Setup).
16. Pause (;) — Allows the user to pause
playback and move forward one frame at
a time (STEP).Press play to return to
normal playback mode.
23. Zoom — Press the zoom button
repeatedly to enlarge the displayed
Picture.
17. Play (4) — Press this button to start
Playback while a disc is loaded into the
disc compartment.
24. Numeric Keypad (0~9) — Allows the
user to enter the numbers 0 to 9 for
selection of CD tracks, DVD chapters, and
Password setting.
18. Skip - (9) — Allows the user to return to
the previous chapter or track.
25. Eject (5) — Use this button to eject a disc.
19. Skip + (:) — Allows the user to skip to the
next chapter or track.
26. Mute — Press this button to mute the
audio. Press it again to restore the sound
to the previously set level.
20. Repeat — Allows the user to repeat various
Initial Use* and Battery Replacement
1. Remove the battery holder. Refer to the
drawing.
2. Insert the battery into the battery holder and
insert the battery holder into the remote. Be
sure to observe the correct polarity
3. For best results, aim the remote directly at
the remote receiver window within 10 feet,
and angles not exceeding 60 degrees.
4. The path between the remote control and
remote sensor should be free of obstructions.
5. Under normal use the battery will last for
approximately one year.
6. Remove the battery if the remote is not going
To be used for a long time or during
storage.
*When purchased the remote control
has a battery installed with a plastic insert
to prevent battery discharge. Remove the
plastic insert before attempting to use
the remote.
9
Power Supply
About the Rechargeable Battery Pack
Battery charge indicator
Red – Charging
Green – Fully charged
ON
OFF
Battery On/Off Switch
Your portable DVD player comes with a lithium ion rechargable battery that attaches to the bottom of the
player. Your new battery must be fully charged before initial use. Charging time is normally about 6
hours. A fully charged battery delivers about 2.5 hours of use, but playback time will vary depending on
the playback settings and environmental conditions. If the battery will not be used for a long period of
time, fully charge the battery prior to storage.
Working conditions and precautions of the battery
New batteries MUST be fully charged before initial use.
Battery should only be used and charged when temperatures are between 32-80F.
Never put the battery in fire or water.
Do not expose the battery to high temperatures or store in hot, sunny places.
Maintain well-ventilated conditions around the product, avoiding heat. Don’t put the product on
bed, sofa or anything that may block ventilation to the product.
Do not disassemble the battery.
When charging the battery pack, the charge indicator on the battery will light red, when the
charging is complete the light will turn green.
Detach the battery when not in use.
The on/off switch on the battery must be in the on position for use and charging. The off position
will prevent accidental battery discharge
Attaching the Battery Pack
Refer to the following steps for attaching the Battery Pack:
Place the DVD Player on a soft and smooth surface to avoid scratching the screen with its back cover
facing UP. Position the Battery Pack directly toward the battery slot on the back cover of the DVD Player.
Align the pins on the battery pack with the slots on the back of the DT7. Then slide the Battery Pack
toward the back of the DVD Player until you hear it click and lock into place.
Charging the Battery Pack
The battery must be attached to the DVD player to charge it and the battery switch must be in the ON
position. Plug the AC Power Adapter into the Player’s DC-IN 9 V Jack, which is located on left side of the
DT7. Plug the other end of the Power Cord into a wall Outlet.
10
Power Supply
After attaching the Battery Pack, place the DT7 screen in a normal position.
The attached Battery Pack can also be used as a stand.
Detaching the Battery Pack
If the DVD Player is not going to be used for long periods of time, the Battery Pack should be
detached. When the DVD Player is turned OFF, the DVD Player is still consuming some power in
STANDBY mode. This could lead to discharging the battery.
Make sure the power is turned OFF before detaching the Battery Pack. After detaching the battery pack,
take care when handling the DVD Player to avoid damaging the screen.
Press the button located on the bottom of the battery to unlock the battery pack. While pressing
the button slide the battery pack from the DVD Player.
NOTE: When attaching or detaching the battery pack, make sure to protect the LCD screen.
Using the Home AC Adapter
Plug the AC Power Adapter into the Player’s DC-IN 9 V Jack, which is located on left side of the DT7.
Plug the other end of the Power Cord into a wall Outlet.
DC 9V
11
Power Supply
Using the Vehicle DC Adapter
To use the Vehicle DC Adapter disconnect the Battery pack and connect the supplied Vehicle Power
Adapter into the DVD Player’s Power Jack and the other end into the Vehicle power outlet as shown
below.
Vehicle
Power
Outlet
DC 9V
NOTE: Do not operate the unit or view video software while driving a vehicle.
Place the unit in a secure position for viewing.
Do not leave the battery attached when using the car adapter as power source.
Make sure the unit and the car adapter are not connected when starting the vehicle.
Using the DT7 in a Vehicle
When used in a vehicle, the DT7 can be placed into the headrest mounting bag. The bag is
easy to attach to a headrest and fits on most vehicle headrest types
A) Place the DT7 into the headrest mounting bag and fasten securely.
B) Attach the headrest mounting bag straps around the vehicle headrest and tighten securely.
C) Connect the DC power adaptor to the DT7 and the vehicle power outlet.
Headrest Mounting Bag
Front View
Back View
DVD Disc
Insert Slot
Lock
12
Playback Preparations
Pre-Operation
1. Connect the DVD Player to the desired
power Adapter or battery.
2. Press the “POWER” button for one
second.
3. Load a disc with the label facing towards
the front. Push the disc in about ¾ of the
the way and the disc will be pulled into the
Player automatically.
4. The disc will load and automatically begin
Playback.
Using Wired Headphones
1. Connect any set of standard headphones
that have a 1/8 jack to either headphone
Jack on the left side of DT7.
2. Adjust the volume to the desired level
Note: Connecting the headphones will
disconnect the internal speakers.
Using Optional Wireless Headphones
Part Number MVIRHS
1. For best results when using wireless
headphones, sit facing the screen within 12
feet and at angles of no more than 30
degrees from center. There should be no
obstacles the between the wireless
headphones and the infrared audio
transmitter.
2. Set the IRT switch located on the left side
of the DT7 to ON.
3. If there is no sound:
A) Make sure the batteries in the headphones
are not discharged.
B Make sure the IR headphones are ON and
the volume is turned up.
C) Make sure the IRT ON/OFF switch is set to
ON.
IR Switch
30°
30°
13
Playback Preparations
Disk Formats Supported By This Player
DISC LOGO
DIAMETER
PLAYBACK TIME / PLAYABLE SIDES
133 min (SS – SL)
242 min (SS – DL)
12cm
DVD
266 min (DS – SL)
VIDEO
484 min (DS – DL)
COMPACT
CD
12cm
74 min
12cm
600 min
DIGITAL AUDIO
Mp3
The disc maker specifies the operation of some DVD discs. Please refer to the instruction manual with
the disc.
Note: The DT7 is capable of playing most recordable DVDs in the DVD-R format. However due
to the variety of recordable DVD disc manufacturers and software manufacturers playback cannot
be guaranteed.
14
System Connections
NOTE: Before plugging the power cord into an AC outlet, make sure that all the connections have been
made as described below.
Power Supply Connection
Connect the AC power adapter to the side of the DVD player in the jack marked “DC 9V IN”. Plug the twoprong end of the power cord to an AC100-240 outlet. If you have difficulty inserting the plug, turn it over
and re-insert it. If the DVD Player will not be used for a long time, disconnect the plug from the outlet.
Connecting To a TV (Refer Figure 1)
Audio/Video connections
Always ensure that the DVD player, TV and any other electrical equipment to be connected to the DVD
player is switched OFF.
Use the supplied Audio/Video adapter to connect the DVD player to a television or audio amplifier.
Connect the audio/video adapter cable from the DVD player to the audio/video inputs of the TV. Switch
the AV IN/OUT switch to OUT.
Note:
This requires an additional A/V cable not supplied.
Connecting to an Amplifier (Refer Figure 2)
The DVD player can also be connected to an audio amplifier. Please refer to the equipment’s manual
before connecting.Switch the AV IN/OUT switch to OUT.
AUDIO
VIDEO
IN/OUT
IN/OUT
IN
OUT
AV
AV Switch turn to OUT
VIDEO IN/OUT
AUDIO IN/OUT
Optional
AV Adapter Cable
AUDIO L
AUDIO R
AMPLIFIER
VIDEO IN
AUDIO L
AUDIO R
AUDIO
VIDEO
IN/OUT
IN/OUT
IN
OUT
AV
AUDIO
VIDEO
IN/OUT
IN/OUT
IN
OUT
AV
AV Switch turn to OUT
AV Switch turn to OUT
VIDEO IN/OUT
AUDIO IN/OUT
VIDEO IN/OUT
AUDIO IN/OUT
Optional
Optional
Figure1
VIDEO IN
AUDIO L
Figure2
AUDIO R
15
AUDIO L
AUDIO R
AMPLIFIER
Setting
Picture Select
When watching the DT7, the quality of the picture can be adjusted.
Press the Picture button on the DT7 or the remote control, the Picture Adjustment Bar will be
displayed.
Press the volume +/- button to adjust the picture settings to the desired level.
ITEM
BRIGHTNESS
CONTRAST
COLOR
TINT
PRESS "-" BUTTON
PRESS "+" BUTTON
To darken the picture
To brighten the picture
Decrease the contrast for Soft color
Increase the contrast for vivid color
To decrease the color intensity
To increase the color intensity
Increase the greenish skin tones
Increase the reddish skin tones
To restore the factory default setting, select RESET and press the (–) button. All of the picture adjustments
(CONTRAST, BRIGHTNESS, COLOR and TINT) will return to the factory default setting.
RESET
CONTRAST
–
+
Volume
VOLUME
–
+
Use the volume +/- to adjust the VOLUME level.
16
Setting And Adjustments
The Setup menu contains features and options that let you customize your DVD player. For example,
you can select a language for the OSD (On Screen Display), limit playback by children, select the TV
Type and aspect ratio.
Using the Setup Menu
1) Press the setup button on the remote control. The Setup Menu will appear on the screen as
shown.There are 3 icons on the top part of the Setup Menu. Each icon represents a page.
2) Use the 34the left/right buttons to select the desired setup page.
3) Use the 6to enter the selected page.
4) Use the 56to select the desired item and press enter to enter the submenu
5) Use the 56to change the setting and press enter to confirm it.
6) Press 3to return to the main page.
7) Press 5 to return to top for page selection.
17
Setup
System Setup
TV System
The TV SYSTEM setup allows you to select the system to fit to the color system of the TV to be connected.
NTSC – Select this type for NTSC TV
PAL – Select this type for PAL TV
AUTO – Select NTSC and PAL automatically.
TV Type
The TV Type setup allow you to adjust screen setting (aspect ratio).
4:3 PS
This displays the wide picture on the screen with a portion of the left & right side removed.
4:3 LB
This displays the wide picture with black bands on the upper and
lower portions of the screen.
16:9
This displays a picture with bands on the upper and lower portion
of the screen. The bands will vary, depending on the What aspect
ratio the disc is.
NOTE: This setting can only be made when there is no disc in player.
OSD Language
The OSD LANGUAGE setup allows you to select the language for the on
screen display. The user can select from ENGLISH, GERMAN, SPANISH,
FRENCH, or PORTUGUESE.
Angle Mark
The ANGLE MARK setup allows you to turn on / off the angle mark
display on the screen.
ON – The screen shows angle mark if an angle option is available on
a DVD.
OFF – There is no angle mark display on the screen even though there
is an angle option available on a DVD.
18
Setup
Screen Saver
ON – Screen save active
OFF – Screen saver inactive
Note: The DVD player will enter the Screen Saver in about
3 minutes if the unit is inactive.
Closing the Setup Menu
Press the SETUP button again or move the highlight to EXIT SETUP
and press ENTER.
Preference Setup
Audio Language Setup
Select "AUDIO" using 56button, then press 4button to enter the
submenu. Select the audio language you desire using 56 button,
then press "ENTER" to confirm the setting. Press 3button to return.
Subtitle Language Setup
Select "SUBTITLE" using 56button, then press 4button to enter the
submenu. Select the subtitle language you desire using 56 button,
then press “ENTER" to confirm the setting. Press 3button to return.
Note: Language and subtitle selection is only available for discs that are recorded in the above listed
languages. If the selected, language is not available,the player will play and display on the screen the
original recorded contained in the disc.
Menu Language Setup
Select "MENU LANGUAGE" using 56button, then press 4button to
enter the submenu. Select the menu language you desire using 56
button, then press "ENTER" to confirm the setting. Press 3button to
return.
19
Setup
Password
When no disc inside the player select "PASSWORD" using56button, then press 4button to enter the
submenu. Input the your password or the default password then press "ENTER".
For 1st time use the default password is 3308.
You may now enter any new four digit
password and press enter.
Note: Record the new password in a
location where you will not lose or forget
the number
Parental Control
This item allows you to limit movie playback from Kid Safe to Adult.
Select "PARENTAL" using 56button, then press 4button to enter
the submenu. Select the parental level you desire using 56for discs
with lock-out function or multiple rating levels. These are listed from
the lowest level (1 Child) to the highest level (OFF).
Note: The level of 8 Adult is the default one.
Default
Select " DEFAULT" using 56button, then press4button to enter the
submenu. Press ENTER to make the setting return to the factory-set
mode.
Note: The parental setting is not affected by the default function.
Closing the Setup Menu
Press the SETUP button again or move the highlight to EXIT SETUP
and then press ENTER.
20
Troubleshooting
PROBLEM
SOLUTION
The DVD Player will not play
There is no sound from front
Speaker
There is no picture
Poor AV performance
Make sure system setting are correct.
Make sure the DVD audio setting is correct.
Is the disc dirty or warped? Clean or replace disc.
Make sure there are no headphones plugged into
Headphone jack.
Make sure TV is turned ON and in correct video mode.
Make sure your system connections are correct.
Press the screen mode button to confirm the screen is
on.
Is your disc dirty or warped? Clean or replace disc.
There is no sound when using
wireless headphone
Make sure the IR on/off switch is set to ON.
Make sure the batteries in the headphones are good.
The remote control does not
work
Make sure there aren’t any obstructions between the remote
control and the DVD Player.
Make sure you are pointing the remote control at the DVD
Player.
Make sure the battery is inserted correctly (check polarity).
Replace weak battery.
The words “Invalid Key”
appear on screen
The feature or action cannot be completed at this time because:
The disc’s software restricts it.
The disc’s software doesn’t support the feature (e.g., angles)
The feature is not available at the moment.
You’ve requested a title or chapter number that is out of
range.
21
Specifications
Screen Size :
7”
Display Resolution :
800 RGB x 480
Compatible Discs :
DVD, CD, MP3, CD-R,
CD-RW, DVD-R
Screen Type :
TFT Active Matrix
Laser Wavelength :
780/650mm
Video System :
NTSC/PAL/AUTO
Audio Output :
Output Level: 1.5V±0.2/1.0,
Load: 10K ohms
Video Output :
Output Level: 1Vp-p±0.1,
Load: 75ohms
Unbalanced Negative
Power Consumption :
1.2 Amps Average
Power Supply :
+9VDC
22
90 DAY LIMITED WARRANTY
Applies to Audiovox Video Products
AUDIOVOX ELECTRONICS CORP. (the Company) warrants to the original retail purchaser
of this product that should this product or any part thereof, under normal use and conditions, be
proven defective in material or workmanship within ninety (90) days from the date of original
purchase, such defect(s) will be repaired or replaced with reconditioned product (at the
Company's option) without charge for parts and repair labor. A game controller, if supplied, is
similarly waranteed for ninety (90) days.
To obtain repair or replacement within the terms of this Warranty, the product is to be delivered
with proof of warranty coverage (e.g. dated bill of sale), specification of defect(s),
transportation prepaid, to the Company at the address shown below.
This Warranty does not extend to the elimination of externally generated static or noise, to
correction of antenna problems, to costs incurred for installation, removal or reinstallation of
the product, or to damage to digital memory cards, discs, speakers, accessories, or electrical
systems.
This Warranty does not apply to any product or part thereof which, in the opinion of the
Company, has suffered or been damaged through alteration, improper installation,
mishandling, misuse, neglect, accident, or by removal or defacement of the factory serial
number/bar code label(s). THE EXTENT OF THE COMPANY'S LIABILITY UNDER THIS
WARRANTY IS LIMITED TO THE REPAIR OR REPLACEMENT PROVIDED ABOVE AND, IN
NO EVENT, SHALL THE COMPANY'S LIABILITY EXCEED THE PURCHASE PRICE PAID
BY PURCHASER FOR THE PRODUCT.
This Warranty is in lieu of all other express warranties or liabilities. ANY IMPLIED
WARRANTIES, INCLUDING ANY IMPLIED WARRANTY OF MERCHANTABILITY, SHALL
BE LIMITED TO THE DURATION OF THIS WRITTEN WARRANTY. ANY ACTION FOR
BREACH OF ANY WARRANTY HEREUNDER INCLUDING ANY IMPLIED WARRANTY OF
MERCHANTABILITY MUST BE BROUGHT WITHIN A PERIOD OF 24 MONTHS FROM
DATE OF ORIGINAL PURCHASE. IN NO CASE SHALL THE COMPANY BE LIABLE FOR
ANY CONSEQUENTIAL OR INCIDENTAL DAMAGES FOR BREACH OF THIS OR ANY
OTHER WARRANTY, EXPRESS OR IMPLIED, WHATSOEVER.
No person or
representative is authorized to assume for the Company any liability other than expressed
herein in connection with the sale of this product.
Some states do not allow limitations on how long an implied warranty lasts or the exclusion or
limitation of incidental or consequential damage so the above limitations or exclusions may not
apply to you. This Warranty gives you specific legal rights and you may also have other rights
which vary from state to state.
U.S.A. : AUDIOVOX Electronics CORPORATION, 150 MARCUS BLVD., HAUPPAUGE, NEW YORK 11788
l 1-800-645-4994
CANADA : CALL 1-800-645-4994 FOR LOCATION OF WARRANTY STATION SERVING YOUR AREA
© 2005 Audiovox Electronics Corporation
128-5556E
For Customer Service
Visit Our Website At
WWW.audiovox.com
Product Information, Photos,
FAQ’s Owner’s Manuals
© 2005 Audiovox Electronics Corp., Hauppauge, NY 11788
128-7344