1
An Oracle White Paper
June 2014
Protecting Oracle Database Appliance – Tape
Backup with Oracle Secure Backup
Protecting Oracle Database Appliance - Tape Backup with Oracle Secure Backup
Disclaimer
The following is intended to outline our general product direction. It is intended for information purposes only,
and may not be incorporated into any contract. It is not a commitment to deliver any material, code, or
functionality, and should not be relied upon in making purchasing decisions. The development, release, and timing
of any features or functionality described for Oracle’s products remains at the sole discretion of Oracle.
Protecting Oracle Database Appliance - Tape Backup with Oracle Secure Backup
Introduction .................................................................................................. 1
Hardware and Software ............................................................................... 2
Oracle Secure Backup Administrative Server and Media Server .............. 2
Oracle StorageTek Library and Tape Drives ............................................ 3
OS ........................................................................................................... 3
Backup Software ...................................................................................... 3
Connectivity ................................................................................................. 3
Ethernet ................................................................................................... 3
Serial Attached SCSI (SAS) ..................................................................... 3
Diagram of Configuration ......................................................................... 3
Date Synchronization ................................................................................... 4
Oracle StorageTek Tape Configuration ........................................................ 4
Physical Attachments ............................................................................... 4
Library Monitoring .................................................................................... 5
Library Drive OS Verification ........................................................................ 5
Oracle Secure Backup Configuration ........................................................... 6
Modify /etc/hosts files ............................................................................... 6
Install Oracle Secure Backup ................................................................... 6
Modify Administrative Server to be a Media Server .................................. 7
Add Clients to Oracle Secure Backup ...................................................... 9
Configuring Storage Devices .................................................................... 9
Add & Attach Library .............................................................................. 10
Obtain Tape Drive Mapping Information ................................................. 11
Add & Attach Tape Drive ........................................................................ 11
Inventory Library .................................................................................... 13
Configure Media Families in Oracle Secure Backup............................... 15
Create and Authorize Oracle Database User in Oracle Secure Backup . 15
Configure RMAN to backup database .................................................... 15
RMAN Script .......................................................................................... 16
Required tnsnames.ora Changes ........................................................... 16
Execute Backup Tests ........................................................................... 17
Restoring the Database ............................................................................. 18
Restore Demonstration .......................................................................... 18
Private Network Configuration.................................................................... 22
OS Setup ............................................................................................... 22
Configure Preferred Network Interfaces for Media Servers .................... 22
Configure PNI in Oracle Secure Backup ................................................ 23
Recommended tuning by tape drive ........................................................... 25
Set Blocking Factor and Max Blocking Factor ........................................ 25
Direct I/O................................................................................................ 25
Protecting Oracle Database Appliance - Tape Backup with Oracle Secure Backup
Hardware Compression ......................................................................... 26
Conclusion ................................................................................................. 26
Additional Resources ................................................................................. 27
Protecting Oracle Database Appliance - Tape Backup with Oracle Secure Backup
Introduction
The Oracle Database Appliance is an engineered system consisting of hardware, software, and storage
that saves customers time and money by simplifying deployment, maintenance, and support of high
availability database solutions. The Oracle Database Appliance provides double or triple mirrored
redundancy using Automatic Storage Management software. The Database Appliance is comprised of
two nodes, each having its own dedicated power, memory, CPU, RAID control, etc. to allow for maximum
redundancy. It allows for single instance, Real Application Clusters (RAC) One Node or full Oracle RAC
configurations. Additionally, the Database Appliance supports virtualization using Oracle Virtual Machine
(OVM). With the high level of redundancy, the chances of a physical failure are remote but still possible
(ex. natural disaster or fire). There is also the possibility of logical corruption such as inadvertently
deleted records or errors in programming. Due to the possibility of a disaster and/or logical corruption, it is
still necessary to backup up the database to provide an extra layer of data protection, along with offsite
storage capabilities. Oracle StorageTek (STK) Tape Libraries and Oracle StorageTek Tape Drives offer
cost effective solutions for meeting Recovery Point Objectives (RPO) and Recovery Time Objectives
(RTO) for the Oracle Database Appliance. The information in this document details how to setup Oracle
Secure Backup to backup the Oracle Database Appliance using Oracle StorageTek tape products. The
information in this document is intended to detail basic configuration of Oracle Secure Backup on the
Oracle Database Appliance to allow for RMAN backups directly to tape. A restore example, private
network example, and performance tuning example are also included to assist with providing additional
knowledge on using Oracle Secure Backup with the Oracle Database Appliance, and to assist with
optimizing the backup environment.
1
Protecting Oracle Database Appliance - Tape Backup with Oracle Secure Backup
Hardware and Software
Below is a summary of the hardware and software utilized for Oracle Database Appliance tape tests.
Note: The below table only lists the combinations of hardware/software that were tested. There are newer
generations of hardware/software available. The Oracle Database Appliance has the x4-2 version available and
Oracle Secure Backup (OSB) Media Server could be an x4-2. Based on the results of testing two generations it is
not expected that performance will differ appreciably (especially in a two to four tape drive setup) as resources on
the lowest versions of the Oracle Database Appliance (V1) and OSB Media Server (x4170 M2) were not being
consumed. Until a major component on the transfer bus is upgraded (Faster SAS card or newer LTO drive) the
performance characteristics should remain similar across generations of servers, Oracle Database Appliances and
Oracle Secure Backup software.
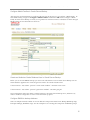
TABLE1.TEST ENVIRONMENT
HARDWARE/SOFTWARE
VERSION
PURPOSE
Oracle Database Appliance
V1, Appliance Manager 2.1.0.3.0
Database Appliance
X3-2, Appliance Manager 2.6.0.0.0
Oracle Linux
5.5 (Oracle Database Appliance V1)
OS on Database and
5.7 (Backup Server for Oracle Database Appliance V1 testing)
Backup Servers
5.8 (Oracle Database Appliance X3-2 & Backup Server for Oracle
Database Appliance X3-2 testing)
Oracle Linux Kernel
Oracle Secure Backup
Oracle Linux 5.5 Kernel= kernel-2.6.18-194.32.1.0.1.el5 (V1)
Kernel on Database
Oracle Linux 5.8 Kernel = 2.6.32-300.32.5.el5uek (X3-2)
Servers
10.4.0.2 (Used for Oracle Database Appliance V1 testing)
Backup Software
10.4.0.3(Used for Oracle Database Appliance X3-2 testing)
Oracle Sun x4170 M2
Base Hardware (Used for Oracle Database Appliance V1 testing)
Oracle Secure Backup
Sun Server X3-2
Base Hardware (Used for Oracle Database Appliance X3-2 testing)
Administrative/Media
Server
Oracle StorageTek SL150
Latest Firmware
Tape Library for Backup
Latest Firmware (Used for Oracle Database Appliance V1 testing)
Tape Drives for Backup
( Oracle StorageTek SL500 or
Oracle StorageTek SL24/48
can also be used)
LTO-5 Half Height Tape
Drives(2)
LTO-6 Half Height Tape
Latest Firmware (Used for Oracle Database Appliance X3-2 testing)
Drives(2)
6Gb SAS HBA
SGX-SAS6-EXT-Z
Tape Connectivity to Media
Server
Oracle Secure Backup Administrative Server and Media Server
To manage the backup and recovery operations on the Oracle Database Appliance, a 1U single processor machine
has plenty of resources as the Administrative Server and Media Server for Oracle Secure Backup. Refer to the
Appendix of this paper for links to Oracle Secure Backup documentation and additional information.
2
Protecting Oracle Database Appliance - Tape Backup with Oracle Secure Backup
Oracle StorageTek Library and Tape Drives
An Oracle StorageTek SL150 with two LTO-5 or LTO-6 tape drives is used to backup the Oracle Database
Appliance. Also compatible are the Oracle StorageTek SL500 or Oracle StorageTek SL24/48 with LTO tape
drives (LTO-6 not supported in SL24/48).
OS
The Oracle Secure Backup Administrative/Media Server has Oracle Linux installed.
Backup Software
Oracle Secure Backup (10.4 or above) is utilized for tape backups.
Connectivity
This section explains the different interfaces that will be utilized in this environment.
Ethernet
The Oracle Secure Backup Administrative/Media Server requires a GbE or 10GbE connection to the Oracle
Database Appliance depending on which interface will be used for backup.
Serial Attached SCSI (SAS)
A single SAS HBA card in the Oracle Secure Backup Administrative/Media Server is used to attach each tape
drive directly to the Oracle Secure Backup Administrative/Media Server.
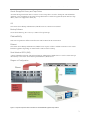
Diagram of Configuration
Figure 1: Physical components and connections for Oracle Database Appliance tape solution.
3
Protecting Oracle Database Appliance - Tape Backup with Oracle Secure Backup
Date Synchronization
Ensure you are using Network Time Protocol (NTP) or have all the dates/times between all servers involved in
this configuration in sync.
Oracle StorageTek Tape Configuration
The Oracle StorageTek (STK) SL150 is a modular library system with high capacity and high reliability which can
be attached to a host via fiber channel or SAS. This configuration will utilize a SAS connection. The SL150 is a
bridged library which means robot control commands are channeled through one of the tape drives (no separate
connection for the robot). If this is a new library, follow the instructions in the SL150 documentation to setup the
library. Following the initial setup of the SL150; connect the tape drives to the Oracle Secure Backup
Administrative/Media Server. To connect the SL150 to the Oracle Secure Backup Administrative/Media Server,
use SAS cables to hook each tape drive to the SAS ports on the Sun Server X3-2 HBA card. See figures 2 & 3
below:
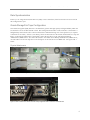
Physical Attachments
Figure 2: Rear of Oracle StorageTek SL150 tape library with two LTO SAS attached tape drives.
Figure 3: Rear of Oracle’s Sun Server X3-2 with multi-pronged SAS cable connected to SAS HBA card.
4
Protecting Oracle Database Appliance - Tape Backup with Oracle Secure Backup
Note: An STK SL150 is featured in this paper. The STK SL500 or STK SL24/48 Library can also be used in
Oracle Database Appliance backup configurations. The physical attachment of a SAS SL500 or SAS SL24/48 will
be identical to using a SAS connected SL150 as all are bridged libraries, meaning robot control is achieved over the
physical tape drive connection.
Library Monitoring
After initial library configuration, the Oracle StorageTek Library Browser User Interface (BUI) can be used to
monitor, re-configure and operate the SL150 library. SL150 BUI is pictured in figure 4:
Note: The BUI is not available on STK SL500 or STK SL24/48 as the STK SL500 is managed using the
StorageTek Library Console (SLC) and the STK SL24/48 is managed using a built-in web GUI.
Figure 4: Oracle StorageTek SL150 Modular Tape Library BUI.
Library Drive OS Verification
Use the sg utility to verify you can see the Oracle StorageTek tape library and LTO-6 tape drives on the Oracle
Secure Backup Administrative/Media Server (sg_map requires sg3 utilities to be installed in Linux. See MOS note
1461798.1 for details on installing RPM’s to the Oracle Database Appliance):
[root@xman2 ~]# sg_map -i -x
/dev/sg0 0 0 0 0 1 /dev/nst0 HP
Ultrium 6-SCSI 32DS
/dev/sg1 0 0 1 0 1 /dev/nst1 HP
Ultrium 6-SCSI 32DS
/dev/sg2 0 0 1 1 8 STK
SL150
0182
/dev/sg3 1 0 0 0 0 /dev/sda HITACHI H106030SDSUN300G A2B0
/dev/sg4 1 0 1 0 0 /dev/sdb HITACHI H106030SDSUN300G A2B0
/dev/sg5 1 0 2 0 0 /dev/sdc HITACHI H106030SDSUN300G A2B0
/dev/sg6 1 0 3 0 0 /dev/sdd HITACHI H106030SDSUN300G A2B0
/dev/sg7 1 0 4 0 0 /dev/sde HITACHI H106030SDSUN300G A2B0
/dev/sg8 1 0 5 0 0 /dev/sdf HITACHI H106030SDSUN300G A2B0
/dev/sg9 1 0 6 0 0 /dev/sdg HITACHI H106030SDSUN300G A2B0
/dev/sg10 1 0 7 0 0 /dev/sdh HITACHI H106030SDSUN300G A2B0
/dev/sg11 8 0 0 0 0 /dev/sdi ORACLE SSM
PMAP
5
Protecting Oracle Database Appliance - Tape Backup with Oracle Secure Backup
From the above output the Oracle StorageTek tape library (STK SL150) and two HP LTO-6 (Ultrium 6) drives are
present.
Oracle Secure Backup Configuration
Oracle Secure Backup configuration for tape backup with the Oracle Database Appliance is comprised of several
tasks including setup at the OS level, installation of the Oracle Secure Backup software, tape library configuration,
tape drive configuration, Oracle Database authorization, and RMAN script setup.
Modify /etc/hosts files
Modification of the /etc/hosts files on the Oracle Secure Backup Administrative/Media Server and database
nodes depends on which network interface will be used for backup, and the DNS setup in the environment. If the
primary network is used for backup, and all hosts are in DNS, no changes to /etc/hosts files are required. If DNS,
or another naming service, is not available, then the Oracle Secure Backup Administrative/Media Server needs to
be added to /etc/hosts on each database node and each database node needs to be added to /etc/hosts on the
Oracle Secure Backup Administrative/Media Server. The example and screen shots in this paper detail setup of a
backup solution using the primary public Ethernet interface. If you plan to use one of the additional interfaces
available on the Oracle Database Appliance for backups over a private network, please see the Private Network
Configuration section near the end of this document for details on that configuration.
Install Oracle Secure Backup
The GUI is used to illustrate the installation and configuration steps below, but all steps can also be completed via
the command line interface (obtool) or Oracle Enterprise Manager (EM). A listing of commands is available in the
Oracle Secure Backup documentation.
1.
Install Oracle Secure Backup on the server designated as the Oracle Secure Backup Administrative/Media
Server (xman2) and on the database nodes (hamms1 and hamms2). Generally all defaults will be chosen
during the installation, but answer installation questions per your environment, and refer to the Oracle Secure
Backup documentation for further details.
During installation define each server with the following roles:
xman2 = Administrative Server, Media Server, and Client
hamms1 = Client
hamms2 = Client
After installation and prior to configuring Oracle Secure Backup, modify the following parameters to ensure
the correct interface will be used when transferring data from the Oracle Database Appliance to the Oracle
Secure Backup server:
[root@xman2 ~]# obtool setp operations/disablerds yes
[root@xman2 ~]# obtool setp testing/supressrdma yes
[root@xman2 ~]# obtool setp testing/useloadbalance no
6
Protecting Oracle Database Appliance - Tape Backup with Oracle Secure Backup
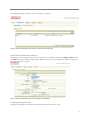
Modify Administrative Server to be a Media Server
During installation you specified option “A” for the installation of the Oracle Secure Backup
Administrative/Media Server which indicates to install the server as an Administrative Server, Media Server, and
Client. However, you must still assign the Media Server role to the server from the GUI in order to attach any
devices to the server.
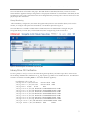
Launch the Oracle Secure Backup GUI (https://xman2 ) and login to access the home screen pictured in figure 5:
Figure 5: Home screen of Oracle Secure Backup GUI.
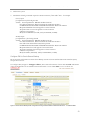
Navigate to Configure->Hosts, select xman2 from the list of hosts and click Edit to display the screen pictured
in figure 6 below:
7
Protecting Oracle Database Appliance - Tape Backup with Oracle Secure Backup
Figure 6: Oracle Secure Backup Hosts configuration screen prior to modifying roles.
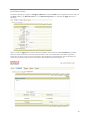
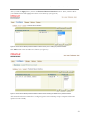
Highlight all roles and click Apply (see figure 7):
Figure 7: Modification of Roles for the Administrative Server to also be a Media Server.
8
Protecting Oracle Database Appliance - Tape Backup with Oracle Secure Backup
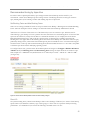
After applying changes, xman2 should look as follows (see figure 8):
Figure 8: Oracle Secure Backup Hosts configuration screen after modifying Roles.
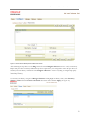
Add Clients to Oracle Secure Backup
The next step in the configuration process is to add clients. To add clients navigate to Configure->Hosts, click
the Add button and populate the required fields. Repeat for each of your clients and enter either the hostname or
IP to add the client (see figure9):
Figure 9: Oracle Secure Backup Hosts screen showing a host being added.
Configuring Storage Devices
Following configuration of the clients, the tape library and tape drives can be setup.
9
Protecting Oracle Database Appliance - Tape Backup with Oracle Secure Backup
Add & Attach Library
To add the tape library, navigate to Configure->Devices and click the Add button. Populate the device name, set
the Type to library, set Barcode reader to yes, set Barcode required to yes and click the Apply button (see
figure 10):
Figure 10: Oracle Secure Backup Add New Device screen for tape library.
After you click the Apply button, another button will appear on the button bar titled Attachments. Click this
button to add an attachment. You must attach the library to the server which will control library operations.
Specify the raw device for the robot found earlier in the Library Drive OS Verification section, and select the
correct server from the drop-down menu (xman2 in this example as pictured in figure 11):
Figure 11: Oracle Secure Backup Device Attachments screen.
10
Protecting Oracle Database Appliance - Tape Backup with Oracle Secure Backup
Once the library is added and attached, ping it with the Ping button from the Configure->Devices screen to
ensure you are connected and properly configured.
Obtain Tape Drive Mapping Information
In order to add and attach each tape drive you must map the /dev/sg# of each tape drive to the correct Drive
Transfer Element (DTE) number in the tape library. To obtain mapping information go to Configure->Devices,
select the library and click the Verify button (see figure 12):
Figure 12: Oracle Secure Backup Libraries Verify screen.
Use the list of /dev/sg#’s and corresponding serial numbers compiled in the Library Drive OS Verification
section of this document to correlate the /dev/sg# to the correct DTE number.
Example:
When sginfo was run on /dev/sg4 it returned:
[root@xman2 ~]# sginfo -s /dev/sg4
Serial Number 'HU1206LY4Y'
The above screen shot (figure 12) shows serial number HU1206LY4Y corresponds to DTE 1. Match
HU1206LY4Y on your list of /dev/sg#’s and serial numbers. The match shows that /dev/sg4 is DTE 1. When
you attach the drive in the next step you will be specifying DTE 1 with a raw device entry for /dev/sg4.
Add & Attach Tape Drive
To add a tape drive, navigate to Configure->Devices and click the Add button. From the entry form, specify a
device name, select Type tape, set the Status to in service, make sure the correct library is selected and that you
have specified the correct Drive Transfer Element (DTE) number. Then, click the Apply button to add the drive
(see figure 13):
11
Protecting Oracle Database Appliance - Tape Backup with Oracle Secure Backup
Figure 13: Oracle Secure Backup Add New Device screen for tape drive.
After you click the Apply button, another button will appear on the button bar titled Attachments. Click this
button to add an attachment. You must attach the tape drive to the correct raw device using the mapping
information obtained from the Verify Library output in the previous step. You must also select the Media Server
to which the drive is attached (see figure 14):
12
Protecting Oracle Database Appliance - Tape Backup with Oracle Secure Backup
Figure 14: Oracle Secure Backup Device Attachments screen.
After attaching the tape drive use the Ping button from the Configure->Devices screen to verify connectivity.
Repeat this procedure to add any additional tape drives required for your configuration. Once all tape drives are
attached, rerun the library verification from Configure->Devices to ensure everything is configured properly.
Inventory Library
To inventory the library, navigate to Manage->Libraries and highlight the library. Then, select Inventory
(Library | Drive) from the Library commands drop-down menu and click Apply (see figure 15):
Figure 15: Oracle Secure Backup Manage Libraries screen.
13
Protecting Oracle Database Appliance - Tape Backup with Oracle Secure Backup
From the Inventory screen check the box for Force, leave the Storage element range blank and click Apply (see
figure 16):
Figure 16: Oracle Secure Backup Manage Libraries Inventory screen.
When the inventory is complete a ‘Success: inventory on ‘library-name’ complete’ message will be displayed. Click
the List Volumes button to display the robot contents (see figure 17):
Figure 17: Oracle Secure Backup List Volumes screen.
14
Protecting Oracle Database Appliance - Tape Backup with Oracle Secure Backup
Configure Media Families in Oracle Secure Backup
After the robot and tape libraries are configured, the next step in the process is to configure a Media Family. To
add a Media Family, navigate to Configure->Media Families and click the Add button. Configure a Media
Family in Oracle Secure Backup to match your organization’s retention scheme. For databases Content managed
Media Families are recommended (see figure 18).
Figure 18: Oracle Secure Backup New Media Families configuration screen.
Create and Authorize Oracle Database User in Oracle Secure Backup
Before you can execute RMAN backups you must create and authorize users in Oracle Secure Backup. For the
Oracle Database Appliance the oracle and grid users need to be created and authorized:
# obtool mkuser --class admin --preauth '*:oracle+rman+cmdline' --unixname oracle oracle
# obtool mkuser --class admin --preauth '*:grid+rman+cmdline' --unixname grid grid
Note: Authorization allows the clients to initiate backups to the Oracle Secure Backup server, and allows any
nodes in the RAC configuration to restore each other’s back-up pieces.
Configure RMAN to backup database
There are multiple methods available to execute database backups with Oracle Secure Backup (RMAN prompt,
Enterprise Manager, & RMAN script). For this example we are executing the backup from the RMAN prompt.
15
Protecting Oracle Database Appliance - Tape Backup with Oracle Secure Backup
Prior to running RMAN the correct environment variables must be set for the oracle user on the database server
which will be used to execute the RMAN script. This example demonstrates setup and execution of RMAN from
database server hamms1.
1.
2.
Switch user to the oracle user - su - oracle
Modify the user environment variables and specify the following parameters to match your environment
(bash shell being used in this example):
vi .bash_profile
export ORACLE_HOME=/u01/app/oracle/product/11.2.0.3/dbhome_1
export PATH=$ORACLE_HOME/bin:.:$PATH
export ORACLE_SID=isr1
Connect to RMAN with the appropriate credentials to verify environment is set correctly.
Example: rman target sys/welcome1@hamms1/isr
RMAN Script
Create an RMAN script containing the following entries to backup the data files, archive logs, and controlfile.
Allocate tape channels for each drive in your configuration and round robin the connection to each of the database
servers (this is how load balancing is achieved). Also be sure to release each tape channel after each section of the
backup. For our example we created the script under /oracleBU/osb on host hamms1:
RUN {
ALLOCATE CHANNEL ch00 TYPE 'SBT_TAPE' CONNECT='sys/welcome1@isr1';
ALLOCATE CHANNEL ch01 TYPE 'SBT_TAPE' CONNECT='sys/welcome1@isr2';
BACKUP AS BACKUPSET INCREMENTAL LEVEL 0 DATABASE INCLUDE CURRENT
CONTROLFILE PLUS ARCHIVELOG;
RELEASE CHANNEL ch00;
RELEASE CHANNEL ch01;
}
Required tnsnames.ora Changes
In order to evenly spread the backup load across each of the database servers, the database server executing the
RMAN script (hamms1 in this example) must be able to open RMAN channels on the other database server. This
requires modifications to the tnsnames.ora file on each database server.
1) Modify the /u01/app/oracle/product/11.2.0.3/dbhome_1/network/Administrative/tnsnames.ora file with a
text editor
Original file:
# tnsnames.ora Network Configuration File:
/u01/app/oracle/product/11.2.0.3/dbhome_1/network/Administrative/tnsnames.ora
# Generated by Oracle configuration tools.
ISR =
(DESCRIPTION =
(ADDRESS = (PROTOCOL = TCP)(HOST = hamms-scan)(PORT = 1521))
(CONNECT_DATA =
(SERVER = DEDICATED)
(SERVICE_NAME = isr)
16
Protecting Oracle Database Appliance - Tape Backup with Oracle Secure Backup
)
2)
)
Modify the file to look as follows:
# tnsnames.ora Network Configuration File:
/u01/app/oracle/product/11.2.0.3/dbhome_1/network/admin/tnsnames.ora
# Generated by Oracle configuration tools.
ISR =
(DESCRIPTION =
(ADDRESS = (PROTOCOL = TCP)(HOST = hamms-scan)(PORT = 1521))
(CONNECT_DATA =
(SERVER = DEDICATED)
(SERVICE_NAME = isr)
)
)
ISR1 =
(DESCRIPTION =
(ADDRESS = (PROTOCOL = TCP)(HOST = hamms1)(PORT = 1521))
(CONNECT_DATA =
(SERVER = DEDICATED)
(SERVICE_NAME = isr)
(SID = isr1)
)
)
ISR2 =
(DESCRIPTION =
(ADDRESS = (PROTOCOL = TCP)(HOST = hamms2)(PORT = 1521))
(CONNECT_DATA =
(SERVER = DEDICATED)
(SERVICE_NAME = isr)
(SID = isr2)
)
)
3) After modifying tnsnames.ora verify ownership/permissions on the file to ensure they are correct:
i)
Owner should be oracle
ii)
Group should be oinstall
iii)
Permissions should be rw-r----- or 640 octal
Execute Backup Tests
Choose one of the clients to execute the RMAN script, in this example we use hamms1:
[root@hamms1 /]# su – oracle
[oracle@hamms1 ~]$ rman target /
From the RMAN prompt provide the path to the previously created RMAN script in order to execute the script:
RMAN>@/oracleBU/osb/rman.script
After executing the script, monitor the job to ensure the backup completes successfully.
17
Protecting Oracle Database Appliance - Tape Backup with Oracle Secure Backup
Restoring the Database
In the event of a logical database corruption, or a complete disaster, restoration of the database from tape can be
executed. In most instances the Database Administrator (DBA) will be conducting the restoration, and will be
executing the restore job from the machine where the database resides. The DBA will use RMAN to request the
needed backup pieces from the Oracle Secure Backup Media Management Layer. The RMAN backup pieces are
cataloged in the controlfile, or RMAN Catalog if using Recovery Manager with catalog, and Oracle Secure Backup
also knows about the pieces in its own catalog. If a complete disaster has occurred and the Oracle Database
Appliance has been re-imaged, you will also require the DBID of your database to perform the restore.
Restore Demonstration
There are many different restore scenarios available with RMAN, depending on the type of problem encountered
in the database (consult RMAN documentation for complete information). For this example, assume that one or
more controlfiles are damaged and so are some of the data files that under lie the database. Also assume all
archive logs are intact in the Fast Recovery Area (FRA). The basic steps in the RMAN restore process are to
restore the controlfile, restore the database, and then recover the database. After the controlfile is restored, the
database will know which backup pieces are needed based on data contained in the restored controlfile. If the
archive logs are still available in the FRA you can use them to recover up to present or to a specific point in time
(they are available in this example).
Example of steps to restore and recover database:
**From hamms1 execute the following**
[root@hamms1 /]# su - oracle
[oracle@hamms1 ~]$ rman target /
Recovery Manager: Release 11.2.0.3.0 - Production on Thu Jul 18 14:38:06 2013
Copyright (c) 1982, 2011, Oracle and/or its affiliates. All rights reserved.
connected to target database: ISR (DBID=2637695581)
RMAN> shutdown immediate;
using target database controlfile instead of recovery catalog
database closed
database dismounted
Oracle instance shut down
** Also login to hamms2 with SQL Plus and execute a shutdown immediate;**
[root@hamms2 /]# su - oracle
[oracle@hamms2 ~]$ sqlplus / as sysdba
SQL> shutdown immediate;
RMAN> startup nomount;
connected to target database (not started)
Oracle instance started
18
Protecting Oracle Database Appliance - Tape Backup with Oracle Secure Backup
Total System Global Area 25654751232 bytes
Fixed Size
Variable Size
Database Buffers
Redo Buffers
2238472 bytes
2818574328 bytes
22749904896 bytes
84033536 bytes
Make sure your DBID is set. The DBID can be found when connecting to RMAN.
connected to target database: ISR (DBID=2637695581)
RMAN> set DBID 2637695581
RMAN> run
2> {
3> ALLOCATE CHANNEL ch00 TYPE 'SBT_TAPE'
4> restore controlfile from autobackup;
5> }
allocated channel: ch00
channel ch00: SID=468 instance=isr1 device type=SBT_TAPE
channel ch00: Oracle Secure Backup
Starting restore at 18-JUL-13
channel ch00: looking for AUTOBACKUP on day: 20130718
channel ch00: AUTOBACKUP found: c-2637695581-20130718-00
channel ch00: restoring controlfile from AUTOBACKUP c-2637695581-20130718-00
channel ch00: controlfile restore from AUTOBACKUP complete
output file name=+DATA/isr/control01.ctl
Finished restore at 18-JUL-13
released channel: ch00
RMAN> alter database mount;
database mounted
**Also login to hamms2 and run startup mount; so you can open a channel on hamms2 for a parallel restore**
RMAN> run
2> {
3> SET AUTOLOCATE ON;
4> ALLOCATE CHANNEL ch00 TYPE 'SBT_TAPE' CONNECT='sys/welcome1@isr1';
5> ALLOCATE CHANNEL ch01 TYPE 'SBT_TAPE' CONNECT='sys/welcome1@isr2';
6> restore database;
7> }
executing command: SET autolocate
allocated channel: ch00
channel ch00: SID=921 instance=isr1 device type=SBT_TAPE
channel ch00: Oracle Secure Backup
allocated channel: ch01
19
Protecting Oracle Database Appliance - Tape Backup with Oracle Secure Backup
channel ch01: SID=922 instance=isr2 device type=SBT_TAPE
channel ch01: Oracle Secure Backup
Starting restore at 18-JUL-13
Starting implicit crosscheck backup at 18-JUL-13
Crosschecked 1 objects
Finished implicit crosscheck backup at 18-JUL-13
Starting implicit crosscheck copy at 18-JUL-13
Finished implicit crosscheck copy at 18-JUL-13
searching for all files in the recovery area
cataloging files...
cataloging done
List of Cataloged Files
=======================
File Name: +reco/ISR/ARCHIVELOG/2013_07_18/thread_1_seq_46.334.782136425
channel ch00: starting datafile backup set restore
channel ch00: specifying datafile(s) to restore from backup set
channel ch00: restoring datafile 00002 to +DATA/isr/datafile/sysaux.298.779819079
channel ch00: restoring datafile 00004 to +DATA/isr/datafile/undotbs2.299.779819079
channel ch00: restoring datafile 00005 to +DATA/isr/datafile/users.297.779815503
channel ch00: restoring datafile 00006 to +DATA/isr/card.dbf
channel ch00: restoring datafile 00008 to +DATA/isr/card2.dbf
channel ch00: restoring datafile 00010 to +DATA/isr/card4.dbf
channel ch00: restoring datafile 00012 to +DATA/isr/card6.dbf
channel ch00: restoring datafile 00014 to +DATA/isr/card8.dbf
channel ch00: restoring datafile 00016 to +DATA/isr/card10.dbf
channel ch00: restoring datafile 00018 to +DATA/isr/card12.dbf
channel ch00: restoring datafile 00020 to +DATA/isr/card14.dbf
channel ch00: restoring datafile 00022 to +DATA/isr/card16.dbf
channel ch00: restoring datafile 00024 to +DATA/isr/card18.dbf
channel ch00: restoring datafile 00026 to +DATA/isr/card20.dbf
channel ch00: restoring datafile 00028 to +DATA/isr/card22.dbf
channel ch00: restoring datafile 00030 to +DATA/isr/card24.dbf
channel ch00: restoring datafile 00032 to +DATA/isr/card26.dbf
channel ch00: restoring datafile 00034 to +DATA/isr/card28.dbf
channel ch00: reading from backup piece efn9smuj_1_1
channel ch01: starting datafile backup set restore
channel ch01: specifying datafile(s) to restore from backup set
channel ch01: restoring datafile 00001 to +DATA/isr/datafile/system.295.779815401
channel ch01: restoring datafile 00003 to +DATA/isr/datafile/undotbs1.296.779815475
channel ch01: restoring datafile 00007 to +DATA/isr/card1.dbf
channel ch01: restoring datafile 00009 to +DATA/isr/card3.dbf
channel ch01: restoring datafile 00011 to +DATA/isr/card5.dbf
channel ch01: restoring datafile 00013 to +DATA/isr/card7.dbf
channel ch01: restoring datafile 00015 to +DATA/isr/card9.dbf
channel ch01: restoring datafile 00017 to +DATA/isr/card11.dbf
channel ch01: restoring datafile 00019 to +DATA/isr/card13.dbf
channel ch01: restoring datafile 00021 to +DATA/isr/card15.dbf
channel ch01: restoring datafile 00023 to +DATA/isr/card17.dbf
20
Protecting Oracle Database Appliance - Tape Backup with Oracle Secure Backup
channel ch01: restoring datafile 00025 to +DATA/isr/card19.dbf
channel ch01: restoring datafile 00027 to +DATA/isr/card21.dbf
channel ch01: restoring datafile 00029 to +DATA/isr/card23.dbf
channel ch01: restoring datafile 00031 to +DATA/isr/card25.dbf
channel ch01: restoring datafile 00033 to +DATA/isr/card27.dbf
channel ch01: restoring datafile 00035 to +DATA/isr/card29.dbf
channel ch01: restoring datafile 00036 to +DATA/isr/card30.dbf
channel ch01: reading from backup piece een9smuu_1_1
channel ch00: piece handle=efn9smuj_1_1 tag=TAG20130718T102222
channel ch00: restored backup piece 1
channel ch00: restore complete, elapsed time: 00:33:37
channel ch01: piece handle=een9smuu_1_1 tag=TAG20130718T102222
channel ch01: restored backup piece 1
channel ch01: restore complete, elapsed time: 00:34:57
Finished restore at 18-JUL-13
released channel: ch00
released channel: ch01
RMAN> run
2> {
3> SET AUTOLOCATE ON;
4> ALLOCATE CHANNEL ch00 TYPE 'SBT_TAPE' CONNECT='sys/welcome1@isr1';
5> ALLOCATE CHANNEL ch01 TYPE 'SBT_TAPE' CONNECT='sys/welcome1@isr22';
6> recover database;
7> }
executing command: SET autolocate
allocated channel: ch00
channel ch00: SID=921 instance=isr1 device type=SBT_TAPE
channel ch00: Oracle Secure Backup
allocated channel: ch01
channel ch01: SID=922 instance=isr2 device type=SBT_TAPE
channel ch01: Oracle Secure Backup
Starting recover at 08-JUL-13
starting media recovery
archived log for thread 1 with sequence 45 is already on disk as file
+RECO/isr/archivelog/2013_07_18/thread_1_seq_45.332.782133169
archived log for thread 1 with sequence 46 is already on disk as file
+RECO/isr/archivelog/2013_07_18/thread_1_seq_46.334.782136425
archived log for thread 2 with sequence 48 is already on disk as file
+RECO/isr/archivelog/2013_07_18/thread_2_seq_48.333.782133161
archived log for thread 2 with sequence 49 is already on disk as file
+REDO/isr/onlinelog/group_3.262.779880941
archived log file name=+RECO/isr/archivelog/2013_07_18/thread_1_seq_45.332.782133169 thread=1
sequence=45
archived log file name=+RECO/isr/archivelog/2013_07_18/thread_2_seq_48.333.782133161 thread=2
sequence=48
archived log file name=+RECO/isr/archivelog/2013_07_18/thread_1_seq_46.334.782136425 thread=1
sequence=46
21
Protecting Oracle Database Appliance - Tape Backup with Oracle Secure Backup
archived log file name=+REDO/isr/onlinelog/group_3.262.779880941 thread=2 sequence=49
Finished recover at 18-JUL-13
released channel: ch00
released channel: ch01
RMAN> alter database open resetlogs;
database opened
RMAN>
**Also login to hamms2 and run alter database open; to bring the 2nd instance back online**
Private Network Configuration
The Oracle Secure Backup configuration in this paper utilized the public network interface for the database backup
traffic. It is a perfectly valid configuration as you may have idle time overnight to execute a database backup.
However, depending on your organization’s backup requirements, it may be necessary to offload backup traffic to
one of the other interfaces on the Oracle Database Appliance (Ex. alleviate traffic on the public network, faster
backup time required, etc.). The following example details how to setup NetBackup to use a 10GbE bonded
interface for database backups.
OS Setup
First you must configure the 10GbE HBA cards on the Administrative/Media server, and each of the database
nodes. For this example, assume you have configured the following host names and IP addresses for the
Administrative/Media Server and the database nodes:
192.168.20.100 hamms1-xbond0
192.168.20.101 hamms2-xbond0
192.168.20.102 xman2-xbond0
If the hostnames are not in the DNS map, or other naming service map, they must be in the local hosts file on
each of the servers in the configuration (xman2, hamms1, and hamms2).
Configure Preferred Network Interfaces for Media Servers
Disable ipv6
For the Preferred Network Interface (PNI) to work properly you may need to disable the ipv6 interface. Only
perform these steps if you are encountering a situation where backup data is being transferred across the wrong
interface.
1.
Modify the /etc/sysctl.conf file to add the following lines:
#disable ipv6
net.ipv6.conf.all.disable_ipv6 = 1
net.ipv6.conf.all.auto_conf = 0
net.ipv6.conf.default.disable_ipv6 = 1
net.ipv6.conf.default.auto_conf = 0
net.ipv6.conf.lo.disable_ipv6 = 1
net.ipv6.conf.lo.auto_conf = 0
22
Protecting Oracle Database Appliance - Tape Backup with Oracle Secure Backup
2.
Reboot the system.
3.
Validate that ifconfig command output does NOT contain any "inet6 addr:" lines - for example
Good output:
[root@xman2 etc]# ifconfig xbond0
xbond0 Link encap:Ethernet HWaddr 00:1B:21:C4:29:3C
inet addr:192.168.20.102 Bcast:192.168.20.255 Mask:255.255.255.0
UP BROADCAST RUNNING MASTER MULTICAST MTU:1500 Metric:1
RX packets:6826620 errors:0 dropped:0 overruns:0 frame:0
TX packets:39671 errors:0 dropped:0 overruns:0 carrier:0
collisions:0 txqueuelen:0
RX bytes:10330269896 (9.6 GiB) TX bytes:2622045 (2.5 MiB)
Invalid output:
[root@hamms2 ~]# ifconfig xbond0
xbond0 Link encap:Ethernet HWaddr 00:1B:21:93:33:A0
inet addr:192.168.20.101 Bcast:192.168.20.255 Mask:255.255.255.0
inet6 addr: fe80::21b:21ff:fe93:33a0/64 Scope:Link
UP BROADCAST RUNNING MASTER MULTICAST MTU:1500 Metric:1
RX packets:6845 errors:0 dropped:0 overruns:0 frame:0
TX packets:1658166 errors:0 dropped:0 overruns:0 carrier:0
collisions:0 txqueuelen:0
RX bytes:452625 (442.0 KiB) TX bytes:2509638263 (2.3 GiB)
Configure PNI in Oracle Secure Backup
Private network configuration in Oracle Secure Backup is achieved via the Preferred Network Interfaces (PNI)
setup at the host level.
To configure PNI, navigate to Configure->Hosts, select xman2 from the list of hosts and click Edit. Add the IP
of the second interface for the 10GbE network separated by a coma. Click Apply to save (see figure 19).
Figure 19: Oracle Secure Backup Hosts configuration showing Preferred Network Interfaces button and 2nd IP address added.
23
Protecting Oracle Database Appliance - Tape Backup with Oracle Secure Backup
After you click the Apply button, click on the Preferred Network Interfaces button. Then, select the IP for
your 10GbE interface and highlight the Clients to be backed up (see figure 20):
Figure 20: Oracle Secure Backup Preferred Network Interface screen prior to adding the preferred interface.
Click Add and the screen should look as follows (see figure 21):
Figure 21: Oracle Secure Backup Preferred Network Interface screen following the addition of the preferred interface.
After the Preferred Network Interface is configured, private network backup setup is complete and all other
operations work normally.
24
Protecting Oracle Database Appliance - Tape Backup with Oracle Secure Backup
Recommended tuning by tape drive
In order to achieve optimal performance, tape settings in Oracle Secure Backup must be tuned for your
environment. Oracle Secure Backup tape drive tuning consists of modifying the block size that gets written to
tape, enabling direct I/O if running on Linux and enabling tape drive compression.
Set Blocking Factor and Max Blocking Factor
There are two settings available for block size setup in Oracle Secure Backup - Blocking Factor and Max Blocking
Factor. The best description of these settings is found in the Oracle Secure Backup Administrator's Guide:
"The block size of a block of data is the size of the block in bytes as it was written to tape. All blocks read or
written during a given backup or restore operation have the same block size. The blocking factor of a block of data
expresses the number of 512-byte records that are contained in that block. So, for example, the Oracle Secure
Backup default blocking factor (128) results in a tape block size of 128*512 bytes or 64KB. The maximum
blocking factor is an upper limit on the blocking factor that Oracle Secure Backup uses. This limit comes into play
particularly during restores, when Oracle Secure Backup must pick an initial block size to use without knowing the
actual block size on the tape. The maximum blocking factor limits this initial block size to a value that is acceptable
to both the tape device and the underlying operating system."
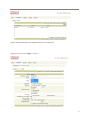
To configure block sizes, open the Oracle Secure Backup GUI and navigate to Configure->Defaults & Policies>Media. Modify the Blocking factor and Max blocking factor settings to adjust the block size written to tape.
This example uses a 1MB block size (Default block size of 128 512 byte records = 64K X 32 = 2048 for 1MB –
(see figure 22):
Figure 22: Oracle Secure Backup Media screen with block setting changes.
Direct I/O
On systems running Linux, Oracle Secure Backup is able to take advantage of Direct I/O to achieve faster backup
speeds. Direct I/O eliminates a memory copy of data going to a device such as a tape drive thereby increasing
performance. To enable Direct I/O execute the following commands as the root user:
25
Protecting Oracle Database Appliance - Tape Backup with Oracle Secure Backup
# echo 1 > /proc/scsi/sg/allow_dio
# touch /usr/local/oracle/backup/device/enable_dio
Note: The /proc/scsi/sg/allow_dio file does not survive reboots. Setup an /etc/rc#.d script to ensure it gets set
during boot.
Hardware Compression
By default most tape drives have compression enabled, and it is recommended to compress at the tape drive level.
You can experiment with compression using RMAN, but if you opt to enable compression at a different layer of
the backup architecture you must disable tape drive compression to avoid doubling compression, which can result
in larger backups and slower transfer rates.
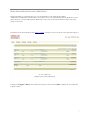
The table below shows the transfer rates achieved in the test environments following tuning.
TABLE 2.PERFORMANCE STATISTICS ORACLE DATABASE
APPLIANCE V1 (TESTS RUN ON X4170 M2 MEDIA SERVER)
DRIVE
BLOCKING
TYPE
FACTOR
INTERFACE
AVERAGE BACKUP TRANSFER RATE PER TAPE DRIVE
LTO5
2048
10GbE
268 MBs
LTO5
2048
GbE
55 MBs
WITH HARDWARE COMPRESSION
TABLE 3.PERFORMANCE STATISTICS ORACLE DATABASE
APPLIANCE X3-2 (TESTS RUN ON X3-2 MEDIA SERVER)
DRIVE
BLOCKING
TYPE
FACTOR
LTO6
2048
INTERFACE
AVERAGE BACKUP TRANSFER RATE PER TAPE DRIVE
WITH HARDWARE COMPRESSION
10GbE
373 MBs
Note1: GbE not tested on Oracle Database Appliance X3-2 as it was verified on Oracle Database V1 that RMAN
can easily saturate a GbE connection.
Note2: The limiting factor on a GbE interface with this configuration is the interface, not the tape drives. Each
node can send up to 120Mbs per second through an interface (bond is active-passive), but the Master/Media can
only consume 120MBs total as that is the capacity of the interface. If active-active bonding is configured, and/or
more NICs or multiple Medias Servers are used, higher rates could be achieved, as the tape drives were not
saturated.
Note3: All tests were run using the Bare Metal configuration (vs. Virtualized). Additionally, on Oracle Database
Appliance X3-2 tests only one storage module was used.
Conclusion
In conclusion, Oracle StorageTek tape products offer cost effective data protection for the Oracle Database
Appliance and, when combined with Oracle Secure Backup, provide an end to end solution fully supported by one
vendor – Oracle.
26
Protecting Oracle Database Appliance - Tape Backup with Oracle Secure Backup
Additional Resources
The following links include the setup information referenced in this document.
Oracle Secure Backup Documentation
Database Appliance Collateral
RMAN Documentation
Protecting Oracle Database Appliance -Tape
Copyright © 2013, Oracle and/or its affiliates. All rights reserved. This document is provided for information purposes only and the
Backup with Oracle Secure Backup
contents hereof are subject to change without notice. This document is not warranted to be error-free, nor subject to any other
June 2014
warranties or conditions, whether expressed orally or implied in law, including implied warranties and conditions of merchantability or
Author: Mike Foss – Integrated Storage
fitness for a particular purpose. We specifically disclaim any liability with respect to this document and no contractual obligations are
Releations
formed either directly or indirectly by this document. This document may not be reproduced or transmitted in any form or by any
Contributing Authors: Kyle Noonan – Integrated
means, electronic or mechanical, for any purpose, without our prior written permission.
Storage Relations, Dennis Frederickson –
Integrated Storage Relations
Oracle Corporation
World Headquarters
500 Oracle Parkway
Redwood Shores, CA 94065
U.S.A.
Oracle and Java are registered trademarks of Oracle and/or its affiliates. Other names may be trademarks of their respective owners.
AMD, Opteron, the AMD logo, and the AMD Opteron logo are trademarks or registered trademarks of Advanced Micro Devices.
Intel and Intel Xeon are trademarks or registered trademarks of Intel Corporation. NetBackup is a trademark or registered trademark
of Symantec Corporation. All SPARC trademarks are used under license and are trademarks or registered trademarks of SPARC
International, Inc. UNIX is a registered trademark licensed through X/Open
Company, Ltd. 0614
Worldwide Inquiries:
Phone: +1.650.506.7000
Fax: +1.650.506.7200
oracle.com
27