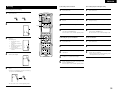
1
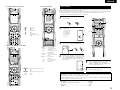
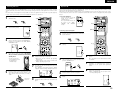
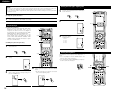
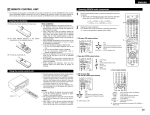
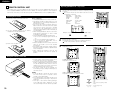
ENGLISH
8 REMOTE CONTROL UNIT
Operating DENON audio components
• The included remote control unit (RC-970) can be used to operate not only the AVR-3805 but other remote
control compatible DENON components as well. In addition, the memory contains the control signals for
other remote control units, so it can be used to operate non-DENON remote control compatible products.
1
AMP/TUNER
ZONE2/ZONE3
TAPE/MD
CD/CDR
TV/DBS/CABLE
VCR1/VCR2
VDP
DVD/DVDR
Inserting the batteries
q Remove the remote control unit’s rear cover.
w Set three R03/AAA batteries in the battery
compartment in the indicated direction.
e Put the rear cover back on.
Notes on Batteries
• Use R03/AAA batteries in the remote control unit.
• The batteries should be replaced with new ones
approximately once a year, though this depends on
the frequency of usage.
• Even if less than a year has passed, replace the
batteries with new ones if the set does not operate
even when the remote control unit is operated
nearby the set. (The included battery is only for
verifying operation. Replace it with a new battery as
soon as possible.)
• When inserting the batteries, be sure to do so in the
proper direction, following the “≈” and “√” marks
in the battery compartment.
• To prevent damage or leakage of battery fluid:
• Do not use a new battery together with an old
one.
• Do not use two different types of batteries.
• Do not short-circuit, disassemble, heat or
dispose of batteries in flames.
• Remove the batteries from the remote control unit
when you do not plan to use it for an extended
period of time.
• If the battery fluid should leak, carefully wipe the
fluid off the inside of the battery compartment and
insert new batteries.
• When replacing the batteries, have the new
batteries ready and insert them as quickly as
possible.
Use the mode selector buttons to select the component you want
to operate.
The function switches as shown below each time one of the
mode buttons is pressed.
:
:
:
:
:
:
:
:
AMP, TUNER
ZONE2, ZONE3
TAPE, MD
CD, CDR
TV, DBS, CABLE
VCR1,VCR2
VDP
DVD,DVDR
Example: Select “AMP” mode.
1
3
Select “TUNER” mode.
2
Operate the audio component.
• For details, refer to the component’s operating instructions.
It may not be possible to operate some models.
3
[SOURCE MENU]
• Operate the source.
1. CD player (CD) system buttons
Using the remote control unit
SEL
CH R
ENTE
30°
30°
Approx. 7 m
30
• Point the remote control unit at the remote sensor
on the main unit as shown on the diagram.
• The remote control unit can be used from a straight
distance of approximately 7 meters from the main
unit, but this distance will be shorter if there are
obstacles in the way or if the remote control unit is
not pointed directly at the remote sensor.
• The remote control unit can be operated at a
horizontal angle of up to 30 degrees with respect to
the remote sensor.
[SURROUND MENU]
• Operate the surround mode.
NOTES:
• It may be difficult to operate the remote control
unit if the remote sensor is exposed to direct
sunlight or strong artificial light.
• Do not press buttons on the main unit and remote
control unit simultaneously. Doing so may result in
malfunction.
• Neon signs or other devices emitting pulse-type
noise nearby may result in malfunction, so keep
the set as far away from such devices as possible.
[10KEY / SYSTEM CALL MENU]
• Operate the 10KEY or SYSTEM CALL mode.
6, 7
2
1
8, 9
3
DISC SKIP +
0~9, +10
:
:
:
:
:
:
:
Manual search (forward and reverse)
Stop
Play
Auto search (to beginning of track)
Pause
(for CD changers only)
10 Key
ENGLISH
4. Tuner system buttons
2. TAPE deck (TAPE) system buttons
Preset memory
The included remote control unit can be used to operate devices of different brands by registering the preset
number corresponding to the brand of your device.
For some models the remote control unit or the device may not operate properly. In this case, use the learning
function (page 33) to store your device’s remote control signals in the included remote control unit.
For instructions on resetting the preset memory, see page 35.
1
Press the power ON button and the OFF button
at the same time.
1
5
3
6
7
2
1
3
0
A/B
:
:
:
:
:
:
:
Rewind
Fast forward
Stop
Forward Play
Pause
Reverse Play
Switch between sides A
and B
2
3
1
2
3
4
5
6
:
:
:
:
:
:
Preset memory
Learning setup
System call
Punch through
Light setup
Reset
2, 4
Press the Mode button for the component you
want to preset, then press ENTER button.
3
3. MD recorder (MD), CD recorder (CDR)
system buttons
6, 7
2
1
8, 9
3
0~9, +10
Press the “1”button to select preset memory.
• Setup List
TUNING +, –
BAND
: Tuning up/down
: Switch between AM
and FM bands
MODE
: Switch between AUTO
and MANUAL
MEMORY
: Preset memory
SHIFT
: Switch preset channel
range
CHANNEL +, – : Preset channel
up/down
CHA~G
: Preset channel range
1~8
: Preset channel
RDS
: RDS search
:
:
:
:
:
:
Manual search (forward and reverse)
Stop
Play
Auto search (to beginning of track)
Pause
10 Key
CH SEL
ENTER
4
Referring to the included List of Preset Codes,
use the number buttons to input the preset
code (a 4-digit number) for the manufacturer of
the component whose signals you want to store
in the memory.
5
“OK” is displayed when the signals are
registered and the mode is terminated.
“FAIL” is displayed when the signals are not
registered, repeat steps 1 to 5.
6
To store the codes of another component in the
memory, repeat steps 1 to 5.
NOTES:
• Depending on the model and year of manufacture, this function cannot be used for some models, even if
the your device is listed on the included list of preset codes.
• Some manufacturers use more than one type of remote control code. Refer to the included list of preset
codes to change the number and check it out.
The preset codes are as follows upon shipment from the factory and after resetting:
TV, VCR1 ..................................................................................HITACHI
CD, MD, TAPE, CDR, VDP, DVD, DVDR ..................................DENON
VCR2, DBS...............................................................................SONY
CABLE......................................................................................ABC
31
ENGLISH
3. Video deck (VCR-1/VCR-2) system buttons
Operating a component stored in the preset memory
1
4. Monitor TV (TV),digital broadcast satellite (DBS)
tuner and cable (CABLE) system buttons
Press the mode selector button for the
component you want to operate.
1
NOTE:
• For the DVD player remote control buttons,
function names may differ according to
manufacturer. Compare with the remote control
operation of the various components.
2
2. Video disc player (VDP) system
buttons
Operate the component.
• For details, refer to the component’s
operating instructions.
Some models cannot be operated with this
remote control unit.
1. Digital video disc player (DVD),
Digital video disc recorder (DVD R) system
buttons
SOURCE ON
SOURCE OFF
6, 7
2
1
8, 9
3
DISC SKIP +
SETUP
TOP MENU
MENU
RETURN
•,ª, 0, 1
ENTER
AUDIO
DISPLAY
SUBTITLE
ANGLE
0~9, +10
: Power on
: Power off (DENON DVD
only)
: Manual search
(forward and reverse)
: Stop
: Play
: Auto search
(to beginning of track)
: Pause
: Disk skip
(for DVD changers only)
: Setup
: Top menu
: Menu
: Return
: Cursor up, down, left
and right
: Enter
: Switch the audio
language
: Display
: Switch the subtitle
: Switch the angle
: 10 key
SOURCE ON
6, 7
2
1
3
0~9, +10
SOURCE ON
6, 7
2
1
8, 9
3
0~9, +10
32
: Power on/Standby
: Manual search
(forward and reverse)
: Stop
: Play
: Auto search (cue)
: Pause
: 10 key
: Power on/Standby
: Manual search
(forward and reverse)
: Stop
: Play
: Pause
: 10 key
SOURCE ON
SETUP
TOP MENU
MENU
RETURN
•,ª, 0, 1
ENTER
DISPLAY
Channel +, –
0~9, +10
TV/VCR
VOL +, –
:
:
:
:
:
:
:
:
:
:
:
:
Power on/Standby
Setup
Top menu
Menu
Return
Cursor up,down,left and right
Enter
Switch display
Switch channels +,–
10 key
Switch between TV and video player
Volume up/down
ENGLISH
Learning function
System call
If your AV component is not a DENON product or if it cannot be operated using the preset memory, it can be
controlled with the accessorious remote control unit by storing its remote control signals in the remote control
unit.
For some remote control signals it is not possible to “learn” the signals or the device will not operate properly.
In such cases use the remote control unit included with the device to operate it.
1
Press the power ON button and the OFF button
simultaneously.
1, 8
3, 7
2
(1) System call buttons
Up to 12 signals each can be
stored at the “CALL1” ~
“CALL6” buttons.
The System Call function can
be used in the “AMP”,
“ZONE2”, and “ZONE3”
modes.
1
3, 5
Press the “2” button to
select Learning setup.
2
3
The accessorious remote control unit is equipped with “system call” function allowing a series of remote control
signals to be transmitted by pressing a single button.
This function can be used for example to turn on the amplifier’s power, select the input source, turn on the
monitor TV’s power, turn on the source component’s power and set the source to the play mode, all at a signal
button.
2, 6, 8
(2) Storing system call signals
1
Press the power ON button and the OFF button
at the same time.
2
Press the “3” button to select system call
setting.
Press the Mode button for the component you
want to learned, then press the ENTER button.
Learning is not possible for the AMP, ZONE2,
and ZONE3 modes.
3
3, 7
CH SEL
ENTER
4
Buttons that allow learning will light. Press the
button that you wish to be learned. The display
will go off and the unit will enter the learning
standby mode.
• To cancel, press the
power ON button and
the OFF button
simultaneously.
6
7
5
“OK” appears on the remote control unit’s
display and learning is completed.
• Other keys can be “learned” by repeating
steps 5 to 6.
• “FAIL” appears on the remote control unit’s
display, repeating steps 4 to 6.
The mode can be switched by pressing a mode
selector button.
The “Buttons that allow learning” display
reappears and the learning standby mode is set.
Point the remote control units directly at each
other and press and hold in the button on the
other remote control unit which you want to
“learn”.
Other remote
control unit
8
3
To cancel the learning mode, press the power
ON button and the OFF button simultaneously
again.
6
Repeat steps 4 and 5 to register the desired
buttons.
Up to 12 signals each can bestored at the CALL
1 ~ CALL 6.
7
Press the ENTER button after the button
registration is completed. There will be a
changeover to the System Call registration
screen.
8
Press buttons from “CALL 1” to “CALL 6” to
register the System Call.
• “OK” is displayed and the set returns to the
normal operating mode.
Press the Mode button for the component you
want to register at the system call button, then
press the ENTER button.
CH SEL
ENTER
4
5
Press the button you want to register.
The mode can be switched by pressing a mode
button.
33
ENGLISH
NOTES:
• The remote control signals of the buttons pressed while registering the system call signals are emitted, so
be careful not to operate the components accidentally (cover the remote sensors, for example).
• If you exceed the number of signals that can be registered, There will be a changeover to the System Call
registration screen.
Setting the back light’s lighting time
1
Press the power ON button and the OFF button
at the same time.
2
Press the “5” button to select Light setup.
1
(3) Using the system call function
1
Press the button at which the system call signals have been stored.
• The stored signals are transmitted successively.
2, 3
Punch Through
(1) Punch through button
Buttons used in the CD, CDR, MD, TAPE, DVD,
DVDR,VDP, VCR1 and VCR2 modes can be
assigned to the buttons shown on the diagram at
the right which are not normally used in the AMP,
ZONE2, ZONE3, TV, DBS and CABLE modes.
For example, when the CD mode is set to the
punch through mode in the AMP mode, the CD
mode’s PLAY, STOP, MANUAL SEARCH, AUTO
SEARCH, PAUSE and DISC SKIP buttons’ signals
are sent in the AMP mode.
1
3
3, 4
1
2
3
4
2
(2) Making the punch through setting
1
5sec
10sec
15sec
20sec
Setting the brightness
The brightness of the display can be adjusted in 4
levels.
• For 1 step brighten Hold the ENTER button and
press the CH+ (channel up) button.
• For 1 step dimmer Hold the ENTER button and press
the CH– (channel down) button.
Press the “4” button to select punch through
setting.
4
3
:
:
:
:
Press the power ON button and the OFF button
at the same time.
3, 4
2
Press the button you want to adjust the lighting
time (5sec~20sec).
• Lighting time
Press the mode button for the component you
want to make the punch through setting, then
press the ENTER button.
CH SEL
ENTER
Press the mode button for the component you
want to punch through, then press the ENTER
button.
• The punch through is set and the set returns
to the normal operating mode.
Up
Down
Enter
CH SEL
ENTER
RC-970
34
ENGLISH
(2) Resetting “learned” buttons
(4) Resetting the punch through setting
1
Press the power ON button and the OFF button
at the same time.
1
Press the power ON button and the OFF button
at the same time.
2
Press the “6” button to select resetting.
2
Press the “6” button to select resetting.
4
3
Press the “2” button to resetting the “learned”
buttons
3
Press the “4” button to resetting the “punch
through”setting.
2, 3
4
The mode buttons will all light.
4
All punched through mode buttons will light.
5
Press the mode button you want to resetting,
then press the ENTER button.
The set returns to the normal operating mode.
5
Press the mode button you want to resetting,
then press the ENTER button.
The set returns to the normal operating mode.
Resetting
(1) Resetting the preset memory
1
2
3
Press the power ON button and the OFF button
at the same time.
1
Press the “6” button to select Resetting.
Press the “1” button to resetting the preset
memory.
• Resetting List
5
1
: Resetting the preset
memory
2
: Resetting the “Learned”
buttons
3
: Resetting the system call
4
: Resetting the punch
through setting
+10 : All reset function (factory
default)
4
5
The mode buttons that were set in preset
memory will all light.
(3) Resetting the system call buttons
(5) All reset function
1
Press the power ON button and the OFF button
at the same time.
1
Press the power ON button and the OFF button
at the same time.
2
Press the “6” button to select resetting.
2
Press the “6” button to select resetting.
3
Press the “3” button to resetting.the system
call buttons.
3
Press the “+10” button to resetting, all the
settings (factory defaults).
• The set returns to the normal operating mode
after approximately 20 seconds.
4
All buttons of System Call will light.
5
Press the button you want to resetting, then
press the ENTER button.
The set returns to the normal operating mode.
RC-970
When resetting the preset memory of a specific
device.
• Press the mode button you want to resetting,
then press the ENTER button.
CH SEL
ENTER
The set returns to the normal operating mode.
35